1
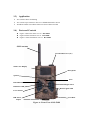
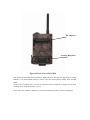
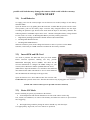
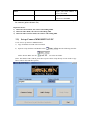
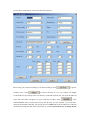
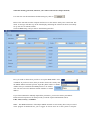
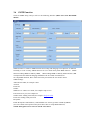
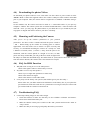
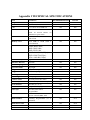
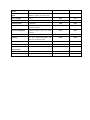
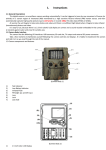
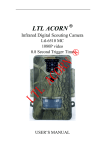
Cellular MMS HD Scouting Camera
BG-520 Series
INSTRUCTION MANUAL
TABLE OF CONTENTS
General Information
1.1)
1.2)
1.3)
1.4)
Description
Features
Application
Parts and Controls
Quick Start
2.1)
2.2)
2.3)
2.4)
2.5)
Load Batteries
Insert SIM Card and SD Card
Enter Into ON Mode
Enter Into Test Mode
Enter Into OFF Mode
Advanced Setting
3.1)
3.2)
3.3)
3.4)
3.5)
3.6)
3.7)
Parameter Settings
Supported Format
Shooting Information Display
MMS Menu Definition
Set up Camera/MMS ON PC
SMTP Function
Multi-Time lapse features
Important Notes
4.1)
4.2)
4.3)
4.4)
4.5)
4.6)
4.7)
4.8)
SD Card
850NM and 940nm IR LED
power supply and Battery Box
Downloading the photos/Videos
Mounting and Positioning the Camera
FAQ on MMS Function
Troubleshooting/FAQ
Firmware Upgrades
Two-Year Limited Warranty
Appendix I Technical Specifications
Appendix II Packing List
GENERAL INFORMATION
1.1) Description
This camera (BG-520M) is a Cellular digital scouting camera with MMS function, it can be
triggered by any movement of game in a location, detected by a highly sensitive passive infra-red
(PIR) motion sensor, and then automatically captures high quality pictures (up to 12M pixels) or
records HD video clips (1080P).Then it can send the pictures (MMS: Multimedia Message service)
or SMS instantly to your mobile device or Email Address via GSM network. You’ll be alerted just
when something has happened. And the camera can be also used as a regular hunting camera if
you don’t insert a SIM Card or turn off MMS Function.
1.2) Features
Ø
Ø
Ø
Ø
Ø
Ø
Ø
Ø
Ø
Ø
Ø
Ø
Ø
Ø
Ø
Ø
Programmable 5 ,8 or 12 Megapixel high-quality image resolution.
Programmable 1080P,720P High definition Video
38pcs Infrared night vision LEDs for flash range as far as 65 feet ( when use 850NM LED)
Ultra low standby power consumption. Extremely long in-field life (in standby mode, up
to 6 months with 8 x AA batteries when use regular function)
Working in Most extremely temperature -22℃+-70℃
Build-in Full Definition 2inch Display to review Image, Video, Cellular signal Information
Lockable and Password protected
Date, Time, Series number ,Temperature and Moon Phase can be stamped on the pictures
Multi-time lapse function: When Timer setting on, programmable to only work in specified
period every day. This feature can be used together with Time Lapse feature to meet your
timetable (Allow user to setup 4 different timer each day, this features is unique and very
useful for some customer who cares multi-time lapse most)
Two MMS image size options: 640 x 480 (VGA) or 320 x 240 (QVGA)
Camera and MMS function can be conveniently configured by a Enclosed CD on Computer
Daily Report allow user to know the camera status in preset time every day via MMS or SMS
function.
Advanced Remote Cellular Technology transmits images to your cell phone and email
account constantly at lower battery consumption and shorter transmission time.
Automatically send text alert when battery power level goes low
All MMS pictures, as well as the original ones, saved on SD card
Operates globally via GSM/GPRS network. Supports four bands: 850 / 900 / 1800 /
1900MHz
1.3) Application
Ø
Ø
Ø
Act as Trail Camera for hunting
Act as Time Lapse Camera to observe Cold Blood Animal or Event.
All indoor/outdoor surveillance where invasion evidence needed
1.4) Parts and Controls
l
l
l
Figure A shows the Front view of BG-520M
Figure B shows the Back view of BG-520M
Figure C shows the Bottom view of BG-520M
GSM Antenna
External DC Power (6V)
2inch Color Display
Microphone
Speaker
Lens
LED IR Flash
Light Sensor
Indication LED
Remote signal LED
Laser Pointer
PIR Sensor
Tripod
Lock Hole
Figure A: Front View of BG-520M
Tilt Adjuster
Security Rope hole
Figure B: Back View of BG-520M
The camera has the following I/O interfaces: USB connector, SD-card slot, SIM Card TV.output
and The 3-way Power/Mode Switch is used to select the main operation modes: OFF, ON and
TEST
On the back of camera, there is a lock for theft-proof and an adjuster to change the tilt when
mounting on an irregular interface e.g. tree.
Please take a few minutes to familiarize yourself the following intuitive controls and displays.
USB Port
SIM Card Slot
TV Out Connector
Battery Cover
Remote control
Battery Depot
Power/Mode Switch
Figure C: Bottom View of BG-520M
Lock
The remote control is an input device of the camera and is primarily used for customer settings
and password input. This is an infrared type wireless remote control.The maximum remote
distance is 9 meters. There are fifteen buttons on the remote control.
Select Item(UP)/Increase value
Display Menus /Exit
Make Selection/Enter
Change Value (Left)
Change Value (Right)
Select Item(Down)/Decrease
A) Press the punctuation “
” to turn on laser direction pointer in the night.
Please note: the Laser could be harmful to eyes if pointed at other humans.
CAUTION: If you are not using the camera for an extended period of time, it is
highly recommended that you remove the batteries from the camera to avoid
possible acid leak that may damage the camera which would void the warranty.
QUICK START
2.1)
Load Batteries
To supply power for the camera, Eight AA size batteries are needed, Voltage of each battery
should be 1.5V.
Open the bottom cover by pulling down the lock hole. Confirm that the power switch is at the
OFF position, pull out the battery depot. Load the fully charged batteries into the depot
according the polarities sign shown below. Push back the depot to the battery chamber. The
following batteries with 1.5V output can be used:(NOTE: rechargeable battery voltage should
be also reach 1.5V each, 1.2V Rechargeable Battery will only working short time).
1. High-density and high-performance alkaline batteries (Recommended)
2. Rechargeable alkaline batteries
3. Rechargeable NiMH batteries
When in low-battery state, Please change the batteries in time. If you have set the MMS
function, it will send you a SMS or Email to indicate the low battery situation.
2.2)
Insert SIM and SD Card
You need to purchase the SIM card from your local Mobile
Phone Network Operators. Making sure they provide
Multimedia Messaging Service (MMS). Ask them for the
relevant information to configure the MMS settings on your
camera.( Please Reference 3.5 Set up MMS function on PC)
(Note: Please Open the Bottom Cover and Insert the SIM card
into SIM card slot under OFF Mode. be sure to insert SIM-card
into the SIM-card slot with angle in the upper left)
Open the bottom cover. Insert SD-card into the card slot with
Golden Pin side upwards. Please note: That the SD-card can only be plugged in one direction.
(NOTE: The camera will not power up if SD card is not inserted)
2.3)
Enter ON Mode
Before switching on, please pay attention to the follows:
Ø Avoid temperature and motion disturbances in front of the camera such as big
leaf, curtain, air-conditioner, air outlet of the chimney and other heat sources to prevent from
false triggering.
Ø The height from ground for placing the camera should vary with the object
size appropriately. In general, one to two meters are preferred
Slide the power switch to the ON position to power on the camera and enter into
the ON mode. Before entering into the ON mode, you can adjust the camera the target
monitoring area by laser pointer
After switching on the camera, the motion indication LED (red) will blink for
15s. The 15s is a buffering time before autonomic capturing photos or videos,
e.g. for closing and locking the bottom cover, fixing the camera on a tree and walk
away.
In ON mode, it is unnecessary to use the remote control. The camera will take
pictures or videos automatically according to the default settings or previous custom
settings. The camera has the sound recording function, so the sound will be embedded
in the video clip while capturing a video.
2.4)
Enter TEST Mode
Slide the power switch to the TEST position and enter into the TEST mode. In this mode you
can take pictures or video clips like a regular digital camera, or enter the Menu to set up
parameters by remote control.
2.5)
Enter OFF Mode
Slide the power switch to OFF position to power off the camera. Off mode allow user to insert
SD ,SIM Card, replace Battery etc. Please note that even in the OFF mode, the camera still
consumes certain power at µA level. Therefore, please remove the battery if the camera will
not be used for a long time
(Cautions: The Power Switch can’t be Slide From “OFF” Mode directly to “ON” Mode
or From “ON “ Mode to “ TEST” Mode. Each time, user should Slide power switch
into “OFF” Mode, then into “Test” Mode and Finally Enter into “ON” Mode)
ADVANCED SETTING
3.1)
Parameter Settings
This chapter explains the advanced operations for customizing the camera settings. The settings
can only be customized in TEST mode and there are two ways are available to customize the
camera settings. Including: Remote control and Parameters Setup EXE file Storage on CD
Disk. (Please reference 3.5 Set up Camera/MMS ON PC)
Following will introduce how to customize the camera settings by remote control:
Press “MENU” Key to Enter/Exit the menu, Press
Press
,
to change the setting.
,
, to move the marker,
Settings (Bold=Default)
Description
Camera
Video
Camera+Video
Select which Mode you would like to
use. In Camera+video mode, the camera
will first take a picture and then start to
record Video immediately.
Photo Size
12M Pixel
8M Pixel
5M Pixel
Selects resolution for still photos from 5
to 12 megapixels, Higher resolution
produces better quality photos, but
creates larger files that take up more of
the SD card capacity. 5M is a good
compromise between quality and file size
Video Size
1080P
720P
VGA
Selects
video
resolution,
higher
resolution produces better quality videos,
but creates longer files that take up more
of the SD card capacity. 1080P and 720P
are high definition video format.
Video Length
10sec
20sec
30sec
Sets length per captured video clip,
settings begin with 10 second, 10sec is
Default value. All videos are in AVI
format that can be played in most of
media players
MM/DD/YY - HH:MM:SS
DD/MMS/YY-HH:MM:SS
YY/MM/DD-HH:MM:SS
Press “OK” to setup date and Time (the
Date format can be switchable)
ON
(Optional from 1Sec to
60Min)
Select the length of time that the camera
will wait from when the last picture was
taken and written in the SD card, until it
Parameter
Mode
Set Clock
Interval
OFF
responds to any new triggers from the
PIR sensor. During the selected interval,
the camera will not take pictures/videos.
This prevents the SD card from filling up
with too many redundant images. (Note:
when your turn on Interval, the
camera can also sending mms or SMS)
Optional from 1 photo to 5
photo
Selects how many photos are taken in
sequence per trigger in camera mode.
ON/OFF
Selects ON if you want voice when setup
the camera by remote control
Sense Level
Medium/Low/High
Selects the sensitivity of the PIR sensor.
The “ High” setting will make the camera
more sensitive to infrared (heat) and
more easily triggered by motion, and the
“Low” setting makes it less sensitive to
heat and motion. The High setting can be
useful when the ambient temperature is
warm( making it more difficult for the
sensor to detect animals), and the Low
setting may help in cold weather if often
by
anything
warmer
than
the
surroundings
Time Stamp
ON/OFF
Select “On” if you want the Date & Time
(that the photo was captured) imprinted
on every photo, select “Off” for no
Imprint
Image Burst
Beep
Press “ OK” to Playback Pictures/Videos
on 2inch HD Display, Press “Right
Arrow” to Delete video or picture, Press
Left button to Play video, Press Up and
Down to adjust the Volume or change
picture and Video.
Playback
Multi-Timer
ON/OFF
H:M—H:M
H:M—H:M
H:M—H:M
H:M—H:M
Select on if you want the camera working
in specified time everyday, our camera
allow user to setup four different
specified time each day. Each different
time should be not overlap with other
different time outside the time period the
camera will not be triggered or take any
photos/videos this features can be used
together with Time Lapse function.
Series Number
ON/OFF
Four Digit (From 0-9, A-Z)
Set Series number can record the pictures
from specified camera if install some unit
outside.
Password
ON / OFF
Four Digit (From 0-9, A-Z)
Set up a password to protect your camera
from unauthorized users.
ON/OFF
HH:MM
If set On, the camera will automatically
take photos/videos at the set interval
(Note: in this mode, the PIR sensor is
disabled). This is helpful when
Observing cold-blooded animals like
snakes, or the process of flowering,This
feature can work together with Timer
feature.
(Note: when you turn on
this function, the camera will not
sending mms or SMS)
TV OUT
NTSC/PAL
Selects video standard/format for the
“TV Out” output jack, The video
standard is NTSC for the United states,
Canada, Mexico, Asia and South
America. Pal is used primarily in Europe
Format
OK/Cancel
Deletes All files stored on a card to
prepare it for reuse. Always format a card
that has been previously used in other
devices. Note: Make sure you have
download and backed up any files you
want to preserve first !
Enter/Cancel
Select “Execute” and Press OK to restore
all parameters to the original factory
default settings. If the camera is behaving
oddly and you think you may have
changed the setting for something
accidently, this will reset all parameters
to their most commonly used or
“generic” settings
Time Lapse
Default Set
Version
Different BOSKON Firmware has
Different Version Number. User need to
check the Version Number when the
firmware is upgrade each time. If the
version number is different from before,
then it means the upgrade is successful,
otherwise user need to upgrade again.
3.2)
Supported Format
Item
Format
Photo
JPG
Video
AVI
File Format
FAT32
The SD card stores all original pictures and videos in the folder \DCIM\100IMAGE, Pictures are
saved with filenamesIMAG0001.JPG and videos like IMAG0001.AVI.
Here are some important notices. You don’t need to concern about the file system format of the
camera unless you have problems with reading the SD-card by your other equipments. If this
happened, please format the SD-card in the camera or in a computer at first and then reinsert the
card into your camera to try again.
3.3)
Shooting Information Display
Slide the Power switch into “Test” Mode and the shooting information will be displayed on the
Screen.
This camera can send pictures instantly to your mobile device via GSM network. You’ll be alerted
just when something has happened; The MMS through GPRS to send, so before using this
function you need to open this business. It supports four band :850MHz, 900MHz, 1800MHz and
1900MHz.
There are five bars indicating the signal strength on the screen
NOTE: two bars is required when sending mms.
Ø
SIM:
Ø
Signal:
Ø
SD Card:
inserted.
Means SIM card is inserted,
, Means no Signal,
Means SIM card is not inserted
Means Signal is good.
Means SD card is inserted, camera will not turn on if SD card is not
NOTE: Be sure that the PIN of the SIM card is disabled before you insert it . (You can
disable the PIN of a SIM card via your mobile phone.)
3.4) MMS Menu Definition
Slide Power switch into “Test” Mode, Select “MMS Setup” and Press “OK” Button to enter
into MMS Set up Menu. The following is a quick introduction about how to setup mms
function.
Note: (All MMS parameters should be configured by PC software).
MMS Status
OFF, VGA,QVGA,SMS
The default setting is Off,
which turns the MMS function
off. To turn it on, choose either
VGA=640x480
or
QVGA=320x240, SMS=Short
Message, which defines the
resolution size of the MMS
picture. (Please Note: Please
turn on MMS Status when you
would like to use MMS
function, Otherwise the camera
will not recognize the SIM
Card and Sginal Icon will not
be shown on Screen )
MMS Number
0-99
(Note: ‘0” is unlimited)
just working in ON mode,
which means the camera will
send a MMS instantly when it
captures a photo or a video
clip. While, for the economy
consideration, there is a
limitation on the MMS
quantity per day. You can set
the MAX number from 0 to 99.
(Note: ‘0” is unlimited)
ON/OFF
(0-24Hour)Programmable
Daily Report, just working in
ON mode, which means that
the camera will report the
camera working status in preset
time
Daily Report
URL
URL of the network operator
APN
APN of the network operator
Gateway
Gateway
operator
PORT
Port of the network operator
of
the
network
Email
Input your email address to
receive the MMS
Mobile Number
Input your Mobile number that
will receive the MMS
(Caution: URL, APN, Gateway, PORT, Email, Mobile number are all need to be setup by
PC software, please reference 3.5)
Important Notes:
1) When in Camera Mode, the camera will sending MMS
2) When in Video Mode, the camera will sending SMS
3) When in Video+Camera mode, the camera will sending SMS
3.5) Set up Camera/MMS/SMTP ON PC
Users can set up camera or MMS function.
1) Copy all folders from CD onto Local Disk.
2) Open PC setup Software and Double Click “
will be shown. Make sure the
” then the following interface
are in the one folder.
(Note: This kind of CD is CD-R, please don’t open Camera setup directly on CD. Need to copy
onto Local PC disk and then open it )
Click Camera setup and you will see the following interface:
Please setup your camera according to your desired settings, Click
computer time. Click
to get the
to choose directory to save you settings. We highly
recommend save the settings in the root directory of the SD card (Be sure you insert the SD card
in the SD card reader and plug it in your computer) and then, Click
A file
named Camera will be created and saved in the directory you just selected. If you selected a
directory other than the SD card, you need to move the Camera file to the root directory of the SD
card before inserting the card in the camera later on. (Caution: Please don’t try to change the file
name that already generated, otherwise your camera will can’t be setup as desired)
User can also user the manufacture default settings by click on
.
Retrieve the SD card from the computer and insert it in the camera. Slide power switch into Test
mode. A message will show up on the TFT display, indicating the Camera has been successfully
set up. You are set with the camera.
Click On MMS Setup, and you will see the following interface:
First, you need to choose how you like to set up the MMS Mode. Auto
or Manual. If you choose Auto, then you need to choose the country and
the Mobile Phone Network Operator. Input the phone number or Email
Address that you would like the MMS pictures to be send to.
You can enter into Four different mobile numbers or Email
address.
If you choose Manual to manually input all the parameters, you need to contact your Mobile
Phone Network Operator to ask them provide you all the required information such as
URL, APN, Gateway, and PORT. .
Note: The MMS Parameters of the Major Mobile network in each country have been pre-stored
in the program on Enclosed CD, you’re suggest to Choose Auto to let the system to setup the
MMS. However, because each local Mobile network operator has their own settings for their
MMS service, and those settings can change sometimes, you may need to acquire the settings
from your Mobile network operator if the Auto-selected settings fail to work. If you find out those
settings have changed according to the information provided by your Mobile Network, or you
have settings from your Mobile network that is not on our Operators list, please notify us so we
can update our program.
Click on
to choose the directory to save the settings, usually under the root
directory of the SD card (You need to insert the SD card in the SD card reader and plug it in your
computer.) Then, click on
. A file named MMSSetup will be created and saved
in the directory you just selected. If you selected a directory other than the SD card, you need to
move the file to the root directory of the SD card before inserting the SD card in the camera later
on. (Caution: Please don’t try to change the file name that already generated, otherwise
your camera will can’t be setup as desired)
Click on Exit to exit the MMS Setup interface. Retrieve the SD card and insert it in the camera.
Switch to the TEST position to enter the TEST mode. A message will show up on the TFT display,
indicating the MMS function has been successfully set up. Congratulations! You camera is all set
to send color pictures to your cell phone and/or email account every time it is triggered.
NOTES: Please Pay an attention to the following notes to make sure the mms picture sending
correctly.
Ø The camera is ON and functions. The SD card has enough space. 8 AA batteries with enough
power capacity.
Ø SIM card is installed. The MMS service is activated (some MMS services need pre-paid
balance in the account.) The SIM card is not password-protected.
Ø The signal is strong in the field. The recipient phone number or email account is entered
correctly. You are suggested to take the receiving phone with you and do the
send-and-receive test on site.
Ø MMS parameters are set correctly.
Ø The Timer function is OFF. If you have the Timer ON, make sure you are in the specified
time period when expecting incoming MMS pictures.
Ø The camera is stationary while sending MMS pictures.
3.6 SMTP Function
Click On SMTP Setup, and you will see the following interface (Make sure select BG-520SM
Model):
SMTP function is similar to MMS function. But setting and charging from Operators is different.
Normally, in some country, SMTP function can save much money than MMS function. SMTP
function sending MMS or SMS by GPRS, GSM sending MMS or SMS by GSM. and also, SIM
card Operators has different charging standard for the two kinds of transmission.
To setup SMTP function, there will be the below precautions the user need to notice:
GPRS Settings:
APN: Internet APN, for example: cnnet
Account
Password
Sender:
SMTP server: email server name, for example: smtp.163.cn
Port:email server port, for example:25
Sender email: sending email add, for example: [email protected];
Password: sending email password
Recipients:
Email: Recipients email address ( email add that user want to get mms or SMS by SMTP)
(user can contact local operator if they don’t know how to setup SMTP function)
NOTE: Encryption server can’t be used in our Camera
3.7 Multi-Time lapse features
our camera has a very unique features Compared to other scouting camera in the market,, here we
called multi-time lapse features. It can be worked as a High Quality Time lapse camera.
User can setup Four timers each day from AM and PM(Please Don’t overlap the time of each
timer). Then the camera will automatically take picture or videos clips according to the specified
time lapse. This features will help some customer to observe behavior of the cold blood animal or
some plant such as: flowers etc.
Important Notes
4.1)
SD Card
There are plenty of different brand SD cards on the market. We tested on our camera as many
brands as we can. However, we cannot guarantee every brand SD card will work compatibly with
our camera, please format the SD card on the camera before use. Please try another brand SD card
if doesn’t work. (NOTE: the camera will not turn on if the SD card is not inserted)
4.2)
850NM and 940nm IR LED
There are two selects of IR LED on the BG-520M series camera, 850nm and 940nm. The former
provides more than 65-foot flash range whereas the latter more than 40 foot flash range. The
benefit of 940nm IR LED, however, it’s emits very low-glow flash that is almost invisible from 5
feet away.
4.3)
power supply and Battery Box
we recommends using eight new lithium AA (Energizer Brand) or Alkaline AA batteries. Nimh
Rechargeable batteries can also be used, but they might have a shorter life span due to their
reduced efficiency over time and at low temperature. Please Note. The voltage of each battery
should be 1.5V for non rechargeable Batteries or rechargeable Batteries。 As a result, the camera
can extend its life in the field by being powered by a external solar panel.
4.4)
Downloading the photos/Videos
To download your photos/videos to a PC. First make sure the Camera is power switch is in the
“TEST” Mode. Connect the supplied cable to the Camera’s USB port. Then connect main USB
port on your computer. Then, the camera will be recognized as a standard “ USB Mass storage”
Device.
On all windows OS, the Camera will also be listed as a “ Removable Disk” if you open my
computer” window. The camera’s photo file are named “PTDC0001.JPG”. video file names will
end with “.AVI”. you may copy the photos/videos to your hard drive as you would any file-just
copy/paste or drag the file name or Icons to your drive or desktop.
4.5) Mounting and Positioning the Camera
After you’ve set up the camera’s parameters to your personal
preferences. You have to take it outside and slide the power switch to
“ ON “. When setting up the camera for scouting game or outdoor
applications. You must make sure to mount it in place correctly and
securely, we recommend mounting the camera on a sturdy tree with
a diameter of 6inch (15cm). (5 meters ) Away from the place to be
monitored, with the camera placed at a height of 5-6.5ft. (1.5-2M).
please also keep in mind that you will get the best results at night when
the subject is within the ideal flash range. No farther than 45’ (14m) and no closer than 10’ (3m)
from the camera. Besides, The camera can be also mounted on a tripod
4.6) FAQ On MMS Function
Ø
Ø
Ø
Why did it take so long to receive the mms pictures
Check if the signal is stable or if the battery is ran out
why didn’t i receive any mms picture ?
Check if you set right mms parameters in mms setup.
Check if the camera has signal
Check if the camera is under Video mode
I was pretty sure the battery was quite low, But I didn’t get any test alert. Why ?
Please make sure you didn’t install some old batteries in the battery box, if you replace the
present batteries with some used ones in a point before receiving test alert, the camera will
get confused and can’t send a text alert later on.
4.7) Troubleshooting/FAQ
Ø
Camera stops taking images or won’t take images
1. Check the batteries to make sure that they are new Alkaline or lithium AA batteries.
Please don’t install short battery life.
2. Make sure that the camera power switch is in the “ON” position and not in the “OFF” or
“setup” modes.
3. Make sure that you are using a good quality SD card in your camera.
4. the camera will not take images if the SD card has its write protected
Ø
Ø
Camera won’t power up
1. Make sure that you have installed 8 AA batteries in the battery compartment.
2. Make sure the batteries are installed correctly
3. After moving the switch from “OFF” to “Test” or “On”, make sure that the switch is
correctly in position to ensure the proper mode (avoid positions “between” two
modes)
4. Do not move the switch directly from “On” to “Test”. Always move the switch all
the way down to “Off” first, then back to “ Test”.
Still photo and/or Video Quality problems
1. Night photos or Videos are too dark
a. You will get the best results when the subject is within the ideal flash range, no
father than 45’(14m) from the camera subject may appear too dark at greater
distance
b. Please note that when the capture number parameter is set higher than “1”
photo”, or with very short interval settings. Some images may appear darker
than others due to the quick response and rapid retriggering of the camera,
allowing less time for the flash to fully recharge before firing again.
2. Daytime photos or videos appear too dark
a. Make sure that the camera is not aimed at the sun or other light sources during
the day, as this may cause the auto exposure to produce darker results
3. Night photos or Videos appear too bright
a. you will get the best results when the subject is within the ideal flash range, no
closer than 10’(3m) from the camera Subjects may appear too light at closer
distances.
4. Daytime photos or video appear too bright
a. Make sure that the camera is not aimed at the sun or other light sources during
the day.
5. Red, green or blue color cast
a. Under certain lighting conditions, the sensor can become confused resulting in
poor color images
b. If this is seen on a consistent basis, then the sensor may need servicing. Please
contact the local distributor for help.
4.7) Firmware Upgrades
BG-520 series camera are equipped with an automatic upgrade function for you,
Upgrading is needed when an improved firmware is available. Follow the steps to implement the
upgrades.
Ø Back up the content on the SD card on your computer (Format the SD card if content is not
useful for you)
Ø Retrieve the SD card and plug it in your computer (SD card reader may needed). Copy and
paste the FW18NA.BIN file in the root directory of the SD card. (Consult with the Local
distributor if there is an upgrade available and where to download it.)
Ø Retrieve the SD card and insert it back in the camera. Switch to TEST mode and check the
Fimrware version number in Camera setup. If the Version number is changed, it means the
updating is successed, if not, please upgrade again.
Ø After upgrade is done, please remember to Delete the firmware (FW18NA.BIN) in SD Card
otherwise, the camera will be upgrade everytime when turn on.
WARNING: A Firmware for one model is not compatible on the other model due to
different functions.
Two-Year Limited Warranty
Congratulations on your purchase of one of the best trail cameras on the market ! BOSKON is
very proud of this little unit and we are sure you will be pleased with it as well. We appreciate
your business and want to earn your trust.
Your BOSKON trail camera is warranted to be free defects in materials and workmanship for two
years after the date of purchase. In the event of a defect under this warranty, we will, at our point,
repair or replace the products, provided that you return the product postage prepaid. This warranty
doesn’t cover damages caused by misuse, improper handling, installation, or maintenance
provided by someone other than a BOSKON Authorized dealer.
Appendix I TECHNICAL SPECIFICATIONS
Item
Parameters
BG-520M&BG520-SM
BG-520
Image sensor
5 Mega Pixels
Yes
Yes
Max. Pixel size
4000*3000 (12MP)
Yes
Yes
Lens
F=3.1;FOV=52°;AutoIR-Cut
Yes
Yes
IR-Flash
65 Feet/20 Meters 850NM IR
Flash; 30 Feet/10 Meters on
940NM Low-glow Flash
Yes
Yes
LCD Screen
2inch (960*240) Full definition
color screen
Yes
Yes
Memory Card
From 8MB to 32GB (4GB is
recommended)
Yes
Yes
Picture size
12MP=4000*3000;
8MP=3200*2400;
5MP=2592*1944
1080P=1440*1080(25fps);
720P=1280*720(25fps);
VGA= 640*480 (30fps)
Yes
Yes
Yes
Yes
PIR Sensitively
High/Normal/Low
Yes
Yes
PIR Sense Distance
65Ft/20m
Yes
Yes
PIR sensing Angle
45°
Yes
Yes
Operation Mode
Day/Night
Yes
Yes
Trigger time
1.1s (when using 2GB SD card)
Yes
Yes
Trigger Interval
0sec-60Min; programmable
Yes
Yes
Shooting numbers
1-5 Photo
Yes
Yes
Video length
0-30s; programmable
Yes
Yes
Camera+Video
First take picture then Video
Yes
Yes
Time stamp
ON/OFF, temperature, moon phase
Yes
Yes
Series Number
ON/OFF, (0-9, A-Z)
Yes
Yes
Password
4-Digit Number; programmable
Yes
Yes
Time lapse
ON/OFF;1Min-24hour
Programmable
Yes
Yes
MMS Status
VGA=640*480;
QVGA=320*240;SMS; OFF
Yes
N/A
MMS Numbers
0-99/Day; Programmable (“0” is
unlimited)
Yes
N/A
MMS Phone Num
0-4 Phones
Yes
N/A
MMS Email
0-4 Email Address
Yes
N/A
0-24hour
Yes
N/A
Video Size
MMS/SMS
Daily
Report
“Battery Low, Please replace new
Batteries in time” Text Alert sent
YES
N/A
Power Supply
8*AA
YES
N/A
Stand-by Current
<0.1mA
YES
YES
Stand-by Time
3-6Months
YES
YES
Auto power off
Auto power off in 2minute if no
input in test mode
YES
YES
Power consumption
150mA(+350mA when IR LED
lights up
YES
YES
Low-Battery Alert
4.2-4.5V
YES
YES
Interface
TV out (NTSC/PAL);USB; SD
card slot; 6V DC External
YES
YES
Mounting
Strap; Tripod
YES
YES
Waterproof
IP54
YES
YES
Operation
Temperature
-22~+158°F/-30 ~+70°C
YES
YES
Operation Humidity
5% ~ 95%
YES
YES
Certificate
CE & FCC & ROHS
YES
YES
Low battery
Alert
SMS
Appendix II Packing List
PART NAME
BG-520
BG-520M
BG-520SM
Digital Camera
1
1
1
Build-in MMS Module
N/A
1
1
SMTP&GPRS
N/A
N/A
1
GSM Antenna
N/A
1
1
Battery Box
1
1
1
TV Cable
1
1
1
USB Cable
1
1
1
Strap
1
v
1
External DC Cable
1
1
1
Installation CD
1
1
1
External Battery Box
(Optional)
1
1
1
DC Power
(Optional)
Supply
1
1
1
Adjustment
Lock
Rope (optional)
1
1
1
Security
(optional)
Lock
1
1
1
External
(optional)
Batteries
1
1
1
1
1
1
SD Card (Optional)