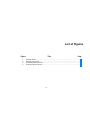
1
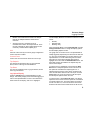
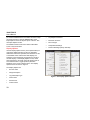
700G/TRACK Data Logging Software Users Manual November 2011 © 2011 Fluke Corporation. All rights reserved. All product names are trademarks of their respective companies. LIMITED WARRANTY AND LIMITATION OF LIABILITY BY USING THIS SOFTWARE PRODUCT IN ANY MANNER, YOU ARE AGREEING TO ACCEPT THE FOLLOWING TERMS AND CONDITIONS. Fluke Corporation (Fluke) grants you a non-exclusive right to use the 700G TRACK Logging License Agreement (Product) and to make copies as necessary for you internal company use. This grant of license does not include the right to copy, modify, rent, lease, sell, transfer or distribute the Product or any portion thereof. You may not reverse engineer, decompile, or disassemble the Product. FLUKE DISCLAIMS ALL OTHER WARRANTIES, EITHER EXPRESS OR IMPLIED, BUT NOT LIMITED TO IMPLIED WARRANTIES OF MERCHANTABILITY AND FITNESS FOR A PARTICULAR PURPOSE, WITH RESPECT TO THE SOFTWARE AND THE ACCOMPANYING WRITTEN MATERIALS. FLUKE ALSO DISCLAIMS THE WARRANTY OF NONINFRINGEMENT. In no event shall Fluke be liable for any damages whatsoever (including, without limitation, indirect, consequential, or incidental damages, damages for loss of business profits, business interruption, loss of business information, or other pecuniary loss) arising out of the use of or inability to use this Product, even if Fluke has been advised of the possibility of such damages. Fluke Corporation Fluke Europe B.V. P.O. Box 1186 P.O. Box 9090 5602 BD Eindhoven Everett, WA 98206-9090 U.S.A. The Netherlands Table of Contents Title Page Introduction .................................................................................................................... Minimum Requirements ................................................................................................. How to Contact Fluke ..................................................................................................... Before You Start ............................................................................................................. Standard Equipment .................................................................................................. Installation ................................................................................................................. Overview ........................................................................................................................ Logging Pressure ........................................................................................................... Logging Pressure and Temperature .......................................................................... Intervals ..................................................................................................................... Data Logging Modes ................................................................................................. Menus ........................................................................................................................ File Menu .............................................................................................................. Gauge Menu ......................................................................................................... Options Menu ....................................................................................................... i 1 1 1 2 2 2 2 2 3 3 3 4 4 4 5 700G/TRACK Users Manual Help Menu ............................................................................................................ Main Screen .............................................................................................................. How to Connect to the Gauge .............................................................................. How to Disconnect from the Gauge ..................................................................... How to Upload Logged Data ................................................................................ How to Erase Logged Data .................................................................................. How to Send Setup Configuration ........................................................................ How to Retrieve Setup Configuration ................................................................... Setup Configuration Fields ........................................................................................ Data Logging Mode .............................................................................................. Interval ................................................................................................................. Samples/Run........................................................................................................ Log Temperature.................................................................................................. Log Type .............................................................................................................. Sample Type ........................................................................................................ Unit ....................................................................................................................... Custom Factor...................................................................................................... Trip Setpoint ......................................................................................................... Trip Reset............................................................................................................. Log Upload Display ................................................................................................... Display Options ......................................................................................................... Export Options .......................................................................................................... Excel Templates ............................................................................................................ Single-Run Graph ..................................................................................................... Single Run Pressure and Temperature Graph .......................................................... Start Data Logging on Gauge ........................................................................................ Download Mode ........................................................................................................ Demand Mode .......................................................................................................... Serial Interface Instructions ........................................................................................... ii 5 5 6 6 6 7 7 7 7 7 7 8 8 8 8 9 9 9 9 9 10 11 14 15 16 17 17 18 21 Contents (continued) Initiating Communication ........................................................................................... List of Commands...................................................................................................... Parameter Units ............................................................................................................. Error Codes .................................................................................................................... iii 21 22 23 24 700G/TRACK Users Manual iv List of Tables Table 1. 2. Title Page Single-Run Graph Template Export Options ......................................................................... 15 Single Run Pressure and Temperature Graph Options ......................................................... 16 v 700G/TRACK Users Manual vi List of Figures Figure 1. 2. 3. 4. Title Page The Main Screen ................................................................................................................... Connection Error Alert ........................................................................................................... The Display Options Screen .................................................................................................. The Export Options Screen ................................................................................................... vii 5 6 10 11 700G/TRACK Users Manual viii Introduction How to Contact Fluke The Fluke 700G/TRACK Software (the Software) extends the functions of the Fluke 700G Series Pressure Gauge (the Gauge). Use this manual with the 700G Series Users Manual. To contact Fluke, call one of the following telephone numbers: The Software lets you: • Technical Support USA: 1-800-44-FLUKE (1-800-443-5853) • Calibration/Repair USA: 1-888-99-FLUKE (1-888-993-5853) • Set up data logging configuration in the Gauge • Upload logged data from the Gauge, including export of run data to text, comma separated values (CSV), and Excel files • Canada: 1-800-36-FLUKE (1-800-363-5853) • Europe: +31 402-675-200 Clear logged data from the Gauge • Japan: +81-3-6714-3114 • Singapore: +65-738-5655 • Anywhere in the world: +1-425-446-5500 • Minimum Requirements To use the Software, Microsoft Windows 2000 (SP4), XP (SP2), Vista, or Windows 7 is necessary. To export data to Excel files, Microsoft Excel version 2002 or newer is necessary. Or, visit Fluke’s website at www.fluke.com. To register your product, visit http://register.fluke.com. To view, print, or download the latest manual supplement, visit http://us.fluke.com/usen/support/manuals. 1 700G/TRACK Users Manual Before You Start Overview Before you start, read this manual to learn more about the Software and its functions. The gauge can record (log) multiple data sets, each of which is identified by a sequential run number. Data logging runs use new items put into the Gauge's CONFIG menu sequence to start and stop the runs. Logging parameters can be changed for each data run. The logging runs can be as short or long as necessary. The length of the runs align with the storage capacity of the Gauge. Standard Equipment Make sure your data logging kit comes with: • 700G/TRACK Software • USB Cable If something is missing, contact Fluke. See the How to Contact Fluke section. Installation To install the Software: 1. Put the Software CD into the CD drive on your computer. 2. The install program starts automatically. If it does not, use Windows Explorer to find the CD drive and click on the "setup.exe" program. 3. Follow the directions on the screen to install the Software. 2 For each sample, the Gauge can log pressure or it can log pressure and temperature. This selection applies to all runs and must be made before you start the first run. Logging Pressure When logging only pressure, the Gauge has a capacity of 8500 data records. These records keep run identification and log sample data. Seven records are necessary for each new data logging run for run identification overhead. One record is necessary to log each sample, except for the triple-value case (average, minimum, maximum) where three records log each sample set. For a single run, the capacity for all but the triple-value case is 8493 sample sets, and the capacity for the triplevalue case is 2831 sample sets. Pressure Gauge Logging Pressure Logging Pressure and Temperature Data Logging Modes When pressure and temperature are logged, the Gauge has a capacity of 5100 data records that keep run identification and log sample data. Two data logging modes are available, Download and Demand. Multiple log runs can be used in these modes, with the most number of runs dependent on the number of samples recorded in each run and the Gauge capacity. For a single run, the maximum capacity for all but the triple-value case is 5093 samples, and the maximum capacity for the triple-value case is 1697 sample sets. Intervals The interval time setting sets the frequency of sample calculation and storage. Eleven discrete interval times are available and range from 1 second to 1 hour. A sample value is calculated at the end of each interval and comes from all of the pressure measurements made during that interval. The sample value can be the last measurement made in the interval, or it can be the average, minimum, maximum, or median of all of the measurements made during that interval. A sample value can be kept for each interval during the run, only for those intervals where the sample value is larger than a specified high or low limit, or only for those intervals where the pressure differential during the interval is larger than a maximum span. Use Download mode to record or change the data logging parameters and send them to the Gauge. The gauge stays in this mode until the application or the Gauge “CLEAr DATA” function is used to clear the recorded data in the Gauge. At this point, the mode is set to Demand. In Download mode the parameters cannot be changed with the Gauge menus and the downloaded values are used for each new log run. Download mode can be used to change the logging parameters between runs and will not change logged data already in memory. When the data logging mode is Demand mode, you can set the Gauge to log data without a computer connection. You can record and change some of the data logging parameters with the Gauge menus, while the remaining parameters default to set values. The gauge menus can be used to change the logging parameters between runs. This will not change previously logged data. 3 700G/TRACK Users Manual description in the Main Screen section. Menus The Software menus duplicate the functions of the Gauge. You can use the buttons or the Software menu to interface with the Gauge. Clear Data Erase all data logging runs from the Gauge. See How to Clear Logged Data in the Main Screen section. Send Setup Send the setup data to the Gauge. See the How to Send Setup Configuration description in the Main Screen section. Retrieve Setup Get the setup data from the Gauge. See the How to Retrieve Setup Configuration description in the Main Screen section. File Menu The File Menu lets you exit the Software. Gauge Menu The Gauge Menu contains the functions that interact with the Gauge: Connect Connect the Gauge and shows the Gauge description and data logging setup. On the Primary Display, select the communication port that the Gauge is connected to before you use this function. See How to Connect to the Gauge in the Primary Display section. Disconnect Disconnect from the Gauge. See How to Disconnect from the Gauge in the Main Screen section. Upload Data Upload all data logging runs from the Gauge and show them on the Log Upload Display. See the Log Upload Display section. The data can be exported from that display. See the How to Upload Logged Data 4 Pressure Gauge Logging Pressure Options Menu The Options Menu specifies the default display and export options. See the Display Options and Export Options sections. Help Menu The functions necessary for help and support are in the Help Menu: Help Shows online help Support Shows customer support data Registration Tells you how to register the Software About Shows Software description and version data This data is shown on the main screen when you connect the Gauge: • Gauge model • Serial number • Firmware version of the Gauge • Number of data logging records used • Number of data logging records free Main Screen The Main Screen is shown in Figure 1. The Main Screen controls let you: • Connect to the Gauge • Disconnect from the Gauge • Upload logged data • Clear logged data • Exit the application gto001.jpg Figure 1. The Main Screen 5 700G/TRACK Users Manual The lower section of the Main Screen shows controls you can use to configure data logging parameters in the Gauge, send the configuration to the Gauge, and retrieve the current configuration from the Gauge. How to Connect to the Gauge To use the Software with the Gauge immediately: 1. Double-click the Software icon on the desktop to start the Software. 2. Turn on the Gauge. 3. Connect the USB cable to the PC and to the Gauge. 4. On the Software’s Main Screen, select the applicable COM Port from the Port dropdown. 5. Note COM Port detection is not automatic. If necessary, go to Windows/Settings/System/Hardware/Device Manager on your PC to determine the USB Serial Port. Push the Connect button. The Main Screen populates with the settings from gauge. See the Main Screen section for more information. Note If the Gauge is off or if the USB cable is not connected, you will receive an error message. See Figure 2. 6 gto004.jpg Figure 2. Connection Error Alert How to Disconnect from the Gauge To disconnect from the Gauge, click the Disconnect button. The button description and function changes to Connect and all shown data is removed. How to Upload Logged Data To upload logged data, click the Upload button. The logged data is uploaded and shown on the Log Upload Display. A display shows percent complete and an estimate of the time remaining in the upload. See the Log Upload Display section. Pressure Gauge Logging Pressure How to Erase Logged Data Enabled, Download To erase logged data, click the Clear button. After you give confirmation that logged data is to be erased, all logged data is removed from the Gauge. The data logging mode is set to Enabled, Demand, and all data on the display is refreshed. Turns on data logging in the Gauge with all logging parameters downloaded from the Software. All data logging functions related to parameter changes are removed from the Gauge's CONFIG menu sequence. The only gauge functions available are start and stop of data logging, show the number of free records, and erase all logged data. How to Send Setup Configuration After you make the necessary selections, click the Send button. The configuration is sent to the Gauge and all data on the display is refreshed. The data logging mode must be set to Enabled, Download to change more than the mode. How to Retrieve Setup Configuration To retrieve setup configuration data, click the Retrieve button. The gauge description, current data capacity, and setup are read from the Gauge and shown in the applicable fields. Setup Configuration Fields The subsequent sections tell you how to set up the configuration fields. Data Logging Mode Disabled This command turns off data logging in the Gauge. All data logging functions are removed from the Gauge's CONFIG menu sequence. Enabled, Demand Turns on data logging in the Gauge with all logging parameters set. This can only be used to upload logged data, erase all logged data, get data logging parameters, and change the data logging mode. The data logging functions that are available in the Gauge's CONFIG menu sequence are start and stop data logging, show the number of free records, change the logging interval, change the samples each run, and erase all logged data. The log type is set at Continuous and the sample type is set at Interval End. Interval Use one of these sampling intervals: • 1, 2, 5, 10, or 30 seconds • 1, 2, 5, 10, or 30 minutes • 1 hour 7 700G/TRACK Users Manual Samples/Run The Samples/Run field is the maximum number of samples to log each run. This can range from 1 to 8500. Log Temperature Select Yes or No to log temperature. Log Type Continuous A sample is kept at each interval of the run. The sample value is specified by the sample type selection below. This is the most common type of logging. Trip high Interval samples are kept during the run only when the sample values are above a high limit. Sample storage starts when a sample value of the interval becomes more than the trip setpoint, and continues at each interval until a subsequent sample value of the interval is lower than the trip reset. Sample storage then stops until a sample value, again, becomes more than the trip setpoint. The sample value is recorded and specified by the sample type selection below. Trip low Interval samples are only kept during the run when the sample values are above a low limit. Sample storage starts when a sample value of an interval becomes less than the trip setpoint, and continues at each interval until 8 a subsequent interval's sample value becomes larger than the trip reset. Sample storage then stops until a sample value again becomes less than the trip setpoint. The sample value is recorded and specified by the sample type selection below. Trip span Interval samples are kept during the run only when the pressure difference during the interval is more than a maximum span or range. Sample storage starts when the difference between a maximum and minimum measurement of an interval becomes larger than the trip setpoint, and continues at each interval until a subsequent difference of the interval becomes less than the trip reset. Sample storage then stops until a difference of the interval again becomes more than the trip setpoint. Sample Type The Sample Type field is recorded as one of these fields: • Interval end- The last measurement made in the sample interval. • Average of all measurements made in the sample interval. • Minimum of all measurements made in the sample interval. • Maximum of all measurements made in the sample interval. Pressure Gauge Logging Pressure • Median of all measurements made in the sample interval, the midpoint between minimum and maximum. • Average, minimum, and maximum of all measurements made in the sample interval. Three records of storage for each logged sample set are necessary. This decreases capacity by 3. Unit Pressure units known by the current gauge configuration. Custom units are included. Custom Factor Custom unit conversion factor shown as units for psi. Trip Setpoint Trip setpoint as specified for the Log Type selected above, shown in the log unit selected above. Trip Reset Trip reset as specified for the Log Type selected, shown in the log unit selected. Log Upload Display Push the upload button to upload data files from the Gauge. The Primary display shows each data logging run found in the uploaded data. To show a run's data in the lower section of the display, click on it to highlight it. Use the Display Mode box to select the subset of run data shown: • • • All Data, Selected Data Readings Only When the Display Mode is set to Selected Data, click the Change Selection button to change the display options. See the Display Options section. The gauge has no real-time clock. The uploaded data is initially tagged by elapsed day and time from the start of a run. The runs are identified by a numeric position in the uploaded data. To record a label that gives more data about the run and to add a calendar date and time, highlight the run and click the Set Date/Label button. The base date and time are added to the elapsed day and time for each sample. To export one run, highlight the run and click the Save Run button. The Export Options screen is shown to let the options be customized for exporting this run. A standard Save As screen is then shown. Select the file name and the folder where the file is to be put. Click the Cancel button of one of the screens to skip the export. See the Export Options section for more. To export all runs, click the Save All button. The Export Options screen is shown to let the options be customized for exporting these runs. The same options are used for all runs. For each run, a Save As screen is then shown. Select the file name and the folder where the file is to be 9 700G/TRACK Users Manual put. Click the Cancel button of the Save As screen to skip the export of that run. Click the Cancel button of the Export Options screen to skip the export of all runs. See the Export Options section. • Trip Setpoint and Reset • Initial Zero and Tare • Zero Changes The default location for files is the folder "Fluke\700G Track" in "My Documents". • Temperature Readings • Pressure Readings (always selected) Display Options Use the Display Options screen (in the Options Menu) to change the default selections for the run description fields. When data is first uploaded, the selections are set to the default values. After the first data display, the selections can be temporarily changed for the length of the data display. In the Display Options screen, check each field that is to be shown when the display mode is set to Selected Data. Logged pressure (Pressure Readings on the menu) is always shown. The Display Options Screen is shown in Figure 3. The Display Options are: • Run # or Label • Gauge Description • Log and Sample Type • Interval Time • Pressure Unit • Custom Factor 10 gto002.jpg Figure 3. The Display Options Screen Pressure Gauge Logging Pressure Export Options Use the Export Options screen to change the default selections for the file type and run description fields to be exported from the Log Upload Display. When data is first uploaded, the selections are set to these default values. After the first data display, the selections can be temporarily changed for each export, and stay changed for the length of the data display. Logged pressure is always exported. See Figure 4. gto003.jpg Figure 4. The Export Options Screen 11 700G/TRACK Users Manual The selections are as follows: Multiple runs in File Type Single File TXT File When the upload has many runs, export all runs to one file. You can print a formatted text file or open it in a text editor. The run description fields are put on isolated lines at the start of the file, followed by a line for each logged data sample and zero change. CSV File Separate Files When the upload contains many runs, export each run to an isolated file. Excel Template An Excel Comma Separated Variable file has each item on a line in quotation marks and all items are separated by commas. The run description fields are put on isolated lines at the start of the file, followed by a line for each logged data sample and zero change. When the file type is set to Excel Template, the template you will use is selected here. Click on the Browse button and go to the necessary template file. See the Excel Templates section. New Excel File Include Field A new Excel spreadsheet (xls) file. The locations of the run description fields, logged data samples, and zero changes in the spreadsheet are shown in the Excel Cell column below. See the Minimum Requirements section. Put a mark by each field to be exported. Logged pressure data is always exported. Excel Template An Excel spreadsheet (xls) file that comes from a predefined Excel template (xlt) file. The locations of the run description fields, logged data samples, and zero changes in the spreadsheet are put into Excel Cell columns. These locations must be synchronized with the set data in the template. See the Minimum Requirements section. See the Excel Templates section. 12 Insert Description An optional field description can be included for each field you will export. Put a mark on each field description to be included. Pressure Gauge Logging Pressure Excel Cell • the time Record the cell location where you put the data. Cell columns can range from A to YZ. Cell rows can range from 1 to 99999. The data fields are put as follows: • the new zero setting • the pressure unit Run Description Fields The second, third, and fourth values are put into the cells to the right of the first. If the field description is included, the field description is put into the applicable cell column and the field values are put into the cell columns to the right. If the field description is not included, the field values are put in the applicable cell columns. If the field description is included, the field description is put into the applicable cell and the field value is put into the subsequent cell to the right. If the field description is not included, the field value is put in the specified cell. The Gauge Description has four values: • Manufacturer • Model • Serial number • Firmware version These are in one cell isolated by commas. The Log and Data Type, Trip Setpoint and Reset, and Initial Zero and Tare fields each have two data items that occupy two rows. Each has its own description and field value, with the second row below the first. Zero Changes Zero changes are shown one for each row and start at the specified cell row. There are four field values for each zero change: • the date Pressure Readings Pressure is shown one for each row and start at the specified cell row. There are four field values for each value pressure indication: • Date • Time • Reading • Pressure unit The second, third, and fourth values are placed in the cells next to the right of the first. There are six field values for each triple value pressure reading: • Date • Time • Average reading 13 700G/TRACK Users Manual • Minimum reading • Maximum reading • Pressure unit The second, third, and further values are put into cells to the right of the first. If the field description is included, the field description is put into the specified cell column and the field values are put into the cell columns to the right. If the field description is not included, the field values are put in the specified cell columns. Temperature Readings If temperature indications are in the uploaded data, they are shown one for each row and start at the applicable cell row. There are two field values for each value sample: • Temperature • Temperature unit The second value is put in the cell to the right of the first. There are four field values for each triple value sample: • Average temperature • Temperature at the time of the minimum pressure • Temperature at the time of the maximum pressure • Temperature units 14 If the field description is included, the field description is put in the specified cell column and the field values are put in the cell columns to the right. If the field description is not included, the field values are put in the specified cell columns. Excel Templates An Excel template is made like a typical spreadsheet, but the file is named with the “.xlt” file extension. The templates can have predefined text, titles, graphs, and calculations which you can use with uploaded pressure data to make a complete spreadsheet presentation. The templates can be used many times, so it will not always be necessary to reformat some of your raw data. The field options and Excel cell locations specified on the Export options screen must be synchronized with the predefined data in the template to make sure data is merged correctly. Sample templates are supplied with the Software and are in their own folder on the CD. The templates must be manually written to your hard drive. The subsequent sections tell you more about them. Pressure Gauge Excel Templates Single-Run Graph The Single-Run Graph template has custom titles and a graph of the merged data. The vertical axis of the graph is scaled to the range of the uploaded pressure values and the horizontal axis is scaled to the number of samples uploaded. Table 1. Single-Run Graph Template Export Options Include Field Insert Description Excel Cell Run # or Label Yes No B3 The template file name is: Gauge Description Yes No B5 700GTRACK-template-single-run-pressure-graph.xlt Log and Sample Type Yes No B10 Interval Time Yes No B12 Pressure Unit Yes No B8 Custom Factor Yes Yes B18 Trip Setpoint and Reset Yes Yes B16 Initial Zero and Tare Yes Yes B14 Zero Changes Yes No J24 Temperature Readings No No Any Pressure Readings Yes No B24 For the Export options for this template, see Table 1. Field 15 700G/TRACK Users Manual Single Run Pressure and Temperature Graph The Single Run Pressure and Temperature Graph template has custom titles and a graph of the merged data. The pressure graph vertical axis is scaled to the range of the uploaded pressure values. The horizontal axis is scaled to the number of samples uploaded. The temperature graph vertical axis is scaled to the range of the uploaded temperature values. The horizontal axis is scaled to the number of samples uploaded. The template file name is: 700G TRACK-template-single-run-pressure-temperaturegraph.xlt For the Export options for this template, see Table 2: 16 Table 2. Single Run Pressure and Temperature Graph Options Include Field Insert Description Excel Cell Run # or Label Yes No B3 Gauge Description Yes No B5 Log and Sample Type Yes No B10 Interval Time Yes No B12 Pressure Unit Yes No B8 Custom Factor Yes Yes B18 Trip Setpoint and Reset Yes Yes B16 Initial Zero and Tare Yes Yes B14 Zero Changes Yes No N44 Temperature Readings Yes No I44 Pressure Readings Yes No B24 Field Pressure Gauge Start Data Logging on Gauge Start Data Logging on Gauge o Set Download or Demand mode from the Software. Download Mode 2. Download Mode shows “LOG” in the primary display and “DATA” in the secondary display. Push to go to the current configuration functions, or push to go to the new data logging branch. The data logging configuration menu sequence (new branch) is: 1. Start or stop data logging • Primary display: LOG • Secondary display: FULL if the log memory is full, OFF if not logging data, or ON if logging data. • 3. and are ignored if the log memory is FULL, otherwise push either button to toggle between OFF and START if not logging data, or to toggle between ON and STOP if logging data. • Push to go to the next menu item. • Push to: o Exit configuration if the display shows FULL, ON, or OFF. o To stop logging and exit configuration if the display shows STOP. 4. To start logging and exit configuration if the display shows START. Display number of free log records • Primary display: number of free records • Secondary display: FREE • and are ignored. • Push to go to the next menu item if not logging, otherwise it exits configuration. • Push to exit configuration. Erase all logged data and set to Demand mode. • Primary display: CLEAr • Secondary display: DATA • and are ignored. • Push to go to the next menu item and confirm erasure. • Push to exit configuration without erasing the data. Make sure that all logged data is erased and set to Demand mode. • Primary display: CLEAr • Secondary display: CNFRM 17 700G/TRACK Users Manual • and are ignored. • Push to erase the data, set Demand mode, and exit configuration after the display briefly shows CLr to confirm erasure. • Push to exit configuration without erasing the data. When not logging data, the Gauge works as given in the 700G Series Users Manual. • The units field on the display cycles between the units, the text LOG, and the text RUN at a rate of one time each second. This shows that data logging is on and the number after the text RUN shows the run number. Demand Mode You can make a data measurement/log without a computer. In Demand mode, a computer is not necessary to configure all of the logging parameters. • When is pushed, the log run to be stops before power is turned off. When data logging is active, a new item is added at the start of the configuration menu tree to point you to a different branch which contains all data logging functions. This new menu item shows “LOG” in the primary display and “DATA” in the secondary display. Push to go to the current configuration functions, or push to go to the new data logging branch. • Power off on low-battery detection stops the log run before power is turned off. The data logging configuration menu sequence (new branch) is as follows: • is active and an event record (including the change in the zero offset value) is placed into the log. 1. When a log run is started, the pressure unit and custom factor are pushed to the downloaded selections. They are changed to their initial values at the end of the run. While logging data, these changes occur: Start or stop data logging • Primary display: LOG • The gauge’s Auto Off feature is disabled. It is changed to its initial value at the end of the run. • • Engineering units, damp, sample rate, tare, and custom factor functions on the current configuration menu are disabled. Secondary display: FULL if the log memory is full, OFF if not logging data, or ON if logging data. • and are ignored if the log memory is FULL, otherwise push either button to go between OFF 18 Pressure Gauge Start Data Logging on Gauge 2. 3. and START if not logging data, or to go between ON and STOP if logging data. • Secondary display: time unit SEC, MIN, or HOUR as applicable for the selection. • Push to go to the next menu item. • • Push to: Push to decrease the interval selection. Stop at 1 second. • Push to increase the interval selection. Stop at 1 hour. • Push to go to the next menu item. • Push to exit configuration. o Exit configuration if the display shows FULL, ON, or OFF. o To stop logging and exit configuration if the display shows STOP. o To start logging and exit configuration if the display shows START. 4. Display number of free log records Select maximum number of samples • Main display: number of samples presently selected • Primary display: number of free records. • Secondary display: SAMPL • Secondary display: FREE • • and are ignored. Push to decrease the interval selection. Stop at 1. • Push to go to the next menu item if not logging, otherwise it exits configuration. • Push to increase the interval selection. Stop at the maximum number of records (8500). • Push to exit configuration. • Push to go to the next menu item. • Push to exit configuration. Select logging interval • Primary display: interval selection of 1, 2, 5, 10, or 30 for seconds, or 1, 2, 5, 10, or 30 for minutes, or 1 for hours. 5. Erase all logged data and set to Demand mode. • Primary display: CLEAr • Secondary display: DATA 19 700G/TRACK Users Manual 6. • and are ignored. • • Push to go to the next menu item and confirm erasure. Power off on low battery detection stops the log run before power is turned off. • • Push to exit configuration without erasing the data. is active and an event record (including the change in the zero offset value) is recorded in the log. • The Gauge’s Auto off function is disabled. It is change to its original value at the end of the run. • Engineering units, damp, sample rate, tare, and custom factor items on the existing configuration menu are disabled. • The units field on the display goes between the units, the text LOG, and the text RUN at a rate of one time each second. This shows that data logging is on and the number after the text RUN identifies the run number. Confirm erasure of all logged data and set to Demand mode. • Main display: CLEAr • Secondary display: CNFRM • and are ignored. • Push to erase the data, set Demand mode, and exit configuration after briefly displaying CLr to confirm erasure. • Push to exit configuration. This will not erase the data. While not logging data, the Gauge works as given in the 700G Series Users Manual. When a log run starts, the pressure unit and custom factor are left at the values set by the current configuration functions. While logging data, these changes occur: • 20 Push to stop the log run before power is turned off. Pressure Gauge Serial Interface Instructions Serial Interface Instructions The subsequent sections tell you how to set up the Gauge for serial communication. Initiating Communication Terminal communication can be setup with terminal communication Software on a PC. The terminal must be set as follows: • Bits per second: 9600 • Data bits: 8 • Parity: None • Stop bits: 1 • Flow control: None • Local echo on 21 700G/TRACK Users Manual List of Commands Use the subsequent list of commands to communicate with the Gauge: MINMAX_RST Resets the minimum and maximum recorded values. MIN? Returns the minimum recorded value MAX? Returns the maximum recorded value CAL_START Puts the calibrator in calibration mode *CLS Clears the error queue FAULT? Returns an error code from the error queue HC_OFF Turns off unit HC_DFLT Sets auto off defaults *IDN? Identification query. Returns the manufacturer, model number, and firmware revision level of the Calibrator. TEMP? Returns temperature in the chosen units HC_COMP_OFF Turns off temperature compensation HC_COMP_ON Turns on temperature compensation on HC_COMP? Returns state of temperature compensation. HC_RD_2410? Return 2410 ADC counts. HC_SI_OFF Turns off SI mode TARE Tares the offset pressure of the reading on the calibrator TARE? Returns the current tare value PRES_UNIT? Returns the pressure unit for the upper display. PRES_UNIT Sets the pressure unit for the display ZERO_MEAS Zeros pressure of the calibrator HC_SI_ON Turns on SI mode ZERO_MEAS? Returns the current zero offset value CAL_STORE Stores calibration data. HC_AUTO_OFF Turns auto shutdown off HC_AUTO_ON Turns auto shutdown on 22 Pressure Gauge Parameter Units Sets the multiplier for the custom unit type Parameter Units STREAM_OFF Turns off streaming data Psi STREAM_ON Turns on streaming data Pressure in pounds per squareinch HC_TEMP? Same as TEMP? Bar Pressure in bars VAL? Returns the measured pressure value in selected units mBar Pressure in millibars Kg/cm2 Pressure in kilograms per centimeter squared CUST_MULT? The subsequent list of units is used with the Gauge: HC_CMD_LIST Prints out a command list TEMP_UNIT Used to set temperature unit InH2O4C Pressure in inches of water at 4 °C TEMP_UNIT? Returns temperature unit InH2O20C Pressure in inches of water at 20 °C InH2O60F Pressure in inches of water at 60 °F mH2O4C Pressure in meters of water at 4 °C MH2O20C Pressure in meters of water at 20 °C cmH2O4C Pressure in centimeters of water at 4 °C cmH2O4C Pressure in centimeters of water at 20 °C ftH2O4C Pressure in feet of water at 4 °C ftH2O20C Pressure in feet of water at 20 °C 23 700G/TRACK Users Manual ftH2O60F Inhg0C Pressure in feet of water at 60 °F Pressure in inches of mercury at 0 °C Error Codes The gauge uses the subsequent error codes: 101 Pressure in millimeters of mercury at 0 °C A non-numeric entry was received where it should be a numeric entry 102 Too many significant digits entered kpal Pressure in kilopascals 103 Far Temperature in Fahrenheit Invalid units or parameter value received Cel Temperature in Celsius 105 Entry is above the upper limit of the allowable range 106 Entry is below the lower limit of the allowable range 108 A required command parameter was missing 109 An invalid pressure unit was received 117 An unknown command was received 120 The serial input buffer overflowed 121 Too many entries in the command line 122 Pressure module not connected mmhg0C 24