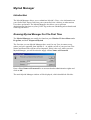
1
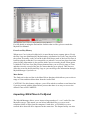
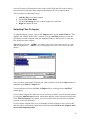
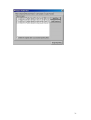
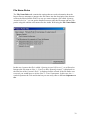
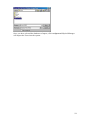
Myriad Manager
Manual
Last Updated 15/10/2003
Table Of Contents
Myriad Manager............................................................................................................4
Introduction ...............................................................................................................4
Running Myriad Manager For The First Time .........................................................4
The Users Tab ...............................................................................................................6
System Administrator: Your Fir st User Account ......................................................6
Group Level Access ...................................................................................................6
Setting Up The System Administration Group ..........................................................7
Group Name & (Mult)iple Users Option ..................................................................7
Default Rights For User Groups ...............................................................................8
Create/Delete/Modify User Accounts ...................................................................8
Edit Cart information and audio............................................................................8
Access mail functions ...........................................................................................8
Create/Delete/Modify information stored in AutoTrack Databases .....................8
Auto-Schedule/Import programme logs into Q-NXT ...........................................8
Perform System Administration functions............................................................8
Creating More User Groups .....................................................................................9
Adding Your First User ...........................................................................................10
Caution! Adding a User will affect the entire Myriad family!............................10
General Details....................................................................................................11
More Information ................................................................................................12
Access Rights ......................................................................................................13
Preferences ..........................................................................................................14
Audio Wall ..........................................................................................................14
Notes ...................................................................................................................14
Saving The Users Details ....................................................................................14
Adding More Users .................................................................................................15
Finding A User A ccount To View Or Edit Details ..................................................15
Listing The Users On The System ...........................................................................16
Viewing, Sorting & Printing Users Details.........................................................16
Deleting A User Account ....................................................................................16
User History: Big Brother Is Watching ..................................................................17
The User Menu ........................................................................................................18
Auto Expire Users ...............................................................................................18
Change My Password..........................................................................................18
The Audio Wall Tab....................................................................................................19
Introduction .............................................................................................................19
Running Reports about the Audio Wall ...................................................................20
Cart Range...........................................................................................................20
Compression Options ..........................................................................................21
Cart Length Options............................................................................................21
More Options ......................................................................................................22
Report Results .....................................................................................................23
The Report Tool Bar ...........................................................................................24
Play Cart..........................................................................................................25
Edit Cart ..........................................................................................................25
Print Report .....................................................................................................25
Block Copy......................................................................................................25
Block Move.....................................................................................................27
Mass Colour Change .......................................................................................27
2
Update Cart Chunk Information......................................................................27
Export To Pad .................................................................................................28
Erase Last Play History...................................................................................29
Mass Delete.....................................................................................................29
Importing .WAV Files In To Myriad .......................................................................29
Selecting Files To Import....................................................................................30
File Name Rules..................................................................................................32
Cart Numbers ......................................................................................................33
Audio Format ......................................................................................................34
Begin Importing ..................................................................................................34
Play Logs .................................................................................................................35
Copyright Report.....................................................................................................38
Overview .............................................................................................................38
Description of the Reports (Profiles) ..................................................................39
General Myriad Copyright Information ..............................................................39
Commercial Return / Music Return Profiles.......................................................40
UK PRS Music Return ........................................................................................40
UK PRS Commercial Return ..............................................................................41
Adding the Copyright Information to a Cart.......................................................42
Running a Report ................................................................................................43
Obtaining Information from Terminals...............................................................45
Start / End Cart Numbers ....................................................................................45
Print / Run the Report .........................................................................................45
The Q-NXT Tab..........................................................................................................46
Introduction .............................................................................................................46
Adverts .....................................................................................................................46
Removing Entries From Q -NXT ..............................................................................49
Remove Entries from a date onwards .................................................................49
Remove Entries up to a date................................................................................50
Remove ALL Entries from the Q-NXT log ........................................................51
Myriad Manager Settings............................................................................................52
Database Settings ....................................................................................................52
Allow User account to not have passwords ........................................................52
Users must change their password every XX days .............................................52
Automatically remove entries from the User History after XX days..................52
Create legacy reconciliation files ........................................................................53
The File Menu .............................................................................................................53
Import / Create ........................................................................................................53
Cart Browser ...........................................................................................................55
Cart Pad...................................................................................................................55
Print Setup ...............................................................................................................57
Print.........................................................................................................................57
Exit ..........................................................................................................................57
3
Myriad Manager
Introduction
The Myriad Manager allows you to administer Myriad’s Users, view information on
your Audio Wall, import Carts into your system and view a history on what actions
Users have performed. The Myriad Manager also allows you to perform
administration functions on your Q-NXT log such as un-scheduling advert breaks and
removing old entries.
Running Myriad Manager For The First Time
The Myriad Manager can usually be found on your Windows™ Start Menu under
Programs, and then P Squared Myriad
The first time you run Myriad Manager there won’t be any User Accounts set up
unless you have upgraded from Myriad v2 - in which case all of your previous User
Names and Passwords will have been imported. If this is the case, when you start
Myriad Manager, you will be asked to supply a User Name and Password.
Enter a User Name and Password for an account that has administration rights and
click on OK.
The main Myriad Manager window will be displayed, which should look like this:
4
5
The Users Tab
System Administrator: Your First User Account
The first User that you add to the system should always be a System Administrator.
This is so that you can always use this account to correct mistakes that you or others
might make and also to check on other User’s Access Rights and Passwords should
the need arise. The System Administrator account is the same as any other User
Account except that the System Ad ministrator should have Access Rights to do
everything in the system.
Tip: You can change the User designated as the System Administrator at any time in
the future so don’t worry if the first account you create will not ultimately be the
System Administrator once you have finished learning and setting up the system.
Group Level Access
Myriad Security works on the standard “Group Based” model that means that each
User on the system is assigned to a User Group . Each of these Groups are given a
Group Name and a set of Default Access Rights that govern what Users can do in
Myriad. When new Users are created, they automatically start with the Access Rights
that the Group has.
Groups can be set to be a Multiple Member Group which means several Users can
belong to that Group, or a Single Member Group which means that only one User can
belong to that Group at any one time. If you create a new User and assign them to a
Single Member Group that already has a User then the existing User is automatically
demoted to the bottom level Group.
Tip: It is a good idea for the last Group to have the least access to your system, as
this is the Group that new Users are automatically assigned to. By setting this Group
to have few or no Access Rights, if you accidentally forge t to set a specific User
Group when you create a new User, they will not have more access to the system then
you intended.
6
Setting Up The System Administration Group
As we have already discussed, the first User that you should add to the system should
hold System Administration Access Rights so that you can use this account to access
all areas of Myriad including other people’s User Accounts. To do this we need to
create a System Administration Group . Click on the Groups button on the User tab
from the main Myriad Manager window.
Group Name & (Mult)iple Users Option
Type in a Group Name (e.g. “System Administration ”) and click on the Mult
(Multiple User’s in Group) box to choose whether you want to allow multiple Users
in the Group (“Yes”) or just one User in the Group (“No”).
Tip: For the System Administrator, we recommend setting this to “No” so that only
one User can be the System Administrator at any one time.
7
Default Rights For User Groups
Below the Group Names window are the Default Rights for the highlighted Group.
You can allow Users in the Group to have access to the various functions by ticking
or clearing the appropriate boxes. The functions and what they allow a User to do are
described below. It is highly recommended that the System Administration Group has
all the options ticked as shown in the example screen above.
Create/Delete/Modify User Accounts
This option allows the User to view and edit all the User Accounts on the system.
This means that they can add new Users, change the Access Rights of existing Users
and view other Users passwords.
Edit Cart information and audio
Ticking this option allows the User to record Carts onto the Audio Wall. They can
also edit the Cart’s information including the Intro & Extro points and Cart
Information (i.e. Notes) as well as editing the actual audio via your chosen audio
editor (i.e. Cool Edit 2000). Users can also delete Carts from the Audio Wall when
they have this right.
Access mail functions
This option is currently not used within Myriad v2.5 although ultimately it will allow
Users to access email directly through Q-NXT Live. Watch out for future updates for
this feature.
Create/Delete/Modify information stored in AutoTrack
Databases
AutoTrack is the Music and Jingle Scheduling module of the Myriad system.
Selecting this option allows the User to use AutoTrack to add or modify songs and
jingles, and manipulate the station schedule.
Auto-Schedule/Import programme logs into Q-NXT
This option allows Users to Auto-Schedule programs (i.e. tell AutoTrack to actually
pick the music and jingles) or to use the Log Import utility to import a music log from
a third party music scheduler (like RCS’s Selector™) into Q-NXT Live.
Perform System Administration functions
This final option allows an individual User or Group of Users to use the System
Administration functions in Myriad. Most of these can be found within the Myriad
Manager itself, therefore without this option, Users will not be able to gain access to
the Myriad Manager.
8
Creating More Us er Groups
Now that you have created the System Administration Group , you can add up to 31
other Groups to cover the spectrum of Users using your Myriad system. You may
have noticed that as you added the System Administration Group , another blank
Group appeared beneath it. This happens automatically to allow you to add new
Groups to the system.
Use the Mult option to set whether your Groups can contain more than one User and
use the tick boxes to determine what Access Rights the members of that Group will
have by default.
Tip: You can also customise the Access Rights of individual Users on a per User
basis so the Default Access Rights are just there to save you time when setting up
several Users.
If you choose not to have any options ticked for a particular User Group then, by
default, members of that Group will only be able to use Myriad to play Carts and
operate Q-NXT but not much else.
If you want to remove a User Group, simply delete the text from the Group Name
box and the Group will be removed.
9
Adding Your First User
As we have already discussed, the first User that you add to the system would usually
have System Administration Access Rights . We have already looked at setting these
(and other) Group level Access Rights, so all that remains is to actually add our first
User to the system.
Caution! Adding a User will affect the entire Myriad family!
Up until this point you will have been able to move freely between the various
programs and segments that make up the Myriad family. As soon as you add in this
first User, Myriad’s security will activate and you will be required to enter a User
Name and Password before you can access each program. In addition, the level of
User Access that your User Name and Password have been assigned will determine
what features are available in each program.
This is why it is so important that the first User you create has access to all areas of
Myriad. Otherwise you could find yourself without access to certain areas or
functions, and also without the access needed to remove these restrictions! If you do
find yourself in that situation, don’t worry - you are not the first but you will have to
contact P Squared for advice on how to resolve this problem.
10
General Details
To add in your new User, click on the New button on the User tab from the main
window. This will open up a blank User Details window. Give the User a simple
Login Name, which will be their personal Myriad User Name. You will have to issue
a unique Login Name for each User on the system.
Next give the User a Password. The User will be able to change this password at
anytime so you could leave it as the same as the Login Name for the time being.
Tip: If you are planning on letting people start learning the system straight away, set
the System Administrators password to something secret from the beginning.
Otherwise users could easily guess the correct password, and then they could
accidentally delete something important.
Fill in whichever of the additional information fields you feel are necessary and select
the User Group from the drop down menu. Because the first User that we are
creating is the System Administrator , we select the System Administrator Group from
the list. In general, you would choose the User Group that best suits the User you are
adding.
Finally, the Account Status option allows you to select one of three statuses for the
User. An Active account can use the Myriad system; a Disabled account leaves the
Users account in the system but does not allow them to log in. An Expired account
marks the User account for removal from the system.
11
More Information
The More Information tab allows you to add in more detailed information about the
User.
The E-Mail (Public) and the Homepage (Public) fields contain email details and
web page details that can be delivered to your stations web site via P Squared’s OCP.
The rest of the information is designed purely for internal use.
The Account Date Information gives you information on when a User Account was
created and also the last time the User logged in to Myriad. The Account Will Expire
and Account Will Be Deleted options allow you to set a date at which the User
Account will expire or be deleted on. To use this feature, tick the appropriate box and
select the date from the drop down list.
Tip: If you have temporary Users to add (ie on work training
placements) it is worth setting the Account Will Expire to a
few days after they are due to leave. This will then
automatically disable their account, without you having to
remember to do it yourself. This can be changed at any time.
12
Access Rights
The Access Rights tab allows you to fine-tune the Access Rights for an individual
User. Because the User we are currently working on is the System Administrator , we
selected the System Administr ator Group so that we would get the default User
Access Rights for that Group.
In this case it doesn’t matter too much because we will only have one System
Administrator on the system, but when we come to add several members to the same
Group (General Users for example) then we may wish to fine-tune the individual
Users Access Rights to be different from that of the rest of the Group. To do this,
Select Use this set of Access Rights instead of the defaults and tick the boxes of the
individual Access Rights that you want the User to have.
Tip: If you leave the User to
Use the default rights for
this User Group , then you
can quickly grant or remove
Access Rights for everyone in
the Group by editing the
Default Access Rights in the
User Groups window T his is
a lot quicker than having to
edit every Group member’s
individual Access Rights.
13
Preferences
The Preferences tab is reserved for future developments in Myriad v2.5 – watch this
space!
Audio Wall
The Audio Wall tab is not used in Myriad v2.5 yet but it will be used in future
releases of Myriad v2.5.
Notes
The Notes tab allows you to add notes to a User’s Account. It also allows you to add a
description of the User.
Saving The Users Details
When you are happy with the Users information, you can close and save the User
Details window by clicking on the OK button.
14
Adding More Users
Now that we have added our first User - the System Administrator - we are ready to
add the rest of the Users. To add more Users to the system, click the New button on
the User tab to open a blank User Details window and follow the procedure outlined
above to complete the Users details.
You will find that some of the details are necessary and others are optional. The
necessary details are Login Name, Password, Full Name & User Group. You may
also notice that once you have created your first User, the default User Group is the
one at the bottom of your list of User Groups. It is a good idea that you double check
that this User Group has minimal access to the system, that way you can be sure that
no one has more access to your system than you intended them to have!
Finding A User Account To View Or Edit Details
If you open a blank User Details window (by clicking on the New button on the User
tab), you will see a button marked Find in the bottom left hand corner of the window.
Not surprisingly, this button is used to find Users that already exist on the system. To
make use of this feature, type in the User Login Name and click on the Find button,
and the rest of the details will be displayed on screen. If you are not sure of the User’s
Login Name, you can use the drop down list on the same field to view a list of all the
Login Names on the system and select the one you wish to look at.
Once you have the User Details for the User on screen, you can make changes by
simply changing the information and clicking OK. If you decide not change any
details, you can either click the Cancel button, or click the small cross in the top right
hand corner.
15
Listing The Users On The System
You can get a full list of all the Users on the system by clicking on the List button on
the Users tab.
The List includes the users Login Name, Full Name, Phone Number, Group, Date Of
Last Login To Myriad and any Notes that you have for them.
Viewing, Sorting & Printing Users Details
You can see the complete details for a User by double clicking on any of the entries or
right clicking and selecting Edit Item. The list can be sorted alphabetically by any of
the columns by clicking on the column title (just like in a Windows™). You can also
print this list by going to the File Menu and select Print or press <Ctrl> P on the
keyboard.
Deleting A User Account
You can delete a User Account (assuming that your own User Account gives you high
enough Access Rights) by right clicking on the User you want to delete and selecting
Delete Item.
16
User History: Big Brother Is Watching
Myriad’s extensive built- in security system not only controls what actions Users can
perform, it also watches most things that they do and makes a note of them to report
back to you later. The History button on the Users tab gives you access to that
information from inside Myriad Manager.
As you can see from the screen above, when you first click on the History button you
get a complete History of everything that everyone has done. You can narrow the
information displayed by selecting the History for just one User with the Show the
User Action History For: drop down menu. After choosing a specific User from this
list, the view will change to show only the actions that the chosen User has carried
out.
You can narrow the field further by specifying which actions you are interested in by
choosing from the When they… drop down list. Almost all actions in Myriad are
now logged so you should be able to find what you are looking for from the drop
down list.
Tip: If you suspect that a malicious user is
logging using someone else’s name, you will
often find that only a few minutes before they
had logged in using their own na me, and
found that they did not have sufficient rights.
17
The User Menu
The User Menu in Myriad Manager gives you access to a couple of features that are
not on the User tab itself.
Auto Expire Users
The Auto Expire Users option on the User menu goes through all the User Accounts
on the system, suspending any accounts that are due to Expire and deleting accounts
that are due for deletion. Myriad automatically deals with these, but the process is
only run periodically which is why this menu option exists. Selecting this option will
force the Manager to process all the accounts immediately eliminating the element of
uncertainty from the automatic expiry and deletion process.
N.B. Although the automatic expiry and deletion of accounts occurs periodically,
accounts that have been marked to expire or delete on a certain date will definitely not
let Users into Myriad after the date has passed, even if it takes a further 24 hours for
the account to be completely disabled or deleted.
Change My Password
The Change My Password option on the Users menu allows you (the User who has
logged in to the Myriad Manager) to easily change your own password. You will be
asked to enter your old password before entering your new password twice.
This password controls your access to all Myriad products and you can change this
password in most other Myriad products as well.
Tip: You can change your password when you log in to any Myriad product by
clicking the Options button, and ticking “ After Login, I Want to change my
password.”
18
The Audio Wall Tab
Introduction
The Audio Wall tab in Myriad Manager offers you a range of tools designed to help
you add to and maintain your Myriad Audio Wall. The Report button allows you to
view and print a range of reports based on the Carts on your Audio Wall.
The Import button gives you access to Myriad Manager’s Mass Import functions for
importing several “.wav” files onto your Audio Wall at once. The Import facility can
also attempt to interpret the filenames of these files and turn them into Title and Artist
information - but more on that later.
Tip: Many CD Digital Extraction programs (like WinDAC or AudioGrabber) can
automatically download Artist and Song Title information from the Internet as they
extract songs onto your hard disk. These can then be incorporated into the filename
that the track is being “extracted” to. You could therefore download many tracks and
import them in one go, and Myriad Manager would save you having to enter these
details yourself. For details on how to configure your Digital Extractor, please check
the documentation that comes with the actual program.
The Play Logs button gives you access to the extensive history that Myriad keeps
about exactly what has been played by the system. The Play Logs facility allows you
to select Cart ranges, date ranges and even individual Users to get accurate
information on what has been played from your system.
19
Running Reports about the Audio Wall
To run one of the many reports that you can get from the Audio Wall, click on the
Report button on the Audio Wall tab.
Cart Range
You can select which area of the Audio Wall you want to search, by using the Cart
Range settings and typing in the numbers of the Carts that want to search between
(inclusively). If you are not sure of the exact number then you can use the Browse
button to open the familiar Cart Browser window, which you can use to select the
Cart Numbers by double clicking on the desired Cart.
As with other areas of Myriad, you can use the Cart Browser in the same way you use
the main Audio Wall to find the Carts you are looking at. The “J” key or J button will
allow you to Jump to a specific Cart Number whilst the “F” Key or the F button will
allow you to search the Audio Wall for a specific Cart name.
20
Tip: You can use Cart Ranges to narrow the results of your Reports. Say for example
you want to look for uncompressed Adverts on the system, if you limit the Cart Range
to just the area of the Audio Wall where your adverts are stored (and select the
Comp ressed Carts only option) then you will get the Report that you want.
Compression Options
You can use the Compression Options to prepare Cart Reports based on whether
Carts are compressed (for instance, using IMA ADPCM 4:1 compression) or linear
(un-compressed or PCM).
Show all Carts regardless of compression: lists all the Carts in the Cart Range
regardless of whether they are compressed or not.
Only show Carts that are compressed: only list Carts in the Cart Range that are
compressed.
Only show Carts that are linear (non compressed): will only list Carts in the Cart
Range that have no compression at all.
Only show Carts that aren’t 44100 Stereo: will only show Carts that are not of the
audio quality and format that you specify.
Cart Length Options
Only show Carts with Extro lengths greater than XX seconds: This option allows
you to list all the Carts in the Cart Range that have an Extro length greater than the
time you set. This is really useful when you want to check the Audio Wall for Carts
that have overly long Extros that you feel will not sound great ‘on air’. Long Extros
usually make for sloppy sounding automation so it is useful to be able to keep on top
of it with this report.
Only show Carts from XX to XX seconds long: Allows you to limit the report
results to Carts within a specific running time range.
21
Only show Carts whose file lengths don’t match their Cart lengths: When you
first record or import a Cart in to Myriad, Myriad works out the Carts length based on
the length of the file at that time. Once it has done this, it will only check the length
again if you go in to Edit Cart on the Audio Wall, otherwise, it assumes that nothing
is different.
Now, lets say we imported a Billie Piper song some time ago and Myriad worked out
(correctly) that the track was 3 minutes and 20 seconds long. We have not edited it
since so Myriad still knows that the length is correct. Now, lets say that last week our
troublesome breakfast jock was playing around with Cool Edit, but instead of opening
it through Edit Cart>Edit Audio on the Audio Wall he just ran Cool from the Start
menu. Say he then trims 20 seconds off of the end of the track. Because he did not do
it through Edit Cart>Edit Audio, Myriad doesn’t know that the length has changed.
Myriad still thinks it is 3min 20 seconds long even although it is now only 3 minutes
long. Later that day, the same track is due to be played in an automated show and of
course Q-NXT thinks it is 20 seconds longer than it actually is so when it comes to
play it, it will end 20 seconds early which momentarily confuses Q-NXT. Q-NXT will
recovers by recalculating any Auto-Fading to ensure that any Absolute Time Markers
are hit correctly - so other than a sloppy segue, no harm is done. Unless you spot the
problem though, it will happen every time the song is scheduled to play.
This Report Option allows you to track down rogue problems like this by comparing
Myriad Cart lengths with the actual file lengths and reporting any Carts that show
discrepancies. You also have the option to automatically fix these problems as Myriad
Manager runs the report. If you select this option then you will get a list of incorrect
Carts but they will all be fixed before the report is produced.
It is unlikely that you will get many situations like this - but if you do, this Report is
your only way of tracking it down short of listening every to every Cart on the Audio
Wall.
More Options
The More Options tab allows you to refine your Report by specifying in greater detail
what it is you are looking for.
22
If a Cart is empty, but now has a WAV file, import the information: This option
searches through the Myriad Audio Wall and finds any Carts that have a valid wave
file (e.g. Myr03000.wav) but do not appear on the Audio Wall itself. Selecting this
option automatically adds any Carts it finds to the Myriad Audio Wall.
Only show Carts that have not been played in XX days: Allows you to limit the
report to Carts that have not been played recently.
Report Results
Once you have entered your Cart Ranges and any Report Options that you want to
apply, click on the OK button to start the Report running, and after a brief delay the
Report Results will be displayed:
23
The Report Results are displayed initially in Cart number order, although you can sort
the results by clicking on the column titles (just like in Windows™ Explorer). If you
double click on one of the results, it will open the Edit Cart screen for that Cart,
allowing you to adjust the title, Intro & Extro times, Notes, Internet hyperlinks etc.
For more information on Edit Cart, please see the Myriad Manual.
The Report Tool Bar
You may have noticed that the Report Results window had a number of icon buttons
along the top. These perform a range of tasks, which are outlined below.
24
Play Cart
The Play Cart button will load the last selected Cart from the report in to the Cart
Player so that you can listen to it.
Edit Cart
This button will open up the Myriad Edit Cart screen for the last selected Cart from
the report (see above).
Print Report
This allows you to get a hard copy of any reports you run. If you click on the Print
Report button you will then have the option to select a printer if you have more than
one set up on your computer, if not it will use your default printer.
Block Copy
You can select multiple Carts from within the report window by either using the
mouse to drag a ‘rubber band’ around the Carts you want to select, or using the Alt
key on the keyboard and clicking on several items. Once you have selected the items
that you want to work with, the Block Copy button will allow you to copy those Carts
to a new location on the Audio Wall.
To do this, the first thing you need to do is select more than one Cart from the results.
25
Next click on the Block Copy button and the Cart Browser will appear.
Use the Cart Browser to find the position on the Audio Wall that you want to copy the
Carts to then double click on it.
You will be asked to confirm the position you want to copy to, click on Yes to
confirm.
26
Next you will be asked if you want to overwrite any existing Carts that are in the
range you are copying to. If you say yes then Myriad Manager will overwrite them. If
you say no then Myriad Manager will work around existing Carts ensuring no loss of
data.
Whatever you decide, a progress bar will appear to tell you how the copy is preceding
and when it is finished you will get a confirmation message.
Block Move
Block Move works in exactly the same way as Block Copy (see above) but instead of
copying the Carts, the Carts are actually moved from the original position to the
destination.
CAUTION! If you Block Move Carts that have been added to AutoTrack as either
Songs, Adverts or Jingles then AutoTrack will not know that they have been moved
and so will continue to schedule them using their old Cart Numbers. This will have
major consequences on the reliability of your scheduling and automation. If you move
Carts on the Audio Wall, you must update AutoTrack accordingly.
Mass Colour Change
The Mass Colour Change utility allows you to select a range of Carts from the Report
window and then change their background and text colours on the Audio Wall to the
colours of your choice.
To use this facility, select a range of Carts (as before) and then click on the Mass
Colour Change button. You will then be asked to select the colour that you want to
change the selected Cart’s background to. Select a colour from the standard Windows
colour palette and click on OK. You will then be asked to select a colour for the
description text to appear on the Audio Wall. Once you have selected the text colour,
you will be asked to confirm your changes before the Audio Wall is automatically
updated.
Update Cart Chunk Information
Cart Chuck is a new international standard for embedding Artist, Title, Intro, Extro
and additional information about songs, adverts and jingles in to the actual file header
of a .WAV file. The theory is that it will make audio transferable between different
playout systems and make the distribution of audio easier. Myriad is now fully Cart
Chuck compliant but as it is a new standard, Carts created with older versions of
Myriad do not include the Cart Chunk information. This tool allows you to select a
27
range of Carts and then have the system go through them and ‘stamp’ the Cart Chunk
information in the file headers.
Before performing this conversion, you should check that all the audio editors and
tools you use support Cart Chunk because although the theory is that non compliant
software will ignore the extra information, it is always worth checking because the
info can not be removed from the header once in. Our tests indicate that Cool Edit
works fine with Cart Chunk enabled .WAV files.
Export To Pad
The Export To Pad button will add the selected Carts from your report, to a Pad run
(just like in the Audio Wall). This Pad can then be used to listen to the Carts in order
or to save the entire list as a single Cart on the Myriad Audio Wall.
If the PC that is running Myriad Manager is equipped with either a multi channel
sound card or multiple sound cards then you will have two Cart Players at the bottom
of the screen. In this case, you can listen to the Pad by clicking on the Play (triangle)
button on the Pad to load the first item in to Cart Player 1. You can then press play on
Cart Player 1 to start the Pad running through the items in the list.
28
For full details on using the Pad and the facilities that it offers, please consult the
Myriad User Manual.
Erase Last Play History
Whenever a Cart is played in Myriad, it is noted down in two separate places. Firstly
the Play Logs are maintained by Myriad and are a definitive list of all Carts played on
the system. Secondly, each Cart on the Audio Wall keeps track of the last five times it
has been played so that the User can quickly see when a Cart was last played and who
played it (this information is also used to mark Carts as recently played if that option
is enabled). The Erase Last Play History button allows you to select a range of Carts
and then erase the record of the last five times that they were played. This does not
affect the record in the Myriad Play Logs so you can still get the information through
Myriad Manager if you have to.
Mass Delete
The final tool on the tool bar is the Mass Delete function which allows you to select a
range of Carts and then delete them from the Audio Wall
CAUTION! Use this feature with care, you will be asked to confirm several times but
if you do proceed with the Mass Delete process then there is no way to recover the
deleted Carts so BE CAREFUL.
Importing .WAV Files In To Myriad
The Myriad Manager allows you to import a large number of “.wav” audio files into
Myriad in one go. This means you can select individual files, or even several
complete folders of files from the computer’s hard drive, a CD-ROM or even a
network drive that will all be imported at the same time. The Import facility can also
29
convert file titles to Description Lines on the Audio Wall and will soon be able to
convert between file types and compress/decompress files as it imports them.
The procedure for importing files is:
1.
2.
3.
4.
Add the files you want to import
Set the File Name Rules
Set the Cart Range that you want to import the Carts into
Begin the Import Process
Selecting Files To Import
To start the Import process, click on the Import button on the Audio Wall tab. This
displays the “Import Audio Files” window. Use the Add Files button to select the
files that you want to import using the standard Windows file browser to select the
files that you want to import.
Tip: Holding down the <CTRL> key allows you to select more than one file at a time,
and holding down the <SHIFT> key will highlight all the files between one cart and
another.
Once you have selected the files that you want to import, click on the Open button to
add them to the Files To Import list.
You can add more files to the Files To Import list by clicking on the Add Files
button again.
If you want to import all of the files in one directory or folder, you can do this quickly
by using the Add Directory button, which then adds the entire contents of a directory
to the Files To Import List. Again, you can use this button several times to add the
contents of several directories
If you want the original files to be permanently deleted (usually to save space) after
they have been successfully imported, tick the box marked Delete the originals after
successfully importing them.
30
31
File Name Rules
The File Name Rules tab contains the settings that are used to determine how the
Import Process attempts to interpret the file names into the description lines that are
used on the Myriad Audio Wall. Lets say we want to import a file called “Spinning
Around -kylie.wav ”, we can get the Import Process to take the file name and use it to
put the song title and the artist name onto the Audio Wall using the File Name Rules.
In this case, because the file is called “Spinning Around -Kylie.wav ”, we will need to
Interpret the file name as Line 1 – Line 2 so that “Spinning Around ” is displayed on
the first line of the Cart and “Kylie ” is displayed on the second. If the file name were
reversed, you would have to use the Line 2 – Line 1 Interpreter. In this case, the “-“
symbol separates the Title and Artist but you can easily enter a different Separator to
use.
32
Cart Numbers
Once you have added the files you want to import to the Import Files list and set the
File Name Rules, all that remains is to set the range of Carts that you want to import
the files into. This is done on the Cart Numbers tab of the Import window.
If you want to automatically place the imported Carts on to the Audio Wall, select the
Automatically assign each file a Cart Number in sequence option and type the Cart
Number that you want to be assigned to the first imported file in the Starting From
Cart: box. You can use the Browse button to open the Cart Browser (see “Running
Reports about the Audio Wall – Cart Ranges” for more details on the Cart Browser)
to choose the Starting Cart.
The Use the number embedded in the file name to determine the Cart number
option makes the Import Process look at each file name and try to determine what
Cart Number on the Audio Wall it should be imported to based on any numbers that
exist in the file name itself. A good example would be if you had a file called
Cart3089.wav that was used by another playout system. This option would assume
that you wanted this file to be imported to Cart Number 3089 on the Myriad Audio
Wall also. If that file already existed, the setting below would determine what the
system should do.
33
If you tick the ‘If a Cart already exists, overwrite it with the new file option then
the files that you are now importing will start at the Starting Cart Number and add
each file in sequence overwriting any Carts that are already on the Audio Wall within
the range that you have set. If this option is not ticked then the Import will start at the
Starting Cart Number but will leave any existing Carts on the Audio Wall and simply
move on to the next free Cart on the Audio Wall. This is the default setting and is the
safer option as it ensures that the Import Process will not damage any existing Carts.
Audio Format
The Audio Format tab is reserved for future developments in Myriad v2.5. Ultimately
this feature will allow you to convert between sample types and even file types as part
of the import process. This option will also allow you to perform batch compression
on existing Carts on your Audio Wall. Keep an eye on the Myriad Updates file on the
P Squared web site for all the latest additional features.
Begin Importing
Once you have finished setting up your Import, all you have to do is click on the
Begin Importing button. You will be asked to confirm that you want to begin the
process, click on Yes to start the Import Process.
Note: There is not a progress bar on this process so you will just see an hourglass
instead of the usual mouse pointer, this is normal and depending on how many files
you are importing, could take some time.
34
Play Logs
Whenever more than 15% of a Cart is played in Myriad, it is noted in the Myriad Play
Logs along with a range of additional information such as which workstation played it
and who was logged in at the time. The Myriad Play Logs can be accessed by the
Play Log button on the Audio Wall Tab of Myriad Manager.
Clicking on the button will open the Play Log Search window as can be seen above.
This allows you to enter a Cart Range to search between, a time and date range and
allows you to specify which workstations you are interested in.
Lets say we want to see all the Carts that have been played in the last in Studio 2 over
the last week.
The first thing we would need to do is enter the Cart Range that we want to search
with. In this example, we have started at Cart Number 1 and ended at Cart Number
10000. To enter a Cart Range, either type in the Cart Range manually or click on the
respective Browse buttons to use the Cart Browser to select your Cart Range.
35
Next we set the time and date range using the Select Start Date & Time and Select
End Date & Time buttons to select the time and date range using the standard
Myriad time / date selection window.
Finally, click on the Add button to select a workstation name from the drop down list.
You can add multiple workstation names and if you leave this section blank then the
results will include Carts Played on all workstation.
We can now start the search by clicking on the OK button.
36
After a couple of seconds, the results of the Play Logs search will be displayed. You
can change the way that the results are displayed by clicking on the column titles to
sort the results by that column. You can also tool bar buttons to Play a highlighted
Cart. Open the Myriad Edit Cart screen for a highlighted Cart, Print the results out or
save the results as a Pad run for playback in Myriad later (see The Report Tool Bar
for more in depth information on tool bar buttons).
You can also save the results on the search as a Reconciliation file for importing in to
a third party advert scheduling system such as Broadnet™. To do this you would
usually restrict your Play Logs search to the Cart Range that contains your adverts and
to the main Studio workstation to get the most accurate results possible.
The only option that we did not cover on the original Play Logs Search is the Collate
and Order Results option that effectively gives you a chart of the most commonly
played Carts on your system.
Lets say we did the same search as in our previous example but this time we ticked
the Collate and Order option.
37
As you can see, in this case the most popular Cart position is tied between Blue and
Westlife. This feature is especially useful to stations that have programming that is
not scheduled in advanced because they very often have little idea about what songs
are the most requested on their station. This facility allows you to keep track on what
is being played and also what is not.
Copyright Report
The Copyright Report option on the Reports and Statistics menu opens the P Squared
Copyright Report Generator which is a sub program that generates logs of played
Carts based on Myriad’s Play Logs, in a format suitable for a number of copyright
protection bodies. Use of the Copyright Report Generator is outlined below.
Overview
The P Squared Ltd. Copyright Report Generator is a solution to the problem of ‘PRS
Sweeps’. Basically, it does exactly what it says on the tin! It generates copyright
reports. However, the reports generated are only as good as the information you put
into them. If you take the time and trouble to put complete copyright information into
Myriad, then this program will make the dreaded nightmare of PRS returns a breeze* .
For those of you who don’t know, ‘PRS Sweeps’ are the checks made periodically by
the Performing Rights Society, which require just about every piece of copyright
information you have on what you play ‘On Air’. PRS Sweeps can last from as little
as 24 hours, to a few weeks at a time. It all depends on your TSA (Transmission
Service Area) and how accurate your last returns were. The more accurate the
information you supply, the shorter the Sweep will last.
However, it is not always that easy to supply accurate information at a moment’s
notice. You may have the constant problem of chasing up DJs to make sure they
supply you with the details of any music beds they decided to play on their shows.
Furthermore, you can spend days talking to agencies, most of whom don’t even know
38
that their 26 week, 7 different ads a day, campaign was heard outside of London! You
have to do a lot of work, collating how many times jingles were played, what different
ads were transmitted, and also you have to collate the commercial returns separately
from the music returns.
Traditionally, this has involved printing reports from several computer systems,
liasing with different departments, and often, getting the returns in late.
The P Squared Ltd. Copyright Report Generator interfaces directly with the audio
played within Myriad and Q-NXT allowing all returns to be quickly and accurately
generated from one, user- friendly program. At a glance, you can check on whether
your presenters have accurate copyright information for their personal jingles or
sweepers.
Description of the Reports (Profiles)
Within Copyright Report Generator you can view, but not alter, copyright
information, which is entered into the Audio Wall (see Adding Copyright information
to a Cart later in this guide). This information is displayed for viewing, and printing
from, different ‘Profiles’.
The Copyright Report Generator has a ‘General’ profile where all the possible
information for played Carts can be viewed (as shown below); the Performing Rights
Society however will never require this type of report. In a PRS Sweep, the
Performing Rights Society requires 2 different types of information: a Music Return
and a Commercial Return, which have different fields of information that need to be
supplied.
General Myriad Copyright Information
This report outputs all the possible, available information on played Carts from the
Audio Wall.
39
Commercial Return / Music Return Profiles
The File menu is where you can select the different report profiles, and which profile
is displayed when you launch the program (e.g. Default).
N.B. The Copyright Report Generator also allows you to save the report out to a file;
this is a particular file type that can be imported into other software, for example:
Microsoftä Excelä or Lotus123ä . This is known as ‘Comma Separated Variables’
or ‘CSV’.
UK PRS Music Return
40
For a Music Return, PRS require the following information (shown in the left hand
column of the diagram below), the example being “Sitting Down Here” by Lene
Marlin (which is the 3rd song from the top on the screen-shot above):
Music Title
Code
Performer
Composer /
Arranger
Publisher
Record
Label
Record(ing)
Number
Duration
The title of the song “Sitting Down Here”
Is it a D= Disc / C= Commercial / P= Promo / S=Station ID / L= Live or Local
“Lene Marlin” can be identified on the CD / LP sleeve notes
“Lene Marlin” can be identified on the CD / LP sleeve notes
“EMI” can be identified on the CD / LP sleeve notes by a ‘(P)’ symbol
“Virgin” can normally be identified on the CD / LP sleeve by a logo
“CDVIR83” is a unique number assigned to each CD / LP produced by the record
company and is found on the sleeve
“3:51” is the exact duration played on air
N.B. Although a Cart Number field is displayed on screen, it is not needed by PRS,
and is therefore not included in the final printout. It is there to allow you to generate a
report, identify which carts need the information entering, and regenerate the report.
UK PRS Commercial Return
41
For a Commercial Return, PRS require the following information in addition to a
copy of your advert logs:
Cart
Number
Product
Title
Play Count
Music Title
Composer /
Arranger
Publisher
Record(ing)
Number
Music
Duration
Duration
This number is referenced against your advert logs which you will have to supply to
PRS for the duration of the sweep
Normally this is the ‘Client’ of the advert for example: Vodafone
How many times this ad was played over the report duration
This is the title of the music used in the advert
This can be identified on the CD sleeve notes, or from IMD or your commercial
production departments consignment notes
This can be identified on the CD sleeve notes, or from IMD or your commercial
production departments consignment notes
This can be identified on the CD sleeve notes, or from IMD or your commercial
production departments consignment notes
This is the duration of the music contained in the advert. A 30sec ad may only have
a 10 second piece of music at the end
This is the duration of the entire advert, e.g. 30sec
Adding the Copyright Information to a Cart
To be able to generate a report, the program needs the copyright information to begin
with. There is no way around it, you (or someone you know), will have to fill this
information in manually.
When you edit a Cart on the Audio Wall, you may have noticed the Copyright tab.
This is where the information is entered.
42
This is where you enter the details you have found out from the CD / LP sleeve notes.
The Copy button next to the Product Title field, will copy the information you have
added onto line 1 of your Cart Description (within the General tab, of Edit Cart). This
is also the case for the Music Title field.
The Performer field’s Copy button, copies the information entered onto Cart
Description lines 2 and 3, separated by a comma.
These details are unique to the Cart, and are saved in a file in addition to the audio.
Therefore if you delete the audio, you also delete the file with the details in.
For example: Your PRS Sweep runs from Mon 1st December to Fri 5th December,
you generate your report on Mon 8th December, and go off in search of details. By that
Friday you have found all the music details, entered it onto the Audio Wall and
decided to have a couple of days off. However, the “evil traffic manager” has decided
to tidy up and delete some Carts before you get back off holiday. Therefore when you
next run your report, all the details are missing, because the carts have been deleted.
So, it is vitally important that no one deletes the Carts before you have completed
your PRS returns.
Running a Report
43
When you launch the Copyright Report Generator for the first time, it will default to
the General Myriad Copyright Information section (described earlier in this guide).
This is a good starting point, as it will show you all of the information associated to
the Carts, and you can change the profile at any point during this process to become a
UK PRS Commercial Return or a UK PRS Music Return by clicking on the File and
Select Profile buttons as shown above.
Start / End Time of Report
Press the Start Time button, to select the beginning of the PRS Sweep. This will
launch a now familiar screen.
Press the End Time button, to select the end of the PRS Sweep.
44
This will now display the PRS Sweep duration in the information banner at the top of
the window prefixed by Date/Time range.
Obtaining Information from Terminals
Use the Start/End Terminal boxes to select where you obtain the played Cart
information from. If you only used one studio ‘On-Air’ during your PRS Sweep then
select the Terminal name from the drop down menu, and make sure the End
Terminal displays the same location.
Start / End Cart Numbers
To select the played Carts that you wish to display information for, enter the numbers
in the Start/End Cart boxes. Most radio stations have assigned Cart groupings to
various Cart types, for example, Adverts start at Cart 1000 and end at Cart 1999.
Songs start at 3000 and go to 7999, it all depends on how you have organised your
own Audio Wall. Now you need to collect the information from a certain Cart range,
obviously if you are about to prepare the UK PRS Commercial Return report, you
don’t want to search through all of your songs, just the adverts. Just type the Cart
number you want the report to start at in the Start Cart field, and type where the
report will end in the End Cart field.
Print / Run the Report
If you have been a good boy (& or) girl, and entered complete copyright details every
time you have recorded audio onto the Audio Wall, then all you need do now is press
the Print button, take the printed report and put it in an envelope. Send it to PRS and
sit back and wait for 6 years until the next PRS sweep!
However mostly, for one reason or another, the information is incomplete. Therefore
you need to amend it. To do this, press the Run button; this will generate the report
on screen. Now you can go through the list and spot which Carts need the information
adding, and add it via the Audio Wall (see instructions above for adding copyright
45
information to a Cart).You can run and re-run a report as many times as you like to
get it right.
The Q-NXT Tab
Introduction
The final tab in the Myriad Manager is the Q-NXT tab which gives you a range of
administration functions that you can use to maintain your system’s Q-NXT database.
The Q-NXT database is the list (sometimes called a “Log”) of songs, adverts, jingles
etc, which Myriad uses to produce Live Assist and Automated programming. It is
effectively a list of all the Carts that need to be played and is usually generated by
AutoTrack or imported from a third party music scheduling system such as RCS’s
Selector™. The Q-NXT database also includes the advert breaks that have been
selected by Myriad or by a third party advert scheduling (“traffic”) system such as
Broadnet™.
The tools on the Q-NXT tab of Myriad Manager are extremely powerful and should
only be used by Users that are familiar with Myriad and have been trained in the use
of these tools.
Tip: You can use “User Access Rights” to stop unauthorised Users from accessing
these functions. Because of the different levels of security, you can give Users the
rights to do everything else on the system, and only prevent them from accessing these
very powerful functions.
Adverts
As was mentioned above, one of the things stored in the Q-NXT database are the
advert breaks that have been scheduled for the system. The Advert button allows you
to remove all the advert breaks from a specified time and date range so that they will
appear in the Q-NXT log as “Unscheduled Advert Breaks”. This feature is useful if
you wish to remove all the advert breaks for the rest of the day so that a rescheduled
set of advert breaks (often called a Traffic or Advert Log ) can be ‘pushed’ into the
gaps left by this removal process. To remove the breaks, click on the Advert button
or select Remove Advert Breaks from the Q-NXT menu.
46
The first task is to select the Q-NXT database that you want to remove the advert
breaks from. To do this, highlight the desired database and click on the OK button or
double click on the database itself.
47
Next, select the time and date that you want to start removing advert breaks from:
Enter the time and date that you want to remove advert breaks until:
Finally, you will be asked to confirm that you want to remove all of the advert breaks
from the selected Q-NXT database between the selected times and dates.
If you are happy with these options, click on the “Yes” button, otherwise click on
“No”. If you select “Yes” then you will be told about any errors that occur whilst
removing the adverts and how many adverts in total are removed. This operation can
safely be performed while Q-NXT is running.
To replace the adverts, either use the advert scheduling functions in AutoTrack or the
Advert Import Utility if you are using a third party advert scheduler.
Tip: Because Myriad’s Q -NXT Log is available in real time across the network, you
can remove and re -schedule adverts even up until a few seconds before they play
“On-Air” without the presenter having to push a single button. This can be done from
any computer that has the Myriad Manager installed and that can access the network
– even remotely over a modem link.
48
Removing Entries From Q -NXT
You can use the Myriad Manager to remove items from your Q-NXT log. This
facility will permanently remove either a range of entries or all of the entries in ‘real
time’ from your Q-NXT Log. This will have an immediate effect on the Myriad
Playout machines in the studio so use these facilities with caution!
The following options can be found on the Q-NXT menu in Myriad Manager:
Remove Entries from a date onwards
As the name suggests, this option permanently removes everything from the Q-NXT
log from the date and time that you specify to the end of the log.
To use this facility, click on the Remove Entries from a date onwards option on the
Q-NXT menu and select the Q-NXT log you want to remove entries from using the
Database Browse as normal (highlight the database and click on OK)
49
Next, select the time and date that you want to delete Entries from by using the time
and date selection screen and click OK.
Finally confirm that you want to remove all the entries from the specified time and
date to the end of the log.
When you click on the Yes button, the system will start to remove the selected logs.
Once it has finished, you will be informed.
Remove Entries up to a date
The Remove Entries up to a date option on the Q-NXT menu allows you to
permanently remove all of the entries in your Q-NXT log, from the earliest item in the
log right up to the time and date you specify. To do this, select the option from the
menu and follow a similar procedure as for removing from a date (outlined above).
The procedure for removing Entries up to a date is:
·
·
·
·
·
Select Remove Entries up to a date option from the Q-NXT menu.
Select the database you want to remove entries from.
Select the time and date that you want to remove entries up to.
Confirm that you want to proceed.
The system will now remove the selected Entries from Q-NXT.
50
Remove ALL Entries from the Q-NXT log
The Remove All Entries from the Q-NXT log option will remove everything from a
your selected Q-NXT database leaving it totally blank.
Caution: You should not do this while any Myriad machine is running Q-NXT or QNXT Live.
Tip: Using this option removes th e entries, and also does the Re -Indexes the Q -NXT
log
The procedure for Removing All Entries is:
·
·
·
Select Remove ALL Entries from the Q-NXT log from the Q-NXT menu.
Select the database you want to remove entries from.
Confirm that you want to proceed.
The system will then remove all the Entries from the selected Q-NXT log.
51
Myriad Manager Settings
The Myriad Manager Settings Menu allows you to configure elements of the system
to suit your needs.
Database Settings
The Database Settings option on the general Settings menu allows you to adjust
some general settings for your Users Database. This contains information on the
Users of your Myriad system and what levels of security that they have. Clicking on
the Database Settings option will open the Myriad System Settings window.
Allow User account to not have passwords
If you want your Users to have the option to have blank passwords then you should
tick this option box. The Users that set blank passwords will still need valid Login
Names to gain entry to the system but will not be required to enter a password.
Users must change their password every XX days
This option allows you to force your Users to change their passwords periodically.
Ticking the option box allows you to enter the time duration before requiring users to
change their passwords. With this option enabled, Users will be forced to change their
password to something new as often as you feel is necessary to maintain a good level
of security for the system.
Automatically remove entries from the User History after XX
days
Myriad keeps track of what Users do when they are logged in to the system so that
you can trace any problems that occur and act accordingly (this User History is
covered in more depth in the Users Tab section of this manual). Because of the level
of detail of the history that they system keeps, they volume of the logs can get quite
large over time. This option allows you to specify a time (in days) after which a Users
52
actions get deleted from the User History logs. This time period should cover the
longest period that you think you will practically need to keep User Histories for.
Create legacy reconciliation files
This final setting determine whether the reconciliation files that Myriad generates for
third party advert scheduling systems (like Broadnet™) are in the new standard
format or an older format that is only compatible with some advert scheduling
systems. Please consult with P Squared before enabling this setting as it may
compromise the your ability to produce accurate Play Logs to confirm to advertisers
that their adverts have been played.
The File Menu
The File menu on Myriad Manager gives you access to the following facilities.
Import / Create
The Import / Create option on the File menu allows you to Import an old Myriad v2
User database into the new Myriad v2.5 Manager format. In most cases, you will
never have to use this option because Myriad Manager looks for your old Users
database and imports it as part of the installation procedure but if you wish to import
an alternative Users database then this option could be useful.
Select Import / Create > Myriad v2 > Database from the File menu. Myriad
Manager will try to find the Users database that you want to import and ask you if it is
the right one when it finds it. If it is, click on the Yes button. If not, click on the No
button and use the file browser to locate your Myriad v2 User database.
Tip: It is usually in the Myriad \System \users folder and is usually called “ users.mdb”
but consult your Myriad v2 Configuration setti ngs to check this.
53
Once you have selected the database to Import, click on Open and Myriad Manager
will import the Users into the system.
54
Cart Browser
The Cart Browser option on the File menu (or pressing <Ctrl> + F1 on your
keyboard) will open the Cart Browser, which allows you to look at the Carts that are
on your Audio Wall.
The Cart Browser works just like a mini version of the main Myriad Audio Wall. You
can move around the Audio Wall by using the cursor keys or the ‘J’ for Jump button
to type in the number you want to jump to. You can also use the ‘F’ button to allow
you to find a particular Cart on the Audio Wall.
To listen to a Cart in Myriad Manager using the Cart Browser, highlight the Cart that
you want to listen to and press the Space bar on your keyboard. The Cart will then be
loaded into the Cart Player at the bottom of the Myriad Manager screen.
The Cart Player can be controlled with the Cart Control buttons to the right of the
screen and the green progress bar that fills from left to right indicates the progress of
the Cart. Just as within Myriad, you can right click on the progress bar to ‘fast
forward’ to any point in the Cart. The time elapsed is shown to the left and the time
remaining to the right with the Cart number displayed next to the Cart Description.
For more details on the Cart Browser, please consult your Myriad User Guide .
Cart Pad
55
The Cart Pad option on the File Menu opens up the Pad in Myriad Manager. If you
are familiar with Myriad then you should already know what the Pad is and what it
can be used for but if not then it is used to build lists of Carts from the Audio Wall
that can then be set to play (in order) using the Cart Players.
To play a Pad, click on the Play button (Triangle) and the first Cart listed in the Pad
will be loaded in to the lowest available Cart Player. Click on Play on this Cart Player
to start the first item playing, the Pad is then running and all the items listed on the
Pad will be played in the order that they are listed.
You can also Export the individual Carts on a Pad in to a single Cart on the Audio
Wall. To do this, click on the spiral bind graphic at the top of the Pad to reveal a drop
down menu. Select Export from this menu to open the Cart Browser and double click
on the Cart that you want to create you Pad run in to. The Pad will then automatically
compile all the individual Carts listed on the Pad in to your chosen Cart Number.
For full details on the Pad and the facilities it offers, please consult the Myriad User
Manual or online documentation.
56
Print Setup
The Print Setup option on the File menu allows you to adjust the Printer Settings that
Myriad Manager uses to print User details, Cart Reports, User Histories etc. You can
use the Print Setup option to decide which printer to use, what size and orientation of
paper to use and to adjust the printer’s properties.
Print
The Print option on the File menu only becomes enabled when you have something
such as a list or report on screen that can be printed. Clicking on the Print option or
pressing <Ctrl> + P on your keyboard will print the selected information to the
printer specified in Print Setup.
Exit
The Exit menu option on the File menu summons ‘Puffy’ the 7 armed lesser god of
pink elephants and banjo players from the eternal realm of ZZigathant. Not really, the
Exit option will close Myriad Manager and exit to your desktop.
57