1
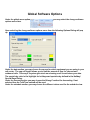
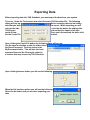
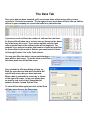
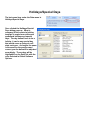
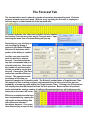
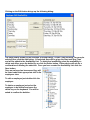
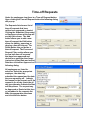
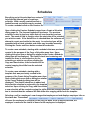
Table of Contents
Creating a Company
Global Software Options
Exporting Data (Telescan, OnviSource, amtelco, Startel, Pinnacle)
Importing Data
The Data Tab
Holidays/Special Days
The Forecast Tab
Employee Skills
Employees
Time-off Requests
The Schedule Tab
1
Creating a Company
The first thing you want to do with TAS Scheduler is to create a company. You may either
click on the new company icon
in the upper left hand corner or click the
Edit Company button on the caption bar.
Both choices bring up the following Company dialog box:
You'll need to enter the company name, the schedule start day (the day your company uses
for the first day of a schedule), the maximum number of seats for your call center and the
minimum number of hours between shifts for your employees. You will also want to setup the
1st, 2nd and 3rd shift hours for your company. Double-clicking a color button brings up a
color selection palette while a single click selects that color for drawing.
When you click the OK button your new company will be created and the company name will
show up in the bottom right corner of the TAS Scheduler window.
From now on the last company you've worked on will automatically be loaded when you start
TAS Scheduler. Two files have been created in the current users documents folder; [your
company name].tsf and [your company name].hld The .tsf file is the file that will hold all of
2
your company information including employee, forecast and schedules. The .hld file copies a
template holiday/special days file that can be modified for this particular company. Whenever
a company is open in TAS Scheduler a [your company name].lck file is created to prevent
someone else from open the same file. If for some reason the program get closed improperly
the .lck file will remain and you will be told that the company is locked by another computer. If
you know that you were the only one working on the file and it was improperly closed just
delete the [your company name].lck file and the select the open company icon
in the upper left corner of the TAS Scheduler window.
This will open the open file dialog where you can choose the company you wish open.
3
Global Software Options
Under the global menu option
options menu item.
you may select the change software
Upon selecting the change software options menu item the following Options Dialog will pop
up:
Under the data section you may choose the source for which equipment you are using in your
call center. The cap call length allows you to limit the amount of time for inbound and
outbound calls. This way if a system gets stuck on releasing a call it won't skew your data.
The special day color is the highlight for holidays and specials day defined in the Holiday/
Special Days Dialog.
Under the forecast section you may choose the Erlang-C method for forecasting. If not
selected then the Talk/Time method will be used.
Under the schedule section you may choose the different colors used for the schedule view.
Exporting Data
Before importing data into TAS Scheduler you must export the data from your system.
Telescan: Under the Tools menu item select Generate TAS Scheduler File. The following
dialog will pop up:
Select a starting date and an ending
date that you wish
to export. When importing you will
only get the data
up to the day before the ending date.
This way we
ensure that you import a full days
worth of data.
Once you have selected the dates click
the the Create File
button.
Upon clicking the Create File button the following dialog will pop up:
Use the save in selection to pick the folder where
the file will be saved. The best choice is the
My Documents folder. This will take the least
amount of time and the file may be copied to
a location that may be seen by TAS Scheduler.
Upon clicking the save button you will see the following:
When the file has been written you will see the following:
Select the No button and you are done exporting your
data.
OnviSource: Log into OnViews and select Admin, then select call log menu item under Logs.
Next select advanced menu item under Filter, Set Date range ( all accounts , all agents, both
directions should be default values already ) then click OK button.
Select the Select All menu item under List, then select the Save as CSV menu item under List.
Name the file and click the save button.
amtelco: From the Access Report Generator click the Account Traffic button.
Select date range and check the following selections and click the export button:
Infinity: From the Unified Reports Call Detail with the following options:
Upon generating export the file as a Tab Delimated file; however, name the file with a .txt or .
csv extension.
Startel: v10_tass.exe was installed to your default directory usually C:\Program Files\Creative
Wizard\TASScheduler\. This file was written by Larry Kinder, a Startel user, to export data.
Select the dates you wish to export.
Then select a folder to put the results file in.
The data will be extracted
and saved in a file with the name Contents_[StartDate]_[EndDate].csv
This is the file that you will import into TAS Scheduler.
Pinnacle: TASSchedulerExportV31.rpt was installed to your default directory usually C:
\Program Files\Creative Wizard\TASScheduler\. This report was created by Alan Hartman at
Pinnacle. Just add this to the other reports on the Pinnacle system and it will be a report
choice. Once the report is created select the export icon at the top. Choose character
seperated value. Leave the comma as the seperator; however, delete the double quote as the
deliminator and leave blank. When asked for a filename add either .csv or .txt as the
extension rather than the default .chr.
Importing Data
Before importing any data, it is important that you have selected the appropriate source. See
Global Software Options. With the data tab
selected,
select Import Data Manager CSV file
from the Data Menu.
menu item
This will open an open file dialog
where you may select the file that
you wish to import. Either doubleclick the file or click the file and
then click the open button.
This will put an Importing Data
message on the screen. Once
this message has disappeared
all of the data has been imported.
We recommend importing a year's
worth of data if possible on the
first import. This way the previous
year's holidays may be factored
into your forecasts.
After the initial import of data, you will only need to import weekly/bi-weekly or however you
are set up for scheduling.
The Data Tab
Once your data has been imported you'll see a break down of how many calls you have
received in 15 minute increments. The far right shows a break down of total calls per shift as
defined in your company set up and total calls for a particular date.
If you select a call cell then the number of calls and the total time
for those calls will show up in an hour:min:sec format on the status
bar in the lower left corner. If you select multiple cells the total
calls and total time for the selected cells will be displayed. For
example if you wish to know the total number of calls and total time
for those calls for the month of October you would select October
1st through October 31st in the Total column.
You may also filter the data to view a particular day or
days within a date range. To do this click on the Filter
the dates menu item on the Data menu.
Once clicked the following dialog will pop up:
Both the start date and end date selections will
auto-fill with every date you have imported.
When a date is selected the actual day is shown
to the right of the date. In the case shown here
we want to look at all of the Fridays that fall
between October 1st and October 31st.
To show all the dates again just click on the Show
all Dates menu item on the Data menu.
Holidays/Special Days
The last menu item under the Data menu is
Holidays/Special Days.
Once clicked the Holidays/Special
Days dialog pops up. When a
company is first created a holiday
template is copied over with some
predefined holidays and special
days. The day doesn't have to be a
holiday, it can be any special day
that would cause a change in call
stats each year. As long as the name
is the same for the previous and
current year the data will be adjusted
accordingly. These days will be
highlighted on the Data Tab with the
color selected in Global Software
Options.
The Forecast Tab
The forecast tab is used to show the number of operators forecasted for each 15 minute
segment of each day of each week. Without every inputting the first skill or employee a
forecast may be created based off of the imported data.
To create a forecast, first select the Forecast Tab then choose
the Create a Forecast menu item on the Forecast menu. Upon
selecting the menu item a Forecast Dialog will pop up.
Depending on your checking or
not checking the Erlang-C
method in the Global Software
Options will determine which
portion of the dialog is enabled.
In either case you select the
week for which you wish to
forecast. You must select the
day that corresponds with your
schedule start day. Next select
the number of previous weeks
of data you wish to use for this
forecast. If using the Talk-Time
method an operator efficiency
is input. This equates to what
percentage of the time you
expect an operator to be handling calls. The Erlang-C method takes a Target Answer Time
(the amount of time in which you want calls answered) and a Service Level (the percent
probability of answering calls withing the Target Answer Time). Clicking on a # of operators
cell displays the data that helped forecast the # of operators. Based on the # of previous
weeks selected the average number of calls and the average time per call in shown on the
status bar in the lower left corner.
Efforts to normalize the data have
been implemented by capping the
call length and normalizing data
with means and standard
deviations; however, if an event
other than holiday or special day
has caused the data in a time frame to be skewed you may change the
average number of calls, the average time per call or both by doubleclicking the number of operators required in any date and time frame.
Double-clicking a # of operators cell will pop up the following Change
Forecast dialog:
Just make the changes you wish and click the save button.
The other Forecast menu
item is Preview and Print
the Forecast. Clicking
this menu item allows you
to print out the Forecast and the data used to calculate the Forecast.
Employee Skills
Before creating employees you must create employee skills. To create a new skill or edit an
existing skill click on the skills button under the employees view.
Upon clicking the button a skills dialog pops up.
This dialog will show all skills that have been
created and allow for the creation of additional
skills. The New button allows you to create a new
skill. Either double-clicking a skill or selecting a
skill and clicking the Edit button allows you to edit
an existing skill. The Move up and Move down
buttons allow you to change the position of a skill.
Skills are listed with the premise that an employee
can perform that skill and all skills listed beneath.
The Save button saves the current changes will the
Cancel button allows closing the dialog without
saving changes.
Clicking the New button or Edit button brings up the
following dialog:
A name must be given to the skill. To give the skill
a color double-click the color square and select a
color that will look good on both a black screen and
a white sheet of paper (for printouts). The percent
effective allows you to choose what percentage of
an operator this skill is. It also allows that
percentage to change based on the number of other
operators. The minimum per shift helps in the autofilling of schedules by scheduling the minimum
required skills first. If you wish to create a Trainee
skill, so that a new hire can be scheduled without
effecting the schedule graph just set all of the
settings to zero.
Employees
Once the employee skills have been created you may start adding
employees to the company. To create a new employee just click the
New Employee button on the employees view.
Upon clicking the button the following dialog will pop up:
The minimum and maximum hours per week and minimum and maximum hours per day are
important for the auto-filling of schedules. The skill level not only allows for a percentage of
an operator, but also the grading of employees. Skill levels 1-4 are multilplied by 20% to allow
for new operators to work to a 100% operator. For example a skill level of 3 would mean this
employee was 60% of a full operator. Skill levels 5-10 are 100% operators and these levels are
used as a hiearchy. The higher the number the better the employee. Auto-filling schedules
the top employees first. The Poor Performance check box allows this employees hours to be
scheduled last regardless of skill level. The Inactive check box allows a employee to be
removed from scheduling. All of the payscale information will be used at a later date. The
skill list allows the selection of the employee's skill. The Edit button under Shift Availability
allows for the creation or editing of an employee's shift availability.
Clicking on the Edit button brings up the following dialog:
The Days listbox allows for the selection of multiple days. A Start Time and Stop Time may be
selected then click the Add button. All selected days will be given the Start and Stop Time
and will be added to the Availability List. To delete and availability select the availability to
delete and either press the delete key or click the Delete button. Either choice will ask for a
confirmation of deleting the selection. Once you have created the Availability List click the
Save button.
Once an emloyee has been saved they will
be listed under their appropriate skill in the
employees view.
To edit an employee just double-click the
employee.
To delete an employee just select the
employee to be deleted and press the
delete key on the keyboard. You will be
asked to confirm the deletion.
Time-off Requests
Under the employees view there is a Time-off Request button.
Upon clicking the Time-off Request button the following dialog
will pop up:
The Requests list shows a list of
time-off requests that have
neither been approved or denied.
Clicking the Submitted, Requested,
or Employee column at the top will
sort by that column. The Add
button allows you to add a new
time-off request, the Edit button
allows for editing, approving or
denying a time-off request. The
Delete button lets you delete a
time-off request. The Processed
Request Filter section allows you
to view both time-off requests
that have been approved and
denied for a particular time frame.
Just select a Start Date and an End
Date then click either Approved or Denied. Clicking the Add or Edit button displays the
following dialog:
All employees are listed for
selection. Select the appropriate
employee, the date they
submitted the request and the date
they are requesting off. Indicate
the reason for the request and if the
request is for all day check the all
day box otherwise indicate the Start
and Stop times. The request may
be Approved or Denied at this time
or just added to the requests list.
Make the appropriate selections
and click the Save button.
The Schedule Tab
The schedule tab is used to show the number of operators forecasted for each 15 minute
segment of each day of each week with a graphical representation and is used to assign shifts
to employees. The schedule tab is also used to create templates.
All saved Forecasts, Schedules and Template are listed under the Schedule
Files on the Schedule View. To recall a Forecast, a Schedule or a Template
for viewing or editing just double-click the appropriate selection. If a
Schedule is double-clicked, the Forecast used for that particular Schedule
is also loaded. To delete any of the listed files just select what you wish to
delete and press the delete key on the keyboard. You will be asked to confirm
the deletion of your selection.
The Schedule menu is broken into two seperate sections. Menu items
that deal with schedules and menu items that deal with templates.
Templates
Templates are used to create fixed shifts for employees. Whether you create two templates
for alternating weekends for certain employees, or you have certain employees that always
work the same fixed shift every week; a
template may be created. To create a
template, click on the Create a Template
menu item on the Schedule menu.
Upon clicking the Create a Template menu item the following
dialog will pop up:
After giving your template a name click on the create and
save button to create your template. You will be presented
with a schedule tab that has no forecast graph and shows
your template name in the graph area. The date/day buttons
are now just day buttons, starting with your schedule start
day through the last day of your schedule. Your current
employees along with their availability is also displayed. The white blocks are available times,
while the black blocks are unavailable times.
Shifts
Dealing with shifts works the same in both Templates and Schedules.
To Add a shift to an employee either left click in the time slot you
want the employees shift to start and press the Ctrl + Insert keys on
the keyboard or right click in the time slot you want the employees
shift to start and select the Add menu item from the pop up menu.
Either choice pops up a Shift Dialog. Since the 7:30am time
slot was clicked the Start Time automatically fills with a
7:30am. A Stop Time needs to be entered. The skill defaults
to the employees skill; however, a different skill may be
selected for the shift being added. Once the appropriate data
has been selected click the Save button to add the shift. If
3:30pm was selected for the Stop Time the shift whould look
like the following:
Left clicking on
the shift selects
the shift and puts
a broken line border around the shift. Selecting the shift and pressing the Ctrl + Enter keys on
the keyboard, or selecting the shift and right clicking the shift and choosing the Edit menu
item, or double-clicking the shift all pop up the Shift Dialog. If you click on a shift with the left
mouse button and keep the button held down, you
may move the mouse left or right to change the
shift. While moving the entire shift the changing Start Time is displayed. If you move the
mouse to either end of the shift until the mouse changes to a left/right arrow you may click
and hold the mouse button to change either the Start or End Time only. The following
keyboard functions show how to manipulate a selected shift:
Left Arrow
move shift 1 minute
left
Down Arrow
Right Arrow move shift 1 minute
right
Up Arrow
w/ Ctrl
move start of shift 1
minute left
move start of shift 1
minute right
move end of shift 1
minute right
move end of shift 1
minute left
w/ Shift
w/ Ctrl + Shift
move shift 15 minutes move start of shift 15
left
minutes left
move start of shift 15
minutes right
move shift 15 minutes move end of shift 15
right
minutes right
move end of shift 15
minutes left
To delete a shift either select it and press the Ctrl + Delete keys on the keyboard or select it
and then choose Delete from the pop up menu. Shifts may also cut/copied and pasted to the
same employee or a different employee.
Schedules
Everything up to this point has been setup to
help with the ultimate goal of creating a
schedule. With a newly created forecast or
loaded forecast a schedule may be created.
To create a schedule click on the Create a Schedule menu item under the Schedule menu.
Upon clicking the Create a Schedule menu item a Create a Schedule
dialog pops up. The forecast loaded will be shown. The previous
schedule is used to load any shifts that roll over from the previous
week. The week of field is used to select the start date of the schedule
you wish to create. If the Autofill box is checked then the software will
attempt to create a schedule for the week. In unchecked you will be
presented with a blank schedule and shifts may be added manually.
Clicking the Create and Save button creates this schedule.
To create a new schedule, starting with a schedule that was previously
created is the purpose of the Copy a Schedule menu item. Upon
clicking this menu item a dialog box similar to the Create a Schedule
dialog box will be displayed. The Autofill check box is missing and
instead the there is a selection box for the
schedule you wish to copy.Upon clicking the
Copy and Save button, a new schedule will be
created copying the shifts from the selected
schedule.
To create a new schedule, starting with a
template that was previously created is the
purpose of the Create Using Template menu item.
Upon clicking this menu item a dialog box similar
to the Copy a Schedule dialog box will be
displayed. The Autofill check box is added and
the schedule selection is replaced by the template
selection. Upon clicking the Copy and Save button
a new schedule will be created copying the shifts from the selected template. If the Autofill
box is checked then the software will add shifts after copying shifts from the template.
Selecting a cell in a employee's row changes that employee red and displays employee info on
the status bar. The amount
of hours the employee is schedule for the day, the week, the # of days scheduled, the
employee's name and the total # of hours for all employees is displayed.
The top left portion of the the
schedule tab allows for selection
of the various days of the week.
Pressing the 1-7 keys on the
keyboard also change the days.
Located below the days is the
Conflicts button. The Conflicts
button is green unless there is a
conflict on the selected day. To
view the Conflict(s), click on the
Conflicts button. Upon clicking
the Conflict button the Conflicts
Dialog will pop up listing the
conflicts for the day.
Once a schedule has been created, both a week long
schedule for the company or individual employee
schedules may be printed. With a schedule loaded click
on the Preview and Print the Schedule menu item. Upon
clicking the menu item a Reports dialog will pop up.