1
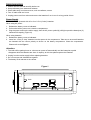
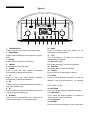
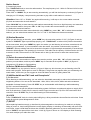
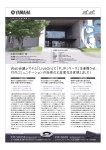
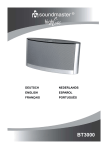
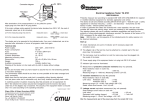
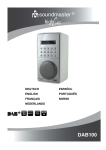
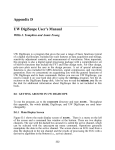
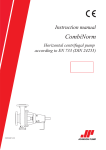
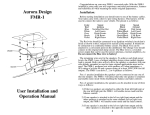
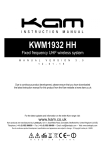
DEUTSCH
ENGLISH
FRANÇAIS
NEDERLANDS
ESPAÑOL
SUOMI
TR 50USB
ENVIRONMENTAL PROTECTION
Do not dispose of this product with the normal household waste at the end
of its life cycle. Return it to a collection point for the recycling of electrical
and electronic devices. This is indicated by the symbol on the product,
user manual or packaging.
The materials are reusable according to their markings. By reusing, recycling or
other forms of utilization of old devices you make an important contribution to
the protection of our environment.
Please contact your local authorities for details about collection points.
WARNING
Risk of electric shock
Do not open!
Caution: To reduce the risk of electric shock, do not remove the
cover (or back). There are no user serviceable parts inside. Refer
servicing to qualified service personnel.
This symbol indicates the presence of dangerous
voltage inside the enclosure, sufficient enough to
cause electric shock.
This symbol indicates the presence of important
operating and maintenance instructions for the
device.
Safety, Environmental and Setup Instructions
•
Use the device in dry indoor environments only.
•
Protect the device from humidity.
•
Do not open the device. RISK OF ELECTRIC SHOCK! Refer opening and servicing to qualified personnel.
•
Connect this device to a properly installed and earthed wall outlet only. Make sure the mains voltage corresponds with
the specifications on the rating plate.
•
Make sure the mains cable stays dry during operation. Do not pinch or damage the mains cable in any way.
•
A damaged mains cable or plug must immediately be replaced by an authorized service center.
•
In case of lightning, immediately disconnect the device from the mains supply.
•
Children should be supervised by parents when using the device.
•
Clean the device with a dry cloth only.
Do NOT use CLEANING AGENTS or ABRASIVE CLOTHS!
•
Do not expose the device to direct sunlight or other heat sources.
•
Install the device at a location with sufficient ventilation in order to prevent heat accumulation.
•
Do not cover the ventilation openings!
•
Install the device at a safe and vibration-free location.
•
Install the device as far away as possible from computers and microwave units; otherwise radio reception may be
disturbed.
•
Do not open or repair the enclosure. It is not safe to do so and will void your warranty. Repairs only by authorized
service/ customer center.
•
Only use mercury and cadmium-free batteries.
•
Used batteries are hazardous waste and NOT to be disposed of with the household waste!!!
Return the batteries to your dealer or to collection points in your community.
•
Keep batteries away from children. Children might swallow batteries.
Contact a physician immediately if a battery was swallowed.
•
Check your batteries regularly to avoid battery leakage.
•
Batteries shall not be exposed to excessive heat such as sunshine, fire or the like.
•
CAUTION: Danger of explosion if battery is incorrectly replaced
Replace only with the same or equivalent type
Safety Instructions
1. Please read this manual carefully before use
2. Keep radio away from water and moisture.
3. Place radio away from heat sources, such as radiators, stoves.
4. Turn off radio while not in use.
5. Unplug power cord from mains and remove the batteries if not in use for a long period of time.
Power Supply
This radio can be powered with AC or four “LR14 (C size)” batteries.
When using AC power:
1. Release the battery cover as indicated.
2. Pull out the built-in power cord, close the compartment.
3. Plug the power cord into the mains supply, then the AC power symbol (6) will light up and the batterybar (5)
indicated full capacity (Figure III).
When using batteries:
1. Release the battery cover as indicated.
2. Insert four “LR14 (C size)” batteries into the spaces in the compartment. Take care to ensure all batteries
are inserted with the correct polarity as shown on the battery compartment. Close the compartment.
Please refer to the Figure I.
Attention:
1. The radio will be getting lower on volume even power off automatically and the batterybar symbol
disappears while the batteries are short of capacity, at this time please replace the batteries.
2. Unplug from the mains supply before replacing batteries.
3. Do not use new and old batteries together.
4. The battery life is relevant to the volume.
Figure I
Hole
Controls (top panel)
Figure II
(2)
(12)
(13)
(3)
(4)
(5)
(6)
(14)
(15)
(16)
R AD IO /M P3
(11)
(1)
(10)
1. POWER/SLEEP
Press to switch on the radio or set “sleep” mode
2. RADIO/MP3
Press to select listening to radio program or playing
MP3.
3. MO/ST
Press to select FM Mono or FM Stereo.
(8)
(7)
(19)
(18)
(17)
10. MEM
Press to memorize the radio station you are
listening to or pause for MP3.
11. VOL
Turn it clockwise to increase the volume and
anticlockwise to decrease.
12. Earphone Jack
For private listening by connect an earphone.
4. FM/AM
Press to select FM or AM band.
5. DOWN
Press to scan the radio stations downwards
automatically or adjust the clock time.
6. UP
Press to scan the radio stations
automatically or adjust the clock time.
(9)
upwards
7. M+
Press to select the memorized stations upwards or
play the next MP3 song.
8. MPress to select the memorized stations downwards
or play the previous MP3 song.
9. M-SCAN
Press to scan automatically and memorize all
scanned radio stations; or stop playing MP3.
13. USB Port
For playing MP3 by insert a USB Disk.
14. RESET
Press to reset your radio while it crashed.
15. IF STEP
Press to select different bandwidth for AM and
different “Load and Deemphasis”.(for example:
50uS, 75uS)for FM.
16. ANTENNA
Pull it out fully and rotate for better FM reception.
17. TUNE/LOCK
Turn it select the radio programs you desired or
Sleep time set. Press it for locking.
18. LCD Display
19. SN/TIME
Press to show the information or set the clock time.
Instructions for LCD Display
(1)
Figure III
(2)
(3)
(4)
(5)
?
(10)
(6)
(9)
(7)
1. FM Stereo symbol
(8)
2. “Sleep mode” symbol
3. Display for signal strength, S/N and clock time
dBu: unit for “signal strength”
dB: unit for “S/N”
4. Memories indication
5. Symbol for quantity of electricity (batterybar)
6. Symbol for AC power supply
7. Frequency unit for AM and FM
8. Frequency numbers and clock time (while
switching off) indication
9. Band indication
10. Lock symbol
RADIO OPERATION
Your radio is equipped with two wavebands to enable you to select the programmer of your choice. The FM
band uses an external telescopic antenna which should be fully extended and rotated for best reception. AW is
received by an internal antenna which is directional. To achieve the best reception, it may be necessary to
rotate the radio.
1. Power Switch
Press “POWER/SLEEP“ key to switch on the radio, the LCD Display lights up, the information of band, the
frequency number (8) before the latest switching off and the number of “00” (SLEEP set state) will show on
LCD display (Figure III). You can search station while “00” turn to “dB and dBu”.
Press again to power off the radio and the clock time (8) will show on LCD display (Figure III)
“SLEEP” setting
Press “POWER/SLEEP“ key to power on the radio, the number of “00” will show on LCD display (Figure III),
turn “TUNE/LOCK” to select the sleep time you want (0, 10, 20, 30 , 40, 60 or 90 minutes), turn to “00” minute
to cancel setting and the sleep symbol will disappear. The sleep symbol (1) will light up while set and the radio
will power off automatically when the sleep time is over (Figure III).
Attention: if the radio failed to power on, please check if the batteries are inserted correctly and the quantity
of electricity is full or the radio is locked. The lock symbol (10) Figure III will be on if radio is locked, then press
“TUNE/LOCK” a time to unlock.
2. Listen to the Broadcasting
This product will on “Radio” mode while powered on. Press “FM/AM” key to select the band, turn the
“TUNE/LOCK” to select the radio program you desired and set a moderate volume. Pull out the antenna fully
and rotate for better FM reception.
Station Search
(i) Scanning by hand:
Turn “TUNE/LOCK“knob to scan the radio stations. The step-frequency is 0.1 MHz for FM and 9 KHz for AM.
(ii) Scanning automatically:
Press “UP” or “DOWN” key to start scanning automatically, you will find the frequency numbers (8) Figure III
changing on LCD display. It stops scanning and start to play while a radio station is searched.
Attention: Press “UP” or “DOWN” key again while scanning, it will stop on the current station scanned.
(iii) Scan and memorize the radio stations
Press “M-SCAN” key to start scanning radio stations automatically from low to high frequency and memorize
all the scanned stations, then press “M+” or “M-” key to select the scanned stations you desired.
(iv) Select the memorized stations
If the radio stations have been memorized with using “MEM” key, press “M+, M-” to select the memorized
stations, you can select these stations from “001” to “100” if 100 stations have been memorized.
(2) Station Memories
When you are listening to the radio , press “MEM” key, the memories position of “001” (3) Figure III and the
symbol of “PRESET” lights up and keeps jumping, turn “TUNE/LOCK” to select which position the stations
will be memorized, then press “MEM” key again, the station you are listening to has been memorized in the
position you just selected. If you succeeded to save the station, the position numbers and the symbol of
“PRESET” will stop winking and shift to show the information of signal-strength automatically 3 seconds later.
Memories will disappear if not operating for 3 seconds. This radio has the capacity of 200 memories and 100
memories for AM, 100 memories for FM. Please refer to title (iv) above how to select the scanned radio
stations.
(3) Delete the memorized stations
If needed to delete some stations or adjust the memories position, press “M+, M-” to find the memories
position you want delete, and then press “MEM” key for seconds till the symbol of “DEL” (8) Figure III
indicated on LCD display to finish deleting.
(4) Select FM Mono and FM Stereo
Press “MO/ST” key, the symbol of stereo (1) Figure III lights up, which means you are listening to the FM
stereo radio program. Press again to return to FM Mono. A big noise may appear while you are listening to a
weak station, at this time you are suggest to close FM Stereo function for getting better S/N.
(5) AM Bandwidth and FM “Load and Deemphasis”
(i) AM Bandwidth
When listening to AM broadcasting, you can select the bandwidth reasonably to reduce the interference from
neighboring stations. You can set five bandwidth: 1KHz, 2KHz, 3KHz, 4KHz, 6KHz and select moderate
bandwidth for better listening. Press “IF STEP” key to set bandwidth while listening to AM broadcasting.
(ii) FM “Load and Deemphasis”
This function is set as per the different broadcasting system of different countries and regions to supply 50µS
and 75µS selections. Usually 50µS is used for some Europe countries and 75µS for China and some other
countries. Press “IF STEP” key to set while listening to FM broadcasting.
(6) LOCK
Press “TUNE/LOCK” knob, the lock symbol will light up, all keys and knobs loose effective at this time. Press
again till the lock symbol disappeared to finish.
(7) RESET
While replacing batteries wrongly or interfered by electromagnetism, the radio may be crashed. no display,
failing to power on, keys loosing effective but with display, display or switching off abnormally will come forth.
At this time, Insert a small hard stick less than 2.5MM in diameter (please do not use a metal stick) into the
hole of “RESET” and press till the clock time “12:00” (8) Figure III shown on LCD display to finish resetting.
You need re-adjust your radio after reset.
(8) SET CLOCK TIME
The clock time can be set only after the radio is turned off. Press “SN/TIME” key, the minute numbers (8)
Figure III starts jumping, then press “DOWN” or “UP” to adjust the minute numbers. Press “SN/TIME” key
again to set the hour numbers analogously, the clock time will be memorized automatically 3 seconds later.
If you want to know what time it is while listening to the radio, just press “SN/TIME” key, the clock time will
show at the position (3) Figure III on LCD display, and shift to show signal-strength information automatically 3
seconds later.
MP3 OPERATION
1. Insert a USB disk into the USB port.
2. Press “RADIO/MP3” key to select MP3 playing if the radio is on Radio mode, now the song number of
“000” will show on LCD play.
3. Press “MEM” key to start playing, press it again to pause.
4. Press “M+” or “M-” key to skip to the next or previous song.
5. Press “M-SCAN” key to stop playing.
Attention:
If unit don´t play the songs on USB-stick, than it is a reason that batteries are low. Please replace the batteries
with new one. (We suggest to use Alkaline-batteries)
SPECIFICATIONS
Mains:
Batteries:
Frequency coverage:
AC 230V~50Hz
4x UM-2 / C 1.5V batteries
FM: 87.5-108MHz
AM: 522-1620KHz
Copyrights by Woerlein GmbH, D-90556 Cadolzburg, Germany
Technical changes without any further announcement