1
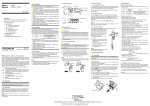
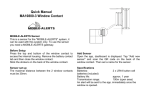
™
For a dealer near you, call:
(847) 573-8400 (U.S. & Int’l)
(800) 222-3909 (U.S. & Canada)
+44 (0)1553 762276 (U.K. & Europe)
© Learning Resources, Inc., Vernon Hills, IL (U.S.A.)
Learning Resources Ltd., King’s Lynn, Norfolk (U.K.)
Please retain our address for future reference.
Made in China.
LPK6900-HDR
™
LER 6900
CONTENTS
INSERT BATTERIES . . . . . . . . . . . . . . . . . . . . . . . . . . . . . . . .2
GETTING STARTED . . . . . . . . . . . . . . . . . . . . . . . . . . . . . . . . .3
SET CLOCK . . . . . . . . . . . . . . . . . . . . . . . . . . . . . . . . . . . . . . . .4
SET MANUAL TIMER . . . . . . . . . . . . . . . . . . . . . . . . . . . . . . .5
SET AUTO TIMER . . . . . . . . . . . . . . . . . . . . . . . . . . . . . . . . . .6
STARTING THE TIMER . . . . . . . . . . . . . . . . . . . . . . . . . . . . . .6
PAUSING THE TIMER . . . . . . . . . . . . . . . . . . . . . . . . . . . . . . .7
STOPPING THE TIMER . . . . . . . . . . . . . . . . . . . . . . . . . . . . . .7
CHECK TIME REMAINING IN EACH SECTION
. . . . . . . .7
USING AN ADAPTER . . . . . . . . . . . . . . . . . . . . . . . . . . . . . . .7
USE AND CARE INSTRUCTIONS . . . . . . . . . . . . . . . . . . . . .8
REPLACING BATTERIES . . . . . . . . . . . . . . . . . . . . . . . . . . . .8
TO REPLACE BACK-UP BATTERIES . . . . . . . . . . . . . . . . .8
IMPORTANT BATTERY INFORMATION . . . . . . . . . . . . . . .7
IMPORTANT BATTERY INFORMATION
Please read and understand these additional
battery usage instructions.
To ensure proper function:
Battery installation and replacement should be done by
an adult only.
Do not mix old and new batteries.
Do not mix alkaline, standard or rechargeable batteries.
Non-rechargeable batteries are not to be recharged.
Rechargeable batteries are to be removed from the product
before being charged (if removable).
Rechargeable batteries are only to be charged under adult
supervision (if removable).
Only batteries of the same or equivalent type as recommended
are to be used.
Batteries are to be inserted with the correct polarity.
Exhausted batteries are to be removed from the product.
Remove batteries if product is to be inactive for long periods
of time, to avoid leakage.
The supply terminals are not to be short-circuited.
Replace batteries at the first signs of erratic operation.
WARNING: DO NOT DISPOSE OF BATTERIES IN FIRE.
BATTERIES MAY EXPLODE OR LEAK.
IMPORTANT INFORMATION :
MAX. 6V D.C. 300mA
• The toy is not intended for children under 3 years old.
• The toy must only be used with the recommended transformer.
• The toy transformer is not a toy.
• Disconnect toy from transformer before cleaning the toy with liquid.
• Transfomers used with the toy are to be regularly examined for damage
to the chord, plug, enclosure and other parts, and that, in the event of such
damage, the toys must not be used with this transformer until the damage
has been repaired.
9
Use and Care Instructions
✓ To protect your Time Tracker™ Visual Timer:
✓ Do not submerge the unit in water.
✓ Prevent spilling food or beverages on the unit.
✓ To clean, wipe gently with a barely damp, soft cloth
✓ Do not throw the unit and do not push sharp objects
through the speaker holes or LCD display screen.
Replacing Batteries
Change the batteries when the sound becomes garbled or
slows down, or when pressing a button does not trigger a
response from the unit.
You will also need to replace the 2 "LR44" back-up batteries
from time to time. These batteries maintain your clock and
time settings should the regular batteries lose power and/or
when you are replacing the regular batteries.
To replace back-up batteries:
The back-up battery compartment is located inside the
battery compartment (under the AA batteries). Use a small
Phillips screwdriver to turn the screw on the battery door in a
counterclockwise direction to loosen screw. Remove the
screw and open the door. Remove the 2 LR44 batteries.
Insert two new LR44 batteries being careful to match the +
and – ends of the batteries to the diagram inside the battery
compartment. Replace the battery compartment door and
insert the screw. Tighten the screw by using a small Phillips
screwdriver to turn the screw in a clockwise direction until
secure. Do not over-tighten the screw.
8
™
The Time Tracker Visual Timer™ and clock helps manage
time in a new way. Bright, long-lasting lights give visual
cues as to the amount of time remaining to complete a
task. The Time Tracker is divided into three lighted
sections, each representing a portion of time. You can
program exactly how long each of the sections remains
lit, or you can select the automatic setting and the Time
Tracker will divide the time for you. For added emphasis,
you can add a sound effect to play each time a section
changes colors (choose from six different sound effects).
Use the Time Tracker to time tests, practice sessions,
study sessions, experiments, phone calls, speeches, or
any timed activity.
1
INSERT BATTERIES
You will need:
4 AA batteries
Phillips screwdriver
1. Turn the Time Tracker™ over. Use the Phillips
screwdriver to turn the screw on the battery door in
a counterclockwise direction to loosen the screw.
2. Remove the screw and open the door.
3. Pull the clear tab sticking out of the backup battery
compartment to activate backup batteries.
4. Insert the four AA batteries, being careful to match
the + and – ends of the batteries to the diagram
inside the battery compartment.
5. Replace the battery compartment door and insert
the screw. Tighten the screw by using the Phillips
screwdriver to turn the screw in a clockwise
direction until secure. Do not over-tighten the screw.
2
PAUSING THE TIMER
1 Press both
buttons at the same time to PAUSE.
2. Press the START to resume.
STOPPING THE TIMER
1. Press and hold the MENU button to stop the timer.
CHECK TIME REMAINING IN
EACH SECTION
1. Press START to display how much time is remaining
in the lit section.
2. Press START again to display total time remaining.
RESET BUTTON
If the unit begins to behave in an erratic manner, use the end of a
paper clip or similar small object to push the reset button located
in the small hole above the adapter jack.
USING AN ADAPTER
Important Note: When using an adapter with the unit, unplug the
adapter from the unit first, before unplugging the adapter from the
wall. Unplugging the adapter from the wall before you unplug it
from the unit will reset the unit and your programming will be lost.
1. Plug the adapter into the jack located on the right
side of the unit.
2. Plug the adapter into the wall.
The power adapter, Model No. LER2901, can be ordered from
Learning Resources by calling 1-888-489-9388 or through online
at www.learningresources.com.
7
SET AUTO TIMER
1. Press and hold START and ENTER buttons
at the same time for 3 seconds.
2. Press
buttons until SET AUTO
appears on the display.
SET
AUTO
3. Press ENTER.
4. Total Time: (Enter the total amount
of time. It will automatically split
between green, yellow and red
lights). Use
buttons to scroll
through numbers and ENTER to
accept.
5. Sound?: Do you want a sound effect
at the start of the green light?
TOTAL TIME
00:00:00
SOUND ?
YES/NO
6. Yes/No: Use
buttons to move
cursor and ENTER to accept.
7. If yes, use
buttons to scroll
through sounds and ENTER to accept.
8. Repeat steps 7 and 8 for yellow and red sections.
9. Press MENU.
STARTING THE TIMER
1. After you set Manual and/or Auto time, press MENU
(the display will show CLOCK).
2. Use
buttons to choose MANUAL TIMER or
AUTO TIMER and ENTER to accept.
3. Press the START button to start the timer.
6
GETTING STARTED
The Time Tracker has 3 modes:
Red Section
CLOCK – Regular digital clock
MANUAL – Program
exactly how long you
want each color section
to stay lit.
Yellow Section
AUTO – Program the
Green Section
Speaker
total amount of time,
(behind)
and the color sections
Display
Screen
Volume Control
will automatically be
divided into 80% green,
Reset Key
15% yellow, and 5%
Enter
red. For example, if
Adapter Outlet
you program 10 minutes
Left Arrow
as your total time, the
Battery
Compartment
green section will stay lit
Right Arrow
Menu
Start
(underneath)
for 8 minutes, the yellow
section for 1 minute 30 seconds, and the red section for 30
seconds.
The Time Tracker has six different sound effects. You may
program a sound effect to be used before one, two, or all three
of the colored sections. The sound effects are:
Begin!
Siren
Buzzer
Bell
Ticking Clock
Time’s Up!
Before setting the time, please note:
1. If you do not press any key for 20 seconds, the unit will
exit the programming mode.
2. Press MENU at any time to go back to the previous step.
3. Once you have set the Manual and/or Auto timer, those
times will remain programmed in the unit until you
change them. Once programmed, you can go directly
to START TIMER.
3
SET CLOCK
1. Press and hold START and ENTER
buttons at the same time for 3
seconds.
2. SET CLOCK?: Press ENTER.
3. 12H/24H: (choose 12hr or 24 hr) Use
to move curser. Press ENTER
to accept.
SET
CLOCK? SET HOUR
12H/24H
SET HOUR
00:00:00AM
SET MIN
12:00:00AM
4. Set time: Use
buttons to scroll
through numbers
(hrs:min:sec)
and ENTER to accept.
5. AM/PM: Use
buttons to move
curser and ENTER to accept.
6. Press MENU or continue to the set
manual and/or auto timer next, using
the
buttons.
4
SET SEC
12:10:00AM
SET AM/PM
AM/PM
SET
MANUAL? SET MANUAL TIMER
1. Press and hold START and ENTER
buttons at the same time for 3 seconds.
2. Press
buttons until SET
MANUAL appears on display
SET
MANUAL? 3. Press ENTER.
4. Section Green: Enter amount of time
(hrs:min:sec) the green section will
be lit. Use
buttons to scroll
through numbers, and ENTER to
accept.
5. Sound?: Do you want a sound effect
at the start of the green section?
SCTN GRN
00:00:00
SOUND ?
YES/NO
6. Yes/No: Use
buttons to move
cursor, and ENTER to accept.
7. If yes, use
buttons to scroll
through sounds, and ENTER to
accept.
SOUND ?
BEGIN
8 Repeat for the yellow and red sections.
9. You may continue to SET AUTO, or skip
to STARTING THE TIME.
5