1
Kingdom of Cambodia
Nation - Religion - King
Student
StudentCentred
CentredApproaches
Approaches
for
forScience
ScienceEducation
Education
Part 2
Chapter 4: Conceptual Science Teaching
Student Centred Approaches for Science Education – Part 2
1
Teacher Training Department 2012
Chapter 4: Conceptual Science Teaching
Published by the Ministry of Education, Youth and Sport of the Kingdom of Cambodia
Printed in Cambodia, 2013 (First edition)
The development and publication of this document has been funded by the General Directorate for
Development Cooperation and Humanitarian Aid (DGD) with technical support from the Flemish
Association for Development Cooperation and Technical Assistance (VVOB). The Flemish and the
Belgian governments cannot be held responsible for the content of this publication.
Copyright Notice
Unless otherwise noted in the materials excluded and rights reserved list below, material in this publication is
licensed under a Creative Commons Attribution-NonCommercial-ShareAlike 3.0 Unported License. This means
that you may distribute, copy, remix and build upon this work non-commercially without prior permission of the
publisher, as long as you credit and license your new creations under identical terms. More information on this
license is available at http://creativecommons.org/licenses/by-nc-sa/3.0/
Material excluded and rights reserved
Some material in this publication is not being made available under the terms of this license. These are ThirdParty materials that are being used under fair use or with permission. The publisher will not be liable on any legal
basis (including negligence) for any loss or damage suffered through the use of Third-Party material.
Student Centred Approaches for Science Education – Part 2
2
Prologue
Capacity building and human resource development are one of the crucial angles in the rectangular
strategy of the Royal Government of Cambodia. Qualitative science education is an important factor
in creating a well-educated workforce. Not only is there a strong need for people with degrees in
scientific domains, but science education also contributes to developing students into well-informed,
critically and creatively thinking citizens.
In cooperation with development partners and international organizations, the Ministry of Education,
Youth and Sport (MoEYS) has developed educational materials to fulfil the needs of teaching and
learning. The process of material development and capacity building consisted of joint efforts of the
technical expertise of both the MoEYS and VVOB educational experts. This enabled us to design
materials that focus on basic knowledge and teaching methodology for science subjects.
This manual focuses on the theory and practices of science education and the promotion of problem
solving skills, reasoning skills, reading comprehension, creativity and deeper understanding of
science. The manual also offers solutions to make science lessons more connected to studentsʼ daily
lives.
MoEYS strongly hopes that all teacher trainers will use this manual to teach science in the teacher
training centres, and thus contribute to improving the quality of science education in Cambodia.
On behalf of MoEYS, I would like to express sincere thanks to the team and educational advisors of
the Flemish Association for Cooperation Development and Technical Assistance (VVOB) for their
energy, motivation and intellectual spirit to develop these useful manuals.
Phnom Penh, March 15, 2012
Minister of Education, Youth and Sport
H.E Im Sethy
(Signature and seal)
Student Centred Approaches for Science Education – Part 2
3
Preface
The manual on Student Centred Approaches (SCA) in Science Education is compiled in order to
support science teacher trainers in their teaching. In 6 chapters we present a wide range of tools and
techniques to increase the student centred character of science lessons.
A student-centred approach means literally that the student is placed in the centre of the learning
process. Some characteristics of a student-centred approach include:
Ͳ
Ͳ
Ͳ
Ͳ
Active involvement of the students in the lesson;
Students learn from each other, not only from the teacher.
Students are more responsible for their own learning.
Differences among students are taken into account.
The tools and techniques in this manual were first introduced at RTTC Kandal. A team of teacher
trainers and teachers tried out the techniques, discarded some and changed others and provided
suitable examples from the local curriculum.
This manual consists of 6 chapters:
Chapter 1: Developing Active Reading and Writing Skills presents techniques to stimulate
strategic reading and writing skills with students in science lessons.
Chapter 2: Developing Science Reasoning Skills presents discussion and argumentation
techniques for science topics.
Chapter 3: Teaching the Scientific Method introduces ways to make students familiar with the
various stages in the scientific method.
Chapter 4: Conceptual Science Teaching focuses on techniques to stimulate conceptual thinking
with students.
Chapter 5: Models and Analogies introduces techniques and examples of models and analogies in
science lessons.
Chapter 6: Educational Games explains how to integrate educational games in science lessons and
gives a range of examples.
We hope that teacher trainers will try out the methods in this manual. We are looking forward to
receiving your comments. We wish you an inspiring experience and many satisfying science lessons.
Editorial Committee,
July 2011
Student Centred Approaches for Science Education – Part 2
4
Manual Development Committee
Management Committee
H.E. Im Sethy
Minister, Ministry of Education, Youth and Sport
H.E. Nath Bunroeun
Secretary of state, Ministry of Education, Youth and Sport
Approval Committee
Mr. Leang Seng Hak
Director, Teacher Training Department
Mr. Eng Kimly
Director, Department of Curriculum Development
Mr. Eung Ngor Hok
Director, General Secondary Education Department
Committee of Authors
Mr. Stefaan Vande Walle
SEAL Programme Coordinator, RTTC Kandal
Ms. Veerle Cnudde
SEAL Programme Coordinator, RTTC Kandal
Mr. Uon Virak
Technical Advisor/Facilitator – Science & life skills RTTC
Ms. Nget Sokhany
M&E Officer/Facilitator – SEAL Programme
Teacher Trainers – RTTC Kandal
Mr. Mam Pha Ol
Mr. Meng Phirun
Mr. Thak Sophea
Mr. Be Bra
Mr. Sok Saroeun
Mrs. Long Punthiny
Ms. Hou Chansara
Mrs. Som Dany
Mr. Oeur Sokmeng
Mrs. Srey Chansophea Ms. Veng Sreymon
Mr. Seang Bunthoeun
Teachers – Hun Sen Sereypheap High school – Kandal Province
Mrs. Kong Sovannra
Mr. Pang Sienghay
Mrs. Sun Chanmoly
Mrs. Pen Raksmey
Student Centred Approaches for Science Education – Part 2
5
Teachers – Anuwat Lower Secondary School – Kandal Province
Mrs. Loch Sotheany
Mrs. Mam Metboran
Mrs. Morn Sokha
Mr. Phan Ny
Teachers – Hun Sen Takhmao High school – Kandal Province
Mr. Prum Vannara
Mrs. Tuon Vannak
Mrs. Phon Socheat
Teachers – Hun Sen Kampong Kantuot High school – Kandal Province
Mr. Men Nimol
Mrs. Ek Amara
Mrs. Chea Yeth
Ms. Tim Bunthen
Editorial Committee
Mr. Men Vannary
Officer, Teacher Training Department
Mr. Sok Saroeun
Officer, Teacher Training Department
Mr. Sin Vath
Officer, Teacher Training Department
Mr. Chan Sopheap
Officer, Department of Curriculum Development
Mrs. Ean Sarin
Officer, General Secondary Education Department
Technical Advisor
Mr. Chea Phon
Vice-director, Teacher Training Department
Translator
Mr. Keo Mono
Technical Advisor/Facilitator – Science RTTC
Student Centred Approaches for Science Education – Part 2
6
Table of contents
Prologue .............................................................................................................................................. 3
Preface ................................................................................................................................................ 4
Manual Development Committee ........................................................................................................ 5
Management Committee ................................................................................................................. 5
Approval Committee ........................................................................................................................ 5
Committee of Authors ..................................................................................................................... 5
Editorial Committee ......................................................................................................................... 6
Technical Advisor ............................................................................................................................ 6
Translator ........................................................................................................................................ 6
Table of contents ............................................................................................................................. 7
Chapter 4: Conceptual Science Teaching ............................................................................................ 13
Concept Cartoons ............................................................................................................................. 13
1.
Introduction............................................................................................................................ 13
2.
Objectives .............................................................................................................................. 14
3.
Material .................................................................................................................................. 15
4.
Methods ................................................................................................................................. 15
4.1 Class Discussion ................................................................................................................. 16
4.2 Group Discussion ................................................................................................................ 20
4.3 Experimental Investigation .................................................................................................. 23
4.4 Group discussion combined with experimental investigation ............................................. 26
5.
When to use concept cartoons?............................................................................................ 29
6.
Examples from the curriculum............................................................................................... 29
6.1
Physics .......................................................................................................................... 29
6.2 Biology................................................................................................................................. 30
6.3 Earth and environmental science ........................................................................................ 30
6.4 Chemistry ............................................................................................................................ 31
7.
Variations .............................................................................................................................. 32
8.
Important tips......................................................................................................................... 32
Annex 1: Concept Cartoons for Physics ........................................................................................... 33
Introduction.................................................................................................................................... 33
Optics ............................................................................................................................................ 34
1.
The White Cat ................................................................................................................... 34
2.
Sunglasses ........................................................................................................................ 35
3.
Shadow screen.................................................................................................................. 36
Student Centred Approaches for Science Education – Part 2
7
4.
Shadows at night ............................................................................................................... 37
5.
Two trees ........................................................................................................................... 39
6.
The colour of shadows ...................................................................................................... 40
7.
Solar eclipse ...................................................................................................................... 41
8.
Moving shadow ................................................................................................................. 42
9.
Shadow of the Sun (size) .................................................................................................. 43
10.
Curved mirror ................................................................................................................ 44
11.
Prism ............................................................................................................................. 45
12.
Torches ......................................................................................................................... 46
13.
Mirror box ...................................................................................................................... 47
Mechanics ..................................................................................................................................... 48
14.
Bungee jump ................................................................................................................. 48
15.
Falling ............................................................................................................................ 49
16.
Skateboard .................................................................................................................... 50
17.
Soccer ........................................................................................................................... 51
18.
Space rocket ................................................................................................................. 52
19.
Fast plane ...................................................................................................................... 53
20.
Moon rock ...................................................................................................................... 54
21.
Hot air balloon ............................................................................................................... 55
22.
Space walk .................................................................................................................... 56
23.
Ski Slope ....................................................................................................................... 57
Heat ............................................................................................................................................... 58
24.
Boiling water .................................................................................................................. 58
25.
Snowman (called “Ice and cloth” in Khmer version) ..................................................... 59
26.
Teapot ........................................................................................................................... 60
27.
Windy day...................................................................................................................... 61
28.
Melting ice ..................................................................................................................... 62
29.
When water is boiling .................................................................................................... 63
30.
Ice cubes ....................................................................................................................... 64
Fluids ............................................................................................................................................. 65
31.
Helium balloon............................................................................................................... 65
32.
Balloon .......................................................................................................................... 66
33.
Lemonade ..................................................................................................................... 67
34.
Mountains ...................................................................................................................... 68
Electricity ....................................................................................................................................... 69
35.
Switch ............................................................................................................................ 69
Student Centred Approaches for Science Education – Part 2
8
36.
Current flow ................................................................................................................... 70
37.
Thicker wires ................................................................................................................. 71
38.
Longer wires .................................................................................................................. 72
39.
Electromagnet ............................................................................................................... 73
Annex 2: Concept Cartoons for Biology ............................................................................................ 74
Introduction.................................................................................................................................... 74
Plants ............................................................................................................................................ 75
40.
The Growth Direction of Plants ..................................................................................... 75
41.
Seeds in the Dark .......................................................................................................... 76
42.
Heavy plants .................................................................................................................. 77
43.
Rotten Apple.................................................................................................................. 78
Human body .................................................................................................................................. 79
44.
Headstand ..................................................................................................................... 79
45.
Babies ........................................................................................................................... 80
46.
Antibiotics ...................................................................................................................... 81
Evolution and reproduction ........................................................................................................... 82
47.
Dominance .................................................................................................................... 82
48.
Use & Disuse................................................................................................................. 83
49.
Adaptation ..................................................................................................................... 84
50.
Competition ................................................................................................................... 85
51.
Reproduction ................................................................................................................. 86
52.
Resistance ..................................................................................................................... 87
53.
Pond Life ....................................................................................................................... 88
54.
Variation ........................................................................................................................ 89
55.
Variation (2) ................................................................................................................... 90
56.
Timeline of natural selection ......................................................................................... 91
Genetics ........................................................................................................................................ 92
57.
Yeast cells versus human cells ..................................................................................... 92
58.
Acquired Traits .............................................................................................................. 93
Annex 3: Concept Cartoons for Earth and Environmental Science .................................................. 94
Introduction.................................................................................................................................... 94
The Solar System and the Universe ............................................................................................. 95
59.
Is it dark in space? ........................................................................................................ 95
60.
Stars .............................................................................................................................. 96
61.
Why does the Moon shine? ........................................................................................... 97
62.
Daytime Moon ............................................................................................................... 98
Student Centred Approaches for Science Education – Part 2
9
68.
69.
70.
71.
72.
73.
74.
75.
76.
77.
78.
79.
80.
Example 2: Seasons on Earth................................................................................................. 125
Example 3: Solar Eclipse ........................................................................................................ 126
Example 4: Water Cycle/ Evaporation .................................................................................... 126
Example 5: Origin of Oil .......................................................................................................... 127
Example 6: Photosynthesis ..................................................................................................... 127
Example 7: Digestive system .................................................................................................. 128
Example 8: The Nervous System............................................................................................ 128
Example 9: Floating ................................................................................................................ 129
Example 10: Dissolving ........................................................................................................... 129
Example 11: Chemical bonds ................................................................................................. 130
Example 12: Structure of Atoms ............................................................................................. 130
Example 13: Forces ................................................................................................................ 131
Example 14: Fluid statics ........................................................................................................ 132
Example 15: Archimedesʼ Principle ........................................................................................ 132
Example 16: Archimedesʼ Principle (difficult) .......................................................................... 133
Example 17: Electricity ............................................................................................................ 133
Example 18: Momentum ......................................................................................................... 133
Example 19: Phase changes .................................................................................................. 134
Example 20: Mechanics .......................................................................................................... 134
Example 21: Mechanics .......................................................................................................... 134
Example 22: Catching a cold .................................................................................................. 135
Example 23: Antibiotics ........................................................................................................... 135
7. Important tips .......................................................................................................................... 136
Annex: Constructing your own Concept test ............................................................................... 138
References ...................................................................................................................................... 139
Books .......................................................................................................................................... 139
Websites...................................................................................................................................... 140
Student Centred Approaches for Science Education – Part 2
11
Chapter 4:
Conceptual
Science Teaching
Student Centred Approaches for Science Education – Part 2
12
Chapter 4: Conceptual Science Teaching
Concept Cartoons
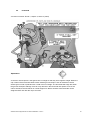
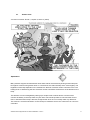
1. Introduction
About this manual
This chapter introduces concept cartoons and concept tests as tools for teacher trainers who want to
make their lessons more student-centred. Both tools involve individual thinking and group discussion
and stimulate students to express their ideas on scientific concepts to each other. Both tools focus on
understanding and applying scientific knowledge in new contexts. By creating new concepts cartoons
and tests students learn higher-order thinking skills and stimulate their creativity and lateral thinking.
Both tools can be used in a variety of ways, depending on lesson
objectives, studentsҋ prior knowledge and available time. We
include sample concept cartoons and concept tests for a variety of
topics and different ways to integrate them in the lesson plan.
Laminated A4 colour copies of all cartoons complement this
manual. Also, digital versions of the cartoons are available for
download on the krou.org website.
The manual is based on the work of Naylor and Keogh and
Arteveldehogeschool in Ghent, Belgium. Cartoons were adapted
to the Cambodian context where necessary and redrawn through
the cooperation between VVOB and Invent Design & Printing.
Student misconceptions
An important concept when using concept cartoons and concept tests are student misconceptions.
Students come to class with prior knowledge on the topic. They acquire this from TV, family, books,
culture or prior lessons. Sometimes, this knowledge is incomplete or incorrect. Sometimes it makes
sense to the students because itҋs more intuitive or because they have been familiar with it for a long
time.
Letҋs take Newtonҋs First Law as an example. When observing an object in rest on a table, itҋs more
intuitive for students to assume that no forces are working on the object than accepting that there are
multiple forces keeping each other in balance. Newtonҋs First Law is counterintuitive due to the
presence of air resistance.
For a teacher itҋs important to acknowledge this prior knowledge and to devise instructional strategies
to elicit and change it. Merely telling students that their viewpoint is incorrect is unlikely to change it,
Student Centred Approaches for Science Education – Part 2
13
but will rather create a difference between their “school view” and their view “outside school”. They
will accept Newtonʼs Laws in the class, but will return to their old views outside class.
Various terms are used to describe this incorrect prior knowledge, such as misconceptions,
preconceptions and naïve knowledge. In this manual we will apply the term misconceptions, because
it indicates clearly the incorrect character of the knowledge.
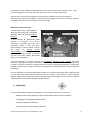
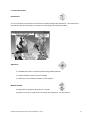
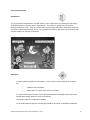
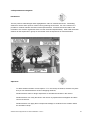
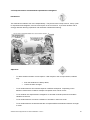
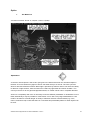
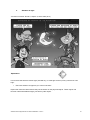
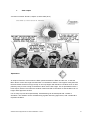
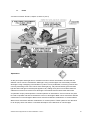
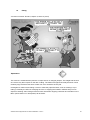
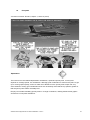
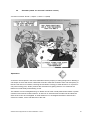
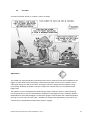
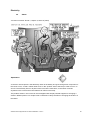
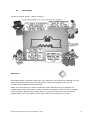
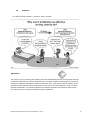
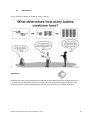
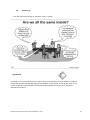
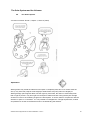
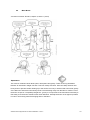
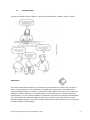
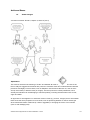
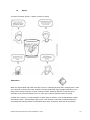
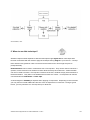
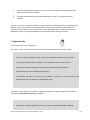
What are concept cartoons?
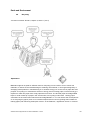
Concept cartoons are simple drawings
which put forward a range of viewpoints
about the science involved in everyday
situations.
In this example an experiment about
shadows is described. Four cartoon
characters try to predict the result of this
experiment, based on their own ideas
about shadows. These possible answers
are
based
on
popular
student
misconceptions. In this way the opinions
expressed will sound familiar to learners
and they will easily identify themselves
with one of the viewpoints.
The main objectives of concept cartoons are stimulating learners to think, discuss, raise new
questions, investigate and bring up arguments. Concept cartoons are more than mere multiple choice
questions. They are instruments to trigger student involvement, thinking and exploration. All answers
represent frequent misconceptions that occur among learners and should therefore be given attention
during class.
It is very important to notice that all possible answers in the cartoon have equal status! Learners have
to try to select and specify the best concepts about the situation. This process of conflict between
different viewpoints is an important aspect of gaining scientific knowledge. For this reason this method
is appropriate for constructivist (student centred) teaching.
2. Objectives
You can reach different objectives, depending on how you apply cartoons in your lesson:
Ͳ
Making studentsʼ ideas explicit (so that potential misconceptions can be identified);
Ͳ
Challenging and developing studentsʼ ideas;
Ͳ
Illustrating alternative viewpoints;
Ͳ
Teaching students to ask scientific questions;
Student Centred Approaches for Science Education – Part 2
14
Ͳ
Providing starting points for investigation (students set up an experiment to verify different
opinions expressed in the cartoon);
Ͳ
Deepening understanding of science concepts.
3. Material
The cartoons must be clearly presented in the classroom. A projector is very useful but if this is not
available you can also provide a copy of the cartoon for the students.
Depending which cartoon you will use and how you will use it, you may need some additional material
such as:
-
Empty sheets (so students can take notes)
-
Experiment material needed for investigation (see description of cartoons).
4. Methods
You can integrate concept cartoons in your lessons through various student centred approaches.
Four ways to apply concept cartoons in class are described in detail, using examples on the topic
“shadows”. Each teaching method integrates a concept cartoon in a student centred way. Try some
other cartoons following the examples below!
Student Centred Approaches for Science Education – Part 2
15
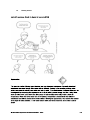
4.1 Class Discussion
Introduction
You can introduce concept cartoons and tests to students through class discussion. This technique is
time-efficient, but lacks the break-out sessions in small groups that activate students.
Objectives
Ͳ
To stimulate discussion of scientific ideas among student teachers.
Ͳ
To activate student teachersʼ prior knowledge
Ͳ
To detect and correct student teachersʼ misconceptions.
Material needed
Ͳ
Concept cartoon (printed or projected on a screen)
Ͳ
A projector or torch as a light source for inquiry and verification (for this cartoon)
Student Centred Approaches for Science Education – Part 2
16
Step-by-step instructions
1.
Show the concept cartoon to the students and explain the context.
2.
Give students a short time for individual reflection, while they read the statements and try to
answer these questions:
a)
With whom do you agree?
b)
Is more than one idea correct?
Why is this question important? Students need to think about why a certain answer is
correct or not. Maybe a statement is only partly true. This reflection time can be
accompanied by small experiments.
c)
Try to construct a definition of shadow.
3.
Do a quick scan to see what the group is thinking (e.g. by raising hands or using voting cards).
4.
Organize a discussion with the whole class. All possible answers are discussed. Use questions
to help students constructing the correct reasoning. For the example on shadows, questions that
can be used are:
a)
What happens if we move our hand closer to a light source?
b)
Is there still a shadow if you cover the light source completely?
c)
Can you think of a situation where the size of the shadow doesnʼt change?
d)
Can you explain why?
e)
How can the size of a shadow cast by the Sun change?
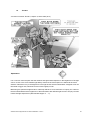
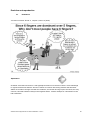
Explanation of statements
1.
My shadow is biggest when I am close to the screen.
2.
Your shadow is biggest when you are close to the lamp.
These two answers are best discussed together because they represent opposite views. Itʼs very
unlikely that a student will agree with both ideas.
Let students discuss and make a plan how to check which answer is correct. The answer can be
found by experimenting and/or by using theory and reasoning. A short experiment with the light
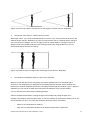
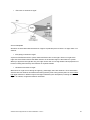
source and hands quickly shows that a shadow is bigger if the object is closer to the light source. It
can also be explained with the fact that light travels by straight lines and that a light source diverges
light in all direction.
Student Centred Approaches for Science Education – Part 2
17
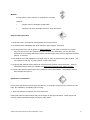
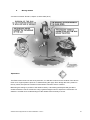
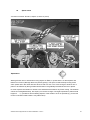
Figure: The closer the object to the light source, the bigger its shadow (Source: Wikipedia)
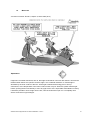
3.
The shadow is the same no matter where you stand.
With a light source, you can demonstrate that this is not true. If you move your hand, the size of the
shadow always changes. Students may notice correctly that the size of a shadow doesnʼt change if
you move around in Sunlight. The Sun is a light source at a great distance. The light rays from a
distant source travel parallel. With the same drawing as before but using parallel rays, you can
demonstrate that the size doesnʼt change.
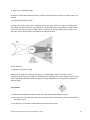
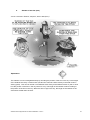
Figure: The shadow doesnʼt change with a distant light source (Source: Wikipedia)
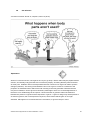
4.
Your shadow will disappear when you are close to the lamp.
When you cover the light source completely, the shadow spreads itself over the whole wall or
classroom. The shadow doesnʼt disappear but everything becomes shadow. Some students may
think that the shadow disappears because the boundary between light and shadow is gone. With this
statement you can start an in-depth discussion about the definition of the concept shadow.
You can start this discussion with the following question:
“What is the difference between covering the light source totally and putting the lights out?”
Actually, both situations have the same effect. In the first situation we speak about shadow, but in the
second situation we donʼt. This starts the discussion about the nature of a shadow.
-
When do we call darkness a shadow?
-
Why donʼt we think about shadows in all situations where there is darkness?
Student Centred Approaches for Science Education – Part 2
18
Conclusion
This concept cartoon shows the need for a good description or definition of the concept shadow.
Moreover, students are stimulated to think about scientific concepts and how to test their hypothesis.
A first conclusion is that in order to have a shadow, you need a light source and an object. A second
conclusion can be that a shadow is the place where there is no light from the light source.
The step-by-step instructions illustrate that it is important to discuss all the statements in the cartoon,
also the ones that are not correct. Students need to be stimulated to think about the statements, to
argue why they are (not) correct, try to design experiments to test the validity of the statements and
formulate definitions of concepts in their own words.
Student Centred Approaches for Science Education – Part 2
19
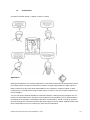
4.2 Group Discussion
Introduction
You only reach the full potential of concept cartoons and concept tests, by providing the opportunity
for student teachers to discuss them in small groups. This allows for students to discuss their
viewpoints with their peers. They can practice their argumentation and listen to alternative viewpoints.
This kind of collaborative learning can be a very powerful experience. We discuss this technique with
a similar example on the topic of shadows.
Objectives
Ͳ
To detect student teachersʼ misconceptions. Some common misconceptions on shadows
are:
•
Shadows are real objects;
•
When there is no light, there can be no shadow.
Ͳ
To make student teachers aware of the logic behind different knowledge models and of the
fact that their validity depends on the circumstances.
Ͳ
To broaden studentsʼ conceptual knowledge.
Ͳ
To let student teachers practice scientific argumentation and listen to alternative viewpoints.
Student Centred Approaches for Science Education – Part 2
20
Material
Ͳ
Concept cartoon (A3 or A4 print, or projected on a screen)
Ͳ
Optional:
•
2-6 light sources, flashlights or light bulbs,
•
a projector can be a good light source for class discussions
Step-by-step instructions
1. Divide the class in small groups and distribute the concept cartoon.
2. Let students think individually with which view they agree (approx. 2 minutes).
3. Encourage discussion and tell groups to seek consensus. If they reach consensus very rapidly,
they must find reasons why students may have another idea. Otherwise, you can add extra
elements such as making distinction between a clouded night and a clear sky night with full Moon
(approx. 10 minutes).
4. Ask students some brief feedback to see what range of views is present among the students. You
can organize a vote (e.g. by raising hands or with voting cards).
5. Let groups with different views share their arguments and organize a class discussion. Discuss
which alternative(s) seem(s) acceptable and what further information we need to be sure.
6. Combine the different ideas and provide a summary of the initial problem. Ask students whether
they changed their opinion.
Explanation of statements
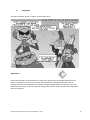
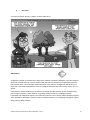
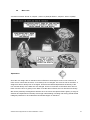
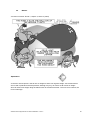
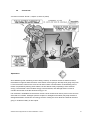
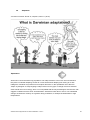
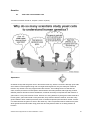
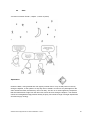
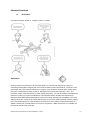
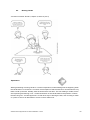
Letʼs assume that we have a dark night (clouded sky, no other light sources). Every view has its own
logic. No statement is completely right or wrong!
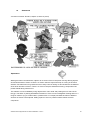
1. There are shadows at night but you cannot see them
Pupils often have this idea because they see shadows as real physical objects. These objects will
become visible with additional light, just like any other object.
Student Centred Approaches for Science Education – Part 2
21
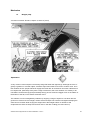
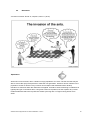
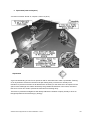
2. There are no shadows at night
Shadows are associated with the absence of light at a particular place. If there is no light, there is no
shadow.
3. Everything is shadow at night
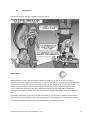
A scheme of a lunar eclipse shows a different view on the night. There is no light in the night portion
of the Earth because that portion of the Earth is in the shadow region of the Earth-Sun system. When
you think of the night this way, the night can be considered as one big shadow. Most people do not
share this opinion because they see shadows as separate entities.
Source: Wikipedia
4. Shadows look darker at night
When there is a light source during the night (e.g. the Moonlight), there are shadows. Close
observation shows that those shadows look darker than during the day. During daytime there is more
indirect light (light reflected on different objects and light scattered by the atmosphere) reaching the
shadow region.
Conclusions
1. Ideas that seem irrelevant at first may turn out to be logical and worthwhile after all.
2. The conclusions we made after the previous concept cartoon are still valid, even if we consider the
Sun/Earth system.
3. The darkness of a shadow is influenced by secondary light sources.
Student Centred Approaches for Science Education – Part 2
22
4.3 Experimental Investigation
Introduction
The two previous methodologies have highlighted the value of scientific discussion. Stimulating
students to discuss their opinions creates a strong learning environment. For some cartoons it is
possible to combine scientific discussion with experimentation. Scientific discussion leads to the
formulation of a research hypothesis which can then be tested experimentally. After initial discussion
students do the experiment in groups or the teacher does the experiment as a demonstration.
Objectives
Ͳ
To detect student teachersʼ misconceptions. For the concept of shadow, students may think
that you can add the darkness of two overlapping shadows;
Ͳ
Student teachers learn to design experiments to simulate the situation in the cartoon.
Ͳ
Student teachers can verify the ideas in the cartoon by experimental investigation and draw
correct conclusions.
Ͳ
Student teachers can apply their conceptual knowledge on shadows for the situation where
two shadows overlap:
Student Centred Approaches for Science Education – Part 2
23
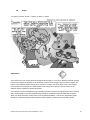
•
Non-transparent object: the overlapping part is as dark as the other shadows,
•
Transparent object: the overlapping part is a bit darker.
Material needed
Ͳ
concept cartoon
Ͳ
material for experiment, for the example on shadows this includes:
•
2-6 light sources, flash lights or light bulbs
•
materials that are not transparent
•
tracing paper or mosquito-net
•
a projector
Ideally there is enough material to let each group execute the experiment.
Step-by-step instructions
1. Introduce the topic to the students.
2. Give students a short opportunity to think individually about the statements on the cartoon. Then,
ask students which statement they agree with (e.g. by raising hands or with voting cards).
3. Let students work together in small groups to investigate the overlap of shadows. It is important
that they simulate the 2 situations: not transparent and transparent. Present them with the
available material, but donʼt give too many instructions. Students should try to design and
execute the experiment themselves.
4. Groups present their outcomes to each other.
5. Organize a class discussion about the concept shadow. Due to the complex situation, the previous
definition of the concept shadow may have to be reconsidered and broadened.
Student Centred Approaches for Science Education – Part 2
24
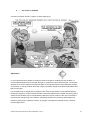
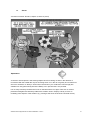
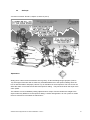
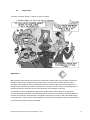
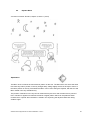
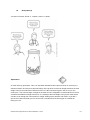
Explanation of statements
With this concept cartoon we need to distinguish between 2 situations.
1. The shadow is twice as dark where the shadows overlap.
When students choose this statement, they consider a shadow as an object. If you add two shadows,
you get a new shadow that is twice as dark. They forget that if there is a shadow, it just means that
there is (almost) no light in that space. “Almost no” light, because there is always some indirect light
we need to take into account.
2. The shadow is just as dark where the shadows overlap.
If shadow is defined as the absence of light of the light source, it is obvious that you can take away
the light from that source only once. If itʼs gone than you canʼt take any more light from the light
source away. So the place where two shadows overlap is as dark as the other shadows. The
experiment makes this clear as long as you overlap the shadows of two objects that are not
transparent.
3. This shadow is a bit darker but not twice as dark.
When a student chooses this answer, he or she has a more complex situation in mind. The situation
drawn in the cartoon is one with trees. Trees are a little bit transparent, depending on their density
and placement of the leaves. The place where the shadows of two trees overlap will be a bit darker.
The leaves of the first tree block only part of the light. The rest of it passes through, but can be
stopped by the leaves of the second tree. Since the overlapping shadow is caused by a double
amount of leaves, the shadow will be a bit darker.
If the experiment from answer 2 is repeated, but now with transparent materials like tracing paper or a
piece of a mosquito-net, this situation will become clear.
Conclusion
The previous definition of the concept shadow has to be changed. A shadow appears when the light
from a light source is totally or partially blocked by an object. In this cartoon the concepts of light and
shadow meet for the first time. In the last experiment you can ask students the thinking question:
“What do we call the spot behind a transparent object? Is it light or shadow?
Student Centred Approaches for Science Education – Part 2
25
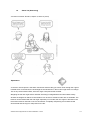
4.4 Group discussion combined with experimental investigation
Introduction
This method lets students work more independently. They discuss the concept cartoon, set up a plan
for experimental investigation, execute it and report on the conclusions. It provides students with a
strongly authentic learning experience and stimulates collaborative learning.
Objectives
Ͳ
To detect student teachersʼ misconceptions. With respect to the concept shadow, students
may:
•
•
think that shadows are always black;
confuse shadow and light
Ͳ
To let student teachers find valuable aspects in different viewpoints. Depending on the
definition used and the conditions multiple conceptual views can be correct.
Ͳ
To let students use experimental investigations to deal with scientific questions and obtain
valuable conclusions.
Ͳ
To let student teachers construct a definition of shadows in their own words
Ͳ
To let student teachers understand that the conceptual difference between shadows and light
is small.
Student Centred Approaches for Science Education – Part 2
26
Material needed
Ͳ
Concept cartoon
Ͳ
Optional (for this concept cartoon)
•
2-6 light sources, flashlights or light bulbs,
•
A projector is a good light source for class discussions.
•
Common materials like plastics, coloured papers, etc..
Step-by-step instructions
1. Introduce the topic and present the concept cartoon. Allow for a short period of individual
reflection, while each student reads all statements. Then, ask students which view they agree
with (e.g. by raising hands or with voting cards).
2. Encourage discussion in small groups (2 to 5 students) and stimulate groups to reach
consensus. When they reach a consensus very quickly, tell the group that other viewpoints are
also correct in some circumstances. Students try to figure out under which conditions each
statement is valid. Ask again for some brief feedback about the range of views present, for
example by having a new vote.
3. Organize a class discussion about how we could find out which alternative(s) are valid and under
which conditions. If necessary, stimulate the discussion with the following questions:
-
What is the definition of shadows? Is this definition applicable to shadows in daily life? Can
we make the definition more general?
Is the shadow of a person on a coloured background (like grass) black?
When there is only red light in a room, will the shadows be red?
Do you understand why shadows on white snow look blue?
4. Small group inquiry. Students work together in small groups to set up experiments to test the
various statements. They record the experiments, observations and conclusions. Afterwards,
students present their outcomes to the class, including which alternative(s) seem(s) acceptable
and what further information we might need to be sure.
5. Combine all ideas together and make a synthesis of the initial problem, the inquiry, the outcome
and what has been learnt.
Student Centred Approaches for Science Education – Part 2
27
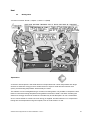
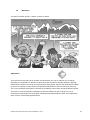
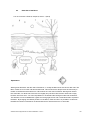
Explanation of statements
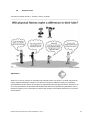
1.
“Shadows are always black”
This is only correct when there is only one light source and no indirect light.
2.
“There is an orange shadow behind the orange card”
This statement refers to confusion between shadow and light. The shadow can have an orange
shade when there is sufficient indirect light. In that case the reflected light on the orange card can
reach the shadow region.
3.
“The orange glass has an orange shadow”
This is correct if it means that the orange spot is the shadow of all the non-orange light frequencies.
4.
“There is no shadow behind the glass only light”
This is correct when you only focus on the point of view of the light. The filter lets the orange
frequencies of the light pass, giving a light spot.
Conclusions
Usually shadows are defined as the region which the direct light of the light source cannot reach.
Since people focus on only one light source, the notion of black shadows is widespread.
However, the extreme situation where there is absolutely no light reaching the shadow region is quite
rare. Look at the shadows around you, and you will see the colour of the substrate (e.g. the dark
green shadows on grass). This means that there is still light that reaches the shadow region. This can
be light from multiple reflections (even blue light reflected by the sky) or from other light sources.
Most people will say that the orange ʻspotʼ behind the orange filter is not coloured shadow, but
coloured light. This is only partly correct because the shadow point of view also makes sense. The
filter stops all the frequencies of the light except for the frequencies of orange light, thus creating a
shadow for the frequencies of non-orange light. So shadows can be light and light can be a shadow.
This manual describes for every cartoon in detail how you can use it. It contains objectives, material
needed, activities and expected results. The methods that were applied for the concept “shadows” will
inspire you to apply them to other cartoons (see the link to curriculum).
Student Centred Approaches for Science Education – Part 2
28
5. When to use concept cartoons?
You can use them at the start of a topic to provide a stimulus for discussion and raise questions
about what needs to be done to find out more. This can help students to identify starting points for
further inquiry and learning.
They can also be used near the end of instruction on a topic. Then the emphasis will lie more on
reviewing and consolidating the learning. Introducing a cartoon will offer an opportunity for students to
apply what they have learned to a real life situation.
6. Examples from the curriculum
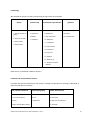
6.1 Physics
We selected 39 cartoons covering a wide range of topics from the curriculum. Each cartoon is
described in detail in Annex 1.
Optic
Mechanics
Heat
Fluids
14. Bungee jump
24. Boiling water
31. Helium balloon
35. Switch
2. Sunglasses
15. Falling
25. Ice and cloth
32. Balloon
36. Current flow
3. Shadow screen
16. Skateboard
26. Teapot
33. Lemonade
37. Thicker wires
4. Shadows at night
17. Soccer
27. Windy day
34. Mountains
38. Longer wires
5. Two trees
18. Space rocket
28. Melting ice
6. The colour of
shadow
19. Fast plane
29. When water is
boiling
1. The white cat
Electricity
39. Electromagnet
20. Moon rock
7. Solar Eclipse
30. Ice cubes
21. Hot air balloon
8. Moving shadow
22. Space walk
9. Shadow of the
Sun (size)
23. Ski slope
10. Curved mirror
11. Prism
12. Torches
13. Mirror box
Student Centred Approaches for Science Education – Part 2
29
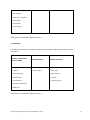
6.2 Biology
We selected 19 cartoons covering a wide range of topics from the curriculum.
Plants
1. Growth direction of
plants
human body
evolution & reproduction
genetics
5. Headstand
8. Dominance
18. Genes
6. Babies
9. Use and Disuse
19. Acquired traits
7. Antibiotics
10. Adaptation
2. Seeds in the dark
3. Heavy plants
11. Competition
4. Rotten apple
12. Reproduction.
13. Resistance
14. Pond Life
15. Variation
16. Variation (2)
17. Timeline of natural
selection
Each cartoon is described in detail in Annex 2.
6.3 Earth and environmental science
For Earth and environmental science, we include 14 model concept cartoons covering a wide range of
topics from the RTTC curriculum.
solar system & Universe
physical geography
Earth & Environment
1. Is it Dark in Space?
10. Soil
12. Recycling
2. Stars
11. Mountains
13. Why is a day 24 hours?
3. Why does the Moon Shine?
Student Centred Approaches for Science Education – Part 2
14. Acid Rain
30
4. Daytime Moon?
5. Moon Shape
6. Dark side of the Moon
7. Moon Boots
8. Space Walk
9. Lunar eclipse
Each cartoon is described in detail in Annex 3.
6.4 Chemistry
For chemistry we include 11 model concept cartoons covering a wide range of topics from the
curriculum.
Mixtures, compounds,
states of matter
1. Liquids
acids and bases
7. Acidic oranges
chemical reactions
8. Rusty nails
2. Scrambled eggs
9. Rusty nails (2)
3. Muddy waters
10. Aspirin
4. Condensation
11. Burning Candle
5. Sweet tea (dissolving)
6. Melting Ice
Each cartoon is described in detail in Annex 4.
Student Centred Approaches for Science Education – Part 2
31
7. Variations
There are more ways to use concept cartoons in your lessons. Some examples:
-
Blank out some speech bubbles and let students complete them.
-
Create your own concept cartoons by collecting studentsʼ ideas.
-
Let groups of student teachers create their own cartoons that reflect the range of ideas in
their group.
-
Advanced student teachers can create their own cartoons to illustrate possible sources of
confusion on a topic.
-
Cartoons can be used as an opening statement to apply reasoning skills such as Agreement
Circles or In the Fishbowl (see chapter on Reasoning Skills). Students take side with a
cartoon character and justify why their view is correct.
-
Creating a concept cartoon can be presented as a challenging activity at the end of an
instruction unit. Student teachers try to design the most imaginative concept cartoon.
8. Important tips
Concept cartoons do not necessarily have a single ʻright answerʼ. In many cases the only
reasonable conclusion involves “It depends on…” statements. Even apparently simple situations can
have a number of complicating factors when they are examined more closely. Often, like in real
science, scientific problems donʼt have a single right answer. It is an important goal for student
teachers to obtain this insight.
Many teachers have problems with this method of teaching science. Their criticism is that the
situations in the cartoons should be specified more clearly, so that there is only one right answer. It is
an important objective of concept cartoons that students learn to express the ideas in the cartoon! It
is important to let student teachers argue and discuss about science, rather than quickly giving the
ʻcorrectʼ answers!
Therefore it is very important to know what possible answers student teachers may give, in order to
anticipate in a good way.
Student Centred Approaches for Science Education – Part 2
32
Annex 1: Concept Cartoons for Physics
(Source ʻConcept Cartoons In Science Education (the ConCISE project), Stuart Naylor & Brenda
Keogh, Millgate House Publishers.)
Disclaimer: The cartoons in this manual were developed by Arteveldehogeschool, based on the work
from Naylor and Keogh. For the Khmer version translated and locally drawn cartoons were used. The
cartoons are copyright protected and cannot be distributed outside RTTCs without written permission
of the copyright holder.
Introduction
In each cartoon the scientific ʻcorrectʼ viewpoint and possible misconceptions are described. We
suggest ideas for scientific investigations and experiments to clarify the concept. The physics
cartoons are divided according to main themes in the curriculum: optics, heat, fluids, mechanics and
electricity.
Student Centred Approaches for Science Education – Part 2
33
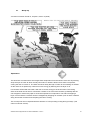
Optics
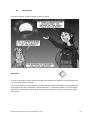
1.
The White Cat
Link with curriculum: Grade 10, chapter 4, lesson 1(2009)
Explanation
A common misconception is that a cat's eyes glow in the dark and that we can see white objects in
the dark. Of course without any light we will not see either the eyes or the cat. The cat's eyes and
white fur are both reflective surfaces. When light is present they reflect it and we can see them clearly.
In absence of light however, these surfaces wonʼt reflect any light either and remain invisible. The
cat's eyes and its fur do not generate light themselves, so neither can be seen in complete darkness.
Access to a completely dark room is necessary to test the different possibilities. A windowless room is
ideal; alternatively it may be possible to create a dark "room" with a very large cardboard box. Care
needs to be taken to exclude all light. A variety of reflective surfaces could be tested (e.g. coins,
mirrors, aluminium foil) to show that there is a consistent and predictable pattern for when objects can
be seen.
Student Centred Approaches for Science Education – Part 2
34
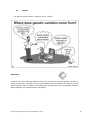
2.
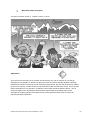
Sunglasses
Link with curriculum: Grade 9, chapter 5, lesson 2&3 (2011)
Explanation
People at the beach may be surprised how easily they get Sun burnt by Sunlight reflecting off the
sand. The reflection from the sand increases the total amount of Sunlight striking the body, so
wearing Sunscreen and Sunglasses is important. However all light comes from the Sun. The snow
itself does not produce or store any light, but simply reflects it Sun. Snow and sand reflect light better
than soil and grass.
Student Centred Approaches for Science Education – Part 2
35
3.
Shadow screen
Link with curriculum: Grade 9, chapter 5, lesson 2&3 (2011)
Explanation
The closer the person is to the light source, the more light will be blocked. The shadow will be biggest
when the person stands close to the lamp. Rays of light from the lamp spread out in all directions, so
close to the lamp the light rays are diverging. If the Sun is used as a light source the rays of light are
parallel and the distance from the screen makes no difference to the size of the shadow.
The situation can be modelled using a range of objects or shadow puppets cut out from cardboard.
Drawing simple diagrams of what is happening to the light and shadow will help to reinforce the idea
that light travels in straight lines.
Student Centred Approaches for Science Education – Part 2
36
4.
Shadows at night
Link with curriculum: Grade 9, chapter 5, lesson 2&3 (2011)
Explanation
Letʼs assume that we have a dark night (clouded sky, no other light sources). Every view has its own
logic:
• “There are shadows at night but you cannot see them”
Pupils often have this idea because they see shadows as real physical objects. These objects will
become visible with additional light, just like any other object.
Student Centred Approaches for Science Education – Part 2
37
• “There are no shadows at night”
Source: Wikipedia
Shadows are associated with the absence of light at a particular place. If there is no light, there is no
shadow.
• “Everything is shadow at night”
A picture of the Earth and Sun system sheds a different view on the night. There is no light at the
night side of the Earth because that Earth side lies in the shadow region of the Earth-Sun system.
When you approach the night this way, the night can be seen as one big shadow. Most people do not
have this feeling because they see shadows as separate entities.
• “Shadows look darker at night”
When there is a light source during the night (e.g. Moonlight), there are shadows. Close observation
shows that those shadows look darker than during the day time. During the day there is more indirect
light (light reflected on different objects and light scattered by the atmosphere) reaching the shadow
region. So indeed, at night the shadows are darker.
Student Centred Approaches for Science Education – Part 2
38
5.
Two trees
Link with curriculum: Grade 9, chapter 5, lesson 2&3 (2011)
Explanation
A shadow is caused by the absence of light. If two shadows overlap the darkness of the two shadows
would not normally result in a darker shadow. With the trees the situation is complicated by the fact
that the trees donʼt cast a complete shadow because of the number, arrangement and thickness of
the leaves. The shadow will therefore be more complete where the two trees overlap, even if it is not
darker.
Observation of actual shadows cast by trees is not difficult and the situation can be modelled using
card or paper models to cast a shadow. Comparing shadows made by overlapping opaque,
translucent and transparent objects is an interesting extension to the activity. With transparent objects
some light will be absorbed to produce a faint incomplete shadow, so overlapping transparent objects
will produce a darker shadow.
Student Centred Approaches for Science Education – Part 2
39
6.
The colour of shadows
Link with curriculum: Grade 9, chapter 5, lesson 2&3 (2011)
Explanation
In most circumstances a shadow is simply the absence of light so shadows usually are black. A
coloured filter absorbs some of the light, but light of a particular colour passes through. The shadow
will then be an area of reduced and coloured light. An orange filter will let orange light pass through
and produce an orange shadow. Since the orange card blocks all light its shadow will be darker than
that from the filter.
It is possible to set up simple tests to determine the colour of the shadow cast by different objects.
Placing the objects on a white surface will help to make the shadows more visible. If a glossy card is
used then the situation may be complicated by reflection from the surface of the card, so that there
may be a faint orange tinge to the shadow. Interesting comparisons could be made between the
shadows cast by dull or reflective surfaces, by opaque or transparent materials and by a white or
coloured light source.
Student Centred Approaches for Science Education – Part 2
40
7.
Solar eclipse
Link with curriculum: Grade 9, chapter 5, lesson 2&3 (2011)
Explanation
An eclipse of the Sun occurs when the Moon passes between the Earth and the Sun, so that the
Moon blocks out the Sun's light and the Earth is in the Moon's shadow. This happens rarely because
the three bodies need to line up precisely. It can only happen with the Moon's shadow since no other
planetary body is close enough to the Earth to block out the Sun's light. This is quite different from a
lunar eclipse, which occurs when the shadow of the Earth falls on the Moon so that the Moon can no
longer reflect light from the Sun.
It is not easy to prove this experimentally. Understanding can be developed with a model or
simulation. The situation can be modelled using a globe and strong light source, with a small ball to
represent the Moon.
Student Centred Approaches for Science Education – Part 2
41
8.
Moving shadow
Link with curriculum: Grade 9, chapter 5, lesson 2&3 (2011)
Explanation
The Earth rotates around its axis every 24 hours, so it will take 24 hours for the shadow of the stick to
return to its original position (there is no shadow during the night). Even though the Sun's position in
the sky varies, the speed of movement of the shadow round the stick is constant.
Measuring the change in position of the shadow cast by a stick during the daytime will give direct
evidence about the rate of movement. Using a globe and light source to explore the movement of a
shadow is a useful aid to understanding how the shadow forms and why it moves.
Student Centred Approaches for Science Education – Part 2
42
9.
Shadow of the Sun (size)
Link to curriculum: Grade 9, chapter 5, lesson 2&3 (2011)
Explanation
The situation can be investigated directly by recording the position of the Sun in the sky or the length
of the shadow formed by a vertical stick (see also the summer solstice activity in the earth science
activity guide). This can be carried out at different times of day and at different times of year to show
how the position of the Sun in the sky seems to vary. The length of the shadow varies according to
the position of the Sun in the sky. When the Sun is high in the sky, the length of the shadow of the
stick will be smaller than the stick.
Student Centred Approaches for Science Education – Part 2
43
10.
Curved mirror
Link with curriculum: Grade 9, chapter 5, lesson 4 (2011)
Explanation
Although with a convex mirror the image is always the right way up, this is not the case with a
concave mirror. The image in a concave mirror can be the right way up or upside down, depending on
the curvature of the mirror and how far away the object is. The critical factor is the position of the
object in relation to the focal point (that is the point at which rays of light reflected from the mirror
cross). If the object is closer to the mirror than the focal point then the image will be upright and
magnified. If the object is further away from the mirror, the image will be upside down and reduced in
size.
Systematic observation of the type of image produced by concave mirrors in different circumstances
will produce consistent patterns in the size and orientation of the images. The concept can be applied
to a range of everyday situations such as car wing mirrors and make-up mirrors.
Student Centred Approaches for Science Education – Part 2
44
11.
Prism
Link with curriculum: Grade 9, chapter 5, lesson 4 (2011)
Explanation
As the prism splits white light into its constituent colours it seems reasonable to assume that the
different colours can be recombined to white light. Using coloured lights can successfully recreate
white light. Using overlapping coloured filters or paints is more problematic, since they produce their
colour by absorbing some of the colours from white light (e.g. red paint will absorb green and blue
light but reflect red light so that the paint appears red). Adding more paint or more filters therefore
subtracts more and more colours from white light. The ultimate result is black rather than white.
A systematic enquiry should produce consistent patterns of observations. Can more than one prism
be used to separate and then recombine the colours in white light? What colours result from different
combinations of coloured lights? What colours result from different combinations of coloured filters?
What colours result from different combinations of coloured paints? These questions form the basis
for an enquiry which can lead to a consistent description of the behaviour of coloured light.
Student Centred Approaches for Science Education – Part 2
45
12.
Torches
Link with curriculum: Grade 9, chapter 5, lesson 2&3 (2011)
Explanation
It is a common misconception that the distance that light travels depends on the brightness of the light
source. In fact in the same medium light always travels at the same speed so it will travel the same
distance. What does vary is the brightness of the light and/or the area illuminated. A brighter torch can
illuminate a bigger area, illuminate an area more brightly or both.
Measuring the speed that light travels is extremely difficult. A more useful line of enquiry is to observe
the area illuminated and the brightness of the illumination with different light sources. Enquiry can also
include thought experiments ("What would happen if . . .?").
Student Centred Approaches for Science Education – Part 2
46
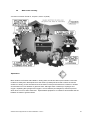
13.
Mirror box
Link with curriculum: Grade 9, chapter 5, lesson 2&3 (2011)
Explanation
If light were a material substance, like air, then light would still be in the box after the lid is shut and be
released when the lid was opened. However, light is not a material substance. In fact the light is
absorbed by the inner surface of the box. As the light is absorbed the energy has to end up
somewhere, so the temperature of the mirrors will increase a tiny bit. Given the speed at which light
travels, opening the box lid carefully to see if any light comes out is impossible. Nevertheless in theory
it would be possible to shine a light into the box, shut the lid and then open it in a completely dark
area to show that no light emerges.
Student Centred Approaches for Science Education – Part 2
47
Mechanics
14.
Bungee jump
Link with curriculum: Grade 8, chapter 2, lesson 3 (2010)
Explanation
A very common misconception is that heavy things fall faster than light things. Although the force of
gravity is greater on a heavier object, a heavier object also needs more force to make it move. So in
this situation the two people will fall at roughly the same rate. Air resistance can make a difference to
how objects fall, particularly if they have a large surface area, but in this situation it is unlikely to be
noticeable. However the big (and presumably heavy) person will exert a bigger force on the elastic at
the bottom of the fall, so the elastic will stretch more.
The situation can be investigated by students by dropping a range of objects to see which hits the
ground first. Factors such as weight, surface area and shape can each be investigated. Keeping the
other factors constant while varying the weight shows that weight makes no difference and
emphasises the effect of shape and surface area on the rate of falling (see next cartoon).
Student Centred Approaches for Science Education – Part 2
48
15.
Falling
Link with curriculum: Grade 8, chapter 2, lesson 3 (2010)
Explanation
This cartoon is related with the previous concept cartoon on bungee jumpers. The weight and the size
do not have any direct impact on the rate of falling. The feather and paper fall slowly because of their
relatively large surface areas which create a lot of air resistance as they fall.
Investigations could include finding out how to make the paper fall faster, such as screwing it up or
folding it. Similarly the effect of modifying the vane or dropping the feather in different ways can be
explored. Showing video footage of the first lunar astronauts dropping a hammer and a feather on the
Moon (where there is no atmosphere) will be useful.
Student Centred Approaches for Science Education – Part 2
49
16.
Skateboard
Link with curriculum: Grade 8, chapter 2, lesson 2 (2010)
Explanation
Although it seems counterintuitive, objects do not need a force to keep them moving. Moving objects
slow down because of friction. If there is no friction then the object will keep on moving in the same
direction. We take friction for granted and donʼt really notice its acting. In this situation the skateboard
slows down because of friction. There is no force to keep the skateboard moving, except when she
pushes herself along with her foot.
The situation can be modelled by using objects which roll or slide and pushing them to see how far
they go. The effect of pushing with different amounts of force can be investigated. Pushing them on a
range of surfaces (e.g. a wooden table, a polished floor or a carpet) will allow the effect of different
amounts of friction to be explored. Sliding a piece of ice on a polished surface makes a useful
comparison.
Student Centred Approaches for Science Education – Part 2
50
17.
Soccer
Link with curriculum: Grade 8, chapter 2, lesson 3 (2010)
Explanation
A common misconception is that moving objects have force acting on them in the direction of
movement. With the football the only forces acting when it is in the air are gravity and a small force
due to air resistance. In theory it would never come down if you could kick it hard enough (like
satellites can stay permanently above the Earth), but in practice this is not possible.
It is not easy to directly measure the forces on the ball while it is in flight. There are no obvious
practical investigations that directly address the situation shown. Enquiry is likely to focus on
modelling some aspects of the situation (e.g. looking at the forces involved in horizontal motion).
Student Centred Approaches for Science Education – Part 2
51
18.
Space rocket
Link with curriculum: Grade 8, chapter 2, lesson 3 (2010)
Explanation
Although friction acts to slow down moving objects on Earth, in space there is no atmosphere and
therefore no friction (although there may still be gravity). The space rocket will keep moving at the
same speed and in the same direction when its fuel runs out. If it is close enough to another star or
planet to be affected by their gravitational field then it will gradually fall towards the star or planet.
In some respects the situation is similar to the skateboard but without any friction acting. The situation
cannot be investigated directly, but enquiry can include a range of thought experiments ("What would
happen if . . .?"), predictions and modelling aspects of the situation as far as possible (e.g. horizontal
motion in situations where there is very little friction).
Student Centred Approaches for Science Education – Part 2
52
19.
Fast plane
Link with curriculum: Grade 8, chapter 1, lesson 2 (2010)
Explanation
The issue here is the relationship between acceleration, speed and journey time. Journey time
depends on average speed, not acceleration. Although good acceleration is useful for the plane to get
up to cruising speed quickly, it will not make much difference to the journey time except over very
short distances. Having good acceleration does not necessarily mean that the top speed is greater or
that the journey time will be noticeably less.
Enquiry can include calculating journey times in a range of situations, drawing distance-time graphs
and the use of computer simulations.
Student Centred Approaches for Science Education – Part 2
53
20.
Moon rock
Link with curriculum: Grade 10, chapter 1, lesson 4 (2009) & Grade 7, chapter 4, lesson 3 (2009)
Explanation
Since the rock weighs less on the Moon than on Earth we would expect it not to sink. However, its
mass and its volume are the same, so its density has not changed. The same is true for the water - it
weighs less but its density has not changed. Therefore the relationship between the density of the
rock and the density of the water has not changed. So the rock will sink on the Moon like it does on
Earth. Since the force of gravity on the Moon is smaller than on Earth, the rock will sink more slowly.
We cannot practically investigate the situation since we cannot escape the Earth's gravity. A range of
activities and experiments to develop a thorough understanding of floating and sinking should enable
intelligent predictions to be made about what would happen on the Moon.
Student Centred Approaches for Science Education – Part 2
54
21.
Hot air balloon
Link with curriculum: Grade 8, chapter 2, lesson 3 (2010)
Explanation
This concept cartoon raises the question of conservation of mass. Is the amount of food the same
whether it is outside or inside the body? Of course eating the food will not make any difference to the
overall weight of the balloon and passengers. It could be argued that over longer periods of time the
food is metabolised and most of it ends up as carbon dioxide and water, both of which are breathed
out from the lungs, so the balloon and passengers must slowly get lighter!
It is not possible to directly test this with a hot air balloon, but thought experiments and predictions
involving similar situations are a useful line of enquiry.
Student Centred Approaches for Science Education – Part 2
55
22.
Space walk
Link with curriculum: Grade 8, chapter 2, lesson 2 & 3 (2010)
Explanation
A good understanding of how forces operate is vital for astronauts who make a spacewalk! Pushing
off in any direction will result in the astronaut just floating away, since there is virtually no air
resistance to prevent movement. It will therefore be necessary for the astronaut to be roped onto the
space rocket. Although s/he will be attracted by the gravitational attraction of the rocket, the size of
this force is much too small to prevent the astronaut from floating away.
There are no practical investigations that directly address the situation shown. Enquiry is likely to
focus on thought experiments and reasoning by analogy.
Student Centred Approaches for Science Education – Part 2
56
23.
Ski Slope
Link with curriculum: Grade 9, chapter 2, lesson 2 (2011)
Explanation
Sliding down a hill involves acceleration due to gravity. So like the falling bungee jumpers (cartoon
14), the weight of the skier will not make any noticeable difference to the speed of sliding down the
hill. As with the feather and paper (cartoon 15), air resistance is more important. The size of skis can
affect the skiersʼ control but will not affect the speed of sliding. They will all ski down the slope at the
same speed.
The situation can be modelled by sliding objects down a ramp to find out whether the weight of the
object makes any difference to the speed of sliding. A useful arrangement is to use a piece of curtain
rail as a track and to roll marbles or balls down it.
Student Centred Approaches for Science Education – Part 2
57
Heat
24.
Boiling water
Link with curriculum: Grade 7, chapter 1, lesson 1-3 (2009)
Explanation
A common misconception is that small amounts of liquid will boil at a lower temperature than larger
amounts. It takes less energy to boil a smaller amount of liquid so small amounts will boil more
quickly, but the boiling temperature will be exactly the same.
The situation can be investigated using a container for boiling water. It is possible to compare the time
taken to boil and the boiling temperature using different amounts of water. The effect of heating the
water more strongly can also be measured. The ideal way to heat the liquid is to use a small heater
since it can be difficult to control how much energy is supplied. A useful extension is to compare the
boiling time and temperature using other liquids, such as a salt solution or milk.
Student Centred Approaches for Science Education – Part 2
58
25.
Snowman (called “Ice and cloth” in Khmer version)
Link with curriculum: Grade 7, chapter 1, lesson 1-3 (2009)
Explanation
A common misconception is that some materials have the property of making things warm. Wearing a
coat keeps us warm and causes a belief that it will also make the snowman warm and melt quickly. In
fact the coat acts as an insulator, reducing the movement of energy in either direction. On a person it
can prevent energy loss, while it prevents the snowman from getting warmer. The snowman will
therefore not melt easily while wearing a coat.
The situation can be investigated using ice. Water can be frozen inside plastic drinks bottles or plastic
containers and used as model snowmen. An old sock or cloth will make a model coat and allow the
effect of the coat to be investigated. A useful extension is to investigate the effect of other factors
such as the nature, colour and thickness of the coat.
Student Centred Approaches for Science Education – Part 2
59
26.
Teapot
Link with curriculum: Grade 7, chapter 2, lesson 1 (2009)
Explanation
The issue here is how quickly thermal energy travels through or is lost from different materials. Energy
loss from the teapot will depend on the thickness (it takes more energy to warm a thicker teapot), the
nature of the material (metals are good conductors of energy), the colour (dark colours lose energy
more quickly) and how shiny it is (dull surfaces lose energy more quickly). The interaction of the
different factors is difficult to predict accurately.
The situation can be investigated using real teapots full of hot water and measuring the rate of cooling
with a thermometer. It can be modelled using containers of different materials filled with hot water,
which can allow the effect of each factor to be analysed separately. The physics experiment guide
describes a useful experiment where students work together to make the best insulating bottle.
Student Centred Approaches for Science Education – Part 2
60
27.
Windy day
Link with curriculum: Grade 10, chapter 2, lesson 3 (2009)
Explanation
The wind feels cool because it encourages faster evaporation from the surface of the skin. By blowing
away the layer of moist air which usually surrounds our bodies it allows more water to evaporate,
cooling the skin as it does so. The wind also blows away the layer of warm air surrounding our bodies.
As this warm air is replaced by colder air we lose energy by warming this new layer of air.
If a container is filled with hot water it will cool as it loses energy to the environment. The cooling
effect of the wind can be seen if a fan blows a stream of air around the container, preferably with the
can wrapped in moist tissue paper to show the importance of evaporation. The effect of trapping a
layer of air around the container can be investigated by wrapping an insulator (such as wool or bubble
wrap) around the container and comparing the rate of cooling.
This concept can also be explored with the situation of a fan providing cooling during hot days. (see
cartoon in Khmer version).
Student Centred Approaches for Science Education – Part 2
61
28.
Melting ice
Link with curriculum: Grade 10, chapter 2, lesson 3 (2009)
Explanation
This concept cartoon illustrates the potential confusion between weight and density. Ice is less dense
than water, which is why it floats on water. When the ice melts its weight does not change. Ten grams
of ice will melt to give ten grams of water. However the volume does change when the ice melts. Ten
grams of water take up less space than the ten grams of ice, so the density of the ice is less than the
density of the water. There is plenty of scope for confusion here! The water and ice are exceptional in
that almost all other substances get denser as they solidify.
The weight of a given amount of ice can be measured before and after melting to see whether or not
the weight changes. Exploring how density alters with changes of temperature is more interesting and
can lead to discussions (e.g. In the fishbowl) on why icebergs float, where ice forms as water is
freezing and how fish manage to survive over the winter when ponds freeze.
Student Centred Approaches for Science Education – Part 2
62
29.
When water is boiling
Link with curriculum: Grade 10, chapter 2, lesson 3 (2009)
Explanation
Most students are familiar with bubbles in boiling water, but what makes up the bubbles is less well
understood. Many think that liquids boil at the surface, probably because that is where we see the
evidence of boiling. In fact the water boils at the bottom of the pan because that is where it is heated
and the water turns into bubbles of gaseous water, Although water is made up of hydrogen and
oxygen, separating the hydrogen and oxygen is a more difficult (and dangerous) chemical process
which does not occur when water boils. Sophisticated equipment it is needed to demonstrate that the
bubbles are made of gaseous water.
Student Centred Approaches for Science Education – Part 2
63
30.
Ice cubes
Link with curriculum: Grade 10, chapter 2, lesson 3 (2009)
Explanation
The smaller ice cube will melt first. Assuming that the two ice cubes have the same temperature, the
bigger ice cube needs more heat energy to melt it because there is more ice to be melted. The ice
cubes gain energy from the environment. The bigger cube has a larger area and will gain energy
more quickly. However the smaller cube has a larger area: volume ratio, so it will melt before the
bigger cube.
The situation can be investigated quite easily using a range of different sized ice cubes and timing
how long they take to melt. A useful extension would be to investigate the rate of melting at different
temperatures to show that the bigger ice cube takes longer to melt whatever the outside temperature
(as long as it is the same for each cube). Students can analyse this quantitatively using various ice
volumes and/ or temperatures and plot their results in a graph.
Student Centred Approaches for Science Education – Part 2
64
Fluids
31.
Helium balloon
Link with curriculum: Grade 7, chapter 1, lesson 2 (2009)
Explanation
Students find it in general more difficult to understand floating in air than floating in water. In this case
the helium is buoyant compared to air. In other words it weighs less than a similar volume of air, so a
balloon full of helium will float in air. The situation is complicated by thermal expansion and
contraction. When the balloon is warmed its volume increases, its density decreases and it will float
better. The reverse occurs when it is placed into a freezer.
Very few commonly occurring substances are lighter than air. If helium balloons are available, you
can investigate the situation. A range of enquiries can be undertaken, including observing the effect of
letting some helium out, warming and cooling the balloons.
Student Centred Approaches for Science Education – Part 2
65
32.
Balloon
Link with curriculum: Grade 7, chapter 4, lesson 4 (2009)
Explanation
A common misconception is that air has no weight or that it has negative weight. Like all substances
air is made of particles and these particles, although very tiny, do have a small amount of weight.
Since air does have weight, filling the balloon with air will make it heavier. The more air it contains, the
more it will weigh.
Student Centred Approaches for Science Education – Part 2
66
33.
Lemonade
Link with curriculum: Grade 7, chapter 4, lesson 4 (2009)
Explanation
A common misconception is that gases have no weight or that they have negative weight. When the
cap is taken off the lemonade bottle carbon dioxide gas will escape. Like all substances carbon
dioxide gas is made of particles with a small amount of weight. The lemonade will weigh less when
the gas has escaped. Although some air may dissolve in the lemonade and replace some of the
carbon dioxide, there will still be an overall weight loss. With a sensitive scale the bottle can be
weighed before and after the cap is removed.
Student Centred Approaches for Science Education – Part 2
67
34.
Mountains
Link with curriculum: Grade 7, chapter 4, lesson 4 (2009)
Explanation
The issue here is the nature of air particles and where they are. The air particles do not change
depending on temperature or altitude, but there are fewer air particles at higher altitudes. Although
individual air particles are moving around randomly at high speeds, they are still attracted to the Earth
by the force of gravity so there will be more particles at the bottom of the mountain than at the top.
This is why the Earth's atmosphere only takes up a relatively narrow band around the Earth's surface.
There are no obvious practical investigations to test this situation. Enquiry is likely to focus on
reasoning from experience and by analogy. Predicting what would happen if each of the statements
were correct is a useful thought experiment.
Student Centred Approaches for Science Education – Part 2
68
Electricity
35.
Switch
Link with curriculum: Grade 7, chapter 3, lesson 6 (2009)
Explanation
A common misconception is that electricity starts at the battery and goes through each component of
the circuit in turn, so that a switch needs to be on the "positive" side of the lamp in order to turn it on
and off. The electricity flows in all parts of the circuit at the same time, so the switch could be
anywhere in the circuit and it would still have an effect on the lamp.
The problem shown in this circuit can be investigated with simple practical equipment. Arranging a
switch in different places in a simple circuit is sufficient to clarify the effect of changing the location of
the switch.
Student Centred Approaches for Science Education – Part 2
69
36.
Current flow
Link with curriculum: Grade 7, chapter 3, lesson 2 (2009)
Explanation
Since batteries go flat something must be being "used up" in electrical circuits. It therefore seems
reasonable to suppose that there will be more electric current going to the lamp than going away from
it. The fact that the current is the same in both wires seems counterintuitive. Understanding can be
further complicated by learning about electric current without clearly separating it from electrical
energy. The electrical current enables energy to be transferred, and although electric current is
constant around the circuit the electrical energy is not.
If an ammeter is available then the electric current can be measured at various points on the circuit to
show that it is constant. Analogies (see the chapter on analogies and models) may help students to
distinguish between current flow and energy transfer. Finding out more about the chemical reactions
going on inside the battery is also helpful.
Student Centred Approaches for Science Education – Part 2
70
37.
Thicker wires
Link with curriculum: Grade 7, chapter 3, lesson 4 (2009)
Explanation
Many students suppose that with thicker wires there will be more electricity flowing and the lamp will
be brighter. However using thicker wires in a circuit does not make the lamp shine more brightly. The
brightness of the lamp depends on the resistance to the flow of electric current round the circuit. The
limiting factor in determining the flow of electric current is therefore the thickness of the filament in the
lamp.
The situation can be investigated by setting up a simple circuit in which thinner or thicker wires
connect the battery to the lamp. With very thin wires it should be possible to notice that the current
flow is reduced and the lamp is dimmer, though thicker wires do not normally make any difference.
This cartoon is a useful introduction to the concept of resistance and to how current flow in a circuit is
controlled.
Student Centred Approaches for Science Education – Part 2
71
38.
Longer wires
Link with curriculum: Grade 7, chapter 3, lesson 4 (2009)
Explanation
Many students think that with longer wires the electricity will take longer to get round the circuit and
the light will be dimmer. However, using longer wires in a circuit does not make the lamp shine
noticeably more brightly or dimly. The electricity flows in all parts of the circuit at the same time, so
having longer wires does not make any difference to the flow of electric current. The limiting factor in
determining the flow of electric current is the thickness of the filament in the lamp.
The situation can be investigated by setting up a simple circuit in which longer or shorter wires
connect the battery to the lamp. Normally the length of wire does not make any noticeable difference.
However there may be some reduction in brightness with very long wires or with reasonable lengths
of very thin wires. This can be a useful introduction to the concept of resistance and to understanding
how current flow round a circuit is controlled.
Student Centred Approaches for Science Education – Part 2
72
39.
Electromagnet
Link with curriculum: Grade 7, chapter 5, lesson 3
Explanation
The magnetic effect of electrical current flow is very important in our electronic age. Although it can be
shown most readily using a nail or some other soft iron object as a magnetic core, this is not
necessary for the magnetic effect to be present.
Setting up a circuit like the one shown will allow the various alternatives to be investigated. The
magnetic effect can be shown with a compass needle or by the degree of attraction shown to objects
such as paperclips. Exploring the magnetic effect of a coil of wire without the nail shows that the
magnetic effect is due to the electric current and not because of the presence of the nail.
Student Centred Approaches for Science Education – Part 2
73
Annex 2: Concept Cartoons for Biology
Disclaimer: The cartoons in this manual have been developed by Arteveldehogeschool, based on the
work from Naylor and Keogh. For the Khmer version translated and locally drawn cartoons were used.
The cartoons are copyright protected and cannot be distributed outside RTTCs without written
permission of the copyright holder.
Introduction
In each cartoon the scientifically ʻcorrectʼ viewpoint and possible misconceptions of the students are
described. We also suggest experiments and other student centred approaches to teach the concept.
Student Centred Approaches for Science Education – Part 2
74
Plants
40.
The Growth Direction of Plants
Link to curriculum: Grade 10, chapter 1, lesson 5 (2008)
Source: Brenda Keogh and Stuart Naylor
Explanation
Did you ever wonder why plants in nature always seem to grow the right way up, even though their
seeds have landed on the ground in a random manner? It doesn't matter which way up the seeds are
when they start to grow. There are mechanisms - called tropisms - inside the plant which ensure that
the shoots always grow upwards or towards the light and the roots always grow downwards or
towards water. Seeds can be grown in suitable conditions to find out whether the orientation of the
seeds makes any difference to how they grow. It is necessary to provide the conditions that they need
for germination to occur (air, moisture and warmth). The seeds can be planted in various orientations,
including letting them begin to grow and then inverting them. Large seeds are easiest to manipulate.
Student Centred Approaches for Science Education – Part 2
75
41.
Seeds in the Dark
Link with Curriculum: Grade 10, chapter 1, lesson 5 (2008)
Source: Brenda Keogh and Stuart Naylor
Explanation
The fact that green plants need light to grow is common knowledge. Therefore many students think
that seeds also need light to start growing. This is not the case. Although a small number of seeds
(e.g. lettuce) may need some light to break their dormancy, most seeds do not require any light. If
they did need light, none of them would grow when buried under the ground. The influence of light
can be tested with a range of seeds. It is necessary to provide the other conditions that they need for
germination to occur (air, moisture and warmth). You can vary the amount of light from dark to bright
light.
Student Centred Approaches for Science Education – Part 2
76
42.
Heavy plants
Link with curriculum: Grade 7, chapter 2, lesson 2 (2009)
Source: Brenda Keogh and Stuart Naylor
Explanation
A common misconception is that plants feed on soil through their roots in the same way that animals
take in food through their mouths. This is not correct. Although it seems unlikely that air and water
turn into new cells in the plant, this is what happens in the process of photosynthesis, where carbon
dioxide (from the air) and water (from the soil) produce glucose with the aid of light energy. The
various factors can be separated to some extent to show that the soil is not necessary for plant
growth (though small quantities of minerals from the soil are necessary). Weighing the soil before and
after a period of plant growth will also demonstrate that soil is not taken up through the roots.
Student Centred Approaches for Science Education – Part 2
77
43.
Rotten Apple
Link with curriculum: Grade 10, chapter 1, lesson 2(2008)
Explanation
A common misconception is that rotting is caused by adverse environmental conditions which
somehow attack organic material. Few students are generally able to point out what happens during
the rotting process. In fact organic material rots because microbes (microscopic organisms such as
bacteria) feed on it. This may not be obvious because microbes are invisible to the naked eye.
However the amount of moisture, the temperature and acidic conditions can all influence how rapidly
the microbes feed on the apple and cause it to rot. The speed of rotting of an apple can be
investigated by leaving it on the surface of different types of soil and in a range of different conditions.
The action of microbes can be prevented by using a disinfectant solution or a bactericidal spray to
sterilize the apple every few days.
Student Centred Approaches for Science Education – Part 2
78
Human body
44.
Headstand
Link with curriculum: Grade 8, chapter 3, lesson 4 (2010)
Explanation
How does blood get to the head normally? Since the head is above the heart it seems that the heart
must be able to pump blood upwards against gravity, suggesting that the feet will continue to get
blood during a headstand. However the distance that the blood needs to be pumped will be greater
during a headstand. The heart will need to work harder to pump the blood this extra distance.
Similarly the blood may not return from the head as readily as it does normally. There should be
some visible signs of any changes in the pattern of blood circulation. If blood leaves the feet more
quickly than usual they will go pale. If blood does not leave the head as quickly as usual, then the
face will go red. If the heart has to work harder, then the pulse rate should increase. Each of these
can be tested with a healthy volunteer.
Student Centred Approaches for Science Education – Part 2
79
45.
Babies
Link with curriculum: Grade 10, chapter 1, lesson 6 (2008)
Explanation
There is no simple single answer to the question of why humans don't lay eggs. Internal development
is safer and more efficient, potentially resulting in larger offspring that can be more highly developed
when they are born. A human egg would need a very thick eggshell to protect it and this might be a
problem for the baby to break through. If humans did lay eggs they would also have developed other
adaptations, such as burying their eggs, protecting them or making nests of some sort to lay their
eggs in. There is no experimental investigation in this situation. Discussion into how a range of
different animals reproduce will help to show how human reproduction is consistent with
developments in other animals.
Student Centred Approaches for Science Education – Part 2
80
46.
Antibiotics
Link with curriculum: Grade 11, chapter 3, lesson 2 (2009)
Explanation
This cartoon topic is something that students may have heard about at home, and may think that they
understand. Character C is correct. All bacteria do not acquire resistance, and people do not become
resistant to antibiotics (although the bacteria inside them can). This cartoon helps to explain why it is
important to take antibiotics long enough when you are sick. If you stop taking it too early, not all the
bacteria will be killed. The remaining bacteria may develop resistance and spread to other people,
who can then not be cured anymore with this type of antibiotics.
Student Centred Approaches for Science Education – Part 2
81
Evolution and reproduction
47.
Dominance
Link with curriculum: Grade 11, chapter 3, lesson 2 (2009)
Explanation
Character A has the best answer. A trait typically becomes more common if there is some advantage
to organisms that have that trait. Answer C reflects a common idea among students that dominant
alleles are somehow stronger. Answer B is irrelevant, and answer D brings up the erroneous, but very
common, idea that mutations always have negative effects. Another example of a dominant but rare
trait is dwarfism.
Student Centred Approaches for Science Education – Part 2
82
48.
Use & Disuse
Link with curriculum: Grade 12, chapter 6, lesson 2 (2010)
Explanation
Answer C is the best choice, since genes do not just "go away". Both A and B may be popular student
choices, and actually, body parts that are not used may atrophy, assuming that they were functional
at some point. Students often incorrectly believe that use or disuse of an organ can lead to species
changes (evolution). The driving force behind the loss of an organ is not due to a need but to the
proportion of individuals with or without the trait surviving to the next generation. Because the trait
may not be needed, it doesnʼt give an evolutionary advantage to have one so the disappearance of
the trait is not a disadvantage to the species. Recent research in genetics makes the distinction
between the presence of genes and the expression of genes. A gene for wings may still be present in
an animalʼs genome, but not be expressed anymore, which means that the gene is no longer
activated. Although this is too advanced for the curriculum, itʼs good to keep it in mind.
Student Centred Approaches for Science Education – Part 2
83
49.
Adaptation
Link with curriculum: Grade 12, chapter 6, lesson 1 (2010)
Explanation
Answer B is correct because only populations can adapt. Answers A and C are incorrect because
they refer to individual adapting. Answer D is incorrect because adapting has nothing to do with
intelligence. Students may benefit from an explicit discussion on the specialized use of the term
"adapt" by biologists. In daily language "adapt" refers to as any type of change over time. Students
often transfer this use to biology, but it is not compatible with the way that biologists use the term. We
suggest to students that the word "acclimatization" would be a better term to use for non-inheritable
changes in behaviour made by an organism during its lifetime, for example acclimatization to high
temperatures.
Student Centred Approaches for Science Education – Part 2
84
50.
Competition
Link with curriculum: Grade 12, chapter 6, lesson 1 (2010)
Explanation
Answer C is the correct answer and acknowledges that some ducks may starve. Answer A is
inaccurate, because cooperation amongst members of a population is very rare. Answer B implies
that an individual is capable of changing to meet needs. Character D makes the mistake of assuming
that it is always the biggest and strongest ducks that will get the most food. In reality, the ducks with a
slightly different beak, or a slightly more efficient metabolism could have a competitive "edge" and
survive.
Student Centred Approaches for Science Education – Part 2
85
51.
Reproduction
Link to curriculum: Grade 12, chapter 6, lesson 1 (2010)
Explanation
Character B is correct since reproduction typically takes place whether there are enough resources or
not. Obviously, not all offspring will survive if there are not enough resources. Most organisms have
no control over the number of offspring they produce. This may come as a surprise to students.
Student Centred Approaches for Science Education – Part 2
86
52.
Resistance
Link with curriculum: Grade 12, chapter 6, lesson 1 (2010)
Explanation
Answer B is most accurate, due to variation in large populations of insects. The few ants that may be
able to survive the spray will reproduce to make the next generation. Answer A denies variation in the
population. Answer C reflects a very common misconception that individual insects develop
resistance to chemicals when the chemicals are applied. It would be worth mentioning to students that
typically this type of resistance takes a long time to become a problem, but this explains why current
malaria treatments that were very effective several years ago are no longer working well in some
areas.
Student Centred Approaches for Science Education – Part 2
87
53.
Pond Life
Link with curriculum: Grade 10, chapter 1, lesson 6 (2008)
Explanation
Unless conditions are very unusual it is unlikely that the fish will use up all the oxygen and die. Fish
have been living in ponds and lakes for many years without using up all the oxygen and dying, so they
must be getting oxygen from somewhere else. The fish get more oxygen from the air as it dissolves in
the water. They can also obtain oxygen from the plants, which release it into the water in the process
of photosynthesis. This is not a situation which can be investigated practically. There are useful
parallels in how aquatic plants obtain carbon dioxide for photosynthesis from carbon dioxide gas
dissolved in the water.
Student Centred Approaches for Science Education – Part 2
88
54.
Variation
Link with curriculum: Grade 12, chapter 6, lesson 1 (2010)
Explanation
Character A is correct, although mutation is only one of two sources of genetic variation - the other is
sexual recombination. Answer B and C are not accurate because the relation is the other way around.
Natural selection works on variation that already exists, and the same is true for adaptation. Variation
allows adaptation and natural selection to take place.
Student Centred Approaches for Science Education – Part 2
89
55.
Variation (2)
Link with curriculum: Grade 12, chapter 6, lesson 1 (2010)
Explanation
Character C is correct, and various blood types are just one example of human variation. Answer A
reflects the common idea that although we look different on the outside, we are all the same on the
inside. Answer B is correct in that our environment does influence how we end up, but genes
definitely are involved.
Student Centred Approaches for Science Education – Part 2
90
56.
Timeline of natural selection
Link with curriculum: Grade 12, chapter 6, lesson 1 (2010)
Explanation
Character C says that natural selection could take place in a single generation if there were dramatic
changes, such as severe drought, or an epidemic of a fatal disease. This is not correct, since you
need various generations to create an evolutionary pattern. Answers A and B are correct in that
natural selection certainly does occur over long periods of time, but that much time is not always
needed. As character A states, it does depend on the pace of reproduction and can even take place
within the course of a few weeks or months, as for bacteria. Answer D is denying that species change.
Student Centred Approaches for Science Education – Part 2
91
Genetics
57.
Yeast cells versus human cells
Link with curriculum: Grade 12, chapter 3, lesson 2 (2010)
Explanation
Character B says that the genes work in almost the same way, which is accurate. Although yeast cells
are members of the kingdom Fungi and are single-celled organisms, they are eukaryotic cells that
function very similar to the way single human cells function. The building blocks for DNA are the
same, and the processes of transcription and translation are nearly identical, although they produce
different proteins. Because of these similarities, scientists can easily run experiments with millions of
yeast cells in a very short amount of time. Answer A is wrong because if yeast genes were identical to
human genes, yeast cells would not be yeast cells, they would be human! However, there are many
genes related to basic cellular processes (such as cellular respiration) that are VERY similar. Answer
C is false because the genes do work in the same way. This is important because students may hear
about genetic discoveries made using yeast cells and may dismiss them as not being relevant to
humans.
Student Centred Approaches for Science Education – Part 2
92
58.
Acquired Traits
Link with curriculum: Grade 11, chapter 3, lesson 2 (2009)
Explanation
Answer D is correct, because an individual can't change his/her own genes in a certain way through
certain activities. Mutations certainly occur during an organism's lifetime, but they are completely
unpredictable and very unlikely to take place in reproductive cells like eggs and sperm. Answers A, B
and C are all related to the discarded Lamarckian idea that traits acquired during the lifetime can be
passed to offspring. This is important to bring up with students several times because it is a common
misconception.
Student Centred Approaches for Science Education – Part 2
93
Annex 3: Concept Cartoons for Earth and Environmental Science
Disclaimer: The cartoons in this manual are taken from the work of Naylor and Keogh. For the
Khmer version translated and locally drawn cartoons were used. The cartoons are copyright protected
and cannot be distributed outside RTTCs without written permission of the copyright holder.
Introduction
For each cartoon we describe the scientifically ʻcorrectʼ viewpoint and possible misconceptions of the
students. Moreover, we suggest ideas for scientific investigations and experiments to further clarify
the concept.
Student Centred Approaches for Science Education – Part 2
94
The Solar System and the Universe
59.
Is it dark in space?
Link with curriculum: Grade 7, chapter 1, lesson 2 (2009)
Explanation
Although films may create the idea that outer space is completely dark, this is not correct. Near the
Sun (or any other star) objects will be brightly lit while further away they will not be brightly lit.
Although empty space appears black, like the night sky from Earth, this does not necessarily mean
that no light is present. Day and night are conceptions related to Earth. During the day we see light
all around us due to the scattering of light in the atmosphere. It can be useful to compare this with the
situation in space or on the Moon. It is not possible to investigate this. Thought experiments, models
and predictions are the most effective means of understanding the situation.
Student Centred Approaches for Science Education – Part 2
95
60.
Stars
Link with curriculum: Grade 7, chapter 1, lesson 2 (2009)
Explanation
Unlike the Moon, stars generate their own light by nuclear fusion. They are still present in the sky
during the daytime, so the question of why they are not visible is a real one. Very little light from the
stars reaches the Earth, because they are so far away. The Sun is so much brighter by comparison
that the small amount of light from the other stars cannot be seen during the daytime. The situation
cannot be investigated through practical activity. Enquiry can include a range of thought experiments
and reasoning by analogy.
Student Centred Approaches for Science Education – Part 2
96
61.
Why does the Moon shine?
Link with curriculum: Grade 8, chapter 3, lesson 2 (2010)
Explanation
A common misconception is that the Moon is a source of light, like the Sun. However, the Sun
generates light itself while the Moon only reflects light from the Sun. Some direct evidence of this can
be obtained by close observation of the Moon. If the Moon is examined with a telescope or pair of
binoculars, then the part of the Moon which is in darkness can be seen as well as the part which is
reflecting the sunlight. This suggests that the Moon is not generating light itself; otherwise all of the
Moon's surface would be bright.
Student Centred Approaches for Science Education – Part 2
97
62.
Daytime Moon
Link with curriculum: Grade 8, chapter 3, lesson 1 (2010)
Explanation
The Moon does not follow the same 24-hour pattern as the Sun. The Moon does not rise at the same
time each day and its position in the sky changes daily, taking slightly more than 29 days to return to
the same position in the sky. Sometimes the Moon can be seen during the daytime, with the Sun and
Moon visible in the sky simultaneously.
The position of the Moon in the sky can be observed every 24 hours and recorded over a period of
time. The Moon's apparent movement will follow a regular pattern which can be predicted. Each
month there is a period when the Moon is visible in the sky during the daytime rather than being
visible at night.
Student Centred Approaches for Science Education – Part 2
98
63.
Moon Shape
Link with curriculum: Grade 8, chapter 3, lesson 2 (2010)
Explanation
A common misconception is that the change in the Moon's shape is due to the shadow cast by the
Earth. In fact when the Earth does cast a shadow on the Moon it causes a lunar eclipse and lunar
eclipses do not happen every month. We only see the part of the Moon that is lit by the Sun and as
the relative positions of the Moon, Earth and Sun change the appearance of the Moon will be different
to an observer on the Earth (any observer will see the same shape though at a given time).
You can help students to understand this concept through low-cost models or simulations. The
situation can be modelled with a globe and strong light source and a small white ball to represent the
Moon. By altering the relative positions of the Moon, Earth and Sun it is possible to model the various
phases of the Moon when viewed from the Earth as different sections of the Moon are illuminated.
Student Centred Approaches for Science Education – Part 2
99
64.
Dark Side of the Moon
Link to curriculum: Grade 8, chapter 3, lesson 1 (2010)
Explanation
Although we talk about "the dark side of the Moon", in reality the Moon does not have a dark side. The
Moon rotates once for each orbit around the Earth. This means that it always faces the same way in
relation to the Earth and therefore has a face which we never see from Earth. Although we call this
the "dark side", for about half of the time it is brightly lit by the Sun. We call it the "dark side" simply
because we never see it. You can help students to understand this through models and simulations.
The situation can be modelled with a globe and strong light source and a small white ball to represent
the Moon. By changing the relative positions of the Moon, Earth and Sun it is possible to model how
the different sections of the Moon are illuminated and to show that there is no dark side.
Student Centred Approaches for Science Education – Part 2
100
65.
Moon Boots
Link with curriculum: Grade 8, chapter 3, lesson 1 (2010)
Explanation
This cartoon combines ideas about space, atmosphere and gravity. There are strong similarities
between an astronaut's airtight suit and a suit from a deep sea diver. Since the deep sea diver has
heavy boots to prevent him/her floating up to the surface it is easy to assume that in the lower gravity
of the Moon the astronauts need heavy boots to avoid floating away from the Moon's surface. In fact
the boots are part of a completely airtight suit - gravity is not important. If the astronauts were likely to
float away, then the boots wouldn't make much difference. Actually the boots are as light as possible
in order to avoid using extra fuel bringing them to the Moon.
Student Centred Approaches for Science Education – Part 2
101
Spacewalk (same as Physics)
Link with curriculum: Grade 12, chapter 2, lesson 3 (2011)
Explanation
A good understanding of how forces operate is vital for astronauts who make a spacewalk! Pushing
off in any direction will result in the astronaut just floating away, since there is virtually no air
resistance to prevent movement. It will therefore be necessary for the astronaut to be roped onto the
space rocket. Although s/he will be attracted by the gravitational attraction of the rocket, the size of
this force is much too small to prevent the astronaut from floating away.
There are no practical investigations that directly address the situation. Enquiry is likely to focus on
thought experiments and reasoning by analogy.
Student Centred Approaches for Science Education – Part 2
102
66.
Lunar Eclipse
Link with curriculum: Grade 8, chapter 3, lesson 3 (2010)
`
Explanation
An eclipse of the Moon occurs when the shadow of the Earth falls on the Moon so that the Moon can
no longer reflect light from the Sun.
You can help students to understand this concept through models and simulations using a globe and
strong light source and a small ball to represent the Moon. Compare the situation of a lunar eclipse
with that of a solar eclipse. Challenge students with the question why we donʼt have a lunar eclipse
every month.
Student Centred Approaches for Science Education – Part 2
103
Physical Geography
67.
Soil types
Link with curriculum: Grade 9, chapter 1, lesson 1 (2011) & Grade 11, chapter 2, lesson 2 (2011)
Explanation
The rate of drainage through the soil depends on the size of the air spaces, and this depends on the
size of the grains in the soil. Since sand grains are considerably bigger than grains of clay, the sandy
soil will have bigger air spaces and the water will run through more quickly.
The situation can be investigated by measuring the time taken for a set amount of water to drain
through different types of soil. The grains of soil can be observed with a microscope, so drainage can
be related to grain size. The soils will retain different amounts of water, so investigating drainage
through wet or dry soils is a useful extension. The influence of other factors on drainage (such as the
amount of organic matter and vegetation) can also be investigated.
Student Centred Approaches for Science Education – Part 2
104
.
Mountains (same as Physics)
Link with curriculum: Grade 11, chapter 3, lesson 1 (2011)
Explanation
The issue here is the nature of air particles and where they are. The air particles do not change
depending on temperature or altitude, but there are fewer air particles at higher altitudes. Although
individual air particles are moving around randomly at high speeds, they are still attracted to the Earth
by the force of gravity so there will be more at the bottom of the mountain than the top. This is why the
Earth's atmosphere is only present in a relatively narrow band around the Earth's surface. The air
density is highest in the troposphere and decreases exponentially in the higher layers of the
atmosphere. Predicting what would happen if each of the statements were correct could be an
interesting thought experiment.
Student Centred Approaches for Science Education – Part 2
105
Earth and Environment
68.
Recycling
Link with curriculum: Grade 9, chapter 3, lesson 1 (2011)
Explanation
Materials might be recycled for different reasons. Recycling can be useful to re-use scarce raw
materials, to reduce environmental damage in obtaining raw materials, to avoid generating bulky or
damaging waste products in manufacturing or to minimize energy use. In the case of paper the main
purpose of recycling is to minimize the amount of energy used in making paper, since less energy is
required to make new paper from scrap paper than from trees. The fact that paper is biodegradable
helps to avoid a build-up of paper in the environment, but recycling is still useful. Leaving paper
somewhere in the environment will show how biodegradable it is. You can discuss the consequences
of not recycling any paper (such as an increased requirement for land for growing trees suitable for
making paper) with reasoning techniques such as “in the Fishbowl”, “Agreement Circles” or “Donuts”.
Student Centred Approaches for Science Education – Part 2
106
69.
Why is a day 24 hours?
Link with curriculum: Grade 7, chapter 2, lesson 1 & 2 (2009)
Explanation
Day and night are caused by the Earth rotating on its axis so that the apparent position of the Sun in
the sky changes. The rotation occurs every 24 hours, resulting in the 24-hour cycle of light and dark.
Although it appears that the Sun travels across the sky, this is because we are not aware of the
rotation of the Earth so we attribute the change in position of the Sun to the Sun moving rather than to
the Earth moving.
It is not easy to prove experimentally that the Earth rotates every 24 hours rather than the Sun
moving. The situation can be modelled using a globe and strong light source. Thought experiments
and predictions can be linked with everyday experience of day and night.
Student Centred Approaches for Science Education – Part 2
107
70.
Acid Rain
Link with curriculum: Grade 12, chapter 1, lesson 3 (2011)
Explanation
Many types of rock are soluble to some extent in acids. The acidity of rainfall varies according to the
location, the prevailing winds and the presence of industrial pollutants. Even very dilute acids can
dissolve some rocks (especially limestone, chalk and marble) given sufficient time and more
concentrated acids can dissolve some rocks more quickly. Most geological processes are too slow to
be noticed, including hills dissolving in acid rain, but this does not mean that they are not occurring.
Acid rain occurs naturally by volcano eruptions and lightning, but is enhanced by human activity, such
as the release of SOx and NOx in the atmosphere.
The situation can be modelled using samples of different types of rock and treating them with dilute
acids, preferably over a period of several days. The acidity of rain water can be measured in the
chemistry lesson.
Student Centred Approaches for Science Education – Part 2
108
Annex 4: Concept Cartoons for Chemistry
Disclaimer: The cartoons in this manual have been developed by Arteveldehogeschool, based on the
work from Naylor and Keogh. For the Khmer version translated and locally drawn cartoons were used.
The cartoons are copyright protected and cannot be distributed outside RTTCs without written
permission of the copyright holder.
Introduction
For each cartoon we describe the scientifically ʻcorrectʼ viewpoint and possible misconceptions of the
students. Moreover, we suggest ideas for investigations, experiments and other student centred
approaches to clarify the concepts.
Student Centred Approaches for Science Education – Part 2
109
Mixtures, Compounds and States of Matter
71.
Liquids
Link with curriculum: Grade 7, chapter 1, lesson 1 (2009)
Explanation
This cartoon deals with the nature of liquids. Scientifically a liquid is a substance with a fixed volume
but a variable shape. It will take the shape of a container. Although modelling clay can also have its
shape altered, it will retain its shape until something acts to change it. "Runny solids", such as sand or
salt, seem to mimic the property of taking on the shape of the container. However individual pieces of
sand or salt do not change shape like liquids do. Each piece is a small solid. Experience of a wide
range of substances, (including some which cannot be categorized easily), discussion and reflection
are necessary for students to develop understanding. It will be helpful to differentiate between pure
substances, which are fairly easily categorized and more complex mixtures. Mixtures are more likely
to combine the properties of solids, liquids or gases. This cartoon can be combined with a cards sort
activity, in which students classify substances according to criteria they discuss.
Student Centred Approaches for Science Education – Part 2
110
72.
Scrambled Eggs
Link with curriculum: Grade 8, chapter 1, lesson 3 (2010) & Grade 8, chapter 2, lesson 1 (2010)
Explanation
This cartoon deals with the nature of a pure element (a pure substance containing only one type of
atom), a compound (two or more substances combined) and a mixture (two or more elements or
compounds mixed together). Confusion is quite likely because eggs are not made from a single pure
substance. Eggs are made up of a complex mixture of compounds which are changed chemically
during heating. You can review the definitions of elements, compounds and mixtures and let students
find out more about the chemical makeup of eggs and to look at how the white and yolk are each
affected separately by heat. This cartoon can be combined with a card sorts activity or a concept test
to deepen studentsҋ understanding.
Student Centred Approaches for Science Education – Part 2
111
73.
Muddy waters
74.
Condensation
Link with curriculum: Grade 7, chapter 2, lesson 1 (2009)
Explanation
Although condensation is a common experience it is not obvious where the condensed water comes
from. Water vapour is present in the air but is invisible. At higher temperatures the water vapour is
likely to remain as a gas, but at lower temperatures it can condense to droplets of liquid. A glass
containing ice is normally cold enough for water vapour in the air to turn into droplets of liquid on the
side of the glass.
You can use various practical activities to explore the situation. Taking an empty cold glass out of a
freezer can show that the ice in the glass is not essential for condensation to occur and that water is
not leaking out of the glass. Comparing the amount of condensation in still air, moving air, warm air
and moist air helps to make the connection with water vapour in the air evident. Exploring where and
when condensation occurs is a useful way to learn about condensation.
Student Centred Approaches for Science Education – Part 2
113
75.
Sweet Tea (Dissolving)
Link with curriculum: Grade 8, chapter 3, lesson 3 (2010)
Explanation
A common misconception is that when substances dissolve they just vanish. Even though the sugar is
invisible when it is dissolved, the total weight of the substances in the tea and sugar does not change.
This is why the tea tastes sweet, since the sugar is still present but invisible.
Weighing the tea and sugar before and after dissolving is straightforward and will indicate clearly
whether the weight has altered. A lever balance can be used if sensitive scales are not available. The
balance can be levelled with tea and sugar separately on one side, then the sugar is dissolved in the
tea and the balance checked to see if it has altered. Completely evaporating some sweet tea will
demonstrate that the sugar is still present in the tea.
Student Centred Approaches for Science Education – Part 2
114
Melting Ice (same as Physics)
Link with curriculum: Grade 7, chapter 2, lesson 1 (2009)
Explanation
This concept cartoon illustrates the potential confusion between weight and density. The ice is less
dense than water, which is why it floats on water. When the ice melts its weight does not change. Ten
grams of ice will melt to give ten grams of water. However the volume does change when the ice
melts. Ten grams of water take up less space than the ten grams of ice, so the density of the ice is
less than the density of the water. There is plenty of scope for confusion here! The water and ice are
exceptional in that almost all other substances get more dense as they solidify. The weight of a given
amount of ice can be checked before and after melting to see whether or not the weight changes.
Exploring how density alters with change of temperature is more interesting and can lead into useful
application of the idea in terms of why icebergs float or where ice forms as water is freezing.
Student Centred Approaches for Science Education – Part 2
115
Acids and Bases
76.
Acidic Oranges
Link with curriculum: Grade 9, chapter 3, lesson 2 (2011)
Explanation
This cartoon discusses the meaning of Ҋacidicҋ and whether all acids are poisonous. The use of the
term in daily life suggests that all acids are poisonous. Students often donҋt make distinction between
poisonous and highly corrosive acids, such as Sulphuric acid and those that are not, such as citric
acid (in citrus fruits) or ethanoic acid (in vinegar). The term poisonous is itself problematic, since
virtually all foodstuffs can be damaging in sufficient quantity, including essential items such as salt,
sugar and water.
An approach for investigation is to start with common foods (e.g. lemons, vinegar) and to see whether
these share the same properties as some acids, such as producing bubbles of carbon dioxide gas
when mixed with calcium carbonate (in chalk or eggshells) or changing the colour of an indicator
(such as red cabbage juice).
Student Centred Approaches for Science Education – Part 2
116
Chemical Reactions
77.
Rusty Nails
Link with curriculum: Grade 11, chapter 2, lesson 1 (2009)
Explanation
Rusting requires the presence of air and liquid water, so wet nails will rust quickly. If they are
completely submerged rusting will still occur because water contains dissolved air. However, it will
take longer due to the lower concentration of oxygen. Cold conditions will slow down rusting due to
the lower concentration of water in cold air. Although rust may look like a disease, it isn't. The
presence of other rusty nails does not make rusting more likely. You can let students investigate the
situation by setting up various combinations of the different factors (let them first brainstorm to
determine these themselves) that might be involved in rusting. Removing air completely is the most
difficult part of this. A layer of oil or paint will keep the air out, but it will also prevent moisture getting
to the nail. Boiling water for a few minutes to remove the air, then putting a nail in boiled water in a
sealed container can provide water but no air as a comparison. Make sure to test one variable at a
time and to provide control set-ups.
Student Centred Approaches for Science Education – Part 2
117
78.
Rusty Nails (2)
Link with curriculum: Grade 11, chapter 2, lesson 1 (2009)
Explanation
As nails rust they get heavier. This is an important indication that the process which is occurring is a
chemical reaction and not just a physical change. If the jar does not have an airtight seal then the total
weight of the jar and nails will be heavier as the iron nails react with oxygen in the air to form iron
oxide (rust). The actual change of weight in the nails can be investigated. A useful extension is to find
out where the additional weight came from. In a sealed jar the total weight of the jar plus nails will be
constant, even though the nails increase in weight. Setting up the situation with nails in a jar with a
gas such as carbon dioxide (you can do this with a candle) will show that oxygen is essential for
rusting to occur.
Student Centred Approaches for Science Education – Part 2
118
79.
Aspirin
Link with curriculum: Grade 7, chapter 2, lesson 2 (2009)
Explanation
When the aspirin tablet and water react they end up in a different physical state, changing from a solid
and a liquid to a solution and a gas. However, the rapid production of gas suggests that this is more
likely to be a chemical reaction, not just a change of state. Whereas changes of state are easily
reversible, many chemical reactions are not, such as the reaction between aspirin and water.
A useful line of enquiry is to find examples of similar types of reaction, such as that between vinegar
and baking powder. Determining the gas in each case will help to show that a chemical reaction is
occurring and producing entirely new materials which were not present at the start of the reaction.
Student Centred Approaches for Science Education – Part 2
119
80.
Burning Candle
Link with curriculum: Grade 9, chapter 2, lesson 2 (2011)
Explanation
Although watching a burning candle is a common experience, understanding what is happening when
the candle burns is not obvious. A common misconception is that the wick burns and the wax are only
there to hold up the wick. Actually, both the wick and the wax burn. The wax melting is visible, but the
wax vaporizing and burning is not. Careful observation of the candle leads to the question of where
the wax has gone. A useful approach is to find other ways of burning the wax, such as using a match
or a piece of card as an alternative to a wick in some molten wax.
Student Centred Approaches for Science Education – Part 2
120
Concept Tests & Peer Teaching
1. Introduction: What are Concept Tests?
What are Concept tests?
Concept tests are challenging multiple choice questions that focus on conceptual understanding on a
key topic in a lesson. They stimulate problem solving skills, reasoning skills and argumentation skills.
This manual is based on the work of Prof. Eric Mazur, a physics professor from Harvard University in
the USA.
Why Concept tests?
Much research has shown that traditional instruction fails to challenge students to construct a correct
conceptual framework on a topic. Often, misconceptions are not changed during traditional lecture
formats. Formulas are memorized and problem solving strategies drilled, but students fail to answer
very simple conceptual questions about the topic, which indicates that students have merely
memorized and havenʼt acquired a higher level of understanding, as described in Bloomʼs taxonomy.
Why Peer Instruction?
Peer instruction is a student centred approach to introduce Concept tests in the class. After a first
vote students discuss the question in small groups (sometimes referred to as “Ask Your Neighbour”).
There are several reasons for this:
1. Because students are very aware of the difficulties involved in grasping a concept, they are often
more effective at explaining an idea than teachers are.
2. Because it provides students with the opportunity to think critically through the arguments that are
being developed;
3. Students who can explain a concept will better understand and retain it;
4. Students are often more motivated to learn from each other;
5. Students enhance teamwork and communication skills.
6. Students obtain experience in using scientific terminology and concepts;
7. The teacher receives immediate feedback about the level of understanding in the class and present
misconceptions.
Student Centred Approaches for Science Education – Part 2
121
Another term used for peer instruction is Think-Pair-Share. First, students think about the answer,
then they pair in small groups to discuss and finally, they share their thoughts with the class.
What are the advantages of peer instruction compared to traditional Ҋhands-upҋ methods?
1. Every student has the chance to rehearse their answer (verbally) to his/ her partner, before having
to speak out in class.
2. Afterwards far more students become willing to put up their hands to reply.
3. How many disappointed looks do you get when a student is Ҋburstingҋ to tell you the answer, and
you choose someone else? They can now turn to their partner and explain him/ her the answer.ҋ
4. Rehearsing their response means they can compare what they thought with the answers that are
given. If they have not understood, they will become aware of this and try to make sense of their
confusion.
2. Objectives
The objectives of Concept tests are similar to those for Concept Cartoons. They aim at focusing
studentsҋ attention on underlying concepts. See also the paragraph on “Why Peer Instruction?”
3. Material needed
No material is needed. The method can be used in conjunction with worksheets, investigations,
computer animations and film clips.
The Concept test can be written on the whiteboard or a large sheet of paper. You can also write the
question on a sheet of paper and have it copied for group work. Laminated sheets can be used for
many years.
You can distribute laminated voting cards to the students. This gives you a quick overview of the
opinions that are present with the students.
Student Centred Approaches for Science Education – Part 2
122
4. How to use Concept tests?
Before the lesson identify the key concepts of the lesson. Divide your lesson in moments of
instruction (this can include other student centred approaches) and the presentation of a concept test.
Preparing good Concept tests requires considerable effort. However, once you have a good set of
questions, you will need less preparation time since part of the lesson time is taken up by the student
discussions.
During the lesson, you present one or more questions along with several possible answers. You
may specify whether only one or several answers are correct. The students get one minute to think
about each Concept test and then vote with their voting cards or a show of hands. The outcome of
the vote determines the subsequent actions by the teacher.
If most students (more than 90%) know the correct answer, you can quickly affirm why it is correct
and continue with the lesson. An alternative is to let one student explain the correct answer. If most
students have not chosen the correct answer, students are given two minutes to try to reach
consensus with their neighbour(s). Afterwards, ask the question a second time to assess evolution in
class understanding.
If possible, write down the (approximate) percentages of students who answer each possibility. It
provides valuable information to improve and monitor your teaching.
The time for peer instruction usually increases both the percentage of correct answers and students'
confidence (how sure they are of their answer). The greatest improvement is usually observed when
about half the students are correct initially. Then, there can be gains of 40 per cent. However,
sometimes students may converge in an incorrect answer, which identifies a shared
misunderstanding.
If after the second vote you are not satisfied with the students' performance, you need to slow the
pace and provide additional instruction. If possible, evaluate studentsʼ understanding again with a
second Concept test. When the results show an understanding of the concept, you can briefly explain
the question and move on to the next topic.
During argumentation periods, circulate around the class and listen to the conversations. Make a
mental note when students make a wrong argument, but donʼt interfere in the discussion. Wrong
arguments may provide you inspiration for future Concept tests.
After the lesson review the questions and the vote results. Analyse which answer categories were
chosen by the students and whether you can improve your instruction. Delete or modify categories
that were not chosen by the students.
Student Centred Approaches for Science Education – Part 2
123
Source: Mazur, 1997.
5. When to use this technique?
Students require minimal experience with the technique though regular use in class helps them
become comfortable with the method. Apply the technique during stage 3 of your lessons. Concept
tests should not be graded in order to ensure honest answers and to encourage everyone to
participate freely.
Demonstrations can be used in combination with a Concept test. They can be used to introduce a
question, whose answer forces students to think about what they have observed. A demonstration
can also be used to answer a Concept test. Because of the test, students will pay closer attention to
the demonstration. They want to see whether their answer was correct. Concept tests can also be
constructed around animations or video clips.
A certain degree of flexibility is required when applying Concept tests. Depending on the outcomes
you may need to include additional instruction such as experiments or exercises. During a typical
lesson, you may introduce one Concept test up to about five.
Student Centred Approaches for Science Education – Part 2
124
6. Examples
We include a set of 23 examples from a variety of curriculum topics. Many more examples can be
found on internet or in the library (see the links at the end of this chapter). It should be noted however
that all examples are to be considered as starting points. You should evaluate each Concept test
after its use. Answer categories that are never chosen should be deleted and answers that reflect
misconceptions present with your students should be included. Stimulate your colleagues to
introduce Concept tests in their lessons and share your tests with each other.
Example 1: Why is it dark at night?
Link with curriculum:
Grade 8, chapter 3, lesson 1 (2010)
Six friends were wondering why the sky is dark at night. This is what they said:
A.
The clouds come in at night and cover the Sun.
B.
The Earth spins completely around once a day.
C.
The Sun moves around the Earth once a day.
D.
The Earth moves around the Sun once a day.
E.
The Sun moves underneath the Earth at night
F.
The Sun stops shining at night.
The reason for the day/night cycle is that the Earth spins completely around its axis approx. every 24
hours (answer B). When our location on Earth is turned away from the Sun, we have might
(darkness). When our location on Earth is turned toward the Sun, we have day (daylight).
Example 2: Seasons on Earth
Link with curriculum Earth and environmental science:
Grade 8, chapter 3, lesson 1 (2010)
Six friends discuss why we have seasons on Earth. These are their answers:
A.
In Summer, the Earth is closer to the Sun
B.
In Summer, the Earthʼs northern axis is tilted toward the Sun
C.
In Summer, the Sun gives off more energy
D.
In Summer, the Sun shines longer
E.
In Summer, the Sun is directly overhead at noon.
F.
In Summer, the Sunlight is bended so it falls more directly on Earth.
Student Centred Approaches for Science Education – Part 2
125
The best answer is B. The tilted axis of the Earth causes parts of the Earth to receive more Sunlight
than others. Answers D and E are consequences of the tilted axis. The slightly differing distance to
the Sun does not have any effect on the seasons and neither have the variations in the Sunʼs output.
Example 3: Solar Eclipse
Link with curriculum Earth and environmental science: Grade 8, chapter 3, lesson 3 (2010)
During a solar eclipse, parts of the Earth experience darkness for a brief time during the day.
Throughout time, people have had different ideas about what happens during a solar eclipse:
A.
The Sun passes between the Earth and Moon
B.
The Earth passes between the Sun and the Moon
C.
Clouds block out the Sun.
D.
The Earthʼs shadow falls on the Sun.
E.
The Moonʼs shadow falls on the Earth.
F.
The Sun shuts off light for a few minutes
G.
The Sun moves behind the Earth for a few minutes then comes back again.
The best answer is E. A solar eclipse occurs during a new Moon when the Moon is directly aligned
with the Sun and the Earth. Because the Moon is blocking the light of the Sun, it causes a shadow to
fall on the Earth. Use a model or a poster to explain how a solar eclipse works.
Example 4: Water Cycle/ Evaporation
Link curriculum Earth and environmental science:
Link curriculum Physics:
Grade 9, chapter 2, lesson 1
Grade 7, chapter 2, lessons 1 (2011)
Grade 10, chapter 2, lesson 3 (2009)
After you washed your trousers, you hang it outside to dry. A few hours later your trousers are dry.
Which answer best describes what has happened to the water in the trousers a few hours later?
A.
It soaked into the ground.
B.
It disappeared and no longer exists.
C.
It is in the air in invisible form.
D.
It moved up to the clouds
E.
It chemically changed into a new substance
F.
It broke down into atoms of hydrogen and oxygen.
Student Centred Approaches for Science Education – Part 2
126
The best response is C. The invisible form is called water vapour. Contrary to many water cycle
diagrams, water does not immediately go up to the clouds. Water on the outside of a cold glass of
water confirms us that water exists in the air around us. The principle of conservation of matter
refutes answer B. The substances, liquid water and water vapour, are still chemically the same. They
do not change into a new substance or break down into hydrogen or oxygen atoms.
Example 5: Origin of Oil
Link with curriculum Earth and environmental science:
Link with curriculum Chemistry:
Grade 9, chapter 2, lesson 5 (2011)
Grade 10, chapter 4, lesson 1 (2008)
Several friends are arguing where oil comes from. This is what they said:
A.
It comes mostly from giant ferns and tress that lived millions of years ago.
B.
It comes mostly from inside ancient rocks that changed into oil after millions of years.
C.
It comes from shallow ocean water that turned into oil millions of years ago.
D.
It comes from microscopic and other ocean organisms millions of years ago.
E.
It comes from ancient mud, sand and soil that gradually turned into liquid millions of years
ago.
F.
It comes from gasoline trapped inside the Earthʼs crust for millions of years.
The best answer is D. Oil comes from the fossil remains of tiny marine organisms (plankton). As they
died, their bodies collected on the seafloor and were gradually buried under layers of sediment. The
remains of the organisms were gradually chemically transformed over millions of years into oil. Coal
comes primarily from land vegetation (answer A). Gasoline is a product of oil and is not found
naturally within the Earth like oil.
Example 6: Photosynthesis
Link with curriculum Biology:
Grade 8, chapter 1, lesson 1-3 (2011)
Take a look at the trees outside. Where did most of the matter that makes up the wood and the
leaves of the trees originally come from?
A.
Sunlight
B.
Water
C.
Soil
D.
Carbon Dioxide
E.
Oxygen
F.
Minerals
Student Centred Approaches for Science Education – Part 2
127
G.
Chlorophyll
The best answer is D, but also B is partially correct. The test is designed to reveal whether students
recognize that a gas from the air (CO2) is combined with water and transformed into the new material
that makes up most of the matter in the tree. The mass contributed by CO2 is much greater than the
mass contributed by the water.
Example 7: Digestive system
Link with curriculum Biology:
Grade 7 chapter 4 lesson 1-4 (2009)
Grade 11 chapter 4 lesson 2 (2009)
A group of students is discussing the main function of the digestive system. Which statement
captures best your opinion?
A.
The main function is to release energy from food.
B.
The main function is to help us breathe.
C.
The main function is to break food down into molecules that can be absorbed by cells.
D.
The main function is to break food down in the stomach into small pieces of food that can be
used by the body.
E.
The main function is to carry bits of food and nutrients to all the different parts of our body.
F.
The main function is to store food so that we can get energy when we need it.
The best answer is C. The digestive system has two major purposes: to break down food and to
prepare nutrients for absorption by cells. The digestive system carries out 6 basic functions: taking
food in (ingestion), secretion, movement of food and wastes, break-down of food, absorption from the
gastrointestinal tract to the cells and the removal of waste products. Responses A and D are partially
correct. Answer E is incorrect since the digestive system doesnʼt move food and nutrients through
different parts of the body. That is the function of the circulatory system.
Example 8: The Nervous System
Link with curriculum Biology:
Grade 9, chapter 2, lesson 1-3 (2011)
A group of students is discussing the role of the brain in various actions. Here is what they said:
A.
The brain is necessary for mental actions such as thinking but not for physical actions such
as playing sport.
Student Centred Approaches for Science Education – Part 2
128
B.
The brain is necessary for both physical and mental actions, but we donʼt use it when we are
sleeping.
C.
We use the brain for all sorts of behaviour. Even when asleep, our brain is working.
Answer C is correct. Answers A and B correspond to popular misconceptions with students that the
brain is only used for certain actions, but not for “unconscious” actions such as coughing, sleeping or
blinking.
Example 9: Floating
Link with curriculum Physics:
Grade 10, chapter 1, lesson 4 (2009)
A student puts a solid ball in a tank of water. As shown by the ball on the left, it floated halfway above
and halfway below the water level. What can he do to make a ball float like the ball on the right?
(Several correct answers possible).
A.
Use a larger ball made out of the same material.
B.
Use a smaller ball made out of the same material.
C.
Use a ball of the same size made out of a denser material
D.
Use a ball of the same size made out of a lighter material
E.
Add more water to the tank so it is deeper.
F.
Add salt to the water
G.
Attach a weight to the ball.
The best answers are C and G. The degree to which a solid object will float when placed in water
depends on the density of the material. To be further submerged, the density of the object must be
increased. By using a ball of the same size in a denser material, the ratio of mass to volume is
greater and the object will be further submerged. Adding salt to the water makes the object more
buoyant because salt increases the density of the water.
Example 10: Dissolving
Link with curriculum Chemistry: Grade 8, chapter 3, lesson 3 (2010)
When stirred a teaspoon of sugar into a glass of warm water, the sugar completely dissolved in the
water. Which statements are true (more than one correct answer possible)?
A.
The sugar melts.
B.
The sugar loses mass.
C.
The sugar turns into water molecules.
Student Centred Approaches for Science Education – Part 2
129
D.
The sugar forms a mixture with water.
E.
The sugar can be separated from the water.
F.
The sugar disappears and no longer exists.
G.
The sugar molecules are spread among the water molecules.
H.
The sugar breaks down into the individual atoms that make up sugar.
I.
The sugar chemically combines with the water to form a new substance.
The best answers are D, E and G. When grains of sugar are added to the water they form a mixture,
called a solution. Sugar molecules become surrounded by attracted polar water molecules, breaking
apart the sugar molecule crystal. When sugar dissolves, it is physically, not chemically, combined
with water and therefore, it does not form a new compound. Dissolving is different from melting
because melting involves a change of state and does not require the interaction between two
substances as dissolving does. According to the conservation of mass principle, the mass of sugar
remains the same even though it cannot be seen in the solution.
Example 11: Chemical bonds
Link with curriculum Chemistry:
Grade 10, chapter 3, lesson 1 (2008)
Four students were discussing their ideas about chemical bonds. This is what they said:
A.
I think a chemical bond is produced by a molecule. It is a substance made up of matter that
holds atoms together.
B.
I think a chemical bond is an attraction between atoms. It is not made up of matter.
C.
I think a chemical bond is a structural part of an atom that connects it to other atoms.
D.
I think a chemical bond means that atoms are combined into bigger atoms.
The best answer is B. Chemical bonds are formed between atoms as a result of an attraction
between their electrons. The bond exists as an attractive force between the atoms where electrons
are transferred or shared. Many students can define the different types of chemical bonds and the
mechanisms behind it, yet still have the common misconception that a chemical bond is a structural
component or a glue-like form of matter.
Example 12: Structure of Atoms
Link with curriculum Chemistry: Grade 8, chapter 1, lesson 1 (2008)
A group of friends is looking at grains of salt through a magnifying glass. They are wondering what
they would see if they had a device powerful enough to see the individual atoms. These are their
answers:
Student Centred Approaches for Science Education – Part 2
130
A.
The atoms would be packed tightly together. They would look like a solid material without
any empty spaces between the atoms.
B.
I would see vibrating atoms arranged in an orderly way with spaces between them. There
would be nothing in the spaces, not even air.
C.
I think I would see atoms not moving and arranged in an orderly way. There would be
space between the atoms. The space would be filled with air.
D.
I think I would see atoms in the shape of small cubes. Each of these cubes would join
together to form a larger cube of salt.
E.
I think I would see lots of vibrating atoms connected together by little lines. The lines
connecting each atom give them a definite cube shape.
F.
I think I would see individual atoms moving from place to place. They would be moving all
about the inside of the crystal shape.
The best answer is B. salt is an example of a crystalline ionic lattice. A salt crystal is made up of a
structure of orderly repeating sodium and chlorine ions. This structure is caused by the electrostatic
attraction between negatively and positively charged ions and gives salt grains its cubic shape. The
ions are closely locked into position and can only vibrate. There is empty space between the atoms in
the crystal, but it is not filled with air. The material is pure salt, not a mixture of salt with air. The lines
that are sometimes used in drawings or models are not actual physical structures but they
representations of the attraction among the ions.
Example 13: Forces
Link with curriculum Physics:
Grade 8, chapter 2, lesson 1 (2010)
A person pulls a box across the floor. Which statement is correct?
A.
The box moves forward because the person pulls forward slightly harder on the box than the
box pulls backward on the person.
B.
Because action always equals reaction, the person cannot pull the box – the box pulls
backward just as hard as the person pulls forward, so there is no motion.
C.
The person gets the box to move by giving it a tug during which the force on the box is
momentarily greater than the force exerted by the box on the person.
D.
The personʼs force on the box is as strong as the force of the box on the person, but the
frictional force on the person is forward and large while the backward frictional force on the
box is small.
Answer D is correct. The force exerted by the person on the box is equal to that exerted by the box
on the person. The person moves forward because of a forward frictional force exerted by the floor.
The frictional force exerted by the floor on the box is much smaller.
Student Centred Approaches for Science Education – Part 2
131
Example 14: Fluid statics
Link with curriculum Physics:
Grade 7, chapter 4, lesson 3 (2009);
When a hole is made in the side of a container holding water, water flows out and follows a parabolic
trajectory. What will happen with the water flow, if the container is dropped in free fall? What do you
think?
A.
The water flow diminishes
B.
The water stops flowing out the container.
C.
The water flows out in a straight line
D.
The water flow curves upward
E.
The water flows out faster.
Answer B is correct. When the container is at rest, there is pressure on the walls of the container due
to the water. The pressure depends on the depth and is equal to ρ.g.h, with ρ being the density of
water. When the container is in free fall, both the water and the container have an acceleration of
zero, not g in the container frame of reference. In this frame the pressure of the water on the walls of
the container is zero, so there is no outward flow.
Example 15: Archimedesʼ Principle
Link with curriculum Physics:
Grade 10, chapter 1, lesson 4 (2009)
You can start with a short lecture (7 to 10 minutes) emphasizing the concepts and ideas of
Archimedesʼ Principle. Preferably include a demonstration such as the Cartesian Diver (see
experiment guide physics). Try to avoid equations at this point. Then present the following Concept
test:
Imagine holding two identical bricks under water. Brick A is just beneath the surface of the water,
while brick B is at a greater depth. The force needed to hold brick B in place is:
A.
larger
B.
the same
C.
smaller
than the force required to hold brick A in place.
The correct answer is B. The buoyant force on each brick is equal to the weight of water it displaces
and does not depend on the depth.
Student Centred Approaches for Science Education – Part 2
132
Example 16: Archimedesʼ Principle (difficult)
Link with curriculum Physics: Grade 10, chapter 1, lesson 4 (2009)
A boat carrying a large boulder is floating on a lake. The boulder is thrown overboard and sinks. The
water level in the lake (with respect to the shore)
A. Rises
B. Drops
C. Remains the same
When it is inside the boat, the boulder displaces its weight in water. When it is thrown overboard, it
only displaces its volume in water so the water level with respect to the shore goes down.
Example 17: Electricity
Link with curriculum Physics:
Grade 7, chapter 3, lesson 6 (2009)
The three light bulbs in the circuit all have the same resistance. Given that brightness is proportional
to power dissipated, the brightness of bulbs B and C together, compared with the brightness of bulb
A, is
A.
Twice as much
B.
The same
C.
Half as much
Answer C is correct. The potential difference across bulbs B and C in series is equal to the potential
differences across bulb A. Since the power dissipated in a resistor of resistance R is V2/R, where V is
the potential difference across the resistor, the power dissipated by the series combination is one half
the power dissipated by resistor (bulb) A.
Example 18: Momentum
Link with curriculum Physics:
Grade 11, chapter 1, lesson 4 (2009)
Suppose rain falls vertically into an open cart rolling along a straight horizontal track with negligible
friction. As a result of water accumulating in the cart, its speed
A.
Increases
B.
Does not change
C.
Decreases
Answer 3 is correct. The water, because it falls vertically, does not change the cartʼs horizontal
momentum. The mass of the cart increases, however, and so its speed decreases.
Student Centred Approaches for Science Education – Part 2
133
Example 19: Phase changes
Link with curriculum Physics:
Grade 7, chapter 2, lesson 1 (2009)
Put five ice cubes in a glass. After 20 minutes, most of the ice had melted to form “ice water”. There
were still some small pieces of ice floating in the water. Measure the temperature of ice water. Then
add five more ice cubes. Three minutes later, measure the temperature.
A.
The temperature of the “ice water” increased
B.
The temperature of the “ice water” decreased
C.
The temperature of the “ice water” stayed the same
The best answer is C. The temperature of the ice water stayed the same. When an ice cube at -4C is
placed in a cup at room temperature, the surface of the solid cube absorbs thermal energy from the
surroundings. The energy is used to overcome the attractive forces between the water molecules.
When sufficient energy is absorbed, the solid ice begins to melt. For water, this phase change occurs
at 0C. During a phase change, the temperature will remain constant as long as both phases are
present. Temperature, heat and thermal energy are related but distinctive terms that are easily mixed
up by students. Be careful to make a correct distinction.
Example 20: Mechanics
Link with curriculum Physics:
Grade 8, chapter 1, lesson 1&2 (2010)
Two cars, one twice as heavy as the other, are at rest on a horizontal track. A person pushes each
car for 5s. Ignoring friction and assuming equal force exerted on both cars, the momentum of the light
car after the push is:
A.
Smaller than
B.
Equal to
C.
Larger than
The momentum of the heavy car
The correct answer is B. The change in momentum caused by a constant force is the product of the
force and the time interval (¨p = F. ¨t). Because the time interval ¨t and the force are the same for
both cars, the changes in momentum are also equal.
Example 21: Mechanics
Link with curriculum Physics:
Grade 8, chapter 1, lesson 1&2 (2010)
Student Centred Approaches for Science Education – Part 2
134
Two cars, one twice as heavy as the other, are at rest on a horizontal track. A person pushes each
car for 5 s. Ignoring friction and assuming equal force exerted on both cars, the kinetic energy of the
light car after the push is:
A.
Smaller than
B.
Equal to
C.
Larger than
The kinetic energy of the heavy car
The correct answer is C. Because the momenta of the two cars are equal, the car with the larger
velocity must have the larger kinetic energy. This will be the lighter of the two; because it has less
inertia, its acceleration is larger than that of the heavy car.
Example 22: Catching a cold
Link with curriculum Biology:
Grade 9, chapter 4, lesson 2 (2011)
Four students discuss how you catch a cold (get sick). Here are their answers:
A.
You can get a cold when youʼre having a fever.
B.
You can get a cold from being cold and wet.
C.
A cold is caused by germs (virus)
D.
Not getting enough sleep can make you catch a cold.
The correct answer is C. Viruses and bacteria are agents of infection. A fever is a physiological
response from the body to the infection. Being cold and wet and not getting enough sleep can
weaken your immune system and thus make it easy for viruses to infect your body.
Example 23: Antibiotics
Link with curriculum biology:
Grade 12, chapter 6, lesson 1 (2010)
Many strains of bacteria are now resistant to antibiotics. How has antibiotic resistance among
bacteria become so widespread?
A.
Since a lot of people use antibiotics, bacteria need resistance to survive. So they develop
resistance.
B.
Antibiotic resistance is the next natural step for bacteria. This stage just happens to be
occurring now.
Student Centred Approaches for Science Education – Part 2
135
C.
Now that many people use antibiotics, most non-resistent bacteria are dead. Most of the
bacteria that are left are resistant.
D.
Individual bacteria that are exposed to antibiotics over and over eventually become
resistant.
Answer C is correct. It contains the idea of random mutations. Mutations that are strengthening the
bacteriaʼs chance on survival and reproduction (here resistance to antibiotics) will become more
dominant in the population. The other options consider the development of resistance as a kind of
deliberate process or suggest that bacteria can somehow decide to become resistant.
7. Important tips
How to make your own concept tests?
There are no strict rules for Concept tests, but they should at least fulfil some basic criteria:
•
Focus on a single scientific concept. Otherwise it is difficult to interpret wrong answers;
•
The question shouldnʼt rely on equations or on memorized facts such as numbers;
•
The various answers should reflect common misunderstandings with students.
•
The questions should be unambiguously worded;
•
The question shouldnʼt be too easy or too difficult (in general, a correct response share
between 40% and 80% indicates a right difficulty level).
In general, itʼs very difficult for a teacher to identify misconceptions without input from the students.
The following information sources are available:
•
Vote results. Answer categories that are never chosen should be modified or deleted.
Student Centred Approaches for Science Education – Part 2
136
•
Peer discussions may reveal misconceptions.
•
Regularly occurring wrong answers on exams may be used in a concept test.
•
A lot of concept tests have been published on internet. They are good starting points, but
always use the information sources listed above to adapt the tests to reflect the
misconceptions in your classes. Some internet links are listed in annex.
•
End-of-chapter questions in many textbooks.
How to interpret the results of Concept tests?
You can use the results of Concept tests to evaluate your own teaching process. For example, after
low scores on a concept test on Newtonʼs Law you may decide to spend more time on this topic the
next year, doing an extra experiment or more exercises.
Student Centred Approaches for Science Education – Part 2
137
Annex: Constructing your own Concept test
You can organize a class discussion such as a brainstorming session to generate many alternative
answers.
For example, ask your students to list three items that they think are food for plants.
Typical answers may include: sunlight, sugar, carbon dioxide, minerals, fertilizer, soil, water, oxygen,
vitamins… Combine the 5 or 6 most occurring answers to a Concept test.
The best answer is sugar. The scientific definition of food is an organic substance containing
carbohydrates, proteins and/ or fats that serves both as fuel and as building material for an organism.
Nutrients are organic or inorganic substances that organisms need in order to carry out life processes.
Examples include water, vitamins and salt. However, nutrients are not a source of energy, nor are
they used as the building material that primarily makes up the body. Plants can make their own food
from water and carbon dioxide using the energy from the Sun (photosynthesis).
Example number 8 about the nervous system is the result of an open question used by a teacher
during class. He noticed that students associate the working of the brain only with deliberate actions
and not with “unconscious” actions such as sleeping or coughing.
An example for Earth and environmental science:
A day on Saturn takes about 10 earth hours. How would you explain this?
Possible answers include: Saturn is less dense than Earth, Saturn is much farther from the Sun than
Earth, Saturn rotates more rapidly than Earth and Saturnʼs orbit has greater eccentricity than Earthʼs.
The correct answer is the third one. The length of a day is only determined by the duration of one
rotation around its axis.
An example for Physics
Imagine students throwing a ball up. Ask them to draw force vectors on the ball, when it is thrown
upwards, when it reaches its highest point and when it falls downward. You may discover that many
students confuse force with momentum and draw two force vectors, one up and one down. In reality
only gravity is acting on the ball as soon as it is thrown away.
If you get multiple answers on this question on a test, you may construct a Concept test or even a
concept cartoon out of it!
Student Centred Approaches for Science Education – Part 2
138
References
Books
Ͳ
Ͳ
Ͳ
Ͳ
Ͳ
Ͳ
Ͳ
Ͳ
Ͳ
Ͳ
Ͳ
Ͳ
Ͳ
Ͳ
Ͳ
ŶŐĞůŽ͕d͘͘ΘƌŽƐƐ͕<͘W͘;ϭϵϵϯͿůĂƐƐƌŽŽŵƐƐĞƐƐŵĞŶƚdĞĐŚŶŝƋƵĞƐ͕:ŽƐƐĞLJĂƐƐ͕ͲtŝůĞLJΘ
^ŽŶƐ͕^ĂŶ&ƌĂŶĐŝƐĐŽ͕ĂůŝĨŽƌŶŝĂ͕h^͘
ŚƵƌĐŚŝůů͕͘Z͘ĞƚĂů͘;ϭϵϵϳͿϯϲϱ^ŝŵƉůĞ^ĐŝĞŶĐĞdžƉĞƌŝŵĞŶƚƐǁŝƚŚǀĞƌLJĚĂLJDĂƚĞƌŝĂůƐ͕ůĂĐŬ
ŽŐΘ>ĞǀĞŶƚŚĂůWƵďůŝƐŚĞƌƐ͕EĞǁzŽƌŬ͘
ƌŝǀĞƌ͕Z͘ĞƚĂů͘;ϭϵϵϰͿDĂŬŝŶŐ^ĞŶƐĞŽĨ^ĞĐŽŶĚĂƌLJ^ĐŝĞŶĐĞ͗ZĞƐĞĂƌĐŚŝŶƚŽŚŝůĚƌĞŶ͛Ɛ/ĚĞĂƐ͕
ZŽƵƚůĞĚŐĞ͘
,ĂƌƌŝƐŽŶ͕͘'͘ĂŶĚŽůů͕Z͘<;ϮϬϬϳͿhƐŝŶŐĂŶĂůŽŐŝĞƐŝŶŵŝĚĚůĞĂŶĚƐĞĐŽŶĚĂƌLJƐĐŝĞŶĐĞ
ĐůĂƐƐƌŽŽŵƐ͗dŚĞ&Z'ƵŝĚĞ͕^ĂŐĞ͘
,ĂƌƌŝƐŽŶ͕͘'͘ĂŶĚdƌĞĂŐƵƐƚ͕͘&͘;ϭϵϵϯͿdĞĂĐŚŝŶŐǁŝƚŚŶĂůŽŐŝĞƐ͗ĂƐĞ^ƚƵĚLJŝŶ'ƌĂĚĞͲϭϬ
KƉƚŝĐƐ͕:ŽƵƌŶĂůKĨZĞƐĞĂƌĐŚ/Ŷ^ĐŝĞŶĐĞdĞĂĐŚŝŶŐ͕sŽů͘ϯϬ͕EŽ͘ϭϬ͕ƉƉ͘ϭϮϵϭͲϭϯϬϳ
,Ğƌƌ͕E͘;ϮϬϬϴͿdŚĞ^ŽƵƌĐĞŬĨŽƌdĞĂĐŚŝŶŐ^ĐŝĞŶĐĞ͕:ŽƐƐĞLJĂƐƐ͕ͲtŝůĞLJΘ^ŽŶƐ͕^ĂŶ
&ƌĂŶĐŝƐĐŽ͕ĂůŝĨŽƌŶŝĂ͕h^͘
<ĞĞůĞLJ͕W͘;ϮϬϬϴͿ^ĐŝĞŶĐĞ&ŽƌŵĂƚŝǀĞƐƐĞƐƐŵĞŶƚ͕E^dWƌĞƐƐʹŽƌǁŝŶWƌĞƐƐ͕dŚŽƵƐĂŶĚKĂŬƐ͕
ĂůŝĨŽƌŶŝĂ͕h^͘
<ĞĞůĞLJ͕W͘ĞƚĂů͘;ϮϬϬϱͿhŶĐŽǀĞƌŝŶŐ^ƚƵĚĞŶƚ/ĚĞĂƐŝŶ^ĐŝĞŶĐĞ͗Ϯϱ&ŽƌŵĂƚŝǀĞƐƐĞƐƐŵĞŶƚ
WƌŽďĞƐ͕sŽů͘ϭ͕E^dWƌĞƐƐ͘
<ĞĞůĞLJ͕W͘ĞƚĂů͘;ϮϬϬϳͿhŶĐŽǀĞƌŝŶŐ^ƚƵĚĞŶƚ/ĚĞĂƐŝŶ^ĐŝĞŶĐĞ͗Ϯϱ&ŽƌŵĂƚŝǀĞƐƐĞƐƐŵĞŶƚ
WƌŽďĞƐ͕sŽů͘Ϯ͕E^dWƌĞƐƐ͘
<ĞĞůĞLJ͕W͘ĞƚĂů͘;ϮϬϬϵͿhŶĐŽǀĞƌŝŶŐ^ƚƵĚĞŶƚ/ĚĞĂƐŝŶ^ĐŝĞŶĐĞ͗Ϯϱ&ŽƌŵĂƚŝǀĞƐƐĞƐƐŵĞŶƚ
WƌŽďĞƐ͕sŽů͘ϰ͕E^dWƌĞƐƐ͘
DĂnjƵƌ͕͘;ϭϵϵϳͿWĞĞƌ/ŶƐƚƌƵĐƚŝŽŶ͗hƐĞƌ͛ƐDĂŶƵĂů͕WƌĞŶƚŝĐĞ,Ăůů͘
DĐĂŶŝĞů͕D͘͘ĂŶĚŽŶŶĞůůLJ͕͘D͘;ϭϵϵϲͿ>ĞĂƌŶŝŶŐǁŝƚŚŶĂůŽŐLJĂŶĚůĂďŽƌĂƚŝǀĞ
/ŶƚĞƌƌŽŐĂƚŝŽŶ͘
EĂLJůŽƌ^͕͘ŽǁŶŝŶŐ͕͘ĂŶĚ<ĞŽŐŚ͘;ϮϬϬϭͿŶĞŵƉŝƌŝĐĂůƐƚƵĚLJŽĨĂƌŐƵŵĞŶƚĂƚŝŽŶŝŶƉƌŝŵĂƌLJ
ƐĐŝĞŶĐĞ͕ƵƐŝŶŐŽŶĐĞƉƚĂƌƚŽŽŶƐĂƐƚŚĞƐƚŝŵƵůƵƐ͘dŚŝƌĚ/ŶƚĞƌŶĂƚŝŽŶĂůŽŶĨĞƌĞŶĐĞŽĨƚŚĞ
ƵƌŽƉĞĂŶ^ĐŝĞŶĐĞĚƵĐĂƚŝŽŶZĞƐĞĂƌĐŚƐƐŽĐŝĂƚŝŽŶ͘dŚĞƐƐĂůŽŶŝŬŝ͕'ƌĞĞĐĞ͘
EĂLJůŽƌ͕^͘ĂŶĚ<ĞŽŐŚ͕͘;ϮϬϬϬͿŽŶĐĞƉƚĂƌƚŽŽŶƐŝŶ^ĐŝĞŶĐĞĚƵĐĂƚŝŽŶ͕DŝůůŐĂƚĞ,ŽƵƐĞ
WƵďůŝƐŚĞƌƐ͘
dǁĞĞĚ͕͘;ϮϬϬϵͿĞƐŝŐŶŝŶŐĨĨĞĐƚŝǀĞ^ĐŝĞŶĐĞ/ŶƐƚƌƵĐƚŝŽŶ͕E^dƉƌĞƐƐ͕ƌůŝŶŐƚŽŶ͕sŝƌŐŝŶŝĂ͕
h^
Student Centred Approaches for Science Education – Part 2
139
Websites
Physics:
Ͳ
ŚƚƚƉ͗ͬͬŐĂůŝůĞŽ͘ŚĂƌǀĂƌĚ͘ĞĚƵ
Chemistry:
Ͳ
Ͳ
ŚƚƚƉ͗ͬͬǁǁǁ͘ĐŚĞŵ͘ǁŝƐĐ͘ĞĚƵͬΕĐŽŶĐĞƉƚͬ
ŚƚƚƉ͗ͬͬǁǁǁ͘ĐŚĞŵĐŽůůĞĐƚŝǀĞ͘ŽƌŐͬĨŝŶĚ͘ƉŚƉ
Earth and environmental science:
Ͳ
Ͳ
Ͳ
Ͳ
Ͳ
ŚƚƚƉ͗ͬͬƐĞƌĐ͘ĐĂƌůĞƚŽŶ͘ĞĚƵͬƌĞƐŽƵƌĐĞƐͬϭϯϬϮ͘Śƚŵů͗ƐƐĞƐƐŵĞŶƚĂŶĚĐƚŝǀĞ>ĞĂƌŶŝŶŐ
^ƚƌĂƚĞŐŝĞƐĨŽƌ/ŶƚƌŽĚƵĐƚŽƌLJ'ĞŽůŽŐLJŽƵƌƐĞƐ
ŚƚƚƉ͗ͬͬƐĞƌĐ͘ĐĂƌůĞƚŽŶ͘ĞĚƵͬƌĞƐŽƵƌĐĞƐͬϮϭϲϵϵ͘Śƚŵů͗hƐŝŶŐŽŶĐĞƉdĞƐƚƐƚŽƐƐĞƐƐĂŶĚ
/ŵƉƌŽǀĞ^ƚƵĚĞŶƚŽŶĐĞƉƚƵĂůhŶĚĞƌƐƚĂŶĚŝŶŐŝŶ/ŶƚƌŽĚƵĐƚŽƌLJ'ĞŽƐĐŝĞŶĐĞŽƵƌƐĞƐ
ŚƚƚƉ͗ͬͬƐĞƌĐ͘ĐĂƌůĞƚŽŶ͘ĞĚƵͬŝŶƚƌŽŐĞŽͬŝŶƚĞƌĂĐƚŝǀĞͬĐƚĞƐƚĞdžŵ͘Śƚŵů͗ŽŶĐĞƉƚdĞƐƚƐĨŽƌŵĂŶLJĞĂƌƚŚ
ƐĐŝĞŶĐĞƚŽƉŝĐƐ͘
140