1
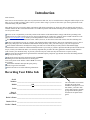
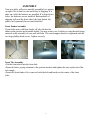
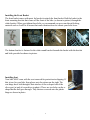
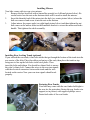
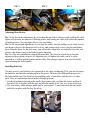
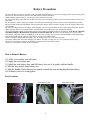
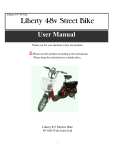
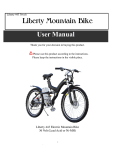
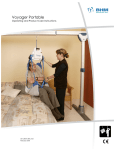
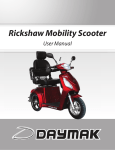
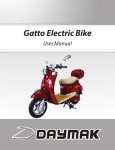
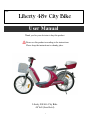
098
Liberty 48v City Bike
User Manual
Thank you for your decision to buy this product.
Please use this product according to the instructions.
Please keep the instructions in a handy place.
Liberty 098 48v City Bike
48 Volt (Lead Acid)
1
Introduction
Dear Customer,
Wow! You are excited! You have just received your brand new ebike. We, too, are excited because as designers and developers of our
bikes, we love to make you happy, and we believe your new ebike will give you lots of fun. I know you want to get this bike on the
road immediately, but please STOP!
Why? Well, first of all, you need to charge your batteries fully before using them. So, while your ebike is charging, take the time to
read this manual. We have worked hard to make it as readable as possible. This manual will help prevent injury and teach you how to
care for your new ebike.
It is the owner’s responsibility to carefully read all of the contents of this manual and to comply with all laws pertaining to the
operation of bicycles and/or electric bicycles in your local jurisdiction. If you have any questions, please consult with the laws web
page on www.iloveEbikes.com or consult your local department of motor vehicles for clarification.
These electric bikes are not classified as motor vehicles, however, to drive them on the roads various states have differing laws.
We have worked hard to provide you a quality, well-designed product without defects. That is our responsibility. You, too, have a
part to play. With proper care, maintenance and attention to bicycle safety rules, your ebike will give you years of enjoyment.
Please read the instructions carefully before using your ebike. Do not ride this bicycle until you have read and thoroughly
understand the owner’s manual. It contains information critical to your safety. If you have questions about the operation of this electric
bicycle, consult your authorized dealer. It is extremely important that you follow the safety guidelines contained in this manual in
order to ensure your maximum safety. If you loan your bike to anyone, make sure they also know how to operate it safely.
When using, the load should not be greater than the maximum capacity, and please pay attention to increase the braking distance
during rainy or snowy days.
This ebike can operate in the rain and snow, but it CANNOT
be submerged in water. When the motor is submerged in
water, it may short circuit and fail, which is NOT covered by
the warranty.
Please don't dismantle and repair the spare parts by
yourself, but go to the local dealer.
Please take time to record the following information:
Recording Your Ebike Info
Serial
Number: _______________________________________________________
Model: __________________098__________________________________
Color: _______________________________________________________
Date of
Purchase: _______________________________________________________
Dealer’s Name: _______________________________________________________
Dealer’s Ph. #: _______________________________________________________
Dealer’s Email: _______________________________________________________
.
2
The serial number is located on
the right side of the frame
behind the chain guard. To view
this number, you need to take
off the chain guard by carefully
prying off the chrome plastic
and unscrew the plastic chain
guard.
Table of Contents
Introduction ...............................................................................................................2
Table of Contents ......................................................................................................3
Important Instructions ...............................................................................................4
Parts Locations and Specifications ...........................................................................5
Assembly ..................................................................................................................6
Safety Precautions ....................................................................................................11
General Operating Instructions ................................................................................12
Charging Batteries....................................................................................................13
Battery Precautions ..................................................................................................14
Maintenance .............................................................................................................15
Troubleshooting........................................................................................................16
Warranty ...................................................................................................................17
Federal Electric Bike Law .......................................................................................18
3
Important Instructions
Safeguard your battery to insure continued high performance. It should be recharged after each use. The normal full-cycle battery
life, if it is continuously discharged and recharged, is between 300–1000 cycles (depending on which battery came with your bike)
after which the storage capacity of the battery will gradually decline.
CAUTION! Fully charge the batteries before the first use!
Failure to do this can result in decreased battery performance for the life of the bike. Fully charge the battery each time you use the
bike.
Battery performance is affected by the temperature and is generally better in warm temperatures. When the temperature is below
32º F (0º C), the battery current may decrease by a third. Consequently, the travel range on a full charge in cold environments is much
less, but will return to normal when the temperature is back to room temperature.
Frequent stopping and starting, riding uphill, traveling against a strong wind, starting from a standstill, riding on rough or muddy
roads, and carrying more than one person or heavy loads will consume extra battery power and shorten the range. A few tips to
prolong the battery life during these conditions is as follows:
Frequent braking – try to look ahead and coast rather than frequently stopping and starting.
Riding uphill or against a stiff wind – pedal to supplement the battery power.
When starting from a standstill, use the pedals to help bring you up to speed.
When the battery meter indicates the voltage is low, switch to manual power and avoid using the battery, so you don’t
shorten the battery life.
To prevent premature failure of your battery and for your warranty to remain in effect on your battery, YOU MUST CHARGE
AND DISCHARGE THE BATTERY AT LEAST ONCE PER MONTH.
Always turn off the motor and remove the key from the ignition before and during charging to
prevent serious damage to the controller and to the batteries!
This electric bicycle can be used in the rain, however, the motor must not be submerged in water. The controller, motor and
other electrical devices may be short circuited causing damage, which is NOT covered by warranty, and creating possible dangerous
situations.
DO NOT use chargers or other components other than that which has been approved
and tested by this company. This company is not responsible for damages caused by the use of other
products not specifically designed and tested for use with this electric bike.
Battery chargers contain sensitive electronics. Improper use, dropping, or sudden jolts can damage the charger and its internal
electronics which is NOT covered by warranty. DO NOT LEAVE THE CHARGER ON FOR MORE THAN 10 HOURS!
Check all nuts, bolts, screws, and spokes to make sure they are tight before riding. If any screws, nuts, or bolts are loose, put some
thread lock on the threads and then tighten.
When riding down hill, you MUST have the key on even if you are NOT using the
throttle and even if the battery is not in the bike. The motor will generate enough
electricity to RUIN your controller which is NOT covered by warranty.
.
4
Parts Locations
Specifications:
Battery: 48v/10 ah Lead Acid
Frame: Steel
Wheel Size: 22”
Suspension: Front fork
Brakes: Front V, rear servo
Motor: 350w brushless
Working Style: Pedal assist & throttle control
Charging Time: 3 - 6 hours
Range: 28 - 41 miles depending on conditions
Speed: Up to 15 mph
Weight of Bike: 108 lb.
Maximum Load: 300 lb.
5
ASSEMBLY
Your new ebike will arrive partially assembled (see picture
on right). We do this for ease and safety of shipping. If it
ships on a skid, the batteries are installed. If it ships in two
boxes, the batteries are not installed. Both methods of
shipping will need the front wheel, the front basket, the
pedals, and (optional) the rear trunk installed.
Front Fender Assembly
If your bike came with front fender off, take the bracket
shown in the picture and assemble tightly. You may want to use Locktite or some thread-locking
material on the assembly of your nuts and bolts. The round support bracket is tightened with the
two large phillips head screws. Tighten securely.
Bushing
Bushing
Front Tire Assembly
•Put the front wheel into the front fork.
•Fasten the hubs, paying attention to the position washers and tighten the nuts on the end of the
axle snugly.
•Fasten the front fender if it is removed with the bolt and bracket at the center of the front
forks.
.
6
Front Brake Assembly and Brake Adjustment
When you have the front wheel assembled, you need to hook up the front brakes. The wire
cable from one side of the brake pad must be fastened into the other side of the front brake cable
clamp (see picture). Brakes should be close to adjustment when you tighten the wire clamp, and
then be adjusted from side to side with the final adjustment on sides of the tires as in a normal
bicycle front brake.
Straightening Handlebars
The handlebars of your bike are turned for shipping. To straighten them, place both legs on
either side of the front tire. Holding the front tire between your legs, turn the handlebars until
they are straight. They should turn fairly hard. If it is impossible to turn them, you can loosen
the handlebar stem by access in the back of the plastic headlight cover (see picture) where you
can loosen the nut, turn the handlebars, and then tighten it again.
REMOVE COVER
Installing the Pedals
•Note the left and right of the pedal.
[ L ] left [ R ] right are stamped on the threaded end of the pedal.
•Attach the L pedal to the L crank, then R pedal to R crank.
•Screw the pedals in and tighten them fully.
The L pedal has left-hand threads, and the R pedal has right-hand threads.
Misapplication is not covered under warranty.
7
Installing the Front Basket
The front basket comes with parts for bracket to attach the front basket. Bolt the basket to the
front mounting bracket that comes off the front of the bike (as shown in picture) through the
white bracket. When you tighten these bolts, we recommend you use some thread-locking
material such as LockTite to insure that road vibration does not vibrate your bolts loose.
Assembly Parts
The bottom bracket is fastened to the white round bracket beneath the basket with the bracket
and bolts provided as shown in picture.
Installing Seat
Your bike MAY come with the seat removed for protection in shipping. If
this is true for your bike, then please note the picture on the right. The
seat hinge has a bolt through it that attaches to the u-shaped end of the
silver post (at end of screwdriver in photo). There are two holes on the ushape that the bolt goes through. They then are screwed onto the plastic
hinge as shown in photo.
.
8
Installing Mirrors
Your bike comes with two rear view mirrors.
1.
Remove the hex head bolt with a 6mm allen wrench (see left-hand picture below). Be
careful not to lose the nut on the bottom which will be used to attach the mirrors.
2.
Insert the threaded end of the mirror into the hole (see center picture below) where the
bolt was removed and screw it into the nut on the bottom.
3.
Adjust mirror for proper angle (see right-hand picture below) and then tighten the nut
that comes on the mirror down on the handlebar bracket to secure the mirror and brake
handle. This tightens the whole assembly.
Installing Rear Locking Trunk (optional)
If you ordered the rear trunk, it has bolts inside that go through the bottom of the trunk into the
rear carrier of the bike. Place the rubber pad on top of the rack, then place the trunk on top
being sure to line up the bolt holes in the steel plates. Then
insert the bolts and tighten. You should use thread lock to ensure
they don’t vibrate lose. Connect the wires to the rear turn signals
with the electrical connectors between the trunk and the wire
located on the carrier. Now your rear turn signals should work
properly.
Fastening Rear Fender
Your bike may come with the rear fender held tight to
the rear tire for protection. Fasten the rear fender wire
support (as in picture) with supplied phillips screw.
Fasten both sides of the rear fender.
9
PIC 1
PIC 2
PIC 3
Adjusting Rear Brakes
Pic 1 is the first brake adjustment. By loosening this nut with a 10mm wrench, pulling the cable
tighter will increase the amount of braking power, and loosing the cable will reduce the amount
of braking power. You can adjust this to your own liking.
Pic 2 is the second pad adjustment. As you spin the wheel, turn the phillips screw clock-wise to
put the pad closer to the drum but not too close, and counter clock-wise to put the pad further
away from the drum. As the pads wear, you will need to adjust this occasionally to put the pad
closer to the drum to keep your brake properly adjusted.
Pic 3 is a fine tune adjustment using an 8mm wrench. This also has a lock nut to keep the
adjuster in the position you put it in. Adjusting out will tighten the cable, and if it can be
adjusted in, it will loosen the tension on the cable. The spring’s purpose is to relax the brake
upon releasing the brake handle.
Installing Batteries
You may receive your batteries in a separate box for safety in shipping. If so, you need to insert
the batteries into the bike and plug them in for power. There are two different battery packs—
the front and the rear. The front has the matching color of your bike, and the rear is a white
pack. They are installed as shown in the following pictures:
1. Set the front battery bottom in the cradle, then connect the cord into the socket and lean it
forward. Lock it in place with the key and fold the handle in the slot, so it is not in the way.
2. The rear battery slides along a guide until it sets in place. Connect the cord into the socket
and lock it in place with the key for safety.
.
10
Safety Precautions
• Before operating your bicycle, inspect it carefully to avoid accidents or damage.
• Do not drive close to other vehicles.
• ALWAYS keep the power switched OFF until you are seated on the bike and ready to ride.
Turning the power on and then accidentally twisting the throttle can result in the bike
lurching forward and may cause an accident, damage, or injury.
• NEVER attempt to disassemble the motor, battery, controller or throttle. This can result in
injury, fire, or damage to the bike.
• ONLY use the charger supplied with your bike to charge the battery. Using the improper
charger can result in fire or explosion.
• KEEP the batteries out of the reach of children.
• Obey all traffic laws relevant to the operation of bicycles and electric bicycles.
• Use the turn signals (if equipped) or hand signals at all times when making turns.
• KEEP both hands on the handlebars at all times.
• DO NOT hang objects on or under the handlebars.
• DO NOT brake suddenly in the rain or on slippery, wet surfaces.
• USE extreme caution when riding near other vehicles. Assume they do not see you, and be
careful at intersections and when starting from a stopped position.
• When cleaning your electric bike, do not use a steady direct stream of water from a hose. Use
a cloth to avoid short-circuiting any electrical components. Your electric bike has a durable
finish and does not need to be waxed. Clean with a mild detergent and buff to restore its
original shine.
• Please wear a safety helmet and glasses for your own protection whenever riding.
• Wear bright clothing to help make you visible to other motor vehicles.
• Do not wear loose clothing that can become caught on the bicycle.
• Do NOT leave the charger connected to the battery for more than 10 hours.
11
General Operating Instructions
BEFORE YOU RIDE
1.Charge your battery until the green indicator light on the charger comes on, but
do not allow it to charge more than 10 hours.
2.Check the air pressure of the tires. Make sure they are at the recommended psi
embossed on the sidewall of the tire.
3.Check the front and back brakes, and the condition of the front and back wheels,
handlebar, and saddle. Make sure they are tight and fastened. Make sure all quick
releases are locked and secure and that all parts are in good working order. Inspect
your bike completely.
4. If it was removed, install the charged battery
in the battery seat of bike and lock it.
5. Raise the kickstand.
Charging
6. Sit on the bike and turn the bike on. The power lights/meter should show
Port
your battery capacity.
7. Pedaling or using the throttle on the right hand will begin to accelerate
the bike.
ATTENTION: After the power is on, if the rider twists the throttle the
bike will lurch forward! Do not turn the power on until you are ready
to go.
The hand brake will automatically cut the power to the motor as also will releasing the throttle. While starting
or climbing a hill, pedal as much as possible, so that the electric power will not be drained too much. At the
same time, it can lengthen the life of the battery and motor.
ATTENTION: When riding down hills, do not turn off the power, otherwise the controller and motor will
be easily damaged which is NOT covered under warranty.
While running, if the battery power is getting low, the battery meter will lessen. At this time you should pedal
your ebike like a regular bike and charge the battery as soon as you get to an electrical outlet. Turn off the
power and remove the key while parking. If you decide to push your bike for any reason, make sure to turn the
power off, so you don’t accidently turn the throttle making the electric bicycle start suddenly and cause an
accident. To help get the best distance out of your electric bike, refrain from a lot of braking and coast as much
as possible.
.
12
Charging Batteries
•Turn the key to OFF and remove the key.
•Insert plug of the charger into charging port of the battery box before plugging charger into
your outlet. You can charge your batteries while they are still in the bike, or you may remove the
batteries and take them inside to charge them by using the short jumper cable provided to provide
continuity between the two batteries (see picture on p. 5 in diagram of electric bike). This is
especially convenient during cold weather. DO NOT TRY TO CHARGE ONLY ONE BATTERY
PACK WHILE BATTERIES ARE NOT CONNECTED TOGETHER!
•Insert the charger into the wall outlet. A red light will come on. It will take about 3-6 hours to recharge
the battery completely. A green light will appear when the battery is approximately 90% charged.
•After the green light comes on, the batteries should be left on the charger for an additional 2 hours for
the batteries to become fully charged.
•After the green light comes on, the charger is in trickle charge mode and will maintain the batteries
fully charged state. If you will be gone for several days, you should unplug the charger. This is
especially true in hot weather. Avoid overcharging and damaging the battery. Do not leave the
charger connected to the battery for more than 10 hours.
•The charger will become warm during charging, so keep
charger away from any flammable materials. The charger may
reach 185ºF (85ºC) during normal charging.
•Because specifications of the charger may change in the process
of production, please read the information on the charger
itself or the charger manual (if supplied) in detail before
using.
•Always charge the bike in a dry and clean place. Keep the
charger dry and clean.
13
Battery Precautions
•Do not touch the two poles of the battery with your hands when the battery is removed for charging. Also, the two battery poles
should not be touched with any metal or other material that conducts electricity.
•While charging, put the battery in a secure place where children can't reach.
•Do not use any charger other than the one that came with your Liberty Electric Bike. If you need another charger, contact your
local dealer.
•Do not attempt to open or repair your charger. The electronics contain high-pressure circuits, so don’t dismantle by yourself.
•Prevent liquids, metal and metal filings from permeating the charger, and be careful to not drop or hit the charger which could
cause damage.
•Do not put anything on top of the charger while charging. It must be well-ventilated to allow all the heat generated to dissipate.
•When charging, if there is a peculiar smell or the temperature is too high, please stop charging immediately.
•To prevent premature failure of your battery and for your warranty to remain in effect on your battery, YOU MUST CHARGE
AND DISCHARGE THE BATTERY AT LEAST ONCE PER MONTH. DO NOT use in the battery in a very low state.
•The charger will produce heat up to 185°F (85°C) in the course of using, so keep it away from flammable articles while using.
•It is normal that the mileage capacity will reduce as a result of low temperatures.
•While carrying the charger, DO NOT bump, drop, or damage, otherwise it may result in failure.
•Avoid any contact with water when charging your battery. If a plug or socket gets wet, dry it completely before using.
•Do not leave the charger connected to the battery and the outlet for more than 10 hours.
•Always use the charger according to the instructions.
How to Remove Battery:
1) Lift the seat, and the seat will open.
2) Unplug the rear battery box.
3) Unlock the rear battery box, and lift battery box out of its guide with the handle.
4) With the key, unlock front battery box.
5) With the handle, tilt the battery box gently towards the seat and unplug the front battery.
6) Lift battery out of its resting place.
Key Locations
Front Battery Lock
ON/OFF key.
.
14
Rear Battery Lock
MAINTENANCE
Wheels: Wheels should be properly placed in the fork or dropouts. If you hear any irregular noise from the
wheels or brakes, they should be checked and adjusted. The wheels should rotate smoothly without wobbling
from side to side. Check the bearing play of the hubs regularly by lifting the bicycle and spinning the wheel.
It should continue to spin for several turns after you stop spinning the wheel. The motorized wheel will NOT
spin as freely as the non-motorized wheel. To check the play of the hubs, try to move the rim from side to
side between the forks. No substantial play should exist. If you detect play or if the wheel is difficult to turn,
please contact your local dealer or your local bike shop to have it serviced.
Rims: The rims should be smooth and without cracks, breaks or bulges.
Spokes: If your bike has spokes, check their tension regularly. About the same tension should be on all the
spokes. If there is some minor loosening of the spokes, you may tighten the nipples, but it is recommended
that you take it to a bicycle mechanic for proper adjustment. If there is a loose spoke or if the rim has side
play of more than 1/8” (4mm), immediately have the wheel trued by a bicycle mechanic. DO NOT RIDE
WITH LOOSE SPOKES! Riding with loose spokes may cause the wheel to fail!
Tires: Inflate your tires to the pressure embossed on the sidewall. Every time you ride, make sure the tires are
properly inflated. Improper tire pressure will make riding more difficult, cause excessive wear, and cause
premature failure of the tires. The tires should be properly seated in the rim and the fitting of the tire beads
and rim beads should be checked. If the tube is pinched between the rim and the tire, it will fail when
inflated. Make sure that the tires are not cracked or worn unevenly. Check for bulges. Check and make sure
that the valve stem is straight in the rim. Irregular tires should be replaced immediately.
Handlebar and Display: We have created the handlebar display so that you can easily see it while riding. To
straighten the handlebars, turn the stem binder bolt to loosen it and straighten the handlebars so they are
aligned properly with the front wheel and tighten. Loose or damaged grips on your handlebars are
dangerous! If your grip comes off, you could lose control of your bicycle. Replace as needed.
Brakes: Riding with brakes that are worn or damaged or with worn cables or wheels in poor condition may
result in losing control of your bicycle. Wet weather may hinder the brake performance. You need more
distance to safely stop in the rain or on a wet or icy street. Before each ride, check to make sure your brake
cables are free of obstacles and are adjusted and working properly.
Batteries/Fuses: Your batteries are in a protective case with a handle to enable you to easily take these on and
off your bike. There is a locking key to lock the batteries on your bike to discourage theft. Do not attempt to
open your battery box without first contacting your dealer. This WILL void your warranty. If you suspect
your battery is not working properly, you can test it with an inexpensive voltage meter. If you get a “zero”
voltage reading, then check and replace your fuse. (Check the pages of this manual that are specific for your
battery.) If this doesn’t fix the issue, then contact your local dealer.
Chain: Lubricate the chain with oil every three months to ensure it stays free of rust as well as every time that
it is ridden in wet weather.
15
Troubleshooting
Problem
A. You turn the power on, the
indicator lights are all on, but
with throttle or pedal assist, the
ebike doesn’t work.
B. You turn the power on, the
indicator lights are all on, bike
works with throttle, but not with
pedal assist.
Solution
1. Your controller needs to be replaced, or
2. Your motor needs to be replaced.
1. Your controller needs to be replaced, or
2. Your pedal assist module needs to be replaced, or
3. Your motor needs to be replaced.
C. You turn the power on, the
indicator lights are all on, bike
works with pedal assist, but not
with throttle.
D. You turn the power on, then
twist the throttle, but the ebike
doesn’t work.
1. Your controller needs to be replaced, or
2. Your throttle needs to be replaced, or
3. Your motor needs to be replaced.
1. Check your battery to see if it needs to be charged, or
2. Your fuse needs to be replaced, or
3. Your controller needs to be replaced, or
4. Your motor needs to be replaced.
E. The switch is turned on, and the 1. Check whether the throttle is stuck in the on position.
ebike takes off without using the 2. Lubricate or replace the throttle if it is faulty.
throttle.
F. After stopping, the ebike doesn’t 1. Check whether the brake handles are fully released.
start when the throttle is twisted. 2. Check A., B., and C. above.
G. The speed is unusually slow.
H. You connect the power to the
charger, but the indicator light
does not come on.
1. Make sure throttle is operating correctly.
2. Check to see if the battery is fully charged.
3. Make sure speed limiter is not connected.
1. Check whether there is electricity to the charger.
2. If you have a voltage meter, you can check to see if the
charger produces the correct current.
I. You plug in the charger to the
1. Check to see if the batteries are fully charged.
ebike and the outlet, and the
2. Check whether the charger is plugged in properly to
green light comes on instead of
both the battery and the outlet.
the red light. This means it isn’t
3. Check the voltage of the charger and battery.
charging.
4. If “zero” voltage on the charger, then it needs to be
replaced.
5. If “zero” voltage from the battery, then check the fuse.
If all above mentioned situations are normal, then there is some other problem.
Please call your local Liberty ebike dealer.
.
16
Warranty
With normal care and recommended maintenance, this electric bicycle is warranted to be free of
defects in materials and workmanship for the following period of time:
3 months – electronic controller, charger, and throttle
6 months – hub motor and battery
1 year – frame.
We will repair or replace, at our option, any product or part that is defective in material or
workmanship without charge if the product is presented to us at our authorized Liberty Electric
Bike Service Center at 1-800-806-7109 with dated proof of purchase inside of warranty period.
Shipping charges are not covered under this warranty.
This limited warranty does not cover the normal wear of items such as tires, brakes, chains, and
other items. All implied warranties are limited to the stated time period.
Liberty Seamless Enterprises, Inc., Liberty Electric Bike Company, and any of its subsidiaries
will not be liable for any incidental or consequential damages.
This limited warranty gives you specific legal rights, and you may have other rights from state
to state.
This warranty applies to normal consumer use of the product. Use in a rental fleet, commercial
setting, or government fleet will void this warranty. Inappropriate use such as trick riding,
abusive riding, or offroad riding will void the warranty as well as violating the instructions in
this manual.
17
.
18