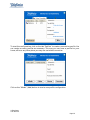
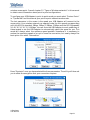
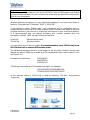
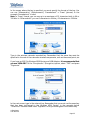
1
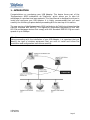
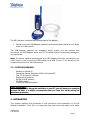
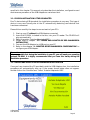
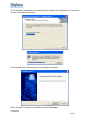
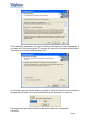
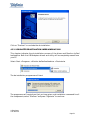
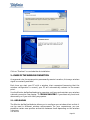
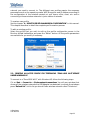
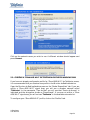
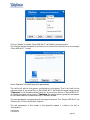
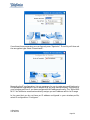
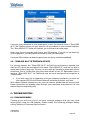
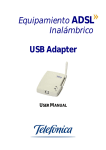
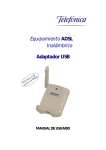
INDEX
1.- INTRODUCTION ................................................................................................ 3
2.- THE USB ADAPTER ............................................................................................ 4
2.1.- PACKAGE CONTENTS .................................................................................................................................4
2.2.- USB ADAPTER DESCRIPTION.....................................................................................................................5
2.3.- SYSTEM REQUIREMENTS...........................................................................................................................5
3.- INSTALLATION .................................................................................................. 6
3.1.- PHYSICAL INSTALLATION OF THE USB ADPATER.................................................................................6
3.2.- DRIVER AND MONITOR DE RED INALÁMBRICA INSTALLATION.......................................................6
4.- WIRELESS CLIENT CONFIGURATION ...............................................................11
4.1.- CONFIGURATION UNDER WINDOWS XP ........................................................................................... 11
4.1.1.- CONNECTING TO A WIRELESS NETWOR ...................................................................................... 11
4.1.2.- VERIFYING THE STATUS OF THE WIRELESS NETWORK............................................................. 12
4.1.3.- CHANGING THE ORDER OF PREFERRED NETWORKS(PROFILE MANAGEMENT) ................ 13
4.1.4.- CHANGING THE ADVANCED CONFIGURATION ......................................................................... 14
4.1.5.- DOMESTIC OR SMALL OFFICE WIRELESS NETWORK WIZARD ................................................ 14
4.2.- CONFIGURATION UNDER WINDOWS 2000 ...................................................................................... 18
4.2.1.- VARIFYING THE CONNECTION ....................................................................................................... 27
4.3.- USB ADAPTER DE-INSTALLATION......................................................................................................... 31
4.3.1.- USB ADAPTER DE-INSTALLATION UNDER WINDOWS XP ........................................................ 31
4.3.2.- USB ADAPTER DE-INSTALLATION UNDER WINDOWS 2000 ................................................... 32
5.- USAGE OF THE WIRELESS CONNECTION.........................................................34
5.1.- USER PROFILES .......................................................................................................................................... 34
5.2.- CREATING A “ZONA ADSL WI-FI” DE TELEFÓNICA PROFILE............................................................ 35
5.3.- “ZONA ADSL WI-FI” DE TELEFÓNICA SECURITY................................................................................. 39
6.- TROUBLE SHOOTING ......................................................................................39
6.1.- COMMON PROBLEMS ............................................................................................................................. 39
6.2.- DRIVER VERIFICATION............................................................................................................................. 42
6.3.- CUSTOMER SERVICE ................................................................................................................................ 44
7.- RECYCLING......................................................................................................45
8.- DECLARATION OF CONFORMITY ....................................................................46
USB Adapter
User Manual
Page 2
1. - INTRODUCTION
Congratulations on purchasing your USB Adapter. This device forms part of the
“Equipamiento ADSL Inalámbrico de Telefónica” which allows you to take full
advantage of a wireless local area network. This User Manual is designed to aid you to
install and configure your USB Adapter. It is highly recommended that you read
carefully the following chapters before proceeding with the start up of this service.
The new version of the Equipamiento ADSL Inalámbrico de Telefónica is based on the
network standard IEEE 802.11g. This regulation guarantees compatibility with IEEE
802.11b and between devices that comply with this Standard. IEEE 802.11g can reach
speeds of up to 54Mbps.
Attention
Before proceeding with the installation of your USB Adapter, it is important that you
identify the type of wireless equipment that you wish to install and follow the
installation and configuration instructions carefully.
USB Adapter
User Manual
Page 3
2.-
THE USB ADAPTER
Please follow the steps indicated in this manual; they will help you to successfully
install the USB Adapter the easiest way possible. The recommended procedure is the
following:
1) Verify that your PC compiles with the minimum requirements indicates in
chapter “2.3.- SYSTEM REPUIREMENTS”
2) Make sure the products box contains all the elements indicated in the chapter
“2.1.- PACKAGE CONTENTS”.
3) Make the physical connection of the USB Adapter, as described in chapter “3.1.PHYSICAL INSTALLATION OF THE USB ADAPTER”.
4) Follow the steps described in chapter “3.2.- DRIVER AND MONITOR DE RED
INALÁMBRICA INSTALLATION”.
In the following chapters the installation and configuration procedure is described.
Please remember that it is very important to follow the chapter step by step.
2.1.- PACKAGE CONTENTS
The following elements should come included inside this products box:
-
USB Adapter
Cradle and USB cable
Documentation:
- Quick Installation Guide.
- User Manual (this document).
- Warrantee Card.
- Waiver Card.
-
One installation and support CD-ROM which contains the following:
- The devices driver and wireless network monitor setup file.
- Acrobat Reader.
- Quick Installation Guide in Spanish and English.
- User Manual in Spanish and English.
- TCP/IP Guidelines.
- Router location Guidelines.
2.2.- USB ADAPTER DESCRIPTION
Telefónica’s USB Adapter is based on the USB 2.0 standard, which is also cpmpliant
with the USB 1.1 standard. It has 1 LED which shows its functional status.
Apart from the USB Adapter, you will also find an USB cradle in the gift box. This cradle
is to help to achieve an optimum signal coverage which and not oblige the USB
Adapter to be connected to the PC. The USB Adapter can be connected directly to your
PC or if you prefer you can connect it to the USB cradle. Please take into account that
the cradle is magnetized and could damage some magnetic devices, make sure that
the cradle is situated as far as possible from these devices.
See photo shown below.
USB Adapter
User Manual
Page 4
The LED indicator indicates the working state of the adpater:
•
Flashes when the USB Adapter transmits and receives data. Remains unlit when
there is no data traffic.
The USB Adapter supports hot swapping, which means you can connect and
disconnect the USB Adapter when your PC is started without causing any damage to
any equipment.
Note: To achieve optimal performance, the USB Adapter should be connected to an
USB 2.0 port. If you connect the USB Adapter to an USB 1.1 port, it will work fine, but
its performance will not be its maximum.
2.3.- SYSTEM REQUIREMENTS
-
Desktop or laptop PC.
Operating system: Windows 2000 or Windows XP.
One 1.1 or superior USB port
Pentium III or superior.
64 MB of RAM memory.
CD-ROM reader.
15MB free hard disk spacce.
¡VERY IMPORTANT!:
It is very possible that during the installation in your PC, you will need your operating
systems CD-ROM. It is highly recommended that you have this handy during the
installation procedure.
3.- INSTALLATION
This chapter explains the procedure of the connection and installation of all the
different elements. To do this it is important that you follow the steps in the order
USB Adapter
User Manual
Page 5
specified in this chapter. This manual only describes the installation, configuration and
maintenance procedure of the USB Adapter as a wireless client.
3.1.- PHYSICAL INSTALLATION OF THE USB ADAPTER
Due To device being USB standard, the installation procedure is very easy. This type of
device is very user friendly due to the PC automatically detecting new devices that
have been connected.
Please follow carefully the steps to connect each of your PC’s:
1. Start up your PC without the USB Adapter connected.
2. Insert the CD-ROM, included in the box, into your CD reader. The CD-ROM will
play automatically.
3. Select the option “Instalar AdaptadorUSB”.
4. Please refer to chapter “3.2.- DRIVER AND MONITOR DE RED INALÁMBRICA
INSTALLATION”.
5. Connect the USB Adapter to a USB port on your PC.
6. Refer to the chapter “4.- MONITOR DE RED INALÁMBRICA CONFIGURATION” to
configure your USB Adapter.
Remember:
It is very possible that during the installation in your PC, you will need your operating
systems CD-ROM. It is highly recommended that you have this handy during the
installation procedure.
3.2.- DRIVERS AND MONITOR DE RED INALÁMBRICA INSTALLATION
Once you have inserted the CD provided inside the USB Adapters box, the installation
procedure will automatically start up. If the screen shown below does not appear,
double click on the “AutoRun.exe”. Select “Instalar Adaptador USB”.
USB Adapter
User Manual
Page 6
The installation programme will automatically prepare the installation of the drivers
shown in the following screens.
The installation will welcome you to the installation process:
Press “Siguiente” to start the installation of the USB Adapter.
USB Adapter
User Manual
Page 7
The installation programme will show a Telefónica de España’s licence agreement. If
you agree with the licence, press “Sí” and you will pass onto the screen shown bellow,
if you wish to exit the installation, press “No”.
In this screen you can choose where you want to install the files that the installation
programme will install. Once you have selected, press “Siguiente” to continue.
The programme will install the Monitor de Red Inalámbrica’s components.
USB Adapter
User Manual
Page 8
Once the installation programme has correctly installed the USB Adapters drivers and
utility, the screen shown above will appear, press “Finalizar” to exit the installation
programme. Depending on the operating system that you PC has installed, your PC
may ask you to restart the PC, if so restart your PC.
When all the installation processes have finished, connect your USB Adapter to a USB
port of your PC and make sure that the task bar at the bottom right hand side of your
screen has a new icon corresponding with your wireless device.
Windows 2000
Windows XP
If the icon appears red, this indicates that you have not yet associated your USB
Adapter with another wireless device.
Important note: If the icon that corresponds with the wireless network appears
“crossed out”, this is because the USB adapter has not yet been configured for an
access point.
Windows 2000
Windows XP
In the following chapter you will find the wireless network configuration procedure.
USB Adapter
User Manual
Page 9
4.- WIRELESS CLIENT CONFIGURATION
Before connecting the USB Adapter to a wireless network, please you must have the
following:
1. Make sure that the wireless option is activated in your router. Check that the
“WLAN” LED is on. Refer to the routers user manual to activate if the “WLAN”
LED is off.
2. Verify the wireless parameters of your wireless network: Network name (SSID),
encryption (WPA or WEP). You can check these parameters on the label situated
on the bottom side of the router or checking in the Agente ADSL (for more
information, consult the routers user manual).
Example of the label on the router.
4.1.- CONFIGURATION UNDER WINDOWS XP
Once you have installed your wireless adapter in your PC, the wireless network
configuration tool becomes enabled en Windows XP which allows you to connect to a
wireless network and verify the wireless network status. In this chapter screen shots
are taken as an example to assist you to make your wireless connection.
4.1.1.- CONNECTING TO A WIRELESS NETWORK
1. To configure the wireless network monitor, double click on Wireless Network
connections icon shown on the task bar.
Connected to a wireless network:
Not connected to a wireless network:
Connection limited or null:
2. In the option General clic on the button Find Wireless Networks.
USB Adapter
User Manual
Page 10
3. In this window you will find a list of wireless networks available. If no wireless
networks appear, refresh the list by clicking on the Refresh button situated at the top
left hand side of this window.
4. To connect to a wireless network shown in the list, double click on the desired
network. If this wireless network is protected by WEP or WPA encryption, once
selected a new window will appear on the screen where you will be required to type in
USB Adapter
User Manual
Page 11
the key and reconfirm this same key that protects this wireless network. To confirm
this procedure, click on the Connect button.
5. Once you have connected to this wireless network, the window will indicate that
you have successfully connected to the desired network.
6. If you require more information about how to manage your wireless network, please
read the following chapters.
It is recommended that you use 128 bit WEP keys for ADSL wireless routers
based on 802.11b and “WPA-PSK” for those based on 802.11g.
4.1.2.- VERIFYING THE STATUS OF THE WIRELESS NETWORK
To verify the status of the wireless network, double click n the wireless networks icon
situated in the task bar in Windows XP. The wireless network connection window will
appear
- The General option will allow you t verify the quality and activity on the wireless link.
USB Adapter
User Manual
Page 12
- The Support option will allow you to verify the TCP/IP parameters of the wireless
client. It will also show whether the TCP/IP parameters have been assign automatically
by a DHCP server or manually.
4.1.3.- CHANGING THE ORDER OF PREFERRED NETWORKS (PROFILE MANAGEMENT)
To change the order of preferred networks and priority to a certain connection over
another, click on the Change the order of preferred networks in the related tasks menu
on the left hand side of the Wireless networks screen. The Wireless network
connection properties screen will appear. Click on the Wireless Network option and a
list of preferred wireless networks will appear. To give a higher priority to a certain
network on the list, select this network and click on the up button. To give a lower
priority to a network on this list, select this network and click on the down button.
USB Adapter
User Manual
Page 13
4.1.4 CHANGING THE ADVANCED CONFIGURATION
When you select this option in the Related Task menu situated on the left hand side of
the Wireless network connection screen, the Wireless network properties will appear.
In the General option you can access the Advanced Configuration of the wireless
network adapter. This is very useful for TCP/IP configuration.
4.1.5.- DOMESTIC OR SMALL OFFICE WIRELESS NETWORK WIZARD
To configure a domestic wireless network assisted by Window XPs setup wizard, click
on Configure a domestic or small office wireless network in the network task menu
situated at the top left hand side of the screen. The setup wizard will appear to help
you to configure a wireless profile with network security enabled.
USB Adapter
User Manual
Page 14
When you click on the “next” button, a new screen will appear where you will need to
type in the wireless network name (SSID). Choose the Assign manually a network key
option. If you use a WPA encryption instead of a WEP, select the corresponding option.
When you click on “next” a new screen will appear where you will need to type in the
network key that you previously selected. Be sure to type in the exact same key (case
sensitive) that has been previously configured in your wireless router.
USB Adapter
User Manual
Page 15
When you click on “Next” once you have typed in the network key and the How would
you like to configure the network? Screen will appear, choose the Configure the
network manually option.
USB Adapter
User Manual
Page 16
Once you have clicked on the “Next” button, wizard finalization screen will appear
where it is recommended that you print out the configuration for other possible
wireless network clients. To finish the setup wizard, click on the “End” button.
USB Adapter
User Manual
Page 17
4.2.- CONFIGURATION UNDER WINDOWS 2000
To open the Monitor de Red Inalámbrica, double click on the corresponding icon in the
task bar (Utility Icon).
The following screen appears:
The Monitor de Red Inalámbrica will show the “Enlace” screen. As you can see from the
graphic on this screen, a link with a wireless access point has not yet been established
(“X” between the USB Adapter and the access point). Because the link has not yet been
made with a wireless device, the monitor can not determine whether the connection
to the Internet is correct. When the utility has been configured, these graphic will help
you to decide on the working state of the USB Adapter and its connections.
Click on the “Redes Disponibles” tab. In this screen you will find all the available
networks that are with the signal range of the USB Adapter.
In this screen you will see a “Refrescar” button, when you click on this button the
programme will search for all the wireless networks within the signal range and
refresh the screen. If after pressing this button no wireless networks appear, you will
need to move around until you find a signal.
In the example you will see a wireless network called “Telefonica”. In the screen you
will see that this network is based on a “Punto de Acceso” (access point), that will work
under canal (channel) 1 has the encriptación (encryption) enabled.
USB Adapter
User Manual
Page 18
To start the configuration, click on the tab “Perfiles” to create a connection profile. You
can create as many profiles as necessary. This way you can have a profile for your
home, office or any other place you may use a wireless connection
Click on the “Añadir” (Add) button to start a new profile configuration.
USB Adapter
User Manual
Page 19
The Monitor de Red Inalámbrica will ask you to give the new profile a name. This name
is only to help you to identify the new profile. For example you can use the name
“Home” in our example the name “Domicilio”.
Press “Siguiente” to select the connection parameters.
Next the utility will ask for the configuration information. Firstly it will ask for the
wireless network name. You can type in the network name or select the network by
pressing on the arrow next to the “Nombre de Red” option which is recommended. If
you choose to type in the network name manually, the name has to be exactly the
same; if you select the name from the list you eliminate any margin of error.
The next parameter is the type of network you wish to use (“Tipo de Red”). If you wish
to connect to an access point or wireless ADSL modem/router, you must always select
“Punto de Acceso”. The mode “Punto a Punto” (point to point) is reserved for
alternative applications and if you select this mode, you will not be able to connect to a
USB Adapter
User Manual
Page 20
wireless access point. Consult chapter 2.2 “Types of Wireless networks” in this manual
to obtain more information about point to point configurations.
To configure your USB Adapter in point to point mode you must select “Punto a Punto”
in “Tipo de Red” and the channel your point to point network works under.
The last parameter in this screen is the speed your USB Adapter will connect to the
access point. Your wireless network can operate under the four speeds corresponding
with the 802.11b standard: 1Mbps, 2Mbps, 5,5Mbps, 11Mbps and the 802.11g speeds:
54, 48, 36, 24, 18, 12, 9, 6Mbps. You can force the USB Adapter to work under any of
these speeds or set the USB Adapter to automatically select the speed for you. This
mode will always select the optimum speed possible. Sometimes it is necessary to
reduce the operating speed so as not to loose the connection, but nearly always the
best option is to select “Automático”
Press “Siguiente” once you have selected the three parameters. The utility will then ask
you to select the encryption that your connection requires.
USB Adapter
User Manual
Page 21
Very important note: If you use encryption, it is necessary to type in the same key both
in the wireless ADSL modem/router and the PCMCIA Card or USB Adapter that makes
up your wireless network. For your convenience, make sure you have the configuration
data of your access point
Wireless network encryption is a very important parameter. You have three kinds of
security: “Deshabilitado” (Disabled), “WEP” o “WPA-PSK”.
If you choose to select “Desactivado”, your connection will be completely open to
unwanted users. Anyone with a wireless device could intercept your signal y use your
wireless network to surf the net or access the information on your local area network.
It is recommended that you always configure your wireless network with the
encryption enabled. “WEP” encryption has two options:
64 bit key:
128 bit key:
Less safe but quicker.
Safer but slower.
You can select any of the two codes. It is recommended to select 128 bits key for an
802.11b Base Unit or wireless ADSL modem/router.
The difference between the two is the length of the key that is used to encode and
decode the data. A 64bit key is made up of 10 hexadecimal digits, which means 0 to 9
and from A to F.
Examples of 64 bits keys:
1020304050
ABCDEF9876
12F4A23CC0
128 bit keys are made up of 26 hexadecimal digits. For example:
102030405060708090AABBCCDD
72388037456272AF23987CD6876
In the example below a 128 bit key is used by selecting “128 bits” and pressing
“Siguiente”.
USB Adapter
User Manual
Page 22
In the screen where the key is specified, you must specify the format of the key. You
can use “Alfanumérico” (Alphanumeric), “Hexadecimal” o “Frase” (phrase). In the
example “Hexadecimal” is used.
Note: In “Frase” format, you can use up to a maximum of 32 characters both in 64 or
128 bits. In “Alfanumérico” you use 5 characters in 64 bits y 13 characters in 128 bits.
Type in the wireless networks encoded key. Remember that the same key must be
specified in the rest of the networks wireless components, such as the access point, etc.
If you have an 802.11g Wireless ADSL Router and USB Adapter, it is recommended that
you use “WPA-PSK”. In the “Encriptación” (Encryption) option, select “TKIP” and press
“Siguiente”.
In the next screen, type in the network key. Remember that you must use the same key
that has been configured in the Wireless ADSL Router, in the example below
“Telefonica” has been used. Press “Siguiente” once you have typed in the correct key.
USB Adapter
User Manual
Page 23
The final part of the profile configuration corresponds with the Internet Protocol (IP)
configuration. For your convenience and security, it is recommended that you select
“Configurar” (Configure) and specify the IP parameters in the utility.
Using the IP configuration, you can have a different IP for each profile you have
configured without having to modify your operating systems IP configuration each
time you change from one profile to another. If you prefer to modify your IP
configuration manually (Consult your operating systems user manual for instructions)
and leave the utilities IP configuration disabled, select “No configurar” and press
“Terminar”. In the example “Configurar” is selected, then press “Siguiente”.
The example will be based static IP address. For this you must disable (“Desactivado”)
the “DHCP” service and type in an IP address. The example below specifies “Dirección
IP” (IP Address) “192.168.1.2”, “Máscara de Subred” (Subnet Mask) “255.255.255.0”
(Both the IP address and the subnet mask must be decided according to the IP
configuration of your modem/router) and the “Puerta de Enlace” (Default Gateway)
USB Adapter
User Manual
Page 24
“192.168.1.1” which must correspond with the IP address of your router/NAT. The
“Servidor DNS” (DNS Server) “80.58.61.250” is obtained from the Internet service
provider.
Once all the IP data has been introduced, you have finished the profile configuration.
Press “Terminar” to save all the profile data.
If your network uses a DHCP Server or your IP address is automatically assigned by
your ADSL modem/router, make sure the DHCP option is set to “Activado” (Enabled) as
shown in the screen below:
Using this kind IP management, your wireless client will receive the IP configuration
automatically. Before you use this service, make sure that your ADSL modem/router
has the DHCP server activated. Press the “Terminar” button to finalize the profile
configuration and return to the profile list.
USB Adapter
User Manual
Page 25
The new profile will now appear in the profile list called “Domicilio”. Select the profile
and press “Conectar” (Connect).
If the connection is successful, the utility’s icon will change from red and the
connection information. In Windows XP, the network icon will appear in an operating
status and without a red cross, informing that there is a physical connection between
the USB Adapter and the access point.
To test the quality of the wireless connection, you can click on the “Más” (More) button
situated in the “Enlace”, “Redes Disponibles” and “Acerca de” tabs. The following
screen with appear:
USB Adapter
User Manual
Page 26
In this screen you can see all the relative data of your wireless connection such as, the
channel (“Canal”), link speed (“Velocidad de enlace”), the intensity (“intensidad”) and
signal quality (“Calidad”) which are very useful to test all the signal coverage of your
home or office. Also you can view the IP configuration of the actual connection.
4.2.1.- VARIFYING THE CONNECTION
NOTE: This chapter refers to the connection between the USB Adapter, an access point
and the Internet access connection. The connection to the access point is the same as
with a Wireless ADSL modem/router. For the access point and wireless ADSL
modem/router configuration, please refer to their user manuals.
The Monitor de Red Inalámbrica will give you a vast amount of visual information that
will help you to determine whether your wireless network is working correctly or if and
where the problem lies.
In normal working conditions, the following screen should be shown in the “Enlace”
tab.
Wireless Connection:
CORRECT
Internet Connection:
CORRECT
This screen informs that:
- The wireless connection between the USB Adapter and the access point is correct.
- The Internet access from the access point is also correct.
You may also find the following connection status:
USB Adapter
User Manual
Page 27
Wireless Connection:
CORRECT
Internet Connection:
INCORRECT
When an “X” appears between the access point and Internet, the wireless network
configuration is correct, but it is possible that the IP parameters are incorrect. Make
sure that these parameters are correct and that the connection between the access
point and the ADSL modem/router is also correct. You can also consult Annex A,
chapter “Verify the TCP/IP Connection”, in the manual to verify the IP configuration
Note: You can also test the Ethernet cable between the access point and ADSL
modem/router is connected correctly.
Finally, the screen may show the following:
Wireless Connection:
INCORRECT
USB Adapter
User Manual
Page 28
Internet Connection:
INCORRECT
This means that the connection between the USB Adapter and the access point. Make
sure that the wireless parameters that you have previously configured in the wireless
profile are correct and coincide with the parameters configured in the access point.
Also make sure that the access point is powered up and working correctly.
This User Manual is based on the Monitor de Red Inalámbrica version 1.0.2.9.
Note: The Monitor de Red Inalámbrica is only visible when your USB Adapter is
connected in the spot of your laptop PC. When the USB Adapter is disconnected, the
Monitor de Red Inalámbrica will disappear from the task bar and will only return when
the card is reconnected.
4.3.-USB ADAPTER DE-INSTALLATION
4.3.1.-USB ADAPTER DE-INSTALLATION IN WINDOWS XP
This chapter indicates how to de-install the USB adapter under Windows XP. All of the
drivers will be completely deleted in your PC.
Select: Stara -> Control Panel -> Add or Remove Programs.
Locate the “Monitor de Red Inalámbrica” programme and click on “Change or delete”.
USB Adapter
User Manual
Page 29
The de-install wizard will commence:
The wizard will inform the de-install command has been given for all the components.
Select the “Eliminar” and click on “Siguiente” to continue.
USB Adapter
User Manual
Page 30
Click on “Finalizar” to conclude the de-installation.
4.3.2- USB ADAPTER DE-INSTALLATION UNDER WINDOWS 2000
This chapter indicates the de-installation process of the drivers and Monitor de Red
Inalámbrica. Both the USB Adapters drivers and utility will be completely erased from
your PC.
Select: Start-> Programs -> Monitor de Red Inalámbrica -> Desinstalar
The de-installation programme will start:
The programme will remind you that you have given a de-installation command for all
the components, select “Eliminar” and press “Siguiente” to continue.
USB Adapter
User Manual
Page 31
Click on “Finalizar” to conclude the de-installation.
5.-USAGE OF THE WIRELESS CONNECTION
As a general rule, the access points permanently remain turned on, this way a wireless
signal is constantly available.
Each time you start your PC with a wireless client connected (assuming that the
wireless configuration is correct), your PC will automatically connect to the access
point.
Use the Monitor de Red Inalámbrica to supervise, configure and maintain your wireless
network connection. See chapter “7.- TROUBLE SHOOTING” if you detect any functional
abnormality or if you wish clarify any queries.
5.1.-USER PROFILES
The Monitor de Red Inalámbrica allows you to configure your wireless client so that it
can be used in different wireless environments. For your convenience, you can
predefine certain user profiles and switch between them depending on the wireless
USB Adapter
User Manual
Page 32
network you need to connect to. The different user profiles require the necessary
parameters such as the operating mode, WEP Encryption and IP address according to
the configuration of the wireless network at your home, office, client, etc. and to
connecting to these wireless networks is just a matter of seconds.
To create a new profile:
See the chapter “4.- MONITOR DE RED INALÁMBRICA CONFIGURATION” in this manual.
This chapter describes in detail the complete profile creation process.
To edit an existing profile:
Select the profile that you wish to edit en the profile configuration screen in the
Monitor de Red Inalámbrica and press the “Editar” button. All the profile parameters
are available for you modify if necessary.
5.2.- CREATING AN ACCESS PROFILE FOR TELEFONICAS “ZONA ADSL WI-FI”SERVICE
UNDER WINDOWS XP
To connect to a “Zona ADSL WI-FI” with Windows XP, follow the following steps:
Clic on Start -> Connect to -> Gíreles network connections. You will see a window that
shows all the wireless networks the USB Adapter has detected, to refresh the windows
press “Refresh list”. In this list you should find a wireless network called “Telefonica”.
USB Adapter
User Manual
Page 33
Click on the network name you wish to use. A different window should appear and
press Connect.
5.3.- CREATING A "ZONA ADSL WI-FI" DE TELEFÓNICA PROFILE FOR WINDOWS 2000
If you have not already configured a profile for “Zona ADSL Wi-Fi” de Telefónica access,
it is recommended that you create a new profile in the Monitor de Red Inalámbrica.
Open the Monitor de Red Inalámbrica press on the "Redes Disponibles" tab. If you are
within a “Zona ADSL Wi-Fi” signal area, you will see a wireless network called
"Telefonica". In the parameter "Tipo de Red" you will see that "Punto de Acceso" is
indicated and the encryption shows as "Desactivada". If you are not within a “Zona
ADSL Wi-Fi” signal area, you will not see "Telefonica" in the available networks list.
To configure your “Zona ADSL Wi-Fi” profile, click on the "Perfiles" tab.
USB Adapter
User Manual
Page 34
Click on "Añadir" to create “Zona ADSL Wi-Fi” de Telefónica access profile.
The Monitor de Red Inalámbrica will ask you to name the new profile, as an example
“Zona ADSL Wi-Fi” is used.
Press "Siguiente" to select the profile parameters.
The utility will ask for the generic configuration information. First it will ask for the
network name. If you are within a “Zona ADSL Wi-Fi” de Telefónica signal range, select
"Telefonica" in the "Nombre de Red" drop list. If you are not within a “Zona ADSL Wi-Fi”
de Telefónica signal range, type in "Telefonica" (be careful when typing this parameter
as a wireless network is case sensitive) in "Nombre de Red".
The next parameter corresponds with the type of network. The “Zonas ADSL Wi-Fi” de
Telefónica is a "Punto de Acceso" network.
The last parameter in this screen is the operation speed, it is best to be left in
"Automático".
USB Adapter
User Manual
Page 35
Once these three parameters are configured, press "Siguiente". The utility will then ask
the encryption type. Select "Desactivado".
Regarding the IP configuration, it is not necessary for you to make any modifications to
this parameter regardless of the IP address that you may have previously configured in
your wireless profile or if you have configured the IP address manually. The “Zona ADSL
Wi-Fi” de Telefónica access automatically assigns you an IP address within its IP range
In the case that you do not have an IP address configured in your wireless profile,
select IP configuration “Configurar”.
USB Adapter
User Manual
Page 36
In the “DHCP” option, select "Activado" and press the “Terminar” button.
You should now have a new profile in your list called “Zona ADSL Wi-Fi”.
To connect to the “Zona ADSL Wi-Fi” de Telefónica, select this profile and press the
"Conectar" button. If the connection is successful, the wireless utility icon will change
from red, indicating that the connection has been made successfully. In Windows XP
the network icon will appear without a cross, indicating that the physical connection
between the USB Adapter and the access point is good.
USB Adapter
User Manual
Page 37
Once you have connected to the access point to surf the Internet from a “Zona ADSL
Wi-Fi” de Telefónica area, you only have to call any website in your Internet explorer.
The “Zona ADSL Wi-Fi” Server will redirect you to the services home page.
Select your form of payment and type in your PIN number. If you do not yet have any
form of payment, you can acquire one directly from the home page.
Once your PIN number has been accepted, you can enjoy wireless broadband.
5.4.- “ZONA ADSL WI-FI” DE TELEFÓNICA SECURITY
For security reasons, the “Zona ADSL Wi-Fi” de Telefónica architecture impedes that
that two PC’s which are connected to the same “Zona ADSL Wi-Fi” area are not able to
access each other in any way. This way, no two users will be able to access each others
directories, files or folders that they may have shared in their PC. Remember, that to
access a “Zona ADSL Wi-Fi” de Telefónica area you must configure the encryption in
"Desactivado":
•
If you wish carry out any operation with your company’s network, you must use
your regular VPN (Virtual Private Network) software to protect your data.
With respect to bank transactions, etc. over the Internet, please take into account that
these connections are already coded through your username and password, for this
reason they are completely safe.
6.- TROUBLE SHOOTING
6.1.-COMMON PROBLEMS
Coming up you will find a list of the most common problems that you may come
across when using the USB Adapter. Please consult the following problems before
calling Telefónica’s Customer Service Centre.
USB Adapter
User Manual
Page 38
The drivers and Monitor de Red Inalámbrica cannot be installed
Cause: Your PC has an anterior version of a wireless device installed. The following
device will appear:
Solution:
De-install the anterior wireless device version. To obtain the de-installation procedure
of this device, please refer to the device in question’s user manual.
Windows cannot detect the USB Adapter
Cause: Connection or installation problems.
Solution:
- Make sure the USB Adapter is connected correctly to the USB port of your
PC.
- Make sure the USB ports are enabled in the BIOS of your PC.
- If an anterior installation has been cancelled, it is possible that the device
is in an inactive state. De-install the device and repeat the installation
process from the beginning as explained in this manual.
The Monitor de Red Inalámbrica shows a very low signal level
Cause: The signal is instable due to obstacles and/or interferences.
Solution:
- Change the orientation of the antennas, both in the access point and the
USB Adapter. You can try this by slightly moving your laptop towards the
access point.
- Other electrical equipment within the vicinity can sometimes cause radio
interference, move the USB Adapter away from the access point, cell
phones and metallic elements that could interfere with the wireless
radio signal.
- If there is a different wireless network within the vicinity, interference
can be caused by the use of the same channel. You can make some home
tests if this problem arise using the Monitor de Red Inalámbrica by
clicking on the tab “Redes Disponibles”. If it detects a nearby wireless
network which is using the same channel as yours, change the channel in
your access point or wireless ADSL modem/router (Consult the
corresponding user manual to reconfigure). Once you have changed the
channel, the wireless clients will automatically change and the new
channel selected and the interference problem will cease to exist. It is
also possible that two or more wireless networks exist within the signal
range of your wireless network, in this case it is recommended that the
channels configured are separated by as greater a distance as possible, it
is not good to have the channels in a consecutive order and it is
recommended that the channels are separated by at least 5 channels to
the nearest access point. Refer to the access point’s user manual for
channel modification.
USB Adapter
User Manual
Page 39
The PCMCIA Card cannot connect to the access point
Cause: There is not a sufficient signal range or there are signal interferences.
Solution: See incident above.
Cause: The access point is off.
Solution: Check the access point’s power supply.
Cause: Incorrect profile user parameter.
Solution:
- One of the most common wireless network incidents is the incorrect key which
is specified in the user profile. In the Monitor de Red Inalámbrica, make sure the
parameters that are specified are correct, primarily the network name of the
wireless network and the encryption key.
The wireless network Works but I do not have Internet access
Cause: The IP configuration is incorrect
Solution:
- Make sure the IP configuration data is correct in your user profile as per
the following explanation:
USB Adapter
User Manual
Page 40
Parameters:
- DHCP: Select “Desactivado” if you want to specify the addresses
manually. Select “Activado” if you have a DHCP Server connected to your
network. If you select “Desactivado” you must fill in the rest of data
specified below.
- Dirección IP: This is the IP address that you must configure in the PC that
has the PCMCIA Card installed. It must be within the same range as the
IP address configured in your ADSL router for Internet access.
- Máscara: Must be the same as in your ADSL modem/router.
- Puerta de enlace: The IP address of your ADSL modem/router.
- Servidor DNS: Supplied in a letter sent by Telefónica or you can also call
900 50 20 10 from your ADSL line or see www.telefonicaonline.com.
6.2.- DRIVER VERIFICATION
In the case of your USB Adapter is not activated (LED permanently off), make sure that
the device’s drivers are correctly installed. To verify this follow these steps:
-
In Windows 2000: Select Start -> Settings -> Control Panel. The Control
Panel window will open, select “System”. Then select “Device Manager”
and “Network Adapters”.
In Windows XP: Select “Start” and right click on “My Computer”, select
“Properties”. Then select the tab “Hardware”, click on the “Device
Manager” and select “Network Adapters”.
The USB Adapter is identified as:
“RT2500 USB Wireless LAN Card”
USB Adapter
User Manual
Page 41
Right click over the USB Adapter and select “Properties”. In the “General” tab there is a
box in the middle of the window titled “Device Status” and if the USB Adapter is
correctly installed, inside this box will appear “This device is working properly”.
USB Adapter
User Manual
Page 42
If this message does not appear, the device has not been installed correctly. Please deinstall the USB Adapter and repeat the installation process according to this User
Manual.
6.3.-CUSTOMER SERVICE
The customer service is available over the telephone and also on the Internet
Telephone support
You can call the customer service on 902 357 000 for any query you may have.
If you do not know the IP addresses that correspond with your ADSL access, dial the
telephone number 900 50 20 10 from your ADSL line and an automatic service will
inform you of the IP addresses the correspond with your access.
Internet support
All ADSL information can be found in the “Todo ADSL” area in telefonicaonline.com:
URL: www.telefonicaonline.com/adsl
Other related websites:
1. – Consult the IP addresses associated with your ADSL line.
Description: Gives you your ADSL configuration data via the Internet.
Requires a username and password from telefonicaonline.com (free of charge).
URL: www.telefonicaonline.com/datosadsl
2.- Quick installation guides and user manuals for auto installation kit.
Description: Support area for the auto installable kits with all the quick installation
guides and user manuals for each kit that Telefonica has to offer.
URL: www.telefonicaonline.com/adsl/ayudakit
3.- Configuration zone and software upgrades.
Description: In this area you can download the latest ADSL routers re-configurators
and software upgrades, the best way to make the most of your broad band connection.
URL: www.telefonicaonline.com/adsl/descarga
4.- ADSL expert zone.
Description: Information and tutorials about ADSL programmes and utilities to make
the most of your broad band access. Look up the ADSL expert zone, all the information
you may need at your finger tips.
URL: www.telefonicaonline.com/adsl/experto
USB Adapter
User Manual
Page 43
CUSTOMER SERVICE CENTER FOR TELEFÓNICAS ADSL PRODUCTS
Telephone home users: 902 357 000
Soho and professionals: 902 357 022
CUSTOMER SERVICE FOR PRODCUTS UNDER GUARANTEE
Teléfono: 902 194 492
7.- RECYCLING
Never dispose of the USB adapter along with house along waste. Ask for information
from your local council for the correct ecological disposal. Always respect these
disposal regulations.
Anybody that does not respect these regulations is liable and may received fines
sanctioned by the authorities.
The card board box, plastic packaging and the pieces that form party of the USB
adapter can all be recycled under the regulations enforced in Spain for recyclable
material.
The symbol of the dust bin with a cross through it, that can be found
on the device, jeans that once the device has reached the end of its
usefulness, it should be taken to the appropriate disposal centre and
should be separated from regular domestic waste.
USB Adapter
User Manual
Page 44
8.- DECLARATION OF CONFORMITY
There may be restrictions for the use of this
product in some EU countries, accept for Spain.
Product: Adaptador USB
Model: WURB-101WL-682
Manufacturer: SparkLAN Communications Inc.
Made in Taiwan
Spanish Representative: IDEAL TECHNOLOGY
NIF: B81187072
ELECTROMAGNETIC AND IMMUNITY COMPATIBILITY
The products previously aforementioned have been tested for their electromagnetic
compatibility according to the la Directive 89/336/EEC of the European council. The
conformity of this regulation is based on the compliance of the following standards:
EN55022:1998 limits and methods of measuring the radio interferences. This
equipment complies with class B limitations.
EN55024:1998 the generic immunity standard of electromagnetic compatibility:
residential, commercial and light industrial ecology (January 1992). Also with IEC 801-2
(1984); IEC 801-3 (1984); IEC 801-4 (1988).
SECURITY (Low voltage committee)
The products previously aforementioned have been tested for their electrical security
according to the Directive 72/23/EEC of the European council with the correction
93/68/EEC on electrical equipment security. The conformity of this regulation is based
on the compliance of the following standards:
EN61558-1:1997
EN61558-2-6:1997
EN61558 A1:1998
Madrid, 3rd March of 2006
IDEAL TECHNOLOGY
Domingo B. Téllez Rojo
Director General
C/ Vicente Caballero 10
28007 MADRID
ESPAÑA
USB Adapter
User Manual
Page 45
TELEFÓNICA DE ESPAÑA, S.A.U. INFORMS
We would like to thank you for your trust in Telefonica de España by purchasing one of our
products; we inform you that for any explanations, query or complaints, you can call free
Telefónica de España SAU, Gran Vía 28, Registro Mercantil: Hoja M-213180, Folio 6, Tomo 13170, Inscripción 1ª, C.I.F.: A-82018474
Empresa adherida al Sistema Arbitral de Consumo
phone the following numbers:
¾ Personal attention (1004)
¾ Customer service centre for SOHO (900 555 022)
¾ Customer service centre for large companies (900 120 900)
Where you will be attended by our advisors, or if you prefer you can visit our website:
www.telefonicaonline.com.
To obtain information about our post sales service, see the warrantee card of the product you
have purchased.
Finally, to send a complaint via postal service, please send to Telefónica de España S.A.U, Gran
Vía 28, 28013 Madrid.
USB Adapter
User Manual
Page 46