1
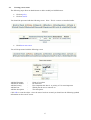
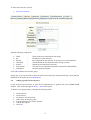
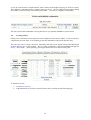
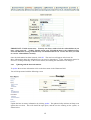
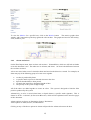
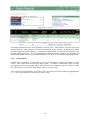
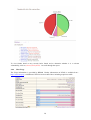
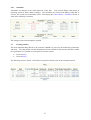
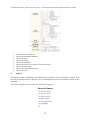
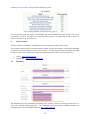
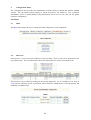
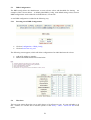
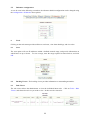
OSSIM
Open Source Security Information Manager
User Manual
Created by Kevin Milne (www.z4ck.org)
Contributions by OSSIM Staff
2nd September 2004
Index
Introduction
3
1
Logging in
5
1.1
The Metrics Screen
5
2
The Policy menu
5
2.1
2.2
2.3
2.4
2.5
Creating a new sensor
Defining signature groups
Creating a network
Adding a group of relevant ports
Editing the priority and reliability
6
7-8
8-9
9-10
10-11
2.6
Creating a host
2.6.1
Updating the host information
2.6.2
Alarms and alerts
2.6.3
Alerts
2.6.4
Using the ACID console
2.6.5
Vulnerabilities
2.6.6
Host Usage
2.6.7
Anomalies
11-12
12-13
13
14
14-15
15-16
16
17
2.7
Creating a policy
17
3
Reports Menu
18
4
4.1
Monitors Menu
Riskmeter
19
19
5
5.1
5.2
5.3
5.3.1
5.4
5.5
Configuration Menu
Main
Directives
RRD Configuration
Inserting a new RRD Config
Host Scan
Riskmeter Configuration
20
20
20
21
21
21
22
6.
6.1
6.2
6.3
Tools
22
22
22
22
7
A final word
Scan
Backlog Viewer
Rule Viewer
23
2
Introduction
OSSIM – Meaning Open Source Security Information Manager can be found at http://www.ossim.net.
An ISO version has been created, and is available at http://www.boseco.com.
The goal of OSSIM is to fill a gap in the needs of security professionals.
Considering the important technological advances of recent years that have made tools with capacities
such as those of IDS available, it is surprising that it is so complex from a security standpoint to
obtain a snapshot of a network as well as information with a level of abstraction that allows practical
and manageable monitoring.
CORRELATION
Correlation means the ability to view all events in all systems in one place and in the same format,
and from this privileged vantage point compare and process the information, thereby allowing us to
improve detection capabilities, prioritise events according to the context in which they occurred, and
monitor the security situation of our network.
The idea of correlation is also implicit in the vision of our project in the sense of bundling and
integrating products. Within the general framework of OSSIM, we want to include a number of
magnificent products developed in recent years that create new possibilities when their functionalities
are interrelated.
RISK ASSESSMENT
In each case, in order to decide whether or not to perform an action we evaluate the threat represented
by an event in relation to certain assets, keeping in mind the reliability of our data and the probability
the event will occur.
This is where the system becomes more complex, and we must therefore be able to implement a
security policy, a network inventory, a real-time risk monitor-all configured and managed within a
single framework... In any case, we cannot let complexity keep us from achieving our objective:
product integration.
WHAT IS OSSIM?
OSSIM is a distribution of open source products that are integrated to provide an infrastructure for
security monitoring.
Its objective is to provide a framework for centralizing, organizing, and improving detection and
display for monitoring security events within the organization.
Our system will include the following monitoring tools:
a. Control panel for high-level display
b. Risk and activity monitors for mid-level monitoring
c. Forensic console and network monitors at the low level
3
These tools utilize new capabilities developed in SIM post-processing, whose objective is to improve
detection reliability and sensitivity:
a. Correlation
b. Prioritization
c. Risk assessment
Post-processing in turn makes use of the preprocessors, a number of detectors and monitors already
known to most of the administrators that will be included in our distribution:
a. IDS (pattern detectors)
b. Anomaly detectors
c. Firewalls
d. Various monitors
Finally, we need an administrative tool that configures and organizes the various modules, both
external and native, that comprise OSSIM. That tool is the framework, which allows us to inventory
assets, to define: the topology, a security policy, correlation rules, and to link up the various integrated
tools.
ABOUT THIS DOCUMENT
If you are looking for information on the installation and configuration of OSSIM, then this can be
obtained from other documents on http://www.ossim.net. This documents hopes to meet the needs
of the security professional as an end user of the system, and takes the user through the steps of
creating, optimising and monitoring the various assets to be protected.
So lets get started.
4
1. Logging in
The OSSIM console is web based, and can be interfaced through any standard web browser.
system runs on port 80 (HTTP) or secure (HTTPS) port 443.
•
•
•
•
The
Start your favourite browser.
In the address bar enter – http://ipaddressorofossimserver
Enter the user ID ossim
Enter the password ossim_password
Remember to change your password from the default.
Once you have logged in, you will be presented with the Metrics screen.
The Metrics screen
provides an overview of what is going on in the networks you have decided to monitor.
1.1. The Metrics Screen
The screen is split into separate sections. Global Metrics, Riskmeter, Service Level, and current
metrics for each of the individual components you have defined as part of a policy.
2.
The Policy Menu
The OSSIM policy menu allows an administrator to create, or modify the objects needed to build a
policy.
5
2.1.
Creating a new sensor
The following steps allow an administrator to add or modify an OSSIM sensor.
•
•
Click on policy
Click on sensors
You should be presented with the following screen. Note – This is a sensor we installed earlier.
•
Click Insert new sensor
You will be presented with the following screen.
Add the Hostname
Add the IP Address
Add the Priority
Add the Port
Add the description
-
Name of your host
IP of the host.
How important this host is. A priority of 5 is most important.
Which port the server connects on.
The description.
Click OK to create the object. Once the sensor has been created you should see the following updated
information on the sensors screen.
6
If the new sensor does not appear as active, click the Active button to recheck the connection. If this
is still not active please refer to the OSSIM or Boseco forums.
2.2
Defining Signature groups
The signatures section relates directly to the snort, and other signatures types that are picked up by the
sensor. These individual alerts can be viewed in ACID. In this section the administrator can optimise
the amount of attack signatures or responses of that are of interest. This section is useful as it allows
the definition of different signatures for different sensors. So, for example, we can define a signature
list of type Virus that only contains the Snort Virus rules for the internal network, but a different list
of Web server signatures for the DMZ.
To create a new signature group:
•
•
•
Click on Policy.
Click on Signatures
Click Insert new signature group.
7
The following screen appears.
From here, give the new signature group a name, and choose the signatures that you wish to define.
•
•
•
Tick the relevant boxes.
Add a useful description.
Click OK
The new signature is now added, and available for use in future policy creation.
2.3
Creating a Network
It is very likely that you will need to define multiple networks within the organisation. The Policy >
Networks option allows us to do this. Click Policy > Networks. You will be presented with the
following screen.
8
To add a new network, click on:
•
Insert new network.
Add the following components.
•
•
•
•
•
•
•
Name
Ips
Priority
Threshold
Sensors
Scan options
Description
-
Name of the new network/networks group.
IP addresses of the networks
How important is this network. A priority of 5 is most important.
The thresholds for this network before raising an alarm.
Which sensors monitor this network.
Tick this if you would like the network scanned for vulnerabilities.
Network group description.
Click OK to add the new network group.
Please note: If you do not wish to have the entire network group scanned periodically, ensure that the
NESSUS SCAN option is set to DISABLED.
2.4
Adding a group of relevant ports
It may be necessary from time to time for the administrator to optimise the ports OSSIM should
monitor. This is done through the Policy > Ports menu option.
To define a new group of ports, complete the following tasks.
•
•
•
•
•
•
•
Click on Policy
Click on Ports
Click Insert new Port Group
Add a name for the port group.
Tick the ports that you wish to monitor.
Add the description.
Click OK.
9
The port group has now been added, as shown below.
2.5
Editing the Priority & Reliability
With OSSIM, it is possible to change the priority and reliability rating of signatures detected on the
network. This is an extremely useful facility as it gives the administrator the ability to reduce the
amount of false positives, or alert you to one specific signature type you may know you are vulnerable
to.
To change the priority and reliability settings:
•
•
Click Policy
Click Priority & Reliability
You will see the following screen.
To edit the priority and reliability of Back Orifice, click on the Id field.
10
As can be seen from the screenshot below, Back Orifice has the highest priority for obvious reasons.
The reliability of the Back Orifice signature has been set to 3. We can change this by simply editing
the number 3, and increasing or decreasing the number. Once this is complete, click Modify.
The above task will be undertaken on a regular basis as you optimise OSSIM for your network.
2.6
Creating a Host
Finally, once all of the previous steps have been completed, a host may be added. It was necessary to
complete the previous steps, as all of them provide the information required for the host entry.
There are two ways to create a new host. Manually, and with a scan, which will provide information
on hosts that are live on the network. We are going to undertake a manual installation through the
Policy > Hosts menu. Host operating system types shown below are detected using P0F.
To add the new host:
•
•
Click Insert new host
Add information to all of the sections shown in the screenshot on the following page.
11
IMPORTANT : Enable nessus scan. You may not always wish to look for vulnerabilities if you
have a large network. Ticking ‘Enable nessus scan’ will add the host to the scheduled scans.
Network utilisation on large networks may reach undesirable levels. Choose the hosts you wish
to scan for vulnerabilities carefully.
Once the information has been inserted, click OK. The new host will appear in the hosts list.
More information about the individual host can now be determined. If the information entered is
incorrect, clicking on Modify, in the Action column, and editing the information can change it.
2.6.1
Updating and the host information.
To update the new host information click on the hosts name in the Hostname field.
You will be presented with the following screen.
Update the host inventory information by clicking update. The update facility initiates an Nmap scan
against the new host. This will obtain the open ports, and the services running on the system, as
shown below.
12
To view the Metrics for a specific host, click on the Metrics button. The metrics graphs show
Attacks, and Compromises picked up against the relevant host. The graphs are based on the last day,
week, month or year.
2.6.2
Alarms and Alerts
On the Host Report menu, there are three sub-sections. Vulnerabilities, which we will look at further
on in this document is one. The other two are Alarms, and Alerts. So what is the difference between
the two latter sections?
Alarms are raised when a set of criteria has been met based on the directives created. For example, an
alarm may trip if the following group of events occur together.
•
•
•
•
•
An alert is produced by Snort.
A specific attack response is detected relevant to the alert.
Specific thresholds have been passed.
An attack has lasted for a designated length of time.
The priority of the system is high enough.
All of the above are added together to create an alarm. This system is designed to limit the false
positives produced by the system
Alternatively, an alert is raised when Snort, or Spade detects a specific attack signature. This is
shown in ACID – A Console for Intrusion Detection, which will be explained on the next few pages
of this document.
Alarms options are Source or Destination, Source, Destination.
Alerts options are Main, Source, and Destination
Clicking on any of the above options in Alarms will provide the Alarms relevant to the host.
13
2.6.3
Alerts
The Alerts view is obtained through ACID. To enter the acid console, a user ID and password are
required.
•
Click on Main.
You will be presented with a login box. The default USERID and PASSWORD are shown below.
USER ID:
PASS:
acid
acid_password
It is advisable to change these passwords during the installation and configuration phase of OSSIM.
As mentioned earlier, documentation pertaining to the installation can be found on
http://www.ossim.net
Once successfully logged in, the administrator is presented with the following screen.
2.6.4
Using the ACID console.
ACID is a very powerful tool for examining intrusion detection information. As this is a user manual
specifically related to OSSIM, and although we touch on the underlying utilities, each of these utilities
may have its own user manual. More information, including a FAQ for ACID can be found at –
http://acidlab.sourceforge.net
Below is a basic demonstration of the information available via ACID.
To look at the occurrences of attacks as source from the designated system click the number in the
Occurances as Src. field. The following screen will appear with the signatures/attacks detected.
14
For further information on any of the signatures, click on [snort]. This will take you to the Snort rules
descriptions page, which will give you relevant information on the signature, including the potential
for false positives and false negatives. As mentioned earlier ACID is a powerful tool, which can also
perform graphing functions. It is recommended therefore that anyone wishing to use OSSIM to its
full potential should also have a good understanding of ACID, as well as the other underlying utilities.
2.6.5
Vulnerabilities
OSSIM allows companies or individuals to view the vulnerabilities currently outstanding on their
servers. This is done from the same Host Report menu. To obtain a vulnerability report, a Nessus
scan against the host must be undertaken. Once this has been completed, click on Vulnmeter, under
the Vulnerabilities section of the Host Report menu to view the results.
A list of hosts with vulnerabilities is provided. The relevant host, and its IP address are highlighted in
red. Click on the IP address of the host you wish to study.
15
To view further detail on any security holes found, and to determine whether it is a relevant
vulnerability, click on (Security hole found). Or scroll through the report.
2.6.6
Host Usage
The Usage information is provided by NTOP. Further information on NTOP is available from –
http://www.ntop.org. OSSIM uses NTOP to look at traffic flows including suspicious traffic.
16
2.6.7
Anomalies
Anomalies are changes in the usual behaviour of the host. This section defines such things as
operating system or MAC address changes. The anomalies are based on the RRD_Config that is
created. An overall list of anomalies can be viewed using the Control Panel > Anomalies section as
show in the following screenshot.
The changes can be acknowledged or ignored.
2.7
Creating a Policy
The most important thing that has to be created in OSSIM is a policy for the monitoring of networks
and hosts. Now that all the relevant information has been entered for the networks and hosts within
the organisation, it is possible to create policies relevant to those.
•
•
Click on Policy
Click on Policy
The following screen is shown. Notice that a few policies already exist for the example network.
17
To add a new policy, click Insert new policy. You are presented with the Insert new policy screen.
•
•
•
•
•
•
•
•
•
3.
Choose the source addresses.
Choose the destination addresses
Choose the ports
Choose the priority
Choose the signatures.
Choose the sensors you wish to use with this policy
Choose the time range.
Enter a description for the policy.
Click OK to save.
Reports
The Reports section of OSSIM provides information on both hosts, and overall network security. The
host report option provides an alternative way of obtaining the host data we touched on earlier in this
document.
The Security Report section provides the following information.
18
Clicking on Top 10 Alerts, will provide the following screen.
It is also possible, from this menu, to drill further into each individual alert using ACID. This screen
is extremely useful for the purposes of removing false positives, or optimising the Snort sensors to
remove an alert you do not wish to see.
4.
Monitors Menu
Session, Network, Availability, and Riskmeter are sub-menus provided in this section.
The monitor’s menu provides real-time network, uptime, and risk session data. NTOP and OpenNMS
provide most of the information shown in this section. To fully appreciate the information provided
in these sections, and to obtain the in-depth documentation, please visit the relevant websites.
•
•
4.1
NTOP – http://www.ntop.org
OPENNMS – http://www.opennms.org
RiskMeter
The Riskmeter provides information pertaining to the systems, which are currently deemed to be at
risk, or are currently launching attacks. For a definition of risk pertaining to OSSIM, and how it is
calculated, please see the OSSIM website at http://www.ossim.net.
19
5.
Configuration Menu
The configuration menu provides the administrator with the ability to change and optimise OSSIM
settings. The sub-menus include options to reload all policies, edit directives, view correlation
information, create or modify RRD_Config information, add a host to scan, and edit the global
riskmeter configuration.
Sub-Menus
5.1
Main
The Main menu allows the user to reload individual components, or all components.
5.2
Directives
Directives are a set of events that combine to cause an alarm. These events can be optimised to suit
any infrastructure. The screenshot below shows the default directive for the win-trin00 Trojan.
The directives can be edited by clicking on the relevant plugin ID. So, for example we can click on
ossim and the following screen is presented, which allows the administrator to edit the priority and
reliability of OSSIM events.
20
5.3
RRD Configuration
The RRD config allows the administrator to enter relevant values and thresholds for alerting. An
example of this is shown below. A default global RRD_Config, with default settings exists, but new
RRD configurations can be added for individual hosts, or networks.
A new RRD configuration is added in the following way.
5.3.1
Inserting a new RRD Configuration.
•
•
Click on Configuration > RRD_Config
Click on Insert new rrd_conf
The following screen appears, which will allow configuration of an individual network or host.
•
•
5.4
Add an IP Address to monitor.
Edit the thresholds based on the hints below.
Host Scan
The host scan option allows the user to add a host to a list of hosts to scan. It is not advisable to do
this. Instead, it is a better idea to add the options via the Policy > Hosts > Insert new host menu
option.
21
5.5
Riskmeter configuration
As can be seen in the following screenshot, the riskmeter default configuration can be changed using
the Configuration > Riskmeter menu options.
6.
Tools
Clicking on the tools menu provides utilities to scan hosts, view alarm backlogs, and view rules.
6.1
Scan
The scan option will scan IP addresses within a defined network range, and provide information on
which hosts are up or down. To scan a range, enter the range required as shown below, and click
OK.
6.2
Backlog Viewer - The backlog viewer provides information on outstanding anomalies.
6.3
Rule Viewer
The rule viewer allows the administrator to view the individual Snort rules. Click on Tools > Rule
Viewer, and choose the rule set you wish to view. In this case the virus.rules.
22
7.
A final word
It may take a while to optimise all the configuration values within OSSIM due to the vast amount of
data and parameters that are available to the system administrator. At the moment OSSIM is going
through a rapid development cycle, therefore it is very likely that this document will be out of date
even as you read it. It is best that this document is used as a basic configuration guide, once you
have installed the system.
23
24