1
TOPS Professional™
Owner Database Manual
Revised 7/5/2011
By
TOPS Software, LLC
Clearwater, Florida
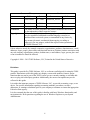
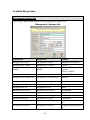
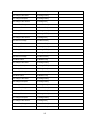
Document History
Edition
First Edition
Trademark
Copyright
Version
Document
Software
TOPS-OD_M-AA
4.0
Date
11 –2008
Revised
6 - 2010
4.0
Revised
7 - 2011
4.0
The names of actual companies and products mentioned herein may
be the trademarks of their respective owners.
Without limiting the rights under copyright, no part of this document
may be reproduced, translated to another language, stored in, or
introduced into a retrieval system, or transmitted in any form or by
any means (electronic, mechanical photocopying, recording or
otherwise), for any purpose, without the express written permission
of TOPS Software, LLC.
Unless otherwise noted, the example companies, organizations, products, domain names, e-mail
addresses, logos, people, places and events depicted herein are fictitious, and no association with
any real company, organization, product, domain name, e-mail address, logos, person, place and
event is intended or should be inferred.
Copyright © 2008 –2011 TOPS Software, LLC, Printed in the United States of America.
Disclaimer
This guide is provided by TOPS Software, LLC as a reference and help tool for using the TOPS
product. Illustrations used in this guide may display screens with modules, features, and or
functions that may not be part of the TOPS version you are currently running, or available addons or as plug-ins to third party products. Additionally, the most recent updates may not be
reflected in this guide.
It is neither the intent nor purpose of TOPS Software, LLC, to provide accounting, wage, or tax
advice. For specific information regarding accounting methods, procedures, tax rates,
deductions, or earnings calculation speak to your company accountant or contact the appropriate
Federal or State agency.
It is also assumed, that the user of this guide is familiar with basic Windows functionality and
navigation tools. Refer questions regarding the use of Windows Explorer to your System
Administrator.
ii
Owner Database
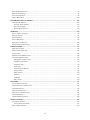
Table of Contents
TOPSPROFESSI
ONAL™ ......................................................................................................................................... I
OWNER DATABASE MANUAL .............................................................................................................................. I
BY ............................................................................................................................................................................. I
TOPS SOFTWARE, LLC ............................................................................................................................................. I
ABOUT OWNER DATABASE ................................................................................................................................. 1
OWNER TOOLBAR ..................................................................................................................................................... 2
MAINTAIN OWNERS SCREEN OVERVIEW .................................................................................................................. 4
PROPERTY INFORMATION SCREEN OVERVIEW........................................................................................................ 13
HISTORY SCREEN OVERVIEW ................................................................................................................................. 18
RECURRING CHARGES SCREEN OVERVIEW............................................................................................................. 22
LETTERS ................................................................................................................................................................. 25
OWNER NOTES ....................................................................................................................................................... 28
Printing Owner Notes........................................................................................................................................ 29
FLEX DATA ............................................................................................................................................................. 30
FLAGS ..................................................................................................................................................................... 31
OWNER RESALES .................................................................................................................................................... 34
Owner Resale Screen......................................................................................................................................... 34
Owner Resale - Add New Owner....................................................................................................................... 37
OWNER CCR RECORDS OVERVIEW ........................................................................................................................ 40
WORK ORDERS ....................................................................................................................................................... 41
PRINT...................................................................................................................................................................... 42
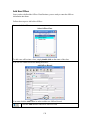
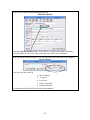
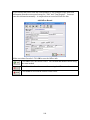
ADD OWNER ATTACHMENT.................................................................................................................................... 43
SELECT HOME & OWNER........................................................................................................................................ 46
ALTERNATE MAILING ADDRESS ............................................................................................................................. 50
MULTIPLE OWNERS ................................................................................................................................................ 52
Husband & Wife ................................................................................................................................................ 54
Previous Owners ............................................................................................................................................... 55
Renters............................................................................................................................................................... 56
COLLECTION ACTION ............................................................................................................................................. 60
HOLD COLLECTION ACTION ................................................................................................................................... 62
HOLD PAYMENTS.................................................................................................................................................... 63
ADD NEW OWNER RECORD .................................................................................................................................... 65
ADD NEW HOME & OWNER .................................................................................................................................... 69
DELETE HOME & OWNER ....................................................................................................................................... 75
DELETE OWNER RECORD ....................................................................................................................................... 77
STREET NAMES ....................................................................................................................................................... 79
SECTION/PHASE NUMBER ....................................................................................................................................... 83
COST CENTERS ....................................................................................................................................................... 88
OWNER FLAGS ........................................................................................................................................................ 91
ACCELERATED ASSESSMENTS ................................................................................................................................ 91
iii
BILLS/STATEMENTS FLAG ...................................................................................................................................... 94
MAILING LABELS FLAG .......................................................................................................................................... 96
SPECIAL FORMS FLAG ............................................................................................................................................ 98
DIRECT DEBIT FLAG ............................................................................................................................................. 100
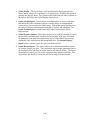
OWNER REPORTS--OVERVIEW...................................................................................................................... 103
PRINT OWNER REPORTS ....................................................................................................................................... 105
Selecting Report Options................................................................................................................................. 105
Select Print Options ........................................................................................................................................ 107
Special Report Options.................................................................................................................................... 109
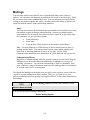
MAILINGS.............................................................................................................................................................. 114
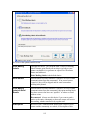
SELECT LABELS OR EMAIL ................................................................................................................................... 114
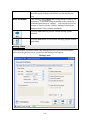
MAILING LABELS.................................................................................................................................................. 116
EMAIL OPTIONS .................................................................................................................................................... 120
SELECT RECIPIENTS .............................................................................................................................................. 123
MAILINGS TASK REVIEW ...................................................................................................................................... 126
EXPORT MAILING LABEL FILE .............................................................................................................................. 129
FORM LETTERS................................................................................................................................................... 133
MAINTAIN LETTERS.............................................................................................................................................. 134
MERGE CODE OVERVIEW ..................................................................................................................................... 135
ADD LETTER ......................................................................................................................................................... 136
WORKING WITH MERGE CODES ............................................................................................................................ 148
AVAILABLE MERGE CODES .................................................................................................................................. 153
Management Company Info ............................................................................................................................ 153
Community Fact Sheet..................................................................................................................................... 154
Community Info ............................................................................................................................................... 156
Owner Info ...................................................................................................................................................... 158
Owner Itemized Balances................................................................................................................................ 160
Charge Tables ................................................................................................................................................. 161
Other Charges ................................................................................................................................................. 164
Subtotals.......................................................................................................................................................... 166
CCR Data ........................................................................................................................................................ 168
Misc. Fields ..................................................................................................................................................... 170
OFFICERS .............................................................................................................................................................. 171
VIEW/CHANGE OFFICERS ..................................................................................................................................... 171
DEFINE OFFICER CLASSIFICATION ........................................................................................................................ 175
ADD NEW OFFICER ............................................................................................................................................... 178
DELETING AN OFFICER ......................................................................................................................................... 181
DELETING AN OFFICER CLASS .............................................................................................................................. 184
OFFICER REPORTS ................................................................................................................................................ 186
OFFICER MAILING LABELS ................................................................................................................................... 189
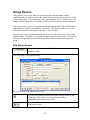
GROUP OWNERS ................................................................................................................................................. 192
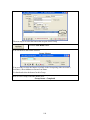
ADD GROUP OWNERS ........................................................................................................................................... 192
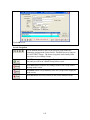
Group Owner Data Fields............................................................................................................................... 193
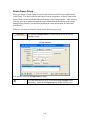
DELETE OWNER GROUP........................................................................................................................................ 196
iv
DELETE HOMES FROM OWNER GROUP ................................................................................................................. 198
MORTGAGE COMPANY .................................................................................................................................... 200
DATA FIELDS ........................................................................................................................................................ 200
ASSIGN MORTGAGE COMPANY............................................................................................................................. 202
POOL PASS ............................................................................................................................................................ 204
OWNER CONTROL INFO................................................................................................................................... 205
DATA FIELDS ........................................................................................................................................................ 205
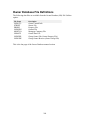
OWNER DATABASE FILE DEFINITIONS....................................................................................................... 209
v
About Owner Database
The Owner Database module is the cornerstone module of the TOPS Professional™
system and is where the homes and owners are stored for each community. Use Maintain
Owner to make corrections to owner names, change mailing address, owner telephone
numbers, e-mail address changes other information stored for the homes and Owners.
Through the Property Info button on Maintain Owners, you can change the information
about the home itself, like the Account #, Lot/Unit #, Street Address, Legal Description,
etc. From the Owner menu, you can also generate owner reports, mailing labels, and form
letters for the Owner Database module.
TheOwne
rDa
t
a
ba
s
ei
si
nc
l
ude
dwhe
ny
oupur
c
ha
s
eTOPSa
spa
r
toft
he“
Ba
s
i
cSy
s
t
e
m”
.
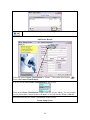
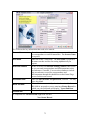
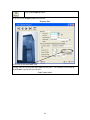
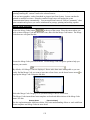
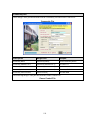
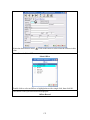
To access the Owner Database module and its features, click the Owner button on the
TOPS Professional™ toolbar. You will see the Owner Database menu:
Use the Owner Database module to perform the following:
Maintain - maintain homes, owners and related information. Also, handle home
resales here.
Reports - print various reports in many sort orders.
Mailing Labels - print several label formats for both laser and dot matrix printers.
Create an owner file for export into other applications. E mail owners as an
alternative to mailing labels.
Form Letters - create letter templates or special forms with mail merge capabilities
to send to owners, either printed letters or e mailed.
Officers - setup and maintain Community Officers and committees. Print reports and
mailing labels. E mail officers here as well.
Group Owners - owners who own more than one home in the community. Generate
consolidated bills and labels for Owner Groups.
Mortgage Companies - set up and maintain Mortgage Companies for tracking.
Pool Pass –track facility memberships and print passes. This is an option which
must be purchased separately; it is not included with Owner Database in the basic
cost of the software.
Control Info –maintain general community information, such as, return address for
bills and coupons, location of the community, etc.
1
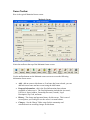
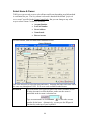
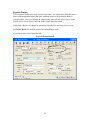
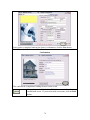
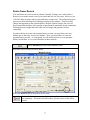
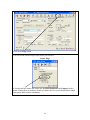
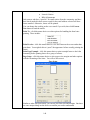
Owner Toolbar
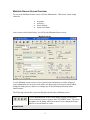
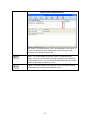
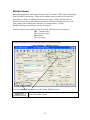
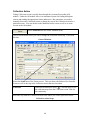
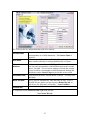
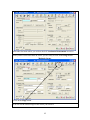
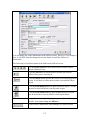
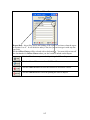
Here is the typical Maintain Owner screen:
Maintain Owner
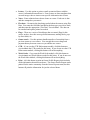
Notice the toolbar at the top of the Maintain Owner screen:
Use the toolbar buttons on the Maintain owners screen to access the following
information for an owner:
Add –add an owner to this home or, if no home has been selected, you can
add both a new home and new owner using the Add button.
Property Information –this is the fixed information about a home
regardless of who owns it. The fixed information includes the Account #,
Lot/Unit #, Street Address, Ownership Percent (if condo), Legal
Description, Zip Code, and more.
History - The charge and payment history for this owner. This is one of
s
e
ve
r
a
lpl
a
c
e
sy
ouc
oul
dg
ot
os
e
et
heowne
r
’
sa
c
c
ountba
l
a
nc
e
.
Charges –See the Charge Tables setup for this community and
activate/deactivate recurring charges for this home.
2
Letters –Use this option to print or email customized letters with the
owne
r
’
si
nf
or
ma
t
i
oni
ns
e
r
t
e
di
nt
oi
t
.For
m Le
t
t
e
r
sa
r
el
e
t
t
e
rt
e
mpl
a
t
e
st
ha
t
use mail merge codes to insert owner specific information into a letter.
Notes –Enter unlimited notes about a home or owner. Each note is date
and time stamped as you enter it.
Flex data –Customize the data being tracked about the owners using Flex
Data. You name the field label and define the data type you wish to track,
a
ndt
he
ne
nt
e
rt
hea
ppr
opr
i
a
t
e“
Fl
e
xDa
t
a
”f
ore
a
c
hhome
.Theda
t
ac
a
n
be searched and reports printed as needed.
Flags –These are a series of checkboxes that set control flags for this
owner, such as, does this owner get bills/statements, mailing labels, pays
by direct debit, etc.
Owner resale –Use this option to handle transfers of ownership from a
previous owner to a new owner. You can split the owner charge and
payment history between owners as you add the new owner.
CCR –if you own the CCR Enforcement module, click this button to
view/maintain the CCR records for this home. If you do not own the CCR
Enforcement module, clicking this button will not do anything.
Work Order - if you own the Work Order module, click this button to
view/maintain any Work Orders records for this home. If you do not own
the Work Order module, clicking this button will not do anything.
Print –click this button to print an Owner Profile Report which includes
all the information about this one home. The Owner Profile Report can be
printed for the entire community from the Owner Reports menu, but this
button will print the information for just the selected home.
3
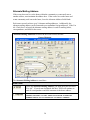
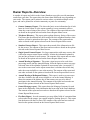
Maintain Owners Screen Overview
To access the Maintain Owners screen, click the Maintain tab. Then select a home using
either the:
Account #
Lot/Unit #
Street Address
Owner Last Name
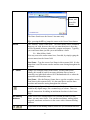
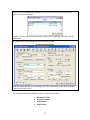
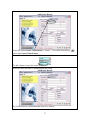
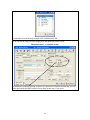
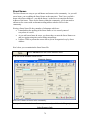
Once you have selected the home, you will see the Maintain Owner screen:
Maintain Owner
Use the Maintain owners screen to view current owner information, to make changes to
owner information, do an owner resale, add a new home and owner not previously added
during the Setup process, and view or change any of the information about the home
and/or owners.
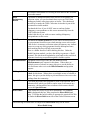
The following explains the owner data displayed on the Owner Maintain screen:
Use the Arrow buttons to move from home to home staying on the
Owner Maintain screen or jump to the LAST/FIRST home. The arrow
navigation can be handy when you want to review/change the Owner
Info for a several homes at a time.
Owner Data
4
Account # (F3)
The account number used to identify this home, if any. The Account # is
entered into the Property screen since it is fixed information about the
home. It is only displayed here for your reference and convenience; it
c
a
nnotbec
ha
ng
e
dont
hi
ss
c
r
e
e
n,onl
ybyc
l
i
c
ki
ngont
he“
Pr
ope
r
t
y
”
button on the toolbar.
Tip –pressing the F3 key to jumps the cursor to the Account # field.
Lot/Unit # (F6)
The lot/unit number used to identify this home, if any. The Account # is
entered into the Property screen since it is fixed information about the
home. It is only displayed here for your reference and convenience; it
c
a
nnotbec
ha
ng
e
dont
hi
ss
c
r
e
e
n,onl
ybyc
l
i
c
ki
ngont
he“
Pr
ope
r
t
y
”
button on the toolbar.
Tip –pressing the F6 key jumps the cursor to the Lot/Unit # field.
Street
Displays the Street Address of this home. The Street Address is entered
into the Property screen since it is fixed information about the home. It
is only displayed here for your reference and convenience; it cannot be
c
ha
ng
e
dont
h
i
ss
c
r
e
e
n,onl
ybyc
l
i
c
ki
ngont
he“
Pr
ope
r
t
y
”but
t
onont
he
toolbar.
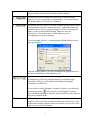
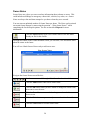
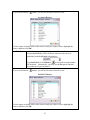
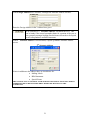
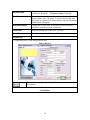
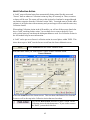
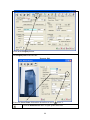
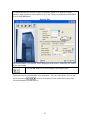
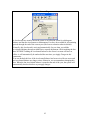
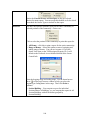
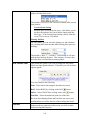
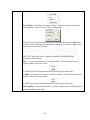
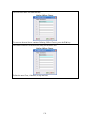
Click this button to select a home using the address. You will then see
the selector screen for selecting the home:
Enter Address
here or use
browse area to
select home
First click on the Street Name. Then enter the Address # or use the
browse area to locate the home and double click to select it.
Tip –pressing the F2 key jumps the cursor to the Street Address button.
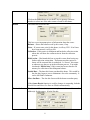
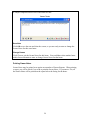
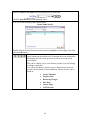
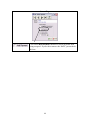
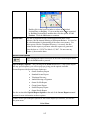
Click this button to select a home by the owners Last Name. You will
then see the selector screen for selecting the home:
5
Enter Last
Name, and
then click
Search
TheNa
meSe
a
r
c
hus
e
st
heOwne
r
’
sl
a
s
tna
meonl
y
.
Tip –pressing the F5 key jumps the cursor to the Owner Name button.
Owner
The“
Pr
i
ma
r
y
”owne
roft
hi
shome
.Theowne
rna
me
sc
an be formatted
however you wish, however, the way you enter them here is how they
will be formatted on letters, statements, coupons and reports. Typically,
you would enter them just like you would address a letter:
Ex. John & Mary Smith
You may correct the owner names here, if needed, by simply typing the
correct names into the Owner field.
Last Name –Type the owners Last Name in this separate field. It is the
name that is used for name searches and last name sorting throughout the
software.
2nd Owner
If there is a secondary owner of this home, you may enter it here.
Ideally, this would be used for an owner situation where a home is
owned by two individuals who are NOT husband and wife or where the
spouse has a different last name.
Last Name –Like the Primary Owner above, type the secondary owners
Last Name in this separate field. It is the name that is used for name
searches and last name sorting throughout the software.
Click the paper clip to add an Attachment to this Owner. An attachment
could be any digital image, like a scanned copy of a letter. There are
specific instructions for adding an attachment elsewhere in the Owner
Help.
Alt. Mailing
Address
If this owner has a mailing address OTHER than the address of this
home, you may enter it here. You can then send letters, mailing labels,
coupons, statements and notices to the owner at this Alternate Mailing
Address.
If you enter an Alt Mailing Address, make sure you checkmark this box.
6
If this is not check marked, all correspondence will be sent to the
property address rather than the Alternate Mailing Address.
Checkmark this box to change the format of the Alternate Mailing
Address to it will accommodate a foreign address. You may then enter
the foreign address as it needs to be formatted.
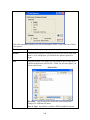
Checkmark this box if there is a second Alternate Mailing Address where
correspondence needs to be sent for this home. Perhaps the Owner has
another residence or has a property manager or relative overseeing this
home, use the second Alternate Mailing Address to store this
information. You can then choose which addresses get the
correspondence from the community.
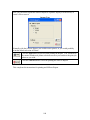
If you checkmark this box, a second Alternate Mailing Address screen
pops-up as follows:
Enter the mailing address. Be sure to checkmark the appropriate boxes
to send correspondence to this address as well.
Sometimes, it is required to notify the Mortgage Companies if an owner
is delinquent or if there are proposed changes to community legal
documents. This gives you a method for tracking the Mortgage
Companies for each home.
If you wish to track the Mortgage Company for a home, you can use the
down browse arrow
to browse the list of Mortgage Companies.
You can add the Mortgage Companies under the tab of the same name on
the Owner Database menu.
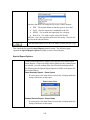
Multiple Owners
If there is more than one owner record for a home, for example, there
might be a Previous Owner, a Renter or third owner of the home, it will
indicate here whether multiple owners exist and let you select one of the
other owner records for this home:
7
Click on the Select button or use the F7 key to open up a browser
window to select one of the other owner records for this home.
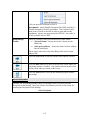
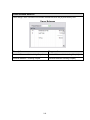
Status
The Status box looks like this:
This box covers important pieces of information about the owner.
Balance –Shows the balance owed by this owner, if any.
Notes –If owner notes exist for this home, it will say YES. If no Notes
have been entered, it will say NO.
Collection –If this owner is delinquent and has had a collection action
taken, this will show the current action in from the collection
process.
Hold Action –Checkmark this box to stop this owner from having any
further collection action taken. That means no other notices or
letters will be sent until this is unchecked. It “
f
r
e
e
z
e
s
”t
hi
sowne
r
at whatever step they are at in the collection process. You might
c
he
c
kma
r
k“
Hold Action”i
ft
hi
sowne
rha
sbe
e
nr
e
f
e
r
r
e
dt
oa
n
attorney for collection of the delinquent balance.
Settled Date –The date this Owner purchased the home. This would be
the date they began to owe a maintenance fee to the community. It
can be left blank if unknown.
Move Out Date –The date this Owner sold the home to another party.
If the Owner Resale function is used for changes in ownership, both the
Settled Date and Move Out Date are filled in automatically.
Contact Info
The Contact Info is where you can enter phone numbers and the e-mail
address(s) for this owner. It looks like this:
8
Home –Enter the home phone number for the owner, if known.
Work –Enter the work phone number for the owner, if known.
Alt –Enter an alternate work or home number, if known.
Fax –Enter a fax phone number, if known.
Disable Web Interface? –Checkmark this box if the community has a
TOPS Community Web Site and this owner does NOT want their
contact information displayed on the web site.
E-Mail –Here you can show existing e mail addresses for this owner.
You can change or add new addresses from the Maintain screen.
Once setup, you then have the option to e-mail the owner certain
information elsewhere in TOPS as described in the Owner
Communications –E Mail section below.
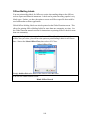
Owner Communications –E Mail
If you clicked the Maintain e mail button, you will see the owner e mail
screen:
Owner E Mails
Each owner record can have an unlimited number of e mail addresses
and each can be marked to receive e mailed communications.
- Checkmark this option to
activate e mail communication for this owner. If checked, then
you can send e mails for various types of communication for
this owner.
Click the browse arrow buttons to stay on the
owner e mail screen but move to the next home or backwards to
9
the previous home. This can be handy when updating or
correcting owner e mails for several homes.
Primary –This is the main e mail address for this owner record. It
should be the e mail address used for most types of
communication. Although you can enter additional e mail
addresses and send any of the 3 types of communications to this
address as well.
Note: There can be only 1 Primary e mail address for each
owner record.
Email Address –e
nt
e
rt
heowne
r
’
sema
i
la
ddr
e
s
she
r
e
.The
r
ec
a
nbe
multiple e mail addresses for each owner record.
General Mailings –The default e mail address to use for general
communications, such as, the one to be used in place of a
printed mailing label. An example might be, a mailing
announcing the pool hours for the summer.
Letters & Notices –The default e mail address for sending official
not
i
f
i
c
a
t
i
onsl
i
keone
sr
e
qui
r
e
di
nt
hec
ommuni
t
y
’
sl
e
g
al
documents. If you wish to use e mail to send letters,
Delinquency Letters and Violation Letters would be sent to this
e mail address. Likewise, it could be used for sending
notification about the annual meeting or annual budgets.
Bills & Statements –The default e mail address to use for e mailing
Bills & Statements to an owner. This gives you an easy, low
cost way to send Bills & Statements to owners.
Whenever you do a mass e mail, you have the option to select any of the
above 3 e mail addresses to use for that particular e mail. So you always
have complete control over which e mail address to use for each mailing.
Likewise, a complete Communication History is kept for each owner so
you have a record of what was sent showing the date, time, description
and whether it was printed or e mailed.
Click the Add New button to add another e mail address for
this owner. You will be positioned at the first available line
where you can enter the e mail address and check which
types of communications are e mailed to this address.
Click to highlight the e mail address you wish to delete,
then click the Delete button. It will permanently delete the
owner e mail address.
Click the Done button to exit back to the Maintain Owner
screen. Any changes you made to owner e mails will
automatically be saved.
10
Returning back to the Owner maintain screen, click the View button to
see the Communication History for this owner.
Owner Communication History
This shows ALL the communications with this owner whether printed or
e mailed. If the communications was a letter, whether it was printed or e
mailed, or if it was an e mail with an attachment, simply click on the
paper clip icon
to see exactly what was sent to the owner.
See the Communications user manual for more information on how to
customize the Communication History views and the other button
functions on the Owner Communication History screen.
Click the Send button to open your default e mail system, either TOPS
iMail if you subscribe to it or your regular e mail system, and send a
quick e mail to this owner.
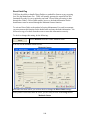
If you have not subscribed to TOPS iMail, you will see this reminder
message:
Note: Only e mails sent using TOPS iMail are recorded in the Owner
Communication History. This message is reminding you that if you use
11
something other than TOPS iMail to send owner e mail, there will be no
entry in the Owner Communication History for this e mail.
You must make a selection here. The default is TOPS iMail, but you
may change it to My Email Client if you wish to use your e mail system
with Outlook®, Outlook Express®, etc. rather than TOPS iMail.
If you are using TOPS iMail, you will see the Compose E Mail screen:
Sending with TOPS iMail
Notice the e mail addresses for this owner are already filled in. You may
then complete the Subject line and enter a body text for this e mail. If
you have an attachment to send, simply click on the Attachment button.
For more information on the Compose E Mail screen, see the
Communications user manual which explains the Compose E Mail
screen in detail.
You can change any of the Owner information from the Owner Maintain screen.
Likewise, you can look-up other information about the home and owner, such as, their
payment history, recurring charges, flag settings, etc. The Owner Maintain screen is a
portal through which you can view and maintain all the information about a home and its
owner(s). You can also use it to send letters and emails to the owner.
12
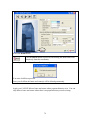
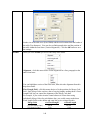
Property Information Screen Overview
Property Information is the fixed information about the home regardless of who owns it.
This includes the street address, account #, lot/unit #, zip code and other data. You may
change any of the information stored here as needed. For example, if the Street Address
is incorrect and needs to be changed, you would do it through the Property button on the
Owner Maintain screen.
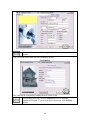
Select the home first, then, from the Owner Maintain screen, click
the Property button.
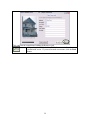
You will see the Property Info screen for the home you selected:
Property Info
We will discuss each data field displayed on this screen.
Data Fields
Account #
This is a unique number used to identify this home. It can contain
alpha letters and numbers. You can use the Account # to select the
home. Also, reports can be printed in Account # order. While it
can be left blank, but we recommend that you use it as the main
identifier of each home. You cannot use the same Account # over
again within the same community.
Maximum –12 digits
Lot/Unit #
This is a 2nd unique number that can be used to identify this home.
It can contain alpha letters and numbers. You can use the Lot/Unit
13
# to select the home. Also, reports can be printed in Lot/Unit #
order. For Condominiums, it can be used for the Unit #. It can be
left blank if not needed. You cannot use the same Lot/Unit # over
again within the same community.
Maximum –10 digits
Street Address
The street address number for this home. It can contain alpha
characters. This is the address number you would use if addressing
a piece of US Mail to this home.
You can use the Street Address # to select the home. Also, reports
can be printed in Street Address # order. It can be left blank if not
needed, but we recommend that you enter that actual Street Address
# for the home. You cannot use the same Street Address # on the
same Street over again within the same community.
Maximum –12 digits
Street Name
The street name where this home is located. Notice the Down
Browse Arrow
. Click this to open up the Street Name selector.
The Street Name selector looks like this:
You can change the Street Name the home is located on, or, edit the
Street Name to correct it. To correct the Street Name, click on the
Edit Street Name button.
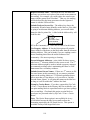
Unit ID
I
fy
ouc
he
c
kma
r
ke
d“
Us
eApa
r
t
me
nt#”i
nt
heOwner Control
Info, then the Unit ID field will be active. You can enter a Unit #
or Apartment # in this field. So if this is a Condominium which
us
e
sUni
t#’
sorApa
r
t
me
nt#’
sa
spa
r
toft
heSt
r
e
e
tAddr
e
s
s
,t
he
n
this is stored here.
Example –10400 Bank Street Unit 301
Section/Building
If you activated Section or Building tracking in the Owner Control
Info, then the Section or Building (depending on which you
selected) will be active. You can enter the Section # or Building #
that this home is part of in this field. You can then sort reports
based on the Section # or Building #.
Legal Description
Youc
a
nt
r
a
c
kt
hel
e
ga
lde
s
c
r
i
pt
i
onoft
hehome
,s
uc
ha
s
,“
Lot
,
14
1
Bl
oc
k,Se
c
t
i
o
n”
,or“
Pl
a
tBook#”i
nt
hi
sf
i
e
l
d.Youdon’
tha
vet
o
enter anything in this field, it can be left blank of not needed. The
Legal Description name you see displayed on the screen is entered
in the Owner Control Info.
Legal Description
2
A continuation of the Legal Description from Legal Description 1
above.Youd
on’
tha
vet
oe
nt
e
ra
ny
t
hi
ngi
nt
hi
sf
i
e
l
d,i
tc
a
nbel
e
f
t
blank of not needed. The Legal Description name you see
displayed on the screen is entered in the Owner Control Info.
Group Owner?
If there are owners that own multiple homes in this community, the
Group Owner feature will allow you to print consolidated Bills and
Statements for the homes. You can also eliminate printing
duplicate mailing labels for every home owned by the Group
Owner. The default answer is NO, which means, this home is NOT
part of an Owner Group.
If you answer YES, to this question, it will allow you to select a
Group Owner # using the
Down Browse Arrow. It will open the
Group Owner selector:
You can Add a new Group Owner on the fly if you do not see the
Group Owner that goes with this home. More on Group Owners
under this heading elsewhere in the help files.
Square Footage
Generally, this is only used for Condominiums. The maintenance
fee might be based on the Square Footage of each home. If so,
you can activate a Recurring Charge Table where the Square
Footage is used as the basis of calculating the charge to the homes.
If needed, enter the Square Footage here. If not needed, you may
leave it blank.
G/L Cost Center
Sometimes it is necessary to track the communi
t
y
’
si
nc
omea
nd
expenses broken down by section or building. If so, the G/L Cost
Center that represents the section or building can be entered here.
If you use the G/L Cost Center, then the income charged to this
home can pick up this cost center so that, you have your income
broken down by cost center. For more info on cost center
15
accounting, see the Appendix titled Using Cost Centers.
If you do not need cost center accounting for your homes, just leave
this blank.
Assessed Value
You can enter an assessment value here if needed. Some
communities use a value from the legal documents or an assessed
property tax value as the basis for calculating the maintenance fee.
If so, you can activate a Recurring Charge Table where the
Assessed Value is used as the basis for calculating the charge to the
homes. If not needed, you may leave it blank.
Ratio
Generally, this is only used for Condominiums. It is the Ratio of
Ownership, also called the Percentage of Ownership, of this home
in the Condominium.
The maintenance fee paid by each home might be based on the
Ratio of Ownership. If so, you can activate a Recurring Charge
Table where the Ratio of Ownership is used as the basis of
calculating the charge to the homes. If needed, enter the Ratio of
Ownership here. If not needed, you may leave it blank.
City
The default City is the main one defined in the Owner Control Info
when you setup the community. However, if a community spans
over into another City, you can enter a separate City here or, if you
setup additional default Cities in the Owner Control Info, you can
open up a browse window to select a different City, State and Zip
Code for this home.
If you click on the down browse
arrow next to the City, you
will see a browse window where you can select any default City
that is setup in the Owner Control Info for this community:
If you select another default City, it will automatically update the
State and Zip Code fields using the State and Zip Code that goes
with this City.
State
The default State is the main one defined in the Owner Control Info
when you setup the community. However, if a community spans
over into another State, you can enter a separate State here or, if
you setup additional default Cities, States and Zip Codes in the
Owner Control Info, you can open up a browse window to select a
different City, State and Zip Code for this home like described
above under City.
Zip + 4 + Carrier
Route
Because, in theory, each home can end up with a unique Zip Code
+ Four + Carrier Route, under current postal guidelines, we have
allowed for the storing of this information here for each home in a
community. It defaults to the Zip Code + Four from the Owner
16
Control Info, but you may change it here for a home if needed.
If you setup additional default Cities, States and Zip Codes in the
Owner Control Info, you can open up a browse window to select a
different City, State and Zip Code for this home like described
above under City.
The Zip Code + Four + Carrier Route is used whenever anything
is addressed for sending to this home.
Navigation
You may change any of the information in the Property Info by clicking on the field, then
typing the new information.
Use the Arrow buttons to move from home to home staying on the
Property Info screen or jump to the LAST/FIRST home. The arrow
navigation can be handy when you want to review/change the
Property Info for a several homes at a time.
The Search button lets you select a particular home in the
community and jump to the Property Info screen for that home.
Delete –Subject to the warning Note below, you may delete a
home and the related Owner information by clicking the Delete
button at the bottom of the Property Info screen.
Note –You cannot delete a home that has Owner Payment
History attached to it. This is a safeguard to protect the integrity
of the accounting system. If you deleted a home with charge and
payment history, previous accounting reports would be made
invalid because a home which was part of the community and
had accounting transactions has now disappeared.
OK –Click this button to accept any changes made and exit from
the Property Info screen.
Cancel –Click this button to scratch any changes entered on the
Property Info screen.
17
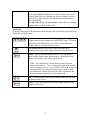
History Screen Overview
Use this button to display the charge and payment history that makes up the account
ba
l
a
nc
ef
orahome
.TheOwne
r
’
sPa
y
me
ntHi
s
t
or
yi
sdi
s
pl
a
y
e
dt
ot
hes
c
r
e
e
nbutma
y
also be printed ready to be sent or e-mailed directly to the owner who has a question.
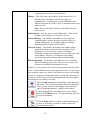
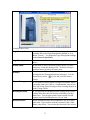
Click the History but
t
ont
ovi
e
wt
heOwne
r
’
sc
ha
r
g
ea
ndpa
y
me
nt
history on the screen.
Youwi
l
ls
e
et
heOwne
r
’
sc
ha
r
g
ea
n
dpa
y
me
nthi
s
t
or
ydi
s
pl
a
y
e
dl
i
ket
hi
s
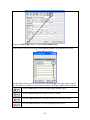
:
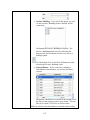
Owner Payment History
We will discuss each data field displayed on this screen.
Data Fields
Unit ID
Depending on the defaults for this community, the Account #, Lot/Unit
# or Street Address of the home will be displayed so you are reminded
which home is being displayed. Also, the Owners Name is displayed
below the Unit ID.
Status
If this owner has a balance due and has been picked up by the TOPS
automated collection system, the step of the collection action will be
displayed next to the Status heading.
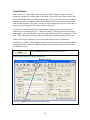
Start Date
The Owner History display will always show the LAST (most recent)
transaction for the owner. If there are several years of charge and
payment history, you can enter the Start Date here so it displays the
transactions from this date FORWARD.
Date
The Date of each transaction in the Owner Payment History. The Date
is very import
a
nti
nTOPS,i
ti
sus
e
dt
ode
t
e
r
mi
net
heOwne
r
’
sa
c
c
ou
n
t
ba
l
a
nc
e“
a
sof
”a
nyg
i
ve
nda
t
e
.
The transactions in the Owner Payment History may not always be in
18
exact date order. Instead, by default, TOPS will display the
transactions in the order they were done, rather than by strict date
order. But even if transactions show out of date order, TOPS knows
how to read them correctly by date in order to give the correct owner
account balance on a certain date.
There are A/R Utilities that can be used to re-order Owner Payment
Histories in strict date order. But these should only be run by someone
who is familiar with the issues that may be caused by such a utility.
The A/R Utilities are discussed under the manual section titled
“
Utilities”
.
Payments
Only owner Payments or payment adjustments, like an NSF check, are
displayed in this column. Payments are always subtracted from the
owners balance due. A payment adjustment may add or subtract from
the owner balance due.
Check #
If a payment transaction, the Check #, if any will display here. If a
Check # has not been entered for a payment, then TOPS will assign a
transaction # in place of the Check #.
Deposit Date
If a payment transaction, the Deposit Date will be shown in this
column. This is the date you will see an Owner Cash Receipt
t
r
a
ns
a
c
t
i
oni
nt
hec
ommuni
t
y
’
sg
e
ne
r
a
ll
e
dge
r
.
Code
TOPS keeps track of owner balances by a 2 digit Charge Code. Every
c
ha
r
g
eorpa
y
me
ntt
r
a
ns
a
c
t
i
oni
na
nOwne
r
’
sPa
y
me
ntHi
s
t
or
yha
s
Charge Codes attached to it. It shows how much of a charge or
payment transaction was applied to each Charge Code. Using this
a
ppr
oa
c
h,TOPSc
a
ns
howy
oua
na
c
c
ur
a
t
ebr
e
a
kdownofa
nOwne
r
’
s
balance by Charge Code as of any date you wish.
Description
The name of the Charge Code. Depending on the type of Charge Code,
the name can be changed in either the recurring Charge Tables or in the
Misc Charge Code setup.
Amount
The Amount of the charge or payment transaction applied to a
particular Charge Code.
Balance Due
This is the running total Balance Due for the Owner shown after every
charge or payment transaction.
Screen Navigation
There are other options on the Owners Payment History screen. Notice these buttons
below:
Balance Breakdown –Click this button to view a breakdown of the
owne
r
’
sba
l
a
nc
ebyCha
r
g
eCode
.
19
Byc
ha
ng
i
ngt
he“
AsOfDa
t
e
”a
tt
het
opoft
hes
c
r
e
e
n,y
ouc
a
nt
a
ke
a“
s
na
ps
hot
”ofa
nOwne
r
’
sba
l
a
nc
ea
ta
nypoi
nti
nt
i
me
.Cl
i
c
k
Close to exit back to the Owner Payment History screen.
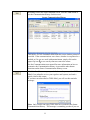
E-mail History –Click this button to e-ma
i
lt
heOwne
r
’
sPa
y
me
n
t
History to either the owner or another party. If you have not
subscribed to TOPS iMail®, you will this reminder screen:
This message is letting you know that your internal email program
from your computer will be used to send the payment history to this
owne
r
.I
fs
o,t
he
nt
heowne
r
’
sc
ommuni
c
a
t
i
onhi
s
t
or
ywi
l
lnotbe
updated for this e mail.
If you subscribe to TOPS iMail®, you will not see the reminder
not
i
c
ea
bove
.I
ns
t
e
a
d,i
twi
l
lope
nTOPSi
Ma
i
lwi
t
ht
heowne
r
’
s
email address(s) already filled in, ready to send. All emails sent
us
i
ngTOPSi
Ma
i
l
®wi
l
lber
e
c
or
de
di
nt
heowne
r
’
sc
ommuni
c
a
t
i
on
history.
The email will be addressed to the owner if their email address was
entered in the Owner Maintain screen. If not or if you wish to email
it to another email address, you will need to type the email address
into the To line at the top.
20
Email Owner Payment History
TheOwne
r
’
sPa
y
me
ntHi
s
t
or
ywi
l
lbea
na
t
t
a
c
hme
ntt
ot
hi
se
ma
i
l
.I
t
is sent in a plain text format which can be opened by any word
processor or by Windows Notepad®.
Print –Cl
i
c
kt
hi
sbut
t
ont
opr
i
ntt
heOwne
r
’
sPa
y
me
ntHi
s
t
or
y
report. The report will include all charge and payment transactions
on file for this owner. It is in a simple enough format that you could
send it to the owner for them to review.
Close –Cl
i
c
kt
hi
sbut
t
ont
oe
xi
tf
r
omt
heOwne
r
’
sPa
y
me
ntHi
s
t
or
y
screen and return to the Owner Maintain screen.
21
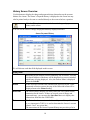
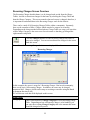
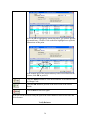
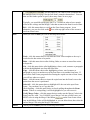
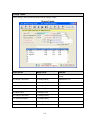
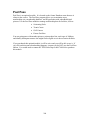
Recurring Charges Screen Overview
The Recurring Charges that this home is to be charged each period from the Charge
Tables. Activate or deactivate charges for the home by selecting the Charge Table and
then the Charge Category. This screen controls what each owner is charged, therefore, it
is important to understand how to the Recurring Charges work for the Owners.
There can be a total of 10 Recurring Charges Tables within a community. Separately,
there can be a number of Misc. Charges which can also be setup to be recurring.
Depending on the charge method selected when a Charge Table was setup, you can select
which Charge Category is the correct one for each owner so that they get charged the
right amount each period.
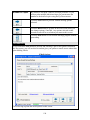
Click the Charges button to see the Recurring Charges this owner is
setup to be charged. You can activate/deactivate charges for the owner
from this screen.
You will see the Recurring Charges for this owner displayed like this:
Recurring Charges
In this example, the owner is setup for 2 Recurring Charges. But in each community,
there can be up to 10 Recurring Charges. In addition, an owner may be charged
numerous Misc. Charges, which can be setup as recurring or one-time using the Batch
Adjustment function in AR.
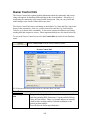
We will discuss each data field displayed on this screen.
Data Fields
Category
There can be numerous Charge Categories in each Recurring Charge
Table. Depending on how a Recurring Charge is to be handled, you
can enter the recurring Charge Category that is the amount this home
should be charged each period.
22
Entering the Charge Category here is how you activate/deactivate a
particular Recurring Charge for an owner.
Schedule
The 2 digit Charge Code for each active Recurring Charge Table in this
community.
Charge Table
Name
The name of the Recurring Charge Table. The names can be changed
at any time through the Charge Tables themselves (Community Setup,
AR & Owner Setup).
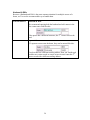
Frequency
The Frequency of each Recurring Charge. The Frequency is entered
through the Charge Tables themselves (Community Setup, AR &
Owner Setup). Recurring Charges can have these Frequencies:
M = Monthly
B = Bi-Monthly (every other month)
Q = Quarterly
S = Semi-Annually
A = Annually
Charge
Description
This is actually the Charge Category Description. It is entered in
each Charge Table when a Recurring Charge is setup. Where there are
multiple Charge Categories in a Charge Table, it should describe
something that would identify this Charge Category.
Example –2 Bedroom/2 Bath
- or Monticello model
Amount
The Amount of the Recurring Charge that should be charged to this
owner. The Amount is from the Charge Table, but may be a calculated
amount depending on the charge method selected when the Charge
Table was setup.
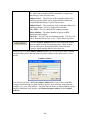
Debit
If the owner has elected to pay this Recurring Charge by Direct Debit,
then make sure there is a checkmark in this column next to each
Recurring Charge to be paid by Direct Debit. Separately, you must
e
nt
e
rt
heowne
r
’
sba
nki
nf
ounde
rt
he“
Fl
a
g
s
”but
t
onont
heOwne
r
Maintain screen to complete the setup of paying for a Recurring Charge
by Direct Debit.
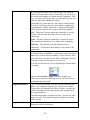
Screen Navigation
Use the Arrow buttons to move from home to home staying on the
Recurring Charge screen or jump to the LAST/FIRST home. The
arrow navigation can be handy when you want to review/change
charge table categories for a several homeowners at a time.
23
The Search button lets you select a particular home in the community
and jump to the Recurring Charge screen for that home.
The OK button saves any changes to the Recurring Charges for the
Owner. You will exit to the Maintain Owners screen.
The Cancel button scratches any changes made to the Recurring
Charges for the Owner. You will exit to the Maintain Owners screen.
24
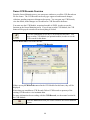
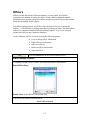
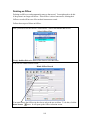
Letters
Open the Form Letter program here to select and print/email a customized letter for the
owner. Form Letters are letter templates that use merge codes to insert owner
information into the letter resulting in a letter that looks like it was individually typed. In
addition to the owner name and address, there are merge codes for virtually ALL the data
being tracked for an owner including their current account balance. There are also merge
codes for community info and the management company, where applicable.
Form Letters can also be used to create ballots, billing statements or any form you can
think of to send to one or all owners. Form Letters are a powerful and flexible tool that
you can use in a variety of ways. Please consult Form Letters elsewhere in this manual
for a further explanation of how to create Form Letters and use the Merge Codes.
Collection & Violation Letters
If you print/email letters through Owner Maintain, you will NOT have a history of the
letters like you would using Collection Action (AR Module) for collection letters or
Violation Action (CCR Module) to print/email violation letters. Therefore, we do NOT
recommend printing/emailing these letters from the Letter button on the Owner screen.
For purposes of explaining Form Letters here, we will just cover the steps to print/email a
Form Letter for the owner that was selected on the Owner Maintain screen. There are
only a few steps involved to print an owner letter.
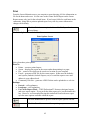
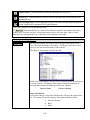
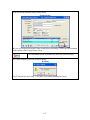
Click the Letters button to select and print a letter for this Owner.
You will see all the Form Letters that exist in this community:
Select Form Letter
Using the mouse, highlight the Form Letter you wish to print for this owner.
25
I
ft
hel
e
t
t
e
rdoe
snote
xi
s
t
,y
ouc
a
ns
e
t
upal
e
t
t
e
r“
on-the-f
l
y
”byt
y
pi
ngt
hel
e
t
t
e
rna
meon
the above screen on an empty line, then type the body of the letter template. Again, we
will not cover how to create a new letter from scratch here; this will be covered elsewhere
in the manual under Form Letters. For our purposes here, we will assume the letter
template does exist already.
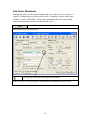
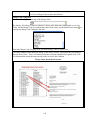
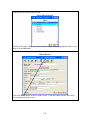
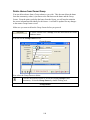
The letter template will open like this:
Form Letter Template
Print - to print the letter for this owner, simply click on either the printer
button or
the File menu, then select Print on the drop down menu. You can then select the printer
and the letter will print with the community and owner information inserted into it like a
custom letter. The owner communication history will be updated for this owner letter.
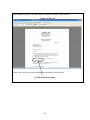
Email –to email the letter to this owner, simply click on the email
button or the File
menu, then select Email Form Letter on the drop down menu. If you use TOPS iMail®,
26
once you click on Send, the letter will be sent attached to an email and the owner
communication will be updated for this emailed letter.
If you do not use TOPS iMail®, then the emailing functions will be inactive.
Remember - If you make changes to the letter template while it is open, be sure to Save
the changes. You can Save changes by clicking the Disk
button or click File, then
Save.
Tha
t
’
showe
a
s
yi
ti
st
opr
i
nt
/email a custom letter for the selected owner. See the Form
Letter section later in the Owner Database manual for more information on creating and
sending Form Letters.
27
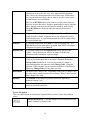
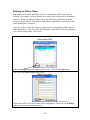
Owner Notes
Owner Notes are a place you can record any information about a home or owner. This
could include such things as emergency contact info, vehicles, key codes, etc. Owner
Notes are always date and time stamped so you know when they were created.
You can store an unlimited number of Owner Notes per home. The Notes can be printed
on certain Owner Reports by answering the question –“
Pr
i
ntOwne
rNot
e
s
?
”whe
n
completing the Owner Report options. See the section titled Reports for more
information.
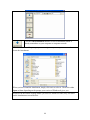
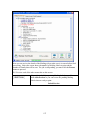
Click the Notes button to type a new Owner Note or view the Notes
already on file for this Owner.
Through this button on the Owner Maintain screen, you can enter, view and delete Notes
about the owner or the home.
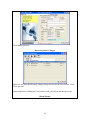
You will see a blank Owner Notes ready to add a new note:
New Owner Notes
Navigate the Owner Notes screen like this:
Use the arrows to scroll through all the Notes for the selected Owner.
Click the Add button to enter a new Owner Note.
Click the OK button when you have added or changed an Owner Note,
then want to save the note.
Click the Cancel button to scratch the changes made on the Owner
Notes screen.
Click the Delete button to permanently remove the select Owner Note.
Click the Close button to exit the Owner Note.
28
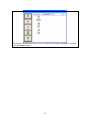
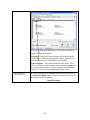
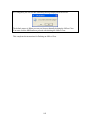
A sample completed Owner Note would look like this:
Owner Notes
Save Note
Click OK to save the note and clear the screen, so you are ready to enter or change the
Owner Notes for this same home.
Change Homes
Click Close to exit the Owner Notes for this home. You could then select another home
within Owner Maintain to enter or change Owner Notes for that home.
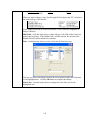
Printing Owner Notes
Owner Notes may be printed as an option on a number of Owner Reports. When printing
a report, you will be asked if you wish to print the Owner Notes. If you answer Yes, all
the Owner Notes will be printed on the report below the listing for the home.
29
Flex Data
The Unlimited Flex Data feature enables you to add an unlimited number of custom data
fields to your TOPS Professional™ Owner databases that are unique to your business
needs. You define the field types and names of your Unlimited Flex Data fields for each
community.
The Unlimited Flex Data feature provides the option to: Define Fields, Arrange Fields
by Categories, Search Flex Data, Save, Edit, Delete, Export and Print lists based on Flex
Data fields you select for your output. Currently you may create five types of data fields
and within some types you have options to further define how the data will display. The
types are: Text, Number, Date, Checkbox and List. Refer to the Unlimited Flex Data User
Guide for detailed instruction on how to create and manage Flex Data Fields.
30
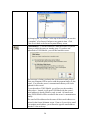
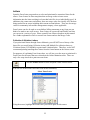
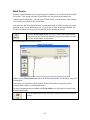
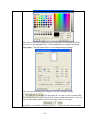
Flags
Checkmark boxes that control actions for this owner such as mailing labels, bills &
statement, hold payment, hold collection action and direct debit payment setup.
Checkmark or uncheck this control information as needed to get the results you desire.
The function of each Flag will be explained below.
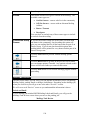
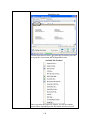
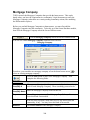
Click the Flags button to see the settings for this Owner.
The owner Flags looks like this:
Control Flags
We
’
l
lc
ove
re
a
c
hi
t
e
mont
hi
ss
c
r
e
e
ni
nmor
ede
t
a
i
lbe
l
ow.
Accelerated
Assessments
This is an option when dealing with a delinquent owner. It
recognizes that the maintenance fee is an annual assessment broken
up into installment payments to make it more affordable and
convenient for owners to pay. In communities that allow for
monthly, quarterly or semi-annually payments, if an owner is
delinquent, you can declare the entire unpaid maintenance fee for the
remainder of the year as delinquent, thereby “ac
c
e
l
e
r
at
i
ng”the
future installment payments, so you only have to take one legal
a
c
t
i
ona
g
a
i
ns
tt
heowne
rf
orc
ol
l
e
c
t
i
onoft
ha
ty
e
a
r
’
se
nt
i
r
e
maintenance fee.
Ty
pi
c
a
l
l
y
,a
no
wne
r
’
s“ac
c
e
l
e
r
at
e
d”balance is added using the
Add/Waive function in the Accounts Receivable module. If done
correctly in the Add/Waive (using the AC Charge Code), the
Accelerated Assessment flag will automatically be checked here in
the owner Flags. The Accelerated Assessments is a self-maintaining
system, meaning, you typically do NOT need to either checkmark or
uncheck this box in the owner Flags. TOPS Professional will take
care of everything for you.
31
Accelerated Assessments are covering in more detail in the Accounts
Receivable manual.
Hold
Delinquency
Notice
If an owner is delinquent and has been referred to an attorney for
collection action, you can checkmark here to prevent TOPS from
sending any further collections notices or letters. This checkmark
can also be set under the TOPS Collection Action that is part of the
Accounts Receivable module.
Checkmark this box if you do NOT want to send any further
delinquency correspondence to this owner automatically from the
TOPS Collection Action.
Uncheck this box if you wish to resume sending delinquency
correspondence to this owner.
Hold Payment
Checkmark the Hold Payment box if you wish to be warned not to
accept payments from this owner when entering owner cash receipts.
If the owner is in attorney collection action, the attorney may instruct
you not to accept any direct payments from the delinquent owner,
check marking this box will help to prevent this.
There is a further benefit of check marking this box. Under the
Global Functions module, you have the a
bi
l
i
t
yt
oge
ne
r
a
t
ea“
Hol
d
Pa
y
me
nt
”f
i
l
ewhi
c
hc
a
nbeupl
oa
de
dt
oy
ourba
nks
ot
he
yc
a
nbl
oc
k
payments from being accepted through their lockbox system.
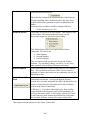
Bills/Statements Checkmark if this owner is the one who should received
Bills/Statements and Coupons for this home. Where there are
multiple owners of a home or renters, this gives you the ability to
pick and choose who receives the Bills/Statements and payment
coupons.
Mailing Labels
Checkmark if this owner is the one who should received Mailing
Labels for this home. Where there are multiple owners of a home or
renters, this gives you the ability to pick and choose who receives the
mailings from the community.
Special Forms
If you used the Form Letter program to create a special form, like a
customized bill, which you wish to send to some or all owners in a
community, checkmark this box to indicate which owners should
receive the Special Forms.
Direct Debit
If this owner has elected to pay their maintenance fee by Direct
Debit, checkmark this box, then complete the Direct Debit bank
setup. TOPS has the built-in ability to generate the required NACHA
file under the Direct Debit menu tab on the Global Functions menu.
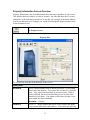
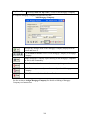
The following are instructions to complete the Direct Debit setup for an owner:
Direct Debit Setup
32
Bank ID –The9di
g
i
tABA#t
ha
ti
de
nt
i
f
i
e
st
heowne
r
’
sba
nk.I
ti
st
hef
i
r
s
ts
e
t
ofMI
CRnumbe
r
sonat
y
pi
c
a
lowne
r
’
sc
he
c
k.This information is stored in TOPS
with data encryption to prevent identity theft.
Account # - Theowne
r
’
sba
nkaccount #. Although there may be spaces within
the Account # on the MICR line of the check, do not enter it with spaces here. It
should be entered as one continuous number. This information is encrypted in
TOPS to prevent identity theft. You only see the Account # displayed fully when
you first enter it. Thereafter, you will only see the last 4 digits of the number.
Checking –Checkmark if the account to be Direct Debited is a checking account.
Savings - Checkmark if the account to be Direct Debited is a savings account.
Do not be concerned with the fields shown at the top of the screen –Added, Tested, and
Last Debit. These fields are updated automatically by TOPS as you work with the Direct
Debit system. The information is displayed here in case you need it.
Use the Clear but
t
ont
oe
r
a
s
et
heowne
r
’
sba
nki
nf
o.
Click the OK but
t
ont
os
a
vea
nyc
ha
ng
e
sma
det
ot
heowne
r
’
sDi
r
e
c
t
Debit bank info.
Click Cancel t
os
c
r
a
t
c
ha
nyc
ha
ng
e
sma
det
ot
heowne
r
’
sDi
r
e
c
t
Debit bank info.
Screen Navigation
Use the Arrow buttons to move from home to home staying on the
Flags screen or jump to the LAST/FIRST home. The arrow navigation
can be handy when you want to review/change Flags for a several
homeowners at a time.
The Search button lets you select a particular home in the community
and jump to the Flags screen for that home.
The OK button saves any changes to the Flags for the Owner. You
will exit to the Maintain Owners screen.
The Cancel button scratches any changes made to the Flags for the
Owner. You will exit to the Maintain Owners screen.
33
Owner Resales
If a home has been sold to another party, handle the sale here. This function will move
the current owner to a Previous Owner, and then prompt you to enter the name of the new
Owner. TOPS will keep track of both the new owner and the previous owner for you.
The payment history can be split between the parties as of the resale date to keep the
history accurate between the previous and new owners.
Warning –ALWAYS use the Owner Resale function when a home sells from one party to
another. It will correctly keep the history of charges and payments for the Previous
Owner and the new Owner. NEVER simply change the owner name. Doing so will cause
problems in many areas. Most importantly, it will distort the history of ownership of this
home and the tracking of the responsible party for past charge and payment history.
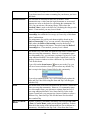
Owner Resale Screen
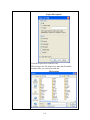
Click the Owner Resale button to start the process of handling a sale
of a home.
The Owner Resale screen looks like this:
Owner Resale
We
’
l
le
xpl
a
i
nhowt
oc
o
mpl
e
t
et
heopt
i
onsont
hi
ss
c
r
e
e
nt
os
t
a
r
tt
her
e
s
a
l
epr
oc
e
s
s
.
Data Fields
Resale Date
Enter the Resale Date which is the date the home sold from the
previous owner to the new owner. You must enter a Resale Date.
Payment
History
Ideally, you want the charge and payment history kept with the
responsible owner for the period they owned the home. TOPS gives
you three options to keep the payment history with the appropriate
owner:
34
Split History by Resale Date –takes all the transactions
PRIOR to the split date and keeps them with the Previous
Owner. Any transactions in the payment history dated from
the split date FORWARD are attached to the New Owner. See
next section to Manually Split History.
History Goes with the Previous Owner –all payment
history transactions are kept with the Previous Owner. The
New Owner starts out with no transactions on their payment
history.
History Stays with New Owner –all payment history
transactions stay with the New Owner of the home.
These options will automatically handle the payment history between
the Previous and New Owners. Checkmark one of the above options
to handle the payment history between owners.
Manually Split
History
The goal with a resale is to accurately keep the charge and payment
history between the Previous and New Owners of a home for the
period that each has owned the home.
Using the mouse, single click on the transaction where you wish to
split the transactions between Previous and New Owners. A blue
highlight bar appears on that transaction. Click on a different
transaction to move the highlight bar.
35
Move the bar to highlight the transaction where you want to split the
payment history. Double Click on the blue highlight bar to split the
transactions at this point.
If the manual split of the payment history looks correct between the
owners, click OK to proceed.
Click the Balance button to view the breakdown of the Balance Due
by Charge Code.
Click the OK button to proceed to the next screen of the Owner
Resale.
Click Cancel to start over again.
You will see the screen to verify the split of the owner balances between Previous and
New Owners:
Verify Balances
36
If it looks correct, click OK to proceed.
If the balances do not look correct between the parties, click Cancel to try again.
Owner Resale - Add New Owner
The last step in the Owner Resale process is to add the New Owner. You will see this
screen for adding the Owner:
Add New Owner
Proceed to add the new owner record.
37
Click Next to proceed.
Recurring Owner Charges
Make sure you have the Recurring Charges setup correctly for the New Owner. Click
OK to proceed.
Upon completion of adding the New Owner record, you will see this Recap screen:
Recap Screen
38
This just verifies that you have completed the steps for handling the Resale. Click the
Finish button to exit. You will return to the Owner Maintain screen showing the New
Owner you just added.
This completes the steps for handling Owner Resales.
39
Owner CCR Records Overview
From the Owner Maintain screen, you can open a window to see all the CCR Records on
file for a home. The CCR Records can be any type: approved architectural changes,
violations, pending requests or disapproved requests. You can open any CCR Records,
view the details, make changes or even add a new CCR Record for the home.
You must own the CCR Module, an optional module in TOPS, in order to use this
function on the Owner Maintain screen. If you do not own the CCR Module, the CCR
button will be grayed out and will not do anything if clicked.
Click the CCR button to see any CCR records for this home. You
must own the CCR Module (an optional module) in order to see the
CCR records for this home.
The CCR Records screen looks like this:
Owner CCR Records
If there are any CCR Records entered in the CCR Module for this home, they will be
displayed.
Notice that you can add new CCR Records, Delete CCR Records or open any of the
existing CCR Records to view/maintain them.
For more information about working with the CCR Records, see the manual section for
the CCR Module.
Click the Exit button when you wish to return to the Owner Maintain
screen.
40
Work Orders
From the Owner Maintain screen, you can open a window to see any Work Orders on file
for a home. This would only show Work Orders for jobs involving this home, not
common area Work Orders. You can open a Work Order, view the details, make changes
or even add a new Work Order for the home.
You must own the Work Order Module, an optional module in TOPS, in order to use this
function on the Owner Maintain screen. If you do not own the Work Order Module, the
Work Order button will be grayed out and will not do anything if clicked.
Click the Work Order button to see any Work Orders for this home.
You must own the Work Order Module (an optional module) in order
to see the Work Orders for this home.
The Work Order screen looks like this:
Owner Work Orders
If there are any Work Orders entered in the Work Order Module for this home, they will
be displayed.
Notice that you can add new Work Orders, Delete Work Orders or open any of the
existing Work Orders to view/maintain them.
For more information about working with Work Orders, see the manual section for the
Work Order Module.
Click the Exit button when you wish to return to the Owner Maintain
screen.
41
Print
From the Owner Maintain screen, you can print a report showing ALL the information on
file for the home and owner. It is the same as the Owner Profile Report on the Owner
Reports menu, only just for the selected home. If you keep a folder for each home in the
community, being able to print an updated report every time key owner information
changes can be handy.
Click the Print button to print the Owner Profile Report for the
selected home.
The Print Options screen looks like this:
Print Options Screen
Select from these print options:
Print To:
Printer –creates a printed report
Screen –displays the report on the screen rather than printing it to paper
File –creates a file which can be saved to a location on your computer
E-mail –generates a PDF file for the owner reports. It then uses the default email system (Outlook, Outlook Express, etc) to e-mail the report to an e-mail
address in your address book.
Community Web Site –generates a PDF file that can be uploaded to a web site.
Settings:
Portrait –self-explanatory
Landscape –self-explanatory
Use Classic Report Mode –TOPS Professional™ features redesigned reports
and a new report engine. If you prefer the older report style, just checkmark this
box. However, we recommend leaving this unchecked because the new report
style has more options available within the report.
Click the Print button to proceed with the report options selected.
Click the Cancel button to exit from printing a report.
42
Add Owner Attachment
Attachments can be any document or digital image you wish to store for an Owner. It
might be a scanned letter received from the Owner. It might be a picture of the home.
Literally, it can be ANYTHING. Think of the Attachments like an electronic filing
cabinet for information relating to each home and owner.
Select Maintain from the Owner Database menu.
Start at the Owner Maintain screen:
Click the paper clip icon to open up the Attachments.
You will see the screen for adding or maintaining the Attachments for this Owner:
43
Click the Add Attachment button to select an attachment which is
already somewhere on your computer or computer network.
A browser window will open up so you can navigate on your computer or network to
locate the Attachment.
When you have found the Attachment, simply click on it to select it. Then click either
Open or Save depending on the prompt your version of Windows® gives you.
Whatever the document or image names you select to Attach to a home, they will show
on the Attachments screen like this:
44
Click on the Attachment to open or view it. Delete it by clicking to highlight it, and then
click the Remove button.
45
Select Home & Owner
TOPS gives you several ways to select a Home and Owner depending on which method
is convenient for you. The way a home is selected is based on the default "preferred
access mode" specified in the Owner Control Info. But you can change to any of the
ways to select a home "on the fly" as follows:
Account Number
Lot/Unit Number
Street Address
Name Search
Browse Arrows
To select a home, start at a blank Owner Maintain screen:
Owner Maintain
This is the area used to select the home and owner. Selecting the home and owner works
t
hes
a
mewa
yt
hr
oug
houtTOPS.We
’
l
lc
ove
re
a
c
ha
va
i
l
a
bl
eme
t
hodi
nt
ur
n.
Account #
Select the home at the upper left part of the Owner Maintain screen.
If using Account # to select the home, make sure the cursor is
positioned in the Account # selection box:
Type account number or click Browse
to select the account
number for the home. Alternatively, you may use the F3 special
function key at the top of your keyboard.
46
If you use the Browse
button, you will see the owner browse screen:
Account # Browse
Use the mouse to double click on the owner record you wish or click to highlight the
owner, and then click OK.
Lot/Unit #
Select the home at the upper left part of the Owner Maintain screen.
If using Lot/Unit # to select the home, make sure the cursor is
positioned in the Lot/Unit # selection box:
Type Lot/Unit # or click Browse
to select the account number
for the home. Alternatively, you may use the F6 special function
key at the top of your keyboard.
If you use the Browse
button, you will see the owner browse screen:
Lot/Unit # Browse
Use the mouse to double click on the owner record you wish or click to highlight the
owner, and then click OK.
47
Street Address
If using Street Address to select the home, click that box on the
owner selection area:
Alternatively, you may use the F2 special function key at the top of
your keyboard.
You will see the Street Address selector:
Street Address Selector
Scroll bar
First, select the Street Name. Then either type the Address # (and Unit #, if any) or
browse the addresses displayed below the address # entry box using the scroll bar till you
find the correct address # on the street.
Name Search
If using Name Search to select the home, click that box on the owner
selection area:
Alternatively, you may use the F5 special function key at the top of
your keyboard.
You will see the Name Search screen:
Owner Name Search
You are ready to select a home and owner by the Owne
r
’
sLas
tName
.
48
Enter the Owner Last Name or the beginning letters of it like this:
Click the Search button to find matching names.
You will see the matching owner names listed.
Owner Name Search
Double click the Owner Name you wish to select or highlight it with a single click, then
click the OK button.
Browse Arrows are another way you can select a home. Use the
arrow buttons on the toolbar to move through the owner information
and display the first record, previous record, next record, or last
record on file.
This can be a handy way to view Owners records if you are looking
to change certain info.
You can use the Browse Arrows to move from home to home on
several screens related to Owner Maintain. Browse Arrows can be
found in:
Owner Maintain
Property Info
Recurring Charges
Flex Data
Owner Flags
CCR Records
49
Alternate Mailing Address
If the owner does not live at the home within the community or wants mail sent to
another address, enter/maintain the address here. If the owner lives at the home and
wants community mail sent to the home, leave the Alternate Address fields blank.
Each owner record can have up to 2 alternate mailing addresses. Additionally, the
alternate mailing address can be formatted to accommodate foreign addresses. If the Use
Alt. Check box is selected, the alternate mailing address is used for mailing labels,
correspondence, and bills for the owner.
Alternate Mailing Addresses are stored in the owner record, like this:
Owner Maintain
The Alternate Mailing Address is stored here.
Data Fields
To use the Alternate Mailing Address, you must check the box titled
“
Us
eAl
t
”
.If you do not checkmark this box, TOPS will continue to
send all correspondence and bills/statement to the home address.
CHECKMARK THIS BOX IF THE ALTERNATE ADDRESS IS IN A
FOREIGN COUNTRY. IT WILL THEN CHANGE THE ALTERNATE
ADDRESS FIELDS TO ACCOMMODATE A FOREIGN ADDRESS.
50
If the Foreign Address box is checked, it changes the Alternate Address like this:
Enter the Foreign Address in the 3 address lines given.
If an owner has a 2nd Alternate Address, checkmark this box. This
can be handy if the owner has another home for a portion of the year or
has a property manager looking after the home who needs to be copied
on all correspondence and bills/statements.
If the 2nd Alternate Address is check marked, it opens up another Alternate Address
screen:
2nd Alternate Address
Notice in addition to the address there are checkboxes for:
Mailing Labels
Bills/Statements
Special Forms
THIS ALLOWS YOU TO CONTROL YOUR MAILING EXPENSES BY SELECTING WHICH
ADDRESSES ARE TO BE INCLUDED WHEN THERE ARE MAILINGS TO THE
COMMUNITY.
51
Multiple Owners
Recognizing that there can be more than one owner of a home, TOPS allows for multiple
owner records for each home. There can be multiple owner records to fully track the
ownership of a home. In addition to the current owner(s), TOPS will keep track of
Previous Owners if the Owner Resale function on the Owner Maintain screen is used.
Also, renters can be added where the home is a rental property. Finally,
Builder/Developer owned homes can also be tracked.
TOPS uses these owner classifications to track the different owner record types:
(H) = Current owner
(P) = Previous owner
(R) = Renter
(V) = Developer
If there are multiple owner records for a home, it will look like this:
Owner Maintain –Multiple Owners
Notice the Multiple Owners areas of the Owner Maintain screen.
The Select (F7) button only displays when there is more than one
Owner Record for a home.
52
Once you click the Select (F7) button, you will see a browse screen showing all the
owner records for this home.
Double Click to select the owner record or single click to highlight, and then click the
OK button.
A sample of a Previous Owner record would look like this:
Previous Owner Record
Like any Owner Record, you can change any of the information on file for a secondary
owner or previous owner.
For more information on Multiple Owners, see the sections titled:
Husband & Wife
Previous Owners
Add Renters
Add Owners
53
Husband & Wife
Because a Husband and Wife is the most common situation for multiple owners of a
home
,we
’
l
lc
ove
rt
her
e
c
omme
nde
dwa
yt
oha
ndl
et
he
m.
Current Owners
Husband & Wife
We recommend entering both the husband and wife names in the
first owner name field like this:
If the spouse has a different last name, the 2nd Owner field can be
used.
Separate Owners
If 2 separate owners own the home, they can be entered like this:
If each owner has a different mailing address, then you would need
to add a new owner record on a new owner screen to enter the 2nd
owner record with a different mailing address.
54
Previous Owners
TOPS will track multiple Previous Owners for a home. It is important to keep the correct
owner with the payment history that goes with that owner for the period the home is
owned by them. Never just change the owners name when a home sells to a new owner,
instead use the Owner Resale function on the Owner Maintain screen.
Using Owner Resale, the change in ownership is handled for you easily and correctly.
See Owner Resale for detailed instructions on handling a resale.
A previous owner record looks like this:
Previous Owner Record
55
Renters
In addition to Owners, Previous Owners and Builder/Developers, TOPS can track
Renters of a home. Renters are one of the four Owner Classifications types for owner
records.
Select Maintain from the Owner Database menu.
To add a Renter record, first select the home.
Owner Maintain
Start at the current owner record.
Click the Add button located at the upper left corner of the Owner
Maintain screen to add a Renter record.
You will see the Owner Selector:
Click the Add button to proceed with adding a Renter record.
56
You will see the screen to add a new owner record:
Add Owner Record
Notice the default Owner Classification i
s“
Owne
r
”
.Cl
i
c
kont
hedownbr
owse
select other Owner Classifications.
You will see the other Owner Classifications to select from.
To add a Renter record, click on the Renter class.
Pr
oc
e
e
dt
oe
nt
e
rt
her
e
nt
e
r
’
si
nf
or
ma
t
i
onont
hi
ss
c
r
e
e
n:
Add Renter Record
We
’
l
ldi
s
c
uss the key information that needs to be entered.
57
to
Lease Start
Enter the name of the renter. To make it more generic, you
c
oul
de
nt
e
r“
Re
s
i
de
nt
”
.TheRenters Name is required.
Ent
e
rt
her
e
nt
e
r
sLa
s
tNa
me
.I
fy
oue
nt
e
r“
Re
s
i
de
nt
”f
ort
he
Rente
r
sNa
me
,e
nt
e
r“
Re
s
i
de
nt
”i
nt
heSor
tNa
mef
i
e
l
d.The
Sort Name is required to do name searches and also for sorting
alphabetically on reports.
Usually this is not needed for a Renter because the Renter
would live at the home in the community.
Enter the starting date of the lease, if known.
Lease End
Enter the ending date of the lease, if known.
Contact Info
Ent
e
rt
heRe
nt
e
r
’
sphone#’
sa
nde
-mail, if known.
Renters Name
Sort Name
Alternate Address
A completed Renter record might look like this:
Renter Record
Onc
ey
ouha
vec
ompl
e
t
e
de
nt
e
r
i
ngt
heRe
nt
e
r
’
si
nf
or
ma
t
i
on,c
l
i
c
kt
he
Next button.
You will see the Add Owner Record confirmation screen:
Confirmation
58
This confirms the completion of adding the Renter record.
If everything looks OK, click the Finish button to exit from the
confirmation screen. If you need to make corrections, click the Back
button.
59
Collection Action
Taking Collection Action is usually done through the Accounts Receivable (AR)
module. Under the AR module, there is an automated system for finding delinquent
owners and sending the appropriate letters and notices. But sometimes you need to
manually freeze the Collection Action or change the step of the Collection Action for a
particular owner. You can do this on the Maintain Owner screen as well as on some
screens in the AR module.
Select Maintain from the Owner Database menu.
Then select the home where you wish to change the collection action step. It will look
like this:
Owner Maintain
Notice the Status area of the Owner screen. This area shows the Balance Due from this
Owner as well as the step in the Collection Action that was last taken.
Collection
Notice the down browse arrow
Click the arrow to see
the collection steps from the Collection Action Table for
this community.
Select the step from the Collection Action Table where you wish to place this Owner:
Collection Action Steps
60
Just double click on the step or single click, and then click OK.
You will see the step you select displayed in the Maintain Owner screen:
Maintain Owner –Collection Action
In addition to manually placing an Owner at a particular Collection Action step, you can
also checkmark the Hold Action to freeze them at this step, if you wish.
61
Hold Collection Action
A“
hol
d”s
t
opsc
ol
l
ection letters from automatically being printed for this owner and
"freezes" them at whatever Collection Action step they are currently in. Then, no notices
or letters will be sent. The owner will stay at this Action level and not be stepped through
any further categories from the Collection Action Table. You might want to do this when
an owner is in legal action with an attorney and you no longer wish to send the owner any
Collection Letters.
When taking Collection Action in the A/R module, you will see all the owners listed who
have a "hold" on taking further action. You can then elect to remove the hold, if you
wish, so that letters are sent about the delinquent balances owed. See Collection Action in
the A/R module help for more information.
A“
hol
d”c
a
nbeputona
nOwne
r
’
sc
ol
l
e
c
t
i
ona
c
t
i
oni
ns
e
ve
r
a
lpl
a
c
e
swi
t
hi
nTOPS.Thi
s
s
howshowt
oputa“
hol
d”i
nt
ot
heOwne
rr
e
c
or
df
r
om t
heOwne
rMa
i
nt
a
i
ns
c
r
e
e
n.
Select Maintain from the Owner Database menu.
Se
l
e
c
tt
hehomewhe
r
ey
ouwi
s
ht
opl
a
c
ea“
hol
d”ont
heCol
l
e
c
t
i
onAc
t
i
on.
Owner Maintain
Notice the Status area of the Owner screen. This area shows the Balance Due from this
Owner as well as the step in the Collection Action that was last taken.
Click on the Hold Action checkbox to place a “
Hol
d”ont
he
Collection Action for this homeowner. If you wish to remove
t
he“
Hol
d”
,j
us
tun-check this box.
62
Hold Payments
Sometimes when a delinquent owner is referred to the attorney for legal action, the
attorney will instruct you not to accept any further payments from the delinquent owners.
I
nt
hi
sc
a
s
e
,y
ouc
a
npl
a
c
ea“
Hol
d”ona
c
c
e
pt
i
ngpa
y
me
nt
s
.A“
Hol
d”ont
hepa
y
me
nt
s
means you will be warned when trying to enter a cash receipt for this owner. The
warning will be given in both the A/R –Owner Cash Receipts system and also in Global
Functions –Sc
a
nPa
y
me
nt
s
.Youc
a
nove
r
r
i
det
hi
s“
Hol
d”i
fne
c
e
s
s
a
r
y
.
Another benefit of placing a "Hold" payment on a delinquent owner is that TOPS can
generate a Hold Payment File that can be uploaded to your bank if payments are received
through a bank lockbox system. The bank can then take this file and use it to not accept a
de
l
i
nque
ntowne
r
’
spa
y
me
ntr
e
c
e
i
v
e
di
nt
ot
heba
nkl
oc
kboxs
y
s
t
e
m.
A“
hol
d”c
a
nbeputona
nOwne
r
’
sc
ol
l
e
c
t
i
ona
c
t
i
oni
ns
e
ve
r
a
lpl
aces within TOPS. This
ma
nua
ls
e
c
t
i
onj
us
ts
howshowt
oputa“
hol
d”di
r
e
c
t
l
yi
nt
ot
heOwne
rr
e
c
or
df
r
om t
he
Owner Maintain screen.
Select Maintain from the Owner Database menu.
The
ns
e
l
e
c
tt
hehomewhe
r
ey
ouwi
s
ht
opl
a
c
ea“
Hol
dPa
y
me
nt
”
.I
twi
l
ll
ook like this:
Owner Maintain
Click on the Flags button.
You will see the Owner Flags screen:
63
Owner Flags
Click on the Hold Payment checkbox to block payments from
be
i
nga
c
c
e
pt
e
d.I
fy
ouwi
s
ht
or
e
movet
he“
Hol
d”
,j
us
tun-check
this box.
64
Add New Owner Record
There can be multiple owner records kept for each home in the community. TOPS can
keep track of multiple Current Owners, Previous Owners, Renters or Builder/Developers
for each home. At any time, you can select a home, and then add another owner record.
Depending on what you wish to do, there are two ways to add Owner Records:
Add Owner Record
If you wish to Add a New Owner Record to an existing home, go to Maintain
Owner, select the home, and then click on the Add button.
Add Home & Owner
If you wish to Add a New Home and Owner, go to Maintain Owner, then click the
Add button WITHOUT selecting a home.
See the Add Home & Owner section for more details.
Select Maintain from the Owner Database menu.
To add a new Owner Record to an existing home, first select the home.
Owner Maintain
Click the Add button located at the top left part of the screen to add
an Owner Record to this home.
You will see the Owner Selector:
65
Click the Add button to proceed with adding an Owner Record.
You will see the screen to add a new owner record:
Add Owner Record
Notice the default Owner Classification i
s“
Owne
r
”
.Cl
i
c
kont
hedownbr
ows
e
select other Owner Classifications.
You will see the other Owner Classifications to select from.
to
Click on the Owner Classification for the record type you are adding. For our example,
we will add another Current Owner to the home, so we will take the default of Owner.
Pr
oc
e
e
dt
oe
nt
e
rt
hene
wowne
r
’
si
nf
or
ma
t
i
onont
hi
ss
c
r
e
e
n:
Owner Setup Screen
66
We
’
l
ldi
s
c
us
st
heke
yi
nf
or
ma
t
i
ont
ha
tne
e
dst
obee
nt
e
r
e
d.
Owners Name
Sort Name
Alternate
Address
Settlement Date
Move Out Date
Contact Info
Enter the name of the owner the way you want to address them in
correspondence or on bills/statements. The Owners Name is
required.
Ent
e
rt
heown
e
r
’
sLast Name. The Sort Name is required to do
name searches and also for sorting alphabetically on reports.
If this owner has an Alternate Mailing Address, enter it here so
you can send correspondence and bills/statements to this second
owner, if needed. You can select whether to include this second
owner record for correspondence and bill/statements through the
checkboxes on the Owner Flags screen for this owner record.
Enter the date the home was purchased, if known. You may leave
this blank.
This is filled in automatically when the home is sold. Leave it
BLANK for now unless you are entering a Renter Record, in
which case, the field name will display –Lease End Date.
Ent
e
rt
heOwne
r
’
sphone#’
sa
nd e-mail, if known.
A completed second Owner Record might look like this:
New Owner Record
67
Onc
ey
ouha
vec
ompl
e
t
e
de
nt
e
r
i
ngt
heOwne
r
’
si
nf
or
ma
t
i
on,c
l
i
c
kt
heNe
xt
button.
You will see the Add Owner Record confirmation screen:
Confirmation
This confirms the completion of adding the new Owner record.
If everything looks OK, click the Finish button to exit from the
confirmation screen. If you need to make corrections, click the Back
button.
68
Add New Home & Owner
You can add a new home and owner at any time. Normally, if setting up a new
community, you would add the new home and owner using the community Setup wizard.
The community Setup wizard is found on the Setup menu on the toolbar at the top of the
screen.
To add new home that does not already exist, click on the Add New button without
selecting a home—in other words, the Maintain Owner screen should be BLANK. You
will automatically go to the Add Property screen where you may add the home and then
proceed to add the owner.
Select Maintain from the Owner Database menu.
To add a new home and owner to a community, start at the Maintain Owner screen:
Maintain Owner - Blank
Click the Add button to add a new home and owner to this
community.
You will see the first screen for adding the home:
Property Setup Data Fields
69
Complete these fields:
Street Address
Street Name
The house number for this home. It can be alpha-numeric.
Select the Street using the down browse arrow
. You will
see all the Street Names already entered. If necessary, you can
add a new Street Name on the fly.
Account #
TheAc
c
ount#us
e
dt
oi
de
nt
i
f
yt
hi
shome
.Ac
c
ount#’
sc
a
nb
e
alpha-numeric. You can skip the Account # if not needed.
Lot/Unit #
Ent
e
rt
heLot#orUni
t#,i
fa
ny
.Lot
/
Uni
t#’
sc
a
nbea
lphanumeric. You can skip the Lot/Unit # if not needed.
Click Next to continue adding the home and owner.
Continue on to the 2nd screen of adding the new home and owner:
Add Home –Screen 2
70
Complete these fields:
Legal Description 1
Legal Description 2
Group Owner
Group #
Enter the legal description of the home, if any. In our
e
xa
mpl
ea
bove
,t
heLe
ga
lDe
s
c
r
i
pt
i
oni
sde
f
i
ne
da
s“
Lot
,
Bl
oc
k,Se
c
t
i
on”
.Youde
f
i
net
heLe
ga
lDe
s
c
r
i
pt
i
onhe
a
di
ng
s
in the Owner Control Info.
A continuation of the description from Legal Description 1
above.
If this home is part of an Owner Group, answer Yes here.
Otherwise, accept the default of No. An Owner Group is
multiple homes owned by the same party.
If you answered Yes to Group Owner, then you can select an
existing Owner Group that this home belongs to. Use the
down browse arrow
Group.
to view and select the Owner
Square Footage
If you wish to track the Square Footage of this home, which
you might want to do if this is a Condominium, enter it here.
You can use the Square Footage to base recurring charges on
in the Charge Tables.
Building/Section #
If you activated the Building/Section tracking in the Owner
Control Info, then enter the Section or Building # for this
home here. You can print certain Owner reports and AR
reports sorted by Building/Section # if you wish.
Assessed Value
Some communities base their maintenance fees on a stated
unit value. If you wish to track the Assessed Value of this
home, enter it here. You can use the Assessed Value to base
71
recurring charges on in the Charge Tables.
GL Cost Center
TOPS has the ability to breakdown income and expenses
using a GL Cost Center. This can be handy if you need to
keep track of the income by Section or by Building. Each
Section or Building can have its own Cost Center. Using
Cost Centers, you could generate financial statements for just
a particular Section or Building. See the Appendix titled
Cost Centers for more information.
Ratio
The Ratio of ownership is also called Percentage of
Ownership for Condominiums and Co-Ops. It is the
fractional share, expressed as a decimal, which this unit owns
in the entire complex. The Ratio can be used to calculate the
amount of a Recurring Charge in the Charge Tables. If not
needed, you can skip the Ratio.
City
The default City is the main one defined in the Owner
Control Info when you setup the community.
State
The default State is the main one defined in the Owner
Control Info when you setup the community
Zip Code
The Zip Code + Four + Carrier Route for this home. The
default Zip Code for the community is stored in the Owner
Control Info. This Zip Code will automatically be entered
here, but if you need to change it, overtype the default with
the correct Zip Code for this home. This can be handy if
there is more than one Zip Code for the homes in your
community.
After entering the information for the new home on the 2nd screen, click
the Next button to proceed with adding the owner information.
Next, you will see the screen for adding the new owner:
Add Owner Record
72
We
’
l
ldi
s
c
us
st
heke
yi
nf
or
ma
t
i
ont
ha
tne
e
dst
obee
nt
e
r
e
d.
Owners Name
Sort Name
Alternate Address
Settlement Date
Move Out Date
Contact Info
Enter the name of the owner the way you want to address them
in correspondence or on bills/statements. The Owners Name
is required.
Enter theowne
r
’
sLa
s
tNa
me
.TheSort Name is required to
do name searches and also for sorting alphabetically on
reports.
If this owner has an Alternate Mailing Address, enter it here
so you can send correspondence and bills/statements to this
second owner, if needed. You can select whether to include
this second owner record for correspondence and
bill/statements through the checkboxes on the Owner Flags
screen for this owner record.
Enter the date the home was purchased, if known. You may
leave this blank.
This is filled in automatically when the home is sold. Leave it
BLANK for now unless you are entering a Renter Record, in
which case, the field name will display –Lease End Date.
Enter the Owne
r
’
sphone#’
sa
nde
-mail, if known.
A completed new Owner Record might look like this:
New Owner Record
73
Onc
ey
ouha
vec
ompl
e
t
e
de
nt
e
r
i
ngt
heOwne
r
’
si
nf
or
ma
t
i
on,c
l
i
c
kt
heNext button.
You will see the Add Owner record confirmation screen:
Confirmation
This confirms the completion of adding the new Owner record.
If everything looks OK, click the Finish button to exit from the
confirmation screen. If you need to make corrections, click the Back
button.
74
Delete Home & Owner
You can delete a home and all the owner records if necessary. However, you CANNOT
delete a home and owner where payment history records exist. This safeguard exists to
prevent you from affecting the accounting integrity of the software. If a home had
charges and payments in the payment history, then the General Ledger also received
these transactions and they were reported on past financial statements for the community.
Deleting the home and owner might affect the audit trail of charges and payments for this
community.
In order to delete a home and owner, you must first waive any balance due so the home is
has a zero balance. Next, you would have to erase any payment history records. As a
safeguard, we will not discuss how to erase payment history records here; it is covered
elsewhere in these manuals.
Select Maintain from the Owner Database menu.
Select the home you wish to delete:
Maintain Owner
Notice the Property button at the top of the screen.
Click on the Property button.
You will then see the Property Info screen:
Property Info
75
Notice the Delete button.
Click the Delete button to proceed with deleting this home and owner
completely from this community.
As a safeguard, you will see this confirming message:
You must click Yes to proceed.
Once you click Yes, the home and owner(s) will be deleted permanently.
Again, you CANNOT delete a home and owner where payment histories exist. You can
only delete a home and owner where there is no payment history records existing.
76
Delete Owner Record
You can Delete an owner record for a home if needed. Perhaps you wish to delete a
Renter or a secondary owner record; you can do that in a few easy steps. However, you
CANNOT delete an owner where payment history records exist. This safeguard exists to
prevent you from affecting the accounting integrity of the software. If an owner had
charges and payments in the payment history, then the General Ledger also received
these transactions and they were reported on past financial statements for the community.
Deleting the owner might affect the audit trail of charges and payments for this
community.
In order to delete an owner with payment history records, you must first waive any
balance due so the home is has a zero balance. Next, you would have to erase any
payment history records. As a safeguard, we will not discuss how to erase payment
history records here; it is covered elsewhere in these manuals.
Select Maintain from the Owner Database menu.
Select the owner record you wish to delete:
Maintain Owner
Notice the Delete button at the bottom of the screen.
Click the Delete button to proceed with deleting this owner completely from
this community. The home will still be there; just the owner record will be
deleted.
77
As a safeguard, you will see this confirming message:
You must click Yes to proceed.
Once you click Yes, the owner will be deleted permanently.
Again, you CANNOT delete an owner where payment histories exist. You can only
delete an owner where there is no payment history records existing.
78
Street Names
The Street Names are setup as you add homes and owners to the community. As you add
ane
whome
,y
oua
r
ea
ddi
ngt
heSt
r
e
e
tNa
me
sa
tt
hes
a
met
i
me
.Tha
t
’
showy
oul
i
nka
home with a Street Address—you add the house # to the Street to complete the Street
Address of the home. These are the Streets within the community; you do not need to
add streets for owners with an alternate mailing address who do not live in the
community.
Having a Street Name file has a number of advantages which are:
It standardizes the spelling of the Street Name so it is correctly entered
everywhere it is used.
As you add a new home & owner, you do not have to enter the Street Name over
and over again saving time and avoiding misspellings.
It allows TOPS to present the owner data to you in an organized way by Street
Address.
He
r
e
’
sh
owy
ouc
a
nma
i
nt
a
i
nt
heSt
r
e
e
tNa
mef
i
l
e
:
Select Maintain from the Owner Database menu.
You will see the Maintain Owner screen:
Maintain Owners
Select ANY home & Owner in the community.
Once you have selected a home & owner, you are ready to click on the Property button:
Select Property Info
79
Click on the Property button.
The Property Info looks like this:
Property Info
Notice the Street Name field and the down browse arrow
next to it..
Click the down browse arrow to open up the Street File.
80
You will see the Street Name file:
Street Names
Highlight the Street Name you wish to change.
Click the Edit Street Name button to bring up the edit screen.
You will see the Edit Street Name window:
Edit Street Name
Type the correction to the Street Name.
After making the correction to the Street Name, press the tab key.
Edit Street Name
You will see the change you made displayed like above.
Click the OK button to proceed.
81
As a final safeguard before the Street Name change is made, you will see this
confirmation message:
Notice the default answer is NO to prevent you from accidentally changing the Street
Name if you did not wish to do so.
Click the Yes button to proceed with the Street Name change.
You will see the Street Names displayed with the changes you made:
Review Street Name Change
Make sure the Street Names are correct before proceeding.
Click the OK button to accept the changes and exit from the Street Names
file.
Click the Cancel button to not accept the changes to the Street Names file.
82
Section/Phase Number
Using Section or Phase Numbers in the owner database allows you to group homes and
owners by an area. Section # tracking can be handy where a community is divided up by
section with each section providing a different level of service and, therefore, paying a
different maintenance fee amount. It can also be used for Building # tracking. Phase # is
similar to Section #, but it can be used for tracking groups of homes that are deeded into a
growing community by the developer by parcel. Either option works the same way; it is
just a matter of using the correct semantics for your situation.
To use Section or Phase Number tracking, you will have to activate it in the Owner
Control Info. Once activated there, you can imbed the Section or Phase # in the Property
Info record for each home.
When a community has Section or Phase Number tracking turned on, then most of the
Owner Reports and many of the AR reports can be sorted by these numbers, meaning, it
will group homes by the Section or Phase Number.
Section/Phase Activation
Toa
c
t
i
va
t
eSe
c
t
i
on/
Pha
s
e#’
s
,f
i
r
s
tc
l
i
c
kont
heOwner Control
Info, click this menu tab on the Owner Database menu.
You will see the Owner Control Info:
Owner Control Info
Notice the field labeled Section Phase.
83
Click the down browse arrow on the Section Phase field.
You will see the choices to use for activating the Section/Phase # tracking:
Choose either Section or Phase by double clicking on it.
Now that you made a selection, you will see it in the Owner Control Info:
Owner Control Info
Notice that Section is now the choice. You are ready to use the Section # with the homes
which will be the next area covered.
84
Activating the Section/Phase tracking in the Owner Control Info is the first step to using
it with the homes. We will now cover the steps to make it work with the homes and
owners. You must imbed the Section/Phase # into each home to complete the activation.
Select Maintain from the Owner Database menu.
You will see the Maintain Owner screen:
Maintain Owners
Select the first home & owner where you wish to enter a Building/Section/Phase number.
Once you have selected a home & owner, you are ready to click on the Property button:
Maintain Owner
85
Notice the Property button.
Click on the Property button.
The Property Info looks like this:
Property Info
Notice the Section field.
86
Go ahead and enter the Section or Phase # this home is part of. It must be a 3 digit
numeric, alpha characters are not allowed. Press the Tab key to record the Section/Phase
# or click the OK button.
Property Info
The Section/Phase # you entered will be displayed on the screen. Make sure it is correct
before proceeding.
Click the OK button to save the change to the Property Info.
Proceed to enter the Section/Phase # for each home. For your convenience, you can use
the browse arrows
to move from home to home within the Property Info
screen entering the Section/Phase #.
87
Cost Centers
Cost Centers are 3 digit numbers that can be setup in the General Ledger to breakout
income or expenses by section, phase or building. If activated, Cost Centers can be used
by the AR module to breakout homeowner income. The Cost Center can be stored in the
Property Record for each home where the AR module will use it to split out income and
cash receipts using the Cost Center. Income is kept separated by the Cost Centers and is
passed to the GL using the Cost Centers if this is activated.
In order to use this feature with the owner charges and payments, you must first have
defined the Cost Center under GL –Chart of Accounts. Once the Cost Center has been
defined there, you can imbed the Cost Center into the Property Info for each home. That
wa
y
,TOPSc
a
nke
e
pt
r
a
c
koft
heowne
r
s
’i
nc
omea
ndpa
y
me
nt
sus
i
ngt
hi
sCos
tCe
nt
e
r
.
Follow these steps to imbed the Cost Center in the Property Info for each home.
Normally, you would do this using the Setup wizard when you initially entered the homes
and owners for the community. But these instructions will show you how to do it from
the Maintain Owner.
Select Maintain from the Owner Database menu.
Then select the home you wish to work with:
Maintain Owner
Notice the Property button at the top of the screen.
88
Click on the Property button.
You will see the Property Info for this home:
Property Info
Notice the G/L Cost Center field.
Simply enter the correct GL Cost Center for this home. The complete screen with the
Cost Center entered will look like this:
Cost Center Active
89
Click the OK button to save this change and return to Maintain Owners.
If you are making this change for all the homes in a community, you might want to use
the browse arrows at the top of the screen to go from home-to-home.
90
Owner Flags
“
Fl
a
g
s
”a
r
ec
ont
r
ols
e
t
t
i
ng
sf
orva
r
i
ousowne
ropt
i
ons
,s
uc
ha
s
,t
hea
bi
l
i
t
yt
os
e
l
e
c
twhi
c
h
owners of a home have mailing labels and bills printed. It gives you the chance to control
s
omeoft
hei
mpor
t
a
nti
t
e
msr
e
l
a
t
e
dt
oe
a
c
howne
rr
e
c
or
d.We
’
l
lc
ove
re
a
c
hone
individually.
Accelerated Assessments
This is an option when dealing with a delinquent owner. It recognizes that the
maintenance fee is an annual assessment broken up into installment payments to make it
more affordable and convenient for owners to pay. In communities that allow for
monthly, quarterly or semi-annually payments, if an owner is delinquent, the legal
documents may allow you to declare the entire unpaid maintenance fee for the remainder
of the year as delinquent, thereby “ac
c
e
l
e
r
at
i
ng”the future installment payments, so you
onl
yha
vet
ot
a
keonel
e
ga
la
c
t
i
ona
g
a
i
ns
tt
heowne
rf
orc
ol
l
e
c
t
i
onoft
ha
ty
e
a
r
’
se
nt
i
r
e
unpaid maintenance fee.
Ty
pi
c
a
l
l
y
,a
nowne
r
’
s “ac
c
e
l
e
r
at
e
d”balance is added using the Add/Waive function in
the A/R module. If done correctly in the Add/Waive (using the AC Charge Code), the
Accelerated Assessment flag will automatically be checked in the Maintain Owners
under the owner Flags. The Accelerated Assessments is a self-maintaining system,
meaning, you typically do NOT need to either checkmark or uncheck this box in the
owner Flags. TOPS Professional will take care of everything for you.
Accelerated Assessments are covering in more detail in the Accounts Receivable manual.
We
’
l
lj
u
s
te
xp
l
a
i
nhe
r
ehowy
ouc
a
ns
e
ei
ft
heAccelerated Assessments flag is active or
not through the Owner Maintain—owner Flags.
Select Maintain from the Owner Database menu.
You will see the Maintain Owner screen:
Maintain Owners
91
Select the first home where you wish to check if Accelerated Assessments are active.
Once you have selected a home & owner, you are ready to click on the Flags button:
Maintain Owner
Click on the Flags button.
You will see the Owner Flags for the owner you selected:
92
Owner Flags
A check mark here usually means the owner is in collection action for a delinquent
balance and that the Assessments or Maintenance Fees have been added for all remaining
periods through the end of the current year (like loan acceleration when in default).
Normally, this check mark is activated automatically for you when you add the
Accelerated balance through an Add/Waive expense adjustment. Check marking the box
here WITHOUT adding an Accelerated balance to the owner's account will have no
effect--it will automatically be unchecked the next time you Apply Charges in this
community.
You can uncheck this box if the Accelerated balance has been waived for an owner and
no Accelerated balance any longer exists. Otherwise, we recommend not changing this
box. When the last Accelerated balance is earned at the end of the year, the system will
automatically deselect this box as you apply charges.
93
Bills/Statements Flag
This controls whether an owner gets invoices, statements and coupons for this home. If
there are multiple owners of a home, you can select which one gets the billing notices.
Uncheck this box if this owner is NOT to receive the invoices, statements and coupons
for this home, such as a Renter.
Select Maintain from the Owner Database menu.
You will see the Maintain Owner screen:
Maintain Owners
Select the first home where you wish to check the Bills/Statements setting.
Once you have selected a home & owner, you are ready to click on the Flags button:
Maintain Owner
94
Click on the Flags button.
You will see the Owner Flags for the owner you selected:
Owner Flags
A check mark here means this owner gets the Bills/Statements and Coupons for this
home. Where there are multiple owners of a home, this lets you pick and choose which
ones get the bills from the community.
95
Mailing Labels Flag
You have control over which owner records have mailing labels printed. If there are
multiple owners of a home, this gives you control in selecting which ones get the mailing
labels. Uncheck this box if you do NOT want this owner to have a mailing label printed.
To check or change this setting, do the following:
Select Maintain from the Owner Database menu.
You will see the Maintain Owner screen:
Maintain Owners
Select the first home where you wish to check the Mailing Labels setting.
Once you have selected a home & owner, you are ready to click on the Flags button:
Maintain Owner
96
Click on the Flags button.
You will see the Owner Flags for the owner you selected:
Owner Flags
A check mark here means this owner gets the Mailing Labels for this home. Where
there are multiple owners for a home, this lets you pick and choose which ones get the
mailings from the community.
97
Special Forms Flag
If you use Form Letters to print letters or specially designed forms—like a custom bill or
voting proxy, a check mark here means this owner will have that Form Letter printed for
them. If there are multiple owners of a home, this gives you control in selecting which
ones get a letter or special form. Uncheck this box if you do NOT want this owner to
have a special Form Letter printed.
Select Maintain from the Owner Database menu.
You will see the Maintain Owner screen:
Maintain Owners
Select the first home where you wish to check the Special Forms setting.
Once you have selected a home & owner, you are ready to click on the Flags button:
Maintain Owner
98
Click on the Flags button.
You will see the Owner Flags for the owner you selected:
Owner Flags
A check mark here means this owner gets any Form Letters or Special Forms for this
home. Where there are multiple owners, you can pick and choose which ones get these
mailings from the community.
99
Direct Debit Flag
TOPS has the ability to handle Direct Debit as a method for Owners to pay recurring
fees, like the Maintenance Fee. TOPS will actually generate the required NACHA
formatted file ready for you to upload to our bank. Direct Debit processing is done
through the Global > Direct Debit module, however, the bank information for the
homeowners must be entered through the Maintain Owners function.
To activate Direct Debit as the method of paying Maintenance Fees and Assessments,
you must turn on this function for the homeowner and enter the bank information. You
will need a copy of a check from the owner to enter this information correctly.
To check or change this setting, do the following:
Select Maintain from the Owner Database menu.
You will see the Maintain Owner screen:
Maintain Owners
Select the first home where you wish to check or change the Direct Debit settings.
Once you have selected a home & owner, you are ready to click on the Flags button:
Maintain Owner
100
Click on the Flags button.
You will see the Owner Flags for the owner you selected:
Owner Flags
If this owner has elected to pay their maintenance fee by Direct Debit, checkmark this
box, then complete the Direct Debit bank setup. TOPS has the built-in ability to
generate the required NACHA file under the Direct Debit menu tab on the Global
Functions menu.
The following are instructions to complete the Direct Debit setup for an owner:
Direct Debit Setup
101
Bank ID –The9di
g
i
tABA#t
ha
ti
de
nt
i
f
i
e
st
heowne
r
’
sba
nk.I
ti
st
hef
i
r
s
ts
e
t
of MICR numbers on a typica
lowne
r
’
sc
he
c
k.Thi
si
nf
or
ma
t
i
oni
ss
t
or
e
di
nTOPS
with data encryption to prevent identity theft.
Account # - Theowne
r
’
sba
nka
c
c
ount#.Al
t
houg
ht
he
r
ema
ybes
pa
c
e
swi
t
hi
n
the Account # on the MICR line of the check, do not enter it with spaces here. It
should be entered as one continuous number. This information is encrypted in
TOPS to prevent identity theft. You only see the Account # displayed fully when
you first enter it. Thereafter, you will only see the last 4 digits of the number.
Checking –Checkmark if the account to be Direct Debited is a checking account.
Savings - Checkmark if the account to be Direct Debited is a savings account.
Do not be concerned with the fields shown at the top of the screen –Added, Tested, and
Last Debit. These fields are updated automatically by TOPS as you work with the
Direct Debit system. The information is displayed here in case you need it.
Use the Clear but
t
ont
oe
r
a
s
et
heowne
r
’
sba
nki
nf
o.
Click the OK button to save any changes made to the owner
’
sDi
r
e
c
tDe
bi
t
bank info.
Click Cancel t
os
c
r
a
t
c
ha
nyc
ha
ng
e
sma
det
ot
heowne
r
’
sDi
r
e
c
tDe
bi
t
bank info.
102
Owner Reports--Overview
A number of reports are built in to the Owner Database to provide you with maximum
results from your data. The reports show the Owner data in different ways depending on
your needs. The reports can be printed in various orders, can include multiple owner
types, and can be printed for an entire community or parts of a community.
Owners Summary Report - This shows the basic owner information for of each
home in a brief format. It is the report normally given to community officers
when they want a listing of the owners. The contents of the report and sort order
are based on the options selected on the Owner Reports Menu screen.
Telephone Directory - This report prints a phone directory listing of the owners.
If an owner has the unlisted box check marked for their telephone numbers, their
numbers will not be printed on this report. The contents of the report and sort
order are based on the options selected on the Owner Reports Menu screen.
Standard Owners Report - This report shows much of the information on file
for the owners. The contents of the report and sort order are based on the options
selected on the Owner Reports Menu screen.
Single Spaced Owners Report - For large communities with many owners, this
is the most compact owner report available. It limits the information printed to
just one line per home for most owners. The contents of the report and sort order
are based on the options selected on the Owner Reports Menu screen.
Annual Meeting w/Signature - This prints a sign-in report to be used when
processing owners into the Annual Meeting. It has the option to start a new page
with each letter of the alphabet if printed in owner name order. An asterisk (*)
next to the owners name on the report means there is a balance due which may
make the owner ineligible to vote at the meeting. The contents of the report and
sort order are based on the options selected on the Owner Reports Menu screen.
Annual Meeting w/Delinquent Balance - This report is used to screen owners
who have a balance due and are not eligible to vote at the Annual Meeting. It
shows the amount of the balance due so that owners may pay to be able to
participate in the Annual Meeting. The contents of the report and sort order are
based on the options selected on the Owner Reports Menu screen.
Owner/Mortgage report - This report shows the Mortgage Company for each
home in the community if this information has been setup in the owner database.
The contents of the report and sort order are based on the options selected on the
Owner Reports Menu screen.
Flex Data Report - In each community you may define fields of customized data
to be tracked for the owners. An example might be Parking Space #'s. This report
lists the homes with the Flex Data. The contents of the report and sort order are
based on the options selected on the Owner Reports Menu screen.
103
Owner Profile - This report shows ALL the information being stored for the
homes and the owners in a community. It is a long report, which has the option of
printing one page per home. The contents of the report and sort order are based on
the options selected on the Owner Reports Menu screen.
Owner Group Report - Owner groups are defined where an owner owns more
than one home in the community and you want the ability of maintaining the
contact info in just one place for all the homes. With owner groups you also have
the option of printing consolidated mailing label, invoices and statements. The
Owner Group Report is sorted based on the order selected on the Owner
Reports menu.
Settled Property Report - This report can be used to verify the number of settled
homes in the community both currently and for any date in the past. It is handy
for getting the count used for expenses that vary by settled home in a growing
community, like trash removal and management fees. The Settled Property
Report prints a separate report for each user-defined period.
Owner Resale Report - This report can be used to find homes that have settled
for a range of dates you enter. You can base the report on the Settlement Date or
the Processing Date (the date the resale function was done in TOPS). The report
shows the new owner, previous owner, settlement date and processed date. This
report shows the details of each home sold for the range of dates selected.
104
Print Owner Reports
No matter which report you wish to print, the method used to print the report is similar
between reports, although some reports have special report options. We will cover the
common steps involved with printing any of the owner reports. If there are unique
options for certain owner reports, we will explain them at the end of this manual section.
Selecting Report Options
To access the Owner Reports menu, click the Reports tab.
You will see the Owner Reports menu:
Owner Reports
Click to select the Owner Report you wish to print.
Print Order
Select from one of the following orders for the report:
Street Address: Prints the report in street address order.
Account Number: Prints the report in account number order.
Lot/Unit Number: Prints the report by lot/unit number order.
Owner Last Name: Prints the report alphabetically by owner
last name.
Property Number: Prints using the TOPS assigned property
number. This number is used by TOPS to keep track of each
home regardless of the Street Address, Account # or Lot/Unit #.
Include
Select the Owner Types you wish to include on the report. Select
from:
105
Notice the Current Owner and Developer are the pre-selected
choices for most reports. You can accept this default or click to check
or uncheck the Owner Types to include on the report.
Print For
You have the option to print the report for the entire community or
selected portions of the community. Choices are:
Click to select the portions of the community to print this report for.
All Homes –click this to print a report for the entire community.
Range of Homes –Select this option to enter a beginning and
ending range of homes. You can use Account #, Lot/Unit#,
Owner Last Name or the TOPS assigned Property ID. It will
default to the Preferred Access Method defined in the Owner
Control Info.
Enter the begging range and ending range. Use the down browse
arrow
to open up a browser window to help you select the
beginning or ending home in the range. Then click Print to
continue.
Section/Building –You can print a report for individual
Sections/Phases or Buildings, or, you can print the report for all
Section/Buildings with all the homes grouped by
Section/Building.
106
Double click in the browse window to select an individual
Section/Phase or Building. If you want the entire report organized
by Building/Section/Phase number then click the option for All
Sections. Click the OK button to continue.
Report Date
The date is important on any Owner Reports that show owner
balances, like the Annual Meeting w/Delinquent Balance. It is used as
the calculation date for determining if the owner owes money. For
other reports, like the Telephone Directory, it is merely the date
printed on the report so you know when the report was generated.
Enter the date as: 031507 for March 15, 2007. Do not enter any
slashes (/) between the dates.
Select Print Options
After making print option selections on the Print Owner Report menu,
Click the Print button to proceed.
Special Report Options –after clicking on the Print button above, if the Owner Report
has any special options, you will see pop-ups giving you the options available.
Owner Reports with Special Report Option are:
Owner Summary Report
Standard Owner Report
Telephone Directory
Annual Meeting w/Signature
Owner Profile Report
Group Owner Report
Settled Property Report
Owner Resale Report
See the section titled Special Report Options at the end of the Owner Reports manual
section for more information on these options.
If there are no Special Report Options for the Owner Report you selected, you will see
the print menu:
Print Menu
107
This is the standard Print Menu you will see throughout TOPS. Select from one of these
print options.
Printer
Checkmark this option to get a printed report.
Screen
Checkmark this option to display the report on the screen rather than
print it. As it is displayed, you still have the option to print it to
paper.
File
Print the report to a file where you can re-print it later or open up in
a different application, like Excel®. When you pick this option, you
will see this screen:
Print to File
File Name –you can accept the default file name displayed or
change it to a different file name.
Save as Type –By default, it will have PDF (Portable Document
108
Format) selected but you can select from any of this file formats:
You have the choice of saving the file to any of these formats:
PDF –The normal format to attach a report to an e-mail
Excel –Puts the report into a standard Excel® file.
HTML –Use to make the report part of a web page
Rich Text –Use with a report writer, like Word®.
All Files –Not a file type that can be used for saving. Just lists all
the files in the chosen folders.
Click the Save button to save the File Name, location and File Type.
This completes the general Owner Reports manual section. The following page
explains the Special Report Options available on some Owner Reports.
Special Report Options
Certain Owner Reports have unique report options not available on all
Owner Reports. If there are unique report options for the Owner Report
you selected, you will see them after you click the Print button above.
The following are the Special Report Options available as an option for
each Owner Report:
Owner Summary Report –Owner Notes
If owner notes exist in the Owner record, they will print under the
listing of the home on the report.
Print Owner Notes
Standard Owners Report - Owner Notes
If owner notes exist in the Owner record, they will print under the
listing of the home on the report.
109
Print Owner Notes
Calculation Basis
Maintenance Fees can be calculated using different basis. You
can enter the amount of the Maintenance Fee directly into a
Charge Table or, you can have TOPS calculate the amount for
you if the charge is based on one of the following:
Select Calculation Basis
Assessed Value –if the Maintenance Fee is based off the Assessed
Value of each home stored in the Property Info, check this option to
the calculation basis prints for the home.
Ratio –if the Maintenance Fee is based off the Percentage
Ownership (ratio) of each home to the total community, check this
option to the calculation basis prints for the home.
Square Foot –if the Maintenance Fee is based off the Square
Footage of each home stored in the Property Info, check this option
to the calculation basis prints for the home.
Click OK to proceed.
Owner Profile Report
If owner notes exist in the Owner record, they will print under the
listing of the home on the report.
Print Owner Notes
110
Telephone Directory
- Exclude Unlisted Numbers
Does not print owners with checkmarks on the Unlisted Phone
Numbers in the Owner record.
Exclude Unlisted?
Annual Meeting w/Signature
- Mark Delinquent Owners
Prints an asterisk (*) next to each owner that owes an amount
“
a
sof
”t
heda
t
eoft
her
e
por
t
.
Click Yes to have this option.
Group Owner Report
- Select Group Order
Select from one of two possible orders for printing the report.
Select Order
111
Select either:
Group Number
Group Name (alphabetic)
Click OK to proceed.
Settled Property Report
- Settlement Dates
Enter up to 12 dates to have the system give you a count of the
settled homes on each of the dates.
Settled Property Report
Enter only those dates you wish. In a growing community, this
is handy for checking whether the correct amounts were paid for
management fees, trash pickup, etc.
Click Print to proceed.
Resale Report
-
Resale Report
Select the option the system will use to find and list the resales.
Resale Dates
112
Find the homes where there have been resales based on either:
Processing Date –the Date the resale was actually
performed in TOPS.
Settlement Date –the Date the home actually sold from one
party to another.
Date Ranges –after making the order selection, then enter
the beginning and ending dates. Only those homes that
match the report criteria will be included in the report. If
you do not use the Owner Resale function on the Maintain
Owner screen, then this report will not work for you.
Click Print to proceed.
113
Mailings
You can either email owners directly here or print mailing labels with a variety of
options. You can select which owners to print labels for as well as the label type. TOPS
lets you select from a many standard label sizes. You may also print envelopes directly
as long as your printer supports this option. Another option is the ability to generate an
e
xpor
tf
i
l
ewi
t
ht
heowne
r
s
’na
me
sa
ndma
i
l
i
nga
ddr
e
s
s
e
s
.
Email
You may email owners the information that would otherwise be mailed to save both
time and the expense of doing a physical mailing. Because you might not have
e
ma
i
la
ddr
e
s
s
e
sf
ora
l
lowne
r
sornota
l
lowne
r
sha
ve“
opt
e
di
n”t
oge
te
ma
i
l
sf
r
om
the community, we give you these options:
Print Labels only
Email Only
Email & Print Labels for those owners with no email address
Note - You must subscribe to TOPS iMail to be able to email owners in place of
printing mailing labels. Your internal email system cannot handle sending bulk
email such as, emailing hundreds of owners at one time. See the TOPS
Communication manual for more information on TOPS iMail and why you need it.
Communication History
Regardless of whether mailing labels are printed or owners are sent emails from the
Mailings screen, the owner communication history is updated for every type of
“
ma
i
l
i
ng
”y
oudohere. You can mark each ma
i
l
i
nga
s“
Bi
l
lt
oCommuni
t
y
”
,t
he
n
print a report for a range of dates that summarizes the mailings done in a community
so you can easily recover your expenses.
The options for Mailings are designed to let you easily create emails to owners who have
“
opt
e
di
n”orpr
i
ntma
i
l
i
ngl
a
be
l
swhe
r
ene
e
de
d.Thi
sg
i
ve
sy
ouc
ont
r
olove
ry
our
delivery method and also your postage and supplies expense. Follow these instructions to
do Mailings.
Click the Mailing Labels tab on the Owner Database menu.
Select Labels or Email
You will see the Owner Mailing Labels menu:
Define Mailing Options
114
We
’
l
lc
ove
rt
heopt
i
onsont
hi
ss
c
r
e
e
n.
Print Mailing
Labels
Through this choice, you can print from a variety of Mailing
Label formats, print directly on envelopes (as long as your
printer can handle it) or generate an export file with owners
names and addresses.
Print Mailing Labels is the default choice.
Send Emails
Se
nda
ne
ma
i
lt
oowne
r
swhoha
ve“
opt
e
di
n”t
or
e
c
e
i
vee
ma
i
l
communications from the community. If an owner has not
“
opt
e
di
n”t
he
ywi
l
lbes
ki
ppe
da
ndnoe
ma
i
ls
e
nta
ndno
mailing label printed.
Print Mailing
Labels & Send
Emails
Send a
ne
ma
i
lt
oowne
r
swhoha
ve“
opt
e
di
n”t
or
e
c
e
i
vee
ma
i
l
communications from the community, then print mailing labels
f
ort
hos
eowne
r
swhoha
venot“
opt
e
di
n”orwhe
r
enoe
ma
i
l
address exists.
Recommend: Always use this choice if you want to send a
notice to the entire community so that each owner will receive
the mailing, whether emailed or by regular mail.
Description
Because of the Communication History that is kept for each
owner and the community as a whole, a Description of this
115
mailing MUST be entered here. It only needs to be a few words
that tells anyone looking at the history why this mailing was
sent.
Mark as Billable
Checkmark
if the mailing should be billed to the
community. It will then record the mailing in the communi
t
y
’
s
c
ommuni
c
a
t
i
onhi
s
t
or
ya
s“
bi
l
l
a
bl
e
”
.Youc
a
npr
i
ntar
e
por
tf
or
ar
a
ng
eofda
t
e
sf
orj
us
tt
he“
bi
l
l
a
bl
e
”ma
i
l
i
ng
st
oba
c
kupt
he
reimbursement, if any, from the community.
Click the Next button to proceed with the mailing options
selected.
Click the Exit button to exit from the Mailings program without
proceeding.
Mailing Labels
If you clicked the Next button above and mailing labels were part of the Mail options
selected on the previous screen, you will see the Mailing Label options:
Mailing Labels
116
We
’
l
lde
s
c
r
i
bee
a
c
hma
i
l
i
ngl
a
be
lopt
i
ons
howi
ngont
hi
ss
c
r
e
e
nbe
l
ow.
Paper Type
Here you can select which kind of general mailing label type
you will be using.
Select Paper Type
Click the down browse arrow
to select which kind of output
you will be using for mailing labels:
Mailing Labels - Thede
f
a
ul
ti
s“
Mailing Labels”
which will work on any standard laser or ink jet printer.
These would be separate sheets of labels.
Like most modern software applications, TOPS no
longer supports dot matrix label printing, however, if
you have a dot matrix printer, try using the export file
functions to get a print file that will work with a dot
matrix printer.
Envelopes –You can print the owners name and address
directly on envelopes as long as your printer can handle
the envelope feeding. If you pick this option, you can
then select from a standard #10 or #9 envelope.
Export to File –if you select the Export option, you
will see two choices:
-
CSV Export –creates a file with the owners name
and mailing address in the CSV format, which will
natively work with Excel as well as other
applications.
-
Alpha Graphics Export –creates a file with the
owners name and mailing address ready to send to
Alpha Graphics if you use them for mailings.
There are other export options available as well when
you reach the last screen of mailing labels.
Use the arrow key to move down the list or use the mouse to
click on the print option you wish.
Select Paper
Here you can select which specific mailing label you will be
using for printing mailing labels.
Select Paper Type
Click the down browse arrow
to select which kind of label
you wish. Depending on the Paper Type selected above, you
117
have a choice of different standard Avery® labels. For a laser
printer, the label choices are:
The default is Avery® #5160—the most common label used on
laser printers.
Carrier Route Sorting
Because space is too limited on Avery 5160 labels, you do
not have the option to do Carrier Route Sorting with this
label type. To do Carrier Route Sorting, choose either the
Avery 5261 or Avery 5262 labels.
Starting Position
For laser labels, you can select the starting row and column to
use a mailing label sheet that has labels missing from previous
mailings:
Thede
f
a
ul
ti
s“
Row1”
,“
Col
umn1”whi
c
hme
a
nsi
twi
l
ls
t
a
r
t
with the first label on the sheet. This assumes, of course, that
the label sheet is full and has no missing labels.
Use Custom Font
Checkmark this option if you wish to change the font on the
labels/envelope options selected. If checked, you will see these
options appear:
You can customize the following:
Font –Select which font using the down browse arrow.
Bold –Select BOLD by clicking on the bold
button.
Italics –Select ITALICS by clicking on the italic
button.
Font Size –Select the numerical point size of the font.
Be aware that changing Fonts and Font Size may cause your
mailing labels to overflow the size of the mailing label itself.
Options
Starting at the top right side of the screen, you will see these
further mailing label options:
118
Replace Resident Name –checkmark this box and then enter
the name you wish to use in place of the actual owners name on
the mailing. For example, you could replace the actual owner
na
mewi
t
ht
heg
e
ne
r
a
lt
e
r
m“
Re
s
i
de
nt
”
.Tha
twa
y
,t
hema
i
l
i
ng
will be delivered to the home no matter who the registered
owner is with the US Post Office.
Include Preferred Access Key - The address key shows the
Community ID and a home identifier on the label so, if the label
is going to an Alternate Mailing Address, you can tell which
home the label is printed for. A label with the Address Key will
look like this:
XX is the Community ID. 100 is the Account # for this home.
Use Property Address - If checked, this option will print the
Street Address of the home on the label rather than the Alternate
Mailing Address. This can be handy if you are sending a notice
about something that affects the actual residents of the
community—like street repaving or cleaning.
Second Alternate Addresses –print a label for those owners
who have a 2nd Alternate Address in the owner record. The 2nd
Alternate Address might be used to include a property manager
in community mailings who is maintaining the home or if the
homeowner has a secondary residence.
Include Second Owner Names –If there are 2nd owners on file
for some homes in this community, do you want to print their
name on the mailing labels too? US Postal regulations do not
a
l
l
owmor
et
ha
na5l
i
nea
ddr
e
s
s
,s
oi
fy
ous
e
l
e
c
tt
o“
I
nc
l
ude
Se
c
ondOwne
rNa
me
s
”i
twi
l
lpr
i
ntt
he
i
rna
meont
hel
a
be
lt
oo
as long as it will fit within the 5 address line limit.
Group by Carrier Route –If you have captured the Zip Code
+ Four + Carrier Route in the Property Info for each home, you
can print mailing labels in a presorted order to get lower postage
rates on mailings. Checkmark this option to print labels or
envelopes in a presorted order by Zip Code + Four + Carrier
Route.
Note: The Carrier Route option is not available for Avery
#5160 labels because the label is too small to allow the
formatting required by the US Postal Service. This option is
available for any of the larger label sizes.
119
Number of Copies
By default, it will print 1 label or envelope per home. If you
wish to print multiple labels/envelopes you can increase the
number to the desired copies using the Up/Down arrows.
Click the Next button to proceed with the mailing options
selected.
Click the Back button to go back to the first screen where you
can change options, if needed. Any options selected on this
second screen will be saved when you return to this screen.
Click the Exit button to exit from the Mailings program without
proceeding.
Email Options
If you clicked the Next button to proceed and emailing is part of the options selected on
the first screen, you will see this screen that gives you options to email owners rather than
print Mailing Labels:
EMail Options
The following explains the email options on this screen:
120
Priority
You can set the Priority delivery for this owner email. The priority
will be displayed in MOST personal email systems, but not all. So
setting the Priority here may not work for emails sent to some
owners.
Use the down browse arrow to select from the choices. The
choices are:
Low –tells the recipient the message is not that important
Normal –tells the recipient the message is of regular
importance. This is the default setting.
High –tell the recipient the message is a HIGH priority and
they should read it immediately. In most email systems, it
would show an exclamation mark (!) next to the email.
Reply To
Use the down browse arrow to select which Reply To address to
use.
General Company Reply to Email Address - The default
is the general Reply To email address from the
Management Company Info under Configure TOPS
iMail®.
User Reply to Email Address - You can select your email
address defined in User Settings & Preferences under
Configure TOPS iMail®.
Bounce Email –Youc
a
na
l
s
os
e
l
e
c
tt
he“
Bounc
e
”e
ma
i
l
address from the Management Company Info under
Configure TOPS iMail®. This will use the address where
returned emails are dumped as the Reply To address for this
email.
Return Receipt
Check mark here to have a Return Receipt sent to you once the
owner opens the email. Of course, the owner can elect NOT to
send the Return Receipt, so if you do not get a Return Receipt, it
does not mean the owner did not get and read the email.
Include
Unsubscribe
Message
Check mark here to include a message to the owner giving them
the ability to Unsubscribe to future community emails. If they
unsubscribe, it will update the owner email settings in Owner
Maintain so they will not receive future community emails.
Subject
The default Subject will say:
“
Communi
t
yNa
me–I
mpor
t
a
ntNot
i
c
e
”
You can type any subject you wish into this field, however, to
encourage the owner to open and read it, we recommend using the
name of the community in the subject line.
121
Body
The Body text looks like this:
It will automatically insert each owners name into the email Body
i
fy
oul
e
a
vet
he“
De
a
r{
@Owne
r
Na
me
}
”
.
If will also default to the message:
“
Thi
si
sa
ni
mpor
t
a
ntnot
i
c
er
e
ga
r
di
ng{
@Pr
ope
r
t
y
Addr
e
s
s
}
”
where the street address of the home will be inserted.
You can accept the default message or type your own message as
needed. However, there must be something typed in the Body field
or you cannot proceed with emailing owners.
Attachment
You can attach a file or document to this owner email if you wish.
For example, if you are sending out an Annual Meeting Proxy or
new community Rules & Regulations. Every email recipient will
get this email with the Attachment.
If there are no Attachments for an email, when you click into the
Attachments box, it will open the Windows® file browser:
From here locate the attachment, then double click to select it.
If there are Attachments already in the email, you can right click
the mouse button to open the Attachment menu:
122
Click on any menu selection to select it.
Recommend: Attach Portable Document File (PDF) instead of a
Word® document or Excel® spreadsheet. The recipient would
need to have Word® or Excel® in order to open and read the
attachment. Anyone can open and read a PDF file—the reader is
widely available and is FREE.
Email Merge
Codes
There are 2 Merge Codes you can insert into owner emails:
{@OwnerName} –I
ns
e
r
t
st
heOwne
r
’
sNa
mei
nt
ot
he
email body
{@PropertyAddress} –I
ns
e
r
t
st
heOwne
r
’
sSt
r
e
e
tAddr
e
s
s
into the email body
These merge codes only work in the Body of the email, not the
Subject line.
Click the Next button to proceed with the email options selected.
Click the Back button to go back to the previous screen where you
can change options, if needed. Any options selected on this screen
will be saved when you return to this screen.
Click the Exit button to exit from the Mailings program without
proceeding.
Select Recipients
Whether you are printing Mailing Labels or Emailing owners, you must select the
Recipients of the mailing. Once you click the Next button, you will see the screen for
selecting the Recipients of the Mailing:
Select Recipients
123
This screen helps you control the order in which labels print and which owners have
labels printed.
Order By
Select the print order that best suits your needs. Use the down
browse arrow
to select from:
Street Address
Account #
Lot/Unit #
Sort Name (Last Name)
Zip Code
Select the order you wish for the mailing.
Process For
Select the homes you wish to include in this mailing. Use the
down browse arrow
to select from:
All Homes –will do a mailing that includes every home
in the community.
Range of Homes –type in the starting / ending range of
homes or use down browse arrow to open the homes
124
selector.
Section / Building –if you select this option, you will
see the Sections / Buildings that are defined for this
community:
Checkmark the Section / Buildings to include. The
Section / Building number must be coded into the
Property Info for each home in order to use this as a
mailings option.
Use Checkmark ALL or UnCheck All buttons to make
selecting the Section / Building easier.
Selected Homes –If you want to do a mailing to
individually selected homes, you will see the homes
selector:
Checkmark which homes to include in the mailing or use
the filter to start typing to narrow your search. You can
filter by Account #, Lot/Unit # or Owner Name.
Make the selection for which homes to include in this mailing
125
from the options shown above.
Include
Checkmark which owner types to include in the mailing. The
available owner types are:
On-Site Owners –owners who live in the community
Off-Site Owners –owners with an Alternate Mailing
Address
Renter / Tenants
Developers
You can check or uncheck any of these owner types to include
or exclude from the mailing.
Consolidate Group
Owners
If you use the Owner Groups for owners who own more than
one home in the community, check marking this option will
give you one mailing label for all the homes that are part of an
Owner Group. If you do not check mark this option, then
mailing labels will be printed for every home whether part of an
Owner Group or not.
Click the Next button to proceed with the mailing options
selected.
Click the Back button to go back to the previous screen where
you can change options, if needed. Any options selected on this
screen will be saved when you return to this screen.
Click the Exit button to exit from the Mailings program without
proceeding.
Mailings Task Review
The final screen where you can verify your job depends on whether you are just printing
Mailing Labels, sending Emails or doing a combination. Depending on the mailings job,
whe
ny
o
uc
l
i
c
kNe
xty
ouwi
l
lg
ot
ooneort
heot
he
r“
Pr
e
vi
e
w”s
c
r
e
e
ns
.
Wewi
l
lc
ove
re
a
c
h“
Pr
e
vi
e
w”s
c
r
e
e
ns
oy
ouunde
r
s
t
a
ndt
hei
nf
or
ma
t
i
oni
ts
hows
.
Labels and Email
If your mailings job included BOTH Mailing Labels and Emails, you will go to the
Mailings Task Review screen where you can see the pending job:
Mailings Task Review
126
Here you can review the details of the Mailings job to make sure it is correct before final
processing. Notice the screen shows the number of Mailing Labels to print and the
number of Emails that will be sent. The job is still pending, you must click the Process
button to proceed.
We
’
l
lr
e
vi
e
we
a
c
hoft
heot
he
rme
nut
a
bsont
hi
ss
c
r
e
e
n.
If your job included just printing Mailing Labels you will see
the Labels Preview so you can review the pending Mailing
Labels that are ready to print.
Labels Preview
127
You can click the Back button here if you wish to go back to
change mailing label options.
Warning: Clicking the Process button will start printing the
mailing labels AND start emailing the Owners. But sure you
want to proceed before clicking the Process button.
Export Options –Notice this button above the labels. This
gives you ability to export owners names and mailing addresses
i
nava
r
i
e
t
yoff
i
l
ef
or
ma
t
s
.Se
et
hehe
a
di
ng“
Expor
tMa
i
l
i
ng
La
be
lFi
l
e
”be
l
owf
ormor
ei
nf
or
ma
t
i
onont
hi
sopt
i
on.
If your job included just sending Emails to owners you will see
the Email Recipients where it lists the owners who will receive
the email from the community.
Email Recipients
128
Thi
ss
ho
wsal
i
s
toft
heowne
r
swhoha
ve“
Opt
e
d-I
n”t
or
e
c
e
i
ve
email from the community. Notice you can uncheck owners if
you wish to skip sending them this email.
Warning: Clicking the Process button will start printing the
mailing labels AND start emailing the Owners. But sure you
want to proceed before clicking the Process button.
If the job preview looks good, click the Process button to
proceed with actually doing the mailing as shown in the Job
Preview.
Warning: Clicking the Process button will start printing the
mailing labels AND start emailing the Owners. But sure you
want to proceed before clicking the Process button.
Click the Back button to go back to the previous screens where
you can change options, if needed. Any options selected on this
screen will be saved when you return to this screen.
Click the Exit button to exit from the Mailings program without
proceeding.
Export Mailing Label File
From the Labels Preview screen you can export owner name
and address info into various formats. This can be handy when
you wish to give just the owner mailing addresses to an outside
party.
129
Labels Preview
Use the down browse arrow to select the file format you wish
to export the owner name and mailing address into:
Available File Formats
Once you select the export file format, you will see another
screen where, depending on the file format selected, you will
130
see other options for the export file
Export File Options
Click OK to proceed or Cancel to exit.
The last step in the File Export is to name the file and the
location where you wish to save the file.
File Location
131
Notice the default file name is the mailing label selected under
Paper Type on the 2nd screen. You can overtype this name and
save the Export File under any name you wish. You can also
select the File Location using a standard Windows© browser.
Summary
Mailings is designed to give you control over general mailings to owners. You can
choose your method for each mailing, whether it is billable to the community or not and
the output that best serves your purposes.
Every mailing is recorded in the Communication History. It can be viewed on an ownerby-owner basis through Maintain Owner or community-wide through the Communication
menu. Keeping a detailed Communication History showing each mailing made to an
owner should help dispel any disputes that arise where an owner says they never received
the mailing.
This completes the Mailings manual section.
132
Form Letters
Form Letters are letter templates that use merge codes to insert owner information into
the letter resulting in a letter that looks like it was individually typed. In addition to the
owner name and address, there are merge codes for virtually ALL the data being tracked
for an owner including their current account balance. There are also merge codes for
community info and the management company, where applicable. Letters can either be
printed and sent to owners or emailed directly to owners as email attachments.
Form Letters can also be used to create ballots, billing statements or any form you can
think of to send to one or all owners. Form Letters are a powerful and flexible tool that
you can use in a variety of ways. Whenever you print/email a Form Letter to an
owner(s), it automatically updates the owner Communication History for this mailing.
You can mark anyma
i
l
i
ngt
hr
oug
hFor
m Le
t
t
e
r
sa
sonet
ha
ty
ou“
Bi
l
lt
oCommuni
t
y
”s
o
you can recover your mailing expense.
Collection & Violation Letters
If you print/email letters through Owner Maintain or anywhere else on the Owner
Database Module, you will NOT have a full history of the letters like you would using
Collection Action (AR Module) for collection letters or Violation Action (CCR Module)
to print/email violation letters. Therefore, we do NOT recommend printing/emailing
these letters from the Letter button on the Owner screen.
We
’
l
ldi
s
c
us
ss
e
t
t
i
ngupl
e
t
t
e
rt
e
mpl
a
t
e
sa
ndus
i
ngFor
m Le
t
t
e
r
s
.
Click the Form Letter button to work with letter templates for this community.
You will see all the Form Letter templates that exist in this community:
Select Form Letter
133
We
’
l
lc
ove
re
a
c
hoft
hebut
t
onsont
hi
ss
c
r
e
e
n.
Maintain Letters
Click to highlight the letter, then click on the Select button or simply double click on
the letter name.
The letter template will open like this:
Form Letter Template
The sample letter above would be used as a Welcome Letter for new owners. Notice the
bracketed [ ] fields. These are mail merge codes that will insert the community and owner
i
nf
or
ma
t
i
oni
nt
ot
hel
e
t
t
e
rwhi
c
hwi
l
lma
ket
hel
e
t
t
e
r“
c
us
t
omi
z
e
d”f
ort
hi
sowne
r
. The finished
letter will look just like it was hand-typed to this owner. You just need to compose the general
134
wording insert Merge Codes where you want them, then let the Form Letter program handle
pr
i
nt
i
ng
/
e
ma
i
l
i
ngt
he“
c
us
t
om”l
e
t
t
e
rt
ot
hes
e
l
e
c
t
e
downers.
You can insert graphics, such as letterhead or pictures into Form Letters. Letters can then be
printed or emailed to owners. Printed or emailed Form Letters will update the owner
communication history automatically. You can mark Form Letters as “
Bi
l
lt
oCommuni
t
y
”
,t
he
n
print a month-end report so you can be reimbursed for postage, printing and mailing expense.
Merge Code Overview
Notice the Merge Codes button
at the top of the screen. Place the cursor where you
wish to insert a Merge Code into the Form Letter, then click the Merge Code button. The Merge
Code browser will open like this:
Locate the Merge Code you wish to insert. Use the Merge Code categories option to help you
narrow your search:
By default, ALL Merge Codes are displayed. But to make them more manageable so you can
easily find the Merge Code you want to insert into a form letter, use the down browse arrow to
open up the Merge Code Categories like this:
Select the Merge Code Category to see just those Merge Codes to select from.
The Merge Codes inserted into letter templates are bracketed abbreviations of the Merge Code
name, like this:
Owners Name
[Owner's Name]
See the explanation under Add letters below for a better understanding of how to work with Form
Letter templates and Merge Codes in more detail.
135
Click to highlight the letter, then click the Delete button.
As a safeguard, you will see this confirming message:
To delete a letter, you must click on the YES button.
Click the NO button to exit without deleting the letter.
If you wish to change the letter name displayed on the screen, simply click to highlight
the letter, then click the Rename button.
The existing letter name will be displayed. Simply type a new letter name.
Click the Save button to save the new letter name.
Click the Cancel button to exit without saving any changes.
Add Letter
To create a new letter, click the Add button.
Simply type a name for the new letter.
Click the Save button to save the letter name and proceed.
Click the Cancel button to exit without adding a new letter.
If you clicked the Save button, you will see the new letter name displayed:
136
New Letter Name
Double click the highlighted letter name or single click, then click the Select button to proceed to
the letter text entry screen.
The letter text entry screen looks like this:
Letter Text Entry
137
The Form Letter in TOPS works similar to many other word processors, particularly MS Word®.
We
’
l
lc
ove
ra
l
lt
hema
j
orf
unc
t
i
onsofFor
m Le
t
t
e
r
.
We
’
l
ls
tart with the File toolbar at the top of the Form Letter screen:
File
When you click on File, you will see this drop down menu:
Open Form Letter –click this menu choice to select an existing form letter in this
community.
Save Form Letter –click this menu choice to save changes to an open form letter.
Import Document –click this menu choice to browse your computer to open a
recognized document created in another word processor, like MS Word®. The
TOPS Form Letter program should import the document maintaining the formatting
from the original. After importing, you would probably want to insert Mail Merge
Codes to make this a template that would work for any homeowner.
Export Form Letter –click this menu choice to take a selected form letter and
export it to a file on your computer that you could use with another application, like
MS Word®.
Form Letter Manager –click this menu choice to copy existing letters from the
current community to another community or copy existing letters from another
community into the current community.
Do Not Attach Form Letters –click this menu choice to print the selected letter
f
orowne
r
s
,butNOTke
e
pac
opya
t
t
a
c
he
dt
ot
heowne
r
’
sr
e
c
or
d.
Print Form Letter –click this menu choice to print the selected letter for an owner.
You can then direct the letter printing to any recognized printer on your computer
s
y
s
t
e
m.Thi
sWI
LLa
t
t
a
c
hac
opyoft
hel
e
t
t
e
rt
ot
heowne
r
’
sr
e
c
or
d.
Print Preview –displays the letter to the screen so you can see it prior to printing it.
You can make changes to the letter prior to printing through the Preview. Tge
changes made on the screen are not saved to the owner communication history.
138
Email Form Letter –you must have activated TOPS iMail® in order to email form
letters. You cannot use your internal email, such as Outlook®, Outlook Express®
or Windows Live Mail® because the size of outgoing emails might crash your
current email server. With TOPS iMail, you have industrial strength email servers
that will distribute your outgoing emails a
c
r
os
sa
na
r
r
a
yofs
e
r
ve
r
ss
oy
oudon’
tg
e
t
blacklisted as a spammer. All owner emails sent through TOPS iMail® are saved to
the owner communication history.
If you choose to email form letters to an owner(s), you will see the default email
transmittal with the form letter attached like this:
Email Transmittal
Output Options
Notice these options at the top left area of the above screen:
Thede
f
a
ul
ti
s“
Ema
i
lOnl
y
”
.I
fy
ouwa
ntt
os
e
ndf
or
ml
e
t
t
e
r
sbye
ma
i
lb
utpr
i
nt
letters for owners who have not “
opt
e
di
n”
,t
he
nc
ha
nget
hi
st
o“
Ema
i
l&Pr
i
nt
”
.
Batch Settings
Notice this area on the screen. You can pick which owner email address to use for
sending the form letter. Choices are:
139
General Mailings
Letter & Notices
Bills & Statements
Only owners who h
a
ve“
opt
e
di
n”f
ore
ma
i
lnot
i
c
e
sf
r
om t
hec
ommuni
t
ya
ndha
ve
been check marked in their owner record for the email address selected will have
letters emailed. Otherwise, letters will be printed.
You can change the wording on the cover email if you wish, then click Process
Now button to send the emails.
Print To –click this menu choice see other options for handling the form letter
printing. These include:
Print Preview - click this menu choice to view the letters on the screen rather than
print them. Youmi
g
htdot
hi
st
o“
pr
oof
”t
hea
ppe
a
r
a
nc
ebe
f
or
ea
c
t
ua
l
l
ypr
i
nt
i
ngt
he
letters.
Print Page Example –click this menu choice to print a sample letter to check the
formatting before printing letters for a group of owners.
Page Setup –click this menu choice to select paper size, margins and other options
with the formatting of the letter. You will see this screen:
Page Setup
Similar to other word processors, you can set your form size and margins. But there
are some unique things on the above screen that you need to understand.
140
Click this option if you want to create a template that
has multiple forms on a page, like the Late Notice example shown above. You can
then use this further option to specify how many forms are on a page:
Typically, you would divide the page into 2 or 3 sections in order to have enough
room for the verbiage and the Merge Codes that customize the form for each owner.
Exit –click this menu choice to exit from the Form Letter program. As an
alternative, you can also click on the box at the top right corner of the screen to
exit from Form Letter.
Edit
When you click on Edit, you will see this drop down menu:
Undo –click this menu choice to roll back the Form Letter template to the way it
was before the last action or keystroke.
Redo –click this menu choice after clicking Undo, to restore an erased last action
or keystroke.
Cut –click this menu choice after highlighting a letter, word, sentence or paragraph
to delete the highlighted area from the form letter.
Copy –click this menu choice after highlighting a letter, word, sentence or
paragraph to copy it to another area of the form letter or to another form letter. If
you exit the Form Letter program before Pasting the copied area into a Form Letter,
you will lose what was copied.
Paste –click this menu choice to insert the copied area into the Form Letter at the
point where the cursor is positioned.
Select All –click this menu choice to highlight ALL the text in the open Form
Letter. You can then Cut or Copy this text.
Check Spelling –click this menu choice to check spelling throughout the Form
Letter. If there is a misspelling, it will be highlighted so you can correct it.
Verify Merge Codes –click this menu choice to make sure the Merge Codes in the
Form Letter are valid. You CANNOT type a Merge Code into a Form Letter, you
MUST select it using the Merge Code button
on the Form Letter screen.
Any invalid Merge Codes will be highlighted so you can delete them, then select the
correct Merge Code using the Merge Code button.
Insert
When you click Insert you will see this drop down menu:
141
Page Break –click this menu choice to insert a page break at the cursor position in
the form letter.
Merge Code –click this menu choice to insert a Merge Code at the cursor position
in the form letter. The Merge Code browser will pop-up so you can select the
Merge Code to insert.
Double click on the Merge Code you wish to insert it into the Form Letter. See Add
Form Letter below for more details on Merge Codes in Form Letters.
Image –click this menu choice to insert a picture or image at the cursor position in
the form letter. A standard Windows® browse screen will open so you can select
the picture or image.
Font Character –click this menu choice to insert a new font at the cursor position
in the form letter. The Font Character browser will pop-up so you can select the
Font Character to insert.
Double click on the Character you wish to insert it into the Form Letter.
Tables
Tables are a great way to organize data into orderly rows and columns. When you
142
click Tables you will see this drop down menu:
Insert Table –click this menu choice to insert a Table into the form letter at the
cursor position. You will see the Tables configuration:
Enter the # of Columns and the # of Rows for the table, then click the OK button.
A table will be inserted into the form letter as configured. A table is a grid of rows
and columns which looks like this:
Ea
c
h“
c
e
l
l
”i
nt
het
a
bl
ec
a
nbes
e
pa
r
a
t
e
l
yc
ont
r
ol
l
e
dwi
t
hdi
f
f
e
r
e
ntf
ont
s
,
justification and tab stops.
Row –A row is a horizontal set of cells in the table. Click this menu choice to
insert or delete a row from a table:
It will take the selected action based on the cursor position in the table.
Column - A column is a vertical set of cells in the table. Click this menu choice to
insert or delete a row from a table:
It will take the selected action based on the cursor position in the table.
Table Options –click this menu choice to further configure the size and position of
the table within the form letter:
143
Set the size of the table rows (Line Width) and the text locations from the border of
the table (Test distances). You can also set Background colors and the position of
the table within the form letter (Vertical alignment). Click the OK button to save
the settings.
Format
When you click Format you will see this drop down menu:
Alignment - click this menu choice set the alignment for a line, paragraph or the
entire form letter:
You can highlight a section of the form letter, then select the alignment from this
drop down menu.
Fixed Length Field –click this menu choice to fix the position of a Merge Code
field. Since Merge Codes can have data of varying lengths, making them a Fixed
Length Field lets you control the alignment of the Merge Code data.
For example, if you wish to itemize owner balances in a form letter using
individually Merge Codes for each balance due, you would want to make them
Fixed Length Fields so the dollars and cents line up in a column like this:
Merge Code
w/o Fixed Length
w/Fixed Length
[(FL)A1 Balance Due]
[(FL)Late Fee Due]
250.00
15.00
144
250.00
15.00
[(FL)Othr Chrg]
[(FL)TOT AMT DUE]
40.00
305.00
_40.00
305.00
Whe
ny
ouma
keaMe
r
geCodeaFi
xe
dLe
ng
t
hFi
e
l
d,i
tpl
a
c
e
sa
nd“
FL”i
nf
r
ontof
the normal Merge Code like this:
Fixed Length Fields can be used to keep either a LEFT or RIGHT alignment of
Merge Code data.
Hide Field –click this menu choice to hide a Merge Code field so that it does not
print in the form letter. If the hidden field is a dollar amount, the amount in the
hidden field will still be included in a subtotal.
Font –click this menu choice to select a Font for the form letter text:
The font you select will change based on the cursor position within the form letter
or for highlighted text. Click the OK button to complete the change.
Font Color –click this menu choice to change the color of the text for the
highlighted text:
145
The color you select will change the text based on the cursor position within the
form letter or for highlighted text. Click the OK button to complete the change.
Page Setup –click this menu choice to view/change the page settings:
Here you can set the Page Size, Margins, Form Size, and other settings.
Click this option if you want to create a template that
has multiple forms on a page, like the Late Notice example shown above. You can
then use this further option to specify how many forms are on a page:
Typically, you would divide the page into 2 or 3 sections in order to have enough
146
room for the verbiage and the Merge Codes that customize the form for each owner.
Click the OK button to save the settings.
Help
When you click Help you will see this drop down menu:
Help –click this menu choice to open detailed form letter help files to answer a
question about working with form letters. You will see all the topics related to form
letters to select from.
Unmask Toolbar Icons –this menu option is no longer used and has no effect.
Display DOS Codes –This menu option exists to help DOS TOPS customers who
have switched to TOPS® understand the Merge Codes in letters that were converted
from DOS TOPS (EZ Pro and EZ Lite). It shows the DOS TOPS equivalents of the
TOPS® Merge Codes.
Ne
xt
,we
’
l
ldi
s
c
us
st
hebut
t
ont
ool
ba
ra
ndt
hef
unc
t
i
onofe
a
c
hbut
t
on:
Open - click this button to open an existing form letter document.
Save –click this button to save the open letter document.
Print –click the button to print the form letter.
Print Preview –generates a sample letter to the screen so you can check the format.
Email –Email the form letter to the owner if TOPS iMail® has been activated. If TOPS
iMail® has not been activated, this button will be inactive.
Undo –deletes or rolls back changes made to the form letter.
Redo –reverses the Undo button one character at a time each time you click the button.
Cut –highlight a character, word, sentence or paragraph, then click the cut button to
delete it from the form letter. The cut text is save in the clipboard in case you wish to
paste it to another area of the form letter.
Copy - highlight a character, word, sentence or paragraph, then click the copy button to
save the text in the clipboard so you can paste it to another area of the form letter.
Paste –click this button to insert Cut or Copied text from the clipboard into the form
letter at the cursor position.
147
Spell Checker –click this button to check the spelling in the form letter.
Font Color –click this button to select a font color for text at the cursor position or for
highlighted text.
Fixed Length Field –click to highlight a Merge Code, then click this button to make it a
Fixed Length Field to maintain left or right alignment.
Notice this checkbox next to the button toolbar:
Checkmark this box so a Form Letter cannot be emailed, only printed and sent by
regular mail. So where you have a letter that must be sent by first class mail, such as a final
demand letter, checkmark this box so the letter will be printed, not emailed.
Working with Merge Codes
Place the cursor where you wish to insert a Merge Code into the Form
Letter, then click the Merge Code button. The Merge Code browser will
pop-up so you can select the Merge Code to insert.
The Merge Code browser will open like this:
Double click on the Merge Code you wish to insert it into the Form Letter at
the cursor position. The Merge Codes inserted into letter templates are
bracketed abbreviations of the Merge Code name, like this:
Owners Name
[Owner's Name]
Merge Code Effects
You can have Merge Codes print with the same effects as the regular letter
text. The means you can have Merge Codes print with these effects:
Font Size & Style
Bold
Italics
148
Alignment (left, center, right, justified)
We
’
l
lc
ove
rMe
r
geCode
si
nmor
ede
t
a
i
lbe
l
ow.
Merge Code Categories
Notice the heading bar at the top of the Merge Codes:
By default, ALL Merge Codes are displayed. But to make them more manageable so you can
easily find the Merge Code you want to insert into a form letter, use the down browse arrow to
open up the Merge Code Categories like this:
Select the Merge Code Category to see just those Merge Codes to select from.
The letter example below shows the Merge Codes for CCR Data. Notice how they are inserted
into the Form Letter. This is a Violation Letter that will print a detailed description of the CCR
Violation and the action the owner needs to take to resolve the violation.
Merge Codes Inserted into Letters
149
Here is another sample CCR Letter showing a number of Merge Codes inserted:
Sample CCR Letter
Merge Codes are always shown with brackets around the field, like this:
[CCR Detailed Description]
150
Collection Letter Template
151
Collection Letter--Printed
We
’
l
ll
i
s
ta
l
lt
heMe
r
g
eCode
sbyc
a
t
e
g
or
ys
t
a
r
t
i
ngont
hene
xtpage.
152
Available Merge Codes
Management Company Info
These Merge Codes pull information from the Management Company File:
Management Company Info
Description
Merge code
Sample
Management Co. Name
[Management Co. Name]
Management Company Inc.
Management Co. Contact
[Management Co. Contact]
President
Management Co. Complete
Address
[Management Co. Complete
Address]
12001 N 102 Street
Suite 100
Phoenix, AZ 85003
Management Co. Address Line 1
[Management Co. Address Line 1]
12001 N 102 Street
Management Co. Address Line 2
[Management Co. Address Line 2]
Suite 100
Management Co. City
[Management Co. City]
Phoenix
Management Co. State
[Management Co. State]
AZ
Management Co. Zip
[Management Co. Zip]
85003
Management Co. Phone 1
[Management Co. Phone 1]
602-999-8888
Management Co. Phone 2
[Management Co. Phone 2]
602-555-4444
Management Co. Fax 1
[Management Co. Fax 1]
602-777-8888
Management Co Fax 2
[Management Co. Fax 2]
602-999-8881
Management Co. Email 1
[Management Co. Email 1]
[email protected]
om
Management Co. Email 2
[Management Co. Email 2]
[email protected]
om
153
nd
nd
Community Fact Sheet
These Merge Codes pull information from the Community Fact Sheet file:
Community Fact Sheet
Description
Merge code
Sample
Property Manager Name
[Property Manager Name]
Joe Manager
Property Manager Signature
[Property Manager Signature]
Property Manager Email
[Property Manager Email]
jmanager@communitymanagement
.com
Property Manager Home #
[Property Manager Home #]
602-897-8887
Monthly Meeting Date
[Monthly Meeting Date]
1 Tuesday of each month
Common Area Responsibility
[Common Area Responsibility]
Common area grass maintenance,
parking lot lights, snow removal,
Tot Lot, Pool
What Association Fees Cover
[What Association Fees Cover]
Common Area Maintenance, Street
Repair
Nearest cross Street/Intersection
[Nearest Cross
Street/Intersection]
Happy Valley Rd and Jomax
Directions to Community
[Directions To Community]
From I-17 take first right
Late Payment Policy
[Late Payment Policy]
Payments received after the 15
are subject to a 10% Late Fee.
Screening/Orientation Policy
[Screening/Orientation Policy]
Prospective purchasers must meet
with the Board of Directors prior to
settlement for a community
orientation.
Architectural Approval Policy
[Architectural Approval Policy]
45 days or disapproved
154
st
th
Leasing Policy
[Leasing Policy]
Copies of the lease must be sent to
the management office. The lease
must state that renters are subject
to all community Rules &
Regulations.
Violation Policy
[Violation Policy]
The community has the right to
enforce architectural violations and
violations of the Rules &
Regulations. Fines are levied for
non-compliance to the community
Rules & Regulations.
155
Community Info
These Merge Codes pull information from the Community File and Owner Control File:
Community File
Description
Merge code
Sample
Community Name
[Community Name]
Circle Community Ranch
Community Address Line 1
[Community Address Line 1]
P.O. Box 777
Community Address Line 2
[Community Address Line 2]
optional second line of address
Community Address Line 3
[Community Address Line 3]
Phoenix, AZ 85302
Community Phone Number
[Comm Phone #]
602-999-8888
The following Merge Codes pull info from the Owner Control File:
Owner Control File
156
Lockbox Community Name
[Lockbox Community Name]
Sample Condominium
Lockbox Address 1
[Lockbox Address 1]
c/o First State Bank
Lockbox Address 2
[Lockbox Address 2]
Bank address 2
Lockbox CSZ
[Lockbox CSZ]
Rockville MD 20888-1212
Other Community Name
[Other Community Name]
Sample Condominium (from
Owner Control File)
Other Address 1
[Other Address 1]
20010 Diamond Drive (from
Owner Control File)
Other Address 2
[Other Address 2]
Will be skipped in the form letter
if blank.
Other CSZ
[Other CSZ]
Rockville MD 20888 -1212
(from Owner Control File)
Community Web Site
[Community Web Site]
Address for community website
157
Owner Info
These Merge Codes pull information from the Property & Owner data:
Owner Info
Description
Merge code
Sample
Owner Name/Mailing Address
[Owner Name\Mailing Address]
Sally Smith
123 Happy Valley Road
Happy Valley, AZ 85302
Owner's Name
[Owner's Name]
Sally Smith
2nd Owner's Name
[2nd Owner's Name]
display name 2 if used
Owner Mailing Address Line 1
[Mailing Address Line 1]
123 Happy Valley Road
Owner Mailing Address Line 2
[Mailing Address Line 2]
Will be skipped if field not used in
owner address
Owner Mailing City-State-Zip
[Mailing City-State-Zip]
Happy Valle, AZ 85302
Home Phone #
[Ownr Home Ph]
602-111-1111
Owner Work Phone #
[Ownr Work Ph]
602-222-2222
Alt. Phone #
[Alt. Phone #]
602-333-3333
158
Owner
’
sLastPay
mentDat
e
[Pay Date]
04/05/07
Percent of Ownership
[Owner Percent]
.0147
Property Assessed Value
[Prop. Assessed Value]
$265,000
Property Street Address
[Prop. Street Address]
123 Happy Valley Road
Property City-State-Zip
[Property City-State-Zip]
Happy Valle, AZ 85302
Property Account #
[Prop Acct #]
1001
Property Lot #
[Prop Lot #]
001
Building\Section\Phase #
[SEC#}
5
Legal Description 1
[Legal Description 1]
Plat Book 7, Section 8, Lot 001
Legal Description 2
[Legal Description 2]
Optional
Property GL Cost Center
[GLC]
200
Website User Name
[Web User Name]
Assigned when using websites
Website Password
[Web Password]
Assigned when using websites
Owner Email Address
[Owner Email]
Owner Email
159
Owner Itemized Balances
These Merge Codes calculate owner balance breakdowns from the payment history files:
Owner Balances
Description
Merge code
Itemized Balances - Not Including Prepaid
[Itemized Balances-Not Including Prepaid]
Itemized Balances - Including Prepaid
[Itemized Balances-Including Prepaid]
160
Charge Tables
These Merge Codes pull information from the Charge Tables:
Charge Tables
Description
Merge code
Sample
A1 Balance Due
[A1 Balance Due]
Accumulated total for owner A1
charge
A1 Charge Table Name
[A1 Charge Name]
Maintenance Fee
A1 Charge Description
[A1 Charge DESC]
Duplex
A1 Charge Table Amount
[A1 Charge AMT]
60.00
A1 Late Fee Charge
[Lat Fee AMT]
5.00
C1 Balance Due
[C1 Balance Due]
C1 Charge Table Name
[C1 Charge Name]
C1 Charge Description
[C1 Charge DESC]
C1 Charge Table Amount
[C1 Charge Amt]
C1 Late Fee Charge
[C1 Late Fee Amt]
161
C2 Balance Due
[C2 Balance Due]
C2 Charge Table Name
[C2 Charge Name]
C2 Charge Description
[C2 Charge DESC]
C2 Charge Table Amount
[C2 Charge Amt]
C2 Late Fee Charge
[C2 Late Fee Amt]
C3 Balance Due
[C3 Balance Due]
C3 Charge Table Name
[C3 Charge Name]
C3 Charge Description
[C3 Charge DESC]
C3 Charge Table Amount
[C3 Charge Amt]
C3 Late Fee Charge
[C3 Late Fee Amt]
C4 Balance Due
[C4 Balance Due]
C4 Charge Table Name
[C4 Charge Name]
C4 Charge Description
[C4 Charge DESC]
C4 Charge Table Amount
[C4 Charge Amt]
C4 Late Fee Charge
[C4 Late Fee Amt]
C5 Balance Due
[C5 Balance Due]
C5 Charge Table Name
[C5 Charge Name]
C5 Charge Description
[C5 Charge DESC]
C5 Charge Table Amount
[C5 Charge Amt]
C5 Late Fee Charge
[C5 Late Fee Amt]
C6 Balance Due
[C6 Balance Due]
C6 Charge Table Name
[C6 Charge Name]
C6 Charge Description
[C6 Charge DESC]
C6 Charge Table Amount
[C6 Charge Amt]
C6 Late Fee Charge
[C6 Late Fee Amt]
C7 Balance Due
[C7 Balance Due]
C7 Charge Table Name
[C7 Charge Name]
C7 Charge Description
[C7 Charge DESC]
C7 Charge Table Amount
[C7 Charge Amt]
C7 Late Fee Charge
[C7 Late Fee Amt]
C8 Balance Due
[C8 Balance Due]
162
C8 Charge Table Name
[C8 Charge Name]
C8 Charge Description
[C8 Charge DESC]
C8 Charge Table Amount
[C8 Charge Amt]
C8 Late Fee Charge
[C8 Late Fee Amt]
C9 Balance Due
[C9 Balance Due]
C9 Charge Table Name
[C9 Charge Name]
C9 Charge Description
[C9 Charge DESC]
C9 Charge Table Amount
[C9 Charge Amt]
C9 Late Fee Charge
[C9 Late Fee Amt]
163
Other Charges
These Merge Codes pull information from the Misc. Charges Table:
Misc. Charges Table
Description
Merge code
Sample
Late Fees
[Misc Chg. (01)]
Balance Due
NSF charges
[Misc Chg. (02)]
Balance Due
Admin Fee
[Misc Chg. (03)]
Balance Due
Interest
[Misc Chg. (04)]
Balance Due
Attorney Fees
[Misc Chg. (05)]
Balance Due
Work Order
[Misc Chg. (06)]
Balance Due
Misc. Charges
[Misc Chg. (07)]
Balance Due
Special Assmts
[Misc Chg. (08)]
Balance Due
User Defined 9
[Misc Chg. (09)]
Balance Due
User Defined 10
[Misc Chg. (10)]
Balance Due
User Defined 11
[Misc Chg. (11)]
Balance Due
User Defined 12
[Misc Chg. (12)]
Balance Due
164
User Defined 13
[Misc Chg. (13)]
Balance Due
User Defined 14
[Misc Chg. (14)]
Balance Due
User Defined 15
[Misc Chg. (15)]
Balance Due
User Defined 16
[Misc Chg. (16)]
Balance Due
User Defined 17
[Misc Chg. (17)]
Balance Due
User Defined 18
[Misc Chg. (18)]
Balance Due
User Defined 19
[Misc Chg. (19)]
Balance Due
User Defined 20
[Misc Chg. (20)]
Balance Due
Continues the above pattern through User Defined Misc. Charge Code 50.
165
Subtotals
These Merge Codes give subtotals after listing owner itemized balances with the owner balance
merge codes shown above:
Form Letter Subtotals
Description
Merge code
Explanation
A1 Balance Due - simple
[A1 Due]
Late Fee Due - simple
[Late Fee Due]
These codes are designed to be
used together for a simple owner
balance breakdown
Total Other Charges Due –
simple (this code calculates the
[Other Chg.]
difference between the TOTAL AMOUNT
DUE and the A1 & Late Fee balances)
TOTAL AMOUNT DUE
[TOT AMT DUE]
TOTAL AMT DUE –Itemized
Balances
[TOTAL ITEMIZED]
Inserts a complete breakdown of
the owner balances with a total
OTHER CHARGES –Plug
Difference
[OTHER CHGS]
1st subtotal of +'s
[1st SubTot +]
Used with the Subtotals below to
make sure the Merge Codes
itemizing owner balances added to
the TOTAL OF SUBTOTALS below.
2nd subtotal of +'s
[2nd SubTot +]
3rd subtotal of +'s
[3rd SubTot +]
4th subtotal of +'s
[4th SubTot +]
5th subtotal of +'s
[5th SubTot +]
6th subtotal of +'s
[6th SubTot +]
166
Example –
[A1 Balance Due]+
[C1 Balance Due]+
[C3 Balance Due]+
[Misc Chg. (01)]+
[Misc Chg. (04)]+
60.00
25.00
30.00
6.00
3.85
7th subtotal of +'s
[7th SubTot +]
8th subtotal of +'s
[8th SubTot +]
TOTAL OF SUBTOTALS
[TOT ALL SUB]
167
[Misc Chg. (05)]+
[OTHER CHGS]
[TOT ALL SUB]
125.00
13.00
259.85
Tot
al
sal
lt
he+’
soral
lt
heSubt
ot
al
levels 1 –8.
CCR Data
These Merge Codes pull information from the CCR Codes and owner CCR Records:
CCR Codes
CCR Records
Description
Merge code
CCR Creation Date
[CCR Creation Date]
168
Explanation
CCR Request Date
[CCR Request Date]
CCR Close Date
[CCR Close Date]
CCR Approval Type
[CCR Approval Type]
CCR Summary Description
[CCR Summary Description]
CCR Detailed Description
[CCR Detailed Description]
CCR Status
[CCR Status]
CCR Owner Resolution Action
[CCR Owner Resolution Action]
CCR Reason For Rejection
[CCR Reason For Rejection]
CCR Next Inspection Date
[CCR Next Insp. Date]
CCR Last Inspection Date
[CCR Last Insp. Date]
CCR Photo Image
[CCR Record's Image]
CCR Current Action Date
[CCR Current Action Date]
CCR Current Action Description
[CCR Current Action
Description]
CCR Last Action Date
[CCR Last Action Date]
CCR Last Action Description
[CCR Last Action Description]
CCR Violation Fee
[CCR Violation Fee]
CCR Code and Description
[CCR Code and Description]
CCR Article Cited
[CCR Article Cited]
CCR # Days Level 1
[CCR # Days Lvl1]
CCR # Days Level 2
[CCR # Days Lvl2]
CCR # Days Level 3
[CCR # Days Lvl3]
CCR # Days Level 4
[CCR # Days Lvl4]
CCR # Days Level 5
[CCR # Days Lvl5]
CCR # Days Level 6
[CCR # Days Lvl6]
CCR # Days Level 7
[CCR # Days Lvl7]
CCR # Days Level 8
[CCR # Days Lvl8]
CCR # Days Level 9
[CCR # Days Lvl9]
CCR # Days Level 10
[CCR # Days Lvl10]
Outstanding CCR Violations ALL Open List all open violations
[Outstanding CCR Violations ALL]
169
Misc. Fields
These Merge Codes let you format dates in Form Letters:
Misc. Merge Codes
Description
Merge code
Sample
Date (Full)
[Date (Full)]
May 15,2009
Date (MM/DD/YY)
[Date (MM/DD/YYYY)]
05/15/09
Date (MM/DD/YYYY)
[Date (MM/DD/YY)]
05/15/2009
Day (Full)
[Day (Full)]
Friday
Month (Full)
[Month (Full)]
May
Day (Number)
[Day (Number)]
15
Month (Number)
[Month (Number)]
05
Year
[Year]
2009
The ends the manual section on Form Letters
170
Officers
Officers include the Board of Directors and may, at your option, also include
Committees. In addition to storing the of
f
i
c
e
r
’
sna
me
,a
ddr
e
s
sa
ndphonenumbe
r
information, their position and term of office can also be tracked. Reports and mailing
labels may be printed for the officers.
The Officer tracking system uses Officer Classifications to let you categorize the
Officers. A Classification is nothing more than a grouping you name, and then add the
Officers or Committee Members into for tracking purposes. It gives you a way to
organize the Officers and Committee Members.
Use the Maintain Officers screen to perform the following options:
View or change officer information
Define officer classifications
Add a new officers
Delete an officer classification
Delete an officer
Click the Officers tab on the Owner Database menu.
View/Change Officers
To maintain existing Officer records, first select the Officer Classification.
Select Officer Class
Double Click on the Officer Class to open it up.
You will see the Officer selection screen:
Select Officer Record
171
Notice the down browse arrow
class.
. Click on this arrow to select from the Officers in this
You will see the Select Officer screen:
Select Officer
Double click to select an Officer or highlight them with a single click, then click OK.
The Officer record you selected will be displayed:
Officer Record
172
You can change any of the information on the Officers screen. However, if you change it
here, it will NOT write the changes back to the Owner record if the Officer is a
homeowner.
The following is a brief description of the fields on the Officers screen.
Use the browse arrows to move from Officer record to Officer
record within this Class.
Click the Add button to add an Officer record to the selected
Officer Class you are currently in.
Click the Delete button to delete the Officer record displayed on the
screen. It will have no effect unless you have selected an Officer
record.
Click the Print Reports button to print an Officers report. You do
not need to select an Officer record to print a report.
Click the Print Labels button to print mailing labels for Officers.
You do not need to select an Officer record to print labels.
Officer #
Assigned automatically be the program as you add new officer
records. You cannot change the Officer #.
Used to select a homeowner when adding a new officer record.
173
Officer Name
The full name of the Officer.
Sort Name
The Last Name of the Officer. It can be used to select the Officer.
Property Address
The Address of the home owned by the Officer if they are a
homeowner. If not a homeowner, you may skip this field.
Mailing Address
The address for mailing notices and correspondence to this Officer.
Enter the Address along with the City, State and Zip Code.
Contact Info
Ent
e
rt
heph
o
ne#’
sa
nde
-mail address for this Officer.
Title
The Officers Title, if any, for the position held.
Term Expiration
The Month and Year the Officers Term Expires, if known. If
entered, it gives you a way to track the expiration of Officers terms.
The Term Expiration prints on the Officers Report.
Click Email to open an e-mail, and then send it to the Officer on
the screen. It will use your default e-mail service to send the email.
Click OK to save and changes and exit this Officer record.
Click Cancel to erase any changes made to this Officer record and
exit.
Click Close to exit from the Officers.
174
Define Officer Classification
Of
f
i
c
e
r“
Cl
a
s
s
e
s
”g
i
ve
sy
ouawa
yt
oor
ga
ni
z
et
heof
f
i
c
e
r
si
nt
oc
a
t
e
g
or
i
e
s
,s
uc
ha
s
,Boa
r
d
Members and Committees. You must define the Officer classes before you can add an
Officer record into them.
Define Officer Classification
You will see the Officer Class selection screen. If this is the first time you are opening
the Officers file, you must define the Officer Classes.
Officer Classes
Notice the Setup button at the bottom of the screen.
Click the Setup button to define the first Officer Classification.
You will see the Officer Setup screen:
Define Officer Classes
The cursor will be positioned in the first Class field highlighted in blue. Type the name
of the firs
tCl
a
s
s
i
f
i
c
a
t
i
onofOf
f
i
c
e
r
sy
ouwi
s
ht
ot
r
a
c
k,s
uc
ha
s“
Boa
r
dofDi
r
e
c
t
or
s
”
.
175
The first class name will look like this:
Define Officer Classes
To move to the next line to continue Defining Officer Classes, press the Tab key.
The cursor will move to the next line ready for the next Class:
Define Officer Classes
Define the next Class, if desired, or stop and exit.
176
In our example, we defined two classifications:
Define Officer Classes
Once you are done defining the Officer Classes, Click the OK button.
Click the OK button to save the Officer Classifications you defined.
Click the Cancel button to exit the Officer Classifications without saving any
categories you defined.
Click the Delete button to delete an Officer Classifications you defined. If you
entered Officers into this Class, they will be deleted as well.
Once Officer Classes are defined, you are ready to add Officer records into them.
177
Add New Officer
Once you have defined the Officer Classifications, you are ready to enter the Officers
information into them.
Follow these steps to Add a New Officer:
Start at the Select Class screen:
Select Officer Class
To add a new officer into a class, simply double click on the name of the class.
You will see a blank screen for adding an Officer:
Add Officer Record
You must click the Add button in order to add a new Officer Record.
Click the Add button to add a new Officer record.
178
You will see a blank screen for adding an Officer:
Add Officer Record
Notice the Browse Owners button. If the Officer is a homeowner in the community,
click this button to select the owner rather than type in the name and address.
You will see the Owner Selector so you can select the Officer from the owner database.
Owner Selector
You can select the owner by:
Street Address
Account #
Lot/Unit #
Owner Last Name
Property Record #
Go ahead and select the Officer from the owner database.
179
If you selected the Officer from the owner database, it will complete all the fields with
information from the owner re
c
or
de
xc
e
ptf
or“
Ti
t
l
e
”a
nd“
Te
r
mExpi
r
e
d”
.Youmus
t
enter this information manually. A completed owner record will look like this:
Add Officer Record
Make corrections if needed. Click OK to save the Officer info.
Click OK to save the Officer record. You can then add another Officer using
the same method.
Click Cancel to clear the screen without saving the Officer record.
Click Close to exit from the Officer record screen.
180
Deleting an Officer
Deleting an Officer record permanently removes that record. You might need to do this
if the person is no longer an Officer. If the Officer is also a homeowner, deleting their
Officers record will have no effect on their homeowner record.
Follow these steps to Delete an Officer:
First, you must select the Officer Classifications. Start at the Select Class screen:
Select Officer Class
Simply double click on the name of the class to select that class.
You will see a blank Officer screen:
Blank Officer Record
You must browse the Officers in the class to select the one to delete. To do this, click the
down browse
arrow. It will open up the Officer selection screen.
181
You will see the Select Officer screen:
Select Officer Record
Double click on the Officer you wish to delete or single click to highlight the Officer, and
then click the OK button.
The Officer record you selected will be displayed.
Officer Record
Notice the Delete button at the top of the screen. Click this button to delete the Officer
record displayed on the screen.
182
As a safeguard, you will see this confirming message displayed on the screen:
The default answer is NO to prevent you from accidentally deleting the Officer record.
You must click the YES button to proceed with deleting the Officer record.
This completes the instructions for deleting an Officer record.
183
Deleting an Officer Class
You might want to delete and Officer Class to re-organize the Officer types you are
tracking. For example, you may decide you no longer wish to keep track of Committee
members. When you delete an Officer Class, then all officer records that are in that
category are also deleted. You do NOT need to delete each Officer record from a Class
before deleting the Class itself.
If you just wish to rename the category, simply type a new description of the category
rather than delete it. You can change the description of the Officer Class by just typing
over it on the Setup Officer Class screen.
To Delete an Officer Class, first start at the Select Class screen:
Select Officer Class
Notice the Setup button at the bottom of this screen. Click on the Setup button.
You will see the Officer Class setup screen:
Officer Class Setup
Click on the Officer Class you wish to delete to highlight it. Then click on the Delete
button to proceed with deleting this class.
184
As a safeguard, you will see this confirming message displayed on the screen:
The default answer is NO to prevent you from accidentally deleting the Officer Class.
You must click the YES button to proceed with deleting the Officer Class.
This completes the instructions for Deleting an Officer Class.
185
Officer Reports
You can print an Officer Report showing the name, address, contact info, title and term
expiration for the Officers. This can be handy for having a contact sheet for the officers.
It also gives a report showing the term expiration when there are staggered elections of
Officers.
Topr
i
nta
nOf
f
i
c
e
rRe
por
t
,y
oumu
s
ts
e
l
e
c
ta
nOf
f
i
c
e
rCl
a
s
s
i
f
i
c
a
t
i
on.I
tdoe
s
n’
tma
t
t
e
r
which Class you select, you will have the option to include all Classes on the report later.
Start at the Select Officer Class, then select ANY Class:
Select Officer Class
Simply double click on the name of the class to select that class.
You will see a blank Officer screen:
Blank Officer Record
Notice the Print Reports button. Click the Print Reports button.
You will see a screen for selecting which Officer Classes to include on the Report:
186
Select Officer Classes
Report Date –this will be used in the heading of the report so you know when the report
wa
spr
i
n
t
e
d“
a
sof
”
.I
twi
l
lde
f
a
ul
tt
ot
oda
y
’
sda
t
e
,buty
ouc
a
nove
r
t
y
pei
twi
t
ha
nyda
t
e
you wish.
All the Officer Classes will be selected with a checkmark . You must click to turn-off
the checkmarks for Officer Classes where y
oudon’
twi
s
ht
oi
nc
l
udeont
heRe
por
t
.
Click the Print button to proceed with printing the Officers Report.
Click the Select All button to select all Officer Classes.
Click the Clear All button to clear the selection of all Officer Classes.
Click the Cancel button to exit from printing the Officers Report.
187
Last, you can select to print the Officers Report to a printer, display it to the screen, or
create a File to store it.
Output Type
Normally with the Officers Report, you would want to print it, so you would probably
want the default selection of Printer.
Click the Print button to proceed with printing the Report. You will then see
the normal Windows® printer selection screen so you can direct the print job
wherever you wish.
Click the Cancel button to exit from printing the Officers Report.
This completes the instructions for printing and Officers Report.
188
Officer Mailing Labels
You can print mailing labels for Officers to assist when mailing things to the Officers,
such as reports and financial statements. Labels can be printed on many popular Avery
labels types. Further, you have the option to create an Officer export file that could be
used with another software application.
Global Officer Mailing Labels can also be printed on the Global Functions menu. This
allows for printing Officer Mailing Labels for more than one community at a time. See
the Global Function manual sections for instructions on printing Officer Labels for more
than one community.
To print Mailing Labe
l
s
,y
oumus
tf
i
r
s
ts
e
l
e
c
ta
nOf
f
i
c
e
rCl
a
s
s
i
f
i
c
a
t
i
on.I
tdoe
s
n’
tma
t
t
e
r
which Class you select, you will have the option to print Mailing Labels for all Classes
later. Start at the Select Officer Class, then select ANY Class:
Select Officer Class
Simply double click on the name of the class to select that class.
You will see a blank Officer screen:
Blank Officer Record
189
Notice the Print Labels button. Click the Print Labels button.
You will see a screen for selecting which Officer Classes to print Mailing Labels for:
Select Officer Classes
All the Officer Classes will be selected with a checkmark . You must click to turn-off
t
hec
he
c
kma
r
ksf
orOf
f
i
c
e
rCl
a
s
s
e
swhe
r
ey
oudon’
twi
s
ht
oha
veMa
i
l
i
ngLa
be
l
spr
i
nt
e
d.
Click the Print button to proceed with printing Mailing Labels.
Click the Select All button to select all Officer Classes.
Click the Clear All button to clear the selection of all Officer Classes.
Click the Cancel button to exit from printing Mailing Labels.
190
When the Print button is clicked, you will then see the screen for selecting the Mailing
Label Type:
Select Label Type
Select the Label Type you wish. You also have the option to create an Export File which
can be used with another application.
Click the Print button to proceed with printing Mailing Labels.
Click the Cancel button to exit from printing Mailing Labels.
Last, you can either print Mailing Labels to a printer or display them to the screen.
Output Type
Normally with Mailing Labels, you would want to print them, so you would probably
always want the default selection of Printer.
Click the Print button to proceed with printing Mailing Labels. You will
then see the normal Windows® printer selection screen so you can direct the
print job wherever you wish.
Click the Cancel button to exit from printing Mailing Labels.
This completes the instructions for printing Officer Mailing Labels.
191
Group Owners
Group Owners can be used where an owner owns more than one home within a
community and you wish to maintain the contact information in only one place for all the
homes in the group. If you change any of the information on file for a Group Owner, the
changes will be reflected for every home owned by the Group Owner in this community.
With group owners, you may also print consolidated mailing labels, bills and statements
rather than get a separate one printed for each home. This can be a handy way to work
with groups of homes owned by the same party—like a builder.
Group Owners can be maintained through the menu tab of the same name on the Owner
Database Menu. From there, you can add, change or delete Group Owners. You can also
add a new Group on-the-fly from the Property Info screen for a home that is part of a
group.
Add Group Owners
To maintain Group Owners, click this menu tab on the Owner
Database menu.
You will see the Group Owner screen:
Group Owners
We
’
l
lc
ove
re
a
c
hoft
hei
t
e
msont
h
i
ss
c
r
e
e
n.
Click the down browse arrow to see all the existing Groups in this
community. This is how you select a Group Owner to
view/maintain the information on file.
Click the Add button to create a new Group. Then complete the
fields on the screen.
192
Group Owner Data Fields
Owner Group #
Automatically assigned by the software when a new Group is added.
Sort Name
The Last Name or Keyword Name to use for this owner. It is used
when doing owner lookups and for sorting reports alphabetically by
name. It is a required field.
Owner Name
The full Owner name, first and last, in the format you wish to use for
addressing mailing labels, letters, bills/statements and coupons to
this owner. It is a required field.
Address 1
The first line of the mailing address for the Group Owner. It is a
required field.
Foreign Address
Checkmark this box to change the formatting of the mailing address
to accommodate a foreign address.
Address 2
The second line of the mailing address for the Group Owner, if
needed. It may be left blank.
City
The City part of the mailing address for this Group Owner. It is a
required field.
State
The State part of the mailing address for this Group Owner. It is a
required field.
Zip Code
Zip Code can handle Zip + Four + Carrier Route. The 5 digit Zip
Code is required.
Home Phone
The home phone of the Group Owner. It may be left blank.
Work Phone
The work phone of the Group Owner. It may be left blank.
Delinq. Notice
Check mark Delinquency Notice if this Group Owner is to receive
delinquency correspondence about the homes in the Group when
Collection Action is taken.
Mailing Label
Check mark if this Group Owner is to receive mailings from the
community when Mailing Labels are printed.
A completed Group Owner will look like this:
Group Owner
193
The next step is to select the homes that are part of this Group.
Click the Add Home button.
You will then see the Owner Selector:
Owner Selector
You are ready to select the homes to include in the Group using either Account #,
Lot/Unit #, Street Address or Owner Last Name.
Go ahead and select the homes for this Group.
Here is a new Group with some homes in it:
Group Owner - Completed
194
Click OK to exit.
Screen Navigation
Use the Arrow buttons to move from group to group within the
community staying on the Group Owner - Maintain screen or jump to
the LAST/FIRST Group. The arrow navigation can be handy when
you want to review/change Groups.
The OK button saves any changes to Group Owner. The screen will
clear and you will be on a blank Group Owner screen.
The Cancel button scratches any changes made to the Group Owner
showing on the screen.
The Delete button will permanently erase the Group Owner displayed
on the screen.
The Close button will exit you back to the Owner Database Menu.
195
Delete Owner Group
When you delete a Group Owner, it removes the link between the Group and the homes
in the Group. This does not delete the homes from the community; it merely removes the
master Group Owner record that links all the homes in the Group together. After deleting
a Group, you can no longer maintain the owner information for the homes in the Group
through Group Owners; you must then maintain the owner information for each home
individually.
Make sure you want to delete the Group Owner before you proceed.
To maintain Group Owners, click this menu tab on the Owner
Database menu.
You will see the Group Owner screen:
Group Owners
You can now select the Group Owner to delete.
Click the down browse arrow to see the existing Groups in this
community. Select the Group Owner by double clicking on it.
196
You will see the selected Group Owner record:
Group Owner
Be sure you wish to Delete this Group record before proceeding. Notice the Delete button
at the bottom of the Group Owner screen.
Click the Delete button to permanently delete the selected Group.
As a final safeguard, you will see this warning:
Warning
Click Yes to delete the Group. Click No to exit without deleting the Group.
197
Delete Homes from Owner Group
You can delete a home from a Group whenever you wish. This does not delete the home
from the community; rather, it just removes the link between the home and the Group
Owner. From the point you delete the home from the Group, you will need to maintain
the owner information individually for this home—it will not be updated for any changes
to the master Group Owner record.
Make sure you want to delete the Group Owner before you proceed.
To Delete a home from a Group, click this menu tab on the Owner
Database menu.
You will see the Group Owner screen:
Group Owners
Now select the Group Owner to delete.
Click the down browse arrow to see all the existing Groups in this
community. Select the Group Owner by double clicking on it.
Group Homes
198
You will see the homes in the Group displayed in the box at the bottom of the screen.
Click on the home to highlight the home to Delete from the Group:
Make sure the home to be Deleted from the Group is highlighted before proceeding.
Click the Delete Home button to delete this home from the Group.
As soon as you click the Delete Home button, the highlighted
home will be removed from this Group.
199
Mortgage Company
TOPS can track the Mortgage Companies that go with the homeowners. This can be
ha
ndywhe
r
ey
ouha
vet
her
e
qui
r
e
me
nti
nac
ommuni
t
y
’
sl
e
g
a
ldoc
ume
nt
st
onot
i
f
yt
he
Mortgage Companies when there are certain pending community actions, like amending
the Declaration or Bylaws.
Before you can link Mortgage Companies to homeowners, you must first add the
Mortgage Companies into the community. To do this, go to the Owner Database module,
then click the Mortgage Company tab on the Owner Database menu.
Click the Mortgage Company tab on the Owner Database menu.
You will see a blank Mortgage Company maintain screen like this:
Mortgage Company
From here, you can add a new mortgage company of use the down browse arrow
select an existing mortgage company.
to
Click the Add button to enter a new Mortgage Company. Then
complete the following fields:
Data Fields
Mortgage
Company #
The system will assign this # for you automatically. It is how it keeps
track of each Mortgage Company. There is nothing you need to do.
Mortgage
Company Name
Enter the Mortgage Company Name on this line.
Department
Enter a Department na
me
,l
i
ke“
Mor
t
g
a
g
eDe
pt
.
”
,i
fa
ny
.Youmay
leave this blank if not needed.
Attention
Youma
ye
nt
e
rape
r
s
on’
sna
mewhor
e
c
e
i
ve
sa
nynot
i
c
e
sf
r
om t
he
community, if any. You may leave this blank if not needed.
Address
The Street Address of the Mortgage Company.
200
City/State/Zip
The City, State and Zip Code (+ Four) for the Mortgage Company.
A complete Mortgage Company screen looks like this:
Add Mortgage Company
Accepts any changes made to the Mortgage Company displayed on the
screen and saves it.
Use the Browse Arrows to move from Mortgage Company to Mortgage
Company.
Print a Mortgage Company report showing all the Mortgage Companies
on file for this community.
Click Cancel to clear the screen and not save any changes made.
Click Delete to permanently erase the currently selected Mortgage
Company.
Click Close to exit back to this Owner Database menu.
See the section to Assign Mortgage Company for details on linking a Mortgage
Company to a homeowner.
201
Assign Mortgage Company
Link a Mortgage Company to an Owner so that you know the Mortgage Companies for
e
a
c
hhome
.Thi
sc
a
nbei
mpor
t
a
n
ti
ft
hec
ommuni
t
y
’
sl
e
ga
ldoc
ume
nt
sr
e
qui
r
enot
i
f
y
i
ng
the Mortgage Company if the Owner is delinquent or if the community is proposing to
amend its legal documents.
Once you assign a Mortgage Company to an owner, you can then print an Owners Report
which shows the Mortgage Company for each home.
Select Maintain from the Owner Database menu.
To assign a Mortgage Company to an Owner, start at Maintain Owner, then select the
home:
Maintain Owners
Notice the Mortgage Company area of the Maintain Owners screen. Click the down
browse
to open up a listing of the Mortgage Companies in this community.
It will open up the Mortgage Company Browse:
Browse Mortgage Companies
202
Double click to select the Mortgage Company to link with this home, or, single click to
highlight the Mortgage Company, and then click the OK button.
Once you select the Mortgage Company for the home, you will see it displayed on the
Maintain Owner screen.
Maintain Owner
Click the OK button to save the changes to the Owner and exit.
203
Pool Pass
Pool Pass is an optional module. It is located on the Owner Database menu because it
relates to the owners. The Pool Pass program allows you to maintain owner
memberships via a membership database, and ID generation with embedded digital
pictures. Use the Pool Pass module to manage membership data for facilities, such as:
Swimming Pools
Tennis Courts
Golf Courses
Fitness Facilities
You can print passes with member pictures, print member lists, track ages of children,
and identify delinquent owners who might not be eligible to use the recreation facilities.
If you purchased this optional module, it will be active and you will be able to use it. If
you click on this menu tab and nothing happens, it means you do NOT own the Pool Pass
add-on. You would need to contact the TOPS Sales Dept at 800-760-9966 to purchase
this module.
204
Owner Control Info
The Owner Control Info contains default information about the community and owners
along with options for handling different things in the owner database. Normally, it is
setup using the community setup wizard on the Setup menu. But you can go back and
make changes to the Owner Control Info at any time.
The Owner Control Info stores such things as the default City, State and Zip Code for the
homes in the community—that way, you do not need to enter the City, State and Zip
Code for every home in the community. It also stores return mail addresses used when
sending bills and coupons to owners. Other important defaults are also stored in this file.
To access the Owner Control screen click the Control Info tab on the Owner Database
menu.
Select Control Info from the Owner Database menu.
You will see the Owner Control Info window:
Owner Control Info
We
’
l
ldi
s
c
us
se
a
c
hi
t
e
m ont
hi
ss
c
r
e
e
ns
oy
ouknowhowi
ti
sus
e
d.
Data Fields
Return Payment
Info
The general mailing address for owners to send payments. It is
used when printing Bills, Statements, Coupons and Mail Merge
Codes in Form Letters. There is a separate address for entering
a bank lockbox mailing address if needed in addition to this
general payment address.
You will enter the following information:
205
Community Name –The name to make payments“
Pa
y
a
bl
e
To”whi
c
hc
a
nbepr
i
nt
e
donBi
l
l
s
,St
a
t
e
me
nt
s
,Couponsa
nd
Mail Merge Codes in Form Letters.
Address Line 1 –The first line of the community address for
sending payments which can be printed on Bills, Statements,
Coupons and Mail Merge Codes in Form Letters.
Address Line 2 –The second line of the community address for
sending payments. It may be skipped if not needed.
City, State –The City and State for sending payments.
Phone Number –The phone number to appear on Bills,
Statements and Coupons.
Zip Code –The Zip Code for sending payments. The Zip Code
can be formatted for the Zip + Four + Carrier Route if needed.
Click the Lockbox Address button to enter a different address
that you might be using for payments sent to a bank lockbox.
You can then select, when printing Bills, Statements and
Coupons, which mailing address you wish to use.
When you click on the Lockbox Address button, you will see fields to enter a separate
payment address other than the Return Payment Address on the main Owner Control
screen:
Lockbox Address
You only need to enter a different Lockbox Address here if you wish to send Bills,
Coupons and Statements to a bank lockbox, but also, upon occasion, want payments
mailed to, say, your office address. You then have the choice of which address to print
on Bills, Statements and Coupons—the Return Payment Address or the Lockbox
Address.
206
Location of Homes
By setting up the default City, State and Zip Code where the
homes are located in the Owner Control Info, you can use it as
the default when adding new homes into the community. That
way, you do not need to type the City, State and Zip Code over
and over again when adding new homes.
The default City, State and Zip Code is stored in the Property
Record for each home where it is used whenever addressing
correspondence or Bills, Statements, Coupons or Mail Merge
Code
si
nFor
m Le
t
t
e
r
st
ot
heowne
r
sa
tt
hehome
’
sa
ddr
e
s
s
.
City –The main City name where the community is actually
located. This becomes the default for every home in the
community.
State –The State where the community is actually located.
This becomes the default for every home in the community.
Section/Phase
Zip Code –The main Zip Code for the homes in this
community. This becomes the default for every home in the
community.
This gives you the ability to sort the homes in the community
by Section, Phase or Building. Certain owner reports can group
homes by a Section, Phase or Building. If you activate it, then
you will need to enter the Section, Phase or Building # into the
Property record for each home so you can use it.
You will see the choices to use for activating the Section/Phase
# tracking:
Choose either Section or Phase by double clicking on it.
There is not a choice for Building, but you can use Section to
accomplish the same result.
Legal Description 1
This is a label you can turn on in the Property record for each
home. It is completely optional; you can just leave it blank.
Typical uses are commonly Lot, Block, Section—which is the
actual legal address of the home on plat maps as approved by
the local jurisdiction.
The name entered here is totally free-form. It can be any label
name you wish. The Legal Description will show on certain
owner reports.
Legal Description 2
A second field which can be used to enter a description in the
Property record for each home.
207
Use Apartment #
Notice this box on the screen:
Check this box to turn on the Apartment/Unit # which may be
needed in building where all the homes have the same Street
Address and need the apartment or unit # to differentiate the
homes.
If checked, then an address would be formatted like this:
25100 South Street, # 101A
Preferred Access
The default way you wish to select homes. This setting is used
in all modules. The internal audit trail reports, such as
Recurring Charges, use this order when printing.
This field defaults to the access option selected for the
community. The choices are
Street Address
Account Number
Lot/Unit Number.
This is a required field, you must use choose one of these
me
t
hods
.Youc
a
na
l
wa
y
sc
ha
ng
e“
on-the-f
l
y
”t
ooneoft
he
other methods when working with homes and owners.
Website Address
If the community has a TOPS web site, enter the www address
here. This can then be used by the TOPS web site interface
program so it knows the location of the community web site for
uploading of data.
Update Property Zip
Code
Use this button where the main default Zip Code for the
community has changed. It will go through the Property
records for every home and update the Zip Code stored there for
whatever is the main Zip Code under the Location of Homes
section of the Owner Control Info.
**Warning** - If you have other default City, State and Zip
Codes entered in the Property record for this community, do
NOT use this utility option. It will replace ALL the Zip Codes
in the Property records with the main default Zip Code under
the Location of Homes section of the Owner Control Info.
This completes the instructions for the Owner Control Info.
208
Owner Database File Definitions
The following data files are available from the Owner Database (OD) File Utilities
option:
File Name
Description
OWNCTL
STREET
PROPFI
OWNERS
MORTCO
ODNOTF
OWNPRP
OWNGRP
Owner Control Info
Streets File
Property File
Owners File
Mortgage Company File
Owner Note File
Group Owner File (Owner Property File)
Group Owner Browser (Owner Group File)
This is the last page of the Owner Database manual section.
209