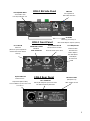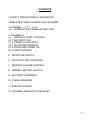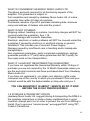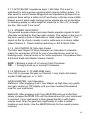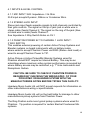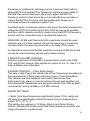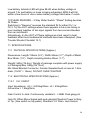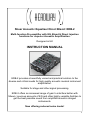
1
 Sheer Acoustic Equaliser Direct Blend: EDB-2
Multi-function Pre-amplifier with EQ, Blend & Direct Injection
functions for superior Acoustic Amplification.
Designed in UK
INSTRUCTION MANUAL
EDB-2 provides a beautifully voiced and practical solution to the
diverse and critical needs for high quality acoustic musical instrument
amplification.
Suitable for stage and other signal processing.
EDB-2 offers an increased range of gain to interface better with
Mixers, luxurious amounts of EQ and other highly versatile facilities to
get the best possible sound from amplified acoustic stringed
instruments.
Now offering reduced noise levels!
1 From a single compact box, the EDB-2 can take on a unique
range of functions and qualities which include:
• Refined Class "A" inputs and Pro Audio IC components.
• Voiced for warmth, clarity & low noise
Now offering increased clarity and even lower noise.
• Effective 5 Band EQ for problem solving and creativity.
Now offering EQ on Ch.1, Ch.2 or on both Channels.
• Easily read Pro Audio design panel layout.
Now offering a HUGE 0 - 32dB Gain!
• Versatile inputs, switchable to optimise a comprehensive range of
passive and active pickups, plus Microphones.
Now offering 3 way Impedance switching on Ch.2
•Tuneable notch filter with switch for extended range of attack on
feedback and problem frequencies.
Now offering notch filter on Ch. 1 or Ch.2.
• Range switch with settings for Guitar, Bass and Violin. Removes
unwanted boom, handling noise and low frequency feedback to amplify
a clearer, more musical tone of the instrument.
• Signal splitting enabled, e.g. personal/stage monitoring plus to front
of house, recording or tuner.
• Dual system mixing of pickups and Mics via separate channels with
differing EQ’s.
• Phantom Powering of all suitably wired Pickup and Mic Systems via
Ch.1 Jack IN
Now Offering Phantom to “Ring” or “Tip”.
• Mic XLR Input offers 18v Phantom to Power 99% of Condenser Mics.
2 • Feedback and hum loop busted via Earth lift and Phase Reverse
switches,.
Now offering Phase Reverse on Ch.1 or Ch.2
• New Aux IN Mini-Jack to allow iPod Connection.
• Mounting via rubber feet, belt clip (included) or on Mic Stand.
• Extended headroom via 18v power supply.
• Powered via regulated mains power supply unit (PSU - included) or
9v PP3 (6F22 batteries – 2 included).
• Sturdy steel housing with quality pots and long life sockets.
• Choice of input and output connectors.
Congratulations on your astute purchase.
Please read this comprehensive manual
carefully before switching on or plugging in the EDB-2
Text is also available on website below:
www.headwaymusicaudio.com
Headway Quality!
Built to last & Guaranteed for 12 Months.
3 HEADWAY EDB‐2 Top Panel POWER ON/OFF/STANDBY Green LED Indicates Power Pause in Standby Posi on to Reduce Power on “Thump” LOW BATTERY LED Lights BLUE when Ba eries are within hours of expiring EARTH/GROUND LIFT Prevents Hum Loop by Disconnec ng Pin 1 from XLR OUT MASTER Sets Output Level to LINE OUT & XLR Out NOTCH FILTER ‐12dB Notch Q=Band width Freq. = Centre Frequency of cut. Switches : CH.1 CH.2 or OFF MUTE Turns OFF Output Signals Re. Red LED. LIVE Denotes Pre‐Amp Output ON 5 BAND EQ SWITCH Assigns 5 Band EQ to CH.1 or CH.2 or BOTH 5 BAND EQ Treble @ 10 kHz +/‐ 13dB Pres @ 2.8 kHz +/‐ 7dB H.Mid @ 880 Hz +/‐ 12dB L.Mid @ 590 Hz +/‐ 13dB Bass @ 120 Hz +/‐ 12dB As Above @ 45Hz +/‐ 16dB XLR SWITCH/MIC IN 18v Phantom ON Phantom OFF XLR OFF RANGE FILTER (High Pass Filter) VIOLIN @ 192 Hz GUITAR @ 85 Hz BASS @ 41 Hz INPUT GAIN 0dB‐+32dB CH.1 & CH.2 INPUT IMPEDANCE +HI & HI ‐ Passive Pickups. Ac ve/LOW ‐ Powered or Low Impedance Pickups Switches: CH.1 & CH.2 PHASE Reverse the Phase of CH.1 or CH.2 Signal. An ‐Feedback Op on 4 EDB‐2 RH Side Panel AUX IN/iPOD INPUT 3.5mm Mini Jack Post EQ to Master Vol. EDB‐2 Front Panel CH.1 JACK IN Mono IN (Refer to Input Impedance Switch & Phantom Power Switch) PHANTOM POWER TO CH. 1 JACK IN SWITCH DI/XLR LINE OUT Balanced Line Output XLR (Mono Mix) *This does NOT accept Phantom Power From Mixer* LINE OUT Low Impedance Mono Mix Jack Out OPTIONS Belt Clip (as shown) or Mic Stand Adaptor 19/32” (15mm) CH.2 MONO JACK IN Routes Stereo to Both Channels if No Jack in CH.1 EDB‐2 Rear Panel EXT. POWER IN 18v AC/DC Adapter Input Connector Use ONLY Headway EDB‐PSU CH.2 MIC/XLR IN Balanced with 18v Phantom Power Op on. See XLR Switch: XLR Off/On Phantom On BATTERY PANEL (PP3/6F22 x 2) With Cap ve Screw 5 CONTENTS
1 SAFETY PRECAUTIONS & OPERATION
2 EDB-2 FEATURES, POWER ON & STANDBY
3 CHANNEL 1: 3.1.1 - 3.1.6
3.2 INTERACTIVE 5 BAND EQ SECTION
4 CHANNEL 2
4.1 INPUTS & LEVEL CONTROL
4.1.1 MIC INPUT XLR
4.1.2 STEREO JACK INPUT
4.1.3 PHANTOM POWER 9v
4.1.4 PHANTOM POWER 18v
4.1.5 GAIN CONTROL
5
MUTE/LIVE SWITCH
6
NOTCH FILTER CONTROLS
7
MASTER VOLUME CONTROL
8
RANGE CONTROL SWITCH
9
BATTERY POWERING
10 PHASE REVERSE
11 SPECIFICATIONS
12 TROUBLE-SHOOTER CHECKLIST
6 1 SAFETY PRECAUTIONS & OPERATION
1.1 Important Safeguards to your life and gear to note before using
your EDB-2
Please read all warnings on Headway Sheer Acoustic EDB-2
Equaliser Direct Blend unit very carefully:
IMPORTANT: Make sure that you power only by Headway's supplied
Power Supply Unit: Headway EDB PSU or via 2 x PP3 (9v) batteries
as included with this unit. (Suitable for EDB-1 & EDM-1)
Mains Plug Connector Types available for EDB-2:
UK = United Kingdom/Eire/Singapore (e.g. EDB PSU UK)
EU = Europe (Continental Mainland)
NA = North America/S. America/Japan
AUS = Australasia/S. Africa
1.1.1 EARTH PROTECTION & GROUNDING
To prevent electric shock ensure that any input/output cables from
EDB-2 are connected to amplification or signal processing devices
(e.g. mixers, amplifiers, effects units) so that where Mains powered
devices are used, there is a continuous, unbroken chain of Mains
earth connection and where the mains supply at the venue offers a
viable Earth or Ground connection.
DO NOT disconnect the ground/earth wire on any connected mains
powered devices.
1.1.2 MAINS PROTECTION
Always take care to protect your own life and those of others, along
with your gear by using RCD Circuit Breakers and AC Mains Surge
Protectors at each source of the mains power. Circuit breakers should
be tested prior to use.
We recommend that you also use Mains Noise Filters.
Switch off Power Supply Unit and other connected mains powered
devices and unplug when EDB-2 unit is not in use.
7 1.1.3 SHOCKS WARNING
Immediately stop the use of any Mains powered or Mains connected
gear when even minor shocks are detected and seek a practical
consultation from a qualified professional electronics repair technician
or relevant approved Authorised Service Centre before using again.
1.1.4 PREVENTION OF SHOCKS & DAMAGE
DO NOT expose the EDB-2, its Power Supply Unit or attached cables
to any liquids such as rain, condensation/spilt drinks.
If your EDB-2 should become in contact with any water or other liquids,
switch off at mains power socket and disconnect. Make sure it is fully
dry and dry your hands before re-use.
1.1.5 VENUE WARNING
Avoid venues with suspect electrical wiring, damp or wet wires &
contacts or where sparks are visible.
1.1.6 MICROPHONE SAFETY WARNING
Where microphones are used into EDB-2 or PA system, try to use
Government Type approved & Licensed Radio Mic’s and Transmitters.
1.1.7 CABLE & PRE-AMP PLACEMENT WARNING
Place EDB-2 and cables where visible and cannot cause accidents,
e.g. on a table, Mic stand or Belt mounting. DO NOT BLOCK EXITS!
1.1.8 PRECAUTIONS DURING USE
Treat your EDB-2 with care and do not drop it, tread on it or subject it
to liquids, extreme heat/cold or rough handling.
Switch off power supply when EDB-2 is not in use for >1 hour.
1.1.9 MINIMISING PLUG IN AND SWITCH ON NOISE
To minimise plug in noise connect cables in and out to instrument/Mic
and to PA or amp etc. while EDB-2 is off or on Standby. Ensure that
Standby has been engaged for at least 2 seconds before switching on.
If requiring to change input cable while live, engage Mute or Standby
first.
Switchcraft, Neutrik, Deltron, ST Pro & GH Industries offer Jack Plugs
for quieter switching.
8 1.2 SERVICING, REPAIR & RETURNS
All Headway servicing and repairs should be carried out by Headway
Music Audio Ltd. or its approved agents where applicable.
All returns must be sent pre-paid and should be insured against loss.
Headway Music Audio Ltd. will NOT be held responsible for losses in
transit or for duty and taxes incurred, e.g. where customs
documentation is completed incorrectly.
Customs Declaration forms on returned products sent internationally
should be completed and could read, for example:
"Electrical Musical Instrument Amplifier unit returned to UK,
country of landed origin for Service/Repair.
Not for Re-sale. Value for Customs = $ 30.00
Customs Code: 8518.10.40 Unit will be returned to sender.”
See: Transport 1.8
If returning product for repair/service you must include:
Your full contact details including name, phone number, full mailing
address and email address.
A full description of any problems.
If claiming under Guarantee/Warranty you must also include:
Proof of Purchase clearly indicating date, business name and address
of dealers who sold the product.
DO NOT DISSEMBLE ANY PARTS OF YOUR EDB-2 since there are
no user serviceable or repairable parts. Any attempt to do so would
negate the guarantee.
1.3 CLEANING the EDB-2
Ensure that your EDB-2 Is UNPLUGGED before cleaning with a dry
cloth. DO NOT allow moisture to enter amplifier and DO NOT use any
chemically based or abrasive cleaning products.
9 1.4 PRODUCT LIABILITY
Headway Music Audio Ltd. cannot be held responsible for damage to
its products caused by the subjection to unreasonably high or low
temperatures or due to wet conditions or for abuse/mishandling.
Headway Music Audio Ltd. retains the right to make such
determination according to its own inspection.
1.5 CONSEQUENTIAL LOSS
Headway Music Audio Ltd. will not be responsible for consequential
loss or damages such as due to the use or misuse of its products,
accident, neglect, technical modifications or unreasonable
expectations. Headway Music Audio Ltd. will not be held responsible
for the application of Phantom Power from any of its products where
some other electronic device may have been damaged.
Headway Music Audio Ltd. retains the right to make all such
determinations from its own inspection.
1.6 PERSONAL INJURIES
Headway Music Audio Ltd. cannot be held responsible for personal
injuries or damages related to its products such as those caused by
heat, fire, obstruction, modifications or electrical shock where obtained
due to a lack of care on the part of the injured party or due to that
persons ignorance of the instruction manual or, due to that persons
ignorance of best practices in the use of mains powered facilities.
Headway Music Audio Ltd. retains the right to make any such
determinations according to its own assessment.
1.7 WARRANTY/GUARANTEE TERMS
EDB-2 guarantee is valid for up to, but no longer than 12 months from
the date of purchase, but valid only after the guarantee registration has
been made online at www.headwaymusicaudio.com
All guarantee issues will be subject to assessment by Headway and
appointed service agents where applicable.
Headway Music Audio Ltd. does NOT recognise or participate within
guarantees/warranties offered by third party companies such as
retailers and dealers.
10 WHAT IS COVERED BY HEADWAY MUSIC AUDIO LTD.
The labour and parts required for all functioning aspects of the
amplifier. This guarantee is subject to:
Full completion and receipt by Headway Music Audio Ltd. of online
guarantee form within 30 days of purchase.
Customers retention of proof of purchase indicating date, business
name and address of dealers who sold the product.
WHAT IS NOT COVERED
Shipping related, handling or customs, tax & duty charges will NOT be
covered under this guarantee. See 1.18
Physical damage and cosmetic blemishes.
Electrical, electronic or audio problems will NOT be covered under this
guarantee if caused by electronic or electrical misuse or general
vandalism! This includes use of incorrect Power Supply.
Damage caused by insufficient care in handling and/or inadequate
transportation.
Non–registered guarantees, partly completed registrations, expired
guarantee periods or 3rd party issue guarantees will NOT qualify for
free repair work or free transportation.
WHAT IF I HAVE NOT REGISTERED THE GUARANTEE?
If you have not registered the Guarantee/Warranty within 30 days of
purchase you are not covered by the 12 Month Guarantee unless you
are the end retail customer and have purchased direct from Headway
Music Audio Ltd.
If you have not registered it, you retain your statutory rights under
consumer law of the country in which you purchased it from and your
contract would be with the dealer/retailer or shop who sold you it.
YOU CAN REGISTER IT IN ABOUT 1 MINUTE SO DO IT NOW
BEFORE THE 30 DAY PERIOD EXPIRES!
1.8 STORAGE & TRANSPORT ADVICE
Headway Music Audio Ltd. suggest storing & transporting the EDB-2 in
the complete original box or inside a heavy cardboard box in good
condition. Always pad it out in order to prevent the unit from shifting in
transit. Due to previous “service issues” we suggest NOT using TNT,
Yodel or Parcelforce.
11 International Shipping with Batteries:
The following are banned from all normal International transit, loose or
installed and may cause a return to sender: Lithium, Re-Chargeables
or Used/Spent.
2 EDB-2 FEATURES, POWER ON & STANDBY
QUIETER SWITCHING ON - Slide from Off slowly holding switch on
Standby for 2 seconds, then switch ON. LED will glow green.
3 CHANNEL 1
3.1 INPUTS & LEVEL CONTROL
3.1.1 +HI IMP Ultra High Impedance Input: < 20 Meg Ohms
This jack input is uniquely optimised for ultra high impedance passive,
NON-Powered Pickups directly into EDB-2
The primary types of pickups include Piezo cable or Co-axial cable
pickups (Headway HE4 Passive) or Flexible “Piezo Film” pickups as
offered by a number of manufacturers. Most are flexible structure
types but some film pickups are encased in rigid metal.
Suitable cable should have at least 80% screening, preferably braided
or conductive plastic shielding with extensive lapped screening.
Metal jack covers should always be used with the cable as short as is
possible, no more than 2m (6’) with standard quality cables (e.g. Klotz
or Van Damme) or 3m (9’) with special low capacitance cable such as
Sommer Cable.
3.1.2 HI IMP High Impedance Input: < 5 Meg Ohms
This input is optimised for the commonly available passive under
saddle Ceramic Piezo pickups or Contact/Bug pickups, also
Headway's “The Band” (for bowed instruments). This input also gives
a brighter sound for passive magnetic sound hole pickups.
Lead lengths for the HI IMP input setting are best kept as short as is
reasonably possible with good screening but no more than 6m (18')
but this application is usually less critical than with +HI IMP pickups.
12 3.1.3 ACTIVE/LOW: Impedance Input < 50k Ohm This input is
optimised for active pickup systems which require battery power. It is
also used for some Passive Magnetic/Low Impedance pickups but on
passives there will be a treble roll-off and hence a thicker more middle
biased sound. Input leads carrying active signals are not so sensitive
to shielding quality or cable length so leads up to 10m (33’) in length
are fine. Also suits "Line Level".
3.1.4 STEREO JACK INPUT
The general purpose stereo jack input feeds separate signals to both
channels controlled by their two gain controls. The signal on the ring of
the jack (usually a blue or black wire in cable) feeds channel 1. The
signal on the tip of jack (usually a red or white wire in a stereo cable)
feeds Channel 2. Check channel switching re. EQ & Notch Filter.
3.1.5 AUX IN/iPOD IN: Mini-Jack Socket
The Mini-Jack Socket (3.5mm diameter) on side panel is intended
mainly for connection of iPod for use of recorded music such as for
backing music, interval music or for tuition purposes. It by-passes Gain
& EQ and feeds into Master Volume Control.
ACW = Backing a knob off or turning it Anti-Clockwise.
CW = Turning a knob up or turning it Clockwise.
3.1.6 GAIN Knob: 0 -10 (0dB-32dB Gain)
Turn CW to increase the gain on Channel 1 only. Each dot marker
equals 2.5dB (approx) or +/- 40%
GAIN & MASTER: Joint Operation.
Method A. After plugging in at 0, turn Master up high then very gently
turn gain control up CW slightly until you have reached the desired
level for your instrument.
Method B. After plugging in at 0 turn MASTER knob up a little then
slowly increase the GAIN CW until the desired level for your instrument
is reached. If your instrument is then played harder or with higher
volume level, drop the gain back significantly in order to retain
headroom and clarity. Use the MASTER knob for the overall volume
required.
13 Method “B” should offer a slightly lower noise level while Method “A”
may offer a slightly clearer tone.
3.2 INTERACTIVE 5 BAND EQ SECTION
The 3 Way Switch applies the EQ section to Ch.1, Ch.2 or both
Channels.
5 rotary controls with active boost & cut functions including shelving
responses at the low and high end. A flat response is achieved when
the knobs are set in their central detent positions which should be
used as a starting point.
There is a degree of interaction, especially between the 5 bands on
adjacent controls.
For example, if you wish to thin out mid range tones as commonly
required, try varying the relative amounts of cut between Lower Mid,
Upper Mid and possibly Presence controls and listening for a
preferred blend. Typical Instrument EQ requirements:
Larger instruments such as Steel Strung Acoustic Guitars often
require a mid range cut especially where full chords are played.
Headway HE4 & Snake3 Fixed EQ pickups will require less EQ
applied than most other pickups because they incorporate an active
tone section which is set for the instrument type specified.
Nylon Strung Guitars played finger style or Resophonic Guitars
played with a slide usually require a flat mid range EQ or, with a
slight boost unless they are played with full chords in which case a
slight mid cut may be preferable.
Violins and Mandolins often require treble cuts, possibly presence
cuts but not usually mid cuts. Bass control may be cut to reduce body
handling noise and feedback.
14 BOOST EQ FACILITY: Boost functions only work effectively if there is
sufficient of the frequency in order to be able to increase it. For critical
applications, EQ is generally thought to sound better where cut rather
than boosted. Most importantly with EQ is to use your ears!
3.2.1 BASS Control: +/- 12dB centred broadly @ 120Hz or +/- 16dB
@ 45Hz Allows control of the bass at the lowest frequency of the audio
spectrum and will over-lap a little tonally with LO MID control.
Controls the lowest frequency of the audio spectrum and will over-lap a
little with LO MID control. Cut BASS ACW to cut body handling noise,
boomy sounds, externally generated hum, percussive clunks and low
end feedback, as well as any instrument bias towards the low strings.
Increase Bass CW to beef-up tone or bias lower strings more strongly.
3.2.2 LO MID Control: +/- 13dB centred broadly @ 590Hz
Allows control of LO MID range which is centred above bass but below
UPPER MID.
Cut LO MID ACW to thin out tone or linearise or naturalise the tone of
many lower mid biased guitar pickups and speakers.
Cut LO MID to reduce body handling noise or over loudness on lower
strings, muddy or boomy sound.
Increase LO MID CW to thicken tone and increase bias towards lower
strings.
3.2.3 HI MID Knob: +/- 12dB centred broadly @ 880Hz
Allows control of UPPER MID range of frequency spectrum. Will
overlap a little tonally mainly with LO MID and Presence.
CUT UPPER MID ACW to thin out or hollow out tone, reduce bias of
middle guitar strings, remove honkiness, clunk, or peakiness.
INCREASE UPPER MID CW to thicken tone, add punch and increase
bias towards middle strings. 15 3.2.4 PRESENCE Control: +/- 7dB centred @ 2.8kHz
Allows control of Presence which noticeably overlaps into lower treble
and upper mid range areas but offers a useful, narrow but distinctive
area of control.
CUT Presence ACW to reduce clunk, peakiness or harshness,
to hollow out sound subtly and reduce low end brightness, reduce bias
of top 2-3 guitar strings, thin the treble, tame low treble feedback and
mellow the sound. A Presence cut is also thought to reduce the Piezo
response effect which is sometimes partly characterised as “quacking”.
INCREASE Presence CW to thicken treble, increase punch and
increase bias to top 2-3 strings.
N.B. Pro Audio or dictionary defined “Presence” should NOT be
confused with the controls sometimes listed on Electric Guitar combo
amps which use the term to denote high treble.
3.2.5 TREBLE Control: +/- 13dB Centred broadly @ 10 kHz
HIGH allows control of treble at higher end of the audio spectrum
which offers you increased brightness on turning CW or a jazzy mellow
sound on turning ACW. Treble overlaps mainly into Presence area.
However, low strings will produce high tones or harmonics.
Cut Treble ACW to reduce high end feedback, harshness, externally
generated hiss, squeaks from new strings or to compensate for
over-bright pickups or hard reflective rooms.
Increase Treble CW to compensate for old, dull strings, weak top
strings, mellow pickups or dull, boxy rooms and P.A’s.
Overall 5 Band EQ can be switched to both channels combined or to
either channel separately.
EDB-2 may operate a dual system by applying 5 Band EQ to one
channel (or both channels) and notch filter to the other channel.
If you need 5 band EQ individually on each of two outputs on one
instrument, you could use two EDB-2 units into a Mixer.
16 4 CHANNEL 2
Channel 2 is suitable for a second pickup or Mic on same instrument. It
suits active and passive magnetic/piezo pickups as well as a wide
range of Mics.
The XLR input allows the use of a high quality Mic directed at the
instrument to be mixed in combination with a pickup source fed into
Channel 1. For live performances when using Mics you should use
Uni-directional Mics such as Cardiod and especially Hyper-Cardiod
Polar Patterns.
The EDB-2 was NOT primarily intended to be used for two totally
separate sources such as Guitar + Vocals since you will normally
require different settings of EQ.
Phantom Power is required to power true condenser Mics e.g. DPA
4099 or AKG C414 where no battery is used inside Mic. Exceptional
quality reproduction may be obtained in this way. Dynamic
Mics such as the Shure SM 57 are more usual in live work as they are
tougher and often easier to use than condenser types but are less
subtle and accurate for acoustic instruments and do not require
Phantom Power.
IMPORTANT: Before Switching Phantom Power ON/Off, switch
Standby ON first.
Mic Use Notes: Headway Music Audio Ltd. do NOT recommend the
use of internal Mics within instrument bodies for several reasons.
Firstly, musical instruments are voiced to be heard from the outside
whereas internal bodies usually have excessive mid and bass boom.
Secondly, Mics are meant to be used in free air where sound waves
travel mainly from front of diaphragm to rear whereas inside
instruments sound reflections and partial cancellations from standing
waves cause phase problems and prevent clarity. In addition, the
sound quality and construction/reliability of Mics offered with pickup
systems for internal use is often poor.
Finally, the placement of a Mic inside a resonant chamber producing
uneven peaks and a preponderance of low frequencies makes it
exceptionally prone to feedback.
17 Mic Use/Notes cont…
Musicians should bear in mind that they might judge the sound of an
internal Mic at very low volumes but will normally find it completely
unusable at typical live performance volumes, or in difficult acoustic
conditions even at low volumes. If you try to blend in a little Mic you
would probably have to turn down the Mic volume to such a low signal
that it is effectively perceived as turned off.
If you try to make the Mic sound a little less boomy and unnatural by
pointing it out of the sound hole you will be making it even more likely
to pickup speaker cabinets and monitors which may make it even more
likely to feedback.
If the internal Mic is on a flexible gooseneck you may lessen the
problems by spending time finding the best sounding spot for
placement but as soon as it inevitably moves or changes angle slightly,
or you take it to a different acoustic environment the problems are
likely to worsen again.
Anti-feedback devices can help but the harder they work the more
holes or bigger holes in the sound they need to remove which defeats
the aim of using a Mic. Instead, if you use Mics, we suggest you use
them externally with Hyper Cardiod polar patterns such as the DPA
4099 with its soft external body clip option. Mic stands with full sized,
quality condenser Mics or using Proel's Guitar body mounting bracket
with Mic holder.
External Mics will still be very prone to feedback than most pickups but
at least they should sound better than internal Mics. Headway's
Co-axial Piezo Cable Under Saddle pickups offer a more natural sound
than flat pickups since they sense around 360 degrees. As an alternative to a Mic, if you wish to add the impression of air in
the sound, try a quality digital reverb (e.g. Lexicon) with a slow natural
decay and a room setting which is larger than the one you are
performing in.
18 4.1 INPUTS & LEVEL CONTROL
4.1.1 MIC INPUT XLR: Impedance < 2k Ohm
XLR input accepts Dynamic, Ribbon or Condenser Mics.
4.1.2 STEREO JACK INPUT
Stereo jack input feeds separate signals to both channels controlled by
their gain controls. The signal on the tip of jack (red or white wire in
stereo cable) feeds Channel 2. The signal on the ring of the jack (blue
or black wire in cable) feeds Channel 1.
See Impedance 3 Way Switch Notes on Ch.1
4.1.3 PHANTOM POWER 9V TO CHANNEL 1 JACK INPUT:
3 WAY SWITCH
This enables external powering of certain Active Pickup Systems and
Blender systems on board instruments with no battery inside
where wired to accept Phantom Power via RING (Stereo Jack Lead) or
wired to accept Phantom Power to TIP.
Active Pickup or Active Pickup/Mic Blender Systems wired for
Phantom should NOT require an Internal Battery. This may be an
advantage where maximum active system performance is required but
where battery access may be restricted, e.g. “f” Hole Instruments and
Resophonic Guitars.
CAUTION: BE SURE TO CHECK IF PHANTOM POWER IS
REQUIRED BY CHECKING THE WIRING SPEC. OF YOUR
PICKUP/MIC OR BLENDER SYSTEM WITH THE
MANUFACTURERS NOTES BEFORE TRYING THIS FACILITY.
Headway Music Audio Ltd. will NOT accept requests for information on
other manufacturers wiring or specifications.
Headway Music Audio Ltd. will not be held liable for damage to other
manufacturers pickup systems from Phantom Power.
The Ring Position suits more typical pickup systems where wired for
Phantom. Tip position is required for certain Electret Condenser Mic
systems.
19 4.1.4 PHANTOM POWER 18V TO CH. 2 XLR IN SOCKET & ON/OFF
MIC SWITCHING
3 Way Switch ON Top Panel offers XLR OFF (to minimise noise)
Mid position offers XLR/Mic Input ON.
Top position delivers 18v Phantom to XLR In.
18v Phantom Power to XLR will operate most Condenser Mics at
above minimum voltage requirements. To date only SE Mics have
been identified as NOT operating.
If powering Condenser Mics or other devices from EDB-2 note low
battery LED.
Powering Constraints: It is NOT possible to power the EDB-2 via
Phantom Power from a Mixer. However, applying Phantom from a
Mixer to EDB-2 will NOT damage it.
4.1.5 GAIN CONTROL 0-10
See 3.1.6 for A & B methods for best combined use of Gain + Master.
5 MUTE/LIVE SWITCH
Mute position with Red LED illuminated indicates that Output is OFF.
Useful to allow silent tuning in front of audience or to switch off during
periods of inactivity without re-setting controls. Mute also offers quieter
plugging in to inputs.
6 NOTCH FILTER CONTROLS
Sometimes known as a “Sweep” the Notch Filter utilises the two knobs
and a Sliding On/Off Switch and a pop up/down channel selector. It
applies either to Channels 1 or 2 and applies to Line out and DI out
sockets. Control markers are a rough guide only.
6.1 NOTCH-Q CONTROL: Sharp to Broad Width.
Sets the bandwidth or spread of notch cut for the filter around the
frequency setting of the NOTCH Control. Turning ACW to "Sharp"
reduces width of cut towards minimum width while turning CW up to
“Broad” increases width of notch cut towards maximum.
20 6.2 NOTCH Frequency Knob: 50Hz - 6kHz
Sets the approximate centre frequency from 50 Hz (low bass) - 6kHz
(treble) where notch cut applies.
6.3 Notch Filter Switches
i) Slider Switch determines whether the notch filter is in or out. This
enables you to determine whether you like the application on or off
without altering settings. The LED indicator illuminates BLUE when
filter is applied.
ii) Pop Up Switch applies Notch Filter to Ch. 1 or Ch. 2
6.4 NOTCH FILTER IN USE
This is a versatile, supplementary tone control which can be used
subtly or severely. It is the most precise and effective method for
cutting highly intrusive or severely problematic sounds such as
feedback, excessive booming & body handling noise, background
rumble, honky upper mid range or muddy lower mids.
You could try the Notch Filter on what seems to be the most
problematic frequency spectrum leaving the other EQ controls at their
centre setting as a starting point. Here are a few potential strategies:
How to sweep out unwanted low end bass (low feedback, boom,
percussiveness, external hum or rumble etc.) below or at the low end
of the instrument range:
a) Set the NOTCH frequency ACW well below useful tonal range of
instrument e.g. for guitar with standard tuning set to cut at just under
80 Hz
b) Set the NOTCH-Q knob fully ACW
c) With the NOTCH button selected for channel, adjust the NOTCH-Q
control from its minimum ACW setting slowly turning CW while
listening to the amplified low strings until the tone of the low strings
starts to thin out. Re-adjust the NOTCH-Q for the best tone on the
lower strings.
If required, re-balance both controls slightly in order to fine tune the
maximum amount of cut according to what sounds best.
21 Excessive or problematic midrange can be found and dealt with by
setting NOTCH-Q and NOTCH frequency controls around middle of
dial and then, whilst listening to the sound, adjust the NOTCH
frequency control to find where the cut is most effective. Increase or
reduce the NOTCH-Q control until the problematic frequency is
minimised without an excessive width of cut.
Feedback peak or excessive spikes in the sound are best countered by
setting the NOTCH-Q width control fully ACW as narrow as possible
and then, whilst listening carefully, slowly move the NOTCH frequency
around until the unwanted noise is located and removed.
WARNING: All EQ and Parametric EQ in particular should be used
carefully and not unless needed. As well as improving a sound they
can also detract by removing elements in the body of the sound.
An alternative view would be that carefully tuned active EQ boost and
cut can be used creatively beyond just problem solving.
7 MASTER VOLUME CONTROL
Sets the output level of the EDB-2 preamp which is fed to the LINE
OUT and DI Out sockets. Also applies as control to Aux. In. See 3.1.6:
Gain & Master Joint Operation.
8 RANGE CONTROL - 3 Way Slider Switch
This sets a High Pass Filter which rolls off low frequencies according to
the requirements of three main instrument types: Violin/Guitar/Bass.
This reduces low end feedback and muddy resonances from
Instrument body, stage or room but allows through and amplifies just
the fundamental frequencies and harmonics above that. May be partly
countered by turning up Bass or LO MID controls.
RANGE SETTINGS
i. Guitar: Cuts bass frequencies significantly below 70 Hz, which will
still allow true amplification when the lowest string is dropped from
bottom "E" to "D" or "C".
This setting also applies to 12 String, Electric and Nylon Strung
Guitars, Resophonic Guitars and Pedal Steel Guitars plus similar mid
range instruments, e.g. Bouzouki.
22 ii) Violin: Cuts bass and Low Mid frequencies significantly below 200
Hz. This setting also applies to similar smaller, high pitched
instruments such as Mandolin and Ukulele.
iii) Bass: Cuts gently below 40 Hz. This setting applies to all
instruments producing bass such as Double Bass. You may also prefer
this setting on Cello and Mandocello.
9 BATTERY POWERING
Via 9v PP3 (6F22) x 2 batteries wired in parallel (supplied) which are
housed under end panel cover. Undo retained nut, using
finger/thumb, small coin or screwdriver to access batteries.
Connection is to two non-reversible 9v Battery clips which should all be
pinched on tight.
Batteries should be connected to battery terminals Male to Female
connector and Female to Male. Red = Positive (+) Black = Negative (-)
Batteries should be matched and fitted new and checked so as not to
be leaking. If one battery is leaking, even slightly, dispose of batteries
and replace with two new ones.
1st: Lithium: 200 Hrs of Power ON, or 100-150 Hrs (typical) if
Phantom Power Switch ON. When using Phantom actual battery life
will be determined by the current draw of the device being driven.
(Lithium Batteries are banned from international shipping).
2nd: Alkali: 50 Hrs of Power ON or 25-35 Hrs (typical) if EDB
Phantom Power Switch is ON.
3rd: Zinc Chloride: Pattern of use largely determines life.
Keep spare batteries.
We do not recommend re-chargeable batteries for this application as
life is limited. Voltages start at 8.4v (These are also banned from
International shipments) but Ni-Mh (Nickel Metal Hydride) are
suitable for limited life use.
We do NOT recommend Zinc Carbon Batteries.
23 Low battery Indicator LED will glow BLUE when battery voltage is
around 7.5v and battery is close to being exhausted. EDB-2 will fail
within a few hours of use or when battery voltage falls below 7v each.
10 PHASE REVERSE – 3 Way Slider Switch: "Phase" Setting denotes
IN Phase.
Switching to "Reverse" reverses the standard IN for either Ch.1 or
Ch.2. Try the OUT settings where there appears to be a mis-timing or
poor meshing together of two input signals from two sources blended
from an instrument.
Alternatively, try the OUT of Phase settings as a last resort to beat
feedback after more fundamental methods have been attempted. (See
Trouble Shooter Checklist 12.1)
11 SPECIFICATIONS
11.1 PHYSICAL SPECIFICATIONS (Approx.)
Dimensions: Length 138mm (5.5”), Width 93mm (3.7”), Depth of Metal
Box 38mm (1.5”). Depth including Knobs 43mm (1.7”).
Weight: 550g (1lb 4oz) Weight of package complete with power supply
in Packaging Box: 880g (1lb 15oz)
Mic Stand Bracket Connector: Female threaded bush on rear at 1.5cm
diam. (19/32” = 15mm) DO NOT OVER TIGHTEN!
11.2 ELECTRICAL SPECIFICATIONS (Approx.)
11.2.1 CH.1 INPUT
Input Impedance: +Hi = >20 MegOhms Hi = 5 MegOhms
Active/Low = 1 MegOhms
Gain Control to Jack: Continuously variable 0 - +32dB. Dual gang pot.
Jack IN: Offers Mono Signal path and optional Phantom Power to Ring
or Tip. (See switch on top panel). Standard 1/4” Diam. Jack Socket.
24 11.2.2 CH. 2 INPUT
Input Impedance to Jack via 3 Way Switch: +Hi = >20 Meg Ohms
Hi = 5 Meg Ohms Active/Low Impedance = 1 Meg Ohms
Post EQ/Routes to MASTER Vol.
Input Impedance to XLR: 2kOhms Balanced.
Gain Control to Jack: Continuously variable 0 - +32dB. Dual gang pot.
Stereo Jack IN Offers: Mono Jack Plug In to Ch. 2 alternatively
Stereo Jack Plug routes Tip to Ch. 2 & Ring to Ch.1
Gain Control to XLR: Continuously variable 0- +50dB
11.2.3 AUX IN/iPod IN (Mini-Jack Socket 3.5mm Diam).
Input Impedance = >1 MegOhm
11.2.4 BAXENDALL INTERACTIVE 5 BAND EQ SECTION
Bass
+/- 12dB Shelf @ 120 Hz. Or: +/- 16 dB @ 45 Hz
Low Mid: +/- 13dB Shelf @ 590Hz
Hi Mid:
+/- 12dB Shelf @ 900Hz
Pres:
+/- 7dB Shelf @ 2.8kHz
Treble:
+/- 13dB Shelf @ 10.5 kHz
11.2.5 NOTCH FILTER
Q Width: ACW = SHARP/CW = BROAD (5.0 – 0.5)
Depth: 12dB
Frequency: 50 Hz-6 kHz
11.2.6 RANGE SWITCH (High Pass Filter)
Slope Profile of LO frequency roll off: 12 dB per Octave.
25 11.2.7 PHANTOM POWER
XLR Mic Input on Ch. 2: 18v with 6K8 Current Limit Resistors
(Pins 2 & 3)
Jack Socket Input on Ch.1: 9v with 10 mA Current Limit.
11.2.8 OUTPUTS
Line Output via Jack: Nominal -10 dBu RMS @ 100 Ohms
Mix of Ch.1 & Ch. 2 + Aux IN via Line Out (Mono Jack Socket : ¼”
Diam.)
DI Balanced Output via XLR: Nominal -20 dBu RMS @ 150 Ohms
Electronically Balanced. Mix of Ch.1 & Ch. 2 + Aux. IN via XLR Out
(Mono).
XLR Wiring: Pin 1 = Earth/Ground Pin 2 = +Signal (Plus)
Pin 3 = - Signal (Minus).
TYPICAL NOISE PERFORMANCE & THD (Total Harmonic Distortion).
Master set to 2 O’Clock (1400 Hrs).
CH.1 Instrument Gain set for 20 dB Gain: -90 dBu
(True RMS 20Hz – 20 kHz)
CH.1 setting as above: THD <0.05% Throughout Audio Range
CH. 2 Mic/ XLR Gain set for 30dB Gain: -84 dB
(True RMS 20Hz – 20 kHz)
CH. 2 setting as above: THD <0.05% Throughout Audio Range
SYSTEM FREQUENCY RESPONSE TO LINE OUT
HF Response: +0-0.25dB @ 20 kHz
LF Response: Relates to “Range” and Bass Control.
26 11.2.9 POWER SUPPLY UNIT. See 1.1
PSU MUST be a Regulated Switching AC/DC Adapter: CE/UL
Input: 100-240 VAC 50/60 Hz @ 100 mA
Output: 18VDC @ 0.5A
EDB-2 Input DC Plug Connections (L.P.S.)
Outer = +VE (Positive) /Inner = -VE (Negative)
EDB-2 Input DC Plug Dimensions
Centre Hole: 2.1mm Diam./Plug Diam: 5.5mm./Plug Length: 10mm
Use ONLY Headway Music Audio Ltd. supplied EDB PSU as in 1.1
Headway will NOT honour guarantees where incorrect Power Supplies
cause damage.
11.2.10 WEEE/RoHS – ENVIRONMENTAL REGULATIONS
WEEE Regulations & Environmental Disposal: Power Supplies,
Batteries and Pre-amplifiers should NEVER be randomly disposed of
in a bin or sent for landfill disposal. Pre-amplifiers should be repaired
or use local re-cycling and electronics collection schemes.
RoHS: Headway products are free of lead and other environmentally
damaging substances. (Conforms to RoHS regulations).
12 TROUBLE-SHOOTER CHECKLIST
12.1 AVOIDING ACOUSTIC FEEDBACK & ROOM RESONANCES
Turn the amplifiers, instruments and microphones down and turn off
when not in use.
If possible have instruments and microphones to the side of, off axis,
or behind speakers.
Check that you have "Range" control set in correct position to remove
unwanted low frequency amplification.
27 Use Tuneable Notch Filter or other EQ controls to cut area of
feedback but by no greater width (Q), than required.
Try Phase Reverse Switch (leave in normal position unless 2 signals
out of Phase or if feedback).
Covering or blocking the sound hole(s) of an instrument can often help
give a few more decibels of level before the onset of feedback.
Sound absorbent materials, such as drapes and heavy banners can
help to damp sound reflections, which cause feedback.
Where using two pickups or pickup + Mic and feedback is
encountered:
i) increase proportion of saddle/bridge pickup or magnetic pickup &
reduce Contact Pickup or Mic.
ii) increase proportion of Contact Pickup and reduce Mic.
Where using Mics avoid Omini-Directional and use Uni-Directional,
preferably Hyper-Cardiod, such as DPA.
Contact pickups such as “The Band” (Bowed Instruments) to give an
advantage over Mics on feedback rejection. Headway's active under
saddle pickups in fretted instruments (HE4 & Snake3) or the VL3
Violin Bridge Pickup should offer much greater sound pressure levels
before feedback.
Electronic feedback destroyers are rack units which can be a great
help for beating feedback by tuning into and attenuating the
troublesome feedback tones. However, they can be complex to use
correctly and will take audible holes out of the sound.
A Limiter, or Compressor/Limiter rack units can be useful in limiting the
peaks which cause acoustic feedback.
Playing harder, get instrument closer to any microphones and reduce
gain.
Damp any strings not in use, either with techniques while playing or
when left on stand.
28 Getting people into an enclosed performance space will soak up a lot
of sound reflections and discourage feedback as if MABS or Mobile
Acoustic Baffles!
Check that a power amp output is not plugged into EDB-2 inputs.
12.2 UNEVEN STRING AMPLIFICATION, HARSH or BOOMY
SOUND
Under saddle pickups may not be seated correctly and evenly in
instrument. Contact a luthier to have the installation put right.
If a contact pickup is in use change its placement in order to get the
best sound by locating the sweet spot and avoiding honks, resonances
and hollowness.
If a Mic is in use, change its position to obtain the best balance and
overall sound. Guitars often Mic up best with Mic pointed towards treble strings area of upper bout, a little away from sound hole.
If a magnetic pickup is fitted in the sound hole, where possible, adjustment of the magnetic pole pieces and overall pickup heights may
enable the string balance to be adjusted.
12.3 POOR SOUND: WEAK, DULL or DISTORTED
Make sure that any batteries such as 9V PP3 on pickup systems and
pedals are in good condition & Low Battery Indicator LED is not BLUE.
Turn down gain control or excessively boosted EQ controls.
AVOID Passive DI boxes (transformers) which can change or
degrade the sound of a pickup due to the way they load it and can add
rhythmical load and discharge noises.
Check that a power amp output or headphone output is not plugged
into EDB-2 inputs (or Outputs).
Check leads for cross leakage, excessive capacitance or resistance
with an Electrical Meter or Cable Tester.
Try Phase Reverse switch.
29 12.4 INTERFERENCE: HUM, BUZZ, HISS & RADIO etc.
Keep your EDB-2 and signal cables away from devices with strong
magnetic fields. These include large AC mains transformers,
generators, lighting control systems, fluorescent and unearthed neon
lighting. If possible, switch off equipment which is causing interference.
Keep signal cables away from mains and speaker leads. Uncoil mains
power leads!
Use highly screened instrument cables, shorter, uncoiled cable runs
and metal shielded jack covers with good solder connections.
When using the XLR DI outputs on the EDB-2 set the GND LIFT
button to cut earth loop hums if required.
AC Mains Filters are useful to stop an impure mains power source
affecting your amplifier.
If lighting is causing you hum and/or buzz try to power your amplifier
from a different AC mains ring which is not used for stage lights.
Hum and buzz can be generated in stringed instruments where there is
no earth connection between the output jack ground and strings or any
tail piece.
Cut externally generated hum via notch filter by cutting with Notch-Q
on minimum at around 50-60 Hz
Excessive hiss will normally be produced by a faulty device or poor
quality noisy device in the chain or by imbalances between different
gear. To reduce hiss, identify gear responsible and increase levels into
it while reducing its own gain or removing it. Also, turn down unused
channels and turn off EDB-2 XLR Switch if un-used.
Alternatively, reduce treble or use notch filter at Sharp "Q", at 6 kHz
(high frequencies) or use "Noise Filter" Rack Unit.
Radio interference within the signal may be caused by the use of poor
quality leads such as curly leads, especially where High Impedance
and low output passive pickups are used.
To avoid, use highly screened jack leads into inputs and use active
pickups.
30 Use only current government licenced type approved, multi-channel
radio mikes and radio transmitters of good quality but if noise or
broadcast radio interference is experienced, change for conventional
Mics and high screen leads.
12.5 INTERMITTENT OR LACK OF SIGNAL
Check that all mains and signal connectors are pushed firmly into their
sockets.
Check that Power Switch is ON, Gain control(s) and Master are turned
up enough, and Mute Switch is OFF. Remember that is 4 different
controls must be on to produce an output signal.
Many sure that any battery connectors are pinched firmly and evenly to
their batteries, the correct way around, are not be leaking and with no
battery warning light showing. (<7.5v)
Check that any jack leads/cables are good physically with good solder
connections and use a Meter/Cable Tester. Make sure jack probes are
straight and that the tip contacts are not mis-shapen in any way.
Check that XLR leads are wired correctly. See Specifications.
Make sure that connectors to your instruments fit firmly into their
sockets. If a socket is incorrectly fitted by being set in too deeply into a
guitar to make contact.
Check that mains supply is operating in chain of power supply with
earth connected at all points.
It is recommended that you use the best quality connectors such as
Neutrik, Deltron & Schurter/Rendar, Switchcraft, Horizon, ST
Professional & GH.
If EDB-2 has somehow become overheated, turn off, cool it down and
try turning on a little later to re-start checking batteries & IN signals.
12.6 PERSISTENT PROBLEMS
You should first work through the Troubleshooting pages BEFORE
contacting your dealer, a professional electronics technician or
Headway and an Authorised Service Centre where applicable. You
may solve the issue more quickly.
31 New Headway Products 2013-14
SAM-1: Sheer Acoustic Magnetic: Active Magnetic Sound-Hole Pickup.
Easy fit for Steel Strung Acoustic Guitar
SA-120 & SA-250: Superior Acoustic Guitar Combo Amplifiers.
Current Headway Products include:
HE4 (e.g. HE4/G.FEQ - Superior Active Under Saddle Pickup System
for Acoustic Guitar/Steel Strings).
Snake3 (e.g. Snake3 NY - Active Under Saddle Pickup for Nylon
Strung Acoustic Guitar).
The Band - Bowed Instrument Instant fit wrap around, passive body
pickup (e.g. Violin, Viola, Cello & Double Bass).
EDM-1 Equaliser Direct Mini - Sub Compact EQ Pre-amp with
comprehensive EQ and Range/Anti-feedback Control plus optional DI
connector.
EDB-2 Equaliser Direct Blend - Multi-Function Pre-Amplifier with EQ,
Blend & DI functions for Superior Acoustic Amplification.
Sheer Acoustic SA2 & SA2-B - Active Under Saddle Pickup System
for Acoustic Guitar & Bass, with 4 Band EQ on sliders + Vol. Control.
VL3 Bridge based Violin Pickup System.
JLD Quality jack leads with appropriate lengths and specifications.
32 HEADWAY POLICY OF CONTINUOUS IMPROVEMENT
Headway Music Audio Ltd. operates a policy of continuous
improvement and reserves the right to alter specifications, components
and prices without prior notice.
We recommend that to get the best possible sound you use only
Headway Pickups and good quality true Condenser Mics such as the
excellent DPA Miniature Instrument Mics.
Find out more about Headway's other products from:
Headway Music Audio Ltd.
Headway House
Walnut Tree Works
St. Thomas Street
Deddington
Oxfordshire
OX15 0SY
United Kingdom
www.headwaymusicaudio.com
The British Acoustic Specialists
Making Acoustic Instruments Louder Since 1995
Copyright: Headway Music Audio © 2013 All Rights Reserved.
33 OTHER HEADWAY PRODUCTS INCLUDE: EDM‐1 Mini EQ Pre‐Amp/DI Box HE4 & SNAKE3 Under Saddle Ac ve Pickups THE BAND Instant fit Pickup for Violin, Viola, Cello & Double Bass 34