1
Attix5 Pro
Plug-ins
V6.2 User Manual
Cover
Your guide to installing
and using Attix5 Pro
plug-ins.
Last updated: 2011/10
for Microsoft Windows
SERVER EDITION V6.0 for MICROSOFT WINDOWS
Copyright Notice and Proprietary Information
All rights reserved.
© Attix5, 2011
Trademarks
® - Microsoft, Windows, Microsoft Windows, Microsoft Windows Server, MS Windows, MS
Exchange, MS SQL, MS SharePoint, Exchange, System State, Windows Backup, Windows
Explorer and VMware are registered trademarks of their respective owners.
1
Attix5 Pro V6.2 Copyright © Attix5. All rights reserved.
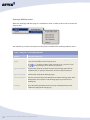
Instruction Symbols
The following icons appear in the user manual:
The information icon precedes important information.
The example icon indicates a practical illustration of a process or procedure.
The hint icon indicates a suggestion or hint to guide or assist you with performing a
task.
The warning icon provides a warning against potential mistakes and actions that could
cause critical error.
Attix5 Pro V6.2 Copyright © Attix5. All rights reserved.
2
SERVER EDITION V6.0 for MICROSOFT WINDOWS
Table of Contents
1. Plug-in Installer ................................................................................. 4
Installation and Configuration .............................................................................. 4
2. Plug-ins .............................................................................................. 6
1.
2.
3.
4.
5.
6.
7.
8.
9.
10.
11.
12.
13.
Email Notification......................................................................................... 7
Single Mailbox Recovery (SMR) ..................................................................... 9
Exchange Single Item Recovery (SIR) .......................................................... 18
Exchange Single Item Recovery Plus (SIR Plus) ............................................ 22
Lotus Domino 6.5/7 ................................................................................... 36
MS Exchange Server 2003/2007 .................................................................. 39
MS SQL Server .......................................................................................... 45
Oracle 9i/10g ............................................................................................ 49
Script ....................................................................................................... 57
SharePoint ............................................................................................ 59
System State ......................................................................................... 62
VMware (ESX 3.5) .................................................................................. 68
VSS (Exchange 2003/7/10, MS SQL 2005/8) ............................................. 71
Index ....................................................................................................77
3
Attix5 Pro V6.2 Copyright © Attix5. All rights reserved.
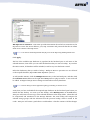
1. Plug-in Installer
The Plug-in Installer allows you to upgrade existing Server Edition (SE) Backup Clients with
added functionality by installing application-specific plug-ins and other monitoring tools. You
can also upgrade existing plug-ins with this installer. As from Attix5 Pro v5.0, plug-ins can also
be auto-updated during the backup process, if enabled on the Storage Platform.
The SE Client must be installed on the computer before you can install any plug-ins. SE plugins require working space for the cache and disk space for creating a data dump and patches.
Note: Ensure that the drive on which the SE Client is installed has enough free hard
drive space to store an extra copy of all the selected files. If not, move the ToBackup,
Cache and dump folders to another drive.
Installation and Configuration
The application that the plug-in will be working on does not have to be installed before installing
the SE Client. Simply run the Plug-in Installer executable and supply the necessary information.
The installer will prompt you to close the SE Client interface, if it is open, when running the
Plug-in Installer. The installer also checks various requirements (such as operating system and
MS .NET Framework installation) and adds a note next to the plug-in name should the
requirement not be met.
Attix5 Pro V6.2 Copyright © Attix5. All rights reserved.
4
SERVER EDITION V6.0 for MICROSOFT WINDOWS
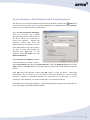
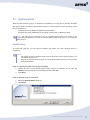
The installer will detect the current SE Client installation location and confirm it as part of the
installation process.
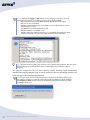
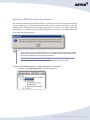
A list of available plug-ins will enable you to select the plug-ins you wish to install and/or
configure. Plug-ins marked with
with a
are already installed on the system. Any plug-ins marked
blue icon will be upgraded to the latest plug-in version.
Select or deselect any of the plug-ins by clicking in the checkbox next to the plug-in name. After
you have made all the necessary changes, click Next. The next step in the wizard will display a
summary of all the changes that you have requested.
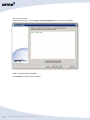
Click Apply requested changes to continue with the upgrade or Back if you want to modify
your selection.
The Plug-in Installer stops the SE Client service, installs/upgrades/uninstalls the selected plugins and starts the service again. Click Finish to close the application. After installing the plugins, open the SE Client and configure the installed plug-ins. For more information about the
plug-ins, see Chapter 2, “Plug-ins” below.
Note: As a precaution, the Plug-in Installer does not remove the dump folder used by
the plug-ins or any plug-in-specific settings when you remove plug-ins. You have to
remove it manually if needed.
5
Attix5 Pro V6.2 Copyright © Attix5. All rights reserved.
2. Plug-ins
Adding to its features and functionality, Attix5 Pro Server Edition also provides a solution for
numerous databases and applications. These solutions are provided as plug-ins to the Server
Edition of the Client software.
Once installed, plug-ins display in one of two areas of the SE
Client application: in the Backup Selection tree or in a
dedicated dialog box. Plug-ins available in the selection tree
can be selected/excluded for backup in the same manner as
all other items in the tree. Plug-ins available in dialog boxes
can be enabled/disabled/configured via the Tools menu.
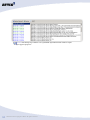
The table below lists the plug-ins included in the SE Client
(in the same order as displayed in the Graphical User
Interface), alongside the section numbers in this chapter that
describe them.
Server Edition Plug-ins currently available
Plug-in name
Description
(As listed in Plug-in Installer)
Backup Client
location
Email Notification
V2.13
Dialogue
Exchange 2003 Single Mailbox Recovery
V3.6 (SMR)
Dialogue
Exchange 2007 Single Item Recovery
V1.9 (SIR)
Tree
Exchange 2010 Single Item Recovery Plus
V1.0 (SIR Plus)
Tree
Lotus Domino 6.5/7
V2.8
Dialogue
MS Exchange Server 2003/2007
V2.19
Dialogue
MS SQL Server
V3.8 (2000/2005/2008)
Dialogue
Oracle 9i/10g
V2.9
Tabs
Script
V1.5
Dialogue
SharePoint
V3.3 (2003/2007/2010)
Tree
System State
V3.1
Dialogue
VMware (ESX 3.5)
V1.1 (20, 5, 50 & Plus)
Tree
VSS (Exchange 2003/7/10, MS SQL 2005/8)
V2.7
Tree
Note: Only plug-ins that appear in the selection tree can be used in secondary backup
sets.
Attix5 Pro V6.2 Copyright © Attix5. All rights reserved.
6
SERVER EDITION V6.0 for MICROSOFT WINDOWS
1. Email Notification
The Email Notification plug-in enables you to receive email notification on backup activity. You
can configure the plug-in to notify you on a specified email address when a backup has been
successful, when it failed or both. The level of information can also be specified.
Note: Please refer to the Attix5 SE Client User manual seeing that this plug-in comes
standard with every SE Client installation.
Installing the Email Notification plug-in
This plug-in has been included in SE installers since v4.2. If it is not installed, run the Plug-in
Installer and select the Email Notification plug-in.
Note: The Plug-in Installer will run automatically during the SE Client installation if
located in the same folder as the Client MSI.
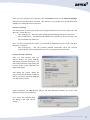
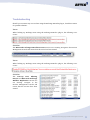
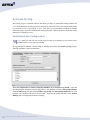
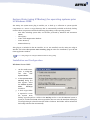
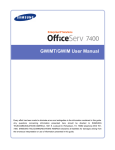
Configuration and Use
To configure the email notification
plug-in:
1.
On the Tools menu, point to Plugins,
and
then
click
Email
Notification.
2. Select the Use email notification
check box to enable the plug-in.
3. Select the types of notifications to
be emailed. The following options
are available:
Notify me when a backup
fails
Notify me after a successful
backup
Append the subject line
with the following options
and message:
7
Warnings
Errors
Attix5 Pro V6.2 Copyright © Attix5. All rights reserved.
Notes:
You can modify the Email subject and content for each of the options by
clicking in the relevant message box, and then editing the text.
The Backup Account name is automatically included in the subject, e.g.
“Backup Completed [Backup Account name]”.
4. In the Mail Settings area, type To and From email addresses in the fields provided and
supply the SMTP server address and authentication information if necessary.
Tips:
In the SMTP Server box, you can specify the SMTP Server name in
isolation (e.g. mail.company.com) or you can include the port number
(e.g. mail. company.com:80).
When no port is specified, 25 will be used by default.
5. Click the Test button to verify that the settings are correct. A test email will be sent to
the address specified in the To field and a message will appear confirming if the email
was sent successfully. Click OK to close the message and return to the Email
Notification settings dialog box.
6. Select the Attach files check box to include a log file and/or report as attachments.
7.
In the Attachment settings area, select from the following options:
Summary, warnings and errors
Entire log file (as per Advanced Options log level setting)
Backup selection report – Provides a summary of the backup selection
8. Click OK to save the settings and close the Email Notification settings dialog box.
The email notification plug-in is now activated and will start emailing reports during the next
backup.
Attix5 Pro V6.2 Copyright © Attix5. All rights reserved.
8
SERVER EDITION V6.0 for MICROSOFT WINDOWS
2. Single Mailbox Recovery (SMR)
The SMR plug-in is used to backup and restore single Exchange server mailboxes. The SMR
plug-in makes use of a robust Exchange tool called ExMerge to perform the backup and restore
operations. However the plug-in presents a user interface façade to the ExMerge settings file
(usually exmerge.ini) so that ExMerge can be configured from the Attix5 Pro SE client. Once
configured, ExMerge can be run in „batch‟ mode that does not require user interaction.
SMR does not require MAPI or a MAPI profile to perform its functionality as the plug-in makes
a native call via the COM component to query LDAP for the list of Exchange mailboxes. The
SMR plug-in supports Exchange 2003 only.
Installing the SMR plug-in
To install the SMR plug-in on an existing SE Client, run the Plug-in Installer and select the
Exchange 2003 Single Mailbox Recovery plug-in.
Additional files are created after running either SMR Backup, or SMR Restore, but these will be
detailed later in this chapter. These files pertain to ExMerge settings with SMR Backup files
having a „smrb_‟ prefix, and SMR Restore files having a „smrr_‟ prefix.
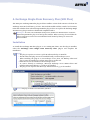
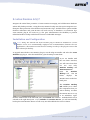
Additional server configuration
You have to change the Attix5 Backup SE Service Log On during start-up from the Local
System account to an account with adequate permissions/administrative rights on the server to
access the Exchange Information Store. Open the Computer Management console by rightclicking on the My Computer icon and selecting Manage.
Expand the Services and
Applications section and click on Services. Right-click on the Attix5 Backup SE Service
and select Properties. Click on the Log on tab, select an Administrator account and supply
the log on password.
Microsoft Exchange 2003 note: You must add an ExMerge security group to the server if
you are using Microsoft Exchange 2003. Add this group by selecting Active Directory Users
and Groups from the Administrative tools menu in the Control Panel. The user that you
selected for the Attix5 Backup SE Service start-up must be added to this group.
9
Attix5 Pro V6.2 Copyright © Attix5. All rights reserved.
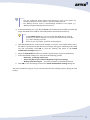
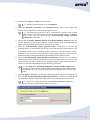
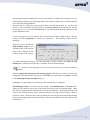
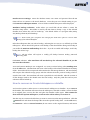
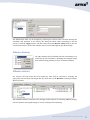
SMR Backup – Configuring the Backup Settings
Select Plug-ins from the Tools menu and select SMR Backup. Enter the details as indicated
in the dialog box (screenshot available on the following page). Folder to backup to: Specify
where the mailbox PST‟s must be stored. SMR will specify <SE Root Dir>\pstbackups by
default but this can be modified to any location visible on your server, including mapped drives.
Exmerge appends a PST file with the changes since the last backup. The file may therefore
increase during each backup and Exmerge cannot reduce the size of the PST file. The Delete
existing PST files option enables you to specify that existing PST files must be deleted during
the backup process. A smaller file will be generated and compared with the copy in the Cache to
create the patch. This option is especially useful after reducing mailbox limits/sizes in the
Exchange server. Click on Customize to specify which days of the week you wish to delete the
PST files in the dump folder.
All
days are selected by default.
User mailboxes to back up: Here
you must provide the name of your
Exchange server in the Server
Name text field and the „Add …‟
and „Remove‟ buttons are used to
select/remove
mailboxes.
the
Exchange
See the „Add…‟ note
below.
The Verify button can be used to
verify
whether
the
selected
mailboxes are in sync with Active
Directory. The plug-in will list any
missing mailboxes and provide you
with the option to remove them from
the list.
Use the Localization button at the bottom of the SMR Backup window in case you are
experiencing problems connecting to the Exchange Server.
Attix5 Pro V6.2 Copyright © Attix5. All rights reserved.
10
SERVER EDITION V6.0 for MICROSOFT WINDOWS
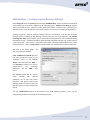
The Check Configuration button
determines whether the SE service
has sufficient permissions to access
Exchange and the SMR Configuration
Results page will provide in depth
information about the configuration,
and possible permission issues.
Please
ensure
that
your
service
account or one of its associated
groups is in the list of trustees with
Send-As and Receive-As rights set to
Allow.
If it is not, you will have to correct
your account configuration. Failure
to do so may compromise your SMR
backups.
The one exception to this is if your SE
account is setup as LocalSystem. In
this case, the „Check Configuration‟
feature will simply warn you that it is set to LocalSystem. The onus will be on you to ensure that
LocalSystem is sufficient, or whether you need to setup a unique account for your SE service.
Exmerge logging option enables you to specify the level of information logged in the Exmerge
logfile. You can enable log file rolling and a log file retention period to limit the space required
by these logs. Note that the plug-in will process these options before each backup, so files may
exceed their size, until the next backup.
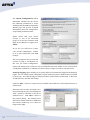
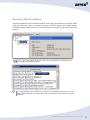
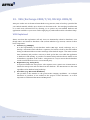
Click the „Add…‟ button to retrieve a list of available user mailboxes on the indicated server as
shown below.
Select the users from the „Available users‟
list by selecting the users and clicking the
„Add >‟ button to add them to the list of
„Selected users‟. Click OK to return to
the previous dialog. The selected users
will now be shown in the list of mailboxes
that will be backed up (as is shown in
image to the right).
11
Attix5 Pro V6.2 Copyright © Attix5. All rights reserved.
Once you have completed your selection, click the OK button on the „Backup Settings‟ dialog
box. This will store your settings in a “.ini” file ready for your next manual or automatic backup.
Backup Settings
The settings you selected are stored in two files in the <SE Root Dir>. These files are:
smrb_exmerge.ini – this is the main settings file that ExMerge will use for the backups
smrb_mailboxes.txt – this indicates the mailboxes you selected from the list of available
user mailboxes
Once you have completed your first backup, you will find an additional log file in the directory
where you indicated your mailbox PST files to be stored:
smrb_exmerge.log – this file provides detailed information about the backups
performed and can be examined if any errors are suspected to have occurred
Output during a Backup
When you initiate a manual backup, you will
see the following output as evidence that the
SMR plug-in is doing its job.
During
the
“Launching
backup,
ExMerge”
when
the
appears
line:
in
the
output, you will also notice an additional dialog
box, from ExMerge, will be launched for the
duration of the SMR backup. This dialog box
provides details about the ExMerge backup in
progress.
Once the ExMerge backup has completed, this
dialog box will be closed automatically.
Note: This dialog box does not appear
for automatic backups.
Attix5 Pro V6.2 Copyright © Attix5. All rights reserved.
12
SERVER EDITION V6.0 for MICROSOFT WINDOWS
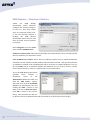
SMR Restore – Running a Restore
Unlike
the
functionality,
SMR
which
Backup
effectively
configures the backup settings to
be used at a later stage (either
when an automatic backup runs,
or the user manually requests a
backup);
the
SMR
Restore
functionality should only be used
when an actual restore operation
is required.
Select Plug-ins from the Tools
menu and then SMR Restore.
Folder to restore from: This indicates the folder where the PST files can be found that match
the user mailboxes you selected for restore.
User mailboxes to restore: This is where you indicate both the server to which the PST files
should be restored, and the available mailboxes that should be restored. Only previously backed
up mailboxes available in the specified folder will be in the list of available mailboxes. You can
use the Verify button to determine whether the mailboxes you are about to restore, actually
exist in Active Directory, as this is a requirement of a successful restore.
As per the SMR Backup instructions
specified
destination
above,
server
indicate
in
a
the
Destination server text field and
click the Add Users… button.
Select the users from the Available
users list by selecting the users and
clicking the Add > button to add
them to the list of Selected users.
Click OK to return to the previous
dialog. The selected users will now
be shown in the list of mailboxes that will be restored (as is shown the previous image).
13
Attix5 Pro V6.2 Copyright © Attix5. All rights reserved.
Once you have completed your selection, click the Restore button on the Restore Settings
dialog box to begin the restore operation. This will store your settings in an .ini file and launch
ExMerge to perform the restore operation.
Restore Settings
The settings that are saved prior to the restore being launched are stored in two files in the <SE
Root Dir>. These files are:
smrr_exmerge.ini – this is the main settings file that ExMerge will use for the restore
smrr_mailboxes.txt – this indicates the mailboxes you selected, to be restored, from the
list of available user mailboxes
Once you have completed the restore, you will find an additional log file in the <SE Root
Directory> as follows:
smrr_exmerge.log – this file provides detailed information about the backups
performed and can be examined if any errors are suspected to have occurred.
Output during a Restore
After you click „Restore‟ and your
restore settings are saved, ExMerge
will launch to perform the restore. You
will see the following output during the
process of the restore operation (see
right-hand image).
This details the activity during the
restore, including how many mailboxes
will be processed, and where ExMerge
is in the restore progress.
Upon completion, the SMR Restore plug-in will then determine whether any errors were
detected and report this to the user.
If no errors were detected then
the dialog on the right will be
shown.
Attix5 Pro V6.2 Copyright © Attix5. All rights reserved.
14
SERVER EDITION V6.0 for MICROSOFT WINDOWS
If errors were detected, then the
dialog on the right will be shown.
The indicated log file will detail the errors for further troubleshooting or problem solving.
Using ExMerge
ExMerge is a utility provided free by Microsoft. Its initial intention was to alleviate the burden
of moving mailboxes between servers, and migrating mailboxes from, say, Exchange 2000 to
Exchange 2003. It primarily uses MAPI to accomplish all of this functionality and is a very
useful and configurable tool.
You will find an “Exmerge.doc” Word document provided with the SMR plug-in.
document provides some insight into the functionality ExMerge provides.
This
In addition to
information about the various settings available for configuration with ExMerge, you should
read this document to understand what the various releases are, past and current bugs,
limitations of ExMerge etc. While we do not recommend that you manually change any of the
settings in the various configuration files, it is useful to know the full power of ExMerge‟s
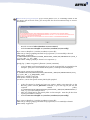
capabilities. Some important configuration settings to take note of:
MergeAction
;This setting controls which merge procedure to use:
;
; Possible values:
;0-
Extract (Merge data to Personal Folders)
;1-
Import (Merge data from Personal Folders)
;2-
Extract&Import (Export from one server and Import into another server)
;
; Default value: 0
SMR Backup: 0
SMR Restore: 1
SourceServerName
; Name of the source Exchange server, from which data will be extracted.
; This setting must be specified if the MergeAction specified is Extract or Extract&Import
SMR Backup only: set to whatever user specifies in „Server name‟ text field
15
Attix5 Pro V6.2 Copyright © Attix5. All rights reserved.
DestServerName
; Name of the destination Exchange server, to which data will be written.
; This setting must be specified if the MergeAction specified is Import or Extract&Import
SMR Restore only: set to whatever user specifies in „Server name‟ text field
LogFileName
; Name of the log file to be used
;
; Default value: C:\ExMerge.log
SMR Backup: <PST Data Dir>\smrb_exmerge.log
SMR Restore: <SE Root Dir>\smrr_exmerge.log
LoggingLevel
; Set the level of logging:
;
; Possible values:
; 0 - None
; 1 - Minimum
; 2 - Medium
; 3 - Maximum
; Default value is 0
SMR Backup and Restore: 2
DataDirectoryName
; Name of the directory to which .PST files will be written or where .PST files will be expected.
; If the directory does not exist, it will be created.
;
; Default value: C:\EXMERGEDATA
;
SMR Backup: set to value of „Folder to backup to‟ text field
SMR Restore: set to value of „Folder to restore from‟ text field
FileContainingListOfMailboxes
; Name of a text file containing the Exchange Distinguished Names (DN) of mailboxes to be;
worked on.
; Each line of the file should have the following format:
; <SourceDN> [, <TargetDN>]
; The TargetDN is optional. If it is specified, depending on what the selected merge action
Attix5 Pro V6.2 Copyright © Attix5. All rights reserved.
16
SERVER EDITION V6.0 for MICROSOFT WINDOWS
; is, it will be used to get the name of the PST file to be generated, or the name of the
; mailbox into which data
; will be merged. By default, a comma is used as the delimiter between the source and
; target DNs. You
; can specify another delimiter, using the DelimiterUsedInMailboxFile setting.
;
; Blank lines are ignored.
; Lines beginning with a ##~ are ignored as comments
; If this setting is not specified, all mailboxes, except those for services (DS, IMS etc.) on the
; specified server will be processed.
;
; Default value: Blank
SMR Backup: <SE Root Dir>\smrb_mailboxes.txt
SMR Restore: <SE Root Dir>\smrr_mailboxes.txt
DataImportMethod
; This setting controls how the data will be copied from the source store to the target store.
;
; Possible values:
; 0 - Copy all messages from the source store to the target store
; 1 - Merge messages into the target store. Copy only those messages that do not exist in the
target store.
; 2 - Replace existing messages in the target store. (If a message in the source store
;
exists in the target store, delete that message in the target store and then copy the
;
message from the target store.
; 3 - Archive existing messages from the source store into the target store. If this option
;
is selected, the program will copy data from the source store to the target store and
;
then delete the data from the source store.
;
;This option is only valid if the MergeAction is Extract.
;
; Default value: 1
SMR Backup and Restore: 1
17
Attix5 Pro V6.2 Copyright © Attix5. All rights reserved.
3. Exchange Single Item Recovery (SIR)
The Attix5 SIR Exchange plug-in allows item-level backups to be done for Exchange 2007. This
includes mailbox folders, emails, mailbox local contacts, tasks, calendar items etc. Public folders
and documents are also supported.
Installation
To install the SIR plug-in on an existing SE Client, run the Plug-in Installer, select the
Exchange 2007 Single Item Recovery plug-in in the list and complete the installation.
Note:
The SE Client and plug-in must be installed locally on the Exchange Server.
The SE Client service must be configured to run as a user that has Full access to
the individual mailboxes that must be included for backup. Refer to the following
for further information:
http://technet.microsoft.com/en-us/library/aa996343.aspx
Exchange 2007: Ensure that the server where the SIR plug-in will run has the
Mailbox role installed to match where the MAPI connection points are.
Configuration
The SIR Plug-in node will be shown underneath the standard backup selection tree and forms
part of the existing backup selection. All configurations have to be done within this view.
Start by clicking the main Exchange Items node in the tree.
Attix5 Pro V6.2 Copyright © Attix5. All rights reserved.
18
SERVER EDITION V6.0 for MICROSOFT WINDOWS
Note: All settings that could be retrieved from the Exchange server will be prepopulated and only dump location needs to be specified.
Ensure that the DC Host, LDAP Port and Access Mailbox fields are correctly populated and
specify a dump folder location. Verbose logging can be enabled by selecting the Enable
Verbose logging that will show more detail in the backup log files.
Click the Apply button before continuing. This will invoke a login onto the Exchange Server and
show all items that can be backed up according to the access granted to the user being used by
the Attix5 SE Client.
Note: Any errors will be shown at the bottom beneath the Apply button:
19
Attix5 Pro V6.2 Copyright © Attix5. All rights reserved.
SIR Backup
All selected items or nodes will be included with the next backup to be performed by the Backup
Client by using the dump folder as specified.
Note:
Before attempting to back up mailbox items, please ensure the following:
MS Exchange is installed on the local system.
Outlook is NOT installed on the local system.
For Exchange 2007: Microsoft Exchange Server MAPI Client and
Collaboration Data Objects 1.2.1 are installed on the local machine. These
can be downloaded from the Microsoft website at:
http://www.microsoft.com/downloads/details.aspx?FamilyID=E17E7F31079A-43A9-BFF2-0A110307611E&displaylang=en.
The login credentials for the primary access mailbox that is used to create a
MAPI session is correct and that this user has full access to the mailboxes
that you wish to back up items from.
The user that the service runs as owns the primary access mailbox.
The user is not hidden from Exchange address lists.
Exchange 2007: Ensure that the server where the SIR plug-in will run has
the Mailbox role installed to match where the MAPI connection points are.
Items that have not been changed since the last backup will not be exported to
the dump folder, as they do not need to be transmitted to the Storage Platform
again.
Attix5 Pro V6.2 Copyright © Attix5. All rights reserved.
20
SERVER EDITION V6.0 for MICROSOFT WINDOWS
A Single Item Recovery/Restore
For restores the required complete parent node or specific item must be selected for restore.
Note: Before attempting to restore mailbox items, please ensure the following:
MS Exchange is installed on the local system.
Outlook is NOT installed on the local system.
For Exchange 2007: Microsoft Exchange Server MAPI Client and
Collaboration Data Objects 1.2.1 are installed on the local machine. These can be
downloaded from the Microsoft website at:
http://www.microsoft.com/downloads/details.aspx?FamilyID=E17E7F31079A-43A9-BFF2-0A110307611E&displaylang=en.
The login credentials for the primary access mailbox that is used to create a
MAPI session is correct and that this user has full access to the mailboxes that
you wish to back up items from.
The user that the service runs as owns the primary access mailbox.
The user is not hidden from Exchange address lists.
Exchange 2007: Ensure that the server where the SIR plug-in will run has the
Mailbox role installed to match where the MAPI connection points are.
Click the Restore button on the toolbar. In the
Restore
Options
dialog
box,
select
the
Exchange Plug-in: SIR tab. Verify the required
settings for the Domain Controller Host,
LDAP Port, Access Mailbox and Temporary
Path location that will be used as part of the
restore process.
Note: If experiencing problems connecting
to an Exchange 2007 server that has no
public folders, select the Ignore absence
of Public Folders check box.
The items selected for restore will be recovered
directly to the live Exchange Server.
21
Attix5 Pro V6.2 Copyright © Attix5. All rights reserved.
4. Exchange Single Item Recovery Plus (SIR Plus)
The Attix5 Pro Exchange SIR Plus plug-in allows mailbox or item-level restores to be done for
Exchange 2010 SP1 (build 218.15) or later. This includes mailbox folders, emails, local contacts,
tasks and calendar items. The Exchange SIR Plus plug-in does not replace the Exchange Single
Item Recovery plug-in and is not backwards compatible with it.
Example: To restore an individual email from a mailbox an administrator would use
the Exchange SIR Plus plug-in to back up the mailbox. When restoring, he would then be
able to navigate to and restore an individual email instead of having to restore the
entire mailbox.
Installation
To install the Exchange SIR Plus plug-in on an existing SE Client, run the Plug-in Installer,
select the Exchange 2010 Single Item Recovery Plus plug-in and complete the
installation.
Notes:
The plug-in requires version 6.2 of the SE Client and Plug-in Installer.
The SE Client and plug-in must be installed locally on the Exchange server.
When installing the plug-in on an Exchange server farm, the Backup Client and
plug-in must be installed on a Client Access Server (CAS) role.
Outlook must not be installed on the Exchange server.
To restore directly to Exchange, Microsoft Exchange server MAPI Client and
Collaboration Data Objects 1.2.1 needs to be installed.
The plug-in also requires the Microsoft .NET Framework 3.5 to be installed.
Note: The plug-in needs to be licensed to function.
Attix5 Pro V6.2 Copyright © Attix5. All rights reserved.
22
SERVER EDITION V6.0 for MICROSOFT WINDOWS
Configuration
The Exchange SIR Plus plug-in can be configured from the Plug-in Configuration page of the
Account Setup Wizard.
To configure the Exchange SIR Plus plug-in:
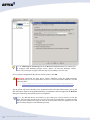
1.
Select Exchange Single Item Recovery Plus on the Account Setup Wizard‟s Plug-in
Configuration page and click the Configure… button.
23
Attix5 Pro V6.2 Copyright © Attix5. All rights reserved.
2. Ensure that the Host and Port boxes are correct.
Note: The Host should always be set to localhost.
3. Enter the Domain, Username and Password details. These boxes specify the
Domain user credentials that the Exchange Agent runs as.
Note: The Exchange Agent must run as a Domain user that has been granted
full permission to the mailbox(es). This will be done automatically by the Backup
Client, unless the user deselects the Automatically assign mailbox
permissions… check box.
4. Ensure that the Dump mailbox data to and Extract mailbox items to boxes are
correct. These boxes specify the temporary working folders for the Exchange SIR Plus
plug-in and are used during the backup and restore processes.
5.
Select the Automatically assign required roles… check box if you want the
Exchange Agent to automatically give its run-as user the necessary Import/Export roles
in Exchange. These roles are needed in order to perform a successful backup. If this is
check box is not selected, the roles will need to be manually assigned to the run-as user
from the Exchange Management Shell or the Exchange Management Console.
6. Select the Automatically assign mailbox permissions… check box if you want to
automatically assign full access permissions for the Exchange Agent run-as user to the
selected mailboxes when a backup starts. Assigning mailbox rights could take up to 15
minutes to take effect depending on Active Directory replication.
Tip: The Plug-ins > Exchange SIR Plus > Assign mailbox rights menu
item can be used to assign selected mailboxes the required rights. Alternatively,
the administrator can use the Exchange Management Shell to manually assign
rights.
7.
Click the Apply or OK button to change the Exchange SIR Plus plug-in‟s settings. If you
have selected the Automatically assign required roles… check box, the plug-in will
automatically assign the needed Exchange roles to the Exchange Agent run-as user.
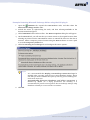
Note: Any errors will be shown above the Run the Exchange Agent on
section and next to the field where the error occurs.
Attix5 Pro V6.2 Copyright © Attix5. All rights reserved.
24
SERVER EDITION V6.0 for MICROSOFT WINDOWS
Note: Clicking the Apply or OK buttons causes the plug-in to run a series of
checks to ensure that it is working correctly. These checks include:
The connection between the Backup Client and the Exchange Agent
The run-as user credentials
Whether the Exchange Agent is installed or not (it will install it if it isn’t)
The Exchange version
The MAPI version and connection points
Whether Outlook is installed or not
Whether Microsoft .NET Framework 3.5 is installed. The Exchange Agent
will not work with only Microsoft .NET Framework 4.0 installed.
Tip: The Task Progress dialog box contains a lot of detailed information. You can rightclick the dialog box and copy the contents to the clipboard if needed for support
purposes.
The plug-in‟s configuration has now been updated, and the Exchange Agent automatically
installed. The Exchange SIR Plus plug-in node is displayed in the standard backup selection tree
and forms part of the existing backup selection.
Note: If you chose not to configure the plug-in in the Account Setup Wizard, you
are asked to configure it when you select the Exchange Mailboxes node. Clicking
the Configure Now button brings up the Exchange Single Item Recovery Plugin Settings dialog box.
25
Attix5 Pro V6.2 Copyright © Attix5. All rights reserved.
After the Exchange SIR Plus plug-in has been configured, selecting the Exchange Mailboxes
node displays the current Exchange server details and allows you to change the configuration.
Tip: The Exchange Single Item Recovery Plug-in Settings dialog box can also be opened
using the Tools > Plug-ins > Exchange SIR Plus > Settings menu item.
Attix5 Pro V6.2 Copyright © Attix5. All rights reserved.
26
SERVER EDITION V6.0 for MICROSOFT WINDOWS
Exchange SIR Plus menu:
When the Exchange SIR Plus plug-in is installed its menu is added to the menu bar under the
Plug-ins item.
The table below provides a description of the options available in the Exchange SIR Plus menu.
Tools > Plug-ins > Exchange SIR Plus
Option
Click the option to…
Assign mailbox
Automatically assigns full access permissions for the Exchange Agent run-as user
rights
to the selected mailboxes when a backup starts.
Note: Assigning mailbox rights could take up to 15 minutes to take
effect depending on Active Directory replication.
Agent Reinstall
Automatically uninstalls, reinstalls and starts the Exchange Agent with the
credentials that you specify in the domain, username and password boxes.
Agent Uninstall
Automatically uninstalls the Exchange Agent.
Test Connection
Tests the connection between the Backup Client and the Exchange Agent. If the
Backup Client cannot connect to the Exchange Agent, it provides an error
detailing why.
Settings
Opens the Exchange Single Item Recovery Plug-in Settings dialog box that
enables the configuration of the plug-in.
27
Attix5 Pro V6.2 Copyright © Attix5. All rights reserved.
Exchange SIR Plus Backup
All selected mailboxes will be included with the next backup performed by the Backup Client
using the temporary folders as specified. Selecting a mailbox displays the mailbox details,
including the alias, display name, and GUID among others. The plug-in will back up the entire
mailbox.
Notes: The same checks that take place when configuring the plug-in occur
when backing up Exchange items.
Tip: The backup progress dialog box contains a lot of detailed information. You can
right-click the dialog box and copy the contents to the clipboard if needed for support
purposes.
Attix5 Pro V6.2 Copyright © Attix5. All rights reserved.
28
SERVER EDITION V6.0 for MICROSOFT WINDOWS
Note: The backup log contains a lot of detailed information that could be useful
for support purposes.
29
Attix5 Pro V6.2 Copyright © Attix5. All rights reserved.
Exchange SIR Plus Recovery/Restore
The Exchange SIR Plus plug-in allows mailbox or item-level restores to be done for Exchange
2010 SP1 (build 218.15) or later. This includes mailbox folders, emails, local contacts, tasks and
calendar items. Normal files and Exchange items cannot be restored in a single restore and
attempting to do so results in an error message. Separate restores have to be performed for the
normal files and Exchange items.
Note:
If you want to restore mailbox data, ensure that Microsoft Exchange server MAPI
Client and Collaboration Data Objects 1.2.1 is installed on the local machine. This
can be downloaded from the Microsoft website at:
http://www.microsoft.com/downloads/details.aspx?FamilyID=E17E7F31-079A43A9-BFF2-0A110307611E&displaylang=en.
Ensure that Outlook is not installed as this will cause the restore to fail.
To restore Exchange items to a folder structure or a ZIP file:
1.
Navigate to the Exchange Items node in the Restore tree.
Attix5 Pro V6.2 Copyright © Attix5. All rights reserved.
30
SERVER EDITION V6.0 for MICROSOFT WINDOWS
2. Select the items that you want to restore, and then click Restore on the File menu or
the Restore button on the main toolbar. This will launch the Exchange Plug-in: SIR
Plus dialog box.
3. Ensure that the Local folder path is correct. The Exchange items will be restored here.
Note: Ensure that this folder has sufficient space to hold the items being
restored.
4. Select the format that the Exchange items should be restored as. You can choose either
Folders and .MSG files or ZIP (one per mailbox).
5.
Select the Maintain directory structure check box to maintain the directory
structure instead of restoring all items to the root folder.
6. Click OK to begin the restore.
Tip: The restore progress dialog box contains a lot of detailed information. You can
right-click the dialog box and copy the contents to the clipboard if needed for support
purposes.
The Exchange items are restored to the location specified in the Local folder box in the chosen
format.
Note: The restore log contains a lot of detailed information that could be useful
for support purposes.
31
Attix5 Pro V6.2 Copyright © Attix5. All rights reserved.
To restore Exchange items directly back into an Exchange server:
1.
Navigate to the Exchange Items node in the Restore tree.
2. Select the items that you want to restore, and then click Restore on the File menu or
the Restore button on the main toolbar. This will launch the Exchange Plug-in: SIR
Plus dialog box.
3. Select the Exchange server option.
Note: Selecting the Exchange server option initiates a series of Exchange
configuration checks, including:
The connection to the Exchange Agent and the IP address of the Exchange
server that it runs on
The Exchange version (Exchange 2010 SP1 [build 218.15] or later is
required)
The MAPI version
Whether Outlook is installed or not (the restore will fail if Outlook is
installed)
Attix5 Pro V6.2 Copyright © Attix5. All rights reserved.
32
SERVER EDITION V6.0 for MICROSOFT WINDOWS
4. Ensure that the Temporary restore location path is correct. The plug-in will store
the Exchange items in this folder until it can transfer them to the Exchange server.
5.
Click Change settings to launch the Exchange Single Item Recovery Settings dialog
box if you want to change the Exchange SIR Plus settings.
6. Review the additional options and click Change to change the relevant setting:
Maintain directory structure maintains the directory structure instead of
restoring all items to the root folder.
Recreate missing mailboxes recreates any mailboxes that no longer exist.
Warning: The mailboxes are recreated with P@ssword0123! as the default
password. The administrator needs to reset the password and configure any
other user-associated settings.
7.
Automatically assign mailbox rights automatically assigns the correct
mailbox rights to the Exchange Agent.
Click OK to begin the restore.
Tip: The restore progress dialog box contains a lot of detailed information. You can
right-click the dialog box and copy the contents to the clipboard if needed for support
purposes.
The Exchange items are restored directly into the Exchange server.
Note: The restore log contains a lot of detailed information that could be useful
for support purposes.
33
Attix5 Pro V6.2 Copyright © Attix5. All rights reserved.
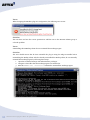
Troubleshooting
Should you encounter any errors when using the Exchange SIR Plus plug-in, check this section
for possible solutions.
Issue:
When backing up Exchange items using the Exchange SIR Plus plug-in, the following error
occurs.
Solution:
The Microsoft Exchange RPC Client Access service is not running. Navigate to the Services
Management Console and ensure that the service has been started.
Issue:
When backing up Exchange items using the Exchange SIR Plus plug-in, the following error
occurs.
Solution:
The
Net.Tcp
Port
Sharing
Service and Microsoft Exchange
Mailbox Replication services are
not
running.
Navigate
to
the
Services Management Console and
ensure that the services have been
started.
Attix5 Pro V6.2 Copyright © Attix5. All rights reserved.
34
SERVER EDITION V6.0 for MICROSOFT WINDOWS
Issue:
When changing the SIR Plus plug-in‟s configuration, the following error occurs.
Solution:
The user does not have the correct permissions. Add the user to the Domain Admins group to
solve the problem.
Issue:
Uninstalling the SE Backup Client does not uninstall the Exchange Agent.
Solution:
The user should ensure that he first uninstalls the plug-in using the Plug-in Installer before
uninstalling the Backup Client. If he has already uninstalled the Backup Client, he can manually
uninstall the Exchange Agent by following these steps:
1.
Open the Command Prompt with Administrator privileges.
2. Navigate to the folder that the Exchange Agent was installed in.
3. Run the A5EAS.exe –uninstall command to uninstall the Exchange Agent.
35
Attix5 Pro V6.2 Copyright © Attix5. All rights reserved.
5. Lotus Domino 6.5/7
Integrate the critical data protection of Lotus Domino messaging and collaboration databases
within daily backup activities. Using the native Domino backup API, this option integrates nondisruptive data protection of the database and transaction logs. Flexible restore options include
database redirection and point-in-time roll back recovery of databases or transaction logs.
Lotus Domino plug-in for version 6.5/7 also gives administrators the flexibility to perform
individual mailbox backup with selective restores of individual messages.
Installation and Configuration
Note: Attix5 Pro SE with the Lotus Domino plug-in should be installed on a Lotus
Domino server as it automatically configures the communications between the two
applications. The Domino services must be running in order for the plug-in to access the
files selected for backup.
To upgrade SE with the Lotus Domino plug-in, run the Plug-in Installer and select the Lotus
Domino 6/7 plug-in. After the installation, open the Attix5 Pro SE Client.
If you are familiar with
the SE Client interface,
you will notice that there
are
two
new
tabs,
Domino Backup and
Domino Restore.
Open
the
Backup tab.
Client
Domino
The SE
displays
the
Domino Server in the lefthand pane.
The Domino Backup
tab enables you to select
the components that you
wish to backup. To select
the Domino Server or any
of its subfolders, rightclick the folder name in the left-hand pane and Include the selection. Individual files can be
selected in the right-hand pane. If you Include the Domino Server, you will automatically
back up the entire Domino Server as well as any new files added to the server in future.
Attix5 Pro V6.2 Copyright © Attix5. All rights reserved.
36
SERVER EDITION V6.0 for MICROSOFT WINDOWS
Select the location for the Database dump folder beneath the selection window. The default
path is C:\Program Files\Attix5 Pro\Backup Client SE\Domino.
A copy of the selected
components from the Domino server is created in this folder should you wish to change this
location, use the Browse button. From here, the files will be encrypted and backed up.
The SE Client requires working space for the cache (which is compressed), a temporary copy of
each database (the dump folder) and temporary disk space for creating patches to be sent to the
Storage Platform.
Notes:
Make sure that your computer has enough free hard drive space to store a data
dump of all the selected databases.
Note that you have to click the Save button after you have made your selection.
The SE Client will not backup the selected components if you do not
save the selection.
Your Domino Server Backup selection is now configured.
The Backup Process: To create your first backup, select Backup Now on the File menu.
Attix5 Pro will create an exact copy of the selected components in the dump folder. These files
will be compressed and transferred to the Storage Platform.
Subsequent backups will be
compared with the selection from the previous backup. Attix5 Pro will create a patch file for
each database or mailbox with all the changes made since the last backup. Only the patch files
and any new selections will be backed up.
How to Restore a Domino Server
Open the SE Client and click on the Domino Restore tab.
You first have to retrieve the dump folder from the Storage Platform before you can restore the
Domino Server. Click the
Restore tab, select the dump folder from the specific backup date
and restore the folder to its original location.
On the Domino Restore tab, use the Browse button to select the Recovery folder that you
restored from the Storage Platform.
The default path is C:\Program Files\Attix5 Pro
SE\Domino. The Domino Restore tab displays all files available from the specific backup. Note
that you have to browse and select the Recovery folder before you will be able to view the
data. You can browse through the available folders to select the specific mailboxes and files, or
you can select the top node to restore all available files.
A Full Media Restore is initiated by enabling the check mark next to Full Media Recovery.
This option selects the entire backup set, including the necessary configuration files (ini file, cert
37
Attix5 Pro V6.2 Copyright © Attix5. All rights reserved.
ID and server ID) to do a full media restore. The procedure when you have to do a Full Media
Recovery:
1.
Install the Domino Server
2.
Run the Domino setup, but DO NOT START THE SERVER
3.
Restore the recovery folder
4.
Do a Full Media Recovery
5.
Start the Domino Server
After you have selected the files that you want to restore and click on Restore.
Note: The selected databases or mailboxes should be closed during the restore process.
The SE Client will restore the selected files to the Domino Server and the SE Client will notify
you when the restore has been completed. You are advised to initiate a full backup after
recovering a large amount of data.
Attix5 Pro V6.2 Copyright © Attix5. All rights reserved.
38
SERVER EDITION V6.0 for MICROSOFT WINDOWS
6. MS Exchange Server 2003/2007
The Attix5 Exchange Server plug-ins enable fast and flexible ways to protect vital Exchange
2003/2007 critical data while the applications are online.
Using the Exchange APIs to
communicate with the Exchange server, the plug-ins provide backup and restore capabilities for
all Exchange Server components, including embedded files.
Note: MS Exchange Server 2010 is not supported using this plug-in. Use the VSS plug-in
for MS Exchange Server 2010.
Installation and Configuration
Note: The SE Client with the MS Exchange plug-in must be installed on an existing
Exchange Server as it automatically detects and configures the communications
between the two applications. The Exchange Server services must be running for the
plug-in to access the files selected for backup. If you wish to install the SE Client on a
different machine, you need to first install Exchange on that second machine to provide
the libraries required by the Exchange plug-in.
If you are installing the Single Mailbox Recovery (SMR) plug-in as well, please do so
before installing the Exchange plug-in to ensure that the SMR mail profile is configured
correctly.
Server Edition can be upgraded with the Exchange plug-in by running the Plug-in Installer and
then selecting the MS Exchange Server 2003/2007 plug-in. After the upgrade, open the
Client to configure the plug-in. On the Tools menu, select Plug-ins, and then click Exchange
2003/2007 Backup settings.
Select where you would like the SE Client to
create a Storage dump folder. This folder
is used to dump a copy of the selected
storage groups from the Exchange server.
From here, the files will be encrypted and
backed up.
The default dump folder is
C:\Program Files\Attix5 Pro
SE\MSExchBackup.
Note: Ensure that your computer has
enough free hard drive space to store
a dump of all the selected storage
groups.
39
Attix5 Pro V6.2 Copyright © Attix5. All rights reserved.
The SE Client requires working space for the cache (which is compressed), a temporary copy of
each Exchange storage group (the dump folder) and temporary disk space for creating patches
to be sent to the Storage Platform.
The next step is to select the storage group(s) that you would like to back up. You have the
option to select individual storage groups by expanding Servers and selecting the Storage
Groups one by one. If you select the Servers box, you will automatically back up all the storage
groups within the Server.
You have the option to choose between Full or Incremental backups. Right-click on a Storage
Group and select Properties to specify your preferences.
The following window will be
displayed:
From here you can modify the
Daily Backup Type for the
selected storage group. The SE
Client will, by default, do full
backups during each backup.
To enable incremental backups (only the Exchange log files), deselect the Only do full
backups box, and then specify the days on which to do incremental backups.
Note: At least one full backup per week will still be enforced if you enable incremental
backups.
Select the Apply this selection to all storage groups check box if you wish to use the same
configuration for all selected storage groups. Click OK to save the changes or Cancel to go back
to the Exchange backup settings dialog box.
Click Ok to save the settings. Your Exchange Server Backup is now configured.
The Backup Process: To create your first backup, select Backup Now on the File menu.
Attix5 Pro will create an exact copy of the selected storage groups in the dump folder. These
files will be compressed and transferred to the Storage Platform. Subsequent backups will
compare the selected storage groups with the selection from the previous backup, which is
stored in a cache. Attix5 Pro will create a patch file for each storage group with all the changes
made to the storage group since the last backup. Only the patch files and any new selections will
be backed up.
Attix5 Pro V6.2 Copyright © Attix5. All rights reserved.
40
SERVER EDITION V6.0 for MICROSOFT WINDOWS
Full Backups vs. Incremental Backups
Attix5 Pro provides you with two options when backing up Exchange 2003/2007; Full and
Incremental Backups.
The Full Backup process is straightforward. All databases are backed up, and the log files for
the particular storage group are removed after the data has been incorporated into the databases
using a process called truncation. Using the efficient patching techniques available in Attix5
Pro, only a small percentage of the full backup is transferred to the Storage Platform on a daily
basis.
During Incremental Backups, only the storage group changes since the most recent full
backup are protected. These changes are stored in the Exchange log files and truncated into the
storage group during the next full backup. Note that when restoring you need the most recent
full backup as well as all the incremental backups between the last full and the required recovery
point (RPO). Attix5 Pro will automatically restore all the required files during the restore
process.
How to Restore an MS Exchange Storage Group
It is very important to follow these steps:
1.
Ensure that Exchange has the same service pack level as when the data was backed up.
2.
Set the database to be overwritten by a restore. Use the Exchange Management Shell to
view the properties of the database that you will be restoring. Select the This database
can be overwritten by a restore check box to ensure that the database can be
restored.
Warning: Not selecting this option will cause the restore to fail.
3.
Delete or move all the .log files in the MDBDATA folder in the Exchange installation
directory. If these files are locked, stop the Exchange Information Store service and try
again. Start the service and if there are any logs created (after starting the service) delete
or move them as well. A restore can now be performed as usual.
4.
Open the SE Client, select Plug-ins on the Tools menu, and then click Exchange
2003/2007 Restore wizard. The Exchange Restore Wizard enables you to restore
any Exchange Storage group without having to restore the backup from the Storage
Platform first, as the Exchange Wizard will automatically restore the files from the
Storage Platform, should you choose to restore from a previous backup. Follow the steps
as outlined below.
41
Attix5 Pro V6.2 Copyright © Attix5. All rights reserved.
Restore Wizard Step 1
In the first step, select either Restore from locally available backup or Restore from
previous backups. Click Next to continue.
Restore Wizard Step 2
If you select the first option, the SE Client will use the last backup that is stored locally on the
server. If you select the Restore from previous backups option, the SE Client will connect
to the Storage Platform and display a list of available Exchange backups.
The Storage Groups available in the backup that you selected are displayed in the second step.
Select whether you wish to Dismount the stores before recovering the groups.
Note: Deselect this option if you are restoring to a Recovery Storage Group.
Specify whether you want to Restore all Storage Groups or Specify restore options for
each Storage Group. Click Next to continue.
Restore Wizard Step 3
In the third step, specify the Exchange Server and Storage Group to which you wish to restore
the data. The original Exchange Server and Storage Group information is displayed by default.
Also specify the following by enabling/disabling the checkboxes:
Mount databases after restore - If you deselect this option, you will have to
manually mount the Store after restoring it.
Wait for Exchange to complete restore - the SE Client will wait for confirmation
from MS Exchange before it notifies you of the successful Restore.
Only restore log files – Use this option to only restore the log files.
Click Next to continue.
The last step displays a summary of what you have configured. You can change the temporary
path that the SE Client will use for the log and patch files by clicking the Browse button. Click
Start restore to start the restore process. You have to select a backup set that you would like to
Restore from. Click Browse, and then select the storage group that you wish to restore. The
Client will list all the details from the backup – displaying the Backup date, to which server the
backup should be restored and the selected Storage group.
If Exchange cannot mount the store, run the Exchange “eseutil” application and try again.
Attix5 Pro V6.2 Copyright © Attix5. All rights reserved.
42
SERVER EDITION V6.0 for MICROSOFT WINDOWS
Restoring Exchange 2007 into a Recovery Storage Group
using VSS
Create the Recovery Storage Group
You can do this either by using the Microsoft Exchange Troubleshooting Assistant (ExTRA) tool,
or by running the New-StorageGroup cmdlet with the –Recovery parameter in the Exchange
Management Shell. In this FAQ, ExTRA is used.
To create the RSG using ExTRA, launch the tool by opening the Database Recovery Tool. (This
is found under the Toolbox work center in the navigation tree of the Exchange Management
Console (EMC). The tool will first want to check for any tool or configuration file updates that
may be available. After this, click on the Go to Welcome screen link. Enter a label for this
activity (such as “Create RSG”), and then click Next. On the appearing Tasks list, click Create
a Recovery Storage Group, and then select the Storage Group you wish to link with the
RSG. For example, if your Storage Group is called “First Storage Group”, you will select
that. Click Next once again.
You now need to provide a name for your RSG. The default name should be fine, namely
Recovery Storage Group. After this is done, click Create the RSG. After a while, you will be
notified that the RSG for the respective Mailbox Database has now been created. With the RSG
created, we can now move, copy or restore db and transaction log files to the RSG paths. To see
the path for the recovery storage group log and database files, click Show Create Recovery
Storage Group Information.
The default is C:\Program Files\Microsoft\Exchange
Server\Mailbox\<Storage Group>\RSGxxxxxxxxx. DO NOT TRY AND MOUNT THE RSG YET.
Restore the Mailbox Database using Attix5 and VSS
Go to the Restore tab in the Attix5 SE client. Click on the date that you require the data from.
As soon as you have closed the date, you will have the option to expand and all the data backed
up will appear. Click on the VSS writer section to the bottom of the selected date. One of the
options will be called Exchange writer. Expand this until you get to the databases. The
databases will have their GUID names, so you will have to go into the folder to identify the
database. Select the specific Mailbox Database you wish to restore, as well as the checkpoint
files and logs. DO NOT SELECT THE EXCHANGE WRITER IN ITS ENTIRETY FOR
RESTORE, AS THIS WILL OVERWRITE THE LIVE DATA!
Restore these files to an alternative location, for example D:\Restore. Now copy the restored
files to the Recovery Storage Group location as created in the previous part.
43
Attix5 Pro V6.2 Copyright © Attix5. All rights reserved.
Checking Integrity and retrieving Data
Go to the ExTRA Task Center. Under Manage Databases, Click Verify Database and
transaction Log Files. This is to verify that the database is in a clean shutdown state. As
soon as this is complete, you can mount the RSG by clicking on Mount or Dismount databases in
the Recovery Storage Group. This is under the Manage Recovery Storage Group heading. On
the next screen, you can mount the database. When the Mailbox Database has been mounted,
click Go back to task center, and then select Merge or copy mailbox content. The next
screen will show us the mailbox database, and there will be a button for Gather merge
information.
On the Select Merge Options page we must click on Perform pre-merge tasks. The final step
would be to select the mailboxes you wish to merge. You will have a list of users on the mailbox
database, click on the ones you want to merge. After doing this, wait for the tool to merge the
mailbox data from the RSG Mailbox Database to the selected mailbox.
When you have merged or copied the required Mailbox data, you can use ExTRA to dismount
and then remove the Recovery Storage Group. Be sure you remove the files in the RSGxxxxxxxxx
folder again after you have removed it, so that the files don‟t take up valuable disk space
Attix5 Pro V6.2 Copyright © Attix5. All rights reserved.
44
SERVER EDITION V6.0 for MICROSOFT WINDOWS
7. MS SQL Server
The Attix5 MS SQL plug-in provides SQL Server 2000/2005/2008 (including R2) protection
down to the individual table or file group.
Execute binary patching backups as well as
Transaction Log backups with automatic truncation. Restore options include redirection to
another SQL Server using the native SQL restore procedures and the ability to perform “rollback
restores”, enabling a database to be recovered to a specific backup job.
Installation and Configuration
Note: Attix5 Pro SE and the MS SQL Server plug-in need to be installed on the actual
SQL Server and the SQL services must be running.
Run the Plug-in Installer and select the MS SQL Server plug-in to upgrade the SE Client with
the MS SQL Server plug-in. After the upgrade, open the Attix5 Pro Client. You will notice a new
entry
on
the
Backup
Selection
tab,
in
the
left-hand
pane,
called
MS SQL Server.
To add and configure a SQL instance click on this entry:
In
the
right-hand
pane,
specify the global database
dump folder for the SQL
instances in the MS SQL
Server
Plugin
section.
You can use the Browse
button
to
browse
to
a
specific folder.
Note: Ensure that the
server has enough
free hard drive space
to store a data dump
of all the selected
databases.
Log Maintenance enables you to specify whether the SQL plug-in must truncate the MS SQL
logs once the backup has been completed to ensure that the log files will not use unnecessary
disk space. Click the Apply button to add the first SQL Server instance. A sub-node will be
created in the MSSQL Server section in the left-hand pane, as displayed in the image below. Use
the MS SQL Server Instance section pane to configure this SQL instance.
45
Attix5 Pro V6.2 Copyright © Attix5. All rights reserved.
MS SQL Server Instance: Last status provides information about the last connection to the
SQL Server. Enter the Server address, port, SQL username and password that the SE Client
must use to connect to the SQL Server.
Note: You need to manually enable TCP/IP ports in the SQL 2005 Management tools.
Click Apply.
The list of the available SQL databases is populated in the left-hand pane as sub-notes of the
selected instance, from where you can select the database that you want to backup. If you select
the entire section, all databases will be included, as well as any new databases created.
Select the database(s) that you wish to backup. Backup & Restore operations are not allowed
on the tempdb database (SQL-DMO ODBC SQLState: 42000).
To add another instance, click the MSSQL Server entry in the left-hand pane, and then click
the Add new server button in the right-hand MSSQL Server plug-in section. A new node will
be added. Configure the SQL Server settings and select the necessary databases.
Note: Ensure that you have sufficient rights if protecting a remote server.
Verify that you have included all the required SQL databases in the left-hand pane before you
initiate the first backup. To create your first backup, select Backup Now on the File menu.
Attix5 Pro will create an exact copy of the selected databases in the dump folder. These files will
be compressed and transferred to the Storage Platform. The next backup will compare the
selected storage groups with the selection from the previous backup, which is stored in the
cache. Attix5 Pro will create a patch file for each database. This file consists of all the changes
Attix5 Pro V6.2 Copyright © Attix5. All rights reserved.
46
SERVER EDITION V6.0 for MICROSOFT WINDOWS
made to the database since the last backup. Only the patch files and any new selections will be
backed up.
47
Attix5 Pro V6.2 Copyright © Attix5. All rights reserved.
How to Restore a SQL Database from a backup device
The first step is to restore the database from the Storage Platform. Click on the
Restore tab
and select the dump folder from the specific backup date. On the File menu, click Restore.
Select a restore location and restore the database.
Open the SQL Enterprise Manager.
From
the
Console
root,
expand
Microsoft SQL Servers and browse to
the Server where you would like to
restore the database.
databases
section
and
Expand the
select
the
database that you would like to restore.
If the database does not exist anymore,
you have to create and configure the
database
first.
Right-click
on
the
database, select All Tasks and click
Restore Database.
In the Restore as database window,
select the database you wish to restore.
Select From device and then click Select Devices. From the Restore from option, select
disk and then click Add. Browse to the folder where you have restored the database and select
the file.
Click OK accept the filename selected and OK again to accept the device.
Using SQL
functionality, you can select how you would like to restore the backup set. You can choose
between a complete or differential database, the transaction log or file group. If you are
restoring to a new database, you need to enable SQL to overwrite the database.
Click OK to start restoring the database. SQL Server Enterprise Manager will confirm that you
have successfully restored the selected database.
Attix5 Pro V6.2 Copyright © Attix5. All rights reserved.
48
SERVER EDITION V6.0 for MICROSOFT WINDOWS
8. Oracle 9i/10g
The Oracle plug-in, combined with the SE Client, provides an automated backup solution for
your Oracle Database at tablespace level. The plug-in will ensure that your business-critical data
is protected in case of corruption or loss. New files are automatically included for backup
without having to open the interface and selecting the files. Restore options include full media,
tablespace or datafile recovery.
Installation and Configuration
Note: Attix5 Pro SE with the Oracle plug-in needs to be installed on an Oracle Server
and the Oracle services must be running.
To upgrade Server Edition, run the Plug-in Installer and select the Oracle 9i/10g plug-in.
After the installation open the SE Client.
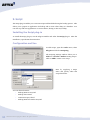
It is very important to ensure that the database is in Archive Log mode. Open the
Oracle Enterprise Manager Console, right-click on the database and select View/Edit Details.
Click the Recovery tab and enable Archive Log mode and Automatic archival if it is not
enabled. The database will have to be restarted. Open the SE Client and click on the Oracle
Backup tab to configure the necessary settings.
49
Attix5 Pro V6.2 Copyright © Attix5. All rights reserved.
Oracle Server settings: Enter the database name, user name and password that the SE
Client will use to connect to the Oracle database. Leave the port at its default setting of 1521.
Click Retrieve tablespace names. A list of all the available tablespaces will be displayed.
Database backup selection:
Select where you would like the SE Client to create the
Database dump folder. This folder is used by the SE Client to dump a copy of the selected
datafiles from where they will be backed up. The default folder is C:\Program Files\Attix5
Pro\Backup Client SE\OracleBackup.
Note: Ensure that your computer has enough free hard drive space to store a data
dump of the selected datafiles.
Select the tablespaces that you wish to backup. Selecting the root (127.0.0.1) will back up all the
tablespaces. The SE Client will perform a full backup of the selected files during each backup if
you enable the Perform Full Backup check box. If you do no enable full backups, it will only
backup the archive logs.
Note: The SE Client will enforce a weekly full backup between Friday 7PM and
Saturday 7PM.
Click Save selection. The SE Client will not back up the selected datafiles if you do
not save the selection.
Your Oracle Server Backup is now configured. To create your first backup, select Backup Now
from the File menu. The SE Client will create a hot backup of the selected datafiles in the dump
folder. These files will be compressed and transferred to the Storage Platform. The next backup
will compare the selected storage groups with the selection from the previous backup, which is
stored in the cache. The SE Client will create a patch file for each datafile. This file consists of
all the changes made to the datafile since the last backup. Only the patch files and any new
selections will be backed up.
How to recover an Oracle tablespace or datafile
You have the option to either recover or restore Oracle tablespaces or datafiles. If you recover
the datafiles, The SE Client will ensure that the tablespace or datafile is offline, restore the data
to its original place, recover the data and place the datafiles online again. This cannot be
done with the System tablespace, as it has to be online when you restore it.
The first step is to retrieve the files that you want to restore from the Storage Platform. Click the
Restore tab and select the dump folder from the specific backup date. On the File menu,
click Restore. Select a restore location (do not restore to the original location) and ensure
Attix5 Pro V6.2 Copyright © Attix5. All rights reserved.
50
SERVER EDITION V6.0 for MICROSOFT WINDOWS
that you select the recreate the directory structure check box. Restore the files. After the
files have been restored, open the Oracle Recover tab.
Oracle Server Settings: Supply the Oracle database name and your user name and password
that you use to connect to the Oracle database. Server Restore selection: Use the Browse
button and select the Recovery Folder where you restored the data from the Restore tab.
Click Retrieve Tablespaces. A list of the available tablespaces and datafiles will be displayed.
Select the datafiles that you wish to recover and click on Recover.
The files will be taken offline, the data will be restored to their original locations and the files
will be recovered. The SE Client will place them online after they have been recovered.
Advanced Note: If the restore dialog window displays any warnings or errors in red,
it is probably requiring a log file that is not located in the default location. In such a
case, you need to perform a manual recovery using SQL Plus, as described below.
Manual Recovery using SQL Plus (as sysadmin)
Follow these steps if the Recovery Tab restore process failed.
1.
Open SQL Plus and log in as sysadmin
2. Run the command Alter database recover cancel;
3. And then Recover datafile „path to table space‟;
4. Follow the on screen prompts. You may be asked to supply the path to specific log files.
These log files form part of the backup selection and would have been restored to the
specified dump folder during the restore process. If you cannot find it, search for the
missing log files in the backup history. You can either supply the path (remember to use
inverted commas) or copy the files to the Oracle folder listed in the error message.
5.
Next you must set the database to online again with Alter database datafile „path to
table space.dbf” online;
6. The last step is to open the database with Alter database open;
7.
51
The Oracle database will be opened and ready.
Attix5 Pro V6.2 Copyright © Attix5. All rights reserved.
Manual Recovery Example: If you see the follow error, or something similar as the
log names will not be the same, you must follow the above-mentioned steps to recover
the database.
Run the command Alter database recover cancel;
And then Recover datafile ‘C:\oraclexe\oradata\xe\users.dbf’;
SQL> recover datafile 'C:\oraclexe\oradata\xe\users.dbf';
ORA-00279: change 318468 generated at 04/09/2008 17:11:02 needed for thread 1
ORA-00289: suggestion :
C:\ORACLEXE\APP\ORACLE\FLASH_RECOVERY_AREA\XE\ARCHIVELOG\2008_0
4_15\O1_MF_1_7_%U_.ARC
ORA-00280: change 318468 for thread 1 is in sequence #7
Specify log: {<RET>=suggested | filename | AUTO | CANCEL}
If you hit RET, it will automatically try to use the suggested file, as specified in the
example. If the file is not available in the folder, a message will be displayed:
ORA-00308: cannot open archived log
'C:\ORACLEXE\APP\ORACLE\FLASH_RECOVERY_AREA\XE\ARCHIVELOG\2008_
04_09\O1_MF_1_8_3ZSQ4MML_.ARC'
ORA-27041: unable to open file
OSD-04002: unable to open file
O/S-Error: (OS 2) The system cannot find the file specified.
If the file cannot be found you have two options. Either point SQL Plus to the
Recovery folder with the filename command, or you can copy the file into the
required
Oracle
folder,
C:\ORACLEXE\APP\ORACLE\FLASH_RECOVERY_AREA\XE\ARCHIVELOG\2
008_04_09\ in the example above.
Files are copied back to the Oracle folder in this example. Once the file has been
copied, press RET to continue.
And then Recover datafile ‘C:\oraclexe\oradata\xe\users.dbf’;
SQL> recover datafile 'C:\oraclexe\oradata\xe\users.dbf';
ORA-00279: change 318494 generated at 04/09/2008 17:11:10 needed for thread 1
ORA-00289: suggestion :
Attix5 Pro V6.2 Copyright © Attix5. All rights reserved.
52
SERVER EDITION V6.0 for MICROSOFT WINDOWS
C:\ORACLEXE\APP\ORACLE\FLASH_RECOVERY_AREA\XE\ARCHIVELOG\2008_0
4_15\O1_MF_1_8_%U_.ARC
ORA-00280: change 318494 for thread 1 is in sequence #8
Specify log: {<RET>=suggested | filename | AUTO | CANCEL}
ORA-00279: change 318498 generated at 04/09/2008 17:11:15 needed for thread 1
ORA-00289: suggestion :
C:\ORACLEXE\APP\ORACLE\FLASH_RECOVERY_AREA\XE\ARCHIVELOG\2008_0
4_15\O1_MF_1_9_%U_.ARC
ORA-00280: change 318498 for thread 1 is in sequence #9
ORA-00278: log file
'C:\ORACLEXE\APP\ORACLE\FLASH_RECOVERY_AREA\XE\ARCHIVELOG\2008_
04_09\O1_MF_1_8_3ZSQ4MML_.ARC' no longer needed for this recovery
Specify log: {<RET>=suggested | filename | AUTO | CANCEL}
Continue with the Recover datafile ‘C:\oraclexe\oradata\xe\users.dbf’;
command and supplying the log files until you see the following message
…
Specify log: {<RET>=suggested | filename | AUTO | CANCEL}
Log applied.
Media recovery complete.
Alter database datafile 'C:\oraclexe\oradata\XE\users.dbf' online;
Database altered.
alter database open;
Database altered.
53
Attix5 Pro V6.2 Copyright © Attix5. All rights reserved.
How to restore an Oracle tablespace or datafile
The first step is to retrieve the files that you want to restore from the Storage Platform. Click the
Restore tab and select the dump folder from the specific backup date. On the File menu,
click Restore. Select a restore location and restore the files. Do not recreate the directory
structure.
There are a few different scenarios when recovering an Oracle database, tablespace or datafile.
After you have selected the recovery folder (the folder to where you restored the data) click on
Retrieve Tablespaces. A list of the available tablespaces will be displayed. Restore control
files must be enabled when you do a full restore. When you click Restore, the SE Client will
remind you to make sure that the database is offline. If you are only restoring a few datafiles,
make sure that they are offline before continuing. Change the necessary settings and click
Restore. The SE Client will restore the selected files to their original location but they will not
be recovered. After the Client has restored the files, you have to manually recover the files and
start the database.
Attix5 Pro V6.2 Copyright © Attix5. All rights reserved.
54
SERVER EDITION V6.0 for MICROSOFT WINDOWS
The following examples provide some assistance if you prefer to restore the data using SQL Plus.
Please note that these are advanced Oracle settings and that you need the required Oracle skills
to attempt any of these options.
Oracle tablespace or datafile Recovery
Recovering a Closed Database
Media or hardware failure:
1.
Determine which datafile or datafiles need to be recovered.
2. Shutdown immediately.
3. Open the SE Client and restore the dump directory from the Storage Platform. Open
the Oracle Restore tab and select the files that you want to restore. Click on Restore.
4. Open SQL Plus with the following command: sqlplus /nolog
5.
Connect / as sysdba
6. Mount the database with the startup mount; command
7.
Recover datafile 'c:\data\datafile1.dbf'; or recover tablespace
tablespacename; or recover database;
8. Open database.
Recovering a Opened Database
Media or hardware failure (Not the System Tablespace):
1.
Determine the datafile or datafiles that need to be recovered.
2. Open sqlplus /nolog and connect /as sysdba
3. Take the datafile offline alter database datafile 'filename' offline;
4. Open the SE Client and restore the dump directory. Select the datafile that you want to
restore.
5.
Recover datafile 'c:\data\datafile1.dbf'; or recover tablespace
tablespacename;
6. Bring the tablespace or datafile online (Step 16 in the next section – Recovery/Full
Recovery)
Recovering a Database
Media or hardware failure (System Tablespace):
1.
Unlike other tablespaces, the SYSTEM tablespace must be available in order to open the
database. Therefore, if any members of the system tablespace are damaged, they must be
restored now. Before doing this, make sure that the database is not open. It may be
mounted. To make sure, run the following command on the mounted, closed database.
55
2.
C:\Oracle\Ora92\bin> sqlplus / nolog
3.
connect / as sysdba
Attix5 Pro V6.2 Copyright © Attix5. All rights reserved.
4.
select status from v$instance; The following will be displayed:
STATUS
------MOUNTED
1 row selected.
5.
If the database is not open, restore the damaged files from the most recent backup
available restore dump directory and select the datafiles. Once all damaged files in the
system tablespace are restored, run the following command on the mounted, closed
database:
6.
recover tablespace system;
7.
alter database open;
8.
quit
Full Media Recovery
Recovery to the same location:
1.
Open SQL Plus and stop the database with the shutdown abort; command.
2.
Open the SE Client and Restore the entire dump folder from the Storage Platform. Open
the Oracle Restore tab and restore all files including the control files.
3.
Mount the database in SQL Plus: startup mount
4.
Recover database using backup controlfile; Accept the default path that is
suggested when restoring the log files. If the last log file cannot be located run the recover
database using backup controlfile; command again and supply the path to the redo folder
that you restored as well as the filename of the redo log file within that folder.
5.
Alter database open resetlogs;
6.
The Oracle database will be opened and ready.
Attix5 Pro V6.2 Copyright © Attix5. All rights reserved.
56
SERVER EDITION V6.0 for MICROSOFT WINDOWS
9. Script
The Script plug-in enables you to execute scripts and batch files during the backup process. This
allows you to prepare an application for backup and to create a data dump of a database. You
can also stop and start applications or services before, during or after any backup.
Installing the Script plug-in
To install the Script plug-in, run the Plug-in Installer and select the Script plug-in. After the
installation, open the SE Client interface.
Configuration and Use
To add scripts, open the Tools menu, select
Plug-ins and click on Scripting.
The Scripting settings window allows you to
Add new and Edit or Delete existing scripts.
Click on Add to create a new script.
Start by supplying a Script
name and specify when this
script should run.
You can choose between:
57
Backup/Restore start/end
Backup data created
Connection open/closed
Backup/Restore Transfer start/end
Attix5 Pro V6.2 Copyright © Attix5. All rights reserved.
Browse to the application or batch file that should be executed. Supply a location where it
should be executed as well as any other Parameters needed.
Specify whether you want the SE Client to wait for the process to be completed before
continuing with backup process by enabling the checkbox next to Wait for process to
complete.
Click Ok to save the new script. You can enable/disable scripts by clicking in the checkbox next
to the Script Name. After you have configured all your scripts, click Ok to close the Scripting
settings window.
Attix5 Pro V6.2 Copyright © Attix5. All rights reserved.
58
SERVER EDITION V6.0 for MICROSOFT WINDOWS
10. SharePoint
The Attix5 SharePoint 2003/2007/2010 plug-in provides protection for Content and individual
document/items of MS SharePoint 2003 (including SharePoint Services 2.0), MS SharePoint
2007 (including SharePoint Services 3.0) and MS SharePoint 2010.
Before you install
The default option to install the Attix5 SE Client service is as local system user but the Local
Windows system user account cannot be given access rights in SharePoint and the SE Client
Service should therefore be configured to run in another account other than System.
A Windows (or domain) user must be created that will only be used to run the SE Client service.
This user should be made a member of the Backup Operators group and should be protected
with a strong password as it will be given full rights in SharePoint.
Once the user has been created, it should be given the Site Collection Administrator role in
SharePoint using the SharePoint interface. This should be done for all Site Collections that need
to be backed up. Remember to include any Shared Services Provider (SSP) Site Collections in
this step. Failure to do so will result in errors when trying to back-up the SSP Web Applications
in your farm.
The user needs rights to read the registry:
The specific key that needs to be read from the registry for SharePoint 2010 is:
LocalMachine\SOFTWARE\Microsoft\Shared Tools\Web Server Extensions\14.0\Secure\
ConfigDb\dsn
The specific key that needs to be read from the registry for SharePoint 2007 (WSS 3.0) is:
LocalMachine\SOFTWARE\Microsoft\Shared
Tools\Web
Server\Extensions\12.0\Secure\
ConfigDb\dsn
The specific key that needs to be read from the registry for SharePoint 2003 (WSS 2.0) is:
LocalMachine\SOFTWARE\Microsoft\Shared
Tools\Web
Server
Extensions\Secure\
ConfigDb\dsn
In addition, this user must be given db_owner role (using SQL Management Studio) to the
Config database and all Content databases that need to be backed up.
59
Attix5 Pro V6.2 Copyright © Attix5. All rights reserved.
The above-mentioned user (as well as the SQL Server service user) should also be given Read
and Write file system rights to the dump folder as specified in the Attix5 SharePoint plug-in
interface.
Note: The dump folder itself is deleted and created again before being used, so if a UNC
path is used, the actual dump folder must not be a shared folder (this will cause an
access violation).
Example, the UNC path should be as follows: \\server\share\dump where dump can be
deleted by the user mentioned above. Specifying \\server\share as the dump folder
might cause access violations, because the service will then try to delete the share itself.
The steps should ensure that backups and restores can be done without access problems.
To summarize:
1.
Special user for running the Attix5 service.
2. Strong password.
3. Site Collection Administrator role for all Site Collections.
4. Db_owner role for Config and Content databases in SQL Server.
5.
File system rights in dump folder for Attix5 and SQL Server services.
6. Dump folder should not be a share itself, but can be a subfolder in a share.
Note: The SharePoint 2007 and 2010 Attix5 plug-in requires the installation of .NET 3.5
SP1. This applies for SharePoint 2003/2007/2010 when using the Attix5 SharePoint
plug-in V3.0 and above. This requires that .NET be installed prior to any upgrade of the
previous 2003 SharePoint plug-in.
Installation and Configuration
Notes:
Attix5 Pro SE and the Attix5 SharePoint plug-in must be installed on a physical
SharePoint server that is joined to the farm that is required for backup.
Please refer to the additional information provided in the “Attix5 SharePoint
Disaster Recovery” guideline.
Run the Plug-in Installer and select the SharePoint plug-in to add the plug-in to the existing
SE Client. After the upgrade, open the client.
After the installation, a new node
will be available in the left-hand
pane, called SharePoint Farm.
The
plug-in
will
automatically
communicate with the SharePoint
Attix5 Pro V6.2 Copyright © Attix5. All rights reserved.
60
SERVER EDITION V6.0 for MICROSOFT WINDOWS
farm using the SharePoint APIs and then retrieve and display a hierarchy of content in the tree.
As seen in the image on the left, individual files are displayed on the right-hand side.
Browse through the available nodes and select the items that you want to back up as you would
select files and folders in the default Backup Selection tab. Once you have made your
selection, you can click the Backup toolbar button to initiate the first backup.
Restoring SharePoint data
Restoring SharePoint data is as simple as selecting the applicable SharePoint node and the
required sub-nodes in the left-hand pane and then any individual files, if needed. The plug-in
does the rest.
Open the
Restore tab,
select the required databases
and files in the SharePoint
section and then click on the
Restore
button
in
the
toolbar.
Specify the restore location, and then click Ok. The SE Client will restore the files to the
specified location and the SharePoint plug-in will pick up the files and restore it to the
SharePoint server.
Once the restore is completed, confirmation will be supplied in the Restore dialog box and the
log file.
For a complete Disaster Recovery, first reinstall SharePoint, then select the complete
SharePoint node and do the restore.
Note: For Disaster Recovery, the server being restored to must have the same hostname
as before. Please refer to the additional information provided in the “Attix5 SharePoint
Disaster Recovery” guideline.
61
Attix5 Pro V6.2 Copyright © Attix5. All rights reserved.
11. System State
When the System State plug-in is selected for installation, two plug-ins are actually installed.
The plug-in used to perform a System State backup or restore depends on the operating system
that it‟s installed on:
System State (using WSB) for Windows 2008 and later
System State (using NTBackup) for operating systems prior to Windows 2008
Note: The VSS plug-in sometimes picks up a System State writer. This writer is not
supported and should not be used. For System State backup and restore, use the System
State plug-in.
Installation
To install the plug-ins, run the Plug-in Installer and follow the steps outlined below to
completion.
Notes:
The Attix5 Pro Server Edition Client must be installed on the computer before you
can install any plug-ins.
SE plug-ins require working space for the cache and disk space for creating a data
dump and patches.
Step 1: Specify Backup Client folder location
1.
Ensure that the correct Backup Client folder location is selected. If not, click the
Browse button, select the correct folder, and then click OK.
2. Click Next.
Step 2: Modify plug-in selection
1.
Select the System State check box.
2. Click Next.
Attix5 Pro V6.2 Copyright © Attix5. All rights reserved.
62
SERVER EDITION V6.0 for MICROSOFT WINDOWS
Step 3: Apply changes
On the Summary page, click the Apply requested changes button, and then click Next.
Step 4: Close Plug-in Installer
Click Finish to close the Plug-in Installer.
63
Attix5 Pro V6.2 Copyright © Attix5. All rights reserved.
System State (using WSB) for Windows 2008 and later
Notes:
On a new Windows Server 2008 R2 installation, Windows Server Backup
Features are not installed by default. To install Windows Server backup and
recovery tools, follow the instructions as specified by Microsoft:
http://technet.microsoft.com/en-us/library/cc732081.aspx.
Space requirement: Because the WSB plug-in splits the VHD into separate
files, the drive where the System State backup is stored needs to have enough
space for two copies of the System State backup. For example, if the System
State backup is 8 GB, a drive with at least 16 GB of space is required.
Enabling the System State (using WSB) plug-in
1.
On the Tools menu, point to Plug-ins, and then click System State (using WSB).
2. In the Backup Settings dialog box that appears, select the Enabled check box.
3. Select a dump target drive.
Note: A System State backup can be over 10 GB large. Ensure that you choose a
drive with enough disk space.
4. Click Ok.
Attix5 Pro V6.2 Copyright © Attix5. All rights reserved.
64
SERVER EDITION V6.0 for MICROSOFT WINDOWS
Backing up
Once the plug-in is enabled, you can select other data to back up, and then schedule backups or
initiate one manually by clicking the Backup button on the toolbar.
Warning: If installed on a Windows 2008 server, the plug-in will also back up Remote
Installation server images. These are included in the backup selection and can inflate the
backup significantly.
Tip: While the backup is in progress, it is useful to monitor its status in detail. To do this,
open a Command Prompt window and run the following command:
Wbadmin get status.
Restoring the System State using WSB
To restore the System State via WSB, you need to restore the System State data to its original
location and then launch the Windows Server Backup restore process via the command prompt.
To restore System State data:
1.
In the Backup Client, click the Restore tab.
2. Under the System State Backup target drive node, navigate to the
WindowsImageBackup folder.
3. Right click the folder name, and then click Include.
4. Click the Restore button on the toolbar.
5.
In the Save files in area of the Restore Options dialog box, select Original
location.
6. Click Ok.
7.
Once the contents of the WindowsImageBackup files are restored to their original
locations, you can invoke the Windows Server Backup tool to complete the restore
process.
To launch the Windows Server Backup restore process:
1.
In Windows Explorer, navigate to:
<System State Backup target drive>\WindowsImageBackup\<Machine
Name>\SystemStateBackup.
2. Open the restore.txt file and follow the instructions contained therein.
65
Attix5 Pro V6.2 Copyright © Attix5. All rights reserved.
System State (using NTBackup) for operating systems prior
to Windows 2008
The Attix5 Pro System State plug-in enables you to back up a collection of system-specific
components as a unit to a target directory that is automatically included in the daily backup
routine. These components include the following (depending on the operating system):
Boot files, including system files, and all files protected by Windows File Protection
(WFP)
The registry.
COM+ Class Registration database
Active Directory
SYSVOL directory
This plug-in is included in the SE installer. If it is not installed, run the Attix5 Pro Plug-in
Installer and select the System State Backup plug-in. After the installation, open the SE
Client application window.
Note: This plug-in is used for Windows Server 2003 only.
Installation and Configuration
Windows Server 2003
1.
On the Tools menu,
point to Plug-ins,
and
then
click
System State.
2. In the System State
Backup dialog box
that appears, select
the Enable System
State
backups
check box.
3. A local target folder
is required to create
the
System
State
backup. Type the path to a folder in the Backup to box or use the Browse button to
specify it, and then click OK. If the target folder does not exist, the SE Client will display
a message asking if it should create the folder. Click Yes. This folder will be included in
the backup selection list automatically.
Attix5 Pro V6.2 Copyright © Attix5. All rights reserved.
66
SERVER EDITION V6.0 for MICROSOFT WINDOWS
The System State plug-in is initiated at the beginning of each backup and uses Windows Backup
and Recovery tools to create the backup file. SE continues with the rest of the backup procedure
after the System State backup has been saved in the specified target folder.
Restore process
Windows Server 2003 (complete recovery):
1.
Click the Restore tab in the Backup Client.
2. Expand the backup date folder to restore from in the left-hand pane and restore the
sysstate.bkf file located in the target folder.
3. Open
Backup
the
and
Windows
Recovery
application (Start > All
Programs
>
Accessories > System
Tools > Backup).
4. If the Restore Wizard does
not appear by default,
click Restore Wizard on
the Tools menu. In the
Restore Wizard, click
Next to proceed to the
Backup
or
Restore
step.
5. Select Restore files and settings, and then click Next.
6. Browse to the restored sysstate.bkf file. (The default restore location is
C:\SystemState.)
7.
In the left-hand pane, expand File > sysstate.bkf created, and then select the
System State check box.
8. Click Next, and then click Finish to complete the Restore Wizard.
67
Attix5 Pro V6.2 Copyright © Attix5. All rights reserved.
12. VMware (ESX 3.5)
The Attix5 Pro VMware Plug-in has been designed for the backup of complete VM hosts via
VMware Consolidated Backup (VCB).
Supports the following subsets and related products:
ESX 3.5 through VCB
The VMware plug-in will connect to an ESX Server (or VirtualCenter Server) and show you the
list of installed VMs from which they can then be selected for backup.
With every backup, the VMware plug-in will dump a copy of each selected VM to a specified
location from which it will be backed up. Subsequent backups will result in patches being
generated. (Sufficient disk space and processing needed.)
This process does not require the VMs to be shut down or suspended prior to backup.
Installation
VCB as a third party application is required for the Attix5 Plug-in to work. It can be downloaded
from the on-site VM Server. Note the installation location of VCB seeing that you need to point
the Attix5 VMware Plug-in to this location as part of the configuration below.
To install the VMware plug-in on an existing SE Client, run the Plug-in Installer and select the
appropriate VM bundle subset that applies to your environment and licence acquired.
One of the following can be selected, providing that adequate licensing has been provisioned for:
5 VMs
20 VMs
50 VMs
Plus (Unlimited VMs)
Attix5 Pro V6.2 Copyright © Attix5. All rights reserved.
68
SERVER EDITION V6.0 for MICROSOFT WINDOWS
Configuration
The VMware Plug-in will be shown underneath the standard backup selection tree and forms
part of the existing backup selection tree. All configuration needs to be done within this view.
Start by selecting the main VMware (VCB) node in the tree. All required VMware settings will
be shown in the right-hand panel.
Verify the VCB Path and required Dump location. Each VM being backed up can be compacted
to save space for the dumps being created with degradation in the patching to be performed
during consecutive backups.
The default option to Create a single file for each VM can be switched off and method of
transfer can be selected in the drop-down options.
Click Apply and select the Add New Server Instance link next to the Apply button.
Select the Newhost(x) node in the tree that will allow for further configuration.
69
Attix5 Pro V6.2 Copyright © Attix5. All rights reserved.
The default host name can be changed by replacing the current name and then entering the
Username and Password to be used by the Attix5 SE Client when connecting to the VM
server(s). Click the Apply button, and then select the new VMware (VCB) node in the tree
view that will invoke a scan of the VMs that can be accessed through the provided settings.
VMware Backup
All VMs selected will be included with the next backup to be
performed by the SE Client by dumping the complete image
first and then using patching on every consecutive backup.
VMware restore
For restores, the VM image that was backed up must first be restored by selecting the
appropriate VM and then restoring it like any other item on the Restore tab and providing a
Restore location.
The standard VMware Converter Tool, amongst various options for restoring VMware images,
can be used after restoring the image to convert and import the VM image.
Attix5 Pro V6.2 Copyright © Attix5. All rights reserved.
70
SERVER EDITION V6.0 for MICROSOFT WINDOWS
13. VSS (Exchange 2003/7/10, MS SQL 2005/8)
Attix5 Pro makes use of the MS Volume Shadow Copy Service (VSS) to back up open files like
your Outlook PST file, which is just a fraction of what VSS can do. The VSS plug-in utilises VSS
on a much more advanced level by allowing you to protect any VSS-enabled database and
application available on your server with a single plug-in; without the need for a database dump.
VSS Explained
Please note that this explanation will only focus on functionality related to databases, even
though VSS is not limited to databases. VSS (Volume Shadow Copy Service) consists of three
basic components:
1.
Writers (e.g. MSSQL)
It is the responsibility of each database vendor (MS SQL, Oracle, Exchange, etc.) to
develop a VSS writer which will allow a requestor (see below) to back up the data without
having to understand the exact inner workings of the database engine. The writer ensures
data consistency and provides a safe way to back up the data, even while the application
or database is still running. It provides a common backup interface that is similar across
all databases, regardless of the vendor. Using writers is a way to ensure that the database
vendor controls the data access, not an outside party.
2.
Requestors (e.g. Attix5 Pro)
A requestor initiates the VSS process. The requestor uses a generic set of instructions to
initiate the VSS process and read data from the database. The instructions are the same
regardless of the database being backed up.
3.
Providers (e.g. Microsoft Windows)
The provider is the interface to the point-in-time imaging capabilities. An in-depth
discussion of providers is not needed for the purpose of this document. It is more
important to understand the Writer and Requestor.
71
Attix5 Pro V6.2 Copyright © Attix5. All rights reserved.
The Attix5 VSS plug-in
The VSS plug-in is a “Requestor” that (in theory) can back up any database or service that has a
VSS writer. These would include MS Exchange and MS SQL to name a few. In short, it works
like this:
1.
During the first backup, the VSS plug-in connects to the VSS writer of the database, reads
all the data and compresses it to the ToBackup folder from where it is transmitted to the
Storage Platform - no database dump is done.
2.
After the backup, the data that has been sent to the Storage Platform is moved from the
ToBackup folder to the cache.
3.
For subsequent backups, the data in the cache is compared to the database data as it is
being read by the VSS plug-in, to work out patches which are again stored in the
ToBackup folder.
4.
The patches are transmitted to the Storage Platform.
5.
After transmission to the Storage Platform the cache is updated by applying the patches to
the files in the cache.
6.
Repeat from step 3.
Notes: The VSS plug-in sometimes picks up a System State writer. This writer is not
supported and should not be used. For System State backup and restore, use the System
State plug-in.
It can be seen that with the VSS plug-in, databases are treated as large files with no need to
dump them separately. If delta blocking is used, the disk space requirements are further
reduced (at the expense of larger backups).
Advantages
Makes use of a generic set of instructions. So as new Writers are developed for
databases, Attix5 Pro should be able to back them up via the VSS plug-in.
NO DUMP SPACE needed. The VSS plug-in reads the data directly from the database,
without the need to make a database dump.
The backup should be much quicker since data is not first dumped and then patched
and compressed.
Disadvantages
Not all the features that are provided in the existing Attix5 Pro plug-ins are available in
the VSS plug-in (for example to use an Exchange recovery group).
Attix5 Pro V6.2 Copyright © Attix5. All rights reserved.
72
SERVER EDITION V6.0 for MICROSOFT WINDOWS
Installation and Configuration
Note: The VSS plug-in can only support VSS-enabled databases, applications and files
on the local machine where it is installed.
Run the Attix5 Pro Plug-in Installer and select the VSS plug-in to upgrade the SE Client with
the plug-in. After the upgrade, open the Attix5 Pro Client.
You will note a new entry in the left-hand pane, called VSS Plug-in. The VSS plug-in will
automatically display all the writers available on the server. If you do not see the expand option
(+) next to the VSS Plug-in node, right-click the node, and then select Refresh on the
shortcut menu that appears.
When you select the VSS Plug-in node, the VSS Backup options display in the right-hand pane.
Select the type of backup you wish to perform: Full Backup or Copy Backup.
Full Backup
Following a Full Backup, the backup history of each file will be updated and, in the case of
Exchange writers, the backup transaction logs will be truncated.
Warning: If employing other backup/archiving processes in addition to Attix5 Pro that
require full backup transaction logs (e.g. Exchange tape backup), it is recommended that
you use Copy Backup instead, as Copy Backups retain full transaction logs.
Copy Backup
Copy Backups leave the backup history of each file and the application logs as they were before
the backup. This is recommended if using additional backup/archiving processes that require
full backup transaction logs.
Warning: If both the SQL database and Exchange server are on the same machine, the
Full/Copy setting will apply to both.
73
Attix5 Pro V6.2 Copyright © Attix5. All rights reserved.
Browse through the available writers and select the items as you would select folders in the lefthand pane. Once you have made your selection, you can click the Backup toolbar button to
initiate the first VSS plug-in backup, as described earlier in this document.
Note: If the MS SQL Server item does not appear in the Backup Selection tree under the
VSS plug-in, ensure that the SQL Service VSS Writer service is running.
Tip: If selecting the Microsoft Exchange Writer, you have the option to bypass the
database integrity check. Please note that integrity checking is recommended by
Microsoft but may slow the backup preparation process down significantly. It should
only be skipped if it is certain that the files are in a good state and can be used for
recovery.
Restoring Databases Using the VSS plug-in
Open the
Restore tab, select the required databases and files in the VSS Writers section and
then click on the Restore button in the toolbar.
The Restore Options dialog box will appear. On the General tab, you will note that you
cannot restore to the original location when selecting any items from the VSS Database section
as VSS will do that once the data is restored. Select a temporary restore location using the
Browse button or enter a path to on in the Temporary folder box.
Attix5 Pro V6.2 Copyright © Attix5. All rights reserved.
74
SERVER EDITION V6.0 for MICROSOFT WINDOWS
Tip: A VSS Plug-in: Exchange tab in the Restore Options dialog box enables you
to configure VSS Exchange-specific restore options. If restoring Exchange Writer
items, ensure that you configure this tab, before proceeding to the next step.
Once you have configured all the relevant restore options, click Ok.
Warning: Restoring the SQL Server master database using the SqlServerWriter
sometimes fails. For more information on how to restore the master database, visit the
following links:
http://msdn.microsoft.com/en-us/library/aa173557%28v=SQL.80%29.aspx
http://msdn.microsoft.com/en-us/library/aa173515%28v=SQL.80%29.aspx
The SE Client will restore the files to the specified location and VSS will thereafter pick up the
files and restore them to the applicable database. Confirmation will be supplied in the Restore
dialog box and the log file once the restore is completed.
Note: For MS SQL Server restorations, if you make your restore selection on the file
level, the VSS plug-in will not be used to restore the entire database. Instead, the files
that you have selected will only be restored to the location that you specified. You will
have to attach the files to the database yourself.
75
Attix5 Pro V6.2 Copyright © Attix5. All rights reserved.
Example: Restoring Microsoft Exchange Writer using the VSS plug-in
1.
Open the
Restore tab, expand the VSS Writers node, and then select the
Microsoft Exchange Writer node.
2. Include the writer by right-clicking the node, and then selecting Include on the
shortcut menu that appears.
3. Click the Restore button in the toolbar. The Restore Options dialog box will appear.
4. On the General tab, you will note that you cannot restore to the original location when
selecting any items from the VSS Database section as VSS will do that once the data is
restored. Select a temporary restore location using the Browse button or enter a path
to on in the Temporary folder box.
5.
Click the VSS Plug-in: Exchange tab and configure the restore options.
Tips:
It is recommended that Replay outstanding transaction logs be
enabled when restoring from the most recent database backup. Please
note that you need to disable this option if restoring from a backup prior
to the most recent one.
Automatically dismount databases and allow overwrites is
disabled by default (as a safety precaution) but enabling it is
recommended to prevent restore failures due to Exchange settings. Only
databases selected for restore will be overwritten.
6. Click Ok.
Attix5 Pro V6.2 Copyright © Attix5. All rights reserved.
76
SERVER EDITION V6.0 for MICROSOFT WINDOWS
Index
A
Advanced Options, 8
N
Notifications, 7, 8
Automatic Backups, 12
B
O
Oracle, 6, 49, 50, 51, 52, 54, 55, 56, 71
Backup Account, 8
P
Backup Client, 4, 6, 20, 37, 50, 62, 65, 67
Backup Selection, 18, 45, 50, 51, 61, 65, 67, 69
C
parameter, 43
password, 9, 46, 50, 51, 59, 60, 70
Patching, 41, 45, 69, 70
cache, 4, 10, 37, 40, 46, 50, 62, 72
R
Client interface, 4, 36, 57
Control Panel, 9
registry, 59, 66
D
Restore Wizard, 41, 42, 67
S
Domino, 6, 36, 37, 38
E
Script, 6, 57, 58
SharePoint, 1, 6, 59, 60, 61
Email Notification, 6, 7, 8
Single Item Recovery, 6, 18, 20, 21
Exchange, 1, 6, 9, 10, 11, 15, 16, 18, 19, 20, 21, 39,
Single Mailbox Recovery, 6, 9, 10, 11, 12, 13, 14, 15,
40, 41, 42, 43, 71, 72, 73, 74, 75, 76
Export, 15, 20
16, 17, 39
SMTP server, 8
G
Graphical User Interface, 6
SQL, 1, 6, 45, 46, 48, 51, 52, 55, 56, 59, 60, 71, 72,
73
Storage Platform, 4, 20, 37, 40, 41, 42, 46, 48, 50,
54, 55, 56, 72
GUID, 43
System State, 1, 6, 62, 64, 65, 66, 67
I
T
Icons, 2
install, 4, 5, 6, 7, 9, 18, 20, 21, 36, 39, 41, 45, 49, 57,
toolbar, 21, 61, 65, 74, 76
59, 60, 62, 63, 64, 65, 66, 68, 73
M
menu, 6, 7, 9, 10, 13, 27, 37, 39, 40, 41, 46, 48, 50,
54, 57, 64, 66, 67, 73, 76
77
Attix5 Pro V6.2 Copyright © Attix5. All rights reserved.
U
UNC, 60
username, 70
V
VMware, 1, 6, 68, 69, 70
VSS, 6, 43, 71, 72, 73, 74, 75, 76
Attix5 Pro V6.2 Copyright © Attix5. All rights reserved.
78