1
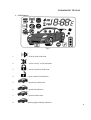
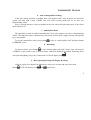
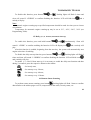
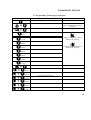
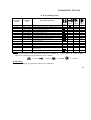
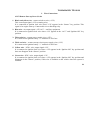
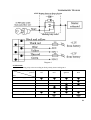
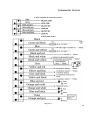
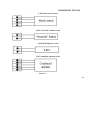
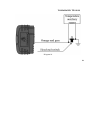
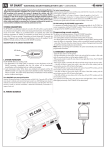
TOMAHAWK TW-9010
®
TOMAHAWK
CAR ALARMS
TW-9010
Two Way Car Alarm System
USER MANUAL
INSTRUCTIONS FOR INSTALLATION
TOMAHAWK TW-9010
CONTENTS
USER MANUAL
1
2
3
4
5
6
7
8
9
10
11
12
13
14
15
16
17
18
19
20
21
22
23
24
25
26
27
28
29
30
31
32
33
34
35
System main features
Remote control trinkets
LCD features
Arming mode
Arming with siren disabled
Automatic arming and re-arming
Immobilizer features
Disarming
Opening/closing doors with engine working
Two-step door opening/channel 3
Remote engine start-up
Remote engine cut-off
Turbo timer
Warming-up engine to specified temperature
Daily (1, 2, 4, 12-hour) automatic start-up
Remote status scanning
Remote boot opening
2nd auxiliary channel
Car searching
Remote shock sensor disabling
Alarm modes
“Panic” mode
“Anti-hijack” mode
“Valet” mode
Call driver
“Override” button functions
Emergency arming/disarming
Remote start-up preparation for cars with manual transmission
Programming auxiliary trinkets
LED indicator operation modes
Trinket-pager battery replacement
Programming mode
Programming trinket-pager functions
Programming table
Description of programmable functions
1
2
3
4
5
6
Basic installation principles
Choosing locations for main units
Wire connections
Selection of manual or automatic transmission
Connection of central lock
Setting shock sensor
Connection diagram
Engineering data
2
3
4
6
6
7
7
7
7
8
8
8
9
9
10
10
11
11
11
11
11
12
12
12
13
13
14
15
15
16
16
17
18
19
20
INSTRUCTIONS FOR INSTALLATION
23
23
25
27
28
28
29
37
1
TOMAHAWK TW-9010
USER MANUAL
1. System Main Features
5-button 2-side programmable trinket with LCD
LCD backlight
Vibration mode
Anti-scanner
Anti-grabber
Programmable trinkets (up to 4 items)
Visual and sound confirmation of functions performed
Arming with siren disabled
Secured remote engine start-up/cut-off
Installation option for cars with automatic or manual transmission
Installation option for cars with gasoline or diesel engines
Cabin temperature control
Auxiliary temperature sensor
Automatic engine warm-up to specified temperature
Daily (1, 2, 4, 12-hour) automatic start-up
Defective area bypass with visual and sound confirmation
Two-zone shock sensor
Remote shock sensor disabling
Protection against mis-operations
Self-diagnostics
3 extra channels
“Anti-hijack” mode
“Panic” mode
“Valet” mode
Doors, hood and boot security
Trinket-pager battery charge indication
Trinket-pager battery power-saving mode
“Driver calling” feature
Car searching
Clock, alarm-clock and timer built in trinket-pager
System status LED indication
Central lock built-in relay
Status memory
Two-step disarming
Two-step central lock opening
Engine locking
Automatic pager active area control
Turbo timer
2
TOMAHAWK TW-9010
2. Remote Control Trinkets
3
TOMAHAWK TW-9010
3. LCD Features
Fig. 3
1.
-- security mode indication.
2.
– “silent security” mode indication
3.
– closed central lock indication
4.
-- open central lock indication
5.
– open door(s) indication
6.
– open hood indication
7.
– open boot indication
8.
- parking lights flashing indication
4
TOMAHAWK TW-9010
9.
– trinket-pager transceiver operation indication
10.
– indication for presence in active zone
11.
– power-saving mode indication
12.
– “driver call” indication
13.
– warm-up to specified temperature mode indication
14.
– daily auto start indication
15.
- light shock indication
16.
– strong shock indication
17.1
- shock sensor warning zone disabling indication
17.2
- shock sensor disable indication
18.
- “Anti-Hijack” mode indication
19.
- vibration mode indication
20.
- “Valet” mode indication
5
TOMAHAWK TW-9010
21.
- hand-brake disengage indication
22.
- started engine indication
23.
- battery level indication
24.
- timer switch-on indication
25.
- alarm-clock switch-on indication
26.
27.
- clock
- temperature measurement units (C or F)
4. Arming Mode
To arm a car, I is necessary to press button
1 time. Parking lights will flash 1 time; siren will
sound 1 “CHIRP” to confirm entry in security mode, doors and windows will close (if connected).
LCD will display icons
and
.
In case when siren sounds 3 “CHIRPS”, it means that the system detected and disabled a
defective zone (open door, hood, boot or hand-brake disengaged). The system will automatically
take this zone for protection as soon as the zone is repaired (door, hood, boot closed and hand-brake
engaged).
5. Arming Mode with Siren Disabled
To arm a car without siren sounds (all messages and confirmations will be sent by the system to
the trinket-pager only), press button
1 time. Parking lights will flash 1 time to confirm entry in
security mode, doors will close. LCD will display icons
and
.
You can also switch this mode ON and OFF while in security mode.
6
TOMAHAWK TW-9010
6. Auto Arming and Re-arming
If the auto arming function is enabled, then: with ignition OFF, after all doors are closed the
system will alert with 1 long “CHIRP” and will switch security mode ON 10 sec later (see
Programming Table).
Auto re-arming function is always enabled in the case when after disarming none of the doors
open within 30 sec.
7. Immobilizer Mode
The immobilizer mode is enabled automatically 30 sec after ignition cut-off (see Programming
Table). LED indicator glows continuously in this mode. In this mode, engine start-up with ignition
key is not possible.
To exit the immobilizer mode, press button
1 time or switch ignition OFF and press button
OVERRIDE 1 time.
8. Disarming
To disarm vehicle, press button
1 time. Parking lights will flash 2 times; siren will sound 2
“CHIRPS” (if the system is not in security mode with siren disabled) to confirm disarming, doors
will open and lighting will go in (if connected). LCD will display icon
.
9. Door Opening/Closing with Engine Working
If the car engine was started with ignition key, then you can open and close doors with
button
. LCD will display icons
and
respectively.
7
TOMAHAWK TW-9010
10. Two-step Door Opening or Channel 3
These functions are not available at the same time! Use Programming Table to select one
thereof.
1. Two- step door opening function is selected.
Press button
to disarm and open the driver’s door. Second press and hold of this button will
open other doors.
2. Auxiliary channel function is selected.
Press and hold button
to enable an auxiliary (supplementary) channel.
ATTENTION!
These functions require additional connection while installation.
11. Turbo Timer
Tomahawk TW-9010 provides a turbo function for vehicles with turbo engines. If this function
is enabled, the engine keeps on running after ignition OFF for 1, 3 or 6 min (see Programming
Table).
12. Remote Engine Start-up
Press button
. Parking lights will flash 3 times; siren will sound 3 “CHIRPS”. LCD will
display the following icons:
1.
– engine start-up attempt.
2.
– if engine fails to start for any reason.
3.
– engine started (accompanied by trinket-pager melody)
The engine will run during pre-programmed time (see Programming Table), after which will
stop automatically. The run time can be prolonged using buttons
and
by 5 min after each
press, to 20 min maximum. LCD will display time before engine stop.
8
TOMAHAWK TW-9010
ATTENTION!
Remote engine start-up cannot be done in the case if:
1. Gear lever is not in neutral position.
2. Ignition switched ON.
3. The hood is open.
4. The hand-brake is not engaged.
In any of these occasions, siren will sound 4 “CHIRPS” at a remote start-up attempt.
13. Remote Engine Stop
In the case when the engine was started using remote start-up, you can stop it by pressing button
. Parking lights will flash 4 times; siren will sound 4 “CHIRPS”. LCD will hide icon
a melody will play.
and
14. Warming-up Engine to Specified Temperature
Tomahawk provides for an auxiliary temperature sensor for installation under the hood (see
Diagram No.10). If this sensor is installed, engine start and warm-up is performed by this sensor’s
data, otherwise by the cabin temperature sensor data.
and
simultaneously. Parking lights
To enable this function, press and hold buttons
will flash 1 time and siren will sound 1 “CHIRP” to confirm enabling the function. LCD will display
icon
and the specified temperature for warm-up switch-on (programmable, see Programming
Table) accompanied with a melody. When temperature reaches the specified value for automatic
warm-up switch-on, the engine will start for previously programmed time (see Programming Table).
9
TOMAHAWK TW-9010
To disable this function, press buttons
and
. Parking lights will flash 2 times and
siren will sound 2 “CHIRPS” to confirm disabling the function. LCD will hide icon
melody will play.
and a
Note:
Automatic engine warming-up to specified temperature should be made six times per two hours
as maximum.
Temperature for automatic engine warming-up may be set at -5°C, -10°C, -20°C, -30°C (see
Programming Table).
15. Daily (1, 2, 4, 12-hour) Automatic Start-up
To enable this function, press and hold buttons
and
simultaneously. Siren will
sound 1 “CHIRP” to confirm enabling the function. LCD will display icon
and a melody will
play.
After this function is enabled, beginning from the next day, the system will automatically start
engine at the time of enabling.
To disable the daily start-up function, press buttons
and
. Parking lights will flash 2
times and siren will sound 2 “CHIRPS” to confirm disabling the function. LCD will hide icon
and a melody will play.
To enable 1, 2, 4 and 12 hour start-up, it is necessary to enable the daily start function and then
during 5 seconds to press the respective button on the trinket:
– for hourly start,
– for start-up every 2 hours,
– for start-up every 4 hours,
– for start-up every 12 hours.
16. Remote Status Scanning
To perform remote status scanning, press button
. Parking lights will flash 3 times to confirm
data transfer to the trinket-pager receiver; temperature in the cabin, security status, etc.
10
TOMAHAWK TW-9010
17. Remote Boot Opening
To remotely open the boot, press and hold button
. Parking lights will flash 3 times to
.
confirm the boot opening. LCD will display icon
ATTENTION!
This function requires auxiliary connection while installation.
18. 2-nd Auxiliary Channel
To enable this function, press and hold button
sound 1 “CHIRP” to confirm enabling the function.
. Parking lights will flash 1 time, siren will
ATTENTION!
This function requires auxiliary connection while installation.
19. Car Search
To enable this function, press and hold buttons
and
simultaneously. Parking lights will
flash 6 times and siren will sound 6 “CHIRPS” to show car location.
20. Remote Shock Sensor Cut-off
To enable this function, while in security mode press and hold buttons
and
simultaneously. LCD will display icon
to show that the shock sensor warning zone is
disabled. Second press on the buttons will disable the shock sensor completely and LCD will display
icon
.
To enable the shock sensor, press buttons
and
once again.
21. Alarm Modes
On triggering the shock sensor warning zone (light shock), parking lights will flash 6 times,
siren will sound 3 “CHIRPS”. LCD will display icon
and a melody will play.
11
TOMAHAWK TW-9010
On triggering the shock sensor main zone (strong shock), the system will enable alarm mode for
25 sec. LCD will display icon
and an alarm signal will sound.
On triggering any other zone, the system will enable alarm mode for 30 sec. LCD will display an
icon corresponding to the triggered zone (see page 3) and an alarm signal will sound.
ATTENTION!
To disable the alarm signal, press button
secured.
. This will cut the alarm mode off but the car will remain
22. “Panic” Mode
To enable this function, press and hold buttons
and
simultaneously, engine must not be
started. Parking lights will flash 3 times and siren will sound 3 “CHIRPS” to attract attention to your
car.
23. “Anti-Hijack” Mode
To enable this function, press and hold buttons
and
simultaneously. Parking lights will
flash for 30 sec, then the system will enable alarm mode, engine starter will be locked. LCD will
display icon
and an alarm signal will sound.
To disable this mode, press button
.
This mode can be also enabled using button “Anti-hijack”. Press button “Anti-hijack” (car
engine must be started). Parking lights will blink for 30 sec, after which the system will enable
alarm mode, engine starter will be locked. This mode will not be disabled before button
pressed. You can also exit this mode by holding button “Anti-hijack” for 5 sec.
is
24. “Valet” Mode
To enable this function, press and hold buttons
,
and
simultaneously. Parking
lights will flash 4 times and siren will sound 4 “CHIRPS” to confirm Valet mode enabling. LCD
will display icon
, and a melody will play.
12
TOMAHAWK TW-9010
In this mode, only service functions are available, such as auxiliary channels, car search, call
driver, etc. Also available are re-arming function and programming mode.
To disable this function, again press
,
and
simultaneously. Parking lights will
flash 3 times and siren will sound 3 “CHIRPS” to confirm Valet mode disabling. LCD will hide icon
, and a melody will play.
25. Call Driver
To enable this function, press call button located on antenna-transmitter. LCD will display icon
, and a melody will play.
26. “Override” Button Functions
Some of TOMAHAWK TW-9010 functions can be enabled without control trinkets. To enter
this mode, do the following:
1. Switch ignition OFF
2. Using “Override” button to select required function:
A) “Valet” mode – 3 times
B) Daily auto start – 4 times
C) Auto warm-up to specified cabin temperature – 5 times
3. Switch ignition ON
4. The system will confirm the selected function with siren CHIRPS and LED flashes:
A) “Valet” mode – 3 CHIRPS and flashes
B) Daily auto start – 4 CHIRPS and flashes
C) Auto warm-up to specified cabin temperature – 5 “CHIRPS” and flashes
5. To enable/disable the functions, press button “Override”
6. The system will confirm enabling/disabling the function with siren “CHIRPS” and LED
flashes:
13
TOMAHAWK TW-9010
1 “CHIRP” and flash – function enabled
2 “CHIRPS” and flashes – function disabled
7. Switch ignition OFF.
NOTE:
If the daily auto start function is enabled, the engine will start up immediately after ignition is switched
OFF. Use your remote control trinket to stop the engine.
27. Emergency Arming/Disarming
1. For emergency arming:
A) Switch ignition ON (engine must not be started)
B) Press button “Override” 8 times
C) Switch ignition OFF
Parking lights will flash 1 time and siren will sound 1 “CHIRP” to confirm the function
enabling. 20 sec later the system will enable security mode.
NOTE:
If 20 sec after emergency arming any of security zones is triggered, the system will alert you with 4
parking light flashes and 4 siren “CHIRPS” providing you 20 sec to disarm the car. If disarming does not take
place, the system will enable alarm mode.
2. For emergency disarming:
A) Switch ignition ON (engine must not be started)
B) Press button “Override” 4 times
C) Switch ignition OFF
Parking lights will flash 2 times and siren will sound 2 “CHIRPS” to confirm the function
enabling.
NOTE:
Remote control trinkets remain functioning after emergency arming/disarming.
14
TOMAHAWK TW-9010
28. Remote Start-up Preparation for Cars with Manual Transmission
To ensure capability of remote start-up for cars with manual transmission, the gear lever should
be in neutral position.
Before stopping car engine, perform the following procedures:
1. Enable car hand-brake (engine should be started)
2. Press button
, LCD will display icon
, and a melody will play.
Perform step 3 and 4 within 30 sec
3. Remove key from ignition lock (engine should keep on running)
4. Open the door, get out the car and close the door
If all the steps are performed correctly, the system will automatically stop the engine, if not –
capability of remote start-up will be disabled.
29. Programming Auxiliary Trinkets
TOMAHAWK TW-9010 provides for recording up to 4 remote control trinkets in its memory.
To record, perform the following:
1.
2.
3.
4.
Switch ignition ON (engine should not be started)
Press and hold button “Override”
Wait for 4 “CHIRPS” to confirm entry in the trinket programming mode
Release button “Override”
5. Press and hold buttons
and
before you hear siren “CHIRPS”, confirming
memorization of a new trinket (1 “CHIRP” for first trinket, 2 “CHIRPS” for second trinket, 3
“CHIRPS” for third trinket and 4 “CHIRPS” for fourth trinket)
15
TOMAHAWK TW-9010
6. The system will automatically exit the trinket programming mode, if it does not receive
signals from the trinket within 6 sec.
ATTENTION!
All un-programmed trinkets will be erased from the memory.
30. LED Indicator Operation Modes
The system displays its status using LED indicator when car ignition is switched OFF.
System status
1. Remote start-up mode and Immobilizer mode
2. Car disarmed
3. Car armed
4. Daily auto start mode
5. Auto warm-up to specified temperature mode
6. Daily auto start mode and Auto warm-up to specified temperature
mode
7. “Valet” mode
Number of flashes
Glowing continuously
Disabled
1 flash
2 flashes
3 flashes
4 flashes
5flashes
31. Trinket-pager Battery Replacement
If battery charge indicator looks like that
replacement.
1. Open trinket-pager battery cover
2. Remove used battery
, it means the battery is low and needs prompt
3. Press button
4. Insert new battery
5. Close trinket-pager battery cover
6. Press button
Battery type: AAA. Alkaline batteries are recommended.
16
TOMAHAWK TW-9010
32. Programming Mode
To enter the programming mode, perform the following:
1. Switch ignition ON (engine should not be started)
2. Press button “Override” 6 times
3. Switch ignition OFF (6 siren “CHIRPS” will confirm entry in programming mode)
Use button “Override” to select required function. Each press means change to the next function.
The system will indicate selected function with siren “CHIRPS”:
Short “CHIRP” – 1
Long “CHIRP” – 5
EXAMPLE:
14 button “Override” presses – 2 long and 4 short “CHIRPS” – function 14 is selected
See numbers and descriptions of functions in Programming Table.
17
TOMAHAWK TW-9010
33. Programming Trinket-pager Functions
Buttons used
Functions performed
Notes
Backlight switch On
Disabled automatically after 5 sec
Power saving mode switch ON
Trinket-pager receiver switched
OFF automatically 2 min after
disarming
Sound/Vibration mode toggle
Clock, alarm-clock and timer setting mode
hold
Clock setting mode - hour
Clock setting mode - minutes
1 time
Setting hour/minute forward.
Hold for fast scrolling.
Alarm clock setting mode - hour
2 times
Alarm clock setting mode - minutes
3 times
Setting hour/minute backward.
Hold for fast scrolling.
Alarm clock setting mode – ON/OFF
4 times
Timer setting mode - hour
5 times
Timer setting mode - minutes
6 times
Timer setting mode – ON/OFF
7 times
Alarm clock setting mode
Timer setting for 10 min
1 time
Timer setting for 20 min
2 times
Timer setting for 30 min
3 times
Timer setting for 60 min
4 times
Timer setting for 90 min
5 times
Timer setting for 120 min
6 times
18
TOMAHAWK TW-9010
34. Programming Table
Number of
“Override”
presses
Confirmation
Description of function
1 time
2 times
3 times
4 times
5 times
6 times
7 times
8 times
9 times
10 times
1 short “CHIRP”
2 short “CHIRPS”
3 short “CHIRPS”
4 short ‘”CHIRPS”
1 long “CHIRP”
1L+1S “CHIRPS”
1L+2S “CHIRPS”
1L+3S “CHIRPS”
1L+4S “CHIRPS”
2 long “CHIRPS”
11 times
12 times
13 times
14 times
15 times
2L+1S “CHIRPS”
2L+2S “CHIRPS”
2L+3S “CHIRPS”
2L+4S “CHIRPS”
3 long “CHIRPS”
16 times
3L+1S “CHIRPS”
Time to stop engine after remote start (min)
Specified engine temperature for automatic warm-up (oC)
Starter operation time for remote start-up (msec)
Engine operation control on order:
Time for enabling 2-nd auxiliary channel (sec)
Siren impulse duration (msec)
Cable IGN 2 (ON/OFF) / Door closing at remote start-up
Starter ON delay before gasoline/diesel engine start (sec)
Duration of central lock opening/closing impulse (sec)
Two-step door opening or 3rd auxiliary
channel/immobilizer
Safe driving function
Auto arming
Cabin lighting delay count (sec)
Time for cabin light switch ON/window raising (sec)
Temperature measurement units/type of locking (black
and white cable)
Turbo- timer
1
1
1
1
CHIRP
5
-5
800
Ver.1
0.8
100
Ver.1
2
Ver.1
Ver.1
CHIRPS
10
-10
1200
Ver.2
10
10
Ver.2
10
Ver.2
Ver.2
CHIRPS
CHIRPS
20
-30
3000
OFF
Ver.1
1
Ver.1
Ver.1
Ver.1
Ver.2
15
Ver.2
Ver.2
Ver.2
Ver.3
30
Ver.3
Ver.3
Ver.3
OFF
1 min
3 min
6 min
15
-20
1800
Ver.3
30
15
Ver.3
10
Ver.3
Ver.3
constant
20
Ver.4
10
Ver.4
Ver.4
45
Ver.4
Ver.4
NOTE:
The system confirms selected functions using siren “CHIRPS”: L – long “CHIRP”, S – short “CHIRP”.
Function is confirmed using the following siren “CHIRPS”:
– 1 “CHIRP”,
– 2 “CHIRPS”,
– 3 “CHIRPS”,
– 4 “CHIRPS”
ATTENTION!
Factory settings for programmable functions are underlined.
19
TOMAHAWK TW-9010
35. Description of Programmable Functions
1. Time allotted for engine running after remote start-up: 5/10/15/20 min.
2. Engine temperature when automatic warm-up is switched ON (if the function is enabled): -5o/
-10o/-20o/30oC.
3. Time for starter operation when remote start-up function is enabled: 800/1200/1800/3000 ms.
Time for the first start-up attempt is specified. If first attempt fails, the system will increase time
for each three subsequent attempt by 200 msec.
ATTENTION!
Set starter operation time for 3000 msec only when engine operation is controlled by tachometer.
4. Engine operation control versions:
Version 1 – by vehicle network voltage.
Version 2 – by oil pressure sensor.
Version 3 – by tachometer.
ATTENTION!
If you choose 3rd version of engine operation control, it is necessary to program idle run RPM
as follows:
1. Disconnect all power users on the vehicle (such as conditioner, radio and tape recorder,
amplifier).
2. Switch ignition ON and press button OVERRIDE 9 times.
3. Switch ignition OFF. Siren will sound 9 “CHIRPS” and LED will give 9 flashes. Wait for
the LED to glow.
4. Start engine with ignition key.
5. After engine speed reaches 500-1500 RPM and the engine is warmed enough, go to the next
step.
6. Press and hold button OVERRIDE 1 time. If the procedure is successful, the system will
sound 1 “CHIRP”, otherwise it will alert with 4 “CHIRPS” of the necessity to repeat the
procedure.
20
TOMAHAWK TW-9010
5. Enabling impulse length for 2nd auxiliary channel: 0.8/10/30/constant.
6. Siren impulse (klaxon) duration: 100/10/15/20 msec.
7. Wire IGN 2 ON/OFF (see wiring diagram) and door auto closing at remote start-up:
Version 1 – IGN 2 ON, locks do not close automatically at remote start-up;
Version 2 – IGN 2 OFF, locks do not close automatically at remote start-up;
Version 3 – IGN 2 ON, locks close automatically at remote start-up;
Version 4 – IGN 2 OFF, locks close automatically at remote start-up.
8. Starter switch-on delay before remote engine start-up:
2 sec - for gasoline engines
10 sec – for diesel engines
9. Enabling impulse length for central lock:
Version 1 – Closing impulse – 0.8 sec, opening impulse – 0.8 sec;
Version 2 – Closing impulse – 3.6 sec, opening impulse – 3.6 sec;
Version 3 – Closing impulse – 0.8 sec, 2 opening impulses – 0.8 sec;
Version 4 – Closing impulse – 30 sec, opening impulse – 0.8 sec;
10. Choice of functions: 3rd auxiliary channel or two-step door opening/immobilizer:
Version 1 – 3rd auxiliary channel, immobilizer OFF;
Version 2 – Two-step door opening, immobilizer OFF;
Version 3 – 3rd auxiliary channel, immobilizer ON;
Version 4 – Two-step door opening, immobilizer ON.
11. Safe driving function:
Version 1 – Doors do not close and are automatically open after ignition ON and OFF
respectively.
21
TOMAHAWK TW-9010
Version 2 – Doors are automatically locked 10 sec after ignition ON and open
immediately after ignition OFF.
Version 3 – Doors are automatically locked 30 sec after ignition ON and open
immediately after ignition OFF.
12. Auto arming.
Version 1 –OFF;
Version 2 – ON without locking doors
Version 3 – ON with locking doors
13. Cabin lighting delay count. The system will secure doors after the specified period (1 sec/15
sec/30 sec/45 sec) after pressing button
.
14. Time for closing windows after vehicle arming or switching cabin lighting ON after
disarming.
Version 1 – Switching cabin lighting ON for 20 sec after disarming
Version 2 – Switching cabin lighting ON for 30 sec after disarming
Version 3 – Closing windows 20 sec after arming
Version 4 – Closing windows 30 sec after arming
15. Selection of cabin temperature measurement units displayed on trinket-pager: oC or oF /
engine auxiliary blocking type (black and white cable).
Version 1 – Measurement units oC, auxiliary blocking normally open
Version 2 – Measurement units oF, auxiliary blocking normally closed
Version 3 – Measurement units oC, auxiliary blocking normally closed
Version 4 – Measurement units oF, auxiliary blocking normally open
16. Turbo timer function.
4444444
22
TOMAHAWK TW-9010
INSTRUCTIONS FOR INSTALLATION
1. Basic Installation Principles
TOMAHAWK TW-9010 vehicle alarm system has a classic connection arrangement. First of all,
before installation disable vehicle power system (disconnect “–“ battery terminal). To choose places
for alarm system units, follow the principles as below:
- Secrecy of installation
- Absence of heat and moisture emitting sources near the units
- Allow for minimal mutual interference between standard vehicle electronics and alarm units
ATTENTION!
Emitting antenna should be installed at a distance from alarm and vehicle control units. Try to minimize
length of cables.
2. Choosing Locations for Main Units
1) An electronic unit for alarm control is installed inside the cabin (passenger compartment). To
achieve maximum range, combined “RF” antenna for the cabinet should be placed at the highest
point, without contact with metal parts and electric wires.
2) Siren is installed in the engine compartment, at a hard-to-reach place. If you use an independent
siren, ensure access to service key slot. The siren should be installed with horn down to escape
moisture entry. Wire connections should better be done inside cabin for less corrosion.
3) All strong current circuits (power supply, lights, central lock, etc.) should be protected with
respectively rated safety fuses.
4) Hood and boot triggers are cut in places protected against moisture, inaccessible with hood and
boot closed. Triggers should be oiled periodically to avoid jams and corrosion.
5) The shock sensor is installed in the cabin, an ideal place might be the vehicle centre, and secured
to the car body metal with self-driving screws or pasted.
6) It is recommended to solder contacts in connections of ignition, starter and other circuits.
23
TOMAHAWK TW-9010
3. Wire Connections
6 PIN Remote Start-up Power Socket
1. Black and yellow wire – starter switch-on wire (+12V).
This is an output signal +12V to starting relay.
It is connected to ignition lock wire where +12V appears in the “Starter” key position. This
signal is for engine start-up. Connect this wire to blocking relay.
2. Blue wire –An output signal +12V ACC – auxiliary equipment.
It is connected to ignition lock wire where +12V appears in the “ACC” and “Ignition ON” key
position.
3. Thin red wire – system power supply wire (+12V)
It is connected to ignition battery “+” terminal via 10A fuse.
4. Thick red wire – remote start-up circuit power supply wire (+12V)
It is connected to ignition battery “+” terminal via 40A fuse.
5. Yellow wire – IGN 1 wire, output signal +12V.
It is connected to ignition lock wire where +12V appears in the “Ignition ON” key position and
does not disappear in the “Starter” position.
6. Green wire - IGN 2 wire, output signal +12V.
It is connected to ignition lock wire where +12V appears in the “Ignition ON” key position and
disappears in the “Starter” position, if this wire is available on the vehicle where the system is
installed.
24
TOMAHAWK TW-9010
6 PIN Remote Start-up Power Socket
1. Blue wire – central contact for central lock opening relay
2. Blue and grey wire – normally open contact for central lock opening relay
3. Blue and black wire – normally closed contact for central lock opening relay
4. Green wire - central contact for central lock closing relay
5. Green and grey wire – normally open contact for central lock closing relay
6. Green and back wire – normally closed contact for central lock closing relay
18 PIN Main Socket
1. Black wire – system “-“
(Ensure reliable contact)
2. Blue wire – wire for cabin light ON or window UP
- 300mA when disarming / arming system (programmable)
3. Black and red wire – IGN 3 output
- 300mA while remote start-up procedure, for arrangement of auxiliary ignition
circuits. This wire may become necessary, if ignition lock of vehicle where the system is
installed has more than two ignition circuits, or for enabling immobilizer by-pass modules.
4. Black and yellow wire – starter lock relay wire.
- 300mA after arming system and/or remote start-up procedure and/or in “Anti-hijack”
mode.
ATTENTION!
Blocking relay should only be used for blocking starter to prevent engine stop while movement.
25
TOMAHAWK TW-9010
5. Yellow and red wire – 2nd auxiliary channel wire (-300mA).
6. Grey and black wire – input for tachometer wire or oil pressure sensor.
Connect to tachometer signal wire or oil pressure sensor wire (programmable).
7. Blue and red wire – “+” input for door sensor.
8. Orange and white wire - “-” input for boot sensor.
9. Violet wire - “Anti-hijack” function switch ON wire.
“Anti-hijack” function is switched ON when “-“ appears on this wire.
10. Green and black wire – parking lights power supply wire.
It is connected via 7.5A fuse.
11. Green and yellow wire – parking lights power supply wire.
It is connected via 7.5A fuse.
12. Black and white wire – programmable auxiliary blocking (normally closed/normally open).
300mA (programmable).
13. Grey wire – siren output
(1.5A)
14. Yellow and blue wire – 3rd auxiliary channel wire or two-step door opening wire
(programmable).
A) 3rd auxiliary channel – “-“ 300mA.
B) Two-step door opening – “-“ 300mA.
15. Yellow and black wire – wire for remote boot opening.
(- 300mA, 1 sec)
26
TOMAHAWK TW-9010
16. Orange and violet wire – hand brake wire.
It is connected to “-“ hand-brake switch (for manual transmission) or to stop lights (for
automatic transmission) (see diagrams 8,9) depending on car bundling.
17. Blue and black wire – “-“ input for door sensor.
18. Orange and grey wire - “-“ input for hood sensor.
4 PIN shock sensor socket
Socket for shock sensor.
2 PIN “Override” button socket
Socket for button “Override”.
2 PIN LED indicator socket
Socket for LED indicator.
5 PIN combined antenna socket
Socket for combined antenna.
4. Selection of Automatic or Manual Transmission
Selection of automatic or manual transmission in TOMAHAWK TW-9010 is done using jumper
1 (see wiring diagram).
Jumper closed – automatic transmission
Jumper open – manual transmission
27
TOMAHAWK TW-9010
5. Connection of Central Lock
TOMAHAWK TW-9010 has in-built power relays for central lock control. Wiring for
connection of central lock is made in a separate six-pin socket. Wire colours and wiring diagrams
are shown in diagrams 1-4.
ATTENTION!
Please note that impulse duration for central lock control is a programmable function.
6. Setting Shock Sensor
Setting
is the last installation stage of TOMAHAWK TW-9010 alarm system. Set shock sensor
sensitivity to minimum. Gradually increase sensitivity and knock the car body with your palm to
check triggering threshold.
ATTENTION!
Excess sensitivity may result in a great number of false trigger actions; you will be forced to desensitize
sensors.
28
TOMAHAWK TW-9010
Wire Connections
Fig. 4
29
TOMAHAWK TW-9010
6 PIN Remote Start-up Power Socket
Diagram 1
ATTENTION!
Connect blocking relay socket according to diode polarity shown in diagram 1.
Ignition key
position
Off
ACC
Ignition
Start
Wire
System power supply wire
Starter wire
IGN 1 wire
ACC wire
IGN 2 wire
Power circuit supply wire
IGN 3 wire
30
TOMAHAWK TW-9010
6 PIN central lock connection socket
18 PIN main socket
Diagram 2
31
TOMAHAWK TW-9010
4 PIN shock sensor socket
2 PIN “Override” button socket
2 PIN LED indicator socket
5 PIN combined antenna socket
Diagram 3
32
TOMAHAWK TW-9010
Connection of auxiliary electric drive
Control time 0.8 sec
Diagram 4
Central lock positive control
Control time 0.8 sec
Diagram 5
33
TOMAHAWK TW-9010
Central lock negative control
Control time 0.8 sec
Diagram 6
Pneumatic central lock (Audi, Mercedes)
Control time 3.6 sec
Diagram 7
34
TOMAHAWK TW-9010
Diagram 8
Diagram 9
35
TOMAHAWK TW-9010
Diagram 10
36
TOMAHAWK TW-9010
Engineering data
Rated voltage
Current consumption
+12V
15mA
Allowable current:
6 PIN remote start-up power socket
In power supply circuit thick red wire
(limited with fuse)
30A
In power supply circuit thin red wire
(limited with fuse)
10A
IGN 1, “+”
(yellow wire)
30A
IGN 2, “+”
(green wire)
30A
IGN 3, “-”
(black and red wire)
300mA
Starter wire, “+”
(black and yellow wire)
30A
6 PIN central lock connection socket
In contact relay circuit
for central lock control
(limited with fuse)
20A
37
TOMAHAWK TW-9010
18 PIN main socket
Blocking relay contacts
40A
Blocking relay service output, “-“
(black and yellow wire)
300mA
Siren power output, “+“
(grey wire)
2A
Auxiliary channel 1 output, “-“
(yellow and black wire)
300mA
Auxiliary channel 2 output, “-“
(yellow and red wire)
300mA
Auxiliary channel 3 output, “-“
(yellow and blue wire)
300mA
Size lights power supply outputs, “+“
(green-black and green-yellow wires,
limited with fuses)
7.5A
Output to cabin light, “-“
(blue wire)
300mA
Temporary intervals:
Service output, “-“ permanently armed
(black and yellow wire)
Auxiliary channel 1 output, “-“
(yellow and black wire)
1 sec
38
TOMAHAWK TW-9010
Auxiliary channel 2 output, “-“
(programmable)
(yellow and red wire)
0.8 sec
10 sec
30 sec
Permanently
Auxiliary channel 3 output, “-“
(yellow and blue wire)
0.8 sec
Impulse duration for
central lock control
(programmable)
0.8 sec
3.6 sec
30 sec
This device meets weather requirements under GOST 15150
for UHL 2 version (installation inside cabin).
This device meets electric compatibility requirements under GOST R50789-95.
39