1
Creating user friendly web interfaces for R scripts automatically
Richard Newton and Lorenz Wernisch
August 15, 2012
Contents
1 Introduction
3
2 Requirements
3
3 Quick tour
3
4 Demonstration Application
4
5 Technical Report and R News Article
4
6 Key features
6.1 Key features of Rwui . . . . . . . . . . . . . . . . . . . . . . . . . . . . . . . . . . . . . .
6.2 Key features of applications created by Rwui . . . . . . . . . . . . . . . . . . . . . . . . .
4
4
4
7 Installation of the download
5
8 R script requirements
6
9 User manual for Rwui
9.1 Title . . . . . . . . . . . . . . . . . . . . . .
9.2 Introductory Explanation . . . . . . . . . .
9.3 Further Instructions . . . . . . . . . . . . .
9.4 Input variables . . . . . . . . . . . . . . . .
9.4.1 How it works . . . . . . . . . . . . .
9.4.2 Input Variable naming . . . . . . . .
9.4.3 Delete Current Item . . . . . . . . .
9.4.4 Section Heading . . . . . . . . . . .
9.4.5 Drop-down list . . . . . . . . . . . .
9.4.6 Multi-select list . . . . . . . . . . . .
9.4.7 Radio Buttons . . . . . . . . . . . .
9.4.8 File upload box . . . . . . . . . . . .
9.4.9 Multiple/Replicate File upload page
9.4.10 Zip file upload box . . . . . . . . . .
9.4.11 OAR entry box . . . . . . . . . . . .
1
.
.
.
.
.
.
.
.
.
.
.
.
.
.
.
.
.
.
.
.
.
.
.
.
.
.
.
.
.
.
.
.
.
.
.
.
.
.
.
.
.
.
.
.
.
.
.
.
.
.
.
.
.
.
.
.
.
.
.
.
.
.
.
.
.
.
.
.
.
.
.
.
.
.
.
.
.
.
.
.
.
.
.
.
.
.
.
.
.
.
.
.
.
.
.
.
.
.
.
.
.
.
.
.
.
.
.
.
.
.
.
.
.
.
.
.
.
.
.
.
.
.
.
.
.
.
.
.
.
.
.
.
.
.
.
.
.
.
.
.
.
.
.
.
.
.
.
.
.
.
.
.
.
.
.
.
.
.
.
.
.
.
.
.
.
.
.
.
.
.
.
.
.
.
.
.
.
.
.
.
.
.
.
.
.
.
.
.
.
.
.
.
.
.
.
.
.
.
.
.
.
.
.
.
.
.
.
.
.
.
.
.
.
.
.
.
.
.
.
.
.
.
.
.
.
.
.
.
.
.
.
.
.
.
.
.
.
.
.
.
.
.
.
.
.
.
.
.
.
.
.
.
.
.
.
.
.
.
.
.
.
.
.
.
.
.
.
.
.
.
.
.
.
.
.
.
.
.
.
.
.
.
.
.
.
.
.
.
.
.
.
.
.
.
.
.
.
.
.
.
.
.
.
.
.
.
.
.
.
.
.
.
.
.
.
.
.
.
.
.
.
.
.
.
.
.
.
.
.
.
.
.
.
.
.
.
.
.
.
.
.
.
.
.
.
.
.
.
.
.
.
.
.
.
.
.
.
.
.
.
.
.
.
.
.
.
.
.
.
.
.
.
.
.
.
.
.
.
.
.
.
.
.
.
.
.
.
.
.
.
6
6
7
7
7
8
9
9
9
9
9
10
10
10
11
12
9.5
9.6
9.7
9.8
9.9
9.10
9.11
9.12
9.13
9.14
9.15
Validation . . . . . . . . . . . . . . . . . . . . . . . . . . . . . . . . .
Linking . . . . . . . . . . . . . . . . . . . . . . . . . . . . . . . . . .
Name . . . . . . . . . . . . . . . . . . . . . . . . . . . . . . . . . . .
Results files . . . . . . . . . . . . . . . . . . . . . . . . . . . . . . . .
9.8.1 Displaying a results file . . . . . . . . . . . . . . . . . . . . .
9.8.2 Image Map . . . . . . . . . . . . . . . . . . . . . . . . . . . .
9.8.3 Geographic (Google) Map . . . . . . . . . . . . . . . . . . . .
9.8.4 Displaying results files of arbitrary name or unknown number
9.8.5 Layout of results files . . . . . . . . . . . . . . . . . . . . . .
9.8.6 Number of columns . . . . . . . . . . . . . . . . . . . . . . .
9.8.7 Displaying current results on analysis page . . . . . . . . . .
Process information . . . . . . . . . . . . . . . . . . . . . . . . . . .
Upload R script . . . . . . . . . . . . . . . . . . . . . . . . . . . . .
Upload subsidiary files . . . . . . . . . . . . . . . . . . . . . . . . . .
Add an initial Login page? . . . . . . . . . . . . . . . . . . . . . . . .
9.12.1 Providing/Editing password(s) . . . . . . . . . . . . . . . . .
Returning the results to the web page or by e-mail . . . . . . . . . .
9.13.1 E-Mail Option (Linux only) . . . . . . . . . . . . . . . . . . .
Cancel Button (Linux only) . . . . . . . . . . . . . . . . . . . . . . .
Installing the application you have created . . . . . . . . . . . . . . .
.
.
.
.
.
.
.
.
.
.
.
.
.
.
.
.
.
.
.
.
.
.
.
.
.
.
.
.
.
.
.
.
.
.
.
.
.
.
.
.
.
.
.
.
.
.
.
.
.
.
.
.
.
.
.
.
.
.
.
.
.
.
.
.
.
.
.
.
.
.
.
.
.
.
.
.
.
.
.
.
.
.
.
.
.
.
.
.
.
.
.
.
.
.
.
.
.
.
.
.
.
.
.
.
.
.
.
.
.
.
.
.
.
.
.
.
.
.
.
.
.
.
.
.
.
.
.
.
.
.
.
.
.
.
.
.
.
.
.
.
.
.
.
.
.
.
.
.
.
.
.
.
.
.
.
.
.
.
.
.
.
.
.
.
.
.
.
.
.
.
.
.
.
.
.
.
.
.
.
.
.
.
.
.
.
.
.
.
.
.
.
.
.
.
.
.
.
.
.
.
.
.
.
.
.
.
.
.
.
.
.
.
.
.
.
.
.
.
.
.
.
.
.
.
.
.
.
.
.
.
.
.
.
.
.
.
.
.
.
.
13
14
14
14
14
15
16
17
18
19
19
19
19
20
20
21
21
21
22
23
10 Application description file
23
11 Modifiying the application
23
12 The
12.1
12.2
12.3
12.4
completed application
Description . . . . . . . . . . . .
A note about working directories
A note about paths, subsidiary R
A note about space on the server
.
.
.
.
24
24
24
25
25
13 Tomcat Installation
13.1 Windows - path to Tomcat . . . . . . . . . . . . . . . . . . . . . . . . . . . . . . . . . . .
26
26
14 Web application servers other than Tomcat
26
15 R installation
15.1 Windows - path to bin directory . . . . . . . . . . . . . . . . . . . . . . . . . . . . . . . .
27
27
16 Error and Warning messages
27
17 Browser Navigation Buttons
28
18 FAQ/Troubleshooting
28
19 Acknowledgments
29
. . . .
. . . .
scripts
. . . .
. . . . . . . . . . . . . . .
. . . . . . . . . . . . . . .
and constant data sources
. . . . . . . . . . . . . . .
2
.
.
.
.
.
.
.
.
.
.
.
.
.
.
.
.
.
.
.
.
.
.
.
.
.
.
.
.
.
.
.
.
.
.
.
.
.
.
.
.
.
.
.
.
.
.
.
.
20 Disclaimer
29
21 Any questions
29
1
Introduction
Rwui is a web application that is used to create web applications for running R scripts. All the code is
generated automatically so that a fully functional web interface for an R script can be downloaded and
up and running in a matter of minutes. No extra scripting is required, no new code needs to be learnt
not even HTML, it’s all done for you.
A user friendly web interface for an R script means your script can be used by anyone, even if they have
no knowledge of R. Since the web interface will run on a server the application can be accessed remotely
and the user does not need to have R installed on their machine. In addition, updates to the R script
need only be made to the one copy sitting on the server.
2
Requirements
In order to use the completed web applications created by Rwui you will need an installation of:
1. A Java webserver such as Tomcat version 6.0.35 or later (see details of Tomcat installation in
Section 13 or Web application servers other than Tomcat in Section 14 below)
2. Java version 1.6.0 31
3. R - a version compatible with your R script(s) (see details of R installation in Section 15 below)
This would not normally be necessary, but if you did want to make changes to the source code of
the downloaded application you may want to consider Ant (http://ant.apache.org) for rebuilding the
application with the included Ant script.
Whilst the application was developed under Unix, we have tested the web applications created with
Rwui under Windows XP as well, where they worked without modification.
3
Quick tour
A Quick Tour shows you how to use Rwui to create a website that uploads and analyses a table and
graphically displays the results. More detailed instructions (see Section 9) for using Rwui are given
below.
To summarise: using Rwui simply involves
• entering details about your R script on a sequence of web pages.
• Rwui then generates the web application,
3
• which you can download either as a .zip or .tgz file.
• Either of these downloads extracts into a folder containing all source, script, and executable files of
the application, in particular, a .war file.
• Once the .war is copied to the Tomcat webapps/ directory, the application is ready.
4
Demonstration Application
We have prepared a more substantial demonstration application for analysing microarray data, created
using Rwui. The complete application (Rwui demo1.tgz or Rwui demo1.zip) is also available for download.
Some .cel files (cels.tgz or cels.zip) for testing the demonstration application can be downloaded from here.
These .cel files are from Choe, S E, Boutros, M, Michelson, A M, Church, G M, Halfon M S, Prefered
analysis methods for Affymetrix GeneChips revealed by a wholly defined control dataset, Genome Biology,
2005, 6, R:16:1-15
5
Technical Report and R News Article
Another source of information, besides the User Manual (see Section 9), is this Technical Report which
gives a technical overview of Rwui. The R News Article gives a general introductory description of
Rwui.
6
Key features
6.1
Key features of Rwui
• Flexible - you can backtrack, edit and insert, as you design your application.
• Whole range of input items available - text boxes, checkboxes, file upload etc.
• Section headings can be included on the web page.
• Facility for uploading of an arbitrary number of files (for example, microarray replicates).
• Facility for grouping uploaded files (for example, into ‘Diseased’ and ‘Control’ microarray data files).
• A Login page can be included.
• Application details saved in ‘application definition file’ for reuse and modification.
6.2
Key features of applications created by Rwui
• User input values checked for validity prior to processing.
4
• Real time progress information displayed when running the application.
• Repeat analyses with different parameters and data files - new results added to list, as a link to the
corresponding results page.
• Results files displayed on results page and available for download.
• The user entered parameters and uploaded data files can also be checked on the corresponding
results page.
• Created application is Java based and platform independent.
7
Installation of the download
What does the download contain?
Once uncompressed the download contains the complete application including all the source code in
a number of directories. All the files are included for the benefit of anyone who would like to make
modifications of their own to the application (for example, changing the layout of the web pages).
Normally however no modifications are necessary in which case only one of the files within the download
is required. This is the .war file in the ‘deploy’ directory.
What do I do with the .war file?
Rwui creates Java based web applications that use the Apache Struts framework so the completed
applications will run on a Tomcat server http://tomcat.apache.org. Tomcat is very simple to install on
both Unix and Windows machines (details of Tomcat installation in Section 13 below). All that needs
to be done to use a web application created by Rwui is to place the completed application’s .war file in
your Tomcat server’s webapps directory. Further details on what to do with the .war file are given in
Section ‘Installing the application you have created’ 9.15 below).
Whilst Tomcat is the recommended web application server to run the applications created with Rwui
the applications should run on many other Java web servers. Please see Web application servers other
than Tomcat in Section 14 below.
How can I make my new application website available to others?
You probably start with a local installation of Tomcat on a stand alone machine in which case web
applications are accessed in a browser on the machine via the ‘localhost:8080’ URL (see details in the
section on Tomcat installation in13 below). If the port you specify for Tomcat (default 8080) is accessible
from outside, other people can access your application by substituting the IP address or machine name
of your machine for ‘localhost’.
Note, however, that not all users are allowed communication via port 8080. If the website should be
accessible to a wider community we recommend that you link Tomcat to a general webserver such as
5
Apache (see http://tomcat.apache.org/faq/connectors.html about connectors to Apache) which, under
most installations of Apache, allows the user to access your application via the standard web port 80.
8
R script requirements
An R script requires a few simple modifications in order to be run by an application created by Rwui:
1. The input variables of the R script must be named according to the rules of both R and Java
variable naming (see Section 9.4.2 ‘Input Variable Naming’ below). But variables in the R script
other than the input variables do not need to conform to the rules of Java variable naming.
2. The R script must not set the working directory.
3. Any results to be made available to the user on the Results page must be written to files. If the
files are to be displayed on the Results page they must be suffixed with either .txt or, for images,
.png or .jpg. If the files are just to be linked to or downloaded from the Results page then the suffix
is irrelevant.
4. Rwui offers the option of informing the user of the application continually about progress in the R
script. In this case, the R script needs to periodically append lines to a file, which must be called
‘process info.txt’, with progress information for the user.
9
User manual for Rwui
Rwui takes you through a series of webpages in order to define and create your application. The following
steps need to be undertaken in sequence.
9.1
Title
Enter a title for the application which will appear in the banner at the top of each page.
Alternatively you can enter a previously saved application description file. When you create an application
the download will contain, amongst other things, an application description file (more details about
application description files in Section 10 below). If you wish to modify an existing application, instead
of entering all the details again, all the information can be automatically uploaded from the application
description file. You can then click through the pages of Rwui and edit the details on the relevant pages
as required. Please note the application description file does not contain the R script so you will need to
upload this again on the ‘Upload R script’ page. The application description file also does not contain
any subsidiary R scripts or reference data sets that you may have uploaded on the ‘Upload Subsidiary
files’ page (see Section 9.11) and you will have to upload these files again.
The application description file is an .xml file. For the routine Rwui user an even simpler way to generate
applications quickly is to create or modify this application description file directly in an editor. Upload
the description file, check that the displayed ‘Fascimile’ and ‘Information Entered’ are correct and click
through to the last page in order to create the application.
6
9.2
Introductory Explanation
Enter some text explaining to the user what your application does, how to use it etc. This is optional.
Any entered text will appear below the title of the application. You can use html formatting tags in
the text if you want. Useful tags may be ¡b¿ ¡/b¿ for creating bold text and ¡br/¿ for putting in a line
break. The characters &, ¿, ¡ or “ anywhere in your text, other than in html formatting tags, might cause
problems, although this hasn’t been the case in any of the browsers I’ve tried. If you need to use these
characters in your text, other than in html formatting tags, and want to be quite safe then use their html
symbols & > < and "
9.3
Further Instructions
If you need to provide the user with more instructions or background information than there is room for
on the web page, you can upload a file of instructions and a link to this file will be automatically added to
the web page of your application. Choices of file format are Word (.doc), PDF (.pdf) or HTML (.html).
Please note if using an Application Description File (see Section 10) (ADF) to load a previously created
application back into Rwui for editing, the file of instructions will have to be reloaded, it is not included
in the ADF.
The HTML format may be the most convenient for your users in that clicking the link on your application
will open a new window displaying the instructions, whilst the browser may need to download Word or
PDF documents before they can be viewed. Creating HTML formatted text is simple since editors like
Word and OpenOffice can save documents as html, and latex documents can be converted using the
‘latex2html’ program.
9.4
Input variables
On this page you create the input items that will appear on your application’s web page.
1. Numeric - box for entering the value of an R numeric variable.
2. Text - box for entering the value of an R text variable.
3. File upload box - box for uploading a single file.
4. Multiple/Replicate File upload page - page for uploading an unspecified number of files.
5. Drop-down list - list of possible values (numeric or text) for an R variable in a drop-down list.
6. Multi-select list - list of possible values (numeric or text) for an R variable which can be a list of
values.
7. Radio buttons - list of possible values (numeric or text) for an R variable in a column of radio
buttons.
8. Checkbox - for assigning R variable as being TRUE (checkbox ticked) or FALSE (checkbox unticked)
9. OAR entry box - Other Application Results entry box, for entering the results from another application created by Rwui.
7
10. Zip file upload box - box for uploading a zip file, which will be automatically unzipped.
11. Text area input box - text box with several rows; used for example to allow users to add notes about
each submission.
12. Section Heading - not actually an input item, included here for convenience (see Section 9.4.4
‘Section Heading’ below).
13. DELETE CURRENT ITEM - also not an input item, included here for convenience, (see Section 9.4.3 ‘Delete Current Item’ below).
There needs to be one input item corresponding to each of the input variables of your R script, that is,
those variables in the R script that require a value supplied by the user.
By default new input items are added to the page in order i.e. below the previous input item. If you would
like to insert an input item between existing input items then change the number in the box ‘Current
input position’. The position numbers of existing input items are given on the right-hand side of the
facsimile page. If a Multiple/Replicate File upload page is included this will always be at position 1.
Select the appropriate type of input item for one of the input variables in your R script, then on the next
web page type in the name that the variable has in your R script (exact same spelling and case).
Next enter some text explaining to the user what they should enter using this input item (optional).
Again html formatting tags may be used. The explanatory text you enter here will appear alongside the
input item on your application’s web page.
Repeat for all the input variables of your R script. A facsimile of the web page you are creating will appear
at the bottom of the page. When all input items have been added correctly press ‘Finished composing
page’.
9.4.1
How it works
If, for example, you associate the R script variable ‘my num’ with a Numeric entry box. Then the
completed application will automatically add a line to the beginning of the R script that assigns whatever
value the user enters in this Numeric entry box on the web page to the R variable ‘my num’. For example,
if the user of the completed application enters 1.234 in the Numeric entry box then the line ‘my num =
1.234’ will be automatically added to the beginning of the R script before the script is run. Similarly for
a Text entry box, if, for example, you associate the R script variable ‘my text’ with a Text entry box and
the user of the completed application enters ‘The cat sat on the mat’ in this box then the line ‘my text =
“The cat sat on the mat”’ will be automatically added to the beginning of the R script. Drop-down List,
Radio Buttons and Checkbox work in a similar fashion except the choices available to the user have been
pre-defined by you when creating the application. For how File upload box and Multiple/Replicate File
upload page work see Section 9.4.8 ‘File upload box’ and Section 9.4.9 ‘Multiple/Replicate File upload
page’ below.
8
9.4.2
Input Variable naming
Important Note: The names for the input variables of your R script must also be named according to
the rules of Java variable naming i.e. permitted characters are any letter of the alphabet, numbers, $ and
underscore. To conform to both Java and R the variable names must start with a letter of the alphabet.
And this needs to be lower-case. Note that if the second character in the variable name is a letter then
it must also be lower-case. But upper-case letters are permitted elsewhere in the variable name.
So the character ‘.’ for example, is not allowed. If an existing script does use the character ‘.’ in the
name of an input variable either replace the ‘.’ throughout the script with an underscore or reassign the
variable at the beginning of the script eg. if the script requires my.input.variable as an input variable,
then enter my input variable as the input variable name when creating the web application with Rwui
and add the line my.input.variable = my input variable at the beginning of your R script. The names of
variables in the R script that are not input variables do not need to conform to the rules of Java variable
naming.
9.4.3
Delete Current Item
Select this from the list if you need to remove an input item already added to the page. Specify the input
item to delete using the ‘Current input position’ box - the position numbers of input items are given on
the right-hand side of the facsimile page. Then press ‘Enter’.
9.4.4
Section Heading
If the web page contains many input items you may wish to divide them up into sections. The selection
‘Section Heading’ allows you to insert a sub-heading on the web page and/or some explanatory text
positioned below the heading.
9.4.5
Drop-down list
For a Drop-down list - after entering the R variable name and any explanatory text you will be taken to
a second web page where you need to specify whether the associated R variable is numeric or text, and
then a third web page where you enter the possible values that the variable can take. If the associated R
variable is numeric then only numeric values, or NA, can be entered as possible values that the variable
can take.
9.4.6
Multi-select list
A Multi-select list is similar to a Drop-down list, but allows the user to select a number of items from
the list. After entering the R variable name and any explanatory text you will be taken to a second web
page where you need to specify whether the associated R variable is numeric or text, and then a third
web page where you enter the possible values that the variable can take. If the associated R variable is
numeric then only numeric values, or NA, can be entered as possible values that the variable can take.
9
If, for example, an R variable called ‘my list’ is associated with a text Multi-select list, and the items in
the list are all colours, and in the completed application the user selects the items from the list “red”,
“yellow” and “green”, then the following line of code will automatically added to the beginning of the R
script before it is run: ‘my list = c(“red”, “yellow”, “green”)’.
If the Multi-select list is numeric, then a similar line of code is added, but without the quotation marks,
eg. ‘my list = c(0.143, 5.21, 1.976)’
9.4.7
Radio Buttons
Similarly for Radio Buttons - after entering the R variable name and any explanatory text you will be
taken to a second web page where you need to specify whether the associated R variable is numeric or
text, and then a third web page where you enter the possible values that the variable can take. If the
associated R variable is numeric then only numeric values, or NA, can be entered as possible values that
the variable can take.
Radio Buttons are unique amongst the input items available to you, because you can put a radio button
onto the page that has the same variable name as an existing radio button(s). For other input items, if
you enter a variable name that has already been associated with an input item on the page, you get an
error. With a radio button you just get a warning message. In this way you can split up a group of radio
buttons on the page and put other input items and section headings between them. This is useful, if you
wish, for example, to provide several alternative analysis methods each with their own set of parameters.
In which case radio buttons can be used to select the particular analysis method and input items for
entering a method’s parameters can be conveniently located below its respective radio button.
9.4.8
File upload box
A File upload box uploads a single file. You can have any number of these on the web page. How it
works: if, for example, you associate an R variable named ‘my data file’ with a ‘File upload box’, then
the completed web application will assign the name of the file that the user uploads with this ‘File upload
box’ to the variable ‘my data file’. eg. if the user uploads a file called, ‘data.txt’ then the application will
automatically add the line ‘my data file =“data.txt”’ to the beginning of the R script. Please note that
the application does not add a line to the script to actually read the file. This means your R script needs
to include a line to read the file whose name is stored in the variable named ‘my data file’, eg. ‘my data
= scan(file=my data file)’. The file ‘data.txt’ will have been automatically stored in the script’s working
directory so you don’t need to include any path to the file.
9.4.9
Multiple/Replicate File upload page
This page is for uploading an unspecified number of files.
When you select a ‘Multiple/Replicate File upload page’ as the input item first of all you enter the name
of the R script variable associated with the multiple files, and (optionally) add an explanation for the
user.
10
How it works: if, for example, you associate an R variable named ‘my data replicates’ with a ‘Multiple/Replicate File upload page’, then the completed web application will assign the names of the files
that the user uploads to ‘my data replicates’ in the form of a list. eg. if the user uploads three files
called, replicate1.txt, replicate2.txt and replicate3.txt then the application will automatically add the
line ‘my data replicates = c(“replicate1.txt”, “replicate2.txt”, “replicate3.txt”)’ to the beginning of the
R script. As for the ‘File upload box’ your R script needs to include line(s) to actually read the files
whose names are stored in the variable that you have associated with the ‘Multiple/Replicate File upload
page’.
After entering the name of the R script variable associated with the multiple files you can choose whether
to include a text box on the ‘Multiple/Replicate File upload page’ for specifying the group each file
belongs to. For example, if the multiple files are microarray data then the data files may belong to either
a ‘Control’ group or a ‘Diseased’ group.
How it works: if you include this text box on the page then the completed application will automatically
add a line to the beginning of the R script which assigns the group names that the user enters in this
box to a variable named ‘groups’ in the form of a list eg. if the user entered ‘Control’ when entering
replicate1.txt and ‘Diseased’ when entering replicate2.txt and ‘Diseased’ when entering replicate3.txt,
then the application will automatically add the line ‘groups = c(“Control”, “Diseased”, “Diseased”)’ to
the beginning of the R script.
9.4.10
Zip file upload box
Uploading a large number of files using a Multiple/Replicate upload page might be quite tedious. An
alternative is to zip all the files and upload them as a single file using a ‘Zip file upload box’. Once
uploaded the zip file is automatically unzipped into the current working directory where the files will be
accessible to the R script. A line is automatically added to the beginning of the R script that assigns,
as a list, the names of all the files in the zip archive, to the R variable you associated with the ‘Zip file
upload box’ when creating the application.
For example if you associated the R variable named ‘zipfilenames’ with the ‘Zip file upload box’ when
creating your application, and the user uploads a zip file containing three files, replicate1.txt, replicate2.txt
and replicate3.txt, then the application will automatically add the line ‘zipfilenames = c(“replicate1.txt”,
“replicate2.txt”, “replicate3.txt”)’ to the beginning of the R script before it is run. Please note that the
application does not add a line to the script to actually read any of the files; the R script you upload
needs to do this.
Using a Multiple/Replicate File upload page, allows a group identifier to be assigned to each file. If a ‘Zip
file upload box’ is used instead, and group identifiers are required, then a simple ‘File upload box’ should
also be included on the page, by means of which the user can upload a file containing a table giving the
structure of the experiment, for example, a table containing a column of filenames and a column of their
group identifiers. Using the filenames held in the experimental structure file is another convenient way of
reading the data files into the R script.
If the user accidentally uploads a zip archive file which has some directory structure then this directory
structure is not maintained when the zip file is unpacked on the server. The data files are put into the
top level of the working directory for the particular submission. Hence they can still be read into the R
11
script using the filenames held in the user’s experimental structure file without problems arising from the
varying and unknown directory structure that the user might have incorporated into their zip archive file.
9.4.11
OAR entry box
An ‘Other Application Results’ (OAR) entry box allows you to link two (or more) applications that
you have created using Rwui; the results of one application serving as input to the second. The set of
analysis results produced by the first application, to use as input to the second application, are specified
by their hexadecimal submission ID, if the results are held on the server (in an active session of the first
application), or their zip file name, if the results have been saved to a local disk.
You can select whether you want the second application to access the results of the first application from
just the server, from just a local disk or, more usefully, from either the server or a local disk.
To include an OAR entry box in an application you will need to supply:
1. The name of the other application whose results you want to use, i.e. the last part of the URL (see
Section 9.7) eg. “my first app”
2. The name of the file of results that the other application produces and which you want your second
application to access eg. “my first results.txt”.
3. The name of the variable that the R script of the second application uses to hold the name of the
other application’s results file eg. “file from first app”.
How it works: if you add an OAR entry box to an application (eg. called “my second app”), with the
above example entries (“my first app”, “my first results.txt”, “file from first app”), then each time this
second application is run, a new line is automatically added to the beginning of its R script. The content
of this line will depend on whether the user is entering results currently held on the server, from an active
session of “my first app”, or is entering results from “my first app” which they have previously saved to
a local disk.
From the server: The user enters in the OAR entry box the hexadecimal submission ID (eg. 2ED41AB9FCC357FA),
corresponding to the results from “my first app” that they wish to use. Then the line automatically added
to the beginning of the R script of “my second app” will be:
file from first app =
/“tomcat.home/my first app/WEB-INF/my first app store/2ED41AB9FCC357FA/results/my first results.txt”
Note that no line is added to the R script to actually read the file. The R script that you upload when
creating “my second app” must contain a line to read the file whose name (and path) is held in the R
script variable ‘file from first app’ eg. your script should include a line such as:
data from first app = read.table(file=file from first app)
From a local disk: The user enters in the OAR entry box of “my second app” the results file produced by
“my first app” which they have previously saved to their local disk (eg ‘my first app C7BA92D55FAF3B1.zip’).
The file ‘my first app C7BA92D55FAF3B1.zip’ will be uploaded to the current working directory of
12
“my second app” and unzipped there. This creates a directory named C7BA92D55FAF3B1 containing the results files from “my first app”, including “my first results.txt”. And the line automatically
added to the beginning of the R script of “my second app” will be:
file from first app = “./C7BA92D55FAF3B1/my first results.txt”
Note that no line is added to the R script to actually read the file. The R script that you upload when
creating “my second app” must contain a line to read the file whose name (and path) is held in the
Rscript variable ‘file from first app’ eg. your script should include a line such as:
data from first app = read.table(file=file from first app)
If you need to enter more than one results file from the first application into the second application, you
can have the first application create an RData file of the required files and then enter this RData file into
the second application. For example, in the R script of the first application:
save(list=c(“results 1”,“results 2”), file=“my first app.RData”)
When creating “my second app” you would enter “my first app.RData” as the the name of the file of
results that “my first app” produces and which you want “my second app” to access. And the R script
that is uploaded would now need to include a line such as:
load(file=file from first app)
In applications created by Rwui users have two options when saving the results of an analysis, either
saving ‘Results only’, or saving results plus the data files they have uploaded. If the first application uses
large data files it would clearly be best if users saved ‘Results only’ to a local disk to use as input to the
second application, so that the data files from the first application are not unnecessarily uploaded to the
second application.
9.5
Validation
Normally your completed web application checks the validity of the values that the user enters and returns
an error message to the page if values entered are not valid. Only numeric values or NA can be entered
into Numeric entry boxes. Numeric, Text and File Upload boxes cannot be left blank. You can turn-off
validation here but it is not a good idea to do this unless absolutely necessary. (Multiple/Replicate file
upload validation is not turned off, and neither is the validation of OAR entry boxes).
If there are radio buttons or check boxes in the web application you also have the option to select linked
validation of input items in your completed web application, and the next web page will allow you to set
this up.
You can link (child) input items with (parent) radio buttons and/or checkboxes so that in the completed
web application, if a parent radio button or check box is not ‘ticked’ then its child input items are ignored,
so won’t cause validation problems if currently they are empty. This will make things easier for users of
your application.
For example in the Section 9.4.7‘Radio Buttons’ we described how you may wish to provide several
alternative analysis methods on the page, each with their own set of parameters. Radio buttons could
be used to select a method, with the input items for entering a method’s parameters located below its
13
respective radio button. In this case it will be easier for the user if they don’t have to bother about the
presence and validity of values in the parameter input items corresponding to the analysis methods that
they have not currently selected. This can be achieved by linking each parent radio button with its child
input items.
9.6
Linking
On this page you set up the parent-child linking of validation. Possible ‘Parent’ checkboxes and radio
buttons (with their options) are named along the top of the table. Potential ‘Child’ input items whose
validation could depend on them are named down the side. Tick the boxes to link items. An input item
can be the child of more than one parent, although for any given parent radio button an input item can
only be the child of one of its ‘options’.
9.7
Name
Enter a short name for the application which will appear as the final part of the URL of the site. eg. If
you enter ‘myapp’ here then the URL will be http://localhost:8080/myapp Hence the name you choose
should not contain any spaces. Permitted characters are all the alphanumerics and - and .
9.8
Results files
The completed web application accesses the results produced by the R script by reading saved files. So
for the user to see the results your R script must write any results to files. For example you should
include lines like: ‘write.table(my.results, file=“my results.txt”)’ in your R script. Any number of results
files can be produced. Once the R script has terminated, the application looks at what files have been
produced by the R script and lists them on the ‘Results’ web page as links which the user can click on
to view and/or download. (If the R script writes temporary files these will also appear in the list of links
on the ‘Results’ page, so they should be removed by the script using file.remove()).
9.8.1
Displaying a results file
You may however want to display the contents of some or all of the results files on the Results page
straight away to save the user the trouble of having to click on a link. To do this enter the name of the
results files that you wish to be displayed one at a time. If more than one results file is to be displayed on
the Results page they will be displayed in order down the page (or across the page - see next paragraph)
in the same order in which their names are entered into wui. The size of the box in which each results
file is displayed can be specified here. Files which are to be displayed in this way must end in either .txt
or, for images, .png or .jpg. Note that Internet Explorer won’t display .png’s, so jpg’s will be necessary
if your completed application might be accessed via IE.
14
9.8.2
Image Map
Giving an image an image map makes the image clickable, with the outcome of clicking depending on
where on the image the mouse was clicked. So it allows the user to see displayed extra information about
an area of an image when they click on that part of an image.
An image can be given an image map on the page ‘Enter the name of a results file to be displayed’.
Images contained in lists entered on the page ‘Enter the name of a list of results files’ currently cannot
be given image maps.
The image map facility will only work when the results are displayed on the web page, not when they are
e-mailed to the user because an image map produced by Rwui is a server-side image map i.e. it needs
the server the web application is installed on in order to work.
1. The image, i.e. a .png or .jpg file (eg. image.png).
2. The lookup table, which tells the application what information to display when a particular part of
the image map is clicked. This is a .csv file (eg. lut.csv).
3. The map of the image, which relates the image to the lookup table. This is also a .csv file (eg.
map.csv).
See below for further information about these files.
The R script needs to write these files to its current working directory. eg write.csv(image map, file=“./map.csv”)
The R script also, of course, needs to actually produce all the information to be displayed when a
particular part of the image map is clicked. These files can be images (.png or .jpg) or text (.txt). The
R script needs to write these files to a subdirectory of the current working directory called ‘mapinfo’ eg.
write(area 1 info, file=“./mapinfo/area 1 info.txt”). The subdirectory ‘mapinfo’ is created automatically.
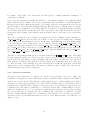
When the user clicks on the image displayed in the results section of your web application, the information
associated with that part of the image will be displayed for the user. You can choose to have that
information displayed on the same page as the clickable image, or have it displayed in a new browser
window (there will be a new browser window to display this information for each set of results i.e. for
each submission).
If you chose to display the additional information on the same page as the image, you need to tell Rwui
to display this information, and whereabouts on the page to display it, and what size to display it. To do
this simply enter the name of the lookup table file, eg. lut.csv, as a ’results file to be displayed’, on the
page ’Enter the name of a results file to be displayed’. This will reserve a space on the page to display
the additional information at the correct size.
If you chose to display the additional information in a new browser window you don’t need to do this,
but you will be asked for the default size of the new browser window and its position on the screen.
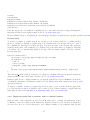
The image map file (eg. map.csv) is a comma separated file of integers with the same number of rows
and columns as the number of rows and columns in the image file (eg. image.png). Each integer entry in
the image map file indicates which group the pixel in the same position in the image belongs to. When
the image is clicked, the row and column of the clicked pixel is recorded. These coordinates are used to
find, from the image map file, which group the pixel belongs to. The look up table (lut.csv) is then used
15
to find which supplementary file corresponds to this group number. And this supplementary file is then
displayed for the user.
The look up table file simply contains two comma separated columns, the group number is in the first
column and the name of the group’s supplementary file is in the second column. If the map file contains
an integer entry (i.e. group number) that doesn’t appear in the first column of the lookup table then the
application will display a blank file. So areas of the image which don’t need to be clickable can be given
a group number (eg. 0) in the map file, then if the lookup table doesn’t contain an entry for this group
number, these areas won’t generate a supplementary file when clicked.
A simple demonstration application can be tried out here: Image Map Test application. This simple test
application can be downloaded here: image map test.tgz. The .war file could be installed in order to test
that the image map function is working correctly on a Tomcat server. The R code from the test application
is linked to here: image map test.R, this generates a simple image (image.png), a corresponding map file
(map.csv), a lookup table file (lut.csv), and four supplementary infomation files to be displayed when the
image is clicked.
The R functions grconvertX(x, from=“user”, to=“device”) and grconvertY(y, from=“user”, to=“device”)
can be very useful when creating map files. These convert plot coordinates (user coordinates) into device
pixel coordinates, which will correspond to row and column values in the map file.
An R function that takes user coordinates of rectangles, ellipses and lines, and creates a map file can be
found here: createImageMap.R.
9.8.3
Geographic (Google) Map
A web application created by Rwui can also display the results of the R analysis as a geographic map.
A typical application would have the user of such a webapp uploading a data file to your server. The
data is then analysed by your R script on the server. The R script produces a text file of results. These
results are then displayed for the user on a geographic map. The geographic map may be either a
static Google map(s) or a dynamic Google map.
In addition, there is the option of making a dynamic map ’clickable’. That is, users of the webapp can
define regions of interest by clicking on the map with the mouse. When the ’Analyse’ button is pressed the
coordinates of the region of interest are automatically made available to the R script. Regions of interest
may be either circles, irregular polygons, squares or rectangles, all of which are dynamically resizable and
draggable.
Static Map
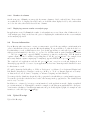
To include a static geographic map in the webapp you are creating check the box asking whether the file
to display is a static geographic map and enter the name of the text file of results that the R script will
produce. Keep the name simple eg geomap.txt, or, if the page has more than one map, geomap1.txt,
geomap2.txt etc. The format of the results file produced by the R script is important. Each line of the
results file must contain the name of one valid static Google maps parameter followed by the value for
that parameter. Valid parameters are documented in the Google static maps guide. The parameter name
and the parameter value must be separated by an equals (=) sign. An example results file would be:
center=Brooklyn+Bridge,New+York,NY
16
zoom=14
size=512x512
maptype=roadmap
markers=color:blue|label:S|40.702147,-74.015794
markers=color:green|label:G|40.711614,-74.012318
markers=color:red|color:red|label:C|40.718217,-73.998284
sensor=false
If the R script produced a results file containing the above information then the webapp will display the
map that is featured as the Quick example in the Google static maps guide.
We have published a paper on displaying Google static maps - Creating web applications for spatial epidemiological ana
Dynamic Map
To include a dynamic geographic map in the webapp you are creating check the box asking whether
the file to display is a dynamic geographic map. For a dynamic map your R script will need to write a
file containing the javascript for creating the map. You enter the name of the file that will contain the
javascript as the name of the results file to be displayed. Keep the name simple eg dynmap.js. Currently
you can have only one dynamic map displayed on a page. Here is a simple example of the type of file the
R script must write:
function initialize() {
var latlng = new google.maps.LatLng(-34.397, 150.644);
var myOptions = {
zoom: 8,
center: latlng,
mapTypeId: google.maps.MapTypeId.ROADMAP
};
var map = new google.maps.Map(document.getElementById("map_canvas"), myOptions);
}
The term ‘map canvas’ in the above must not be changed to anything different, but apart from that any
changes/additions can be made that conform to the Google dynamic maps API.
Further details on how to display dynamic Google maps in applications created by Rwui are given in the
document Documentation on displaying results on Google dynamic map, with examples, step-by-step guides
and helper functions.
To include a clickable dynamic geographic map in the webapp you are creating check the appropriate
box. The steps then required are similar to those required for an ordinary dynamic geographic map and
full details are given in Documentation on displaying results on Google dynamic map
9.8.4
Displaying results files of arbitrary name or unknown number
Often the name of the results files produced by an R script will be constant. In applications created
by Rwui, because the results from an analysis are uniquely identified by the directory in which they
are saved there is no need for the R script to add a unique identifier to the results file that depends,
17
for example, on the name of the data file the user has uploaded. Calling results files ‘results.txt’ or
‘results.png’ is sufficient.
However in some circumstances the R script will need to add a unique identifier to the results files which
will be unknown prior to runtime. Also in some circumstances the exact number of results files that the
R script produces will be unknown and variable. For example, if the user of an application created by wui
uploads a number of data files using a Multiple/Replicate File upload page or a Zip file entry box and the
R script produces a results file for each of these data files. The number of results files will vary depending
on how many data files the user has uploaded. The exact names of the results files will also vary since
the R script will be naming each results file with an identifier related to the name of its corresponding
data file.
These type of results files can be displayed by applications created by Rwui. Specify a filename eg.
‘my list of results files.txt’ and select the option ‘Name of a file, produced by the R script, containing
a list of the names of results files produced by the R script’. In the R script, as well as writing results
to files, the names of these results files need to be written to the file ‘my list of results files.txt’. For
example, if the R script contains the lines ‘write(my data 1, file=“results 1.txt”)’ and ‘write(my data 2,
file=“results 2.txt”)’ then to have these two results files displayed, the R script also needs to include the
lines ‘write(“results 1.txt”, file=“my list of results files.txt”, append=TRUE)’ and ‘write(“results 2.txt”,
file=”my list of results files.txt”, append=TRUE)’.
The name of each results file must appear on a new line in the file ‘my list of results files.txt’. The results
file names themselves still need to end in .txt, .png or .jpg in order to be displayed. All three types can
appear in the list. Any number of ‘files containing a list of the names of results files’ can be specified
in an application. And the same application can also display other results files in the more direct way
i.e. where the name of the results file is specified explicitly when creating the application. All the files
displayed from a ‘file containing a list of the names of results files’ will be displayed the same size, the
width and height being specified on this page.
9.8.5
Layout of results files
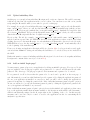
The layout of the results files to be displayed is controlled by layout tables. You need to assign each
results file to be displayed to a table. Files which are lists of results files must be assigned a table number
on their own; one table per file. Files which are actual results files can be combined within a table. Tables
will appear down the page in ascending order of table number. Within a table, for files which are lists of
results files, the results files will be displayed on the page in the order in which they appear in the ‘file
containing a list of the names of results files’, i.e. if the table is divided into columns, filling a row left to
right before starting a new row. So you can arrange results files in a logical way on the page by specifying
the order in which they are written to the ‘file containing a list of the names of results files’. For files
which are actual results files which have been assigned to the same table, the order they appear will be
determined by the order in which their names were entered on the ‘Enter the name of a results file to be
displayed’ page.
18
9.8.6
Number of columns
On the next page of Rwui you can specify how many columns to divide each table into. If more than
one results file is to be displayed in a table and you would like them displayed side by side, rather than
one below the other, then divide the table into columns.
9.8.7
Displaying current results on analysis page
In applications created by Rwui, the results of each analysis are accessed from a list of links at the foot
of the analysis page. But you also have the option of displaying the results files from the current analysis
on the analysis page itself.
9.9
Process information
If your R script takes some time to execute you may want to provide the user with process information in
order to inform them of the progress the R script is making. If you would like to do this check the box.
For this facility to work, your R script needs to periodically append lines to a file called ‘process info.txt’
with progress information for the user. i.e. you need to add lines such as ‘write(“Starting the analysis
....”, file=“process info.txt”, append=TRUE)’ at strategic points in your R script. The R function
‘capture.output’ can also be useful for appending lines to the file ‘process info.txt’. For example, from
microarray analysis: capture.output(expr = rma(data), append=TRUE, file=“process info.txt”).
The completed web application reads the file ‘process info.txt’ every few seconds and displays it in a
Javascript popup window. So a user of your application needs to have Javascript enabled in their browser
for this feature to work.
(To enable Javascript: In Mozilla go to ‘Edit’ ⇒ ‘Preferences’ ⇒ ‘Advanced’ ⇒ ‘Scripts and Plugins’ and
tick ‘Enable Javascript’ for ‘Navigator’ at the top. In IE go to ‘Tools’ ⇒ ‘Internet Options’ ⇒‘Security’
⇒ ‘Custom Level’, scroll down to ‘Scripting’ ⇒ ‘Advance Scripting’ and tick ‘Enable’.)
You can specify the default size (in pixels) of the popup window in which the process information appears.
You can also specify the refresh rate in seconds for the message in the popup window. The default refresh
rate is every 5 seconds.
In addition to, or instead of, a text process information box the application can also display a graphical
process information box. This might be useful, for example, for showing users graphically the convergence
of an iterative calculation. Your R script must write the periodically updated graph, for example at each
iteration, to a file called ‘process graph.jpg’.
9.10
Upload R script
Upload the R script.
19
9.11
Upload subsidiary files
On this page you can upload any subsidiary R scripts and/or reference data sets. They will be automatically incorporated into the application in the correct location. You can then access each one in your R
script using the R variable name you are asked to provide on this page.
For example if you upload a subsidiary R script “my subsidiary script.R” and provide the R variable
name “subsid script”, then you could use this subsidiary script in the main R script (which you have
uploaded on the previous page) with the line “source(file=subsid script)”. Similarly if you upload a data
file “reference data.RData” and provide the R variable name “reference data”, then you could access this
data in the main R script with the line “load(file=reference data)”
How it works: The file (for example, “my subsidiary script.R” with variable name “subsid script”) is
uploaded and incorporated into the WEB-INF directory of the application you have created. The actual
working directory for the main R script, for each submission, is always three directory levels below the
WEB-INF directory, so the line ‘subsid script = “../../../my subsidiary script.R”’ is automatically added
to the beginning of the main R script.
Please note if using an Application Description File (see Section 10) to load a previously created application back into Rwui for editing, the subsidiary files will have to be reloaded, they are not included in
the ADF.
Further information on ways of including subsidiary files is given below in ‘A note about paths, subsidiary
R scripts and constant data sources’ (see Section 12.3)
9.12
Add an initial Login page?
You may want to password protect your application by adding an initial Login page. Two types of Login
page are available. One Login page requires only a password to be entered, and all users use the same
password. The other type of Login page requires both a username and a password to be entered.
If ‘one password for all’ is chosen then the password to be used can be specified on the next page of
wui. Alternatively you can leave this blank and provide a password by editing the application’s password
file once your application is installed on your server. And you will be able to change the application’s
password at any time by editing the password file. If the ‘individual username/password pairs’ option is
chosen you will need to provide the username/password pairs by editing the application’s password file
once your application is installed on your server.
If the ‘individual username/password pairs’ option is chosen, in the finished web application, when a user
logs on, the application makes their username available to the R script as an R variable called ‘username’,
which is automatically assigned in the R script right at the beginning of the code. In this way the
username can be used not only for control of access to the application but also for customising the R
analysis for specific users.
20
9.12.1
Providing/Editing password(s)
The password file is called ‘passwords.txt’ and can be found in the ‘/WEB-INF’ subdirectory of your
application once the application has been installed on your server (see Section ‘Installing the application
you have created’ 9.15 below for an explanation about the ‘/WEB-INF’ directory).
If ‘one password for all’ was chosen when the application was created, and a password was specified at
the time, then the text file ‘passwords.txt’ will contain the password (one word and nothing else), and
editing the password is simply a matter of changing the word in this file. If a password was not specified
when the application was created then the password can be provided by inserting your chosen word for
the password into this file.
If the ‘individual username/password pairs’ option was chosen then the username/password pairs must be
inserted into the file ‘passwords.txt’ with one username/password pair per line and with each username
and password separated by a comma. An example would be:
jack, red$gold
jill, black$iron
tom, brown$copper
dick, green$tin
harry, blue$zinc
So a username/password file can be stored off the server and when changes are required, conveniently
edited in a spreadsheet, then saved as a .csv file called passwords.txt and copied to your application’s
‘WEB-INF’ directory on the server, overwriting the existing ’passwords.txt’ file.
9.13
Returning the results to the web page or by e-mail
The web application can return the results online to the user’s web browser. Alternatively the results can
be returned offline to the user via email, in which case, after submitting data for analysis the user can
close the browser window if required. Please note that the e-mail option only works when the application
is installed on a Linux machine. It will not work when installed on a Windows server.
9.13.1
E-Mail Option (Linux only)
If the E-Mail option is selected the web application must contain a text entry box associated with a
variable called ‘email address’. If this input item is not present Rwui won’t allow this option to be
selected and you will need to click back and add it to the page.
With the E-mail option selected Rwui creates a web application that will set the R script running, but
not wait for it to finish. It will return a message to the web page immediately, informing the user that
the analysis has started and the results will be e-mailed to the address they entered on the page. The
user can then close the browser window if required or submit further jobs. No process information or
graphical process information is displayed. Note that the SessionListener is also turned off so files will
not be deleted from the server automatically.
21
Your R script must contain code for e-mailing the results of the analysis. Here is some example R code,
for a Linux system using the mailing program ‘nail’:
Firstly arrange for any error messages to be e-mailed to the user if the analysis fails, and for any results
files to be deleted, by pasting something like this at the beginning of your R script before uploading it
to Rwui:
unlnk.command <- "../results/"
nail.command <- paste("nail -s ", message_subject, " -r ", from_address,
to_address, " < error.txt")
options(error=quote({ write(geterrmessage(),"error.txt"); system(nail.command);
unlink(unlnk.command, recursive=TRUE); q()}))
Then when the analysis has finished, zip up the results files by pasting the following at the end of your
R script before uploading it to Rwui:
## this extracts the hexadecimal submission id
pth <- unlist(strsplit(getwd(),"/"))
id <- pth[length(pth)-1]
zip.command <- paste("zip ", id, ".zip", " my_results_table.txt",
" my_results_graphs.pdf", sep="")
system(zip.command)
Then e-mail the zip file as an attachment by including the following code:
nail.command <- paste("nail -s ", message_subject, " -a ", paste(id, ".zip"),
" -r ", from_address, to_address, " < message.txt")
system(nail.command, wait=TRUE)
Then clear results files from server, since the SessionListener is turned off, with this line of code:
unlink("../results/", recursive=TRUE)
9.14
Cancel Button (Linux only)
If the R script of your webapp can take a significant amount of time to run you may wish to include a
‘Cancel’ button on the web page of your webapp. In this way a user of the webapp can stop an unwanted
R analysis that has been started in error. Any files produced by the R script prior to cancellation are
also deleted. For a webapp in which the results are returned to the user by e-mail, the ‘Cancel’ button
will stop the last submission. Any prior submissions that are still running won’t be cancelled and cannot
be cancelled by the ‘Cancel’ button. Please note this will only work for webapps installed on Linux/Unix
servers. It won’t work for webapps installed on Windows servers.
22
9.15
Installing the application you have created
Once the application has been created a link will appear on the final web page. If you named the
application, for example, ‘myapp’ then the link will be called ‘myapp.tgz’. A link to an identical zipped
copy called ‘myapp.zip’ is also provided. Download one of these compressed files to a download directory
and uncompress it (eg. tar zxvf myapp.tgz). If you called your application ‘myapp’ then uncompressing
produces a directory named ‘myapp’ in your download directory containing a number of subdirectories
(build, doc, object, web, deploy, lib, src). In order to use the application that you have created you just
need to copy the .war file from the deploy subdirectory to your Tomcat ‘webapps’ directory (eg. On
Unix systems cp
/download.directory/myapp/deploy/myapp.war
/tomcat.home/webapps/). After
a moment the server will automatically unpack the ‘myapp.war’ file for you, creating a directory named
‘myapp’ in Tomcat’s ‘webapps’ directory.
Then the application should be accessible from your browser at the URL http://localhost:8080/myapp
10
Application description file
If you called your application, for example, ‘myapp’ then the application description file will be called
‘myapp.xml’ and will be found in the top level of the directory ‘myapp’ created when you uncompressed
‘myapp.tgz’ or ‘myapp.zip’ eg. /download.directory/myapp/myapp.xml.
Our thanks to the developers of the Java package XStream (http://xstream.codehaus.org/) which has
been used to create the xml file. The ‘XStream’ License can be viewed here xstream license.txt.
11
Modifiying the application
You may want to modify the application, for example, editing the .jsp’s to change the layout of the input
and/or the results pages. If you want to modify the completed application then the download includes
all the files necessary. After you have modified the .java or .jsp files the application needs to be rebuilt
and redeployed. To do this using the included Ant script:
1. cd to the directory ‘/download.directory/myapp’ (or whatever you called your application)
2. Edit the file /download.directory/myapp/build.properties to add the path to the Tomcat directory
on your system (the path to the top level of Tomcat, not ‘webapps’) i.e in Unix you will need a line
like: tomcat.home = /***/***/*** or in Windows you will need a line like: tomcat.home = C:\\***\\***
3. In directory ‘/download.directory/myapp’ type ‘ant clean-all’
4. Then type ‘ant deploy’. The application will be rebuilt and the .war file copied to your Tomcat
webapps directory.
5. Restart the Tomcat server
(Unix: /tomcat.home/bin/startup.sh, Windows: \tomcat.home\bin\startup.bat or start it from
‘Start’ ⇒ ‘Control Panel’ ⇒ ‘Administrative Tools’ ⇒ ‘Services’)
23
6. On Unix systems remember to cd to ‘/tomcat.home/webapps/myapp’ and ‘chmod a+x srcmd.sh’
12
12.1
The completed application
Description
If a ‘Multiple/Replicate File upload page’ has not been included then the completed application for
running your R script consists of one web page where values of variables may be entered, data uploaded
(if necessary) and the whole lot analysed.
If a ‘Multiple/Replicate File upload page’ is included the completed application has two input web pages.
The user uploads the multiple files one at a time using a ‘File upload box’ on the first web page. Once
completed a button takes the user to a second web page where values for all other variables and singleton
data files are entered.
The application checks the validity of the values that the user enters and returns an error message to the
page if values entered are not valid. Only numeric values or NA can be entered into Numeric entry boxes.
Numeric, Text and File Upload boxes cannot be left blank. Multiple/Replicate Files must be unique,
that is, the same file cannot be entered more than once. Text entered into Text boxes is trimmed of any
leading or trailing whitespace that may inadvertently been entered.
Once analysed, a link to the Results page appears at the bottom of the web page. The user can change
any of the variables and/or data and re-analyse and the new results will appear as a second link at the
bottom of the page, and so on. Clicking on a link brings up a Results page for the corresponding analysis.
The user can download individual results files from a Results web page by clicking on the name of the
appropriate results file. Alternatively each Results page also has a link which will download all the results
files presented on the page and the html of the Results page itself. In this way the user can view offline
any saved Results web page plus its results files. There are infact two links on the page; one will download
just the results files the other will also download any submitted data files that were used to produce the
results. (If the results are displayed on a Google dynamic map then these two links will not be available).
The current results file(s) will also appear on the analysis page itself if this option was selected when the
application was created.
12.2
A note about working directories
As mentioned above once the .war file has been copied by you and unpacked by the server your application
called, for example, ‘myapp’ will have a directory under the Tomcat webapps directory called ‘myapp’.
Amongst other things this directory will contain a subdirectory called ‘WEB-INF’. Under this directory,
once the application has been used for the first time, there will be a subdirectory called ‘myapp store’.
Each time the analyse button is pressed a unique directory with a 15 digit hexadecimal name is created
in the directory ‘myapp store’. Under this uniquely named directory is a subdirectory called ‘results’ into
which the R script writes any results files. Once the R script has finished the web application looks in
this directory for the files to display on the ‘Results’ page. The application also uploads any data for
processing into this directory. This means these data files will also appear in the list of results on the
24
‘Results’ page. This gives the user the opportunity to check that the correct data has been submitted
for processing and has been uploaded correctly. When the application is created the R script has a line
automatically added at the beginning to set the working directory correctly. Important note: So it is
important that the R script you upload does not set the working directory at any point.
12.3
A note about paths, subsidiary R scripts and constant data sources
Normally you will not have to bother about paths on the server. Rwui will have arranged things so that
everything is in the right place and your R script will not need any path information. If your main R
script requires subsidiary R scripts or data files these can be incorporated into the application using the
‘Upload Subsidiary files’ page (see Section 9.11) of Rwui, which arranges the correct paths for these files
automatically.
However situations might arise when you need to manually include path information in your R script, so
the following paragraphs provides the information you will need in case you do have to do this.
If, for example your main R script runs additional R scripts, using the source() function in R. You will
need to place these additional R scripts somewhere accessible on the server and include the path to them
when using the source() command in your R script. This could be the absolute path. Alternatively,
if you place the additional scripts on the server in the WEB-INF directory of your application, where
you will find your main R script located, then (because the actual working directories are always three
subdirectories below the WEB-INF directory) the relative path to use in the source() command will be
source(“../../../my additional R script.R”). This is what, in effect, the ‘Upload Subsidiary files’ page (see
Section 9.11) of Rwui does for you automatically.
Similarly you may have a constant data source used by your R script each time it is run. You could place
this data on the server in the WEB-INF directory of your application and access it in the R script using
a relative path of “../../../my data source”.
Alternatively you could place the subsidiary R scripts and data sources in the library directory of your
R installation. A subsidiary R script would then be accessed in your main R script with the command
source(paste(.Library, “my additional R script.R”, sep=“//”)).
Alternatively you could construct an R package out of all your R scripts and/or data sources, install the
package in your R library and then access them in your main R script using the library() or require()
commands. In which case you will not have to bother about paths in your R script. Details on how to
create an R package can be found on the R website in the section Writing R Extensions.
12.4
A note about space on the server
Even if the data files have not been changed, each time the analyse button is pressed, they will be copied
over to the new uniquely named submission directory. If the user presses the ‘Clear Page’ button then
all their current submission directories and their contents are deleted on the server. But if the user
exits the application by closing the browser window without pressing the ‘Clear Page’ button, then the
submission directories and their contents will remain on the server. To stop the server from becoming
clogged with data the completed web application includes a SessionListener. The SessionListener detects
25
when a session is about to expire. By default this occurs 30 minutes from when the application was last
used but the session timeout can be changed in the Tomcat server configuration if necessary (in the
‘Default Session Configuration’ section of the file ‘tomcat.home/conf/web.xml’). On detecting a session
expiring the SessionListener removes the submission directories associated with the session.
13
Tomcat Installation
Installing Tomcat on both Unix and Windows machines is very simple and straightforward. For instructions on downloading and installing Tomcat click here tomcat installation.html.
If you don’t wish to provide remote access to your application then Tomcat can be installed for users on
a stand alone machine. You may also wish to install Tomcat on a stand alone machine so that you can
test the applications you have created before they are put on a ‘deployment server’. When installed on a
stand alone machine web applications are accessed in a browser on the machine via the ‘localhost’ URL
eg. http://localhost:8080/myapp.
Note that the portnumber being used for Tomcat localhost is usually 8080 but if necessary the portnumber in use on your system can be found or changed in the file ‘server.xml’ which will be located in the
/tomcat.home/conf directory - look for the section ‘Define the Tomcat Stand-Alone Service’.
13.1
Windows - path to Tomcat
An important point to note when installing Tomcat on a Windows machine - when the installer asks
into which directory Tomcat should be installed don’t install into the default directory, install into a
directory called, for example, “C:\tomcat\tomcat-5-5”. The reason for this is that the default choice
will have spaces in the path which will prevent applications from running. Dots in the directory names
also causes problems, as might other characters, so just use alphanumerics and hyphens as shown in the
example.
14
Web application servers other than Tomcat
Tomcat is the recommended web application server to use to run the applications created with Rwui,
but the applications should in theory run on many other Java web servers. We currently have not tried
any other than Tomcat, so if you do need to use another Java web server we would recommend thorough
testing.
The applications have been created using the Apache Struts framework (http://struts.apache.org) so
should work with J2EE web application servers compatible with the Servlet API Specification, version 2.2 or later, and the JavaServer Pages (JSP) Specification, version 1.1 or later. If you need
to use another web server some useful information can be found in the Struts installation documentation http://www.jajakarta.org/struts/struts1.2/documentation/ja/target/userGuide/installation.html.
The link will take you to a page towards the foot of which there is a section ‘Installing Struts With Your
Servlet Container’ that gives specific information about installing .war files on a number of different web
26
application servers. If you encounter problems with a particular application server it would be worth
searching the struts-user mail archive http://www.mail-archive.com/[email protected].
Any feedback on using applications created with Rwui on web servers other than Tomcat would be
most useful (contact [email protected], preferably with Rwui somewhere in the subject line).
15
R installation
Just the normal R installation is required.
15.1
Windows - path to bin directory
If using Windows remember to set the path to R’s bin directory, something you may not normally think
to do. To set the path, go to ‘Start’, ‘Control Panel’, ‘System’, ‘Advanced’, ‘Environment Variables’.
In the ‘System Variables’ box scroll down and select variable ‘Path’ and press ‘Edit’. Add the path
to R’s bin directory eg by adding something like C:\Program Files\R\R-2.1.0\bin to the ‘;’ separated
list. Then reboot the PC for the change to take effect. As of R version 2.15 the path that needs to be
specified has changed to C:\Program Files\R\R-2.15.1\bin\x64 (for 64 bit machines) and C:\Program
Files\R\R-2.15.1\bin\i386 (for 32 bit machines). If in doubt find the path on your machine to the file
‘Rterm.exe’.
16
Error and Warning messages
If an R error occurs when your web application is being used it will be displayed on the web page. To
track down the cause of the error look at the actual R script that is being run (completeRscript.R) which
can be found in the directory:
/tomcat.home/webapps/myapp/myapp store/hexadecimal submission id/
(if you called your application ‘myapp’).
The R error is displayed on the web page because the R ‘options’ command is automatically set by the
application at the beginning of the R script so that if an error occurs the error message is written to a
text file called ‘error.txt’. The web application checks this file when the R script terminates and if it is
not empty, displays the message it contains on the web page.
If you want to include error checking code in your R script you could communicate error messages to the
user of the application by way of the ‘error.txt’ file. To do this simply include lines in your R script that
write the error messages to the file ‘error.txt’. You need to include lines such as:
write(“The data file you submitted is in the wrong format”, file=“error.txt”)
q(save=“no”)
If the file ‘error.txt’ is not empty then the returning web page will not display any results that the R
script may have produced prior to the error occurring.
27
Warning messages from the R script can be communicated to the user by having the R script write
warning messages to a file called ‘warning.txt’. The contents of this file will be displayed on the returning
web page. Unlike error messages, if the file ‘warning.txt’ is not empty then the returning web page will
still display any results that the R script may have produced.
17
Browser Navigation Buttons
You should not use the Browser navigation buttons i.e. Back, Forward or Reload, to navigate through
Rwui. You should use the buttons provided on the web pages to navigate through Rwui. If you
inadvertently do press one of the Browser navigation buttons a warning should popup, giving you the
option to cancel the request. If you still proceed with the request you will end up at an error page and
will have to restart your session from Rwui’s start up page, having lost all your work.
The above applies to the applications created by Rwui, so you may wish to include a warning not to use
the browser navigation buttons in the introductory text of the application you are creating.
18
FAQ/Troubleshooting
1. If the application produces no results files and it is installed on a Windows machine please first
check points 13.1 and 15.1 above.
2. If the application produces an error message ’An error occurred creating a directory’ and Tomcat is
installed on Ubuntu it might be because Tomcat was installed by using the package manager which
results in permissions problems. The solution is to uninstall Tomcat with the package manager
and re-install it by simply copying the Tomcat tgz from the Tomcat website and installing it by
unpacking the tgz in a convenient location on your machine. See tomcat installation.html.
3. The R graphics devices png() and jpeg(), in an R script being run by an Rwui webapp, may or
may not work depending on how R was installed. A more reliable graphics device in this instance is
bitmap() although you do need to have ghostscript installed on your machine. Here is an example
producing a png using bitmap():
bitmap(file="box.png", type="png256", width=12, height=5, res=100, pointsize=8)
boxplot(dt)
dev2bitmap(file="box.png", type="png256", width=12, height=5, res=100, pointsize=8)
dev.off()
4. File upload size. The size of file that can be uploaded in an application created by Rwui is limited
to around 100Mb. Upload fails for larger files without an error message. The solution is to add this
line towards the end of the file tomcat home/webapps/your app/WEB-INF/struts-config.xml:<controller processorClass="org.apache.struts.action.RequestProcessor" maxFileSize="1G"/>
So that the end of the file will now look like this:<message-resources parameter="sreg.ApplicationSettings"
null="false"
28
key="settings"/>
<controller processorClass="org.apache.struts.action.RequestProcessor" maxFileSize="1G"/>
</struts-config>
This will allow up to 1Gigabyte files to be uploaded, if you want users to be able to upload up to
2Gigabytes then replace the ”1G” in the new line with ”2G”.
5. Setting environment variables Linux/Unix. If the R script requires environment variables to be set,
for example for database access, one way is to add export statements prior to the line
‘R CMD BATCH ...’
in the file srcmd.sh, which can be found at /tomcat home/webapps/your app/WEB-INF/srcmd.sh
19
Acknowledgments
Our thanks to the developers at the Apache Software Foundation for Struts, Tomcat and Ant; to the
developers at the R Foundation for R; to the developers of the Google Maps API; to the developers of
the Java package XStream and to Romain Guay for the Java class ‘SynchroAction’ and to Sterling Udell
and John Coryat for the javascript file for map overlays ProjectedOverlay.js. Wolfgang Pichler for drawing
draggable and resizable polygon javascript functions and Luke Mahe for drawing draggable and resizable
circle javascript functions.
20
Disclaimer
The web applications created by Rwui come with absolutely no warranty. Whilst every effort has been
made to ensure Rwui will produce a bug free web application that will run your R script faithfully
and correctly under all circumstances we cannot guarantee this and advise you to test thoroughly the
completed application.
21
Any questions
We will be happy to answer any questions and would welcome feedback. Please contact [email protected]
Preferably including ‘Rwui’ somewhere in the subject line.
29