1
QNX® 4.0 Operating System
Administrator's Guide
Quantum Software Systems Ltd.
175 Terrence Matthews Crescent
Kanata, Ontario K2M 1W8
Canada
(613) 591-0931
© Quantwn Software Systems Ltd. 1991
All rights reserved.
No part of this publication may be reproduced, stored in a retrieval system, or transmitted in any form or by any
means, electronic, mechanical, photocopying, recording, or otherwise without the prior written permission of
Quantum Software Systems Ltd
Although every precaution has been taken in the preparation of this book, we assume no responsibility for any
errors or omissions, nor do we assume liability for damages resulting from the use of the information contained
in this book.
This edition: April, 1991
QNX is a registered llademark of Quantum Software Systems Ltd.
UNIX is a registered trademark of AT&T
,.....
,_.,
UNIX Software Acknowledgments and Copyrights
The following utilities have been placed in the public domain by an individual or organization. We have
enhanced these utilities and hope you will find them helpful. The full source code for these utilities along with
additional notes and credits are available from our on-line update and conferencing system QUICS:
cp.io, pax, and tar-developed by Mark H. Colburn and sponsored by The USENIX Association.
freeze and melt-Leonid A. Broukhis
Cover art by Robert Tmney.
,_.,
,.....
,.,.,.,
,_,
,.....
,.,.,.,
,...
,-.
,...
Printed in Canada.
,.....
,...
,.,.,.,!
Acknowledgments
Several members of Quantum Software Systems Ltd. have
contributed to the design and implementation of QNX 4.0. This
product embodies more than a decade of research, development, and
field-tested experience. Veteran QNX users will recognize the
performance advantages and comfortable feel of their familiar OS,
while new users can expect a "standard" operating system with a
difference. We are proud to see the QNX operating system enter the
standards arena without sacrificing the fundamental qualities of its
original vision.
The following people deserve a special word of thanks and
acknowledgment for their substantial contribution to QNX 4.0:
Software Development:
Luc N. Bazinet
Documentation:
Kevin Didsbury
Gordon Bell
Paul N. Leroux
Andrew C. Boyd
Paul McManus
Brian Campbell
John M. Ostrander
Grant D. Courville
Dan Dodge
Andrew Edgar
William A. Flowers
Dan Frank
Jeffrey G. George
Dan Hildebrand
Eric Johnson
Debbie Kennedy
Terry Laughlin
Steve McPolin
Rob Oakley
Martin Walter
About this Guide
What wi l l I find i n th is g uide?
The QNX operating system Administrator's Guide accompanies the
QNX operating system (release 4.0) and is intended to show system
administrators how to install and configure a QNX system.
The Administrator's Guide contains two main parts:
•
•
Installation & Configuration-a detailed look at installing ,
configuring, and maintaining your system
Managers, Drivers, & Utilities-a "man page" for each,
arranged
alphabetically
Throughout this guide, we assume t:Q.at as the system administrator,
you have superuser privileges, which you acquire by logging in
using the root login account.
Administrator 's Guide
About this Guide
v
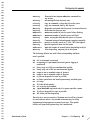
Conventions for techn ical terms
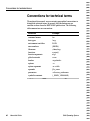
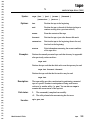
Conventions for technical terms
Throughout this manual, we use certain typographical conventions to
distinguish technical terms. In general, the conventions we use
conform to those found in IEEE POSIX publications. The following
table summarizes our conventions.
vi
About this Guide
Reference
Example
command names
ls
data types
long
environment variables
PATH
error numbers
[EINTR]
filenames
/dev/tty
functions
system()
function arguments
argl
global externals
errno
headers
<sys/stat.h>
options
-c
option arguments
-w
width
operands
file_name
parameters
<directory pathname>
symbolic constants
{_POSIX_VDISABLE}
QNX Operating System
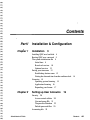
Contents
Part/
Chapter 1
I n stal l ation & Co nfig u ration
Installation
3
4
5
Installing QNX on a hard disk
B ooting QNX over a network
The system initialization file
Initial boot
8
8
10
Optional services 12
Setting your time zone 1 3
B ase-level services
Establishing the time zone
13
Getting the date and time from the realtime clock
Licensing
Operating system licensing
Application licensing
Expanding your license
Chapter2
Administrator 's Guide
14
15
15
16
17
Setting up User Accounts
Security 20
Access control utilities 20
User and group IDs 2 1
The password database 23
Default password files 25
Accounting file 25
19
Contents
vii
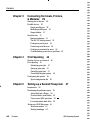
Contents
Chapter3
Connecting Terminals, Printers,
& Modems
29
Starting device drivers
Parallel devices
30
30
Single parallel port
30
Multiple parallel ports
Output buffers
Serial devices
30
31
31
Hardware adapters
31
The RS-232 serial protocol
Configuring serial ports
33
35
Connecting serial devices
36
Configuring terminals for users
39
Troubleshooting serial device problems
Chapter4
Print Spooling
45
Sharing devices in a network
Print spooling
46
46
Submitting print jobs
Querying print jobs
47
47
Cancelling print jobs
47
Controlling the print queues
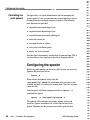
Configuring the spooler
50
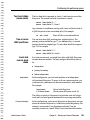
Setting up a Second Filesystem
Introduction
A hard disk and a floppy
58
58
Tw o hard disks (same node)
59
Two o r more QNX partitions
59
Local and remote hard disks
59
Setting up a DOS fllesystem
Contents
57
58
Partitioning the pathname space
viii
48
48
Spool configuration file
ChapterS
42
Invocation modes
61
Starting Dos fsys
62
61
QNX Operating System
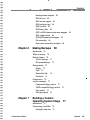
Contents
Dos fsys name adoption
DOS devices
62
62
DOS version support
63
DOS partition types
64
64
DOS text files
DOS binary files
64
QNX to DOS character and name mapping
DOS volume labels
65
DOS/QNX permission mapping
File ownership
Making Backups
Introduction
69
70
Backup formats
70
Archive backups
71
Filesystem backups
Backup media
Tape
72
72
72
73
74
Removable disk
Fixed disk
Compression
74
74
Archive examples
75
Compressed floppy archive
75
UNIX-compatible floppy archive
Tape archive
Administrator 's Guide
76
Building a Custom
Operating System Image
Introduction
75
75
Cartridge/optical
Chapter 7
66
70
When to back up
Floppy
65
66
Error codes returned by Dos fsys
Chapter6
65
77
78
Constructing a build file
78
Setting th e heap size
79
Contents
ix
Contents
Building a Custom
Operating System Image (cont'd)
Selecting processes for an image
79
Disk images 80
The Mak:efile 80
Copying an image to /boot
.
81
Network images 82
Embedded images 83
ChapterS
Disk & File Recovery
Introduction 86
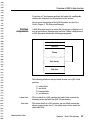
Overview of QNX 4 disk structure
Partition components
Directories
Links
86
87
89
90
Extent blocks
Files 92
91
File maintenance utilities
fdisk 93
dinit
93
93
chkfsys
zap
85
93
94
spatch
94
Disk recovery procedures
94
Using chkfsys 94
Recovering deleted files
96
Recovering from a bad block in the middle of a file
What to do if your system will no longer boot 97
97
If the disk is unrecoverable 10 1
If the fllesystem is intact 1 0 1
Recovering lost files and directories 1 0 1
The lost+found directory 1 02
Using spatch 102
X
Contents
QNX Operating System
Contents
Chapter9
The Quantum Update System
Introduction
105
1 06
Reporting bugs 1 06
Free software 1 06
Electronic mail 1 06
Conferencing system 1 07
About our hardware 1 07
How to phone us 1 08
Logging in
1 09
Using QUICS
Part II
Appendix A
Managers, Drivers, & Uti l ities
Time Zone Rules
Index
Administrator 's Guide
110
201
207
Contents
xi
Part/
Instal l ation
& Co nfigu rati o n
In this Part...
Installation
Setting up User Accounts
Connecting Terminals, Printers, & Modems
Print Spooling
Setting up a Second Filesystem
Making Backups
Building a Custom Operating System Image
Disk & File Recovery
The Quantum Update System
Chapter
1
I nstal lation
In this Chapter...
Installing QNX on a hard disk
Booting QNX over a network
The system initialization file
Setting your time zone
Licensing
Administrator 's Guide
Chapter
1
•
Installation
3
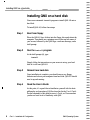
I nstalling QNX on a hard disk
I nstal l i ng QNX on a hard d isk
You use an automated install program to install QNX 4.0 onto a
hard disk.
To install QNX 4.0, follow these steps:
Step 1
Boot from floppy
Place the QNX 4.0 boot diskette into the floppy drive and reboot the
computer. You should see a spinning arrow in the top left corner of
your screen, followed by the QNX logo, a welcome message, and a
shell prompt.
Step2
Run the install program
At the shell prompt (#), type:
install
Simply follow the instructions on your screen to set up your hard
disk so it will boot QNX 4.0.
Step3
Reboot from hard disk
Once installation is complete, you should remove any floppy
diskettes and reboot your computer from hard disk. QNX 4.0 should
now be up and running.
Step4
Read the User's Guide
At this point, it's a good idea to familiarize yourself with the basic
philosophy and operation of QNX as described in the User's Guide.
For the remainder of this Administrator's Guide, we 'll assume that
you have a basic level of familiarity with QNX.
4
Part I
•
Installation & Configuration
QNX Operating System
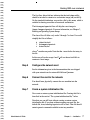
Booting QNX over a network
Booting QNX over a network
Once you 've installed QNX onto a hard disk that will be used as a
network file server, follow these steps to boot a computer over the
network. Note that the booting computer may be a diskless
workstation or a file server.
Before you boot over the network, you must first install QNX on at
least one machine that boots from hard disk (as described in the
previous section). If you haven't done this, please do so now, then
return to this section.
�
�
�
�
�
�
Step 1
�
QNX must be licensed to run on each computer in a network. Before
you proceed, make sure you are licensed to run the machine you
wish to boot over the network. This is described in the section
"Licensing" in this chapter.
�
�
�
,_.,.,
�
�
Check your network license
Step2
�
Select a boot server
You must select which node in the network you wish to boot from.
-�
For small networks we recommend you pick a single node, typically
node 1 . This node should have a local QNX filesystem.
�
�
�
For larger networks, you may want to select more than one boot
server node. For example, let's assume you have three
departments-R&D, Marketing, and Operations-each with its own
machine that acts as a major file server. You may elect to have each
department boot from its own major server. This provides fault
tolerance, since a failure in one department won't prevent another
department from booting. For large numbers of nodes, this practice
should also reduce the potential for a boot bottleneck when people in
the office start work first thing in the morning.
�
�
,_.,.,
�
�
,-,
Administrator 's Guide
Chapter
1
•
Installation
5
Booting QNX over a network
Step3
Start the netboot utility
When a node boots, it sends a boot request to its boot server. When
the network manager receives a boot request message, it forwards
this request to the netboot utility, which must be running on the
boot server if the request is to be honored.
When you boot over the network, the operating system image loaded
will inherit the following from the boot server:
•
•
•
the time
its list of name locators (see nameloc utility in Utilities
Reference)
its licensing capabilities
The netboot utility is typically started in the system initialization
file of the boot server as follows:
netboot &
Step4
Edit the netboot configuration file
When a boot request is received, the netboot utility opens the
/etc/ confiq/netboot file on the boot server. This file contains
entries that describe which operating system image to boot for each
node in the network.
Each line in the /etc/ confiq/netboot file starts with a logical
node number followed by a file specification identifying the
operating system image to boot. For example, the following file
might be used to boot nodes 2 through 7 (node 1 is the boot server,
which boots from disk, so it doesn't need to be in the file):
2
3
4
5
6
7
6
Part I
•
Installation & Configuration
f=build/ws
f=build/ws
f=build/ws2
f=build/ws
f=build/ws
F=imaqe s / special
QNX Operating System
Booting QNX over a network
The first line, f=build/ws , indicates that the buildqnx utility
should be invoked to construct a workstation image ( ws) on the fly.
On the standard distribution, we provide a file by this name, which is
suitable for booting a machine as a network workstation.
The F=imaqes / special line will ship the exact image in
/boot / imaqe s / special. For more information, see Chapter 7,
Building an Operating System Image.
The above file will allow only nodes 2 through 7 to boot. You could
simplify the file as follows:
4
7
*
f=build/ws2
F=imaqe s / special
f=build/ws
where * matches any node. Note that the * must be the last entry in
the file.
In this case, all nodes except 4 and 7 will use the ws build file to
construct a boot image.
StepS
Configure the network card
See the information given in the documentation that was shipped
with your network card or network ROM from Quantum.
Step6
Connect the card to the network
You should now physically connect the new machine into the
network.
Step7
Create a system initialization file
Now create a custom system initialization file. Creating this file is
described in the section "The system initialization me," below.
Note that you can still boot without creating a custom system
initialization me. If you boot without creating your own file, the
default me /etc/ confiq/sysinit will be used. That file should
contain generic commands suitable to start any machine.
Administrator 's Guide
Chapter
1
•
Installation
7
The system .initialization file
The system i n itial ization fi le
Initial boot
When you boot QNX, you are booting an image composed of several
processes. The frrst process in the image is always the Process
Manager (which contains the Microkemel). The Process Manager
performs processor initialization, and then schedules each process
included within the image for execution.
The last process is the s init utility, which starts the second phase
of your system initialization. This is done by starting a shell that
executes commands from a system initialization file. This is a
standard shell ftle that runs in exactly the same manner as any other
shell file except that breaks are disabled.
Starting system services after boot is one of the benefits of QNX's
modular architecture. The image that is booted typically contains
only those few essential services needed to start all other desired
services.
In order to run, sinit needs access to a ftlesystem that contains a
shell that can process the system initialization file. This filesystem
can be local (a hard disk on that machine) or remote (a hard disk on
another machine). If the filesystem is local, the image must contain
the Filesystem Manager and a disk driver to access the local disk. If
the filesystem is remote, the image doesn't need the Filesystem
Manager, but will require the Network Manager to access the remote
filesystem over the network.
When sinit runs, it firsts determines if the image it's part of was
booted from disk or over the network. If the image was booted from
disk, s init checks to see if a normal boot or an alternate boot
occurred. Based upon this information, it attempts to open one of two
files (see below). If the open succeeds, then s init will exec into the
Shell (/bin/ sh) with the file it opened as an operand. The Shell
replaces s init , whose job is now done.
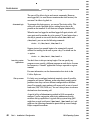
If (and only if) sinit can't open this first file, it will attempt to open
the I etc/ confiq I sys ini t file. If it opens this file, it will exec
into the Shell with this file as an operand. If it can open neither file,
then sinit will terminate and no system initialization file will be
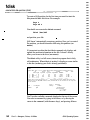
processed. This is summarized in the following table:
8
Part I
•
Installation & Configuration
QNX Operating System
The system initialization file
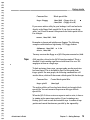
If you choose:
a normal boot
s init tries to find and open:
/etc/config/ sysinit . node
If this fails, it tries:
/ etc/config/ sysinit
an alternate boot
/etc/config/al.t sysinit
If this fails, it tries :
/etc/config/ sysinit
For any given node in the network, a total of three potential files may
be executed by s init:
•
sys init.node
•
al.t sys init
•
sys init
Each of these files serves a particular purpose.
sysinit .node
This file contains the custom commands needed to set up the
environment and services for your machine, allowing every node in
the network to have its own custom setup. The node after the dot (. )
is replaced at runtime by s init with the logical node number of
your machine. This is a value between 1 and the number of nodes in
your network. If your machine doesn't contain a network card, node
will be 1 .
al.t sys init
This file is executed only if you boot from the local disk and specify
an alternate boot by pressing <Esc> when you are prompted to do so
just before the QNX loader loads the operating system image.
The al.t sysinit file should contain a backup of the last working
copy of the sysinit . node file for this machine. It's there as a
safety net in case you make a modification to your sysinit . node
file that leaves the system in a state where you can't log in.
Since many services are started in the system initialization file, we
recommend that you update this file after all successful changes to
your node-specific file.
Administrator 's Guide
Chapter
1
•
Installation
9
The system initialization file
Note that the alt sysinit file is never used by a node that boots
over the network. In this case, you can correct any problems in a
modified sys init.node on the up-and-running boot server node.
sys init
This file is executed if a custom node-specific system initialization
file isn't present. It should contain services that will work on any
machine. Quantum ships such a generic file; we recommend that you
make few or no modifications to this file.
For testing purposes, you can boot a new machine over the network
without creating a custom sysinit . node file. When the node boots,
it will use the default sys init file. Once you're satisfied that the
machine is functional, you can then create a node-specific
initialization file.
If you remove a network card, or change the logical node number of
a machine, the machine won't find its old system initialization file,
which is keyed off its old node number. In this case, the machine will
look for a new node-specific file (node 1 if the card was removed or
if a new node number is to be used). If the file is missing, the
machine will use the default sys init file.
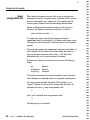
Base-level
services
The contents of each machine's system initialization file reflects the
hardware on that machine and the services you wish to provide. The
following describes a base set of services that will be in most
initi alization files.
The following lines define the time zone (EST in this case) and get
the time from the realtime clock. These two lines should be the first
in the file for machines that boot from hard disk. They are optional in
a machine that boots over the network, since the machine inherits
this information from the node it boots from.
export TZ=ESTSDST4 , M4.1.0 / 3 , M10.5 . 0 / 3
rtc hw
The following lines start the Device Manager and the console driver
with eight virtual consoles, then instruct the Shell to reopen its
standard 1/0 through the new console device.
10
Part I
•
Installation & Configuration
QNX Operating System
The system initialization file
Dev &
Dev . con -n 8 &
reopen /dev/conl
The following lines start up any other device drivers you may need.
They start both a serial driver, which will look for COMl and COM2,
and a parallel driver. These drivers will terminate if they can't find
the needed hardware.
Dev . ser &
Dev . par &
If you started Dev . ser, you might need to use the stty utility to
change the default line configuration. For example, the following
lines change the baud rate to 1 9200:
stty baud= 1 9 2 0 0 </dev/ serl
stty baud= 1 9 2 0 0 </dev/ ser2
etc ...
If your programs use floating point and you don't have an 80x87
chip, you need to start the floating point emulator:
emu87 &
The following line starts a login on the first console and arms all
other consoles. This should be the last command executed in the file.
This particular example shows a reasonable default suitable for the
console:
tinit - T /dev/con* -t /dev/conl &
You may wish to place common sets of commands in a separate
Shell file that you execute via the . (dot) Shell built-in. This allows
you to edit a single file to affect a group of machines. For example,
the following system initialization file could be used for all machines
in the Technical Department:
. /etc/ confiq/techies
Note that node-specific commands would be added after this "dot"
line, followed by the tinit utility.
Administrator 's Guide
Chapter
1
•
Installation
11
The system initialization file
Optional services
You can add a host of other services to your system initialization file.
You should add these services just before the line containing the
tinit command. The following examples show commonly used
optional services. Note that these utilities typically support
command-line options to modify their behavior-these options are
explained in the documentation for each utility.
Define any environment variables you wish inherited by all
processes started in the sys init file:
export var=value
Start a local floppy driver (if the QNX filesystem is running locally,
don't include the first line):
Fsys &
Fsys . floppy
If a floppy driver is running, you can use the vol and pax utilities to
access the driver 's block special file. If you want to access it as a
QNX filesystem, you must mount it as such (we recommend that you
transport files using pax rather than as files in a QNX filesystem):
mount /dev/ fdO /fdO
Start a DOS filesystem to access DOS floppies and partitions. This
requires that the QNX filesystem be running with a driver for the
floppy and/or hard disk:
Dos fsys &
If this is a boot file server, start the netboot utility:
netboot &
If this is a machine that you hope will be available at all times, you
may select it as a global name server:
nameloc &
If this is a machine that you hope will be available at all times, you
may also select it as a cron server:
cron &
12
Part I
•
Installation & Configuration
QNX Operating System
Setting your ti me zone
Start a clock that will continuously display the time in the upper right
comer of the screen:
-
clock -f green "+%X" &
Setting your time zone
It's important that the correct date, time, and time zone information
be established early during initialization. This should be the first step
in your system initialization file.
Internally, QNX uses Coordinated Universal Time (UTC), which is
often referred to as Greenwich Mean Time. Applications and utilities
convert to local time by using information about your time zone.
If you don't set your time zone, QNX will assume that local time is
the same as UTC time. This would present a problem only if you
wish to transfer files to another system in a different time zone. In
this case, the dates on the file will appear to be shifted by the
difference between the two time zones. If you plan to use Quantum's
update system to download new software, you'll want to set your
time zone correctly.
-
Establishing the
time zone
You should establish time zone information before setting the current
date and time. If the realtime clock in your computer has been set to
local time, QNX needs the time zone information in order to establish
UTC.
-
Administrator's Guide
Chapter
1
•
Installation
13
Setting your ti me zone
In the following example, the time zone as well as the time change
rules are set for Eastern Standard Time in North America:
export TZ=EST5DST4 , M4 . 1 . 0 / 3 , M1 0 . 5 . 0 / 3
where:
export
TZ
EST
5
DST
4
M4 . 1 . 0 / 3
M1 0 . 5 . 0 /3
Shell command to set an environment variable
Name of variable
Eastern Standard Time
5 hours before Greenwich Mean Time
Daylight savings time
4 hours before Greenwich Mean Time
First Sunday of April at 3am
Last Sunday of October at 3am
For more information on the time zone rules, see Appendix A.
Getting the date
and time from
the realtime clock
If you're booting from disk, you should follow the first line in your
system initialization file with the rtc utility to establish the current
date and time from the realtime clock. The following two lines would
accomplish this:
export TZ=EST5DST4 , M4 . 1 . 0 / 3 , M1 0 . 5 . 0 / 3
rtc hw
This will set the date and time on an IBM AT-compatible computer.
Note that there are two possible approaches to take when setting the
realtime clock in your machine:
•
setting the realtime clock to universal time
•
setting the realtime clock to local time
We recommend that you set the time in the realtime clock to UTC.
But if you're also running operating systems that assume the realtime
clock is set to local time (e.g. DOS), you'll want to use the rtc utility
with the 1 option:
-
rtc -1 hw
14
Part I
•
Installation & Configuration
QNX Operating System
Licensing
This invocation of rtc assumes that the realtime clock was set to
local time. Note that when you use local time in the realtime clock,
you ' ll have to manually change the value in the realtime clock when
you switch to and from daylight savings time in locales where it's
used.
If the time in your hardware clock is incorrect (perhaps the battery
has been replaced) , you should set the system time using the date
utility, then set the realtime clock using the rtc utility with the - s
option. For details, see the documentation for these utilities in the
Utilities Reference.
-
If you're booting over the
network...
If you boot over the network, the booting machine will inherit the
UTC time and time zone environment variable from the node it
booted from. Therefore, you don't need to put this information in
your system initialization file.
-
Licensi ng
Operating
system licensing
QNX must b e licensed for each computer it runs on. This is true
whether you're using 10 standalone machines or 1 0 networked
machines.
In a network, each machine is referred to as a "node" and each node
is assigned a "logical" node number. Logical node numbers range
from 1 to the number of nodes in the network. For example, a
network licensed for three nodes would support logical node
numbers 1 , 2, and 3 . You set the size of the network by running the
l.icense utility (see the section "Expanding your license").
-
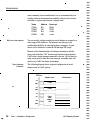
You can use the s in utility to query the number of nodes your
network has been licensed for.
Administrator 's Guide
Chapter
1
•
Installation
15
Licensing
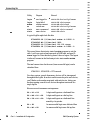
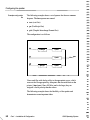
Typing:
sin info
will produce output similar to the following:
Node
CPtJ
2
386/0
Reap
Machine Speed
�
563
Memory
Ticksize
840k/ 2048k 10ms
Monitor
Flags
VGA Color ---------------P
Bandlers Names Sessions Procs Timers Nodes Boot
13668
Locators :
32
30
32
150
40
10 Bard
1 4
The number under the Nodes heading (in this case 10) indicates the
number of nodes licensed within this network.
Application
licensing
Per node licensing
Applications are usually licensed per node or per concurrent use.
Some applications are licensed per node in a QNX network in the
same way as the operating system. If you have an application
licensed for, say, three nodes, then you would be restricted to running
it only on three nodes of your network. Note that your network
license size may exceed the license size for an application.
You may run multiple invocations of the application on each licensed
node. When you run an application licensed per node, the invoking
node will consume one of the licenses. The license will remain with
that node until it is rebooted.
By convention, serial numbers that end in "nddd'' are licensed per
node.
Concurrent use licensing
Applications may also be licensed for the number of copies in
concurrent use. For example, if an application is licensed for three
concurrent copies, then up to three copies may be run anywhere in
the network at one time. Note that on a non-networked single node
machine, you may still run only three concurrent invocations.
By convention, serial numbers that end in "uddd'' are licensed per
use.
16
Part I
•
Installation & Configuration
QNX Operating System
Licensing
Expanding your
license
You expand your license size for the operating system or an
application using the license utility. This utility installs license
serial numbers from floppies to your hard disk. Each QNX boot
diskette and application diskette contains a serial number license for
one node (or for one use).
The following example transfers the license from floppy d1ive 0
("drive A:" in DOS terminology) to your hard disk. Note that the
floppy driver (Fsys. floppy) must be running.
license /dev/fdO
You can list the serial numbers you own by doing an ls of the
/etc/licenses directory. After adding new serial numbers to your
set of licenses, you must reboot before they will take effect.
Any machines that boot over the network will inherit the serial
numbers from the machine they boot from. If you wish to boot
networked machines from their local hard disk, you must use the
license utility to add se1ial numbers to each hard disk you wish to
boot from. Once you have done this on a single hard disk, you can
use license to install the serial numbers across the network from
one hard disk to another and thus avoid having to re-insert floppies.
For more information on the license utility, see Part II, Managers,
Drivers, & Utilities.
Administrator's Guide
Chapter 1
•
Installation
17
Chapter2
Setti n g u p User Accou nts
In this Chapter...
Security
Accounting file
Administrator 's Guide
Chapter 2
•
Setting up User Accounts
19
Security
Security
QNX provides mechanisms to control access to resources and critical
system functions. These mechanisms
system to identify a particular user.
Access control
utilities
The l.ogin utility
The
su
utility
are
based on the ability of the
The QNX access control utilities are:
login
su
pas swd
newgrp
sign on to the system
temporarily become another user
maintain the user accounts/change password
switch to a different group
The login utility should be started by tinit on all tty devices. The
login utility demands a usemame and password which it verifies in
the password database. If the user fails to enter a correct
usemame/password combination within three attempts, the utility
will exit, updating appropriate accounting information. If the user
enters a correct combination, login will start a login shell and will
load the user 's environment.
The su utility lets a user temporarily have the privileges of another
user. If the user is not the superuser (root), su will demand the
appropriate password. If a valid combination is entered, su will do
an exec( ) to create a shell for the user with the effective group ID and
user ID of the desired user.
Exiting from the shell will return you to where you were before
running su.
The pas swd util ity
20
Part I
•
The pas swd utility may be used to change a password or to add a
new user account to the system. Only the superuser (root) may add
a new account. When changing or setting a password, the pas swd
utility will insist that the password consist of at least six characters
from at least two different character classes. Examples of character
classes are alphabetic, numeric, and punctuation. This is to lessen the
chance of accidental discovery of another user's password and to
discourage unsafe practices.
Installation & Configuration
QNX Operating System
Security
The pas swd utility asks the user for the old password, the new
password, then the new password again (to verify it was entered
correctly). If the user is the superuser, the old password isn't
requested.
When the superuser adds a new account, passwd prompts for the
following information:
•
user name
•
useriD
•
initial password
•
home directory
•
shell
•
group name
If the initial password isn't entered, the user account will be created
without a password. If the home directory doesn't exist, it will be
created under /usr with the permission mask " rwxr-xr-x. " If no
shell is given, the system default shell (/bin/ sh) will be used. If the
group doesn't exist, a new group will be created with one member,
namely this user. If the group does exist, this user will be added to it.
The pas swd utility doesn' t provide any mechanism for deleting
accounts. This function may be performed using a text editor on the
/etc/pas swd, /etc/group, and /etc/ shadow files.
-
The newqrp utility
·
User and group
IDs
Administrator 's Guide
The newqrp utility changes the current process 's real and effective
group ID. If invoked without arguments, newqrp changes the group
identification to the group identified in the password database for the
current user. The groups that a particular user may change to are
controlled by the password database.
QNX uses two pieces of information to control access to resources :
•
user ID
•
group ID
Chapter 2
•
Setting up User Accounts
21
Security
The user ID should be unique-that is, no two users should share the
same user ID. This rule is enforced by the pas swd utility, but the
superuser can override this rule by editing the password file directly.
The group ID refers to a database that allows several users to be
associated to a group. This group mechanism allows a team of users
to share resources without making them available to the rest of the
world.
File permissions
All files and directories in the QNX fllesystem have three sets of
access fields corresponding to:
•
owner
•
members of the owner's group
•
everyone else
All files and directories also have fields that identify the owner and
group of the me.
setuid and setgid
Executable files have further permissions that cause them to execute
with the privileges of the file's owner or group, regardless of who
executes them. Colloquially, this mechanism is referred to as
"setuid" and "setgid," respectively.
This simple mechanism allows non-privileged users to perform
certain privileged functions. For example, pas swd allows anyone to
modify their own entry in the password database, even though they
would normally be denied access to the file.
The pas swd, login, su, and newqrp utilities are all "setuid" to
root ; these programs therefore run with the permissions of the
superuser.
22
Part I
•
Installation & Configuration
QNX Operating System
Security
-
By convention, root is the only user with user ID zero, which yields
superuser status. With respect to access control, you must ensure that
only programs that can be trusted-and absolutely need to be
trusted-are "setuid" or "setgid" to root .
Since these "setuid" and "setgid" programs will inherit superuser
capabilities, you should make sure they do not have general write
permissions so that non-superusers won't be able to modify the
programs.
The password
database
Three files collectively form the password database:
•
I etc/pas swd
•
/etc/shadow
•
/etc/group
The access to these files should be as follows:
/etc/passwd
File
Owner
Group
Permissions
/etc/pas swd
/etc/group
/etc/ shadow
root
root
root
root
root
root
rw
r-- r-rw- r - - r-rw
- --
- ---
The I etc/pas swd file contains a set of lines in the following
format:
username: haspw: userid: group: comment: homedir: shell
where :
username
haspw
userid
group
comment
homedir
shell
-
Login name of user
If empty, user has no password, otherwise
a password exists in the I etc/ shadow file
Numeric user ID
Numeric group ID
Free-form comment field, must not contain ":"
Home directory of this user (default is /)
Initial shell (and arguments) to start from login
(default is /bin/ sh)
-
Administrator 's Guide
Chapter 2
•
Setting up User Accounts
23
-
Security
-
/etc/group
The I et c/ group file contains lines in the following format:
-
groupname: reserved: group: member [ , member]
*
-
-
where:
-
groupname
reserved
group
member
/etc/shadow
The name of the group
Reserved for later use
Numeric ID of the group
A list of usemames that belong to this group
-
The I etc/ shadow file contains lines in the following format:
userid: password: reserved: reserved: reserved
where:
userid
password
reserved
The name of this user
The encrypted password of this user
The first three numeric fields are reserved for
"password aging"; for now, they are always 0.
You may notice from the above permission list that /etc/pas swd is
readable by anyone. This is to provide standard utilities with a simple
mechanism to find information about users. Since this file is
readable, the encrypted password isn 't stored within it. The
encrypted password is stored in the I etc/ shadow file, which is
readable only by the superuser. This is to inhibit unauthorized
attempts to decrypt the passwords by malevolent users. As a system
administrator, you should ensure that these permissions are
maintained.
QNX is shipped with a default password database that includes
/etc/pas swd and /etc/group. The /etc/shadow file isn't
shipped, because the accounts initially don't have passwords
associated with them.
The first job, after the system is installed, is to set up passwords for
all the system accounts and to defme any user accounts. You
perform both of these functions with the pas swd utility. By
convention, user accounts have a user ID greater than or equal to 1 00.
24
Part I
•
Installation & Configuration
QNX Operating System
-
Accounting file
Default
password files
The default /etc/pas swd file that was shipped with your QNX
system contains the following:
root : : O : O : : / : /bin/ sh
Tbe default I etc/ group file contains the following:
root : : 0 : root
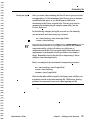
Accou nting fi le
Accounting information i s logged t o the I etc/ accloq file. I f this
file doesn't exist, all accounting information will be discarded. This
is the normal mode of operation after QNX has been installed.
For most realtime systems, this default of discarding accounting
information is recommended. If you have a dial-up line to a
computer or if you run QNX in a network of many users, you may
.
wish to change this default by creating an empty I etc/ accloq file.
Enabling accounting
To enable accounting, you create an empty I etc/ accloq file. You
can do this using the touch utility:
touch /etc/accloq
chmod q= , o= /etc/accloq
Once this file is created, accounting information will be logged here.
Note that only the superuser (user ID root) should create and
modify this file.
Record format
Each record in this text file is of the form:
tttttttttt
cc
data...
where tttttttttt is the time in seconds (in decimal). This is always
followed by a single space. The time is followed by a two-character
code cc. This code is then followed by a space and data specific to
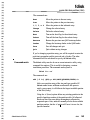
each code and terminated by a <newline>. The following utilities
write these accounting records:
Administrator 's Guide
Chapter 2
•
Setting up User Accounts
25
Accou nting file
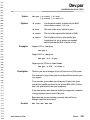
Utility
Purpose
Record
login
login
modem
su
t init
t init
user logged in
login failed
modem connect
switch user
start a command
arm a device
tttttttttt
tttttttttt
tttttttttt
tttttttttt
tttttttttt
tttttttttt
LO device uid gid uname
LF device uname
MO device baud
su
device uid gid uname
TS device command
TA device
A typical logfile might look like this:
670464500
670464545
670464550
670465824
TS
MO
LO
TS
/ / 1 /dev/ ser1
/ / 1 /dev/ ser1
/ / 1 /dev/ ser1
/ / 1 /dev/ser1
modem -b 19200 -L
2400
100 1 0 1 steve
modem -b 19200 -L
This record shows that t init started a modem program to wait for
calls. A call was received and answered at 2400 baud, and user ID
steve logged in. Note that the log doesn't show a logout. The logout
is inferred, because in the final entry t init starts another modem
program.
The total connect time for the user (from successful login) can be
calculated thus:
670465824 - 670464550 = 1 274 seconds
On a busy system, records from many devices will be interspersed
throughout the logfile. In order to match events keyed to each device,
you' ll find a node number associated with each device, letting you
track accounting records for all devices throughout a network in a
single logfile.
Here are several common event sequences:
TS � LO
�
TS
TS � MO � LO � TS
A login and logout on a dial-up line.
TA � TS
A login and logout on a dedicated line
armed by a keystroke.
�
LO � TA
An unsuccessful login on a dedicated line.
TS � TS
TS � MO
26
Part I
•
A login and logout on a dedicated line.
�
Installation & Configuration
TS
An unsuccessful login on a dial-up line.
QNX Operating System
Accounting file
Clearing the logfile
Once you create I etc/ acc1og, the file will start to grow as records
are appended to it. If left unmanaged, this file may grow to consume
considerable disk space, so you should print or archive the
information in this file on a regular basis. You may even want to
automate this housekeeping job using the cron utility (see the
Utilities Reference).
In the following example, the logfile is moved to a file named by
year and month, and a new empty log is created:
mv /etc/acc1og /etc/acclogs / 9 1 0 6
touch /etc/acc1og
Since the data in this file is very regular, you may use the freeze
compression utility, which will achieve very high rates of
compression on the file. This can significantly reduce disk space
requirements if you keep the saved logs online or save them to a
floppy. Remember to move the file before compressing it. Never
compress I etc/ acc1og directly.
Here 's an example of the recommended compression procedure:
mv /etc/acc1og /etc/ logs / 9 1 0 6
touch /etc/acc1og
freeze /etc/ logs / 9 1 0 6
Note also that other utilities (possibly third-party) may add their own
accounting records to the /etc/acc1og file. Utilities may also log
problems or unexpected events to the I etc/ sys 1og text file.
Administrator's Guide
Chapter 2
•
Setting up User Accounts
27
Chapter 3
Con necti ng Term i n als, Pri nters, &
Modems
In this Chapter...
Starting device drivers
Parallel devices
Serial devices
Administrator 's Guide
Chapter 3
•
Connecting Terminals, Printers,
&
Modems
29
Parallel devices
Starting device d rivers
A QNX system will usually contain one or more terminal devices. All
such devices are managed by the Dev process. This process must be
started first, before any device drivers are started.
/bin/Dev &
Device Manager process
Once Dev has been started, one or more of the following device
drivers may be started:
/bin/Dev . con &
console device driver process
/bin/Dev . par &
parallel printer device driver process
/bin/Dev . ser &
serial device driver process
Each of these drivers is described in more detail in Part II,
Managers, Drivers, & Utilities.
Paral lel devices
Parallel ports are used to communicate with parallel printers. Apart
from starting up the driver, there 's little work for you to do other than
connect the printer to the machine.
Single parallel
port
If only one parallel port is available on a machine, then no
parameters are required:
Dev . par &
Started this way, the parallel driver will create a device called
/dev/par, which corresponds to the first parallel port found by the
BIOS (LPTl ) .
Multiple parallel
ports
If your machine has more than one parallel port, then you '11 need to
start an additional Dev . par for each extra port. You must provide a
unique name for the extra devices. For example:
Dev . par &
Dev . par -b 2
30
Part I
•
Installation & Configuration
-
N laser &
QNX Operating System
-
Serial devices
These commands will create a device called ldevlpar on LPTl, and
a second device c alled I devI laser on LPT2.
Output buffers
If you have the memory, you might find that specifying large output
buffers significantly improves turnaround time when sending data to
your printer� Here's an example of a parallel device created with a
30K output buffer:
Dev . par -0 3 0 0 0 0 &
Serial devices
Hardware
adapters
1/0 addresses
The Dev . ser driver can support one or more serial ports. The
hardware interface to the computer consists of a UART ( Universal
Asynchronous Receiver/Transmitter) for each serial port. The driver
will support any or all of the 8250, 1 6450, or 1 6550 family of serial
controllers.
Each UART exists in the 1/0 address space of the computer at eight
consecutive addresses. The Dev . ser driver is informed of the 1/0
address range for each UART by command-line arguments when it is
started.
Hardware interrupt
Just as important as the 1/0 address is the hardware interrupt
generated by each UART. Most microcomputers provide several
hardware interrupt signals on the bus, labelled IRQ2 through IRQ I S
(except for interrupts 0 , 1 , 8, 9, and 1 3 , which are used internally by
the system motherboard) .
These interrupt signals are active-high TTL logic signals on ISA
buses, which means that you can connect only one adapter card to
any one interrupt signal. Microchannel architectures (MCA bus)
don't have this limitation.
Serial adapter cards come in various configurations. Adapter cards
with only one serial port typically offer only a limited set of choices
for 1/0 address and hardware interrupt. The following table shows
-
Administrator's Guide
Chapter 3
•
Connecting Terminals, Printers,
&
Modems
31
Serial devices
some commonly found combinations, but we recommend that you
read the hardware documentation carefully to discover the choices
available on a given manufacturer's adapter card:
Name
COMl
COM2
COM3
COM4 .
Multi-port serial adapters
Address
3F8 .
2F8
3E8
2E8
Interrupt
IRQ4
IRQ3
varies
varies
You can usually configure multi-port serial adapters to respond to a
wide range of 1/0 addresses. The adapters may also give you
considerable flexibility in selecting hardware interrupts. A good
choice for 1/0 addresses is often the 280 through 2BF range.
Because of the limited number of hardware interrupts available,
these cards will often "OR" the interrupt lines from the individual
UARTs into a single interrupt conriected to the bus. QNX allows for
many serial ports to share the same interrupt, since Dev . ser will
check every UART that shares an interrupt.
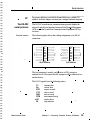
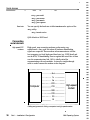
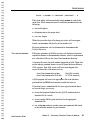
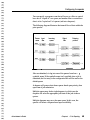
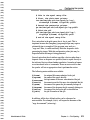
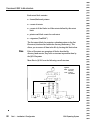
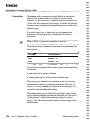
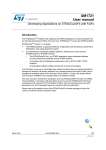
Typical hardware
installation
The following diagram shows a typical configuration of serial
adapter cards in a QNX system.
CPU Bus
3F8
IRQ4
2F8
IRQ3
Adapter cards
Serial devices
COM1
COM2
280
288
288
8-port
serial
adapter
card
IRQ5
32
Part I
•
Installation & Configuration
QNX Operating System
Serial devices
For proper operation, each serial channe l must have a unique 1/0
address, and each adapter card must use a unique hardware interrupt.
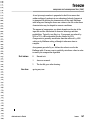
The RS-232
serial protocol
The RS-232C asynchronous communications protocol defmes the
electrical and physical interface between Data Terminal Equipment
(DTE or terminals) and Data Communications Equipment (DCE or
modems).
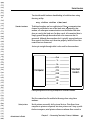
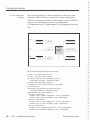
Electrical interface
The following figure shows the cabling assignments of an RS-232
connection.
,----
D .
T
E
-
,-----
2 Tx
3 Rx
4 RTS
5 CTS
6 DSR
7 Gnd
B CD
20 DTR
D
c
E
1 CD
2 Rx
3 Tx
4 DTR
5 Gnd
6 DSR
7 RTS
8 CTS
D
T.
E
�
D
c
E
�
9-pin connector
25-pin connector
The host computer is usually configured as a DTE, acting as a
terminal device. We assume that the computer will be connected to a
modem device.
-
·
The RS-232 signals have the following names:
Tx
Rx
RTS
CTS
DSR
DTR
CD
RI
Administrator's Guide
transmit data
receive data
request to send
clear to send
data set ready
data terminal ready
carrier detect
ring indicator
Chapter 3
•
Connecting Terminals, Printers,
&
Modems
33
Serial devices
Serial protocol
Data is transmitted asynchronously using a bit protocol as shown
below:
·-----------------------
Mark
0
Start
bit
Data
bits
0 0
Parity Stop
bit bit(s)
Space
Normally, an RS-232 data line is in the SPACE (0) condition. A
transmitted character consists of bits in the following order:
1 ) START bit (always 1 )
2) 5 to 8 data bits (least-significant bit first)
3) parity bit (optional)
4) one or more STOP (0) bits.
The duration of each bit is defined by the baud rate, which indicates
the number of bits per second that can be transmitted.
Parity is optional, but if used can be one of:
odd
even
mark
space
Session control
sum of data bits plus parity bit is odd
sum of data bits plus parity bit is even
always 1
always 0
RS-232 uses the DTR and DSR lines to control communication
sessions. The terminal raises DTR when it is powered up and
available. Similarly, the modem raises DSR when it is powered up
and available (but not necessarily connected to a remote modem). No
communication is expected to occur unless both DTR and DSR are
raised.
A terminal indicates that it no longer wishes to communicate by
dropping the DTR line, which causes most modems to hang up the
telephone line, thus releasing the connection.
34
Part I
•
Installation & Configuration
QNX Operating System
Serial devices
A modem indicates that it has established a connection with another
modem by raising CD.
Some modems will also indicate that they have detected (but not yet
answered) an incoming call by raising RI.
Flow control
Configuring
serial ports
Data bits
The RTS and CTS lines control the flow of data between terminal and
modem. The terminal raises RTS when it is capable of receiving data
on the Rx line. Similarly, the modem raises CTS when it can accept
data on the Tx line.
You use the stty utility to set the four major parameters that define
an RS-232 link.
QNX supports four character sizes . You choose the size of data
character with the stty utility:
stty
stty
stty
stty
bit s
bit s
bit s
bit s
=5
=6
= 7 or
= 8 (default)
This parameter defines how many bits following the start bit will be
used to form the least significant portion of a received character.
Stop bits
It's possible to transmit data that is followed by either one or two
stop bits. Two stop bits are used only to slow down the overall
transmission of data so that the remote end has a chance to keep up.
Using stty, you specify one of these:
stty stopb=l
(default)
stty stopb=2
Parity
To disable the transmission of parity bits, and suppress the checking
(in hardware) of received parity bits, you specify:
stty par=none
-
(default)
If parity is used, you specify one of the following values :
-
Administrator's Guide
Chapter 3
•
Connecting Terminals, Printers,
&
Modems
35
Serial devices
stty
stty
stty
stty
Baud rate
par=odd
par=even
par=mark
par=space
You can specify the baud rate with the baud=number option of the
stty utility:
stty baud=number
QNX defaults to 9600 baud.
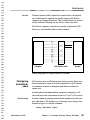
Connecting
serial devices
High-speed ECC
modems
High-speed, error-correcting modems are becoming very
sophisticated-they work best when all hardware handshaking
signals are respected. These modems often communicate with the
host computer at a fixed high-speed baud rate (e.g. 1 9200 baud) and
use the RTS/CTS handshaking lines to regulate the actual flow of data
over the communications link. QNX is ideally suited for
communicating with such modems. A nine-pin, straight-through
cable is used to connect the modem to the computer.
Gnd
Tx
Rx
RTS
Computer
CTS
DSR
High-speed
modem
DTR
CD
Rl
Cabling assignments for linking a computer to a high-speed modem.
36
Part I
•
Installation & Configuration
QNX Operating System
Serial devices
You should enable hardware handshaking in both directions using
the stty utility:
-
stty +ihf1ow +ohf1ow </dev/serl
Standard modems
Traditional modems are less sophisticated. Once a communications
channel is established at one of the baud rates supported by that
modem, all subsequent communication over the modem link takes
place at exactly that baud rate. In other words, all transmitted data is
simply passed through the modem link at the same rate that it's
presented. Although these modems don't typically support hardware
flow control, they often won't function properly unless all four flow
control lines are connected.
A nine-pin straight-through cable is also used for these modems.
Gncl
Tx
Rx
RTS
Computer
CTS
DSR
Standard
modem
DTR
CD
Rl
Cabling assignments for linking a computer to a standard modem.
No flow control need be enabled with stty when using these
modems.
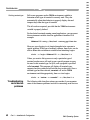
Serial printers
Administrator's Guide
Serial printers are usually bidirectional devices. Data flows from
computer to printer as expected, but since printers can't keep up with
the host computer, serial printers often use software flow control to
Chapter 3
•
Connecting Terminals, Printers,
&
Modems
37
Serial devices
regulate the flow of data. In other words, they transmit XON and
XOFF characters back to the computer. Some printers use the
hardware handshaking lines for this purpose, some support both
forms of flow control.
To be safe, you should connect all nine signals, although printers that
support only software flow control may function just as well with a
three-wire cable (Rx, Tx, and Gnd) . Also, since printers are usually
configured as Data Terminal Equipment (DTE)-just like the host
computer-you may need to use a null-modem cable.
Gnd
--
Tx -Rx
--
RTS -CTS -DSR -DTR --
X
X
X
CD -Rl
Computer
--
Null modem cable
Serial printer
Cabling assignments for linking a computer to a serial printer.
38
Part I
•
If the printer uses:
you use:
software flow control
stty +os flow </dev/ serl
hardware flow control
stty +ohflow </dev/ serl
both software flow control
and hardware flow control
both stty options
Installation & Configuration
QNX Operating System
Ser ial devices
Termi nals
Terminals operate with or without flow control and at a fixed baud
rate. Unlike printers, terminals can usually keep up with the host
computer at a supported baud rate. Thus, a simple three-wire cable is
usually sufficient, although you can still use a nine-wire cable.
Like the host computer, terminals are normally configured as DTE
devices, so a null-modem cable is usually required.
----
Gnd
--
----
Tx
--
----
Ax
--
- - - - - - - - - RTS
- - - ·
- - - - - - - - - CTS
- - - ·
- - - - - - - - - DSR - - - - - - - - - - - - DTR - - - -
X
X
X
- - - - - - - - - CD
- - - - - - - - - Rl
Terminal
Null modem cable
Computer
Cabling assignments for linking a computer to a terminal.
Configuring
terminals for
users
QNX can be used as a full-function time-sharing system. Many users
can be connected to some or all of the computers in a QNX network
via hardwired terminals or through modem links to terminals at
remote sites.
Assuming that the terminal/modem is properly configured, you 'll
also need to provide a mechanism for users to "log in" to the system.
Simple example
Assume a terminal, properly connected and configured, on the serial
port /dev/ serl . The simplest way of allowing a user sitting at that
terminal to log in is to use this command:
ontty /dev/ serl loqin
-
Administrator's Guide
Chapter 3
•
Connecting Terminals, Printers,
&
Modems
39
Serial devices
The user will be able to log in and execute commands. However,
once logged off (i.e. once the user terminates that shell session), the
user won't be able to log back in.
Automated login
To automate this login process, you can use the tinit utility. This
utility will watch a specified device, waiting for any key to be
pressed on that terminal. It will then start a login automatically.
When the user has logged in and then logged off again, tinit will
once again wait for another key to be pressed. To start logins when a
data key is pressed on two serial devices called I dev I serl and
ldevl ser2, you can use the following command:
t init -T ldevl serl ldevl ser2 &
Suppose instead you wanted logins to be automatically started
without first waiting for the user to press a key. You would use the
-t option:
tinit -t ldevl serl ldevl ser2 &
Launching custom
applications
You don 't have to always start up login. You can specify any
program or even specify a different program on each device. In some
environments, a "canned" application is always expected on a given
terminal.
For more information, see the documentation for tinit in the
Utilities Reference.
Dial-up access
It's fairly easy to configure hardwired terminals, since all possible
parameters are known. Modems, on the other hand, present special
problems since they can have different configurations at different
times. For example, most modems will answer calls at one of several
baud rates (300, 1 200, 2400, etc). You can't always know in advance
the baud rate of an incoming call.
A special utility called modem is provided in QNX to respond to
modems. Used in conjunction with t init , modem can provide
excellent dial-up capabilities. A typical dial-up system using QNX
might have several serial ports (/devl serl, ldevlser2 , etc.) and
might use the following command to permit dial-up access through
Hayes-compatible modems :
40
Part I
•
Installation & Configuration
QNX Operating System
Serial devices
tinit - c modem -t /dev/ serl /dev/ ser2
...
&
The t init utility will automatically launch modem on each of the
serial lines. When communication is established, modem will do the
following:
•
answer the phone
•
determine and set the proper baud
•
exec into login
When the user either logs off or hangs up, t init will once again
launch a new modem, which will wait for another call.
For more information, see the documentation for modem in the
Utilities Reference.
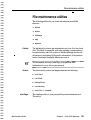
The terminfo database
Full-screen programs in QNX have access to a database of terminal
capabilities known as the terminfo database, which is implemented
as a collection of files in the /usr/lib/terminfo directory.
A separate file exists for each terminal supported in QNX. These files
use an industry-standard format, so can be shared between different
UNIX systems. Your QNX system will have been shipped with
several of these files, with names such as :
/usr/ lib/terminfo/q/qnx
/usr/ lib/terminfo/v/vt l O O
(the QNX console)
(a VT1 00 terminal)
A QNX program will access the appropriate file in the database,
provided that the TERM environment variable has been set.
If you don't have a terminfo file for your type of terminal, there
are several things you can try :
•
•
•
Administrator's Guide
access the Quantum Update Service (QUICS) and download a
terminfo file (if it exists)
access another UNIX system and look for the appropriate
terminfo file
use infocomp and tic to make your own terminfo file based
on the reference manual for your terminal
Chapter 3
•
Connecting Terminals, Printers,
&
Modems
41
Serial devices
Full-screen programs use the TERM environment variable to
determine which type of terminal is currently used. They also
automatically adjust their behavior to properly display data and
interpret keys from that type of terminal.
Defining terminal type
This all works as expected, provided that the TERM environment
variable is properly defmed.
For hardwired terminals running canned applications, you can preset
this environment variable when the application is launched. For
example:
TERM=vt l O O ontty /dev/ serl custom_application
However, users logging in via login through tinit represent a
special problem. If the type of terminal is known, then tinit can be
told to define this environment variable before launching login:
tinit -c login TERM=vt l O O -t /dev/ serl &
Unless you restrict dial-up access to only a particular type of
terminal, modem users will need to run a special program to query
the user for his terminal type. In QNX, such a program is provided
called termdef. This program will display all terminal types
supported on this system and will ask the user to select one. Once a
terminal type has been selected, termdef will set the TERM
environment variable appropriately, then exec into login.
tinit -c "modem -c termde f " -t /dev/serl &
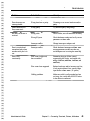
Troubleshooting
serial device
problems
42
Part I
•
·
The following table describes actions you can take if you encounter
some of the common problems involved in connecting serial devices.
Installation & Configuration
QNX Operating System
Ser ial devices
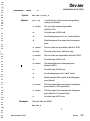
Problem
Probable Cause
Data characters are
unrecognizable
Wrong baud rate or parity
Use stty to set correct baud rate and/or
parity
Some characters are
fme, some aren't
Wrong parity
Try different parity using stty
No data can be sent or
received
Wrong cable
Check cables; use null-modem if necessary
Wrong 1/0 ports
Check hardware settings and verify correct
parameters to Dev . ser
Interrupt conflict
Change interrupt on adapter card
Data is received and
transmitted only when
another serial port is in
use
Interrupt conflict
Check hardware interrupts and Dev . ser
startup parameters; make sure that two
serial adapters are not using the same IRQ
Data is lost
occasionally
Flow control supported,
but not enabled
Determine the type of flow control
supported by the device, and enable with
stty {ihflow, ohflow, is flow, and
os flow)
Flow control not supported
Reduce baud rates and/or increase stop bits;
if only received data is lost, specify larger
input buffer to Dev . ser ( - I option)
Cabling problems
Make sure cable is well grounded and not
too long; also, verify that all RS-232 wires
in the cable are connected
Administrator's Guide
Remedy
Chapter 3
•
Connecting Terminals, Printers,
&
Modems
43
Chapter 4
Pri nt Spoo l i ng
In this Chapter...
Sharing devices in a network
Print spooling
Configuring the spooler
Administrator's Guide
Chapter 4
•
Print Spooling
45
Print spooling
Shari ng devices i n a network
'
QNX encourages the distribution of resources throughout a local area
network with few artificial boundaries. Every device (disk, modem,
or printer) connected to any computer is, by default, a shared
resource. Any program running on any computer has equal access to
all of these devices, whether they are connected to the same
computer (local) or not (remote).
This transparent sharing of resources is a mixed blessing. Users of a
QNX network will enjoy the ease of access to network resources. The
system administrator, on the other hand, must take steps to prevent
misuse and uncontrolled access to some resources.
Some devices, such as hard disks, can be readily accessed by many
users concurrently. But other devices, such as printers and modems,
can't be used by more than one user at a time. Access to such
resources therefore requires some sort of sequencing or spooling.
Pri nt spoo l i ng
QNX provides a set of spooling services to allow convenient access
to shared resources such as printers. Spooling is a simple process
where data is written (spooled) into a disk file rather than directly to
a hardware device. This process can occur for many users
simultaneously. You can set up a system spooler process that takes
print files and sends them to the printer one at a time.
The QNX print spooling server is:
lpsrvr
The QNX print spooling utilities are:
lp
lprm
lpc
lpq
send files to a printer
remove jobs from the printer queue
control print spooler queue
display print queue status
The server (lpsrvr) is documented in Part II of this guide. For
documentation on the other print utilities, see the Utilities Reference.
46
Part I
•
Installation & Configuration
QNX Operating System
Print spooling
Submitting print
jobs
Users submit jobs to the spooler using the lp utility. For example,
the following command will cause the file report to be inserted
into the default print queue and (ultimately) printed:
lp report
In systems where more than one print queue is available, you can
specify the symbolic name of a print queue:
lp
-n txt
report
The spooler for that symbolic printer will queue the submitted jobs
and will ship them to the actual printer one at a time.
Querying print
jobs
A user may wish to examine the printer queue using the lpq utility.
A sample output from the lpq utility might look like this :
1:
2:
steve
aboyd
[ j ob # 3 9 ]
[ j ob # 4 2 ]
1 4 0 0 bytes
2 3 1 2 bytes
lalist . doc
netdrvr . c
This utility lets the user determine when any jobs submitted have
actually been printed. It also provides the print job ID for use in other
lp utilities.
Cancelling print
jobs
The lprm utility lets the user remove jobs from a print queue. Jobs
may be removed by explicitly specifying the job ID number(s). If the
state of the system print queue was as shown above, steve 's job
(job #39) could be cancelled with the command:
lprm 3 9
If job #39 was currently being printed, the printing would be
abandoned. The success of abandoning current print jobs may vary
with the type of printer you're using, since some printers have large
internal buffers.
The superuser may also remove all jobs belonging to a particular
user. For example, all of steve 's jobs can be cancelled with the
command:
lprm steve
Administrator's Guide
Chapter 4
•
Print Spooling
47
Configuring the spooler
Controlling the
print q ueues
The lpc utility is a system administration tool for managing the
system spoolers. It lets you perform many control functions, such as
'
shutting down and starting up a queue or a printer. The following
basic functions are provided:
•
suspend/resume enqueueing of jobs
•
suspend/resume dequeueing of jobs
•
suspend/resume the currently printing job
•
delete the current job
•
rearrange the jobs in a queue
•
move jobs to a different queue
•
display the status of queues
Note that lpc 's functionality overlaps that of lprm and lpq. This is
for convenience, since lpc may be used in an interactive mode.
Config u ring the spooler
Before any print spooling can occur in a QNX system, you must run
lpsrvr, the print spool server:
lpsrvr
&
When started, the lpsrvr utility reads the
/usr/ spool/lp/ . setup file to determine what resources it has
available and how it is expected to manage them. Note that you must
create this file.
You can specify a different configuration file via lpsrvr 's -c
command-line option:
lpsrvr
-c /usr/ spool/lp/custom
&
The lps rvr utility manages two primary objects: queues and
dequeues. Queues are intemal lists of data files that need to be
printed. Dequeues are the processes that actually print the data.
48
Part I
•
Installation & Configuration
QNX Operating System
Configuring the spooler
You can specify a program to run that will serve as a filter to control
how data is "copied in" to a queue, and another filter to control how
data is to be "copied out" of a queue (and into a dequeue)�
The following diagram illustrates the internal flow of data within the
print spooler:
Queue
name
Input
filter
Incoming
queue
Outgoing
process
Output
filter
Jobs are submitted, via lp, into one of the queues based on a
symbolic name. If the symbolic name isn't specified when a job is
submitted, the first entry in the configuration file will be used as the
default queue.
A dequeue will process data from a queue based upon priority, then
upon time of job submission.
Multiple queues may feed a single dequeue, in which case the
dequeue will select the appropriate job from all the jobs in those
queues.
Multiple dequeues may serve the same queue. In this case, the
spooler will select a dequeue based upon availability.
Administrator's Guide
Chapter 4
•
Print Spooling
49
Configuring the spooler
Spool
configuration file
When started, the spooler accesses a file to get its configuration
information. If no file is specified on the command line, the spooler
uses the /usr/spool./l.p/ . setup file. This configuration file
defmes queues, dequeues, and the relationships between them.
Queues and dequeues have symbolic names as well as a set of
attributes. The format of each entry in this file is as follows:
name : attribute : attribute : ... :
If a single entry spans a line, the last character before the
<newl.ine> must be a backslash (\); all leading white space on the
following line will be discarded. Comment lines start with a pound
sign (#) .
The name may contain only alphanumeric characters and slashes (1),
and is limited to 48 characters. If the object being described is a
dequeue, the name must start with a dash (- ). The dash is for
delineation only; it isn't considered part of the name.
Each attribute consists of a two-letter key in one of the following
forms :
key
key# number
key=string
Boolean
Numeric
Character
All numbers are assumed to be decimal numbers, unless they start
with a leading zero (meaning octal) or a leading Ox (meaning hex).
All strings contain printable characters. The backslash (\) is a
"special" character. It can be used to escape other characters. In
particular, the colon (:) must be represented with:
\:
and a "real" backslash must be represented with:
\\
The following keys are defined:
50
Part I
•
Installation & Configuration
QNX Operating System
Configuring the spooler
ab=string
af=string
ci=string
co=string
d.e=string
dv=string
mn#numeric
mx#numeric
na=string
ok=string
pr#numeric
sp=string
wa#numeric
qn=string
Executed when dequeue abandons command for
any reason
accounting file that the queue uses
copy in command, to place the job on the queue
copy out command, used by the dequeue
despooler associated with this queue (or name of device)
device that the dequeue uses
minimum number of jobs for queue before flushing
maximum number of jobs the queue will hold
name, a string that describes the queue or dequeue
Command executed when dequeue completes normally
priority to run this queue at ( 1 - 1 00); 1 00 is the highest
spooler registered name for this queue
wait this number of seconds before despooling each job
After despooling, enqueue job on this queue
The following defaults are used if their corresponding attributes
aren't specified:
ab
af
ci
co
de
dv
mn
mx
na
pr
ok
sp
wa
qn
nil; no command is executed
accounting isn't performed (note that �psrvr logging is
unaffected)
binary copy in of file; no transformation applied
binary copy out of file; no transformation applied
output is sent to standard output of �psrvr
output is sent to standard output of �psrvr
0; jobs are despooled as soon as possible
no limit; queue limits are based upon memory and disk space
nil string
50 is the default priority
nil; no action is performed
/qnx/SPOOLER; registered only if no queue specifies a name
0; jobs are despooled as soon as possible
nil; delete job after despooling
Since the keys are case-sensitive, Quantum reserves all keys formed
by two lowercase letters. Any custom extensions may be safely
implemented using uppercase or mixed-case keys. The spooler
utilities will ignore any options they don't understand.
Administrator's Guide
Chapter 4
•
Print Spooling
51
Configuring the spooler
Example configuration
file
The following example shows a set of queues that share a common
dequeue. The three queues are named:
•
txt (text files)
•
ps (PostScript files)
•
gif (Graphic Interchange Format files)
The configuration is as follows:
txt
text2ps
1---· \
queue
�
\
queue
ir--r---. /dev/pa;r
._____
__
_.
_
ps
_
_________
-
gi:f2ps
1---•
_.
__
._____
1
queue
�
-
-
Users send files with the lp utility to the appropriate queue, which
converts the file appropriately, then prints the converted data on the
printer (/dev/par). Since GIF files tend to be large, they are
assigned a lower priority than the others.
-
The following example shows the flexibility of the spooler and
demonstrates some important ideas.
-
52
Part I
•
Installation & Configuration
QNX Operating System
-
Configuring the spooler
# Thi s i s the spool setup file .
# First , the plain-text printer .
txt : de=/dev/par : af=/usr/ spool /lp . log : \
ci=text2ps $ ( £name ) >$ ( spfile ) : pr#50 :
# Second the post script printer .
ps : de=/dev/par : af=/usr/ spool/ps . log : pr# 60 :
# Third the gif .
gi f : de=/dev/par : af=/usr/ spool/gif . log : \
ci=gi f2ps $ ( £name ) >$ ( spfile ) : pr#S :
# end of the spool setup file .
First, notice that in the gif queue, the ci key is used. This is
important because the (imaginary) program gif2ps may require
substantial time to complete. If the program were used as a
"copy-out" filter, it would needlessly block the despooler while
generating the image. With this configuration, other jobs may be
despooled while the image is being generated.
Second, notice that the de attribute specifies a device rather than a
dequeue. Since no dequeue was specified, data is copied directly to
the indicated device without further translation. A number of names
were introduced in the ci commands. These are metavariables that
the spooler will set as appropriate when it performs the action.
The following metavariables
$ ( £name )
$ ( spname )
$ (username )
$ (userid)
$ ( qname )
$ ( deqname )
$ ( device )
$ ( j obid)
are
available:
the original file name submitted in the job
the name of the spool data file
the login name of the user who submitted the job
the numeric userid of the user who submitted the job
the name of the queue the job currently belongs to
the name of the dequeue the job currently belongs to
the name of the device the job is scheduled on
the job ID number of this job
In addition, all the keys defined earlier can be referenced as
metavariables. For example, $ ( ci) will expand to the name of the
"copy in command" ( ci=string).
Administrator's Guide
Chapter 4
•
Print Spooling
53
Configu ring the spooler
A more complicated
example
The following example is a further refinement of the above setup
with some additional features required for a larger configuration .
There are n ow three laser printers, all PostScript, located at different
locations in the building (connected to I l l ldevlserl ,
I l 2 l devlserl, an d I l 3 ldevlserl ) . The configuration looks like
this:
txt
text2ps
�I
ps
queue
I
Select
unused
dequeue
8----
gif
gif2ps
�E_j
rl
I I l ldevlserl
�
r-+ 1
ll2ldevlserl
�
ll3ldevlserl
�
��
Here's the configuration file to set this up:
# This is the spool setup file .
# First ,
the plain-text printer :
txt : de=lpl , lp2 , lp3 : af=/usr/spool/lp . log : \
ci=text2ps $ ( fname )
> $ ( spfile) : pr#S O :
# Second the postscript printer
ps : de=lpl , lp2 , lp3 : af=/usr/spool/ps . log : pr# 6 0
# Third the gif
gif : de=lpl , lp2 , lp3 : af=/usr/spool/gi f . log : \
ci=gif2ps $ ( fname )
>$ ( spfile) : pr#S :
# Now define the laser printers .
-lpl : dv=/ / 1 /dev/ serl : \
ok=echo
job $ ( j obid)
ab=echo job $ ( jobid)
completed
1
aborted I
mail $ (username ) : \
mail $ ( username ) :
-lp2 : dv= / / 2 /dev/serl : \
ok=echo j ob on $ ( na)
completed
ab=echo j ob on $ ( na)
aborted
1
I
mail $ (username) : \
mail $ (username ) :
-lp3 : dv= / / 3 /dev/serl : \
54
Part I
•
ok=echo file $ ( fname)
printed ok
ab=echo file $ ( fname )
aborted
Installation & Configuration
I
I
mail $ ( username ) : \
mail $ ( us ername ) :
QNX Operating System
Configuring the spooler
The above configuration uses the same three "logical" printers
described earlier (txt , ps, and qi f). These logical printers,
however, now feed three physical printers. The server selects a free
printer from the set of dequeues (lpl, lp2 , lp3) The job will be
dispatched on the first available printer, and the printers will be
examined for availability in the order they are specified in the
configuration.
In this example, when a job completes normally, a mail message
indicating success is sent to the submitter. When a job completes
abnormally, a mail message indicating failure is sent to the submitter.
Administrator's Guide
Chapter 4
•
Print Spooling
55
-
-
Chapter S
Sett i n g u p a Seco nd Fi lesystem
In this Chapter...
Partitioning the pathname space
Setting up a DOS filesystem
-
Administrator's Guide
Chapter 5
•
Setting up a Second Filesystem
57
Partitioning the pathname space
Introd uction
A filesystem rooted at slash (/) may be composed of one or more
physical filesystems grafted together. A physical filesystem is a
separate disk or partition. One of the physical filesystems is typically
assigned to be the root (/), while the other filesystems are mounted
as subdirectories. These subdirectories don 't exist on disk but rather
in an independent space called the prefix tree. The prefix tree maps
pathnames to 1/0 managers, which in tum map to disks and devices.
For more information on the prefix tree, see the chapter on "1/0
Namespace" in the Users Guide.
Partition ing the path name space
The following examples should help clarify how the pathname space
is partitioned. We 'll look at the following configurations :
•
a hard disk and a floppy
•
two hard disks
•
two or more QNX partitions
•
local and remote hard disks
In these examples, we assume that Fsys as well as the appropriate
drivers are running, and that the mount -p command has been done
on your hard disk.
A hard disk and
a floppy
The hard disk is mounted as slash (/) and forms the root of the
filesystem. The floppy is mounted as l fdO :
mount ldevlhd0t 7 7 I
mount ldevl fdO l fdO
Any reference to a pathname starting with I £dO will be directed to a
QNX filesystem on the floppy. For example:
ls
58
Part I
•
- aR
Installation & Configuration
l fdO
Show all files on the floppy
QNX Operating System
Partitioning the pathname space
Two hard disks
(same node)
The first hard disk is mounted as slash (/) and forms the root of the
filesystem. The second hard disk is mounted as lusr2 :
mount ldevlhd0t 7 7 I
mount ldevlhdlt 7 7 lusr2
-
-
Any reference to a pathname starting with lusr2 will be directed to
a QNX filesystem on the second hard drive. For example:
l s -aR lusr2
Two or more
QNX partitions
-
Show all files on second hard drive
You can have three QNX partitions on a single hard drive. The
primary partition should be type 77 (see fdisk utility). A second
partition should be assigned type 78, and a third should be assigned
type 79. For example:
mount ldevlhd0t77 I
mount ldevlhd0t7 8 lusr2
Local and
remote hard
disks
In a local area network, you might have disks with QNX filesystems
on more than one machine. You may configure these filesystems to
be:
-
Independent
-
•
independent
•
primary/secondary
•
linked independent
In this configuration, you treat each machine as an independent,
self-contained filesystem. To access a file on a remote machine, you
would precede a pathname with the remote machine 's node number.
For example:
letclmotd
l l l Oiet clmotd
-
file on local filesystem
file on remote filesystem (node 1 0)
.
The ability to .specify a filesystem for a particular node will always
work and is the most general mechanism for accessing remote files.
Primary/secondary
-
In this configuration, you treat one filesystem as the primary and you
mount the second filesystem as a subdirectory under the primary. For
example, assume node 1 has the primary and node 2 has the
secondary mounted as lusr2 . Node 1 boots from hard disk and has
-
Administrator's Guide
Chapter 5
•
Setting up a Second Filesystem
59
Partition ing the pathname space
its root set to its local disk by a mount utility built into the operating
system image (with Fsys and a driver) . Its system initialization file
would invoke the prefix utility to mount the remote filesystem as
follows :
prefix -A /usr2=/ / 2 /usr2
Node 2 boots over the network from node 1 and has its filesystem
root set to /=/ / 1 / using the -r option of the s init utility built into
the operating system. Its system initialization file would invoke the
mount utility to mount the local filesystem as follows:
mount /dev/hd0t 7 7 /usr2
The Filesystem Manager (Fsys) and its driver may be built into the
image, but they are more likely started from the system initialization
file. In other words, node 2 boots like a simple diskless workstation,
then starts its filesystem after booting.
Both nodes 1 and 2 will access the filesystem on node 1 as I and the
filesystem on node 2 as /usr2 .
Li nked independent
In this configuration, you treat each machine as an independent
self-contained filesystem, but you link portions of them together via
the prefix utility. For example, assume that the filesystem on node
1 has a /usr1 directory while the filesystem on node 2 has a /usr2
directory. You could map each user directory into the other
filesystem's space as follows :
On node 1 :
On node 2 :
prefix - A /usr2=/ / 2 /usr2
prefix -A /usr1=/ / 1 /usr1
Other than this link, each filesystem is self-contained with its own
copies of /bin etc. The advantage is greater redundancy : if one
department uses node 2, and node 1 goes down, the department using
node 2 can continue to work (except that the files under /usr1
won't be available).
60
Part I
•
Installation & Configuration
QNX Operating System
Setti ng u p a DOS filesystem
In the examples in this section, you ' 11 notice that local fllesystems
are associated with block special files (e.g. /dev/hd0t 7 7), while
remote filesystems are associated with pathname prefix mappings.
This prefix mapping redirects requests to a remote fllesystem that
will be associated with a remote block special flle.
Setting u p a DOS fi lesystem
The Dos fsys filesystem manager provides totally transparent access
to DOS files and directories that reside on a DOS disk. Dosfsys can
support up to eight drives (a to h).
You can create flles on DOS disks, read them, write to them, and
delete them with most QNX programs. You can also create, read, and
delete directories on DOS disks with standard QNX utilities, such as
mkdir, l. s , and rmdir. Most standard QNX utilities will work with
DOS files, provided that the DOS file structure allows for the
functionality required by the utility.
Your own programs will also be able to process DOS flles just as they
process QNX files, by using the standard 1/0 functions such as
open(), read(), write(), close(), seek(), etc. When you read DOS
directories, they 'll be presented to you in QNX format.
Invocation modes
Dos fsys has three invocation modes:
Dos fsys [ - S 1 s ]
-
[ -m]
Dosfsys - i [ -n node ]
[dos_drive=qnx_drive [ , R] ] ... &
[ dos_driveyath ] ...
Dosfsys -x [ -n node ]
The - i option lets you get information about the currently adopted
DOS drives. The -x option terminates the Dos fsys server. When
this command is issued, no new open() requests will be accepted, and
the server will terminate once all active files (i.e. files that are still
open) are closed.
If you don't specify -i or -x, Dos fsys will start up and try to adopt
the specified drives.
Administrator's Guide
Chapter 5
•
Setting up a Second Filesystem
61
Setting up a DOS filesystem
Starting Dos fsys
When you start Dos fsys , it performs the following actions:
•
opens the specified drive(s)
•
adopts the root DOS name (I dos)
•
registers the name qnx/dos fsys with the local Process Manager
If no options have been specified, or if either - s or - s has been
specified, Dos fsys scans the I dev directory for valid DOS drives to
adopt. It looks for the following device names:
Dos fsys name
adoption
DOS devices
Device name
on disk
Drive
assignment
/dev/ fdO
/dev/ fdl
/dev/hdOt l
/dev/hd0t 4
/dev/hd0t 6
/dev/hdlt l
/dev/hdlt 4
/dev/hdlt 6
/dos/a
/dos/b
/dos/c
/dos/c
/dos/c
/dos/d
/dos/d
/dos/d
Dosfsys can adopt up to eight drives (a to h). As mentioned above,
Dosfsys will adopt the name /dos as a system prefix. It will also
manage each specific drive's name as /dos /a, /dos/b, etc. These
names aren't registered in the system prefix tree but are kept
internally by Dosfsys. This will be transparent to the user except
for the fact that the user won 't be able to create files or directories at
the /dos root.
A DOS device could be one of the following:
•
a DOS partition on a hard disk
•
a floppy diskette
•
an image of a DOS partition or diskette
To create an image of a DOS diskette or DOS partition, you use the
QNX cp utility. For example, to copy an image of a DOS floppy in
your floppy drive 0, you could use the following:
62
Part I
•
Installation & Configuration
QNX Operating System
Setti ng u p a DOS filesystem
-
cp /dev/ fdO
-
/usr/qnx/dosa
and then invoke Dos fsys as follows:
Dos fsys a=/usr/qnx/dosa &
The same could be done with a hard disk partition. Dos fsys will
handle these images just as it would the actual device.
-
For all non-removable devices, Dosfsys immediately reads the DOS
boot parameter block (BPB) as well as part of the file allocation table
(FAT) at startup. For removable devices, the BPB and the FAT are
read only when the drive is being accessed.
When Dosfsys has a non-removable device open, the device is
locked for READ/WRITE so no other process can access this device
without going through Dosfsys. Removable devices are kept open
and locked only during accesses (e.g. during reading or writing to the
disk). Note that unless you specify the R option, all drives have
READ/WRITE access.
DOS version
support
The Dos fsys manager supports all DOS partitions formatted with
DOS 2. 1 or later, including standard primary DOS partitions and DOS
large partitions (DOS 4.0 >32M). Hard disks, 5 W' floppies, and 3 W'
floppies are supported.
The Dos fsys manager also supports DOS extended partitions
(type 5). To make these extended partitions accessible to Dosfsys,
you must mount them explicitly via the QNX mount utility. To do
this, you use mount as follows :
mount -p /dev/hd0t5
This will mount all "real" partitions within the DOS extended
partition. For example, after issuing the above mount command, you
might see the following drive mounted:
/dev/hd0t5t l
The ending t l indicates that this is a type 1 DOS partition within the
type 5 extended partition-this is the way DOS handles extended
partitions.
Administrator's Guide
Chapter 5
•
Setting up a Second Filesystem
63
Setting up a DOS filesystem
This drive can now be adopted by Dos fsys . For example:
Dosfsys - s e=/dev/hd0t5t l
Since Dosfsys doesn't automatically scan the /dev directory for
extended partitions (scanning is done when - s or - s is specified),
you must specify the drives in these partitions on the command line.
Once adopted, these drives will be accessed in the same way as
"standard" DOS drives.
DOS partition
These are the standard DOS hard disk partition types :
types
Partition type:
DOS text files
Description:
1
DOS primary partition ( 1 2-bit FAT)
4
DOS primary partition ( 1 6-bit FAT; ::::;; 32M)
5
DOS extended partition (DOS 3 .3 or later)
6
DOS primary partition (DOS 4.0 or later; >32M)
DOS uses a structure for text files that's different from the one used
in QNX (by text files we mean line-oriented files containing lines of
ASCII text separated by line separator sequences). In DOS , each line
of a text file is terminated with a carriage return sequence (CR/LF) ,
while in QNX each line is terminated by a line-feed character (LF) .
The Dosfsys manager doesn't translate these files. All files are
treated "as is." Therefore, you may need to use the QNX textto
utility to convert your text files before copying them to or from QNX
and DOS disks.
Note also that the text files created by some DOS programs may
contain a SUB character ("'Z) as the last character of the file. This is
also treated as is.
DOS binary files
64
Part I
•
Since Dos fsys doesn 't translate the contents of files, binary files
may be copied to or from the QNX/DOS partitions as is.
Installation & Configuration
QNX Operating System
Setti ng u p a DOS filesystem
QNX to DOS
character and
name mapping
DOS doesn't permit certain characters within a filename; it also
doesn't allow certain filenames.
In DOS, you can't include any of these characters in a filename:
I
\
+
*
=
?
In DOS, you can't use these filenames :
CLOCK$
NUL
COM2
LPT l
CON
AUX
COM3
LPT2
PRN
COMl
COM4
LPT3
If you attempt to create a file that contains one of the invalid DOS
characters or whose filename is invalid, you will be denied access.
Since all DOS filenames and filename characters are allowed under
QNX, no validation is required on these filenames.
DOS also maps all alphabetical characters to uppercase, so Dos fsys
maps these characters to uppercase when creating a DOS filename; it
maps a filename to lowercase when returning the filename to a QNX
application.
DOS volume
labels
DOS/QNX
permission
mapping
DOS uses the concept of a volume label, which is an actual directory
entry at the root of a DOS filesystem. To distinguish between the
volume label and an actual DOS file, Dos fsys places an equal sign
(=) as the first character of the volume label name. Dos fsys treats
this directory entry as a zero-length, read-only file whose
permissions cannot be changed.
DOS doesn't support all of the permission bits that QNX does. The
DOS attribute bits are as follows:
READ_ONLY
HIDDEN
SYSTEM
VOLUME_LABEL
DIRECTORY
ARCHIVE
Administrator's Guide
Chapter 5
•
Setting up a Second Filesystem
65
Setting up a DOS filesystem
Dos fsys uses the following mapping logic to handle the QNX to
DOS attribute-bit translations:
•
•
if the entry is a directory, set the DOS DIRECTORY file bit
if the entry is a file, and if all of the QNX WRITE bits are off, set
the DOS READ_ONLY bit
The following mapping logic is used to handle the DOS to QNX
permission-bit translations :
•
•
•
•
set the QNX READ permission bits for user, group, and other
if the entry isn 't a volume label, and if the entry isn 't read only,
set the QNX WRITE permission bits for user, group, and other
if the entry is a directory, set the QNX DIRECTORY and
EXECUTE bits for user, group, and other
if the entry is a file, set the QNX REGULAR FILE bit
If a file is written to, the DOS ARCHNE bit is also set.
File ownership
Although the DOS filesystem doesn't support user IDs and group IDs,
Dosfsys will not return an error code if an attempt is made to
change the group ID or user ID with the chown utility or chown()
library function. An error isn 't returned because a number of utilities
make use of the chown() library function, which could result in many
error messages being displayed.
All files under Dosfsys are owned by the superuser (uid=O,
group=O) with access to all .
Error codes
returned by
Dos fsys
66
Part I
•
If a request made to Dos fsys isn't supported, the EOPNOTSUPP
error code will be returned to the application making the request.
Examples of requests not supported by Dos fsys include:
Installation & Configuration
QNX Operating System
Setting u p a DOS filesystem
LINK
BLOCK_READ
BLOCK_WRITE
MOUNT_PARTITION
MOUNT_RAMDISK
PIPE
DISK_GET_ENTRY
RECORD LOCKING
If Dos fsys detects a corrupt filesystem, it will return EBADFSYS, at
which point you may wish to run the CBKDSK utility under DOS to
correct the problem.
The DOS ftlesystem structure is such that the root directory's size is
fixed at format time and cannot be resized. If it does become full, an
error will be returned (ENOSPC) .
Administrator's Guide
Chapter 5
•
Setting up a Second Filesystem
61
� I
� I
r-.
�
<-"
�
�
,...,
(1"1'1
r-"1
r-"1
r-"1
�
f""J,
,..,
�
�
�
�
r-"1
r'-1
r'-1
�
�
,.,..
�
f!-1
�
,...,
�
,...,
�
�
,...,
�
,...,
�
�
,...,
,...,
r'-1
r'-1
,...,
,..,
�
,...,
Chapter 6
Maki ng Backu ps
In this Chapter...
Introduction
When to back up
Backup formats
Backup media
Compression
Archive examples
Administrator's Guide
Chapter 6
•
Making Backups
69
Backu p formats
Introd uction
This section deals with making a copy of your data to guard against
hardware, software, or human error that may destroy the original. If
your data is important to you, you should regularly perform a set of
backup procedures that would allow you to restore lost data with
minimal cost to you in time and money. Remember: hard disks do
fail and people do make mistakes. It's too late to start a backup after
your data is gone!
You can back up an entire filesystem or only portions of it. Users
may elect to back up their own files only, usually to floppy diskette.
To back up large portions of the filesystem with files owned by many
users, you 'll need to have read permissions on these files. The
superuser (root login account) has such privileges.
When to back up
You should back up often enough so that you c an recover data that is
still current or can be made current with minimal work. In a software
development group, this may range from a day to a week. Each day
of out-of-date backup will generally cost you a day of
redevelopment. If you 're saving fmancial or point-of-sale data, then
daily or even twice-daily backups are common.
Backup formats
QNX supports a variety of backup formats that can be classified into
two groups:
•
archives
•
regular filesystems
An archive consists of one or more files, merged into a single unit
with its own directory of contents. This single unit can be saved
either to a regular QNX file or to a raw block device like a floppy or
tape.
70
Part I
•
Installation & Configuration
QNX Operating System
Backup formats
Saving to a regular filesystem simply involves copying the files. In
this case, the destination must be a device with a mounted QNX
filesystem on it.
Archive backups
QNX supports three major archive utilities:
•
cpio
•
tar
•
pax
Both cpio and tar are implemented as links to pax, which is
capable of reading and writing both cpio and tar formats. Both
cpio and tar are common on UNIX systems. The pax utility is a
cover utility for cpio and tar, so it doesn't support its own archive
format. By default, pax will use the tar format when creating an
archive.
The pax utility will detect when you 've reached the end of a media
on a volume and will prompt you to insert the next volume to be
used for the save. The result is a backup spanning several media
(diskettes, tapes, etc.).
Unfortunately, the tar/cpio format does not label the media with
volume IDs. If you mixed up your media or inserted the wrong one
out of order, you would end up restoring bad data.
To safeguard against this possibility, QNX is shipped with the vol
utility, which labels each volume with its sequence number and
therefore prevents you from inserting out-of-sequence media. The
vol utility will, be default, step over block one of all media. This is
important for floppies and cartridge disks that contain a QNX
signature in block one. This signature contains the size of the diskette
(360K, 1 .2M, etc.) and allows for automatic remounting of
removable media by the filesystem. Quantum ships its distribution
diskettes using pax to create an archive, freeze to compress the
data, and vol to write to the floppies.
-
Administrator's Guide
Chapter 6
•
Making Backups
71
Backu p media
If you wish to save data for restoration on a UNIX system other than
QNX, don 't use free ze or vol, since you won't find those utilities
to do the restore at that end. Instead, use pax to save and restore
directly to the target media.
Filesystem
backups
You back up to a filesystem by copying files, probably with the cp
utility. If your destination media is a floppy diskette, the cp utility
will prompt you for more diskettes, but remember that no single file
can be larger than the diskette size. If you wish to back up to floppy,
we recommended that you use one of the archive utilities.
Backup med ia
Your choice of backup media will b e determined b y available
hardware and cost. There are four common choices:
Floppy
•
floppy
•
tape
•
removable disk
•
fixed disk
Floppies are the most widely available device for backups. Their
major shortcoming is their limited size. Since the QNX pax and vol
utilities let you span media, your only concern will be having to feed
several floppy diskettes into the drive. If you have to deal with more
than four or five floppies, this will make the procedure unpleasant
enough that backups may occur less frequently. You might want to
consider compressing your data as described below.
In order to back up/restore from a floppy diskette, you must make
sure the floppy driver has been started. This is described in Part II,
Managers, Drivers, & Utilities (under Fsys . floppy) . For most
people, the following command line will start the driver (assuming
that Fsys is already running), which will then create a block special
file for each floppy:
72
Part I
•
Installation & Configuration
QNX Operating System
Backup media
Command line
Block special files
Fsys . floppy
/dev/ fdO
/dev/ fdl
(floppy drive A)
(floppy drive B)
I f you use a n archive utility for your backups, it will read and write
directly to the floppy block special file. If you elect to use the cp
utility, you ' ll have to mount a filesystem on the block special device.
For example:
mount /dev/ fdO / fdO
Remember to format and initialize new floppies. The following
example would initialize a high density 5 1A" floppy diskette:
fdformat /dev/ fdO - s 1 . 2m
dinit /dev/ fdO
You may now treat the floppy as a QNX filesystem mounted as / fdO .
Tape
QNX provides a driver for the QIC-02 interface standard. This is a
standard Y4-inch cartridge tape that can hold from 60 to over 300
megabytes of data on a single tape.
To back up/restore from a tape, you must make sure the tape driver
has been started. This is described in Part II of this guide under
Fsys . qic02 . For most people, the following command line will
start the driver, which will then create a block special file for the tape:
Command line
Created block special files
Fsys . qic02
/dev/tpO
The archive utilities will read and write directly to the tape's block
special file. You can't mount a filesystem on this type of block
special file.
When the QIC-02 driver receives a request to read or write, it does so
by starting at the current tape position. If you 're starting a new
backup, you' ll need to erase and rewind the tape. A number of tape
position and control functions are provided by the tape utility
Administrator's Guide
Chapter 6
•
Making Backups
73
Compression
described in Part II of this guide. For example, the following
command would erase, then rewind the tape in preparation for an
archiving procedure:
tape erase
Removable disk
Fixed disk
Removable hard disks are popular in both magnetic and optical
formats. The optical formats hold more data, but they 're slower.
Most units use a SCSI interface to the computer, so you may want to
consider making your internal fixed disk a SCSI drive. Unlike
floppies and tapes, a removable hard disk lets you avoid using the
archive utilities like pax. Instead, you'd likely use cp to copy your
data to a real filesystem on the cartridge. This allows you to recover
single files very easily and quickly.
You can place a second hard disk in your machine or you can back
up to a hard disk on another machine in the network. This will give
you an online backup. However, it's still a good idea to maintain
off-site storage.
Com pression
You can use a compression utility to reduce the amount of space
required to store data. The amount of compression will depend on
the nature of the data you 're saving. Some databases containing large
amounts of null data may compress up to 90%. Other data might
compress less than 1 0%. Although compressing may save media
space, it has two side effects:
•
•
Compressing requires a fair amount of computation and may slow
down the saving of data.
You can't recover compressed data should a defect develop, such
as a bad block, on your saved backup media. Potentially, all data
following a bad block can be lost. In comparison, uncompressed
data will simply have a "hole" in the middle.
You may use the freeze utility to compress your data and the melt
utility to restore it. Both these utilities will act on a stream of data as
well as on files. This ability to act as a filter lets you connect them to
74
Part I
•
Installation & Configuration
QNX Operating System
Archive examples
one of the standard archivers via a pipe. For example, Quantum
distributes its operating system in compressed form on floppies using
pax, free ze, and vol.
Archive exam ples
Compressed
floppy archive
Collect files under /usr into a tar format archive, compress the
archive and write it out to as many floppies as are needed, adding
sequence numbers to the diskettes:
pax
-w
-x ustar /usr I freeze I vol
-w
/dev/ fdO
Read data off floppies, uncompress it back into an archive and
restore the files:
vol -r /dev/ fdO I melt I pax -r
UNIX-compatible
floppy archive
Save files under /usr/brianc in a tar format archive for
restoration on a UNIX system:
pax
-w
-x ustar /usr/brianc >/dev/ fdO
Save files under /usr /brianc in a cpio format archive for
restoration on a UNIX system:
pax
-w
-x cpio /usr/brianc >/dev/ fdO
Restore data in a tar or cpio format archive from another UNIX
system and place all flies under /usr/unix:
pax -r -s " , / , /usr/unix/ , " </dev/ fdO
Tape archive
Start a new tape archive and save all flies onto a QIC-02 tape :
tape erase
pax -w I >/dev/qic02
Append flies that have changed since the date of the file last save
to the end of an existing archive tape. After the save, update the time
of last save:
Administrator's Guide
Chapter 6
•
Making Backups
75
Archive examples
tape forward
find I -newer last save I pax -w >ldevlqic02
touch last save
Restore all the files on a tape that are under the directory
lusrlrobo:
tape rewind
pax -r " lusrlrobol * " <ldevlqic02
Cartridge/optical
Copy all files from the filesystem on node 1 to the filesystem on
node 2:
cp -Rp 1 1 1 1 1 1 2 1
In the following example, the disk on node 2 is probably a very large
optical with sufficient room for many disk contents. A full backup is
done each Friday and a partial backup of modified files could be
done each day of the week:
cp -Rp 1 1 1 1 / l 2 1 fri
cp -Rp -a date I 1 1 1 I l 2 lmon
cp -Rp -a date I 1 1 1 I l2 1tue
76
Part I
•
Installation & Configuration
QNX Operating System
Chapter 7
B u i ld i ng a Custom Operati ng
System I mage
In this Chapter...
Introduction
Constructing a build file
-
Administrator's Guide
Chapter 7
•
Building a Custom Operating System Image
77
Constructing a build file
I ntrod uction
QNX is a modular operating system composed o f a microkemel and
one or more processes that provide services. For example, a process
named Fsys provides filesystem services, while a process named
Dev provides device services.
When you build an operating system image, you select those services
you wish to be available immediately after boot, and include the
processes that provide these services into a custom-built operating
system image. You create this image with the buildqnx utility. The
image can be booted from disk by the QNX partition loader or booted
over the network using the netboot utility.
Constructi ng a bu i ld fi le
The buildqnx utility takes a text file containing a list o f process
names as input and produces a binary image file containing these
processes as output. This is called a "build" file. The build files are
kept in the directory /boot /build, and the image files are kept in
the directory /boot / images.
You can create an image by invoking buildqnx directly or by using
the make utility and the Makefile in the /boot directory. For
example, you could use:
buildqnx build/ws imaqes /ws
OR
make b=ws
Each program you want included in the created image occupies two
lines in the build file. Empty lines are ignored. The first line is the
pathname of the program you want included. The second line starts
with a $ followed by a number representing the size of the heap
(alloc space) to be used, followed by a command.
The following example would select the QNX Filesystem Manager
(Fsys) and start it with its -x option to specify that Y2 the cache is to
be used to cache executables.
78
Part I
•
Installation & Configuration
QNX Operating System
Constructing a build file
/bin/Fsys
$ 0 Fsys -x 2
Setting the heap
size
Selecting
processes for an
image
When an image is created for a process, space is reserved in the
image's data segment for local memory allocation. If this space is set
too small, the system will have to dynamically grow the data
segment at runtime, which can result in minor memory
fragmentation. If the space is set too large, you'll end up wasting
memory. For more information on setting appropriate heap sizes, see
the documentation on Proc in Part II, Managers, Drivers, & Utilities.
The processes you include in an operating system image are
determined by several factors. You can typically group images into
three classifications :
•
images that boot from disk
•
images that boot over the network
•
images for embedded systems
For images that boot from disk or over the network, you can start
most processes after booting. You do so by placing their command
line in the system initialization file that QNX executes after boot (see
the section "System initialization file" in Chapter 1 ) . This lets you
keep the boot image small and simple.
When you 're building an image, remember that there are two
required processes:
•
the Process Manager/Microkemel (/boot/ sys /Proc)
•
the system shared library (/boot / sys / Slib)
If you want to use the QNX network, you 'll also need to include the
Network Manager (/bin/Arcnet)
Administrator's Guide
Chapter 7
•
Building a Custom Operating System Image
79
Constructing a build file
Disk images
The Makefile
For hard disk booting, you need to include:
•
the two required system processes (Proc and Slib)
•
the Filesystem Manager (Fsys)
•
the driver required to access the drive (Fsys . driver)
•
the Network Manager (Arcnet) if you want to use the network
The Makefile under the directory /boot contains an entry for
making a generic hard disk boot. You can provide command-line
macros to change the defaults. The following macros are defmed:
Macro
make argument
Default, if not
specified
Description
$b
$d
$h
$i
$p
b=buildfile
d=driver
h=hard disk
i=imagefile
p=parameters
no default
Fsys . wd
/dev/hdO
imaqes / buildfile
none
build file
disk driver
hard disk file
image file
hard disk parameters
This is the makefile:
FILES
= @build/ $b
# Define some defaults which may be overridden
# by h=xx and d=xx
d
h
= Fsys . wd
= /dev/hdO
= $b
$b :
images/$b
# Each OS image file is dependent on the core
# modules it is made from .
images/$b : build/$b $ (FILES)
buildqnx -v d=$d h=$h p=$p build/$b images/$i
The following examples will help clarify the Makefile usage:
80
Part I
•
Installation & Configuration
QNX Operating System
-
Constructing a build file
Use build file /boot /bui ld/hard and make an image
/boot / images /hard that contains a Western Digital driver and a
mount command that mounts a QNX filesystem on /dev/hd0t 7 7 :
make b=hard
Use build file /boot /build/hard and make an image
/boot / images /hard that contains a PS/2 SCSI driver instead of the
Western Digital driver and a mount command that mounts a QNX
filesystem on SCSI ID 6:
make b=hard d=Fsys . ps 2 s h=/dev/hd6
Use build file /boot /images/hard and make an image
/boot / image s /ps2s that contains a PS/2 SCSI driver instead of the
Western Digital driver and a mount command that mounts a QNX
filesystem on SCSI ID 6. The image is written to the image file ps2 s
rather than the default, which is the name of the b= option (in this
case hard).
make b=hard d=Fsys . ps 2 s h=/dev/hd6 i=ps2 s
Copying an
image to . /boot
Once you've built an image, it won't become the new boot image
until you copy it to the I . boot file. However, before you do this,
you should make a backup of the current I . boot file by copying it
to the I . al tboot file:
cp / . boot / . altboot
If for any reason your new image doesn't work properly, you can
press <Esc> when prompted during the boot process and load the
. I al tboot file instead of the . /boot file. When you select the
alternate boot image, the normal check for the
/etc/ config/ sysinit . node file is replaced by a check for the
/etc/config/alt sys init file. You should ensure that the
alt sys init file contains the latest copy of your working sysinit
file:
-
cp /etc/config/sysinit . node
/etc/config/altsysinit
The hard build file doesn 't contain the Device Manager /bin/Dev.
The Device Manager and its drivers are usually started in the system
initialization file after the system boots.
Administrator's Guide
Chapter 7
•
Building a Custom Operating System Image
81
Constructing a build file
If the system initialization file isn't executed, the Device Manager
will not be started. As a result, your keyboard and system console
won't function.
The build file for hard disks contains an entry for the network
manager ( /bin/Arcnet) . This entry is mandatory if you are
running QNX on a network. Arcnet will automatically terminate if
no network hardware is present.
A network link can be used to perform remote diagnostics. For
example, assume that node 1 is running with access to an available
filesystem and node 8 was just booted but appears dead (the
keyboard is ignored and there 's no login prompt). Entering the
following commands from node 1 might provide some clues as to the
state of node 8:
-
s in -n 8
s in -n 8 info
prefix -n 8
Network images
You normally use a network image to boot a diskless workstation
over the network. As such, the boot image doesn't need to contain a
local filesystem or a disk driver. The Makefile under /boot
contains an entry for making a generic workstation boot.
The following example uses the build file /boot /build/ws and
makes an image /boot / image s /ws :
make b=ws
The buildqnx utility defmes a macro, namely $ ( node ) , which is
the current node number. When you boot over the network, you have
the option of loading a pre-built image or building one on the fly. If
you build an image on the fly-which is recommended-then you
won 't need to build one manually as shown above. This option is
specified in the /etc/boot /netboot file and documented with the
netboot utility.
When the netboot utility invokes buildqnx to build an image on
the fly, the image file is not written to disk.
82
Part I
•
Installation & Configuration
QNX Operating System
Constructing a build file
Embedded
images
-
Administrator's Guide
An embedded system doesn't need to contain a filesystem or a
network manager. As such, it might not be able to load a new process
after booting. If you wanted to load a new process, you'd have to
build an image containing all the processes needed to run the system.
This image would then have to be transferred to the embedded
system (most likely in ROM).
Chapter 7
•
Building a Custom Operating System Image
83
Chapter S
Disk & Fi le Recovery
In this Chapter...
Introduction
Overview of QNX 4 disk structure
File maintenance utilities
Disk recovery procedures
What to do if your system will no longer boot
Recovering lost files and directories
Administrator's Guide
Chapter 8
•
Disk & File Recovery
85
Overview of QNX 4 disk structure
Introd uction
The QNX filesystem achieves high throughput without sacrificing
reliability. The filesystem is designed to be as robust as possible;
however, there will always be situations in the real world where disk
corruption will occur. Hardware will fail eventually, power will be
interrupted, and users will no doubt reboot the computer at just the
wrong time.
The QNX filesystem has been designed to tolerate such catastrophies.
It is based on the principal that the integrity of the filesystem as a
whole should be consistent at all times-any single failure will
damage no more than the contents of files opened for writing at the
time of a crash.
Effectively, this means that the most common types of
failures-power failure, reboot, CPU crash-usually leave the QNX
filesystem intact.
If a crash occurs, we 've provided recovery utilities that let you
examine the filesystem to determine if any damage was done to files
there were open for writing at the time of the crash. These same
utilities can also fix such damage, and in many cases will completely
restore the filesystem.
Sometimes the damage may be more severe. For example, it's
possible that a hard disk will develop a bad block in the middle of a
file, or worse, in the middle of a directory or some other critical
block. Again, the utilities we've provided can help you determine the
extent of such damage. You can often rebuild the filesystem in such a
way as to avoid the damaged areas. In this case, some data will be
lost, but with some effort, a large portion of the affected data may be
recovered.
Overview of QNX 4 d isk structu re
In this section, we describe how the QNX filesystem stores data on a
disk. Reading this section should enable you to recognize and
possibly correct filesystem damage if you ever have to rebuild a
filesystem.
86
Part I
•
Installation & Configuration
QNX Operating System
Overview of QNX 4 disk structure
-
If you have a C development package, the header file <sys/fsys.h>
contains the definitions for all terms used in this section.
-
For an overall description of the QNX filesystem, see the User's
Guide, Chapter 5, The Filesystem Manager.
-
Partition
components
A QNX filesystem may be an entire disk (in the case of floppies) or it
may be one of many partitions on a hard disk. Within a disk partition,
a QNX filesystem contains the following components:
Loader
Root block
-
-
r-
r-
-
Bitmap
-
-
Root directory
-
�
1
Other data
1
The following blocks are always found, in order, on a QNX 4 disk
partition:
1)
2)
3)
4)
Loader block
-
Root block
Administrator's Guide
loader block
root block
bitmap blocks
root directory
The first block of a QNX partition, the loader block contains the
bootstrap loader that loads the QNX OS into memory.
The second block of a QNX partition, the root block contains the
directory entry for the root (/), the inode entries for the inode file,
and a label field.
Chapter 8
•
Disk & File Recovery
87
Overview of QNX 4 disk structure
Bitmap blocks
Several consecutive blocks follow the root block. The bitmap blocks
form the bitmap for the QNX partition. One bit exists for each block
on the partition, thus one bitmap block will be used for every 4096
disk blocks (corresponding to 2M of disk space).
If the value of a bit is zero, its corresponding block is unused.
Unused bits at the end of the last bitmap block (for which there are
no corresponding disk blocks) are turned on.
Bit assignments start with the least significant bit of byte 0 of the
first bitmap block-which corresponds to QNX block # 1 .
Root directory
The root directory follows the bitmap blocks. The root directory i s a
"normal" directory (see "Directories," below). It is initially created
by the dinit utility with enough room for 32 directory entries (4
blocks).
As the following illustration shows, the root directory (/) contains
directory entries for several special files that always exist in a QNX
filesystem. The dini t utility creates these files when the filesystem
is first initialized.
I
,---
I
f--
I
r--.bitmap
J
.inodes
I
.boot
I
.altboot
I
r--f-1----
r---
88
Part I
•
Installation & Configuration
QNX Operating System
Overview of QNX 4 disk structure
I.
A link to the directory: I
I. .
Also a link to the directory: I
I . bitmap
Represents a read-only file consisting of the bitmap
blocks.
I . inodes
A normal file of at least one block on a floppy/RAM
disk and 1 6 blocks on other disks, I . inodes is a
collection of inode entries. The first entry is reserved
and used as a signature/info area. The first bytes of the
. inode file are "lamTHE.inodeFILE".
I . boot
Represents an OS image file that will be loaded into
memory during the standard boot process. This file will
be of zero-length if no boot file exists.
I al tboot Represents an OS image file that will be loaded into
memory during the alternate boot process. This file will
be of zero-length if no alternate boot file exists.
.
Directories
A directory is simply a file that has special meaning to the filesystem.
A directory file contains a collection of directory entries as shown in
the following illustration:
Offset
0
dUname [16)
d_size
16
20
di first x1nl
di_xblk
28
one physical block
of a directory
0
1
2
3
di_ftime
32
36
di_mlime
di_atime
40
44
48
di_ctime
di_rwm_xln1s
dl mode
50
di uid
52
di..,!lid
di_nlink
54
56
4
58
5
6
7
63
di_zero [4)
di_lype
d status
62
Normal directory entry.
Administrator's Guide
Chapter 8
•
Disk & File Recovery
89
Overview of QNX 4 disk structu re
The type of directory entry is determined by the bits in the
d status field, as follows :
_
Bit 3 (FILE_LINK}
Bit 0 (FILE_USED)
Comment
0
0
unused directory entry
0
1
normal, used directory entry
1
X
link to an entry in I . inodes
(which may be used or unused)
The first directory entry is always for the file " . " and includes a
directory signature ("I • QNX"). This entry refers to the directory
itself by pointing to the entry within the parent directory that
describes this directory.
The second entry is always for the " . . " file. This entry refers to the
parent directory by pointing to the first block of the parent directory.
Every directory entry either defines a file or points to an entry within
the I inodes file. lnode entries are used when the filename exceeds
1 6 characters or when two or more names are linked to a single file.
.
The first extent (if any) of a file is described in the directory/inode
entry. Additional file extents require a linked list of extent blocks
whose header is also in the directory/mode entry. Each extent block
in the chain points to between 1 and 60 extents.
Links
Files with names greater than 16 characters long and links to other
files are implemented with a special form of directory entry. These
entries are identified with the FILE_LINK bit (Ox08) of the
_
d status field being set.
_
For these files, a portion of the directory entry is moved into the
I . inodes file.
90
Part I
•
Installation & Configuration
QNX Operating System
Overview of QNX 4 disk structure
I .lnodes
directory entry
dl_fname [48]
0
b--J
dljnode_blk
48
dl_inode_ndx
52
dl_spare [10]
53
d_status
63
0
Lsize
l_first Xb1l
16
20
l_xblk
28
32
Ulima
36
l_mtime
l_atime
40
I_clime
44
l_num xtnts
48
Lmode
50
l_uid
52
54
LIJid
56
i nlink
I_zero
I_type
I_status
58
62
63
Extent blocks
entry
i,reserved [16]
Extent blocks are used for any file that has more than a single extent.
The directory entry di xbl.k points to one of these extent blocks,
which in turn defmes where the second and subsequent extents are to
be found.
_
An extent block is exactly one 5 1 2-byte disk block with the
following form:
0
4
8
9
12
xblk_num_xtnts
xblk_spare [3)
xblk_num_blocks
xblk_xtnts [0]
lk_
]
24
� +m d
488
xplk_xtpts [5�]
496
xblk_s
16
504
Administrator's Guide
xblk_next_xblk
xblk__prev_xblk
r
ature
+lk_first_�
Chapter 8
"lamXblk''
(1 st xblk only)
•
Disk & File Recovery
91
Overview of QNX 4 disk structu re
Each extent block contains:
•
forward/backward pointers
•
a count of extents
•
a count of all the blocks in all the extents defined by this extent
block
•
pointers and block counts for each extent
•
a signature ("lamXblk")
The first extent block also contains a redundant pointer to the first
file extent (also described within the directory/inode entry). This
allows you to recover all data in the file by locating this block alone.
Files
Files or file extents are groupings of blocks described by
directory/mode entries; they have no structure imposed on them by
the QNX filesystem.
Most files in QNX 4 have the following overall structure:
Signatures
"'QNX
In "do1" entry of
each dii8Cloly.
fam)(ljk
In header of
each elden! blod<
Extent blocks
extent!
92
Part I
•
Installation & Configuration
IJ
QNX Operating System
File maintenance utilities
Fi le maintenance util ities
The following utilities let you create and maintain the disk/file
structure:
fdi s k
•
£di sk
•
dinit
•
chkfsys
•
zap
•
spatch
The £di sk utility creates and maintains the partition block on a hard
disk. This block is compatible with other operating systems and may
be maintained by other OS versions of £disk (although ours has the
advantage of recognizing QNX-specific information). If the partition
loader is missing or damaged, £di sk can create it.
We recommend you keep a hard copy of the partition table
information for every disk in your network.
dinit
chkfsys
Administrator's Guide
The dinit utility creates (but Fsys maintains) the following:
•
boot block
•
root block
•
bitmap blocks
•
root directory
•
inode file ( I . inodes )
The chkfsys utility is your principal filesystem maintenance tool.
This utility:
Chapter 8
•
Disk & File Recovery
93
Disk recovery procedures
•
checks the directory structure of an entire disk partition, reports
any inconsistencies, and fixes them, if possible
•
verifies overall disk block allocation
•
writes a new I . bitmap, upon your approval
The chkfsys utility assumes that the root block is valid. If the root
block isn't valid, chkfsys will complain and give up-you'll need
to try restoring the root block with the dinit utility.
zap
The zap utility lets you remove files or directories from the
filesystem without returning the used blocks to the free list. You
might do this for several reasons, including:
•
the directory entry is damaged
•
two files occupy the same space on the disk (an error)
To remove zapped file entries and recover the used disk blocks, you
use the chkfsys utility.
spat ch
The spat ch utility lets you browse the raw disk and patch minor
problems. You can sometimes cure transient disk problems by
reading and writing the failing block with spat ch.
Disk recovery proced u res
Using chkfsys
The chkfsys utility is your principal tool for checking and restoring
a potentially damaged filesystem. It can identify and correct a host of
minor problems as well as verify the integrity of the entire disk
system as a whole.
Normally, chkfsys requires that the filesystem be idle and that no
files are currently open on that device. You'll have to shut down any
processes that have opened files or that may need to open files while
chkfsys is running.
To run chkfsys on an idle filesystem called /dev/hd0t 7 7 , you
would simply type:
-
chkfsys /dev/hd0t 7 7
94
Part I
•
Installation & Configuration
QNX Operating System
Disk recovery procedu res
The utility will scan the entire disk partition from the root down,
building an internal copy of the bitmap and verifying the consistency
of all files and directories it finds in the process. When it has finished
processing all files, chkfsys will compare the internal bitmap to the
bitmap on the disk. If they match, chkfsys is finished. If any
discrepancies are found, chkfsys will-upon your
approval-rewrite the bitmap with data consistent with the files it
was able to find and verify.
In addition to verifying block allocation (bitmap), chkfsys attempts
to fix any problems it finds during the scan. For example, chkfsys
can:
When to run chkfsys
•
"unbusy" files that were written during a crash
•
fix the file size in a directory entry to match the real data
It's a good idea to run chkfsys as part of your regularly scheduled
maintenance procedures--this lets you verify that the data on your
disk is intact.
It's especially important to run chkfsys after a system crash so that
you can identify those files, if any, that have been damaged.
If you " zap" any files for any reason-possibly because chkfsys
suggested you do so--you' ll need to run chkfsys at some point to
recover the lost blocks on the disk.
Using chkfsys in a live
system
If you're running an application that can't afford downtime, you
might not be able to shut down your system long enough to run
chkfsys. In order to provide a comprehensive verification of the
disk, chkfsys normally requires exclusive use of the filesystem.
But you can identify potential problems in a live system by using a
special, read-only mode of chkfsys :
chkfsys
-
£ /dev/hd0t 7 7
The - fix mode won't b e able t o correct problems, but i t will give
you a feeling for the overall sanity of your filesystem.
If serious problems are detected that must be fixed right away, you
can use another special mode-the "Rambo" mode:
Administrator's Guide
Chapter 8
•
Disk & File Recovery
95
Disk recovery procedures
chkfsys -R /dev/hd0t 7 7
Remember that you must not use "Rambo" mode unless you are sure
that:
•
the affected files are not presently opened
•
the affected files will not be opened during the rebuild process
•
any files currently opened will not grow during the process
Using Rambo mode will fix most errors, but since you 're fixing the
disk underneath a live filesystem with opened files, it will not:
•
attempt to recover bitmap blocks
•
check for block allocation errors
•
attempt to rebuild the I inodes file
.
There is some risk to running chkfsys on a live system-both
chkfsys and the filesystem are reading and possibly writing the
same blocks on the disk. Also, the filesystem has internal cached data
about files and directories that cannot be updated when chkfsys
makes a change. Static changes, in-place, on files or directories that
Fsys doesn' t currently have opened will probably not cause
problems.
Recovering
deleted files
If a file is accidentally deleted, it's sometimes possible to recover the
file using the zap utility. To recover a file using zap :
•
•
the directory entry for that (now deleted) file must not be reused
the disk blocks previously used by the file must not be reassigned
to another file
Still, if you act quickly enough, or if you 're lucky enough, there 's a
chance that the following command might restore the file:
zap
96
Part I
•
Installation & Configuration
-u
filename
QNX Operating System
What to do if you r system will no longer boot
Recovering from
a bad block in
the middle of a
file
Hard disks occasionally develop bad blocks as they age. In some
cases, you might be able to recover most or even all the data in a file
containing a bad block.
Some bad blocks are the result of power failures or of weak media
on the hard disk. In these cases, sometimes simply reading then
rewriting a block will "restore" the block for a short period of time.
This may allow you to copy the entire file somewhere else before the
block goes bad again. This procedure certainly can't hurt, and is
often worth a try.
To examine the blocks within a file, you use the spatch utility.
When you get to a bad block, spatch should report an error, but it
may have actually read a portion of "good" bytes from that block.
Writing that same block back will often succeed. At the same time,
spatch will rewrite a correct CRC that will make the block good
again (but with possibly incorrect data).
You can then copy the entire file somewhere else, and then zap the
previously damaged file. To complete the procedure, you mark the
marginal block as bad (by adding it to the I bad blks file), then
run chkfsys to recover the remaining good blocks.
.
If this procedure fails, you can use the spatch utility to copy as
much of the file as possible to another file, and then zap the bad file
and run chkfsys .
What to do if your system wi l l no
longer boot
If a previously working QNX system suddenly stops working and
will no longer boot, then either the hardware has failed or the data on
the hard disk has been damaged.
The following steps can help you identify the problem. Where
possible, corrective actions are suggested.
Administrator's Guide
Chapter 8
•
Disk & File Recovery
97
What to do if your system will no longer boot
Step 1
If you don't have a
network . . .
I f you do have a
network. . .
Try booting from floppy or across the network
If you don't have access to a QNX network, then you '11 need to boot
from the QNX boot floppy that was used to install your system onto
the hard disk. The fllesystem will already be running in this case.
If you have a network to boot over, try booting your machine over
the network. Once the machine is booted, you'll need to start up a
local fllesystem:
Fsys &
Step2
Start the hard disk driver
You now have to start the appropriate hard disk driver. For example,
to start a disk connected to a standard Western Digital compatible
controller, you would type:
Fsys . wd
This should create a block special file called 1 dev /hdO that
represents the entire hard disk.
Step3
Run fdi sk
Running the fdisk utility will immediately give you useful
information about the state of your hard disk.
The fdisk utility might report one of several types of problems:
Error reading block 1
Probable cause--If fdisk reports an error trying to read the
partition block (which is the first physical block on the disk),
then chances are that either the disk controller has failed or the
hard disk has failed.
Remedy-If the disk is good, replacing the controller card
might allow you to continue using the disk. Otherwise, you
have little option but to replace the hard drive, reinstall QNX,
and restore your files from backup.
98
Part I
•
Installation & Configuration
QNX Operating System
-
What to do if you r system will no longer boot
Wrong disk parameters
Probable cause-If £disk successfully reads block 1 , but
reports incorrect disk parameters (#heads, #cylinders,
#sectors/cylinder), then your hardware has probably "lost" its
information about this hard drive. The most probable cause is
that the battery for the CMOS memory is running low.
Remedy-Rerunning the hardware setup procedure (or the
programmable option select procedure on a PS/2) will norm ally
clear this up. Of course, replacing the battery will make this a
more permanent fix.
Bad partition information
Probable cause-If the disk size is reported correctly by
£disk, but the partition information is wrong, then the data in
block 1 of the physical disk has somehow been damaged.
Remedy-Use £di sk to recreate the correct partition
information. It's a good idea to keep a hard copy of the correct
partition information available, in case you ever have to do this
step.
Step4
Create a raw volume
At this point, you have verified that the hardware is working (at least
for block 1 ) and that a valid partition is defined for QNX. You now
need to create a raw volume for the QNX partition itself:
mount -p /dev/hdO
This should create a volume called I dev/hdOt 7 7, or its equivalent.
If the partition information is correct, this shouldn't fail.
StepS
Mount a QNX filesystem
At this point, you still don 't know the health of the fllesystem on the
QNX partition. Your goal now is to run the chkfsys utility on the
disk to determine-and possibly fix-the fllesystem. But first you ' ll
Administrator's Guide
Chapter 8
•
Disk & File Recovery
99
What to do if your system wi ll no longer boot
need to create a mount point for a QNX fJJ.e system. Since the root (/)
already exists (on a floppy or on a remote disk on the network), you
can mount the local hard disk partition with the name /hd:
mount /dev/hd0t 7 7 /hd - r
Depending o n th e state of the QNX partition, the mount may or may
not fail.
If the mount fails
If the mount fails, the first portion of the QNX partition is probably
damaged (since Fsys will refuse to mount what it considers to be a
corrupted fJJ.e system).
In this case, you can use the dinit utility to overlay sufficient good
information onto the disk to satisfy Fsys :
dinit -hr /dev/hd0t 7 7
The -r option tells dinit to rewrite:
•
the root block
•
the bitmap (with all blocks allocated)
•
the constant portions of the root directory.
After doing this, you will need to rebuild the bitmap with chkfsys ,
even on a good partition.
You should now be able to reissue the mount command and once
again try to create a mount point for a QNX fJJ.e system called /hd.
Step &
Run chkfsys
At least a portion of your QNX fJJ.esystem should now be accessible.
You can use chkfsys to examine the fJJ.esystem and recover as
much data as possible.
1 00
Part I
•
If you booted:
you enter this command:
from floppy
/hd/bin/chkfsys /dev/hd0t 7 7
across the network
chkfsys /dev/hd0t 7 7
Installation & Configuration
QNX Operating System
Recovering lost files and directories
In either case, you should make note of any problems reported, and
allow chkfsys to fix as much as it can. What you do next depends
on the result of running chkfsys.
If the disk is
unrecoverable
If, for any reason, your disk is completely unrecoverable, read the
next section "Recovering lost files and directories." In some cases,
you may need to reinstall QNX from floppy, and restore your disk
from your backup files.
If significant portions of the filesystem are irreparably damaged, or
important files are lost, then restoring from backup might be your
best alternative.
If the filesystem
is intact
If your filesystem is intact, yet the machine still refuses to boot from
hard disk, then either of the following is probably damaged:
•
the partition loader program in physical block 1
•
the QNX loader in the first block of the QNX partition
To rewrite a partition loader, use £disk:
£di sk /dev/hdO loader
To rewrite the QNX loader, use dinit :
dinit -b /dev/hd0t 7 7
You should now be able to boot your system.
Recovering lost fi les and d i rectories
You may sometimes find that files or directories have been
completely lost due to disk corruption. If after running chkfsys you
know that certain key files or directories were not recovered, then
you might be able to use spatch to recover some or all of this data.
Before attempting this, you should first familiarize yourself with the
details of a QNX filesystem, as described in the section "Overview of
QNX 4 disk structure" in this chapter. You should also study the
documentation for the spatch utility (see the Utilities Reference).
Administrator's Guide
Chapter 8
•
Disk & File Recovery
1 01
Recovering lost files and di rectories
The lost+found
directory
The spatch utility can take a range of disk blocks and link them into
the filesystem as a real file (or directory) under the lost+found
directory.
A space for the lost+found directory always exists and has room
for at least 1 26 entries on a hard disk.
After you use spatch to link all such pieces of the disk into the
lost+found directory, you should immediately run chkfsys to
rebuild the bitmap and verify the integrity of the filesystem that now
includes these new files.
Once chkfsys validates the disk, you can safely move these files
(or directory trees) to other directories on the disk.
It's a good idea to keep the lost+found directory empty so that
there will be as much room as possible to recover files in any future
disk recovery episodes.
Using spat ch
The spatch utility has a special menu item, called Mark, that allows
you to identify a range of disk blocks.
The first time you select Mark, the spatch utility will mark the
current disk block as the first block in a range of blocks. You can
then move to the last block of the region, and select Mark a second
time. This will identify the region of blocks to spatch. A special
menu will now appear giving you the option of:
•
removing all marks
•
linking the marked blocks into lost+found as a file
•
linking the marked blocks into lost+found as a directory
•
copying the marked blocks to a file
•
copying with append the marked blocks to a file
•
ignoring the second mark, allowing you to select a different one
If you choose to link or copy the blocks into a file/directory, spatch
will ask if you first want to perform a scan of the entire disk looking
for an xblk that references this range of blocks. If you say yes, then
1 02
Part I
•
Installation & Configuration
QNX Operating System
Recovering lost files and di rectories
spatch will perform the scan, and if it finds a block, it will give you
the option of linking in all the extents defined by that xblk and any
other associated xblks.
The xblk scanning allows potentially large disk files (or directories)
to be recovered in one piece.
If you choose not to scan for xblks, or no such xblk is found, then a
file/directory will be created that has only a single extent containing
just these blocks.
If you copy, you should specify a file on another disk (filesystem).
Remember to always run chkfsys after linking or copying a
number of files or directories.
-
Administrator's Guide
Chapter 8
•
Disk & File Recovery
1 03
� ·
('I-ll
�
�
�
�
I'-'
�
�
�
(i""'
�
�
rw-.
fM!!">
(WI
,_,
("&.
�
�
fii""t
,_,
,_,
(WJI
�
,_,
�
�
�
�
�
�
�
�
�
�
�
�
�
�
�
�
�
�
1'-1
r-.
Chapter S
The Quantu m U pdate System
In this Chapter...
Introduction
Reporting bugs
Free software
Electronic mail
Conferencing system
About our hardware
How to phone us
Logging in
Using QUICS
Administrator's Guide
Chapter 9
•
The Quantum Update System
1 05
Electronic mai l
Introd uction
The Quantum update system, called QUICS, runs 24 hours per day on
a computer that you may call via modem to :
•
download fixes and changes to the operating system, utilities, and
libraries
•
download a variety of free software from various sources
•
send electronic mail to Quantum
•
engage in a conference with other QNX users on a large variety of
topics
Reporting bugs
Quantum 's software refresh policy provides prompt response. For
example, if you report a bug, perhaps in a utility or library routine,
you can often download a revised version within hours of reporting
the problem. We maintain the most current versions of all programs,
including operating system modules, for download. Along with
these, we provide a list of all changes made to the system. You may
want to sign on once a month and make a log of this list.
Free software
We also maintain a growing list of free software that may be of
interest to you. It includes useful utilities, games, and megabytes of
public domain source provided by ourselves and by our customers.
This source can often help you understand some of the intricacies of
QNX.
Electron ic mai l
You can use the private mail facility to communicate privately with
Quantum employees or with any other user of QUICS .
1 06
Part I
•
Installation & Configuration
QNX Operating System
About our hardware
Conferencing system
If you ' d like to make a comment or ask a question that you feel other
users may be interested in, then you'll want to use our conferencing
system. Its command structure is very similar to that used by Byte
·
magazine 's conferencing system.
All Quantum developers are members of the conferencing system, as
are most of our more active third-party developers. It's not unusual
to pose a question and have several comments on it within an hour or
so. You'll fmd topics on realtime, hardware, utilities, C, and so on.
You don't need to be a QNX customer to use the conferencing
system. You can access it from a terminal or a terminal emulation
program running under DOS.
About our hardware
At the time of this printing, the QUICS computer supports seven
modem lines and eight X.25 channels into the Datapac public packet
switching network.
All modems will support a variety of baud rates and data
compression protocols. The following table shows the hardware
configuration at the time of printing:
Hunt group B aud rates
Modem type Protocols
6 1 3-59 1 -0934 19200 to 300
HST-9600
MNP5,ARQ
6 1 3-59 1 -0935 38400 to 300
HST- 1 4.4K
MNP5,ARQ,v42bis
6 1 3-591 -0940 38400 to 300
HST-Dual-Std
MNP5,ARQ,v42bis,v32
6 1 3-59 1 - 1 735 38400 to 300
HST-Dual-Std
MNP5,ARQ,v42bis,v32
6 1 3-59 1 -3009 38400 to 300
HST-Dual-Std
MNP5,ARQ, v42bis, v32,v32bis
6 1 3-59 1 -3 1 28 1 9200 to 300
Telebit
MNP5,PEP
Telebit
MNP51PEP
6 1 3-59 1 -6093 19200 to 300
The modems are on a hunt group with the following primary number:
(61 3) 59 1 -0934
Administrator's Guide
First number of the hunt group.
Chapter 9
•
The Quantum Update System
1 07
How to phone us
On the update system, we maintain an up-to-date configuration on
the number of modems, their types, and phone numbers. You can
read this when you give us a call.
To connect to QUICS via X.25, you have to make a pre-paid call or
register with us for an X.25 account number (allowing you to make
collect calls). Our X.25 network address is:
3020 8570 1 4 1 6
L L
Quantum's Datapac address
Datapac's network code
How to phone us
Since qtal.k i s shipped with every system, we describe how to
contact us from within qtalk. We assume that your modem is
connected to the QNX device I dev I serl . If it isn't, you 'll have to
tell qtal.k where your modem is.
Step 1
Set your serial port settings
Set your serial port settings to the following values. Refer to the
section on configuring modems if you need help with this.
par=none
bit s=B
You'll also need to set your baud rate
will support.
Step2
to
whatever rate your modem
Start qtal.k and have your modem dial us
If you are in North America and have a Hayes-compatible modem,
you can use qtalk's dialing directory capability. The default dialing
directory, letcl configldial . dir, provides an entry called
1 08
Part I
•
Installation & Configuration
QNX Operating System
Logging in
-
quics, which contains Quantum's phone number. For more
information, see the documentation on qtalk in the Utilities
Reference.
qtalk quics [ m modem ]
(Hayes-compatible modem)
qtalk [ -m modem ]
(other modem)
-
OR
The -m modem option is needed only if your modem is not
connected to the I devI serl device.
Logg ing i n
Once you have successfully established communications with
QUICS, you' ll be asked to log in. If this is your first time signing
onto QUICS, you should log in as user ID newuser.
Logi n :
newuser
Next you 'll be asked to enter information about you and your
company as well as the name you wish to create as your own
personal user ID.
Since there are many thousands of QUICS users, we ask that you
avoid simple names (like your first name alone) when selecting your
user ID. A good rule that works well is to select a name consisting of
your first two initials, followed by your last name.
For example, the user ID for "Johann Sebastian Bach" would be:
j sbach
From now on, you log in with your user ID (instead of newuser)
each time you access QUICS .
Administrator's Guide
Chapter 9
•
The Quantum Update System
1 09
Using QU I CS
Using QUICS
After logging in, you ' 11 see the main menu. QUICS is a fully
menu-driven system. We encourage you to explore the system to get
familiar with its many capabilities.
By the way, one of the submenus lets you download a manual on
how to use QUICS .
If at any time you experience difficulty, just give our technical
support line a call:
(613) 59 1 094 1
We at Quantum look forward to seeing you on QUICS !
110
Part I
•
Installation & Configuration
QNX Operating System
Part II
-
& Uti l iti es
Ma n agers, Drivers,
Arcnet
Arcnet network manager (QNX)
buildqnx
build a custom version of QNX (QNX)
cpio
copy file archives in and out (UNIX)
Dev
device manager (QNX)
Dev . con
console driver (QNX)
Dev . par
parallel device driver (QNX)
Dev . ser
serial device driver (QNX)
Dos fsys
DOS filesystem manager (QNX)
emu 8 7
80x87 floating point emulator (QNX)
feat
display compressed files (QNX)
fdi sk
create QNX disk partition (QNX)
freeze
compress and uncompress files (QNX)
F sys
Filesystem Manager (QNX)
Fsys . aha
Adaptec SCSI host adapter (QNX)
Fsys . floppy .
floppy disk controller (QNX)
F sys . ps2e
driver for th e PS/2 ESDI controller (QNX)
Fsys . ps2m
driver for the IBM PS/2 MFM Disk Controller (QNX)
Fsys . ps 2 s
driver for the PS/2 SCSI controller (QNX)
Administrator's Guide
113
1 15
121
1 25
1 27
1 29
131
1 33
1 37
1 39
141
1 45
149
151
153
15 5
1 57
1 59
111
F sys . qic 0 2
QIC-02 tape driver (QNX)
F sys . wd
driver for PC/AT fixed disk interface (QNX)
l i cense
license software for use (QNX)
lps rvr
print server (QNX)
melt
uncompress files (QNX)
Mouse
mouse driver (QNX)
netboot
service boot requests from the network (QNX)
net node
display or change the Arcnet node permit bitmap (QNX)
net poll
display or change default polling parameters of a node (QNX)
pax
portable archive interchange (POSIX)
P roc
Process Manager (QNX)
s init
system initialization (QNX)
1 89
tape
control a tape driver (QNX)
191
tar
read and write tape archive files (UNIX)
termdef
prompt for terminal type (QNX)
vol
manage multi-volume archives (QNX)
112
Part II
•
Managers, Drivers,
&
161
163
1 65
1 67
Utilities
169
171
173
1 75
1 77
1 79
1 85
193
1 97
1 99
QNX Operating System
Arc net
Arcnet network manager (QNX}
-
Buildfile syntax:
Options :
Examples:
Arcnet [ - i irq ]
[ -m mem]
- i irq
The interrupt line to use (IRQ). This option overrides
automatic IRQ detection.
-m mem
The memory segment to use. This option overrides
automatic memory detection.
Use automatic IRQ and memory detection:
Arcnet
Set the QNX Arcnet board to use IRQ 3 :
Arcnet - i 3
Set the QNX Arcnet board to use IRQ 3 ; set its memory segment to be
located at CEOO hex:
Arcnet - i 3 -m CEO O
Description:
The Arcnet network manager communicates directly with the QNX
Arcnet network board. It provides the low-level services the Process
Manager and Kernel require to support transparent networking.
If you want to use the network, the Arcnet manager must be built
into the operating system image. You cannot start Arcnet in your
sys init file or at the command line.
The QNX Arcnet board uses an interrupt line (IRQ) and 8K of
memory. The Arcnet manager should automatically determine these
values, as configured on the QNX Arcnet board. The command-line
options are meant for cases where Arcnet is unable to automatically
detect the interrupt or the memory segment.
Automatic IRQ detection does not work on IRQ 2. To use IRQ 2, you
must specify the - i irq option.
If you experience any problems with the QNX Arcnet network,
remember to run the net info utility-this gives you more
information about recent significant network events, and about the
current state of the network board.
Administrator's Guide
Arcnet
113
Arc net
Arcnet network manager (QNX)
If for some reason Arcnet cannot initialize the hardware or its
runtime environment, it terminates. If this happens, a message is
printed directly to the current console with an integer error code.
Record this code and contact Quantum for more information.
Exit status :
See also:
0
Successful.
>0
An error occurred.
netnode, netpoll
Utilities Reference: netinfo
114
Part II
•
Managers, Drivers,
&
Utilities
QNX Operating System
bu i ldq nx
build a custom version of QNX (QNX)
Syntax:
Options :
Examples:
Description :
-
buildqnx [ -v]
[macro=name ] buildJi.le osJile
-v
Be verbose.
macro=name
Define a macro.
buildJile
An input file of module names.
osJile
An output image file.
cd /boot
buildqnx build/ws images /ws . 4 0 0
You use the buildqnx utility to build a QNX boot image. A boot
image is a collection of individual processes packed into a single flle
image. This image is loaded into memory at boot time. Once the
image is in memory, control is transferred to the first process in the
image-this process starts each of the other processes.
-
Each major QNX service is provided by a process. You can add or
delete an operating system service by adding or deleting the process
that manages it. Most processes may be started after the system
boots, and as such do not need to be included in an image.
-
For example, let's say you've booted from disk and the boot image
didn't contain the DOS fllesystem manager (Dosfsys). At this point
you're getting your flles and commands from a local QNX
filesystem. You could start Dos fsys by typing its name on the
command line and running it as a background process, as follows:
-
-
·
Dosfsys &
It's necessary to start some processes before the operating system
loads. For example, if a diskless workstation boots over the network,
it will need to have a Network Manager in the image to access the
remote filesystem. Likewise, if you boot from a hard disk, you can't
start a filesystem by loading it off the disk, since you don't yet have a
filesystem. In this case, you would build an image containing Fsys,
Fsys . driver, and mount so that the filesystem is available
immediately upon loading.
-
-
-
Administrator's Guide
buildqnx
115
bu i ldq nx
build a custom version of QNX (QNX)
As a general rule, you should build into the image only the minimum
services needed, and start other services after boot. In some
environments, you may want to freeze an OS and a larger number of
services by building a large image that you don't change. If you 're in
a special realtime environment where dynamic loading isn 't possible,
you may also choose to build a complete load image of all the
processes you need.
The core kernel modules and images are placed under the /boot
directory. This directory also contains a Makefile, which references a
set of build files that name the processes to be included in an image.
The Quantum kernel processes that make up the required operating
system services are kept in the /boot / sys directory. The following
lists Quantum processes that are often included in an image:
Type
Process
Description
A
P roc
Process Manager, including the
microkernel
A
Slib
Shared Library
B
Fsys
QNX Filesystem Manager
B
Fsys . floppy
Fsys . wd
NEC 765 floppy driver
Western Digital 1 002- 1007 hard disk
driver
PS/2 MFM hard disk driver
PS/2 ESDI hard disk driver
PS/2 SCSI hard disk driver
Adaptec SCSI hard disk driver
Fsys . ps 2m
Fsys . ps2e
Fsys . ps 2 s
Fsys . aha
c
116
Part II
•
Managers, Drivers,
Dosfsys
&
Utilities
DOS Filesystem Manager
(requires Fsys)
QNX Operating System
bu i l d q nx
build a custom version of QNX (QNX)
Type
Process
Description
c
Dev
Device Manager
c
Dev . con
Dev . par
Dev . ser
Monochrome, EGA, VGA console
text driver
Parallel driver
8250, 1 6450, 1 6550 RS-232 serial driver
D
Arcnet
QNX Arcnet Network Manager/driver
E
s init
System initialization process
F
Debuqqer
Low-level system debugger
(not for general use)
The process types are as follows:
A
Must be present in an image as the first two processes.
B
Needed if you want to use the network.
c
Can be started later in the sys init file-we
recommend this method.
D
Needed if you want to use the network.
E
Usually included to execute a shell file of processes that
you start dynamically.
F
Needed for low-level system work.
You must include the Process Manager and Shared Library in the
boot image. If you want to use the network, then you must also
include the Arcnet Network Manager. The Filesystem Manager and
Device Manager typically require that you include one or more
drivers with them if they are to be useful.
The list of programs to build into the image is kept in a build file
under /boot /build. Each program occupies two lines in this file
(empty lines are ignored) . The first line is the pathname of the
program. The second line starts with a $ followed by a number
representing the size of the heap (alloc space), followed by a
Administrator's Guide
buildqnx
117
bu i l d q nx
build a custom version of QNX (QNX)
command line. Your program will start at priority 10, with a
round-robin scheduling algoritlun.
The following is a simple build file for creating an image to boot
from a hard disk with a Western Digital controller on a single-node
computer. The sinit utility is used to execute the system
initialization file.
sys /Proc
$ 3 8 0 0 0 Proc
sys / Slib
$ 1 Slib
/bin/Fsys
$ 1 6 0 0 0 Fsys
/bin/Fsys . wd
$ 1 0 0 0 Fsys . wd
/bin/mount
$ 4 0 0 0 mount -p /dev/hdO /dev/hd0t 7 7 I
/bin/Arcnet
$ 1 0 0 0 Arcnet
/bin/s init
$ 2 0 0 0 sinit
Likewise, the following build file will create an image to boot a
workstation over the network. Note the macro $ (node ) , which will
be replaced by the current node ID.
sys /Proc
$ 3 8 0 0 0 P roc
sys /Slib
$ 1 Slib
/bin/Arcnet
$ 1 0 0 0 Arcnet
118
Part II
•
Managers, Drivers,
&
Utilities
QNX Operating System
bu i l d q nx
build a custom version of ONX (QNX)
/bin/s init
$ 2 0 0 0 sinit -r / / $ (node ) /
sys /Debugger
$ 1 Debugger
You should start the processes that were omitted from the image in
the system initialization file, which is executed by the s init
process. The sinit process will attempt to execute the
/etc/config/sysinit . node file on the current node. If the file
doesn't exist, sinit will attempt to execute the
/etc/ config/sys init file.
The following is an example of a simple system initialization file:
export TZ=EST5DST4 , M4 . 1 . 0 / 3 , Ml 0 . 5 . 0 /3
rtc hw
Dev &
Dev . con -n 3 &
reopen /dev/ conl
Dev . ser &
Fsys . floppy &
tinit -t con2 conl
Starting the Device Manager and console driver after boot presents a
minor problem. You can't start the console driver from the keyboard,
since your system doesn't yet recognize a keyboard. But you can
start it from the system initialization file. You should start the Device
Manager and console driver right after setting the date, as the next
two commands in the file. You then execute the shell command:
reopen /dev/conl
which causes the shell to reopen its standard input and standard
output.
Note the last command, t init , which starts up user logins on two
consoles.
Let's say the above build file is in /boot /build/test. You could
build an image with the make utility, using the following:
Administrator's Guide
buildqnx
119
bu i l d q nx
build a custom version of QNX (QNX)
cd /boot
make b=test
An image, called test, is placed in the /boot / images file. To
make this image bootable from a hard disk, copy it to the I . boot
file in the root directory of the hard disk. Before copying the file, you
may wish to make a copy of the existing boot image-in case you
made a mistake in your build file-by copying the existing I . boot
to I . altboot, as follows :
cp / . boot / . altboot
cp /boot / images/test / . boot
We have provided a Makefile and a few standard build files in the
/boot directory that you can use as models :
Exit status :
See also:
make b=hard d=driver name
hard disk image
make b=ws
workstation image
0
Successful.
>0
An error occurred.
netboot , s init
Utilities Reference: tinit
1 20
Part II
•
Managers, Drivers,
&
Utilities
QNX Operating System
cp i o
copy file archives in and out (UNIX)
Syntax:
Read/list an archive:
cpio - i [Bcdfmrtuv]
[pattern ]
...
Write an archive:
cpio -o [Bacv]
Copy files:
cpio -p [ ad1mruv] directory
Options:
Administrator's Guide
-B
Cause input/output to be blocked 5 120 bytes to the record. Can
be used only with the -o or -i options for data directed to or
from character special files.
-a
Reset access times of input files after they've been copied.
When the -1 option is also specified, the access times of linked
files aren't reset. Can be used only with the -o or -i options.
-c
Write header information in ASCII. Can be used only with the
- i or -o options. Note you should always use this option to
write portable files.
-d
Create directories as needed. Can be used only with the - i or
-p options.
-f
Copy i n all files except those in patterns. Can b e used only with
the -i option.
-1
(the letter "el") Whenever possible, link files rather than copy
them. Can be used only with the -p option.
-m
Retain previous modification times. This option won't work on
directories that are being copied. Can be used only with the - i
or - p options.
-r
Interactively rename files. Th e system will ask you whether to
rename pattern each invocation. Read and write permissions for
the controlling terminal (/dev/tty) are required for this
option. If you type a null line, the file is skipped. Should be
used only with the -i or -o options.
cpio
1 21
cpio
copy file archives i n and out (UN IX)
-t
-u
-v
Print a table of contents of the input. No files are created. Can
be used only with the -i option.
Copy files unconditionally. Usually an older file will not
replace a new file with the same name. Can be used only with
the - i or -p options.
Be verbose. Print the names of the affected files. Can be used
only with the -i option. Provides a detailed listing when used
with the -t option.
[pattern ]
Simple regular expression given in the name-generating
notation of the shell.
directory
The destination directory.
Examples:
Copy out the files listed by the ls utility and redirect them to the file
newfile:
ls
cpio -o > . . /archive
Use the output file archive from the cpio -o utility, extract those
files that match the patterns memo/a/ and memo!b*, create the
directories below the current directory, and place the files in the
appropriate directories :
cat archive
cpio -id "memo/al " "memo/b* "
Take the filenames piped to cpio from the find utility and copy or
link those files to another directory named newdir, while retaining
the modification time:
find . - depth -print I cpio -pd1mv newdir
Description:
The cpio utility produces and reads files in the format specified by
the POSIX cpio Archive/Interchange File Format. It operates in
three modes.
The -i option (copy in) extracts files from the standard input, which
is assumed to be the product of a previous cpio -o. Only files with
names that match patterns are selected. Multiple patterns may be
1 22
Part II
•
Managers, Drivers,
&
Utilities
QNX Operating System
cpio
copy file archives i n and out (UN IX)
specified. If no patterns are specified, the default for patterns is to
select all files. The extracted files are conditionally created and
copied into the current directory, and possibly any levels below,
based on the options used. The permissions of the files will be those
of the previous cpio -o invocation. The owner and group of the
files will be that of the current user unless the user has appropriate
privileges, which causes cpio to retain the owner and group of the
files of the previous cpio -o invocation.
The -o option writes the archive to the standard output.
The -p option (pass) reads the standard input to obtain a list of
pathnames of files that are conditionally created and copied into the
destination directory based upon the options used.
If an error is detected, the cause is reported and the cpio utility will
continue to copy other files. The utility will skip over any
unrecognized files encountered in the archive.
The following restrictions apply to the cpio utility:
Exit status :
•
Pathnames are restricted to 256 characters.
•
Appropriate privileges are required to copy special files.
•
Blocks are reported in 5 1 2-byte quantities.
0
All input files were copied.
2
The utility encountered errors in copying or accessing files or
directories. An error will be reported for nonexistent files or
directories or for permissions that don't allow the user to access
the source or target files.
It is important to use the -depth option of the find utility to
generate pathnames for cpio. This eliminates problems cpio could
have trying to create files under read-only directories.
Note also that the controlling terminal (/dev/tty) is used to prompt
the user for information when the -i or - r options are specified.
-
See also:
Administrator's Guide
pax, tar
cpio
1 23
�
�
�
(1"""1
�
�
�
(i"""\
(�"""\
(1"""1
�
(1"""1
�
(i"""\
�
�
(i"""\
�
(!""'i\
�
�·
�
�
�
�
�
�
�
�
�
�
�
�
�
�
�
�
�
�
(i"""\
(i"""\
(i"""\
�
(�"""\
(�"""\
�
Dev
device manager (QNX)
Syntax:
Options:
Examples :
Description:
Dev [ -n max_device ] &
-n max device
The maximum number of terminal devices to
support (default is 1 2).
Dev &
Start Dev; use defaults.
Dev -n 1 0 0 &
Allow 1 00 devices.
The Dev manager is responsible for managing all terminal devices in
a QNX system.
Once Dev is started, you can then start individual driver processes,
which register themselves with Dev to support additional devices.
For example:
Driver
Description
Dev . con
console JJO
Dev . par
parallel JJO
Dev . ser
serial I/O
Dev always supports the NULL device (called /dev/null).
See also:
Administrator's Guide
Dev . con, Dev . ser, Dev . par
Dev
1 25
Dev. co n
co nsole driver {QNX)
Syntax:
Options :
Dev . con [ -C number]
[ -0 number]
-c
The size of the canonical input buffer
(default is 256).
number
-I number
The size of the raw input buffer (default is 256).
-N name
The prefix to use for the device name
(default is con) .
-0
The size of the output buffer (default is 2048).
number
The maximum number of virtual consoles
(default is 1 ).
-n number
Examples:
Dev . con
&
Dev . con -n 4 &
Description:
[ - I number] [ -N name ]
[ -n number] &
Start Dev . con; use defaults.
Allow 4 virtual consoles.
The Dev . con driver manages all console devices in a QNX system.
Remember that you can start Dev . con only after the Device
Manager (Dev) has been started.
See also:
Administrator's Guide
Dev, Dev . ser, Dev . par
Dev. con
1 27
I
� I
�
�
r-'1
r-'1
r-'1
�
r-'1
�
rr-,
rr-,
�
�
r-'1
�
�
�
�
�
r
r-'1
�
t-o
�
�
�
�
�
�
�
�
�
�
�
�
�
�
�
�
�
�
�
r-.
�
�
�
Dev. pa r
parallel device driver (QNX)
Syntax:
Options :
Dev . par [ -b number]
[ -p number]
[ -0 number] &
-b
number
Use the printer number, as defined by the BIOS,
where number can be 1 , 2 , 3 , or 4 .
-N
name
The name of the device (default is par).
-0
number
The size of the output buffer (default is 1000).
-p number
Examples:
[ -N name ]
The 1/0 address (in hex) of the parallel port
(required only if you're using a non-standard
parallel port that the BIOS is unable to find).
Support LPTl as I dev /par:
Dev . par &
Support LPT2 as /dev/prn:
Dev . par -b 2 -N prn
Support port at 278 hex as I devI laser
Dev . par -p 2 7 8
Description:
-N laser &
The Dev . par driver manages all parallel devices in a QNX system.
You must start a copy of Dev . par for each parallel device Dev . par
is to support.
If you start Dev . par without specifying any 1/0 ports, Dev . par
uses the first parallel port found by the system BIOS (LPTl ) . If there
aren't any parallel ports, Dev . par terminates.
If you need to have more than one parallel port supported, remember
to assign a unique name to each of the ports.
Remember that you can start Dev . par only after the Device
Manager (Dev) has been started.
See also:
Administrator's Guide
Dev, Dev . ser, Dev . con
Dev.par
1 29
""""
"""'
Dev.se r
�
serial device driver (QNX}
""""'
""""'
I<M\
Syntax:
Dev . ser [ options ] &
�
�
Options :
port [ , irq]
�
""""
-
c
number
""""
A serial I/O port (in hex) and its corresponding
interrupt (in decimal).
The size of the canonical input buffer
(default is 256).
""""
tal\
�
�
�
-D
Set initial state of DSR to off.
-E
Set all subsequent ports to "raw" mode (default) .
-F
Disable hardware flow control on all subsequent
ports.
- I number
The size of the raw input buffer (default is 2048).
-N name
The name of the device (default is ser).
-0
The size of the raw output buffer (default is 2048).
�
"""'
""""
_,
"""'
�
11M\
number
-R
Set initial state of RTS to off.
-b number
The initial baud rate for subsequent ports
(default is 9600) .
-d
Set initial state of DSR to on.
-e
Set all subsequent ports to "edited" mode.
-f
Enable hardware flow control on all subsequent
ports (default).
-h number
The flow control high-water mark for subsequent
ports (default is 3f4 of input buffer).
- 1 number
The flow control low-water mark for subsequent
ports (default is Y4 of input buffer).
-r
Set initial state of RTS to on.
""""
"""'
"""""
�
"""""
""""
11M\
�
""""
,....,
�
"""'
""""
""""'
""""'
�
"""'
Examples :
Scan for COM l and COM2:
Dev . ser &
�
�
""""
_,
"""""
"""""
Administrator's Guide
Dev.ser
1 31
Dev. ser
serial device driver (QNX)
Set port at 3F8 as a raw device at 1 200 baud, and port at 2F8 as an
edited device at 9600 baud:
Dev . ser
-E -b 1 2 0 0 3£8 , 4
.-e -b 9 6 0 0 2 £ 8 , 3
&
Specify a standard COMl port at 3F8 as well as four ports on a
multiport card:
Dev . ser
Description :
3 £8 , 4
2 80 , 3 2 8 8 , 3 2 90 , 3 2 98 , 3
&
The Dev . ser driver manages all serial devices in a QNX system.
If you don't specify any serial ports on the command line, Dev . ser
scans the hardware, looking for a port at 3F8 (COM I) or a port at 2F8
(COM2), or both. If COM l is present, Dev . ser assumes that it uses
interrupt IRQ 4; if COM2 is present, Dev . ser assumes that it uses
interrupt IRQ 3. If the scan shows that neither of COMl nor COM2 is
present, Dev . ser terminates.
Remember that you can start Dev . ser only after the Device
Manager (Dev) has been started.
See also:
1 32
Part II
•
Dev, Dev . con, Dev . par
Managers, Drivers,
&
Utilities
QNX Operating System
Dosfsys
DOS
Syntax:
Dos fsys [ - S I - s ]
[ -m]
Dosfsys - i [ -n node ]
filesystem manager (QNX)
[dos_drive=qru_drive [ , R] ]
...
&
[dos_drive_yath ] ...
Dosfsys -x [ -n node ]
Options :
[ ' R]
Mounts the DOS drive as a read-only drive.
-s
Same as - s , except the drives are adopted as read-only.
-i
Gets drive information from the Dos fsys manager on the
specified node. If no node number is specified, the local
Dos fsys manager is used.
-m
Suspends adoption of the indicated drives; only displays
the drives that would be adopted.
-n node
The node the Dos fsys manager resides on.
-s
Causes Dos fsys to scan the /dev directory for drives to
adopt.
-x
Causes the Dosfsys manager on the specified node to exit.
If no node is specified, the local Dos fsys manager is used.
dos drive
A DOS drive letter, ranging from a to h.
dos_drive_path
The full name of the adopted DOS drive (defaults: /dos/a
for a drive, /dos/b for b drive, etc.)
qnx_drive
The name of the QNX drive or file to open (e.g.
/dev/hd0t4). The drive or file can be local or it can
reside on another node in the network.
Examples :
1)
Scan the /dev directory and mount the corresponding drives:
Dosfsys &
OR
Dosfsys - s &
This syntax is the norm for most environments.
Administrator's Guide
Dosfsys
1 33
Dosfsys
DOS
filesystem manager (QNX)
2) Adopt drivea as /dos/a (read-only) and
I / 8 /di sks/drivec as /dos/c:
Dos fsys a=drivea , R
c=/ / 8 /disks /drivec &
3) Adopt /dev/ fdO as /dos/a and /dev/wd0t 4 as /dos/c:
Dos fsys a=/dev/ fdO
Description:
c=/dev/wd0t 4
&
The Dos fsys filesystem manager provides transparent access to
DOS files and directories that reside on a DOS disk. Dosfsys can
support up to eight drives (a to h).
You can create files on DOS disks, read them, write to them, and
delete them with most QNX programs. You can also create, read, and
delete directories on DOS disks with standard QNX utilities, such as
mkdir, l s , and rmdir. Most standard QNX utilities will work with
DOS files, provided that the DOS file structure allows for the
functionality required by the utility.
Your own programs will also be able to process DOS files just as they
process QNX files, by using the standard 1/0 functions such as
open(), read(), write(), close(), seek(), etc. When you read DOS
directories, they'll be presented to you in QNX format.
The - i option lets you get information about the currently adopted
DOS drives.
The -x option terminates the Dos fsys server. When this command
is issued, no new open() requests will be accepted, and the server
will terminate once all active files (i.e. files that are still open) are
closed.
If you don't specify -i or -x, Dos fsys will start up and try to adopt
the specified drives.
1 34
Part II
•
Managers, Drivers,
&
Utilities
QNX Operating System
Dosfsys
DOS
Exit status:
See also:
filesystem manager (QNX}
If an error occurs at startup, Dos fsys displays an appropriate error
message, then exits with one of the following exit codes :
1
Exit due to signal.
2
Can't register name.
3
Can't create proxy.
4
Can't register drive prefix.
5
Can't set up timer.
6
Invalid command-line option(s).
7
Error mounting drive.
8
Not enough memory for buffers.
9
Invalid drive specifier.
10
No drive specified on the command line.
11
Dos fsys must start up in background.
Fsys
Utilities Reference: textto
Administrator's Guide
Dosfsys
1 35
em u87
80x87 floating point emulator (QNX)
Syntax:
Options :
Examples:
emu 8 7 [ - f ] &
-f
Force the emulator to remain, even if floating point hardware is
present.
Start the floating point emulator:
emu87 &
Description:
The emu87 process traps 80287 and 80387 floating point instructions
and emulates them through software. By default, the emulator will
quietly terminate if you attempt to start it on a machine equipped
with floating point hardware. You can force the emulator to remain
active by using the - f option.
Note that the emu87 process is required if you wish to run programs
that need floating point support on a computer that doesn't have an
80X87 floating point coprocessor.
To remove the emulator, you use the slay utility:
slay emu87
Never attempt to start or stop the emulator while processes are
actively using floating point.
-
-
-
Administrator's Guide
emu87
1 37
�
�
feat
�
display compressed files (QNX)
�
�
�
�
�
Syntax:
Description:
feat [filename . . . ]
See the freeze utility.
�
�
�
�
�
�
�
�
�
�
�
""""
�
�
�
�
�
""""
�
""""
�
�
�
�
�
�
�
�
�
,_.,
�
�
,_.,
""""
f'1""'
�.
Administrator's Guide
feat
1 39
fd isk
create ONX disk partition (ONX)
Syntax
Options :
fdisk [ -p ] drive [ cmd]
-p
Pause before starting.
drive
Disk drive to partition.
cmd
An optional installation command, which is one of:
•
add [ -f slot] QNX I type ALL I HALF I QUARTER I TENTH I size
•
boot [QNX I QNX2 1 DOS I OS2 1 type I slot]
•
loader
•
show
•
query [ QNX I QNX2 1 DOS I OS2 1 FREE I TOTAL I type I slot]
where:
type is the partition specifier (e.g. t 77), as in the following
list:
QNX 4.0
t77
QNX 2. 1
t7, t 8 , or t 9
tl, t2, t3, or t 4 DOS
size is the size of the partition, in cylinders (e.g. 680) or
megabytes (e.g. 7 2m).
slot is partition number 1, 2 , 3, or 4 .
Refer to the description for more details on partition specifiers.
Examples:
fdi sk /dev/hdO
fdisk /dev/hdO add qnx half
Description:
Administrator's Guide
The £disk utility lets you partition a hard disk. The partition
information matches that used by DOS. The information is kept on
the first physical block on the disk.
fdisk
1 41
fd i s k
create QNX disk partition (QNX)
To create a QNX partition for the first time you must first start the
filesystem and hard disk driver. For example:
Fsys &
Fsys . wd &
You should now execute the fdi sk command:
fdisk /dev/hdO
and partition your disk.
QNX doesn't automatically mount any partition. Once you've created
the partition, you should mount the disk using this partition (see
mount).
It's important to realize that the fdi sk command only displays and
updates the partition information on the disk. It doesn't directly
affect your access to the drive (see mount).
The fdisk utility is a full-screen, interactive program that is fairly
self-explanatory. When fdi sk is invoked, it displays a screen similar
to this one (assuming your disk is already partitioned):
FDISK
I g n o r e Next P r e v
1
2
OS_
name
1 .
DOS
3
4 C h a n g e D e l e t e Boot
Start
type
Cy l i n der
End
C y l inder
C y l inders
Size
Boot
Blocks
(
4)
3 9 1 65
19
QNX2 . x
(
7)
160
419
260
63700
3 1 MB
3.
QNX
( 77)
420
854
435
1 0 6575
4 .
------
( --- )
one
the
of
part i t i on s ,
159
R e s t o r e L o a d e r S ave Qu i t
_Number__
2 .
Choose
0
Unboot
_
by :
p o i n t e r w i t h t h e U P / DOWN a r rows ;
of the
160
typing
then,
MB
MB
the p a rt i t i o n number OR moving t h e
choose
one o f the
act ions
on t h e top
line
s c reen .
D r ive
Size
52
:
Loade r :
1 0 2 Mby t e s
QNX
:
Con f i g :
/dev/hdO
7 Heads
35
Sectors / c y l
8 5 5 Cyl inders
0
==
First
854
�
Last
You '11 see the available commands displayed at the top of the screen.
You select a command by typing its first letter, or by moving the
cursor to the command (with the arro w keys), and pressing <Enter>.
1 42
Part II
•
Managers, Drivers,
&
Utilities
QNX Operating System
-
fd isk
create QNX disk partition (QNX)
The commands are:
Next
Move the pointer to the next entry.
Prev
Move the pointer to the previous entry.
1, 2 , 3 , or 4
Move the pointer to the indicated entry.
Change
Change the selected entry.
Delete
Delete the selected entry.
Boot
Tum on the boot flag for the selected entry.
Unboot
Tum off the boot flag for the selected entry.
Restore
Restore the previous non-QNX bootstrap loader.
-
Loader
Change the bootstrap loader to the QNX loader.
-
Save
Save all changes and quit.
Quit
Quit without saving changes.
-
If you're changing a partition entry, you will be required to enter the
partition type number and the start and end cylinders. The other
information will be calculated for you by the £disk utility.
-
Command mode:
The £disk utility can also be run as a non-interactive utility using
command-line options. This is useful for designing a custom
installation procedure. The command mode syntax is:
£di sk drive cmd
The commands are:
add [ - f slot] QNX I type ALL I HALF I QUARTER I TENTH I size
Add a new partition entry of the size and type specified. If
£disk cannot locate sufficient un-allocated disk space to
satisfy your request, it will allocate the largest available portion
of the disk (if any).
-
Using the - £ (force) option deletes any existing partition in the
specified partition number of the partition table. All allocated
blocks are freed for reuse before attempting to allocate the
requested space. Also, add will normally use the first available
partition number, but the - £ option will force it to use slot, the
specified number.
Administrator's Guide
fdisk
1 43
fd i s k
create QNX disk partition (QNX)
boot [ QNX I QNX2 1 DOS I OS2 1 type I slot]
Boot will tum on the boot flag for the indicated partition. If
another partition was already flagged as the primary boot
partition, the flag will be turned off for it.
loader
Write the QNX loader to the disk.
show
Show the fdisk partition entries.
query [ QNX I QNX2 1 DOS I OS2 1 FREE I TOTAL I type I slot]
Exit with a return code which is the size of the indicated entry
in megabytes.
where :
type is the partition specifier (e.g. t77), as in
the following list:
t77
t 7 , t 8 , or t 9
t l , t 2 , t3, or t 4
QNX 4
QNX 2
DOS
size is the size of the partition, in cylinders
(e.g. 6 8 0) or megabytes (e.g. 7 2m) .
slot is partition number 1 , 2 , 3 , or 4 .
If you wish your disk to contain both QNX and DOS partitions, we
recommend that you create the DOS partition first, using DOS
commands.
Exit status :
See also:
Caveats:
1 44
Part II
•
0
Successful.
>0
An error occurred.
dinit , fdformat , mount
After changing any partition that is mounted, you must reboot. If
you don't reboot, you could damage the filesystem on the new
partition.
Managers, Drivers,
&
Utilities
QNX Operating System
freeze
compress and uncompress files (QNX)
Syntax:
Options:
freeze [ -Vcdfv]
[ [ +nl , . . . , n8 ]
[filename ] ] . . .
-v
Display the program's version number and compilation options.
-d
Uncompress the files from the archive (melt).
-f
Force creation of the . F file. This option creates the . F file,
even if one already existed, without prompting you for
confirmation. The . F file will be created even if the
compressed file is larger than the original.
-c
Write the results o f the freeze/melt operation t o standard
output. No files are changed.
-v
Display a counter. For each file being frozen, display a
kilobytes counter, and, after the file is frozen, print a message
giving the percentage of the input file 's size that has been saved
by compression.
-z
If the output of a melt (option -d) is to a tty, allocate a larger
output buffer so screen output is in full screen chunks.
+nl , . . . , nB
A list of 8 numbers separated by commas, specifying the values
for the static Huffman table.
Examples:
Freeze all files in the current directory:
freeze *
Extract all C source and header files:
mel.t * . [ ch ] . F
Expand files from a compressed pax archive on floppy:
vol. -r /dev/ fdO I mel.t I pax -r
View the concatenated contents of all compressed files in the current
directory:
feat * . F I more
-
Administrator's Guide
freeze
1 45
freeze
compress and uncompress files (QNX}
Description :
The free ze utility compresses the specified files or the standard
input. If a file becomes smaller, it's replaced by a file with the
extension . F, (you can use the -f option to force the creation of the
. F file, even if the compressed file is larger). If no files are specified,
the compression is applied to the standard input and is written to the
standard output.
If you don't specify the -f option, and you run free ze in the
foreground, you're prompted as to whether the file should be
overwritten.
When a F file is created, the original file is removed.
.
The following links to freeze are equivalent to using freeze with
these options:
This link:
is equivalent to:
melt
freeze -d
feat
free ze -cd
You can restore compressed files to their original form through either
of two ways:
•
specifying the -d option to freeze
•
running melt on the F files or on the standard input
.
When you specify filenames, the ownership, modes, access times,
and modification times are maintained between the file and its F
version. As a result, freeze can be used for archival purposes, yet
can still be used with make after melting.
.
The freeze utility uses the Lempel-Ziv algorithm on the first pass
and the dynamic Huffman algorithm on the second one. The size of
"sliding window" is 8K and the maximum length of "matched
string" is 256. The positions on the window are coded using a static
Huffman table.
1 46
Part II
•
Managers, Drivers,
&
Utilities
QNX Operating System
freeze
compress and uncompress files (QNX)
A two-byte magic number is prepended to the file to ensure that
neither melting of random text nor refreezing of already frozen text
is attempted. In addition, the characteristics of the static Huffman
table being used during the freeze are written to the file so that these
characteristics may be adapted to concrete conditions.
The amount of compression you obtain depends on the size of the
input file and the distribution of character substrings and their
probabilities. Typically, text files (e.g. C programs) are reduced by
60% to 75%, while executable files are reduced by 50%.
Compression is generally much better than that achieved by LZW
coding or by Huffman coding, although it takes more time to
compute.
An argument preceded by a + defines the values to use for the
Huffman table. You may want to explicitly state these values in order
to modify the compression algorithm.
Exit status:
See also:
Administrator's Guide
0
Normal exit.
1
An error occurred.
2
The last file grew after freezing.
cpio, pax, tar
freeze
1 47
Fsys
Filesystem Manager (QNX)
Syntax:
Options:
Fsys [ options ] &
-c cache size
The size of the cache in units of lK. The default is 1/s of the
available free memory, up to a maximum of 2048K.
- f ocb
The maximum number of open control blocks that may be
open at one time in the filesystem (default is twice the
number of processes).
- i inode table size
The maximum number of distinct files that may be open at
any time (default is 2/3 of the number of processes).
-1 lock table size
-
-
The number of locks that can be simultaneously
outstanding (default is 200 entries).
- r ramdisk size
The size of an optional ramdisk, in units of lK. The
minimum size is 4K; the maximum size is 8 1 92K. There is
no default size.
-x
cacheyroportion
The maximum proportion of the cache that may be used for
caching load modules. For example, -x 2 would fill up to
1h the cache with load files. The default is 0 , which will not
cache load modules.
Examples:
Description:
Fsys &
The Filesystem Manager (Fsys) provides a standardized means of
storing and accessing data on disk subsystems. Fsys is responsible
for handling all requests to open, close, read, and write to files.
The Fsys manager lets you define ramdisks. A ramdisk is a block of
memory that's accessed by the filesystem as if it were a disk drive. It
can be effectively used for temporary files or to augment the cache
by storing frequently used data, such as programs or tables. Only one
ramdisk is supported by the Filesystem Manager. The ramdisk is
Administrator's Guide
Fsys
1 49
Fsys
Filesystem Manager (QNX}
defined as a block special file with the name I dev I ram. To defme
the root name for the filesystem on the ramdisk, you use the mount
utility.
Note that since a ramdisk is entirely RAM-based, its contents are lost
when the system is rebooted.
Normally, QNX filesystems don't cache load modules. But you can
use the -x option to specify that up to Vn of the cache may be used to
cache frequently used load modules (where n is the
cache_proportion argument for this option).
The maximum number of distinct files that may be open at any time
may be less than the total number of open files, since files with links
have only one entry and the same file opened by several processes at
the same time has only one entry.
See also:
mount , Fsys drivers (e.g. Fsys . wd)
-
1 50
Part II
•
Managers, Drivers,
&
Utilities
QNX Operating System
-
Fsys.aha
Adaptec SCS I host adapter (QNX)
Syntax:
Options:
Fsys . aha [ -a controller] [ - i interrupt]
[ -m maxsize ] [ -n name ] [ -x on [ , off] ]
-a controller
The controller address (default is to scan for the
AHA controller).
-i interrupt
The interrupt level used by the controller
(default is 14).
-m maxsize
The maximum number of blocks that will be
transferred from the SCSI controller to memory in
one 1/0 operation (default is 36) .
- n name
The name of the block special device associated
with the SCSI drives. The default is hd, which yields
a device name of I dev /hdn, where n is a unit
number assigned by Fsys.
-x on [ , off ] Specify the bus on time and bus off time. The
default values are 5 IJ.sec and 9 jlsec, respectively.
These values control the amount of time the host
adapter will "own" the bus. The default values were
chosen to prevent DMA overrun in Fsys . floppy
or any other DMA device. If no other DMA device is
used, values of 1 1 and 4, respectively, are
appropriate for avoiding conflict with dynamic
memory refresh. This may provide higher disk
throughput.
Description:
Fsys . aha is the driver for the Adaptec SCSI disk controllers,
including these models:
AHA- 1540N1 542A
AHA- 1540B/l542B
AHA- 1642
These devices are generically referred to as AHA devices (Adaptec
Host Adapter).
Administrator's Guide
Fsys.aha
1 51
Fsys.aha
Adaptec SCSI host adapter (QNX)
The Fsys . aha driver:
•
•
•
doesn't require any specification of drive parameters-this
information is provided by the drive(s)
uses the Direct Memory Access technology on the AHA controller
to transfer data between memory and the SCSI device
allocates DMA buffers of maxsize x 5 1 2 for each fixed disk
device it detects on the SCSI BUS
The Fsys . aha driver makes its code and data available to the local
Filesystem Manager (Fsys), which then invokes that code and data
via direct calls. Once Fsys has "adopted" this code and data,
Fsys aha terminates as a process.
.
This driver works only with the Adaptec SCSI controllers, and not
with other manufacturers ' controllers.
See also:
Fsys . ps2 s , Fsys drivers
AHA-1540, 1540A/1542A
User's Manual
IBM AT Technical Reference
Caveats:
The AHA controller has configuration parameters for setting the
transfer speed of its DMA circuitry (the Fsys . aha driver doesn't
change these values) . Setting the transfer speed too high may affect
operation of DMA-based devices, including the Fsys . floppy driver.
Any drive detected on the SCSI BUS is labeled with its physical unit
number. Thus, it's possible to have ldevlhd2 without having a
I devlhdl or a I dev lhdO . The current version of Fsys . aha
supports only PUNs (Physical Unit Number); later versions will
support LUNs (Logical Unit Number) as well.
Since the -x option may affect the operation of critical component
functions, you should use it with caution. In particular, you should
ensure that your chosen values don't interfere with dynamic memory
refresh cycles.
1 52
Part II
•
Managers, Drivers,
&
Utilities
QNX Operating System
Fsys.fl oppy
floppy disk controller (QNX)
Syntax:
Options :
Description:
Fsys . floppy [ -a controller]
[ -n name ]
[ -i interrupt]
[ -m maxsize ]
-a controller
The controller address (default is lfO hex) .
- i interrupt
The interrupt level used by the controller
(default is 6).
-m maxsize
The maximum number of blocks that will be
transferred from the diskette to memory in one
operation (default is 36).
-n name
The name of the block special device associated
with the floppy. The default is fd, which yields a
device name of I dev I fdn, where n is a unit number
assigned by Fsys.
Fsys . floppy is the driver for IBM PC/AT/PS2-compatible floppy
disk controllers. These controllers are based on the NBC 765 FDC, the
INTEL 8237 DMA controller, and some extra control hardware
defmed by IBM for the PC.
Since these controllers use the 8237 DMA controller to transfer data
between memory and the device, the driver will attempt to allocate
up to maxsize x 5 1 2 bytes upon startup.
Ideally, maxsize should be the number of sectors in a cylinder,
allowing the driver to read an entire cylinder in a single request. The
default is 36, which is the number of sectors in a cylinder on a 1 .44M
drive.
The Fsys . floppy driver makes its code and data available to the
local Filesystem Manager (Fsys), which then invokes that code and
data via direct calls. Once Fsys has "adopted" this code and data,
Fsys . floppy terminates as a process.
This driver is sensitive to the drive type specified in the non-volatile
setup information in AT and PS/2 computers. Specifying the wrong
type of drive during this setup might result in sporadic errors.
Administrator's Guide
Fsys.floppy
1 53
Fsys .floppy
floppy disk control ler {QNX}
The driver recognizes and mounts the proper parameters for diskettes
from QNX 4.0, QNX 2. 1 , and several versions of DOS. If you need to
specify additional parameters to the driver, you use the qnx ioctl() C
function.
1 54
Part II
See also:
Fsys , other Fsys drivers
Caveats :
You can specify the controller address (via option -a) , but your
floppy disk controller hardware must match the IBM specification,
which involves more than the NEC 765 FDC.
•
Managers, Drivers,
&
Utilities
QNX Operating System
Fsys. ps2e
driver for the PS/2 E S D I controller (QNX}
Syntax:
Options :
Description:
Fsys . ps2e [ -a controller] [ -d dma_channel]
[ -m maxsize ] [ -n name ]
[ - i interrupt]
-a controller
The controller address (default is 35 1 0 hex).
-d dma channel
The DMA Channel to use (default is 5).
-i interrupt
The interrupt level used by the controller
(default is 1 4).
-m maxsize
The maximum number of blocks that will be
transferred from the disk to memory in one
operation (default is 36).
-n name
The name of the block special device
associated with the hard drive. The default is
hd, which yields a device name of I dev /hdn,
where n is a unit number assigned by Fsys.
Fsys . ps2e is the driver for the IBM PS(2 ESDI Fixed Disk Drive
Adapter.
The Fsys . ps2e driver:
•
•
•
doesn't require any specification of drive parameters-this
information is provided by the drive(s)
uses the PS/2 DMA controller to transfer data between the Adapter
and the system memory
allocates maxsize x 5 1 2 bytes for a DMA buffer
The Fsys . ps2e driver makes its code and data available to the local
Filesystem Manager (Fsys ), which then invokes that code and data
via direct calls. Once Fsys has "adopted" this code and data,
Fsys . ps2e terminates as a process.
This driver works only with the PS(2 ESDI, and not with the PC/AT
ESDI controllers.
Administrator's Guide
Fsys.ps2e
1 55
Fsys . ps2 m
driver for the IBM PS/2 M FM Disk Co ntroller (QNX)
Syntax:
Options :
Fsys . ps2m [ -a controller] [ - c drivespec ] [ -d dma_channel]
[ -i interrupt] [ -m maxsize ] [ -n name ]
-a controller
The controller address (default is 320 hex).
-c drivespec
The parameters of the drive. You specify these
in the following format:
heads I cylinders 1 sectors [ I disknum]
If you specify this option, you must include
heads, cylinders, and sectors. If you omit
disknum, unit 0 is assumed.
Description:
-d dma channel
The DMA channel to use (default is 3).
-i interrupt
The interrupt level used by the controller
(default is 1 4).
-m maxsize
The maximum number of blocks that will be
transferred from the disk to memory in one
operation (default is 34).
-n name
The name of the block special device
associated with the hard disk. The default is
hd, which yields a device name of I dev/hdn,
where n is a unit number assigned by Fsys.
Fsys . ps2m is the driver for the IBM PS/2 MFM Disk Controller.
The Fsys . ps2m driver:
•
•
transfers data between the drive and memory using the PS/2 DMA
Controller
allocates maxsize x 5 1 2 bytes of memory as a DMA buffer.
In order to obtain drive parameters, Fsys . ps2m examines values
established by the BIOS of your computer. If necessary, you can
override these default parameters via the -c option.
-
Administrator's Guide
Fsys.ps2m
1 57
Fsys . ps2m
driver for the I BM PS/2 M FM Disk Controller (QNX)
The Fsys . ps2m driver makes its code and data available to the local
Filesystem Manager (Fsys ), which then invokes that code and data
via direct calls. Once Fsys has "adopted" this code and data,
Fsys . ps2m terminates as a process.
1 58
Part II
•
Managers, Drivers,
&
Utilities
QNX Operating System
Fsys. ps2s
driver for the PS/2 SCSI controller (QNX)
Syntax:
Options:
Fsys . ps 2 s [ -a controller]
[ -n name]
[ - i interrupt]
[ -m maxsize ]
-a controller
The controller address (default is 3540 hex).
- i interrupt
The interrupt level used by the controller
(default is 1 4).
-m maxsize
The maximum number of blocks that will be
transferred from the disk to memory in one
operation (default is 34).
-n name
The name of the block special device associated
with the hard disk. The default is hd, which yields a
device name of I dev/hdn, where n is a unit number
assigned by Fsys.
-
Description :
Fsys . ps2s is the driver the IBM PS/2 SCSI Disk Drive Adapter.
The Fsys . ps 2 s driver:
•
•
•
doesn't require any specification of drive parameters-this
information is provided by the drive(s)
uses the PS/2 SCSI DMA controller to transfer data between the
Adapter and the system memory
allocates maxsize x 5 12 bytes for a DMA buffer.
The Fsys . ps 2 s driver makes its code and data available to the local
Filesystem Manager (Fsys), which then invokes that code and data
via direct calls. Once Fsys has "adopted" this code and data,
Fsys . ps2s terminates as a process.
This driver works only with the IBM PS/2 SCSI, and not with the
Adaptec SCSI controllers-or any other SCSI controllers-for the
IBM PS/2.
Administrator's Guide
Fsys.ps2s
1 59
�
�
�
f"""\
(-I
�
r-'1
�
�
r-.
�
�
�
("""'
("""'
�
("""'
("""'
,...,
�
("""'
�
�
("""'
�
,.,
�
�
�
("""'�
,...,
("""�
("""�
�
�
("""'
("""'
("""'�
("""'
("""�
("""'
("""'
("""'
("""i
("""'
("""'
Fsys.q i c02
QIC-02 tape d river (QNX)
Syntax:
-"t
Fsys. qic02
[ - L type] [ - a address ] [ -d dma ]
[ -i interrupt] [ -m max_buffers ] [ -n name]
?l:{ type
The type of QIC-02 unit, where type can be
one of:
archive
tecmar internal
tecmar external
The default is archive.
Description:
-a address
The base address, in hex, of the controller
(default is 200).
-d dma
The DMA channel to use (default is 3).
-i interrupt
The interrupt level to use (default is 5).
-m max_buffers
The maximum number of blocks that can be
transferred to or from the tape controller
(default is 32).
-n name
The name to associate with the device. The
default is tp, which yields a device name of
/dev/tpO .
Fsys. qic 02 is the driver for tape controllers conforming to the
QIC-02 specification.
The Fsys . qic0 2 driver makes its code and data available to the
local Filesystem Manager (Fsys) , which then invokes that code and
data via direct calls. Once Fsys has "adopted" this code and data,
Fsys . qic0 2 terminates as a process.
See also:
Administrator's Guide
Fsys drivers
Fsys.qic02
1 61
Fsys .wd
d river for PC/AT fixed disk interface {QNX)
Syntax:
Options:
Fsys . wd [ - a controller] [ -c drivespec ] [ -i interrupt]
[ -m maxsize] [ -n name ] [ - 7 1 8 ] [ - s ]
- a controller
The controller address (default is 3f0 hex).
-c drivespec
The parameters of the drive. You specify these in the
following format:
heads I cylinders I sectors [ I disknum ]
If you specify this option, you must include heads,
cylinders, and sectors. If you omit disknum, unit 0 is
assumed.
Description:
-i interrupt
The interrupt level used by the controller
(default is 1 4).
-m maxsize
The maximum number of blocks that will be
transferred from the disk to memory in one
operation (default is 34).
-n name
The name of the block special device associated
with the hard disk. The default is hd, which yields a
device name of I dev/hdn, where n is a unit number
assigned by Fsys.
-7
Don't reprogram the Fixed Disk Control Register.
-8
Enable a bit in the Fixed Disk Control Register to
allow drives with more than seven heads.
-s
Don 't program the drive parameters into the wd
controller.
Fsys . wd is the driver for the Fixed Disk interface defined by IBM
for the PC/AT computer. This interface is based upon a Western
Digital l O l 0-05 Winchester Disk Controller. Many controllers are
register-level compatible with this controller, including AT MFM,
RLL, IDE, WD 1007ESDI, etc.
In order to obtain drive parameters, Fsys . wd examines values
established by the BIOS of your computer. If necessary, you can
override these default parameters via the -c option.
Administrator's Guide
Fsys. wd
1 63
Fsys .wd
driver for PC/AT fixed disk interface (QNX)
The -m maxsize option defines the largest single read or write the
driver will support. The default value of 34 is appropriate for a
non-interleaved drive. For other configurations, you can alter this
value. For example, you can specify 1 7 for a 2: 1 interleave.
The Fsys . wd driver makes its code and data available to the local
Filesystem Manager (Fsys), which then invokes that code and data
via direct calls. Once Fsys has "adopted" this code and data,
Fsys . wd terminates as a process.
See also:
1 64
Part II
•
Fsys, Fsys drivers
Managers, Drivers,
&
Utilities
QNX Operating System
l icense
license software for use (QNX)
Syntax:
Options :
license [ source [destination ] ]
source
The source of the serial number, which can be one of:
/dev/ fdn
A floppy drive that the serial number
is transferred from (n can be either 0
or 1).
directory
A directory that all serial number files
are transferred from.
file
A specific serial number file to
transfer.
The default is /dev/ fdO .
destination
Examples:
The pathname of the etc/licenses directory that is
to be updated (default is the /etc/licenses
directory in the current filesystem).
Copy the serial number from the floppy diskette in drive 0 to the
I etc/ licenses directory:
license /dev/ fdO
Copy the serial number from the floppy diskette in drive 0 on node
10 to the /etc/licenses directory:
license / / 1 0 /dev/ fdO
Copy all serial numbers from the /etc/licenses directory on
node 1 to the /etc/licenses directory on node 5 :
license / / 1 / etc/licenses / I S /etc/licenses
Description :
The license utility transfers serial numbers to your hard disk.
These serial numbers are used by the operating system and some
applications to verify the licensing of the software. The serial
numbers are placed in files under the I etc/ licenses directory.
When you receive a new license for your network or for an
application that is licensed to you, you should place the diskette
containing the license serial number in a floppy drive and run the
license utility.
-
Administrator's Guide
license
1 65
l i cense
license software for use ( QNX)
Before you run the license utility, make sure the floppy driver has
been started.
The utility will copy the serial number from the diskette to your hard
disk. Note that the new serial number will not become effective until
you reboot.
Nodes that boot over the network will inherit serial numbers from the
node they boot from. If you have more than one machine that boots
from disk in a local area network, you can specify a directory to the
license utility to copy all serial numbers from one hard disk to
another.
Note that if you don't specify a destination, the license utility
always writes to the /etc/ licenses directory in the current
file system.
1 66
Part II
•
Managers, Drivers,
&
Utilities
QNX Operating System
l psrvr
print server (QNX)
Syntax:
Options:
Description:
Files:
See also:
lpsrvr [ -L logfile ]
[ -c file ]
[ -n name ]
[ - q] &
-L logfile
Print log information into logfile rather than to standard
error.
-c file
Use file for configuration information. Default is the
/usr/spool/lp/ . setup file.
-n name
Register using name, rather than the I qnx/ spooler
file.
-q
Be quiet. Don't generate log information.
The lpsrvr utility is the print server. The utility accepts requests for
printing, rescheduling, and examination of print j obs. When lpsrvr
starts, it scans the configuration file to find out about existing
printers, then scans for any residual work from a previous invocation.
/usr/ spool/lp/ . setup
Utilities Reference: lp, lpc, lpq, lprm
-
Administrator's Guide
lpsrvr
1 67
melt
uncompress files (QNX)
Syntax:
Description:
Administrator's Guide
meit [ -Vcfv]
[filename ]
...
See the freeze utility.
melt
1 69
Mouse
mouse driver (QNX)
-
Syntax:
Mouse [ -b [ - i interrupt] [ -p address ] ] [ -g number]
[ -n name ] [ - s baud] [ -x ] [ -y] type <serial_yort &
Mouse test
Options:
-q
Examples :
Assume a bus mouse (default is serial) .
-b
number
The gain to apply to mouse motions (default is 1 ) .
- i interrupt
The hardware interrupt to use for the bus mouse
(default is 5).
-p address
The 1/0 address of the bus mouse, in hex
(default is 23C) .
-n name
The name to register (default is qnx/mouse).
-s baud
Set the serial port to this baud rate (default is
1 200 baud).
-x
Reverse x motions.
-y
Reverse y motions.
type
The type of mouse (see Description) .
<serial_yort
The port your serial mouse is attached to.
Assume a Microsoft Serial Mouse on /dev/ ser l :
Mouse msoft </dev/serl &
Assume a standard bus mouse:
Mouse -b msoft &
Test an installed mouse driver:
Mouse test
Description:
The Mouse driver manages the mouse on a QNX system. It accepts
and interprets the stream of data generated by a moving mouse, and
processes this into an internal first-in first-out queue of significant
mouse events. Application programs can "read" these mouse events
-
Administrator's Guide
Mouse
1 71
Mouse
mouse driver (QNX)
by sending messages to the Mouse server via a set of mouse-specific
functions.
To minimize buffer requirements, yet ensure a consistent mouse
position, Mouse "compresses" unread mouse motions. A mouse
event is always generated when the user presses or releases a mouse
button.
To ensure that mouse motions apply only to the visible console, and
don't interfere with background programs, Mouse tracks the system
console and flushes all mouse events if the visible console is changed.
At the time of printing, the following mouse types are supported:
msoft
msys
ps2
Standard 200 DPI Microsoft Mouse
Mouse Systems Mouse
IBM PS/2 Integrated Mouse
To see a list of currently supported mouse types, you type:
use mouse
See also:
1 72
Part II
•
Dev, Dev drivers, C language mouse_ functions
Managers, Drivers,
&
Utilities
QNX Operating System
net boot
service boot requests from the network (QNX)
Syntax:
Options:
netboot [ - f netfile ]
- f netfile
[ -n netname ]
[ -v] &
The name of the network configuration file. This file
contains information on each node that can boot
over the network. The default is :
/etc/ config/netboot
-n netname
The registered name of the Network Manager
process to receive network boot requests. The
default is:
qnx/arcnet
-v
Examples:
Description:
Be verbose. Print each boot request to the standard
output.
netboot &
The netboot utility accepts boot requests from machines attempting
to boot over the network. The netboot utility must be running as a
background process on the boot machine before another (booting)
machine can boot. Upon receiving a boot request, netboot opens
the network configuration file and uses the node ID of the booting
machine as a key to locate the boot information. An operating system
is then prepared and transmitted to the requesting machine.
The network configuration file is an editable text file containing one
line for each node that may be booted. Blank lines and lines that start
with a double quote ( " ) are ignored. Lines must be in the following
format:
node-number F=imagefile I f=buildfile
You may use spaces or tabs to separate each token. Note that you
may use * instead of node-number to match any requesting node. If
you do this, make sure the line is last in the file, since all nodes will
match and look no further.
Administrator's Guide
netboot
1 73
net boot
service boot requests from the network (QNX}
If an image file (F=) is specified, it must contain the path of an
operating system image that was built via the buildqnx utility. If a
relative pathname is used, it is assumed to be relative to the /boot
directory. For example:
F=images /ws
is equivalent to:
F=/boot / images/ws
If a build file (f=) is specified, the buildqnx utility will be invoked
on the fly to build an operating system image that is piped to
netboot and shipped as an image over the network. If a relative
pathname is used, it is assumed to be relative to the /boot directory.
For example:
f=build/ws
is equivalent to:
f=/boot /build/ws
Build files are much smaller than operating system images, so if you
have a number of different images you want loaded, you can save
considerable disk space by building them on the fly. Images are
sometimes useful for freezing a particular operating system image
that you wish to be immune from subsequent operating system
module updates. In this case, you would have to build a new image
using buildqnx to activate any new modules.
-
QNX is a modular operating system. As such, you don't need to build
into the transmitted image all modules you may require. Once the
operating system loads, you can start many subsequent modules from
the command line, or more typically, from a shell script that is
executed right after boot. This is described in more detail under the
buildqnx and sinit utilities.
You may run netboot on more than one machine in the network.
This is advisable in larger networks to speed up booting when many
requests are active at one time.
See also:
buildqnx, netnode, netpoll, s init
Utilities Reference: netinfo
1 74
Part II
•
Managers, Drivers,
&
Utilities
QNX Operating System
-
net node
display or change the Arcnet node permit bitmap (QNX)
Syntax:
Options:
Examples:
netnode [ -a I d nid [ -end_nid] ]
-a nid [ -end_nid]
Allow qnx_vc_attach() to node nid, or to a
range of nodes, from nid to end_nid.
-d nid [ -end_nid]
Disallow qnx_vc_attach() to node nid, or to a
range of nodes, from nid to end_nid.
To all of your /etc/config/ sys init . xu files, add the line
net di sallow
Create a /usr/bin/net di sallow script file, which might look
_
something like:
netnode -d1 : 4 -d7 -d1 1 : 2 5 5
This would b e for a 10-node network where nodes 1 , 2 , 3, 4 , an d 7
are always running a different operating system; nodes 1 1 through
2 5 5 are masked off, because they are known to not exist.
Description:
The netnode utility lets you display or change the Arcnet node
permit bitmap to optimize network response.
Arcnet internally maintains a bitmap of all 255 possible nodes, which
is used to determine whether or not a qnx vc attach() is permitted to
another node on the network. When Arcnet first starts up, by default
all nodes are permitted.
The benefit of the node permit list is to speed up commands like sin
net on a network containing a mix of nodes in which some are
running QNX 4.0 and others aren't. If an application on a QNX 4.0
node attempts to attach a virtual circuit to a node that isn't running
QNX 4.0, the destination node would normally accept the low-level
control packet from the QNX 4.0 node, but not recognizing the
packet, would discard it. The application on the QNX 4.0 node,
patiently waiting for a response, is eventually released by the QNX
4.0 self-polling, but this typically happens slowly.
The netnode utility can be used to avoid this situation. By knowing
which nodes "do not exist", the system can avoid sending packets to
non-QNX nodes in the first place.
-
Administrator's Guide
netnode
1 75
netnode
display o r change the Arcnet node permit bitmap (ONX)
The - a option, which re-allows virtual circuits to the node or node
range, is added for completeness, but will probably be rarely used.
The list of masked-off nodes should not change often.
To see the current list of disallowed nodes, invoke netnode with no
arguments.
QNX 4.0 nodes that aren't on the node permit list cannot
communicate with each other.
See also:
netboot
Utilities Reference: netinfo
1 76
Part II
•
Managers, Drivers,
&
Utilities
QNX Operating System
-
net po l l
display or change default polling parameters of a node (QNX)
Syntax:
Options :
netpoll [ -N node ] [ - i idle_time ]
[ -p poll_yeriod]
-N node
The node on which to change the poll
parameters. The default is the node from which
the utility is invoked.
- i idle time
The length of time, in seconds, that the system
will allow a virtual circuit (VC) to remain idle
before checking the VC 's integrity (default is
1 0). The integrity check consists of
transmitting a network poll packet to the
remote node.
-n num_polls
The number of times that the system will
transmit a network poll packet to a remote
node before it concludes that the remote node
is permanently unreachable (default is 6).
-p poll_yeriod
The length of time, in seconds, between checks
for idle VCs (default is 1 0) .
-
Examples:
[ -n num_yolls]
The following example:
1 ) reduces to an average of 1 0 seconds the time allowed to detect a
node "disappearing" (poll_period x num_polls), at the expense of
increased CPU consumption
2) increases the frequency of the VC polling
3) decreases the maximum number of allowed polls:
netpoll
-p 2
-
i 2
-n 5
The following example:
1 ) increases to an average of 200 seconds the time allowed to detect
a node "disappearing" (poll_period x num_yolls)
2) decreases the frequency of the VC polling
3) increases the maximum number of allowed polls:
netpoll
Administrator's Guide
-p 2 0
-i 20
-n 10
netpo/1
1 77
net po l l
display or change default polling parameters of a node (QNX)
Description:
In QNX, virtual circuits (VCs) provide transparent, detached
interprocess communication between processes residing on two
different nodes in a network. If a node abruptly powers down, or if it
can no longer be communicated with, the resources associated with
the VCs to that node should be recovered.
Each node polls its own VCs, checking their integrity. The netpoll
utility lets you view or change the default polling parameters of a
specific node.
To display the polling parameters for a node, don 't specify any
parameters; if the node is remote, specify only the -N node option.
See also:
netboot, netnode
Utilities Reference: net info
1 78
Part II
•
Managers, Drivers,
&
Utilities
QNX Operating System
pax
portable arch ive interchange (POSIX)
Syntax:
List archive contents :
pax [ - cimopuvy ]
[pattern ... ]
[ - f archive ]
[ - s replstr] . . . [ -t device ]
Read an archive:
pax
-r
[ - cimnopuvy ] [ - f archive ]
[ - t device ] [pattern . . . ]
[ - s replstr] . . .
Write an archive:
pax
-w
[ -adimuvy ] [ -b blocking ] [ - f archive ]
[ - s replstr] ... [ -t device ] [ -x format] [pathname . . . ]
Copy files:
Options :
pax
- rw
[ - ilmopuvy ]
[ -s replstr] ...
-a
Append the files specified by pathname to the specified archive.
[pathname . . . ] directory
-b blocking
Block the output at blocking bytes per write to the archive file.
A k suffix multiplies blocking by 1024, a b suffix multiplies
blocking by 5 1 2, and an m suffix multiplies blocking by
1 048576 ( 1 megabyte). In QNX, the maximum buffer size is
32K- 1 . If not specified, blocking is automatically determined
on input and is ignored for -rw (copy files).
-
-c
Complement the match sense of the pattern operands.
-d
Don't create intermediate directories not explicitly listed in the
archive. This option is applied only if the - r option is specified.
-f archive
Use archive as the pathname of the input or output archive,
overriding the default of standard input for - r or standard
output for -w.
-
-i
-
Administrator's Guide
Interactively rename files. Substitutions specified by - s options
are performed before requesting the new filename from the
user. A file is skipped if an empty line is entered. If EOF is
encountered, pax exits with an exit status of 0.
pax
1 79
pax
portable archive interchange ( POSIX)
-1
When possible, link rather than copy files.
-m
Don't keep file modification times.
-n
When -r is specified, but -w is not, treat the pattern operands
as ordinary filenames. Only the first occurrence of each of
these files in the input archive is read. The pax utility exits
with an exit status of 0 after all files in the list have been read.
If one or more of the files in the list aren't found, pax writes a
diagnostic to standard error for each of these files and exits
with a nonzero exit status. The filenames are compared before
any of the -i, - s , or -y options are applied.
-o
Restore file ownership as specified in the archive. The invoking
process must have appropriate privileges to accomplish this.
-p
Preserve the access time of the input files after they have been
copied.
-s replstr
Modify filenames according to the substitution expression. The
syntax for the expression is:
-s /old/new/ [ gp ]
Any non-null character may b e used as a delimiter (a I i s used
here as an example). Multiple - s expressions are applied in the
order specified terminating with the first successful
substitution. The optional trailing p causes successful mappings
to be listed on standard error. The optional trailing g causes the
old expression to be replaced each time it occurs in the source
string. Files that substitute to an empty string are ignored both
on input and output.
-t device
The device argument names the input or output archive device,
overriding the default of standard input for -r and standard
output for -w.
-u
1 80
Part II
•
Managers, Drivers,
Copy each file only if it is newer than a preexisting file with the
same name. This implies option -a.
&
Utilities
QNX Operating System
pax
portable arch ive interchange (POSIX)
-v
-x
Be verbose; list filenames as they are encountered. This option
produces a table of contents listing on the standard output when
both - r and -w are omitted; otherwise the filenames are printed
to standard error as they are encountered in the archive.
format
Use this output archive format. The input format, which must
be one of the following, is automatically determined when the
-r option is used. The supported formats are:
cpio-the extended cpio interchange format specified in
IEEE Std. 1 003 . 1 - 1 988.
ustar-The extended tar interchange format, also
specified in IEEE Std. 1 003 . 1 - 1 988. This is the default
archive format.
-y
Interactively prompt for the disposition of each file.
Substitutions specified by - s options (described above) are
performed before the user is prompted for disposition. EOF or
an input line starting with the character q causes pax to exit.
Otherwise, an input line starting with anything other than y
causes the file to be ignored. This option cannot be used in
conjunction with the -i option.
Only the last of multiple - f or -t options take effect.
Administrator's Guide
directory
The destination directory pathname for copies when
both the - r and -w options are specified. The directory
must exist and you must have the appropriate write
permissions, or an error results.
pathname
A file whose contents are used instead of the files
named on the standard input. When a directory is
named, all of its files and (recursively) subdirectories
are copied as well.
pattern
A pattern given in the standard shell pattern-matching
notation. If no pattern is specified, the default is *,
which selects all files.
pax
1 81
pax
po rtable archive interchange ( POSIX}
Modes of operation
If you don't specify -r or - w , then pax lists the contents of the
specified archive. In this mode, pax lists normal files one per line.
Hard link pathnames are listed as :
pathname
==
linkname
where pathname is the name of the file being extracted, and
linkname is the name of a file that appeared earlier in the archive.
If -v is specified, then pax lists normal pathnames in the same
format used by the 1s utility with the -1 option. Hard links are
shown as:
<1s -1 listing>
==
linkname
-w
Write the files and directories specified by pathname operands
to the standard output, together with the pathname and status
information prescribed by the archive format used. A directory
pathname operand refers to the files and (recursively)
subdirectories of that directory. If no pathname operands are
given, then the standard input is read to get a list of pathnames
to copy, one pathname per line. In this case, only those
pathnames appearing on the standard input are copied.
-r
Read an archive file from the standard input; select for
extraction only those files whose names match any of the
pattern operands. The selected files are conditionally created
and copied relative to the current directory tree, subject to the
options chosen. By default, the owner and group of selected
files will be that of the invoking process, and the permissions
and modification times will be the same as those in the archive.
The supported archive formats are automatically detected on
input. The default output format is ustar, but may be
overridden by the -x format option described below.
-rw
1 82
Part II
•
Managers, Drivers,
Read the files and directories named in the pathname operands
and copy them to the destination directory. A directory
pathname operand refers to the files and (recursively)
subdirectories of that directory. If no pathname operands are
given, the standard input is read to get a list of pathnames to
copy, one pathname per line. In this case, only those pathnames
&
Utilities
QNX Operating System
pax
portable arch ive interchange (POSIX}
appearing on the standard input are copied. The directory
named by the directory operand must exist and must have the
proper permissions before the copy can occur.
Examples:
Copy the contents of the current directory to the floppy drive:
pax -w - f /dev/ fdO .
Copy the contents of olddir to newdir:
mkdir newdir
cd olddir
pax -rw . newdir
Read the archive pax . out with all files rooted in /usr in the
archive extracted relative to the current directory:
pax - r - s " , /usr/ , , " - f pax . out
Description :
The pax utility reads and writes archive files that conform to the
archive/interchange file format specified in IEEE Std. 1 003. 1 - 1988.
The utility can also read, but not write, a number of other file
formats. Support for these traditional file formats (such as V7 tar
and System V binary cpio format archives) is provided for
backward compatibility and to maximize portability.
The pax utility will also support traditional cpio and System V tar
interfaces if invoked with the name " cpio " or "tar " respectively.
The pax utility is capable of reading and writing archives that span
multiple physical volumes. Upon detecting an end of medium on an
archive that is not yet completed, pax will prompt you for the next
volume of the archive and will let you specify the location of the
next volume.
Combinations of the -r and -w command-line arguments specify
whether pax will read, write, or list the contents of the specified
archive, or will move the specified files to another directory.
When writing to an archive, the standard input is used as a list of
pathnames if no pathname operands are specified. The format is one
pathname per line. Otherwise, the standard input is the archive file,
Administrator's Guide
pax
1 83
pax
portable archive inte rchange (POSJX)
which is formatted according to one of the format specifications in
IEEE Std. 1 003 . 1 - 1 988.
The user ID and group ID of the process, together with the
appropriate privileges, affect the ability of pax to restore ownership
and permissions attributes of the archived files. (See
Archive/Interchange File Format in IEEE Std. 1 003. 1 - 1 988.)
Note that the options -a, -c, -d, -i, 1 -p, -t, -u, and -y are
provided for functional compatibility with the historical cpio and
tar utilities. The option defaults were chosen based on the most
common usage of these options, so some of the options have
meanings different from those of the historical commands.
-
Files :
Exit status:
Caveats :
,
The controlling terminal (/dev/tty) is used to prompt the user for
information when the - i or -y options are specified.
0
All files in the archive were processed successfully.
>0
The pax utility aborted due to errors encountered during
operation.
Special permissions may be required to copy or extract special files.
Device, user ID, and group ID numbers larger than 65535 cause
additional header records to be output. These records are ignored by
some historical versions of cpio and tar.
The archive formats described in Archive/Interchange File Format
have certain restrictions that have been carried over from historical
usage. For example, there are restrictions on the length of pathnames
stored in the archive.
When getting an ls l. style listing on tar format archives, link
counts are listed as zero since the ustar archive format doesn't keep
link count information.
-
On 1 6-bit architectures, the largest buffer size is 32K- 1 . This is due,
in part, to using integers in the buffer allocation schemes. On many
of these machines, however, it is not possible to allocate blocks of
memory larger than 32K.
See also:
1 84
Part II
•
cpio, tar
Managers, Drivers,
&
Utilities
QNX Operating System
P.r oc
Process Manager {QNX)
Buildflle syntax:
Options:
Proc [ options ]
-a
Disable time accounting. This option saves
1 6 x num_procs bytes of memory and slightly reduces the
work done in the timer interrupt handler.
-d num dev
The number of major device numbers supported (default is
32).
-£ minJds maxJds extraJds
This option controls the availability of file descriptors
(FDs):
minJds
The minimum number of FDs that must be
available for a process. This argument defaults
to 1 6 and should be left at that value if
POSIX-compliance is a requirement (POSIX
requires that a process be capable of opening at
least 1 6 files). You can save some memory by
reducing this number.
maxJds
The maximum number of FDs that can be
available for a process (default is 32).
extraJds The pool of extra FDs that can be allocated, as
needed, to processes that exceed their
minimum number of FDs.
- i irq
-
Make irq the highest-priority hardware interrupt in the
system (default is 3).
m num_shared_segs
The number of shared segments (managed by the
qnx segment() . . . family of functions) that will be available
in this operating system image
(default is 300).
Administrator's Guide
Proc
1 85
P roc
Process Manager (QNX)
-n num names
The maximum number of names that can be registered
locally by the qnx_name_attach() function
(default is 30).
-p
num_yrocs
The total number of real processes, virtual circuits, and
proxies that can exist at any time (default is 1 50).
-r prefix_len
The size of the system prefix space (default is 400
characters).
- s num sessions
The maximum number of sessions that will be supported
(default is 32).
-t num timers
The number of timers that will be supported (default is 40
per system). These timers are allocated to processes with
the mktimer() function and returned with the reltimer()
function.
-v
level
Set the verbosity level (0 to 2; default is 1 ) . Messages are
always displayed on the console in the form:
QNX ( level)
:
Mes sage
The messages should be interpreted as follows:
1 86
Part II
•
Managers, Drivers,
&
Level 0 :
An internal inconsistency was detected. Contact
Quantum.
Level l :
The Kernel was forced to take a planned, but
uncommon, recovery action.
Level 2 :
Expected actions have occurred as a result of a
misbehaving process or remote computer.
Utilities
QNX Operating System
Proc
Process Manager (ONX)
Description:
The Process Manager (Proc) works closely with the Kernel to
provide essential operating system services. The Kernel is in fact
bundled with the code for Proc and shares the same address space.
For these reasons, P roc is a required system process in all operating
images that are built. You cannot start Proc after booting.
Most of the services provided by Proc require the use of memory
within Proc. The amount of memory used is controlled by tables
whose sizes are set using command-line options. Some tables are
fixed in size, while others dynamically request more memory as
needed. Unlike other system processes, P roc cannot grow its data
segment at runtime. This means that you must provide sufficient
intemal memory (referred to as heap space) when you build Proc
into an OS image. This heap space is provided as a number in a
buildJile used by the buildqnx utility. The following formula may
be used to approximate Proc 's minimum heap space requirements:
heap
=
num_dev x 2
+ num_shared_segs x
8 + (total length of registered names)
+ num_JJrocs x 1 48 + (total length of unique command names)
+ each_code or data_segment x 1 2
+ num _names x
+ prefix_len
20
24
+ num sessions x
+ num timers x
+
8000
The number of code and data segments will be determined by the
programs you run. A small model program requires one code and one
data segment. While the system is running, you may use the
sin info utility to display the amount of free heap space available
in Proc.
Administrator's Guide
Proc
1 87
s i n it
system in itial ization (ONX)
Syntax:
Options :
sinit [ - i initfile ]
- i initfile
-r
Examples:
Description:
root
[ -r root]
[ -s shell]
[ var=value] . . .
Open this system initialization file (for defaults, see the
Description below).
Define an alias prefix for the filesystem root (/).
-s shell
Invoke this shell (default is /bin/ sh).
var=value
Define an environment variable.
sinit -r / / 1 /
sinit - s /bin/myshell
The s init utility sets up the initial operating system environment
immediately after boot. It is usually bound to the operating system
by means of the buildqnx utility.
The s init utility attempts to find and open the system initialization
file for your node. This is a text file that contains a list of system
initialization commands for which s init invokes a shell to execute.
There are two types of boots: a normal boot and an alternate boot.
All boots over the network are considered normal. When you boot
from disk, you are prompted with the option of doing an alternate
boot. The type of boot you choose determines which system
initialization file will be used:
If you
choose:
sinit tries to find and open:
a normal boot
/etc/ config/sysinit . node
If this fails, it tries:
/etc/ config/sysinit
an alternate boot
/etc/ config/alt sysinit
If this fails, it tries :
/etc/config/ sys init
It's usually a good idea to keep the sys init file generic and create
custom sys init . node files for each node as required. The
alt sys init file is usually a backup of the sysinit . node file for
the node that boots from its own hard disk.
Administrator's Guide
sinit
1 89
s i n it
system initial ization (QNX)
Whenever you wish to get your files from another node (remote file
server), you use the r root option. If you boot from hard disk and
you get your files from your local hard disk, you don't need to
specify this option.
-
You can override the default search for sys init . node or
altsysinit by specifying an explicit filename with the -i initfile
option.
The default shell invoked by sinit is /bin/ sh. To override this
default, you use the - s shell option. You should specify a complete
pathname for the shell, starting with a slash (/).
You can cause sinit to create an environment variable using the
var=value operand. These environment variables will be inherited by
the system initialization shell. The time zone variable (TZ) is often
set here.
The s init utility always terminates; it doesn't stay resident in the
system. If you wish to start up user sessions, you should use the
terminal initialization utility, tinit , and place it in the appropriate
sysinit file.
See also:
buildqnx
Utilities Reference: t init
1 90
Part II
•
Manage�, Drivers,
&
Utilities
QNX Operating System
tape
control a tape driver (ONX)
Syntax:
Options:
Examples:
tape [bot . . . ] [ eod ... ] [ erase . . . ]
[ retens ion . . . ] [ status . . . ]
[ forward. . . ]
bot
Position the tape to the beginning.
eod
Position the tape to the end of the data (perhaps to
continue writing after a previous archive).
erase
Erase the contents of the tape.
forward
Position the tape to just after the next file mark.
retens ion
Position the tape to the beginning, then to the end,
then back to the beginning.
status
Print information concerning the current condition
of the tape drive.
Position the currently mounted tape such that data may be appended
after previously written archives:
tape eod
Position the tape such that the third archive on the tape may be read:
tape bot forward forward
Position the tape such that the first archive may be read:
tape bot
Description:
Exit status:
See also:
Administrator's Guide
The tape utility provides a mechanism for positioning a mounted
tape to a specific location in anticipation of being read from or
written to by another utility (i.e. pax). You can also use tape to
examine the current status of the tape unit.
0
The command(s) completed successfully.
>0
The utility aborted after encountering the first error.
cpio, pax, tar
tape
1 91
� �
r
r
r
�
�
�
�
,-.,
�
�
�
�
�
�
�
,-.,
�
�
�
f'-l
�
r'"'-1
r
�
�
�
r-1
�
�
�
�
�
�
�
�
�
�
�
�
�
�
�
�
�
�
tar
read and write tape archive files (UN IX)
Syntax:
tar -c [bfvw] [filename . . . ]
tar - r [bvw] [filename . . . ]
tar t [ fv] [filename ]
tar -u [bvw] [filename ]
tar -x [ flmovw] [filename . . . ]
-
Options
-b
Use the next argument on the command line as the blocking
factor for tape records. The default is 1 ; the maximum is 20.
This option should be used only with raw magnetic tape
archives. Normally, the block size is determined automatically
when reading tapes.
-c
Create a new archive. Writing begins at the beginning o f the
archive, instead of after the last file.
-f
Use the next argument o n the command line as the name o f the
archive instead of the default, which is usually a tape drive. If
the dash character (-) is specified as a filename, tar writes to
the standard output or reads from the standard input, whichever
is appropriate for the options given. Thus, tar can be used as
the head or tail of a pipeline.
-1
(lowercase letter "el") Report i f all o f the links t o the files being
archived cannot be resolved. If this option isn't specified, no
error messages are written to the standard output. This option is
valid only with the -c, - r, and - u options.
-m
Don't restore modification times. The modification time of the
file will be the time of extraction. This option is invalid with
the -t option.
-o
Cause extracted files to take on the user and group identifier of
the user running the program rather than those on the archive.
This option is v alid only with the -x option.
-r
Write named files to the end of the archive.
-t
List the names of all of the files in the archive.
-u
Administrator's Guide
Add named files to the archive if they aren't already there, or if
they have been modified since last written into the archive. This
implies the - r option.
tar
1 93
ta r
read and write tape arch ive files {UN I X)
-w
Print the action to be taken, followed by the name of the file,
then wait for the user's confirmation. If you enter a word
beginning with y, the action is performed. Any other input
means "no". This option is invalid with the -t option.
-x
Extract named files from the archive. If a named file matches a
directory whose contents had been written onto the archive, that
directory is recursively extracted. If a named file in the archive
doesn't exist on the system, the file is created with the same
mode as the one in the archive, except that the set-user-id and
get-group-id modes are set only if you have appropriate
privileges.
If the files exist, their modes are not changed except as
described above. The owner, group, and modification time are
restored if possible. If no filename argument is given, the entire
contents of the archive is extracted. Note that if several files
with the same name are in the archive, the last one will
overwrite all earlier ones.
-v
Be verbose. Usually, tar works silently, but the -v option
causes it to print the name of each file it processes, preceded by
the option letter. With the -t option, -v gives more information
about the archive entries than just the name.
filename
The pathname of the file to be archived.
Examples:
Display a verbose listing of the archive members in dist . tar:
tar -tvf di st . tar
Copy the contents of the current directory to the floppy drive:
tar -cf /dev/ fdO .
Make an archive, backup . tar, of all the C source and header files
in the current directory:
tar - cvf backup . tar * · [ ch]
1 94
Part II
•
Managers, Drivers,
&
Utilities
QNX Operating System
tar
read and write tape archive files (UN IX)
Description:
Files:
See also:
Administrator's Guide
The tar utility reads and writes archive files that conform to the
Archive/Interchange File Format specified in IEEE Std. 1 003 . 1 - 1 988.
The controlling terminal (/dev/tty) is used to prompt the user for
information when either or both the - i or -y options are specified.
cpio, pax
tar
1 95
termdef
prompt for terminal type (QNX)
Syntax:
Description:
termdef [ -c command]
The termdef utility prompts the user for their terminal type. You
should fmd termdef useful as a front-end process on dial-up lines.
If the terminal name entered matches one of the supported
terminfo entries, termdef will set the TERM environment
variable accordingly, and will do an exec() into the login command.
A list of all available terminal types will be displayed if the user
presses <Enter> without specifying a terminal name.
To launch a command other than login, use the -c option. The
specified command will be launched instead.
Administrator's Guide
termdef
1 97
�
�
�
,_.,
('-"1
�
�
�
,...,
,....
�
('WI
f!-1
,...,
,_.,
�
r-.
�
�
,_,
,...,
�
(*I
�
�
�
�
,...,
{'*I
�
�
,....
�
,_,
�
,...,
�
,...,
�
,...,
,...,
1'*1
,...,
,...,
�
,.,.,
vo l
manage multi-volume archives (QNX}
Syntax:
Options :
Examples:
vol. - r l -w [ - s blks_num ] block_special_device
-r
Read from the block special device.
-w
Write to the block special device.
- s blks num
Skip this number of blocks at the start of each
volume (default is 1 ).
Use pax to archive everything under the current directory and let
vol. split the data across as many diskettes (/dev/ fdO) as required:
pax -w
.
I vol.
-w
/dev/ fdO
Restore the archive from /dev/ fdO :
vol. - r /dev/ fdO I pax -r
Description:
You use the vol. utility primarily with removable media, particularly
floppy diskettes. At the beginning of each volume, vol. writes a
header containing the creation time and sequence number of the
volume-this helps you detect out-of-sequence diskettes.
A media descriptor is located on the first block of a floppy diskette.
For this reason, vol. by default skips the first block of each volume it
writes to. If you don't want it to skip the first block, you can specify
the - s option with a value of zero.
If you specify - s 0 , no blocks will be skipped and no header will be
written at the beginning of each volume. If you specify the - s option
when writing an archive, remember that you must also specify the
same number of blocks when the archive is retrieved.
If you want to save files larger than a single volume, you specify the
-w option. The vol. utility will read the standard input and write it
onto a block special device (usually diskettes), pausing at the start of
each one.
If you want to reassemble and extract archives split across several
volumes, you specify the -r option. The vol. utility will read from a
block special device and write the output in a single stream to
standard output.
Administrator's Guide
vo/
1 99
vo l
manage multi-volume archives (QNX)
See also:
cpio, pax, tar
Caveats :
If you tell the vol utility to skip zero blocks on a floppy ( - s 0), it
might not be able to determine the media characteristics on retrieval.
The vol utility does not format media.
200
Part II
•
Managers, Drivers,
&
Utilities
QNX Operating System
Appendix A
Ti me Zone R u l es
This appendix describes the various rules used for establishing time
zones and time changes (e.g. daylight savings time). You'll fmd a
time zone chart* and a map at the end of this appendix.
You specify time zone information via the TZ environment variable.
This variable contains a coded string that lets you specify the time
zone, as well as the rules for changing to and from daylight savings
time (if used in your area) . The value of TZ has the following form
(spaces have been inserted for clarity) :
std offset dst offset, rule
where:
std
offset
dst
offset
rule
standard time
offset of standard time from UTC time
daylight savings time
offset of daylight savings time from UTC time
specifies when to change between standard time
and daylight savings time.
In more detail, TZ is coded as follows:
TZ=std [ offset [dst [ offset] [ 1 start [ /time] 1 end [ /time ] ] ] ]
* The
time zone chart was excerpted from OAG® Desktop Flight Guide-Worldwide Edition
(May 1 9 9 1 , Vol. 16, No. 3 pp. 1278-1279), published by Official Airline Guides, Inc., Oak
Brook, lliinois.
Administrator's Guide
Time Zone Rules
201
Appendix A
The components of the TZ environment variable string are defmed as
follows.
std and dst
Defines a string used to identify the time zone (e.g.
EST). All characters are allowed, except for:
a leading colon ( : )
digits
a comma { , )
a minus sign (-)
a plus sign (+ ),
ASCII NUL
std defines the name of the standard time zone and dst
defines the name of the daylight savings time zone. If
dst is omitted, then daylight savings time isn't used in
this locale.
offset
Indicates the value you must add to the local time to
arrive at UTC. The form for offset is:
HH [ : MM [ : SS ] ]
The minutes MM and seconds SS are optional. The
hour HH is required and can be a single digit. You must
specify an hour between 0 and 24. You can specify
minutes and seconds, if required, between 0 and 59.
Time zones east of the Prime Meridian (through
England) should be preceded by a minus (- ); time
zones west of the Prime Meridian can be optionally
preceded by a plus ( + ). An offset following std is
required, but the offset following dst may be omitted.
In this case, daylight savings time is assumed to be one
hour ahead of standard time.
rule
Specifies when to change from standard time to
daylight savings time and back again. If you don't
specify rule, QNX assumes standard time is in effect.
The rule has the following format:
date I time , date I time
202
Appendix A
QNX Operating System
A ppendix A
where the first date specifies when the change to
daylight savings time takes place and the second date
specifies when the change to standard time takes place.
Each time field specifies the exact time at which the
change shall be made. The date field has one of the
following formats:
-
Jn
Specifies the date as a Julian day where
1 ::ill::;;3 65 . This format doesn't allow leap
days to be referenced (e.g. February 28 is
day 59 and March 1 is day 60; it 's
impossible to refer to February 29).
n
This specifies the date as a zero-based
Julian day where O::ill::;;3 65. Leap days are
counted and you can refer to February 29.
-
Mm
-
.
w.d
This specifies the dth day (O::;;d::;;6) of week
w of month m of the year o ::;;w::;;s ,
1 ::;;rn::;; 1 2, where week 5 means "the last d
day in month m that may occur in either
the fourth or fifth week"). Week 1 is the
first week of month m in which the dth day
occurs. Day zero is Sunday.
The time has the same format as offset
except that no leading sign (+ or -) is
allowed. The default, if time isn't
specified, is 02:00:00.
I�
Administrator's Guide
Time Zone Rules
203
,_
,_
International Time Chart
�
::s
,_
S/sndsnl Time: Legal lime for eacll country lilted by IBw and based on /he lheorelical tHIIision ol lhe
world's surface into 24 zones eacll of 15" longitude wilh certain deviations due to frontiers or loall
nr C, Sa.tng Time (DSTJ: Modified (advanced} /egBl time adopted by certain counllies for part of year,
Joot especially during loall summer.
::s
a
1-' •
CGun1ry
Q
::s
�
-
�
1-' •
a
t'D
n
::::r
�
Joot
-
=""
=. Samoa
Andorra
=.
Aruba
LM/IIowtl/s.
--�erriiJJry
Soutii Austrs/la BIId Bro/uln /1111
T-
- A- C8pild TerriiJJry (A. C. T./
- Ausllllll8
t,��ng Tlllks and Caicos Islands)
Austria
t::.u.
,_ Rap. (Oal1omey)
Bhulall
llolswana
err.:; Ear. (lnduding All Coast and
- Time
GMT
Time at
+ 4 112
+1
+1
-11
+1
+1
-3
-4
1 6 30
1 3 00
1 3 00
01 00
1 3 00
1 3 00
09 00
08 00
+ 1 0 1/2
+ 10
+ 9 1/2
+10
+ 9 1/2
+ 10
+10
+8
+1
22 30
22 00
21 30
22 00
21 30
22 00
22 00
20 00
13 00
07 00
1 S OO
1 8 00
08 00
13 00
06 00
1 3 00
06 00
1 8 00
06 00
14 00
09 00
-5
+3
+6
-4
+1
-6
+1
-4
+6
-4
+2
-3
-
-4
- De -
-- 2
-4
+8
+2
GMT
+2
+7
+1
- 3 1/2
-4
TerriiJJry ofAr:ttl
=:=::s
�=Faso
CBmboclla
=:...� (lslandol)
Allatrllc
E8slem
centniJ
PscUit:
���
=�:Rapublic
QI&CI
Q;fe
C«rrin6nnaa
E8sl8f lsiBIId
China. People's Repu�� Of
aano' =:
Comoros
g:r_
-s
-s
-6
-7
-8
-6
-1
-s
+1
+1
-4
-6
+B
+ 6 1/2
-s
+3
+1
-10
-6
Coala Rica
COfe D'Ivoile
Cuba
GM7
-s
lljil>ouli
lliJrnUilcan Repubtic
EcuCtlntitrerrl8l
-s
=-
����Guinea
.
F-..cl ,_
F::l:::r
�
France
Francll Guiana
F
r:_�
.,.,_., Is.
liodfly ls., Tu/Julli /s., T- /s., T-
aGembia
�- - Rop. Of
Greece
Greenland
� BIId W. CDast
�
,._
Guadeloupe lind. St. Barlhelemy,
�
St Martin)
Guatomxla
Guinea
+2
+1
+1
+3
-4
1 200 hrl
GMT
06 00
07 00
1 0 00
06 00
20 00
14 00
12 00
1 4 00
1 9 00
1 3 00
0630
06 00
07 00
06 00
os oo
04 00
04 00
1 1 00
07 00
1 3 00
1 3 00
06 00
06 00
20 00
1 6 30
07 00
1 S OO
13 00
02 00
06 00
1 2 00
07 00
14 00
1 3 00
1 3 00
1 S OO
08 00
-6
+2
-6
+1
+3
07 00
06 00
1 4 00
06 00
1 3 00
1 S OO
-4
GMT
+12
+2
+1
-3
06 00
1 2 00
23S9
1 4 00
1 3 00
09 00
-9
- 9 1/2
- 10
+1
GMT
+1
+1
+2
03 00
0230
02 00
1 3 00
1 2 00
1 3 00
1 2 00
1 3 00
14 00
-3
GMT
-1
-4
-4
+ 10
-6
GMT
GM7
DaJilglll Saving Time
GMT
-(lint and last day)
+2
Mar. 31-llep. 28, 1991
+2
Mar. 31-llep. 28, 1991
�.,::c':.f:'c"::/:. �lies remain on Standard Time au year.
f:::
#,.��"f'=�
• - Excepl Broken Hill. N.S. W.; follows Soulh Australia limes.
• - Amapa, Amazonas. Para, Rondenia, Roraime, Stales of BrazH do not observe OST.
E - Eslimsled Dale Based On Previous Year.
Slancta!d Timo
Country
Lesotho
liberia
Ubyan Arab Jamahiriya
Luxem�
Madagascar
Malawi
�=:
Mot
Mana
Martinique
MMaurillus
Mexico
rtf:,.Clliklmia Sur Blld N. PscUit: Coast
+2
-4
Mar. 31-Sop. 28. 1991
Apr. 7--()ct. 26, 1991
+2
Mar. 31-Sop. 28. 1991
-3
Apr. 7--()ct. 28, 1991
+3
Mar. 31-Sep. 28, 1991
- 2 1/2 Apr. 7--()ct, 28. 1991
-3
Apr. 7--()ct. 28. 1991
-4
Apr. 7--()ct. 26. 1991
-s
Apr. 7-0ct. 26. 1991
-6
Apr. 7 -0ct. 28. 1 99 1
-7
Apr. 7--()ct. 26. 1991
-7
Apr. 7-0<1. 26. 1991
Bsjii
�J::k, Psr81/61}
ffBtss�
of OunJngD. CoahuiiB. Msro Leon.
J:::
Mexi<o.
::r' Slates of Campeche,
OuinlanB Roo and Yucatan
Cities of Ensensda. MexiCBII, SSn Felipe,
rljuana
=
Island
Mongolla (Ulan Salor)
-
Myamnar
Namlbia
Nauru, Republic Of
Napa!
Netherlands
Netherlands Anliles �nd. Soulhem St. Maarten)
New Caledonia
New Zealand (El«::uding Ch.- ls.)
Chattrem/s.
Nicaragua
Niger
Nigeria
Niue Island
Notfolll lsland
Notway
Oman
Pac!fic lslands Trust Territory
� Is. (Excluding Poi/ape Is., KIIRill,
=� - /s. (ExchltRng
Kwrjs/Bin/
=lsiBIId (Exc/uding Gul}lm
l'lllau lsiBIId
Ponape lsiBIId
+9
Apr. 14-llep. 14, 1991
Pakistan
Panama
p=:..Gf.r (And
�uay
PNiippines,
Poland
-4
+3
+2
+2
2
�-��- �-�Js1
Mar. 31-sep. 28, 1991
Mar. 31-llep. 28. 1991
Rapublic Of
Po=.
Puerlo Rico
Qatar
Romania
w-
R
+3
May 1 -llep. 30, 1991
Saint i'Mirre and Saint Vmcent and the Grenadines
samoa
and PrinCipe Is.
-3
+1
Sop. 9, 1990E-Apr. 20, 1991E
Mar. 31-Sop. 28. 1991
+3
+2
Mar. 31-Sop. 28, 1991
Mar. 31-llep. 26. 1991
smg_.
SoiOmon lslands (Excluding &ouga;nolle Is.)
SOmal'm
South Africa
Spa
+2
Mar. 31-llep. 28. 1991
+2
+3
Mar. 31-llap. 28. 1991
Mar. 31-llep. 28. 1991
09 00
12 00
1 1 00
06 00
06 00
-2
+1
GMT
-3
Mar. 30-Sep. 28.
Mar. 30-Sop. 28.
Mar. 30-Sep. 28.
Mar. 30-llep. 28.
22 00
06 00
12 00
-s
Mar. 23-Sop. 11. 1991
1991
1991
1991
1991
in
Cllna>y ts.
c.n-. Batsaric and - tstands
Sri Lanka
St. Helena
Sudan
Suriname, Republic Of
Swaziland
Sweden
Swi1zarland
Syria
T&MM
Ta an;a
nz
Tha<1anc1
Togo
�� and Tobago
Tunisia
Turl<ey
O.,HgMSawlng Time
GMT
E- Perlad
(l!nl and laot ctay)
+2
Mar. 31-Sop. 28, 1991
,_
,_..
,_.
,...
GMT
Tlmo al
+2
GMT
+2
+1
+3
+2
+8
+S
GMT
+1
-4
GMT
+4
14 00
1 2 00
14 00
1 3 00
1 S OO
14 00
20 00
1 7 00
1 2 00
1 3 00
08 00
12 00
1 6 00
-7
os oo
,_
-8
-6
04 00
08 00
,...
-8
06 00
1 200 houJs
GMT
-8
04 00
-11
+1
+6
GMT
+2
+ 6 112
+2
+ 12
+ S 314
+1
-4
+11
+ 12
+ 12 3/4
-6
+1
+1
-11
+ 1 1 112
+1
+4
01 00
1 3 00
20 00
1 2 00
1 4 00
1 6 30
1 4 00
23 S9
1 7 4S
1 3 00
06 00
23 00
23 S9
00 4S
06 00
1 3 00
13 00
01 00
23 30
13 00
1 6 00
+11
22 00
+12
23 S9
-12
+10
+9
+11
+S
00 01
22 00
21 00
23 00
1 7 00
07 00
22 00
-s
+10
-4
-s
+8
+1
,.,
,_
,...,
+2
-7
+2
Mar. 31-Sop. 28, 1991
Apr. 7--()ct. 26, 1991
Mar. 30E-Sop. 29, 1991 E
,...,
,_
,...,
,...
,...
+2
Mar. 31 -llep. 28. 1991
,..,
,...
,_,
+2
Mar. 31 -llep. 28, 1991
,_,..
,...
,...
,....
r-,
06 00
07 00
20 00
,....
t-o
13 00
+2
Mar. 31-Sop. 26, 1991
-1
GMT
GMT
-4
+3
+4
+2
+2
--3
-4
-11
+1
GMT
+3
GMT
+4
GMT
+8
+11
+3
+2
1 1 00
1 2 00
1 2 00
06 00
1S OO
16 00
14 00
14 00
09 00
06 00
01 00
13 00
12 00
1 S OO
12 00
16 00
12 00
20 00
23 00
1S OO
1 4 00
GMT
+1
+1
Mar. 31-Sop. 28, 1991
Mar. 31-Sop. 26. 1991
Mar. 31-sej>. 28. 1991
GMT
+1
+1
+ S 1/2
GMT
+2
-3
+2
+1
+1
+2
+6
+3
+7
GMT
+ 13
-4
+1
+2
1 2 00
1 3 00
1 3 00
1 7 30
1 2 00
14 00
09 00
14 00
13 00
13 00
14 00
20 00
1S OO
19 00
1 2 00
01 00
06 00
13 00
1 4 00
+1
+2
+2
Mar. 31 -Sop. 28, 1991
Mar. 31 -llep. 28, 1991
Mar. 31-Sop. 28. 1991
+2
+2
+3
Mar. 31-Sep. 28, 1991
Mar. 31-Sop. 28, 1991
Apr. 1-liep. 29, 1991
+3
Mar. 31-5eo. 28. 1991
+3
Mar. 31-Sop. 28. 1991
-2
Apr. 7-0ct. 26, 1991
,_
�
,_.
,_.
,....
,_.,
,..,
,..,
('*A.
,_,
,...,
,...,
�
,...
,_
,....
,..,
,...,
,-.
eachofcountry
fixed by law and based on the lheorelicaf division of the
each
t5' longitude with certain deviations due to frontiers or local
StsndJJtd Time: Legal time for
world's surface into 24 zones
saving rune (DST): Modified (advanced} leg;Ji tima adopted by r:eriJJin COIHitries for part of year,
�t
especiaHy during local summer.
Country
Standard Time
Hours
Time al
12DD hrs
GMT
1 2 00
09 00
07 00
06 00
20 00
1 3 00
1 2 00
1 7 30
!rom
GMT
Guinea-Bissau
�1ana
Honc!uras
Hong Kong
=
India (incl. Andaman Is.)
Indonesia
C..tral
East
West (Jakarla}
Iran (The Islamic Rep. of)
Iraq
Ireland. Rep. 01
Israel
llaly
Jamaica
��:
ton ls.
Jordan
Kampuchea, Dem. (see CambOCiia)
='J:Ii. Re� Islands
Canton.
Christmas Is.
Korea. Democratic People's Rep. 01
Korea, RepubliC 01
K at
Laos
Lebanon
Leewarel lstancls
uw i
Anligua. Dominica. Mcnlsetrat. SI.
Clvistopher. 51. Kills. Nevi$, Anguilla
··3
-5
-6
+8
+1
GMT
+ 5 1/2
f8
+9
+7
3 1/2
+3
i
GMT
+2
+ 1
..5
'9
- 10
+2
GMT
20 00
21 00
1 9 00
1 5 30
15 00
1 2 00
1 4 00
1 3 00
07 00
21 00
02 00
1 4 00
+3
+ 12
· 11
.. 10
+9
+9
+3
+7
+2
1 5 00
23 59
01 00
02 00
21 00
21 00
1 5 00
19 00
14 00
-4
08 00
Dayfigh! SaWigTane
-
Hours
GMT
f::
t:/,Z:,:.a:c:::.:::.n::.'!fb.
:: =�ties remain on Slmldard Tnne aN year.
* - Except Broken HiH, N.S.W.; follows SOuth Australia Nmes.
• - Arnapa, Amazonas. Para, RondJJnia, Roraima, Ststes of BrazH do not observe DST.
E - Estimated Date Based On Previous Year.
Country
Slanclani Tlme
Effac:tlve Pellocl
(!bat and laat .,,
Caicos t5.
-4
Apt. 7-0ct.. 26, 1991
Turks and
Tuvalu
Ug -
+2
Mar. 31-Sep. 28. 1991
UnlledKl�
u��'::'���.\::,1""" ·
Dubai.
U.S.A.-Eislem Time.:>
C6nlni/ T..,.
Mountllin rtiJJ«!!
Pllcllii: Trne
Alllslra feK<BP/ Aitiulilln IslandS W. 169.30
Dsg.J
_ ,_ 169.30/ong. w. to Wsstem
+1
+3
+2
Mar. 31-oct. 28, 1991
+3
Apt. 19-5ep. 26, 1991
�: �==: � :;;:
�
Hawaiiall fslandS
time
App�oxR>M� ";7;
'}
to 172' 30' .
Vanuaw
·
I hr.
flom so· 30' E.
Venezuela
VIetnam, Socialist Rep. ol
Wake Is.
Wa!Us and Futuna Is.
Windward bland$
Gmnada. SI. LIICIB
+3
May 1-0ct. 15, 1991
IlVia
Yemen, Repu�ic o1
��
Hauf.Zllire, ShsiJa
Kinshasa Mbandatul
Kssai, Kivu,
Zambia
Zimbabwe
Darfight Saving Time
-GMT
Hours
GMT
Time at
1200 homs
GMT
Hours
-5
+ 12
+3
+4
07 00
23 59
1 5 00
1 6 00
-4
Apt. 7-0ct. 26, 1991
GMT
-5
-6
-7
-8
-9
1 2 00
07 00
06 00
05 00
04 00
03 00
+1
-4
-5
-8
-7
-8
Mar. 31-0ct. 26. 1991
Apt. 7-0ct. 26. 1991
Apt. 7-0ct. 26, 1991
Apt. 7-0ct. 26. 1991
Apt. 7-0ct.. 26, 1991
Apt. 7-0ct.. 26, 1991
- 10
02 00
-9
Apt. 7-0ct.. 26. 1991
-7
-10
-5
-4
-3
+2
+4
+ 12
+11
-4
+7
+12
+ 12
05 00
02 00
07 00
08 00
09 00
1 5 00
1 8 00
23 59
23 00
08 00
1 9 00
23 59
23 59
-4
+3
+1
08 00
1 5 00
1 3 00
+1
+2
+2
+2
1 3 00
1 4 00
1 4 00
14 00
(lirll and .... ...,,
-
+3
Mar. 31
+12
5ep. 29, 1991-Mar. 28, 1992
Sep. 28. 1991
+2
Mar. 31-sep. 28, 1991
.......
=:s
nr
....
=:s
..
.... .
Q
=:s
I»
-
�
.... .
e
ft)
(")
1:1"
I»
....
-
Index
A
access control utilities
loqin 20
newqrp 2 1
pas swd 20
su 20
access fields 22
accessing resources 20
accounting file 25 - 27
clearing 27
compressing 27
creating 25
discarding information 25
format 25
interpreting 25
typical example 26
accounts
adding 20
creating without password,
home directory, shell, or group 21
deleting 2 1
restriction o n who can add t o system 20
setting up 1 9 - 27
adapter cards 32
see also serial adapters
altsys init file 9
see also system initialization file
Administrator's Guide
archive utilities
cpio 7 1
pax 7 1
tar 7 1
vol 7 1
archives 7 1
compressing data 74
examples 75 - 76
see also backups
8
backup formats 70 - 7 1
archive backups 7 1
filesystem backups 72
backup media 72 - 73
fixed disks 74
floppies 72
removable disks 74
tape 73
backup utilities
see archive utilities
backups
compressing data 74
when to back up 70
see also archives
Index
207
I ndex
baud rate
specifying 36
bitmap blocks 88
blocks
bad block, recovering from
middle of file 97
examining 97
extent blocks 9 1
booting
boot server, selecting 5
diskless workstation 5, 82
from floppy 4
from hard disk 4 - 7, 10
from hard disk, processes required
initial boot 8
netboot configuration file 6
over a network 5 - 7
system doesn't boot 97 - 1 00
without creating a system
initialization file 7
bugs, reporting 1 06
build file, constructing 78 - 83
buildqnx utility 78
c
cancelling print jobs 47
chkfsys utility 93
Rambo mode 96
using 94
using in a live system 95
when to run 95
clock, starting 1 3
communication sessions 34
compressed data
recovering 74
compression utilities 74
conferencing system 107
see QUICS
208
Index
80
connecting serial devices 36
see also serial devices
console driver
starting 1 0, 30
consoles, starting login 1 1
coordinated universal time
see time zones, UTC
cpio utility 7 1
cron server
selecting a machine as 1 2
current process
changing group ID of 2 1
custom operating system images
see images
D
data
bits 35
compression 74
slowing down transmission of 35
date
establishing 14
see also time zones
daylight savings time
changing to or from 201 - 202
time zone, defining 202
see also time zones
deleted files, recovering 96
dequeues 48
file where defined 50
serving the same queue 49
see also print spooling
device drivers
Dev . con 30
Dev . par 30
Dev . ser 30 - 3 1
starting 30
see also system initialization file
QNX Operating System
I ndex
Device Manager
starting 1 0, 30
devices
see parallel devices
see also serial devices
dinit utility 93
directories
access fields 22
directory entries 89
links 90
lost+found directory 102
recovering if lost 101 - 1 03
removing without returning
used blocks 94
root directory 88
structure 89
structure, checking 93
disk images 80
see also images
disk partitions 87
see also partitions
diskless workstations
booting over the network 82
disks
backing up to or restoring from 72, 74
bad blocks, recovering 97
browsing 94
maintenance utilities 93
patching minor problems 94
recovering 85 - 1 03
recovery procedures 94 - 96
structure 86 - 92
DOS
attribute bits 65
disks, accessing via QNX programs
and utilities 6 1
filesystems, setting up 61 - 67
invalid filename characters 65
invalid filenames 65
partition types 64
Administrator's Guide
text files, structure of 64
Dosfsys filesystem manager 6 1
actions performed when started 62
binary files 64
DOS to QNX permission-bit translations 66
DOS version support 63
DOS/QNX permission mapping 65
error codes 66
file ownership 66
invocation modes 6 1
name adoption 62
QNX to DOS attribute-bit translations 66
QNX to DOS character and name mapping 65
drivers
see device drivers
DSR 34
DTR lines 34
E
electronic mail
sending to Quantum employees
or other users 1 06
see also QUICS
embedded images 83
emu87 utility 1 1
environment variables, defining 1 2
I etc/ acclog file
see accounting file
executable files
executing with privileges of owner or group
extent blocks 91
22
F
fdisk utility 93
file maintenance utilities
chkfsys 93 - 95
93
Index
209
I ndex
dinit 93
fdi sk 93
spatch 94, 97, 102
zap 94, 96
file permissions 22
filenames
DOS 65
longer than 16 characters 90
files
access fields 22
accounting file 25 - 27
blocks, examining 97
deleted 96
DOS text files 64
executable files 22
extent blocks 9 1
links 90
maintenance utilities 93
multiple extents 91
permissions 22
recovering 85 - 103
recovering if deleted 96
recovering if lost 101 - 1 03
removing without returning used blocks 94
structure 92
filesystems
backups 72
how data is stored on disk 86
restoring 94
setting up second system 57 - 67
see also DOS filesystems; partitions
fixed disks, backing up to or restoring from 74
see also backups
floating point emulator 1 1
floppies, backing up to or restoring from 72
see also backups
floppy driver, starting 1 2
free software 1 06
freeze utility 75
21 0
Index
G
global name server
selecting a machine as
greenwich mean time
see time zones, UTC
group IDs 2 1
12
H
hard disk booting
see booting
hard disks
see disks
hardware adapters 3 1
hardware interrupt generated by each UART
31
I
images
build file, constructing 78 - 83
buildqnx utility 78
creating through buildqnx or
the Makefile 78
disk images 80
embedded images 83
heap size, setting 79
image file location 78
local memory, allocating 79
network images 82
processes required for hard disk booting
processes, selecting 79
installing
on a hard disk 4
interrupt generated by each UART 3 1
80
QNX Operating System
I ndex
high-speed, error-correcting 36
standard 37
terminal type, querying user for 42
L
licensing 1 5 - 17
application licensing 16
expanding your license 1 7
license utility 17
operating system licensing 15
links 90
loader block 87
login utility 20
login, automated 40
login, starting on consoles 1 1
lost+found directory 102
lp utility 47
lpc utility 48
lpq utility 47
lprm utility 47
lpsrvr utility 48 - 55
name server
see global name server
network
sharing devices 46
network booting 5 - 7
netboot configuration file
network card
removing, effects of 10
network images 82
node numbers
changing, effects of 10
M
0
mail
see QUICS, email
Makefile
examples 80
location 80
macros for changing defaults 80
melt utility 75
modem utility 40
modems
configuring 40
connecting 36 - 37
detecting incoming call 35
dial-up access 40
establishing connection with
another modem 35
flow control between terminals
and modems 35
hardware handshaking 37
operating system images
see images
output buffers, specifying
Administrator's Guide
N
6
31
p
parallel devices 30
multiple parallel ports 30
output buffers, specifying 3 1
single parallel port 30
parallel driver
starting 1 1 , 30
parity bits 35
partitioning pathname space 58 - 60
partitions
bitmap blocks 88
directory structure, checking 93
Index
21 1
I ndex
key components 87
loader block 87
multiple partitions on single drive 59
root block 87
root directory 88
pas swd utility 20
password database 20
access to files 23
default password files 25
I etc/ qroup file 24
I etc/pas swd file 23
I etc/ shadow file 24
list of files 23
users modifying their own entry 22
passwords
changing 20
characters required in 20
entering 20
patching minor disk problems 94
pathname space
partitioning 58 - 60
pax utility 1 2, 7 1
permissions 22
phoning Quantum 1 08
print jobs
cancelling 47
querying 47
submitting 47
print queues, controlling 48
print spooling 46 - 47
configuration file 50
configuration file (example) 52, 54
configuring spooler 48 - 55
flexibility 52
flow of data within spooler 49
lp utility 47
lpc utility 48
lpq utility 47
lprm utility 47
lpsrvr utility 48 - 55
21 2
Index
server 46
printers
serial printers, connecting 37
see also serial devices
privileges
giving to another user 20
non-privileged users performing
privileged functions 22
processes
group ID, changing 2 1
Q
Quantum update system
see QUICS
Quantum, phoning
see QUICS
querying print jobs 47
queues 48
feeding a single dequeue 49, 52
file where defined 50
see also print spooling
QUICS
conferencing system 107
email 1 06
free software 1 06
hardware 1 07
logging in 1 09
phoning Quantum 108
refresh policy 106
reporting bugs 1 06
using 1 10
R
Rambo mode (chkfsys)
raw disks
browsing 94
95
QNX Operating System
I ndex
realtime clock
serial devices
10
getting time from
connecting
see also time zones
3 1 - 43
36
31
hardware adapters
recovering
96
85 - 103
85 - 103
37
deleted files
printers, connecting
disks
RS-232 serial protocol
files
1 0 1 - 1 03
102
lost+found directory
see also file maintenance utilities
refresh policy
106
1 1 , 30
starting
74
see also disks
data bits
20
35
35
35
parity bits
21
controlling access to
distributing throughout LAN
restricting access to a group
87
stop bits
46
22
setgid
35
22
22
46
shared resources
sinit utility
88
RS-232
19 - 27
setting up user accounts
setuid
root directory
36
baud rate, specifying
configuring
resources
contents
8
requirements for running
33
cabling assignments
flow control between terminal
and modem
serial protocol
session control
signal names
34
34
33
software, free
106
1 06
94, 97, 1 02
spool configuration file
see print spooling
standard time
serial devices
34
see also
su utility
s
time zones
standard time zone, defming
stop bits
see also
20 - 24
47
single-port
print spooling
system initialization file
serial adapters
alt sysinit
32
32
typical installation
Administrator's Guide
clock, starting
8 - 12
9
base-level services
32
202
35
20
submitting print jobs
multi-port
8
software refresh policy
spatch utility
35
transmitted characters
see also
terminals
serial ports
backing up to or restoring from
root block
35
42
see also modems; RS-232;
troubleshooting
serial driver
removable disks
accessing
33
serial ports, configuring
lost file and directories
security
32
multi-port serial adapters
10
13
console driver, starting
10
Index
21 3
I ndex
cron server, selecting machine as 1 2
Device Manager, starting 10
DOS filesystem, starting 12
environment variables, defining 12
floating point emulator 1 1
floppy driver, starting 1 2
global name server,
selecting machine as 1 2
last command i n file 1 1
login, starting on consoles 1 1
machines booting from hard disk 1 0
optional services 1 2
parallel driver, starting 1 1
realtime clock, getting time from 1 0
serial driver, starting 1 1
single file affecting
group of machines 1 1
sysinit 10
sysinit . node 9
time zone, defining 1 0
querying for type 42
terminfo database 41
see also serial devices
terminfo database 4 1
time zones 1 3 - 14
coordinated universal time (UTC) 1 3
date and time, establishing 14
daylight savings time,
changing to or from 20 1 - 202
daylight savings zone, defming 202
defining 1 0
establishing 13
not setting, effects of 13
standard zone, defining 202
time, establishing 1 4
TZ environment variable 20 1 - 202
UTC 1 3
tinit utility 4 1
transmission of data, slowing down 35
troubleshooting serial device problems 42
TZ environment variable 20 1
contents of 202
T
tape
backing up to or restoring from 73
tape utility 73
tar utility 7 1
termdef utility 42
terminals
automated login 40
capabilities 41
configuring for users 39
connecting 39
defining type 42
ending communication 34
flow control between modems
and terminals 35
hardwired terminals 42
launching custom applications 40
21 4
Index
u
UARTs 3 1
hardware interrupts generated by 3 1
update system
see QVICS
user accounts
see accounts
user IDs 2 1
usemame
entering 20
UTC
see time zones
utilities, fmding information about users 24
QNX Operating System
,.,
r-'1
'---'
filii\
I ndex
'--
�"""�
�
�
�
ilili'l
v
vol utility
1 2, 7 1
�
fliliil
fiiiS\
IR\
�
z
z ap utility
94 - 96
�
'----
�
'- �
�
(aii)
�"""�
fiRi!\
�
�
lli!!il\
�
lli!!il\
'--
tS"'
,...,
(aii)
�
f'illill
�
�
�
�
(ii!iii>,
fiiiS\
fiiiS\
fiiiS\
tili>\
(a\
r-1
'--
fiOi'l
fiOi'l
fiOi'l
!"""'�
l'i'i)
Administrator's Guide
Index
21 5