1
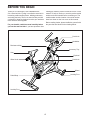
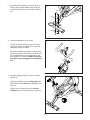
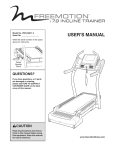
Model No. FMEX88910.0
Serial No.
Write the serial number in the space
above for reference.
USER’S MANUAL
Serial Number
Decal
QUESTIONS?
If you have questions, or if parts
are damaged or missing, please
see HOW TO CONTACT
CUSTOMER CARE on the back
cover of this manual.
CAUTION
Read all precautions and instructions in this manual before using
this equipment. Keep this manual
for future reference.
www.freemotionfitness.com
TABLE OF CONTENTS
WARNING DECAL PLACEMENT . . . . . . . . . . . . . . . . . . . . . . . . . . . . . . . . . . . . . . . . . . . . . . . . . . . . . . . . . . . . . . .2
IMPORTANT PRECAUTIONS. . . . . . . . . . . . . . . . . . . . . . . . . . . . . . . . . . . . . . . . . . . . . . . . . . . . . . . . . . . . . . . . . . 3
BEFORE YOU BEGIN. . . . . . . . . . . . . . . . . . . . . . . . . . . . . . . . . . . . . . . . . . . . . . . . . . . . . . . . . . . . . . . . . . . . . . . .4
ASSEMBLY . . . . . . . . . . . . . . . . . . . . . . . . . . . . . . . . . . . . . . . . . . . . . . . . . . . . . . . . . . . . . . . . . . . . . . . . . . . . . . . .5
HOW TO USE THE EXERCISE BIKE . . . . . . . . . . . . . . . . . . . . . . . . . . . . . . . . . . . . . . . . . . . . . . . . . . . . . . . . . . . .8
PART LIST. . . . . . . . . . . . . . . . . . . . . . . . . . . . . . . . . . . . . . . . . . . . . . . . . . . . . . . . . . . . . . . . . . . . . . . . . . . . . . . .10
EXPLODED DRAWING. . . . . . . . . . . . . . . . . . . . . . . . . . . . . . . . . . . . . . . . . . . . . . . . . . . . . . . . . . . . . . . . . . . . . . 11
HOW TO CONTACT CUSTOMER CARE . . . . . . . . . . . . . . . . . . . . . . . . . . . . . . . . . . . . . . . . . . . . . . . . Back Cover
WARNING DECAL PLACEMENT
This drawing shows the location(s) of
the warning decal(s). If a decal is missing or illegible, see the back cover
of this manual and request a free
replacement decal. Apply the decal
in the location shown. Warning decals
in other languages are included. Apply
the warning decals on top of the English
warnings in the indicated location(s) if
desired. Note: The decal(s) may not be
shown at actual size.
FREEMOTION is a registered trademark of ICON IP, Inc.
2
310696
IMPORTANT PRECAUTIONS
WARNING:
To reduce the risk of serious injury, read all important precautions and
instructions in this manual and all warnings on your exercise bike before using your exercise bike.
FreeMotion Fitness assumes no responsibility for personal injury or property damage sustained by
or through the use of this product.
1. Before beginning any exercise program,
consult your physician. This is especially
important for persons over age 35 or persons with pre-existing health problems.
9. Wear appropriate clothes while exercising;
do not wear loose clothes that could become
caught on the exercise bike. Always wear
athletic shoes for foot protection.
2. U
se the exercise bike only as described in
this manual.
10.The exercise bike should not be used by
persons weighing more than 350 lbs.
(159 kg).
3. It is the responsibility of the owner to ensure
that all users of the exercise bike are adequately informed of all precautions.
11.Always keep your back straight while using
the exercise bike; do not arch your back.
4. The exercise bike is intended for use in a
supervised environment only.
12.The exercise bike does not have a freewheel;
the pedals will continue to move until the
flywheel stops. Reduce your pedaling speed
in a controlled way.
5. Keep the exercise bike indoors, away from
moisture and dust. Do not put the exercise
bike in a garage or covered patio, or near
water.
13.To stop the flywheel quickly, press the resistance knob downward.
6. Place the exercise bike on a level surface,
with a mat beneath it to protect the floor or
carpet. Make sure that there is at least 2 ft.
(0.6 m) of clearance around the exercise bike.
14.When the exercise bike is not in use, tighten
the resistance knob completely to prevent
the flywheel from moving.
15.Over exercising may result in serious injury
or death. If you feel faint or if you experience
pain while exercising, stop immediately and
cool down.
7. Inspect and properly tighten all parts regularly. Replace any worn parts immediately.
8. Keep children under age 12 and pets away
from the exercise bike at all times.
3
BEFORE YOU BEGIN
Thank you for selecting the new FREEMOTION®
S11.6 exercise bike. Cycling is an effective exercise for
increasing cardiovascular fitness, building endurance,
and toning the body. The S11.6 exercise bike provides
a selection of features designed to make your workouts
more effective and enjoyable.
reading this manual, please see the back cover of this
manual. To help us assist you, note the product model
number and serial number before contacting us. The
model number and the location of the serial number
decal are shown on the front cover of this manual.
Before reading further, please familiarize yourself with
the parts that are labeled in the drawing below.
For your benefit, read this manual carefully before
you use the exercise bike. If you have questions after
Post Knob
Handlebar
Resistance Knob
Accessory Tray
Seat
Flywheel
Slider Knob
Post Knob
Wheel
Leveling Foot
Pedal/Strap
Leveling Foot
4
ASSEMBLY
• Assembly requires two persons.
• Assembly requires the following tools (not
included):
• Place all parts in a cleared area and remove
the packing materials. Do not dispose of
the packing materials until you complete all
assembly steps.
one adjustable wrench
one 6 mm hex key
Assembly may be easier if you have a socket set
or a set of ratchet wrenches. To avoid damaging
parts, do not use power tools.
• If a part is not in the hardware kit, check to see
if it has been preassembled. To avoid damaging parts, do not use power tools for assembly.
1. Attach the Front Stabilizer (8) to the Frame (1)
with two M10 x 50mm Button Patch Bolts (73),
four M10 Washers (67), and two M10 Locknuts
(74).
1
73
67
1
8
67
74
5
2. Attach the Rear Stabilizer (7) to the Frame (1)
with two M10 x 50mm Button Patch Bolts (73),
four M10 Washers (67), and two M10 Locknuts
(74).
2
73
67
1
7
67
74
3. Orient the Handlebar (3) as shown.
Loosen the Post Knob (32) on the front of the
Frame (1) and pull it outward. Then, insert the
Handlebar (3) into the Frame.
Move the Handlebar (3) upward or downward to
the desired position, release the Post Knob (32)
into an adjustment hole in the Handlebar, and
then tighten the Post Knob. Make sure that the
Post Knob is firmly engaged in an adjustment
hole.
3
3
4. Identify the Right Pedal (15), which is marked
with an “R.”
Using an adjustable wrench, firmly tighten the
Right Pedal (15) clockwise into the Right Crank
Arm (14).
Tighten the Left Pedal (not shown) counterclockwise into the Left Crank Arm (not shown).
Holes
1
32
4
14
6
15
5. Place the exercise bike in the location where
it will be used. Tip: Place a mat beneath the
exercise bike to protect the floor.
Make sure that all four Leveling Feet (29) are in
contact with the floor.
If the Leveling Feet (29) are not in contact with
the floor, loosen or tighten the Leveling Feet on
the Rear and Front Stabilizers (7, 8) until all four
Leveling Feet contact the floor.
5
8
7
29
29
70%
29
6. Loosen the Resistance Knob (34) until the Brake
Pad (13) is not in contact with the Flywheel (9).
Spray the Brake Pad (13) thoroughly with a clear
silicone lubricant (not included).
Note: This action will extend the life of the Brake
Pad (13) and ensure smooth contact with the
Flywheel (9).
Then, tighten the Resistance Knob (34) until
the Brake Pad (13) is in firm contact with the
Flywheel (9). Leave the Brake Pad in this position for one hour or longer.
Note: This action will set the brake parts and
provide the spring with initial compression. This
action will also ensure that the clear silicone
lubricant penetrates the entire surface of the
Brake Pad (13).
6
34
13
9
7. Make sure that all parts are properly tightened before you use the exercise bike. Note: After assembly is
completed, some extra parts may be left over.
7
HOW TO USE THE EXERCISE BIKE
HOW TO ADJUST THE SEAT
HOW TO ADJUST THE SEAT POST
You can adjust the angle of the seat to the position that
is most comfortable. You can also slide your seat forward or backward to increase your comfort or to adjust
the distance to the handlebar.
For effective exercise, the seat should be at the proper
height. As you pedal, there should be a slight bend in
your knees when the pedals are in the lowest position.
To adjust the seat,
first loosen the hex
nuts on the seat
clamp a few turns.
Next, tilt the seat
upward or downward
or slide the seat forward or backward to
the desired position.
Then, retighten the
hex nuts.
To adjust the seat
post, first loosen the
post knob and pull it
outward. Then, move
Post
the seat post upward
Knob
or downward, release
the post knob into
Seat
an adjustment hole
Post
in the seat post, and
firmly tighten the post
knob. Make sure that the post knob is engaged in
an adjustment hole. IMPORTANT: Do not adjust the
seat post beyond the stop mark on the seat post.
Seat
Seat
Clamp
Hex
Nuts
HOW TO ADJUST THE SEAT CARRIAGE
To adjust the position
of the seat carriage,
loosen the slider
knob, move the seat
carriage forward
or backward to the
desired position, and
then firmly tighten the
slider knob.
HOW TO ADJUST THE HANDLEBAR POST
To adjust the handlebar post, first loosen
Post
the post knob and
Knob
pull it outward. Then,
move the handlebar post upward or
downward, release
the post knob into
Handlebar
an adjustment hole
Post
in the handlebar
post, and firmly
tighten the post knob.
Make sure that the post knob is engaged in an
adjustment hole. IMPORTANT: Do not adjust the
handlebar post beyond the stop mark on the
handlebar post.
Seat
Carriage
Slider
Knob
8
HOW TO USE THE PEDALS
HOW TO LEVEL THE EXERCISE BIKE
To use the toe cage side of the pedals (see the drawing on page 4), insert your shoes into the toe cages
and pull the ends of the toe straps. To adjust the toe
straps, press and hold the tabs on the buckles, adjust
the toe straps to the desired position, and then release
the tabs.
If the exercise bike rocks slightly on your floor during
use, turn one or both of the leveling feet on the front or
rear stabilizer (see the drawing on page 4) until the
rocking motion is eliminated.
To use the clip-in side of the pedals, you must wear
cycling shoes. To clip into the pedals, press the cleats
on your cycling shoes firmly into the slots in the pedals
until they snap into place. To unclip from the pedals,
twist your cycling shoes outward from the pedals.
Inspect and tighten all parts of the exercise bike regularly. Replace any worn parts immediately.
HOW TO ADJUST THE PEDALING RESISTANCE
For maximum performance and safety, replace the
pedals every year. To purchase pedals, see the back
cover of this manual.
To increase the resistance of the pedals,
turn the resistance
knob clockwise;
to decrease the
resistance, turn the
resistance knob
counterclockwise.
HOW TO MAINTAIN THE EXERCISE BIKE
To clean the exercise bike, use a damp cloth and a
small amount of mild detergent.
IMPORTANT: To avoid damage to the exercise bike
and to prevent injury to the user, use only manufacturer-supplied pedals. Other pedals may not be
designed for use in fitness clubs or indoor cycling
studios and may be dangerous.
Resistance
Knob
To stop the flywheel, push the resistance knob
downward. The flywheel should quickly come to a
complete stop.
IMPORTANT: When the exercise bike is not in use,
tighten the resistance knob completely.
9
PART LIST
Model No. FMEX88910.0 R0311A
Key No. Qty.
Description
Key No. Qty.
Description
1
2
3
4
5
6
7
8
9
10
11
12
13
14
15
16
17
18
19
20
21
22
23
24
25
26
27
28
29
30
31
32
33
34
35
36
37
38
39
40
Frame
Seat Post Selector
Handlebar
Seat Post
Seat Carriage
Seat
Rear Stabilizer
Front Stabilizer
Flywheel
Accessory Tray
Resistance Cover
Resistance Arm
Brake Pad
Right Crank Arm
Right Pedal
Left Crank Arm
Left Pedal
Bottom Bracket
Outer Shield
Chain
Inner Shield
Sensor Cover
Resistance Bushing
Resistance Spring
Front Frame Bushing
Rear Frame Bushing
Stabilizer Cap
Wheel
Leveling Foot
Pin Assembly
20mm x 25mm Washer
Post Knob
Slider Knob
Resistance Knob
Knob Cap
Wedge Cap
M8 x 30mm Washer
Adjustment Rod
Ring Cap
Tension Spring
41
42
43
44
45
46
47
48
49
50
51
52
53
54
55
56
57
58
59
60
61
62
63
64
65
66
67
68
69
70
71
72
73
74
75
76
77
78
*
Handlebar Cap
Upper Wedge
Lower Wedge
Sleeve
Post Shield
Cap Bushing
Medium E-clip
Sensor Magnet
Resistance Nut
M22 Sleeve Nut
M22 x 30mm Washer
Large E-clip
11mm x 20mm Washer
M4 x 40mm Socket Patch Bolt
M4 Nut
M4 Washer
M12 x 18mm Socket Patch Screw
Sensor Cover Screw
M4 x 7mm Socket Screw
M4 x 8mm Button Patch Screw
M8 x 51mm x M6 Shoulder Bolt
M6 x 18mm Hex Screw
M6 Locknut
M4 x 20mm Socket Screw
M5 x 30mm Set Screw
3/8" Nut
M10 Washer
M4 x 10mm Flat Head Patch Screw
M5 x 16mm Socket Patch Screw
M5 x 16mm Flat Head Patch Screw
M4 x 8mm Cap Screw
M4 x 20mm Flat Head Patch Screw
M10 x 50mm Button Patch Bolt
M10 Locknut
M4 x 10mm Cap Screw
M6 x 40mm Button Patch Bolt
M6 Washer
M6 Nut
User’s Manual
1
1
1
1
1
1
1
1
1
1
1
1
1
1
1
1
1
1
1
1
1
1
2
1
2
2
4
2
4
2
2
2
1
1
1
1
1
1
2
1
1
1
1
1
1
1
1
1
1
2
2
2
2
1
1
1
2
1
4
8
1
1
1
10
2
2
10
4
1
2
1
2
4
4
8
2
4
2
–
Note: Specifications are subject to change without notice. For information about ordering replacement parts, see
the back cover of this manual. *These parts are not illustrated.
10
EXPLODED DRAWING
Model No. FMEX88910.0 R0311A
60
41
39
69
35
33
38
36 47
60
37
60
9
44
46
42
45
68
68
71
10
64
39
70
4
17
31
31
26
30
67
73
12
67
27
15
77
76
67
59
22
78
64
77
28
77
75
29
20
28
8
27
75
58
77
75
75
13
21
57
67
74
11
75
29
23
54
59
65
14
51
50
49
24
56
48
1
75
74 29
53
40
55
32
75
66
52
61
73
29
32
64
72
16
75
67
11
62
51
7
67
52
50
25
66
72
30
64
63
2
27
26
64
43
18
25
5
70 34
57
3
6
27
76
64
19
64
59
HOW TO CONTACT CUSTOMER CARE
If you have questions after reading this manual, or if parts are damaged or missing, please contact Customer
Care at the phone numbers or addresses listed below. Please note the model number, serial number, and
name of the product (see the front cover of this manual) before contacting Customer Care. If you are
ordering replacement parts, please also note the key number and description of each part (see the PART
LIST and the EXPLODED DRAWING near the end of this manual).
In the United States and Canada
Call: 1-800-201-2109, Mon.–Fri. 8 a.m.–5 p.m. MT
Write:
FreeMotion Fitness
1500 South 1000 West
Logan, UT 84321-9813
United States
Outside the United States and Canada
Call: 001-435-786-3521
Email: [email protected]
Part No. 311923 R0311A
Printed in Taiwan © 2011 ICON IP, Inc.