1
INTREPID User Manual
Library | Help | Top
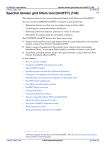
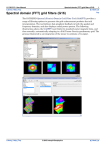
INTREPID batch processing (G19)
1
| Back |
INTREPID batch processing (G19)
Top
The guided tours up to now have concentrated on the interactive use of INTREPID.
INTREPID also provides powerful batch operation through the use of task
specification files. This is referred to as job files for our historic “PARMS” block
structured language.
Protobuf
With the release of V5.0 INTREPID, a complete new world of batch processing
technology is also being co-released, with guarenteed duplication of functionality for
all tools. Our test system in fact contains many exactly duplicate jobs, this time
expressed in the new GOOGLE protobuf syntax., to verify that the same process can
be reproduced using the new syntax. So why change?
Well, firstly, INTREPID gets to publish the formal task specification language to all
our users, so it is comepletely unambiguous. This is done in the API section of the
product distribution. These *.proto files completely encapulate the data model used to
specify each and every option, process and message. These files are guarenteed to be
exactly the same as those used to build the batch engine indise the delivered system.
Secondly, INTREPID is relieved of the job of writing parsers and validation code, to
tell you what you have or have not done wrong, in creating the task files. All thet is
required is a minimal amout of “glue” code to pick up the parameter settings, and
pass them into the tool. GOOGLE kindly have put all this technology in the public
domain, and what they have gifted is very close to our internal designs, so once it was
realised how close it is in spirit and intent to the internally developed system, only
much better, it took very little time time to decide to migrate to the GOOGLE
technology. typically, it took about one day to convert an existing tool over to also use
this technology, including the duplication of the test system.
And finally, the Eclipse framework also has support for protobufs, so the whole
business of buoilding and maintaining a formal specification of all the processes can
be streamlined, and then more easily understood by even relatively inexperienced
code developers. This also applies to any enthusists who wish to use the INTREPID
specifications that cover all of the Geomodeller and Intrepid tool set. If you have
Eclipse, you can get GOOGLE protobuf plug-in, and off you go. Python binding, Java
and C++ are all available.
Parms Blocks
Most INTREPID tools can save the current working parameters (Save Options) to a
job file. Most tools will also load a set of working parameters (Load Options) from an
existing job file. In addition, you can execute job files independently of the interactive
tool, using a special batch language command.
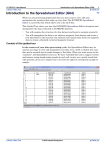
Job files are simple block structured ASCII text files that define the inputs, outputs,
parameters and operations required for INTREPID tasks. You can edit them using
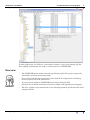
any text editor. The following illustration shows a typical job file which is being
viewed in the ProjectManager display panel. As the job/task files are simple ASCII
files, and text editor can be used to modify the syntax.
Library | Help | Top
© 2012 Intrepid Geophysics
| Back |
INTREPID User Manual
Library | Help | Top
INTREPID batch processing (G19)
2
| Back |
In this guided tour you will use a text editor to make a copy of an existing job file,
then rapidly perform the new task as a batch process in INTREPID.
Overview
Library | Help | Top
•
The INTREPID batch mode and task specification (job) file system can greatly
streamline your data processing work.
•
You can load job files into interactive tools instead of using menus and dialog
boxes to specify the task parameters.
•
You can execute tasks in INTREPID batch mode using job files.
•
Job files are in ASCII text format and use a simple task specification language.
•
The V5.0 syntax is also introduced via an example protobuf specfication file and a
sample task file.
© 2012 Intrepid Geophysics
| Back |
INTREPID User Manual
Library | Help | Top
INTREPID batch processing (G19)
3
| Back |
Creating job files
You can create a job file by
•
Using the Save Options command which is available in most INTREPID tools
•
Using a text editor to modify an existing job file.
•
Edit the History file to recover the ‘job’.
Duplicating and editing job files
In many cases you will wish to carry out similar but not identical tasks. In this case
you can duplicate a job file by
•
Making a copy and editing the copy using any text editor (e.g., Windows NotePad
or vi under UNIX).
•
Alternatively you can load an existing job file into an INTREPID interactive tool
and use the menus and dialog boxes to adjust only the parameters you wish to
change.
Using job files
You can use INTREPID’s powerful task specification (job) file system in two ways:
•
You can execute the task specified by one of these files in INTREPID batch mode.
You can do this using a command window.
•
You can load a job file into an INTREPID interactive tool instead of manually
specifying the files, parameters and operations.
Job files are particularly useful when you have repetitive ‘production line’ tasks. You
can resubmit or reload a job file repeatedly without needing to use menus and dialog
boxes.
You can further coordinate job files using operating system scripts, such as korn
shell.
Several INTREPID tools also know a lot about job and task files, being able to parse
macros embedded within the syntax, and executing repeat loops and paramter
subsititutions as required. the principal tool for syupporting this extra functionality
is the ProjectManager tool, or fmanager.exe. this tool is the backbone of the batch test
system, as it can decide which tool to execute, and also how to asses the correct
running, via comparing such things as the output statistics, against the previously
known good results. Extra tools with this built in intelligence include invbatch.exe
and gmbatch.exe
Library | Help | Top
© 2012 Intrepid Geophysics
| Back |
INTREPID User Manual
Library | Help | Top
INTREPID batch processing (G19)
4
| Back |
Context of this guided tour
In the context of your data processing cycle, this tour describes creating a
subsection of a grid dataset based on a subsectioning process performed on another
grid earlier in the cycle. The new subsection will cover the same geographic region
because it uses the same polygon dataset, but will use different input and output grid
specifications.
Location of sample data for Guided Tours
We provide two complete sets of sample datasets, one in INTREPID format and one
in Geosoft format. INTREPID works equally well with both formats. When you want
to open a dataset, navigate to the directory containing the required data format.
Where install_path is the path of your INTREPID installation, the project
directories for the Guided Tours sample data are
install_path\sample_data\guided_tours\intrepid_datasets and
install_path\sample_data\guided_tours\geosoft_datasets.
For example, if INTREPID is installed in
C:\Program Files\Intrepid\Intrepid4.5.nnn,
then you can find the INTREPID format sample data at
C:\Program Files\Intrepid\Intrepid4.5.nnn\sample_data\
guided_tours\intrepid_datasets
This is the default location for the sample data. If you have installed INTREPID
normally, the data resides there. If you have installed INTREPID elsewhere, the
exercises will work just as well. Just use the appropriate pathnames.
For more information about installing the sample data, see "Sample datasets—
installing, locating, naming" in INTREPID Guided Tours Introduction (G01)
For a more detailed description of INTREPID datasets, see Introduction to the
INTREPID database (G20). For even more detail, see INTREPID database, file and
data structures (R05).
Location of sample data for CookBooks
Right next to the Guided tours data, is a rich set of more exotic geophysics datasets
and grids, already prepared for the cookbook training sessions. A casual user might
also gain some trial and error insights into the capbilities of the software, just by
testing the Project Manger’s ability to preview and describe the attributes of each of
the cookbook datasets.
Should you complete this guided tour?
This guided tour is intended for intermediate level users. It describes an INTREPID
process that requires precise editing of a text file and understanding of the concept of
batch processing. If you are a beginner or wish only to have a brief overview of
INTREPID’s capabilities, you can omit this guided tour. Batch processing is,
however, a very important and timesaving INTREPID process. You should not omit it
from a thorough evaluation of INTREPID’s capabilities.
Library | Help | Top
© 2012 Intrepid Geophysics
| Back |
INTREPID User Manual
Library | Help | Top
INTREPID batch processing (G19)
5
| Back |
What you will do
Flowchart Summary
Inputs
Process
Outputs
Existing
"job" file
Edit "job" file in
a text editor
Edited "job"
file
Use Project
Manaer to run
the batch file
Grid dataset
View the grid
dataset
Library | Help | Top
© 2012 Intrepid Geophysics
| Back |
INTREPID User Manual
Library | Help | Top
INTREPID batch processing (G19)
6
| Back |
Steps to follow
In Managing INTREPID datasets (G06), you created a job file called
sub_anomL1.job. This job file would perform the subsectioning task described in
that guided tour.
In this guided tour you will edit the job file to modify the task, then have INTREPID
carry out the new task in its batch operation mode.
The existing job file uses the polygon dataset polyA to create a subsection of the grid
dataset smooth_grid. The new grid dataset created by this process is called
anomL_grid.
The new job file creates a subsection of the same size and location using the same
polygon dataset (polyA). It creates the subsection from the microlevelled grid dataset
mlevel_grid. The new grid dataset created by this process is called L_mlev_grid.
You will use sub_anomL.job (a solution file we have provided which is identical to
sub_anomL1.job).
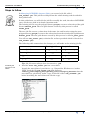
The following table summarises the changes you will make to the existing job file
Existing job file
New job file
Name of job file
sub_anomL.job
sub_anomLM1.job
Source grid dataset
smooth_grid
mlevel_grid
Polygon dataset
polyA
polyA
Target grid dataset
anomL_grid
L_mlev_grid1
Tip: Job file names always have the extension .job.
Load the job
file into a text
editor
Library | Help | Top
1
Load the file sub_anomL.job into a text editor.
Launch the text editor of your choice, e.g., Notepad for Windows or vi under
UNIX. Load the file sub_anomL.job from directory
install_path\sample_data\guided_tours\intrepid_datasets into the
text editor (or, preferably, make a copy of this file called sub_anomLM1.job
before launching the text editor and edit the copy).
© 2012 Intrepid Geophysics
| Back |
INTREPID User Manual
Library | Help | Top
Edit the job file
2
INTREPID batch processing (G19)
7
| Back |
Edit the file so that it inputs the grid mlevel_grid and produces the grid
L_mlev_grid1.
Modify the Grid = and Out = lines of the file so they read as shown in bold below.
#### Audit Stamp Audit Stamp V3.1d - 5/ 7/1996 12:22:39
Process Begin
Comments="Audit Stamp V3.1d- 5/ 7/1996"
Name = subsection
POLY = polyA
GRID = mlevel_grid
OUT = L_mlev_grid1
Parameters Begin
Box_Centroid_East = 0.00
...
Box_Projection = "TMAMG54"
Box_Datum = "AGD66"
Parameters End
Process End
If you load a job file that you have saved yourself it will contain relative paths for
the input/output dataset names. For example:
...
POLY = .\sample_data\guided_tours\intrepid_datasets
\polyA
GRID = .\sample_data\guided_tours\intrepid_datasets
\mlevel_grid
OUT = .\sample_data\guided_tours\intrepid_datasets
\L_mlev_grid1
Save the edited
job file
3
Save the edited job file as sub_anomLM1.job.
Launch a
command
prompt
4
Save the job file with the new name sub_anomLM1.job in directory
install_path\sample_data\guided_tours\intrepid_datasets\tutori
als. Note: Do not save the modifications back to the original file. Leave it in its
original state for the next person who uses this guided tour.
Launch a command prompt window.
Execute a job
file in batch
mode
5
Launch a command prompt. How you do this will depend on which operating
system you are using. In Windows, either choose Start > Programs > Accessories
> Command Prompt, or you can use Start > Run with the command cmd.exe.
Execute the job file.
At the command line prompt, type the command
fmanager -batch sub_anomLM1.job.
This command instructs INTREPID to run sub_anomLM1.job as a batch process.
Any INTREPID job file can be launched in this way.
INTREPID will execute the task in batch mode, creating the grid dataset
L_mlev_grid1.
Every batch process will write a report, which can be inspected either while the
process is running or after it has completed. This is the recommended way of
monitoring the progress of the batch job. If you are running UNIX/LINUX, the
report will go to the command window which is running the process. If you are
running Windows, the report will be written to a log file.
Library | Help | Top
© 2012 Intrepid Geophysics
| Back |
INTREPID User Manual
Library | Help | Top
6
INTREPID batch processing (G19)
8
| Back |
Inspect the log file created by the batch process (optional).
The actual name and location of the log file will vary depending upon which
version of INTREPID you are using. Versions from 4.5 onwards create
WINXX.user.log, where user is the user name of the person logged on, for
example WIN32.chris.log. This file is created in the install_path/temp
directory.
When INTREPID performs batch mode tasks, it does not display the interactive
tool window or provide any other display of its progress until the task is complete,
other than the log report or file, which can be viewed at any time while the process
is executing.
View the
resulting
dataset
7
Use a thumbnail tool to view the dataset L_mlev_grid (a solution dataset
provided by us, which is identical to L_mlev_grid1.ers
Extra Examples
With V4.5, INTREPID is delivering many more examples of more powerful processes
involved with supporting tensors, vectors etc. The cookbook section of the
sample_data, has a new tensors\ProcessSurveyJOBS directory with many examples
of ways to do terrain corrections, grid, form the tensor, handle Falcon datsets etc etc.
Whilst all of this is not comprehensively documented in these tours, the syntax,
especially with V5.0, becomes a lot more self documenting. The example below is for a
spreadsheet editor job to create a new Tensor field in an Oasis database, using the
individual components.
Library | Help | Top
© 2012 Intrepid Geophysics
| Back |
INTREPID User Manual
Library | Help | Top
INTREPID batch processing (G19)
9
| Back |
ProtoBuf Examples
The Aurizonia tensor grid integration example from the Spectral Filter guided tour, is
repeated here as a V5.0 task file.
#
# Example task file - gfilt
#
# Perform integration on a FTG tensor grid to give best estimate
of Vertical component of gravity.
# nb Falcon requires different options
# Usage: fmanager -batch auriz_Tensor_integrate.task
#
IntrepidTask {
GridFilter { # FTG data set from Brazil
InputGridName:
"../datasets/
t_integrate.ers";
FilteredGridName:
"../datasets/t1_gz.ers";
Band:
0;
FftGridName:
"../datasets/t1_fft";
OutputFftGridName:
"../datasets/t1_fft_out";
#WindowedGridName:
"../datasets/t1_wind";
#ExpandedGridName:
"../datasets/t1_exp";
DetrendDegree:
0;
# silly to
detrend so dont.
Library | Help | Top
© 2012 Intrepid Geophysics
| Back |
INTREPID User Manual
Library | Help | Top
INTREPID batch processing (G19)
10
| Back |
InputGridCoordSysType: END;
# Bell data, so left
hand coords
OutputPrecision:
IEEE4ByteReal;
FillType:
ARTHUR;
RolloffType:
Cosine_RollOff;
WindowType:
NO_Window;
ReApplyTrendAfterReverseFft: false;
ApplyMaskAfterReverseFft: true;
CalculateTensorIntegration: true;
ScaleTensorIntegration: true;
# change the units
from Eotvos to mGals
InputTensorComponents: INT_XZ_YZ_ZZ;# here is the
specification of 3 inputs to produce the one output
}}
The formal specification of the syntax for this GridFilter tool,
is contained in a section of the “intrepid_tasks.proto” file.
This reproduced below to show the tie in, to what you see above.
//##
// primary tool for 2D FFT geophysical filtering
// this tool is designed to primarily work in a cartesian map space
// some support for working on spheroid is allowed, but you are advised to be very cautious
// you get to do this by using a grid that has geodetic projection
// TODO flesh out the full filter description langauge options
message GridFourierFiltering_INT {
// the input database and any relevant fields
required string InputGridName=1; // primary grid dataset to do work on!
optional grid_subset_INT Subset = 3; // use if you just want a subset of your gridded data
optional GetRolloffTypeList RolloffType
=4 [default = NO_RollOff];
optional GetWindowTypeList WindowType
=5 [default = NO_Window];
optional GetFillTypeList FillType
=6 [default = NO_Fill];
optional bool FillStopAtEdge
= 8 [default = false];
optional int32 DetrendDegree
= 7 [default = 1]; // detrend the input grid
optional ctm.SetReferenceMagneticField IGRF = 9;
optional int32 Number_CPUs
= 10 [ default = 1]; // here is the way to get more CPUs
into the act
optional string FilteredGridName
=11 [ default ="filtered_grid.ers"];
optional string FftGridName
=12 [ default = "fftGridName.ers"]; // input grid transformed to Fourier
coefficients
optional string OutputFftGridName
=13 [ default = "OutfftGridName.ers"]; // this is the Fourier coeffiecents
grid
optional string InputRadialPowerSpectrumReport=14 [ default = "inputRadial.rpt"];
optional string OutputRadialPowerSpectrumReport=15 [ default = "outputRadial.rpt"];
// options to keep intermediate grids
optional string WindowedGridName
=16 [ default = "windowGrid.ers"];
optional string ExpandedGridName
=17 [ default = "expandedGrid.ers"];
optional string AmplitudeGridName
=18 [ default = "amplitudeGrid.ers"];
optional string PhaseGridName
=19 [ default = "phaseGrid.ers"];
optional string CoefficientGridName
=20 [ default = "coefficientsGrid.ers"];
optional int32 Band
=21 [ default = 1]; // first band in a multi-band grid
optional ctm.GridDataTypes OutputPrecision=22 [ default = IEEE4ByteReal];
optional bool ReApplyTrendAfterReverseFft =23 [default = false]; // not an ordinary filter
optional bool ApplyMaskAfterReverseFft
=24 [default = true];
optional bool UseSymmetry
=25 [default = true]; // save memory by using symmetry in coefficients
optional diskUsageRules DiskUsageRule
=26 [default = AUTO];
repeated fdf.FilterDescription_FDF filter
=27;
// access to special filter descriptions
// list of special, compound filtering options, all mutually exclusive of each other
optional bool CalculateAnalyticSignal
= 30 [default = false];
optional bool CalculateTiltAngle
= 31 [default = false];
optional bool CalculateTotalHorizontalTiltAngle = 32 [default = false];
optional bool CalculateHorizontalDerivative = 33 [default = false];
optional double HorizontalDegree
= 34 [ default = 1.0];
optional bool CalculateTensorIntegration
= 35 [default = false];
optional bool CalculateFalconTransform
= 36 [default = false];
optional bool ScaleTensorIntegration
= 37 [default = false]; // units change from EOTVOS to mGal,
scale by 10000
// here is a leading edge compound option hilbert pair and the convolution theorem... Trouble!!
// avoid for now
optional bool LowPassFalconIntegration
= 38 [default = false]; // anti-alias filter for falcon before
integration
// stuff for tensor filtering
optional ctm.Tensor_Integration_Method InputTensorComponents = 40 [default = INT_XZ_YZ_ZZ];
optional ctm.Falcon_FFT_TRANSFORM_Option RequiredFalconTransform = 41 [default = FALCON_TZ];
optional ctm.Falcon_Reading_Options RequiredFalconQuery = 42 [default = FALCON_AVERAGE];
optional ctm.CoordinateReferenceSystem InputGridCoordSysType = 43 [default = END]; // for vector/tensor fields
optional string ToolName = 99 [default = "gfilt"];
}
Key points of this guided tour
•
Library | Help | Top
In a previous guided tour you saved a job file from an interactive session.
© 2012 Intrepid Geophysics
| Back |
INTREPID User Manual
Library | Help | Top
•
INTREPID batch processing (G19)
11
| Back |
In this guided tour you have used the INTREPID batch system to streamline a
repetitive task by
•
Editing the existing job file to specify a new task then
•
Executing the job in batch mode.
•
You could also reload the edited job file in an interactive session to execute the
new task or further reconfigure the job file.
•
You can run job files from the command line without launching the interactive
tool.
•
You can write and edit your own job files using any text editor.
•
You can manage repetitive ‘production line’ activities in conjunction with
operating system scripting languages.
Frequently Asked Questions
Q : Does the batch system support argument substitution?
A : Yes.The Euler Deconvolution reference manual shows such an example.
Q : Does the batch system support repeat loops?
A : Yes. The Euler Deconvolution reference manual shows such an example.
Q : Can I monitor the progress of the batch job while it is running?
A : Yes. INTREPID provides a log file report for Windows and a terminal report for
UNIX / LINUX. INTREPID produces an audit trail for ALL of its processes.
Q : How can I check on the syntax of my job file?
A : Try loading the job file into the tool and examine the log file for diagnostic
information. At V5.0, check the formal specification of the language directly in the
intrepid_tasks.proto file.
Library | Help | Top
© 2012 Intrepid Geophysics
| Back |