1
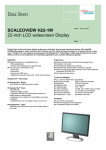
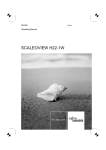
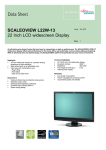
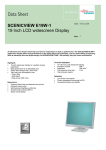
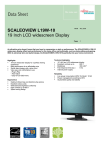
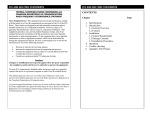
Downloaded from ManualMonitor.com Manuals
Note on mounting a swivel arm or a wall bracket
For instructions on how to mount the swivel arm or wall bracket, please see the
documentation for the swivel arm or wall bracket.
Only operating the monitor in the standard position (4:3, wide format, landscape mode) is
allowed.
Remarque concernant le montage du bras pivotant ou du support mural
Pour les instructions concernant le montage du bras pivotant ou du suppport mural,
veuillez vous reporter à la documentation du bras pivotant ou du support mural.
Lorsque le moniteur est en position standard (4:3, format large, mode paysage) est permis.
Hinweis zur Montage eines Schwenkarms oder einer Wandhalterung
Wie Sie Schwenkarm bzw. Wandhalterung montieren, entnehmen Sie bitte der
Dokumentation des Schwenkarmes bzw. der Wandhalterung.
Es ist nur erlaubt den Bildschirm in der Standardposition zu betreiben (4:3, Breitformat,
Landscape-Modus).
Nota sobre el montaje de un brazo basculante o un soporte de pared
Para las instrucciones sobre cómo montar el brazo basculante o el soporte de pared,
consulte la documentación correspondiente.
El monitor sólo se puede utilizar en la posición estándar (4:3, formato ancho, modo paisaje).
Nota sul montaggio dei bracci mobili o delle staffe a parete
Per istruzioni su come montare un braccio mobile o le staffe a parete si faccia riferimento
alla relativa documentazione.
È consentito l’uso del monitor solo nella posizione normale (4:3, formato wide, modalità
paesaggio).
Downloaded from ManualMonitor.com Manuals
Analog LCD Monitor
SCALEOVIEW C17-7 User’s Manual
Downloaded from ManualMonitor.com Manuals
TABLE OF CONTENTS
Safety notes .............................................................................................i
Power cable ............................................................................................ ii
Transport ................................................................................................. ii
CE marking ............................................................................................. ii
FCC compliance statement ......................................................................1
DOC compliance notice ..........................................................................1
Introduction .............................................................................................2
Features ..................................................................................................2
Unpacking ...............................................................................................3
Attaching/Removing the base ..................................................................4
Screen position adjustment.......................................................................4
Connecting the power cord ......................................................................5
Safety precaution ....................................................................................5
Cleaning your monitor ..............................................................................5
Preset modes ..........................................................................................6
Power saving ..........................................................................................7
DDC .......................................................................................................7
Installation ...............................................................................................8
User controls ...........................................................................................9
Front panel controls..............................................................................9
Basic section of a OSD screen .......................................................... 10
Standard OSD operation .................................................................... 11
OSD function description ................................................................... 11
Troubleshooting ..................................................................................... 13
Specification .......................................................................................... 14
Downloaded from ManualMonitor.com Manuals
i User’s Guide
Safety notes
This device complies with the relevant safety regulations for data processing equipment,
including electronic office machines for use in an office environment. If you have any
questions, contact your sales outlet or our help desk.
• The display surface of the LCD monitor is sensitive to pressure and scratches. You should
therefore be careful with the display surface so as to avoid lasting damage (Newton rings,
scratches).
• If the device is brought into the installation site from a cold environment, condensation can
form. Before operating the device, wait until it is absolutely dry and has reached
approximately the same temperature as the installation site.
• To ensure sufficient ventilation, the intake and exhaust air openings of the monitor must
never be blocked.
• The monitor automatically sets itself to a mains voltage in the range of 100 V to 240 V.
Ensure that the local mains voltage lies within these limits.
• Ensure that the power socket on the device or the grounded mains outlet is freely
accessible.
• The ON/OFF switch does not disconnect the device from the mains voltage. To completely
disconnect the mains voltage, remove the power plug from the socket.
• The monitor is equipped with a power cable that complies with safety standards.
•
•
No data transfer cables should be connected or disconnected during a thunderstorm.
Make sure that no objects (e.g. jewellery chains, paper clips, etc.) or liquids get inside the
device (danger of electric shock, short circuit).
•
•
•
•
•
•
The device is not waterproof! Never immerse the device in water and protect it from spray
water (rain, sea water).
In emergencies (e.g. damaged casing, elements or cables, penetration of liquids or foreign
matter), switch off the unit, disconnect the power plug and contact your sales outlet or our
help desk.
The monitor must be disposed of in accordance with the local regulations for disposal of
special waste. The screen background lighting contains mercury. You must observe the
applicable handling and disposal safety regulations for fluorescent tubes.
Only qualified technicians should repair the device. Unauthorised opening and incorrect
repair may greatly endanger the user (electric shock, fire risk).
Use a screen saver with moving images and activate the power management for your
monitor to prevent still images from “burning in”.
Store this manual close to the device. If you pass the device on to third parties, you should
pass this manual on with it.
Downloaded from ManualMonitor.com Manuals
SCALEOVIEW C17-7
ii
Power cable
To guarantee safe operation, use the cable supplied. Use the following guidelines if it is
necess ary
to replace the original cable set.
• The female/male receptacles of the cord set must meet IEC60320/CEE-22 requirements.
•
•
•
•
The cable has to be HAR-certified or VDE-certified. The mark HAR or VDE will appear on
the outer sheath.
For devices which are mounted on a desk or table, type SVT or SJT cable sets may be
used.
For devices which sit on the floor, only SJT type cable sets may be used.
The cable set must be selected according to the rated current for your device.
If necessary, replace the original power cable with a regular grounded 3-core mains lead.
Transport
•
•
Transport the monitor with care and only in its original packaging or another corresponding
packaging fit to protect it against knocks and jolts.
Never drop the LCD monitor (danger of glass breakage).
CE marking
The shipped version of this device complies with the requirements of the
EECdirectives 89/336/EEC Electromagnetic compatibility” and 73/23/EEC Low
voltagedirective”.
Downloaded from ManualMonitor.com Manuals
SCALEOVIEW C17-7
E-1
FCC Compliance Statement
This equipment has been tested and found to comply with the limits for a Class B digital
device, pursuant to Part 15 of the FCC Rules. These limits are designed to provide resonable
protection against radio frequency interference in a residential installation. This equipment
generates, uses, and can radiate radio frequency energy. If not installed and used in
accordance with the instructions, it may cause interference to radio communications.
However, there is no guarantee that intereference will not occur in a particular installation.
If this equipment does cause interference to radio or television reception (this can be
determined by turning this equipment off and on), the user is encouraged to try to correct
the interference by one or more of the following measures:
•
Reorient or relocate the receiving antenna.
•
Increase the separation between this equipment and the receiver.
•
Connect this equipment to an outlet on a circuit different from which the
receiver is connected to.
•
Consult the dealer or an experienced radio/TV technician for help.
Caution:
To comply with the limits for an FCC Class B computing device, always use the shielded
signal cable supplied with this unit.
Caution to the user:
The Federal Communications Commission warns the user that changes or modifications to
the unit not expressly approved by the party responsible for compliance could void the
user’s authority to operate the equipment.
Notice of Compliance Canadian
Interference-causing Equipment Regulations
DOC Compliance Notice:
This digital apparatus does not exceed the Class B limits for radio noise emissions from
digital apparatus set out in the Radio Interference Regulations of the Canadian Department
of Communications.
DOC Avis de Conformation
Le présent appareil numérique n’emet pas de bruits radioélectriques dépassant les limites
applicable aux appareils numériques de la class B prescrites dan le Réglement sur le brouillage
radioélectriques édicté par le ministére des Communications du Canada.
Downloaded from ManualMonitor.com Manuals
E-2 User’s Guide
INTRODUCTION
Congratulations for purchasing model SCALEOVIEW C17-7, a high performance 17-inch
color TFT LCD monitor. SCALEOVIEW C17-7 monitor provides flicker-free and color images
at optional resolutions. Through this user guide, we will introduce you step-by-step all the
features, functions and technical specifications of the LCD monitor. Surely you will have a
refreshing experience working with the monitor.
FEATURES
The SCALEOVIEW C17-7 is a 17-inch TFT LCD monitor that is intelligent, microprocessorbased and ergonomically designed display, compatible with most analog RGB (Red, Green,
Blue) display standards, including PS/V, PS/2. The LCD monitor is capable of displaying
crisp and vibrant color graphics with VGA, SVGA, XGA, SXGA (non-interlaced).
• The monitor is able to properly function even in case of upgrade video cards or
software because of the wide auto-scanning compatibility range without requiring to
buy a new monitor.
• The internal microprocessor digitally controls auto-scanning. For horizontal scan
frequencies between 30 KHz and 81 KHz, and vertical scan frequencies between 55 Hz
and 76 Hz. In each frequency mode, the microprocessor-based circuitry allows the
monitor to function at the precision-of a fixed frequency.
• The resident memory allows for storing factory default settings and also additional
user adjustment parameters.
• The maximum resolution achievable is SXGA (1280 x 1024), best suited for Windows
applications
• The compact and sleek cabinet design saves lot of your desk space and makes your
desk look neat and tidy.
• The monitor is also compliant with the most stringent environmental scheme of TCO
99. In this scheme, no environmental harmful substances are used during the entire
manufacturing process.
Downloaded from ManualMonitor.com Manuals
SCALEOVIEW C17-7
E-3
UNPACKING
Please check the following items are present when you unpack the box, and save the
packing materials in case you will need to ship or transport the monitor in future.
•
LCD Monitor
•
AC Power Cord
(European Schuko type)
•
Downloaded from ManualMonitor.com Manuals
User Manual
E-4 User’s Guide
Attaching / Removing the Base
Install:
Align the four hooks on the bottom of
the monitor with the corresponding
slots on the bottom of the base.
Remove:
Depress the hook as indicated first
before removing the base and follow the
arrow direction to remove it.
SCREEN POSITION ADJUSTMENT
In oder to optimize the best viewing position, you can adjust the tilt of the monitor by
using both of your hands to hold the edges of the monitor as shown in the figure below.
The monitor can be adjusted to 30 degrees up or 5 degrees down as indicated by arrow
below.
Downloaded from ManualMonitor.com Manuals
SCALEOVIEW C17-7
E-5
CONNECTING THE POWER CORD
•
•
•
•
•
Check first to make sure that the power cord you use is the correct type required for
your area.
This monitor has a universal power supply that allows operation in either 100/120V
AC or 220/240 V AC voltage area. No user-adjustment is required.
Plug one end of the power cord to the AC Inlet, plug another end to a proper AC
outlet.
For unit using at 120 V AC:
Use a UL Listed Cord Set, Type SVT wire and plug rated 10 A/125 V.
For unit using at 220/240 V AC (outside of U.S.):
Use a Cord Set consisting of H05VV-F cord and plug rated 10 A, 250 V. The cord set
should have the appropriate safety approvals for the country in which the equipment
will be installed.
SAFETY PRECAUTION
•
•
•
•
•
•
Avoid placing the monitor, or any other heavy object, on the power cord to avoid
damage to the cable.
Do not expose the monitor to rain, excessive moisture, or dust.
Do not cover the ventilation slots or openings of the monitor. Always put the monitor
in a place where there is adequate ventilation.
Avoid placing the monitor against a bright background or where sunlight or other
light sources may reflect on the face of the monitor. Place the monitor just below
eye level.
Handle with care when transporting the monitor.
Refrain from giving shock or scratch to the screen, as screen is fragile.
CLEANING YOUR MONITOR
Please carefully follow the below guidelines when cleaning the monitor.
• Always unplug the monitor before cleaning.
• Use a soft cloth to wipe the screen and cabinet front and sides.
• Apply a small quantity of alcohol to a soft cloth to clean the monitor screen, if requires
more than dusting.
Downloaded from ManualMonitor.com Manuals
E-6 User’s Guide
PRESET MODES
To reduce the need for adjustment for different modes, the monitor has default setting
modes that are most commonly used as given in the table below. For optimum adjustment,
the user is suggested to perform the Auto Setup under Windows “Full Screen” pattern. If
the mode in use does not match one of the defaults, the user can store their preferred
modes in the user modes. The monitor is capable of storing up to 9 user modes. The only
condition to store as a user mode is the new display information must have 1 KHz difference
for horizontal frequency or 1 Hz for vertical frequency or the sync signal polarities are
different from the default modes.
Mode
Resolution
Polarity
H. Freq.
(KHz)
Band Width
(MHz)
H
V
1
VGA
720 x 400
70 Hz
31.47
28.322
-
+
2
VGA
640 x 480
60 Hz
31.47
25.175
-
-
3
VESA
640 x 480
75 Hz
37.50
31.5
-
-
4
VESA
800 x 600
60 Hz
37.88
40
+
+
5
VESA
800 x 600
75 Hz
46.88
49.5
+
+
6
VESA
1024 x 768
60 Hz
48.36
65
-
-
7
VESA
1024 x 768
75 Hz
60.02
78.75
+
+
8
VESA
1280 x 1024
60 Hz
64
108
+
+
9
VESA
1280 x 1024
75 Hz
80
135
+
+
Downloaded from ManualMonitor.com Manuals
SCALEOVIEW C17-7
E-7
POWER SAVING
The monitor will be driven into “Power Saving” mode by the control signal from the
display controller, as indicated by the amber-color power LED.
State
Power
Consumption
LED Light
ON
Normal
Blue
Active
OFF
<2W
Amber
The power saving states will be kept until a control signal has been detected or the
keyboard or mouse is activated. The recovery time from Active OFF state back to ON state
is around 3 seconds.
DDC
To make your installation easier, the monitor is able to Plug and Play with your system if
your system also supports DDC protocol. The DDC (Display Data Channel) is a
communication protocol through which the monitor automatically informs the host system
about its capabilities, for example, supported resolutions and corresponding timing. The
monitor supports DDC2B standard.
Downloaded from ManualMonitor.com Manuals
E-8 User’s Guide
INSTALLATION
To install the monitor to your host system, please follow the steps as given below:
Steps
1. Connect Video Cable
a. Make sure both the monitor and computer are powered-OFF.
b. Connect the video cable to the computer.
2. Connect power cord
Connect the power cord to the monitor, then to a properly grounded AC outlet.
3. Power-ON Monitor and Computer
Power-ON the monitor first, then power-ON the computer.
This sequence is very important.
4. If the monitor still does not function properly, please refer to the troubleshooting section
to diagnose the problem.
Please don’t open
the Cover.
Downloaded from ManualMonitor.com Manuals
SCALEOVIEW C17-7
E-9
USER CONTROLS
3
4
5
6
1
2
Front Panel Controls
1. Power Switch: To turn ON or OFF the power.
2. Power LED: Lights up to indicate the power is turned ON.
3. Select MENU: To exit and enter OSD menu.
4. Select
: To move downward in the OSD Item.
5. -: To decrease the value of the parameter in the OSD, which has been selected for
adjustment.
-: Choose the previous OSD MENU page.
6. +: To increase the value of the parameter in the OSD, which has been selected for
adjustment.
+: Choose the next OSD MENU page.
AUTO: Act as AUTO adjustment hot key when OSD is not displayed.
Downloaded from ManualMonitor.com Manuals
E-10 User’s Guide
Basic Sections of a OSD Screen
Downloaded from ManualMonitor.com Manuals
SCALEOVIEW C17-7
E-11
Standard OSD Operation
1. Press MENU key to activate the OSD menu, when OSD is not displayed.
2. Use Select key to move down through the menu cyclically. The parameter will be
highlighted when selected.
3. Then use + or - to increase or decrease the value of the parameter, or make selection
between different options.
4. To quit the OSD screen at any time during the operation, press MENU key. If no keys
are pressed for a time period, the OSD automatically disappears.
5. When OSD is not displayed, press + key to start Auto-Adjust.
OSD Function Description
−−−−−−−−−−−−−−−−−−−−−−−−−−−−−−−−−−−−−−−−−−−−−−−−−−−−−−−−−−−−−
• Brightness
To increase or decrease the brightness.
• Contrast
To increase or decrease the contrast.
• Auto Contrast
Press “+” key to start auto analog contrast.
−−−−−−−−−−−−−−−−−−−−−−−−−−−−−−−−−−−−−−−−−−−−−−−−−−−−−−−−−−−−−
• Color Temperature Press “-” or “+” to select 5000, 6500, 7500, 8200, 9300
and USER. Only when selecting USER, you can make
adjustments to the R/G/B content, otherwise not.
−−−−−−−−−−−−−−−−−−−−−−−−−−−−−−−−−−−−−−−−−−−−−−−−−−−−−−−−−−−−−
• Horizontal Size
To increase or decrease the size of image.
• Fine
To increase or decrease the snow noise of the image.
• Left/Right
To move the screen toward left or right.
• Down/Up
To move the screen upward or downward.
• Auto-Adjust
Press “+” to turn on this function. The Auto-Adjust
will automatically adjust V-Position, H-Position, Clock,
and Clock-Phase, the whole process takes about 4
seconds.
−−−−−−−−−−−−−−−−−−−−−−−−−−−−−−−−−−−−−−−−−−−−−−−−−−−−−−−−−−−−−
Downloaded from ManualMonitor.com Manuals
E-12 User’s Guide
−−−−−−−−−−−−−−−−−−−−−−−−−−−−−−−−−−−−−−−−−−−−−−−−−−−−−−−−−−−−−
• Language
Select among English, French, Italian, German and
Spanish.
• Factory Reset
To return the monitor to its default settings.
• OSD Time Out
To adjust the period of OSD auto turn-off time.
• OSD Left/Right
To move the OSD position horizontally on the screen.
When the “+” key is pressed, the OSD control menu
will move to the right side of the screen. Likewise when
the “-” key is pressed, the OSD control menu will move
to the left side.
• OSD Down/Up
To move the OSD position vertically on the screen.
When the “+” key is pressed, the OSD control menu
will move to the up side of the screen. Likewise when
the “-” key is pressed, the OSD control menu will move
to the lower side.
−−−−−−−−−−−−−−−−−−−−−−−−−−−−−−−−−−−−−−−−−−−−−−−−−−−−−−−−−−−−−
• Information
Indicates the current resolution, H-Frequency, and
V-Frequency.
−−−−−−−−−−−−−−−−−−−−−−−−−−−−−−−−−−−−−−−−−−−−−−−−−−−−−−−−−−−−−
Downloaded from ManualMonitor.com Manuals
SCALEOVIEW C17-7
E-13
TROUBLESHOOTING
Before sending your LCD monitor for servicing, please check the troubleshooting list
below to see if you can self-diagnose the problem.
Problems
Current Status
Remedy
LED ON
•
Using OSD, adjust brightness and contrast to
maximum or reset to their default settings.
LED OFF
•
Check the power switch.
•
Check if AC power cord is properly connected
to the monitor.
•
Check if video signal cable is properly
connected at the back of monitor.
•
Check if the power of computer system is ON.
•
Check if the specification of graphics adapter
and monitor is in compliance which may be
causing the input signal frequency mismatch.
•
Using OSD, adjust RESOLUTION, CLOCK,
CLOCK-PHASE, H-POSITION and VPOSITION with non-standard signals.
•
Using OSD, in case of missing full-screen image,
please select other resolution or other vertical
refresh timing.
•
Wait for a few seconds after adjusting the size of
the image before changing or disconnecting the
signal cable or powering OFF the monitor.
No
Picture
LED displays
amber color
Unstable Picture
Display is missing,
center shift, or too
Abnormal small or too large
in display size
Picture
Downloaded from ManualMonitor.com Manuals
E-14 User’s Guide
SPECIFICATION
Model Name
K17AN
Type No.
SCALEOVIEW C17-7
LCD Display
Display Type
17" TFT LCD
Display Area (H x W)
337.9 x 270.3 mm
Power Input
Voltage
100-240Vac
Frequency
50-60Hz
Current Rating
0.9A
Operational Features
Display Colors
16.2M
Resolution
SXGA (1280 x 1024) at 75 Hz maximum.
Interface
Analog RGB
Input Connector
15-pin D-sub
Users Controls
Front Panel Controls
Power On/Off, MENU, Select DOWN(
Value (+/ -), AUTO
OSD Controls
Brightness, Contrast, Auto Contrast, Color
Temperature, Horizontal Size, Fine, Left/Right,
Down/Up, Auto-Adjust, Language, Factory Reset,
OSD Time Out, OSD Left/Right, OSD Down/Up,
Information
Physical Specification
Dimension (H x W x D)
396 x 374 x 197.6 (mm)
Net Weight
4.8 Kg
Downloaded from ManualMonitor.com Manuals
),
SCALEOVIEW C17-7
E-15
Power
Power Saving
Yes
Power Consumption
35 W (Max.)
Regulation
Safety & EMI
UL, CUL, TUV-GS, TUV-Ergonomics, FCC-B, CE,
TCO99 (Optional)
* All specifications are subject to change without notice.
Downloaded from ManualMonitor.com Manuals