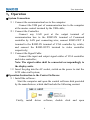
1
User instruction Skyworth LCD Video Wall Controller User Manual Please read the user guide book carefully before using this product 1 User instruction Contents 1. Features 2. Specifications 3. Control System Illustration 4. Operation 2 User instruction 1、Features Controller features: ★Skyworth the fourth generation V12 digital array high-speed image processing technolgy. Video bandwidth as high as 500MHZ, it make combination image more brilliance, stable. ★Open window function. It make image across the screen, open window, PIP, zoom, stacked, roaming etc. ★LVDS transmission technology can enhance anti-interference ability. We adopt high-speed bus connection technology, system can fast switch signal to the command of the speified channel, realizing fast response. LVDS technology enhances anti-interferenceability.The influence of the external disturbance to signal the lowest. ★The latest high-speed digital matrix switch technology. The input signal is less than 64 channels; it can realize the arbitrary switching channels without other matrix. ★Full HD Signal Supported Adopting the advanced de-interlacing method and motion compensation method, the processor can display the clearer and more exquisite interlacing signal on the screen, and eliminate the jaggies to the largest extent, and the real-time processing with full and actual HD on images can be realized. The design of video processing module with pure hardware structure can realize the real-time sampling on HD video and computer signal with high resolution, and ensure the highest video quality of HD signal, so as to perform the high quality and perfect frame for the clients. ★ Modular design meet customer different requirement 3 User instruction Adopting modular and pure hardward video processing, combination mode are not restricted by processing speed. According to customer requirement to order product. Contorl software features: ★Humanized software interface. System management software platform based on windows 2000/NT/XP operating system, support all kinds of application of windows. Professional skyworth software no need database support, no need install the database engine. It’s easy to maintenance and backup.Humanized software interface is easy to understand, easy to operate for User. ★Combination unit real-time control function.The software real-time controls every LCD unit through the RJ485 communication interface to connect with every LCD unit. It can adjust brightness, contrast and color temperature of every LCD unit. The adjusted parameters save automatically, it ensure the whole combination screen’s color and brightness is same standard. ★Freeze function. Through freeze button of software interface, it can freeze the current image rapidly, so that user can watch detail. ★Memory function.Through software setting, restart the system, it cam memory the state before power off. ★Identify and Process Multi-Signals in a Smart and Quick Way. It can select, retrieve, switch and display such signal sources as video, VGA (RGB) and YPbPr in a convenient and fast way, and may set and adjust such signal parameters as color and luminance of signal. The prompt function for signal source can give the detailed information of each signal source to the client at any time and any where. ★Diversified splicing display function on image The LCD video wall system will be operated and controlled by a set of control software. The operator can set all parameters of the large screen 4 User instruction system by the software, and operate the functions of information display and signal switch. It can arrange and set the size and position of the window for signal display, and can also save the result as a display pre-arranged plan, so that the display pre-arranged plans can be retrieved and executed by multiple ways. ★Open software design, support the second developing According to customer different requirement, we can offer software service, such as open SKD software package I/O protocol and the second developing of software. 2. Specification Model LCD-CONTROLLER8 HDMI IN 1920x1080(60Hz)downwards compatible Communication interface RJ485port in/out , RS232port D-Sub9 Communication control Baud rate: 115200 Input: USB2.0 port Communication box Output: RJ485port,2 output Storage Environment Temp -20℃-60℃;Relative Humidity 5%-90﹪ Operating Environment Temp 0℃-60℃;Relative Humidity 10%-90﹪ Power/Consumption Hardware Support PC Power:100-240V(AC) 50/60Hz Standard configuration :Intel P4 or above; Memory :512MB DDR or above; USB2.0 Port; Operating System Software Support Control & Management software ≤80W Windows XP/Windows 7 Provide SKYWORTH 5 Manager software User instruction 3、Operation System Connection: (1)Connect the communication box to the computer: Connect the USB port of communication box to the computer at the master control terminal by the USB cable; (2)Connect the Controller: Connect any LAN port at the output terminal of communication box to the RJ485-IN terminal of Command controller by LAN port connecting wire; connect RJ485-OUT 8 terminal to the RJ485-IN terminal of VGA controller by reticle; and connect the RJ485-OUT9 terminal to video controller respectively; (3)Connect the Signal Cable: Connect the input and output signal cables of VGA controller and video controller; Note: The signal cables shall be connected correspondingly to the display units. (4)Insert the plug into the AC socket, switch on the power to start the LCD video wall system; Operation Instruction to the Control Software: (1)Install the software: Start the computer and open the control software disk provided by the manufacturer, which shall include the following content: Firstly, install driver software, 6 double click and open User instruction "USB-rs232" , click computer and "PjSetup.exe". install . After install driver, re-start control software, double click and Choose "English" language, click "next ",then click "Install": After installation, click "quit". (2) Start software In "start" menu to open software “Skyworthpj”: 7 open User instruction As shown following interface: User name is "user", the password is "user". After login, as shown following interface: Set serial port Before start system, we first need to set serial port, click “set serial port” icon, you can modify serial port and baud rate in following dialog box. (Baud rate is 115200) After connecting with communication box, computer auto identify relevant serial port; Baud rate is "115200", data bit is "8", check bit is "none", stop bit is "1". Click "sure". 8 User instruction Start system After the completion of the set, start system. Operation interface as shown: Basic function adjustment Display Number & Automatic Video Assigning Click the “Display Number” and “Automatic Video Assigning” 9 User instruction buttons, numbers of all screens and auto assigned pictures shall be shown. Brightness & Contrast Ratio Click the “+” and “–” buttons by the indicating “Brightness” and “Contrast Ratio” symbols (once at a time) to adjust individual or combined picture brightness and contrast ratio. Click the “reset” button to return to manufacturer preset. Display Modes Click “Display Modes” button to access control of display modes of individual screens. There are 3 alternatives: ‘Standard”, “enrich”, “Soft” mode. Freeze Screen Click the “Freeze Screen” button to freeze picture of individual or combined screens. Click the “cancel”button, the picture is back to normal. System management Click on the upper left corner “system management” icon, then click “login management”, it will pop up “password”dialog box. User can modify log name and password. As shown: New Profile The profile refers to the large splicing image defined by the user and the current signal status. 10 User instruction The new profile refers to empty the large image and make a new mono-image with AV or VGA (the default signal can be set as AV or VGA after setting the new profile in the Advanced Function) . Advanced Function Click the button of “Advanced Function” on the top left corner , and then input the password for limits of authority: abc.123, and the administration interface for log in will be popped: 11 User instruction When the image of display unit cannot be adjusted to be the perfect status by the Auto Adjustment of main interface, it shall be adjusted in the Advanced Function, and the serial number of splicing unit to be adjusted shall be selected at first. 。 Mock Keyboard Functional Area 12 User instruction Such function can replace with the function of remote controller and switch the signal of display units, menu, OSD, power on and off, and entry of factory menu, etc.. Splicing Adjusting Area Blue Screen Switch: When it is open, the display unit will be in blue when there is no signal; otherwise, it will be in black; OSD Switch: When it is open, the signal format and resolution will be displayed when switching the signal. Otherwise, it will not be displayed; Prompt Switch for No Signal: When it is open and there is no input signal for the display unit, the prompt for No Signal will be displayed, otherwise, it will not be displayed. Reset to Factory Default: Click such button, all parameters of the splicing system will be reset to be the factory defaults; 13 User instruction Image Adjusting Area Such function is to adjust image color and position through“+” 、 “-”button to adjust image R 、 G 、B and image vertical position & horizontal position. Adjustment of Input VGA Signal For the input VGA signal, click the button of “White Balance Adjustment” and “Position Adjustment” in order to make the image best. After adjustment, it shall click the button of “Save” for save the result. Choose the Default Signal of New Profile After choosing “AV/VGA/HDMI”, click the button of “New Profile” on the main interface, and then all signals of the display units will be correspondingly switched to "AV/VGA/HDMI ". 14 User instruction Note: 1) “restore the default factory” button is to clear EPROM, the memory will clear. 2) All function in the advanced setting base on the screen unit is selected. When parameters is changed, please click save, and click “reboot screen unit”. 3) Enter “factory menu”, click “OSD” to exit menu. LCD video Wall Setting ①Single Screen Setting Select splicing units then click the right mouse button and select to switch the signal to AV/VGA, and then select the signal input channel, and the display unit will show the signal to be input in the input channel. ②Large Screen Setting Any combination type of splicing can be realized in the large screen splicing. Firstly, press the mouse left button for a long time, and drag the first unit of the splicing combination to the last unit. When the selected area is changed to be green, it is shown that such area has been selected. Then click the mouse right button and select “Splice”, namely splice the selected units to be a large frame. Then press the mouse right button to input the signal, switch the signal to be AV/VGA, and select the signal input channel. If the splicing large frame shall be displayed in a single screen, it shall press the button of “Single Screen” and it can be displayed in a single screen. For saving the set splicing method, select “Profile” beneath and press “Save” with the mouse left button, and then such splicing method will be saved in such profile. The preview window on the left side may also show the picture with the splicing method saved in the profile. 15 User instruction Click right mouse to choose "signal screen", splicing will show signal screen.. then the large screen If save splicing mode, click "mode 1.2.......18", press left mouse to save, then this profile is saved. The left preview window can show splicing picture. 16 User instruction Several common splicing methods can be respectively saved in the profile, so that during operation, it can directly click the button of “Profile” to complete the splicing of corresponding large frame. Instruction to the operation related to the corresponding profile: Load: Load the profile that has been already saved; Save: Save the current profile; Delete: Delete the profile that has been already saved; New: Build a new profile 17