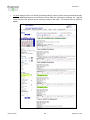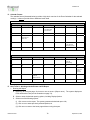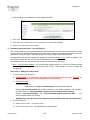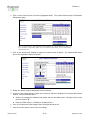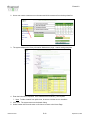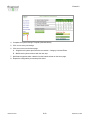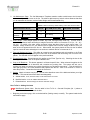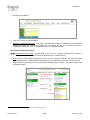
1
Events The Web Based Event Calendar with Online Patron Registration Version 6.0 User Manual Release Date April 2008 MAN0100-06.05 September 5, 2008 Events 6.0 COPYRIGHT INFORMATION Evanced Solutions, Inc. 712 Willow Pointe North Drive Plainfield, Indiana 46168 Phone: Fax: E-mail 1: E-mail 2: Web: 888-519-5770 888-519-5770 [email protected] [email protected] www.evancedsolutions.com COPYRIGHT© 2008 by Evanced Solutions, Inc. Copyright© 2008 by Evanced Solutions, Inc. All rights reserved. No part of this publication may be reproduced, transmitted, transcribed, stored in a retrieval system, or translated into any language or computer language, in any form by any means (electronic, mechanical, magnetic, optical, chemical, manual or otherwise) without the prior written agreement of Evanced Solutions, Inc. (“Evanced”). All software described in this document or media is also copyrighted material subject to the terms and conditions of the Evanced Software License Agreement. Information in this document is subject to change without notice and does not represent a commitment on the part of Evanced. MAN0100-06.05 September 5, 2008 Events 6.0 LIMITED WARRANTY AND LIMITATIONS OF LIABILITY Evanced Solutions, Inc. (“Evanced”) warrants to the original purchaser that the Events software system manufactured by Evanced is free from defects in material and workmanship under normal use and service. The obligation of Evanced under this warranty shall be limited to the repair or exchange of any part or parts which may prove defective under normal use and service within two (2) years from the date of manufacture or eighteen (18) months from the date of installation by the original purchaser, whichever occurs first, such defect to be disclosed to the satisfaction of Evanced after examination by Evanced of the allegedly defective part or part(s). THIS WARRANTY IS EXPRESSLY IN LIEU OF ALL OTHER WARRANTIES EXPRESSED OR IMPLIED, INCLUDING THE WARRANTIES OF MERCHANTABILITY AND FITNESS FOR USE AND OF ALL OTHER OBLIGATIONS OR LIABILITIES AND E-VANCED SOLUTIONS, NEITHER ASSUMES, NOR AUTHORIZES ANY OTHER PERSON TO ASSUME FOR EVANCED, ANY OTHER LIABILITY IN CONNECTION WITH THE SALE OF THE EVENTS SOFTWARE SYSTEM. THIS WARRANTY SHALL NOT APPLY TO THIS EVENTS SOFTWARE SYSTEM OR ANY PART THEREOF, WHICH HAS BEEN SUBJECT TO ACCIDENCE, NEGLIGENCE, ALTERATION, ABUSE, OR MISUSE. EVANCED MAKES NO WARRANTY WHATSOEVER IN RESPECT TO ACCESSORIES OR PARTS NOT SUPPLIED BY EVANCED. THE TERM “ORIGINAL PURCHASER”, AS USED IN THIS WARRANTY, SHALL BE DEEMED TO MEAN THAT PERSON FOR WHOM THE EVENTS SOFTWARE SYSTEM IS ORIGINALLY INSTALLED. THIS WARRANTY SHALL APPLY ONLY WITHIN THE BOUNDARIES OF THE CONTINENTAL UNITED STATES. In no event, whether as a result of breach of contract, warranty, tort (including negligence) or otherwise, shall Evanced or its suppliers be liable for any special, consequential, incidental or penal damages, including, but not limited to, loss of profit or revenues, loss of use of the product(s) or any associated equipment, damage to associated equipment, cost of capital, cost of substitute products, facilities, services or replacement power, down time costs, or claims of original purchaser’s customers for such damages. MAN0100-06.05 September 5, 2008 Events 6.0 Publication History Version 6 Revision 5, September 5, 2008 • Appendix B - Deleted “Section 1 – Access to the System and Configuration Settings” and “Section 2 – MultiBranch Systems – Special Notes” and ADDED “Section 1 – Logging in the First Time”. • Appendix B – Added references throughout that reinforce that the ENABLE MULTI-BRANCH setting must be enabled in order to access and configure more than one branch, including the creation of private and staff calendars. • Appendix E – Added the following URL parameters: curdate feeddesc. • Minor editorial changes. Revision 4, August 6, 2008 • Introduction – Added the “What’s New in Events” section. • Chapter IV - Updated the following fields in the Event Template: Location Event Description Other Information Custom Stipulation • Chapter IV - Updated the EDIT SINGLE reference in “How To Do It – Publishing and Unpublishing Existing Individual Events”. • Appendix F - Added the AG (Age Group) switch. • Minor editorial changes. Revision 3, July 9, 2008 • Chapter IV – Updated the CUSTOM STIPULATION field in the Event Template. • Appendix B – Updated the Security Access (Passwords) table. • Appendix B – Updated the OPTIONAL STATISTIC INPUT field in the System Settings template. • Minor editorial changes. Revision 2, May 30, 2008 • Chapter III – In the Event System Maintenance Home Page table of function descriptions, added the Settings Section and updated the following fields: Event Attendance Calendar Registration Attendee Lookup Subscriber Details. • Chapter III, Section 1(A) – updated “The Search/Filter - How To Do It”. • Chapter III, Section 2 – updated the following fields on the Event Template: MAN0100-06.05 September 5, 2008 Events 6.0 • Branch Location Event Title Event Description Featured Event Other Info Must be [Residency/Other Term Requirement] Must be Between the Grades Custom Stipulations Name/Initials Chapter III, Section 3(B) –updated the following sections: How To Do It – Multi-Branch Systems (All Branches Mode) How To Do It – Multi-Branch Systems (Individual Branch Mode) • Chapter III, Section 4(D) – updated introduction to “Deleting Archived Events”. • Chapter III, Section 4(E) – updated “Purging Events History”. • Chapter V, Section 1 – updated the introductory paragraph. • Chapter V, Section 1 – updated some of the graphics. • Chapter V, Section 1(D) – updated “Display Personal Schedule”. • Chapter V, Section 2(A) – updated the following in the category descriptions of the Event Attendance Sheet. 2. Statistics Entry 3(A). Main List Table describing Event Attendance Sheet fields and functions: added: EDIT EVENT field. • Chapter VI – updated the introduction paragraph. • Chapter VI, Section 1 – updated the Attendance Information portion of the introduction paragraph. • Chapter VI, Section 2 – updated the Event Information Filter to include the ONGOING EVENTS field. • Chapter VI, Section 3 - updated the Event Information Filter to include the ONGOING EVENTS field. • Chapter VI, Section 4 – updated “How To Do It – Deleting (Removing) Subscriber(s) with Active Subscriptions” section. • Appendix A, Section 1 – updated System Requirements. • Appendix E – updated the introductory paragraph. • Appendix E, Section 1 – updated or added* the following items in the table of xml.asp parameters: dm primarygroup fe* roominfo* • Appendix E, Section 2 – updated “xml” Display Mode Description to include <DATE> reference. • Appendix E, Section 3 – updated the <STATUS> field in the “exml” Display Mode Description output example and the table of tags. • Minor editorial changes. Revision 1, April 9, 2008 Revision 1 is the original Events manual for version 6. MAN0100-06.05 September 5, 2008 Events 6.0 TABLE OF CONTENTS Page Introduction.............................................................................................................................................................. 1 Section 1 - Welcome to Events ............................................................................................................................1 Section 2 - What’s New in events ........................................................................................................................1 Section 3 - Beyond Events– Room Reserve and Summer Reader .....................................................................4 Chapter I. Installation and Configuration .............................................................................................................. 5 Chapter II. Logging Into the System ...................................................................................................................... 6 Chapter III. Event System Maintenance Home Page............................................................................................ 7 Chapter IV. Event Maintenance ............................................................................................................................ 10 Section 1 - Page View and Navigation...............................................................................................................11 A. The Search/Filter...................................................................................................................................12 B. The Event Information Table.................................................................................................................12 Section 2 - The Event Template ........................................................................................................................14 Section 3 - The Add/Edit/Archive Function ........................................................................................................32 A. Add an Event.........................................................................................................................................32 B. Holidays and Closings...........................................................................................................................32 C. Edit an Existing Event ...........................................................................................................................34 D. Copying an Event..................................................................................................................................34 E. Deleting an Existing Event ....................................................................................................................35 F. Publishing Events..................................................................................................................................35 G. Archiving an Event ................................................................................................................................36 H. Accessing the Event Registration Form and Event Attendance Sheet.................................................37 Section 4 - The View Archive Function ..............................................................................................................39 A. Viewing Registration and Attendance Information................................................................................40 B. Restoring an Event................................................................................................................................41 C. Copy to Active Event List ......................................................................................................................42 D. Deleting Archived Events ......................................................................................................................42 E. Purging Events History..........................................................................................................................42 Chapter V. Registration & Attendance ................................................................................................................ 44 Section 1 - Event Calendar Views and Navigation ............................................................................................44 A. Calendar Views – Event Attendance and Calendar/Registration .........................................................44 B. Event Listings........................................................................................................................................47 C. Search Slider.........................................................................................................................................47 D. Display Personal Schedule ...................................................................................................................47 Section 2 - Event Attendance ............................................................................................................................48 A. The Event Attendance Sheet ................................................................................................................49 B. Managing Event Attendance Sheets.....................................................................................................53 C. Working in Patron Records ...................................................................................................................59 Section 3 - The Calendar/Registration Function ................................................................................................61 A. The Event Registration Form ................................................................................................................62 MAN0100-06.05 i September 5, 2008 Events 6.0 B. Working in Calendar/Registration .........................................................................................................63 Section 4 - The Attendee Lookup Function........................................................................................................64 A. Views and Navigation............................................................................................................................65 B. Working in Attendee Lookup.................................................................................................................66 C. Working in Patron Records ...................................................................................................................67 Chapter VI. Reports ............................................................................................................................................... 70 Section 1 - The Event Statistics Report .............................................................................................................70 Section 2 - The Detailed Event Report ..............................................................................................................72 Section 3 - The Events and PR Report..............................................................................................................74 A. The Event Information Filter..................................................................................................................74 B. Table Format.........................................................................................................................................75 C. List Format ............................................................................................................................................75 D. Calendar Format ...................................................................................................................................76 E. How To Do It – Working with the Events and PR Report .....................................................................76 Section 4 - The Subscriber Details Report.........................................................................................................77 Section 5 - The Subscriber Lookup Report........................................................................................................78 Appendix A. Implementation Guide....................................................................................................................... 1 Section 1 - System Requirements .......................................................................................................................1 Section 2 - Installation Options ............................................................................................................................1 A. Home Server Configurations...................................................................................................................1 B. Hosted Server: ........................................................................................................................................2 Section 3 - Library Policy Considerations ............................................................................................................2 A. Address Collection from New Registrants ..............................................................................................2 B. 24 Hr Cancellation Notice and Probation Features ................................................................................2 C. Event Maintenance Security ...................................................................................................................4 D. Project Planning ......................................................................................................................................4 E. Backup Recommendations .....................................................................................................................5 F. Technical Support ...................................................................................................................................5 Appendix B. Configuring Events ........................................................................................................................... 1 Section 1 - Logging In the First Time ...................................................................................................................1 Section 2 - E-mail Configuration ..........................................................................................................................2 A. Setting Up E-mail ....................................................................................................................................2 B. E-mail Server Settings ............................................................................................................................2 C. E-mail Settings ........................................................................................................................................6 D. Scheduling Automatic E-mail – The notify.bat File .................................................................................8 E. Troubleshooting ......................................................................................................................................9 Section 3 - Configuration Settings .....................................................................................................................10 A. Appearance (Style Configuration).........................................................................................................10 B. Library Information ................................................................................................................................13 C. System Messages.................................................................................................................................22 D. System Templates (Registration Messages) ........................................................................................25 E. E-mail Templates (Subscriber Messages) ............................................................................................27 F. Security Access (Passwords) ...............................................................................................................30 G. System Settings ....................................................................................................................................32 MAN0100-06.05 ii September 5, 2008 Events 6.0 H. Category Lists and Filters .....................................................................................................................40 Appendix C. Events and Room Reserve a Guide to Functions and Responsibilities...................................... 1 Appendix D. HTML Reference Guide ..................................................................................................................... 1 Section 1 - HTML Formatting ...............................................................................................................................1 Section 2 - Inserting HyperLinks: .........................................................................................................................2 Section 3 - Frequently Used Codes .....................................................................................................................2 Appendix E. Using Events XML.asp ...................................................................................................................... 1 Section 1 - Usage.................................................................................................................................................1 Section 2 - “xml” Display Mode Description .........................................................................................................2 Section 3 - “exml” Display Mode Description .......................................................................................................3 Appendix F. Creating Calendar Views (URL Formatting) .................................................................................... 1 MAN0100-06.05 iii September 5, 2008 Events 6.0 INTRODUCTION SECTION 1 - WELCOME TO EVENTS Welcome to Events, a web-based event and program management system for libraries and their patrons. Libraries The cross-functionality of Events helps libraries leverage their staff workloads by managing: • • • • • Event and program calendars, Marketing and public relations, Patron registration, both staff assisted and patron self-registration, Statistical reporting about event registration and attendance, and Communications with patrons. The cross-functional benefit of Events extends to its capabilities in multi-branch systems, including the ability to: • • • • Apply configurations and revisions to all branches or a single branch from one location. Individual branches maintain their ability to customize their own features, View any or all of the event calendars within the library system, Add system-wide events to the calendar, and Configure reports to include statistical data from one or more branches within the library system. Patrons Events provides library patrons with a user-friendly way to: • • • • • View and search the Event Calendar, Subscribe to event notification e-mails, Register for events and programs, Receive event and registration reminders, and Create a personal calendar to display the events and programs that interest them. This manual is intended to provide a comprehensive description of the function and capabilities of the Events system. Please contact Evanced Solutions, Inc. at [email protected] or 888-519-5770 with any questions or feedback about the system or the contents of this manual. SECTION 2 - WHAT’S NEW IN EVENTS Feature Patron Calendar MAN0100-06.05 Description • Added a button for a “print-friendly” version of the calendar • Added RSS link on patron calendar\list view. • Added option to show patrons the number of openings available for an event. • Added support of iCalendar (iCAL) to enhance compatibility with internet based calendars using iCAL, such as Google calendar. This is helpful to patrons who download events to a personal internetbased calendar. • Added paging to the events List View that allows users to control the number of records that appear per page. • Added a “Show More” button for quick searches on the selected Event Type (i.e. Show More Events Like This). • Added a status indication for closed registrations. September 5, 2008 Events 6.0 Feature Staff Calendar System Configuration & Settings MAN0100-06.05 Description • Added an Edit Event button on both the Attendance Sheet and Event Registration pages. • Added “[+]” in the Calendar view that allows staff to add an event right from the calendar. • Added an enhanced RSS button on calendar page that displays the available RSS feed options. • Enhanced “Show URL” button to include both Fixed and Dynamic URLs created from a search, along with explanations of available switches. • Added an Ongoing Events section to the Calendar view. • Added counts to event mouse-overs, which show staff the maximum number of attendees, the number registered on the Main List, the number of openings and the number on Wait List. • Created separate default calendar view settings for staff and patrons. • Added paging to the events List View that allows users to control the number of records that appear per page. • Enhanced the calendar/list filter to include Published, Unpublished or both. • Added a setting that allows staff to automatically receive an email when any change occurs to an event attendance list. By default, staff only receives an email when a move occurs automatically or when performed by a patron. • Added an option to disable all Waiting Lists. • Added an “Unlimited Registration Password Level” option that allows libraries to set the minimum password level that needed to submit registrations beyond an event’s maximum number of attendees. • Added an option that allows staff to edit the Internal Notes field from the Attendance page. • Added “Outside of Standard Hours Checking” that warns a user when they create or edit an event that occurs outside the library’s standard hours. For example, the system will warn a user when they attempt to add an event at 9:00p.m. rather than 9:00a.m., if 9:00p.m. is outside the library’s standard hours. • Added the ability to add and edit branches from a drop down list under Library Information. • Added the ability to delete an entire branch. • Added the ability to make an entire branch Private\Internal only. • Added the ability to add a link on the Event Information and Event List View pages that displays a map to the library branch. • Added Regional Settings to System Configuration & Settings. Libraries can now control their own regional settings, including time zones and daylight saving time. • Added additional tags for System and Email Templates. 2 September 5, 2008 Events 6.0 Feature System Configuration & Settings (Cont.) Add\Edit\Archive Attendee Lookup MAN0100-06.05 Description • Separated Style Configuration pages for Events and Room Reserve, each they can share a style configuration or be configured separately. • Added an option to hide blank fields on the PR Report. • Added Registration Start Date and Registration End Date to PR Report. • Added Event Edit\Creation date to the Filter option. This allows staff to see when the event was created or last edited without having to open the Event Template. • Added the ability to convert a recurring event to a single event. • Added the ability to create 20-minute programs. • Added a Patron Status Display field to the Event Template for Staff Only Registrations. This allows libraries to display a message (i.e., “Please see library staff to register for this event.”) for events with no on-line registration. • Added the ability to set expiration of the Residency\Other Term restriction X number of days after registration begins. • Added the ability to set expiration of the Maximum In-house Spots hold X number of days after registration begins. • Added the ability to copy a Recurring Series from Archive. • Added the ability to restore a Recurring Series from Archive. • Added paging to the events list (also on the events List View) that allows users to control the number of records that appear per page. • Added a limit on the Event Length drop list that prevents events from being scheduled beyond 11:59 PM • Added the ability to edit an attendee’s library card number from Attendee Lookup. • Added paging to Attendee Lookup that allows users to control the number of records that appear per page. 3 September 5, 2008 Events 6.0 SECTION 3 - BEYOND EVENTS– ROOM RESERVE AND SUMMER READER Evanced offers additional applications that help libraries manage their reading programs and facilities. Please contact Evanced at [email protected] or 888-519-5770 for more information. • Room Reserve: Room Reserve helps libraries manage the use and reservation of their meeting rooms, study rooms and other non-traditional gathering places in the library. Like Events, Room Reserve contains patron self-service options, supports recurring reservations, automatic e-mail messaging (i.e., confirmations and reminders), and provides detailed reports. The table below describes the responsibilities of Room Reserve and Events when both are installed. • Events ........................ Manages internal reservation of rooms. • Room Reserve ........... Manages reservation of rooms made by external organizations. • Summer Reader: Summer Reader helps libraries manage their reading programs and special interest groups, such as book clubs, anime clubs, etc. Summer Reader manages registration processes, progress logs, prizes, drawings, certificates of achievement, participant reviews and statistics. MAN0100-06.05 4 September 5, 2008 Events 6.0 CHAPTER I. INSTALLATION AND CONFIGURATION Information concerning system requirements, installation and configuration is found in Appendix A Implementation Guide (page 1) and Appendix B - Configuring Events (page 1). MAN0100-06.05 5 September 5, 2008 Events 6.0 CHAPTER II. LOGGING INTO THE SYSTEM The gateway to Events is the user login screen illustrated below. Login to Event Management System Password: [Text Entry Field] Login Remember Me Back The system is set to time-out - automatically terminate a user’s session – if it should sit idle for 90 minutes or more. The user must enter their password to re-access the system. Clicking “Remember Me” allows users to remain logged-in to the system. Should the time-out occur, click the Login button to re-enter the system without typing a password. This feature requires the enabling of cookies. For information about password levels, please see Appendix A, Section 4(F) – Security Access (Passwords). MAN0100-06.05 6 September 5, 2008 Events 6.0 CHAPTER III. EVENT SYSTEM MAINTENANCE HOME PAGE The Event System Maintenance page is also known as the Events system home page. From the home page, staff has access to all Events functions based upon the level of authority provided by their password (see Appendix B(4)(F) – Security Access (Passwords) on page 30). The illustration below displays the home page accessible to the Administrative level password, which includes all functions. The functions displayed by your password authority may contain fewer options than appear in the illustration. 1 The Branch Selector menu only appears if there is more than one library branch configured on the system. The “Go to Room Maintenance hyperlink only appears if Room Reserve is installed and configured to work with Events. 3 These options appear at all Security levels. 4 These options appear at the Administrative level only. 5 These options appear at the individual branch level only and only to those with an Administrative level password. 2 The table below describes the functions available on the Event System Maintenance home page and provides reference links to more comprehensive information found in this manual. The chapters that follow describe each function in more detail. Function Event Maintenance Add/Edit/Archive MAN0100-06.05 Description The Add/Edit/Archive function allows staff to search a list of current events, view event information, add, edit, and archive events, determine an event’s publication status (i.e., whether the event appears on the patron’s calendar view), and publish events. A detailed discussion of “Add/Edit/Archive begins on page 14. 7 September 5, 2008 Events 6.0 Function View Archive Description The View Archive function allows staff to search events that have been archived and no longer appear on the active Events Calendar. Staff may also permanently delete events from the archive. A detailed discussion of View Archive begins on page 39. Registration and Attendance Event Attendance The Event Attendance function provides access to an event’s attendance sheet. The Event Attendance Sheet displays the event schedule, registration requirements, if any, and attendance statistics. This function supports the exporting of Event Attendance information to Excel. It also provides opening of the event in Edit mode. A detailed discussion of Event Attendance begins on page 49. Calendar/Registration The Calendar/Registration function allows staff access to the Event Registration Form, which includes information about the event (i.e., schedule, pre-requisites, etc.), registration status (i.e., total openings, total registered, etc.), and a registration form. It also provides opening of the event in Edit mode. A detailed discussion of Calendar/Registration begins on page 61. Attendee Lookup This Attendee Lookup function allows users to: • Search the database for anyone who has ever registered for an event, • View and edit contact information, • View and reset no show information, • Delete attendees from the database, and • Register attendees for events. • Cancel attendees from events. Attendee Lookup streamlines event registration by automatically completing the contact information section of the Event Registration Form. A detailed discussion of Attendee Lookup begins on page 64. Reports Event Statistics Report The Event Statistics Report summarizes statistics for all events and event types within a specified date range. The report is exportable to Word or Excel. A detailed discussion of the Event Statistics Report begins on page70. Detailed Event Report The Detailed Events Report allows to users generate a customized report based upon criteria selected from the Event Information Report Filter. The available criteria include keyword, date range, age group, branches/libraries, and event types. Users can display reports in HTML format and export to Word or Excel. A detailed discussion of Detailed Event Report begins on page 72. Events and PR Report The Events and PR Report provides users with a detailed report about events scheduled within a specified time frame, including the schedule, description, and public relations needs of scheduled events. The amount of detail in the report depends upon the report’s format (i.e., list, table or calendar). Users may export reports to Word or Excel. A detailed discussion of Events and PR Report begins on page 74. Subscriber Lookup Subscriber Lookup allows users to: • Search the database of subscribers to Notify Me or Remind Me, • View and edit subscriber contact information (name and email address only), and • Delete subscribers from the database. A detailed discussion of Subscriber Lookup begins on page 77. MAN0100-06.05 8 September 5, 2008 Events 6.0 Function Subscriber Details Quick Search Fields Calendar Search Page Description Subscriber Details displays a list of all patrons subscribed to Notify Me or Remind Me along with their email information, the type of event they subscribed to and their library branch. It includes an option to export this list to Excel. A detailed discussion of Subscriber details begins on page 78. The Calendar Search Page is a filter allowing users to search the Event Calendar. Search fields include date, location, event type, age group, presenter, zip code, published events and unpublished events. Registration and Attendance The Registration and Attendance function is a keyword search field that displays in calendar format all events and occurrences containing the keyword(s). Click on any event occurrence to display the Event Registration page. Attendee Lookup The Attendee Lookup allows users to search for a registered patron by first name, last name, phone number, library card number, email address, or event confirmation number. This quick search field performs the same function as the Attendee Lookup function listed under Registration and Attendance. Event Maintenance Event Maintenance is a key word search of the current month’s Event Calendar. The system displays search results on the Event Maintenance page in list format. Settings: This section is only available at the Administrator level. See Appendix B – Configuring Events. System Settings System Settings contains all the system settings that make Events look and function the way it does for your library. Settings include Style Configuration, Library Information, System Messages, System Templates, Email Templates, Email Settings, Security (Passwords) and other System Settings (Registration, Event, Attendance and Calendar settings). In a multi-branch system, System Settings are available at both the individual branch and All Branches level. Branch Specific Lists Branch Specific Lists configures the Location, Grade, Zip Code and Presenter information that appear throughout the system. As the name indicates, these lists are configured at the individual branch level. System Wide Lists System Wide Lists configures the content of the Event Type and Age Group information that appear throughout the system. In a multi-branch system, this list is available at the individual branch and All Branches level. MAN0100-06.05 9 September 5, 2008 Events 6.0 CHAPTER IV. EVENT MAINTENANCE Event Maintenance • Add/Edit/Archive • View Archive Event Maintenance allows users with the appropriate security level access to manage the Event Calendar, including adding, editing, copying, publishing, archiving and deleting events. Event Maintenance also provides access to Event Registration Forms and Event Attendance Sheets (see also Chapter V - Registration & Attendance (page 44)). • Section 1 - Page View and Navigation (page 11) provides information about accessing and navigating through the event database. • Section 2 - The Event Template (page 14) contains a table with detailed information about the Event Template, along with a description of the available fields and how to use them. • Section 3 - The Add/Edit/Archive Function (page 32) provides information about working in the database of active events, which contains all the events that appear in the staff and patron calendar views. • Section 4 - The View Archive Function (page39) provides information about working in the database of inactive events, which contains all the events that have been removed from the staff and patron calendar views. Archived events still provide statistical information to the Reporting function. MAN0100-06.05 10 September 5, 2008 Events 6.0 SECTION 1 - PAGE VIEW AND NAVIGATION This section describes the organization of information in Event Maintenance. The illustration below shows the layout of the Event Maintenance (Add/Edit/Archive) page. Archive Maintenance (“View Archive” on the Home Page) is laid out in the same way. *)) MAN0100-06.05 Multi-Branch System Note: The branch list appears when accessing Event Maintenance functions from the All Branches mode. 11 September 5, 2008 Events 6.0 A. The Search/Filter The Search/Filter function allows users to search all events in the database. The Add/View/Archive and View Archive functions have their own separate Search/Filters, which search their assigned database. The Search Filter retains search criteria until a new search is entered. How To Do It 1. Beginning at the home page, click on the desired function on the Event Maintenance menu. The system displays the selected maintenance page. 2. Enter the desired search parameters into the Search/Filter on the left side of the page. A. Select an Event Type from the drop down field (optional). B. Select the desired date range (optional). C. Published or Unpublished Events (optional): (i) Click Published Events to search events published to the calendar. (ii) Click Unpublished Events to search events that are not viewable on the public calendar. Staff have the ability to view unpublished from the staff calendar. (iii) Deselect both Published and Unpublished options to search all events. D. Click Show ongoing events to include Ongoing Events in the list. E. Click Combine recurring events to consolidate a recurring event into one event listing. Deselecting Combine recurring events displays recurring events as multiple single date events (i.e., four listings showing one date each vs. one listing showing four dates.). F. Type a keyword into the Key Word field to narrow the search. Keyword searches event titles and descriptions only. G. Results per page: Click on the number of event records you want displayed per page – 25, 50, 100 or 1,000. 3. Click SEARCH. The system displays results in the ‘Event Information’ table to the right of the Search/Filter. 4. Click CLEAR SEARCH to clear the previous search criteria. B. The Event Information Table The Event Information table displays search results based on entries made in the Search/Filter. The Event Information Window allows users to: • • • • • Sort events by date, time, location, type, description, title, age group or status; Sort results in descending or ascending order; Archive events individually or in batches; Edit, copy and delete events; and Access Event Attendance Sheets and Event Registration Forms. The Event Information Table includes a set of buttons and links that allow users to perform certain actions. The table below describes the available buttons and links and the actions they perform. Buttons/Links Add/Edit/Archive Add New Event MAN0100-06.05 Description A button above the Event Information Window that loads the Event Template. 12 September 5, 2008 Events 6.0 Buttons/Links Add New Holiday Event Description Available in single branch libraries only. A button located above the Event Information Window that loads an Event Template configured for holiday entries only. )) Multi-Branch System Note: See Section 3(B) – Holidays and Closings (page 32) for more information. Bulk Publish A button located above the Event Information Window that loads the Bulk Publish tool. Bulk Archive A button located above the Event Information Window that loads the Bulk Archive tool. Archive or Archive Recurring A checkbox located above each event record that, when checked, marks a record for Archiving. Works in connection with the “Archive Checked Event(s)” button. Delete A small link or button located above each event record that deletes a record with secondary confirmation. The system will display the following message before permanently deleting a record: “Are you sure you want to PERMANENTLY delete the event and all associated statistical information? This skips the archive process so there is no way to undo the delete.” Edit Single or Edit Recurring A small link or button located above each event record that displays the Event Template in edit mode. A change made in edit mode permanently changes the original event. Copy A Single or Copy Recurring A small link or button located above each event record that displays the Event Template in copy mode. A change made in copy mode creates a new event and retains the original event. Attendance or Attendance Stats A small link or button located above an event record requiring registration that displays the event’s attendance sheet. Register A small link or button located above an event that displays the Event Registration page. View Archives Delete History Loads the Purge Events tool. Delete Checked Event(s) Deletes events marked for deletion without secondary confirmation. Delete A checkbox located above each event record that marks the event for deletion. The Delete checkbox works in connection with the “Delete Checked Event(s)” button. Deletion occurs without secondary confirmation. Restore A small button or link located above each record that moves the event record from Archive Maintenance to Event Maintenance. Delete Recurring Event A small button or link located above a recurring event that deletes the event with secondary confirmation. The system will display the following message before permanently deleting a record: “Are you sure you want to delete all recurring events associated with “[Event Name]”? MAN0100-06.05 13 September 5, 2008 Events 6.0 Buttons/Links Description Copy to active Event List A small button or link located above single date events that copies the Event Template to the Event Maintenance list. This action retains the original event in the archive. Attendance or Attendance Stats A small link or button located above an event record requiring registration that displays the event’s attendance sheet. Register A small link or button located above an event that displays the Event Registration page. SECTION 2 - THE EVENT TEMPLATE The Event Template is the primary form for entering and maintaining information about events. The table on the following pages provides detailed information about the template and how to use it. MAN0100-06.05 14 September 5, 2008 Events 6.0 Field Options Date/Time Information *Branch [Branch List] [] Ongoing Event Date Range Description How To Do It This field appears only in a Multi-Branch System when adding an event from All Branches mode. The drop down list contains the names of all branches in the library system as configured by the Administrator as well as a “System Wide Event option. The System Wide Event option is used to add Holiday and Other Closings to the Event Calendar. Select a branch from the drop down list. Recognition of a holiday, display, etc. during a specific time period. The Ongoing Event is for information purposes only and requires no registration (i.e., Black History Month). • Unchecked - Go to the EVENT DATE field. This field appears only if ONGOING EVENT is checked and refers to the date range for an Ongoing Event. Enter a date by typing a date in the text entry field or pick a date by clicking the calendar button. Appears only if 'Ongoing Event' is unchecked and refers to the start date for an event. Enter a date by typing a date in the text entry field or pick a date by clicking on calendar button. • Checked – Activates the to DATE RANGE field. DATE RANGE field. Go [Text Entry Field] Pick [Text Entry Field] Pick Event Date [Text Entry Field] Pick Recurring Options See below This field allows users to set the frequency of an event. One Time Select for single date events. This is the default setting. This is the default setting. recurring option to deselect. { Daily { Select when an event occurs daily or every X number of days. 1. Click on the desired option. 2. If “Every X days”, enter the frequency of the occurrence. { Weekly, Every 1 weeks on . . . Sun Mon Tues Wed Thurs Fri Sat Select when an event occurs weekly. 1. Click on WEEKLY. 2. Type in the frequency (i.e., 1=every week, 2=every other week, etc.) 3. Click on the day the event occurs. MAN0100-06.05 Every 1 day(s) [Default] Every weekday 15 Select an alternate September 5, 2008 Events 6.0 Field Options Description How To Do It { Monthly Day 5 of every 1 month(s). [Default] { The [first] [] [day] [] of every 1 month(s). Select when an event occurs monthly. Option 1 allows you to select the specific day of the specified month. Option 2 allows you to target which day of the month (i.e., first Sunday, second weekday, etc.) 1. Click MONTHLY. 2. Click the desired option. 3. Type in or select, as appropriate, the day and month desired (i.e., 1=every month, 2=every other month, etc.) { Additional Dates Date: [Month][] [Day][] [Year][] Allows users to enter multiple, non-sequential dates. Dates must be entered in sequential order. Any date in a series can be deleted. 1. Make sure the event’s start date appears in the EVENT DATE field above. 2. Click ADDITIONAL DATES to activate the option fields. 3. Select the second scheduled event date using the DATE option. 4. Click ADD DATE to enter the date in the text entry box. 5. Repeat steps 3 and 4 to add additional dates. The system enters a semi-colon separator automatically. 6. Clear the last date entered by clicking CLEAR LAST DATE. 7. Clear all dates by clicking CLEAR ALL. 8. Clear any date in the series by clicking on the date. The system displays the following confirmation: "The date of ____ is going to be removed from the date list." To accept, click 'OK' or click 'Cancel' to go back. Determines the end date of the recurring event. Options are: “End After X occurrences”, or “End By [date]”. The default is “End After 7 occurrences”. 1. Select either End After or End By from the drop down menu. The system displays an option to enter or select an end date based on your choice. 2. Enter or select the end date, as appropriate. Add Date Clear Last Date Pick Clear All [Text Entry Field] Recurrence: Ends [Ends After] [] [##] occurrences End By [Text Entry Field] MAN0100-06.05 Pick 16 September 5, 2008 Events 6.0 Field *Event Time Options Start Time: [Hr][] : [Min] [] [AM] [] All Day (Either event time or All Day is required.) Description How To Do It Sets the event start time and length. “Set Up Time” and “Take Down Time” work with Room Reserve and adds time for room set up and clean up. The system automatically calculates the end time based upon event length. Selecting All Day overrides all other fields. 1. In the “Start Time” field, select the hour, minutes and AM/PM start time of the event; or 2. Click “All Day” for an all day event; 3. In the “Set Up Time” field, select the amount of set up time required. 4. In the “Event Length” field, select length of the event. 5. In the “Take Down Time” field, select the amount of clean-up time required. Set Up Time: [0] [] Event Length: [0 (10:00 AM)] [] Take Down Time: [0] [] MAN0100-06.05 17 September 5, 2008 Events 6.0 Field Event Information *Location Options [Location List] [] No Location Needed (Either Location or No Location Needed is Required) ***** Status: [Need to check for conflicts] Check/Resolve Conflict View Room Schedule MAN0100-06.05 Description How To Do It The Location selected appears in the event detail (Registration & Attendance). The Administrator creates the list contents in Settings Branch Specific Lists Location List. “Status” is a variable field that helps prevent double booking by telling you whether the selected location has a conflict with the date and time entered. • Highlighted Yellow: “Need to check for conflicts”. • Highlighted Red: The system has encountered a conflict with the selected location and displays the number of conflicts. • Highlighted Green: The system displays 0 conflicts. CHECK/RESOLVE CONFLICT allows you view limited information about a conflict. Users then have to adjust the date or time of their event to resolve the conflict. VIEW ROOM SCHEDULE only appears when Room Reserve is installed and enabled. When selected, it loads the Room Request Calendar (from Room Reserve) for the selected location. The Location list created in Events is available to both Events and Room Reserve when Room Reserve is installed. 1. Select the desired room/location from the list. 2. Click CHECK/RESOLVE CONFLICT to confirm room or location availability. 3. Click VIEW ROOM SCHEDULE to view the room’s Room Reserve calendar. This button only works with rooms configured in Room Reserve. 18 September 5, 2008 Events 6.0 Field *Event Type Options Description How To Do It Primary: Event Type List [] (Required field) Used for statistics. Refers to the type of event (i.e., Book Club, Author Lecture, etc.) and appears in the event detail. The system requires at least one event type – Primary - to generate statistical reports. The Search Slider (Registration & Attendance) and Search/Filter (Event Maintenance) use and recognize all three fields. Select up to 2 additional event types to provide increased search ability. The Administrator creates the content of the list in Settings System Wide Lists Even Type List. 1. Select a Primary event type from the drop down list. 2. Select up to two additional event types using the drop down lists in Option 1 and Option 2 fields. Refers to the targeted age group for the event and appears in the event detail. The system requires at least one Age Group – Primary - to generate statistical reports. The Search Slider (Registration & Attendance) uses and recognizes all three fields. Select up to 2 additional Age Groups to provide increased search ability. The Administrator creates the content of the list in Settings System Wide Lists Age Group List. 1. Select a Primary age group from the drop down list. 2. Select up to two additional age groups using the drop down lists in Option 1 and Option 2 fields. Refers to the title of the event and appears on the Event Calendar and in the event detail. Use a short, concise title to ensure that as much of the title as possible appears. Type a short (up to 80 characters), descriptive title in the text field. Option 1: Event Type List [] Option 2: Event Type List [] *Age Group Primary: Age Group List [] (Required field) Used for statistics. Option 1: Age Group List [] Option 2: Age Group List [] *Event Title MAN0100-06.05 [Text Entry Field] 19 September 5, 2008 Events 6.0 Field Options Description How To Do It *Event Description Count: ### [Text Entry Field] Refers to a detailed description or synopsis of the event. The Event Description appears in the event detail. The “Count: ###” refers to the number of characters (including spaces and returns) entered into the field. When using the Enter key, the count increases by 2 – one for the carriage return and one for the line feed. By default the count limit is 5,000 characters. To reduce the character limit of this field, please contact Evanced Support. Type a description or synopsis of the event in the text entry field. This field will hold 1024 characters, including html codes. Featured Event Checking the Featured Events field allows the event to be emphasized within an RSS feed.. Click on the checkbox to emphasize a Featured Event within an RSS feed. Other Information Count: ### [Text Entry Field] Refers to additional information or details regarding the event (i.e., pre-requisites, items to bring, etc) to appear on the Registration Page. The “Count: ###” refers to the number of characters (including spaces and returns) entered into the field. When using the Enter key, the count increases 2 – one for the carriage return and one for the line feed. By default the count limit is 5,000 characters. To reduce the character limit of this field, please contact Evanced Support. Type desired information into the text entry field. This field holds up to 1024 characters, including html codes. Presenter [Presenter List] [] or Refers to the event’s presenter, facilitator or moderator. Presenter information appears in the Event Detail and the Search Slider (Registration & Attendance). The drop down list contains a list of presenters used most frequently by the library. The Administrator configures the list in Settings Branch Specific Lists Presenter List. 1. Select the desired presenter from the drop down menu, or 2. Type the presenter's name in the text entry field. [Text Entry Field] MAN0100-06.05 20 September 5, 2008 Events 6.0 Field Options Description How To Do It Internal Email [Text Entry Field] An optional field that refers to the internal email address to which the system sends status change emails. If left blank, all messages will go to the default e-mail address entered by the Administrator in Settings System Configuration & Settings Email Settings. Enter the internal email address to which status change notifications should be sent. Contact Name Name: Text Entry Field] Email: Text Entry Field] Type the name, email and phone of the event contact in the appropriate field. Phone: Text Entry Field] Refers to the contact patrons may use for additional information and may be someone outside the library (i.e., the presenter). The contact appears in the event details with a hyperlink that allows a patron to send the contact an e-mail message, if an e-mail address is provided. Link Text [Text Entry Field] The text label associated with Link Address that directs patrons to an alternate website for additional information (i.e., a sponsor's website). The Link Text appears as a hyperlink to the Link Address in the event detail. Type the name or title associated with the Link Address. Link Address [Text Entry Field] The URL address (website, .pdf file, etc.) associated with the Link Text. Type the desired URL address associated with the Link Text. PR Request Fill in PR details. Describes the types of public relations information (i.e., brochures, posters, press release) required by the event. The information entered here appears on the Events and PR Report. 1. Click on the check box to flag that PR is requested. 2. Enter PR types, quantities, deadlines and other information in to the text entry field. 3. Run the Events and PR Report according library procedures. Details: [Text Entry Field] 1 Note: There is no automatic notification that a PR Request exists. Users must run the Events and PR Report according to their library’s procedures. MAN0100-06.05 21 September 5, 2008 Events 6.0 Field Optional Image Display Path Options [Text Entry Field] Alternate Text: [Text Entry Field] Height: [## Field] Width: [## Field] Internal Notes MAN0100-06.05 Check Image [Text Entry Field] Description How To Do It Allows the attachment of a .gif, .jpg, or .bmp image to the event. Alternate Text refers to a description or label associated with an image, which benefits those using screen readers. The image appears in the List View of the Event Information/Registration page. 1. Type the URL path to the image into the text entry field. 2. Click CHECK IMAGE to preview the image. The preview also displays height and width of the image. 3. Click USE THIS IMAGE to attach the image and return to the Event Template. The system automatically completes the Height and Width fields; or 4. Click CANCEL to return to the Event Template. The system does not complete the Height and Width fields. 5. Type the text to associate with the image in the Alternate Text field. 6. Height and Width contains information if an image has been attached (Steps 1-3 above). Internal Notes is a private staff-only field accessible when accessing an event through Add/Edit/Archive (Event Maintenance) or on the Registration page (when enabled). See Settings Systems Configuration & Settings Registration Page Enable Staff Viewing to enable the Internal Notes field on the staff Registration and Attendance Page. Enter text as desired. 22 September 5, 2008 Events 6.0 Field Options Registration Information Registration | No Registration | Patron & Staff Registration | Staff Only Registration [Fill in any applicable stipulations.] Description Determines whether the event requires registration and who may submit a registration. See the Stipulations section below for additional information concerning registration. How To Do It Click the desired registration option. • No Registration Required indicates the event does not require registration to attend. • Patrons & Staff indicates the event requires registration and that both patrons and staff may submit registrations. • Staff Only indicates the event requires registration and that patrons must see a staff member to register. The Reports function includes registration statistics in its reports. Selecting either Patron & Staff Registration or Staff Only Registration enables a list of optional registration stipulations. Some stipulations are optional based upon settings configured in "System Configuration & Settings." Stipulations: This list appears only if Registration has been enabled in the previous section. *Maximum This required field determines the maximum Maximum Attendees: [## Field] Attendees capacity of the event. MAN0100-06.05 23 Enter the maximum number of people who can attend the event (i.e., 20). September 5, 2008 Events 6.0 Field Maximum In-House Spots Waiting List Options Options [ ] Timeout after: [ ] Hours [Optional – leave blank or set to 0 if not used] No Waiting List Maximum Waiting List: [Text Entry Field]* *Note: The Maximum Waiting List field does not appear when the default setting for “No Waiting List” is set “checked”. This is a System Setting – “Set ‘No Waiting List’ default to Checked.” MAN0100-06.05 Description How To Do It This optional field reserves a portion of the number entered in the Maximum Attendees field for staff-assisted registration. This accommodates people who may call or walk-in to register, and people unfamiliar or uncomfortable with the internet. “Timeout after [X] Hours” refers to the number of hours after registration opens that in-house spots will be held for staff-assisted registration. After [X] hours, in-house spots are released for patron self-registration. A Starting Registration value must be set in order for the Timeout function to work. For example, enter 10 to release in-house spots 10 hours after registration begins. 1. Enter into the first box, the number of spots reserved for patrons who call or walk in to ask for staff assistance in registering. This number must be less than the Maximum Attendees number. Determines whether the system creates a waiting list when the Maximum Number of Attendees is reached, the maximum length of the waiting list, and at what point registration closes. The system creates a waiting list by default unless otherwise indicated here. Patrons may appear on a Waiting List for one of three reasons: (a) The Maximum Number of Attendees has been reached; (b) A required participation fee has not been paid; or (c) A patron is on probation for failing to appear for or cancel from more than three events in a six month period (Configured in Settings System Settings & Configuration System Settings – Enforce 24HR Notice setting. 1. Click the No Waiting List check box to deactivate the waiting list. 24 2. Enter the number of hours in-house spots will be held for staff-assisted registration once registration opens. When this time expires, any remaining in-house spots are released for patron self registration. 2. Enter in the Maximum Waiting List field the maximum number of patrons that may appear on the waiting list. Note: This field will not appear if the default setting for No Waiting List is “checked”. This is a System Setting (Set ‘No Waiting List’ default to Checked”). September 5, 2008 Events 6.0 Field *Attendance Sheet Operation Options | Individual | Shared [For recurring events only] Description This field appears only in recurring events. A required field that determines how the system manages attendance sheets for recurring events. This field cannot be changed once registration has begun. How To Do It Click on the desired option. • Individual: Each instance of a recurring event has its own attendance sheet. • Shared: The system creates one cumulative attendance sheet showing all attendees in all dates of a recurring event. Starting Registration Fixed Date: [Date Entry Field] Pick Days before Event: [Text Entry Field] Day(s) [For individual attendance sheets, enter either a 'Fixed Date' or 'Days before Event'. Do not select both.] Refers to the date on which registration opens. When advance registration is not open, the system displays the following message in the event details: "We're sorry. The first registration date for this event is scheduled for [date] at [time]. Please come back and register at that time." The system automatically opens registration at the specified date and time. 1. Fixed Date field: Enter or pick the date on which registration should open; or 2. Days before Event: Enter the number of calendar days before the event that registration should open. • Fixed Date: Select Fixed Date if you know the exact date registration will open; or • Days before Event: Select Days before Event if registration opens a specific number of days before the event date. The system automatically calculates the date based upon the number of days entered. This setting is recommended for recurring events when Attendance Sheet Operation is set to Individual. Works with Starting Registration Time. Starting Registration Time MAN0100-06.05 [Hr][] : [Min] [] [AM] [] Refers to the time at which registration opens. If blank, registration opens at 12:01A.M. on the date given in the Starting Registration field. 25 Select a time from the drop down list. September 5, 2008 Events 6.0 Field Ending Registration Options Fixed Date: [Date Entry Field] Pick Days before Event: [Text Entry Field] Day(s) [For individual attendance sheets, enter either a 'Fixed Date' or 'Days before Event'. Do not select both.] Ending Registration Time MAN0100-06.05 [Hr][] : [Min] [] [AM] [] Description How To Do It Refers to the date on which registration closes. This field and Starting Registration function the same way. 1. Fixed Date field: Enter or pick the date on which registration should close; or • Fixed Date: Select Fixed Date if you know the exact date registration will close; or • Days before Event: Select Days before Event if registration closes a specific number of days before the event date. The system automatically calculates the date based upon the number of days entered. This setting is recommended for recurring events when Attendance Sheet Operation is set to Individual. Works with Ending Registration Time. Refers to the time at which registration closes. If blank, registration closes at 12:01A.M. on the date given in the Starting Registration field. 26 2. Days before Event: Enter the number of calendar days before the event that registration should close. Select a time from the drop down list. September 5, 2008 Events 6.0 Field Options Description Must be [Residency/Other Term Requirement] Timeout after: [ ] Hours [Optional – leave blank or set to 0 if not used] This field is only visible if the Residency/Other Term field (Systems Configuration & Settings Æ Library Information) is filled in. Checking this field activates a yes-no field on the registration page that requires patrons to respond to an eligibility requirement. Answering ‘No’ automatically places the patron on the waiting list, if the wait list function is enabled, or prevents the patron from continuing with the registration. “Timeout after [X] Hours” refers to the number of hours after registration opens that the eligibility term becomes null and void. After [X] hours, patrons who do not meet the residency term are allowed to register for the event. The stipulation checkbox and a Starting Registration value must be set in order for the Timeout function to work. For example, enter 10 to disable the eligibility requirement 10 hours after registration begins. MAN0100-06.05 27 How To Do It 1. Click the check box to activate Residency/Other Term Requirement. the 2. Enter the number of hours the eligibility requirement remains in effect. When this time expires, the eligibility requirement is disabled and patrons who did not meet the requirement are allowed to register. September 5, 2008 Events 6.0 Field Must be Between the Ages Options [Age List] [] TO [Age List] [] Description How To Do It Determines the age patrons must be to participate using their chronological age. This information appears in the event detail and in a drop down list on the Registration page. The options in the drop down list are hard coded in the system and not a configurable option. Use the drop down lists to enter the following: “Ages X to X”: 1. Left field = the minimum age required to participate. 2. Right field = the maximum age required to participate. “Ages X and Older” or “Ages X and Younger”: 1. Ages X and Older: • Left field = the youngest a person can be to participate; • Right field = blank. 2. Ages X and Younger: • Left field = blank. • Right field = the oldest a person can be to participate. Must be Between the Birthdates [Month][] [Day][] [Year][] TO [Month][] [Day][] [Year][] Determines the age patrons must be to participate using their birth date. This information appears in the event detail and in a drop down list on the Registration page. Use the drop down lists to enter the following: “Ages X to X”: 1. Left field = the date reflecting the minimum age required to participate. 2. Right field = the date reflecting the maximum age required to participate. “Ages X and Older” or “Ages X and Younger”: 1. Participants Born After: • Left field = the date that reflects the oldest a person can be to participate; • Right field = blank. 2. Participants Born Before: • Left field = blank. • Right field = the date that reflects the youngest a person can be to participate. MAN0100-06.05 28 September 5, 2008 Events 6.0 Field Must be Between the Grades Options [K-12] [] TO [K-12] [] Description How To Do It Determines the age patrons must be to participate using their academic grade. This information appears in the event detail and in a drop down list on the Registration page. The Administrator configures the contents of the list in Settings System Configuration & Settings Branch Lists Grade List. By default, this list is pre-populated with grades K-12. Use the drop down lists to enter the following: “Grade X to X”: 1. Left field = the lowest academic grade required to participate. 2. Right field = the highest academic grade required to participate. “Grade X and Above” or “Grade X and Below”: 1. Grade X and Above: • Left field = lowest academic grade required to participate; • Right field = blank. 2. Grade Level x and Below: • Left field = blank. • Right field = the highest academic grade required to participate. Must Give Cancellation Notice Determines whether the event requires participants to cancel their registration a minimum of 24 hours before an event. When selected, this option: 1. Activates an attendance tracking function on the Attendance Sheet; and 2. Automatically places patrons who are on probation on the waiting list when they register for future events. Click the check box to activate the cancellation policy. Must Enter Parent/Guardian Name Determines whether a Parent/Guardian Name field appears on the Registration page as a required field. Click the check box Parent/Guardian name field. Address Entry Required Determines whether the patron address field appears on the Registration page as a required field. Click on check box to activate the Address Entry field. MAN0100-06.05 29 to activate the September 5, 2008 Events 6.0 Field Options Description How To Do It Payment Required Determines whether the following functions are activated: 1. Automatically put patrons on a payment waiting list until payment is received; 2. Activates payment notification and information on the Registration page; and 3. Automatically move patrons from the waiting list to the main list when staff marks payment as received. Click the check box to activate payment functions. Enable Card Number Entry Card Number Not Required: Determines whether the library card number field appears on the Registration page and whether registration requires patrons to provide their library card number. Enabling Card Number Entry works with authentication when enabled. Please contact Evanced Solutions for more information about or assistance with authentication. Click the appropriate checkbox to activate the library card number field on the Registration page as: 1. = a required field; or 2. CARD NUMBER NOT REQUIRED = an optional. Custom Stipulations Determines whether the associated stipulation appears on the Registration page. Libraries may set up to six (6) custom stipulations. These are questions about additional information you would like from your attendees (i.e., How did you hear about this event?, Did you self register for this event?). The stipulations can be about anything the library wants to know. Information from this field appears on the Attendance Sheet. The Administrator sets the stipulations and response method (check box, yes/no, drop down list) in Settings Systems Configuration & Settings System Settings Event Entry Settings. Select stipulations to include on the Registration page by clicking the associated checkbox. MAN0100-06.05 30 September 5, 2008 Events 6.0 Field Options Administrative Information *Name/Initials [Text entry field] Description How To Do It An auditing feature that indicates who created or revised an event. This required field provides staff with a contact for questions or issues with the event. Users must enter their name or initials the first time they create or revise an event form in a session, which begins when a user logs onto the system. The system automatically enters the user’s name or initials in all subsequent forms created or revised during the session, which ends when a user logs off the system and closes their browser. The Administrator configures this field in Settings Systems Configuration & Settings System Settings Event Entry Settings Enable Auditing. Enter your name or initials in the text entry field. Determines whether an event is published to the public calendar when saved. The system automatically publishes events to the public calendar unless DO NOT PUBLISH is checked. The security level of the user’s password determines the ability to publish an event. The Administrator sets security levels at the individual branch level through Settings System Configuration & Settings Security. Click the DO NOT PUBLISH checkbox to withhold the event from the public calendar. Otherwise, the system automatically publishes the event to the public calendar. Save Saves and publishes the event based upon the authority of the creator as set by the library. Click SAVE to save the event. Back Returns to the Event Maintenance home page without saving data entered. Click BACK to return to the home page without saving data. Status Publish Do Not Publish: Closing Out MAN0100-06.05 31 September 5, 2008 Events 6.0 SECTION 3 - THE ADD/EDIT/ARCHIVE FUNCTION Add/Edit/Archive is the primary means of accessing and managing the events database. This section provides information and instructions related to: • Adding events (Paragraph A - Add an Event (page 32)) • Adding holidays and other closings (Paragraph B - Holidays and Closings (page 32)) • Editing events (Paragraph C - Edit an Existing Event (page 34)) • Copying events (Paragraph D - Copying an Event (page 34)) • Deleting events and how that affects statistical information (Paragraph E - Deleting an Existing Event (page 35)) • Publishing and unpublishing events, including what that means for the Event Calendar (Paragraph F - Publishing Events (page 35)) • Archiving events and how that affects Attendance Sheets and statistical information (Paragraph G - Archiving an Event (page 36)) • Accessing Event Registration Forms and Event Attendance Sheets from the event database (Paragraph H - Accessing the Event Registration Form and Event Attendance (page 37)) A. Add an Event The Event Template is the basic form used to post events to the Event Calendar. It determines: • • • • Which calendar the event is posted to - patron or staff only; How the event appears on the calendar, What information the calendar provides, and The attendance requirements and limits of registration, (if any). See the Section 2 - The Event Template (page 14) for detailed information about the Event Template. How To Do It 1. Beginning at the home page, click on ADD/EDIT/ARCHIVE (Event Maintenance menu). The system displays the Event Maintenance page. 2. Click ADD Template. NEW EVENT located above the Event Information Window. The system loads the Event 3. Complete the Event Template. See Section 2 - The Event Template (page 14) for more information. 4. Click SAVE. The system saves the event and returns to the Event Maintenance page. B. Holidays and Closings This section describes how to add holidays and other closing to the Event Calendar. The instructions are categorized into the three sections listed below. Please see the appropriate section for your library. • • • How To Do It – Multi-Branch System (All Branches Mode) (page 33) How To Do It - Multi-Branch Environment (Individual Branch) (page 33) How To Do It - Single Branch System (page 33) MAN0100-06.05 32 September 5, 2008 Events 6.0 How To Do It– Multi-Branch System (All Branches Mode) Use the following instructions to add a holiday or closing as a System Wide Event applied to All Branches. 1. Beginning at the home page, select ALL BRANCHES from the branch drop list. 2. Click ADD/EDIT/ARCHIVE (Event Maintenance menu). The system displays the Event Maintenance page. 3. Click ADD Template. NEW EVENT located above the Event Information Window. The system loads the Event 4. Select SYSTEM WIDE EVENT from the BRANCH field drop down list. 5. Complete the remainder of the Event Template. See Section 2 - The Event Template (page 14) for more information. 1 Note: When Events works with Room Reserve, click the “Check All” box for Location. This allows you to close all the rooms for the holiday so they can’t be reserved by a patron while the library is closed. 6. Click SAVE. The system will save the event and return to the Event Maintenance page. How To Do It - Multi-Branch Environment (Individual Branch) Use the following instructions when an individual branch needs to close independently of other branches in the system. 1. Beginning at the home page, select the desired branch from the branch drop list. 2. Click ADD/EDIT/ARCHIVE (Event Maintenance menu). The system displays the Event Maintenance page. 3. Click ADD Template. NEW EVENT located above the Event Information window. The system loads the Event 4. Complete the Event Template. See Section 2 - The Event Template (page 14) for more information. 1 Notes: (i) Event Time: Click ALL DAY to close for the day. (ii) Location: If a Location is not required, select “No Location”. (iii) Holiday Closings: If the library also has Room Reserve, create a dummy room in Room Reserve that combines all the rooms in the branch (i.e., ROOM CLOSING STAFF ONLY (ALL ROOMS)) and use that dummy room to close all rooms for the holiday. See Appendix B(4)(H) – Category Lists and Filters (page 40) for instructions about adding a room. 5. Click SAVE. The system will save the event and return to the Event Maintenance page. How To Do It - Single Branch System 1. Beginning at the home page, click on ADD/EDIT/ARCHIVE (Event Maintenance menu). The system displays the Event Maintenance page. 2. Click ADD NEW HOLIDAY EVENT located above the Event Information Window. The system loads the Event Template. 3. Complete the Event Template. The Event Template is the same template used for other events, except that the Location and Event Type fields contain no options. See Section 2 - The Event Template (page 14) for more information about the Event Template. 4. Click SAVE. The system will save the event and return to the Event Maintenance page. MAN0100-06.05 33 September 5, 2008 Events 6.0 C. Edit an Existing Event The following section describes how to edit an existing event. How To Do It 1. Beginning at the home page, click on ADD/EDIT/ARCHIVE (Event Maintenance menu). The system displays the Event Maintenance page. 2. Use the Search/Filter to locate the desired event. The system displays search results, which includes the publication status of the event, in the Event Information Window to the right of the Search/Filter. (See Section 1(A) - The Search/Filter - (page 11) for more information.) 3. Locate the desired event in the list displayed. 4. Click the appropriate edit link located at the top of the event. The event record contains one or more of the following links as determined by the type of event - single date or recurring. A. ‘Edit Single’ to edit one occurrence of an event; B. ‘Edit Recurring’ to edit the entire series of a recurring event; or C. Click on a single date of a recurring event to edit just that occurrence. The system displays the Event Template in edit mode. 5. Edit the template as desired. 6. Click SAVE to save your changes; or 7. Click BACK to return to the home page without saving changes. D. Copying an Event Users may copy an event to use as a template for creating a new event. Copying retains the original event record and all associated records. How To Do It 1. Beginning at the home page, click on ADD/EDIT/ARCHIVE (Event Maintenance menu). The system displays the Event Maintenance page. 2. Use the Search/Filter to locate the desired event. The system displays search results, which includes the publication status of the event, in the Event Information Window to the right of the Search/Filter. (See Section 1(A) - The Search/Filter - (page 11) for more information.) 3. Locate the desired event in the list displayed. 4. Click the appropriate copy link located at the top of the event. The event record contains one or more of the following links as determined by the type of event - single date or recurring. A. ‘Copy A Single’ to copy one occurrence of an event; or B. ‘Copy Recurring’ to copy the entire series of a recurring event; The system displays the Event Template in copy mode. 5. Revise the template as needed to reflect a new event. 6. Click SAVE to save the new (revised) event; or 7. Click BACK to cancel the process and return to the Event Maintenance page. MAN0100-06.05 34 September 5, 2008 Events 6.0 E. Deleting an Existing Event Deleting an event permanently deletes the event and its associated attendance sheets and all statistical information. T Deleted events cannot be recovered. To move events from the active event list and retain statistical information, see Paragraph G - Archiving an Event (page 36). How To Do It 1. Beginning at the home page, click on ADD/EDIT/ARCHIVE (Event Maintenance menu). 2. Use the Search/Filter to locate the desired event. The system displays search results, which includes the publication status of the event, in the Event Information Window to the right of the Search/Filter. 3. Locate the desired event in the list displayed. 4. Click the DELETE link at the top of the desired record. The system displays the following warning and secondary confirmation: “Are you sure you want to PERMANENTLY delete the event and all associated statistical information? This skips the archive process so there is no way to undo the delete.” 5. Click OK to permanently delete the event; or 6. Click CANCEL to close the message and return to the Event Information Window. F. Publishing Events An event is designed as either “Published” (appears on the Events calendar) or “Unpublished” (does not appear on the Events Calendar) at the time it is created. Unpublished events may be published at any time either individually or in bulk by date range. How To Do It – Publishing and Unpublishing Existing Individual Events 1. Beginning at the home page, click on ADD/EDIT/ARCHIVE (Event Maintenance menu). The system displays the Event Maintenance page. 2. Use the Search/Filter to locate the desired event. The system displays search results in the Event Information Window to the right of the Search/Filter. The information displayed includes the Published/Unpublished status of each event listed. (See Section 1(A) - The Search/Filter - (page 11) for more information.) 3. Locate the desired event in the list displayed. 4. Click the appropriate edit link located at the top of the event. The event record contains one or more of the following links as determined by the type of event - single date or recurring. A. ‘Edit Single’ to edit a single date of an event. This option only appears in connection with a recurring event, if Combine Recurring Events is unchecked on the Search Filter; B. ‘Edit Recurring’ to edit the entire series of a recurring event; or C. Click on a single date of a recurring event to edit just that occurrence. The system displays the Event Template in edit mode. 5. Locate the Status field of the Administrative Information section at the end of the Event Template. MAN0100-06.05 35 September 5, 2008 Events 6.0 6. Click the PUBLISH/UNPUBLISH checkbox. The checkbox label will differ depending on the current status of the event. 7. Click SAVE to save your changes; or 8. Click BACK to return to the home page without saving changes. How To Do It – Bulk Publishing 1. Beginning at the home page, click on ADD/EDIT/ARCHIVE (Event Maintenance menu). The system displays the Event Maintenance page. 2. Click tool. BULK PUBLISH located above the Event Information Window. The system displays the Bulk Publish 3. Select or pick the desired date range of the events to publish. 4. Select the Event Types to publish from the drop down list. The default is All Events, which publishes all event types within the specified range. 5. Click PUBLISH EVENTS to publish the selected events. The system searches the active list of events and displays a confirmation based on its search. See Step 6 if the search was unsuccessful and no unpublished events were found. See Step 7 if the search was successful and you want to proceed with publishing events. 6. Unsuccessful Search: The system displays the following message when the search for unpublished events in the specified date range was unsuccessful: “Found [X] between [Beginning Date] and [Ending Date]. Enter a different Range.” A. Click ENTER A DIFFERENT RANGE to return to the Bulk Publishing tool and go back to Step 3 above; or B. Click the X in the upper right corner to close the Bulk Publishing tool. 7. Successful Search: The system displays the following message when the search for unpublished events in the specified date range was successful: “Found [X] events between [Beginning Date] and [Ending Date]. Are you sure you want to Publish all X?” A. Click PUBLISH EVENTS X to confirm and publish the selected events; or B. Click CANCEL to close the Bulk Publishing tool without publishing events and return to the Event Maintenance page. G. Archiving an Event Archiving an event: • Removes the event from the Event Calendar (staff and patron views), • Moves the event from the Add/Edit/Archive (Event Maintenance menu) database to the Archive database, and • Deletes all attendance sheets associated with the event, unless otherwise configured by the Administrator. Deleting an attendance list does not affect statistical reporting. The Reports function retains access to event statistics as long as the event resides in the Archive. See Section 4 - The View Archive Function (page 39) for further information about accessing the Archive. MAN0100-06.05 36 September 5, 2008 Events 6.0 Users may archive individual events, multiple individual events or all events within a specified time frame (Bulk Archiving). How To Do It – Archiving One or More Individual Events 1. Beginning at the home page, click on ADD/EDIT/ARCHIVE (Event Maintenance menu). The system displays the Event Maintenance page. 2. Use the Search/Filter to locate the desired event. The system displays search results, which includes the publication status of the event, in the Event Information Window to the right of the Search/Filter. (See Section 1(A) - The Search/Filter - (page 11) for more information.) 3. Locate the desired event(s) in the list displayed. 4. Click either the ARCHIVE or ARCHIVE RECURRING check box at the top of the desired event record(s) to mark the event for archiving. You may mark multiple events to move to the Archive. 5. Click ARCHIVED CHECKED EVENT(S) located above the Event Information Window. The system archives the marked events without secondary confirmation. How To Do It – Bulk Archiving By Date Range 1. Beginning at the home page, click on ADD/EDIT/ARCHIVE (Event Maintenance menu). The system displays the Event Maintenance page. 2. Click tool. BULK ARCHIVE located above the Event Information Window. The system displays the Bulk Archive 3. Select or pick the desired date range of the events to archive. 4. Click ARCHIVE to archive the selected events. The system searches the active list of events and displays the following secondary confirmation message: “Found X events between [Beginning Date] and [Ending Date]. Are you sure you want to Archive all X events?” 5. Click ARCHIVE X EVENTS to confirm and archive the selected events; or 6. Click CANCEL to close the Bulk Archiving tool without archiving events and return to the Event Maintenance page. H. Accessing the Event Registration Form and Event Attendance Sheet In addition to the functions described above, users have access to the Event Registration Form and Event Attendance Sheet from the Event Maintenance page. Both forms display event details (title, description, date, etc.) and event status information (i.e., attendance statistics). The Event Registration Form contains a section allowing users to register patrons for the event. The Event Attendance Sheet provides a link to the Event Registration Form. The following table provides an overview of the registration and attendance links associated with each event and the actions that may be performed. Link Attendance Attendance Stats Register Update Statistics 3 3 Register 3 Export to Excel 3 3 3 See the following How To Do It sections for related instructions. See Chapter V - Registration & Attendance (page 44) for additional information about registration and attendance functions. MAN0100-06.05 37 September 5, 2008 Events 6.0 How To Do It – Accessing an Event’s Registration Form 1. Beginning at the home page, click on ADD/EDIT/ARCHIVE (Event Maintenance menu). The system displays the Event Maintenance page. 2. Use the Search/Filter to locate the desired event. The system displays search results in the Event Information Window to the right of the Search/Filter. 3. Locate the desired event in the list displayed. Events that require registration include a the top of the record. REGISTER link at 4. Click REGISTER. The system displays the Event Registration Form. 5. Complete the Event Registration Form as desired. See Chapter V(3) - The Calendar/Registration Function (page 61) for more information about registration. 6. Click CLOSE to close the Event Registration Form without completing the registration and return to the Event Maintenance page; or 7. Click COMPLETE REGISTRATION to finalize registration. Complete confirmation, such as: The system displays an Event Registration “John Doe is registered for: Title: Date(s): Time: The confirmation number is: In consideration of the presenters and other attendees, please try to be at the library 5 minutes prior to the beginning of the program.” 8. Click CLOSE to close the Event Registration Complete confirmation; or 9. Click SAME EVENT REGISTRATION to complete an additional registration. Calendar/Registration Function (page 61) for more information. See Chapter V(3) - The How To Do It – Accessing the Event Attendance Sheet 1. Beginning at the home page, click on ADD/EDIT/ARCHIVE (Event Maintenance menu). The system displays the Event Maintenance page. 2. Use the Search/Filter to locate the desired event. The system displays search results in the Event Information Window to the right of the Search/Filter. 3. Locate the desired event in the list displayed. 4. Click either ATTENDANCE STATS or ATTENDANCE. The event will have one or the other at the top of the record. The system displays the Event Attendance Sheet. 5. Complete or update the Event Attendance Sheet as desired: A. Statistics Entry Only: (i) Update the Statistics Entry field. (ii) Click SAVE ATTENDANCE. (iii) Click BACK to return to the Event Maintenance page. B. Export to Excel: (i) Click EXPORT TO EXCEL. The system displays the Event Attendance Sheet in Excel format. (ii) Select FILE SAVE AS to save the report to your network. MAN0100-06.05 38 September 5, 2008 Events 6.0 C. Registration: (i) Click REGISTER. The system displays the Event Registration Form. (ii) Complete the Event Registration Form. (iii) Click COMPLETE REGISTRATION or ADD ME TO THE WAITING LIST, as appropriate. provides one of these options depending upon the status of the attendance sheet. The system (iv) The system displays an Event Registration Complete confirmation with a message appropriate to your registration status. (v) Click CLOSE to close the Event Registration Complete confirmation; or (vi) Click SAME EVENT REGISTRATION to complete an additional registration. SECTION 4 - THE VIEW ARCHIVE FUNCTION The Archive retains detail and statistical information for events removed from the Event Calendar. Archived events can only be viewed from the Archive database. The illustration below is an example of the Archive Maintenance page and the functions and links associated with each record type (i.e., Ongoing Event, Single Event, or Recurring Event). Text Size T T T [Library] Archive Maintenance Home Event Maintenance Registration & Attendance Delete History SEARCH/FILTER Event Type: [Event Type List] [] Branch:* [Branch List] []* Date [Mo][] [Day][] [Yr][] TO [Mo][] [Day][] [Yr][] Pick Pick Published Events Only Unpublished Events Only 5 Show ongoing events 5 Combine recurring events Keyword: [Text Entry Field] [] Search Clear Search Records: [###] of [###] Reports Settings About Logoff: Admin Level Delete Checked Event(s) Event Information Sort Results By: [Event Information List] [] Descending | Ascending Status Delete 4 Restore Copy to Active Event List Attendance Stats Published [Program Name] (Ongoing Event) Branch: Event Type: Event Date: Ongoing Event Age Group: Description: Delete 4 Restore Copy to Active Event List Attendance Stats [Program Name] Branch: Location: Event Type: Event Date: Event Time: Age Group: Description: Unpublished Single Event Listing Delete 4 Restore Delete Recurring Event Attendance Register Published [Program Name] Edit Single Occurrence: This event, Date 1, Date 2, Date 3, Date 4, Date 5, Date 6 Branch: Location: Event Type: Event Date: Recurring Event Event Time: Age Group: Description: Delete Checked Event(s) *)) Multi-Branch System Note: The branch list appears when accessing Event Maintenance functions from the All Branches mode. MAN0100-06.05 39 September 5, 2008 Events 6.0 A. Viewing Registration and Attendance Information The Archive Maintenance page provides access to the Event Registration Form and Event Attendance Sheet. Both forms display event details (title, description, date, etc.) and event status information (i.e., attendance statistics). The Event Registration Form contains a section allowing users to register patrons for the event. The Event Attendance Sheet provides a link to the Event Registration Form. 1 Note: The system can be configured to delete the Attendance Sheet when an event is archived. The system retains statistical information until the event is deleted from the database. The following table provides an overview of the registration and attendance links associated with each event and the actions that may be performed. Link Attendance Attendance Stats Register Update Statistics 3 3 Register 3 Export to Excel 3 3 3 See the following How To Do It sections for related instructions. How To Do It – Accessing an Archived Event Registration Form 1. Beginning at the home page, click on Archive Maintenance page. VIEW ARCHIVE (Event Maintenance menu). The system displays the 2. Use the Search/Filter to locate the desired event. The system displays search results, which includes the publication status of the event, in the Event Information Window to the right of the Search/Filter. (See Section 1(A) - The Search/Filter - (page 11) for further information about the Search/Filter.) 3. Locate the desired event in the list displayed. Events that require registration contain a the top of the record. REGISTER link at 4. Click REGISTER. The system displays the Event Registration Form. 5. Complete the Event Registration Form as desired. See Chapter V - Registration & Attendance (page 44) for more information about registration. 6. Click CLOSE to close the Event Registration Form without completing the registration and return to the Event Maintenance page; or 7. Click COMPLETE REGISTRATION to finalize registration. Complete confirmation, such as: The system displays an Event Registration “John Doe is registered for: Title: Date(s): Time: The confirmation number is: In consideration of the presenters and other attendees, please try to be at the library 5 minutes prior to the beginning of the program.” 8. Click CLOSE to close the Event Registration Complete confirmation; or 9. Click SAME EVENT REGISTRATION to complete an additional registration. How To Do It – Accessing the Event Attendance Sheet 1. Beginning at the home page, click on Archive Maintenance page. MAN0100-06.05 VIEW ARCHIVE 40 (Event Maintenance menu). The system displays the September 5, 2008 Events 6.0 2. Use the Search/Filter to locate the desired event. The system displays search results, which includes the publication status of the event, in the Event Information Window to the right of the Search/Filter. (See Section 1(A) - The Search/Filter - (page 11) for more information.) 3. Locate the desired event in the list displayed. 4. Click either ATTENDANCE STATS or ATTENDANCE. The event will have one or the other at the top of the record. The system displays the Event Attendance Sheet. 5. Complete or update the Event Attendance Sheet as desired: A. Statistics Entry Only: (i) Update the Statistics Entry field. (ii) Click SAVE ATTENDANCE. (iii) Click BACK to return to the Event Maintenance page. B. Export to Excel: (i) Click EXPORT TO EXCEL. The system displays the Event Attendance Sheet in Excel format. (ii) Select FILE SAVE AS to save the report to your computer or network. C. Registration: (i) Click REGISTER. The system displays the Event Registration Form. (ii) Complete the Event Registration Form. (iii) Click COMPLETE REGISTRATION or ADD ME TO THE WAITING LIST, as appropriate. provides one of these options depending upon the status of the attendance sheet. The system (iv) The system displays an Event Registration Complete confirmation with a message appropriate to the registration status. (v) Click CLOSE to close the confirmation; or (vi) Click SAME EVENT REGISTRATION to complete an additional registration. B. Restoring an Event The RESTORE function returns an event record to the active event list and the Event Calendar. 1 Note 1: Restored events retain their original status – Published or Unpublished – when they return to the Event Calendar. So, a Published event returns to both the staff and patron views. An Unpublished event returns to the staff view only. 1 Note 2: Restoring an event does not restore the list of attendees that may have been deleted when the event was originally archived. How To Do It – Restoring an Archived Event 1. Beginning at the home page, click on Archive Maintenance page. VIEW ARCHIVE (Event Maintenance menu). The system displays the 2. Use the Search/Filter to locate the desired event. The system displays search results, which includes the publication status of the event, in the Event Information Window to the right of the Search/Filter. (See Section 1(A) - The Search/Filter - (page 11) for more information.) 3. Locate the desired event in the list displayed. 4. Click RESTORE located above the event record. The system moves the event record to the active event list and the Event Calendar without a secondary confirmation. MAN0100-06.05 41 September 5, 2008 Events 6.0 C. Copy to Active Event List The COPY TO ACTIVE EVENT LIST function allows users to use an archived event to create a new event. Copying an event retains the original archived event and all associated statistical information and creates a duplicate event (minus attendance statistics) to use as a template for a new event. How To Do It – Copy an Archived Event 1. Beginning at the home page, click on Archive Maintenance page. VIEW ARCHIVE (Event Maintenance menu). The system displays the 2. Use the Search/Filter to locate the desired event. The system displays search results, which includes the publication status of the event, in the Event Information Window to the right of the Search/Filter. (See Section 1(A) - The Search/Filter - (page 11) for further information about the Search/Filter.) 3. Locate the desired event in the list displayed. 4. Click COPY TO ACTIVE EVENT LIST. The system opens the Event Template in copy mode. 5. Edit the Event Template as desired. 6. Click SAVE. The system saves all changes and displays the following message: “Do you want to clear the audit log? Click ‘OK’ to clear the log or ‘Cancel’ to keep the log.” 7. Click either OK to clear the original audit log, close the Event Template and return to the Archive Maintenance page; or 8. Click CANCEL to retain the audit log from the original event, close the Event Template and return to the Archive Maintenance page. D. Deleting Archived Events Deleting events permanently removes the selected events and associated attendance sheets and statistics from the database. Deleted events cannot be restored. Note: There is no feature to delete events in bulk. How To Do It – Deleting Selected Events 1. Beginning at the home page, click on Archive Maintenance page. VIEW ARCHIVE (Event Maintenance menu). The system displays the 2. Use the Search/Filter to locate the desired event. The system displays search results, which includes the publication status of the event, in the Event Information Window to the right of the Search/Filter. (See Section 1(A) - The Search/Filter - (page 11) for further information about the Search/Filter.) 3. Locate the desired event in the list displayed. 4. Click the DELETE checkbox to mark the event for deletion. 5. Verify that events marked for deletion are correct. Once DELETE CHECKED system deletes marked items without additional warning or confirmation. 6. Click DELETE confirmation. CHECKED EVENT(S). EVENT(S) is selected, the The system deletes marked items without secondary warning or E. Purging Events History When you delete events, an event ‘marker’ remains in the database’s Event History table. This table contains a list of all deleted events. It is not possible to view or access the table. Over time this table can grow quite large and should be purged from time to time to keep the system operating at its peak. MAN0100-06.05 42 September 5, 2008 Events 6.0 How To Do It – Purging Events History 1. Beginning at the home page, click on Archive Maintenance page. VIEW ARCHIVE (Event Maintenance menu). The system displays the 2. Click DELETE HISTORY (located above the Event Information Window). The system displays the Purge Events Action Tool: Purge Events The Event History Table contains a list of all events that were deleted from the active event list. It should be purged as needed to remove old events. Click on the calendar icon to select an ending date. All events that are older than the selected date will be purged from the history information: Select Ending Date: [Date Entry Field] Purge Events Pick Cancel 3. Enter the end date of the date range to be purged. For example, entering 2/28/2005 will permanently delete all events from the beginning of time to and including 2/28/2005. 4. Click CANCEL to close the Purge Events Action Tool and return to the Archive Maintenance page; or 5. Click PURGE EVENTS to permanently delete all events prior to and including the specified end date. The system displays the following secondary confirmation: “Are you sure you want to purge events that occurred prior to 11/30/2006?” 6. Click PURGE EVENTS to confirm the intent to purge; or 7. Click CANCEL to close the Purge Events Action Tool and return to the Archive Maintenance page. MAN0100-06.05 43 September 5, 2008 Events 6.0 CHAPTER V. REGISTRATION & ATTENDANCE Registration & Attendance • Event Attendance • Calendar/Registration • Attendee Lookup Registration & Attendance allows users to manage event-related functions, including event registration, attendance, and patron records. Many of the features in Registration & Attendance are cross-functional. For example, the Event Registration Forms and Event Attendance Sheets are accessible from all three functions. This chapter provides information and instruction about what users can see, do and access from Registration & Attendance. • Section 1 - Event Calendar Views and Navigation (page 44) provides information about how to access, navigate and work with the Event Calendar. • Section 2 - Event Attendance (page 48) provides information about managing event attendance, including managing attendance sheets, entering attendance statistics, and exporting the attendance list to Excel. This section also provides information about accessing and working with patron records from the Event Attendance function. • Section 3 - The Calendar/Registration Function (page 61) provides information about managing registering patrons for events and accessing the Event Attendance Sheet from the Calendar/Registration function. • Section 4 - The Attendee Lookup Function (page 64) provides information about accessing and working with patron records, including registering patrons for events and accessing Event Attendance Sheets. SECTION 1 - EVENT CALENDAR VIEWS AND NAVIGATION This section describes the organization of information in the Event Attendance and Calendar/Registration functions and how to navigate within both. Though both functions accomplish different goals they are essentially the same in appearance and functionality. Please note that the Calendar\Registration view provides a view similar to what patrons see on the public side. A. Calendar Views – Event Attendance and Calendar/Registration The Event Calendar is the home page for Event Attendance and Calendar/Registration functions. system displays events in either a monthly calendar or list format. • The Calendar View displays events in a monthly calendar format (as illustrated below). This is the default view displayed when users select Event Attendance or Calendar/Registration. Users access event detail by either hovering over the event to display a pop-up window or by clicking on the event to display the Event Attendance Sheet. The Search Slider is hidden by default, but is accessible by clicking SEARCH SLIDER located above the calendar. MAN0100-06.05 44 September 5, 2008 Events 6.0 MAN0100-06.05 45 September 5, 2008 Events 6.0 • List View displays events in list format (as illustrated below), which provides more event detail and ready access to additional functions, such as Email a Friend, Notify me, Download to Calendar, etc. Ongoing events are listed first followed by the remaining events in date order. The Search Slider is visible by default. MAN0100-06.05 46 September 5, 2008 Events 6.0 How To Do It - Changing Calendar Views 1. Beginning at the home page, click either EVENT ATTENDANCE or CALENDAR/REGISTRATION. The system displays the Programs and Events Page calendar in monthly format. 2. Locate the VIEW: CALENDAR VIEW | LIST VIEW link above the calendar. The current view is grayed out. 3. Click on the desired view. The system changes the calendar format to match your selection. B. Event Listings All events titles that appear on the calendar are hyperlinks to the Event Information page. Events that require registration appear underlined. For example: • Event Title ............... Requires registration. The hyperlink opens the Event Registration Form. • Event Title ............... Does not require registration. The hyperlink opens the Event Information Form. The pop-up windows also indicate whether the event requires registration and, if so, the status of the attendance sheet – Openings, Full, etc. C. Search Slider The Search Slider performs the same function the Search/Filter performs in Event Maintenance, though the options differ somewhat. Please see the illustrations in the previous section for an example of the Search Slider. How To Do It – Using the Search Slider 1. Beginning at the home page, click the desired function on the Registration & Attendance menu. The system displays the Programs and Events page. 2. Click SEARCH SLIDER if the Search page is hidden. The system displays the Search Slider to the left of the calendar or list. 3. Enter or select the desired search parameters in the Search Slider. When selecting a Location, Event Type, or Age Group, deselecting ALL [LOCATIONS, EVENT TYPES OR AGE clears all checks from the list. Click on the desired check boxes to include individual Locations, Event Types or Age Groups. GROUPS] 4. Click FIND. The system displays results in the calendar or list to the right of the Search Slider. 5. Click CLEAR to clear the previous search parameters. The Search Slider remembers the last search until a new search is entered or users log off the system. D. Display Personal Schedule DISPLAY PERSONAL SCHEDULE displays an individual patron Event Calendar containing the schedule of events that the patron has registered for. Users must have a confirmation for one of the events the patron is scheduled to attend and patron’s last name. How To Do It – Using Display Your Personal Schedule 1. Beginning at the home page, click either displays the Programs and Events page. EVENT ATTENDANCE or REGISTRATION & ATTENDANCE. The system 2. Click display personal calendar located above the Event Calendar. The system displays the Display Patron Schedule page. MAN0100-06.05 47 September 5, 2008 Events 6.0 3. Enter the confirmation number for one of the events the patron registered for and the patron’s last name. An optional feature this allows the patron to elect to use their first and last names, plus their phone number. (See System Configuration & Setting Æ System Settings Æ Display Personal Schedule Validation Options for more information). 4. Click SUBMIT. The system displays the patrons personal Event Calendar. Or 5. Click BACK to return to the Events Calendar. SECTION 2 - EVENT ATTENDANCE The primary function of Event Attendance is managing attendance functions for the various events, including: • • • • • Registering and canceling patrons, Moving patrons between attendance lists - Main List, Waiting Lists and Cancelled List, Communicating with patrons by e-mail, Transferring or copying registrations to other events, and Managing event attendance statistics. For this reason primary access for all information in Event Attendance originates with the Event Calendar and an event record in the form of the Event Attendance Sheet. The event record also provides access to Patron Records and all the functions normally available there. This cross-functionality allows users to assist patrons without going to Attendee Lookup, Calendar/Registration or the home page; they can start from where they are. This section is organized as follows: • Paragraph A - The Event Attendance Sheet (page 49) • Paragraph B - Managing Event Attendance Sheets (page 53) • Paragraph C - Working in Patron Records (page 59) MAN0100-06.05 48 September 5, 2008 Events 6.0 A. The Event Attendance Sheet The illustration below displays the Event Attendance Sheet, as it appears for an event that requires registration. When an event does not require registration, the Event Attendance Sheet excludes the Attendance List portion of the form. TITLE: DATE: START TIME: END TIME: LOCATION: MAX PEOPLE: s Event Details s Attendance Statistics s Attendance Lists Statistics Entry Total Number of Attendees: Total Number of Adults: Total Number of Seniors: Total Number of Teens: Total Number of Children: ## ## ## ## ## Save Attendance Main (##) Waiting (##) Payment Waiting (##) Cancelled (##) v MAIN LIST – Sort By: [Patron Info] [] [Asc/Desc] [] 1 2 3 No Show Move Name Phone Alt Phone Email Age | | | Cancel Transfer/ Copy Notes Copy All Update Notes Reg Date Registered By Position Confirm Number Update Email Cancel STATUS: No Show Attendance has NOT been taken. Back to Maintenance Page MAN0100-06.05 Register View Another Attendance Sheet 49 Export to Excel September 5, 2008 Events 6.0 The Event Attendance Sheet contains three categories of information. 1. Event Information: The first section of the Event Attendance Sheet contains event details, including title, date, time, location and the maximum number of attendees allowed. 2. Statistics Entry: The second section of the Event Attendance Sheet contains census information about the attendees, including the total number of attendees and any optional statistical inputs that may be included. (See System Configuration & Settings Æ System Settings Æ Optional Statistical Inputs.) 3. Attendance Lists: The third section of the Event Attendance Sheet contains the event’s attendance list. The attendance list appears in the following categories: the Main List, the Waiting List, the Payment Waiting List, if applicable, and the list of Cancelled registrations. Users may sort the list in ascending or descending order by first name, last name, phone, alternate phone, e-mail, registration date, library card number or confirmation number. The Main List is the default view. Each Attendance List contains its own information fields and functions depending upon the type of list. See the table at the end of this section for information about the Attendance List’s fields and functions. A. Main List: The Main List contains information about patrons registered to attend the event. The Main List allows users to track attendance, view, edit, copy, transfer and cancel registrations, e-mail attendees, and enter notes. Attendees that were originally on the Waiting List will contain one of the following codes after their name: • A = Automatically moved. Registrants move from the Waiting List automatically due to the cancellation of an attendee. • M = Manually moved. Users may move registrants from the Waiting List to the Main List if circumstances and library policy dictate. If the library or the event facilitator choose to increase the maximum number of event participants, patrons on the Wait List must be manually moved to the Main List. B. Waiting List: Registrants are put on the Waiting List when the Main List reaches capacity. Registrants move from the Waiting List to the Main List in two ways: • • Automatically when space on the Main List opens up; or Manually by library staff (with the appropriate access) as circumstances dictate. When registrants move from the Waiting to the Main List, the system enters a code next to their name that indicates how they were moved: • • A = Automatically M = Manually C. Payment Waiting List: The system creates a Payment Waiting List when an event requires the advanced payment of a fee. All registrations requiring a fee payment are initially assigned to the Payment Waiting List until payment is received and confirmed. Registrants move to the Main List or Waiting List on a first-paid-first-moved basis. D. Cancelled List: The Cancelled List contains the names of patrons who registered to attend, but then cancelled their registration – either on their own or with staff assistance. The table below describes the fields and functions associated with the Attendance List portion of the Event Attendance Sheet. Because fields and functions do not appear on all lists, information in the table is presented in alphabetical order. MAN0100-06.05 50 September 5, 2008 Events 6.0 List Appearance Wait Pay Cancel Description Main Age Appears when there is an age requirement to attend an event and refers to the participant’s age. √ √ √ √ Alt Phone Displays an alternate phone number for the patron. √ √ √ √ Cancel Moves the patron from the Main List to the Cancelled List and generates a status change e-mail to the patron, if the patron’s record includes an e-mail address. √ √ √ Cancelled By Displays whether patrons self-cancelled or were cancelled by staff. Card Number Displays patron library card numbers when the Library Card Number field is active on the Event Registration Form and the patrons provide it. √ √ Confirmation Number Displays the patron’s registration confirmation number. √ √ √ √ Email Displays the patron’s e-mail address. √ √ √ √ Move Moves a patron between the Main List and the Waiting List and generates a status change e-mail to the patron, if the patron’s file includes an e-mail address. √ √ Name Contains the patron’s name and a link (View/Edit) to the patron’s record. The patron’s record includes contact information, no show information, and the patron’s schedule of events. From the patron’s record users may register the patron for another event, cancel a patron from any event on their schedule, update no show information, and access the Event Attendance Sheet for any event on the patron’s schedule. √ √ √ √ No Show Allows libraries to track when patrons register for but do not attend or cancel their registration 24 hours in advance of the event. Patrons with a pattern (more than 3 events in 6 months) of registering for events but not attending or canceling are automatically wait-listed when they register for future events. The Administrator enables this function in Settings System Settings & Configuration System Settings – Enforce 24HR Notice. √ Notes Displays notes entered into the Notes field of the Event Registration Form. Both patrons and staff see the information in this field. Patrons access this information on their Event Registration Form. Staff may edit the Notes field from the Attendance Sheet. √ √ √ √ Payment Moves selected patrons from the Payment Waiting List to the Main List or the Waiting List, as appropriate, without secondary confirmation. Moving a patron also generates a status change e-mail to the patron, if the patron’s file includes an e-mail address. Fields MAN0100-06.05 51 √ √ √ September 5, 2008 Events 6.0 Description Main List Appearance Wait Pay Cancel Phone Displays the patron’s phone number. √ √ √ √ Reg Date Displays the date a patron registered for an event. √ √ √ √ Registered By Displays who submitted the registration – “Staff” or “Patron”. √ √ √ Remove Moves the patron from the Main List to the Cancelled List and generates a status change e-mail to the patron, if the patron’s file includes an e-mail address. √ Remove Deletes selected patrons from the Cancelled List. √ Stipulation Questions The fields between “Registered By” and “Cancelled By” are assigned to the Stipulation Questions that appear on the Event Registration Form. The titles and answers displayed are dependent on the questions. √ √ Transfer/Copy Transfers a patron from one event or event date to another. √ √ Uncancel Moves a patron from the Cancelled List to the Main List and generates a status change e-mail to the patron, if the patron’s file includes an e-mail address. Functions Back to Maintenance Page √ √ √ Returns the user to the Event System Maintenance home page. √ √ √ Cancel Appears beneath the Cancel field, it moves selected participant(s) from the Main List or Waiting List to the Cancelled List and generates a status change e-mail to the patron, if the patron’s file includes an e-mail address. √ √ √ Copy All Appears beneath the Transfer/Copy field, it copies all listed patrons from one event to another. √ √ Edit Event Opens the event in Edit mode allowing staff to make changes to the event √ √ √ √ Email Appears beneath the E-mail field and sends an e-mail to all listed patrons. Patron e-mail addresses appear in the blind copy (BCC) field. √ √ √ √ Export to Excel Allows users to save the Event Attendance Sheet in Excel. √ √ √ √ Move A radio button in the Move field, it moves selected patrons between the Waiting List and the Main List. √ √ Pay Appears beneath the Payment field, it moves selected patrons from the Payment Waiting List to the Main List or the Waiting List, depending upon the status of the Attendance Sheet. Register Displays an Event Registration Form for the selected event. MAN0100-06.05 52 √ √ √ √ √ √ September 5, 2008 Events 6.0 Description Main List Appearance Wait Pay Cancel Remove Deletes selected patrons from the Cancelled List. √ Uncancel It moves selected patrons from the Cancelled List to the Main List or Waiting List, as appropriate. √ Update Appears beneath the No Show field, it updates the No Show count. √ Update Notes Appears beneath the Notes field, it saves entries made in the Notes field. √ √ √ √ View Another Attendance Sheet Returns user to the Event Calendar (Event Attendance). √ √ √ √ View/Edit Appears beneath the Name field and opens the patron’s record. The patron’s record includes contact information, no show information, and the patron’s schedule of events. From the patron’s record users may register the patron for another event, cancel a patron from any event on their schedule, update no show information, and access the Event Attendance Sheet for any event on the patron’s schedule. √ √ √ √ B. Managing Event Attendance Sheets The following section provides instructions for working with the primary function of Event Attendance – the Event Attendance Sheet. How To Do It - Accessing the Event Attendance Sheet 1. Beginning at the home page, click current month. EVENT ATTENDANCE. The system displays the Event Calendar for the 2. Locate the desired event on the calendar. 3. Click the desired event. The system displays the Event Attendance Sheet. How To Do It - Registering a Patron 1. Access the desired Event Attendance Sheet (see How To Do It – Accessing the Event Attendance Sheet at the beginning of this section for more information.) 2. Click REGISTER (located at the bottom of the page). The system loads the Event Registration Form. 3. Click COMPLETE REGISTRATION (or ADD ME TO THE WAITING LIST, depending on the status of the event’s attendance sheet). The system saves the registration and displays a confirmation message: “A confirmation email has been sent to the patron’s email account.” 4. Click OK to close the confirmation message. The system displays the following Event Registration Complete confirmation. The event confirmation differs depending on whether the patron is on the Main List or the Waiting List. The example below is the message displayed the system confirms a registration on the Main List. MAN0100-06.05 53 September 5, 2008 Events 6.0 “[Patron Name] is registered for: Title: Date(s): Time: The confirmation number is: In consideration of the presenters and other attendees, please try to be at the library 5 minutes prior to the beginning of the program. Do not use the browser Back button. navigation.” Use one of the following buttons for 5. Click CLOSE to close the Event Registration Complete confirmation and return to the Patron Record; or 6. Click SAME EVENT REGISTRATION to access a blank Event Registration Form for the same event. The contact information in this second Event Registration Form is blank. Complete the Event Registration Form as desired and continue at Step 3 above. How To Do It - Returning to the Home Page You may return to the home page at any time by clicking on BACK TO MAINTENANCE PAGE located at the bottom of the page. How To Do It - Updating Event Attendance Statistics (Taking Attendance) This section describes how to enter attendance information. attendance to be taken at the event. This is a manual process that requires 1. Access the desired Event Attendance Sheet (see How To Do It – Accessing the Event Attendance Sheet at the beginning of this section for more information.) 2. In the Statistics Entry section of the Event Attendance Sheet, enter the total number of event attendees. 3. In the attendance list section, click on the Main List tab to make sure the Main List is active. 4. Click the NO SHOW checkbox associated with any patrons who did not appear for the event. 5. Click UPDATE (located at the end of the No Show column). The system updates participant No Show counts. How To Do It - Moving Participants: Waiting List to Main List 1. Access the desired Event Attendance Sheet (see How To Do It – Accessing the Event Attendance Sheet) at the beginning of this section for more information.) 2. Click on the Waiting List tab to make it active. 3. Click the Move checkbox to mark the desired participant(s). 4. Click MOVE (located at the end of the Move column). The system moves the desired participant(s) to the Main List without secondary confirmation and marks the record with an (M) showing that participant was manually moved from the Waiting List. How To Do It - Moving Participants: Main List to Waiting List or Payment Waiting List 1. Access the desired Event Attendance Sheet (see How To Do It – Accessing the Event Attendance Sheet at the beginning of this section for more information.) 2. Make sure the Main List is active by clicking on the Main List tab. 3. Click the MOVE radio button associated with the desired participant. The system displays the following message: MAN0100-06.05 54 September 5, 2008 Events 6.0 “Move from the Main List to | Waiting List | Payment Waiting List and Close Window.” | Cancel 4. The system moves the selected participant to the selected list and displays the following message if there is an active waiting list: “The next person on the Waiting List is about to be moved to the Main List. Click OK to proceed with moving the person or click ‘Cancel’ to manually move people to the Main List. Please note that the opening will remain vacant until a staff member manually moves someone to the Main List.” 5. Click OK to move the first person on the Waiting List to the Main List or go to Step 6 to continue. A. The system displays the following message if participant’s record contains an e-mail address: “A status change email has been sent to the patron’s email address.” B. Click OK to close the message and return to the Event Attendance Sheet. 6. Click CANCEL to cancel the move and return to the Event Attendance Sheet. How To Do It- Moving Participants: From the Payment Waiting List (Confirming Payment) 1. Access the desired Event Attendance Sheet (see How To Do It – Accessing the Event Attendance Sheet at the beginning of this section for more information.) 2. Click on the Payment Waiting List tab to make it active. 3. Click Payment checkbox mark the desired participant(s) paid. 4. Click PAY (located at the end of the Payment column). The system moves (without secondary confirmation) the participant(s) to the Waiting List or Main List depending on whether openings are available on the Main List. How To Do It - Canceling a Registration 1. Access the desired Event Attendance Sheet (see How To Do It – Accessing the Event Attendance Sheet at the beginning of this section for more information.) 2. Click on the desired attendance list – Main List, Waiting List or Payment Waiting List. 3. Click the Cancel check box associated with the desired participant(s). 4. Click CANCEL (located at the end of the column). The system cancels marked participant(s) and moves them to the Cancelled List. Whether the system displays a secondary confirmation depends on the originating list, as indicated below. • • • Main List: Secondary confirmation Waiting List: No confirmation Payment Waiting List: No confirmation When the system displays a secondary confirmation, it reads: “The next person on the Waiting List is about to be moved to the Main List. Click OK to proceed with moving the person or click ‘Cancel’ to manually move people to the Main List. Please note that the opening will remain vacant until a staff member manually moves someone to the Main List.” How To Do It - Uncancelling a Registration 1. Access the desired Event Attendance Sheet (see How To Do It – Accessing the Event Attendance Sheet at the beginning of this section for more information.) 2. Click on the Cancelled tab to active the Cancelled List. MAN0100-06.05 55 September 5, 2008 Events 6.0 3. Click the Uncancel checkbox associated with the desired participant(s). 4. Click UNCANCEL (located at the end of the column). The system moves the marked participant(s) without secondary confirmation to the appropriate attendance list – Main List, Waiting List or Payment Waiting List – as dictated by the status of the registration (payment pending) and whether there are openings on the Main List. How To Do It - Emailing a Single Patron The following instructions apply only if patron(s) supply an e-mail address. 1. Access the desired Event Attendance Sheet (see How To Do It – Accessing the Event Attendance Sheet at the beginning of this section for more information.) 2. Click on the desired attendance list – Main List, Waiting List, Payment Waiting List or Cancelled List. 3. Locate the desired patron. The e-mail field must contain an e-mail address to continue. 4. Click on the patron’s email address (located in the E-mail Address column). The system loads a blank email message containing the patron’s e-mail address. 5. Compose and send an email using your library’s standard email procedures. How To Do It - Emailing All Patrons 1. Access the desired Event Attendance Sheet (see How To Do It – Accessing the Event Attendance Sheet at the beginning of this section for more information.) 2. Click on the desired attendance list – Main List, Waiting List, Payment Waiting List or Cancelled List. 3. Click EMAIL (located at the end of the Email column). The system loads a blank email message with all email addresses listed in the “BCC” address field. 4. Compose and send the email using your library’s standard email procedures. How To Do It - Transferring a Selected Patron to Another Event 1. Access the desired Event Attendance Sheet (see How To Do It – Accessing the Event Attendance Sheet at the beginning of this section for more information.) 2. Click on the desired attendance list – Main List or Waiting List. 3. Click the TRANSFER link associated with the desired patron. The “Patron Transfer” window appears as illustrated below. TRANSFER: [Patron Name] FROM TO Event Title [System Autofill Field] [Branch Selector] [v] Date [System Autofill Field] Event Title [System Autofill Field] Date [System Autofill Field] Time [System Autofill Field] Select Event Submit Change Cancel 4. Review information in the “From” fields to ensure event information is correct. 5. In the “To” fields select the alternate event to which the patron will be transferred: A. Use the Branch Selector to select the branch whose calendar you wish to view. MAN0100-06.05 56 September 5, 2008 Events 6.0 B. Click SELECT EVENT to display the selected branch’s Event Calendar. C. Locate the desired event. D. Click on the title for the alternate event. The system returns the alternate event details to the “To” fields of the Patron Transfer window. E. Review information in the “To” fields to ensure the correct event has been selected. 6. Click SUBMIT CHANGE. The system completes the transfer without secondary confirmation. Or 7. Click CANCEL to cancel the transfer, close the Patron Transfer window and return to the Event Attendance Sheet. How To Do It - Copying All Patrons to Another Event You may copy the Main List or the Waiting List to another event or event occurrence. This function is not available from Payment Waiting List or Cancelled List. 1. Access the desired Event Attendance Sheet (see How To Do It – Accessing the Event Attendance Sheet at the beginning of this section for more information.) 2. Select either the Main List or the Waiting List by clicking on the appropriate tab. 3. Click COPY ALL (located at the end of the Transfer/Copy column). The Copy [Main or Waiting] List window will appear (illustrated below). COPY: [List Type – Main List or Waiting List] FROM TO Event Title [System Autofill Field] [Branch Selector] [v] Date [System Autofill Field] Event Title [System Autofill Field] Date [System Autofill Field] Time [System Autofill Field] Select Event Submit Change Cancel 4. Review information in the “From” fields to ensure event information is correct. 5. In the “To” fields select the alternate event to which the patron will be transferred: A. Use the Branch Selector to select the branch whose calendar you wish to view. B. Click SELECT EVENT to display the selected branch’s Event Calendar. C. Locate the desired event. D. Click on the title for the alternate event. The system returns the alternate event details to the “To” fields of the Copy List window. E. Review information in the “To” fields to ensure the correct event has been selected. 6. Click SUBMIT CHANGE. The system completes the copy without secondary confirmation. Or 7. Click CANCEL to cancel the transfer, close the Copy List window and return to the Event Attendance Sheet. MAN0100-06.05 57 September 5, 2008 Events 6.0 How To Do It - Editing the Notes Field 1 Note: You may edit multiple notes before selecting UPDATE NOTES at the end of the Notes column. 1. Access the desired Event Attendance Sheet (see How To Do It – Accessing the Event Attendance Sheet at the beginning of this section for more information.) 2. Click on the desired attendance list – Main List, Waiting List, Payment Waiting List or Cancelled List. 3. Click in the Notes field associated with the desired patron. 4. Enter or update the Notes field. 5. Click UPDATE NOTES (located at the end of the Notes column). How To Do It - Exporting the Event Attendance Sheet to Excel 1. Access the desired Event Attendance Sheet (see How To Do It – Accessing the Event Attendance Sheet at the beginning of this section for more information.) 2. Click EXPORT TO EXCEL. The system exports information from all attendance lists – Main List, Waiting List, Payment Waiting List, and Cancelled List – to a web window. See below for an illustration of the report as it appears in the web window. List Status Main First Name Last Name Phone Alt Phone Email Address City State Zip Age Stipulation Answer Notes Reg Date Confirmation Number Waiting Payment Cancelled 3. Click File Save As. The system displays the Save As window. 4. Select the desired Save As options – file directory, file name, file type. 5. Click SAVE. The system saves the file. 6. Close the export web window. The system displays the Event Attendance Sheet. How To Do It - View Another Attendance Sheet The following instructions describe the process for accessing an Event Attendance Sheet from another Event Attendance Sheet (i.e., going from the Event Attendance Sheet for event 1 to the Event Attendance Sheet for event 2). This process essentially bypasses the home page, but retains all the capabilities and functionality of an Event Attendance Sheet accessed from the home page. 1. Access the desired Event Attendance Sheet (see How To Do It – Accessing the Event Attendance Sheet at the beginning of this section for more information.). 2. Click VIEW ANOTHER ATTENDANCE SHEET (located at the end of the page). The system displays the Event Calendar for the current month. 3. Locate the desired event on the calendar. (See Section 1(C) - Search Slider (page 47) for information about the Search Slider.) 4. Click the desired event. The system displays the Event Attendance Sheet. MAN0100-06.05 58 September 5, 2008 Events 6.0 C. Working in Patron Records In addition to managing event attendance, Event Attendance also provides full access to Patron Records and all the functions available from Patron Lookup. The illustration below is an example of the Patron Record and the functions available. Contact Information First Name: Last Name: Phone Number: Email Address: Street Address: City: State/Province: Zip Code: [Text Entry Field] [Text Entry Field] ([###]) [###] – [####] Ext. [####] [Text Entry Field] [Text Entry Field] [Text Entry Field] [Drop List Field] [Number Entry Field] Save Back Registration No Show Information Total: Last Date: Reset N/A Schedule for [Patron Name] Date Time Title Location Library Description Status Monday, January 1, 20__ 10:00 AM Book Discussion Meeting Room Branch 1 Read and discuss book. Registered Tuesday, May 5, 20__ 6:00 PM Computer Skills Computer Room Branch 2 Computer Skills for Seniors Waiting List Wednesday, June 2, 20__ 12:00 AM Brown Bag Lecture Community Room Branch 3 Impact of Harry Potter on Family Reading Payment Waiting Cancel Saturday, July 8, 20___ 10:00 AM Magic Time for Youth Community Room Branch 2 Magician entertains 5-7 Year Olds Cancelled Attendance Attendance Cancel Attendance Cancel Attendance The Patron Record contains the following information: • Contact information: address. • No Show Record: The No Show record displays the total number of times a patron has registered for an event and failed to attend the event or cancel the registration and the date of the last event they didn’t attend (assuming attendance was taken at the event). Based upon library policy, a patron who has exceeded the no show threshold will be automatically wait-listed for the next event for which they register. To reset the ‘No Show’ counter, click the “Reset” button. • Patron Schedule: The events (past and present) for which a patron has registered for are listed in the ‘Schedule for [Patron]’. From the Patron Schedule, staff may view the Attendance Sheet for any listed event and cancel the patron’s registration in an event. This section contains the patron’s name, address, phone number, and e-mail How To Do It - Accessing Patron Records 1. Beginning at the home page, click Calendar for the current month. EVENT ATTENDANCE. The system displays the Program and Events 2. Locate the desired event on the calendar. (See Section 1(C) - Search Slider (page 47) for information about the Search Slider.) MAN0100-06.05 59 September 5, 2008 Events 6.0 3. Click the desired event. The system displays the Event Attendance Sheet. 4. Click on the desired attendance list – Main List, Waiting List, Payment Waiting List or Cancelled List. 5. Locate the desired patron. 6. Click VIEW/EDIT (located beneath the patron’s name). The system displays the patron’s record (illustrated at the beginning of this section). How To Do It - Editing Contact Information 1. Access the desired Patron Record (See How To Do It – Accessing Patron Records at the beginning of this section for more information.) 2. Edit patron contact information as desired. 3. Click SAVE; or 4. Click BACK to return to the Event Attendance Sheet without saving. How To Do It - Resetting No Show Information 1. Access the desired Patron Record (See How To Do It – Accessing Patron Records at the beginning of this section for more information.) 2. Click RESET in the “No Show Information” section. The Total field resets to 0. How To Do It - Canceling a Registration 1. Access the desired Patron Record (See How To Do It – Accessing Patron Records at the beginning of this section for more information.) 2. Locate the desired event on the patron’s schedule. 3. Click CANCEL associated with the desired event. confirmation: The system displays the following secondary “Are you sure you want to cancel your registration for [Seminar] on [Event Date]? Click ‘Continue’ to continue or click ‘Close Window’ to stop the process.” 4. Click CONTINUE to cancel the registration; or 5. Click CLOSE WINDOW to cancel the cancellation. How To Do It - Registering a Patron 1. Access the desired Patron Record (See How To Do It – Accessing Patron Records at the beginning of this section for more information.) 2. Click REGISTRATION (located between Contact Information and No Show Information). The system loads the Event Calendar. 3. Click on the desired event. The system loads the desired Event Registration Form with the patron’s contact information completed. 4. Click COMPLETE REGISTRATION (or ADD ME TO THE WAITING LIST, depending on the status of the event’s attendance sheet). The system saves the registration and displays a confirmation message: “A confirmation email has been sent to the patron’s email account.” MAN0100-06.05 60 September 5, 2008 Events 6.0 5. Click OK to close the confirmation message. Complete confirmation: The system displays the following Event Registration “[Patron Name] is registered for: Title: Date(s): Time: The confirmation number is: In consideration of the presenters and other attendees, please try to be at the library 5 minutes prior to the beginning of the program. Do not use the browser Back button. navigation.” Use one of the following buttons for 6. Click CLOSE to close the Event Registration Complete confirmation and return to the Patron Record; or 7. Click SAME EVENT REGISTRATION to access a blank Event Registration Form for the same event. The contact information in this second Event Registration Form is blank. Complete the Event Registration Form as desired. How To Do It - Viewing an Attendance Sheet from the Patron Schedule 1 Note: The Event Attendance Sheet accessed from the Patron Schedule (the “Secondary Event Attendance Sheet”) does not contain the full functionality of the Event Attendance Sheet accessed from Event Attendance (the “Primary Event Attendance Sheet”). The Secondary Event Attendance Sheet does not allow you to: • • • Return to the Event System Maintenance Page, Register a patron, or Access another Event Attendance Sheet. For full functionality, access the Primary Event Attendance Sheet from Event Attendance. 1. Access the desired Patron Record (See How To Do It – Accessing Patron Records at the beginning of this section for more information.) 2. Locate the desired event on the patron’s schedule. 3. Click ATTENDANCE associated with the desired event. Attendance Sheet for the selected event. 4. Click CLOSE to close the Secondary Attendance Sheet. Attendance Sheet and displays the Patron Record. The system displays the Secondary Event The system closes the Secondary Event 5. Click BACK to return to the Primary Event Attendance Sheet. This is the Event Attendance Sheet you originally accessed from the Event Calendar. SECTION 3 - THE CALENDAR/REGISTRATION FUNCTION The primary function of Calendar/Registration is registering patrons for events. The process begins with the Event Calendar and the Event Registration Form. From the Event Registration Form users also have access to Event Attendance Sheets with limited functionality (referred to as the Secondary Event Attendance Sheet). This Secondary Event Attendance Sheet does not allow users to register patrons for an event, access additional attendance sheets or return to the home page. For full functionality, access the Event Attendance Sheet from Event Attendance. See Section 2 - Event Attendance (page 48) for information and instructions related to the Event Attendance Sheet. This section is organized as follows: • • Paragraph A - The Event Registration Form (page 62) Paragraph B – Working in Calendar/Registration (page 63) MAN0100-06.05 61 September 5, 2008 Events 6.0 A. The Event Registration Form The Event Registration Form illustrated below appears when accessing an event that requires registration. The Event Template determines the information requested in the Registration Section (see Chapter IV(2) The Event Template (page 14) for more information). [Event Title] Email a friend 8 Notify Me Print Æ Download to Calendar Description: Event Type: Date: Start Time: Description: Library: Location: Registration Ends: Contact: Contact Number: Presenter: Internal Notes: Status: The event details section of the Event Registration Form contains all the Who, What, When and Where information about an event. From this section users may: Please Note: This section only appears if the event has special requirements or prerequisites (i.e., residency term, fee, etc.) • • • • [Any special requirements or prerequisites.] Event Status Information Maximum People: Maximum Internal Spots: [##] [##] Main List Count: [##] Waiting List Count: [##] Payment Waiting List: [##] Available Space: [##] Email a copy of the event to another person Request notification about similar types of events Print the event Download the event to their personal Events calendar. Event Status Information contains a statistical breakdown of registration, including: • • The maximum capacity of the event. • • The number registered by attendance list type The number of spots reserved for staff-assisted registration. The number of open spaces remaining. Registration *Attendee First Name: [Text Entry Field] *Attendee Last Name: [Text Entry Field] *Attendee Phone Number: ([###]) [###] – [####] Alternate Phone Number ([###]) [###] – [####] Attendee Email Address: [Text Entry Field] *Resident of [Town/County] | Yes | No The information requested in the Registration section is determined by selections made on the Event Template (see Chapter IV(2) - The Event Template (page 14) for more information). Attendee Age: [Drop Down List] [] Stipulation Questions 1-6: [Format varies based upon configuration of response fields.] Payment Required: Number of Registrants (Group): Note: | Yes | No [##] [Leave blank for single reservation.] [Text Entry Field] * = Required Field Complete Registration 1 2 3 1 Attendance 2 Back 3 or ADD ME TO THE WAITING LIST: This button will read either “Complete Registration” or “Add Me to the Waiting List” depending on the status of the Event Attendance Sheet. It save the registration and send an e-mail confirmation to the patron, if they provided an e-mail address. COMPLETE REGISTRATION ATTENDANCE: This button provides access to the Event Attendance Sheet. See Section 2 - The Event Attendance Sheet (page 48) for information about the Primary Event Attendance Sheet. BACK: Back returns users to the Event Calendar without saving any information entered into the Event Registration Form. MAN0100-06.05 62 September 5, 2008 Events 6.0 B. Working in Calendar/Registration How To Do It - Accessing Calendar/Registration and the Event Registration Form 1. Beginning at the home page, click CALENDAR/REGISTRATION. Events Calendar for the current month. The system displays the Program and 2. Locate the desired event on the calendar. See Section 1 - (C) - Search Slider (page 47) for information about the Search Slider. Reminder: Events that require registration are underlined on the Event Calendar. 3. Click on the Event Title. The system displays the Event Registration Form. How To Do It - Registering a Patron 1. Access the desired Event Registration Form (See How To Do It – Accessing Calendar/Registration and the Event Registration Form at the beginning of this section for more information.) 2. Review the event details to ensure the correct event is displayed. 3. Scroll down to the Registration section. 4. Complete the Event Registration Form. 5. Click COMPLETE REGISTRATION (or ADD ME TO THE WAITING LIST), depending on the status of the event. How To Do It - Accessing the Event Attendance Sheet 1 Note: The Event Attendance Sheet accessed from Event Registration Form (the “Secondary Event Attendance Sheet”) does not contain the full functionality of the Event Attendance Sheet accessed from Event Attendance (the “Primary Event Attendance Sheet”). The Secondary Event Attendance Sheet does not allow you to: • • • Return to the Event System Maintenance Page, Register a patron, or Access another Event Attendance Sheet. For full functionality, access the Primary Event Attendance Sheet from Event Attendance. 1. Access the desired Event Registration Form (See How To Do It – Accessing Calendar/Registration and the Event Registration Form at the beginning of this section for more information.) 2. Scroll down to the end of the Event Registration Form. 3. Click ATTENDANCE. The system displays the Secondary Event Attendance Sheet. See Section 2 - The Event Attendance Sheet (page 48) for information about the Event Attendance Sheet. MAN0100-06.05 63 September 5, 2008 Events 6.0 SECTION 4 - THE ATTENDEE LOOKUP FUNCTION The primary function of Attendee Lookup is accessing and working with Patron Records. The process begins with the Attendee Lookup Report (search filter) and the Patron Record. From Attendee Lookup users may update contact information, reset No Show Information, and work with a patron’s schedule of events, including registering and canceling patron registrations. Users also have access to the attendance sheets of any event on the patron’s calendar. The Event Attendance Sheets accessed from Attendee Lookup have limited functionality (referred to as the Secondary Event Attendance Sheet). It does not allow users to register other patrons, access additional attendance sheets or return to the home page. For full functionality, access Event Attendance Sheets from Event Attendance. See Section 2 - Event Attendance (page 48) for information about the Event Attendance Sheet. This section is organized as follows: • • • Paragraph A - Views and Navigation (page 65): Paragraph B - Working in Attendee Lookup (page 66): Finding, removing and e-mail a patron. Paragraph C - Working in Patron Records (page 67): Resetting No Show Information, Registering and Canceling a patron, and accessing an attendance sheet. MAN0100-06.05 64 September 5, 2008 Events 6.0 A. Views and Navigation The illustration below displays the Attendee Lookup Report home page. By default, patron records are listed in alphabetical order. SEARCH First Name: [Text Entry Field] Last Name: [Text Entry Field] Phone Number: ([###]) [###] – [####] Library Card Number: [#######] Email: [Text Entry Field] Confirmation Number: [#######] Show All Names: Search Back to Maintenance Page Item Remove Last Name First Name Card Number 1 Smith Jane 123456 (123) 555-1212 [email protected] 111 Home St. Somewhere ST 12345 8/31/20__ View/Edit Registration 2 Wood John 234567 (123) 555-1213 [email protected] 222 Another St. Somewhere ST 12345 8/20/20__ View/Edit Registration 3 Zane Scott 345678 (123) 555-1214 [email protected] 451 Home St Somewhere ST 12345 7/1/20__ View/Edit Registration Phone Email Remove MAN0100-06.05 Address City State Zip Last Date Back to Maintenance Page 65 September 5, 2008 Events 6.0 B. Working in Attendee Lookup How To Do It - Finding a Patron Record 1. Beginning at the home page, click page. ATTENDEE LOOKUP. The system displays the Attendee Lookup Report 2. Search Fields: A. To find one record, complete one or more of the Search fields. information; or The system accepts partial B. To display all records, check “Show All Names”. 3. Click SEARCH. The system displays a list of records matching the criteria. 4. Locate the appropriate Patron Record; or 5. Click BACK TO MAINTENANCE PAGE to return to the home page. How To Do It - Managing the Patron Database (Deleting Patrons from the Database) Removing a patron from the Attendee Lookup Report permanently deletes the patron and all associated information from the Events database. 1. Find the desired Patron Record. See How To Do It – Finding a Patron above for more information. 2. Locate the appropriate patron(s). 3. Mark record(s) for deletion by clicking the check box(es) (in the Remove column) associated with desired record(s). Only those records without active registrations may be marked for removal. The system prevents accidental deletion of Patron Records with current registrations. 4. Click REMOVE (located at the end of the list). How To Do It - Emailing a Patron 1. Find the desired Patron Record. See How To Do It – Finding a Patron above for more information. 2. Locate the appropriate patron(s). 3. Click on the email address (in the E-mail column) associated with the desired patron. displays a pre-addressed email message. The system 4. Compose the email message. 5. Click SEND. The system sends e-mail message. How To Do It - Returning to the Home Page You may return to the home page at any time by clicking on BACK TO MAINTENANCE PAGE located at the bottom of the page. MAN0100-06.05 66 September 5, 2008 Events 6.0 C. Working in Patron Records Contact Information First Name: Last Name: Phone Number: Email Address: Street Address: City: State/Province: Zip Code: [Text Entry Field] [Text Entry Field] ([###]) [###] – [####] Ext. [####] [Text Entry Field] [Text Entry Field] [Text Entry Field] [Drop List Field] [Number Entry Field] Save Back Registration No Show Information Total: Last Date: 0 NA Reset Schedule for [Patron Name] Date Time Title Location Library Description Status Monday, January 1, 20__ 10:00 AM Book Discussion Meeting Room Branch 1 Discuss book. Registered Tuesday, May 5, 20__ 6:00 PM Computer Skills Computer Room Branch 2 Senior Audience Waiting List Wednesday, June 2, 20__ 12:00 AM Brown Bag Lecture Study Room Branch 3 Local Arts Payment Waiting Cancel Saturday, July 8, 20___ 10:00 AM Magic Time for Youth Kids Section Branch 2 Magic for kids. Cancelled Attendance Attendance Cancel Attendance Cancel Attendance How To Do It - Accessing and Editing Patron Records 1. Find the desired Patron Record. See How To Do It – Finding a Patron above for more information. 2. Locate the appropriate patron(s). 3. Click VIEW/EDIT (located in the last column on the right) associated with the desired patron. The system displays the desired Patron Record. See Section 2(C) - Working in Patron Records (page 59) for an illustration of the Patron Record. 4. Edit patron contact information as desired. 5. Click SAVE to save any revisions; or 6. Click BACK to return to the Attendee Lookup Report. How To Do It - Resetting No Show Information 1. Access the desired Patron Record (See How To Do It – Accessing Patron Records at the beginning of this section for more information.) 2. Click RESET in the “No Show Information” section. The Total field resets to 0. How To Do It - Canceling a Registration 1. Access the desired Patron Record (See How To Do It – Accessing Patron Records at the beginning of this section for more information.) 2. Locate the desired event on the patron’s schedule. MAN0100-06.05 67 September 5, 2008 Events 6.0 3. Click CANCEL associated with the desired event. confirmation: The system displays the following secondary “Are you sure you want to cancel your registration for [Seminar] on [Event Date]? Click ‘Continue’ to continue or click ‘Close Window’ to stop the process.” 4. Click CONTINUE to cancel the registration; or 5. Click CLOSE WINDOW to cancel the cancellation. How To Do It - Registering a Patron 1. Access the desired Patron Record (See How To Do It – Accessing Patron Records at the beginning of this section for more information.) 2. Click REGISTRATION (located between Contact Information and No Show Information). The system loads the Event Calendar. 3. Click on the desired event. The system loads the desired Event Registration Form with the patron’s contact information completed. 4. Click COMPLETE REGISTRATION (or ADD ME TO THE WAITING LIST, depending on the status of the event’s attendance sheet). The system saves the registration and displays a confirmation message: “A confirmation email has been sent to the patron’s email account.” 5. Click OK to close the confirmation message. Complete confirmation: The system displays the following Event Registration “[Patron Name] is registered for: Title: Date(s): Time: The confirmation number is: In consideration of the presenters and other attendees, please try to be at the library 5 minutes prior to the beginning of the program. Do not use the browser Back button. navigation.” Use one of the following buttons for 6. Click CLOSE to close the Event Registration Complete confirmation and return to the Patron Record; or 7. Click SAME EVENT REGISTRATION to access a blank Event Registration Form for the same event. The contact information in this second Event Registration Form is blank. Complete the Event Registration Form as desired. MAN0100-06.05 68 September 5, 2008 Events 6.0 How To Do It - Viewing an Attendance Sheet from the Patron Schedule 1 Note: The Event Attendance Sheet accessed from Attendee Lookup (the “Secondary Event Attendance Sheet”) does not contain the full functionality of the Event Attendance Sheet accessed from Event Attendance (the “Primary Event Attendance Sheet”). The Secondary Event Attendance Sheet does not allow you to: • Return to the Event System Maintenance Page, • Register a patron, or • Access another Event Attendance Sheet. For full functionality, access the Primary Event Attendance Sheet from Event Attendance. 1. Access the desired Patron Record (See How To Do It – Accessing Patron Records at the beginning of this section for more information.) 2. Locate the desired event on the patron’s schedule. 3. Click ATTENDANCE associated with the desired event. Attendance Sheet for the selected event. The system displays the Secondary Event 4. Click CLOSE. The system closes the Second Event Attendance Sheet and displays the Patron Record. MAN0100-06.05 69 September 5, 2008 Events 6.0 CHAPTER VI. REPORTS Reports • Event Statistics Report • Detailed Event Statistics Report • Events and PR Report • Subscriber Lookup • Subscriber Details Reports allow users to obtain a variety of information from the system. This information can often be printed or exported to a file. SECTION 1 - THE EVENT STATISTICS REPORT The Event Statistics Report provides summary attendance and registration statistics by month (for a 12-month time frame) and by Event Type, including: 1. Attendance Information: A. Total number of attendees B. The total number of attendees can be broken down into a maximum of 4 categories. (See System Configuration & Settings Æ System Settings Æ Optional Statistical Inputs.) 2. Registration Information: A. The total number registered B. Of the total in 2(a), how many were on the Main List, Waiting List, and Cancelled List C. Of the total in 2(a), how many were registered by staff and how many self-registered The following illustration is a condensed sample of the report. Event Types are listed in alphabetical orders. Export this report: W Word X Excel Select a Date Range (Up to 12 months) [[Month []] [[Year] []] TO [[Month []] [[Year] []] Get Report 1 Mo 1 Mo 2 Event Statistics Report for [12-Month Period] Mo 3 Mo 4 Mo 5 Mo 6 Mo 7 Mo 8 Mo 9 Mo 10 Mo 11 Mo 12 Total Total Events Total Attendance Total Registered Total Waiting List Total Cancelled Total Staff Reg Total Patron Reg Total Attend Stat A1 Total Attend Stat B1 Total Attend Stat C1 Total Attend Stat D1 By Event Type: Adult Program Total Events Total Attendance Total Registered Total Waiting List Total Cancelled Total Staff Reg Total Patron Reg Total Attend Stat A1 Total Attend Stat B1 Total Attend Stat C1 Total Attend Stat D1 Total Attend Stat [Ltr] refers to optional Attendance Settings set by the Administrator that appear on the Event Registration Form as required fields. The statistic title will match the configured setting (i.e., Adult, Senior, Teen, etc.). MAN0100-06.05 70 September 5, 2008 Events 6.0 How To Do It – Working with the Event Statistics Report The following information is categorized into three sections: Section 1 tells you how to run the report, Section 2 tells you how to export the report to Word or Excel, and Section 3 tells you how to print the report. 1. Running the Report: A. Beginning at the home page, click EVENT STATISTICS REPORT (Report menu). The system displays the Event Statistics Report for the 12-month period ending at the end of the current month. For example, if the current date is August 15, 2007, the displayed report reflects information from September 1, 2006 – August 31, 2007. B. To select a different date range: (i) Use the “Select a Date Range” drop down lists to select an alternate rolling 12-month period. (ii) Click GET REPORT. The system generates the Event Statistics Report for the selected period. 2. Exporting the report: Located above the report on the right side of the page are hyperlinks for exporting the report to Word or Excel (“Export this report: W Word X Excel”). A. Click the desired export option – Word or Excel. The system opens a separate internet window containing the report in the desired format. B. Select FILE SAVE AS from the menu. The system displays the Save As window. C. Enter the appropriate file parameters. 1 Note: The default file type is Web Page (*.htm; *.html). Be sure to select either Microsoft Word (*.doc) or Microsoft Excel (*.xls) as the file type. D. Click SAVE. The system saves the file based upon the selected options. 3. Printing the report: A. Select FILE PRINT from the menu. MAN0100-06.05 71 September 5, 2008 Events 6.0 SECTION 2 - THE DETAILED EVENT REPORT The Detailed Event Report provides much of the same information provided by the Event Statistics Report, but provides the information by event title. This report does not provide information about how patrons registered – staff assisted or self-registered. The illustration below provides is a sample of the report format: Date Time End Time Teen Book Club 2/18/20__ 4:00 PM 5:00 PM Avon Public Library Teen Room Job Seekers Network 3/2/20__ 9:00 AM 10:00 AM Plainfield Public Library Bedtime Stories 4/6/20__ 6:00 PM 6:30 PM Avon Public Library Title 1 Library Last Modified Attendance Registered Waiting List Cancelled List Adults1 Seniors1 Teen1 Children1 Book Club 2/1/20__ 16:00 8 10 0 0 0 0 8 0 Community Room Community 2/15/20__ 9:00 10 15 0 0 10 0 0 0 Children’s Room Children’s 1/20/20__ 10 0 0 0 0 0 0 10 Location Event Type 13:00 These fields are optional Attendance Settings set by the Administrator that appear on the Event Registration Form as required fields. The statistic title will match the configured setting (i.e., Adult, Senior, Teen, etc.). An Event Information Filter (illustrated below) allows users to select the information that appears on the report as well as the format of the report. Running the report based solely on a date or date range returns a report containing statistics for all events scheduled for the current month displayed in HTML format. Keyword Search: [Text Entry Field] Date or Date Range: | This Week This Month | Specific Day: [Mo][] [Day][] [Yr][] Pick | Date Range: [Mo][] [Day][] [Yr][] Pick - [Mo][] [Day][] [Yr][] Pick Ongoing Events: | Include Ongoing No Ongoing Age Groups: Check All/Uncheck All Age Group 1 Age Group 3 Age Group 5 Age Group 2 Age Group 4 Age Group 6 Branches/Libraries: Check All/Uncheck All Branch 1 Branch 3 Branch 5 Branch 2 Branch 4 Branch 6 Event Types: Check All/Uncheck All Event Type 1 Event Type 3 Event Type 5 Event Type 2 Event Type 4 Event Type 6 Display Type: HTML | Word | Excel Find MAN0100-06.05 Clear Back 72 September 5, 2008 Events 6.0 How To Do It – Working with the Detailed Event Report The following information is categorized into three sections: Section 1 tells you how to run the report, Section 2 tells you how to export the report to Word or Excel, and Section 3 tells you how to print the report. 1. Running the Report: A. Beginning at the home page, click DETAILED EVENT STATISTICS REPORT (Report menu). The system displays an Event Information Filter (see the illustration on the previous page). B. Select or enter the desired reporting options, including the Display Format – HTML, Word or Excel. C. Select one of the following options: (i) Click FIND to run the report. The system generates the desired report. Or, (ii) Click CLEAR to erase previously selected options, or (iii) Click BACK to return to the home page without running the report. 2. Printing the report: A. Select FILE PRINT from the menu. 3. Saving the report: A. Select FILE SAVE AS from the menu. The system displays the Save As window. B. Enter the appropriate file parameters. 1 Note: The default file type is Web Page (*.htm; *.html). Be sure to select either Microsoft Word (*.doc) or Microsoft Excel (*.xls) as file type. C. Click SAVE. The system saves the file based upon the selected options. MAN0100-06.05 73 September 5, 2008 Events 6.0 SECTION 3 - THE EVENTS AND PR REPORT The Events and PR Report provides information about the schedule of events for the specified time frame. This is the only method for obtaining notification of public relations requirements. There is no automatic notification when an event that is added to the Event Calendar requires public relations or other materials. The reported information includes: • • • • • • • • • • Event Title Date Time Location Event Type Age Group Description Any Additional Information Instructor Name PR Information The level of detail provided by the report depends upon the information requested on the Event Information Filter and on the format selected – list, table or calendar. The sections that follow provide information and illustrations of the Event Information Filter and the available report formats. A. The Event Information Filter An Event Information Filter (illustrated below) allows users to select the information that appears on the report as well as the format of the report. The default report (no selections are made on the filter) is a schedule of events for the current month in list format. PR information is hidden on the default report. In a multi-branch system, the report contains information for all libraries even if logged into an individual branch. Keyword Search: [Text Entry Field] Date or Date Range: | This Week This Month | Specific Day: [Mo][] [Day][] [Yr][] Pick | Date Range: [Mo][] [Day][] [Yr][] Pick Ongoing Events: | Include Ongoing - [Mo][] [Day][] [Yr][] Pick No Ongoing Age Groups: Check All/Uncheck All Age Group 1 Age Group 2 Age Group 3 Age Group 4 Age Group 5 Age Group 6 Branch 3 Branch 4 Branch 5 Branch 6 Event Type 3 Event Type 4 Event Type 5 Event Type 6 Branches/Libraries: Check All/Uncheck All Branch 1 Branch 2 Event Types: Check All/Uncheck All Event Type 1 Event Type 2 Display Options: PR Requested: Hide PR Details: Include Room Reservations: 5 Display Format: List | Table | Calendar Display Type: HTML | WORD | EXCEL Sort Results By: Date | Time | Publish Status | Event Type | Age | Title | Location Combine Recurring Events: Find MAN0100-06.05 Clear Back 74 September 5, 2008 Events 6.0 B. Table Format The table format (illustrated below) provides the most comprehensive form of the Events and PR Report that is easy to manipulate when saved to Word or Excel. Some column headings in the illustration below have been abbreviated to conserve space. Title Date Time End Time Library Location Event Type Age Group Description Add. Info Instructor Reg Req PR Detail Teen Book Club 5/15/20__ 6:00 PM 7:00 PM Avon Public Library Teen Room Book Club Teen Discuss Harry Potter and the Deathly Hollows. John Smith No Request bookmarks and discussion guides. Bedtime Stories 6/20/20__ 6:00 PM 6:30 PM Danville Public Library Children’s Room Children’s Program Toddler Mother Goose Fairy Tales Jane Smith No Req coloring books and bookmarks. C. List Format The list format (illustrated below) provides most of the same comprehensive detail provided in the table format. PR details, however, do not appear on the report. Title:TEEN BOOK CLUB Date:Tuesday, May 15, 20__ Time:6:00 PM End Time:7:00 PM Library:AVON PUBLIC LIBRARY Location:TEEN ROOM Event Type:BOOKCLUB Age Group:TEEN Description:Discussion of Harry Potter and the Deathly Hollows Additional Information: Instructor:JOHN SMITH 1 NO Title:BEDTIME STORIES Date:Wednesday, June 20, 20__ Time:6:00 PM End Time:6:30 PM Library:DANVILLE PUBLIC LIBRARY Location:CHILDREN’S ROOM Event Type:CHILDREN’S PROGRAM Age Group:TODDLER Description:Mother Goose Fairy Tales Additional Information: Instructor:JANE SMITH 1 NO 1 MAN0100-06.05 This is the Registration Required field. 75 September 5, 2008 Events 6.0 D. Calendar Format The calendar format (illustrated below) provides a high-level overview of the Event Calendar for the selected month(s). It does not provide links to additional event detail. MONTH 20__ Sunday Monday 1 Tuesday 2 Wednesday 3 Thursday Friday Saturday 4 5 6 12:00 Brown Bag Lunch Seminar 7 8 9 10 11 12 13 14 15 16 17 18 19 20 23 24 25 26 27 6:00 PM Teen Book Club 21 22 7:00 AM Friday Networking Group 28 29 30 MONTH 20__ Sunday Monday Tuesday Wednesday Thursday 1 Friday 2 Saturday 3 8:30 AM Staff Meeting 4 5 6 7 8 9 10 11 12 13 14 15 15 17 10:00 AM Family Carnival 18 19 20 21 22 23 28 29 30 24 6:00 PM Bedtime Stories 25 26 27 E. How To Do It – Working with the Events and PR Report 1. Running the Report: A. Beginning at the home page, click EVENTS AND PR REPORT (Report menu). The system displays an Event Information Filter (see the illustration on page 74). B. Select or enter the desired reporting options, including Display Options. C. Select one of the following options: (i) Click FIND to run the report. The system generates the desired report. Or, (ii) Click CLEAR to erase previously selected options, or (iii) Click BACK to return to the home page without running the report. MAN0100-06.05 76 September 5, 2008 Events 6.0 2. Printing the report: A. Select FILE PRINT from the menu. 3. Saving the report: A. Select FILE SAVE AS from the menu. The system displays the Save As window. B. Enter the appropriate file parameters. 1 Note: The default file type is Web Page (*.htm; *.html). Be sure to select either Microsoft Word (*.doc) or Microsoft Excel (*.xls) as file type. SECTION 4 - THE SUBSCRIBER DETAILS REPORT The Subscriber Details Report provides a list of patrons - name and e-mail address only - with subscriptions to upcoming event notifications (the “Notify Me” function). The Subscriber Lookup Report allows staff to search the subscriber database, edit subscriber names and email addresses, and delete subscribers from the subscription list. Subscribers cannot be deleted unless they unsubscribe to all their notifications. This prevents subscribers from being inadvertently deleted from the list. Deleting subscribers does not affect any other record the patron may have in the system (i.e., Attendee Lookup). How To Do It – Finding a Subscriber 1. Beginning at the home page, click SUBSCRIBER Subscriber Lookup Report (illustrated below). SEARCH First Name: Last Name: Email: Show All Names: LOOKUP (Report menu). The system displays the [Text Entry Field] [Text Entry Field] [Text Entry Field] Search Back to Maintenance Page Please enter one or more search criteria. 2. Enter one or more criteria into the search fields or click “Show All Names” for a full list of subscribers. The system displays the following information: SEARCH First Name: Last Name: Email: Show All Names: [Text Entry Field] [Text Entry Field] [Text Entry Field] Search Item 1 2 3 4 Remove Last Name Jones Kendall Lane Martin Back to Maintenance Page First Name Adam Jane Claire William Remove Email [email protected] [email protected] [email protected] [email protected] View\Edit View\Edit View\Edit View\Edit Back to Maintenance Page 3. Click SEARCH to find the requested name(s); or MAN0100-06.05 77 September 5, 2008 Events 6.0 4. Click BACK TO MAINTENANCE PAGE to cancel the search and return to the home page. 1 Note: BACK TO MAINTENANCE PAGE does not clear the search filter. The search filter does not clear until another search is performed or the user logs out of the system. How To Do It – Editing Subscriber Information 1. Find the desired subscriber (see How To Do It – Finding a Subscriber above). 2. Click the VIEW/EDIT associated with the desired subscriber. Information Report. The system displays the Subscriber 3. Edit the subscriber information as desired. 4. Click SAVE to save your changes; or 5. Click BACK to return to the Subscriber Information Report without saving. How To Do It - Deleting (Removing) Subscriber(s) with Inactive Subscriptions 1 Note: Only patrons that have unsubscribed to all upcoming event notifications may be deleted or removed from the subscriber list. Patrons that have cancelled all notifications have a checkbox in the “Remove” column of the Subscriber Information Report. Patrons with active subscriptions cannot be accidentally deleted from the Subscriber Information Report. 1. Find the desired subscriber (see How To Do It – Finding a Subscriber on page 77). 2. Click the checkbox in the “Remove” column to mark records for deletion. 3. Click REMOVE located at the end of the report, or 4. Click BACK TO MAINTENANCE PAGE to cancel the process and return to the home page. How To Do It - Deleting (Removing) Subscriber(s) with Active Subscriptions 1 Note: Only the Administrator may delete patrons with active subscriptions. This process is performed with the deletion of the patron’s notification entries from the Notify.asp file and requires the subscriber’s e-mail address. This prevents the system from sending future e-mail, but does not delete subscribers from the Subscriber Information Report. Staff must still delete the subscriber from the Subscription Information Report. 1. Obtain the subscriber’s e-mail address. 2. Open the Notify.asp file. 3. Enter the desired subscriber’s e-mail address. 4. Click the checkbox in the Delete column for the desired Event Type(s) 5. Click DELETE PREVIOUS ENTRY. The system deletes the subscriber from the Notify.asp file. The system will no longer send e-mails to the subscriber’s e-mail address. 6. Staff or the Administrator may delete the subscriber from the Subscription Information Report (see How To Do It - Deleting (Removing) Subscriber(s) with Inactive Subscriptions above.) SECTION 5 - THE SUBSCRIBER LOOKUP REPORT The Subscriber Lookup Report (illustrated below) provides a list of all subscribers to upcoming event notifications. This is an information only list. There are no functions associated with this list. Subscribers may not be added, deleted or e-mailed from this list. However, this list may be exported to Word or Excel. MAN0100-06.05 78 September 5, 2008 Events 6.0 Total Subscribers: [##] First John Sam Jane Joanne Robert Jamie Last Doe Adams Smith Trent William Frasier Email [email protected] [email protected] [email protected] [email protected] [email protected] [email protected] Event Type Adult Adult Book Club Book Club Children’s Program Children’s Program Library [Branch] Public Library [Branch] Public Library [Branch] Public Library [Branch] Public Library [Branch] Public Library [Branch] Public Library Things to note about the Subscriber Details Report: • • • The list appears in order by Event Type. Patron names do not appear in alphabetical order within Event Types. This is an information only list; it contains no functions. It cannot be sorted or otherwise manipulated from within Events, but it can be copied to Word or Excel. Users cannot e-mail, add or delete subscribers from the list. How To Do It - Accessing the Subscriber Details Report 1. Beginning at the home page, click SUBSCRIBER Subscriber Details Report (illustrated above). DETAILS (Report menu). The system displays the How To Do It – Exporting Subscriber Details to Word or Excel 1. Access the Subscriber Details Report (see How To Do It – Accessing the Subscriber Details Report above). 2. Above the report table, locate Export this report at the top of the page and click on the desired application hyperlink – Word or Excel. 3. The system opens the report in a browser window in the selected format. 4. Select File Save As to save the file in the selected format. MAN0100-06.05 79 September 5, 2008 Events 6.0 APPENDIX A. IMPLEMENTATION GUIDE This chapter provides detailed information about configuring Events to work with your library system. Users must have Administrator level access to use the functions in this chapter. The configuration information in this chapter applies to both single and multi-branch systems. Special notes relating to either single or multi-branch systems are either contained in separate sections at the beginning of a section (such as Section 2(B) below) or flagged with the following symbols: ) Single Branch System Notes )) Multi-Branch System Notes SECTION 1 - SYSTEM REQUIREMENTS The following list provides the minimum system requirements to run effectively. 1. Server Platform: Microsoft Windows 2000 or 2003 Server, or higher. 2. Disk Space: 50-100MB Free Disk Space (primarily on the drive where the database resides). 3. Internet Information Services: Microsoft IIS installed and running with ASP allowed. 4. Internet (External) Access to the Events Calendar: If patrons are allows to access the Events calendar through the internet (i.e., from their home computer), the library’s servers must have at least port 80 (web service port (http)) accessible through the firewall. 5. Security - Strongly Recommended: All Microsoft security updates, patches and fixes installed. SECTION 2 - INSTALLATION OPTIONS Evanced offers two installation options: • • In-house installation. This may be an option whether your website is managed from an in-house or external host server. Off-site host installation. The impact of Events on computer resources and performance is very low. Libraries occasionally install the program on the server that supports their web site (the web interface for their circulation system), though this is not recommended. A. Home Server Configurations 1 Note: Installation on the library’s server does not require the system to be rebooted. (i) Main Web Server: This is the most common location for installation of e-vents. Events is typically installed in a directory labeled: inetpub\wwwroot\evanced\lib. The MYSQL database is installed on a hard drive in a root directory, or on the drive or partition with the most available disk space. (ii) Other Server: Any server with the System Requirements described in Section 1, above, will accommodate Events. Firewall security is the primary consideration when installing Events on another server. Port 80 (web service port (http)) must be accessible through the firewall to accommodate patron access through the internet (i.e., from their home computer). MAN0100-06.05 A-1 September 5, 2008 Events 6.0 B. Hosted Server: Evanced will work with anyone interested in an off-site host installation. Evanced can host Events through a third-party provider or will work you to determine if your internet service provider is able and willing to host Events. There may be additional costs associated with hosted servers. SECTION 3 - LIBRARY POLICY CONSIDERATIONS Events has several options that can be turned on or off as policies dictate. Many of these options can be turned on or off at anytime, which provides libraries with some flexibility as their needs and policies change. These features include: A. Address Collection from New Registrants Events requires patrons to enter their contact information the first time they register for an event. Patrons do not have the options to opt out if this feature is activated. Users activate or deactivate this option on the Event Template when an event is entered into the system. (See Chapter IV(2) - The Event Template, for more information.) B. 24 Hr Cancellation Notice and Probation Features The following features can be activated or deactivated independently, but work together: • “Requires 24-Hour Cancellation Notice”: This is an optional stipulation activated or deactivated on the Event Template. (See Chapter IV(2) - The Event Template (for more information.) It requires patrons to cancel their registration with 24 hours of the event start time. When this stipulation is activated along with “Enforce 24 Hour Notice” (System Settings), the system tracks the number of patron “No Shows”, which may impact future registrations. See “No Show/Probation” below. • No Show/Probation: This feature is activated or deactivated in Settings System Configuration & Settings System Settings Registration Settings ("Enforce 24 Hour Message”). It tracks the number of times a patron registers for and fails to attend the event or cancel their registration. The system allows three (3) no shows within a 6-month period. When a patron exceeds this limit, they are wait listed for any future events they register for. This restriction remains in place for six (6) months or until a staff member resets the patron’s No Show Information, whichever is earlier. The No Show/Probation parameters (three (3) no shows in 6 months) cannot be adjusted at this time. See Chapter V(4)(C) - Working in Patron Records for more information about resetting a patron’s No Show Information. • Probation Warning Message: This feature is activated or deactivated in Settings System Configuration & Settings System Settings Registration Settings ("Enforce 24 Hour Notice”). It triggers a warning message from the system: “Attendee will automatically be placed on a waiting list if they miss 3 events in 6 months that require 24-hour cancellation notice.” This is the default message. Libraries may compose an alternate message by accessing System Configuration & Settings System Messages Cancellation Notice. See Appendix C(4)(C) – System Messages for more information for more information. MAN0100-06.05 A-2 September 5, 2008 Events 6.0 The resulting probation process flows as follows: Patron registers for an event that requires them to cancel at least 24 hours before the event if they cannot attend. Patron fails to cancel their registration or attend the event. Library takes attendance at the event and updates the Event Attendance Sheet. One (1) no show is added to the Patron’s Record. If they fail to cancel or appear for three (3) events within six (6) months, they are placed on a waiting list when registering for future events. Patron on probation registers for an event with a 24 Hr Cancellation Stipulation. The system displays the following message: “We’re sorry! [Patron] has automatically been placed on the waiting list for: Title: Date(s): Time: Our records show that you missed a confirmed event in the last 6 months that required 24-hour cancellation notice. The confirmation number is:” MAN0100-06.05 A-3 September 5, 2008 Events 6.0 C. Event Maintenance Security Event Maintenance allows users with the appropriate security level access to manage the Event Calendar, including adding, editing, copying, publishing, archiving and deleting events. Administrators may set the security level required to access Event Maintenance to prevent unauthorized revision to configuration settings. How To Do It – Setting Event Maintenance Security 1. Beginning from the home page, click SETTINGS SYSTEM SETTINGS SYSTEM CONFIGURATION & SETTINGS SYSTEM SETTINGS. The system displays the System Settings Maintenance page. 2. Go to the Event Entry Settings section and find “Publishing Password Level”. 3. Select the desired minimum password level required to access the Event Maintenance – Read Only, Create Only, Staff User or Staff Admin. 4. Click SAVE to save your settings. D. Project Planning Listed below are our recommendations for ensuring a successful and effective installation. Please feel free to contact Evanced with any questions. 1. Assign a lead person from your project team. The lead person will act as the main contact with Evanced. This person should have the knowledge and authority to discuss the project, make decisions and resolve issues, including those related to features and policies related to your organization. 2. Determine where the system and current policies and procedures are incompatible. 3. Determine an implementation schedule. This typically involves the following key steps: A. Installation B. Key staff training - usually conducted by Evanced C. Pre-pilot trials, limited data entry, and configuration adjustments D. Full staff training - usually conducted by the library E. Full staff pilot and data entry – enter current events into the Event Calendar. F. Public launch and promotion G. Determine policies and procedures for managing updates The following tools are available on the Evanced website (www.evancedsolutions.com) to assist you: • • • • Manuals Quick Start Implementation Guides Templates Marketing Tools MAN0100-06.05 A-4 September 5, 2008 Events 6.0 E. Backup Recommendations T Regular system backups are very important to maintaining the integrity of your data. recommend the following: File <drive>:\mysql\data\autoemail Web file We Backup Nightly Web file data should be backed-up regularly consistent with your library’s policy - to prevent data loss. F. Technical Support Please contact the following for assistance: Phone 888-519-5770 E-mail [email protected] Web http://www.evancedsolutions.com and http://evanced.blogspot.com MAN0100-06.05 A-5 September 5, 2008 Events 6.0 APPENDIX B. CONFIGURING EVENTS This section provides detailed information about configuring Events, including: • Appearance ................... The look and feel of the web pages, including colors, text, backgrounds, buttons, hyperlinks, etc. • Library information ......... Any information about the library appearing on the web pages, including name, address, phone number, website name, hours, etc. • Messages and ............... The text of messages and e-mails displayed or sent by e-vents. templates • E-mail server and........... The server settings and e-mail settings impacting event notices and reminders. other settings • Security settings ............ Reassigning passwords for system access. • System settings ............. The settings affecting how the system functions, including event entry, registration, attendance, calendars, etc. SECTION 1 - LOGGING IN THE FIRST TIME Evanced sends initial passwords to the primary contact. Use the Admin Level password to access configuration settings. T We recommend changing these passwords to ensure the security of your system. The Events system initially comes to you as a blank slate. To begin configuration, you must first log into the system and set up at least one library branch. This step must be taken regardless of the number of branches associated with the library. How To Do It – Preparing for Configuration 1. At the Login Screen, enter the Administrative password provided by Evanced. The system displays the Event System Maintenance Home Page. 2. Click SYSTEM CONFIGURATION & Maintenance page. SETTINGS (Settings Menu). The system displays the Style Configuration 3. Click LIBRARY INFORMATION on the menu. The system displays the Library Information Maintenance page, which displays Library Number: 0. 4. Complete the Library Information template. 5. Click SAVE at the bottom of the template. 6. To create multiple branches, including a private or staff calendar, you must enable the system’s multibranch function. If you are a single branch system and will not be creating a private or staff calendar, you can skip this step and go to Step 7. A. Click SYSTEM SETTINGS on the menu. The system displays the System Settings Maintenance page. B. In the Calendar Settings section, set the Enable Multi-Branch setting to “Yes”. C. Click SAVE. 7. Click BACK on the menu. The system returns to the Home Page. 8. Click LOGOFF on the tool bar. The system returns to the Login Screen where a menu has been created. MAN0100-06.05 B-1 September 5, 2008 Events 6.0 ) Single Branch Systems: Single branch systems continue configuring your system using the instructions in the remainder of this Appendix. )) Multi-Branch Systems: Continue configuring your system by selecting All Branches and following the configuration instructions in the remainder of this chapter. See Section 3 - B) - Library Information (page B-13) for more information about creating additional branches. SECTION 2 - E-MAIL CONFIGURATION ) Single Branch System Note: All e-mail configuration settings discussed in Section B – E-mail Server Settings (Template) and Section C – E-mail Settings are condensed into and accessible from E-mail Settings. )) Multi-Branch System Note: E-mail configuration settings are accessed as follows: • E-mail Server Settings: Access in All Branches mode. E-mail Server Settings contains the template for entering server settings and upcoming event and reminder settings. • E-mail Settings: Access in individual branch mode. E-mail Settings is where you set the default “To” and “From” address fields for e-mails sent by Events. A. Setting Up E-mail You will need the following information to set up e-mail in Events: • The URL or IP address for your outgoing mail server (SMTP server). You will enter this information into the “SMTP Address (URL or IP):” field of the E-mail Server Settings Template (see Section B below). • The authentication (i.e., username and password) requirements of your server, if any. If the server does require authentication, you need to know what type - Basic Authentication or NTLM. You also need a valid username and password for the SMTP server. (i) An Optional Approach: Pretend to set up Outlook Express on the same server where Events is installed. When the system asks you to configure “outgoing” email, the server information needed will match the Email Server Settings (or Email Settings). Contact the technical person in charge of your e-mail server if you have trouble setting up or sending e-mail with Outlook Express. (ii) More about SMTP servers SMTP (Simple Mail Transfer Protocol) servers process outgoing e-mail. This is separate from the server that processes incoming e-mail (typically POP3 or IMAP). While you always need a username and password (authentication) to check your incoming e-mail, sending e-mails depends on the configuration of the SMTP server. Some SMTP servers require authentication. SMTP servers are configured this way to prevent the server from becoming a source of spam or other illicit e-mail. Contact your Systems Administrator for more information. B. E-mail Server Settings Email Server Settings refers to network server settings that determine how your server handles outgoing mail and Upcoming Event/Reminder Settings. These instructions apply to new installations of version 4.0 or later. The location of e-mail configuration settings depends on whether Events works as a standalone program or with Room Reserve. See the table below to determine where to access e-mail configuration options. )) Multi-Branch System Note: Email Server Settings is an All Branches setting. MAN0100-06.05 B-2 September 5, 2008 Events 6.0 1 Note: When Events and Room Reserve work together, you only need to configure e-mail in Events. Module Configuration • Events only • Room Reserve only • Events and Room Reserve E-mail Configuration Access Events Room Reserve Events The table below illustrates the Email Server Settings template. Setting Option Description SMTP Address (URL or IP): [localhost] Refers to the localhost reference or the specific server address. Windows servers require the SMTP address. Authentication Type: No Authentication Basic Authentication | NTLM | • No Authentication eliminates the user name/password requirement for access to the system. • Basic Authentication requires a user to enter a user name and password. • NTLM refers authentication. to NT LAN User Name:* [Text Entry Field] Required for Basic Authentication. Password:* [Text Entry Field] Required for Basic Authentication. Manager Upcoming Events/Reminder Settings: Event Notification Offset: [30] Day(s) Determines when the system sends event notifications and reminders, up to 60 days before an event. 0 disables Upcoming Event Notifications. Works with NOTIFY ME and notify.asp. Event Reminder Offset: [2] Day(s) Determines when the system sends reminder messages, up to 60 days before an event. 0 disables Event Reminders. The system sends reminders to patrons who register for an event or select REMIND ME for events that do not require registration. Room Reminder Offset: [2] Day(s) Determines when the system sends room reminders, up to 60 days before an event. Room Reminder Offset functions when libraries run Events and Room Reserve, and the event calendar displays room reservations. 0 – Disables Room Reminders Web Server URL or IP: [URL/IP Address Entry Field] Indicates the URL or IP address where Events has been installed. Include “http://” when entering the address (i.e., http://[serveraddress].com). Folder Path: [Text Entry Field] Indicates the system subfolder where Events is installed. Type the path without the server address and starting or ending forward slash (i.e., Evanced/lib) MAN0100-06.05 B-3 September 5, 2008 Events 6.0 Setting Option Description “From” Name: [Text Entry Field] Related to nightly Notify.bat, “From” Name refers to the sender name in email messages. We recommend the name be general to the library rather than a specific individual to preserve continuity of the address if changes occur. “From” Email Address: [Text Entry Field] Related to nightly Notify.bat, “From” Email Address refers to the sender email address associated with the “From Name” setting. Nightly Status “To” Email Name: [Text Entry Field] Related to nightly Notify.bat, Nightly Status “To” Email Name refers to the name of the internal recipient of nightly status emails. This field is restricted to one name only. The Nightly Status and From name fields may contain the same name. Nightly Status “To” Email Address: [Text Entry Field] Related to Notify.bat, Nightly Status “To” Email Address refers to the email address of the internal recipient of nightly status emails. This field is restricted to one address only. The Nightly Status and From Email Address fields may contain the same email address. Email Sending Option: Individual Emails Condensed Emails | Determines whether a patron interested in multiple event types receives multiple individual notifications or a single condensed notification. Enable Log No Yes | Enables a read-only log file tracking Notify Me and reminder messages. The file contains information for a rolling 30 days. Functions: SAVE SEND TEST EVENT/REMINDER EMAIL Click to save your settings. Click to test the Nightly Status Email connection. The system displays the following message: “Test Email Sent. Sent Email: E-Notify Status Email: Click the following link to test the URL/IP and Folder path settings. The About web page should appear. If the web page does not appear then there is a problem with the ‘Web Server URL or IP’ and/or the ‘Folder Path’ settings. Test Path: http://[________________] If everything is configured correctly, an email was sent to the Nightly Status ‘To’ Email Address.” Follow-up by checking the Inbox of the address associated with the Nightly Status “To” field to confirm receipt of the test message. The test message includes a link to the Event Calendar. VIEW NOTIFY LOG MAN0100-06.05 Click to view a status log of nightly outgoing e-mail messages. This option is available at the Administrator level when “Enable Logging” setting is set to “Yes”. B-4 September 5, 2008 Events 6.0 How To Do It 1. Click SYSTEM CONFIGURATION & SETTINGS on the home page (Settings menu). The system loads the Style Configuration Maintenance page. 2. Click EMAIL SERVER SETTINGS on the menu. The system loads the Email Settings page. MAN0100-06.05 B-5 September 5, 2008 Events 6.0 3. Complete the Email Server Settings Template. 4. Click SAVE to save your settings. 5. Click SEND TEST EVENT/REMINDER EMAIL to test your settings. 6. Click BACK on the menu to return to the home page. C. E-mail Settings Email Settings refers to the address fields of the automatic email messages sent by Events. “From” Name................................. The library name appearing on all email messages sent by Events (i.e., Avon Public Library). We recommend the name be general to the library rather than a specific individual to preserve continuity of the address if changes occur. “From” Email Address ................... The email address associated with the “From Name” above (i.e., [email protected]). We recommend the email address be general to the library rather than a specific individual to preserve the continuity of the address if changes occur. Default “To” Internal Name............ The staff or department receiving copies of Status Change notifications. Use a semi-colon (;) separator when entering multiple names. The Internal Email field of the Event Template overrides this setting. Default “To” Internal Email ........... The e-mail address(es) associated with Default “To” Internal Name. The Address(es) Internal Email field of the Event Template overrides this setting. MAN0100-06.05 B-6 September 5, 2008 Events 6.0 How To Do It )) Multi-Branch System Note: Email Settings is an individual branch setting. 1. Click SYSTEM CONFIGURATION & SETTINGS on the home page (Settings menu). The system loads the Style Configuration Maintenance page. 2. Click EMAIL SETTINGS on the menu. MAN0100-06.05 B-7 September 5, 2008 Events 6.0 3. Enter names and email addresses into the appropriate fields. 4. Click SAVE. 5. Click SEND TEST CONFIRMATION/STATUS CHANGE EMAIL to send a test message. 6. Click BACK to return to the Home Page. D. Scheduling Automatic E-mail – The notify.bat File This is a scheduled event that requires a valid user ID and password. In most cases it is appropriate to create a dummy user with administrative privileges to run this script. However, the system will accept any user with Administrative level privileges. This should be done before attempting to add a scheduled item. If the associated user account is disabled or deleted, the scheduled task will not run until file is updated. This has only been tested with user accounts with full administrative privileges. The batch file will run in a Command window on the host computer for a short time. 1 Note – Virus Scanning Software: Any virus-scanning program setup to run on the host computer should automatically scan all outgoing email from this code as well. There should be no need to modify the configuration. How To Do It – Editing the notify.bat File 1. Locate and edit the notify.bat file: T Important Note: Use only a basic text editor such as Notepad to edit these files. DO NOT use WordPad or Word, which adds formatting that corrupts the file(s). A. Edit batch file URL: Contents of notify.bat = HttpRequester.vbs http://localhost/notify/eventnotify.asp?opmode=ALL Replace http://localhost/notify/ with the URL that points to your Events installation. For example, if your URL location is: http://mycalendar.mylibrary.org/evanced/lib/eventcalendar.asp Replace http://localhost/notify/ with notify.bat would contain the following: http://mycalendar.mylibrary.org/evanced/lib/. Your HttpRequester.vbs http://mycalendar.mylibrary.org/evanced/lib/eventnotify.asp?opmode=ALL 2. Schedule this script: A. Select CONTROL PANEL SCHEDULED TASKS B. Click ADD SCHEDULED TASK. The Scheduled Task Wizard opens. MAN0100-06.05 B-8 September 5, 2008 Events 6.0 C. Click NEXT. The system will ask you to “Click the program you want Windows to run. To see more programs, click Browse.” D. Click BROWSE. The system displays the Select Program to Schedule window. E. Locate and click on the notify.bat file. F. Click OPEN. G. Enter a meaningful file name, such as “Event Notification". H. Select ‘Daily’ to run the script once a day I. Click ‘Next’. J. Select the start time, ‘Every Day’ and start date. K. Click NEXT. The system displays the current user logged into the system. (i) To keep the current user, do nothing and proceed to the next step, or (ii) Enter the user log-in and password for an alternate user. 1 Important Note: This must be a valid user account with Administrator privileges. If the user account is disabled or deleted, the scheduled task will not run until file is updated. This has only been tested with user accounts that have full administrative privileges on the server. L. Click NEXT. The system displays the following message, if setup is successful: successfully scheduled the following task . . .” “You have M. Click FINISH. 3. Configuring or changing task properties: A. Select CONTROL PANEL SCHEDULED TASKS B. Double click on notification item. The system displays the task’s update window. From here you may update the task’s properties and schedule. C. Update task properties and schedule as desired. D. Click APPLY. E. Click OK. The system closes the task update window. E. Troubleshooting Problem When I try to send an email and/or I try to register for a program, I keep getting the error message, “The transport failed to connect to the server.” Causes and Solutions Your web server is unable to establish a connection to your e-mail server because: • Antivirus software (specifically McAfee VirusScan Enterprise 8.0) or a firewall (hardware or software) are blocking port 25; • The URL or IP address for the server are incorrect or cannot be resolved; or • The e-mail server is experiencing difficulties. Contact your Systems Administrator for assistance. MAN0100-06.05 B-9 September 5, 2008 Events 6.0 Problem I keep getting the error message, “550 5.7.1 Relaying Denied.” Causes and Solutions Your SMTP server configuration needs to be altered to accept email connections from the web server. “Relaying” means that the SMTP server does not know the server, so it will not forward any email intended for a person outside the library. If your email address ends with “@mylibrary.org” you can send email to anyone else at “@mylibrary.org”, but no one else. Contact your Systems Administrator and ask them to configure the SMTP server to accept outgoing e-mails from the web server. SECTION 3 - CONFIGURATION SETTINGS A. Appearance (Style Configuration) Libraries may customize the look and feel of Events consistent with their web page style. This affects the appearance of titles, backgrounds, calendars, buttons, hyperlinks and more. You may operate two windows to better preview your choices. Open one window to the Style Configuration Maintenance page (Settings → System Settings → System Configuration & Settings) and one window to the Program and Events page (Registration & Attendance → Calendar/Registration). Refresh the Program and Events page to see your changes. New to Version 6: • Applying styles from other Evanced programs: The style configurations for Events and Room Reserve are configured separately. You can apply the style from Room Reserve to Events by clicking the LOAD ROOM RESERVE button. • Restoring Factory Default Settings: You may restore style settings to their factory default by clicking the LOAD FACTORY DEFAULTS button. The system will display a confirmation message - “Loading Factory Defaults will erase changes you have made” - allowing you to confirm or abort the process. • Clear Settings: In a multi-branch system, style settings are controlled by the Administrator at the All Branches level. Individual branches have the ability to customize their style settings locally. When they do, they break the connection that allows global style changes to All Branches. Therefore, any subsequent global changes to All Branches will not impact the style settings of any branch that MAN0100-06.05 B-10 September 5, 2008 Events 6.0 customized their style settings locally. Clear Settings re-establishes the link between All Branches and the individual branch to allow global style changes. • Load ‘All Branches’: In a multi-branch system, Load ‘All Branches’ allows an individual branch that customized its own styles locally to apply the global All Branches style settings to their branch. Unlike Clear Settings, it does not re-establish the link between All Branches and the individual branch. • Entry Form Title Preview allows you to preview style settings for event registration pages. How To Do It 1. The table below illustrates one form of the Event System Maintenance Home Page. Your home page may display additional options depending on the number of branches in your system and the security level of your password. If you are a multi-branch system, what you see depends upon the branch mode selected. MAN0100-06.05 B-11 September 5, 2008 Events 6.0 2. Click SYSTEM CONFIGURATION & Maintenance page. SETTINGS (highlighted above). The system loads the Style Configuration Note: Your menu options (i.e., Style Configuration, Library Information, etc.) may differ depending on whether you are a multi-branch or single branch system, and, in a multi-branch system, whether you are in All Branches or individual branch mode. 3. Click on the desired topic heading to expand or contract the list of options. The sample below shows Event Title expanded to display its options. 4. Select font options using the drop down menu (not shown). 5. Use one of the options below to make color selections, which are displayed in the associated preview window. See the illustration above. A. Select PICK to display the available color palette and click the desired color. Selecting a color closes the PICK window. Or B. Enter the HTML code (i.e., #FF090) for the desired color. 6. Click SAVE at the end of each category when all options have been set. 7. Click BACK on the menu to return to the Home Page. MAN0100-06.05 B-12 September 5, 2008 Events 6.0 B. Library Information Library Information refers to the library’s contact information (i.e., name, address, phone, etc.), residency (or other) terms, and hours (standard and alternate). This information must be entered before events are posted to the calendar. )) Multi-Branch System Note: In order to setup or access multiple branches, the multiple branches feature must be enabled. See Section G - System Settings (page B-32) for more information. (i) New for Version 6.0 • At the All Branches level, Library Information is managed from a drop list. Add Branch Add Branch allows you to set up a new library branch in the system. Libraries might also use this function to create a private, internal only staff calendar. Note: In order for Add Branch to be active, the Enable Multi-Branch setting in System Settings must be set to “Yes”. You can no longer set the total number of branches from System Settings. Edit Branch Edit Branch allows you to view and edit the configuration of existing branches, adjust the order in which branches appear in drop down lists, and delete individual branches. Master Branch Master Branch is the Library Name and website address only. • When adding or editing a branch, the Library Information Maintenance page includes the ability to add a map link that will appear on the Event Calendar (in List view) and on the Event Information/Registration page next to the library name. • When adding or editing a branch, you may elect to make the branch private – hidden from public view. This allows libraries to create an internal-only staff calendar. )) Multi-Branch System Note: Library Information is split between All Branches and individual branch modes as follows: Mode All Branches Individual Branch MAN0100-06.05 Information All Branches mode contains: • Add Branch • Edit • Master Branch Individual Branches may edit their own branch only. The fields that appear on the Edit Branch template do not change when accessed from All Branches or Individual Branches. B-13 September 5, 2008 Events 6.0 How To Do It – Master Branch 1 Note: You must log into the system with an Administrator level password. )) Multi-Branch System Note: This is an All Branches function. Be sure the branch drop list in the upper right corner of the page shows All Branches. 1. Click SYSTEM CONFIGURATION & SETTINGS on the home page (Settings menu). The system loads the Style Configuration Maintenance page. 2. Hover over LIBRARY INFORMATION on the menu and click EDIT MASTER from the drop down list. MAN0100-06.05 B-14 September 5, 2008 Events 6.0 3. The system displays the Library Information Maintenance page – library name and website. 4. Enter the information requested. Items marked with an asterisk (*) are required. 5. Click SAVE. 6. Select another item from the menu or click BACK to return to the Home Page. How To Do It – Add a Branch If you do not see Add Branch in the Library Information drop down list, then you must go to System Settings and set Enable Multi-Branch to Yes. 1 Note: You must log into the system with an Administrator level password. )) Multi-Branch System Note: This is an All Branches function. Be sure the branch drop list in the upper right corner of the page shows All Branches. 1. Click SYSTEM CONFIGURATION & SETTINGS on the home page (Settings menu). The system loads the Style Configuration Maintenance page. MAN0100-06.05 B-15 September 5, 2008 Events 6.0 2. Hover over LIBRARY INFORMATION on the menu and click ADD BRANCH from the drop down list. 3. The system displays the Library Information Maintenance page – branch settings template. 4. Enter the information requested. Items marked with an asterisk (*) are required. 1 Note: To hide a branch from public view, be sure to click the PRIVATE checkbox. 5. Click SAVE. The system returns to the branch listing. 6. Select another item from the menu or click BACK to return to the Home Page. MAN0100-06.05 B-16 September 5, 2008 Events 6.0 How To Do It – Creating a Staff or In-House Only Calendar To create a staff or in-house only calendar, create a private branch. Private branches are not accessible to public view. To create a private branch in a single branch library system, you must go to System Settings and set Enable Multi-Branch to Yes. 1. Click SYSTEM CONFIGURATION & SETTINGS on the home page (Settings menu). The system loads the Style Configuration Maintenance page. 2. Hover over LIBRARY INFORMATION on the menu and click ADD BRANCH from the drop down list. MAN0100-06.05 B-17 September 5, 2008 Events 6.0 3. The system displays the Library Information Maintenance page – branch settings template. 4. Enter the information requested. Items marked with an asterisk (*) are required. A. Click the PRIVATE checkbox to make the calendar private and accessible to staff only. 5. Click SAVE. The system returns to the branch listing. 6. Select another item from the menu or click BACK to return to the Home Page. MAN0100-06.05 B-18 September 5, 2008 Events 6.0 How To Do It – Edit Branch 1 Note: You must log into the system with an Administrator level password. )) Multi-Branch System Note: This is an All Branches function. Be sure the branch drop list in the upper right corner of the page shows All Branches. 1. Click SYSTEM CONFIGURATION & SETTINGS on the home page (Settings menu). The system loads the Style Configuration Maintenance page. 2. Hover over LIBRARY INFORMATION on the menu and click EDIT BRANCH from the drop down list. MAN0100-06.05 B-19 September 5, 2008 Events 6.0 3. The system displays the Library Information Maintenance page – branch settings. 4. Click on the desired branch to open. The system opens the branch template, which allows you to enter the library’s contact information, location mapping and hours. 5. Enter the information requested. Items marked with an asterisk (*) are required. 6. Click SAVE. The system returns to the branch listing. MAN0100-06.05 B-20 September 5, 2008 Events 6.0 7. Display Order: To change the order in which branches appear, click the Order column, as appropriate, to move a branch’s position in the list. UP/DOWN button in the Display 8. Select another item from the menu or click BACK to return to the Home Page. How To Do It – Deleting a Branch Events allows you to delete library branches from the system without first clearing any data associated with the branch. T Warning: Deleting a branch permanently deletes all information associated with that branch, including all events, rooms, reservations, registrations, attendance and all related statistics. This includes, but is not limited to, published, unpublished and archived information. Deleted information is unrecoverable. 1. You must log into the system with an Administrator level password. )) Multi-Branch System Note: This is an All Branches function. Be sure the branch drop list in the upper right corner of the page shows All Branches. 2. Click SYSTEM CONFIGURATION & SETTINGS on the home page (Settings menu). The system loads the Style Configuration Maintenance page. 3. Hover over LIBRARY INFORMATION on the menu and click EDIT BRANCH from the drop down list. MAN0100-06.05 B-21 September 5, 2008 Events 6.0 4. Click the DELETE button associated with the branch to be deleted. 5. The system will display the following message: “Are you sure you want to delete this branch? This will delete the branch and all associated information including events, rooms and reservations!” Click OK to delete the branch or CANCEL to abort the process. 6. If you clicked OK, the system displays the following secondary confirmation message: “The branch and all associated information will be deleted permanently! Are you sure?” Click OK to delete the branch or CANCEL to abort the process. 7. If you clicked OK, the system deletes the branch without further confirmation. 8. Select another item from the menu or click BACK to return to the Home Page. C. System Messages System Messages is a branch level function that refers to the standard messages that appear while using Events, including: • Event Calendar View Information entered here is used for instructional information at the top of the Patron’s view of the calendar in Calendar View. These instructions are separate from the Event List View instructions. • Event List View Information entered here is used for instructional information at the top of the Patron’s view of the calendar in List View. These instructions are separate from MAN0100-06.05 B-22 September 5, 2008 Events 6.0 the Event Calendar View instructions. • Event Registration Instructions Information entered here is used for the instructional information at the top of the Event Registration Page. • Payment Information Information entered here appears in the Send Payment section of events that require payment. • Contact Information Information entered here is used by the system to display contact information in case of errors, such as someone attempting to sign up twice for the same event. • Cancellation Notice Information entered here is used to construct the cancellation notice. • Notify Me Instructions Information entered here is used to construct the Notify Me link instructions. • Email a Friend Instructions Information entered here is used to construct the Email a Friend link instructions. How To Do It )) Multi-Branch System Note: System Messages is an individual branch setting. 1. Click SYSTEM CONFIGURATION & SETTINGS on the home page (Settings menu). The system loads the Style Configuration Maintenance page. MAN0100-06.05 B-23 September 5, 2008 Events 6.0 2. Click SYSTEM MESSAGES on the menu. The system loads the System Messages Maintenance page. 3. Enter messages in the appropriate fields. The fields support HTML and graphic codes. 4. Click SAVE. 5. Click BACK to return to the Home Page. MAN0100-06.05 B-24 September 5, 2008 Events 6.0 D. System Templates (Registration Messages) System Templates refers to messages displayed when an Event Registration Form is completed, including. • Event/PR Report A report of events detailing the schedule of events with additional information. This template determines the level of information and detail of the report. In a multi-branch system, the Event/PR Report only appears at the All Branches level. • Print List Print List controls the information that appears when a patron prints the calendar from List View. • Registration Successful The message confirming a patron successfully registered for an event. • Registration Probation The message notifying a patron of their probation status. • Already Registered The message notifying a patron that they are attempting to submit a duplicate registration. • Registration Residency Failed The message notifying a patron they do not meet a residency requirement for registration. This message works with “Residency/Other Terms” (located under Library Information) and “Must be a Resident” (event specific stipulation). • Registration Payment Required The message notifying a patron of their wait list status pending receipt of a required fee or deposit and instructs a patron where to send payment. System Templates support HTML codes. )) Multi-Branch System Note: System Templates is split between All Branches and individual branch mode as follows: Mode All Branches Individual Branch MAN0100-06.05 Information • Event/PR Report • Print List • • • • • Registration Successful Registration Probation Already Registered Registration Residency Failed Registration Payment Required B-25 September 5, 2008 Events 6.0 How To Do It – Composing a New Template )) Multi-Branch System Note: The settings configured here may be saved and applied to all branches in the system. Individual branches maintain their ability to customize their own templates. Any customization by the individual branch overrides the original configuration. 1 Note: The screen shots in this section illustrate general principles only. They may not reflect the specific message or content your screen displays. 1. Click SYSTEM CONFIGURATION & SETTINGS on the home page (Settings menu). The system loads the Style Configuration Maintenance page. 2. Hover over SYSTEM TEMPLATES on the menu. A menu of templates appears. 3. Click the desired template. The system opens the desired template. Note: All System Templates are formatted and function the same way. MAN0100-06.05 B-26 September 5, 2008 Events 6.0 4. Edit the default text in the message window; or click customized message. CLEAR to erase the default message and enter a 1 Note: You may restore the default template at any time by clicking the LOAD DEFAULT TEMPLATE button. 5. To enter the tags that pull information from the reservation database: A. Click on the desired tag in the Tags window. B. Click on the location in the message window where the tag should appear. C. Click the arrow button between the message and Tags window. The selected tag appears in the selected location. 6. Click SAVE to save the template. )) Multi-Branch System Note: SAVE applies the template the individual branch only. Click APPLY TO ALL BRANCHES to save the template to all branches your system. SAVE AND 7. Click BACK to return to the Home Page. How To Do It - Restoring the Default Template 1. Open the desired template (See How To Do It – Composing a New Template steps 1-3 for more information). 2. Click the LOAD DEFAULT TEMPLATE button to restore the default message template. E. E-mail Templates (Subscriber Messages) Email Templates refers to reminders and notifications automatically created by the system based upon a patron’s subscription or event registration, including: Upcoming Event MAN0100-06.05 A subscription message with scheduled event information requested by a patron. Patrons activate the message in two ways: (1) From an event list by clicking on NOTIFY ME (OF SIMILAR TYPES OF EVENTS); or (2) From the Notify.asp page, if active on the library’s website. Patrons select the types of events (i.e., Author Lecture, Children’s Programs, etc) to include and receive messages a preset number of days prior to an event. B-27 September 5, 2008 Events 6.0 Registration Reminder An automatic registration reminder message sent to a patron a pre-set number of days prior to an event. Event Reminder An automatic message a patron may request when an event does not require registration. Patrons activate the message by clicking on REMIND ME in the event list. The system sends the reminder a pre-set number of days prior to an event. Confirmation An automatic message sent to a patron confirming their registration in an event. The confirmation can include a link patron’s may use to self-cancel their registration. Status Change An automatic message notifying a patron of a status change in their registration as a result of a canceled registration, move from a waiting list, etc. Email Templates now support HTML and graphic codes. )) Multi-Branch System Note: Email Templates is an individual branch setting. How To Do It – Editing the Default Templates 1. Click SYSTEM CONFIGURATION & SETTINGS on the home page (Settings menu). The system loads the Style Configuration Maintenance page. MAN0100-06.05 B-28 September 5, 2008 Events 6.0 2. Hover over EMAIL TEMPLATES on the menu. A menu of templates appears. 3. Click the desired template. 4. Edit the default text in the message window; or click customized message. CLEAR to erase the default message and enter a 5. To enter the tags that pull information from the reservation database: A. Click on the desired tag in the Tags window. B. Click on the location in the message window where the tag should appear. C. Click the arrow button between the message and Tags window. The selected tag appears in the selected location. 6. Click SAVE to save the template. 7. Click BACK to return to the Home Page. MAN0100-06.05 B-29 September 5, 2008 Events 6.0 How To Do It - Restoring the Default Template 1. Open the desired template (See How To Do It – Editing the Default Template steps 1-3 for more information). 2. Click the LOAD DEFAULT TEMPLATE button to restore the default message template. F. Security Access (Passwords) Security determines the level of authority for performing tasks related to viewing, creating, editing, deleting and publishing events, and registering patrons. √ √ System Wide Lists √ Branch Lists √ System Configure √ Reports Register √ Publish Read Delete Edit Security Levels Read Only Add The table below describes the access and control privileges associated with the available security levels. √ √ √ √ Create Only √ √ General Staff √ √ √ √ √ √ √ Admin √ √ √ √ √ √ √ How To Do It )) Multi-Branch System Note: Security is an All Branches and individual branch setting. 1. Click SYSTEM CONFIGURATION & SETTINGS on the home page (Settings menu). The system loads the Style Configuration Maintenance page. MAN0100-06.05 B-30 September 5, 2008 Events 6.0 2. Hover over SECURITY on the menu. The system displays a menu of options. 3. Click on the desired security level. The system displays the password template. 4. Enter the existing password in the Administrator Password field. 5. Enter the new password in the New Password field. 6. Re-enter the new password in the Re-enter New Password field. 7. Click SAVE to save your settings. MAN0100-06.05 B-31 September 5, 2008 Events 6.0 G. System Settings System Settings allows libraries to customize Registration, Event Entry, Attendance and Calendar settings to comply with their policies and procedures. How To Do It ) Single Branch System Note: The table in this section illustrates the System Settings Template as it appears in a multi-branch system. In a Single Branch System, the System Settings Template appears altogether as one template. )) Multi-Branch System Note: Multi-branch systems begin System Setting configuration in All Branches mode. In order to setup or access individual branches, the Enable Multi-Branch setting must be set to Yes. After configuring in All Branches mode, then configure each individual branch. The table in this section illustrates the System Settings breakdown between the All Branches and individual branch modes. 1. Select “All Branches” from the branch selector on the home page (multi-branch systems only). Single branch systems skip this step. 2. Click SYSTEM CONFIGURATION & SETTINGS on the home page (Settings menu). The system loads the Style Configuration Maintenance page. 3. Click SYSTEM SETTINGS on the menu. The system loads the System Settings Maintenance page. MAN0100-06.05 B-32 September 5, 2008 Events 6.0 4. Complete the System Settings Template (illustrated below). 5. Click SAVE to save your settings. 6. Click BACK to return to the home page. A. Single branch systems proceed to the next section – Category Lists and Filters. B. Multi-branch systems continue with the next step. 7. Multi-branch systems select a branch from the branch selector on the home page. 8. Repeat the configuration process steps 2-6 above. MAN0100-06.05 B-33 September 5, 2008 Events 6.0 Setting Options Description “All Branches” Mode Registration Settings Enable Patron Self Cancellation No Yes | Determines whether patrons can self-cancel their registration in an event. “Yes” enables a “Registration Cancel” link in the Registration Confirmation email. Libraries may also create a Regcancel.asp link on their website. The system sends cancellation confirmation by email if the registration contains an email address and the “Enable Auto Status Change Emails” function is activated. Enable Registration Confirmation Emails No Yes | Determines whether the system automatically sends a registration confirmation when an email address appears on the Event Registration Form. This function works with the Registration Successful Template (System Templates). No | Yes [Statistical information is retained.] Determines whether the system deletes attendance sheets when archiving events. The system retains statistical information when attendance sheets are deleted. “Yes” deletes attendance sheets; “No” retains attendance sheets until an event is deleted. “Yes” is the default setting in consideration of the USA Patriot Act. No Yes | Determines whether the system is a single branch or multi-branch system. This feature must be enabled if you want to create more than one branch. Note: Single branch systems wanting to create a private staff calendar should set this field to Yes. Enable Event Type Searching No | Yes Determines whether patrons can filter or search for events by Event Type. This setting impacts the public view only. Enable Multiple Library Searching No | Yes Affects the Search Slider and determines whether staff and the public can search the calendars of multiple locations. Enable Calendar Search Window No | Yes Enables the Search Slider and SEARCH button in the public view of the Events Calendar. Attendance Settings Remove Attendee Information when Archiving Calendar Settings Enable Multi-Branch MAN0100-06.05 B-34 September 5, 2008 Events 6.0 Setting Search Window Default State Options Closed Initially | Open Initially | Always Open Description Determines whether the Search Slider appears open or closed when staff or the public initially logs into Events. This setting impacts the public view when “Enable Search Calendar Window” is set to “Yes”. The default is “Closed Initially”. • Closed Initially: Default Setting (Search Slider closed or hidden). Users must select either the SEARCH or SEARCH SLIDER button to open the Search Slider. • Open Initially: Search Slider begins in the open position. Click the X on the Search Slider or SEARCH SLIDER to close. • Always Open: Forces the Search Slider to remain open and prevents users from closing it. Enable “Display Your Personal Schedule” Link No | Yes Enables or disables the DISPLAY YOUR PERSONAL SCHEDULE button on the Event Calendar. This setting impacts both the staff and public views. Display Personal Schedule Validation Options 5 Confirmation First/Last/Phone Determines the information used to validate access to a user’s personal calendar. The system requests validation when a user’s clicks on the DISPLAY YOUR PERSONAL SCHEDULE link. Authenticate* • Selecting “Confirmation” requires an event confirmation number and a patron’s last name to access a personal calendar. • Selecting “First/Last/Phone” requires a patron’s first name, last name and phone to access a personal calendar. • *The system enables “Authenticate” when “Event Authentication” (authconfig.asp page) is set to either “Per Event” or “All Events Requiring Registration”. Selecting “Authenticate” requires a patron’s library card number and last name to access a personal calendar. Enable Event Time Display in Combination with Event Title No Yes | Enables an event start time display next to an event title on the calendar page. Default Patron View 5 Calendar List Determines the default format – monthly or list – for “Programs and Events page” on the Patron side. Default Staff View 5 Calendar List Determines the default format – monthly or list – for “Programs and Events page” on the Staff side. MAN0100-06.05 B-35 September 5, 2008 Events 6.0 Setting Options Description Show Registration Numbers in Patron Views No Yes | Enable the system to display registration totals in the patron views, such as the number of available stops and the number of people on the waiting list. Combined Calendar Title [Text entry field] Determines the title of the Event Calendar displayed when a user selects a combined, multibranch calendar display. This field supports HTML format codes. Calendar Title [Text entry field] Determines the default title displayed above the events calendar. Use Library Name No | Yes Determines whether the library name appears at the top of the public view of the events calendar. Branch Specific Settings Registration Settings Enable Staff Side Group Registration No | Yes Allows (“Yes”) or prevents (“No”) staff from registering multiple patrons under a single name. Group Registrations require staff assistance. Patrons are unable to register multiple individuals under a single contact. Enable Staff Editing of Internal Notes on Attendance Page No Yes | Allows the staff to edit the Internal Notes field on the attendance page. Enable Staff Viewing of Internal Notes on Registration Page No | Yes Disables (“No”) or enables (“Yes”) staff to see the “Internal Notes” field on the Registration page. Enable Notes Entry for Patron Registration No | Yes Maximum Number of Patron Recalls [Number field] Disables (“No”) or enables (“Yes”) a Notes field (Text Entry Field) on the Event Registration Form. Enables the RECALL PREVIOUS REGISTRANT button on the patron Event Registration Form. This prefills the registration information of prior registrants’ information up to the number set here. [0 = Disables “Recall” button on patron side] Enforce 24HR Notice No Yes | • Enables (“Yes”) or disables (“No”) enforcement of the 24-hour cancellation notice and automatic wait listing policy. • Enables (“Yes”) or disables (“No”) the automatic reassignment of registered patrons from the Waiting List to the Main List when the “Enable Auto Waiting List Move w/Email” option is enabled. MAN0100-06.05 B-36 September 5, 2008 Events 6.0 Setting Options Description Enable 24HR Message No Yes | Determines whether the 24-hour advanced notice cancellation reminder appears at the bottom of the Event Registration Form. The text for cancellation notices is set in Settings → System Messages. Enable Registration Limit No Yes | Staff with the accompanying password level and above has the ability to register patrons beyond the maximum attendees allowed by an event. Unlimited Registration Password Level [Security Access] [v] Sets the password level for allowing registration beyond maximum attendees allow by an event. Event Entry Settings Default Time [10:00 A.M.] [v] Default Setup Time [___] Minutes Determines the default event start time appearing in the “Event Time – Start Time” field on the Event Template. Determines the default time – in minutes - added to a reservation to allow for room set up. [Typically 15 or 30 minutes] Default Take Down Time Maximum Recurring Occurrences [___] Minutes [Typically 15 minutes] [Number field] or 30 Determines the default time – in minutes - added to a reservation to allow for room clean up. Determines the maximum number of events allowed in a recurring event. For example, if set to 12, only 12 recurrences of an event are allowed. Require Event Type Selection No | Yes Determines whether assigning an Event Type is required or optional on the Event Template. The Reports function uses information from this field. Require Location Selection No | Yes Determines whether assigning an event location is required or optional on the Event Template. Enable Card Number Stipulation No | Yes Enables (“Yes”) or disables (“No”) a library card number stipulation in the Registration section of the Event Template. When enabled, libraries may choose whether to include the Library Card Number field on the Event Registration Form and, if so, whether the information is required or optional. MAN0100-06.05 B-37 September 5, 2008 Events 6.0 Setting Set “No Waiting List” Default to Checked Options Description No | Yes When set to “Yes”, the “No Waiting List” (Waiting List Options field) registration stipulation on the Add New Event template is set to “checked” (5) by default. This means the system will not create a waiting list for the event. When the attendance reaches its maximum, the system closes registration. Enable Auditing No | Yes Enables (“Yes) or disables (“No”) an Administration Information section on the Event Template that creates an audit trail tracking who created and edited event entries and when (date and time). Enable Address Stipulation 5 Disabled Per Event Always On Per Event Determines whether an “Address Entry Required” field on the Event Template and, if so, on what basis. Enable Custom Stipulation 1 – 6 5 Disabled Per Event Always On Per Event Edit Enables libraries to add customized questions to the Event Template (i.e., Where did you hear about this program?). Staff may select one or more of the questions to appear on the Event Registration Form when adding an event. Enable Publish Features No | Yes Activates or deactivates Publish - Do Not Publish authority on the Event Template. The Publish Feature determines whether a new event appears on the live calendar. This allows libraries to add events to the calendar without making them public for planning purposes. Publishing Level Password [Password Authority] [v] Determines the authority level required to publish events to the public view of the events calendar. The authority levels are: Read Only, Create Only Staff User and Staff Admin. Read Only is the only authority level that cannot publish events. Auto Archive Option Disable Determines the parameters for automatically archiving events. Archiving removes events and all associated attendance sheets from the calendar. In consideration of the USA Patriot Act, all attendance sheets are deleted when archiving events, unless otherwise configured. The underlying statistics based upon the attendance sheets are retained for reporting purposes. See Attendance Settings in this table for further information. | Events Older than ___ Days | On the ___ Day of the Month Always show registration settings MAN0100-06.05 No Yes | Determines the default position – open (“Yes”) or closed (“No”) – of Registration Stipulations on the Event Template. B-38 September 5, 2008 Events 6.0 Setting Options Description Outside of Standard Hours Checking Start Time [1-24] [v] – End Time [1-24] [v] Allows the system to determine whether and event’s start and end time are outside of the library’s normal operating hours. The drop down list displays options based on a 24-hour clock (military time). This is primarily used for checking time entry mistakes (i.e., 1:00a.m. v. 1:00p.m. Attendance Settings Enable Auto Waiting List Move w/Email No | Yes Enables the automatic reassignment of registered patrons from the Waiting List to the Main List when an opening occurs. The system automatically sends the attendee a status change e-mail, if they provided an e-mail address. The event’s contact or the Default Internal Contact also receives the status change e-mail for information and follow-up purposes in the event the attendee does not provide and e-mail address. This feature works with “Enable Auto Status Change Emails” described below. Enable Auto Status Change Emails No | Yes Include Staff on all Changes Enables the automatic distribution of status change notifications to attendees, and an event’s contact or Default Internal Contact. Status change notifications result from reassignment to or from the Wait List, Cancelled List or Payment Waiting List. This feature works with “Enable Auto Waiting List Move w/Email” above. Optional Statistic Input Item 1-4 [Text Entry Field] Optional fields libraries may use to obtain a statistical breakdown of event attendees. When enabled, these fields tell you how many of the event’s attendees were w, x, y or z (i.e., Seniors, Adults, Teens, Children 12 and under). These fields appear regardless of an event’s registration requirement. If used, these fields appear on the Events reports in the Statistics Entry section. See “Registration & Attendance for additional information. No Yes | Determines whether the system is a single branch or multi-branch system. Note: Single branch systems wanting to create a private staff calendar should set this field to Yes. Calendar Title [Text field] The Calendar Title appears at the top of the public calendar view (i.e., “Programs & Events”, “Our Calendar”, etc.). Use Library Name No | Yes Determines whether the library’s name appears at the top of the public calendar view. Calendar Settings Enable Multi-Branch MAN0100-06.05 B-39 September 5, 2008 Events 6.0 H. Category Lists and Filters Categories and filters appear as drop-down lists throughout Events. Access to these lists requires an Administrative Level password. The table below describes the features and access required to configure categories and filters. Instructions for configuring lists and filters follow the table and apply generally to all categories, though not all categories apply the same options. For example, adding an item to a list occurs the same way in all categories, but not all categories allow you to affect list order, color, or accessibility to the public. New to Version 6: Each branch specific list contain a button (COPY TO ALL BRANCHES) that allows you to apply to all branches a list created in any branch. Filter Location Settings Category Description Refers to places where events are held (e.g. Meeting Room A, Children’s Room, Reading Area, etc.). When used with Room Reserve, Location becomes the master list of all rooms and locations. List Order Report Statistic Branch Specific Alphabetical No )) Multi-branch System Note: Individual branches may create a virtual or dummy room (i.e., Room Closing Staff Only (All Rooms)) if they need to close independently of others in the system. Grade List Refers to academic grade levels assigned to events. The default list shows Kindergarten through 12th grade but may be edited. Branch Specific Order Weight No Zip Code List Refers to the zip code areas supported by a library. Branch Specific Order Weight No Branch Specific Alphabetical No Presenter List MAN0100-06.05 )) Multi-branch System Note: Zip codes may overlap among individual branches. Refers to event presenters and instructors available for events. This list is optional and might contain the names presenters and instructors frequently used by the library. The Presenter field in the Event Template can be overwritten if the desired presenter is not listed. B-40 September 5, 2008 Events 6.0 Settings Category Filter Description Event Type List Refers to event categories (i.e., Adult Book Club, Lecture, Children Program, etc.) and is a required field on the Event Template. Events uses the Event Type List in statistical reporting, the Notify Me subscription feature, and the Search Slider. Event Types cannot be deleted if in use by an event. The Event Type List is highly customizable - text color, background color, and viewing level – staff only or public. Individual Event Types are public by default, but may be set for Private/Internal Only (i.e., staff meetings). Event Types marked Private/Internal Only appear only in the staff view of the Calendar/Registration function. List Order Report Statistic System Wide Alphabetical Yes System Wide Order Weight Yes )) Multi-branch System Note: This list is accessible in All Branches mode and Individual Branch mode. Age Group List Refers to age group categories – Infants, Toddlers, Children, Teens, and Adults. The Age Group List appears on the Search Slider and in the Event Template. )) Multi-branch System Note: This list is accessible in All Branches mode and Individual Branch mode. How To Do It - General Principles 1. Multi-branch System Lists ())): The following table describes ownership of the lists in a multi-branch system: List Location List Controlling Mode Individual Branch All Branches 3 Grade List 3 Zip Code List 3 Presenter List 3 Event Type List 3 3 Age Group List 3 3 Individual branch settings override All Branches settings in dual mode lists. MAN0100-06.05 B-41 September 5, 2008 Events 6.0 2. List Maintenance Page: The List Maintenance Template contains a table to add items to the list and a table to modify or delete items on the list. The table to add items may include various features that allow you to customize the list item, such as Order Weight and Private/Internal Only. MODIFY items in the list by double-clicking on the item within the table: ADD a new item to the list: DELETE LIST ITEM (Click to Edit) List Item: [Text Entry Field] [Item Name] Additional Features: [Entry Field] [Item Name] Add New Item Delete Item(s) ADDITIONAL FEATURES Back 3. Order Weight: Order weight applies to Grade, Zip Code, and Age Group Lists only. It forces a list of items into a preferred order according to assigned numerical values in increments of 10 (i.e., 10 – 20 – 30, etc.). To modify a list order, assign numerical values that place items in their proper order. For example: assign a value of 5 if you want an item to appear first on the list; assign a value of 25 if you want an item to appear third on the list, etc. When saved, the system places the item into the list based upon its numerical value and assigns a new number to maintain the list in increments of 10. 4. Text and Background Color: The ability to customize text and background color applies to the Event Type list. Assign colors by entering the HTML code of the desired color or clicking PICK to use the color palette. The selected color will appear in the preview window. 5. Private/Internal Only: Private/Internal Only applies to the Event Type list only: Checking the box in this field suppresses the list item in the public calendar view. 6. Copy to All Branches: This button appears in all branch specific lists. When selected it applies the list created in one branch to all branches and overwrites any existing lists. The system will ask you to confirm your intent to overwrite any existing list with the new list before proceeding – “This will delete ALL other [list type] lists in ALL other branches and populate with this list. Click OK to continue or CANCEL to abort the process.” Overwritten lists cannot be recovered. 7. Saving: Labels on buttons vary by list. The list below describes some of the labels and where you might find them. This manual uses these labels interchangeably. A. Added entries: SAVE, ADD NEW ITEM, B. Modified entries: C. Deleted entries: SAVE or ADD NEW EVENT TYPE ITEM. or SUBMIT MODIFIED ENTRY. DELETE ITEM(S) or DELETE CHECKED ITEM(S). How To Do It - Adding List Items )) Multi-Branch System Note: See the table in How To Do It – General Principles (No. 1) above to determine which mode controls the lists. 1. Beginning at the home page, click on the desired list (Settings menu) to modify. The system loads the list maintenance page. MAN0100-06.05 B-42 September 5, 2008 Events 6.0 2. Type a list name in the List Item field of the Add table. 3. Configure additional features, as applicable: A. Item’s Order Weight (Grade, Zip Code and Age Group only): Assign a numerical value to the new item that places it in the proper order on the list. For example: assign a value of 5 if you want an item to appear first on the list; assign an item a value of 25 if you want an item to appear third on the list, etc. When saved, the system places the item into the list based upon its numerical value and assigns a new number to maintain the list in increments of 10. B. Text and Background Color (Event Type only): Enter the HTML code of the desired color or clicking PICK to use the color palette. The selected color will appear in the preview window. MAN0100-06.05 B-43 September 5, 2008 Events 6.0 C. Private/Internal Only (Event Type only): Click the check box to suppress the Event Type on the public calendar view. 4. Click ADD NEW ITEM1 to save your entry. 5. Optional – Multi-Branch System: Click copy to all branches to apply the updated list to all branches. Applying this option will overwrite any existing list. The system will ask you to confirm your intent to overwrite the existing list. Click OK to proceed or CANCEL to abort the process. 6. Click BACK to return to the home page. 1 This button may be labeled SAVE, ADD NEW ITEM, or ADD NEW EVENT TYPE ITEM, depending on the list. MAN0100-06.05 B-44 September 5, 2008 Events 6.0 How To Do It - Editing List Items )) Multi-Branch System Note: See the table in How To Do It – General Principles (No. 1) above to determine which mode controls the lists. 1. Beginning at the home page, click on the desired list (Settings menu) to modify. The system loads the list maintenance page. 2. Double click the list item to be modified. The system loads a table containing the list item’s configuration options. MAN0100-06.05 B-45 September 5, 2008 Events 6.0 3. Edit the item as desired. 4. Click SAVE1 to save your modifications. 5. Optional – Multi-Branch System: Click copy to all branches to apply the updated list to all branches. Applying this option will overwrite any existing list. The system will ask you to confirm your intent to overwrite the existing list. Click OK to proceed or CANCEL to abort the process. How To Do It - Deleting a List Item )) Multi-Branch System Note: See the table in How To Do It – General Principles (No. 1) above to determine which level – Branch level or All Branches level - controls the lists. 1 Note: An Event Type cannot be deleted if in use by an event – active or archived. Use the Search/Filter in Event Maintenance - Add/Edit/Archive and View Archive - to determine if an Event Type is still in use. 1. Beginning at the home page, click on the desired list (Settings menu) to modify. The system loads the list maintenance page. 1 This button may be labeled SAVE or SUBMIT MODIFIED ENTRY, depending on the list. MAN0100-06.05 B-46 September 5, 2008 Events 6.0 2. Click the “Delete” checkbox to mark an item for deletion. 3. Click DELETE ITEM(S)1. The page will refresh and remove the selected items. 1 This button may be labeled DELETE ITEM(S) or DELETE CHECKED ITEM(S), depending on the list. MAN0100-06.05 B-47 September 5, 2008 Events 6.0 APPENDIX C. EVENTS AND ROOM RESERVE A GUIDE TO FUNCTIONS AND RESPONSIBILITIES The intention of this information sheet is to provide a high level overview of Events and Room Reserve as standalone applications and as partners. When working together, each retains its original functions (except those related to holidays and closings) while benefiting from cross-functional strengths. Events Room Reserve • Events provides tools for: Managing Library-sponsored events and activities. Reporting event schedules, PR needs, and event statistics. • Room Reserve provides tools for: Managing rooms. Advanced costing. Equipment inventory tracking. Customizing Reservation Forms. Reporting room and equipment schedules, and utilization statistics. • Library staff have the ability (based on security level) to: Configure the system. Add, modify, and delete events. Register patrons. Access reporting tools. • Library staff have the ability (based on security level) to: Configure the system. Assist patrons with reservations. Accept or deny reservations. Post fee and deposit payments. Access reporting tools. • Patron access is limited to: Viewing the event calendar. Registering for events. Subscribing to e-mail notifications and reminders. • Patron access is limited to: Viewing the reservation calendar. Submitting reservation requests for rooms or equipment. • The spaces where events are held: Are called “Locations”. Are not profiled in the system (i.e., no details about room capacity and features). • The spaces where meetings are held: Are called “Rooms”. Are profiled in the system (i.e., profiles include room capacity and features). • Holidays and other closings are managed by Events when Events: Is a standalone application. Works with Room Reserve. • Holidays and other closings are managed by Room Reserve when Room Reserve: Is a standalone application. What Happens When They Work Together When Events and Room Reserve are partnered: • Room reservations appear on the Events calendar at the discretion of the library. Both Room Reserve and Events recognize reservation conflicts regardless of a reservation’s appearance on the Events calendar. • Events that use rooms configured in Room Reserve always appear on the Room Reserve calendar. • Locations created in Events are not available to Room Reserve, unless they are configured as Rooms in Room Reserve. • Rooms configured in Room Reserve are always available to Events. • When Events and Room Reserve are partnered, Events assumes custody of holiday and closing functions. MAN0100-06.05 C-1 September 5, 2008 Events 6.0 APPENDIX D. HTML REFERENCE GUIDE This Appendix D provides information about some simple HTML (Hypertext Markup Language) tags you can use to format text in Events. The use of HTML tags is limited to areas such as System Messages, System Templates, some System Settings, description and other information fields. Section 1 – HTML Formatting provides basic information about the structure and syntax for entering HTML codes Section 2 – Inserting Hyperlinks provides information about adding links to additional pages and documents, and adding images to event descriptions. Section 3 – Frequently Used Codes contains a list of the HTML codes you will most frequently use in Events. SECTION 1 - HTML FORMATTING When using HTML tags, make sure the syntax of the code is correct. Errors can affect the look and layout of the entire calendar and other pages. The principle or formula for an HTML tag is: <tag attribute 1= “value” attribute 2=“value”>Your Text</tag> The principle parts of the formula are: Part Beginning Tag Illustration/Example <tag attribute 1 attribute 2=”value”> Example: <font color=“#FF0000”> Description The beginning tag includes coding that formats text or inserts a file or image. These tags may contain no additional attributes or multiple additional attributes. The example displays the text that follows it in red. Your Text Avon Public Library This is the actual text that appears on the web page. Ending Tag </tag> Example: </font> This tag always contains a slash. It acts as the period on the sentence and signals the end of that particular code or instruction. Putting it Together <font color=“#FF0000”>Avon Public Library</font> Results in: Avon Public Library. Additional Examples: Example 1: • • Code: <font color=“#FF0000”>Avon Public Library</font> Result: Avon Public Library (Red Font) Example 2: • • Code: <B>Avon Public Library</B> Result: Avon Public Library Example 3: When multiple tags are used together, the tags are nested together. When entering the beginning tags, it does not matter which tag you start with. End tags should be entered in reverse order (i.e., <tag 1> <tag 2>Your Text</tag 2></tag1> (bold and italics added for emphasis)). • • Code: <B><font color=“#FF0000”>Avon Public Library</font></B> Result: Avon Public Library (Bold and Red) MAN0100-06.05 D-1 September 5, 2008 Events 6.0 SECTION 2 - INSERTING HYPERLINKS: HTML code can be embedded into Description and Other Information text boxes. Add the HTML code as you would on an HTML page. The example below inserts a link to the specified file or page. <a href=‘http://www.e-vancedsolutions.com/index.html’>Evanced Solutions Website</a> The code above breaks down as follows: Codes <a href= Beginning Tag File Name ‘http://www.e-vancedsolutions.com/index.html’ Anchor > Your Text End Tag Evanced Solutions Website </a> T This exact syntax is critical to make the link work. Specific items to note: • • The address must include http://. The address must be enclosed in single quotes (‘address’ (emphasis added)). You may include additional HTML codes for images and text formatting. See Section 1 - HTML Formatting above for more information. 1 Note: If you use image tags, limit the image size to 20 - 30 (pixels) (both height and width) for best results. SECTION 3 - FREQUENTLY USED CODES This section lists the HTML codes and tags most frequently used in Events. These codes are not case sensitive, but attributes such as file names, might be. See Section 1 - HTML Formatting above for more information. Code/Tag Text Formatting Codes <BIG>Your Text</BIG> <B>Your Text</B> <I>Your Text</I> <U>Your Text</U> <FONT color="#XXXXXX">Your Text</FONT> Description Increases the Font size in some, but not all, views Bold text Italicizes text Underlines text Sets text color. Replace “#XXXXXX” with the appropriate color code: #00FFFF #000000 #0000FF #FF00FF #808080 #008000 #00FF00 #800000 Paragraph Codes <BR> Image Code <img src=“*.jpg” width=“20” height=“20”> Font Color Codes #000080 Navy #808000 Olive #800080 Purple #FF0000 Red #C0C0C0 Silver #008080 Teal #FFFFFF White #FFFF00 Yellow Line break or carriage return • • • MAN0100-06.05 Aqua Black Blue Fuschia Gray Green Lime Maroon Inserts an image at the point in the text where the codes resides. Replace “*.jpg” with the image file to be inserted. This file must be copied to the web server into the folder where the Evanced application resides (“/evanced/lib0/”). “Width” and “height” are in pixels. 1 Note: Width and height are adjustable but may impact page layout. Generally, avoid sizes above 30 pixels in either dimension. D-2 September 5, 2008 Events 6.0 APPENDIX E. USING EVENTS XML.ASP Events xml.asp allows the system to display core event information for a given period of time. It also provides data in XML format so that it can be used on individual homepages or in other software programs. SECTION 1 - USAGE Events xml.asp displays event information for a single branch or All Branches (multi-branch system) for a given time period. By default Events xml.asp displays events at Branch 0 (lib=0) that have a: • • Date value = the current date and Time value ≥ the current time. By default, Events xml.asp does not display events prior to the current date and time. The following list contains parameters that can be passed through the URL to control the output: Parameter dm Description Controls output using a different XML format. Valid values are: > xml ....... to use the XML format (default) > rss2 ....... to output a RSS 2.0 feed > atom1.... to output an ATOM 1.0 feed > exml ..... to output an Extended XML format > ical ........ iCalendar formatted output for use in other calendar programs like Google calendar. lib Controls the events for a single branch or All Branches [default = 0]. Use the library number (lib=x) or “all” (lib=all) to specify which library’s events to display. do A date offset used to add x number of days to today’s date [default = 0 (today’s date)]. See also curdate below. alltime Displays all event times – past, present and future. Use alltime=1 to override the default setting. nd Specifies how many days to display [default = 1]. Note: ‘nd’ must equal an integer. et Limits events output to specific Event Types. The default = all Event Types. Specify multiple Event Types using a comma and plus separator (et=Adult+Program,+Book+Discussion) ag Limits event output to specific Age Groups. Similar to “et” above, specify multiple Age Groups using a comma and plus separator. (ag=Adult+Senior,+Teen+Toddlers) kw Limit event output to events containing Key Words. The default is to display all events. primarygroup Determines whether only the primary event type and age group are searched (primarygroup=1), or search secondary/tertiary event types and age groups for each event as well [Default]. Curdate Uses the current date as the start date. It can be used in lieu of “do” (Date MAN0100-06.05 E-1 September 5, 2008 Events 6.0 Parameter Description Offset) to specify a date. fe Refers to Featured Events. Set to 1 to include only Featured Events roominfo Refers to room reservations and is only available if Room Reserve is installed. Set to 1 to include room reservations. feedtitle Allows for changing the RSS feed title by-passing the title string. “Upcoming library events at [Library Name]”. feeddesc Allows for changing the RSS Feed Description by-passing the original description string. The Feed Description will use the Feed Title if a description is not set. Default: The following table provides examples of possible URLs. Result Display events at Library 1 for the current date. URL (Emphasis Added for Illustration Purposes) [Path to event calendar]/eventsxml.asp?lib=1 Display events at Library 1 for the current date - all past, present and future times. [Path to event calendar]/eventsxml.asp?lib=1&alltime=1 Display events at All Libraries dated tomorrow. [Path to event calendar]/eventsxml.asp?lib=all&do=1 Display events at All Libraries for the next week beginning with the current date. [Path to event calendar]/eventsxml.asp?lib=all&nd=7 Display all future events for [Age Group] (i.e., Adult) about [Key Word] (i.e., knitting). [Path to event calendar]/eventsxml.asp?lib=[##]&nd=7&ag=Adult&k w=knitting Display an RSS feed containing the events at All Libraries for the next week beginning with the current date. [Path to event calendar]/eventsxml.asp?lib=all&nd=7&dm=rss2 SECTION 2 - “xml” DISPLAY MODE DESCRIPTION The page output uses XML tags to represent event data (see the example below). Event information that appears on the calendar has been bolded for emphasis. <?xml version="1.0" encoding="ISO-8859-1" ?> <event> <item> <title>Professional Leadership</title> <date>Tuesday May 27th, 2008</date> <time>01:00 PM</time> <description>Basic leadership skills.</description> <location>DPL Program Room</location> <library>North Demo Library</library> <link>http://websitepath/evanced/lib/eventsignup.asp?ID=461</link> </item> MAN0100-06.05 E-2 September 5, 2008 Events 6.0 <item> <title>Beginning Conversational Spanish</title> <date>Tuesday May 27th, 2008</date> <time>06:00 PM</time> <description>Hendricks College Network Class designed for people with little or no knowledge of Spanish.</description> <location /> <library>South Demo Library</library> <link>http://websitepath/evanced/lib/eventsignup.asp?ID=465</link> </item> </event> There are two events represented in the example, each starting with <item> and ending with </item>. The information between <item> and </item> represent specific event data (bolded for emphasis). Tag Pairs Start Tag End Tag <title> </title> Event title <date> </date> Date of the event <time> </time> Event start time <description> </description> Event description <location> </location> Location of the event. See also <location /> below. <location /> Description A single tag (also known as an empty element) appears if no location is specified. Note the location of the slash compared to an end tag. <library> </library> Library name associated with the event <link> </link> Link to the event information and registration page if registration is required SECTION 3 - “exml” DISPLAY MODE DESCRIPTION The “exml” display option adds additional extended data tags to the “xml” display output. The following is an example of an “exml” output: <?xml version="1.0" encoding="ISO-8859-1" ?> <event> <item> <title>Dia De Los Ninos/Dia De Los Libros</title> <date>Tuesday June 5th, 2007</date> <time>10:30 AM</time> <description>Join the Riverside County Library System celebrate Dia De Los Ninos/Dia De Los Libros.</description> <location>Children's Activity Room</location> <library>Downtown Library</library> <link>http://evanced.info/evanceddemo/lib/eventsignup.asp?ID=2722</link> <date1>2007/06/05</date1> <date2>200706051030Dia De Los Ninos/Dia De Los Libros</date2> <length>75</length> <status /> MAN0100-06.05 E-3 September 5, 2008 Events 6.0 <endtime>11:45:00 AM</endtime> <prieventtype>Children's Program</prieventtype> <eventtypes /> <agegroups>Children & Teens</agegroups> <otherinfo>Additional program information can be entered here.</otherinfo> <presenter>Lulu Delacre</presenter> <signup>1</signup> <signupstarts /> <signupends /> <contactname>Paulina Moreno</contactname> <contactphone>800-555-5055</contactphone> <contactemail>[email protected]</contactemail> <linktext>Click here for Information!</linktext> <linkaddress>www.evancedsolutions.com</linkaddress> <imagepath>http://www.ala.org/Images/ALSC/Dia_FNLclr.TM_072big.jpg</imagepath> <imagetext /> <imageheight>576</imageheight> <imagewidth>576</imagewidth> <extratag /> </item> </event> The information between <item> and </item> represent specific event data (bolded for emphasis). Tag Pairs Start Tag End Tag Description <title> </title> Event Title <date> </date> Date of the event <time> </time> The time the event starts <description> </description> Event description <location> </location> Location of the event. See also <location /> below. <location /> A single tag (also known as an empty element) appears if no location is specified. Note the location of the slash compared to an end tag. <library> </library> Library name associated with the event <link> </link> Link to the Event Information and Registration Page, if registration is required <date1> </date1> Date in yyyy/mm/dd (year / month / day) format <date2> </date2> Value that can be used for sorting (yyyymmddhhmm[event title]) (year month day hour minutes format) <length> </length> Event length <status> </status> Event status <endtime> </endtime> The time the event ends <prieventtype> </prieventtype> Primary Event Type <eventtypes> </eventtypes> Alternate Event Types MAN0100-06.05 E-4 September 5, 2008 Events 6.0 Tag Pairs Start Tag End Tag <agegroups> </agegroups> Age Groups <otherinfo> </otherinfo> Other information <presenter> </presenter> The name of the Presenter <signup> </signup> Sign up value 0 - no sign up 1 - Staff and Patron 2 - Staff Only <signupstarts> </signupstarts> Sign up starts <signupends> </signupends> Sign up ends <contactname> </contactname> Contact name <contactphone> </contactphone> Contact phone number <contactemail> </contactemail> Contact email address <linktext> </linktext> Link text <linkaddress> </linkaddress> Link web address <imagepath> </imagepath> Image path <imagetext> </imagetext> Image alternate text <imageheight> </imageheight> Image height <imagewidth> </imagewidth> Image width <extratag> </extratag> An extra tag that can be altered programmatically for sorting or flagging certain events. MAN0100-06.05 Description E-5 September 5, 2008 Events 6.0 APPENDIX F. CREATING CALENDAR VIEWS (URL FORMATTING) Events allows users to create an unlimited number of customized calendar views using URLs. This results in the ability to create calendar views focused on certain Age Groups (i.e., Adult or Teen), Event Types (i.e., Computer Workshop or Author Lecture), branch, etc. For instance, the URL: “http://evanced.info/evanceddemo/lib/eventcalendar.asp?EventType=ALL&Lib=ALL” displays a calendar displaying all events for all Event Types at all branches, and http://evanced.info/evanceddemo/lib/eventcalendar.asp?EventType=ALL&Lib=1” displays a calendar displaying all events for all Event Types at one branch. This Appendix F provides instructions for creating URLs to access different calendar views. Any examples of URLs are generic and do not apply to any specific library. The format for a calendar view URL is shown below. This is one uninterrupted line of characters (think of one long word). http://calendar.hclibrary.org/evanced/lib/eventcalendar.asp?df=calendar&EventType=Adult%2C+All+Ages %2C+Children&Lib=0%2C+15%2C+1 The table below breaks the URL above into its individual parts: Protocol http:// Domain Path File Name Switches calendar.hclibrary.org/ evanced/lib/ eventcalendar.asp ?df=calendar&EventType=Adult%2C+All+Ages%2C+Children& Lib=0%2C+15%2C+1 The switches (everything after “?”) tell the system what to display and how to display it. The table below provides a reference for deciphering the switches. Switch ag= Description Tells the system what Age Group(s) to display. df= Tells the system what format to use when displaying the calendar – list or calendar. EventType= Tells the system what Event Type(s) to display. Lib= Tells the system which library or branch to display. libnum= Tells the system which library or branch number is the “Home” branch for this view. Setting the Home branch determines which style configuration (Branch 1, Branch 2, etc.) is used. “libnum=999” tells the system to use the All Branches style configuration. Lib= versus libnum= • Lib tells the system which branch, in a multi-branch system, to display. • “libnum” tells the system which branch is your Home (default) branch and applies the associated configuration to that branch. "%2C" and “%2C+” MAN0100-06.05 The browser inserts codes such as "%2C" and “%2C+” to represent special characters, such as spaces or commas. F-1 September 5, 2008 Events 6.0 How To Do It - Creating Filtered Calendar Views 1. Beginning at the home page, click CALENDAR SEARCH PAGE. The system displays the Schedule of Events Search page. 2. Complete the Search filter. 3. Click FIND (located at the bottom of the page). The system displays the filtered calendar. 4. Click SHOW URL (located above the calendar). The system displays a “Permalink” window with the URL for the filtered calendar. 5. Highlight and copy the URL. 6. Paste the URL into the HTML code of your webpage. How To Do It – Calendar Notes 1. Current Date Default: To set the Event Calendar’s default date to the current date, delete any date specific parameters (i.e., “&mo=4/1/2006” or “&sd=4/27/2006”). (“Default date” is the date the calendar first opens to.) 2. Link to a Specific Day or Month: If you want to provide a link to a specific day or month, retain date specific parameters (i.e., “&mo=4/1/2006” or “&sd=4/27/2006”). How To Do It – Finding a Branch’s “Libnum” To find the “libnum” for a specific branch: 1. Beginning at the home page, click SYSTEM CONFIGURATION & displays the Style Configuration Maintenance Page. SETTINGS (Settings menu). The system 2. Click LIBRARY INFORMATION on the menu located on the left side of the page. The system displays the Library Information Maintenance page. 3. The Library Number appears above the Name field. How To Do It - Displaying Select Branches By default, libnum = 0. To display select branch(es): 1. Locate the branch number for the desired branch (see “Note 2” above). 2. Add each branch number to the URL separated by “%2C+”“%2C+”. Using the original example at the beginning of this section: http://calendar.hclibrary.org/evanced/lib/eventcalendar.asp?df=calendar&EventType=Adult%2C+All+ Ages%2C+Children&Lib=0%2C+15%2C+1 The URL above displays an Event Calendar that includes events for branch numbers 0, 15 and 1. How To Do It - Branch Color Configuration Each branch may have its own color configuration (Style Configuration). To set a style configuration associated with a single branch as the default configuration, enter “libnum=[branch number]” ([branch number] = a single branch number). Enter “&libnum=999” to use the style configuration from the All Branches mode. MAN0100-06.05 F-2 September 5, 2008