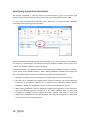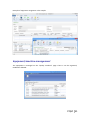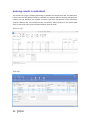
1
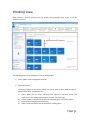
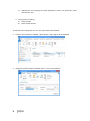
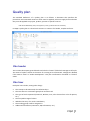
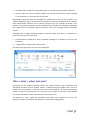
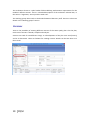
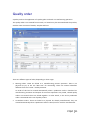
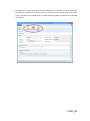
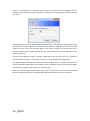
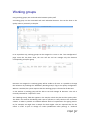
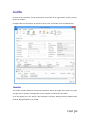
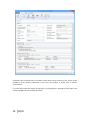
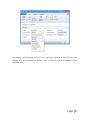
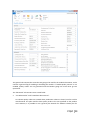
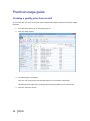
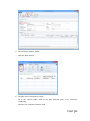
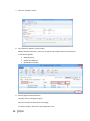
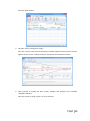
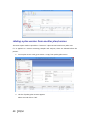
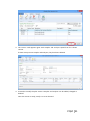
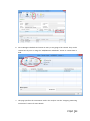
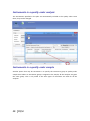
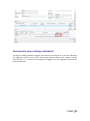
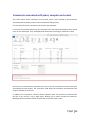
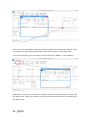
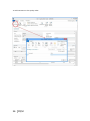
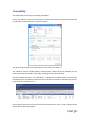
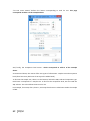
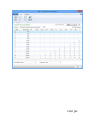
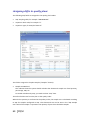
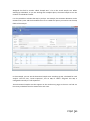
PQM by olivia QUALITY MANAGEMENT for Microsoft Dynamics NAV2013Rx User manual PQM 1 Contents Introduction .................................................................................................................................. 4 Working area ................................................................................................................................. 5 Quality plan ................................................................................................................................... 7 Plan header ............................................................................................................................... 7 Plan lines ................................................................................................................................... 7 Samples ..................................................................................................................................... 8 Plan = what + when, but who? .................................................................................................. 9 Versions ................................................................................................................................... 10 Quality order ............................................................................................................................... 11 Decision ................................................................................................................................... 12 Lot statuses ............................................................................................................................. 14 Related and additional orders ................................................................................................. 14 Cancelling orders ..................................................................................................................... 14 Signatures, security and the audit trail ....................................................................................... 15 Working groups ........................................................................................................................... 17 Audits .......................................................................................................................................... 19 Header ..................................................................................................................................... 19 Audit lines................................................................................................................................ 20 Deficiencies detected .............................................................................................................. 20 Creating audits ........................................................................................................................ 20 Closing audits .......................................................................................................................... 22 Nonconformities ......................................................................................................................... 23 Incident ................................................................................................................................... 23 Investigation ............................................................................................................................ 25 Deviation ................................................................................................................................. 25 Preventive/corrective actions ................................................................................................. 26 Configuration............................................................................................................................... 28 Practical usage guide ................................................................................................................... 32 Creating a quality plan from scratch ....................................................................................... 32 2 PQM Adding a new version to an existing quality plan.................................................................... 37 Adding a plan version from another plan/version .................................................................. 40 Manufacturing cycle with quality ............................................................................................ 42 Querying pending quality tasks ............................................................................................... 44 Assigning measuring instruments ........................................................................................... 45 Specifying instruments in a quality plan ................................................................................. 46 Instruments in a quality order analysis ................................................................................... 48 Instruments in a quality order sample .................................................................................... 48 Instruments when adding individuals ..................................................................................... 49 Specifying equipment/machines ............................................................................................. 50 Equipment/machine management ......................................................................................... 51 Entering results in individuals ................................................................................................. 52 Without AQL ........................................................................................................................ 52 With AQL ............................................................................................................................. 52 Comments associated with plans, samples and orders .......................................................... 53 Traceability .............................................................................................................................. 57 AQL .......................................................................................................................................... 59 Assigning AQLs to quality plans............................................................................................... 64 Posting samples and decisions with AQL ................................................................................ 66 PQM 3 Introduction The quality control program provides the tools necessary for analysing and evaluating the quality of suppliers, manufacturers and products. Product quality is applied from the time when goods are received from a supplier or product manufacturing begins. The processes involved are: Reception of raw materials purchased from other companies. Manufacture of finished and semi-manufactured products. Subcontracting. Checks not triggered by logistics processes are also applied, such as warehouse inspections or periodic quality orders. All posting actions are logged. These actions normally require the signature of a user with the correct authorizations. Security management in PQM is very flexible, making it possible to implement various access levels which can be changed in time. The module has audit management, allowing supplier evaluation, both for initial approval and routine checks. The scope of the audits has been expanded to also include the evaluation of manufacturers and internal management systems. Finally, a CAPA system is incorporated for managing nonconformities. Its main feature is nonconformity management based on corrective and preventive action, allowing the monitoring and assessment of compliance with regulations. This area deserves its own chapter in this manual. 4 PQM Working area PQM contains a specific working area for quality staff providing quick access to all the module’s functions. The following parts of the working area can be distinguished: 1. Action ribbon, with configuration accesses. 2. Exploration panel. Five buttons appear at the bottom. When you click on each of them, different options appear above them. The buttons are: a) b) c) d) Home. When you click here, “Working Area” appears as the first option. This makes the central activity panel appear (number 3 in the image). Product quality. Contains the accesses for managing plans and quality orders. Incidents for managing nonconformities. Audits. Audit documents and worksheets for creating them. PQM 5 e) Departments for accessing the whole application’s menu tree (purchases, sales, manufacture, etc.). 3. Activity panel, including: a) Stacks of tasks b) Stack of tasks actions To allocate this working area to users, two steps need to be followed: Create a new profile (for example, “Basic quality”) and assign it the ID 7035200. Assign the profile created to module users in “User customization”: 6 PQM Quality plan The standard definition* of a quality plan is as follows: a document that specifies the procedures and associated resources which must be applied, who must apply them and when they must be applied to a project, product, process or specific contract. * UNE-EN ISO 9000:2005, quality management systems, fundamentals and vocabulary. In PQM, a quality plan is a three-level structure. It consists of a header, samples and lines: Plan header This contains descriptive general details and also the “Status” field which manages its lifecycle. The status of a plan is similar to the status of a routing or list of materials. Changes are allowed if the status is “New” or “Under Development”. They are not allowed in “Certified” or “Closed” status. Plan lines Each plan line includes, among other things: The concept to be measured, also called analysis. The instrument or instrument group that must be used. The type of result expected (numerical, Boolean, text, value chosen from a list of options, etc.). The acceptable range of values. Whether the entry of a result is mandatory. The working group it will be assigned to. Additional information (comments, AQL information, etc.). PQM 7 The list of possible items to be measured (analyses) normally remains stable. This list is loaded into the system on initial implementation, but it is possible to extend it later. Some properties can already be established in the analysis itself and these are transferred to the plan line. They are as follows: The type of result expected (numerical, Boolean, text, value chosen from a list of options, etc.). Whether the entry of a result is mandatory. Working group. Samples Not all the analyses are measured at the same time or by the same staff. We group them into samples, which means we can differentiate them. There can be as many samples as needed. Similarly, within the sample there can be as many analyses as necessary. There are three important characteristics defined in the sample: how its size is calculated, what type it is and whether or not it is by items. In terms of size, it can be a full sample (the whole batch is analysed), a percentage of the batch size or a fixed quantity. It may have an AQL associated with it. There are four different types of sample depending on what we are trying to achieve: Identification. Typically, this allows us to identify/check the raw material we have received. Sample library. This is used to send a sample of manufactured product or raw material to a special location where it will be stored in case a problem is detected in the future and has to be analysed. 8 PQM Documentation. Sample for storing information or a checklist of things to be confirmed. General. These are “normal” quality samples. They contain measurement results resulting in the conformity or nonconformity of the batch. Depending on how the results are managed, the sample may or may not be “by items”. In a sample managed by items, measurements are made for every part manufactured or received. Each measurement therefore has N results instead of just one. Example: diameter of an implant. If you measure 10 parts, you have 10 diameters. A sample not managed by individuals has a single result. For example: richness of mixture = 97%. This is a single result for the whole sample. Although there is a flag to establish whether or not the sample is by items, it is important to know that there are two restrictions: An identification sample must be by individuals (although it is possible to have just one individual). A sample library sample cannot be by items. The other two types may or may not be by individuals. Plan = what + when, but who? Going back to the standard definition above, the analyses specify “what” procedures and associated resources must be applied. “When” is defined using the samples: there can be a sample for each operation or just one at the end of manufacturing. The same thing happens with the receipt of raw materials: there may be just one sample, or the tasks can be divided into several: document review, identification, purity analysis, etc. The question of “who” applies the procedures still needs to be answered. To do this, the quality plan offers two features: the evaluation schema and working groups. PQM 9 The evaluation schema is a plan header field establishing authorization requirements for the module’s different actions. There is a detailed description of the evaluation schema later, in the section: “Signatures, security and the audit trail”. The working groups allow tasks to be divided between laboratory staff. There are also more details in the “Working groups” section. Versions There is the possibility of creating different versions of the same quality plan. Like the plan, each version contains a header, samples and analyses. Versions are used for two different things: as a development of the plan over time (history) and as an alternative. There are facilities for creating versions. Details can be seen later on in the manual. 10 PQM Quality order A quality order is the application of a quality plan to a batch or manufacturing operation. The quality order is not created from scratch, it is based on a plan associated with the product, with the same structure of header, samples and lines. There are different types of order, depending on their origin: Routing orders. These are linked to a manufacturing process operation. There is no physical lot yet, so we use “WIP Lots” for monitoring. These are internal identifiers different from the “Lot No.” used by Navision. An order of this kind is created automatically when a production order is launched. As manufacturing continues and outputs of successive operations are posted, related quality orders are created. These are linked together. In other words, in the end a production order is associated with a set of quality orders. Lot Release orders. These are linked to a physical lot already manufactured. They are created automatically when a production order is closed, one for each lot manufactured. PQM 11 Reception orders. These are linked to a batch of raw material received from the supplier. They are automatically created when the purchase order is posted. Subcontracting is not covered here. For that, a routing order linked to the subcontracting operation is used. Warehouse inspection orders. These are created manually from Navision’s lot card. The order is linked to the lot, which goes into “quarantine” from then until the order decision. It is not possible to create an inspection order on a lot in quarantine (because that means there is already another quality order on the lot awaiting a decision). Reanalysis orders. These are used for periodic quality and are generated from the reanalysis worksheet: The product has a field called “Reanalysis Frequency” on the card. The creation of an order is suggested, depending on the date of the last lot reanalysis (this date is on its card). Reanalysis orders have an established start and end date. Unlike other orders, when a new one is created the lot does not go into quarantine. This makes sense because we are talking about periodic quality and the orders are created in the future. The decision on a reanalysis order checks whether the lot is still in stock (if it is not in quarantine it could have been dispatched or consumed). Decision The decision on a quality order represents its closure. It is a prerequisite for the samples to be posted. There are three types of decision: Conforming: a good quantity and various rejection quantities, with different reasons for rejection, can be specified. Non-conforming: the whole quantity will be rejected. No good quantity is allowed. 12 PQM Partial decision: a good quantity and various quantities for rejection can be specified. The total quantity specified must be less than the quantity on the quality order. The quality order is decided and a related order is created with the quantity remaining to be decided on in future. PQM 13 Lot statuses As explained above, reception, inspection and lot release quality orders are linked to a lot code. As soon as the order is created, the lot goes into “quarantine” status. In this status, the product cannot be sold or consumed. The order decision alters this status to “Conforming” or “Non-conforming”. There is another possible status for lots: expired. The expiry of a lot is not automatic. When it reaches its expiry date, its status does not change. Lots expire under a manual process: there is a worksheet that checks the expiry date and suggests moving lots to “Expired” status. In this status, they cannot be dispatched or consumed. In routing quality orders, linked to WIP lots, the operation is different. There is no physical stock that can be kept in quarantine. Instead, there is a check in the production worksheet that does not allow an operation to be posted if the quality decision for the previous operation is missing. In the same way, to make a decision on a routing order the operation first needs to have been registered in the production worksheet. Otherwise, the order has no destination WIP lots assigned and the decision shows an error. Related and additional orders In the “Decision” section we have seen that a related order can be generated in the case of partial release. This is an identical order with the quantity remaining outstanding from the decision on the first order. There is another type of related order: additional orders. The normal use of additional orders is to collect information or apply additional procedures not established in the quality plan. Instead of amending the original order to add or modify samples and analyses, one or more additional ones can be created. In this way, what was established is better differentiated from what was not. An additional order can be created from the quality order card associated to a lot. To put it another way, additional orders cannot be created from routing orders. They can be created at any time unless the original order is already closed. The quality plan on which an additional order is based is the warehouse inspection plan. To be able to make a decision on the original order, all the additional ones must be decided. Cancelling orders Quality orders cannot just be deleted*. Under certain conditions they can be cancelled, remaining in the system in “Cancelled” status. In this way an order ceases to be pending and any lot associated with it will cease to be in quarantine. 14 PQM Cancellation conditions: The order must not be decided. The user must have the role specified in the order evaluation schema. It is important that the number of people who belong to that role is restricted. The cancellation of a quality order without another one being created as a result allows the product to be used without quality control. Routing orders may be cancelled as long as the “Destination WIP Lot” is not filled in. If this field has a value, the operation already has at least one production output posted. * There is an exception to this: from the production module, it is possible to delete a production order if it has no movements. If it has an associated quality order, the deletion of the production order will lead to the deletion of the quality order without a trace. Signatures, security and the audit trail Security management in PQM is very flexible, making it possible to implement various access levels which can be changed in time. The basic element that manages security is the evaluation schema, which is associated with the quality plan. From there it is transferred to the order. The schema contains two types of information: How many signatures are required for the acceptance of samples, analyses and the quality order. The following may be required: Posting only. Posting and review. Posting, review and approval. The simplest implementation requires only posting the samples and the quality order decision. The most complex requires posting, review and separate approval (different people) for each thing. Which user role is required for each module action: To post results and to post the sample. To change results already posted. To make a decision on the order when there are no values outside tolerance. To make a decision on the order when there are values outside tolerance. To make a decision on a release order (“Lot Release” type order). Etc. An electronic user signature is required in all quality module posting actions. A signature is also required in some actions outside quality, such as posting the production worksheet. PQM 15 Under no circumstances is it assumed that the action is carried out by the logged-in user. A dialog is shown describing why the signature is being given and prompting for a user name and password: The dialog forms part of an add-in designed specifically for using Windows security APIs, so the password is not saved in Navision, nor does it travel between applications. The add-in merely checks the user name and password against the Active Directory and returns the OK to Navision. Navision then checks whether the user name entered has the role required for the action assigned to it. As well as the signature dialog, a dialog is displayed so that the user can enter comments associated with the action. This dialog is optional, it can be disabled by configuration. This differentiation between the session user and the signing user is a regular requirement of control authorities (FDA, EMA). It also allows a user to complete a specific task requiring higher authorization, getting his/her superior to come and sign. Once the action has been authorized, a log is saved in the audit trail. This uses the standard Navision change log function completed with additional information, such as comments. 16 PQM Working groups Using working groups, we can divide tasks between quality staff. A working group can be associated with each individual decision. This can be done in the quality order or previously in the plan. In an equivalent way, working groups can be assigned to a user on the “User Configuration” page. Once this has been done, the user will see and can manage only the decisions corresponding to his/her group. Decisions not assigned to a working group will be visible to all users. It is possible to change this behaviour by enabling the “Mandatory Working Group” flag in the quality configuration. When it is enabled, the system requires that the working group is informed in all decisions. A user without a working group will be able to see and manage all decisions. This role is normally reserved for “supervisor” users. The “Working Group” field also appears in the sample, in both the plan and the quality order. This field is not used for distributing tasks. Here it operates in a way similar to the evaluation schema: it makes it possible to establish different levels of requirements for signing actions. So, for example, we might have a sample for which higher roles are required than for the others in order to post or change its results (modification after posting). A “technical PQM 17 management” group will be assigned to this sample, while a group with fewer restrictions will be assigned to the others. 18 PQM Audits An audit is the systematic, critical examination carried out of an organization, system, process, project or product. In PQM, audits are documents structured in three parts: the header, lines and deficiencies. Header The header contains different descriptive information about the origin of the audit. The types of origin can be: product, management system, supplier, manufacturer and other. As in the quality plan, the “Status” field manages its lifecycle: Being Prepared, Implemented, Entered, Being Followed Up or Closed. PQM 19 Audit lines The lines represent the items evaluated. Lines can be added manually, but normally an evaluation template is used. It can be seen that the above audit is based on the ‘AUT0001’ template. Each item can be assigned a “score” between 1 and 10. The meaning of this score is defined on the same line. For example, a score between 1 and 3 for packaging means “fragile”. A score between 8 and 10 means “robust”. The scores can be weighted using the “weighting” field. Depending on the scores and the weighting of each one, a final audit evaluation (header field) is calculated. This is a field for information, with no further implications. Deficiencies detected As a result of the implementation of an audit, deficiencies are detected and added at the bottom of the page. The deficiencies are coded in an attached table. When deficiencies are added to the audit, existing codes can be reused or new ones created. Once the deficiencies detected have been specified, the next step is to create an investigation for each of them. There is an action to do this automatically (the “Create Investigations” button). Investigations follow an independent course and can result in associated preventive and/or corrective actions. Their operation is described later on in this manual. Creating audits There are three different worksheets for creating audits automatically. These worksheets suggest audits for suppliers, manufacturers and management systems with assigned evaluation templates. 20 PQM The worksheet contains two buttons, one to suggest audits to be created and the other to create the audit documents. The worksheet’s suggestion can be changed before being accepted. Audits can also be created manually at any time and for any item. PQM 21 Closing audits Audits can be closed only when one of these circumstances occurs: They have no deficiencies. They have no investigations associated with the deficiencies detected. The preventive and corrective actions associated with the investigation of deficiencies have been closed successfully (see the following section on investigations and preventive/corrective actions). To help with closure there is the “Ready for Closure” field in the audit header. It also appears in the list of audits in progress. 22 PQM Nonconformities Paper-based or partially computerized nonconformity management can slow down the lifecycle of the nonconformity and the resolution of the defect. Manual monitoring of nonconformities based on unrelated sources can take a great deal of time. It is very difficult to monitor the different circumstances that can potentially end in a preventive or corrective action. A nonconformity management system based on activities to be carried out is necessary, allowing the monitoring and evaluation of conformity with the regulations. This system is called CAPA. Any problem identified as a deviation from standard procedure linked to an asset, tool, piece of equipment, instrument or service must be notified and managed. An analysis of how it has occurred, its impact and seriousness and the actions to be taken to correct the situation is needed. All these steps must be posted and documented. Any restoration or incident prevention action must be stored in the system. * Extract from “Managing corrective and preventive action (CAPA) in a life sciences environment. IBM asset management solutions white paper”. PQM has up to three levels of nonconformity management: incident, investigation and deviation. Incident The incident is the entry point into the CAPA system. It reflects only the detection of the problem, with no conclusions for the moment. Incidents can be created in the system from various origins: From a quality order, when an out-of-range value is detected. From a sale delivery note, when a customer complaint is received. Manually. Whenever an anomaly is detected, a problem is suspected or an improvement opportunity is seen. The incident card has four parts: The header, with descriptive data concerning the time and the origin of the incident. An analysis of the causes. Preventive actions. Corrective actions. PQM 23 Sometimes the conclusion that it has been a false alarm can be reached, or the causes of the problem may be perfectly identified. In this case, the incident is closed with no further consequences. If, on the other hand, the causes are unknown, an investigation is opened to clarify them. This is done in PQM from the incident card itself. 24 PQM Investigation The investigation card is almost identical to the incident card. It has the same four parts. As well as identifying the causes, the investigation categorizes the nonconformity depending on the risk: “Incident” if it has occurred in non-GPM-critical processes*. The investigation is closed without further consequences. “Minor Deviation” when it occurs in GMP processes but does not affect product quality, critical operations or instruments associated with the manufacturing process. “Critical or Major Deviation”, in other cases. If the investigation determines that the nonconformity is a deviation (minor, major or critical), a deviation document is created. This may be done in PQM only from a closed investigation card. * GMP-critical processes are those which have an impact on patient/customer safety or on final product quality. Deviation The deviation card is also similar to the incident and investigation cards. It is possible that the investigation may have classed the nonconformity as a “deviation” but not been able to fully determine the causes. For this reason, a new investigation, which will probably be referred to other people or departments, can be created from the deviation card. PQM 25 Preventive/corrective actions Preventive and corrective actions have their own identity and their own card. They have their own status and implementation deadlines. They are assigned to incidents, investigations or deviations (or the same action is assigned to several of them at the same time). An incident, investigation or deviation cannot be closed if it has preventive/corrective actions assigned and they are still in their initial status (“Planned”). 26 PQM The deadline can be changed up to five times, requiring a signature in each case. Once five changes have been reached, the “Renew” action is necessary before the deadline can be extended again. PQM 27 Configuration PQM is designed in a “modular” way. Businesses with very demanding regulations will use most of its functions. Smaller businesses, seeking maximum flexibility without compromising safety, can disable some functions from the configuration page. You access the configuration page from the options ribbon in the quality working area… … or from the Departments -> Quality menu: The module configuration page has two parts or tabs: a general one and a more advanced one. 28 PQM The general tab contains the series that are going to be used for the module documents. It also contains a general flag for enabling or disabling the module. If “Enable Quality Control” is not enabled, quality orders are not generated and the batches going into stock never go into quarantine. The “Advanced” tab contains more critical fields: “Lot Release Plan” and “Lot Release Plan Version”. Lot release quality orders are created when production orders are closed, one for each lot manufactured. The plan used for these quality orders is the one specified on the product card. However, it is possible to use a general plan instead of a different release plan for PQM 29 each product. To work in this way, the lot release plan on the product card needs to be left blank and a plan must be specified here in configuration. If there is no release plan assigned either on the product card or in setup, it is assumed that no quality order is required to release the lot. In this case, the lot is in “Conforming” status from the time it is registered in stock. “Change Audit Status Role”. Only users with the role specified here can manage audits. “Change Incident Status Role”. Only users with the role specified here can manage incidents, investigations and deviations. “Change Action Deadline Role”. Only users with the role specified here can change the deadline for preventive and corrective actions. “Create Reanalysis Role”. Only users with the role specified here can create reanalysis orders. “Reanalysis Lead Time (Days)”. Corresponds to the estimated lead time for a reanalysis. It is used to plan reanalysis quality orders. “Mandatory Working Group”. If enabled, each analysis must be assigned to a working group. If this not enabled, it may be assigned or left blank. The working groups function allows tasks to be distributed between different people. A user assigned to a working group can see and manage only its tasks. “Confirm Password”, “Ask for Observations”. These two flags enable the signature function. The first should always be enabled. If it is disabled, the dialog prompting for a user name/password when posting actions is not displayed. It is assumed that the user posting is the logged-in user and the action can only be completed if this user has the required role. “Automatic Incident Creation”. If enabled, incidents are created for out-of-range values in the quality order decision. A dialog is displayed to ask for confirmation. “Sample Posting Causes Review”. Posting is always mandatory but does not require a user role. By enabling this flag, we post and review the sample in a single step. It requires a role specified in the evaluation schema. “Sample Release Order Posting Optional”. 30 PQM If enabled, lot release orders may be decided without the need to post the samples. It makes sense to enable it when the release order has a single sample, of the “Release (Yes/No)” type. “Ask For Confirmation To Close PO w/o Lot Release Plan”. When enabled, if a production order is closed without the product having a release plan assigned to it, a dialog is displayed asking for confirmation. This is an attempt to prevent the lot carelessly being made available without having been released. “Positive Adjustments Do Not Generate QO”. This flag should only be enabled when the system starts up for initial stock loading. It avoids the creation of quality orders for all the stock transferred. “Use Single WIP Lot”. Affects only routing quality orders. The normal way of working consists of using different WIP lots in each operation. And also using different WIP lots at each shift change, component lot change or change in any circumstances that could affect the quality of the manufactured product. This is the way of ensuring full traceability, in exchange for a little more effort in posting the production worksheet and managing quality orders (because there are more of them). This flag releases you from the need to use different WIP lots in each operation. When enabled, when the production worksheet is opened it suggests the production order code as the WIP lot in all operations. There is no need to change the WIP lot, although this can be done sporadically. PQM 31 Practical usage guide Creating a quality plan from scratch By “from scratch” we mean a new plan code to which new samples and decisions will be added manually. 1. From the Start button, go to the quality plan list. 2. Click the “New” button 3. The quality plan card appears. Fill in the “Nº” field on the plan manually (there is no automatic numbering). The description and plan type (reception/manufacturing) fields are for information. 4. Click the “Versions” button. 32 PQM 5. The version list appears, empty. Click the “New” button. 6. The plan version card appears, empty. Fill in the “Version Code” field on the plan manually (there is no automatic numbering). Also fill in the “Evaluation Schema” field. PQM 33 7. Click the “Samples” button. 8. The sample list appears, initially empty. Add the samples required. In each one, as well as the sample number you need to fill in the following fields: Working Group. Sample Size Method. By Individual (Yes/No). 9. Exit the page with the OK button. The plan version card appears again. Enter the analyses at the bottom of the page. To choose analyses, select from the drop-down menu. 34 PQM The following fields are required: “Sample Nº”. Each analysis must be assigned to one of the samples created in the previous step. “Quality Link Code”. “Not Mandatory” flag. If an analysis is mandatory, a result will be required for the sample to be posted. And if the sample is by individuals, as many results will be required as the number in the sample size. Examples: Sample X. Batch of 100 units. Sample size method = 10%. 10 results are required. Sample Y Batch of 100 units. Sample size method = AQL. The sample size is calculated according to AQL and comes out as 7. 7 results are required. If the “Not Mandatory” flag is enabled, results are not required. The following fields are optional: “Standard”. For information. “Minimum Value”, “Maximum Value”. If these are not present, the system will allow results to be entered without checking the range. “Sample Size Method”. If its value is established as “AQL”, the fields “AQL Sample Table”, “Inspection Level Code”, “Inspection Type” and “AQL Column” must be filled in. 10. (Optional). If the analysis does not exist in the drop-down menu, it can be added by clicking on the “New” label. PQM 35 The list of analyses appears with a blank line. All fields must be filled in. The code must contain letters and numbers. When templates were imported, analyses were created with a counter. It is recommended that the same criterion should be followed. Fill in the “Measurement Value Type” field: “Numerical”, “Boolean”, “Value List”, etc. If it is “Value List”, fill in the “List Code” field. Finally, exit the page with the OK button. 11. Once all analyses have been added, certify the version so it can be used. 36 PQM Adding a new version to an existing quality plan This will be the option most often used once the module is up and running. Starting with an existing plan and version, when you add a new version the system copies the old version to the new one (samples and analyses). In this way, only the changes have to be modified. This should be much quicker than doing it from scratch. However, it is possible to delete the lines and leave it blank if you prefer. 1. From the Start button, go to the quality plan list. 2. Choose the existing plan to which you a new version will be added. Double click on it. PQM 37 3. The plan card appears. Click the “Versions” button. 4. The version list appears (there must be at least one!). 38 PQM Click the “New” button 5. The plan version card appears empty. Fill in the “Version code” field. At that point, the data copied from the previous version appears on the screen: samples, analyses, description and evaluation schema. 6. Then proceed to modify the plan version. Samples and analyses can be added, changed or deleted. Once the version is ready, certify it so it can be used. PQM 39 Adding a plan version from another plan/version This menu option makes it possible to “construct” a plan version based on any other one. If it is applied to a version containing samples and analyses, these are deleted before the process. 1. From a plan version card, go to Actions -> Copy from quality plan version. 2. The list of quality plan versions appears. Select one and click on “OK”. 40 PQM 3. The version card appears again with samples and analyses copied from the chosen version. If there were previous samples and analyses, they have been deleted. 4. Proceed to modify the plan version. Samples and analyses can be added, changed or deleted. Once the version is ready, certify it so it can be used. PQM 41 Manufacturing cycle with quality The first three actions are carried out from the manufacturing side. The others come on the quality side. 1. Creating a planned/confirmed production order. 2. Launching a production order. If the first operation in the routing has quality linked to it (the Quality link code field is filled in), the quality order is created automatically. 3. Posting production. The production worksheet gives information about parts manufactured together with the original and destination WIP lot. 4. Entering results in quality order. This action can be done before step 3 “Posting production”. That is, it would be possible to first enter results and then post the production worksheet. 5. From Quality order -> General samples, post start of analysis. 42 PQM 6. Go to Manage individuals and create as many as are going to be entered. They can be created one by one or using the “Add/Remove Individuals” action to create them in bulk. 7. This page specifies the instruments used in the analysis. See the “Assigning measuring instruments” section for more details. PQM 43 8. Finally, go to Show matrix. Go to the “Entering results in individuals” section for more information about the results entry page. 9. (Optional) Post the results on the results entry page. If they are posted, they are frozen. Special permission will be required to change them afterwards. 10. Posting the sample. To post the sample you must first have created at least one individual and entered results for it. 11. Quality order decision. A check is made that the samples are posted. Querying pending quality tasks There are queries providing quick access to the list of samples waiting to be posted and the list of quality orders awaiting decisions. A third query shows the two things together. 44 PQM Either of the queries can be filtered by working group, warehouse or evaluation schema. This is useful if the laboratory has enough volume to distribute tasks among staff. Assigning measuring instruments In a heavily audited environment, it must be possible to obtain information about the instruments used in each measurement. The module supports this level of stringency, but, at the same time, offers facilities so that entering this information is quick and convenient. This is especially important when working by individuals, as the number of times this information has to be entered many times. One of these facilities is particularly useful: entering the instruments once and offering the same one every time individuals are added. All you need to do is enter the changes. Throughout this section, it is important to differentiate between measuring instrument and equipment/machine. The instrument is the “class”: clock, gauge, etc. The equipment/machine is the instance: ‘IM-024’, ‘IM-029’, etc. The measuring instruments can be organized in instrument groups. A instrument group represents a set of instruments to be used for a specific measurement. PQM 45 You can create as many groups as you like. By sections, by working groups or even by analyses (a group to measure diameters, a group to measure edges, etc.). Specifying instruments in a quality plan Instruments can be specified in the quality plan. This is done using the “Instrument Group” field of the plan lines. The field displays a drop-down arrow with an ellipsis alongside (“assistedit”). The drop-down menu allows you to choose between predefined instrument groups: The choice of an instrument group assigns the instruments in the group to the plan line. These can be consulted by clicking on the ellipsis. 46 PQM In the same way, it is possible to leave the instrument group empty and specify the instruments manually. It is important to bear in mind that only instrument “types” are defined here. Actual equipment or machines are not specified. PQM 47 Instruments in a quality order analysis The instruments specified in the plan are automatically included in the quality order. Once there, they can be changed. Instruments in a quality order sample Another option that may be convenient is to specify the instrument group at quality order sample level. When an instrument group is assigned to the sample, all the analyses are given the same group. This is only useful if the same types of instrument are used for all the analyses. 48 PQM Instruments when adding individuals The page for adding individuals suggests instruments to be assigned. If it is the first individual, this suggestion comes from any of the three places explained above: plan, sample or quality order analysis. If it is not the first individual, the suggestion is the assignment made for the previous individual. PQM 49 Specifying equipment/machines The specific equipment or machine used in the measurements is given on the same page where the types of measurement instrument are entered, in the “Machine Code” field. It is not a free text field. The drop-down menu allows you to choose between registered equipment of the specific type of instrument: Equipment/machines must be entered on all existing lines. If a particular type of instrument is not used for a measurement, the whole line must be deleted. Example: there cannot be a “CLOCK” line with the “Machine Code” field empty. As described above, it is possible to enter the instrument types in different places (in the plan, in the quality order sample/analysis or when adding individuals). Equipment/machines can also be specified in different places. The different possibilities are detailed here: Equipment/machines cannot be specified in the quality plan (only instrument types). But they can be specified in the quality order sample and analysis. The system takes this information as a template (“Individual nº = 0 appears in the assignments). When the first individual is added, this assignment is shown so the user can change it if required. When adding individuals. The first individual suggests the assignment of the instrument types and equipment given in the plan or in the order sample/analysis. For each new individual to be added, the last assignment made is offered. That means, if a piece of equipment is changed for the second individual, this assignment suggestion is maintained for the third and successive individuals. 50 PQM Example of equipment assignment in the sample: Equipment/machine management The equipment is managed on the “Quality machines” page. There it can be registered, modified or deleted: PQM 51 Entering results in individuals The results entry page is adapted, depending on whether the sample uses AQL. This difference is due to the fact that different fields are needed. For example, AQL has already calculated the sample size and therefore the number of values that must be entered in the mandatory analyses. Without AQL, we normally use the “Frequency” field to indicate to the worker how often or after how many parts the measurements must be made. Without AQL With AQL 52 PQM Comments associated with plans, samples and orders The results matrix shows comments from the plan, and it is also possible to add comments associated with the quality order (to the measurement being made). First we will see how the comments from the plan are displayed... In the case of automatic monitoring, the comments from the imported templates were overall ones, for the whole plan. They are displayed at the bottom of the page (“Comments” field). By contrast, on the laboratory templates there are no overall comments but there were some associated with each analysis. The “Comment” field shows the comments associated with the analysis selected on the screen. In addition, the “Comment” column indicates whether there are comments associated with the line. If you click on a cell, a page opens, allowing you to add or modify the comments. Modifying these comments affects the plan and not just the quality order. PQM 53 Firstly, there is the possibility of entering comments linked to the quality order analysis. These are comments on the specific measurement, which are stored only in the quality order. To enter the comment, go to the analysis you want and click on HOME -> Line Comments. Meanwhile, there is also the possibility of adding comments associated with the sample and the quality order. These are comments on the specific measurement which are stored only in the quality order. 54 PQM To add comments to the sample: PQM 55 To add comments to the quality order: 56 PQM Traceability The module has various ways of checking traceability. Firstly, the “Browse” function launched from a quality order shows all related documents and it is possible to follow the links to see each of them. The same thing can be done by asking about a lot instead of an order no. This “Browse” function includes quality “measurements”. When this link is followed, you can check the results list entered for this code, including the user, date and time. Another available function is “Lot Traceability”, available only in release orders. It shows all the information from the different operations and components involved in manufacturing the lot, in the form of a drop-down tree. On the right (it does not fit into the screen shot) information on users is shown, along with the time when the posts were signed PQM 57 Finally, there are two special traceability functions for routing orders. From the routing order card, “Forward Traceability” shows later orders. “Backward Traceability” shows earlier orders. It is also possible to launch “Backward Traceability” from a lot release order: 58 PQM AQL AQL means “Acceptable Quality Level” and represents the maximum percentage of defects that can be considered satisfactory for a chosen sample. AQL also makes it possible to determine the sample size for inspection depending on the total quantity of the order and the level of strictness. It is possible to choose between levels I, II and III, where level III is the strictest and level I the least strict. Two types of table are used for the calculations, for which there are various standards. Example AQL table: code GENERAL, level II, normal inspection. PQM 59 The procedure to be followed is to look for the letter corresponding to the lot size in the first table, with inspection level II. For example, for a batch of 5,000, we obtain the letter L. With the letter L we go to the second table and obtain two things: The size the sample should be: 200 The acceptance level. In this example, for an AQL column of 2.5 it tells us that we accept up to 10 defective units (out of a sample of 200). To define an AQL like the one above in the module, we need to go to the “AQL” section by either of the following two paths: From the quality “Role Centre” working area, Start -> Administration menu. Departments -> Quality control -> Administration -> AQL The tables “AQL Columns” and “Inspection Letter” contain additional data (the letters of the alphabet and the numerical columns of the latter 0.10, 0.25, 0.40). Additional inspection levels can be inserted on the “Inspection Level” page. 60 PQM “Inspection Level Lot Size” defines the size intervals of the desired lot. PQM 61 “Lot Size Letter Matrix” defines the letters corresponding to each lot size. This page corresponds to table 1 of the example above. And, finally, the acceptance level matrix... which corresponds to table 2 of the example above. As mentioned above, this matrix offers two types of information: sample size and acceptance level (after how many bad units do we reject the whole batch). To find out the sample size, select it at the bottom, below the AQL code and inspection type. Each letter corresponds to a sample size. To find out the acceptance level, we also need the AQL column. This value defines how strict we are. For example, for an AQL of 0.4, letter L, we accept that there are 3 bad units within the sample of 200. 62 PQM PQM 63 Assigning AQLs to quality plans The following AQL fields are assigned in the quality plan header: AQL sampling table, for example “IMPCOMP100”. Inspection level code, for example “II”. Inspection type, for example “Normal”. This field is assigned in the plan samples (“Samples” button): Sample Size Method. This indicates how the system should calculate the theoretical sample size: fixed quantity, percentage, AQL, etc. To enable calculation by AQL, you need to select “AQL” here. These four fields move from the plan to the quality order. When the lot quantity is confirmed in the quality order, the sample size is calculated according to AQL for samples configured as AQL. This theoretical size can be seen in the “AQL Sample Size” field of the sample. It represents the quantity of parts that should be samples. 64 PQM Alongside this field is another called “Sample Size”. This is the actual sample size. When working by individuals, as you are working with complete plans, the actual sample size is the number of individuals created. It is also possible to calculate the AQL by analysis. For example, the maximum diameter can be measured in 5 parts and the threaded hole in 8. To enable this option you need to use the AQL fields of the analysis: In this example, you can see the theoretical sample sizes according to AQL, calculated for each analysis. The first line, “Visual Inspection”, has an AQL of “100%” assigned. This AQL is configured internally as “Full Inspection”. These theoretical sample sizes also appear on the results entry page, so the user can find out how many individuals must be measured in each case. PQM 65 Posting samples and decisions with AQL As explained above, the system makes various checks on the sample post. One of these is that, for each decision, there are as many measurements as indicated by the line AQL. If there are none, it does not allow the sample to be posted. In the decision there are no checks at all on the number of individuals. This has already been done in the sample post. As for the acceptance threshold, the system merely offers information. It does not prohibit a “Conforming” decision when there are rejectable individuals above the acceptance threshold set by the AQL. 66 PQM Written by : Toni Martínez 22 October 2014 Reviewed by : Frederic Barberà 18 November 2014 Doc. version : V06.2 Add-on version : V6.0 NAV version 2013Rx : All rights reserved in favour of Olivia Sistemas, s.l., Barcelona (+34)932 380 132 [email protected] www.olivia.es PQM 67