1
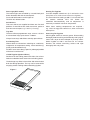
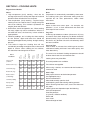
DOMINATORPLUS
ELECTRIC RANGE APPLIANCES
USERS INSTRUCTIONS
SECTION 1 - GENERAL DESCRIPTION
SECTION 2 - CONTROLS and OPERATION
SECTION 3 - COOKING HINTS
SECTION 4 - CLEANING and MAINTENANCE
This appliance has been CE-marked on the basis of compliance with the Low Voltage and
EMC Directives for the voltages stated on the data plate.
The appliance MUST BE installed by a competent person in compliance with the INSTALLATION AND
SERVICING INSTRUCTIONS and National Regulations in force at the time.
UK regulations are listed on the front of the Installation and Servicing Instructions.
Regular servicing by a qualified person is recommended to ensure the continued safe and efficient
performance of the appliance.
WARNING - THE APPLIANCE MUST BE EARTHED.
Upon receipt of the User's Instruction manual, the installer should instruct the responsible person(s)
of the correct operation and maintenance of the unit.
This equipment is ONLY FOR PROFESSIONAL USE, and shall be operated by QUALIFIED persons.
It is the responsibility of the Supervisor or equivalent to ensure that users wear SUITABLE
PROTECTIVE CLOTHING and to draw attention to the fact that, some parts will, by necessity, become
VERY HOT and will cause burns if touched accidentally.
WEEE Directive Registration No. WEE/DC0059TT/PRO
At end of unit life, dispose of appliance and any replacement
parts in a safe manner, via a licenced waste handler.
Units are designed to be dismantled easily and recycling of all
material is encouraged whenever practicable.
Falcon Foodservice Equipment
HEAD OFFICE AND WORKS
Wallace View, Hillfoots Road, Stirling. FK9 5PY. Scotland.
SERVICELINE CONTACT
Phone: 01438 363 000
Fax: 01438 369 900
T100763 Ref.1
SECTION 1 GENERAL DESCRIPTION
SECTION 2 CONTROLS and OPERATION
Hotplates
Hotplate assembly is dependent upon specification of
range or boiling table and will consist of one of the
following arrangements:-
Hotplates
All hotplates are controlled by 6-heat
switches
to
provide
variable
temperatures from Setting 1 (lowest)
progressively increasing to Setting 6
(highest).
E3101 Three Hotplate Range
3 rectangular, heavy duty hotplates.
E3101 Four Hotplate Range
2 circular, energy saving, solid pattern hotplates and
2 rectangular, heavy duty hotplates.
E3101OTC Three Hotplate Range
3 rectangular, heavy duty hotplates.
E3101OTC Four Hotplate Range
2 circular, energy saving, solid pattern hotplates and
2 rectangular, heavy duty hotplates.
E3117 General Purpose Oven
E3117 General Purpose Oven on Stand
E3117/2 Two Tier General Purpose Oven
No hotplates.
E3121 Three Hotplate Boiling Table
Three heavy duty rectangular hotplates.
E3121 Four Hotplate Boiling Table
2 circular, energy saving, solid pattern hotplates and
2 heavy duty rectangular hotplates.
E3161 Three Hotplate Range
2 circular, energy saving, solid pattern hotplates and
1 rectangular, heavy duty hotplate.
All range and general purpose ovens are thermostatically
controlled. They have 5 position, nickel-plated shelf
hangers with 2 safety pattern, anti-tilt oven shelves.
Warning - THIS APPLIANCE MUST BE EARTHED.
Circular, energy saving hotplates embody a temperature
limiting device. This automatically cuts off part of element
circuit should plate become overheated when left on
without a pot upon it.
When this occurs, full element circuit will be automatically
restored when a pot is placed upon hotplate.
A neon indicator lamp adjacent to each control indicates
that plate is ON.
The requisite setting for simmering or fast boiling pots of
various sizes will quickly be found by experience.
For efficient operation of hotplates, it is essential that
good contact is made between hotplate and utensil.
Ground-based pots should be used and hotplate surface
must be in good condition. Spillage should not be allowed
to accumulate around plate edges as this will burn on and
become difficult to remove. The spillage tray is positioned
below hotplates and can be readily withdrawn for
emptying and cleaning when unit has cooled down.
Caution: The spillage tray will become very hot during
operation of appliance.
Important
To ensure long life of hotplates and to conserve
electricity, DO NOT leave plates switched on when they
are not in use, particularly at high settings.
If, for any reason it is considered necessary to maintain
a plate hot when it is not being used, turn control to a low
setting no greater than 2 or 3.
Oven
The oven temperature is controlled by
a thermostat.
The amber neon when lit, indicates that
current is being supplied to elements.
It will go out when oven has reached
selected temperature.
The cooking chart provides thermostat settings,
time required etc., but for best performance - these
instructions should be followed.
Oven Light (OTC model)
The internal lights are controlled by a round black push
button located at RH side of control panel.
Press and hold button to switch lights on.
To switch off, release button.
Grid Shelves
Two oven shelves are supplied and there are five shelf
positions. If two shelves are used at one time, space at
least two runners apart, e.g. 2 and 4 (1 is at top).
Tray Size
The oven will accept gastronorm trays - 527mm x 324mm
or conventional trays up to 535mm x 400mm.
Always locate trays and dishes centrally upon shelves.
Pre-Heating Time
Allow at least 45 minutes from switching on a cold oven,
irrespective of temperature setting. Insert food item(s)
quickly and close doors firmly.
DO NOT leave oven door(s) open for prolonged periods
while oven is switched on.
Lift-Off Fryplate (Optional Extra)
Position over fast boiling plates with drain slot at front.
Pads on underside locate around rims of boiling plates.
The drainage tray slides in from either side at front below
drain slot during operation. The tray can be removed for
emptying and/or washing without disturbing fryplate.
Figure 1
Heating The Fryplate
Turn both hotplate controls to 6 (It is advisable to have
both plates on to achieve even heat across fryplate).
The normal time for heating to 200°C is 25 minutes with
the controls switched FULL ON. Plates are
controlled thermostatically and no adjustment is
necessary to maintain maximum temperature.
When lower cooking temperatures are required e.g. 120°C for eggs. Set control to 3, allow 10 minutes
heat up time.
Seasoning The Fryplate
Wash fryplate surface to remove grease. Rinse and dry
thoroughly before brushing surface liberally with frying oil.
Cover with a layer of salt to a depth of (at least) 10mm.
Switch fryplate to 250°C and heat for 45 minutes.
Remove salt without scratching surface and wipe
thoroughly with a dry cloth.
SECTION 3 - COOKING HINTS
Regular Oven Models
OTC Models
Notes
1. High temperature (quick) roasting - times are for
average requirements. Quality and shape of meat and
personal tastes will affect the time required.
2. Low temperature (slow) roasting - requires longer
cooking times, but reduces loss in weight and gives
more even cooking. This method is preferable for
tougher joints and old birds.
3. Small cakes, scones and pastries, etc - When cooking
two trays, upper tray will be cooked first. When it is
removed from oven, the lower tray is then raised to
upper position.
4. Yorkshire puddings, etc. in baking tins when cooking
on two shelves, upper and lower tins should be
interchanged approximately halfway through cooking
process.
5. Fruit cakes in large tins. Cooking time will vary
considerably according to weight of cake, richness and
depth of mixture. When cooking on two shelves,
tins should be interchanged as in Note 4.
Oven
Temperature is automatically controlled by thermostat.
The cooking chart gives thermostat setting and time
required but for best performance, follow these
instructions.
Grid Shelves
Space at least one runner apart - for example, use
positions 1, 3 or 2, 4. Push shelves back into oven until
shelf stops hit front runners.
Tray Size
A cake tray up to 650mm x 530mm (Gastronorm 2/1) may
be used on each shelf. Single trays or dishes should be
placed centrally. Trays must not be allowed to overhang
the shelf in any direction since this will adversely affect
the heat circulation.
Pre-heat Time
Allow at least 15 minutes from switching oven on from
cold before loading with food. Insert dish quickly and
close doors firmly.
Total
Weight (kg)
Temperature
Setting (°C)
Chageover
Time (mins)
Total Cook
Times (mins)
80
1.1
230 2 & 4
10
16
Five shelf positions are available.
Sultana scones (½”)
80
4.5
240 2 & 4
9
14
Two shelves are supplied.
Croissants (55g)
36
2
200 2 & 4
12
20
When using 3 shelves, we recommend that Positions 1,
3 and 5 be used.
Bread rolls (75g)
48
3.6
230 2 & 4
10
17
Quiche lorraine
(8” dia/680g)
12
8.2
195 2 & 4
35
60
Yorkshire pudding
72
2.7
240 3 & 5
18
32
Sponge (slab)
4
5.5
200 2 & 4
12
24
Baked jacket
potatoes
72
26.5 220 2 & 4
70
110
Products
Runner
Positions
Total
Quantity
The oven is fan assisted. Cooking temperatures should
be lower than those of a conventional oven.
Vol-au-vents
(medium)
Food
Cooking times may also differ.
Chef's Tips
Always pre-heat oven to desired temperature.
Use appropriate trays.
Do not overload oven.
Place food centrally upon the shelf.
Avoid opening oven doors during cooking process.
When removing food from oven, ensure the doors are
fully open.
Cooking times are dependant upon the following:
Pre-heat Temperature
Food Temperature
(e.g. frozen, chilled or ambient)
Shelf Load
Oven Load
Size and weight of food
SECTION 4 CLEANING and MAINTENANCE
Warning
BEFORE ANY CLEANING IS UNDERTAKEN, ISOLATE
APPLIANCE FROM MAINS POWER SUPPLY AT
ISOLATOR SWITCH.
OTC Oven
Clean oven while still warm. The internal and external unit
surfaces are stainless steel. Glass viewing panels are
fitted within doors.
THE UNIT MUST NOT BE CLEANED WITH A JET OF
WATER OR STEAM CLEANED.
General cleaning of surfaces to remove light staining and
spillage may be achieved by washing with a slightly damp
cloth and soap detergent. This practice, if carried out
daily, will prevent build-up of stubborn baked-on deposits.
Wipe surfaces down with a soft cloth rinsed in fresh water
which has been squeezed free of excess liquid.
Clean appliance with hot, soapy water as often as
possible and rinse and dry thoroughly. Grease should be
removed with fine steel wool or proprietary cleaning pads
such as "Brillo". Nylon pan scrubbers should be used with
care, especially when new as they may scratch the
enamelled surfaces.
Stubborn stains and baked-on deposits are best removed
by nylon scouring pads or oven spray-on materials.
Before removing any parts, notice carefully how they are
arranged and replace them in the same positions after
cleaning.
The glass may be cleaned with proprietary glass spray-on
materials. Cold water must not be applied to glass when
hot as cracking of the toughened panel could occur.
All Ovens (not OTC)
Clean oven while it is still warm. The enamelled base
plate lifts out and the runners can be removed.
Oven shelves and support grids can be removed for
cleaning. This will also facilitate cleaning of cavity walls.
Grip at bottom, lift up until lower ends leave brackets and
pull out toward centre of oven and lower.
Two oven drip trays are provided and are simply
removed by sliding them out from front of unit.
Hotplate and Fryplate
A smooth bladed metal scraper is handy for removing
deposits of burned-on grease from hotplate and fryplate
surface.
Hotplate spillage tray is simply removed by sliding out
from front of unit.
Caution: Spillage tray will become very hot when unit is
in operation.
Some internal areas of the oven around the fan baffle will
not be accessible to kitchen staff. Since build-up of
deposits in these areas could be detrimental to oven
performance, these should be cleaned periodically by
service personnel.