1
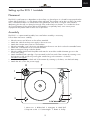
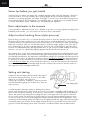
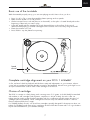
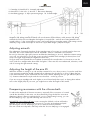
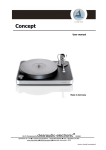
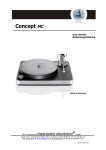
ECG 1
Regulated belt drive turntable
Owner's Manual
Version 1.0
EN
ENGLISH
ENG
Welcome to the world of Electrocompaniet!
We thank you for choosing an Electrocompaniet high-end product.
At Electrocompaniet we are relentlessly focused on developing audio
equipment that is capable of bringing the fabulous experience of the
concert hall into the very heart of your home.
Our aim when developing and testing new products is to ensure that
the wonderful richness of tone and every nuance of feeling and emotion of a piece of music is delivered to you just as the artist intended.
We continually strive to give you the very best musical listening experience available whatever your preferred musical genre.
Sincerely yours
Mikal Dreggevik
CEO
2
ENG
Precautions
• Before connecting the AC power cord to the appliance, make sure the voltage designation of the appliance corresponds to the local electrical supply. If you are unsure of your power supply, contact your local
power company. The acceptable power input range is AC ~100V-240V, 50/60Hz.
• The motor is still receiving power from the AC power source as long as it is connected to the wall outlet,
even if the turntable itself has been turned off.
• Unplug the power cord if you are not going to use the product for an extended period of time.
• The power cord is used as the mechanism for cutting off power, therefore make sure it is easy to unplug.
• High temperature will lead to abnormal operation of this unit. Do not expose this unit or batteries to
direct sunlight or near other heating objects.
• Condensation may occur when moving the ECP 2 from a cold location to a warm one, or vice versa. Should
this occur, the ECP 2 may not operate properly. In such a case please turn the unit on for 1-2 hours to facilitate moisture evaporation.
Important Safety Instructions
1)
2)
3)
4)
5)
6)
7)
Read these instructions.
Keep these instructions.
Heed all warnings.
Follow all instructions.
Do not use this turntable near water.
Clean only with dry cloth.
Install in accordance with the manufacturer’s instructions.
Do not install the unit in a small and closed rack or shelf.
8) Do not install near any heat sources such as radiators, heat registers, stoves, or other devices
(including amplifiers) that produce heat.
9) Do not defeat the safety purpose of the polarized or grounding-type plug. A polarized plug has two
blades with one wider than the other. A grounding type plug has two blades and a third grounding prong.
The wide blade or the third prong is provided for your safety. If the provided plug does not fit into your
outlet, consult an electrician for replacement of the obsolete outlet.
10) Protect the power cord from being walked on or pinched, particularly at plug, receptacle, and the point
where it exits from the motor.
11) Only use attachments/accessories specified by the manufacturer.
12) Unplug this turntable during lightning storms or when unused for long periods of time.
13) Refer all servicing to qualified service personnel. Servicing is required when the turntable has been damaged in any way, such as power-supply cord or plug is damaged, liquid has been spilled or objects have
fallen into the turntable, the turntable has been exposed to rain or moisture, does not operate normally, or
has been dropped.
3
ENG
Warning:
To avoid risk of fire or electric shock, do not expose this appliance to rain or moisture. Verify line
voltage before use. Do not remove cover. No user serviceable parts inside. Refer servicing to qualified
service personal. The warranty is void if the product is tampered with by non-authorised personnel.
Use only authorized Electrocompaniet service center.
The contents of the carton
•
•
•
•
•
•
•
•
•
•
•
•
•
•
1
1
1
1
1
1
1
1
1
1
1
1
2
1
pc.
pc.
pc.
pc.
pc.
pc.
pc.
pc.
pc.
pc.
pc.
pc.
pc.
pc.
Electrocompaniet ECG 1 turntable.
Owner’s manual.
Rubber drive belt.
Motor unit.
Power supply for motor unit.
AC main cord.
Tonearm (mounted).
Head shell.
Tonearm counter weight.
Tonearm interconnect (RCA).
Inspection card.
Syringe filled with silicone oil.
Hex keys.
Cartridge alignment protractor.
Unpacking the ECG 1
Immediately upon receipt of the ECG 1 turntable, inspect the carton for possible damage during shipment.
The carton and packaging have been designed to provide the safest possible protection for transport of
your turntable. Save all packaging materials for future shipment.
Set up procedure
Before connecting the ECG 1s motor unit to the AC Power outlet, check that the main voltage indicated
on the power supply corresponds to the line voltage in the country were you intend to use the unit.
How to avoid damages
Do not under any circumstances connect or disconnect equipment when power is turned on. The design
of the RCA plug generates a huge transient when inserted. Connecting or disconnecting equipment with
the power on can result in severe damage to the phonostage, amplifiers and loudspeakers.
How to avoid noise problems
The ECG 1 turntable contains delicate circuits that are to magnetic stray fields. The unit should not be
placed near power voltage transformers, TV sets etc. Care should also be taken regarding placement of
the interconnect and earth cables. Do not run interconnect and earth cables in parallel with main cords
or speaker cables. Keep interconnect and earth cables as short as possible.
How to avoid possible antenna problems
In some set-ups hum may occur when you connect the radio, VCR or TV to your system. The problem is
caused by DC voltage coming from your antenna. Please contact your cable network operator.
4
ENG
Setting up the ECG 1 turntable
Placement
The ECG 1s performance is dependent on the surface it is placed upon. It is therefore important that the
surface below the ECG 1 is solid, vibration free and level. This surface can be the top shelf of an audio
rack, a stand-alone table or a wall bracket. The spiked feet of the ECG 1 will give some vibration
dampening, but this will not always be enough if the surface below it vibrates. So consider this when
choosing placement. If the surface below the turntable is not perfectly level, some cutout pieces
of paper can be placed under its feet. Use a spirit level.
Assembly
The ECG 1 is a premounted turntable, but some further assembly is necessary.
Follow these instructions carefully.
•
•
•
•
•
•
•
Place the motor unit left rear on the surface intended.
Attach the cable from the power supply to the motor unit.
Attach the tonearm interconnect to the armbase.
Place the turntable “over” the motor unit.Make sure the motor unit don’t touches the turntable frame.
Attach the cord between motor unit and turntable.
Remove transport fixings under the platter.
Place the rubber belt around the platter and stretch it around the smaller diameter groove in the
motor unit’s pulley.
• Attach headshell (with cartridge - if pre mounted) to the front end of the tonearm by inserting it into
the bayonet socket and fix it by turning the serrated ring on the tonearm – clockwise.
DO NOT over tighten.
• Attach counterweight to the back end of the tonearm by screwing it, clockwise, onto the back stump.
2
3
4
5
• Attach the6 AC cord to the power
supply.
7
8
D
1
6
1
2
C
5
B
3
4
1. Motor unit
2. Rubber belt 3. Navigator 4. Head shell
5. Bayonet socket
A
6. Counterweight
7. Platter 8. Pulley
Designed by
Checked by
Date
Approved by
Date
15.11.2014
Roma
Editio
6
5
5
4
3
2
1
ENG
Some tips before you get started
Several of the procedures involved in the cartridge alignment (HTA, VTA and Azimuth) is based on
visual information. A strong movable light source (spotlight) and good indirect lighting is recommended to use during alignment. The angle of the light is crucial, since cast shadows may give you
inaccurate perception. Good eyeglasses, a magnifying glass or a USB microscope makes it easier
to see the small details (stylus, cantilever etc.), involved with the alignment.
Basic adjustments to the tonearm
If your turntable is delivered from the store - already set up with a correctly aligned cartridge (in the
headshell) and tonearm - you only need to do these two basic adjustments:
Adjust vertical tracking force (stylus pressure)
The first thing you have to do is to remove the stylus protection from the cartridge. Then carefully
lift the front end of the tonearm out of its crib and twist the counterweight (back or forth) until the
tonearm balances horizontally (floats). Put the tonearm back in its crib. Than hold the counterweight
fixed with one hand, while you use the other hand to rotate the weight gauge (on the front end of
the counterweight) so 0 aligns with the white line. Then turn the counterweight to apply the stylus
pressure recommended by the cartridge manufacturer. To get a more accurate reading of the stylus
pressure, one can use a (preferably digital) gauge made specifically for that purpose.
The tracking force is one of the settings that when altered will change the sound quality and sound
character of the turntable. We recommend keeping the tracking force within the boundaries set by
the cartridge manufacturer, but experiment with different settings. The cartridge will often track at its
best when given values up against the maximum setting. DO NOT go below the recommended stylus pressure, since this will wear the records and stylus more than using recommended stylus pressure. DO NOT go above the recommended stylus pressure, since this will compress the suspension
and in some cases make the cartridge body touch the surface of the record. It will also wear out
the suspension of the cartridge prematurely.
Setting anti-skating
Simply turn the anti-skating dial (located to the right of
the tonearms bearing housing) - from 0 - to the same
setting as you used for stylus pressure.
Softer, high compliance cartridges is often best served
with the anti-skating gauge set “a little lower” than the
stylus pressure.
Anti-skating dial
A radial tonearms geometry creates a (skating) force that pulls the cartridge toward the inner
groove wall and the center of the record. As a result, you get the soundstage shifted slightly to the
left of center and poorer tracking. To counter this, most tonearms is equipped with an anti-skating
device that counters the skating force, pulling the stylus more against the outer groove wall and
the rim of the record. The best way to confirm that you have the right anti-skating setting is to put
on a mono record. The sound should appear perfectly centered between the loudspeakers. If not,
increasing the anti-skating setting will shift the sound slightly towards the right, while decreasing the
anti-skating setting will shift the sound slightly towards the left. Using a blank record side without
grooves to check anti-skating will not work, since there is unsufficient friction from the blank surface.
6
ENG
Basic use of the turntable
With the turntable properly set up, you can start playing records. Here is how you do it:
• Press 33, 45 or 78 - to start the turntables platter spinning at those speeds.
• Make sure the armlift is in its UP position!
• Lift the tonearm from its crib and place it on the armlift, so the stylus is located directly above the
beginning of the track you want to play.
• Lower the armlift and the cartridge will slowly descend down to the surface of the record.
When finished playing, just lift the cartridge from the surface of the record by using the armlift.
• Place the tonearm in its crib.
• Press STOP to stop the platter from spinning
6
4
5
2
3
D
C
B
Speed
control
Complete
cartridge alignment on your ECG 1 turntable
A
Designed by
Checked by
Approved by
Date
Roma
So far, we have looked at playback and the basic setup and adjustments on your tonearm, when it
comes with a pre-aligned cartridge already
mounted in the
headshell. We will3 now go through how
to
2
4
5
6
set up the tonearm from scratch - with a new cartridge out of the box.
Choice of cartridge
The ECG 1s tonearm is a fairly heavy, with a moving mass of 21 grams. It should ideally be matched
with medium to stiff cartridges (with dynamic compliance < 20 (at 10 Hz)) - but also softer cartridges may be used.In todays marked cartridges with low compliance typically means Moving Coil
cartridges (and some MMCs). These cartridges should work very well with the tonearm – and our
Electrocompaniet ECP phono stages.
For 78-RPM (shellac) records, one should use cartridges specially designed for that purpose. Most cartridges for 78-RPM records have a low compliance and should fit the tonearm well. It is a good idea to
buy an extra headshell for your 78-RPM cartridge.
7
Date
15.11.201
ENG
Mounting the cartridge to the headshell
Mounting the cartridge to the headshell is much easier with the headshell detached from the tonearm.
Using the two mounting screws (and nuts if needed) fasten the cartridge to the headshell, so the two
screw heads are located about midway in the two slots in the headshell. Attach the four headshell
leads; RED to right channel plus (R+), GREEN to right channel minus (R-), WHITE to left channel plus
(L+) and BLUE to left channel minus (L-) - to the cartridge (that often have the same color coding).
Mount the headshell onto the tonearm (see above).
Adjusting the Horizontal Tracking Angle of the cartridge (HTA)
When the record is “cut” at the studio this is done (tangential) in a straight line along the records
radius. During playback, the cartridge draws an arc with a radius equal to the tonearms length, unless
you have a tangential arm. To get a minimum of angle error, thereby a minimum of angle distortion
and ultimately a minimum of tracking distortion, the cartridge is set to follow a predetermined geometry
(set by the tonearm). The geometry makes the cartridge have zero angle error in two locations on the
record face (HTA-1 and HTA-2). To get zero angle error in both these locations at the same time, the
cartridge must first have the correct overhang - calculated from the arm’s length and choice of geometry. On the Electrocompaniet protractor, you have a choice of tree different geometries: Löfgren A
(Baerwald) (1938), Stevenson (1966) and High Fidelity (1990). All these geometries take into account
the reduced peripheral speed of the inner grooves of the record (from Löfgren A), to reduce tracking
distortion. We recommend using the most modern geometry - High Fidelity.
• Place a record and then the Electrocompaniet protractor on the platter with the spindle through the
hole - corresponding with your choice of geometry. Let the arrow point directly towards the horizontal pivoting point on the armbase (the hole on top) of the Jelco arm.
• Loosen the cartridge screws slightly so the cartridge can be moved (with some resistance) back or
forth.
• Lift the tonearm and turn it all the way in, so the cartridge is located over the protractor line leading to the arrow. Move the cartridge back or forth so the stylus is positioned directly above the
cross labelled Overhang and fix the cartridge by slightly tightening the inner (left) screw.
• Adjust stylus pressure to the cartridge manufacturer’s recommendation (see above). Set antiskating
to 0 (see above).
• Turn the platter manually and lower the cartridge so the stylus is located on the cross labelled
HTA-1. The cantilever of the cartridge should be aligning perfectly with the line behind the crosses
center. If not, lift the tonearm, twist the cartridge (around the inner (left) fixing screw) and try again.
Continue until you have perfect alignment in HTA-1 and then tighten both screws. DO NOT over
tighten. Check the alignment in HTA-1 one more time, since the tightening of the screws may twist
the cartridge out of alignment. (On some cartridges, it is hard to see the cantilever so the whole
housing of the cartridge must be aligned with HTA-1 using the helplines parallel to the main line).
• Double check the alignment by placing the stylus on the cross labelled HTA-2. You should have
perfect alignment here too. If you do not, your overhang is off and you need to start this whole
process again.
The HTA alignment is done to get the best possible result across the entire record face. One can alter
the HTA angle and get better sound quality (lower tracking distortion) in a specific point on the record
face, but this means the sound quality will get poorer on other places on the record face.
Therefor - DO NOT adjust HTA by ear, but stick to the alignment you just did -based on geometry.
Adjusting vertical tracking angle (VTA – arm height)
Start out by lowering the stylus onto the record (with the correct stylus pressure). If you see a cause for
altering the VTA (arm wand NOT parallel to the record surface), secure the tonearm in its crib. Place
the fingers on your left hand under the bulk of the bearing housing while loosening the hexscrew (hidden in the hole on the right side of the armbase) with a hex key in your right hand. Raise - or lower the arm before tightening the screw. Confirm correct setting by lowering the stylus onto the record once
more. Repeat procedure if necessary. A ruler can be used to measure the distance from arm wand to
the record surface – front and back – to confirm a parallel arm.
8
ENG
1. Cartridge 2.Head shell 3. Azimuth adjustment
4. Armwand 5. Arm crib 6. Arm lift 7. Resonance damping
8. Anti-skating gauge 9. Stylus preassure gauge 10. Counterweight
Altering the vertical tracking angle on the tonearm will change the sound character from the cartridge.
Negative VTA (tilting towards the back) will sound warmer and mellower, while positive VTA (tilting
towards the front) will sound brighter and tighter. A neutral VTA – with the arm wand parallel to the
record surface – is the normal place to start - and usually the best sounding setting. VTA settings can be
aided by using a USB microscope to check the “Stylus Rake Angle” (SRA) of the stylus.
Adjusting azimuth
The adjustment of azimuth, the tilting of the cartridge seen in front view is not performed on the tonearm itself, but on the standard Jelco HS-25 headshell - while it is attached to the tonearm.
Be sure you have the right stylus pressure and that the Antiskating is set to 0. With the tonearm resting
in its crib, use a hex key to loosen the screw, twist the headshell with cartridge (clockwise/anti clockwise) to the right angle and then retighten the hexscrew.
Using a small mirror placed flat on the platter (instead off the record) makes it a lot easier to see the
result. Look for a straight rather than tilted “hourglass”. There are also more advanced, electronic, methods of securing the right azimuth setting.
Adjusting the height of the arm lift
While the tonearm is resting in its crib and the tonearm lift is in its down position; loosen the small hexscrew pointing towards the armlift cylinder before adjusting the cylinder up or down. Tighten the hexscrew when finished. Try the armlift with the arm and continue adjusting until you get sufficient (about
½”) clearance between the stylus and the record surface – in the up position.
If you are using a cartridge with much higher or much lower body than usual, or having done alterations to the height (VTA) of your arm, you might have to alter the height of the armlift.
Dampening resonances with the silicone bath
To reduce the amplitude of the arm resonance, especially if this resonance is located
outside the desired 8-12 Hz area, can be achieved by using the build in resonance
dampening device. After unscrewing the lid, on top of the bearing housing, you can
fill the underlying “cup” (up until half way) with silicone oil.
DO NOT fill it more than half way, since screwing the lid back on than will lead to
spillage. You do not want that, since silicone oil is a sticky and unpleasant liquid.
Avoid using the silicone damping if you do not have resonance problems.
The arm sounds more dynamic and lively when the silicone damping is not engaged.
9
ENG
Technical specifications
The following technical data were measured on randomized test objects and are typical data.
All measurements are made at 120V / 240V // 50Hz / 60Hz
Turntable ECG 1
Operation:..........................................................................................................Manual
Drive system:..............................................................................Exterior rubber belt drive
Motor:..................................................................................24 V AC synchronous motor
Speeds:.......................................................................................33 1/3 – 45 – 78 RPM
Speed selection:.....................................................................Fully regulated electronically
Platter:................................................................................12” / 2.8 kg (6.1 lbs) acrylic
Tonearm
Operation:........................................................................................................Manual
Profile:........................................................................................................S – shaped
Headshell:..................................................................................................(SME-mount)
Efficient length:.................................................................................................258 mm
Overhang:....................................................................................................15.17 mm
Offset angle:...........................................................................................................21˚
Tracking error - angle:.............................................................................+ 1.75˚ - 1.25˚
Cartridge weight:.............................................................................................4 - 12 g
Cartridge height:.........................................................................................38 - 60 mm
Moving mass:.............................................................21 g (+ cartridge + screws (0,5 g))
Dimensions
Width ......................................................................................465 mm / 18.3 inches
Depth ......................................................................................360 mm / 14.1 inches
Height ............................................................................................153mm / 6 inches
Weight (Turntable with tonearm)..........................................................13 kg. / 28.6 lbs
Motor......................................................................................1,3 kg / 2.2 lbs
*The manufacturer reserves the right to alter these specifications without further notice.
10
ENG
Product registration
Please consider registering your product with Electrocompaniet.
Registering will make sure you are informed about important information about your Electrocompaniet
product, including notifications when a new firmware version is available for your system.
Please go to http://members.electrocompaniet.no register your product.
If Service is needed
Your dealer will have all relevant information regarding the service centers in your area, and will ensure that
your unit is serviced with minimum delay. It is our general policy to have your unit returned to you within five
working days. This is an average time, and can vary locally, depending on the workload at that particular
service station. If, for some reason, there are no service facilities available in your country, please ship the
unit to the following address:
Electrocompaniet as,
Breivikveien 7,
N-4120 Tau,
Norway
Web: www.electrocompaniet.no
Service department: www.electrocompaniet.no/support
The end user is responsible for all shipping charges, insurance, re-importation and duty charges.
When shipping a product to the factory for service, always include the following:
1.
2.
3.
4.
A sales slip or other proof of purchase if repair is claimed under warranty.
A proforma invoice with value of goods, stating that the ECG 1 is returned to Norway for repair.
An accompanying letter describing faults, symptoms, or problems with the unit.
Always ship the unit in its original carton and packaging material to prevent damage in transit.
Electrocompaniet will not cover damages incurred in transit. If you require further information concerning the
operation of the unit, or if you have any questions related to service, please do not hesitate to contact your
dealer or your national distributor.
User Manual Updates Online
An updated version of the User Manual may be available online at the Electrocompaniet web site.
Occasional updates are needed to reflect new features added to the player since the User Manual was
printed. As future firmware updates bring in new features and functions, the online version of the User
Manual will be updated accordingly.
11
DEALER
STICKER
HERE
LOCAL DEALER
Warning!
To avoid risk of fire or electric shock, do not expose this appliance to rain or moisture.
Verify line voltage before use.
Do not remove cover. No user serviceable parts inside.
Refer servicing to qualified service personal.
The warranty is void if the product is tampered with by non-authorised personnel.
Use only authorized Electrocompaniet service center.
Made in Norway
www.electrocompaniet.no