1
OPERATING INSTRUCTIONS
Personal Computer
Model No.
CF-T8 series
Contents
On-screen Manual .......................................17
Handling and Maintenance .............................18
Expanding Memory ......................................21
Intel® Active Management Technology ...............23
Troubleshooting
Troubleshooting (Basic)/Error Code/Message .......25
Hardware Diagnostics...................................29
Useful Information
Useful Information
Troubleshooting
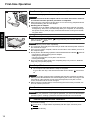
Introduction .................................................2
Read Me First ..............................................3
Description of Parts .....................................11
First-time Operation .....................................13
Getting Started
Getting Started
For further information about the computer, you can refer to the on-screen
manual.
To access the on-screen manual Î page
17 “On-screen Manual”
For your technical support office, refer to
“LIMITED WARRANTY.”
Installing Windows Vista ................................31
LIMITED USE LICENSE AGREEMENT ..............33
Specifications ............................................35
LIMITED WARRANTY ..................................38
Please read these instructions carefully before using this product and save this manual for future use.
Appendix
Appendix
Introduction
Thank you for purchasing this Panasonic computer. For optimum performance and safety, please read these instructions carefully.
Terms and illustrations in these instructions
:
Conditions that may result in minor or moderate injury.
Useful and helpful information.
Enter :
Press [Enter] key.
Fn + F5 :
Press and hold [Fn] key, and then press [F5] key.
[start] - [Run] : Click [start], and then click [Run].
Î:
Page in these Operating Instructions.
CAUTION
NOTE
Î
:
:
Reference to the on-screen manuals.
Some illustrations are simplified to help your understanding and may look different from the actual unit.
If you do not log on as an administrator, you cannot use some functions or cannot display some screens.
Refer for the latest information about optional products to the catalogs, etc.
In these instructions, the names and terms are referred as follows.
• “Microsoft® Windows® XP Professional Service Pack 2 with Advanced Security Technologies” and “Microsoft®
Windows® XP Tablet PC Edition 2005” as “Windows” or “Windows XP”
• “Windows Vista® Business with Service Pack 1” as “Windows” or “Windows Vista”
z The display modes are referred as follows. ( ) indicates the terms in [Intel® Graphics Media Accelerator Driver for
mobile] screen. To display the screen, right-click the desktop and click [Graphics Properties].
• Internal LCD (Notebook): The computer’s display
• External display (Monitor): External display
• Simultaneous display (Intel (R) Dual Display Clone): The same screen is displayed on the internal LCD and the
external display.
• Extended Desktop: The extended working area across the internal LCD and the external display.
Useful Information
Getting Started
z
z
z
z
Copyright
This manual is copyrighted by Panasonic Corporation with all rights reserved. No part of this manual may be reproduced in any form without the prior written permission of Panasonic Corporation.
No patent liability is assumed with respect to the use of the information contained herein.
© Panasonic Corporation 2008
Troubleshooting
Disclaimer
Computer specifications and manuals are subject to change without notice. Panasonic Corporation assumes no liability
for damage incurred directly or indirectly from errors, omissions or discrepancies between the computer and the manuals.
Trademarks
Microsoft®, Windows®, Windows Vista®, IntelliMouse and the Windows logo are registered trademarks of Microsoft
Corporation of the United States and/or other countries.
Intel, Core, Centrino and PROSet are either registered trademarks or trademarks of Intel Corporation.
SDHC Logo is a trademark.
Appendix
Adobe, the Adobe logo and Adobe Reader are either registered trademarks or trademarks of Adobe Systems Incorporated in the United States and/or other countries.
Bluetooth™ is a trademark owned by Bluetooth SIG, Inc., U.S.A. and licensed to Panasonic Corporation.
Computrace® is a registered trademark of Absolute® Software Corp.
Panasonic is a registered trademark of Panasonic Corporation.
Names of products, brands, etc., appearing in this manual are trademarks or registered trademarks of their respective
own companies.
2
Read Me First
Useful Information
Troubleshooting
Appendix
<Only for model with a “
” mark on the bottom of the computer>
This device complies with Part 15 of the FCC Rules.
Federal Communications Commission Radio Frequency Interference Statement
Operation is subject to the following two conditions:
(1)This device may not cause harmful interference, and
Note: This equipment has been tested and found to com(2)This device must accept any interference received, includply with the limits for a Class B digital device, pursuant to
Part 15 of the FCC Rules. These limits are designed to
ing interference that may cause undesired operation.
provide reasonable protection against harmful interferResponsible Party: Panasonic Corporation of North America
ence in a residential installation. This equipment generOne Panasonic Way
ates, uses and can radiate radio frequency energy and, if
Secaucus, NJ 07094
not installed and used in accordance with the instructions,
Tel No:1-800-LAPTOP5 (1-800-527-8675)
may cause harmful interference to radio communications.
6-M-1
However, there is no guarantee that interference will not
occur in a particular installation. If this equipment does
FCC Regulation Notice for modem
cause harmful interference to radio or television recepThis equipment contains a FCC approved modem.
tion, which can be determined by turning the equipment
off and on, the user is encouraged to try to correct the
interference by one or more of the following measures:
z Reorient or relocate the receiving antenna.
z Increase the separation between the equipment and
1. This equipment complies with CFR47 Part 68 rules.
receiver.
On the computer is a label that contains, among other
z Connect the equipment into an outlet on a circuit differinformation, the FCC registration number and ringer
ent from that to which the receiver is connected.
equivalence number (REN) for this equipment. If
z Consult the Panasonic Service Center or an experirequired, this information must be provided to the teleenced radio/TV technician for help.
phone company.
Warning
2. An FCC compliant telephone cord and modular plug is
To assure continued compliance, use only shielded interprovided with this equipment. This equipment is
face cables when connecting to a computer or peripheral.
designed to be connected to the telephone network or
Also, any changes or modifications not expressly
premises wiring using a compatible modular jack
approved by the party responsible for compliance could
which is Part 68 compliant. See Installation Instrucvoid the user’s authority to operate this equipment.
tions for details.
3. The REN is used to determine the quantity of devices
FCC RF Exposure Warning:
which may be connected to the telephone line. Excesz This computer is provided with a PC Card slot that could
sive RENs on the telephone line may result in the
be used with wireless transmitter(s), which will be spedevices not ringing in response to an incoming call. In
cifically recommended, when they become available.
most, but not all area, the sum of RENs should not
Other third-party wireless transmitter(s) have not been
exceed five (5.0). To be certain of the number of
RF exposure evaluated for use with this computer and
devices that may be connected to a line, as determay not comply with FCC RF exposure requirements.
mined by the total RENs, contact the local telephone
<Only for model with wireless LAN/wireless WAN/Bluetooth>
company.
4. If your telephone equipment cause harm to the telez This equipment complies with FCC radiation exposure
phone network, the telephone company will notify you
limits set forth for an uncontrolled environment.
in advice that temporary discontinuance of service
z This equipment must be installed and operated in
may be required. But if advice notice isn’t practical, the
accordance with provided instructions and minimum
telephone company will notify the customer as soon as
1.5 cm spacing must be provided between antenna
possible. Also, you will be advised of your right to file a
and all person’s body (excluding extremities of hands,
complaint with the FCC if you believe it is necessary.
wrist and feet) during wireless modes of operation.
5. The telephone company may take changes in its faciliz This transmitter must not be co-located or operated in
ties, equipment, operations or procedures that could
conjunction with any other antenna or transmitter.
affect the operation of the equipment. If this happens
25-M-2-3
the telephone company will provide advance notice in
<Only for model with wireless LAN>
order for you to make necessary modifications to
This product is restricted to indoor use due to its operation
maintain uninterrupted service.
in the 5.15 to 5.25 GHz frequency range.
6. If trouble is experienced with this equipment, for repair
FCC requires this product to be used indoors for the freor warranty information, please contact Panasonic
Corporation of North America at DIAL TOLL FREE 1quency range 5.15 to 5.25 GHz to reduce the potential for
800-LAPTOP5 (1-800-527-8675). If the equipment is
harmful interference to co-channel Mobile Satellite syscausing harm to the telephone network, the telephone
tems.
company may request that you disconnect the equipHigh power radars are allocated as primary users of the
ment until the problem is resolved.
5.25 to 5.35 GHz and 5.65 to 5.85 GHz bands. These
7. There are no user serviceable parts contained in this
radar stations can cause interference with and /or damequipment.
age this product.
Getting Started
Models for U.S.A.
25-M-W-1
3
Read Me First
Getting Started
8. This equipment may not be used on coin service provided by the telephone company. Connection to party
lines is subject to state tariffs.
9. The Telephone Consumer Protection Act of 1991
makes it unlawful for any person to use a computer or
other electronic device to send any message via a
telephone fax machine unless such message clearly
contains in a margin at the top or bottom of each transmitted page or on the first page of the transmission,
the date and time it is sent and an identification of the
business or other entry, or other individual sending the
message and the telephone number of the sending
machine or such business, other entity, or individual. In
order to program this information into your fax software, you should refer to the manual of the Fax software being used.
10.According to the FCC’s electrical safety advisory, we
recommend that you may install an AC surge arrestor
in the AC outlet to which this equipment is connected.
Telephone companies report that electrical surges,
typically lightning transients, are very destructive to
customer terminal equipment connected to AC power
sources and that this is a major nationwide problem.
“Caution : To reduce the risk of fire, use only No.26 AWG or
larger telecommunication line cord.”
“ATTENTION : Pour réduire le risque d’incendie, utiliser
uniquement des conducteurs de télécommunications 26
AWG ou de section supérieure.”
16-M-1
Notice for the products using LCD
This product has a fluorescent lamp that contains mercury. Disposal may be regulated in your community due to
environmental considerations.
For disposal or recycling information, please contact your
local authorities, or the Electronic Industries Alliance:
<http://www.eiae.org/>
24-M-1
<For USA-California Only>
This product contains a CR Coin Cell Lithium Battery
which contains Perchlorate Material- special handling
may apply.
See http://www.dtsc.ca.gov/hazardouswaste/perchlorate/
38-M-1
Useful Information
Safety Precautions
<Only for model with wireless WAN>
The following safety precautions must be observed during all phases of the operation, usage, service or repair of any
Personal Computer or Handheld Computer incorporating Wireless WAN. Manufacturers of the cellular terminal are
advised to convey the following safety information to users and operating personnel and to incorporate these guidelines
into all manuals supplied with the product. Failure to comply with these precautions violates safety standards of design,
manufacture and intended use of the product. Panasonic assumes no liability for customer failure to comply with these
precautions.
Troubleshooting
When in a hospital or other health care facility, observe the restrictions on the use of mobiles. Switch
Personal Computer or Handheld Computer incorporating Wireless WAN off, if instructed to do so by the
guidelines posted in sensitive areas. Medical equipment may be sensitive to RF energy. The operation of
cardiac pacemakers, other implanted medical equipment and hearing aids can be affected by interference
from Personal Computer or Handheld Computer incorporating Wireless WAN placed close to the device. If in
doubt about potential danger, contact the physician or the manufacturer of the device to verify that the
equipment is properly shielded. Pacemaker patients are advised to keep their Personal Computer or
Handheld Computer incorporating Wireless WAN away from the pacemaker, while it is on.
Switch off Personal Computer or Handheld Computer incorporating Wireless WAN before boarding an
aircraft. Make sure it cannot be switched on inadvertently. The operation of wireless appliances in an aircraft
is forbidden to prevent interference with communications systems. Failure to observe these instructions may
lead to the suspension or denial of cellular services to the offender, legal action, or both.
Appendix
Do not operate Personal Computer or Handheld Computer incorporating Wireless WAN in the presence of
flammable gases or fumes. Switch off the cellular terminal when you are near petrol stations, fuel depots,
chemical plants or where blasting operations are in progress. Operation of any electrical equipment in
potentially explosive atmospheres can constitute a safety hazard.
Your Personal Computer or Handheld Computer incorporating Wireless WAN receives and transmits radio
frequency energy while switched on. Remember that interference can occur if it is used close to TV sets,
radios, computers or inadequately shielded equipment. Follow any special regulations and always switch off
Personal Computer or Handheld Computer incorporating Wireless WAN wherever forbidden, or when you
suspect that it may cause interference or danger.
Road safety comes first! Do not use a Personal Computer or Handheld Computer incorporating Wireless
WAN while driving a vehicle. Do not place the computer with Wireless WAN in an area where it could cause
personal injury to the driver or passengers. It is recommended to stow the unit in the boot or secure stowage
area while driving. Do not place the computer with Wireless WAN in an area over an air bag or in the vicinity
where an air bag may deploy. Air bags inflate with great force and if the computer with Wireless WAN is
placed in the air bag deployment area may be propelled with great force and cause serious injury to
occupants of the vehicle.
4
IMPORTANT!
Personal Computer or Handheld Computer incorporating Wireless WAN operate using radio signals and
cellular networks cannot be guaranteed to connect in all conditions. Therefore, you should never rely solely
upon any wireless device for essential communications, for example emergency calls.
Remember, in order to make or receive calls, Personal Computer or Handheld Computer incorporating
Wireless WAN must be switched on and in a service area with adequate cellular signal strength.
Some networks do not allow for emergency calls if certain network services or phone features are in use (e.g.
lock functions, fixed dialing etc.). You may need to deactivate those features before you can make an
emergency call.
Some networks require that a valid SIM card be properly inserted in Personal Computer or Handheld
Computer incorporating Wireless WAN.
“NOTICE: The Industry Canada label identifies certified equipment. This certification means that the equipment meets telecommunications network protective, operational and safety
requirements as prescribed in the appropriate Terminal Equipment Technical Requirements document(s). The Department
does not guarantee the equipment will operate to the user’s
satisfaction.
Before installing this equipment, users should ensure that it is
permissible to be connected to the facilities of the local telecommunications company. The equipment must also be
installed using an acceptable method of connection. The customer should be aware that compliance with the above conditions may not prevent degradation of service in some
situations.
Repairs to certified equipment should be coordinated by a representative designated by the supplier. Any repairs or alterations made by the user to this equipment, or equipment
malfunctions, may give the telecommunications company
cause to request the user to disconnect the equipment.
Users should ensure for their own protection that the electrical
ground connections of the power utility, telephone lines and
internal metallic water pipe system, if present, are connected
together. This precaution may be particularly important in rural
areas. Caution: Users should not attempt to make such connections themselves, but should contact the appropriate electric inspection authority, or electrician, as appropriate.”
“NOTICE: The Ringer Equivalence Number (REN) assigned to
each terminal device provides an indication of the maximum
number of terminals allowed to be connected to a telephone
interface. The termination on an interface may consist of any
combination of devices subject only to the requirement that the
sum of the Ringer Equivalence Numbers of all the devices
does not exceed 5.”
REN: See bottom of the computer
“AVIS: L’étiquette d’Industrie Canada identifie le matériel
homologué. Cette étiquette certifie que le matériel est conforme aux normes de protection, d’exploitation et de sécurité
des réseaux de télécommunications, comme le prescrivent les
documents concernant les exigences techniques relatives au
matériel terminal. Le Ministère n’assure toutefois pas que le
matériel fonctionnera à la satisfaction de l’utilisateur.
Avant d’installer ce matériel, l’utilisateur doit s’assurer qu’il est
permis de le raccorder aux installations de l’entreprise locale
de télécommunication. Le matériel doit également être installé
en suivant une méthode acceptée de raccordement.
L’abonné ne doit pas oublier qu’il est possible que la conformité aux conditions énoncées ci-dessus n’empêche pas la
dégradation du service dans certaines situations.
Les réparations de matériel homologué doivent être coordonnées par un représentant désigné par le fournisseur.
L’entreprise de télécommunications peut demander à l’utilisateur de débrancher un appareil à la suite de réparations ou
de modifications effectuées par l’utilisateur ou à cause de
mauvais fonctionnement.
Pour sa propre protection, l’utilisateur doit s’assurer que tous
les fils de mise à la terre de la source d’énergie électrique, des
lignes téléphoniques et des canalisations d’eau métalliques,
s’il y en a, sont raccordés ensemble. Cette précaution est particulièrement importante dans les régions rurales. Avertissement: L’utilisateur ne doit pas tenter de faire ces
raccordements lui-même; il doit avoir recours à un service
d’inspection des installations électriques, ou à un électricien,
selon le cas.”
“AVIS: L’indice d’équivalence de la sonnerie (IES) assigné à
chaque dispositif terminal indique le nombre maximal de terminaux qui peuvent être raccordés à une interface. La terminaison d’une interface téléphonique peut consister en une
combinaison de quelques dispositifs, à la seule condition que
la somme d’indices d’équivalence de la sonnerie de touts les
dispositifs n’excède pas 5.”
IES: Voir sous le fond de l’ordinateur
Useful Information
EQUIPMENT ATTACHEMENT LIMITATIONS
RESTRICTIONS CONCERNANT LE RACCORDEMENT
DE MATÉRIEL
Troubleshooting
Industry Canada (IC) Notice for modem
This equipment contains an Industry Canada approved
modem unit.
The Industry Canada label is affixed on the modem unit.
Appendix
Models for Canada
Getting Started
27-1-2
17-Ca-1
5
Read Me First
Canadian ICES-003
This Class B digital apparatus complies with Canadian
ICES-003.
Cet appareil numérique de la classe B est conforme à la
norme NMB-003 du Canada.
7-M-2
<Only for model with wireless LAN/Bluetooth>
Industry Canada
Operation is subject to the following two conditions;
(1) this device may not cause interference, and
(2) this device must accept any interference, including
interference that may cause undesired operation of
the device.
<Only for model with wireless LAN>
This product (local network devices) for the band 51505250 MHz is only indoor usage to reduce potential for
harmful interference to co-channel Mobile Satellite systems.
High power radars are allocated as primary users (meaning they have priority) of 5250-5350 MHz and 5650-5850
MHz and these radars could cause interference and/or
damage to LELAN devices.
30-Ca-2-1
Getting Started
30-Ca-1-1
Models for Europe
<Only for model with a “CE” mark on the bottom of the computer>
Useful Information
Declaration of Conformity (DoC)
“Hereby, we declare that this Personal Computer is in compliance with the essential requirements
and other relevant provisions of the Directive 1999/5/EC.”
Hint:
If you want to get a copy of the original DoC of our products which relates to the R&TTE, please contact our web address: http://www.doc.panasonic.de
Contact and Pursuant to at the directive 2004/108/EC, article 9(2)
Panasonic Testing Centre
Panasonic Service Europe, a division of
Panasonic Marketing Europe GmbH
Winsbergring 15, 22525 Hamburg, Germany
Troubleshooting
Network connection.
The terminal equipment is intended for connection to the following public network;
In all the countries of European Economical Area;
- Public Switched Telephony Networks
Technical Features.
The terminal equipment includes the following features;
- DTMF dialing
- Maximum bitrate receiving mode: 56 kbit/s
- Maximum bitrate sending mode: 33.6 kbit/s
Appendix
18-E-1
6
When using your telephone equipment, basic safety precautions should always be followed to reduce the risk of
fire, electric shock and injury to persons, including the following:
1. Do not use this product near water, for example, near
a bath tub, wash bowl, kitchen sink or laundry tub, in a
wet basement or near a swimming pool.
2. Avoid using a telephone (other than a cordless type)
during an electrical storm. There may be a remote risk
of electric shock from lightning.
3. Do not use the telephone to report a gas leak in the
vicinity of the leak.
4. Use only the power cord and batteries indicated in this
manual. Do not dispose of batteries in a fire. They may
explode. Check with local codes for possible special
disposal instructions.
SAVE THESE INSTRUCTIONS
19-E-1
Certaines mesures de sécurité doivent être prises pendant l’utilisation de matérial téléphonique afin de réduire
les risques d’incendie, de choc électrique et de blessures.
En voici quelquesunes:
1. Ne pas utiliser l’appareil près de l’eau, p.ex., près d’une
baignoire, d’un lavabo, d’un évier de cuisine, d’un bac à
laver, dans un sous-sol humide ou près d’une piscine.
2. Éviter d’utiliser le téléphone (sauf s’il s’agit d’un appareil
sans fil) pendant un orage électrique. Ceci peut présenter
un risque de choc électrique causé par la foudre.
3. Ne pas utiliser l’appareil téléphonique pour signaler
une fuite de gaz s’il est situé près de la fuite.
4. Utiliser seulement le cordon d’alimentation et le type de
piles indiqués dans ce manual. Ne pas jeter les piles
dans le feu: elles peuvent exploser. Se conformer aux
règlements pertinents quant à l’élimination des piles.
CONSERVER CES INSTRUCTIONS
19-F-1
Getting Started
Important Safety Instructions / Importantes Mesures De Sécurité
Regulatory Information
We are not responsible for any radio or television interference caused by unauthorized modification of this product.
The correction of interference caused by such unauthorized modification will be the responsibility of the user. We
and its authorized resellers or distributors are not liable for
damage or violation of government regulations that may
arise from failing to comply with these guidelines.
Informations concernant la réglementation
Nous déclinons toute responsabilité pour toute interférence
radio ou télévision causée par des modifications non
autorisées apportées à ce produit. La correction d’interférences causées par de telles modifications non autorisées
sera la seule responsabilité de son utilisateur. Nousmêmes, les
revendeurs officiels et les distributeurs ne sommes pas responsable de tout dégât ou de toute violation des règlements de
l’État pouvant découler du non-respect de ces directives.
26-M-1
Troubleshooting
<Uniquement les modèles avec réseau local sans fil,
réseau large sans fil et/ou Bluetooth>
Ce produit et votre santé
Ce produit, comme tout autre appareil radio, émet de l’énergie radioélectrique. Toutefois, la quantité d’énergie émise par
ce produit est beaucoup moins importante que l’énergie
radioélectrique émise par des appareils sans fil tels que les
téléphones portables. L’utilisation de ce produit ne comporte
aucun risque pour le consommateur du fait que cet appareil
opère dans les limites des directives concernant les normes
et les recommandations de sécurité sur les fréquences radio.
Ces normes et recommandations reflètent le consensus de
la communauté scientifique et résultent de délibérations de
jurys et comités de scientifiques qui examinent et interprètent
continuellement les nouveautés de la vaste littérature sur les
recherches effectuées. Dans certaines situations ou environnements, l’utilisation de ce produit peut être restreinte par le
propriétaire du bâtiment ou par les représentants responsables de l’organisation. Ces situations peuvent être les suivantes par exemple :
z A bord d’un avion, ou
z Dans tout autre environnement où les risques d’interférence sur d’autres appareils ou services sont perçus
ou identifiables comme dangereux.
Si vous n’êtes pas sûr de la réglementation applicable à
l’utilisation d’appareils sans fil dans une organisation ou
un environnement spécifique, (par exemple dans un
aéroport) nous vous invitons à demander l’autorisation
d’utiliser ce produit avant sa mise en marche.
Appendix
<Only for model with wireless LAN/wireless WAN/Bluetooth>
This product and your Health
This product, like other radio devices, emits radio frequency electromagnetic energy. The level of energy emitted by this product however is far much less than the
electromagnetic energy emitted by wireless devices like
for example mobile phones.
Because this product operates within the guidelines found
in radio frequency safety standards and recommendations, we believe this product is safe for use by consumers. These standards and recommendations reflect the
consensus of the scientific community and result from
deliberations of panels and committees of scientists who
continually review and interpret the extensive research literature.
In some situations or environments, the use of this product may be restricted by the proprietor of the building or
responsible representatives of the organization. These situations may for example include:
z Using this product on board of airplanes, or
z In any other environment where the risk of interference
to other devices or services is perceived or identified
as harmful.
If you are uncertain of the policy that applies on the use of
wireless devices in a specific organization or environment
(e.g. airports), you are encouraged to ask for authorization to use this product prior to turning on the product.
Useful Information
Information to the User / Informations destinées aux utilisateurs
26-F-1
7
Read Me First
Lithium Battery / Pile au lithium
Lithium Battery!
This computer contains a lithium battery to enable the
date, time, and other data to be stored. The battery should
only be exchanged by authorized service personnel.
Warning! A risk of explosion from incorrect installation or
misapplication may possibly occur.
15-E-1
Pile au lithium!
Le micro-ordinateur renferme une pile au lithium qui permet de sauvegarder certaines données, notamment la
date et l’heure. La pile ne doit être remplacée que par un
technicien qualifié.
Danger ! Risque d’explosion en cas de non respect de
cette mise en garde!
15-F-1
Information on Disposal in other Countries outside the European Union
Getting Started
These symbols are only valid in the European Union.
If you wish to discard this product, please contact your local authorities or dealer and ask
for the correct method of disposal.
Useful Information
53-M-1
Precautions
THIS PRODUCT IS NOT INTENDED FOR USE AS, OR AS
PART OF, NUCLEAR EQUIPMENT/SYSTEMS, AIR TRAFFIC CONTROL EQUIPMENT/SYSTEMS, OR AIRCRAFT
COCKPIT EQUIPMENT/SYSTEMS*1. PANASONIC WILL
NOT BE RESPONSIBLE FOR ANY LIABILITY RESULTING
FROM THE USE OF THIS PRODUCT ARISING OUT OF
THE FOREGOING USES.
Troubleshooting
AIRCRAFT COCKPIT EQUIPMENT/SYSTEMS include Class2
Electrical Flight Bag (EFB) Systems and Class1 EFB Systems
when used during critical phases of flight (e.g., during take-off and
landing) and/or mounted on to the aircraft. Class1 EFB Systems
and 2 EFB Systems are defined by FAA: AC (Advisory Circular)
120-76A or JAA: JAA TGL (Temporary Guidance Leaflets) No.36.
Panasonic cannot guarantee any specifications, technologies, reliability, safety (e.g. Flammability/Smoke/
Toxicity/Radio Frequency Emission, etc) requirements
related to aviation standards that exceed the specifications of our COTS (Commercial-Off-The-Shelf) products.
Appendix
*1
This computer is not intended for use in medical equipment including life-support systems, air traffic control systems, or other equipment, devices or systems that are
involved with ensuring human life or safety. Panasonic
cannot be held responsible in any way for any damages
or loss resulting from the use of this computer in these
types of equipment, devices or systems, etc.
39-E-1
If a Malfunction Occurs, Immediately Unplug the AC
Plug and the Battery Pack
• This product is damaged
• Foreign object inside this product
• Smoke emitted
• Unusual smell emitted
• Unusually hot
Continuing to use this product while any of the above conditions are present may result in fire or electric shock.
8
• If a malfunction occurs, immediately turn the power off and
unplug the AC plug, and then remove the battery pack.
Then contact your technical support office.
Do Not Touch This Product and Cable When It Starts
Thundering
Electric shock may result.
Do Not Connect the AC Adaptor to a Power Source
Other Than a Standard Household AC Outlet
Otherwise, a fire due to overheating may result. Connecting to a DC/AC converter (inverter) may damage the AC
adaptor. On an airplane, only connect the AC adaptor/
charger to an AC outlet specifically approved for such
use.
Do Not Do Anything That May Damage the AC Cord,
the AC Plug, or the AC Adaptor
Do not damage or modify the cord, place it near hot tools,
bend, twist, or pull it forcefully, place heavy objects on it,
or bundle it tightly.
Continuing to use a damaged cord may result in fire, short
circuit, or electric shock.
Do Not Pull or Insert the AC Plug If Your Hands Are Wet
Electric shock may result.
Clean Dust and Other Debris of the AC Plug Regularly
If dust or other debris accumulates on the plug, humidity,
etc. may cause a defect in the insulation, which may result
in a fire.
• Pull the plug, and wipe it with a dry cloth.
Pull the plug if the computer is not being used for a long
period of time.
Insert the AC Plug Completely
If the plug is not inserted completely, fire due to overheating or electric shock may result.
• Do not use a damaged plug or loose AC outlet.
Do Not Place This Product on Unstable Surfaces
If balance is lost, this product may fall over or drop, resulting in an injury.
Avoid Stacking
If balance is lost, this product may fall over or drop, resulting in an injury.
Do Not Keep This Product Wherever There is a Lot of
Water, Moisture, Steam, Dust, Oily Vapors, etc.
Otherwise, possibly resulting in fire or electric shock.
Do Not Leave This Product in High Temperature Environment for a Long Period of Time
Leaving this product where it will be exposed to extremely
high temperatures such as near fire or in direct sunlight
may deform the cabinet and/or cause trouble in the internal parts. Continued use in such a resulting condition may
lead to short-circuiting or insulation defects, etc. which
may in turn lead to a fire or electric shocks.
Do Not Block the Ventilation Hole
Otherwise, heat will build up inside, possibly resulting in a fire.
Use the Modem with a Regular Telephone Line
Connection to an internal phone line (on-premise
switches) of a company or business office, etc. or to a digital public phone or use in a country or area not supported
by the computer may result in a fire or electric shocks.
Do Not Connect a Telephone Line, or a Network Cable
Other Than the One Specified, into the LAN Port
If the LAN port is connected to a network such as the
ones listed below, a fire or electric shock may result.
• Networks other than 1000BASE-T, 100BASE-TX or
10BASE-T
• Phone lines (IP phone (Internet Protocol Telephone),
Telephone lines, internal phone lines (on-premise
switches), digital public phones, etc.)
Do Not Use with Exposing the Skin to This Product
for a Long Period of Time
Using this product with exposing the skin to the heat
source of this product or AC adaptor for a long period of
time can cause a low-temperature burn.
z Do not place the computer near a television or radio
receiver.
z Keep the computer away from magnets. Data stored
on the hard disk may be lost.
Getting Started
Keep SD Memory Cards Away from Infants and Small
Children
Accidental swallowing will result in bodily injury.
• In the event of accidental swallowing, see a doctor immediately.
Do Not Turn the Volume Up to Loud When Using
Headphones
Listening at high volumes that overstimulate the ear for
long periods of time may result in loss of hearing.
Useful Information
Do Not Disassemble This Product
There are high-voltage areas inside which may give you
an electric shock if you should touch them. Do not touch
the pins and circuit boards inside, and do not allow foreign
matter to enter inside.
Also, remodeling or disassembly may cause a fire.
Take a Break of 10-15 Minutes Every Hour
Using this product for long periods of time may have detrimental health effects on the eyes or hands.
Troubleshooting
Do Not Place Containers of Liquid or Metal Objects on
Top of this Product
If water or other liquid spills, or if paper clips, coins, or foreign matter get inside this product, fire or electric shock
may result.
• If water spills in the keyboard, refer to page 20. If other
foreign matter has found its way inside, immediately
turn the power off and unplug the AC plug and remove
the battery pack. Then contact your technical support
office.
Do Not Move This Product While the AC Plug Is Connected
The AC cord may be damaged, resulting in fire or electric
shock.
• If the AC cord is damaged, unplug the AC plug immediately.
Appendix
Hold the Plug When Unplugging the AC Plug
Pulling on the cord may damage the cord, resulting in a
fire or electric shock.
Use Only the Specified AC Adaptor With This Product
Using an AC adaptor other than the one supplied
(attached to your product or supplied by Panasonic) may
result in a fire.
Do Not Subject the AC Adaptor to Any Strong Impact
Using the AC adaptor after a strong impact such as being
dropped may result in electric shock, short circuit, or fire.
9
Read Me First
Precautions (Battery Pack)
Appendix
Troubleshooting
Useful Information
Getting Started
Do Not Use with Any Other Product
The battery pack is rechargeable and was intended for
the specified product. If it is used with a product other
than the one for which it was designed, electrolyte leakage, generation of heat, ignition or rupture may result.
Do Not Charge the Battery Using Methods Other Than
Those Specified
If the battery is not charged using one of the specified
methods, electrolyte leakage, generation of heat, ignition
or rupture may result.
Do Not Throw the Battery Pack into a Fire or Expose It
to Excessive Heat
Generation of heat, ignition or rupture may result.
Avoid Extreme Heat (Near the Fire, in Direct Sunlight,
for Example)
Electrolyte leakage, generation of heat, ignition or rupture
may result.
Do Not Insert Sharp Objects into the Battery Pack,
Expose It to Bumps or Shocks, Disassemble, or Modify It
Electrolyte leakage, generation of heat, ignition or rupture
may result.
• If this product is subjected to a strong impact, stop using
it immediately.
approx. 95% (when Economy Mode (ECO) is enabled:
75%) of capacity.
z The battery pack is not charged when the computer is
first purchased. Be sure to charge it before using it for
the first time. When the AC adaptor is connected to
the computer, charging begins automatically.
z Should the battery leak and the fluid get into your
eyes, do not rub your eyes. Immediately flush your
eyes with clear water and see a doctor for medical
treatment as soon as possible.
NOTE
z The battery pack may become warm during recharging or normal use. This is completely normal.
z Recharging will not commence if internal temperature of the battery pack is outside of the allowable
temperature range (0 °C to 55 °C {32 °F to
z
Do Not Short the Positive (+) and Negative (-) Contacts
Generation of heat, ignition or rupture may result.
• Do not place the battery pack together with articles such as
necklaces or hairpins when carrying or storing.
z
Do Not Use This Product with a Battery Pack Other
Than the One Specified
Use only the specified battery pack (CF-VZSU51W/CFVZSU52W) with your product. Use of battery packs other than
those manufactured and supplied by Panasonic may present
a safety hazard (generation of heat, ignition or rupture).
z
When the Battery Pack Has Become Degraded,
Replace It with a New One
Continued use of a degraded battery pack may generate
high levels of heat, cause a fire to start and cause the
pack to burst or explode.
z Do not touch the terminals on the battery pack. The
battery pack may no longer function properly if the
contacts are dirty or damaged.
z Do not expose the battery pack to water, or allow it to
become wet.
z If the battery pack will not be used for a long period of
time (a month or more), charge or discharge (use) the
battery pack until the remaining battery level becomes
30% to 40% and store it in a cool, dry place.
z This computer prevents overcharging of the battery by
recharging only when the remaining power is less than
z
131 °F}). (Î
Reference Manual “Battery
Power”) Once the allowable range requirement is
satisfied, charging begins automatically. Note that
the recharging time varies based on the usage
conditions. (Recharging takes longer than usual
when the temperature is 10 °C {50 °F} or below.)
In high-temperature environments, the battery takes
longer to fully recharge. In low-temperature environments, the battery takes longer to fully recharge and
the operating time is shorter. Only use the computer
within the allowable temperature range.
The battery pack is a consumable item. If the
amount of time the computer can be run by using a
particular battery pack becomes dramatically
shorter and repeated recharging does not restore
its performance, the battery pack should be
replaced with a new one.
When transporting a spare battery inside a package,
briefcase, etc., it is recommended that it be placed in
a plastic bag so that its contacts are protected.
Always power off the computer when it is not in
use. Leaving the computer on when the AC adaptor is not connected will exhaust the remaining battery capacity.
A lithium ion battery that is recyclable powers the product you
have purchased.
Please call 1-800-8-BATTERY
for information on how to recycle
this battery.
L’appareil que vous vous êtes
procuré est alimenté par une batterie au lithium-ion.
Pour des renseignements sur le
recyclage de la batterie, veuillez
composer le 1-800-8-BATTERY.
48-M-1
10
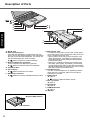
Description of Parts
A
B
M
E
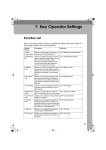
A :Function Key
Î
Reference Manual “Key Combinations”
B :Keyboard
C :Touch Pad
Î
Reference Manual “Using the Touch Pad”
D :Bluetooth Antenna
<Only for model with Bluetooth>
Î
Reference Manual “Bluetooth”
E : Wireless LAN Antenna
<Only for model with wireless LAN>
Î
Reference Manual “Wireless LAN”
F : Power Switch
Î page 14
Power Indicator
• Off: Power off/Hibernation
• Green: Power on
• Blinking green: Standby
G :Wireless Switch
Switch the wireless devices to on (right side) or to off
(left side).
<Only for model with wireless LAN/wireless WAN/Bluetooth>
Î
Reference Manual “Disabling/Enabling Wireless Communication”
H :LED Indicator
: SD/SDHC Memory Card status
: Caps lock
: Numeric key (NumLk)
: Scroll lock (ScrLk)
: Hard disk drive status
ECO : Economy Mode (ECO) status
Î
Reference Manual “Battery Power”
I : LCD/Touchscreen
Î
Reference Manual “Using the Touchscreen”
J : Security Lock
You can connect a Kensington cable. Refer to the instruction manual of the cable. The security lock and cable is a
theft prevention device. Panasonic Corporation will bear
no responsibility in the event of theft.
K :Modem Port
• Be sure to use the included modem telephone
cable.
Î
Reference Manual “Modem”
L : LAN Port
If the Mini Port Replicator is connected to the computer, connect the LAN cable to the LAN port on the
Mini Port Replicator. You cannot use the LAN port on
the computer.
Î
Reference Manual “LAN”
M :USB Ports
Î
Reference Manual “USB Devices”
Getting Started
K
L
Useful Information
J
Troubleshooting
E
F
G
H
I
Appendix
C
D
: Battery status
Î
Reference Manual “Battery Power”
11
Description of Parts
A
B
EXT. C
D
E
F
G
H
M
Getting Started
I
J
K
A :DC-IN Jack
B :External Display Port
If the Mini Port Replicator is connected to the computer, connect the external display to the external display port on the Mini Port Replicator. You cannot use
the external display port on the computer.
Î
Reference Manual “External Display”
C :Mini Port Replicator Connector
Connect the Mini Port Replicator (optional).
Î
Reference Manual “Mini Port Replicator”
D :Ventilation Hole
E : PC Card Slot
Î
Reference Manual “PC Cards”
F : SD Memory Card Slot
Î
Reference Manual “SD/SDHC Memory Card”
G :Microphone Jack
A condenser microphone can be used. If other types
of microphones are used, audio input may not be possible, or malfunctions may occur.
• When recording in stereo using a stereo microphone: Click
[start] - [All Programs] - [SoundMAX] - [Control Panel] and
select [Microphone], and then select [No Filtering] in [Microphone Enhancements].
• When using a monaural microphone with a 2-terminal plug:
Click [start] - [All Programs] - [SoundMAX] - [Control Panel]
and select [Microphone], and then select [Voice Recording] in
[Microphone Enhancements]. Otherwise only audio on the left
track will be heard when recorded in stereo.
H :Headphone Jack
You can connect headphones or amplified speakers.
When they are connected, audio from the internal
speakers is not heard.
I : Battery Pack
Î page 13
Î
Reference Manual “Battery Power”
J : Battery Latches
Î page 13
K :Hand Strap
Î page 15
L : RAM Module Slot
Î page 21
M :Speaker
<Only for model with wireless WAN>
Wireless WAN Antenna
SIM Card Slot
12
L
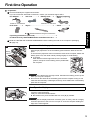
First-time Operation
Preparation
A Check and identify the supplied accessories.
If you do not find the described accessories, contact your technical support office.
• AC Adaptor . . . . 1 • AC Cord . . . . . . 1 • Battery Pack . . .1 • Modem Telephone
Cable . . . . . . . . . 1
Model No: CF-AA6373A
• Operating Instructions (This book) . . . . . . . . . . . . . . . . . . . . . . . . .1
• Product Recovery DVD-ROM Windows Vista® Business SP 1 . .1
B Read the LIMITED USE LICENSE AGREEMENT before breaking the seal on the computer’s packaging
(Î page 33).
1
1
Insert the battery pack.
Slide the battery pack in parallel with the arrow direction and attach it so that the
left and right projections on the new battery pack match the dents of the computer.
In case that the projection does not match the dents of the computer, detach the
battery pack once, then slide it while pushing it lightly to avoid floating.
z To remove
Slide both the left and right latches to the unlocked
position, and push out the battery pack in parallel with
the computer.
Battery
Latches
CAUTION
z Make sure the latches are securely locked. Otherwise the battery pack may fall
when you carry the computer.
z Do not touch the terminals of the battery pack and the computer. Doing so can
make the terminals dirty or damaged, and may cause malfunction of the battery
pack and the computer.
2
2
Open the display.
Hold the side of the computer with either of your hands and then hold and lift the
(A) part to open the display.
<Only for model with wireless WAN>
z Be careful not to press the SIM card slot cover (B) by mistake.
B
A
Getting Started
Reference Manual “Using the Touchscreen”
Useful Information
Î
• Tether. . . . . . . . . 1
Troubleshooting
• Stylus . . . . . . . . . . . . . . . . . . . . . . . . . . 1
Appendix
• Soft Cloth . . . . . 1
Model No: CF-VZSU51W
CAUTION
z Do not open the display wider than necessary (140° or more), and do not apply
excessive pressure to the LCD. Do not open or close the computer holding the
edge of the LCD segment.
13
First-time Operation
3
3
Connect your computer to a power outlet.
The battery charging starts automatically.
CAUTION
Getting Started
z Do not disconnect the AC adaptor and do not switch the wireless switch to
on until the first-time operation procedure is completed.
z When using the computer for the first time, do not connect any peripheral device
except the battery pack and AC adaptor.
z Handling the AC adaptor
• Problems such as sudden voltage drops may arise during periods of thunder
and lightning. Since this could adversely affect your computer, an uninterruptible power source (UPS) is highly recommended unless running from the battery pack alone.
4
4
Turn on the computer.
Slide and hold the power switch
power indicator
lights.
for approximately one second until the
CAUTION
z Do not slide the power switch repeatedly.
z The computer will forcibly be turned off if you slide and hold the power switch for
four seconds or longer.
z Once you turn off the computer, wait for ten seconds or more before you turn on
the computer again.
z Do not perform the following operation until the hard disk drive indicator
turns off.
• Connecting or disconnecting the AC adaptor
• Sliding the power switch
• Touching the keyboard, touch pad or touchscreen
• Closing the display
z Do not change the Setup Utility until completing step 5. If you do so, Windows
setup may not operate properly.
5
Setup Windows.
Follow the on-screen instructions.
z The computer will restart after the setup is complete.
To go to the next step, wait until the hard disk drive indicator
off.
has turned
CAUTION
z Do not turn off the computer until completing the first-time operation procedure.
z When you set date/time/time zone and click [Next], the screen may not go to the
next step for a few minutes. Do not touch the keyboard, touch pad or touchscreen, and wait until the screen changes.
z When using the included stylus, avoid touching the screen with you hands, etc.
This can cause input errors.
6
Create a new account.
Click [start] - [Control Panel] - [User Accounts] - [Create a new account].
CAUTION
z Remember your password. If you forget the password, you cannot use the Windows
operation system. Creating a password reset disk beforehand is recommended.
7
Perform the touchscreen calibration.
A Click [start] - [All Programs] - [Fujitsu Touch Panel (USB)] - [Touch Screen
Calibration Utility].
B Touch the 9 “+” target marks sequentially with the stylus, and then press
Enter.
C Click [Save & Exit].
14
When using the supplied battery pack (CF-VZSU51W)
• In standby: Approx. 3 days (If “Wake Up from wired
LAN” is enabled: 2 days)*2
• In hibernation: Approx.1.5 months (If “Wake Up
from wired LAN” is enabled: 3 days)*2
• When power is off: Approx. 1.5 months (If “Power
On by wired LAN” is enabled: 3 days)
*2
When using the optional battery pack (CF-VZSU52W)
• In standby: Approx. 1.5 days (If “Wake Up from
wired LAN” is enabled: 1 days)*2
• In hibernation: Approx. 0.7 months (If “Wake Up
from wired LAN” is enabled: 1.5 days)*2
• When power is off: Approx. 0.7 months (If “Power
On by wired LAN” is enabled: 1.5 days)
If “Wake Up from wired LAN” is disabled, the period of time will become slightly longer.
If “Wake Up from wireless LAN” is enabled, the period of time will become shorter.
When Starting Up/Shutting Down
z Do not do the following
• Connecting or disconnecting the AC adaptor
• Sliding the power switch
• Touching the keyboard, touch pad, touchscreen or external mouse
• Closing the display
Using the Hand Strap
Useful Information
Reference Manual “Standby or Hibernation Functions” about resuming from standby.
Troubleshooting
Refer to
z Power consumption in each mode is as follows. (When AC adaptor is connected)
• When the screen is off Approx. 10 W
• In standby Approx. 2.2 W
• The battery pack is fully charged (or not being charged) and the computer is off Approx. 0.9 W
z Note that the computer consumes electricity even when the computer power is off. If the battery pack is fully
charged, the battery will be fully discharged in the following period of time:
Appendix
*1
Getting Started
NOTE
z Regarding Windows XP
You can select the Classic view of Control Panel or the Classic Start menu. You can also change the way a user logs
on or off. This manual explains using the Windows XP default setting (not Classic view or Classic Start menu etc.).
z Windows Update
You can update to the latest patches and service packs for Windows with the following menus.
[start] - [All Programs] - [Windows Update]
Do not apply “Driver Updates” even if a message to update a driver appears. If a driver update is required,
contact your technical support office.
z If the message “Your computer might be at risk” is displayed
Select
(red icon) on the notification area and make the appropriate settings. The Windows Security Center regularly gives you notice so that you can make the optimum settings. This is not an error message and you can use the
computer. However, making appropriate measures is recommended to reduce the risk of virus and other attacks.
z PC Information Viewer
This computer periodically records the management information of the hard disk, etc. The maximum data volume for
each record is 1024 bytes. This information is only used for estimating the cause when the hard disk goes down by
any possibility. They are never sent to outside via network nor used for any other purpose except for the purpose
described the above.
To disable the function, add the check mark for [Disable the automatic save function for management information
history] in [Hard Disk Status] of PC Information Viewer, and click [OK].
When you disable the function, information on how to use the hard disk of PC Information Popup is not displayed.
(Î
Reference Manual “Check the Computer’s Usage Status” and “PC Information Popup”)
z To conserve power, the following power saving methods are set at the time of purchase. (When AC adaptor is connected)
• The screen automatically turns off after 15 minutes of inactivity.
• The computer automatically enters standby*1 after 20 minutes of inactivity.
The hand strap is convenient for computing while standing.
To carry the computer, put your hand between the computer and the
hand strap to prevent it from falling, and firmly hold the computer when
using it.
15
First-time Operation
Before Using the Stylus
At the time of purchase, the stylus (included) is not attached to the stylus
holder (A).
The tether prevents the stylus from falling accidentally. It can be attached
to the stylus holder.
A
Perform the following steps before using the stylus.
Getting Started
1
Attach the tether to
the stylus.
A
Tether
B
Stylus
2
Thread the stylus strap of the tether from (B) in the
direction of the arrow.
3
Pass the stylus through the strap.
4
Fasten the strap to the hook (C).
5
To store the stylus, push the end into (D).
CAUTION
z Do not carry the computer by gripping the stylus holder.
16
On-screen Manual
You can access the following manuals on the computer screen after completing the “First-time Operation”.
When you access the on-screen manual for the first time, the License Agreement of the Adobe Reader may be displayed. Read it carefully and select [Accept] to proceed.
Reference Manual
The Reference Manual contains the practical information to help you fully enjoy the computer’s performance.
Important Tips
The Important Tips will provide you with the helpful information about the battery. Read to use the battery pack in the
optimum condition to obtain longer operation time.
To access the Important Tips:
Double-click
on the desktop.
z Alternatively click [start] - [All Programs] - [Panasonic] - [On-Line Manuals] - [Important Tips].
Hard Disk Handling
The Hard Disk Handling will provide you with the helpful information on how to use the hard disk.
To access the Hard Disk Handling:
Click [start] - [All Programs] - [Panasonic] - [On-Line Manuals] - [Hard Disk Handling].
NOTE
z When Adobe Reader update notice is displayed, we recommend you follow the on-screen procedure to update.
See http://www.adobe.com/ for the latest version of Adobe Reader.
Useful Information
Setup Utility
Icon Enlarger
Loupe Utility
Troubleshooting (Advanced)
Check the Computer’s Usage Status
z PC Information Popup
z Protecting Your Computer from
Viruses
z Technical Information
z
z
z
z
z
Troubleshooting
SD/SDHC Memory Card
Mini Port Replicator
External Display
USB Devices
Modem
LAN
Disabling/Enabling Wireless Communication
z Wireless LAN
z Bluetooth
z
z
z
z
z
z
z
Appendix
Contents
z Read Me First
z Using the Touch Pad
z Using the Touchscreen
z Display Rotation
z Key Combinations
z Battery Power
z Computing on the Road
z Standby or Hibernation Functions
z Security Measures
z PC Cards
Getting Started
To access the Reference Manual:
Click [start] - [All Programs] - [Panasonic] - [On-Line Manuals] - [Reference manual].
17
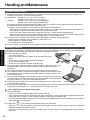
Handling and Maintenance
Getting Started
Operation Environment
z Place the computer on a flat stable surface. Do not place the computer upright. If the computer is exposed to an
extremely strong impact, it may become inoperable.
z Temperature: Operation: 5 °C to 35 °C {41 °F to 95 °F}
Storage: -20°C to 60 °C {- 4 °F to 140 °F}
Humidity:
Operation: 30% to 80% RH (No condensation)
Storage: 30% to 90% RH (No condensation)
Even within the above temperature/humidity ranges, using for a long time in an extreme environment will result in
the product deterioration and will shorten the product life.
• Be sure to use the computer in an environment with sufficient heat ventilation.
- Avoid using the computer on a highly heat retentive surfaces (e.g., rubber pads and blankets). If possible, use
the computer on surfaces that can dissipate heat, such as a steel desk.
- Do not cover the computer with towels, keyboard covers, etc., as this prevents heat dissipation.
- When using the computer, always keep the display open. (Note, however, that closing the display while the computer is in use does not cause generation of heat, ignition, or other malfunctions.)
z Do not place the computer in the following areas, otherwise the computer may be damaged.
• Near electronic equipment. Image distortion or noise may occur.
• Near magnets or in magnetic fields.
• In extremely high or low temperature.
z As the computer can become hot during operation, keep it away from items that are sensitive to heat.
Appendix
Troubleshooting
Useful Information
Handling Cautions
This computer is designed to minimize shock to parts such as the hard disk drive, but no warranty is provided against
any trouble caused by shock. Be extremely careful when handling the computer.
z When carrying the computer:
• Turn off the computer.
• Remove all external devices, cables, cards and other protruding
things.
• Do not drop or hit the computer against solid objects.
• Do not leave the display open.
• Do not pick up or hold the computer by display part.
z When you board an airplane, take the computer with you and never put it in your
checked luggage. When using the computer on airplane, follow the airline’s
instructions.
z When carrying a spare battery, put it in a plastic bag to protect its terminals.
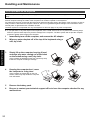
z This computer contains a magnet and magnetic products at the locations circled
in the illustration at right. Avoid leaving metallic object or magnetic media in contact with these areas.
z The touch pad is designed to be used with a finger tip. Do not place any object on
its surface and do not press down strongly with sharp-pointed or hard objects that
may leave marks (e.g., nails, pencils and ball point pens).
z Avoid any harmful substances such as oil from getting into the touch pad. The curBottom
sor may not work correctly.
z If the computer is being carried in a soft bag with the battery pack removed, avoid undue pressure on the body of the
computer in a crowded place, etc., as this may result in damage to the LCD.
If the computer becomes warm during usage
z Check the following
• If you are not using a wireless LAN, turn the wireless LAN off.
• If the computer becomes warm while the screen saver is displayed, set the screen saver to [Windows XP]. Screen
savers that use 3-D images or other complex images increase the CPU utilization rate.
• Use recommended RAM module products. Non-recommended RAM modules may not operate properly, and may
cause damage to your computer.
z Double-click
on the desktop and click [High speed], then click [OK].
• When you set [High speed], rotation of the cooling fan speeds up and the computer can be cooled down. Note that
the battery operating time will be shorter.
• When you do not frequently use CPU or the rotation noise of the fan bothers you, set [Standard] or [Low speed] as
necessary.
18
When using peripheral devices
Follow these instructions and the Reference Manual to avoid any damage to the devices. Carefully read the instruction
manuals of the peripheral devices.
z Use the peripheral devices conforming to the computer’s specifications.
z Connect to the connectors in the correct direction.
z If it is hard to insert, do not try forcibly but check the connector’s shape, direction, alignment of pins, etc.
z If screws are included, fasten them securely.
Preventing your computer from unauthorized use via wireless LAN/wireless WAN/Bluetooth
<Only for model with wireless LAN/wireless WAN/Bluetooth>
z Before using wireless LAN/wireless WAN/Bluetooth, make the appropriate security settings such as data encryption.
Computrace® Software
Computrace® software tracks your stolen computer.
z Computrace® software is not included or installed in this computer.
z Consult Absolute Software Corp. before disposal.
z Refer to the following URL for Computrace® software for installation and available service regions. Note that this
service is only available in certain regions.
http://www.absolute.com
Getting Started
<Only for model that supports TPM>
To clean areas other than the LCD panel and touch pad
Wet a soft cloth with water or a diluted kitchen cleanser (neutral), wring the cloth out thoroughly, and wipe the dirty area
gently. Using a detergent other than a neutral kitchen cleanser (e.g., a weak alkali cleanser) may adversely affect
painted surfaces.
CAUTION
z Do not use benzene, thinner, or rubbing alcohol since it may adversely affect the surface causing discoloration, etc.
Do not use commercially-available household cleaners and cosmetics, as they may contain components harmful to
the surface.
z Do not apply water or detergent directly to the computer, since liquid may enter inside of the computer and cause
malfunction or damage.
Troubleshooting
To clean the touch pad
Wipe lightly with a gauze or other dry, soft cloth.
Appendix
To clean display (LCD)
Use the soft cloth included with the computer (For more information, refer to “Suggestions About Cleaning the LCD Surface” that comes with the soft cloth.)
Cleaning the display while the power is on may cause the computer to malfunction. Also, dirt on the touchscreen is easier to see when the computer is powered off, and so is easier to clean.
Useful Information
Maintenance
19
Handling and Maintenance
If You Spill Water on the Keyboard
Note that repairs resulting from liquids being spilled on the computer are not free of charge, and not covered by warranty.
Appendix
Troubleshooting
Useful Information
Getting Started
The keyboard on this computer incorporate a drain system (a moisture protection mechanism) that minimizes the
amount of liquid reaching the inside of the computer even if water is spilled on the keyboard.
Any water that comes in contact with the keyboard is drained off through holes in the bottom of the computer, so that virtually no water is left inside the computer. However, this is not a guarantee against damage to the hard disk or other
internal parts, or against the loss or deletion of data.
The drain system is incorporated into only the keyboard. It does not apply to any other components.
20
z If you spill water or any other liquid on the keyboard, even a small amount, be sure to perform the following steps.
Failure to perform these steps may result in damage to the computer. The drain system will not provide complete
protection against water entering the computer.
1
Immediately turn off the computer, and remove the AC adaptor.
2
Wipe any water droplets off of the top of the keyboard using a
soft, dry cloth.
3
Slowly lift up the computer, keeping it level,
and wipe any water coming out of the holes
on the bottom using a soft, dry cloth.
If the computer is tilted during this step, liquid may seep
inside the computer resulting in damage.
4
Keeping the computer level, move
the computer to a dry place.
If the computer is placed back on the wet
surface, water may seep inside the computer
from the bottom.
5
Remove the battery pack.
6
Be sure to contact your technical support office to have the computer checked for any
malfunctions.
Expanding Memory
Use RAM modules that comply with the specifications below. Using any other module may cause malfunction or result
in computer failure.
RAM module specifications:
DDR2 SDRAM, 200 pins, SO-DIMM, 1.8 V, PC2-5300
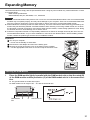
A
Inserting the RAM Module
Place the RAM module lightly in parallel with the RAM module slot so that the notch (B)
of the RAM module and the protrusion (C) of the RAM module slot is in the same direction.
z The gold terminals are visible at this point.
z RAM module is at an angle of 20° - 30° with the horizontal line.
Appendix
1
Useful Information
Preparation
A Turn off your computer.
• Do not use the standby or hibernation.
B Disconnect the AC adaptor and remove the battery pack.
C Remove the screw (A) and the cover on the bottom of the computer.
• Use the appropriate screw driver so as not to strip the thread of screw.
Troubleshooting
z Use recommended RAM module products. Do not use non-recommended RAM modules. Non-recommended RAM
modules may not operate properly, and may cause damage to your computer. Some non-recommended RAM modules may overheat, causing the cover to warp. Refer to various sources for recommended RAM module.
z RAM modules are extremely sensitive to static electricity. There are cases where static electricity generated by the
human body has adversely affected such RAM modules. When inserting or removing a RAM module, do not touch
the terminals or internal components, insert objects other than the module, or allow foreign particles to enter. Doing
so has been known to cause damage, fire or electric shock.
z Panasonic Corporation will bear no responsibility whatsoever for failures or damage caused by the use of non-recommended RAM modules, or by incorrect installation or removal of such RAM modules. Before installing a RAM
module, confirm the product type and the correct installation method.
Getting Started
CAUTION
RAM Module
Slot
B
C
Gold Terminals
21
Expanding Memory
2
Insert the RAM module parallel to the slot firmly until the gold
terminals are invisible.
z If it is hard to insert the RAM module, do not try forcibly but check the module’s direction.
Press the RAM module down until the right and left hooks (D)
lock into place.
z When pressing down the module, the right and left hooks will open slightly
and will return after locking.
z If it is hard to press down the RAM module, do not try forcibly but check the
module’s direction.
D
4
Set the cover and battery pack back.
NOTE
1
2
Carefully remove the RAM module from the slot.
3
Set the cover and battery pack back.
Appendix
Useful Information
z If the RAM module is recognized correctly, the total size of this computer’s memory and RAM module memory is displayed on the [Information] menu of the Setup Utility.
If the RAM module is not recognized, turn off the computer and insert it again.
Troubleshooting
Getting Started
3
22
Removing the RAM Module
Carefully open the left and right hooks (E).
The RAM module will be raised.
E
Intel® Active Management Technology (Intel® AMT)
<Only for model with Intel® AMT>
Intel® AMT offers the operational management function and security function through network.
Setting AMT configuration
1
Turn on the computer, and press F2 or Del while [Panasonic] boot screen is displayed.
Select the [Security] menu, and select [AMT Configuration], and press Enter.
4
Select [Intel(R) AMT] and press Enter.
5
Select [Enabled] and press Enter.
6
Select [Intel(R) ME Setup Prompt] and press Enter.
7
Select [Enabled] and press Enter.
8
Press Esc.
If you do not use the Supervisor Password, clear the Supervisor Password following steps.
A Select [Set Supervisor Password], and press Enter.
B Enter the Current Password, and press Enter.
C Press Enter when the [Create New Password] display is shown.
D Press Enter when the [Confirm New Password] display is shown.
9
Press F10.
At the confirmation message, select [Yes] and press Enter.
The computer will restart.
The following procedures are example. It is different according to your environment. Contact your technical support office.
A Press Ctrl + P when [Press <CTRL - P> to enter Intel(R) ME Setup] is shown after the [Panasonic] boot
screen disappears.
B Enter “admin” in [Intel(R) ME Password], and press Enter.
C Enter the New Password in [Intel(R) ME New Password] to change the password, and press Enter.
At confirmation massage, enter the password, and press Enter.
Write down new password to remember you password.
The password has the limitation (Î bellow).
D Select [Intel(R) ME Configuration], and press Enter.
At the confirmation message, press Y.
E Setup the items if necessary.
Confirm your system administrator about the setup items.
F Select [Return to Previous Menu] after setup is complete.
Follow the on-screen instructions.
The computer will restart.
CAUTION
Useful Information
3
Troubleshooting
If the Supervisor Password is not set, select the [Security] menu, then set Supervisor
Password.
Appendix
2
Getting Started
The Setup Utility starts up.
z If the password is requested, enter the Supervisor Password.
z You can use the following characters to set Intel(R) ME Password.
• Minimum of 8 and maximum of 32 characters are used.
• 1 or more numeric characters are included.
• 1 or more special characters (example: “!” “$”) are included (only characters that can be displayed with the US
keyboard).
• Capital letters and small letters are mixed.
23
Intel® Active Management Technology (Intel® AMT)
Installing the driver
1
Click [start] - [Run] and input “c:\util\drivers\amt\MEI\setup.exe”, then click [OK].
Follow the on-screen instructions.
2
If [SOL/IDE-R] is set to [Enabled] in the INTEL(R) AMT CONFIGURATION, click [start] [Run] and input “c:\util\drivers\amt\LMS_SOL\setup.exe”, then click [OK].
Follow the on-screen instructions.
Appendix
Troubleshooting
Useful Information
Getting Started
Resetting AMT configuration
1
Turn on the computer, and press F2 or Del while [Panasonic] boot screen is displayed.
24
The Setup Utility starts up.
z If the password is requested, enter the Supervisor Password.
2
If the Supervisor Password is not set, select the [Security] menu, then set Supervisor
Password.
3
Select the [Security] menu, and select [AMT Configuration], and press Enter.
4
Select [Intel(R) AMT] and press Enter.
5
Select [Disabled] and press Enter.
6
Press Esc.
7
Select the [Exit] menu, and select [Save Current Values], and press Enter.
At the confirmation message, select [Yes] and press Enter.
8
Select the [Security] menu, and select [AMT Configuration], and press Enter.
9
Select [Reset AMT Configuration] and press Enter.
At the confirmation message, select [Yes] and press Enter.
The computer will restart.
z If the password is requested, enter the Supervisor Password.
10
Press Y when the “Continue with unconfiguration” message will appear.
Troubleshooting (Basic)/Error Code/Message
Troubleshooting (Basic)
Follow the instructions below when a problem has occurred. There is also an advanced troubleshooting guide in the
“Reference Manual”. For a software problem, refer to the software’s instruction manual. If the problem persists, contact
Windows does not start up.
z Remove all peripheral devices (e.g. USB memory).
z If an additional RAM module has been inserted, remove the RAM module and check to
see if the RAM module is the recommended one.
z If the power indicator is lit, slide the power switch for four seconds or longer to turn off,
then turn on again.
z Using the following procedure, start up in Safe Mode, and check the error details.
A Turn on the computer, and when the [Panasonic] boot screen disappears (after entering the password*1 if one is set) hold down F8.
B Release your finger when [Windows Advanced Options Menu] is displayed, and with
Ï or Ð, select [Safe Mode], then press Enter.
Follow the on-screen instructions.
Connect the AC adaptor.
Insert a fully charged battery.
Remove the battery pack and the AC adaptor, then connect them again.
If an additional RAM module has been inserted, remove the RAM module and check to
see if the RAM module is the recommended one.
z When the CPU temperature is high, the computer may not start up to prevent overheating of
the CPU. Wait until the computer cools down, and then turn the power on again. If the computer does not power on even after cooling down, contact your technical support office.
*1
Supervisor Password or User Password set with the Setup Utility
z Press F9 in the Setup Utility (Î page 28 “To start the Setup Utility”) to return the Setup
Utility settings (excluding the passwords) to the default values. Start the Setup Utility and
make the settings again.
You have forgotten the
password.
z Supervisor Password or User Password: Contact your technical support office.
z Administrator password:
• If you have a password reset disk, you can reset the administrator password. Set the
disk and enter any wrong password, then follow the on-screen instructions and set a
new password.
• If you do not have a password reset disk, reinstall (Î Supplementary Instructions for
Windows XP) and set up Windows, and then set a new password.
“Remove disks or other
media. Press any key to
restart” or a similar message appears.
z A floppy disk is in the floppy disk drive and it does not contain system startup information. Remove the floppy disk and press any key.
z This message may appear with some devices connected to the USB port. Remove the
device or set [Legacy USB Support] to [Disabled] in the [Advanced] menu of the Setup Utility.
z If the problem persists after removing the disk, it may be a hard disk failure. Perform the reinstallation and return the hard disk to its condition at the time of purchase (Î Supplementary
Instructions for Windows XP). If the problem persists even after the reinstallation, contact
your technical support office.
[Executing Battery Recalibration] screen appears.
z The Battery Recalibration was canceled before Windows was shut down last time. To
start up Windows, turn off the computer by the power switch, and then turn on.
The computer will not automatically enter standby/
hibernation.
z If you connect to a network using wireless LAN function, perform access point settings.
(Î
Reference Manual “Wireless LAN”)
z If you do not use wireless LAN function, turn off wireless LAN function. (Î
Reference Manual “Disabling/Enabling Wireless Communication”)
z Make sure that you are not using any software that regularly accesses the hard disk.
Useful Information
z
z
z
z
Troubleshooting
The computer does not
power on/
The power indicator or battery indicator is not lit.
Getting Started
Reference
Appendix
your technical support office. You can also check the computer’s status in the PC Information Viewer (Î
Manual “Check the Computer’s Usage Status”).
Starting Up and Standby and Hibernation Mode
25
Troubleshooting (Basic)/Error Code/Message
Getting Started
Starting Up and Standby and Hibernation Mode
When logging on (e.g.,
resuming the computer),
audio is distorted.
z Perform the following steps to change the audio settings to prevent audio output.
A Click [start] - [Control Panel] - [Sounds, Speech, and Audio Devices] - [Sounds and
Audio Devices], and click [Sounds].
B Set [Windows Logon] and [Windows Logoff] to [(None)].
Cannot resume.
z One of the following operations may have been carried out.
• In standby mode, the AC adaptor or battery pack was disconnected, or a peripheral
was connected or disconnected.
• The power switch was slid for four seconds or longer to forcibly turn off the computer.
Slide the power switch to turn on the computer. Data not saved will be lost.
Other startup problems.
z Check to see if there was a disk error.
A Remove all peripheral devices including an external display.
B Click [start] - [My Computer] and right-click [Local Disk (C:)], and click [Properties].
C Click [Tools] - [Check Now].
• A standard user needs to enter an administrator password.
D Select the option in [Check disk options] and click [Start].
z Start the computer in Safe Mode and check the error details. (Î page 25 “Windows
does not start up”.)
Shutting Down
Windows does not shut
down.
z Remove all peripheral devices.
z Wait one or two minutes. It is not a malfunction.
Appendix
Troubleshooting
Useful Information
Password
Even after entering the password, a message appears
requesting to type it again.
z If
lights up, press NumLk to disable the ten-key mode, and then input.
z If
lights up, press Caps Lock to disable the Caps Lock mode, and then input.
Display
When the screen becomes
black for a moment.
z When you set [Intel video driver power saving function (Intel(R) Display Power Saving Technology)] of Power Saving Utility to [Enable], if you do the following operations, the screen
becomes black for a moment, but this is not a malfunction. You can continue to use this.
• Adjust the brightness of the screen with Fn + F1 / Fn + F2.
• Remove and insert the AC adaptor.
While you are using motion video playback software, benchmark software for graphic, if
error screen is displayed or application software does not function normally, set [Intel video
driver power saving function (Intel(R) Display Power Saving Technology)] to [Disable].
No display.
z The external display is selected. Press Fn + F3 to switch the display. Wait until the display has been switched completely before pressing Fn + F3 again.
z The display is turned off by the power-saving function. To resume, do not press the direct
selection keys, but press any other key like Ctrl.
z The computer entered standby or hibernation by the power-saving function. To resume,
slide the power switch.
z The screen may become darker. Press Fn + F2 to make the screen brighter.
The screen is disordered.
z Changing the number of display colors and resolution may affect the screen. Restart the computer.
z The refresh rate of the internal LCD may be 40 hertz. Change the refresh rate of the internal LCD.
A Click [start] - [Control Panel] - [Other Control Panel Options] - [Intel(R) GMA Driver
for Mobile].
B Click [Display Settings].
C If [Refresh Rate] of the Notebook is [40 Hertz], change to [60 Hertz] and click [OK].
The external display does
not work normally.
z If the external display does not support the power saving function, it may not work normally when the computer enters the power saving mode. Turn off the external display.
Battery
The battery indicator is
lights red.
26
z The battery level is very low (the charge is approx. 9% or less).
z Connect the AC adaptor. You can use the computer when the indicator light is orange. If
you do not have an AC adaptor, save your data and power off your computer. After
replacing the battery pack with a fully charged one, turn your computer on again.
z The battery is recharging.
If [Battery Charging Indicator] in [Main] menu of the Setup Utility is set to [Flashing], the
indicator will alternately become lighter and darker.
Touch Pad/Touchscreen
The cursor does not work.
z When using the external mouse, connect it correctly.
z Restart the computer by using the keyboard.
Press
, U, and R to select [Restart].
z If the computer does not respond to keyboard commands, read “No response” (Î below).
Cannot input using the
touch pad.
z Set [Touch Pad] to [Enabled] in the [Main] menu of the Setup Utility.
z The drivers for some mice may disable the touch pad. Check your mouse’s operating instructions.
Cannot input using the
touchscreen.
z When mouse drivers are installed (i.e. IntelliMouse), the touchscreen does not work.
Reinstall the touchscreen driver.
Cannot input using the
touchscreen as the tablet
mode.
z Set [Touchscreen Mode] to [Auto] or [Tablet Mode] in the [Main] menu of the Setup Utility.
Cannot point the correct posi- z Perform the touchscreen calibration (Î page 14).
tion using the included stylus.
Reference Manual
The Reference Manual is not z Install Adobe Reader.
displayed.
A Log on to Windows as an administrator.
B Click [start] and input “c:\util\reader\setup.exe” in [Run] then click [OK].
C Follow the on-screen instructions.
Others
No response.
z Press Ctrl+Shift+Esc to open Task Manager and close the software application that
is not responding.
z An input screen (e.g., password input screen at startup) may be hidden behind another
window. Press Alt+Tab to check.
z Slide the power switch for four seconds or longer to shut down the computer, and then slide
the power switch to turn it on. If the application program does not work normally, uninstall and
reinstall the program. To uninstall, click [start] - [Control Panel] - [Add or Remove Programs].
Useful Information
The battery indicator is
flashing.
Troubleshooting
z If blinking red:
Quickly save your data and power off your computer. Remove the battery pack and disconnect the AC adaptor, then connect them again. If the problem persists, contact your
technical support office. The battery pack or charging circuit may be defective.
z If blinking orange:
• Battery cannot be recharged temporarily because the internal temperature of the battery pack is outside the acceptable temperature range for recharging. Your computer
can be used normally in this state. Once the range requirement is satisfied, charging
begins automatically.
• Software applications and peripheral devices (USB devices, etc.) are consuming too
much power. Exit the software applications currently running, and remove all peripherals. Once the range requirement is satisfied, charging begins automatically.
Appendix
The battery indicator is
blinking.
Getting Started
Battery
27
Troubleshooting (Basic)/Error Code/Message
Error Code/Message
Follow the instructions below when an error code or message appears. If the problem persists or if the error code/message displayed is not shown here, contact your technical support office.
Error Code/Message
Bad System CMOS
Troubleshooting
Useful Information
Getting Started
System CMOS
Checksum Error
Solution
An error has occurred in the memory of system settings. This occurs when the memory content is changed by an unexpected program operation, etc.
z Start the Setup Utility and return the settings to the default values, and then change the settings as necessary.
z If the problem persists, the internal clock battery may need to be replaced. Contact your technical support office.
The date and time settings are not correct.
Invalid Year. System
date restored to 01/01/ z Start the Setup Utility and set the correct date and time.
z If the problem persists, the internal clock battery may need to be replaced. Contact your tech2008
nical support office.
Error
Hard disk access is
prohibited by "Hard
Disk Lock". Please
enter the Setup Utility
and change the
values correctly to
permit access.
The hard disk access is prohibited.
z Start the Setup Utility and select [Disabled] in [Hard Disk Lock] in the [Security] menu.
Press <F2> to enter
setup
z Write down the error details and press F2 or Del to start the Setup Utility. Change the settings if necessary.
Reboot and Select
proper Boot device or
Insert Boot Media in
selected Boot device
and press a key
The operating system is not installed in the floppy disk or the hard disk that you are going to boot from.
z If using a floppy disk, change the disk to the one you can use for boot.
z If using the hard disk, check if the hard disk is recognized in [Information] menu of the Setup
Utility. If the hard disk is recognized, perform the reinstallation (Î “Supplementary Instructions for Windows XP”). If not, contact your technical support office.
z If a device is connected to the USB port, disconnect the device, or set [Legacy USB Support]
to [Disabled] in the [Advanced] menu of the Setup Utility.
Disk error
Press any key to
restart
Extended RAM
Module Failed
z The RAM module is not inserted correctly. Turn off the computer, and confirm that the RAM
module conforms to the recommended module, and reinsert it.
Standard RAM Failed
z Contact your technical support office.
FAN ERROR
z The cooling fan does not work correctly. Contact your technical support office.
To start the Setup Utility
Appendix
A Restart the computer.
B Press F2 or Del while [Panasonic] boot screen is displayed.
28
Hardware Diagnostics
If the hardware installed in this computer is not operating properly, you can use the PC-Diagnostic Utility to determine
whether or not there is a problem.
If the utility discovers a problem in the hardware, contact your technical support office.
z When the video diagnostic check is running, the display may be distorted, and when the audio diagnostic check is
running, sounds may be generated from the speaker. These are not malfunctions.
Regarding the PC-Diagnostic Utility
NOTE
z Only for the hard disk, keyboard and touch pad, you can select standard diagnostic check or extended diagnostic
check.
When the PC-Diagnostic Utility starts up, it will run the standard diagnostic check.
z We recommend that you use the touch pad for operations. When not using the touch pad, you can operate using the
internal keyboard instead. Note, however, that the touch pad and internal keyboard may not function temporarily during diagnostic check. If this happens, wait for a moment before operating them.
Operations
Touch pad operations
Internal keyboard operations
Select icon
Place the cursor above the icon
Press Space and then press Î Í Ï Ð
(
(close) cannot be selected).
Click the icon
Tap or click (right click cannot be used)
Press Space above the icon.
Complete the PC- Diagnos- Click
tic Utility and then restart
the computer
(close)
Press Ctrl + Alt + Del.
z If the touch pad does not operate properly, press Ctrl + Alt + Del to restart the computer, or slide the power switch
to turn the power off, and then restart the PC-Diagnostic Utility.
Running the Diagnostic Check
Run this utility using the default settings in the Setup Utility.
If the Setup Utility or other settings will not allow a hardware to be executed, the hardware icon will be displayed in gray.
1
Useful Information
When the PC-Diagnostic Utility is running, a beep will sound, so do not use headphones at this time. (The beep will not sound if
mute is using Windows.)
*2 Only for model with wireless LAN
*3 Only for model with Bluetooth
Troubleshooting
*1
Appendix
Hardware below can be checked using this utility. (Software cannot be checked.)
z CPU
z Memory
z Hard Disk
z Video Controller
z Sound*1
z Modem
z LAN
z Wireless LAN*2
z Bluetooth*3
z USB
z PC Card Controller
z SD Card Controller
z Keyboard
z Touch Pad
z Touchscreen
Getting Started
Hardware that can be checked using the PC-Diagnostic Utility
Connect the AC adaptor, and turn on the wireless switch.
During the diagnostic check, do not remove the AC adaptor, or attach any peripheral devices.
2
Turn on or restart the computer, and press F2 or Del while [Panasonic] boot screen is displayed.
The Setup Utility starts up.
z If the password is requested, enter the Supervisor Password.
z If you are using the computer after changing the settings from the status at the time of purchase, we recommend that you make a note of the settings that are changed.
29
Hardware Diagnostics
3
Press F9.
At the confirmation message, select [Yes] and press Enter.
4
Press F10.
At the confirmation message, select [Yes] and press Enter.
The computer will restart.
5
While [Panasonic] boot screen is displayed, press and hold Ctrl + F7 until “Please Wait”
appears at the bottom of the display.
•
: Start the diagnostic check from the beginning
•
: Stop the diagnostic check (You cannot restart the check partway through by clicking
)
A
•
: Display help (click the screen or press Space to return to the original diagnostic check screen)
z You can check the status of the diagnostic check by the display color on the left side of the hardware icon (A).
• Aqua: Not running diagnostic check
• Alternating blue and yellow: Currently running diagnostic check. The interval of the alternating colors differs
depending on the type of diagnostic check currently running.
During memory diagnostic check, the display may freeze for a long period of time. Wait until the process is
complete.
• Green: No problems discovered
• Red: Problems discovered
NOTE
z Using the following procedure, you can run a diagnostic check on a specified hardware component,
or run an extended diagnostic check on the hard disk, keyboard and touch pad (You do not need to
perform the extended diagnostic check for the keyboard and touch pad in normal use.). The
extended diagnostic check on the hard disk is more detailed, and so requires a longer period of time
to run.
A Click
to stop the diagnostic check.
B Click the icon for the hardware that is not to be checked, so that the icon is displayed in gray (B).
When running a check on the hard disk, keyboard or touch pad, clicking the icon once will turn on
the extended diagnostic check (“FULL” (C) will be displayed below the icon); click again, and the
icon will be displayed in gray (D).
Troubleshooting
Useful Information
Getting Started
When the PC-Diagnostic Utility starts up, it will automatically begin the diagnostic check for all hardware components.
z If the password is requested, enter the password.
z The touch pad and the internal keyboard cannot be used until alternating blue and yellow colors are displayed
on the left side of the hardware icon (A).
z By clicking the icon, you can execute the following operations:
C Click
B
e.g. hard disk
to start the diagnostic check.
C
Appendix
D
6
When all the hardware has been checked, confirm the diagnostic check results.
If the display is red and the message “Check Result TEST FAILED” is displayed, you can assume that there is a
problem with the computer’s hardware. Confirm which hardware component is displayed as red, and contact your
technical support office.
If the display is green and the message “Check Result TEST PASSED” is displayed, the computer’s hardware is
operating normally. Continue using the computer as it is. If the computer still does not operate properly, reinstall
the software. (Î Supplementary Instructions for Windows XP)
NOTE
z If you run a memory diagnostic check after installing a new RAM module (sold separately) and the message “Check
Result TEST FAILED” is displayed:
Remove the additional RAM module and run the diagnostic check again. If the message “Check Result TEST
FAILED” is still displayed, you can assume that there is a problem with the internal RAM module.
7
30
After the diagnostic check is complete, click
restart the computer.
(close), or press Ctrl + Alt + Del to
Installing Windows Vista
When you install Windows Vista, the hard disk data will be erased.
Back up important data to other media or an external hard disk before reinstallation.
CAUTION
Do not delete the recovery partition on the hard disk when using
Windows Vista.
This partition contains data to help recover your system.
The disk space in the partition is not available to store data.
Hard disk
Recovery partition
(approximately 2 GB)
Area usable by Windows Vista
NOTE
z Even if reinstallation is performed, the number of times of DVD’s region code setting will not be reset.
1
Turn off the computer and connect the CD/DVD drive to the computer.
2
Turn on the computer, and press F2 or Del while [Panasonic] boot screen is displayed.
The Setup Utility starts up.
z If the password is requested, enter the Supervisor Password.
3
Write down all of the contents of the Setup Utility and press F9.
Useful Information
Preparation
z Prepare the Product Recovery DVD-ROM for Windows Vista (included).
z Prepare the Panasonic CD/DVD drive (optional): CF-VDRRT1M, CF-VDRRT2W, CF-VDRRT3W,
CF-VDRRT3U.
z Remove all peripherals (except for the CD/DVD drive).
z Connect the AC adaptor and do not remove it until installation is complete.
Getting Started
NOTE
z This computer is provided the license of Windows Vista Business which includes the right to downgrade to Windows
XP Professional.
z To correctly operate “First-time operation for Windows Vista” (ÎStep 16), please download the Operating Instructions for the Windows Vista model before installation.
Press F10.
At the confirmation message, select [Yes] and press Enter.
The computer will restart.
5
Press F2 or Del while [Panasonic] boot screen is displayed.
The Setup Utility starts up.
z If the password is requested, enter the Supervisor Password.
6
Set the Product Recovery DVD-ROM for Windows Vista into the CD/DVD drive.
7
Select the [Exit] menu, then select your CD/DVD drive in [Boot Override].
8
Press Enter.
The computer will restart.
9
Click [Reinstall Windows] and click [Next].
The License Agreement screen appears.
10
Click [Yes, I agree to the provisions above and wish to continue!] and click [Next].
11
Select the settings and click [Next].
Appendix
4
Troubleshooting
At the confirmation message, select [Yes] and press Enter.
z [Reinstall Windows to the whole Hard Disk to factory default.]
You will have a single partition.
z [Reinstall Windows to the operating system partition.]
You can keep the partition structure.
This option is only available when using Windows Vista.
12
At the confirmation message, click [YES].
Reinstallation starts automatically. (It will take approximately 40 minutes.)
31
Installing Windows Vista
z Do not interrupt reinstallation, for example by turning off the computer. Otherwise reinstallation may become
unavailable as Windows may not start up or the data may be corrupted.
13
14
Remove the Product Recovery DVD-ROM, and then click [OK] to turn off the computer,
then remove the CD/DVD drive.
Turn on the computer.
Appendix
Troubleshooting
Useful Information
Getting Started
z If the password is requested, enter the Supervisor Password.
32
15
Perform the first-time operation for Windows Vista.
16
Start the Setup Utility and change the settings as necessary.
17
Perform Windows Update.
18
Information about Windows Vista
Information about Windows Vista
To download the Operating Instructions for Windows Vista model
Select your model and download the Operating Instructions from the following web site:
https://eww.pavc.panasonic.co.jp/pc/cgi-bin/itn/toughbook/dl01.cgi
The information about Windows Vista on the Panasonic personal computer
Visit the following web site:
https://eww.pavc.panasonic.co.jp/pc/itn/support/vistaxpdwg1.html
LIMITED USE LICENSE AGREEMENT
THE SOFTWARE PROGRAM(S) (“PROGRAMS”) FURNISHED WITH THIS PANASONIC PRODUCT (“PRODUCT”)
ARE LICENSED ONLY TO THE END-USER (“YOU”), AND MAY BE USED BY YOU ONLY IN ACCORDANCE WITH
THE LICENSE TERMS DESCRIBED BELOW. YOUR USE OF THE PROGRAMS SHALL BE CONCLUSIVELY
DEEMED TO CONSTITUTE YOUR ACCEPTANCE OF THE TERMS OF THIS LICENSE.
Panasonic Corporation has developed or otherwise obtained the Programs and hereby licenses their use to you. You
assume sole responsibility for the selection of the Product (including the associated Programs) to achieve your intended
results, and for the installation, use and results obtained therefrom.
D. You may not copy or reproduce, or permit to be copied or reproduced, the Programs or related documentation for
any purpose, except that you may make one (1) copy of the Programs for backup purposes only in support of your
use of the Programs on the single Product which was accompanied by the Programs. You shall not modify, or
attempt to modify, the Programs.
E. You may transfer the Programs and license them to another party only in connection with your transfer of the single
Product which was accompanied by the Programs to such other party. At the time of such a transfer, you must also
transfer all copies, whether in printed or machine readable form, of every Program, and the related documentation,
to the same party or destroy any such copies not so transferred.
F. You may not remove any copyright, trademark or other notice or product identification from the Programs and you
must reproduce and include any such notice or product identification on any copy of any Program.
YOU MAY NOT REVERSE ASSEMBLE, REVERSE COMPILE, OR MECHANICALLY OR ELECTRONICALLY TRACE
THE PROGRAMS, OR ANY COPY THEREOF, IN WHOLE OR IN PART.
YOU MAY NOT USE, COPY, MODIFY, ALTER, OR TRANSFER THE PROGRAMS OR ANY COPY THEREOF, IN
WHOLE OR IN PART, EXCEPT AS EXPRESSLY PROVIDED IN THE LICENSE.
IF YOU TRANSFER POSSESSION OF ANY COPY OF ANY PROGRAM TO ANOTHER PARTY, EXCEPT AS PERMITTED IN PARAGRAPH E ABOVE, YOUR LICENSE IS AUTOMATICALLY TERMINATED.
TERM
This license is effective only for so long as you own or lease the Product, unless earlier terminated. You may terminate
this license at any time by destroying, at your expense, the Programs and related documentation together with all copies thereof in any form. This license will also terminate effective immediately upon occurrence of the conditions thereof
set forth elsewhere in this Agreement, or if you fail to comply with any term or condition contained herein. Upon any
such termination, you agree to destroy, at your expense, the Programs and related documentation together with all copies thereof in any form.
YOU ACKNOWLEDGE THAT YOU HAVE READ THIS AGREEMENT, UNDERSTAND IT AND AGREE TO BE BOUND
BY ITS TERMS AND CONDITIONS. YOU FURTHER AGREE THAT IT IS THE COMPLETE AND EXCLUSIVE STATEMENT OF THE AGREEMENT BETWEEN US, WHICH SUPERSEDES ANY PROPOSAL OR PRIOR AGREEMENT,
ORAL OR WRITTEN, AND ANY OTHER COMMUNICATIONS BETWEEN US, RELATING TO THE SUBJECT MATTER OF THIS AGREEMENT.
Useful Information
C. You and your employees and agents are required to protect the confidentiality of the Programs. You may not distribute or otherwise make the Programs or related documentation available to any third party, by time-sharing or otherwise, without the prior written consent of Panasonic Corporation.
Troubleshooting
B. You may use the Programs only on the single Product which was accompanied by the Programs.
Appendix
A. Panasonic Corporation hereby grants you a personal, non-transferable and non-exclusive right and license to use
the Programs in accordance with the terms and conditions stated in this Agreement. You acknowledge that you are
receiving only a LIMITED LICENSE TO USE the Programs and related documentation and that you shall obtain no
title, ownership nor any other rights in or to the Programs and related documentation nor in or to the algorithms, concepts, designs and ideas represented by or incorporated in the Programs and related documentation, all of which
title, ownership and rights shall remain with Panasonic Corporation or its suppliers.
Getting Started
LICENSE
About Intel® software products
The enclosed software products and documentation were developed at private expense, and are provided with
“RESTRICTED RIGHTS.” Use, duplication or disclosure by the government is subject to restrictions as set forth in
FAR 52.227-14 and DFARS 252.227-7013 et. seq. or its successor. The use of this product by the government
constitutes acknowledgment of Intel’s proprietary rights in the product.
33
Contrat de licence d’usage limité
Le(s) logiciel(s) (les “Logiciels”) fournis avec ce produit Panasonic (le “Produit”) sont exclusivement concédés en
licence à l’utilisateur ultime (“vous”), et ils ne peuvent être utilisés que conformément aux clauses contractuelles
cidessous. En utilisant les logiciels, vous vous engagez de manière définitive à respecter les termes, clauses et
conditions des présentes.
Panasonic Corporation a mis au point ou obtenu les Logiciels et vous en concède l’utilisation par les présentes. Vous
assumez l’entière responsabilité du choix de ce Produit (y compris des Logiciels associés) pour obtenir les résultats
escomptés, ainsi que de l’installation, de l’utilisation et des résultats obtenus.
Appendix
Troubleshooting
Useful Information
Getting Started
Licence
A. Panasonic Corporation vous octroie par les présentes le droit et la licence personnels, non cessibles et non
exclusifs d’utiliser les Logiciels conformément aux termes, clauses et conditions de ce contrat. Vous reconnaissez
ne recevoir qu’un droit limité d’utiliser les Logiciels et la documentation les accompagnant et vous vous engagez à
n’obtenir aucun droit de titre, propriété ni aucun autre droit vis-à-vis des Logiciels et de la documentation les
accompagnant ni vis-à-vis des algorithmes, concepts, dessins, configurations et idées représentés par ou
incorporés dans les Logiciels et la documentation les accompagnant, dont les titres, propriété et droits resteront tous
à Panasonic Corporation ou à leurs propriétaires.
B. Vous ne pouvez utiliser les Logiciels que sur le Produit unique qui est accompagné par les Logiciels.
C. Vous et vos employés ou agents êtes requis de protéger la confidentialité des Logiciels. Vous ne pouvez ni
distribuer ni mettre les Logiciels et la documentation les accompagnant à la disposition d’un tiers, par partage de
temps ou de quelque autre manière que ce soit, sans l’autorisation écrite préalable de Panasonic Corporation.
D. Vous ne pouvez ni copier ni reproduire ni permettre la copie ni la reproduction des Logiciels ni de la documentation
les accompagnant pour quelque fin que ce soit, à l’exception d’une (1) copie des Logiciels à des fins de sauvegarde
uniquement pour soutenir votre utilisation des Logiciels sur le Produit unique qui est accompagné par les Logiciels.
Vous ne pouvez ni modifier ni tenter de modifier les Logiciels.
E. Vous ne pouvez céder les Logiciels et en octroyer la licence à une autre partie qu’en rapport avec votre cession du
Produit unique qui est accompagné par les Logiciels à cette autre partie. Au moment de cette cession, vous devez
céder également toutes les copies, que ce soit sous forme imprimée ou lisible par la machine, de tous les Logiciels
ainsi que de la documentation les accompagnant, à la même partie ou détruire les copies non cédées.
F. Vous ne pouvez retirer aucune marque de droits d’auteur, marque de commerce ou autre ni aucune identification de
produit des Logiciels et vous devez reproduire et inclure toutes ces notices ou identifications de produit sur toutes
les copies des Logiciels.
Vous ne pouvez assembler en sens inverse, compiler en sens inverse ni retracer les Logiciels ni aucune de leurs
copies, de façon électronique ou mécanique, en tout ou en partie.
Vous ne pouvez utiliser, copier, modifier, altérer ni céder les Logiciels ni aucune de leurs copies, en tout ou en partie, à
l’exception de ce qui est expressément stipulé dans ce contrat.
Si vous cédez la possession de toute copie ou de tout Logiciel à une autre partie, à l’exception de ce qui est autorisé au
paragraphe E ci-dessus, votre licence est automatiquement résiliée.
Termes, clauses et conditions
Cette licence n’est effective que pour la durée de possession ou de crédit-bail du Produit, à moins d’une résiliation
antérieure. Vous pouvez résilier cette licence à tout moment en détruisant, à vos frais, les Logiciels et la documentation
les accompagnant avec toutes leurs copies, sous quelque forme que ce soit. Cette licence sera également résiliée,
avec application immédiate, si les conditions de résiliation définies ailleurs dans ce contrat se sont réalisées ou si vous
ne respectez pas les termes, clauses et conditions qui y sont contenues. Au moment de la résiliation, vous acceptez de
détruire, à vos frais, les Logiciels et la documentation les accompagnant avec toutes leurs copies, sous quelque forme
que ce soit.
Vous reconnaissez avoir lu ce contrat, en avoir compris toute la substance et avoir accepté de respecter ses termes,
clauses et conditions. Vous reconnaissez en outre qu’ils sont la description complète et exclusive du contrat conclu
entre nous, contrat qui remplace et annule toute proposition ou contrat précédent, écrit ou oral, et toute autre
communication entre nous, relativement à l’objet du présent contrat.
34
Specifications
To check CPU speed, memory size and the hard disk drive (HDD) size:
Start the Setup Utility (Î
Reference Manual “Setup Utility”) and select [Information] menu.
[Processor Speed]: CPU speed, [Memory Size]: Memory size, [Hard Disk]: Hard disk drive size
Main Specifications
Model No.
CPU/
Secondary cache memory
CF-T8EWDTZAM
Intel® Core™ 2 Duo Processor Ultra Low Voltage SU9300 (1.20 GHz, 3 MB*1 L2 cache,
800 MHz FSB)
Chip Set
Mobile Intel® GS45 Express chip set
Main Memory*2
Video Memory
3 GB*1, DDR2 SDRAM (2 GB*1 RAM module has been added to the RAM module slot.)
× 768 dots)
× 768 dots)*5
65,536/16,777,216 colors (800 × 600 dots/1024 × 768 dots/1280 × 768 dots/1280 ×
1024 dots/1400 × 1050 dots/1440 × 900 dots/1680 × 1050 dots/1600 × 1200 dots/
1920 × 1080 dots/1920 × 1200 dots)
65,536/16,777,216 colors (1024
External Display*6
Simultaneous Display on LCD + External Display*6
Wireless LAN
Bluetooth*8
65,536/16,777,216 colors (800
× 600 dots/1024 × 768 dots)*5
Intel® WiFi Link 5100 *7 (Î page 36)
Î page 36
IEEE 802.3 10Base-T, IEEE 802.3u 100Base-TX, IEEE 802.3ab 1000Base-T
LAN*9
Modem
Sound
Data: 56 kbps (V.92) FAX: 14.4 kbps
Security Chip
TPM (TCG V1.2 compliant)*10
Card Slots
WAVE and MIDI playback, Intel® High Definition Audio subsystem support, Monaural
Speaker (built in)
PC Card Slot
SD Memory Card
RAM Module Slot
Slot*11
× 1, Type I or Type II, Allowable current 3.3 V: 400 mA, 5 V: 400 mA
×1
× 1, DDR2 SDRAM, 200-pin, 1.8 V, SO-DIMM, PC2-5300 Compliant*12 (2 GB*1 RAM
module has been added to the RAM module slot.)
Interface
Operating Time*16
USB Ports × 3 (USB2.0 × 3)*13 / Modem Port (RJ-11) / LAN Port (RJ-45) *9 /
External Display Port: Mini Dsub 15-pin female / Microphone Jack*14: Miniature jack,
3.5 DIA / Headphone Jack: Miniature jack, 3.5 DIA / Mini Port Replicator connector:
Dedicated 50-pin male
83 keys/Touch Pad/Touchscreen (stylus (included) touch capable)
AC adaptor or Battery pack
Input: 100 V - 240 V AC, 50 Hz/60 Hz
Output: 16 V DC, 3.75 A
Li-ion 10.8 V, 5.8 Ah (typ.), 5.4 Ah (min.)
Approx. 8 hours (Economy Mode (ECO) - Disable)
Charging Time*17
Approx. 5 hours (Power off)/Approx. 6.5 hours (Power on)
Keyboard/Pointing Device
Power Supply
AC Adaptor*15
Battery Pack
Power
Consumption*18
Approx. 25 W*19 / Approx. 60 W (maximum when recharging in the ON state)
Physical Dimensions (W × D × H)
272 mm × 214.3 mm × 36 mm (at the front)/49.3 mm (at the rear) {10.7 " × 8.4 " ×
1.4 " / 1.9 "} (excluding protrusion)
Weight*20
Environment
Approx. 1485 g {3.3 lb.}
Operation Temperature
Storage
OS*21
Useful Information
12.1 XGA type (TFT) (1024
Internal LCD
Troubleshooting
Hard Disk Drive*4
Display Method
Getting Started
UMA (1024 MB*1 Max.)*3
120 GB
5°C to 35°C
Humidity
30% to 80% RH (No condensation)
Temperature
-20°C to 60°C
Humidity
30% to 90% RH (No condensation)
Microsoft® Windows® XP Professional Service Pack 2 with Advanced Security Technologies (NTFS File System)
35
Specifications
Model No.
Pre-installed Software
CF-T8EWDTZAM
*21
Microsoft® Internet Explorer 6 Service Pack 2 / DirectX 9.0c /Microsoft® Windows® Media
Player 10 / Microsoft® Windows® Movie Maker 2.1 / Microsoft® .NET Framework 1.1 SP1/
2.0 / Adobe Reader / Intel® PROSet / Icon Enlarger / Loupe Utility / Touch Pad Utility / PC
Information Viewer / PC Information Popup / Display Rotation Tool / Hotkey Settings / Power
Saving Utility / FAN Control Utility / Intel® Matrix Storage Manager / Wireless Switch Utility /
Wireless Connection Disable Utility*22 / Bluetooth Stack for Windows by TOSHIBA*8 / Economy Mode (ECO) Setting Utility / Battery Recalibration Utility / Infineon TPM Professional
Package V3.0 SP2HF2*22
Aptio Setup Utility / Hard Disk Data Erase Utility*23 / PC-Diagnostic Utility*24
Appendix
Troubleshooting
Useful Information
Getting Started
Wireless LAN <Only for model with wireless LAN>
Data Transfer Rates
IEEE802.11a : 54/48/36/24/18/12/9/6 Mbps (automatically switched)*25
IEEE802.11b : 11/5.5/2/1 Mbps (automatically switched)*25
IEEE802.11g : 54/48/36/24/18/12/9/6 Mbps (automatically switched)*25
IEEE802.11n : (HT20) 144.4/130/117/115.6/104/86.7/78/65/58.5/57.8/52/43.3/39/28.9/26/19.5/14.4/
13/6.5 Mbps (automatically switched)*25
(HT40) 300/270/243/240/216/180/162/130/120/117/108/104/90/81/78/60/54/52/39/
30/27/26/13 Mbps (automatically switched)*25
Standard Supported
IEEE802.11a / IEEE802.11b / IEEE802.11g / IEEE802.11n(Draft 2.0)
Transmission Method
OFDM system, DS-SS system
Wireless Channels Used
IEEE802.11a : Channels 36/40/44/48/52/56/60/64/100/104/108/112/116/132/136/140/149/153/157/
161/165
IEEE802.11b/IEEE802.11g : Channels 1 to 11
IEEE802.11n : Channels 1-11/36/40/44/48/52/56/60/64/100/104/108/112/116/132/136/140/149/153/
157/161/165
RF Frequency Band
IEEE802.11a : 5.18 GHz - 5.32 GHz, 5.5 GHz - 5.58 GHz, 5.66 GHz - 5.7 GHz, 5.745 GHz 5.825 GHz
IEEE802.11b/IEEE802.11g : 2.412 GHz - 2.462 GHz
IEEE802.11n : 2.412 GHz - 2.462 GHz, 5.15 GHz - 5.35 GHz, 5.5 GHz - 5.58 GHz, 5.66 GHz 5.7 GHz, 5.745 GHz - 5.85 GHz
Bluetooth™ <Only for model with Bluetooth>
Bluetooth Version
Transmission Method
FHSS system
Wireless Channels Used
Channels 1 to 79
RF Frequency Band
2.402-2.48 GHz
*1
*2
*3
*4
*5
*6
*7
*8
*9
*10
36
2.0 + EDR
1 MB = 1,048,576 bytes / 1 GB = 1,073,741,824 bytes
You can physically expand the memory up to 3 GB, but the
total amount of usable memory available will be less depending on the actual system configuration.
A segment of the main memory is allotted automatically
depending on the computer’s operating status. The size of
the Video Memory cannot be set by the user.
The size of Video memory is allotted depending on the operating system.
1 GB = 1,000,000,000 bytes. Your operating system or some
application software will report as fewer GB.
A 16,777,216-color display is achieved by using the dithering function.
Display may be impossible using some connected external displays.
Only for model with wireless LAN.
Only for model with Bluetooth.
Some devices cannot be used depending on the port type.
Only for model that supports TPM.
For information on TPM, click [start] - [Run] and input
“c:\util\drivers\tpm\README.pdf”, and refer to the Installation
Manual of “Trusted Platform Module (TPM)”.
*11
*12
*13
*14
*15
This slot is compatible with High-Speed Mode. Operation has
been tested and confirmed using Panasonic SD/SDHC
Memory Cards with a capacity of up to 32 GB.
Operation on other SD equipment is not guaranteed.
Only a RAM module designed for DDR2 (PC2-5300) can be
added (Panasonic : CF-BAK1024U, CF-BAB2048U).
172-pin Micro DIMM used in CF-T5/CF-W5 series cannot be used.
Does not guarantee operation of all USB-compatible peripherals.
Use a condenser-stereo microphone.
<Only for North America>
The AC adaptor is compatible with power sources up to
240 V AC adaptor. This computer is supplied with a 125 V
AC compatible AC cord.
20-M-1-1
*16
Measured using MobileMark™ 2007 (LCD brightness : 60
cd/m2).
Varies depending on the usage conditions, or when an
optional device is attached.
When Economy Mode (ECO) is enabled, the operating time
becomes approximately 20% shorter than when it is disabled.
When using the optional battery pack (CF-VZSU52W), operating time will be almost halved.
*17
Varies depending on the usage conditions, CPU speed, etc.
It may take a long time to charge a fully discharged battery.
When using the optional battery pack (CF-VZSU52W):
Approx. 4 hours (Power off)/Approx. 5 hours (Power on)
*18
Approx. 0.9 W when the battery pack is fully charged (or not
being charged) and the computer is off.
*19 Rated power consumption.
*24
*25
Useful Information
*23
Troubleshooting
*22
Average value. May differ depending on models.
Operations of this computer are not guaranteed except for
the pre-installed OS and the installed OS by using the Product Recovery DVD-ROM (included).
Only for model that supports TPM.
Must be installed before use.
The Product Recovery DVD-ROM is required.
For startup methods, refer to “Hardware Diagnostics”
(Î page 29).
These are speeds specified in IEEE802.11a+b+g+n standards. Actual speeds may differ.
Appendix
*21
Getting Started
23-E-1
*20
37
LIMITED WARRANTY
For U.S.A.
Panasonic Computer Solutions Company - Worldwide Product Warranties
Section 1 - Limited Warranty - Hardware
Troubleshooting
Useful Information
Getting Started
Panasonic Computer Solutions Company (referred to as “Panasonic”) will repair the products listed below with new or rebuilt parts,
free of charge in the U.S.A. or other Panasonic approved location for the period specified below from the date of original purchase in
the event of a defect in materials or workmanship. These warranties are extended solely to the original purchaser. A purchase receipt
or other proof of date of original purchase will be required before warranty performance is rendered.
•
•
•
•
•
•
•
•
•
•
•
Laptop Computers – 3 Years
PDRC - LCD and Keyboard Assemblies – 3 Years
MDWD – Mobile Computer and Wireless Display Assemblies (CF-07/CF-08) - 3 Years
Hand-held Computers (P1/P2) – 1 Year
Arbitrator Video Camera – 1 Year
Arbitrator Recorder Unit – 1 Year
Arbitrator Remote Control Panel – 1 Year
Arbitrator Wireless Receiver Unit – 1 Year
Arbitrator P2 Card(s) (All Sizes) – 1 Year
Arbitrator Wireless Microphone(s) / Transmitter – 90 Days
Arbitrator System Component Interconnect Cables – 90 Days
Main Battery
The battery supplied with the product is covered under the warranty for one (1) year from date of purchase, except as excluded in
Section 3. Batteries purchased separately are covered under the warranty for one (1) year from the date of purchase. A battery furnished under the warranty is covered for the remaining period of the one year warranty on the original or purchased battery.
Options and Accessories
The below listed Panasonic brand or supplied options and accessories are covered under this limited warranty for the period specified from the date of purchase or as specifically stated:
•
•
•
•
•
•
•
•
•
•
•
•
AC Adaptor / Power Cord – 3 Years
Memory Card (Panasonic Brand) – 3 Years
Car Mount Docking Station PCB or Complete Vehicle Docking Station – 3 Years
Port Replicator / I-O Box / Device Cradle (like CF-08) – 3 Years
Antenna Pass-through Cable – 3 Years
Backlit or Full-sized keyboard - 3 Years or assumes warranty of the unit in which it is installed
Integrated Panasonic supplied options and kits including, but not limited to Wireless WAN, Media Bay Drives (Floppy, CD/
DVD), GPS, Bluetooth, Smartcard Reader, and Fingerprint readers – 3 Years or assumes warranty period of the unit in which it
is installed provided the integration was performed by Panasonic or an Authorized Options Integrator.
Hard Drive (separately purchased) – 1 Year
External USB Drives (CD / DVD / Floppy / Hard Drive) – 1 Year
Optional Battery – 1 Year
Battery Charger – 1 Year
Standard or Digitizer Stylus Pens – 90 Days (physical damage excluded)
Appendix
Section 2 - Limited Warranty - Software
Panasonic Computer Solutions Company (referred to as “Panasonic”) warrants to you only that the disk(s) or other media on which
the Programs are furnished will be free from defects in material and workmanship under normal use for a period of sixty (60) days
from the date of delivery thereof to you, as evidenced by your purchase receipt.
This is the only warranty Panasonic makes to you. Panasonic does not warrant that the functions contained in the Programs will meet
your requirements or that the operation of the Programs will be uninterrupted or error free. Panasonic shall have no obligation for any
defects in the disk(s) or other media on which the Programs are furnished resulting from your storage thereof, or for defects that have
been caused by operation of the disk(s) or other media.
Panasonic’s entire liability and your exclusive remedy under this warranty shall be limited to the replacement, in the United States or
other Panasonic designated location, of any defective disk or other media which is returned to Panasonic’s Authorized Service Center, together with a copy of the purchase receipt, within the aforesaid warranty period. The customer is responsible for ensuring that
all data is backed up and made secure during normal use and before sending a unit for service.
38
Section 3 - Limited Warranty Exclusions
Other Limits and Exclusions: There are no other express warranties except as listed above.
PANASONIC SHALL NOT BE LIABLE FOR LOSS OF DATA OR OTHER INCIDENTAL OR CONSEQUENTIAL DAMAGES
RESULTING FROM THE USE OF THIS PRODUCT, OR ARISING OUT OF ANY BREACH OF THIS WARRANTY. ALL EXPRESS
AND IMPLIED WARRANTIES, INCLUDING THE WARRANTIES OF MERCHANTABILITY AND FITNESS FOR A PARTICULAR
PURPOSE ARE LIMITED TO THE APPLICABLE WARRANTY PERIOD SET FORTH ABOVE. Some states do not allow the exclusion or limitation of incidental or consequential damages, or limitations on how long an implied warranty lasts, so the above limitations
or exclusions may not apply to you.
This limited warranty gives you specific legal rights, and you may also have other rights which vary from state to state.
For technical support or to arrange for service on your Panasonic computer product, call our toll-free 24 hours hotline at 1-800LAPTOP5.
DIAL TOLL FREE: 1-800-LAPTOP5 (1-800-527-8675)
Web Site : www.panasonic.com/toughbook
Useful Information
THIS PRODUCT IS NOT INTENDED FOR USE AS, OR AS PART OF, NUCLEAR EQUIPMENT/SYSTEMS, AIR TRAFFIC CONTROL EQUIPMENT/SYSTEMS, OR AIRCRAFT COCKPIT EQUIPMENT/SYSTEMS*1. PANASONIC WILL NOT BE RESPONSIBLE
FOR ANY LIABILITY RESULTING FROM THE USE OF THIS PRODUCT ARISING OUT OF THE FOREGOING USES.
*1 AIRCRAFT COCKPIT EQUIPMENT/SYSTEMS include Class2 Electrical Flight Bag (EFB) Systems and Class1 EFB Systems
when used during critical phases of flight (e.g., during take-off and landing) and/or mounted on to the aircraft. Class1 EFB Systems and 2 EFB Systems are defined by FAA: AC (Advisory Circular) 120-76A or JAA: JAA TGL (Temporary Guidance Leaflets)
No.36
Troubleshooting
This warranty only covers failures due to defects in materials or workmanship which occur during normal use.
Appendix
• All consumable items; such as screen protection films, logo badges, labels, cleaning cloths, carry cases, manuals, cables,
straps, belts, holsters, tethers, and harnesses and any other options and accessories not listed above or covered under a separate warranty.
• Failures related to the product operating system, hard drive image, software setup, software program, virus, other program(s)
or file(s) on the hard drive or in any computer memory location.
• Failures due to BIOS settings or changes, as well as any cosmetic or physical damage to the unit.
• Any unit or device with a missing or altered model number or serial number label
• Damage which occurs in shipment
• Failures which are caused by products not supplied by Panasonic
• Failures which result from alteration, accident, misuse, introduction of liquid or other foreign matter into the unit, abuse, neglect,
installation, maladjustment of consumer controls, improper maintenance or modification, use not in accordance with product
use instructions
• Failures due to service by anyone other than a Panasonic Authorized Service Provider
• Failures caused by improper integration by any company other than Panasonic Configuration and Integration Centers.
• Damage, failure, or loss due to the unit being stolen, lost, misplaced, or used by anyone other than the original purchaser
• Damage that is attributable to acts of God
Getting Started
Specifically excluded from the warranty are:
39
LIMITED WARRANTY
For Canada
PANASONIC COMPUTER AND PERIPHERALS LIMITED WARRANTY
Appendix
Troubleshooting
Useful Information
Getting Started
Coverage – Panasonic Canada Inc. (“PCI”) warrants to you, the first end user customer, this computer product (excluding software
media), when purchased from PCI or from a PCI authorized reseller, to be free from defects in materials and workmanship under normal use, subject to the terms set forth below, during the period of warranty coverage specified.
Scope of Coverage
Period of Coverage
Type of Failure Coverage
• Laptop Computers (except Battery) and AC Adaptor
• Factory/PCI installed options including Wireless WAN, GPS,
Bluetooth, Fingerprint reader, Backlit keyboard, Memory Card
and Media Bay Drives (Floppy, CD/DVD)
• Mobile Wireless Display
• PDRC – LCD and Keyboard Assemblies
• Port Replicator
• Hand-held Computers
• Battery
• Battery charger
• Auto Adaptor
• External USB Drives
• Standard or Digitizer Stylus Pen
Three (3) Years from Date of
Original End User Customer
Purchase
Defective Materials or Workmanship
One (1) Year from Date of
Original End User Customer
Purchase
Defective Materials or Workmanship
Ninety (90) Days from Date of Defective Materials or WorkmanOriginal End User Customer
ship
Purchase
• All consumable items including protection film, cleaning cloth, No Coverage
carry case, tether and harness
Remedy – In the event of a warranty claim, contact PCI’s representatives within the applicable warranty period, identifying the nature
of the defect claimed, at 1-800-668-8386 between 9:00 A.M. and 5:00 P.M., Eastern Time Zone, Mon. – Fri. (excluding holidays) for
instructions on how to obtain service. A purchase receipt or other proof of date of original purchase is required before warranty service is performed. Defective parts covered by this Limited Warranty will be repaired or replaced with new or comparable rebuilt parts
on an exchange basis. Warranty replacement or repair is subject to the terms of this Limited Warranty for the balance of the original
period of warranty coverage.
No Coverage – This Limited Warranty does not cover products purchased outside Canada. Neither does it cover damage to, failure
of, or defects in a product or accessory through mishandling, improper installation, abnormal use, misuse, neglect, accident, introduction of liquid or other foreign matter into the product, alteration or servicing by anyone not authorized by PCI, or act of God.
THIS PRODUCT IS NOT INTENDED FOR USE AS, OR AS PART OF, NUCLEAR EQUIPMENT/SYSTEMS, AIR TRAFFIC CONTROL EQUIPMENT/SYSTEMS, OR AIRCRAFT COCKPIT EQUIPMENT/SYSTEMS*2. PANASONIC WILL NOT BE RESPONSIBLE
FOR ANY LIABILITY RESULTING FROM THE USE OF THIS PRODUCT ARISING OUT OF THE FOREGOING USES.
*2 AIRCRAFT COCKPIT EQUIPMENT/SYSTEMS include Class2 Electrical Flight Bag (EFB) Systems and Class1 EFB Systems
when used during critical phases of flight (e.g., during take-off and landing) and/or mounted on to the aircraft. Class1 EFB Systems and 2 EFB Systems are defined by FAA: AC (Advisory Circular) 120-76A or JAA: JAA TGL (Temporary Guidance Leaflets)
No.36
IF YOU SHIP THE PRODUCT FOR WARRANTY SERVICE
Carefully pack the product, preferably in the original carton. Include details of defect claimed and proof of date of original purchase.
No liability is assumed for loss or damage to the product while in transit, if you chose your own transportation carrier.
SOFTWARE MEDIA LIMITED WARRANTY
Coverage – PCI warrants to you, the first end user customer, that the disk(s) or other media on which software program(s) is/are
supplied will be free from defects in materials and workmanship under normal use in Canada for a period of sixty (60) days from date
of receipt as evidenced by your purchase receipt for your Panasonic Computer product.
THIS IS THE ONLY WARRANTY THAT PCI MAKES RESPECTING THE SOFTWARE MEDIA. PCI does not warrant the software.
Please refer to the software licensor’s written warranty (accompanying the copy of the software) for any software warranty claim.
Claim Procedure – In the event of a defect in material or workmanship in the media during the sixty (60) day warranty period, and
you return it, transportation costs prepaid, to Panasonic Canada Inc., Computer Products Marketing, 5770 Ambler Drive, Mississauga, Ontario L4W 2T3, within the warranty period, together with a copy of your purchase receipt, and an explanation of the suspected defect, PCI will replace in Canada the defective disk(s) or other media.
Remedy – PCI’s entire liability, and your only remedy for any breach of this software media warranty is limited to replacement of the
media only. It does not cover any other damages, including, but not limited to, loss of use or profit loss, or special, indirect or consequential damages, or other claims, whether or not of similar character.
No Coverage – This limited warranty does not apply if the disk(s) or other media has been used in other than a Panasonic product,
or in environmental conditions other than those specified by PCI or the manufacturer, or if subjected to misuse, neglect, mishandling,
modification or attempted modification of the program, or if damaged by accident or act of God. PCI is not responsible for damage to
or loss of any program, data or removable storage media.
GENERAL
NO OTHER WARRANTIES – PCI DISCLAIMS ALL OTHER WARRANTIES, EITHER EXPRESS OR IMPLIED, INCLUDING, BUT
NOT LIMITED TO, IMPLIED WARRANTIES OF MERCHANTABILITY AND FITNESS FOR A PARTICULAR PURPOSE, WITH
RESPECT TO THE SOFTWARE, SOFTWARE MEDIA, COMPUTER PRODUCT, OPTIONS AND ACCESSORIES.
NO LIABILITY FOR CONSEQUENTIAL DAMAGES – IN NO EVENT SHALL PCI BE LIABLE FOR ANY SPECIAL, INDIRECT OR
CONSEQUENTIAL DAMAGES ARISING FROM ANY BREACH OF THE LIMITED WARRANTIES SET OUT IN THIS DOCUMENT,
OR FROM THE USE OF THE COMPUTER PRODUCT, INCLUDING, WITHOUT LIMITATION, LOSS OF DATA, BUSINESS,
PROFIT OR GOODWILL.
IN ANY EVENT, PCI’S MAXIMUM LIABILITY FOR ANY BREACH SHALL NOT EXCEED THE AMOUNT ACTUALLY PAID BY YOU
FOR THE COMPUTER PRODUCT.
NO ACTION, REGARDLESS OF ITS BASIS, MAY BE BEGUN AGAINST PCI MORE THAN TWO (2) YEARS AFTER THE CAUSE
OF ACTION AROSE.
Statutory Warranties – Some jurisdictions do not allow these limitations or exclusions, so they may not apply to you.
40
GARANTIE LIMITÉE
Pour le Canada
GARANTIE LIMITÉE – ORDINATEURS ET PÉRIPHÉRIQUES PANASONIC
Couverture – Panasonic Canada Inc. (« PCI ») garantit à l’acheteur original que ce produit informatique (à l’exclusion des supports des
logiciels) est, au moment de sa vente par PCI ou d’un revendeur agréé par PCI, exempt de défauts de pièces et de fabrication dans les
conditions normales d’utilisation, et ce, pendant la période de couverture de la garantie, sous réserve des modalités décrites ci-dessous.
Un (1) an à partir de la date
d’achat original.
Défauts de pièces et de fabrication
Quatre-vingt-dix (90) jours à
partir de la date d’achat original.
Aucune couverture
Défauts de pièces et de fabrication
Recours – Pour obtenir des informations sur la marche à suivre dans le cas où une réclamation en vertu de la garantie deviendrait
nécessaire, communiquez par téléphone avec un représentant de PCI au 1-800-668-8386, entre 9h00 et 17h00 (heure de l’Est) du lundi
au vendredi (sauf les jours fériés), avant l’échéance de la garantie applicable, en prenant soin d’identifier la nature de la défaillance. Un
reçu ou toute autre pièce justificative de la date d’achat original sera exigé avant toute réparation. Toute pièce défectueuse couverte par
la présente garantie limitée sera réparée ou remplacée par une pièce neuve ou remise à neuf. Le remplacement ou la réparation sera fait
conformément aux modalités de la présente garantie limitée pendant la durée restante de la période originale de la garantie.
Produits non couverts – La présente garantie limitée ne couvre pas les produits achetés à l’extérieur du Canada. Elle ne couvre
pas non plus les dommages, la défaillance ou les défauts attribuables à une manutention inadéquate, une mauvaise installation, une
utilisation anormale ou abusive, de la négligence, un accident, un déversement ou la pénétration d’un objet étranger, une modification, un cas fortuit ou une réparation effectuée par une personne non agréée par PCI.
CE PRODUIT N’EST PAS DESTINÉ À ÊTRE UTILISÉ, EN TOUT OU EN PARTIE, COMME SYSTÈME/ÉQUIPEMENT NUCLÉAIRE,
SYSTÈME/ÉQUIPEMENT DE CONTRÔLE DU TRAFFIC AÉRIEN OU SYSTÈME/ÉQUIPEMENT DE POSTE DE PILOTAGE D’AVION*3.
PANASONIC DÉCLINE TOUTE RESPONSABILITÉ CONCERNANT L’UTILISATION DE CE PRODUIT DANS LES CAS SUSMENTIONNÉS.
*3 Les SYSTÈMES/ÉQUIPEMENTS DE POSTE DE PILOTAGE D’AVION sont dotés de systèmes OEPP (organiseur électronique
de poste de pilotage) de classe 2 et de classe 1 utilisés pendant des phases critiques de vol (par exemple, pendant le décollage
et l’atterrissage) et (ou) montés sur l’avion. Les systèmes OEPP de classe 1 et de classe 2 sont définis par le circulaire d’information FAA : AC (Advisory Circular) 120-76 A ou le feuilet n°36 JAA :JAA TGL (Temporary Guidance Leaflets) No 36.
EXPÉDITION DU PRODUIT POUR SERVICE SOUS GARANTIE
Emballez soigneusement le produit, de préférence dans son emballage d’origine. Joignez une description de la défaillance de
même qu’une pièce justificative de la date d’achat. Panasonic Canada Inc. ne peut être tenue responsable pour tout dommage ou
perte subi pendant le transport si vous avez choisi le transporteur.
GARANTIE LIMITÉE – SUPPORTS DES LOGICIELS
Couverture – Panasonic Canada Inc. (« PCI ») garantit à l’acheteur original que la ou les disquettes ou tout autre support sur lequel
le ou les programmes sont fournis sont exempts de défauts de pièces et de fabrication dans des conditions normales d’utilisation au
Canada, et ce, pour une période de soixante (60) jours suivant la date de réception indiquée sur la preuve d’achat.
LA PRÉSENTE GARANTIE EST LA SEULE OFFERTE PAR PCI COUVRANT LES SUPPORTS DE LOGICIELS. PCI ne garantit
pas les logiciels. Reportez-vous à la garantie écrite du concédant de licence d’utilisation du logiciel (qui accompagne la copie du
logiciel) pour toute réclamation en vertu de la garantie.
Réclamation – marche à suivre – Panasonic Canada Inc. remplacera toute disquette ou support défectueux si l’article en question est
retourné, port payé, à son service de Marketing – produits informatiques, 5770 Ambler Drive, Mississauga (Ontario) L4W 2T3, dans les soixante (60) jours suivant la date d’achat original. Joignez à votre envoi une pièce justificative de votre achat et une description du problème.
Recours – La responsabilité de PCI - et votre seul recours - dans le cas de toute défaillance couverte par la garantie sur ce support de
logiciel est limitée au seul remplacement du support. Elle ne couvre aucun autre dommage, y compris, mais non exclusivement, la
perte d’usage ou de profits, ni aucun dommage spécial, indirect ou consécutif, ni aucune autre réclamation de nature similaire ou autre.
Produits non couverts – La présente garantie limitée ne s’applique pas si la ou les disquettes ou autre support ont été utilisés dans
un produit d’une marque autre que Panasonic ou dans des conditions environnementales autres que celles spécifiées par PCI ou le
fabricant, ou soumis à une mauvaise utilisation, à la négligence, à une manutention inadéquate ou encore si le programme a été modifié ou subi une tentative de modification ou des dommages attribuables à un accident ou à un cas fortuit. De plus, PCI n’assume
aucune responsabilité pour toute perte de, ou tout dommage à, un programme, des données ou un support de sauvegarde amovible.
Getting Started
• Tous les articles consommables incluant les pellicules protectrices, chiffons de nettoyage, étuis de transport, longes et sangles
Type de couverture
Useful Information
Trois (3) ans à partir de la date Défauts de pièces et de fabricad’achat original.
tion
Troubleshooting
Durée de couverture
• Ordinateurs blocs-notes (sauf batteries) et adaptateur secteur
• Options installées en usine/par PCI incluant : WAN sans fil,
GPS, Bluetooth, lecteur d’empreintes digitales, clavier rétroéclairé, carte mémoire et lecteurs (disquettes, CD/DVD)
• Écran mobile sans fil
• Ensembles PDRC – ACL et clavier
• Duplicateur de port
• Ordinateurs de poche
• Batterie
• Chargeur de batterie
• Adaptateur pour voiture
• Périphériques USB
• Stylo pointeur standard ou pour numériseur graphique
Appendix
Éléments couverts
GÉNÉRALITÉS
PCI NE RECONNAÎT AUCUNE AUTRE GARANTIE, EXPLICITE OU IMPLICITE, Y COMPRIS, MAIS NON EXCLUSIVEMENT, LES
GARANTIES IMPLICITES DE VALEUR COMMERCIALE ET D’UTILITÉ À UNE FIN QUELCONQUE, À L’ÉGARD DU LOGICIEL,
SUPPORTS DE LOGICIELS, PRODUITS INFORMATIQUES, PÉRIPHÉRIQUES ET ACCESSOIRES.
SOUS AUCUNE CIRCONSTANCE PCI NE POURRA ÊTRE TENUE RESPONSABLE DES DOMMAGES SPÉCIAUX, INDIRECTS OU CONSÉCUTIFS ATTRIBUABLES À UN MANQUEMENT AUX GARANTIES LIMITÉES DÉCRITES DANS LE PRÉSENT DOCUMENT OU À L’UTILISATION DU
PRODUIT INFORMATIQUE, Y COMPRIS, SANS RESTRICTION, LA PERTE DE DONNÉES, D’AFFAIRES, D’ACHALANDAGE OU DE PROFIT.
DANS TOUS LES CAS, LA RESPONSABILITÉ MAXIMALE DE PCI POUR TOUT MANQUEMENT NE POURRA EXCÉDER LE
PRIX DE VENTE DU PRODUIT INFORMATIQUE.
AUCUNE RÉCLAMATION, SANS ÉGARD À SES MOTIFS, NE POURRA ÊTRE FAITE AUPRÈS DE PCI PLUS DE DEUX (2) ANS
APRÈS LES FAITS INVOQUÉS À LA BASE D’UNE TELLE RÉCLAMATION.
Garantie statutaires – Certaines juridictions interdisent de telles limitations ou exclusions; aussi, pourraient-elles ne pas s’appliquer.
41
MEMO
42
43
Troubleshooting
Operation
As an ENERGY STAR® Partner, Panasonic Corporation has determined that this product meets
the ENERGY STAR® guidelines for energy efficiency.
Outline of the International ENERGY STAR® Office Equipment Program
The international ENERGY STAR® Office Equipment Program is an international program that promotes energy
saving through the use of computers and other office equipment. The program backs the development and dissemination of products with functions that effectively reduce energy consumption. It is an open system in which business proprietors can participate voluntarily. The targeted products are office equipment such as computers,
displays, printers, facsimiles, and copiers. Their standards and logos are uniform among participating nations.
For information about ENERGY STAR®, refer to the following web side:
Web Site: www.energystar.gov
22-M-1
Panasonic Computer Solutions Company
3 Panasonic Way, Panazip 2F-5,
Secaucus, NJ 07094
© Panasonic Corporation 2008
Printed in Japan
Panasonic Canada Inc.
5770 Ambler Drive Mississauga,
Ontario L4W 2T3
HS1008-0
DFQW5225ZA