1
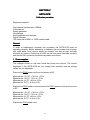
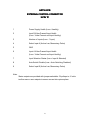
ARTS-201B
2 x 1 Analog Protection Switch
RJM & Associates, LLC
175 Joerschke Drive, Suite A
Grass Valley, CA 95945
Phone: 530-205-3437 Fax: 530-273-8482
info@rjmandassociates
www.rjmandassociates.com
Statement of Warranty
RJM & Associates, LLC warrants its products for a period of three (3) years from
the date of shipment to be free from defects in materials and workmanship and
meets applicable published specifications. Equipment which has been operated
within its ratings and has not been subjected to mechanical or other abuse or
modification by the purchaser, its agents, and/or employees, will, at the option of
RJM, be replaced or repaired if it is returned, freight prepaid, to RJM &
Associates, LLC. Equipment that fails under conditions other than described
herein will be repaired at the price of components and labor in affect at the time
of repair.
This warranty is in lieu of all other warranties, expressed or implied, with respect
to the condition or performance of any RJM product, its merchantability or fitness
for a particular purpose. RJM is not liable for any consequential damages.
FCC Compliance
This equipment has been tested and found to comply with the limits for a Class A
digital device pursuant to Part 15 of the FCC Rules. These limits are designed to
provide reasonable protection against harmful interference when the equipment
is operated in a commercial environment. This equipment generates, uses, and
can radiate radio frequency energy and, if not installed and used in accordance
with the instruction manual, may cause harmful interference to radio
communications. Operation of this equipment in a residential area is likely to
cause harmful interference in which case the user will be required to correct the
interference at his own expense.
Copyright
© 2014 RJM & Associates, LLC
Contents of this publication may not be reproduced in any form without the
written permission of RJM. Reproduction or reverse engineering of copyrighted
software is prohibited.
July 2014
Part Number 7171-0023
0023
Table of Contents
Introduction
Important Safeguards and Notices ............................................................................i
Important Warnings and Cautions ............................................................................ ii
Warnings ............................................................................................................ ii
Cautions ............................................................................................................ iii
North American Power Supply Cords ................................................................ iv
Section I
General Description ................................................................................................ 2
Section II
Specifications .......................................................................................................... 4
Section III
Installation ............................................................................................................... 6
Section IV
Circuit Description ................................................................................................... 8
Video Path ......................................................................................................... 8
Audio Path ......................................................................................................... 9
GPI Path.......................................................................................................... 10
Control Logic ................................................................................................... 10
Status Output .................................................................................................. 11
Power Supply/Regulators ................................................................................ 12
Section V
Calibration procedure ............................................................................................ 13
General ........................................................................................................... 13
Power supplies ................................................................................................ 13
Video ............................................................................................................... 14
Audio ............................................................................................................... 15
Section VI
Diagrams............................................................................................................... 17
External Control Connector Pin Assignment .................................................... 18
GPI A & B Connector Pin Assignment ............................................................. 19
Important Safeguards and Notices
Information on the following pages provides important safety
guidelines for both Operator and Service personnel. Specific
warnings and cautions will be found throughout the manual
where they apply, but may not appear here. Please read and
follow the important safety information, noting especially those
instructions related to risk of fire, electric shock or injury to
persons.
WARNING
Any instructions in this manual that require opening the
equipment cover or enclosure are for use by qualified service
personnel only. To reduce the risk of electric shock, do not
perform any servicing other than that contained in the operating
instructions unless you are qualified to do so.
so.
Symbols and Their Meaning in This Manual
The lightning flash with arrowhead symbol, within an equilateral
triangle, alerts the user to the presence of “dangerous voltage”
within the product’s enclosure that may be of sufficient
magnitude to constitute a risk of electric shock to persons.
The exclamation point within an equilateral triangle alerts the
user to the presence of important operating and maintenance
(servicing) instructions in the literature accompanying the
appliance.
This symbol represents a protective grounding terminal. Such a
terminal must be connected to earth ground prior to making any
other connections to the equipment.
The fuse symbol indicates that the fuse referenced in text must
be replaced with one having the ratings indicated.
i
Important Warnings
Warnings and Cautions
Warnings
•
Heed all warnings on the unit and in the operating instructions.
•
Do not use this product in or near water.
•
Disconnect ac power before installing any options.
•
This product is grounded through the grounding conductor of the
power cord. To avoid electrical shock, plug the power cord into a
properly wired receptacle before connecting the product inputs
or outputs.
•
Route power cords and other cables so that they are not likely to
be damaged.
•
Disconnect power before cleaning. Do not use liquid or aerosol
cleaners; use only a damp cloth.
•
Dangerous voltages exist at several points in this product. To
avoid personal injury, do not touch exposed connections and
components while power is on.
•
Do not wear hand jewelry or watches when troubleshooting high
current circuits, such as the power supplies.
•
During installation, do not use the door handles or front panels
to lift the equipment as they may open abruptly and injure you.
•
To avoid fire hazard, use only the specified correct type, voltage
and current rating as referenced in the appropriate parts list for
this product. Always refer fuse replacements to qualified service
personnel.
•
To avoid explosion, do not operate this product in an explosive
atmosphere unless it has been specifically certified for such
operation.
•
Have qualified personnel perform safety checks after any
completed service.
ii
Warnings (continued)
•
If equipped with redundant power, this unit has two power cords.
To reduce the risk of electrical shock, disconnect both power
supply cords before servicing.
•
This equipment may employ laser(s). If it does, they comply
with the current construction requirements of the code of
Federal regulations, title 21, chapter I, subchapter J, sections
1010.2 and 1010.3 and sections 1040.10 and 1040.11.
•
Do not attempt to view light output of the laser transmitter, eye
damage may result. Always use an optical power meter to verify
laser output.
•
To prevent injury:
Never install telephone wiring during a lightning storm.
Never install telephone jacks in wet locations unless the jack is
specifically designed for wet locations.
Never touch uninsulated telephone wires or terminals unless the
telephone line has been disconnected at the network interface.
Use caution when installing or modifying telephone lines.
Cautions
•
When installing this equipment, do not attach power cord to
building surfaces.
•
To prevent damage to equipment when replacing fuses, locate
and correct the trouble that caused the fuse to blow before
applying power.
•
Verify that all power supply lights are off before removing power
supply or servicing equipment.
•
Use only specified replacement parts.
•
Follow static precautions at all times when handling this
equipment.
iii
Cautions (continued)
•
Leave the back of the frame clear for air exhaust cooling and to
allow room for cabling. Slots and openings in the cabinet are
provided for ventilation. Do not block them.
•
Front door is part of fire enclosure and should be kept closed
during normal operation.
•
This product should be powered on as described in the manual.
To prevent equipment damage select the proper line voltage at
the ac input connector as described in the Installation
documentation.
•
To prevent damage to this equipment read the instructions in
this document for proper input voltage range selection.
•
To reduce the risk of electric shock, ensure that the two power
supply cords are each plugged into a separate branch circuit.
•
Circuit boards in this product are densely populated with surface
mount and ASIC components. Special tools and techniques are
required to safely and effectively troubleshoot and repair
modules that use SMT or ASIC components. For this reason,
service and repair of RJM products incorporating surface mount
technology are supported only on a module exchange basis.
Customers should not attempt to troubleshoot or repair modules
that contain SMT components. RJM assumes no liability for
damage caused by unauthorized repairs. This applies to both inand out-of-warranty products.
North
North American Power Supply Cords
This equipment is supplied with molded grounding plug (NEMA 515P) at one end and molded grounding connector (IEC 320-C13) at
the other end. Conductors are CEE color coded, light blue (neutral),
brown (line) and green/yellow (ground).
Operation of this equipment at voltages exceeding 130 VAC will
require power supply cords which comply with NEMA
configurations.
iv
Note:
This equipment has been tested and found to comply with the limits
for a class A digital device, pursuant to Part 15 of the FCC Rules.
These limits are designed to provide reasonable protection against
harmful interference when the equipment is operated in a
commercial environment. This equipment generates, uses, and can
radiate radio frequency energy and, if not installed and used in
accordance with the instruction manual, may cause harmful
interference, in which case the user will be required to correct the
interference at his own expense.
v
SECTION 1
ARTSARTS-201B
General description
The RJM ARTS-201B functions as an analog input transfer unit that can switch
between two sets of input signals, A and B, either automatically or manually,
using either a local or remote A/B switch. When operating in the automatic switch
mode, the switch is determined by the presence of video on the in-use video
input. If video goes away on the selected (in-use) input and video is present on
the non-selected input, then a switch to the non-selected input will occur. If no
video is present on the non-selected input then no switch will occur.
There are three types of signal inputs to the ARTS-201B for each of the A and B
inputs; analog video, analog audio and GPI. The video input terminates in 75
ohms and has a differential input to remove any common mode hum. There are
two 75 ohm BNC connectors for the video switch output. There are four channels
of balanced audio. Each audio input is passively looped to a second connector
for monitoring purposes. All balanced audio inputs are high impedance, greater
than 100K ohms. There is a single connector for each audio channel output.
There are five GPI lines, plus a dedicated line that indicates the A and B
receiver’s health. This line is sensed by the ARTS-201B and indicated on the
External Control connector.
The output of the ARTS-201B will be either the A or B inputs of video, audio and
GPI. During the transfer from one input to the other, all channels (video, audio
and GPI) switch together. The video switch is not vertical interval.
Some of the other features of the ARTS-201B include:
•
When the unit is in the automatic mode, if the signal fails on the A input
the unit switches to the B input. A jumper is provided on the module to
allow the user to define whether the unit returns to the A input upon return
of the A signal or that the unit remains on the B input until it is manually
returned to the A input. The return-to-A-signal mode can be delayed by an
adjustment to allow from 1 to 5 seconds after return of A signal before the
unit switches back to the A input. Default mode is remain-on-B.
•
Relays are provided for both the video and audio signal inputs that will
allow the A input signal to be re-routed to the #1 output, bypassing the
changeover function, upon loss of power to the changeover unit.
•
Video monitor outputs for A and B inputs. These monitor outputs are postgain so that they represent the true video input of the A/B switch.
•
A jumper is provided on the main module that defines whether the unit
powers up in the automatic or manual mode. Default mode is automatic.
The audio connections are made with separate three-pin Weco-type connectors
for each audio channel. The connectors have a removable mate that is wired to
the audio cable with screw down compression terminals. The input and output
audio connections are all the same style connectors.
All GPI connections are 9 pin ‘D’. The input ‘D’ connectors for the GPIs are
female, while the output of the switch is a 9 pin male ‘D’ connector. The switch
between GPIs is made with relays so that the logic level passes through the
switch unaltered. Default mode is the A signal passing to the output. See the
table on page 19 for the pin out of the connector.
There is an External Control connector, which is a female 9 pin ‘D’. The External
Control is used for external transfer control and also function monitoring of the
ARTS-201B. See the table on page 18 for the pin out of the connector.
The frame has space for two power supplies for redundancy, with the output of
each supply voltage diode OR’d with the same output of the other supply. Each
supply has its own AC line connection. If either supply fails or the AC line fails,
then the other supply will keep the unit running.
2
SECTION II
ARTSARTS-201B
Specifications
Video:
Inputs:
Number
Input type
Impedance
Common Mode Rejection (CMRR)
Return Loss
Level
Maximum level, (differential)
Outputs:
Number
Return loss
Impedance
Level
Horizontal Tilt
Vertical Tilt
Differential gain
Differential phase
Chrominance/luminance delay
Hum
Signal to noise ratio
Crosstalk
Response, minimum equalization
Response, maximum equalization
(assumes 1505A or 8281 coax)
Differential delay
DC offset
2 (Input A & Input B)
Differential, video instrumentation
>100KΩ, bridging to 75Ω
>70dB
>46dB @ 5MHz
1 volt peak-to-peak nominal, 2v max
±2v
2
>35dB @ 5MHz
75Ω 0.1%
1 volt peak-to-peak nominal, 2v max
0%, DC coupled
0%, DC coupled
<0.2%, 10 to 90% APL @ 3.58MHz
<0.2º, 10 to 90% APL @ 3.58MHz
<±5nsec
<1mV
>70dB weighted to 20MHz
>-60dB @ 5MHz
<±0.05dB to 5MHz
<±0.2dB to 10MHz
+0, to -1dB @ 20MHz
<±0.1dB to 5MHz
<±0.25dB to 10MHz
+0, to -1dB @ 20MHz
<0.5º @ 3.58MHz
<±50mV
3
ARTSARTS-201B Specifications, (cont.)
Audio:
Inputs:
Number
Impedance
Input type
Common Mode Rejection (CMRR)
Maximum level
Outputs:
Number
Output type
Impedance
Maximum level
Gain
Total Harmonic Distortion (THD)
Intermodulation Distortion (IMD)
Response
Crosstalk
Signal to noise ratio
8, (4 Channels Input A & 4 Channels
Input B)
>100KΩ
Balanced, differential
>70dB, 20Hz to 20KHz
+22dBu
4 (1 per channel)
Balanced around ground
<10Ω
+22dBu
Unity, ±6dB by internal adjustment
<0.02% 20Hz to 20KHz @ +24dBu
<0.02% 4:1 SMPTE
<±0.1dB, 20Hz to 20KHz
+0, -0.3dB @ 100KHz
>80dB referenced to 0dBu
>86dB
GPI Interface:
Connector type
Contact closure current
Contact closure power
9-pin “D”
0.5 Amp maximum
10VA maximum
Power requirements
115/230VAC, 50/60 Hz
36VA maximum
(18VA each power supply)
Size
1.75” x 19” x 10”
Weight
≈7 lbs
•
Specifications and design are subject to change without notice.
4
3 kg
SECTION III
ARTSARTS-201B
Installation
The RJM ARTS-201B input transfer unit is designed to be mounted in a standard
19” equipment rack. There are no special cooling requirements though care
should be taken to ensure that extremely hot equipment is not installed directly
beneath. It is also recommended that, if possible, one rack-unit of space be left
above the unit.
Unless specified at the time of order, the ARTS-201B is shipped from the factory
for nominal 117VAC 60Hz power. The unit is supplied with a 120V type AC plug.
If it is desired to operate at 230VAC 50Hz, then a selector switch must be set on
the power supply. The supply is removed from the frame, the switch set to
230VAC, and then the supply replaced in the frame.
The two analog video inputs are internally terminated at 75Ω. The second
connector for each input, marked MON, can be used as a monitor of the input.
This connector receives its signal from an internal post-gain amplifier, which
allows the operator to confirm and make gain adjustments to the signal that is
being fed to the A/B video switch. If these connectors are not used, they should
be terminated.
Audio input and output cables must be wired to conform to the silk-screen on the
rear of the frame. All connectors have the same orientation. Shield (or ground) is
the center of the three pins. Use care to maintain the polarity as shown, so that
input phases match the output.
An internal adjustment, labeled VID DELAY (R28
R28),
R28 allows for a delay of the
automatic changeover from one input signal to the other. This has the effect of
delaying the detection of the absence of video for up to one second. If vertical
pulses become present again on the in-use channel before the one second timeout, the video presence will not indicate a loss of video. This keeps the logic from
switching to the opposite input for very short losses of video. Moving the delay
clockwise will increase the delay.
If the unit is to be switched remotely by a computer or similar device please note
that the ground signal applied to pins #4 or #9 of the External Control connector
must be maintained for a minimum of 20msec in order for the vertical interval
switch pulse to operate the logic. These pins are normally held at +5v on the
module.
5
Two jumpers are provided on the main module to allow for certain user defined
operations:
J9 is utilized to determine whether the ARTS-201B unit is powered up in the
automatic or manual mode. After power up, the pushbutton inside the front cover
can always be used to override the power up selection.
When the unit is in the automatic mode, if the signal fails on the A input the unit
switches to the B input. A jumper (J10
J10)
J10 is provided on the module to allow the
user to define whether the unit automatically returns to the A input upon return of
A signal or whether it remains on the B input until it is manually returned to the A
input. The return-to-A-signal mode can be delayed by an adjustment (R177
R177)
R177 to
allow from 1 to 5 seconds after return of A signal before the unit switches back to
the A input. This is included to allow the A signal to stabilize before returning to
the A signal position. The manual changeover pushbutton switch located in the
front cover, as well as the remote changeover pins in the External Control
connector continue to provide for manual operation of the unit.
6
SECTION IV
ARTSARTS-201B
Circuit description
Video Path:
Path
Only one signal path, A, will be described since both A and B paths are the
same. The signal comes from the input BNC on the motherboard and onto the
main board where it is terminated in 75 ohms. The video is then fed into the
differential amplifier U16. This amplifier is a true differential amp, and will reject
common mode signals such as AC line hum due to ground loops or AC cabling
running in parallel with the video cable. The input stage’s gain is set with a
variable pot R71 that can be adjusted to compensate for any gain inaccuracies in
the remainder of the path to the output. The next stage has an adjustable
equalization circuit to compensate for cable runs of up to 100 meters of Belden
8281 cable, or equivalent. This essentially operates as a unity gain stage when
the R6 pot is adjusted to the end closest to the amplifier’s output. As the pot is
adjusted to the opposite end, the equalization network attached to the wiper
connection of R6 begins to have more effect. The equalization network, by rolling
off the higher frequencies, causes the gain of the amplifier to rise at higher
frequencies. Resistor R11 sets the DC gain and low frequency gain of the
amplifier, which compensates for the cable loss at DC from the cable resistance.
There are three different destinations for the video signal after the gain stage.
One is to the sync separator U19, which is used to determine video presence. A
second destination is to the monitor amplifier U18, which has a gain of two to
drive a source terminated output. U18’s input is also shared by the output
amplifier/mux, U21, which does the actual selection of either the A or B input. A
resistor-capacitor divider network is shared by both the U18 and U21 amplifiers,
which is used to adjust the overall frequency response of both the monitor and
main output of the RTU. The output amplifier drives two video output BNC
connectors through the 75 ohm source resistors R23 and R24.
A dual form C relay has been inserted into the video path. One section, K4B, is
located at the A Video Input and selects whether the input signal passes to U16,
or whether it bypasses the entire 2x1 switching system. The other section, K4C,
is located after the 2x1 switch, U21. During normal operation the relay coil is
energized and K4B passes the input signal through the input amplifier U16,
equalizer U17 and 2x1 switch U21 to K4C to the output BNC connectors. Should
there be a power failure within the unit, the relay drops to the relaxed mode, and
the video input signal is routed directly to PGM output #1. When power is
restored, the relay coil is re-energized and the signal is again routed to the 2x1
switch output via U16, U17 and U21. The relay coil is powered from the -15 volt
regulator U37.
7
The sync separator U19, which is a vertical sync output, is used to trigger a retriggerable one shot. The one shot timing is adjusted by the current into C22 from
the current source comprised of Q1 and U38. The current source is adjustable
with R28 over a range such that timing can be varied from 100ms to 1 second.
This has the effect of delaying the absence of video for up to one second. If
vertical pulses become present before the one second time-out the video
presence will not indicate a loss of video. This keeps the logic from switching to
the opposite input for extremely short losses of video.
Audio Path:
Only one path will be described since all four inputs and paths are alike. The
input comes into a differential stage U39A, with high impedance buffers to keep
the input impedance at or above 100K ohms. U1 provides the actual differencing
of the balanced inputs. Common mode signals such as AC line hum are rejected
by this stage. This stage has a gain of –6 dB which is made up in the balanced
output stage. The output of U1 feeds the switch of U9 which selects either A
inputs or B inputs. The output of the switch feeds an adjustable gain stage U11,
which compensates for gain inaccuracies of the output stages. The output is a
balanced output which has a gain of +6 dB when measured across the output
positive to negative output pins.
As described above in the video path, form C relays are included in all four
output channels which provide a path from module input directly to module
output in the event of power failure of the ARTS-201B. All four channels of A
audio are also routed to NC contacts on relays K5, K6, K7 and K8. The NO
energized side of these relays comes from the four output amplifiers, U11, U12,
U13 and U14 and the common pin connects to the audio output connectors.
Should there be a power failure within the unit, all four relays drop to the relaxed
mode, and the audio input signal is routed directly to PGM output. When power is
restored, the relay coils are re-energized and the output signal is again derived
from the 2x1 switches U9 and U10. The relay coils are powered from the -15 volt
regulator U37.
8
GPI Path:
The A and B GPI inputs enter on female 9 pin ‘D’ connectors. The output GPI
connector is a 9 pin ‘D’ male connector. The A and B GPI’s each go to opposite
sides of a form C relay with the common pin of the relay going to the output GPI
connector. In the relaxed position, the A input is passing through the relay to the
output connector. The relay is controlled by a logic level to the input of U15:H.
The output of U15:H is an open collector output which saturates to ground. When
the collector is turned on, it turns on relays K1 through K3, which will select the B
GPI inputs. One of the GPI lines is dedicated to receiver health, which is
monitored by the logic on board and reported on one of the external control
outputs.
Control Logic:
Whether or not A inputs or B inputs are selected is determined by the state of D
flip-flop U27:B outputs. There are two ways to effect a change on the outputs of
U27:B. One is with the preset and clear inputs, and the other is with the clock
input. The preset and clear lines are affected by the “Select A” and the “Select B”
inputs that come in through the External Control connector. The clear line is also
affected by the logic state of the Power on Reset circuitry of C30, D20 and either
R47 or R175 depending on the position of jumper J9. Normally the preset and
clear is always driven by a high state but at power up a low logic level at the
input to U32:D is inverted to a high state which causes XOR gate U31:D to invert
the normally high level from U29:C to a low logic level. This clears U27:B, putting
a logic high on the Q output, which forces selection of the A inputs at power on.
The Select A or Select B control signals are buffered by U31:A and :B and their
logic sense can be inverted by opening or closing S4:A and :B. If either Select
input is activated a positive going edge will be produced at the input to the one
shot U28:B. If S4:D is closed, an output pulse forms the one shot, which will gate
a low logic level through U29 to either the preset or clear of U27:B. This causes
the A or B inputs to be selected. If the S4:D is open then the selected input on
Select A or B lines will cascade through U29 gates to always set or clear U27:B
as long as that input is activated, whereas with S4:D open a pulse will set or
clear U27:B when the Select lines are first activated. Leaving S4:D open causes
an override of the second means to change the state of U27:B, which is through
the clock input to U27:B.
There are two ways to clock U27:B which will cause the output to toggle between
states. First is from the A/B Select momentary switch S2 on the front edge of the
board. Pushing S2 triggers one shot U26:A which sends a positive going pulse to
the clock input of U27:B causing it to toggle and select the opposite input. The
second way is caused by the loss of video on the active input. Assume the case
where A is selected with video present and B has video present. Under these
9
conditions, if A video goes away a positive going pulse edge will be created at
the input to U27:B clock and the output will toggle to the B inputs. This can only
occur if the unit is in Auto mode. U32:B locks out edges that could change the
selected inputs due to loss of video on the active channel.
The Manual/Auto function that controls NAND gate U32:B is activated by either
the Remote Auto/Man input from the External Control connector or from the front
edge momentary switch S1 or by the position of J9 at power on. S1 triggers one
shot U26:A, which toggles U27:A between manual and auto modes. The Remote
Auto/Man input can have its logic polarity changed with S4:C. After being
buffered by U31:C, the remote input triggers one shot U26:B, which in turn
triggers U26:A. This then toggles the state of the Manual/Auto lines. At power on,
if the J9 jumper is positioned to AUTO then the action of C30 charging will preset
the Q output of U27:A high, which sets the system to the AUTO mode.
Alternately, if the J9 jumper is set to MANUAL, U27:A will be cleared at power on
and the system will set to MANUAL mode.
AUTO RETURN TO A INPUT operates only in the AUTO mode. As long as the B
input is selected and A video is not present U49 is held in its reset state. The
action of A video going away sets a high on the Q output of U52:A. This high is
fed to one of the inputs of NAND gate U50:D, which will allow a Force-A signal to
pass through to the output of U51:D. Once a Force-A signal has forced the
system back to the A input, U51:D will clear U52:A and the Force-A signal will
not have an effect until the A video input is not present again. The A signal must
be present for a time-out period set by R177, from approximately 1 to 5 seconds.
The 3-input NAND gate, U53:A, insures that no more pulses from the counter
U49 will be created for the Force-A signal. The delay created by R184 and C132
insures that a 4µsec pulse will be present for the Force-A signal.
Status Outputs:
Status is available for different functions on the External Control connector. Each
output is an open collector output with a jumper-selectable pull-up resistor of 1K
ohms to +5 volts. There are five such outputs. The first one is A input health and
A video present, which will go to a high state if input health is bad or video is not
present. Second output is the same as the first but for the B input health and B
video present. The third output indicates the health of the power supplies in the
frame. If either supply goes down then the output goes high. The fourth status
output is for switch selection status. A low on this output indicates the A is
selected and a high indicates B is selected. The final output indicates the number
of inputs, where a low indicates one input and a high indicates two inputs. This
indication is changed with a slide switch, S3.
10
Power Supply / Regulators:
The unregulated voltage to the voltage regulators on the main board comes from
either of two power supplies that can be removed at the front of the RTS frame
for service and replacement. Each unregulated supply has an input fuse and a
115/230VAC selector switch, and contains the circuitry that monitors the positive
and negative outputs, and reports the power supply condition on one pin to the
main board. A dual color LED on the front of the power supply displays its health.
Green indicates normal operation, or healthy condition. Red indicates a problem
with that supply. The output of the supply is diode OR’d to its respective supply
bus.
There are four regulators on the main board, one for each of the voltages. Three
of the regulators are linear voltage regulators. U36 controls the +15 volts, U37
the -15 volts and U43 controls the -5 volts. The +5 volts is controlled by a
switching regulator U35.
11
SECTION
SECTION V
ARTSARTS-201B
Calibration procedure
Equipment required:
Dual channel oscilloscope, >50MHz.
Video test set.
Sweep generator.
Vectorscope.
Audio generator and analyzer.
Digital voltmeter.
100 meter reel of 8281 or 1505A coaxial cable.
General.
In order to satisfactorily complete this procedure the ARTS-201B must be
operating correctly. Before attempting to calibrate the unit ensure that all audio
and video paths, from input to output, are present, and that all logic and tally
functions are correct. Check that all LEDs on the front panel illuminate correctly
and that the GPI connector functions are present and correct.
1. Power supplies.
The voltages shown on the main board test points are nominal. The circuits
employed in the ARTS-201B are not voltage level sensitive and the voltage
values are not adjustable.
Remove the PS#2 power cord from the source of AC.
Measure the +15v TP, +14.5v to +15.5v.
Measure the -15v TP, -14.5v to -15.5v.
Measure the +5v TP, +4.8v to +5.2v.
Measure the -5v TP, -4.8v to -5.2v.
Replace the PS#2 power cord and remove the PS#1 power cord from the source
of AC.
Measure the +15v TP, +14.5v to +15.5v.
Measure the -15v TP, -14.5v to -15.5v.
Measure the +5v TP, +4.8v to +5.2v.
Measure the -5v TP, -4.8v to -5.2v.
Replace the PS#1 power cord.
12
2. Video.
Terminate the primary and backup input loops and output #2 with precision 75Ω
terminations.
2.1
Connect a one volt peak-to-peak staircase signal to the ‘A’ input. Operate the
front push-button to ensure that the ‘A’ green status LED is illuminated. Connect
output #1 to the oscilloscope and terminate in 75Ω.
2.2
Adjust A GAIN (R71
R71)
R71 for one volt peak-to-peak at the output. Check with the
vectorscope that the output differential phase is less than ± 0.1° and that the
differential gain is less than ± 0.1%. Move the output cable to output #2 and
confirm the same results.
2.3
Connect the sweep generator to the ‘A’ primary input. Adjust the sweep for 30
MHz bandwidth and 100mV level. Set R137 to the mechanical center of its
range.
2.4
Adjust C70 for the best response out to 30 MHz. It may be necessary to adjust
R137 for optimum results. Confirm that the response conforms to the
specifications listed in section II.
2.5
Connect the sweep generator to the primary input through the 100 meter reel of
coax cable.
2.6
View the response and adjust A GAIN (R71
R71)
R6)
R71 for the correct level and EQ (R6
R6 for
the flattest response. It may be necessary to adjust C70.
C70 Confirm that the
response conforms to the specifications listed in section II.
2.7
Remove the 100 meter cable, turn EQ fully counter-clockwise, and adjust the
output level to one volt peak-to-peak.
2.8
Repeat 2.1 through 2.7 with input signals applied to the ‘B’ input and with the ‘B’
green status LED illuminated.
13
2.9
Connect a one volt peak-to-peak signal to the ‘A’ input. Connect a different one
volt peak-to-peak signal to the ‘B’ input. Operate the front push-button to ensure
that the ‘B’ green status LED is illuminated. Connect output #1 to the
oscilloscope and terminate in 75Ω. Confirm that the ‘B’ signal appears on the
output.
2.10
Disconnect all power to the unit and confirm that the ‘A’ video input signal is
routed to output #1.
3. Audio.
3.1
Operate the front push-button to ensure that the ‘A’ green status LED is
illuminated.
3.2
Connect a 1KHz. +22dBu balanced audio signal to the ‘A’ primary input #1.
3.3
Monitor the #1 output and adjust GAIN 1 (R77
R77)
R77 for +22dBu.
3.4
Move the 1KHz. +22dBu balanced audio signal to the ‘A’ primary input #2.
3.5
Monitor the #2 output and adjust GAIN 2 (R80
R80)
R80 for +22dBu.
3.6
Move the 1KHz. +22dBu balanced audio signal to the ‘A’ primary input #3.
3.7
Monitor the #3 output and adjust GAIN 3 (R83
R83)
R83 for +22dBu.
3.8
Move the 1KHz. +22dBu balanced audio signal to the ‘A’ primary input #4.
3.9
Monitor the #4 output and adjust GAIN 4 (R86
R86)
R86 for +22dBu.
3.10
Connect a 1KHz. +22dBu balanced audio signal to the ‘A’ primary input #1.
14
3.11
Disconnect all power to the unit and confirm that the ‘A’ audio input signal is
routed to the ‘A’ channel output.
3.12
Repeat steps 3.10 and 3.11 for all four channels.
15
SECTION VI
ARTSARTS-201B
Diagrams
External Control Connector Pin Assignments
GPI A & B Connector Pin Assignments
16
ARTSARTS-201B
EXTERNAL CONTROL CONNECTOR
9-PIN ‘D’
1
Power Supply Health (Low = Healthy)
2
Input B Video Present/Input Health
(Low = Video Present and Input Healthy)
3
Number of Inputs (Low = 1 Input)
4
Select Input A (Active Low, Momentary Pulse)
5
GND
6
Input A Video Present/Input Health
(Low = Video Present and Input Healthy)
7
Input Selection Status (Low = Input A Selected)
8
Auto Switch Disable (Low = Auto Switching Disabled)
9
Select Input B (Active Low, Momentary Pulse)
Note:
Status outputs are provided with jumper-selectable 1K pullups to +5 volts
to allow one or more outputs to source current into optocouplers.
17
ARTSARTS-201B
GPI A,
A, B and Output CONNECTOR
9-PIN ‘D’
1
GND
2
Receiver Health
3
GPI 2
4
GPI 4
5
GND
6
GND
7
GPI 1
8
GPI 3
9
GPI 5
18