1
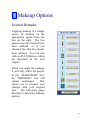
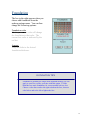
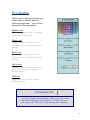
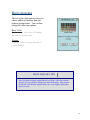
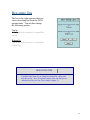
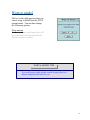
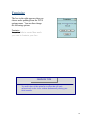
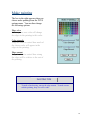
User’s Manual
Table of Contents
1) Getting started
Installing the program
Starting the program
Putting your picture on your computer
2) General Options
3) Feature Outlining
Creating an outline
Outline fine tuning
3
3
4
5
6
9
10
13
4) Makeup Options
14
Foundation
Lipstick
Lip liner
Eye shadow
Eye liner
Brow mascara
Blush
Hairstyle
Auto- makeover
15
16
17
18
19
20
21
22
23
4) PLUS Options
24
Bee-stung lips
De-age
Warp to model
Feminize
Make painting
Botox
Nose job
Blend faces *
Glitter
25
26
27
28
29
30
31
32
33
6) Sample Sessions
34
Session 1
Session 2
7) Problems
*
34
38
43
This feature available only in the purchased version.
2
1
Getting started
Congratulations on purchasing the most advanced virtual
makeover system on the market today. The Mirror of Beauty
will allow you to achieve a number of new and exciting looks
with a minimum of effort. The following sections will help you
to install the program and to use it to maximum advantage.
Installing the program
1. Download the installation file.
2. Install the program by clicking on Mirror.exe.
3. You will also need a copy of the Java interpreter. It is likely that you already
have a copy of this program, but if get a message saying it is not present when you
start the MIRROR go to http://java.sun.com/getjava to download this (click on the
Windows (U.S. English) JRE).
4. Click on the MIRROR shortcut on your desktop to start the program.
5. Contact us at [email protected] regarding any difficulties with the
program.
3
Starting the program
Normally when you start the program, the dialog box below will appear. You
have two sets of choices. First, you can choose among the four existing models
pictured. Alternatively, you can load your own picture by clicking on the button.
If you choose to do this, a new dialog box will appear and you will be able to
choose the file containing your picture. If this is a new face, you will be asked to
outline your features (Chapter 3). Otherwise you can click on any of the three
files associated with your face (the original picture, the makeover picture, and the
file that contains the outline information), and start your makeover right away
(Chapter 2). The next section describes how to take your picture and place it on
your computer in order to perform a makeover on it.
4
Putting your picture on your computer
Taking your picture
You have two choices for loading your picture onto your computer:
i) Via a digital camera (or webcam)
Take your picture and upload it to your hard disk. Place it in a folder of your choosing in one of
the formats described below. When you choose “Load Your Picture” you will be able to
browse and find your picture. Clicking on your file will load your picture into the program.
ii) Via a scanner
Take your picture with a conventional camera. Scan it into computer and save it in a folder of
your choosing in one of the formats described below. When you choose “Load Your Picture”
you will be able to browse and find your picture. Clicking on your file will load your picture
into the program.
Picture format
You have a choice of three formats in which to save your picture:
i) jpeg
Jpeg format is a standard format for pictures. When you save your picture in this format, you
will typically have a choice of quality. The higher the quality, the larger the file, and vice versa.
For the purposes of the MIRROR, yo u should save your picture at a medium quality or better
for best results.
ii) png
Png format is a newer format that may not be available depending on how recently you bought
your picture-editing software. It is, however, to be preferred to gif format (below) for
photographs, and will yield better results.
iii) gif
Gif format is a flexible format for pictures; however, it does not always represent skin colors
well because of a limitation on the number of colors. You may find that it is sufficient for the
Mirror, though, depending on the lighting and your skin color.
Picture appearance
You should keep in mind the following points when taking your picture
i) Face appearance
Best results are obtained if you are facing into the camera as in the models on the bottom of the
previous page. Crop your picture so that your face occupies a relatively large amount of the
picture as in the case of the models. If possible, use a well- lit picture (many image and photo
manipulation programs will allow you to adjust the brightness of the picture).
ii) Picture size and resolution
The MIRROR can read any size picture; however, if narrower than 180 pixels wide or greater
than 320 pixels wide it will be adjusted to fit in these dimensions. You should store your
picture in 72dpi if possible.
iii) Hair
If you wish to add different hairstyles to your picture, pull your hair all the way back and away
from your face as in the case of the first three models in the picture at the bottom of the previous
page. If you do not wish to do this, you do not need to do anything special to your hair (as in
the case of the fourth model).
5
2
General Options
The main screen for the program is shown above. This screen will appear after
you have outlined the features on a new face, or if you have chosen a face that has
already been outlined. Two faces will always be shown. The first is the original
picture (on the left) which is unaffected by any operations you may apply to your
face. The second is the makeover picture (to the right), which will show any
changes that you make. You then have a choice of the following options.
Fine Tune Outline
This option allows you to fine-tune the features of the face. You typically will do
this when you first outline the face, and thereafter to perfect the results of the
makeup options. This option is described in more detail on p. 13.
Get New Face
This option allows you to choose a new face (either one of the four models or a
picture of your choosing). This option is described in more detail on p. 4.
6
General Options (cont.)
Revert to Original Face
This option allows you to replace the makeover face with the original face to
restart your makeover. All changes that you have made to the makeover face will
be lost unless you have previously saved it (see the Save option, below). Note
also that if you have changed the shape of your face by using the “bee-stung”,
“de-age”, “warp to model”, “feminize”, or “nose job” options, AND you have
saved the result, then you may have to fine tune your feature outline to make it
match the structure of your original face.
Help
This option will display help for this screen. You can also receive help with a
particular option (for example, apply lipstick) by clicking on the “?” in these
dialog boxes.
Quit
Click on this to quit the program. You can also quit at any time by clicking on the
close window button in the top right hand corner.
Save
Click on this to save the changes you have made. Two types of changes will be
saved. First, any outlining changes will be saved. Second, any change to the
makeover face will be changed. Thus, the next time you load the same face, the
makeover that you previously created will appear in the makeover window.
NOTE: Your makeover will be present in a JPEG file with the same name as your original
file, with “(mkr)” appended to it. For example, if your file name was “mypic.jpg” you can
find the makeover in the same folder with the name “mypic.jpg(mkr)”. You can access
this file in an image processing program other than the MIRROR if you wish.
Save as
This option works in an identical fashion to “Save” except that you will be able
give your changes a new name and/or put them in a different folder.
Print
Click on this to print the makeover face (the original face will not be printed).
Makeup options
Click on the desired makeup option to bring up a dialog box for that option.
These options are described fully in Chapter 4.
PLUS Options
Click on this button to bring up another menu with the special options in the
MIRROR. These options are described fully in Chapter 5.
7
General Options
(cont.)
Undo-Redo
After making a change, you will
always have the option of undoing
that change. The undo option will
appear in the bottom left of the
makeover window. Simply click on
the arrow to go back to the previous
picture.
For example, the makeover window
to the right appears after adding
lipstick to the first model. To remove
the lipstick, click on the arrow next to
“undo”. Once you have clicked on
this option, a redo button will appear
on the right of the window. This
option will redo the option you have
just undone.
8
3 Feature Outlining
General Remarks
Before a makeover can take place, the facial features must be
outlined. These include the profile as a whole, the eyebrows,
the eyes, the nose, and the lips. Fortunately the MIRROR has a
number of advanced features that make this task easy and
efficient. If the face is new, you will be asked to place a mask
over the face and the program will automatically find the facial
features. This is described in the next section. Once your face
has been outlined, it can be fine-tuned at any time. This is
described in the subsequent section.
9
Creating an Outline
If the face has not been
previously outlined, the
window to the right will
appear. The following two
modes then allow you to fit
the mask (the blue outline) to
the face:
Clicking and dragging in the
outline window will change
the position of the mask
when this mode is activated
(by clicking on this icon).
Clicking and dragging in the
outline window will change
the size of the mask when
this mode is activated (by
clicking on this icon).
Moving up will increase the
size and moving down will
decrease the size.
10
Creating an Outline (cont.)
You should attempt to align
your mask as in the picture to
the right.
Note: To achieve the best
results concentrate on
matching the eyes and the
bottom of the chin; the other
features are not as important.
For example, in the picture on the
right, the mouth in the mask is not
aligned with the actual mouth. This
should not affect the program’s
ability to find the mouth and the other
facial features.
11
Creating an Outline (cont.)
When you click on “Find
outline”, the program will
attempt to form an outline of
your facial features. The
result for the previous
example is shown to the
right. You will then have
three choices:
Reposition Mask
If there is a large difference between
the result and your features, you may
want choose this option and try again.
Fine Tune Outline
If there are some minor differences
between the mask and your features,
you can go to this option to fine tune
the outline (this is described in the
next section).
Start Makeover
If there is a good match between the
mask and your face, then you may
wish to start your makeover directly.
You can then fine-tune the outline at
any time if this turns out to be
necessary.
12
Outline Fine Tuning
When you click on “Fine Tuning”,
you will see a window similar to the
one on the right. You can then
choose the feature you wish to adjust
by clicking on the appropriate icon
(your choices are listed below). The
outline itself can then be adjusted by
clicking and dragging on the light
blue dots which form the outline.
Click on this icon to adjust the profile
(the outline of the face as a whole).
Click on this icon to adjust the outline
of the lips.
Click on this icon to adjust the nose
outline.
Tuning Complete
Click on this button when you have
completed the fine-tuning process
and you are ready to start the
makeover.
Click on this icon to adjust the outline
of the eyes.
FINE TUNING TIP
Click on this icon to adjust the outline
of the eyebrows.
Click on this icon at any time to see
the ideal outlining for the given
feature.
If you wish to save the finetuning so that you do not have
to repeat it for each session,
choose the SAVE option from
the main screen (p. 7).
13
4
Makeup Options
General Remarks
Applying makeup is a simple
matter of clicking on the
appropriate option from the
box on the right. The box
appears once the features have
been outlined, or if you
choose a face that has already
been outlined. You can also
click on PLUS Options, which
are described in the next
chapter.
When you apply the makeup,
it will only affect the picture
in the “MAKEOVER” box;
the “ORIGINAL” box will
remain unchanged.
This
allows you to compare your
changes with your original
face. The following pages
describe in detail the makeup
options.
14
Foundation
The box to the right appears when you
choose add foundation from the
makeup options menu. You can then
change the following options:
Foundation color
Clicking once on a color will change
the foundation to that color. The
current face color is indicated by the
red dot.
Amount
Drag the slider to the desired
foundation thickness.
FOUNDATION TIPS
Foundation is probably the single most important makeup you can
apply to your face, so take your time with this option. To hide
blemishes use more foundation; for a more natural look use less.
Choose a color above and to the right to darken the face; choose a
color below and to the left to lighten the face.
15
Lipstick
The box to the right appears when
you choose add lipstick from the
makeup options menu. You can
then change the following options:
Lipstick color
Clicking once on a color will
change the lipstick to that color.
Thickness
Drag the slider to the desired
lipstick amount.
Gloss
Make the lips glossier by dragging
the slider to the right.
LIPSTICK TIPS
Normal lipstick colors are located toward the center; more exotic
colors can be found on the sides and on the top row. Add gloss to
achieve a more alluring look; leave gloss off for a “work” look.
16
Lip liner
The box to the right appears when
you choose add lip liner from the
makeup options menu. You can
then change the following options:
Lip liner color
Clicking once on a color will
change the lip liner to that color.
Thickness
Drag the slider to the desired lip
liner amount.
LIP LINER TIPS
Unless you are trying for something special, us a lip liner color
slightly darker than the same color as your lipstick. You can adjust
the liner position by first fine-tuning the lip outline if necessary.
17
Eye shadow
The box to the right appears when you
choose add eye shadow from the
makeup options menu. You can then
change the following options:
Shadow color
Clicking once on a color will change
the shadow to that color.
Above eyes
Drag the slider to specify the area
above the eyes on which the shadow
appears.
Below eyes
Drag the slider to specify the area
below the eyes on which the shadow
appears.
Side of eyes
Drag the slider to specify the area to
the side of the eyes on which the
shadow appears.
Thickness
Drag the slider to add the desired
shadow amount.
EYE SHADOW TIPS
To create a “normal” look, increase the “Above eyes” slider to max
(this will take the shadow up to the brows). To create a cat’s eye
look, increase the “Side of eyes” slider and increase the thickness.
18
Eyeliner
The box to the right appears when you
choose add eyeliner from the makeup
options menu. You can then change
the following options:
Liner color
Clicking once on a color will change
the liner to that color.
Pencil size
Drag the slider to change the width of
the eyeliner.
Thickness
Drag the slider change the amount of
liner the pencil adds.
EYE LINER TIPS
Before applying eyeliner, make sure the outline of the eye conforms
to the eye precisely for the best results (to adjust the eye outline, go
to the “Fine Tune Outline” option, and click on the eye).
19
Brow mascara
The box to the right appears when you
choose add brow mascara from the
makeup options menu. You can then
change the following options:
Brow Color
Clicking once on a color will change
the mascara to that color.
Amount
Drag the slider to change amount of
mascara added.
BROW MASCARA TIPS
Once you have carefully outlined the brows (in the “Fine Tune Outline”
option), don’t be afraid of adding brow mascara liberally. Most women
look better with full and complete brows in a color slightly darker than
their hair color.
20
Blush
The box to the right appears when you
choose add blush from the makeup
options menu. You can then change
the following options:
Blush color
Clicking once on a color will change
the blush to that color.
Blush area
Drag the slider to change the area over
which blush is added.
Thickness
Drag the slider to change the amount of
blush added.
BLUSH TIPS
Blush should be felt but not seen. Add a moderate amount of pink blush
to achieve a healthy glow.
21
Hairstyle
The box to the right appears when you
choose change hairstyle from the
makeup options menu. You can then
change the following options:
Hair color
Clicking once on a color will add dye of that
color to the current hair.
Color strength
Drag the slider to change the amount of hair
color that is added.
Hair style groups
Click on one the drop-down menu to see the
available style groups (you may need to scroll
up or down to see all available groups). To
add a downloadable group to this list, go to
www.mirrorofbeauty.com, click on “Hair
Styles”, and follow the directions (version 1.4
or higher, only).
Move or resize hair
To move the hair style to better fit your face,
click anywhere in the box that appears in the
makeover window and drag. To resize the
hair style, click on one of the yellow circles,
and drag. In both cases, the result will appear
once you release the mouse.
HAIR TIPS
Best results are achieved if your hair is pulled back fully from your face
in your original picture. If you have already added hair and you want to
change your hairstyle, choose “Revert to Original Face” and then add the
new hair.
22
Auto-makeover
This box is produced when you first
click on auto-makeover. It shows a
number of looks without added hair.
This box is produced when you
choose makeovers with added
hairdo.
AUTO-MAKEOVER TIPS
Each click on the wild card symbol (in the bottom right) will
produce a new randomly generated look.
23
5
Plus Options
General Remarks
Applying a PLUS option is a
simple matter of clicking on
the appropriate option from
the box on the right. The box
appears when you choose the
“PLUS Options” from the
Makeup Menu. You can click
on “Makeup Options” to
return to this menu.
When you apply a PLUS
option, it will only affect the
picture in the “MAKEOVER”
box; the “ORIGINAL” box
will remain unchanged. This
allows you to compare your
changed face with your
original face. The following
pages describe in detail the
PLUS options.
PLUS OPTIONS TIP
Clicking on “Apply” for a given option will allow you to see the
effect of this change without permanently changing the
MAKEOVER face. Then click “OK” to make the change
permanent, or “Cancel” to ignore the changes.
24
Bee-stung lips
The box to the right appears when you
choose bee-stung lips from the PLUS
options menu. You can then change
the following options:
Top lip
This controls the amount to expand the
top lip.
Bottom lip
This controls the amount to expand the
bottom lip.
BEE-STUNG TIPS
It usually looks better if you enlarge the bottom lip a little more
than the top lip. Also, for optimal results, make sure the lips are
outlined correctly (see Fine Tune Outline, chapter 3).
25
De-age
The box to the right appears when you
choose de-age from the PLUS options
menu. You can then change the
following options:
De-age amount
This controls how far to go back in
time.
DE-AGE TIPS
Although it may be tempting to try to maximize the de-age effect, a
more natural and subtle de-aging effect may be achieved by trying a
small amount first.
26
Warp to model
The box to the right appears when you
choose warp to model from the PLUS
options menu. You can then change
the following options:
Warp amount
This controls how much your face will
be transformed into the typical facial
structure seen in a model.
WARP to MODEL TIPS
Try a small warp to model and then a small de-aging effect for a
dramatic change that still looks like you.
27
Feminize
The box to the right appears when you
choose make painting from the PLUS
options menu. You can then change
the following options:
Feminize
Drag the slider to control how much
you want to feminize your face.
FEMINIZE TIPS
Try small values of this option for an effect that will work
unconsciously on the viewer without fundamentally altering your
facial structure.
28
Make painting
The box to the right appears when you
choose make painting from the PLUS
options menu. You can then change
the following options:
Edge color
Clicking once on a color will change
the edges in the painting to this color.
Color strength
Drag the slider to control how much of
the chosen color will appear in the
edges in the painting.
Edge amount
Drag the slider to control how strong
the edges will be relative to the rest of
the painting.
PAINTING TIPS
To make a line drawing, turn up the edge amount. To make a more
realistic painting, keep it at a low value.
29
Botox
The box to the right appears when you
choose botox from the PLUS options
menu. You can then change the
following options:
Forehead
Drag the slider to adjust the amount of
botox added on the forehead.
Around eyes
Drag the slider to adjust the amount of
botox added to the sides and beneath
the eyes.
Between eyes
Drag the slider to adjust the amount of
botox added between the eyes.
Around mouth
Drag the slider to adjust the amount of
botox added to the sides and below the
mouth.
BOTOX TIPS
Like all plastic surgery options in the MIRROR, this option is for
entertainment only. Please contact a qualified doctor before
embarking on any plastic surgery.
30
Nose job
The box to the right appears when you
choose nose job from the PLUS
options menu. You can then change
the following options:
Reduce width
Drag the slider to adjust the amount of
width reduction that will occur.
Reduce length
Drag the slider to adjust the amount of
length reduction that will occur.
NOSE JOB TIPS
As we age, the nose grows in length and becomes wider at the tip.
Thus, to achieve a younger look, reduce both the width and length of
the nose.
31
Blend faces
(purchased version only)
The box to the right appears when you
choose blend faces from the PLUS
options menu. You can then change
the following options:
Load new face to blend with
Click on this option first to load the face that
you with to blend with your face. NOTE:
This must be a face that you have previously
outlined in the MIRROR. This will be a file
which ends in “(vmp)”. You should select a
file with this ending. If you have selected a
valid face, it will appear in the window at the
top of this box.
Face
Drag the slider to adjust the degree to which
you wish to blend the new face with your
face.
Background
Drag the slider to adjust the amount of
background to blend with the current picture.
In the default “none” position, only your face
itself will be affected by this option. Note:
the background may be smaller than your
picture. In this case, you can save your
makeover and crop it in a photo-editing
program (the makeover will be saved with the
in a file ending with “(mkr)”.
BLEND FACES TIPS
Blending works best if the face you are blending with is well- lit and
does not contain shadows. Experiment with different slider settings
to get the best result.
32
Glitter
The box to the right appears when you
choose nose job from the PLUS
options menu. You can then change
the following options:
Glitter colors
Choose the color of glitter to add to
your face.
Amount
Drag the slider to adjust the amount of
glitter that will be added.
GLITTER TIPS
Each click on apply will add glitter from scratch. Keep clicking until
you get the look you want. Use lighter colors for a dramatic effect,
darker ones for a subtler look.
33
6
Sample Sessions
Session 1: Younger woman, added hairdo
In this session, we will
transform a younger
woman and add a new
hairdo to her picture. The
woman is the first model in
the program. You can
follow along by first
selecting this face in the
starting menu of the
program; the makeover
window will then appear as
on the right.
(i) The first thing we will
do is add the default
foundation as depicted in
the dialog box below.
34
Session 1 (cont.)
(ii) Next we will add
glossy lipstick in a
dramatic color:
(iii) The subtle addition of
eye shadow in a similar
color to the lipstick makes
the eyes more prominent:
35
Session 1 (cont.)
(iv) The addition of
eyeliner enhances this
effect:
(v) Eyebrow mascara also
helps draw attention to the
eyes.
36
Session 1 (cont.)
(v) Finally, we make the
most dramatic addition,
hair:
The difference between the initial and final pictures shows that a
large change can be achieved with relatively little effort:
Original Image
Makeover Image
37
Session 2: Older woman; PLUS options
In this session, we will
transform an older woman
but leave her hair as it is.
The woman is the fourth
model in the program.
You can follow along by
first selecting this face in
the starting menu of the
program; the makeover
window will then appear as
on the right.
(i) The first thing we will
do is remove some
wrinkles using the botox
options listed below; the
result is shown on the
right.
38
Session 2 (cont.)
(ii) As women age, their
nose gets longer and wider.
In some cases such as in
the case of this model it
may be desirable to reduce
this to some extent:
(iii) Next, we will add a
moderate amount of
foundation in the closest
color to the woman’s face:
39
Session 2 (cont.)
(iv) A moderate amount of
lipstick and gloss never
hurts:
(v) Next we enhance the
eyebrows:
40
Session 2 (cont.)
(vi) And add some eye
shadow to further highlight
the eye region:
(vii) Finally, we highlight
the eyes themselves with
eyeliner:
41
Session 2 (cont.)
Compare the final result with the initial image. Notice that
not only does the woman look younger and more attractive;
her hair also looks better even though it we didn’t change it
at all. The eye does not evaluate each feature individually;
rather, it makes a quick judgment of the overall
attractiveness of the face.
Original Image
Makeover Image
42
7
Problems
If you have any difficulties installing or running the
MIRROR, contact us at [email protected] and
we will get back to you as soon as possible.
43