1
PCnet™ Family
Network Driver Installation Guide
Revision 4.0
March 1998
The information contained in this document is subject to change without notice. Advanced Micro Devices makes no
warranty of any kind with regard to this material including, but not limited to, the implied warranties of merchant
ability and fitness for a particular purpose. Advanced Micro Devices shall not be liable for errors contained herein or
for incidental or consequential damages in connection with the furnishing, performance, or use of this material.
© Copyright 1998 by Advanced Micro Devices, Inc.
All rights reserved.
This document contains information that is protected by copyright. All rights reserved. No part of this document
may be photocopied, reproduced, or translated to another language without the prior written consent of Advanced
Micro Devices, Inc.
The following are trademarks of Advanced Micro Devices and may be used to identify AMD products: PAL, AMD,
TPEX, PCnet.
Ethernet is a registered trademark of Xerox Corp.
Novell and Netware are registered trademarks of Novell, Inc.
PC-NFS and Solaris are trademarks of SunSoft Microsystems, Inc.
LAN Server and IBM are registered trademarks of International Business Machines Corp.
Microsoft, LAN Manager, Windows for Workgroups, Windows 95, and Windows NT are registered trademarks of
Microsoft.
Unix is a registered trademark of AT&T Technologies, Inc.
SCO is a registered trademark of Santa Cruz Operation, Inc.
Artisoft and LANtastic are registered trademarks of Artisoft, Inc.
Banyan and VINES are registered trademarks of Banyan Systems.
Intel is a registered trademark of Intel Corporation.
Other product names used in this publication are for identification purposes only and may be trademarks of their
respective companies.
Contents
Contents
1.
PCNET FAMILY SOFTWARE......................................................................................................... 1
2.
AMD'S SOFTWARE DRIVER POLICY ........................................................................................... 3
2.1.
2.2.
2.3.
3.
OBJECT CODE FOR INTERNAL TESTING ............................................................................................ 3
OBJECT CODE FOR DISTRIBUTION ................................................................................................... 3
SOURCE CODE FOR MODIFICATIONS AND DISTRIBUTION .................................................................... 3
AMINSTAL UTILITY ....................................................................................................................... 5
3.1.
RUNNING AMINSTAL.................................................................................................................... 5
3.1.1.
PCnet Family Installation Main Window............................................................................... 7
3.1.2.
Automatic Card Configuration Window ................................................................................ 9
3.1.3.
Custom Card Configuration Window ................................................................................. 10
3.1.4.
PCnet Driver Installation Window ...................................................................................... 11
3.1.5.
Diagnostics Window.......................................................................................................... 13
3.2.
CARD CONFIGURATION ................................................................................................................ 15
3.2.1.
PCnet-ISA Adapter Card................................................................................................... 15
3.2.2.
PCnet-ISA+ and PCnet-ISA II Adapter Card...................................................................... 18
3.2.3.
PCnet-32 Adapter Card..................................................................................................... 23
3.2.4.
PCnet-PCI Adapter Card................................................................................................... 26
3.3.
DRIVER INSTALLATION .................................................................................................................. 28
3.4.
OEM CUSTOMIZATION ................................................................................................................. 29
4.
AUTOMATIC OEM INSTALLATION............................................................................................. 31
5.
INSTALLING NOVELL NETWARE ODI DRIVERS....................................................................... 33
5.1.
NOVELL NETW ARE DOS ODI CLIENT ........................................................................................... 33
5.1.1.
Driver Installation Using the AMINSTAL Utility................................................................... 33
5.1.2.
Driver Installation From The Command Line Prompt ......................................................... 34
5.1.3.
Driver Installation For The LAPP Driver............................................................................. 35
5.1.4.
Keyword Examples ........................................................................................................... 37
5.2.
NOVELL NETW ARE OS/2 ODI CLIENT........................................................................................... 38
5.2.1.
Keyword Examples ........................................................................................................... 39
5.3.
NOVELL NETW ARE SERVER 3.11.................................................................................................. 40
5.3.1.
Keyword Examples ........................................................................................................... 42
5.4.
NOVELL NETW ARE SERVER 3.12.................................................................................................. 43
5.4.1.
Keyword Examples ........................................................................................................... 45
5.5.
NOVELL NETW ARE SERVER 4.X .................................................................................................... 46
5.5.1.
Keyword Examples ........................................................................................................... 48
5.6.
NOVELL NETW ARE OPERATING SYSTEM KEYWORDS ...................................................................... 52
6.
INSTALLING THE NDIS 2.01 DRIVER ......................................................................................... 57
6.1.
DRIVER INSTALLATION USING THE AMINSTAL UTILITY ................................................................... 57
6.2.
MICROSOFT LAN MANAGER ......................................................................................................... 59
6.2.1.
Driver Installation Using Microsoft LAN Manager Setup Utility ........................................... 59
6.2.2.
File Examples ................................................................................................................... 61
6.2.3.
Keyword Examples ........................................................................................................... 62
6.3.
MICROSOFT W INDOWS FOR W ORKGROUPS 3.1.............................................................................. 63
6.3.1.
Keyword Example............................................................................................................. 64
6.4.
MICROSOFT W INDOWS FOR W ORKGROUPS 3.11............................................................................ 65
6.4.1.
Keyword Example............................................................................................................. 67
i
PCnet Family Network Driver Installation Guide
6.5.
MICROSOFT W INDOWS 95............................................................................................................ 68
6.6.
IBM LAN SERVER ...................................................................................................................... 69
6.6.1.
Driver Installation For IBM Extended Services 1.0 ............................................................. 70
6.6.2.
Driver Installation For IBM LAN Server 4.x (DOS Client) ................................................... 71
6.7.
SUNSOFT PC-NFS ..................................................................................................................... 72
6.8.
ARTISOFT LANTASTIC .................................................................................................................. 73
6.9.
BANYAN VINES .......................................................................................................................... 76
6.9.1.
Files Required................................................................................................................... 76
6.9.2.
User Must Create.............................................................................................................. 76
6.9.3.
User Must Find ................................................................................................................. 77
6.10.
DEC PATHWORKS FOR DOS/WINDOW V5.1 INSTALLATION ........................................................ 78
6.11.
NDIS 2.01 DRIVER KEYWORDS ................................................................................................ 79
7.
INSTALLING THE NDIS 3.X AND 4.X DRIVERS.......................................................................... 81
7.1.
INSTALLATION OF THE NDIS 3.X DRIVER ........................................................................................ 81
7.1.1.
Microsoft Windows NT ...................................................................................................... 81
7.1.2.
Microsoft Windows for Workgroups 3.11 ........................................................................... 83
7.1.3.
Installation of the NDIS 3.x Win 95 Driver.......................................................................... 85
7.1.4.
Win 95 NDIS 3.x Driver Installation When Controller Is Not Detected On System Boot..... 86
7.1.5.
Installation of the WINNT 3.51 NDIS 3.x Driver ................................................................. 87
7.2.
INSTALLATION OF THE NDIS 4.X DRIVER ........................................................................................ 89
7.2.1.
Microsoft Windows NT ...................................................................................................... 89
8.
8.1.
8.2.
9.
INSTALLING THE SCO UNIX LLI DRIVER (ODT 3.0 AND BELOW)........................................... 91
DRIVER INSTALLATION FROM THE COMMAND LINE PROMPT.............................................................. 91
SCO UNIX LLI DRIVER KEYWORDS ............................................................................................... 94
INSTALLING THE SCO UNIX MDI DRIVER (SCO OPENSERVER 5.0 AND ABOVE) ................. 97
9.1.
SCO UNIX MDI DRIVER KEYWORDS ............................................................................................. 97
10.
INSTALLING THE SCO MDI DRIVER (RELEASE 4.0) ................................................................ 99
10.1.
SCO MDI SOFTWARE RELEASE 4.0 DRIVER KEYWORDS .......................................................... 100
10.1.1.
LED Keywords................................................................................................................ 100
11. INSTALLING THE SCO UNIXWARE 1.1 DLPI DRIVER............................................................ 105
11.1.
11.2.
11.3.
DRIVER INSTALLATION USING THE DESKTOP GUI ..................................................................... 105
DRIVER INSTALLATION FROM THE COMMAND LINE PROMPT ....................................................... 108
UNIXWARE 1.1 DLPI DRIVER KEYWORDS ................................................................................ 112
12. INSTALLING THE SCO UNIXWARE 2.X DLPI DRIVER ........................................................... 115
12.1.
UNIXWARE 2.X DLPI DRIVER KEYWORDS ................................................................................ 115
13. INSTALLING THE VXWORKS DRIVER ..................................................................................... 117
13.1.
13.2.
INTRODUCTION...................................................................................................................... 117
INSTALLATION PROCEDURE .................................................................................................... 117
14. INSTALLING THE SUNSOFT SOLARIS DRIVER...................................................................... 119
14.1.
SUNSOFT SOLARIS DRIVER KEYWORDS................................................................................... 121
15. INSTALLING THE PACKET DRIVER......................................................................................... 123
15.1.
15.2.
15.3.
15.4.
DRIVER INSTALLATION USING THE AMINSTAL UTILITY ............................................................. 123
DRIVER INSTALLATION FROM THE COMMAND LINE PROMPT ....................................................... 124
KEYWORD EXAMPLE .............................................................................................................. 124
PACKET DRIVER KEYWORDS .................................................................................................. 124
ii
Contents
16. INSTALLING THE DMI COMPONENT INTERFACE (CI) ........................................................... 127
16.1.
DESKTOP MANAGEMENT INTERFACE (DMI) .............................................................................. 127
16.1.1.
Service Layer.................................................................................................................. 128
16.1.2.
Component Interface (CI)................................................................................................ 128
16.2.
DMI INSTALLATION PROGRAM (DMI VERSION 1.1) ................................................................... 129
16.2.1.
Invoking DMINSTL.......................................................................................................... 129
16.2.2.
Editing Input.................................................................................................................... 131
16.2.3.
Starting the Installation Program ..................................................................................... 131
16.2.4.
Exiting The Installation Program...................................................................................... 133
16.3.
DMI INSTALLATION PROCEDURE (DMI VERSION 2.0)................................................................ 133
17. INSTALLING A UNIVERSAL BOOT ROM............................................................................................. 135
18. APPENDIX A: NET.CFG OPTIONS FOR NOVELL NETWARE ................................................. 139
18.1
18.2
CONVENTIONS ...................................................................................................................... 139
OPTIONS .............................................................................................................................. 139
19. APPENDIX B: SOFTWARE KEYWORDS (FOR ALL DRIVERS)............................................... 143
19.1
COMMON KEYWORDS ............................................................................................................ 143
19.1.1
PORT ............................................................................................................................. 143
19.1.2
INT ................................................................................................................................. 143
19.1.3
DMA ............................................................................................................................... 144
19.1.4
Full Duplex...................................................................................................................... 144
19.2
AMD DRIVER SPECIFIC KEYWORDS ........................................................................................ 147
19.2.1
DMAROTATE ................................................................................................................. 147
19.2.2
BUSTYPE = bus ............................................................................................................. 147
19.2.3
TP .................................................................................................................................. 147
19.2.4
LED0 = XXXX................................................................................................................. 147
19.2.5
LED1 = XXXX................................................................................................................. 148
19.2.6
LED2 = XXXX................................................................................................................. 148
19.2.7
LED3 = XXXX................................................................................................................. 148
20. APPENDIX C: DRIVER ERROR MESSAGES............................................................................ 151
20.1
20.2
20.3
20.4
20.4.1
20.5
20.6
20.7
20.8
20.9
20.10
20.11
20.12
NOVELL DOS ODI DRIVER ERROR MESSAGES ........................................................................ 151
CUSTOM DOS ODI DRIVER COUNTERS .................................................................................. 162
NOVELL OS/2 ODI DRIVER ERROR MESSAGES ........................................................................ 164
NOVELL SERVER ODI DRIVER ERROR MESSAGES .................................................................... 169
Custom Netware Server Driver Counters ........................................................................ 177
NDIS 2.01 DRIVER ERROR MESSAGES ................................................................................... 179
NDIS 3.X DRIVER ERROR MESSAGES ..................................................................................... 185
NDIS 4.X DRIVER ERROR MESSAGES ..................................................................................... 188
SCO UNIX LLI DRIVER ERROR MESSAGES ............................................................................ 190
SCO UNIXWARE DLPI DRIVER ERROR MESSAGES................................................................... 195
SUNSOFT SOLARIS DRIVER ERROR MESSAGES ........................................................................ 200
VXW ORKS DRIVER ERROR MESSAGES .................................................................................... 206
PACKET DRIVER ERROR MESSAGES ........................................................................................ 207
21. APPENDIX D: SOFTWARE CERTIFICATION........................................................................... 213
22. APPENDIX E: PCNET FAMILY AMINSTAL UTILITY
22.1
22.2
22.3
22.4
22.5
OEM CUSTOMIZATION GUIDE ........ 215
AMINSTAL UTILITY SOFTWARE ............................................................................................. 215
AMD'S AMINSTAL UTILITY SOFTWARE POLICY ...................................................................... 216
OBJECT CODE FOR INTERNAL TESTING .................................................................................... 216
OBJECT CODE FOR DISTRIBUTION ........................................................................................... 216
AMINSTAL UTILITY CUSTOMIZATION ...................................................................................... 217
iii
PCnet Family Network Driver Installation Guide
22.5.1
22.5.1.1
22.5.1.2
22.5.1.3
22.5.1.4
22.5.2
22.5.2.1
22.5.2.2
22.5.3
22.5.3.1
22.5.3.2
22.5.3.3
Main Window Customization ........................................................................................... 217
Window Title .......................................................................................................................218
Title Line .............................................................................................................................219
AMD Logo ...........................................................................................................................219
Copyright Text Lines............................................................................................................220
PCnet Adapter Card Customization................................................................................. 221
IEEE Address ......................................................................................................................221
PCnet Adapter Card Names ................................................................................................221
Foreign Language Support.............................................................................................. 222
Specifying A Language ........................................................................................................222
Adding the Language...........................................................................................................223
Positioning the Text .............................................................................................................224
23. APPENDIX F: GLOSSARY........................................................................................................ 227
iv
PCnet Family Software
1.
PCnet Family Software
The PCnet Family Licensable Technology Kits include software drivers for AMD's
PCnet Family of Ethernet controllers:
• PCnet-ISA (Am79C960)
• PCnet-ISA+ (Am79C961)
• PCnet-ISA II (Am79C961A)
• PCnet-32 (Am79C965)
• PCnet-PCI (Am79C970)
• PCnet-PCI II (Am79C970A)
• PCnet-FAST (Am79C971)
• PCnet-FAST+ (Am79C972)
Note:
AMD PCnet Family software is backward compatible to the Am2100/Am1500 architecture.
However, the Am2100/Am1500T software drivers for the Am2100/Am1500T/PCnet-ISA
architecture may provide unexpected results with the newer PCnet Family of products.
The AMD PCnet Family software provides support for the following environments:
• Novell Netware 3.1x, 4.x, 5.x (Server ODI, DOS ODI Client, Client 32,
OS/2 ODI Client)
• SCO Unixware 1.1 (DLPI), 2.x
• Microsoft LAN Manager 2.x (NDIS 2.01)
• Microsoft Windows for Workgroups 3.1 (NDIS 2.01)
• Microsoft Windows for Workgroups 3.11 (NDIS 2.01/NDIS 3.x)
• Microsoft NDIS 2.01 compatible network environments
- IBM LAN Server 2.0, 3.x, 4.x
- SunSoft PC-NFS 5.x
- Artisoft LANtastic 6.0
• Microsoft Windows NT 3.1, 3.5 (NDIS 3.x), 3.51 (NDIS 3.x) 4.0 (NDIS 4.x)
• Microsoft Windows 95 (NDIS 3.x, NDIS 4.x)
(Open Desktop (ODT) 3.0, Open Server R3.0, Gemini 1.0)
• SunSoft Solaris 2.1
• Packet Driver (DOS)
1
PCnet Family Network Driver Installation Guide
• Universal Boot ROM
- Novell NetWare 3.1x, 4.x
- Microsoft LAN Manager (Server) 2.x
- IBM LAN Server 2.0, 3.x, 4.x
• VxWorks (for PCnet PCI-II, PCnet-FAST, and PCnet-FAST+)
2
AMD’s Software Driver Policy
2.
AMD's Software Driver Policy
A brief summary of AMD's acquisition and distribution policy associated with PCnetbased drivers is presented below.
2.1.
Object Code for Internal Testing
The AMD driver diskettes are provided free of charge for evaluation purposes only.
Distribution rights must be obtained as detailed below. Copies of these diskettes can
be obtained by contacting your local AMD sales representative.
2.2.
Object Code for Distribution
Unlimited, royalty-free rights to distribute the object code and Boot ROM code in the
AMD driver diskettes (for all AMD-developed Novell drivers, NDIS 2.01, NDIS 3.x,
Packet Driver, and Unix) can be obtained by purchasing a PCnet Licensable
Technology Kit and signing the corresponding license agreement. Contact your local
AMD sales representative for more information.
2.3.
Source Code for Modifications and Distribution
• Source code for the Novell NetWare ODI drivers (Assembly- and C-based) is
available to anyone owning a Novell LAN Driver Development Kit (DDK).
These drivers and all rights associated with them must be obtained by
contacting Novell directly.
• Source code for NDIS 2.01 and Boot ROM can be obtained by purchasing a
source code package from AMD. Contact your local AMD sales representative
for more information.
• Source code for NDIS 3.x and NDIS 4.x for the Microsoft Windows operating
systems can be obtained by purchasing a source code package from AMD.
Contact your local AMD sales representative for more information.
• SCO UNIX source code can be obtained by purchasing a source code
package from AMD. Contact your local AMD sales representative for more
information.
• SCO Unixware source code can be obtained by purchasing a source code
package from AMD. Contact your local AMD sales representative for more
information.
• Wind River VxWorks source code can be obtained by purchasing a source
code package from AMD. Contact your local AMD sales representative for
more information.
3
PCnet Family Network Driver Installation Guide
•
•
•
SunSoft Solaris source code can be obtained by purchasing a source code
package from AMD. Contact your local AMD sales representative for more
information.
Source code for the Packet Driver is included in the AMD Object Code Driver
Diskette.
Source code for AMD's PCnet Family AMINSTAL utility is included with the
PCnet Licensable Technology kits.
Upon purchasing any of the above listed source code packages, customers receive the
rights to modify this source code, recompile, and ship unlimited object code versions of
this modified driver. Customers receive no rights to redistribute source code. However,
customers do receive unlimited object code distribution rights for the unmodified driver.
4
AMINSTAL Utility
3.
AMINSTAL Utility
Connection to an Ethernet network requires an Ethernet adapter card to be configured
and driver software to be installed on the system hard drive. AMD’s PCnet Family
AMINSTAL utility provides an easy-to-use graphical interface to automatically configure
a PCnet (Ethernet) adapter card and install one software driver. The AMINSTAL utility
automatically scans the system bus (ISA, VL, or PCI) to identify which PCnet adapter
card (PCnet-ISA, PCnet-ISA+, PCnet-ISA II, PCnet-32, PCnet-PCI, or PCnet-PCI II) is
present. The PCnet adapter card must then be configured and driver software must be
installed on the system hard drive.
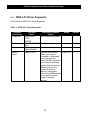
The AMINSTAL utility can be used to install the following drivers:
•Novell NetWare DOS ODI client driver
•NDIS 2.01 driver
For other environments, see the appropriate driver installation section for installation
instructions.
The following drivers may be installed using the AMINSTAL utility or manually at the
command-line prompt:
•NDIS 3.x driver (refer to Section 7)
•SCO UNIX LLI driver (refer to Section 8)
•SCO Unixware DLPI driver (refer to Section 10)
•SunSoft Solaris driver (refer to Section 12)
3.1.
Running AMINSTAL
The AMINSTAL utility requires Microsoft DOS 3.3 or later. To run the AMINSTAL utility,
follow the steps below:
1.
Install the PCnet Ethernet adapter card into the system as described in
the specific PCnet Hardware User’s Manual.
2.
Insert the AMD All Drivers diskette into the floppy drive. Make sure
HIMEM.SYS is present in the CONFIG.SYS file. To run the AMINSTAL
utility faster, copy the disk contents to a temporary directory on the system
hard drive.
3.
Change the directory to the drive and path where the AMINSTAL utility is
located. At the prompt, type:
5
PCnet Family Network Driver Installation Guide
aminstal.exe
Then press <Enter>.
Note:
If the pcnet.txt file is corrupt, the following error message will be displayed:
The pcnet.txt file is an incompatible version.
Please contact an AMD sales representative to receive the
correct version.
The pcnet.txt file is a text file used to specify AMINSTAL’s characteristics. By
changing keywords and text strings in the pcnet.txt file, the AMINSTAL utility
can be customized by OEMs without editing and recompiling the program.
See Section 3.4, OEM Customization, for more information.
4.
Follow the screens to complete the card configuration and driver installation for
the PCnet adapter card. Refer to Figures 1 through 5 for sample AMINSTAL
screens.
Note: Depending on which PCnet adapter card is being configured, the AMINSTAL utility may not
allow certain fields to be modified
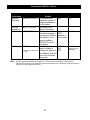
Although the AMINSTAL utility supports a mouse, a key map is provided below to
navigate through the utility without a mouse.
Key
ESC
F1
Tab
Left/Right arrows
<Shift> Tab
Up/Down arrows
ENTER
Space bar
<Alt> Hot Keys
5.
Function
Exit the configuration or help screen
Help
Move the cursor to the next position
Move the cursor left or right
Move the cursor to the previous position
Move the cursor up or down
Select (Highlight)
Select (Highlight)
Select functions
To continue, see Section 3.2, Card Configuration, and Section 3.3, Driver
Installation, for specific PCnet adapter card configurations and software driver
installation.
6
AMINSTAL Utility
3.1.1. PCnet Family Installation Main Window
Figure 1. PCnet Family Installation Main Window
The PCnet Family Installation Main Window has the following six button selections:
Automatic, Custom, Drivers, Diagnostics, Exit, and Help. Before the Main window
appears, the utility searches for a PCnet adapter card in the system. If one is not found,
an error screen is displayed telling the user to install the adapter card before using the
utility. If only one Ethernet card is found and a conflict-free configuration is determined,
the Automatic, Custom, and Drivers buttons are enabled. If more than one card is found
or the configuration has conflicts, only the Custom and Drivers buttons are enabled.
3.1.1.1.
Automatic and Custom
The Automatic and Custom selections of the AMINSTAL utility are used to configure
the PCnet adapter cards. Depending on the PCnet adapter card, the utility allows the
7
PCnet Family Network Driver Installation Guide
user to view and modify the I/O Address, IRQ Level, and DMA Channel settings. The
AMINSTAL utility determines settings that will configure the PCnet card to be
compatible with other card settings in the system. The Automatic selection displays
system compatible settings. The Custom selection displays the current PCnet card’s
settings and allows the user to choose the system compatible settings.
Note:
If multiple adapter cards are present, the AMINSTAL utility permits the user to select each
adapter card in turn and modify its configuration settings as needed.
3.1.1.2.
Drivers
The Drivers selection of the AMINSTAL utility is used to install the software drivers.
Depending on the operating system, the utility allows the user to select a default path
or specify the destination.
3.1.1.3.
Diagnostics
The Diagnostics selection of the AMINSTAL utility is used to determine PCnet
adapter card installation failures. The utility will determine: (1) if the system
conflicts with the PCnet adapter card’s settings, such as I/O, IRQ, DMA, and also
tests T-MAU loopback and EEPROM checksum, and (2) if the PCnet adapter card
is connected to the Local Area Network (LAN).
3.1.1.4.
Exit
The Exit selection of the AMINSTAL utility quits the program.
3.1.1.5.
Help
The Help selection of the AMINSTAL utility displays screen specific information to
aid in making selections. The following three help levels are always available:
Help Level
Button Help
Field-Selected (F1) Help
Dynamic Help
(Context Sensitive)
Description
The major screens contain a help button, which displays
button and field description text when selected.
Displays helpful information about a selected field.
Displays a one-line message at the bottom of the
screen when the mouse cursor passes over the
selectable item.
8
AMINSTAL Utility
3.1.2. Automatic Card Configuration Window
After selecting Automatic in the PCnet Family Installation Main Window, the Automatic
Card Configuration Window appears as shown in Figure 2.
The AMINSTAL utility detects and displays the following information:
• Card Name
• DMA Channel (default)
• Bus Type
• IRQ Level (default)
• Ethernet Address
• Boot ROM Address
• I/O Address
Figure 2. Automatic Card Configuration Window
The Automatic Card Configuration Window has five button selections:
Selection
Configure
Drivers
Main
Exit
Help
Description
To accept proposed values and configure card
To select and install drivers
To return to PCnet Family Installation Main Window
Exits Installation Program and returns to DOS
Gives more help on this screen
9
PCnet Family Network Driver Installation Guide
Refer to Section 3.2, Card Configuration, for configuring a specific PCnet adapter
card.
3.1.3. Custom Card Configuration Window
After selecting Custom in the PCnet Family Installation Main Window, the Custom
Card Configuration Window appears as shown in Figure 3.
The AMINSTAL utility detects and displays the following information:
• Card Name
• I/O Address
• Bus Type
• DMA Channel (default)
• Ethernet Address
• IRQ Level (default)
• Card Configuration
• Boot ROM Address
• Port Mode
Figure 3. Custom Card Configuration Window
The Custom Card Configuration Window has five button selections:
Selection
Configure
Drivers
Main
Description
To accept current values and configure card
To select and install drivers
To return to PCnet Family Installation Main Window
10
AMINSTAL Utility
Exit
Help
Exits Installation Program and returns to DOS
Gives more help on this screen
Refer to Section 3.2, Card Configuration, for configuring a specific PCnet adapter card.
11
PCnet Family Network Driver Installation Guide
3.1.4. PCnet Driver Installation Window
After selecting Drivers in the PCnet Family Installation Main Window (or the
Automatic and Custom Card Configuration Windows), the Driver Installation Window
appears as shown in Figure 4. The PCnet Driver Installation Window can be used to
install the following drivers:
• Novell NetWare DOS ODI client driver
• NDIS 2.01 driver
• Packet driver
• NDIS 2.01 driver to NDIS 2 DOS Driver
• Microsoft LAN Manager/NDIS 2
• IBM LAN Server/NDIS 2
• Windows for Workgroups 3.1/NDIS 2
• Windows for Workgroups 3.11/NDIS 2
• Windows for Workgroups 3.11/NDIS 3
• Windows for Workgroups 3.11/ODI
• Netware 4.x/ODI
• PC-NFS/NDIS 2
• PC-NFS/ODI
• SCO UNIX/Stream Driver
• Windows NT 3.1/3.5/NDIS 3
• Windows NT 3.1/3.5/ODI Requester
The PCnet Driver Installation Window has four button selections:
Selection
Install
Main
Exit
Help
Description
To accept the selections and install the driver
To return to PCnet Family Installation Main Window
Exits Installation Program and returns to DOS
Gives more help on this screen
Refer to Section 3.3, Driver Installation, for complete instructions.
For other environments, refer to the specific driver installation sections (Section 5
through Section 11 in this manual).
12
AMINSTAL Utility
Figure 4. PCnet Driver Installation Window
13
PCnet Family Network Driver Installation Guide
3.1.5. Diagnostics Window
After selecting Diagnostics in the PCnet Family Installation Main Window, the
Diagnostics Window appears as shown in Figure 5. The Diagnostics Window is used to
test the PCnet adapter card configuration. The AMINSTAL utility determines if the
system conflicts with the card’s settings and if the system can communicate with the
PCnet adapter card. The test results are PASS, FAIL, and N/A (Not Applicable).
Figure 5. Diagnostics Window
The I/O Address, DMA Channel, and IRQ Level are configuration settings. A
PASS test result means the system does not have other cards in the system set
to the PCnet card’s settings. A FAIL result means the failed setting conflicts with
another card in the system. Either the PCnet adapter card’s or the conflicting card’s
settings should be changed. Non-conflicting settings are indicated in the
Automatic and Custom configuration windows as blue. A N/A result means the
setting does not apply to the PCnet adapter card.
The loopback test indicates whether the computer system was able to communicate
with the PCnet adapter card. Information is written to the adapter card and then read
from it. A PASS test result means the system could write and read to the adapter
card. A FAIL result means the system could not write and read to the adapter card.
The loopback test is performed for all PCnet adapter cards.
14
AMINSTAL Utility
The Diagnostics Window has four button selections:
Selection
Diagnostics
Main
Exit
Help
Description
To execute diagnostics test
To return to PCnet Family Installation Main Window
Exits Installation Program and returns to DOS
Gives more help on this screen
15
PCnet Family Network Driver Installation Guide
3.2.
Card Configuration
3.2.1. PCnet-ISA Adapter Card
The AMINSTAL utility detects if a PCnet-ISA adapter card is installed. If an adapter
card is not already installed, refer to the PCnet-ISA Hardware User’s Manual for more
information on card installation.
The PCnet-ISA adapter card cannot be configured automatically. To custom configure
the PCnet -ISA adapter card, select Custom in the PCnet Family Installation Main
Window and skip to Section 3.2.1.2, Custom.
3.2.1.1.
Automatic
The Automatic button in the PCnet Family Installation Main Window is not activated
for the PCnet-ISA adapter card.
3.2.1.2.
Custom
After selecting Custom in the PCnet Family Installation Main Window, the Custom
Card Configuration Window appears as shown in Figure 6.
Figure 6. Custom Card Configuration Window
16
AMINSTAL Utility
The AMINSTAL utility detects and displays the following information:
• Card Name
• I/O Address
• Bus Type
• DMA Channel (default)
• Ethernet Address
• IRQ Level (default)
• Card Configuration
• Boot ROM Address
• Port Mode
The PCnet-ISA adapter card requires the user to set the appropriate jumpers on the
adapter card. However, the jumper settings on the adapter card must match the Card
Configuration Window settings for proper operation. Otherwise, the following warning
message will be displayed:
PCnet-ISA adapter card is not software configurable.
You must set the jumpers on the PCnet-ISA adapter card.
After setting the jumpers and inserting the card, the user must enter the DMA Channel
and IRQ Level in the Custom Card Configuration Window. The AMINSTAL utility will
not determine the actual IRQ Level and DMA Channel settings for the adapter card, but
will display the following default values:
Default DMA Channel
Default IRQ Level
=
=
5
3
After the necessary changes are entered, a software driver may be installed by
pressing the Drivers button. Driver configuration of the I/O Address, IRQ Level, and
DMA Channel may be modified. Refer to the appropriate driver installation section in
this manual.
3.2.1.2.1.
Port Mode Selection
Automatic Port Selection is the default port mode. While in the Custom window, the
Port Mode may be changed from Automatic Port Selection to 10 BASE 2 (BNC).
Automatic Port Selection allows the adapter card to automatically detect which port is
connected to the network. If both ports are connected, the card will choose the
10BASE-T port. Triple-port cards may require specific port selection in the Custom
Card Configuration Window. Refer to the PCnet-ISA Hardware User’s Manual for more
information.
3.2.1.2.2.
Configure
Next, a software driver must be installed. Select Configure so that the AMINSTAL
utility can specify the Configuration Options and Port Mode to the software driver as it
is installed. Proceed to the appropriate driver installation section to install the software
driver.
17
PCnet Family Network Driver Installation Guide
3.2.1.2.3.
Drivers
When ready to select and install a software driver, select the Drivers button. Refer to
Section 3.1.4, PCnet Driver Installation Window, and Section 3.3, Driver Installation, for
additional information.
3.2.1.3.
Remote Boot
Refer to Section 15, Installing A Universal Boot ROM, in this manual.
18
AMINSTAL Utility
3.2.2. PCnet-ISA+ and PCnet-ISA II Adapter Card
The AMINSTAL utility detects whether a PCnet-ISA+ (or PCnet-ISA II) adapter card is
installed. If a card is not already installed, refer to the PCnet-ISA+ (or PCnet-ISA II)
Hardware User’s Manual for more information on card installation. The PCnet-ISA+ and
PCnet-ISA II adapter cards can operate in two modes:
• Microsoft Plug ‘n’ Play (PnP) ISA Enabled
• Microsoft PnP ISA Disabled
To automatically configure the PCnet-ISA (or PCnet -ISA II) adapter card, select
Automatic in the PCnet Family Installation Main Window and follow the instructions in
Section 3.2.2.1, Automatic. To custom configure the adapter card, select Custom in
the PCnet Family Installation Main Window and skip to Section 3.2.2.2, Custom.
3.2.2.1.
Automatic
After selecting Automatic in the PCnet Family Installation Main Window, the Automatic
Card Configuration Window appears as shown in Figure 7.
3.2.2.1.1.
PnP ISA Mode Enabled
The AMINSTAL utility detects if a system uses PnP and sets the default parameters.
For a PnP system, the AMINSTAL utility detects and displays the following information:
• PCnet-ISA+ (or PCnet-ISA II) adapter card in PnP mode
rnet address
• I/O Address
• DMA Channel
• IRQ Level
The configuration information is controlled by the PnP BIOS or a PnP configuration
manager. If the PnP configuration manager is not loaded, edit the CONFIG.SYS file
and reboot the system.
Boot ROM is disabled in PnP mode. To enable Boot ROM, use the Custom Card
Configuration Window to disable PnP mode and manually configure the card.
3.2.2.1.2.
PnP ISA Mode Disabled
Selecting Manual Configuration disables PnP ISA Mode.
19
PCnet Family Network Driver Installation Guide
Figure 7. Automatic Card Configuration Window
3.2.2.1.3.
Manual Configuration
For a non-PnP system (one that does not respond to a PnP system call), the
AMINSTAL utility detects and displays the following information:
• PCnet-ISA+ (or PCnet-ISA II) adapter card in manual mode
• Ethernet address
Settings are displayed in the following three colors:
Color
Red
Blue
Green
Description
Most likely has a system conflict and may need to be changed. Use the
Custom Card Configuration Window to change a red-displayed setting.
No system conflict
Recommended settings
Note: Settings with an asterisk (*) prefix are the PCnet card’s current settings.
20
AMINSTAL Utility
The user should select green or blue settings for the card’s configuration. Green and
blue settings will not conflict with other cards’ settings. Red settings conflict with other
cards’ settings in the system. However, note that a PCnet card can be set to red
conflicting settings and then transferred to another system. The user must ensure in
advance that the red settings will not conflict in the other system.
Note: System administrators may want to take advantage of this by configuring several PCnet cards to a
standard configuration in one system and then transferring them to other end-user systems for
installation.
3.2.2.1.4.
Configure
To set the configuration of the adapter card using the AMINSTAL utility, select the
Configure button. Next, a software driver must be installed. Proceed to the specific
driver installation section for the software driver being installed.
3.2.2.1.5.
Drivers
When ready to select and install a software driver, select the Drivers button. Refer to
Section 3.1.4, PCnet Driver Installation Window, and Section 3.3, Driver Installation, for
additional information.
3.2.2.2.
Custom
After selecting Custom in the PCnet Family Installation Main Window, the Custom
Card Configuration Window appears as shown in Figure 8.
3.2.2.2.1.
PnP ISA Mode Enabled
The AMINSTAL utility detects if a system uses PnP and sets the default parameters.
For a PnP system, the AMINSTAL utility detects and displays the following information:
•
•
•
•
•
•
PCnet-ISA+ (or PCnet-ISA II) adapter card in PnP mode
Bus Type
Ethernet Address
I/O Address
DMA Channel
IRQ Level
The configuration information is controlled by the PnP BIOS or a PnP
configuration manager. If the PnP configuration manager is not loaded, edit the
CONFIG.SYS file and reboot the system.
Boot ROM is disabled in PnP mode. To enable Boot ROM, select Manual
Configuration to disable PnP mode and manually configure the card.
3.2.2.2.2.
PnP ISA Mode Disabled
PnP may be disabled by selecting Manual Configuration.
21
PCnet Family Network Driver Installation Guide
Figure 8. Custom Card Configuration Window
3.2.2.2.3.
Manual Configuration
For a non-PnP system (one not responding to a PnP system call), the AMINSTAL
utility detects and displays the following information:
• PCnet-ISA+ (or PCnet-ISA II) adapter card in non-PnP mode
• Bus Type
• Ethernet address
• I/O Address
• DMA Channel
• IRQ Level
• Port Mode
The user may change the I/O Address, IRQ Level, and DMA Channel settings.
Settings are displayed in the following three colors:
Color
Red
Blue
Green
Description
Most likely has a system conflict and may need to be changed. Use
the Custom Card Configuration Window to change a red-displayed
setting.
No system conflict
Recommended settings
22
AMINSTAL Utility
Note: Settings with an asterisk (*) prefix are the PCnet card’s current settings.
The user should select green or blue settings for the card’s configuration. Green and
blue settings will not conflict with other cards’ settings. Red settings conflict with other
cards’ settings in the system. However, note that a PCnet card can be set to red
conflicting settings and then transferred to another system. The user must ensure in
advance that the red settings will not conflict in the other system.
Note: System administrators may want to take advantage of this by configuring several PCnet cards to
a standard configuration in one system and then transferring them to other end-user systems
for installation.
3.2.2.2.4.
Port Mode Selection
Automatic Port Selection is the default port mode. Any other port mode may be
selected. Automatic Port Selection allows the adapter card to automatically detect
which port is connected to the network. If both ports are connected, the card will
choose the 10BASE-T port. Triple-port cards may require specific port selection in the
Custom Card Configuration Window. See the PCnet-ISA+ (or PCnet-ISA II) Hardware
User’s Manual for more information.
3.2.2.2.5.
Configure
To set the configuration of the adapter card using the AMINSTAL utility, select the
Configure button. Next, a software driver must be installed. Proceed to the
specific driver installation section for the software driver being installed.
3.2.2.2.6.
Drivers
When ready to select and install a software driver, select the Drivers button. Refer to
Section 3.1.4, PCnet Driver Installation Window, and Section 3.3, Driver Installation, for
additional information.
3.2.2.3.
Remote Boot
Refer to Section 15, Installing A Universal Boot ROM, in this manual.
23
PCnet Family Network Driver Installation Guide
3.2.3. PCnet-32 Adapter Card
The AMINSTAL utility detects if a PCnet-32 adapter card is installed. If a card is not
already installed, refer to the PCnet-32 Hardware User’s Manual for more information
on card installation.
To automatically configure the PCnet-32 adapter card, select Automatic in the PCnet
Family Installation Main Window and follow the instructions in Section 3.2.3.1,
Automatic. To custom configure the adapter card, select Custom in the PCnet Family
Installation Main Window and skip to Section 3.2.3.2, Custom.
3.2.3.1.
Automatic
After selecting Automatic in the PCnet Family Installation Main Window, the Automatic
Card Configuration Window appears as shown in Figure 2.
VL bus systems are not PnP compatible. Hence, configuration options are limited to
Manual Configuration. The AMINSTAL utility detects and displays the following
information:
•
•
•
•
•
•
PCnet-32 adapter card
Bus Type
Ethernet address
I/O Address
DMA Channel
IRQ Level
The DMA Channel setting is DISABLED since the VL bus designates the DMA
Channel according to each slot. Settings are displayed in the following three
colors:
Color
Red
Blue
Green
Description
Most likely has a system conflict and may need to be changed.
Use the Custom Card Configuration Window to change a reddisplayed setting.
No system conflict
Recommended settings
Note: Settings with an asterisk (*) prefix are the PCnet card’s current settings.
3.2.3.1.1.
Configure
To set the configuration of the adapter card using the AMINSTAL utility, select the
Configure button. Next, a software driver must be installed. Proceed to the appropriate
driver installation section for the software driver being installed.
24
AMINSTAL Utility
3.2.3.1.2.
Drivers
When ready to select and install a software driver, select the Drivers button. Refer to
Section 3.1.4, PCnet Driver Installation Window, and Section 3.3, Driver Installation, for
additional information.
3.2.3.2.
Custom
After selecting Custom in the PCnet Family Installation Main Window, the Custom
Card Configuration Window appears as shown in Figure 3.
VL bus systems are not PnP compatible. Hence, configuration options are limited to
Manual Configuration. The AMINSTAL utility detects and displays the following
information:
•
•
•
•
•
•
•
PCnet-32 adapter card
Bus Type
Ethernet address
I/O Address
DMA Channel
IRQ Level
Port Mode
The DMA Channel setting is DISABLED since the VL bus designates the DMA
Channel according to each slot. The I/O Address and IRQ Level may be changed.
Settings are displayed in the following three colors:
Color
Red
Blue
Green
Description
Most likely has a system conflict and may need to be changed.
Use the Custom Card Configuration Window to change a reddisplayed setting.
No system conflict
Recommended settings
Note: Settings with an asterisk (*) prefix are the card’s current settings.
The user should select green or blue settings for the card’s configuration. Green
and blue settings will not conflict with other cards’ settings. The user must be
careful not to select red settings. Red settings conflict with other card’ settings in
the system. However, note that a PCnet card can be set to red conflicting settings
and then transferred to another system. The user must ensure in advance that the
red settings will not conflict in the other system.
Note: System administrators may want to take advantage of this by configuring several PCnet cards to
a standard configuration in one system and then transferring them to other end-user systems for
installation.
25
PCnet Family Network Driver Installation Guide
3.2.3.2.1.
Port Mode Selection
Automatic Port Selection is the default port mode. Any other available port mode may
be selected. Automatic Port Selection allows the adapter card to automatically detect
which port is connected to the network. If both ports are connected, the card will
choose the 10BASE-T port. Triple-port cards may require specific port selection in the
Custom Card Configuration Window. See the PCnet-32 Hardware User’s Manual for
more information.
3.2.3.2.2.
Configure
To set the configuration of the adapter card using the AMINSTAL utility, select the
Configure button. Next, a software driver must be installed. Proceed to the
appropriate driver installation section for the software driver being installed.
3.2.3.2.3.
Drivers
When ready to select and install a software driver, select the Drivers button. Refer to
Section 3.1.4, PCnet Driver Installation Window, and Section 3.3, Driver Installation, for
additional information.
26
AMINSTAL Utility
3.2.4. PCnet-PCI Adapter Card
The AMINSTAL utility detects if a PCnet-PCI adapter card is installed. If a card is
not already installed, refer to the PCnet-PCI Hardware User’s Manual for more
information on card installation.
To automatically configure the PCnet-PCI adapter card, select Automatic in the PCnet
Family Installation Main Window and follow the instructions in Section 3.2.4.1,
Automatic. To custom configure the adapter card, select Custom in the PCnet Family
Installation Main Window and skip to Section 3.2.4.2, Custom.
3.2.4.1.
Automatic
After selecting Automatic in the PCnet Family Installation Main Window, the Automatic
Card Configuration Window appears as shown in Figure 2. The AMINSTAL utility
detects and displays the following information:
•
•
•
•
•
•
PCnet-PCI adapter card
Bus Type
Ethernet address
I/O Address
DMA Channel
IRQ Level
The I/O Address, IRQ Level, and DMA Channel are assigned by the PCI system BIOS.
The DMA Channel in the PCI bus is slot specific and is not associated to a number.
The user may not modify the configuration options for the PCnet-PCI adapter card.
3.2.4.1.1.
Configure
To set the configuration of the adapter card using the AMINSTAL utility, select the
Configure button. Next, a software driver must be installed. Proceed to the appropriate
driver installation section for the software driver being installed.
3.2.4.1.2.
Drivers
When ready to select and install a software driver, select the Drivers button. Refer to
Section 3.1.4, PCnet Driver Installation Window, and Section 3.3, Driver Installation, for
additional information.
3.2.4.2.
Custom
After selecting Custom in the PCnet Family Installation Main Window, the Custom
Card Configuration Window appears as shown in Figure 3.
27
PCnet Family Network Driver Installation Guide
The AMINSTAL utility detects and displays the following information:
•
•
•
•
•
•
•
PCnet-PCI adapter card
Bus Type
Ethernet address
I/O Address
DMA Channel
IRQ Level
Port Mode
The I/O Address, IRQ Level, and DMA Channel are assigned by the PCI system BIOS.
The DMA Channel in the PCI bus is slot specific and is not associated to a number.
The user cannot modify the configuration options for the PCnet-PCI adapter card.
3.2.4.2.1.
Port Mode Selection
Automatic Port Selection is the default port mode. Any other port mode may be
selected. Automatic Port Selection allows the adapter card to automatically detect
which port is connected to the network. If both ports are connected, the card will
choose the 10BASE-T port. Triple-port cards may require specific port selection in
the Custom Card Configuration Window. Refer to the PCnet-PCI Hardware User’s
Manual for more information.
3.2.4.2.2.
Configure
To set the configuration of the adapter card using the AMINSTAL utility, select the
Configure button. Next, a software driver must be installed. Proceed to the
appropriate driver installation section for the software driver being installed.
3.2.4.2.3.
Drivers
When ready to select and install a software driver, select the Drivers button. Refer to
Section 3.1.4, PCnet Driver Installation Window, and Section 3.3, Driver Installation, for
additional information.
28
AMINSTAL Utility
3.3.
Driver Installation
The PCnet Driver Installation Window of the AMINSTAL utility can be used to install the
following drivers:
• Novell NetWare DOS ODI client driver
• NDIS 2.01 driver
• Packet driver
• NDIS 2.01 driver to NDIS 2 DOS Driver
• Microsoft LAN Manager/NDIS 2
• IBM LAN Server/NDIS 2
• Windows for Workgroups 3.1/NDIS 2
• Windows for Workgroups 3.11/NDIS 2
• Windows for Workgroups 3.11/NDIS 3
• Windows for Workgroups 3.11/ODI
• Netware 4.x/ODI
• PC-NFS/NDIS 2
• PC-NFS/ODI
• SCO UNIX/Stream Driver
• Windows NT 3.1/3.5/NDIS 3
• Windows NT 3.1/3.5/ODI Requester
For other environments, refer to the appropriate driver installation section in this
manual for instructions.
Select Drivers in the PCnet Family Installation Main Window (also in the Automatic
Card Configuration Window or Custom Card Configuration Window). The PCnet Driver
Installation Window will appear as shown in Figure 4. A driver may be installed by
selecting the driver and specifying the destination directory. Select Install to copy the
driver to the system hard drive.
Notes: 1) When the AMINSTAL utility installs a device driver, it creates sample CONFIG.NET,
AUTOEXEC.NET, and PROTOCOL.INI or NET.CFG files. The user may use these files as
examples to modify the system's CONFIG.SYS and AUTOEXEC.BAT files.
2) See Installing the NDIS 2.01 Driver section (Microsoft LAN Manager) for more information on
the PROTOCOL.INI file. See Appendix A for more information on the NET.CFG file.
Some drivers must be installed using the Network Operating System’s OEM installation
guidelines. Refer to Section 4, Automatic OEM Installation, for more information.
29
PCnet Family Network Driver Installation Guide
3.4.
OEM Customization
OEMs can customize the AMINSTAL utility in the following ways:
1. The PCnet Family Installation Main Window must be customized by replacing
the AMD-specific graphics and text with OEM-specific graphics and text.
2. The FFFF card placeholder must be changed to the manufacturer’s IEEE
address prefix.
3. The button labels, window titles, data labels, screen text, and help messages of
each section are customizable and can be in any language.
The pcnet.txt file specifies AMINSTAL’s characteristics. By changing keywords and text
strings in pcnet.txt, the utility can be customized without editing and recompiling the
program. The pcnet.txt file is located in the a:\aminstal directory on the All Drivers
disk. It is important to test run the AMINSTAL utility after each text string modification to
identify editing mistakes, such as deleted or extra quotes and missing text, which will
prevent the program from running.
Refer to Appendix E, PCnet Family AMINSTAL Utility OEM Customization Guide, for
further customization details.
30
AMINSTAL Utility
31
Automatic OEM Installation
4.
Automatic OEM Installation
Automatic OEM installation is structured into some of the AMD PCnet Family software
driver diskettes. The directory structures on these diskettes are set up to correspond to
a network operating system’s search path during the installation process.
The following environments are supported for automatic OEM installation:
ODI
• Novell NetWare 4.x (DOS and Server)
• Novell NetWare 5.x (Server)
NDIS 2.01
• Microsoft LAN Manager 2.x
• IBM LAN Server 2.0, 3.x, 4.x
• Microsoft Windows for Workgroups 3.1 and 3.11
• SunSoft PC-NFS 5.x
• Artisoft LANtastic 6.0
NDIS 3.x
• Microsoft Windows for Workgroups 3.11
• Microsoft Windows NT 3.1, 3.5
• Microsoft Windows NT 3.51
• Microsoft Windows 95
NDIS 4.x
• Microsoft Windows 95
• Microsoft Windows NT 4.0
UNIX
• SCO UNIX 3.2.4 (Open Desk Top (ODT) 3.0)
• SCO Unixware 1.1, 2.x
• SunSoft Solaris 2.1
• SCO UNIX Open Server 5.0
• SCO UNIX Gemini 1.0
Note:
Refer to the appropriate OEM User Manuals for specific instructions on loading
additional drivers from an external floppy diskette.
33
PCnet Family Network Driver Installation Guide
34
Installing Novell Netware ODI Drivers
5.
Installing Novell NetWare ODI Drivers
Open Datalink Interface (ODI) is a driver specification developed by Novell to offer a
standard driver interface for Novell NetWare. AMD provides driver support for the
following environments:
•Novell NetWare 3.1x
•Novell NetWare 4.x
•Novell NetWare 5.x
and AMD provides the following drivers:
•32 bit ODI driver for NetWare Server 3.1x, 4.x, 5.x and Client 32
•16 bit ODI driver for NetWare DOS ODI Client
for NetWare OS/2 ODI Client
Installation procedures for each of the above drivers are described in the following
sections.
5.1.
Novell NetWare DOS ODI Client
AMD’s NetWare DOS ODI client driver may be installed using the automated
AMINSTAL utility or manually from the command line prompt. Both methods are
explained below.
Note:
The user may need to make modifications to autoexec.bat, using the AMD-supplied sample
autoexec.net file as reference.
5.1.1. Driver Installation Using the AMINSTAL Utility
Follow the steps listed below:
__1
Run the AMINSTAL utility to configure your PCnet adapter card’s I/O base
address, IRQ channel, and DMA channel.
See the AMINSTAL Utility section for more information on
configuring your PCnet adapter card.
After you have completed the configuration of your PCnet adapter card
using the AMINSTAL utility, go to step 2 below to continue.
__2
Select the Continue button in the Configuration dialog box. The
Installation dialog box will appear.
__3
Select the desired PCnet adapter card by highlighting it in the top of the
dialog box.
35
PCnet Family Network Driver Installation Guide
__4
Highlight the Novell ODI DOS Client driver for the NetWare environment.
Change the default path if necessary.
__5 Press the Continue button to install the driver. The AMINSTAL utility will then
copy the driver into the specified directory, create a NET.CFG file in the
specified directory, and copy a sample AUTOEXEC.NET file into the
specified directory. The AUTOEXEC.NET file contains the following
command lines:
LSL
PCNTNW
IPXODI
NETX
The user must copy the following files into the specified directory above:
•LSL.COM
•PCNTNW.COM
•IPXODI.COM
•NETX.EXE
(Link Support Layer)
(AMD NetWare DOS ODI Client driver)
(An IPX protocol stack file)
(NetWare Shell, used with conventional memory workstations)
The LSL.COM, IPXODI.COM, and NETX.EXE files can be obtained from the
Workstation Driver Diskette in the Novell Client Software Package or from
CompuServe. The AMD-supplied client driver file PCNTNW.COM can be
obtained from the DOS ODI directory of the AMD NetWare driver diskette
(i.e., a:\novell\wkstn\dosodi).
__6
Exit from the AMINSTAL utility when the installation has completed.
The installation of the NetWare DOS ODI client driver is now complete.
5.1.2. Driver Installation From The Command Line Prompt
Follow the steps listed below:
__1
Insert the AMD DOS ODI driver diskette into the floppy drive.
__2
Create a subdirectory in your client's main boot drive with the following
files:
•LSL.COM
•PCNTNW.COM
•IPXODI.COM
•NETX.EXE
(Link Support Layer)
(AMD Netware DOS ODI Client Driver)
(An IPX protocol stack file)
(Netware Shell, used with conventional memory workstations)
•NET.CFG
(Optional (used for configuring options different from the default
settings). See Appendix A or the Novell Netware Operating
36
Installing Novell Netware ODI Drivers
System Keywords section.)
The NETX.EXE, LSL.COM, and IPXODI.COM files can be obtained
from the Workstation Driver Diskette in the Novell Client Software Package
or from CompuServe. Copy the AMD-supplied client driver file
(PCNTNW.COM) from the DOS ODI directory of the AMD NetWare driver
diskette to the appropriate subdirectory. To do this, copy the file using the
following path:
A:\NOVELL\WKSTN\DOSODI
__3
To manually load these files from the DOS prompt, type the following
commands in the given order to initialize DOS ODI driver support and the
IPX protocol stack:
LSL.COM
PCNTNW.COM
IPXODI.COM
NETX.EXE
Note:
__4
Followed by <Enter>
Followed by <Enter>
Followed by <Enter>
Followed by <Enter>
NETX.EXE is compatible with DOS Versions 3.x, 4.x, 5.x, and 6.x.
To automatically load these files, use a DOS text editor to create and/or
modify an AUTOEXEC.BAT file. Load the files in the following order: (1)
link support layer, (2) LAN driver, (3) protocol stacks, and (4) the shell.
Your AUTOEXEC.BAT file should look similar to the following:
\<subdirectory>\LSL
\<subdirectory>\PCNTNW
\<subdirectory>\IPXODI
\<subdirectory>\NETX
__5
When the commands have been added to the AUTOEXEC.BAT file, reboot
the workstation. After the commands execute and if a server is present,
the workstation will attach to the server and display the server’s name.
__6
Log onto the network.
The installation of the NetWare DOS ODI client driver is now complete.
5.1.3. Driver Installation For The LAPP Driver
Follow the steps listed below:
__1
Insert the AMD DOS LAPP driver diskette into the floppy drive.
37
PCnet Family Network Driver Installation Guide
__2
Create a subdirectory in your client's main boot drive with the following
files:
•LSL.COM
(Link Support Layer)
•PCLAPP.COM (AMD Netware DOS ODI LAPP Driver)
•IPXODI.COM
(An IPX protocol stack file)
•NETX.EXE
(Netware Shell, used with conventional memory workstations)
•NET.CFG
(Optional (used for configuring options different from the default
settings). See Appendix A or the Novell Netware Operating
System Keywords section.)
The NETX.EXE, LSL.COM, and IPXODI.COM files can be obtained
from the Workstation Driver Diskette in the Novell Client Software Package
or from CompuServe. Copy the AMD-supplied client driver file
(PCLAPP.COM) from the DOS ODI directory of the AMD NetWare driver
diskette to the appropriate subdirectory. To do this, copy the file using the
following path:
A:\LAPP\DOSODI
__3
To manually load these files from the DOS prompt, type the following
commands in the given order to initialize DOS ODI driver support and the
IPX protocol stack:
LSL.COM
PCLAPP.COM
IPXODI.COM
NETX.EXE
Note:
__4
Followed by <Enter>
Followed by <Enter>
Followed by <Enter>
Followed by <Enter>
NETX.EXE is compatible with DOS Versions 3.x, 4.x, 5.x, and 6.x.
To automatically load these files, use a DOS text editor to create and/or
modify an AUTOEXEC.BAT file. Load the files in the following order: (1)
link support layer, (2) LAN driver, (3) protocol stacks, and (4) the shell.
Your AUTOEXEC.BAT file should look similar to the following:
\<subdirectory>\LSL
\<subdirectory>\PCLAPP
\<subdirectory>\IPXODI
\<subdirectory>\NETX
__5
When the commands have been added to the AUTOEXEC.BAT file, reboot
the workstation. After the commands execute and if a server is present,
the workstation will attach to the server and display the server’s name.
__6
Log onto the network.
The installation of the NetWare DOS ODI LAPP driver is now complete.
38
Installing Novell Netware ODI Drivers
Note:
The LAPP driver cannot work on a PCnet-ISA board.
5.1.4. Keyword Examples
To change any default settings after the driver is loaded, the user must create a
NET.CFG file on the workstation diskette. See Section 5.6, Novell NetWare
Operating System Keywords for more information on valid keywords. See
Appendix A for sample NET.CFG files using various keywords.
Note:
The Novell Netware ODI DOS installation documentation will provide additional information
on installing the DOS ODI driver and using keywords during installation.
39
PCnet Family Network Driver Installation Guide
5.2.
Novell NetWare OS/2 ODI Client
To install AMD’s OS/2 ODI client driver, the Novell OS/2 Requester should be used.
Load the NetWare OS/2 ODI client driver from the OS/2 CONFIG.SYS file in the
sequence given below. See the Novell NetWare Requester OS/2 Installation
documentation for more information.
After installing the OS/2 Requester, follow the steps listed below:
__1
Using the Netware OS/2 disks provided by Novell, install the Netware OS/2
Requester files on the client. Follow the instructions displayed to configure
the Netware OS/2 Requester for a Netware-supported LAN adapter card.
If the Netware-supported LAN adapter card contains the PCnet adapter
option, select it; otherwise, select any other LAN adapter.
__2
Insert the AMD NetWare driver diskette into the floppy drive.
__3
Copy the OS/2 ODI driver (PCNTNW.OS2) from the AMD NetWare driver
diskette to the C:\NETWARE directory of the boot drive using the following
path:
A:\NOVELLl\WKSTN\OS2ODI\PCNTNW.OS2
__4
Edit the CONFIG.SYS file and replace the Netware-supported LAN
adapter driver with the name of the AMD OS/2 ODI driver
(PCNTNW.OS2). For example:
DEVICE=C:\NETWARE\PCNTNW.OS2
If the Novell OS/2 Requester is used to install the driver, the Requester will
automatically make modifications to the CONFIG.SYS file.
The following is an example of the CONFIG.SYS load sequence for
NetWare 3.12 OS/2 ODI driver support using the IPX protocol stack:
REM --- Netware Requester Statements BEGIN --SET NWLANGUAGE=ENGLISH
DEVICE=C:\NETWARE\LSL.SYS
RUN=C:\NETWARE\DDAEMON.EXE
REM -- ODI-Driver Files BEGIN -DEVICE=C:\NETWARE\PCNTNW.OS2
REM DEVICE=C:\NETWARE\ROUTE.SYS
REM -- ODI-Driver Files END -DEVICE=C:\NETWARE\IPX.SYS
DEVICE=C:\NETWARE\SPX.SYS
RUN=C:\NETWARE\SPDAEMON.EXE
DEVICE=C:\NETWARE\NWREQ.SYS
IFS=C:\NETWARE\NWIFS.IFS
RUN=C:\NETWARE\NWDAEMON.EXE
DEVICE=C:\NETWARE\VIPX.SYS
40
Installing Novell Netware ODI Drivers
DEVICE=C:\NETWARE\VSHELL.SYS GLOBAL
REM --- Netware Requester Statements END ---
The default settings may be modified when the driver loads by creating the
NET.CFG file. The AMD OS/2 ODI client driver may also be installed to
support multiple protocol stacks and Ethernet frame types. Refer to
Appendix A for sample NET.CFG files using the optional keywords. Also,
refer to the Novell Netware Requester OS/2 Installation documentation for
more information on configuring the NET.CFG file.
__5
Reboot the system.
The installation of the NetWare OS/2 ODI client driver is now complete.
5.2.1. Keyword Examples
To change any default settings when the driver is loaded, the user must create a
NET.CFG file on the workstation diskette. The Novell NetWare Operating System
Keywords section provides a list of the available keywords. See Appendix A for
sample NET.CFG files using common keywords used when installing the OS/2
ODI client driver.
41
PCnet Family Network Driver Installation Guide
5.3.
Novell NetWare Server 3.11
For a NetWare Server 3.11 configuration, AMD provides a NetWare 3.11 Server
ODI driver on the AMD NetWare driver diskette. Use the LOAD and BIND
commands to load the NetWare 3.11 ODI server driver as described below. For
more information on these commands, refer to the Novell NetWare 3.11 LAN
Driver Installation documentation.
There are two methods for loading the NetWare Server 3.11 driver: (1) use the
server command line prompt ( : ) or (2) edit the AUTOEXEC.NCF file.
Note:
If you use the server command line, you will need to load the driver each time the system is
booted. If you edit the AUTOEXEC.NCF file, it will automatically load the driver each time
your system is booted.
WARNING: Be sure to use the Monitor Program, which is included on the AMD NetWare driver diskette.
Do not use the original Monitor Program shipped with NetWare 3.11 because it will cause
the system to crash (known software bug).
Follow the steps listed below:
__1
Install the Novell NetWare Server 3.11 on your system.
__2
Copy all the files from the 3.11 server directory of the AMD NetWare driver
diskette to the hard disk directory where the NetWare 3.11 system files are
located. The following path should be used to access the files from the
AMD NetWare driver diskette:
A:\NOVELL\SERVER\3.1x\PCNTNW.LAN
__3
Boot NetWare by executing SERVER.EXE. Refer to the appropriate
Novell NetWare documentation on loading disk drivers and mounting
volumes for more information.
__4
To load the driver manually, follow either step 4.1 (for a PCnet-ISA Adapter
Card) or step 4.2 (for PCnet-ISA+, PCnet-ISA II, PCnet-32, PCnet-PCI, and
PCnet-FAST Adapter Cards). If you want to load the driver using the
AUTOEXEC.NCF file, go to step 5.
Note:
You will need to specify the DOS path if the driver is located in a DOS partition.
__ 4.1 To manually load the driver for a PCnet-ISA adapter card:
a. Type the following command at the file server console (which also
changes the default settings for PCnet-ISA adapter cards):
LOAD LSLENH.NLM
42
Installing Novell Netware ODI Drivers
LOAD MSM31X.NLM
LOAD ETHERTSM.NLM
LOAD PCNTNW PORT=320 INT=5 DMA=7 FASTISA
Notes: 1) All of the files listed above are needed. You must use the versions of
these files included on the AMD driver diskettes.
2) Make sure the LSLENH, MSM31X, PATCHMAN, and ETHERTSM files
are present in the same directory as the PCNTNW.LAN file. These files
should be copied from the AMD NetWare support files driver diskette from
the 3.11 subdirectory under the Novell directory. You must use the latest
versions of these files provided in the AMD diskette.
b. Then press <Enter>. The PORT, INT, and DMA values used above must
correspond to the PCnet-ISA adapter card’s jumper settings.
Note: IOP, IRQ, and DRQ are older keywords previously used in place of PORT, INT,
and DMA, respectively. However, they are still supported in order to maintain
backward compatibility.
c. Next, bind the driver to the IPX protocol stack by typing:
BIND IPX TO PCNTNW NET=xxxx
(Bind to IPX or any other protocol stack; where e.g., xxxx=1234)
d. Then press <Enter>.
The installation of the NetWare Server 3.11 driver is now complete.
__4.2 To manually load a driver for PCnet-ISA+, PCnet-ISA II, PCnet-32, PCnetPCI, and PCnet-FAST adapter cards:
a. Type the following commands at the file server console:
LOAD
LOAD
LOAD
LOAD
Note:
LSLENH.NLM
MSM31X.NLM
ETHERTSM.NLM
PCNTNW
All of the files listed above are needed. You must use the versions of these
files included on the AMD driver diskettes.
b. Then press <Enter>.
The PCNTNW driver automatically determines the adapter card
configuration information.
c. Next, bind the driver to the IPX protocol stack by typing:
BIND IPX TO PCNTNW NET=xxxx
(Bind to IPX or any other protocol stack; where e.g., xxxx=1234)
43
PCnet Family Network Driver Installation Guide
d. Then press <Enter>.
The installation of the NetWare Server 3.11 driver is now complete.
__5.
To load the driver using the AUTOEXEC.NCF file, you must first edit the
AUTOEXEC.NCF file.
Note: You will need to specify the DOS path if the driver is located in a DOS partition.
a. Type LOAD INSTALL at the server prompt ( : ) to access the Install
Utility.
b. Open the SYSTEM OPTIONS menu to access EDIT AUTOEXEC.
c. Then add the following command lines to the AUTOEXEC.NCF file.
The following is a PCnet-ISA adapter card example:
LOAD C:\PCNTNW DMA=5 INT=3 PORT=320 FRAME=Ethernet_802.2
BIND IPX TO PCNTNW NET=xxxx
(Bind to IPX or any other protocol stack; where e.g., xxxx=1234)
Note: IOP, IRQ, and DRQ are older keywords previously used in place of PORT, INT,
and DMA, respectively. However, they are not supported starting from Release 4.0.
The installation of the NetWare Server 3.11 driver is now complete.
5.3.1. Keyword Examples
See Keyword Examples under Section 5.5, Novell NetWare Server 4.x , to use
keywords for NetWare Server 3.11.
44
Installing Novell Netware ODI Drivers
5.4.
Novell NetWare Server 3.12
For a Novell NetWare Server 3.12 configuration, AMD provides a NetWare 3.1.2
Server ODI driver, which is included on the AMD NetWare driver diskette.
Note:
The directory structure provided on the AMD NetWare driver diskette has been set up for
automatic OEM installation. Also, more information can be found in the Novell NetWare 3.12
documentation.
Use the LOAD and BIND commands to load the NetWare 3.12 ODI server driver
as described below. For more information on these commands, refer to the Novell
NetWare 3.12 LAN Driver Installation documentation.
There are two methods for loading the NetWare Server 3.12 driver: (1) use the
server command line prompt ( : ) or (2) edit the AUTOEXEC.NCF file.
Note:
If you use the server command line, you will need to load the driver each time the system is
booted. If you edit the AUTOEXEC.NCF file, it will automatically load the driver each time
your system is booted.
Follow the steps listed below:
__1
Install NetWare 3.12 on your system.
__2
Copy the AMD ODI Server driver (PCNTNW.LAN) from the AMD
NetWare driver diskette to the hard disk directory where the NetWare 3.12
system files are located. The following path should be used to access the
files from the AMD NetWare driver diskette:
A:\NOVELL\SERVER\3.1x\PCNTNW.LAN
__3
Boot NetWare by executing SERVER.EXE. Refer to the appropriate
Novell NetWare documentation on loading disk drivers and mounting
volumes for more information.
__4
To load the driver manually, follow either step 4.1 (for a PCnet-ISA Adapter
Card) or step 4.2 (for PCnet-ISA+, PCnet-ISA II, PCnet-32, PCnet-PCI, and
PCnet-FAST Adapter Cards). If you want to load the driver using the
AUTOEXEC.NCF file, go to step 5.
Notes: 1) You will need to specify the DOS path if the driver is located in a DOS partition.
2) Make sure the MSM31X.NLM and ETHERTSM.NLM files are present in the
same directory as the PCNTNW.LAN file. These files should be copied from the
AMD NetWare support files driver diskette from the 3.12 subdirectory under the
Novell directory. You must use the latest versions of these files provided in the
AMD diskette.
.
45
PCnet Family Network Driver Installation Guide
__4.1 To manually load the driver for a PCnet-ISA adapter card:
a. Type the following command at the file server console (which also
changes the default settings for PCnet-ISA adapter cards):
LOAD C:\PCNTNW PORT=320 INT=5 DMA=7 FASTISA
b. Then press <Enter>.
The PORT, INT, and DMA values used above must correspond to
the PCnet-ISA adapter card’s jumper settings.
Note:
IOP, IRQ, and DRQ are older keywords previously used in place of PORT,
INT, and DMA, respectively. However, they are still supported in order to
maintain backward compatibility..
c. Next, bind the driver to the IPX protocol stack by typing:
BIND IPX TO PCNTNW NET=xxxx
(Bind to IPX or any other protocol stack; where e.g., xxxx=1234)
d. Then press <Enter>.
The installation of the NetWare Server 3.12 driver is now complete.
__4.2 To manually load a driver for a PCnet-ISA+, PCnet-ISA II, PCnet-32,
PCnet-PCI, or PCnet-FAST adapter card:
a. Type the following command at the file server console:
LOAD C:\PCNTNW
b. Then press <Enter>.
c. Next, bind the driver to the IPX protocol stack by typing:
BIND IPX TO PCNTNW NET=xxxx
(Bind to IPX or any other protocol stack; where e.g., xxxx=1234)
d. Then press <Enter>.
The installation of the NetWare Server 3.12 driver is now complete.
__5 To load the driver using AUTOEXEC, you must first edit the
AUTOEXEC.NCF file.
46
Installing Novell Netware ODI Drivers
a. Type LOAD INSTALL at the server prompt ( : ) to access the Install
Utility.
Note: You will need to specify the DOS path if the driver is located in a DOS partition.
b. Open the SYSTEM OPTIONS menu to access EDIT AUTOEXEC.
c. Then add the following command lines to the AUTOEXEC.NCF file.
The following is a PCnet-ISA adapter card example:
LOAD C:\PCNTNW DMA=5 INT=3 PORT=320 FRAME=Ethernet_802.2
BIND IPX TO PCNTNW NET=xxxx
(Bind to IPX or any other protocol stack; where e.g., xxxx=1234)
Note: IOP, IRQ, and DRQ are older keywords previously used in place of PORT, INT,
and DMA, respectively. However, they are not supported starting from Release
4.0.
The installation of the NetWare Server 3.12 driver is now complete.
5.4.1. Keyword Examples
See Keyword Examples under Section 5.5, Novell NetWare Server 4.x , to use
keywords for NetWare Server 3.12.
47
PCnet Family Network Driver Installation Guide
5.5.
Novell NetWare Server 4.x
For a NetWare 4.x server configuration, AMD provides a NetWare 4.x Server ODI
driver which is included on the AMD NetWare driver diskette.
Note:
The directory structure provided on the AMD NetWare driver diskette has been set up for
automatic OEM installation. Also, more information can be found in the Novell NetWare 4.x
documentation.
Use the LOAD and BIND commands to load the NetWare 4.x ODI server driver as
described below. For more information on these commands, refer to the Novell
NetWare 4.x LAN Driver Installation documentation.
There are two methods for loading the NetWare Server 4.x driver: (1) use the
server command line prompt ( : ) or (2) edit the AUTOEXEC.NCF file.
Note:
If you use the server command line, you will need to load the driver each time the system is
booted. If you edit the AUTOEXEC.NCF file, it will automatically load the driver each time
your system is booted.
Follow the steps listed below:
__1
Install Novell NetWare Server 4.x on your system.
__2
Copy the AMD ODI Server driver (PCNTNW.LAN) from the AMD
NetWare driver diskette to the hard disk directory where the NetWare 4.x
system files are located. The following path should be used to access the
files from the AMD NetWare driver diskette:
A:\NOVELL\SERVER\4.x\PCNTNW.LAN
__3
Boot NetWare by executing SERVER.EXE. Refer to the appropriate
Novell NetWare documentation on loading disk drivers and mounting
volumes for more information.
__4
To load the driver manually, follow either step 4.1 (for a PCnet-ISA Adapter
Card) or step 4.2 (for PCnet-ISA+, PCnet-ISA II, PCnet-32, PCnet-PCI, and
PCnet-FAST Adapter Cards). If you want to load the driver using the
AUTOEXEC.NCF file, go to step 5.
Notes: 1) You will need to specify the DOS path if the driver is located in a DOS partition.
2) Make sure the MSM.NLM and ETHERTSM.NLM files are present in the same
directory as the PCNTNW.LAN file. These files should be copied from the AMD
NetWare support files driver diskette from the 4.x subdirectory under the Novell
directory. You must use the latest versions of these files provided in the AMD
diskette.
48
Installing Novell Netware ODI Drivers
__4.1 To manually load the driver for a PCnet-ISA adapter card:
a. Type the following command at the file server console (which also
changes the default settings for PCnet-ISA adapter cards):
LOAD C:\PCNTNW PORT=320 INT=5 DMA=7 FASTISA
The PORT, INT, and DMA values used above must correspond to
the PCnet-ISA adapter card’s jumper settings.
Note:
IOP, IRQ, and DRQ are older keywords previously used in place of PORT,
INT, and DMA, respectively. However, they are not supported starting from
Release 4.0.
b. Next, bind the driver to the IPX protocol stack by typing:
BIND IPX TO PCNTNW NET=xxxx
(Bind to IPX or any other protocol stack; where e.g., xxxx=1234)
c. Then press <Enter>.
The installation of the NetWare Server 4.x driver is now complete.
__4.2 To manually load the driver for PCnet-ISA+, PCnet-ISA II, PCnet-32,
PCnet-PCI, and PCnet-FAST adapter cards:
a. Type the following command at the file server console:
LOAD C:\PCNTNW
b. Then press <Enter>.
c. Next, bind the driver to the IPX protocol stack by typing:
BIND IPX TO PCNTNW NET=xxxx
(Bind to IPX or any other protocol stack; where e.g., xxxx=1234)
d. Then press <Enter>.
The installation of the NetWare Server 4.x driver is now complete.
__5. To load the driver using the AUTOEXEC.NCF file, you must first edit the
AUTOEXEC.NCF file.
Note: You will need to specify the DOS path if the driver is located in a DOS partition.
a. Type LOAD INSTALL at the server prompt ( : ) to access the AMINSTAL utility.
49
PCnet Family Network Driver Installation Guide
b. Open the MAINTENANCE/SELECTIVE INSTALL menu and select the
NCF File Options from the menu to access EDIT AUTOEXEC.
c. Then add the following command lines to the AUTOEXEC.NCF file.
The following is a PCnet-ISA adapter card example:
LOAD C:\PCNTNW DMA=5 INT=3 PORT=320 FRAME=Ethernet_802.2
BIND IPX TO PCNTNW NET=xxxx
(Bind to IPX or any other protocol stack; where e.g., xxxx=1234)
Note: IOP, IRQ, and DRQ are older keywords previously used in place of PORT, INT, and
DMA, respectively. They are still supported in order to be backward compatible.
The installation of the NetWare Server 4.x driver is now complete.
5.5.1. Keyword Examples
5.5.1.1.
BUSTYPE
Note: Only applies to drivers before Release 3.2. Starting from Release 4.0, BUSTYPE keyword is no
longer supported. Use Novell standard keyword, SLOT.
If the bus type is known for the PCnet adapter card installed in the system, the
BUSTYPE keyword may be used with the LOAD command. If the BUSTYPE
keyword is specified, then the driver will not scan other buses. The available bus
types are:
Bus Type
ISA
ISA Plug and
Play (PnP)
VESA Local
Bus (VL)
PCI Local Bus
PCnet
Adapter Card
PCnet-ISA
PCnet-ISA+,
PCnet-ISA II
PCnet-32
Keyword
(before 3.2)
ISA
PNP
Keyword
(after 4.0)
ISA
VESA
VESA
PCnet-PCI,
PCnet-PCI II,
PCnet-FAST,
PCI/PCI1/PCI2
PCI
Examples:
For PCnet-ISA:
For PCnet-ISA+/PCnet-ISA II:
For PCnet-32:
For PCnet-PCI:
Before 3.2 Release
LOAD PCNTNW BUSTYPE=ISA
LOAD PCNTNW BUSTYPE=PNP
LOAD PCNTNW BUSTYPE=VESA
LOAD PCNTNW BUSTYPE=PCI
50
After 4.0 Release
LOAD PCNTNW ISA
LOAD PCNTNW
LOAD PCNTNW VESA
LOAD PCNTNW PCI
Installing Novell Netware ODI Drivers
For PCnet-PCI:
For PCnet-PCI:
For PCnet-FAST:
Note:
LOAD PCNTNW BUSTYPE=PCI1
LOAD PCNTNW BUSTYPE=PCI2
LOAD PCNTNW PCI
LOAD PCNTNW PCI
LOAD PCNTNW PCI
If the PCI Configuration Access mechanism is known for the PCI system, the user may use
PCI1 or PCI2 with the BUSTYPE keyword. However, using PCI with the BUSTYPE
keyword will cause the driver to attempt to determine the proper mechanism in the PCI
system.
5.5.1.2.
FRAME (Multiple Frame Type Support)
The FRAME keyword should be used with the LOAD command to designate the
desired frame type. In addition, to supporting multiple FRAME types, the BOARD
keyword must be used in conjunction with the FRAME keyword if no IO Address is
specified. The available FRAME values are the following:
Ethernet_802.2
Ethernet_802.3
Ethernet_SNAP
Ethernet_II
Refer to the appropriate Novell NetWare documentation for details regarding each
frame type. The user designates the BOARD keyword value. The range available
for BOARD is 0-254.
LOAD
LOAD
LOAD
LOAD
PCNTNW
PCNTNW
PCNTNW
PCNTNW
FRAME=Ethernet_802.2 BOARD=1
FRAME=Ethernet_802.3 BOARD=1
FRAME=Ethernet_II BOARD=1
FRAME=Ethernet_SNAP BOARD=1
Then press <Enter>.
Finally, the driver must be binded to the IPX protocol for each frame type based
on the procedure provided in the Novell NetWare documentation. Note that if
memory is low to support multiple frames, the buffer size must be increased in the
STARTUP.NCF file in NetWare. For example, the SET RESERVED BUFFERS
below 16 MBytes should be set to 32 from the default setting of 16. For example:
Set Reserved Buffers below 16 Meg=32
5.5.1.3.
FRAME (Single Frame Type Support)
The FRAME keyword should be used with the LOAD command to designate the
desired frame type. For single FRAME support, no BOARD keyword is needed to
designate one frame type. The available values and description to load FRAME
types is explained above in the Multiple Frame Type Support section.
5.5.1.4.
Loading Multiple PCnet Adapter Cards
The driver must be loaded again for each new PCnet adapter board installed in
the system. For example, to load three PCnet-ISA+, PCnet-32, or PCnet-PCI
51
PCnet Family Network Driver Installation Guide
adapter cards in the system for the Novell NetWare environment, the following
must be entered.
First PCnet Adapter Card:
Second PCnet Adapter Card:
Third PCnet Adapter Card:
LOAD PCNTNW
LOAD PCNTNW
LOAD PCNTNW
SLOT=10001
SLOT=10002
SLOT=10003
Then press <Enter>.
If more than one PCnet-ISA adapter card will be installed, the user must specify
the IRQ and DMA channel for each card. For example, to load two PCnet-ISA
adapter cards:
PCnet-ISA Adapter Card 1:
PCnet-ISA Adapter Card 2:
LOAD PCNTNW DMA=5 INT=3
LOAD PCNTNW DMA=6 INT=5
Then press <Enter>.
5.5.1.5.
BOARD
Note: There is no BOARD keyword after Release 4.0.
The BOARD keyword may be used with the LOAD command to specify the board
number to the selected physical adapter board. This keyword is used to load a
different frame type to the same board. See the Multiple Frame Type Support
section above for examples using the BOARD keyword.
Note: If PORT and IO Port Address are specified, then the BOARD keyword should not be used.
In this case, the same PORT should be used to load a different frame type.
5.5.1.6.
FDUP (PCnet-ISA II, PCnet-PCI-II)
The PCnet-ISA II adapter card provides full duplex operation. For example:
Enable full duplex on 10BaseT port:
Enable full duplex on AUI port:
Disable full duplex:
Note:
Load PCNTNW FDUP = UTP
Load PCNTNW FDUP = AUI
Load PCNTNW FDUP = OFF
If FDUP = AUI then the TP (Twisted Pair) keyword is void.
5.5.1.7.
CDCOFF (PCnet-PCI)
Note: There is no CDCOFF keyword after Release 4.0.
The CDCOFF keyword will disable the write buffers on the Intel CDC chip. For
example:
BUSTYPE=PCI CDCOFF
52
Installing Novell Netware ODI Drivers
Note:
1. The driver for IntraNetWare Client32 is identical to that for NetWare Server 4.x.
2. Refer to IntraNetWare Installation Manual for the Client32 Installation.
3. Keywords for Clent32 are identical to those of NetWare Server 4.x.
5.5.1.8.
LineSpeed
The LineSpeed keyword is used to force the line to a special speed and duplex mode.
For example:
LOAD PCNTNW 100F
5.5.1.9.
MPMODE
The MPMODE keyword is used to set up Magic Packet mode.
For example:
LOAD PCNTNW MPMODE=ON
5.5.1.10.
Primary/Secondary
The Primary/Secondary keywords are used to set a pair of adapters Fail-Over mode.
For example:
LOAD PCNTNW PRIMARY=10001
5.5.1.11.
SECONDARY=10002
SCAN
The SCAN keyword is used to switch back to the Primary adapter after Primary adapter
Fail-Over and hot swap.
For example:
LOAD PCNTNW SCAN
53
PCnet Family Network Driver Installation Guide
5.6.
Novell NetWare Operating System Keywords
Keywords for Novell NetWare DOS and OS/2 ODI client drivers and Server drivers are
shown in Tables 1 and 2, respectively.
Table 1. Novell NetWare DOS and OS/2 ODI Client Keywords
Keyword
Keyword
Description
Name
I/O Address PORT
IOP
Interrupt
INT
IRQ
DMA
DMA
DRQ
FASTISA
FASTISA
* Not supported
with OS/2 ODI
Ethernet
Frame type
FRAME
Bus Timer
Off
BTO
* Not supported
with OS/2 ODI
Additional Keyword
Details
See Common Keywords.
Range
Default
Present or
Not Present
Not Present
See Common Keywords.
See Common Keywords.
FASTISA is a mode that
increases the
performance of the
PCnet-ISA, PCnet-ISA+,
and PCnet-ISA II by
reducing the memory
write cycle time from
450 ns to 350 ns. Some
older machines with
slower memory may not
be compatible, if they do
not have an EISA mode.
Refer to Appendix A for
more details on
NET.CFG options.
See Ethernet Frame
type from the IEEE
Specification.
BTO will reset bit 13 in
CSR4 of the PCnet
device to enable the Bus
Timer register (CSR82).
By default the timer is
always on.
54
Ethernet_802.2 Ethernet_802.2
Ethernet_802.3 (NetWare 3.12, 4.x)
Ethernet_SNAP Ethernet_802.3
(NetWare 3.11)
Ethernet_II
Present or
Not Present
Not Present
Installing Novell Netware ODI Drivers
Keyword
Keyword
Description
Name
Full Duplex
FDUP
* Supported on
PCnet-ISA II
only
Disable write CDCOFF
buffers
* Not supported
(CDC chip)
with OS/2 ODI
MII Mode
(Line Speed
and Duplex)
Note:
LineSpeed
Additional Keyword
Details
FDUP keyword is used to
enable or disable full
duplex on the 10BaseT
and AUI ports. See
Common Keywords.
CDCOFF keyword is
used to disable the write
buffers on the Intel CDC
chip.
LineSpeed keyword is
used to force line to a
special speed and duplex
mode.
Range
Default
UTP
AUI
OFF
Not Present
Present or
Not Present
Not Present
100F
100H
10F
10H
Auto
Auto
Negotiation
(What is in EEPROM)
All of the keywords available to the Novell ODI client drivers may be automatically activated
by creating or modifying the NET.CFG file. See Appendix A for sample NET.CFG files.
55
PCnet Family Network Driver Installation Guide
Table 2. Novell NetWare Server Keywords
Keyword
Keyword
Description
Name
I/O Address PORT
IOP
Interrupt
INT
IRQ
DMA
DMA
DRQ
FASTISA
FASTISA
Ethernet
Frame type
FRAME
Physical
Board
Number
Name of
Logical
Board
Number
Bus Timer
Off
BOARD
NAME
BTO
Additional Keyword
Details
See Common Keywords.
Range
Default
Present or
Not Present
Not Present
See Common Keywords.
See Common Keywords.
FASTISA is a mode that
increases the
performance of the
PCnet-ISA, PCnet-ISA+,
and PCnet-ISA II by
reducing the memory
write cycle time from
450 ns to 350 ns. Some
older machines with
slower memory may not
be compatible if they do
not have an EISA mode.
Refer to Appendix A for
more details on
NET.CFG options.
See Ethernet Frame
type from the IEEE
Specification.
Specifies the physical
board number. (Used
before 3.2 release)
Used to identify the
logical board for
different FRAME types
BTO will reset bit 13 in
CSR4 of the PCnet
device to disable the
Bus Timer register
(CSR82). By default the
timer is always on.
56
Ethernet_802.2 Ethernet_802.2
Ethernet_802.3 (NetWare 3.12, 4.x)
Ethernet_SNAP Ethernet_802.3
(NetWare 3.11)
Ethernet_II
0-254
255
(No BOARD keyword
specified)
Any ASCII
characters
None
Present or
Not Present
Not Present
Installing Novell Netware ODI Drivers
Keyword
Keyword
Description
Name
Full Duplex
FDUP
* Supported on
PCnet-ISA II
only
Disable write CDCOFF
buffers
* Not supported
(CDC chip)
with OS/2 ODI
PCI Bus
Type
PCI
ISA Bus
Type
ISA
VESA Bus
Type
Slot Number
VESA
MII Mode
(Line Speed
and Duplex)
LineSpeed
Magic
Packet
LED Light
Setting
MPMode
PermaNet
(Fail-Over)
Switch back
to the
Primary
adapter
Slot
Additional Keyword
Details
FDUP keyword is used to
enable or disable full
duplex on the 10BaseT
and AUI ports. See
Common Keywords.
CDCOFF keyword is
used to disable the write
buffers on the Intel CDC
chip. (Used before 3.2
release)
PCI is used with PCnetPCI, PCnet-PCI-II, and
PCnet-FAST.
ISA is used with PCnetISA, PCnet-ISA+, and
PCnet-II.
VESA is used with
PCnet-32.
Slot keyword is used with
the LOAD command to
specify the slot number to
selected physical adapter
board.
LineSpeed keyword is
used to force the line to a
special speed and duplex
mode.
Range
UTP
AUI
OFF
Not Present
Present or
Not Present
Not Present
Present or
Not Present
Not Present
Present or
Not Present
Not Present
Present or
Not Present
Number of
Slot
Not Present
100F
100H
10F
10H
Auto
On
Off
For Values
see User's
Guide
Number of
slot
Auto
Negotiation
MPMODE is used to set
Magic Packet mode.
LEDx
LEDx keyword is used to
program the adapter's
LEDs.
Primary/
Primary/Secondary
Secondary keywords are used to set
a pair of adapters to FailOver mode.
SCAN
SCAN keyword is used to Present or
switch back to the
Not Present
Primary adapter after
Primary adapter FailOver and hot-swap.
57
Default
(What is in EEPROM)
Not Present
Not Present
Not Present
Not Present
Not Present
PCnet Family Network Driver Installation Guide
58
Installing the NDIS 2.01 Driver
6.
Installing the NDIS 2.01 Driver
The Network Driver Interface Specification (NDIS) 2.01 is a driver specification
developed by Microsoft to offer a standard driver interface for adapter cards. AMD’s
NDIS 2.01 driver supports the following environments:
•Microsoft LAN Manager 2.x
•Microsoft Windows for Workgroups 3.1
•Microsoft Windows for Workgroups 3.11
•IBM LAN Server 2.0, 3.x, 4.x
•SunSoft PC-NFS 5.x
•Artisoft LANtastic 6.0
•Banyan VINES
AMD’s NDIS 2.01 driver may be installed using the automated AMINSTAL utility or
manually from the command line prompt for each specific environment. Both methods
are described below.
6.1.
Driver Installation Using the AMINSTAL Utility
To install a driver using the AMINSTAL Utility, follow the steps listed below:
__1
Run the AMINSTAL Utility to configure your PCnet adapter card’s I/O base
address, IRQ channel, and DMA channel.
See the AMINSTAL Utility section for more information on
configuring your PCnet adapter card.
Once you have completed the configuration of your PCnet adapter card
using AMINSTAL, go to step 2 below to continue.
__2
Select the Continue button in the Configuration dialog box. The
Installation dialog box will appear.
__3
Select the desired PCnet adapter card by highlighting it in the top of the
dialog box.
Note: If IBM LAN Manager, Microsoft Windows for Workgroups, SunSoft PC-NFS, etc.,
OEM installation procedures are used to install the NDIS 2.01 driver, then do not
use AMINSTAL to install the NDIS 2.01 driver.
__4
Highlight the NDIS 2.01 driver to install the driver. Change the default
path if necessary. The default directory is C:\NDIS.
__5
Press the Continue button to complete the installation. AMINSTAL will
copy the selected driver file into the specified directory, create a
PROTOCOL.INI file in the specified directory, and copy a sample
59
PCnet Family Network Driver Installation Guide
CONFIG.NET file into the specified directory.
The CONFIG.NET file contains the following:
DEVICE=<install path> PROTMAN.DOS /I:<install path>
DEVICE=<install path> PCNTND.DOS
Note:
__6
PROTMAN.DOS is distributed by Microsoft, IBM, and other operating system
companies.
Exit the AMINSTAL utility when the installation has been completed. The
user may need to make modifications to the system files, using the AMD
sample files
as reference.
The installation of the NDIS 2.01 driver is now complete.
60
Installing the NDIS 2.01 Driver
6.2.
Microsoft LAN Manager
Support is provided for the Microsoft LAN Manager (Version 2.x) environment. The
driver should be installed using the Microsoft LAN Manager Setup Utility.
Notes: 1) The hardware for the Microsoft LAN Manager environment can be configured to run as an
OS/2 server, OS/2 workstation, basic MS-DOS workstation, or an enhanced MS-DOS
workstation. Refer to your Microsoft LAN Manager documentation as needed.
2) The directory structure provided on the AMD NDIS 2.01 driver diskette has been setup for
automatic OEM installation. The OEM Installation section of this manual provides more details
regarding OEM driver installation. Also, more information can be found in the Microsoft LAN
Manager Installation Guide.
6.2.1. Driver Installation Using Microsoft LAN Manager Setup Utility
The installation procedure described below assumes the Microsoft LAN Manager has
already been installed. If not, refer to the Microsoft LAN Manager Installation Guide for
installation instructions.
To install a driver using the Microsoft LAN Manager Setup Utility, follow the steps listed
below:
__1
Insert the AMD NDIS 2.01 driver diskette into the floppy drive.
Note: Two information files (pcntnd.nif and protocol.ini) will be used for driver installation. These
files are located on the AMD NDIS 2.01 driver diskette.
__2
Change to the LAN Manager subdirectory on your hard disk by typing:
cd C:\LANMAN
Then press <Enter>.
__3
Next start the Microsoft LAN Manager Setup utility by typing:
setup
Then press <Enter>. The following message will be displayed:
Loading Microsoft LAN Manager configuration ...
__4
Hold down the <Alt> key and press C to access the Configuration dropdown menu.
__5
Use the up/down arrow keys to select Network Drivers... and then press
<Enter>. This will open the Workstation Configuration window.
__6
If you have an existing (old) PCnet Family Ethernet driver installed, use the tab
key to select Remove Config and then press <Enter>. This removes the
existing PCnet driver.
61
PCnet Family Network Driver Installation Guide
__7
Use the tab key to select Add New Config and then press <Enter>. This
will open the Network Adapter Drivers window.
__8
Use the tab key to select Other Driver and then press <Enter>.
__9
Enter the disk drive letter (e.g., A: ) where the AMD NDIS 2.01 driver diskette is
located.
Note:
No path is required since the AMD diskette is structured for the Microsoft LAN Manager
OEM setup.
Use the tab key to select OK and then press <Enter>.
__10 Use the up/down arrow keys to select PCnet Family Ethernet Adapter. Next,
use the tab key to select OK and then press <Enter>.
Note: If you have older PCnet Family drivers installed, you will be asked if you want to
Overwrite? Use the tab key to select <Yes> and then press <Enter>.
The following message will be displayed:
Copying drivers, please wait ...
Wait for the message to go away.
__11 Use the up/down arrow keys to select the desired protocol, press the spacebar
to select, and then use the tab key to select OK. Then press <Enter>. You
will then be returned to the Workstation Configuration window.
__12 Use the tab key to select Save and then press <Enter>. The following
message will be displayed:
Saving Microsoft LAN Manager Configuration ...
Wait for the message to go away.
__13 Hold down the <Alt> key and press L to access the LAN Manager dropdown menu.
__14 Use the up/down arrow keys to select Exit Setup and then press <Enter>. The
following message will be displayed:
LAN Manager Configuration Complete
OK will be highlighted. Press <Enter>.
The installation of the NDIS 2.01 driver for Microsoft LAN Manager is now
62
Installing the NDIS 2.01 Driver
complete.
63
PCnet Family Network Driver Installation Guide
6.2.2. File Examples
During installation, LAN Manager will automatically make modifications to the
CONFIG.SYS, AUTOEXEC.BAT, and PROTOCOL.INI files. Below are sample
files for a PCnet-ISA adapter card.
CONFIG.SYS
DEVICE=C:\LANMAN.DOS\DRIVERS\PROTMAN\PROTMAN.DOS /i:C:\LANMAN.DOS
DEVICE=C:\LANMAN.DOS\DRIVERS\ETHERNET\PCNET\PCNTND.DOS
AUTOEXEC.BAT
SET PATH=C:\LANMAN.DOS\NETPROG;%PATH%
NET START WORKSTATION
LOAD NETBEUI
NET LOGON bill.gates
PROTOCOL.INI
[PROTMAN]
DRIVERNAME
DYNAMIC
PRIORITY
= PROTMAN$
= YES
= NETBEUI
[NETBEUI_XIF]
Drivername
SESSIONS
NCBS
BINDINGS
LANABASE
=
=
=
=
=
netbeui$
6
12
PCNTND_NIF
0
[PCNTND_NIF]
;-----------------------------------------------------------------;
; AMD PCnet Ethernet Adapter
;
;-----------------------------------------------------------------;
DriverName
IOAddress
Interrupt
DMAChannel
Note:
=
=
=
=
PCNTND$
0x0300
4
5
For PCnet-ISA adapter cards, be sure the IOAddress, Interrupt, and the DMA Channel
match the card's jumper settings. For other PCnet adapter cards, the user can leave out
these keyword parameters.
64
Installing the NDIS 2.01 Driver
6.2.3. Keyword Examples
To change the transmit and receive buffers, insert the following statements in the
PROTOCOL.INI file (located in the PCnet Driver (PCNTND) directory):
RXBUFFERS = 4
TXBUFFERS = 4
To use the BUSTYPE keyword, remove the I/O Address and insert the BUSTYPE
keyword in the PROTOCOL.INI file (located in the PCnet Driver (PCNTND)
directory). For example, to designate the PCnet-32 adapter card and the VL bus,
insert the following:
BUSTYPE = VESA
65
PCnet Family Network Driver Installation Guide
6.3.
Microsoft Windows for Workgroups 3.1
Support is provided for the Microsoft Windows for Workgroups (Version 3.1)
environment.
Notes: 1) The format and procedure to install the NDIS drivers for Windows for Workgroups 3.1
is different from that of Windows for Workgroups 3.11. Refer to Section 6.4 for the
procedure for Windows for Workgroups 3.11.
2) The directory structure that is provided on the AMD NDIS 2.01 driver diskette has been
set up for automatic OEM installation. The OEM Installation section of this manual
provides more details regarding OEM driver installation. Also, more information can be
found in the Microsoft Windows for Workgroups 3.1 User’s Guide.
Follow the steps listed below:
__1
Insert the AMD NDIS 2.01 driver diskette in the floppy drive.
__2
From the Main menu in Windows, select the Control Panel icon.
__3
In the Network Setting dialog box, select the Adapters button. The
Network Adapters dialog box should appear.
__4
Choose the Add button to install the PCnet driver from the AMD NDIS
2.01 driver diskette.
__5
In the list of network adapters, select the Unlisted or Updated Network
Adapter. Then enter the path to load the NDIS 2.01 driver (e.g.,
A:\WFW31 ).
__7
Select the AMD PCnet Family Driver and choose OK.
__8
If the network adapter driver requires additional settings, a Setup dialog
box appears displaying the default settings.
__8.1 For a PCnet-ISA adapter card:
The dialog box will appear and the default settings will show IRQ =
3 and DMA =5 . Use the Advanced button option for additional
settings such as the DMA channel setting. Make any modifications to
the settings to correspond with the jumper settings on your PCnetISA adapter card.
__8.2 For PCnet-ISA+, PCnet-ISA II, PCnet-32, and PCnet-PCI adapter
cards:
No settings need to be specified for one installed adapter.
66
Installing the NDIS 2.01 Driver
__9
In the Network Adapters dialog box, choose the Close button. Then
choose the OK button in the Network Settings dialog box.
__10 Follow the remaining Window instructions. Restart the computer to have
the driver installation take effect.
The installation of the NDIS 2.01 driver for Windows for Workgroups is now
complete.
6.3.1. Keyword Example
To set the IRQ channel value for the PCnet-ISA adapter card, choose the
Network icon to select the Adapters button. Then, choose the AMD PCnet
adapter card to modify the card’s settings. In the Setup dialog box, select (or
enter) the IRQ (interrupt channel) desired to match the corresponding jumper
setting on your PCnet-ISA adapter card.
67
PCnet Family Network Driver Installation Guide
6.4.
Microsoft Windows for Workgroups 3.11
Support is provided for the Microsoft Windows for Workgroups (Version 3.11)
environment. Microsoft Windows for Workgroups 3.11 supports both NDIS 2.01
and NDIS 3.x drivers. AMD provides both of these NDIS drivers.
Notes: 1) The format and procedure to install the NDIS drivers for Windows for Workgroups 3.11
is different from that of Windows for Workgroups 3.1. Refer to Section 6.3 for the
procedure for Windows for Workgroups 3.1.
2) The directory structure that is provided on the AMD NDIS 2.01 driver diskette has been
setup for automatic OEM installation. The OEM Installation section of this manual
provides more details regarding OEM driver installation. Also, more information can be
found in the Microsoft Windows for Workgroups 3.11 User’s Guide.
Follow the steps listed below:
__1
Insert the AMD NDIS 2.01 driver diskette into the floppy drive.
__2
In the Windows for Workgroups 3.11 Program Manager, double click on
the Windows Setup icon.
__3
From the Options Menu, select Change Network Settings.
__4
From the Network Setup dialog box, select the Drivers... button to
install the PCnet NDIS 2.01 and NDIS 3.x drivers.
__5
In the Network Drivers dialog box, select the Add Adapter button to
install the PCnet device drivers.
__6
In the Add Network Adapter window, choose the Unlisted or Updated
Network Adapter from the menu and then select OK .
Note: The Detect button, the Am2100/Am1500T, or the PCnet Family selections from
the menu of standard drivers uses a previous release of the AMD driver software.
__7
The Install Driver dialog box will appear. Enter the floppy drive containing
the AMD NDIS 2.01 driver diskette and specify the Windows for
Workgroups 3.11 path and the path for \PCI or \ISA, depending on which
network interface card you are using to install the PCnet drivers. For
example, enter:
A:\WFW311\ISA or \PCI
Then select OK.
__8
The Advanced Micro Devices PCnet Family selection will appear under the
Network Adapters list. Select OK to continue.
68
Installing the NDIS 2.01 Driver
__9
Answer the series of questions for the correct base I/O port, IRQ channel,
and DMA channel if you are using an ISA card. In the Network Drivers
dialog box, select Setup. If you are using a PCnet PCI device and would
like to load the NDIS 2 driver, go to step 9.3. If loading the NDIS 3 driver,
go to step 10.
__9.1 For a PCnet-ISA adapter card:
Specify the IRQ, base I/O port, and DMA channel to correspond to
the jumper settings on the adapter card.
__9.2 For PCnet-ISA+, PCnet-ISA II, PCnet-32, and PCnet-PCI adapter
cards
a. Set interrupt (IRQ) to Auto_scan and the base I/O port to 0.
b. Select OK. In the Network Drivers dialog box, select Close. In
the Network Setup dialog box, select OK. For the Microsoftspecific dialog boxes, select Skip. For the Install Driver dialog
box, enter:
\WFW311\ISA or \PCI
Note: If Auto_scan is selected for PCnet-ISA+, PCnet-ISA II, PCnet-32, or
PCnet-PCI, then no value need be specified; however, Windows for
Workgroups 3.11 will issue a warning message regarding possible interrupt
conflict. This is due to the temporary configuring of the interrupt to channel
0 until the real value is set according to the EEPROM configuration.
__9.3 Highlight the Advanced Micro Devices PCnet adapter (NDIS2/NDIS3) and
click on the Setup option on the right side of the screen.
__9.4 Click the pull-down bar under Driver Type, highlight the Real Mode NDIS
Driver option, and click OK.
__9.5 A window will appear warning you about a possible interrupt conflict and it
asks you if you want to change the setting. Click No, then go to step 10.
__10 Select OK to exit. Windows for Workgroups 3.11 will ask the user to
reboot the machine once the installation is completed.
The installation of the NDIS 2.01 driver for Windows for Workgroups 3.11 is
now complete.
69
PCnet Family Network Driver Installation Guide
6.4.1. Keyword Example
To set the LED0 keyword value, follow the instructions given above to access the
advanced settings for a PCnet adapter card. A dialog box will appear to set the
LED keyword options. In the LED0 setting, enter the value desired from the list
given in the Software Keywords section (Appendix B).
70
Installing the NDIS 2.01 Driver
6.5. Microsoft Windows 95
This installation assumes that there is a PCnet controller and driver installed in the
system and that this is an upgrade.
To install the driver from the distribution floppy, follow these directions:
__1 Click on Start, choose settings, and click on Control Panel.
__2 Double click on the Network icon. Highlight the network driver and remove the
already installed network adapter.
__3 Click Add and select adapter, and click once again. Select the Have Disk option
and specify the path: A:\Win95 and click OK.
__4 Choose the correct adapter from the list on the screen. Click OK.
__5 Highlight the driver you selected and click on properties. Select the Real Mode (16
bit) NDIS driver and click OK. Click OK again. Insert the PCnet Family driver
Disk 2, which contains the NDIS2 driver. Type the path:
A:\MSLANMAN.DOS\drivers\ethernet\pcntnd and click OK.
__6 Before you restart your computer make sure that you add the real mode protocol
which you would like to use, such as Microsoft DLC protocol.
__7 On completion, shut down the system and reboot. The NDIS2 driver should be up
and running now.
71
PCnet Family Network Driver Installation Guide
6.6.
IBM LAN Server
AMD’s NDIS 2.01 driver can also be used with the IBM LAN Server (Version 2.x,
3.x, and 4.x) environment. IBM LAN Server requires a unique NIF file. This NIF file
is included on the AMD NDIS 2.01 driver diskette (see the README.TXT file
under the IBMCOM directory).
Note: The directory structure provided on the AMD SCO Unix driver diskette has been setup for
automatic OEM installation. The OEM Installation section of this manual provides more details
regarding OEM driver installation. Also, more information can be found in the IBM LAN Adapter
and Protocol Support Configuration Guide.
Follow the steps listed below:
__1
Insert the AMD NDIS 2.01 driver diskette into the floppy drive.
__2
In IBM LAN Server, select or run the LAPS (LAN Adapter and Protocol Support)
program. Refer to the IBM LAN Adapter and Protocol Support
Configuration Guide for more information on this utility and for more details on
how to install additional adapters and device drivers.
__3
From the IBM LAPS dialog box, choose the INSTALL button to install a PCnet
Network adapter card for the IBM LAN Server environment. If the PCnet adapter
card has already been installed, go to step 6 below to continue.
__4
Specify the drive and path (e.g., LANSRVR ) to the AMD NDIS 2.01 driver
diskette (e.g., A:\LANSRVR ).
__5
After installing/copying the appropriate NIF files from the AMD NDIS 2.01 driver
diskette, the IBM LAPS dialog box will appear again.
__6
From the IBM LAPS dialog box, select Configure.
__7
In the Configuration dialog box, choose the Configure LAN transports
(default) option and select Continue.
__8
When the Configure Workstation dialog box is displayed, remove the current
configurations from the Current Configuration list box.
__9
Choose the AMD PCnet Family Ethernet Adapter from the Network Adapters
list box, by highlighting the entry. Then choose Add to add the AMD PCnet
adapter card to the Current Configuration list box.
__10 Highlight the appropriate protocols in the Protocols list box. Then choose Add
to add them to the Current Configuration list box.
__11 Choose the AMD PCnet adapter from the Current Configuration list box. Then
72
Installing the NDIS 2.01 Driver
choose Edit. The Parameters for AMD dialog box is displayed.
__12 View the default configuration. If the default configuration is OK, choose OK.
If you need to change the AMD configuration, change the options in this dialog
box. Choose Range to display the available settings for each option. Press [F1]
if you need help deciding on a setting.
__12.1 For a PCnet-ISA adapter card:
Make all modifications necessary to match the jumper settings on the
PCnet-ISA adapter card.
__12.2 For PCnet-ISA+, PCnet-ISA II, PCnet-32, and PCnet-PCI Adapter
cards:
No settings need to be specified since they are software configurable.
The installation of the NDIS 2.01 driver for IBM LAN Server is now complete.
6.6.1. Driver Installation For IBM Extended Services 1.0
Follow the steps listed below:
__1
Insert the AMD NDIS 2.01 driver diskette into the floppy drive.
__2
Display the Communication Manager main menu and choose Advanced.
__3
Choose Configuration.
__4
Choose LAN Adapter and Protocol Support (LAPS).
__5
At the Options dialog box, choose Copy additional network adapter drivers.
Then choose OK.
__6
At the Copy Additional Network Adapter Drivers dialog box, type the path (e.g.,
A: ). Then choose OK.
__7
When the Copy Diskette dialog box is displayed, choose OK.
__8
When the Options dialog box is displayed, choose Configure Workstation.
Then choose OK.
__9
When the Configure Workstation dialog box is displayed, remove the current
configurations from the Current Configuration list box.
73
PCnet Family Network Driver Installation Guide
__10 Choose the AMD PCnet Family Ethernet Adapter from the Network Adapters
list box, by highlighting the entry. Then choose Add to add the AMD adapter to
Current Configuration list box.
__11 Highlight the appropriate protocols in the Protocols list box. Then choose Add
to add them to the Current Configuration list box.
__12 Choose the AMD PCnet Adapter at the Current Configuration list box. Then
choose Edit. The Parameters for AMD dialog box is displayed.
__13 View the default configuration. If the default configuration is OK, choose OK.
If you need to change the AMD configuration, change the options in this dialog
box. Choose Range to display the available settings for each option. Press [F1]
if you need help deciding on a setting.
__13.1 For a PCnet-ISA adapter card:
Make all modifications necessary to match the jumper settings on the
PCnet-ISA adapter card.
__13.2 For PCnet-ISA+, PCnet-ISA II, PCnet-32, and PCnet-PCI adapter
Cards
No settings need to be specified since they are software
configurable.
The installation of the NDIS 2.01 driver for IBM Extended Services 1.0 (LAN Server) is
now complete.
6.6.2. Driver Installation For IBM LAN Server 4.x (DOS Client)
To support DOS client packages for IBM LAN Server 4.x, two new directories have
been added on diskette 6. The first directory, \IBMLSP, should be used as a path for
the Advanced LAN Support Program. The second directory, \IBMADOS, should be
used as a path for the Advanced LAN DOS Services package.
74
Installing the NDIS 2.01 Driver
6.7.
SunSoft PC-NFS
The AMD NDIS 2.01 driver can also be used with the SunSoft PC-NFS (version
5.x) environment.
Note:
The directory structure provided on the AMD PC-NFS driver diskette has been set up for
automatic OEM installation. Also, more information can be found in the SunSoft PC-NFS
Manuals.
Follow the steps listed below:
__1
Be sure PC-NFS is installed on your system and configured for an NDIS
2.01 driver. See the PC-NFS Installation Procedure Manuals for more
information.
__2
Run NFSCONF. Select Adapter Menu. Select Ethernet. Select NDIS.
__3
Insert the PC-NFS QUIKNDIS diskette into the floppy drive. Change to the
drive containing the QUIKNDIS diskette (e.g., A:\ ).
__4
At the prompt type:
QUIKNDIS
Then press <Enter>.
__5
A message will appear asking for the current boot drive. Enter the current
boot drive and then press <Enter>.
__6
Press Y to save the current PROTOCOL.INI file as PROTOCOL.OLD.
Ignore this step if this dialog box does not appear.
__7
In the Adapter Card List box, select the Custom option to install the
PCnet NDIS driver for PC-NFS.
__8
Remove the QUIKNDIS disk from the floppy drive. Insert the AMD NDIS
2.01 driver diskette into the floppy drive.
__9
Follow the dialog boxes and enter the correct driver and path on the AMD
NDIS 2.01 driver diskette to install the NDIS driver (e.g., A:\PCNFS ).
__10 Enter PCNTND for the NIF file name and then press <Enter>.
__11 Make the appropriate changes to the CONFIG.SYS and AUTOEXEC.BAT
files.
__12 Reboot your system.
The installation of the NDIS 2.01 driver for PC-NFS is now complete.
75
PCnet Family Network Driver Installation Guide
6.8.
Artisoft LANtastic
Support is provided for the Artisoft LANtastic (Version 6.0) environment.
Note:
Artisoft LANtastic 6.0 is now based on the NDIS 2.01 specification.
In order to install a driver for LANtastic 6.0, the operating system must be re-installed.
Start from the DOS system prompt. Follow the steps listed below:
__1
Insert disk 1 of LANtastic 6.0 into your floppy drive (e.g., A ). At the DOS
prompt, type:
a:\install
Then press <Enter>. This starts the LANtastic installation process.
__2
Artisoft's installation program will then search for Microsoft Windows on your
system. If Windows is not found, press <Enter> at the message to run the install
program under DOS and go to step 2.1 to continue. Otherwise, if Windows is
found, Windows will be started. Go to step 3 to continue.
__2.1
Some Artisoft initialization messages will appear on the screen. Press
<Enter> to continue.
__2.2
Select KEEP all previous LANtastic setup information.
__2.3
Select any additional LANtastic features you wish to install (see Artisoft
LANtastic Manuals for more information). Press <Enter> to continue.
__2.4
Select NDIS Support for Network Adapters.
__2.5
Insert the AMD NDIS 2.01 driver diskette (disk 1) into the floppy drive
and then press <Enter> to continue.
__2.6
Insert the appropriate Artisoft LANtastic 6.0 disk when prompted. Press
<Enter> to continue.
__2.7
Select OK to perform the installation and press <Enter> to continue.
__2.8
Information will appear on the screen, press <Enter> to continue.
__2.9
Insert the appropriate Artisoft LANtastic 6.0 disk when prompted.
Press <Enter> to continue.
__2.10 You will see the Installation complete and Need to reboot your
76
Installing the NDIS 2.01 Driver
computer message. Press <Enter> to continue. Remove the disk from
the floppy drive. Press <Enter> to reboot.
__2.11 On start-up you'll see the message:
AMD PCnet Family Ethernet Adapter
NDIS v2.0.1 MAC Driver, Version x.xx
Drivername
Driver configuration information such as IOAddress,
Interrupt, and DMA
__2.12 Next, you will see some LANtastic configuration messages.
The installation of the NDIS 2.01 driver for Artisoft LANtastic 6.0 is now complete.
__3
You will see the Artisoft Install message. Click OK to continue.
__4
Select KEEP all previous LANtastic setup information and click OK to
continue.
__5
Select any additional LANtastic features you wish to install (see Artisoft
LANtastic Manuals for more information). Click OK to continue.
__6
Select NDIS Support for Network Adapters and click OK to continue.
__7
Insert the AMD NDIS 2.01 driver diskette (disk 1) into the floppy drive and then
click OK to continue.
__8
Insert the appropriate Artisoft LANtastic 6.0 disk when prompted. Click OK to
continue.
__9
Select OK to perform the installation and click OK to continue.
__10 Information will appear on the screen, click OK to continue.
__11 Insert the appropriate Artisoft LANtastic 6.0 disk when prompted.
Click OK to continue.
__12 You will see the Installation complete and Need to reboot your
computer message. Click OK to continue. Remove the disk from the
floppy drive. Click OK to reboot.
__13 On start-up you'll see the message:
AMD PCnet Family Ethernet Adapter
NDIS v2.0.1 MAC Driver, Version x.xx
Drivername
77
PCnet Family Network Driver Installation Guide
Driver configuration information such as IOAddress,
Interrupt, and DMA
__14 Next, you will see some LANtastic configuration messages.
The installation of the NDIS 2.01 driver for Artisoft LANtastic 6.0 is now complete.
78
Installing the NDIS 2.01 Driver
6.9.
Banyan VINES
AMD’s NDIS 2.01 driver may be configured to run in the Banyan VINES
environment (for client-based systems only). Follow the steps listed below:
__1
Compile all the necessary files (see the file list below) for VINES. These
files are all located in one subdirectory on the AMD NDIS 2.01 driver
diskette (A:\NDIS).
__2
Create the PROTOCOL.INI, CONFIG.SYS, and AUTOEXEC.BAT files
(sample files are shown below).
a. Modify the PROTOCOL.INI file to reflect the changes necessary for the
appropriate LAN card section.
b. Modify the AUTOEXEC.BAT and CONFIG.SYS files to reflect changes
in the directory where the files mentioned in step 1 are to be located.
__3
Run the VINES PCCONFIG Utility to configure the NDIS driver.
__4
Reboot the machine. The installation of the NDIS 2.01 driver for Banyan
VINES is now complete.
6.9.1. Files Required
BAN
BAN
REDIR
NEWREV
NEWREV
PCCONFIG
REDIRALL
PCCONFIG
PCCONFIG
NDISBAN
NETBIND
NDISBAN
NDISBAN
PROTMAN
EXE
MSB
MSB
EXE
MSB
DB
EXE
EXE
MSB
COM
EXE
DOC
OVL
DOS
32835
2058
982
47933
5139
19656
51546
61155
5785
35356
15639
3072
15639
10649
02-12-92
02-12-92
02-12-92
02-12-92
02-12-92
02-12-92
02-12-92
02-12-92
02-12-92
02-12-92
02-12-92
02-12-92
02-12-92
02-12-92
6:07p
6:07p
6:07p
6:07p
6:07p
6:07p
6:07p
6:07p
6:07p
6:07p
6:07p
6:07p
6:07p
6:07p
351
226
112
05-28-92
05-29-92
05-28-92
11:07a
10:05a
05:25p
6.9.2. User Must Create
PROTOCOL
CONFIG
AUTOEXEC
INI
SYS
BAT
79
PCnet Family Network Driver Installation Guide
PCNTND
DOS
6.9.3. User Must Find
The following path should be used to access the driver from the AMD NDIS 2.01
driver diskette:
A:\MSLANMAN.DOS\DRIVERS\ETHERNET\PCNET
The modifications to the CONFIG.SYS, AUTOEXEC.BAT, and PROTOCOL.INI
files are shown below as an example for PCnet-ISA adapter cards.
CONFIG.SYS
FILES=20
BUFFERS=20
DEVICE=C:\BANYAN\PROTMAN.DOS
DEVICE=C:\BANYAN\PCNTND.SYS
/I:C:\BANYAN
AUTOEXEC.BAT
PATH=C:\DOS
PROMPT $P$G
C:
CD\BANYAN
BAN /nc
ndisban
netbind
redirall
PROTOCOL.INI
[PROTOCOL.INI]
DRIVENAME= PROTMAN$
; PROTOCOL.INI section for the AMD PCnet Card
[PCNTND_NIF]
DRIVENAME = PCNTND$
;IOBASE = 0x300
;INTERRUPT = 3
;DMACHANNEL = 5
[VINES_XIF]
DRIVENAME = NDISBAN$
BINDINGS = PCNTND_NIF
80
Installing the NDIS 2.01 Driver
6.10.
DEC Pathworks for DOS/Window V5.1 Installation
The following instructions assume that the DEC Pathworks for DOS/Windows has been
installed on the hard drive from the installation diskettes or CD ROM. Refer to the DEC
manual for installation instructions if the software has not been installed.
__1 Go to the drive where Pathworks software is installed.
__2 Change directory to PCAPP.
__3 Execute PWSETUP.
__4 Enter the directory where you want the software installed. The default is c:\PW.
__5 Choose CUSTOMIZE under the Select a Configuration Option menu.
__6 Choose appropriate template in the Select a Workstation Template menu.
__7 Under the Customize: Modify Workstation Configuration menu, put an X mark
beside the Network Adapter Information line.
__8 Additional menus will appear. Choose the appropriate options for your network
environment. Refer to the DEC manual for questions regarding these menus.
__9 Choose <Other Network Adapter> under the Customize: Network Adapter
Information menu.
_10 If installing options other than NetWare, type:
a:\mslanman.dos\drivers\ethernet\pcntnd\pcntnd.dos on the drive
file line.
Then type:
a:\mslanman.dos\drivers\ethernet\pcntnd\protocol.ini on the
Protocol.ini Stub line.
_11 Verify that Ethernet is marked and click OK.
_12 Click OK under the Customize: Network Adapter Information menu.
_13 Additional menus will appear. Follow the DEC instruction to complete the
installation.
81
PCnet Family Network Driver Installation Guide
6.11.
NDIS 2.01 Driver Keywords
See Table 3 for NDIS 2.01 Driver Keywords.
Table 3. NDIS 2.01 Driver Keywords
Keyword
Description
I/O Address
Interrupt
DMA
Transmit
Buffers
Keyword
Name
IOADDRESS
PORT
IOBASE
INT, INTERRUPT
IRQ
DMA
DMACHANNEL
TXBUFFERS
Additional Keyword
Details
See Common Keywords.
Range
Default
See Common Keywords.
See Common Keywords.
Transmit and Receive
Power of 2
buffer sizes may be
increased or decreased
using Transmit and
Receive Buffer keywords.
Each network operating
system environment has
different formats and
syntax for interrupt
settings. Once again,
refer to the OEM manuals
for correct format and
usage of interrupt
settings.
82
4
Installing the NDIS 2.01 Driver
Keyword
Keyword Name
Description
Maximum
MAXMULTICASTS
Multicasts
Bus type
designation
Net Address
BUS_TO_SCAN
Full Duplex
FDUP
NETADDRESS
* Supported on PCnet-ISA
II only
Note:
Additional Keyword
Details
To designate the
maximum number of
multicast addresses
for the device
See AMD Driver
Specific Keywords
This keyword allows
the user to specify or
overwrite the IEEE or
Mfr. address. This
must be edited in
PROTOCOL.INI or
NT registry.
FDUP keyword is
used to enable or
disable full duplex on
the 10BaseT and AUI
ports. See Common
Keywords.
Range
N/A
Default
10
Not Present
Any valid
IEEE
address or
Not Present
UTP
AUI
OFF
Not Present
(What is on the
EEPROM)
All of the keywords available to the NDIS 2.01 driver may be activated by configuring the
PROTOCOL.INI file in some operating system environments or by selecting the options through a
dialog box in other operating systems.
83
Installing the NDIS 3.x and 4.x Drivers
7.
Installing the NDIS 3.x and 4.x Drivers
7.1.
Installation of the NDIS 3.x Driver
The Network Driver Interface Specification (NDIS) 3.x is a driver specification
developed by Microsoft to offer a standard driver interface for adapter cards. AMD’s
NDIS 3.x driver supports the following environments:
•Microsoft Windows NT 3.1, 3.5, 3.51
•Microsoft Windows for Workgroups 3.11 and Microsoft Windows 95
Installation of AMD’s NDIS 3.x driver for the environments listed above is described
below.
7.1.1. Microsoft Windows NT
Support is provided for the Microsoft Windows NT (Versions 3.1, 3.5, and 3.51)
environment.
Notes: 1) The directory structure provided on the AMD NDIS 3.x driver diskette has been set up
for automatic OEM installation. Also, more information can be found in the Microsoft
Windows NT User’s Guide.
2) Only x86-based Windows NT platforms are supported.
Follow the steps listed below:
__1
Insert the AMD NDIS 3.x driver diskette into the floppy drive.
__2
From the Control Panel in the Windows NT Main window, double click
on the Network icon to install the PCnet adapter card.
__3
In the Network Settings dialog box, choose Add Adapter.
__4
In the Add Network Adapter dialog box, pull down the adapter card list
menu and select <Other> Requires disk from manufacturer from the list
and continue.
__5
In the next window, enter:
A:\WINNT350
__6
Then, select AMD PCnet Family Ethernet Adapter from the dialog box to
install the AMD PCnet adapter card.
85
PCnet Family Network Driver Installation Guide
__7
In the AMD PCnet Family Ethernet Adapter Card Setup dialog box, select
bus type All (defaults to All if nothing is selected). If more than one
network adapter card is used, select its bus type.
Note: Sometimes All will not work on PCI-based systems. In this case, try selecting
PCI1 or PCI2 depending on the bus type.
__7.1 For a PCnet-ISA adapter card:
Enter the correct I/O port, IRQ, and DMA channel values to
correspond with what is set on the card by jumpers. If no values are
selected, the default values will be chosen by the AMD driver.
__7.2 For PCnet-ISA+, PCnet-ISA II, PCnet-32, and PCnet-PCI adapter cards:
IRQ and DMA channel values are auto-detected. However, the
values must be specified for multiple network cards. The IRQ and
DMA values are set by using the AMINSTAL Utility (see the Express
Installation section for more details). Shutdown Windows NT and run
the AMINSTAL Utility from DOS.
Note: If you are using a PCnet-PCI adapter card, you do not need to run the AMINSTAL
Utility.
__8
Reboot your system to complete the driver installation process.
For additional information, refer to your Microsoft Windows NT OS documentation.
In addition, the user may review the README.TXT file in the WINNT directory of
the AMD NDIS 3.x driver diskette.
7.1.1.1.
Keyword Example
To set the TP keyword, go into the AMD PCnet Family Ethernet Adapter Card
Setup dialog box (see instructions above on how to access this dialog box),
activate the TP button to use the TP keyword as described in the Software
Keywords section (Appendix B).
86
Installing the NDIS 3.x and 4.x Drivers
7.1.2. Microsoft Windows for Workgroups 3.11
Support is provided for the Microsoft Windows for Workgroups (Version 3.11)
environment. Microsoft Windows for Workgroups 3.11 supports both NDIS 2.01
and NDIS 3.x drivers. AMD provides both of these NDIS drivers.
Notes: 1) The format and procedure to install the NDIS drivers for Windows for Workgroups 3.11
is different from that of Windows for Workgroups 3.1.
2)
The directory structure that is provided on the AMD NDIS 3.x driver diskette has been
setup for automatic OEM installation. The OEM Installation section of this manual
provides more details regarding OEM driver installation. Also, more information can be
found in the Microsoft Windows for Workgroups 3.11 User’s Guide.
Follow the steps listed below:
__1
Insert the AMD NDIS 3.x driver diskette into the floppy drive.
__2
In the Windows for Workgroups 3.11 Program Manager, double click on
the Windows Setup icon.
__3
From the Options Menu, select Change Network Settings.
__4
From the Network Setup dialog box, select the Drivers... button to
install the PCnet NDIS 2.01 and NDIS 3.x drivers.
__5
In the Network Drivers dialog box, select the Add Adapter button to
install the PCnet device drivers.
__6
In the Add Network Adapter window, choose the Unlisted or Updated
Network Adapter from the menu and then select OK.
Note:
__7
The Detect button, the Am2100/Am1500T, or the PCnet Family selections from
the menu of standard drivers uses a previous release of the AMD driver software.
The Install Driver dialog box will appear. Enter the floppy drive containing
the AMD NDIS 3.x driver diskette and specify the Windows for Workgroups
3.11 path to install the PCnet drivers. For example, enter:
A:\WFW311\ISA for ISA cards or
A:\WFW311\PCI for PCI cards
Then select OK.
__8
The Advanced Micro Devices PCnet Family selection will appear under the
Network Adapters list. Select OK to continue.
__9
Answer the series of questions for the correct base I/O port, IRQ channel,
and DMA channel.
87
PCnet Family Network Driver Installation Guide
In the Network Drivers dialog box, select Setup.
In the AMD PCnet Family dialog box:
__9.1 For a PCnet-ISA adapter card:
Specify the IRQ, base I/O port, and DMA channel to correspond to
the jumper settings on the adapter card.
__9.2 For PCnet-ISA+, PCnet-ISA II, PCnet-32, and PCnet-PCI adapter
cards:
a. Set interrupt (IRQ) to Auto_scan and the base I/O port to 0.
b. Select OK. In the Network Drivers dialog box, select Close. In
the Network Setup dialog box, select OK. For the Microsoftspecific dialog boxes, select Skip. For the Install Driver dialog
box, enter:
\WFW311
Note: If Auto_scan is selected for PCnet-ISA+, PCnet-ISA II, PCnet-32, or
PCnet-PCI, then no value need be specified; however, Windows for
Workgroups 3.11 will issue a warning message regarding possible interrupt
conflict. This is due to the temporary configuring of the interrupt to channel
0 until the real value is set according to the EEPROM configuration.
__10 Select OK to exit. Windows for Workgroups 3.11 will ask the user to
reboot the machine once the installation is completed.
The installation of the NDIS 3.x driver for Windows for Workgroups 3.11 is now
complete.
7.1.2.1.
Keyword Example
To set the LED0 keyword value, follow the instructions given above to access the
advanced settings for a PCnet adapter card. A dialog box will appear to set the LED
keyword options. In the LED0 setting, enter the value desired from the list given in the
Software Keywords section (Appendix B). See Table 4 for NDIS 3.x Driver Keywords.
88
Installing the NDIS 3.x and 4.x Drivers
7.1.3. Installation of the NDIS 3.x Win 95 Driver
This installation assumes that there is a PCnet controller and driver installed in the
system and that this is an upgrade.
To install the driver from the distribution floppy, follow these instructions:
__1
Click on the Start button, choose Settings, and then choose Control Panel.
__2
Choose the Network icon from the menu. Then delete the already installed
network card.
__3
From distribution diskette 1, copy the file Netamd.inf from
<drive>:\WIN95\MAC\NDIS3 to c:\WINDOWS\INF
__4
Then shut down the system.
__5
On reboot, Win95 detects the PCnet controller installed in the system and
prompts the user for the path of the distribution floppy. For example,
a:\WIN95\MAC\NDIS3
Note: In case, Win95 does not detect the controller on the system, then skip the
following and try the next installation procedure.
__6
The rest of the network files are copied from the Win95 Distribution disks.
__7
On completion of the installation, the user will be prompted to Shutdown the
system. When the System comes up again, the network should be up and
running.
__8
Highlight the AMD PCnet Adapter in the Network Control Panel and select the
File Sharing Box. Choose the appropriate box here.
__9
The experienced user can choose the advanced button in the Network Control
panel of Settings and set the appropriate parameters.
89
PCnet Family Network Driver Installation Guide
7.1.4. Win 95 NDIS 3.x Driver Installation When Controller Is Not
Detected On System Boot
__1
Click on the Start button, choose Settings, and then choose Control Panel.
__2
Choose the Network icon and then click on Add.
__3
Select the AMD PCnet Family Adapters, from which the appropriate adapter type
can be chosen.
__4
The user may be prompted to choose the I/O resources. Select resources
without any conflicts.
__5
The experienced user can choose the advanced button in the Network Control
panel of Settings and can set the appropriate parameters.
__6
Highlight the AMD PCnet Adapter in the Network Control Panel and select the
File Sharing Box. Choose the appropriate box here.
__7
On completion, shutdown the system and then reboot. The NDIS 3.x driver
should be up and running now.
90
Installing the NDIS 3.x and 4.x Drivers
7.1.5. Installation of the WINNT 3.51 NDIS 3.x Driver
This installation procedure is the same procedure as for the WINNT 3.1/3.5 driver.
Refer to Section 7.1. The AMD WINNT 3.51 NDIS 3.x driver is in distribution diskette 6
under the WINNT 3.51 subdirectory. There is only one difference. The WINNT 3.51 will
detect the PCnet-PCI controller if it is in the system and the PCI-only dialog box will
appear. This means the user does not have to select the Bus To Scan for PCI
controllers.
If there is a non-PCI controller in the system, then the AMD PCnet VL/ISA dialog box
appears, and the appropriate parameters can be chosen as in the WINNT 3.1/3.5
driver case.
If there is a PCI and an ISA/VL controller in the same system, then the PCI controller is
detected first, and the PCI dialog box appears. Then, when the user adds the next
adapter, the AMD PCnet VL/ISA dialog box appears and the appropriate parameters
can be chosen as in the WINNT 3.1/3.5 driver case.
Note: This driver will work on WINNT 3.51 onwards only and is not compatible with NT 3.1/3.5. The
name of the driver has changed to AMDPCN.SYS.
7.1.5.1.
NDIS 3.x Driver Keywords
See Table 4 for the NDIS 3.x Driver Keywords.
Table 4. NDIS 3.x Driver Keywords
Keyword
Keyword Name
Description
I/O Address IOADDRESS
Interrupt
INTERRUPT
DMA
DMACHANNEL
Bus type
designation
BUS_TO_SCAN
Additional Keyword
Details
See Common
Keywords.
See Common
Keywords.
See Common
Keywords.
See AMD Driver
Specific Keywords.
91
Range
Default
PCnet Family Network Driver Installation Guide
Not Present
Any valid
IEEE address
or Not
Present
Net Address
NETADDRESS
This keyword allows
the user to specify or
overwrite the IEEE or
Mfr. address. This
must be edited in
PROTOCOL.INI or
NT registry.
Full Duplex
FDUP
UTP
FDUP keyword is
AUI
used to enable or
disable full duplex on OFF
the 10BaseT and AUI
ports. See Common
Keywords.
* Supported on PCnetISA II only
Note:
Not Present
(What is on the
EEPROM)
All of the keywords available to the NDIS 3.x driver may be activated by selecting the options
through a dialog box in the appropriate operating system.
92
Installing the NDIS 3.x and 4.x Drivers
7.2.
Installation of the NDIS 4.x Driver
The Network Driver Interface Specification (NDIS 4.x) was developed by Microsoft to
offer a standard driver interface for adapter cards. AMD’s NDIS 4.x driver supports the
following environments:
• Microsoft Windows NT 4.0
• Microsoft Windows 95 OSR2 and above (Memphis, etc.)
Installation details for AMD’s NDIS 4.x driver are described below.
7.2.1. Microsoft Windows NT
Support is provided for Microsoft Window NT (Version 4.0) environment.
Notes: 1. The directory structure that is provided on the AMD NDIX 4.x driver diskette
has been set up for automatic OEM installation. Also, more information can
be found in the Microsoft Windows NT User’s Guide.
2. Only x86-based Windows NT platforms are supported.
Follow the steps listed below:
__1 Insert the AMD NDIS 4.x driver diskette into the floppy drive.
__2 From the Control Panel in the Windows NT Main window, double click on the
Network icon to install the PCnet adapter card.
__3 From the Network Settings dialog box, choose Adapter and click Add.
__4 From the Select Network Adapter dialog box, click Have Disk button.
__5 From the Insert Disk window, enter:
A:\WINNT\MINIPORT\NDIS4
__6 On completion of the installation, the user will be prompted to shut down the
system. When the system comes up again, the network should be up and running.
__7 Highlight the AMD PCnet adapter in the Network Control Panel and select the File
Sharing box. Choose the appropriate box here.
__8 The experienced user can choose the Advanced button in the Network Control
Panel settings and set the appropriate parameters.
93
PCnet Family Network Driver Installation Guide
94
Installing The SCO UNIX LLI Driver
8. Installing the SCO Unix LLI Driver
(ODT 3.0 and below)
Support is provided for the SCO UNIX (Version 3.2.4) environment. The SCO UNIX LLI
stream-based driver should be installed from the command line prompt.
Notes: 1) Support for Version 3.2.2 is no longer provided by AMD.
2) The directory structure that is provided on the AMD SCO Unix driver diskette has been set up
for automatic OEM installation. The OEM Installation section of this manual provides more
details regarding OEM driver installation. Also, more information can be found in the SCO
UNIX User’s Guide.
8.1.
Driver Installation From The Command Line Prompt
If you currently have an older SCO UNIX driver installed in your system, you should
remove it prior to installing a newer version. Use the netconfig and custom utilities to
remove the older driver version. Refer to your SCO UNIX OS documentation as
needed. After removing your existing driver, you may then proceed with installing a
newer SCO UNIX driver.
Note:
The custom and netconfig utilities are provided by SCO.
Follow the steps listed below:
__1
Login in as root.
__2
Insert the AMD SCO UNIX LLI driver diskette into floppy drive A. Make sure
the floppy drive in which this diskette is inserted is fd0. This is the default
floppy drive where the SCO UNIX custom utility will look for the driver and the
corresponding installation script.
__3
Run the custom utility by typing:
custom
Then press <Enter>
Note:
If you are using drive B, run the custom utility with the -m option to specify the correct
drive where the AMD SCO UNIX LLI driver diskette is located.
__4
In the custom utility main menu, you will see four main options at the upper left
hand corner of the screen (Install, Remove, List, Quit). Use the right/left arrow
keys to select the Install option and then press <Enter>.
__5
Next, use the up/down arrow keys to select A new product and press <Enter>.
__6
Three options will be displayed (Entire Product, Packages, Files). Select Entire
95
PCnet Family Network Driver Installation Guide
Product and press <Enter>.
__7
The following message will be displayed:
Insert the requested volume and press <Return> to continue the
installation
Insert:
Distribution
Floppy Volume 1
Continue
Quit
Press <Enter> to continue.
__8
The following message will be displayed:
Installing custom data files...
Insert the requested volume and press <Return> to continue the
installation
Insert:
AMD PCnet Family LLI Driver
Floppy Volume 1
Continue
Quit
Press <Enter> to continue.
__9
The following message will be displayed:
Extracting files...
Checking file permissions...
You will then be returned to the custom utility main screen.
__10 Select Quit from the custom utility main options. Answer Yes you want to
exit from the custom utility. You will then be returned to the Unix prompt.
__11 Next, run the netconfig utility by typing:
netconfig
Then press <Enter>.
The netconfig utility is used to configure the SCO UNIX driver for different INT,
DMA, and I/O address values. This utility is also used to add the driver to the
protocol chain.
Note: The netconfig utility modifies the space.c file automatically and must be used in order to
get proper support for PCI BIOS API calls.
96
Installing The SCO UNIX LLI Driver
__12 The following will be displayed:
Available options:
1. Add a chain
2. Remove a chain
3. Reconfigure an element in a chain
q. Quit
Select Option:
Select option 1 (Add a chain) by typing:
1
Then press <Enter>.
__13 The following will be displayed:
Select top level of chain to Add or q to quit:
Select the appropriate top level of chain for your system by entering the
appropriate number (Num) value and pressing <Enter>.
__14 Next, select the appropriate number (Num) value for the AMD PCnet Ethernet
driver and press <Enter>.
__15 Answer all of the questions asked by netconfig as appropriate for your system.
Refer to your SCO UNIX OS documentation as needed. Also, see the Software
Keyword section in this manual for more details on keyword settings.
Note: If you need to modify keyword values, you should edit the space.c file as needed. The
path for this file is:
/etc/conf/pack.d/pnt0/space.c
__16 Select Quit from the netconfig utility by typing q and then press <Enter>.
__17 At this point, you should relink your kernel and reboot the system. Refer to
your SCO UNIX OS documentation as needed.
The installation of the SCO UNIX LLI driver is now complete.
97
PCnet Family Network Driver Installation Guide
8.2.
SCO Unix LLI Driver Keywords
Keywords can be added, deleted, and/or modified by manually editing the appropriate
#define values in the space.c file. See Appendix B (Software Keywords) and your
SCO UNIX Manuals for more details. A sample version of this file is listed below:
/******************************************************************************/
/*
Copyright (c) 1993 Advanced Micro devices, Inc.
*/
/*
*/
/*
File:
/etc/conf/pack.d/pnt0/space.c
*/
/*
Version:
1.0
*/
/*
Description:
SCO Unix System V/386 Config. file for PCnet family
*/
/*
Author:
Leonid Grossman
*/
/*
Created:
08/20/93
*/
/******************************************************************************/
#include config.h
#if defined(PNT3_UNITS)
#define TOT_UNITS (PNT3_UNITS+PNT2_UNITS+PNT1_UNITS+PNT_UNITS)
#elif defined(PNT2_UNITS)
#define TOT_UNITS (PNT2_UNITS+PNT1_UNITS+PNT_UNITS)
#elif defined(PNT1_UNITS)
#define TOT_UNITS (PNT1_UNITS+PNT_UNITS)
#else
#define TOT_UNITS (PNT_UNITS)
#endif
#define MAX_MINORS 16
/* Please do not modify */
#define TX_BUFFERS_0 16 /* Must be power of 2 (1,2,4,8,...512) */
#define TX_BUFFERS_1 16
#define TX_BUFFERS_2 16
#define TX_BUFFERS_3 16
#define RX_BUFFERS_0 16
#define RX_BUFFERS_1 16
#define RX_BUFFERS_2 16
#define RX_BUFFERS_3 16
#define SCAN_TYPE_0 0 /* 0-all, 1-PCI, 2-PnP, 3-VESA, 4-ISA, 5-PCI1, 6-PCI2 */
#define SCAN_TYPE_1 0
#define SCAN_TYPE_2 0
#define SCAN_TYPE_3 0
#define LED0_0 0xffffffff /* 0xffffffff - defaults */
#define LED0_1 0xffffffff
#define LED0_2 0xffffffff
#define LED0_3 0xffffffff
#define LED1_0 0xffffffff
#define LED1_1 0xffffffff
#define LED1_2 0xffffffff
#define LED1_3 0xffffffff
#define LED2_0 0xffffffff
#define LED2_1 0xffffffff
#define LED2_2 0xffffffff
#define LED2_3 0xffffffff
#define LED3_0 0xffffffff
#define LED3_1 0xffffffff
#define LED3_2 0xffffffff
#define LED3_3 0xffffffff
#define dmarotate_0 0 /* 0 - normal priority, 1 - rotate priority */
#define dmarotate_1 0
#define dmarotate_2 0
#define dmarotate_3 0
#define tp_0 0
/* 0 - the autoselect mode, 1 - the UTP mode */
#define tp_1 0
#define tp_2 0
#define tp_3 0
#define fdup_0 0 /* 0 - default, 1 - AUI, 2 - 10BaseT, 3 - OFF */
98
Installing The SCO UNIX LLI Driver
#define fdup_1 0
#define fdup_2 0
#define fdup_3 0
/* Please do not modify ACCESS_TYPE and LAST_BUS parameters */
/* unless you are sure that the values provided by 'netconfig' are wrong */
#define ACCESS_TYPE_0 0
#define ACCESS_TYPE_1 0
#define ACCESS_TYPE_2 0
#define ACCESS_TYPE_3 0
#define LAST_BUS_0 256
#define LAST_BUS_1 256
#define LAST_BUS_2 256
#define LAST_BUS_3 256
int
int
pnt_MaxStreams = MAX_MINORS;
pnt_TotalDevCount = TOT_UNITS;
/*
* Structure used in space.c to pass configuration to driver. This information
* is copied to the pnt_DeviceStruct structure.
*/
struct pnt_ConfigStruct {
short index;
short minors;
short vec;
short iobase;
short ioend;
short dma;
short tx_buffers;
short rx_buffers;
long bus_scan;
long led0;
long led1;
long led2;
long led3;
long dmarotate;
long tp;
long fdup;
long access_type;
long last_bus;
};
/*
/*
/*
/*
/*
/*
/*
/*
/*
/*
/*
/*
/*
board index */
minor devices configured */
interrupt vector # */
boards base memory address */
Ending base I/O address */
DMA channel used by the board */
Number of Transmit buffers*/
Number of Receive buffers*/
Bus type to search for */
LED value */
LED value */
LED value */
LED value */
struct pnt_ConfigStruct pnt_ConfigArray[TOT_UNITS] = {
#if defined PNT_UNITS
{0,
MAX_MINORS,
PNT_0_VECT,
PNT_0_SIOA,
PNT_0_EIOA,
PNT_CHAN,
TX_BUFFERS_0,
RX_BUFFERS_0,
SCAN_TYPE_0,
LED0_0,
LED1_0,
LED2_0,
LED3_0,
dmarotate_0,
tp_0,
fdup_0,
ACCESS_TYPE_0,
LAST_BUS_0
}
99
PCnet Family Network Driver Installation Guide
#endif
#if defined PNT1_UNITS
,{1,
MAX_MINORS,
PNT1_0_VECT,
PNT1_0_SIOA,
PNT1_0_EIOA,
PNT1_CHAN,
TX_BUFFERS_1,
RX_BUFFERS_1,
SCAN_TYPE_1,
LED0_1,
LED1_1,
LED2_1,
LED3_1,
dmarotate_1,
tp_1,
fdup_1,
ACCESS_TYPE_1,
LAST_BUS_1
}
#endif
#if defined PNT2_UNITS
,{2,
MAX_MINORS,
PNT2_0_VECT,
PNT2_0_SIOA,
PNT2_0_EIOA,
PNT2_CHAN,
TX_BUFFERS_2,
RX_BUFFERS_2,
SCAN_TYPE_2,
LED0_2,
LED1_2,
LED2_2,
LED3_2,
dmarotate_2,
tp_2,
fdup_2,
ACCESS_TYPE_2,
LAST_BUS_2
}
#endif
#if defined PNT3_UNITS
,{3,
MAX_MINORS,
PNT3_0_VECT,
PNT3_0_SIOA,
PNT3_0_EIOA,
PNT3_CHAN,
TX_BUFFERS_3,
RX_BUFFERS_3,
SCAN_TYPE_3,
LED0_3,
LED1_3,
LED2_3,
LED3_3,
dmarotate_3,
tp_3,
fdup_3,
ACCESS_TYPE_3,
LAST_BUS_3
}
#endif
};
100
Installing The SCO UNIX MDI Driver
9. Installing The SCO Unix MDI Driver
(SCO OpenServer 5.0 and above)
Note: For PCnet Software Release 3.x only.
SCO OpenServer 5.0 has built-in support for the PCnet driver. See the SCO
documentation for the network driver installation directions.
To upgrade the AMD PCnet driver to the 3.0 Version, follow the steps below:
__1
Copy the install file from the SCOUNIX.50 directory on diskette 6. The file
is in DOS format. It can be copied with the doscp command or from the
DOS MERGE session.
__2
Run sh install command to upgrade the PCnet MDI driver package.
9.1.
SCO Unix MDI Driver Keywords
Keywords can be added, deleted, and/or modified by using the ADVANCED button for
PCnet driver during netconfig installation. See Appendix B (Software Keywords) and
your SCO UNIX Manuals for more details. The SCO MDI driver has an additional
keyword, pcnet2 . If set to a non-zero value, the pcnet2 keyword enables advanced
features for the PCnet-PCI2 chip.
101
PCnet Family Network Driver Installation Guide
102
103