1
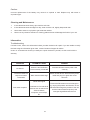
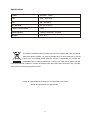
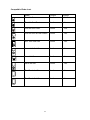
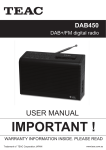
CRX313i
Alarm Clock Radio with Dock for iPod
USER MANUAL
IMPORTANT !
WARRANTY INFORMATION INSIDE. PLEASE READ
Trademark of TEAC Corporation JAPAN
www.teac.com.au
WARRANTY PROCEDURE
v1.5.2: DEC 2011
Please read the owner’s manual carefully and ensure that you have followed the correct installation and operating
procedures.
1.
2.
3.
Please read this warranty card.
Keep your purchase receipt to enable you to proceed quickly in the event of a Warranty Service.
If you require Warranty Service, please contact the TEAC Customer Support Hotline at 1300 553 315 for
assistance. Please ensure that you have the model number, serial number and purchase receipt ready when
you call.
Please complete the section below and keep this information for your own records.
Owner’s Name
Owner’s Address
Postcode
Model Name/No.
Serial No.
Dealer’s Name
Dealer’s Address
Postcode
Authorised Service Centres in Major Australian Cities
NSW
151 Arthur Street
Homebush West, NSW 2140
Queensland
Unit 1, 320 Curtin Ave West
Eagle Farm, QLD 4009
South Australia
11 McInnes Street
Ridleyton, SA 5008
Victoria
282 Normanby Road
South Melbourne, VIC 3205
Western Australia
Unit 2, 50 Pilbara Street
Welshpool, WA 6106
Thank you for selecting a TEAC product .
If you should require assistance with your product regarding its setup
or operation, or if any difficulties arise, please call us directly for advice
between Monday to Friday at 8.30AM – 6PM AEST at the
TEAC Customer Support Hotline
1300 553 315
[email protected]
www.teac.com.au
WARRANTY INFORMATION
v1.5.2: DEC 2011
Our goods come w ith guarantees that cannot be excluded under the Australian Consumer Law . You are
entitled to a replacement or refund for a major failure and for compensation for any other reasonably
foreseeable loss or damage. You are also entitled to have the goods repaired or replaced if the goods fail
to be of acceptable quality and the failure does not amount to a major failure.
Warranty Terms & Conditions
1.
TEAC warrants that this product is free from defects in material and workmanship under normal domestic use with
reasonable care and skill. Maintenance and cleaning (i.e. laser head) is not covered by this warranty. The TEAC
warranty only applies to TEAC products purchased, used and serviced in Australia.
2.
The benefits to the consumer given by this Warranty are in addition to other rights and remedies of the consumer
under a law in relation to goods or services to which the warranty relates, being the Australian Consumer Law.
3.
Refund or replacement via your retailer is available for a period of 14 days after purchase for goods that have been
inspected and determined to have a major failure. Refund and exchange is not applicable for change of mind.
4.
Subject to the terms herein, this warranty effectively covers the equipment as specified in the Warranty Periods
Table below from the date of purchase.
TEAC PRODUCT
LED/LCD TV 32” (80 cm) and above
All other TEAC products
5.
WARRANTY PERIOD
1 Year (In-Home Service/ Pick up Available)*
1 Year (Carry-in Service)
In Home Service/Pick up* Service
This service will only be provided as part of this warranty if all the following conditions are met;
a) The product is indicated in the Warranty Period Table.
b) The product is within the warranty period.
c) The product is located within the normal service area of the local TEAC Authorised Service Centre.
If TEAC determines that the product is not repairable on site, TEAC can complete the repair by taking the product to
a TEAC Authorised Service Centre.
Carry-in Service
Where In-Home service/Pick up* is not available, the purchaser is required to send the product to the nearest TEAC
Authorised Service Centre for repair. In this event, proof of purchase is required to support a warranty claim. After
the repair, the product will be available for collection by or return to the purchaser at a fee upon request. TEAC inhome service can be made available at a fee upon request.
6.
A 12-month replacement warranty is applicable to all Accessories such as Remote, Power Adaptors and Cables.
7.
TEAC will ensure to the best of its abilities that all required parts are made available for any required service/repair.
8.
TEAC Australia Pty Ltd and its Authorised Service Centres will use their best endeavours to complete product
repairs within a reasonable period based on available resources and workload during the time when service is
requested and performed.
9.
Refurbished parts may be used to repair the product. In the case of a replacement, the product may be replaced,
with a refurbished unit of the same type or, if one is unavailable, a similar refurbished model with equal or better
features & specifications.
10.
Please be advised that if the product presented for repair is capable of retaining user-generated data, the data may
be lost during servicing. Customers are strongly encouraged to back up all important information/data before
sending the product in for service/repair.
11.
Service will be provided only during normal business hours and under safety conditions and circumstances. TEAC
and its authorised service agents can refuse any repair if safety, in relation to OH&S, becomes a concern to its staff
or authorised service agents’ personnel.
12.
The warranty is void and warranty claims may be refused, subject to the Australian Consumer Law, if:
a) The product was not transported, installed, operated or maintained according to manufacturer instruction, or
b) The product was abused, damaged, tampered, altered or repaired by any unauthorised persons, or
c) Product failure is due to accidents during use, installation or transit, power surges, use of defective or
incompatible external devices, exposure to abnormal conditions such as excessive temperatures or humidity, or
entry of liquids, objects or creatures into the product.
13.
No one is authorised to assume any liability on behalf of TEAC or impose any obligation on it, in connection with the
sale of any equipment other than as stated in this warranty and outlined above.
14.
TEAC reserves the right to inspect and verify whether the product is exhibiting a major failure as claimed by
customers/retailers.
15.
LCD dead pixel policy, please contact TEAC Customer Support Hotline on 1300 553 315 for assistance.
2
22.) Do not destroy the safety purpose of the polarized or grounding-type plug. A polarized plug has two
blades with one wider than the other. A grounding type plug has two blades and a third grounding
prong. The wide blade or the third prong is provided for your safety. If the provided plug does not fit
into your outlet, consult an electrician for replacement of the obsolete outlet.
23.) Protect the power cord from being walked on or pinched particularly at plugs, convenience
receptacles, and the point where they exit from the apparatus.
24.) Do not overload wall outlet. Use only power source as indicated.
25.) Upon completion of any service or repairs to this product, ask the service technician to perform
safety checks.
26.) Refer all servicing to qualified service personnel. Servicing is required when the unit has been
damaged in any way, such as power-supply cord or plug is damaged, liquid has been spilled or
objects have fallen into the unit, the unit has been exposed to rain or moisture, or has been
dropped, does not operate normally.
27.) Batteries shall not be exposed to excessive heat such as sunshine, fire or the like.
28.) Attention should be drawn to the environmental aspects of battery disposal.
29.) This product is not intended for commercial use. Household use only.
3
Before Setting Up the Unit
•
Operate controls and switches as described in the manual.
•
Before turning on the power, make certain that the power cord is properly installed.
•
When moving the unit, be sure to first disconnect the AC power cord.
•
Avoid installing this unit in places exposed to direct sunlight or close to heat radiating appliances
such as electric heaters, on top of other stereo equipment that radiates too much heat, places
lacking ventilation or dusty areas, places subject to constant vibration and/or humid or moist areas.
Unpacking and Setting Up
•
Remove the product from the carton and remove all packing material from the unit. We suggest
that you save the packing material, if possible, in the unlikely event that your unit ever needs to be
returned for service. The original carton and packing material is the only safe way to pack your
product to protect it from damage in transit.
•
Remove any descriptive labels or stickers on the front or top of the cabinet. Do not remove any
labels or stickers from the back or bottom of the cabinet.
•
Place your unit on a level surface such as a table, desk or shelf, convenient to an AC outlet, out of
direct sunlight, and away from sources of excess heat, dirt, dust, moisture, humidity, or vibration.
•
Unwind the FM antenna and extend it to its full length. It must be fully extended to provide the best
FM reception.
Protect Your Furniture
This model is equipped with non-skid rubber 'feet' at the bottom of the unit to prevent the product from
moving when you operate the controls. These 'feet' are made from non-migrating rubber material
specially formulated to avoid leaving any marks or stains on your furniture. However certain types of oil
based furniture polishes, wood preservatives, or cleaning sprays may cause the rubber 'feet' to soften,
and leave marks or a rubber residue on the furniture. To prevent any damage to your furniture we
strongly recommend that you purchase small self-adhesive felt pads, available at hardware stores and
home improvement centers everywhere, and apply these pads to the bottom of the rubber 'feet' before
you place the product on fine wooden furniture.
Power Source
This product is designed to operate on normal 240V~50Hz AC power only. Do not attempt to operate the
unit on any other power source. You could cause damage to the product that is not covered by your
warranty.
4
5
SIDE VIEW
BOTTOM VIEW
6
AC POWER SUPPLY CONNECTION
1. Check that rating label located at the bottom of the unit corresponds to your local power supply.
2. Make sure the wall socket is switched off, then plug the AC plug into the wall socket.
3. Switch on the wall socket.
CAUTION:
The device is connected to the power with the AC plug. Disconnect the AC plug from the wall socket if
you want to completely disconnect the device from the AC power. Make sure the power plug is easily
accessible during operation and not hindered by other objects.
DC BACKUP BATTERY
Install Battery
1.
Install 1 x 9V/6LR61 type battery (not included) into the back up battery compartment located at the
bottom of the unit (Alkaline batteries are recommended for longer life time).
2.
Make sure batteries follow the polarity markings, and then close the battery compartment cover.
3.
If AC Power is cut off, the backup battery maintains the time settings.
GENERAL FUNCTIONS
Switching On and Off
1. The unit will automatically switch to standby mode once the AC power source is connected.
2. Switch on the device from standby mode by sliding the FUNCTION switch to ON position.
3. Switch the device to standby mode by sliding the FUNCTION switch to OFF position.
4. The display will show the time once the AC power source is connected.
Selecting Play Mode
1.
Switch the unit on by sliding the FUNCTION switch to ON position.
2.
Select the play mode by sliding the MODE switch to either AM / FM / iPod.
Adjusting the Volume
1.
The volume can be adjusted by rotating the VOLUME knob located at the side of the unit.
Setting Clock
1. Press and hold the TIME button and press the HOUR button to set the hour and press the MIN
button to set the minute.
2. Release the buttons to confirm settings.
7
Setting Alarm
1. Press and hold ALARM button on the unit and press the HOUR button to set the hour and press the
MIN button to set the minute.
2. Release the buttons to confirm settings.
3. Slide the FUNCTION switch to AUTO / BUZZ to set the alarm.
4. Select AUTO mode to wake up by radio and select BUZZ mode to wake up by buzzer.
5. The ALARM LED will illuminate on the display once the alarm is set.
6. Slide the MODE button to select the wake-up mode.
7. When the alarm time is reached, depending upon your prior selection, the AM radio or FM or the
buzzer will sound.
8. If the iPod is selected as the wake-up mode, the buzzer will sound.
9. Press ALARM button to cancel the alarm and the ALARM LED will remain on the display and the
alarm will sound again on the next day at the same time.
10. Slide the FUNCTION switch to ON / OFF to cancel the alarm.
Snooze Function
Press SNOOZE button to silence the ALARM sound (radio / buzzer) temporarily for approximately 9
minutes. The snooze function is repeatable for 119 minutes and will automatically stop, however the
alarm remains set and activates again according to your alarm mode settings.
Sleep Function
This function switches the unit from operation mode to STANDBY mode after the specified time.
(Supports AM / FM mode only).
1. Press and hold the SLEEP button to turn the unit on and press HOUR and MIN buttons to set the
sleep time.
2. The sleep time ranged from 1 minute to 1 hour 59 minutes.
3. Having set the sleep time, press SLEEP button to reset the sleep time to 59 minutes.
4. Press the SNOOZE button to cancel SLEEP function.
Note:
Sleep function would not be able to turn off the iPod. In this case, once the sleep function is activated,
the speaker of the unit will mute but the iPod will keep on playing.
Dimmer Function
The brightness of the display can be controlled by sliding the DIMMER switch to HIGH / LOW position.
TUNER MODE
Radio Antenna
1.
The FM antenna is located at the back of the unit. If FM is weak, extend the FM antenna to its full
length or try varying the position and direction of the FM antenna until you find the strongest signal.
2.
The AM bar antenna is built-in inside the unit. If AM reception is weak, change the position of the
unit until the internal antenna picks up the strongest signal.
8
Listening to Radio
1.
Slide the FUNCTION switch to ON position.
2.
Select AM / FM mode by sliding the MODE switch.
3.
Tune to the desired radio station by rotating the TUNING WHEEL.The related frequency is
displayed beneath the TUNING LENS.
4.
To turn off the radio, slide the FUNCTION switch to OFF position to switch the unit into standby
mode.
iPod Mode
iPod Universal Dock Adaptor
1.
Select the iPod universal dock adaptor (not included, check your iPod packaging if it came with this
adaptor) that fits with your iPod model.
2.
Install the adaptor with the 2 tabs facing the front, by pushing it down in the universal dock on top of
the unit.
3.
To remove the adaptor, press its inside rear surface and pull it upward.
Note:
Make sure you use the correct adaptor for your iPod to prevent damage due to insecure iPod seating.
Listen to iPod
1.
With the correct iPod universal dock adaptor installed, gently dock the iPod into the unit’s universal
dock.
2.
Depending upon your iPod, the battery will begin to charge when docked- PLEASE REFER TO
iPOD COMPATABILITY CHART ON PAGE 14. For charging period, follow your iPod’s instruction
manual.
3.
Slide the FUNCTION switch to ON position and slide the MODE switch to iPOD mode.
4.
Control the iPod to playback music as mentioned in the iPod’s instruction manual
NOTE:
This unit display cannot display any music information from your iPod. Please view the music information
through your iPod display.
Charging your iPod while in AM radio mode is not recommended as it can interfere with the AM
reception.
Battery Precautions
1.
Dispose of the old battery properly. Do not leave it lying around where a young child or pet could
play with or swallow it. If the battery is swallowed, contact a physician immediately.
2.
Battery may explode or leak if mistreated. Do not attempt to recharge it or disassemble it. Do not
dispose of the old battery in a fire.
9
Caution:
Incorrect replacement of the battery may cause it to explode or leak. Replace only with same or
equivalent type.
Cleaning and Maintenance
1.
If the cabinet becomes dusty, wipe it with a soft cloth.
2.
If the cabinet becomes smudged or dirty, clean it with a soft, slightly dampened cloth.
3.
Never allow water or any liquid to get inside the cabinet.
4.
Never use any abrasive cleaners or cleaning pads as these will damage the finish of your unit.
Information
Troubleshooting
If a fault occurs, refer to this information before you take the device for repair. If you are unable to rectify
the fault using the information given here, contact Customer Support for advice.
Under no circumstances should you attempt to repair the device yourself, as this would void the
warranty.
PROBLEM
POSSIBLE CAUSE
REMEDY
No Sound
Volume is too low/Power
cord incorrectly connected
Increase volume/Connect power cord
correctly
Static electrical discharge
Switch off the device, disconnect the power
cable and plug it in again after a few
seconds.
The device does not
respond to button
commands
Weak radio signal
Poor radio reception
Interference from electrical
devices such as televisions,
video recorders,
computers, neon lamps,
etc.
10
Extend the FM antenna to its full length or
try varying the position and direction of the
FM antenna/Change the position of the unit
until the internal antenna picks up the
strongest signal/Relocate the unit
Specifications
Power
AC240V 50Hz
AM
530 - 1600 kHz
FM
88 - 108 MHz
DC Backup
9V (6F22 9Vx1)
Power Consumption
13W
Measurement
160(L)X125(W)X71(H)mm
Weight
0.67 KG
This marking indicates that this product should not be disposed with other household
wastes throughout Australia. To prevent possible harm to the environment or human
health from uncontrolled waste disposal, recycle it responsibly to promote the
sustainable reuse of material resources. To return your used device, please use the
return and collection systems or contact the retailer where the product was purchased. They can take
this product for environmental safe recycling.
Design and specifications are subject to change without prior notice
Weight and dimensions are approximate
11
Compatible iPods chart
Model
Output
Charge
iPod 4th Gen
Audio
Yes
iPod 4th Gen Photo
Audio
Yes
iPod 4th Gen Color
Audio
Yes
iPod 5th Gen & iPod Classic
Audio
Yes
Mini 1st & 2nd Gen
Audio
Yes
Nano 1st & 2nd Gen
Audio
Yes
Nano 3rd Gen
Audio
Yes
Nano 4th Gen
Audio
Yes
iPod Touch 1st Gen
Audio
Yes
iPod Touch 2nd Gen
Audio
Yes
12