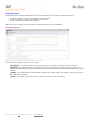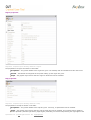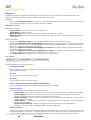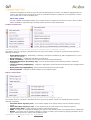
1
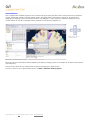
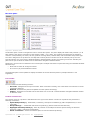
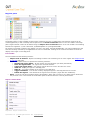
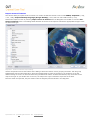
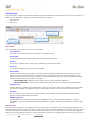
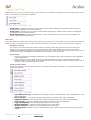
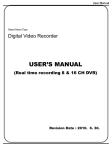
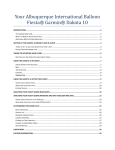
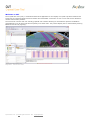
Welcome to CUT
The Cryosat User Tool (CUT) is a Windows stand-alone application for the display of Cryosat-2 product locations and
zones with an integrated product archive browser and downloader. Connection to one or more FTP servers allows for
remote access of the products.
The CUT has an intuitive and user-friendly graphical user interface allowing for simultaneous product visualisation
geographically on a 3D world map and temporally on a Gantt chart. The product display can be customised by filtering
based on time and by region(s).
Diagram 1. CUT screen shot.
Cryosat User Tool - © ESA All rights reserved - info: [email protected]
Main features
•
•
•
•
•
•
•
•
•
•
•
•
Full featured Windows (2000/XP/Server/Vista/7) application with advanced user interface.
Concurrent map, Gantt chart and file detail visualisation of products.
Full 3D visualization of the Earth with automatic management of level of detail (LOD) and on-demand remote
download of images, similar to Google Earth and Worldwind applications.
Terrain display using digital elevation models (DEM).
Selection of a number of thematic maps from different sources using high-performance map-tiling technology and
open-standard WMS protocols.
Import of industry-standard shapefiles and manual creation of user-defined areas for display and for filtering of
products.
Filtering of product display by time using a calendar or orbit range.
Display of a realistic 3D satellite model of Cryosat.
Use of ROEF in orbit propagation and product footprint calculations.
Automatically reconnecting FTP client capable of accessing and downloading Cryosat products from remote FTP
servers.
FTP site manager used to store multiple FTP site addresses and credentials.
Check for Updates capability to download the latest ROEF and software version.
Cryosat User Tool - © ESA All rights reserved - info: [email protected]
System requirements
Minimum system requirements for CUT:
Hardware:
• Microsoft Windows XP Service Pack 2, Windows 2000, Windows Server, Windows Vista or Windows 7
• Intel Pentium III 1 GHz (or AMD Athlon)
• 3D Graphics Card with 128 MB of RAM
• 2 GB of available disk space
• DSL / Cable Internet connection
• 256 MB of RAM (Random Access Memory)
Software:
•
•
Microsoft .NET Framework 2.0 Service Pack 2 (available freely from Microsoft web site) - to be installed manually
DirectX 9.0c (with updates to at least February 2010) - automatically installed by the installer
Cryosat User Tool - © ESA All rights reserved - info: [email protected]
Download the latest release
The latest version of CUT can be obtained from Taitus Software. Software releases are contained in self-extracting
executable files (.exe) that are downloaded from the web and saved to your computer for installation.
The URL needed to access the latest version of CUT can be obtained by contacting [email protected].
Once installed, updates can checked as needed using Help > Check for software updates....
Cryosat User Tool - © ESA All rights reserved - info: [email protected]
Install CUT
Releases of CUT are contained in self-extracting executable (.exe) files (see Diagram 1).
To install a CUT release:
1.
2.
3.
Uninstall any previous versions of CUT by running Start > All Programs > Taitus Software > CUT
> Uninstall CUT
Close all programs.
Double click the self-extracting (.exe) installation file to start the installation. An InstallShield wizard is launched
to guide you step by step through the rest of the installation.
Diagram 1. Example of CUT self-extracting executable file.
3.
Follow the InstallShield wizard instructions until the installation has completed.
See also: Download the latest release
Cryosat User Tool - © ESA All rights reserved - info: [email protected]
Launch CUT
•
From the Windows Start menu, select All Programs > Taitus Software > CUT > CUT.
or...
•
From the desktop click on the CUT shortcut (see Diagram 1).
Diagram 1. CUT shortcut.
When the CUT application is started, a number of initialisation steps are taken to load the necessary information. The
operation being performed is shown under the splash screen. Once the initialisation is completed, the entire local data
base is loaded into memory and the graphical user interface is populated.
Cryosat User Tool - © ESA All rights reserved - info: [email protected]
Tutorial
The CUT application is made to be intuitive and simple to use. In this page, a few pointers are provided to help you get
started.
Connecting to the FTP server
Usually, the first step of a CUT session involves the connection to an FTP server containing the Cryosat-2 products. This
step may be skipped if the products are already available locally, either on the hard drive or on removable media (e.g.
CD-ROM, DVD, USB key, etc.).
•
•
Click on the Connect...
button at the top left of the screen.
A pop-up appears giving the default FTP server settings.
•
•
Enter the password (which will be saved for future use) or create a new server by using the New server button.
Click on the Connect button to connect to the displayed FTP server.
The Log pane provides the progress of the connection and will give feedback as to any eventual errors or problems. Once
the connection is established, the File browser pane is populated with the available directories on the remote server.
Navigating the directories
With the Browser pane loaded with the remote directories (or the local root directories of the attached drives) and files,
the file system can be navigated for displaying products.
The connection progress messages are provided in the Log pane. All product files and all subdirectories are shown in the
Browser pane. Any files matching the naming convention of the product header (i.e. CS_*.HDR) are assumed to be a
product and are shown in the Browser, Map and Timeline panes. By clicking on the Folders icon
, a split-window
(similar to the Windows Explorer windows) can be used to navigate the file system with the directories listed on the left
and the directory contents on the right.
Product selection and downloading
After navigating to a directory containing a product of interest, the product can be selected in any one of the Browser
pane, the Map pane or the Timeline pane. The details of the product are provided in the Properties pane. In order to
download/save a product, right-click the product in any of the panes and select Get Product(s).... The CUT will request
the destination directory and initiate the download. Note that each product consists of two files: CS_*.HDR (header) and
CS_*.DBL (data block). The CUT automatically downloads/saves both files.
Cryosat User Tool - © ESA All rights reserved - info: [email protected]
Disconnecting from the FTP server
Click on the Disconnect
button at the top left of the screen to disconnect from the remote FTP server.
The CUT provides access to your locally available products for further visualisation. To close the CUT, close the window
by clicking the close
button at the top right of the window, File > Exit or Alt-F4.
Cryosat User Tool - © ESA All rights reserved - info: [email protected]
Customisation
CUT is supplied with a default layout for the numerous panes providing the data views. These panes can be detached,
moved, docked and resized to support specific needs. Arranging panes is achieved by clicking on its title bar and
dragging and dropping a pane to its desired location (see Diagram 1). Once a pane is clicked and dragged from its
current location an overlay of possible docking locations is provided (see Diagram 2).
Diagram 2. Pane
arrows detail.
Diagram 1. Positioning a pane.
Panes can also be moved behind others (appearing as tabs) by dragging them to the middle of the pane arrows symbol
(see Diagram 2).
The size of the panes can be customised by clicking and dragging the pane borders.
In order to return to the original default layout, use Edit > Restore factory layout.
Cryosat User Tool - © ESA All rights reserved - info: [email protected]
Main Window
The CUT application has a GUI consisting of a set of menus above a Main controls toolbar. These two items interact with
a number of customisable and dockable panes which make up the remainder of the interface.
Menus
Diagram 1. Main menus.
The main menus are described below:
•
File : File and global functionality.
• Get all visible products... - Saves all visible products (i.e. not filtered and not dimmed) to the user-
selected folder. This option is available when the application is connected to a remote server.
Load ROEF - Allows the temporary (only for the current session) loading of a ROEF (Reference Orbit Event
File) used to calculate the satellite orbits and product locations.
• Import areas of interest... - Opens a previously saved area of interest in one of the following
formats: 1) CUT native XML, 2) ESRI Shapefile or 3) Google Earth KML. (also available in the Main controls
toolbar).
• Exit - Exits the application.
Edit : General edit functions.
• Advanced time filter... - When the time filter is active, this option allows to enter the time filter
parameters using additional methods such as orbit range and/or duration. This feature is also available by
clicking on the Start: and End: labels of the time filter.
• Toggle highlighting - Toggles the highlighting (visibility) of all products (i.e. visible products are shown
dimmed and vice versa).
• Reset highlighting - All products are drawn highlighted (visible).
• Reset selections - All product selections are removed.
• Restore factory layout - Repositions and resizes all panes to their original settings.
• Properties... - This allows configuration of the software and ROEF update location as well as some userspecific customisation settings.
Map : Functions related to the Map pane.
• Timebar - Toggles the display of the timebar at the top centre of the Map pane.
• Compass - Toggles the display of the compass at the top right of the Map pane.
• Navigator Banner - Toggles the display of the 2D map indicating the centre of the current viewpoint at
the bottom right of the Map pane.
• Grid - Toggles the display of the latitude/longitude grid on the map.
• Clouds - Toggles the display of the clouds on the map.
• Features - Toggles the display of some visual features such as the atmosphere, roads, etc. on the map.
• Ecliptic plane - Toggles the display of the Earth's orbital plane around the Sun.
• Equatorial plane - Toggles the display of the plane going through the Earth's equator.
• Camera Frame - Sets how the camera is positioned when the Timebar is used to change the current
time. Inertial puts the camera in a point in space so that the Earth will rotate with time. Fixed puts the
camera in a fixed position relative to the Earth so that it always appears still.
• North lock - Toggles the panning behaviour of the camera and forces the Earth axis to remain in a
vertical plane perpendicular to the viewer. As a result, the North direction remains pointing upward (as
much as possible!).
• Tilt lock - Toggles the tilting behaviour of the camera and forces the camera to point perpendicular to the
Earth's surface (e.g. no tilt towards the horizon).
• Ambient light - Sets the amount of artificial light is added to illuminate the Earth. Less lighting gives a
more realistic appearance but can be difficult for analysis.
Timeline : Functions related to the Timeline pane.
• Draw cycles - Toggles the display of the orbit cycles for the satellite in the Timeline pane.
• Draw orbits - Toggles the display of the compass at the top right of the Map pane.
• Draw Eclipse Zones - Displays shaded vertical "zones" corresponding to the times when the satellite is
in eclipse (both umbra and penumbra).
Help : Help and update information.
• About CUT... - Displays a splash screen showing the version number of the application.
• CUT Help... - Displays these help pages.
• Check for software updates - Checks on the configured remote server for a new version of this
software and allows download and installation.
• Check for ROEF updates - Checks on the configured remote server for a new version of the ROEF and
allows download and installation.
•
•
•
•
•
Cryosat User Tool - © ESA All rights reserved - info: [email protected]
Main controls toolbar
Diagram 2. Main controls toolbar.
The main controls toolbar has the following buttons:
•
•
•
•
Import areas of interest - Opens a previously saved area of interest in one of the following formats: 1) CUT
native XML, 2) ESRI Shapefile or 3) Google Earth KML.
Connect... - Opens the FTP site manager allowing to add a new and/or connect to a remote product
repository/site and to display the products. When CUT is remotely connected, this button is disabled. Clicking the
arrow next to the button allows connection to a previously configured product repository/site.
Disconnect - Disconnects from the remote product repository and the local file system is displayed in the
Browser pane. When CUT is disconnected, this button is disabled.
Map - A menu allowing selection of various maps: pre-tiled MERIS FR, pre-tiled BMNG (Blue Marble Next
Generation) for various months optionally including bathymetry, uni-coloured maps (suggestion: turn on at least
coastlines in Maps > Features > Coasts), WMS maps (i.e. Demis). Note that pre-tiled maps are generally
faster than WMS maps.
The panes that make up the rest of the GUI are explained in further details in separate pages.
Cryosat User Tool - © ESA All rights reserved - info: [email protected]
Browser pane
Diagram 1. Browser pane.
The Browser pane is used to navigate the local or remote file system. The pane displays all folders and products (i.e. all
files matching the naming convention of the product header - CS_*.HDR). The products are listed with the following
columns: colour/visibility, file name, file size, product coverage times, creation date, last access date and product type.
The colour assigned to the products on the Map and Timeline panes is random but can be manually set by the user.
This pane works very much like the Windows Explorer window allowing sorting and resizing of columns. Similarly the
pane can be split to show the folders tree to allow faster navigation between folders.
Selections in the File list are reflected in the Timeline pane. Multiple selections are permitted using the standard Windows
selection keys:
•
•
Shift-click to select all contiguous entries.
Ctrl-click to (de-)select additional entries.
The Properties pane is also updated to display the details of the last selected product (multiple selection is not
supported).
Icon toolbar
The icon toolbar has the following buttons:
•
•
•
Go home - Navigates to the top level folder. When connected remotely, this is the folder from which the remote
connection was done.
Refresh - Refreshes the pane and updates the other panes accordingly.
Folders - Partitions the window to show the folder tree on the left. This allows faster navigation between folders
of different levels.
Product context menu
The context menu for a product is activated when the right mouse button is clicked on a product and provides the
following commands:
•
Open HDR product(s) - Downloads, if necessary, and opens the HDR file(s) (XML compatible file) in one or
•
•
Get product(s)... - Downloads and saves the product(s) (both the HDR and the DBL files).
Highlight selected product(s) - Dims all products on the Map and Timeline panes leaving the selected
•
more tabs.
product(s) visible / undimmed (highlighted).
Zoom on timeline - Zooms the Timeline pane to view the selected product(s).
Cryosat User Tool - © ESA All rights reserved - info: [email protected]
•
•
•
•
Zoom on map - Zooms and positions the product in the centre of the Map pane and positions the satellite at the
start of the product. Also, the ground tracks are displayed for one day centred around the product start time. This
function is also performed when the user double-clicks on the product.
Toggle highlighting - Toggles the highlighting of the products so that highlighted products are dimmed and
vice versa.
Reset highlighting - Reset all dimmed products to be visible / highlighted again.
Change colour(s) - Change the colour of the selected products for display on the Map and Timeline panes.
Cryosat User Tool - © ESA All rights reserved - info: [email protected]
Regions pane
Diagram 1. Regions / Filters panes.
The Regions pane is used to display regions either created by the user or loaded from external files. Regions can be
created graphically or with manually entered points from the Areas of interest button in the icon toolbar of the Map
pane. Regions stored in files can be loaded using the Import area of interest button in the icon toolbar. The following
formats are supported: 1) CUT native XML, 2) ESRI Shapefile or 3) Google Earth KML.
As regions are created or loaded, they appear in a tree in this pane, ordered alphabetically. The colours assigned to the
area are randomly selected by the application but can be customised. Clicking on the coloured checkbox turns off the
display of the region on the Map pane.
Icon toolbar
The icon toolbar has the following buttons:
•
•
•
Import area of interest - Opens a file dialog to select a file containing one or more regions. See Import areas
of interest help page.
Tools - This opens a menu to provide the following functions:
• Activate all region filters - All the regions are used as filters (see Filter pane below).
• Clear all region filters - All regions are removed as filters.
• Toggle all region filters - Set regions used as filters to not be used and vice versa.
• View all - Display all regions in the Map pane.
• Hide all - Turn off the display of the regions in the Map pane.
• Toggle visibilities - Turn off the currently displayed regions in the Map pane and vice versa.
• Delete all regions - This deletes all the regions from the pane (region files are unaffected).
Filter - Turns on and off the product filtering functionality. When this is turned on, the Filter pane is shown and
the products in the current folder of the Browser pane are filtered with the currently active filters.
Region context menu
Diagram 2. Region context menu.
Cryosat User Tool - © ESA All rights reserved - info: [email protected]
The context menu for a region is activated when the right mouse button is clicked on a region and provides the following
commands:
•
•
•
•
•
•
•
•
•
•
Zoom on map - Zooms and positions the region in the centre of the Map pane.
Edit points... - Opens a dialog box (the same as the one used for Define points... in the Areas of interest
button in the icon toolbar of the Map pane) allowing the manual editing of the region coordinates.
Save as.... - Opens a file dialog allowing the region to be saved in CUT native XML format. This way, the region
can be reloaded in future sessions.
Toggle region filter - If the region is used as a filter, it will be removed as a filter and vice versa.
View this only - Only the selection region will be displayed in the Map pane.
Filter this only - All region filters will be removed and this region will be set as the only region filter.
Shift - The region can be shifted by dragging the region to the desired position (the shape/extent is maintained).
Resize - The region can be resized by dragging a vertex or creating new vertices by dragging the border of the
region. Double-click on the map to exit the editing mode.
Change colour - The colour used for the region can be changed.
Delete - The deletes the region from the pane (region files are unaffected).
Cryosat User Tool - © ESA All rights reserved - info: [email protected]
Filters pane
The CUT application has a very powerful filtering functionality to help the user to identify the products that may be of
interest. Filtering can be done geographically using regions and/or by time range (optionally by orbit range). These filters
exclude all products that do not overlap (at least partially) with the region filters OR do not overlap in time with the time
filter.
The Filters pane is shown whenever the product filtering functionality is enabled using the Filter button in the Regions
pane.
Regions can be used as filters by dragging and dropping them from the Regions pane into the Filters pane or they can be
set using the region context menu. When a region is used as a filter, the region is also shown in the Filters pane and the
icon changes to include a small filter symbol. In order to remove a region filter, the region context menu in the Regions
pane can be used or similarly from the Filters pane. Note that the nominal swath width is used when filtering
geographically and that the the Show wider swaths functionality does not affect the results.
Time filtering is done by clicking the Time Filter button in the Filters pane. When activated, the date time range can be
updated to cover the time range of interest. Additional options are available by clicking the arrow next to the Start: and
Stop: labels and selecting Advanced.... With the pop-up dialog, the start and stop orbits and duration in various units
can be set. If visible, the filter time range is shown in pink in the Timeline pane. When the filter is not active, the time
range is shown in light grey in the Timeline pane.
Cryosat User Tool - © ESA All rights reserved - info: [email protected]
Import areas of interest
CUT has the ability to import areas of interest in a number of different formats. This includes ESRI® shapefiles (*.shp,
*.shx, *.dbf), Keyhole Markup Language (Google Earth®) (*.kml) and CUT native XML format (*.xml).
Activate the import function by selecting Import areas of interest from the Map pane icon toolbar or from the File>
Areas of Interest menu. A file dialog allows selection of the file to be imported. Choose the appropriate file type to see
the desired file type.
Diagram 1. Areas of Interest import dialog.
Use the drop-down menu at the bottom of the dialog to select the field to use for grouping the areas. This will group
shapes/areas with the same field value. Select the shapes/areas to import by clicking on the checkbox on the left,
double-clicking on the line or select all areas using the Select All button. As areas are selected, they are drawn on the
map on the right. If you double-click on the line, the map on the right is zoomed to a preview of the area.
Once the areas are imported, they are shown under the Regions pane and drawn in the Map pane.
Cryosat User Tool - © ESA All rights reserved - info: [email protected]
Properties pane
The Properties pane contains detailed information on the selected object. The pane is updated every time:
•
•
•
a product is selected / clicked in the Browser or Timeline pane
a region is selected / clicked in the Regions or Filters pane
a map is selected in the Main control toolbar
Read-only items are shown dimmed in order to emphasize that they are not modifiable.
Products properties
Diagram 1. Properties pane showing details of a product.
The properties of a product are shown in four tabs:
Properties - The general details of the product are given. Currently, no parameters can be modified.
Satellite - The satellite characteristics of the product is presented here (currently, always Cryosat-2). This
includes the ROEF being used and the visibility state of satellite-related and orbit-related information which can be
modified.
Model - The characteristics of the 3D satellite model that is used is shown. The visibility, size and colouring of
the model can be modified.
Style - The graphic style used to draw the product is shown and can be modified.
Cryosat User Tool - © ESA All rights reserved - info: [email protected]
Region properties
Diagram 2. Properties pane showing details of a region.
The properties of a region are shown in three tabs:
Properties - The general details of the region are given. The visibility and its activation as a filter can be set.
Points - The latitude and longitude of the points making up the region are given.
Style - The graphic style used to draw the region is shown and can be modified.
Map properties
Diagram 3. Properties pane showing details of a map.
The properties of a map are shown in two tabs:
Properties - The general details of the map are given. Currently, no parameters can be modified.
Style - The graphic style used to draw the map is shown and can be modified. This includes various graphics
options: Specular (reflective light effect), Night Lights (a blending of a second map showing the night lights of the
Cryosat User Tool - © ESA All rights reserved - info: [email protected]
Earth), Ocean Occlusion (darkening of all oceans), Invert Colours, Level map enable (mapping of colours to an
internal pseudo colouring to emphasis difference in map values).
Cryosat User Tool - © ESA All rights reserved - info: [email protected]
Map pane
The Map pane contains a graphical representation of the Earth along with the swaths of the products and any userdefined or loaded regions. The Cryosat-2 satellite is also shown in its orbit.
Selection
•
Clicking the left mouse button on a product or region will display its details in the Properties pane. If more than
one product is overlapping, only one product will have its details.
Navigation features
Keyboard commands:
•
•
•
•
Ctrl-up/down to zoom in and out over the map centre.
Arrow keys to rotate the world.
Shift-up/down to tilt the point of view from perpendicular towards the horizon.
Shift-left/right to rotate the Earth around the middle of the map taking into account the amount of tilt in the
point of view.
Mouse commands:
•
•
•
•
•
Clicking the left mouse button on the map pans the clicked point to the centre of the map.
Clicking the left mouse button and dragging rotates the Earth in the same direction. Clicking the left mouse
button with the Shift key down and dragging locks the Earth's axis and allows rotation in the East-West direction
only. This is useful for seeing global phenomena.
Clicking the right mouse button and dragging up or down has the effect of tilting the point of view from
perpendicular towards the horizon.
Clicking the right mouse button and dragging left or right has the effect of rotating the Earth around the
middle of the map taking into account the amount of tilt in the point of view.
The mouse wheel can be used to zoom in and out over the map centre.
Icon toolbar
Diagram 1. Map pane icon toolbar.
The icon toolbar has the following buttons:
Fit in window width
This icon resets the view of the Earth to the default location over the Equator along vernal equinox with the Earth
axis vertically positioned.
Zoom in
This icon zooms in towards the map centre.
Zoom out
This icon zooms out from the map centre.
Show or hide the geographical latitude/longitude grid
This icon toggles the display of the latitude and longitude grid on the Earth.
Areas of interest
This icon activates a menu allowing the creation of an area:
•
•
•
•
•
Create circle - Click on the map to define the circle centre and drag to create a circular area of interest.
Create polygon - Click on the map to define each of the vertices in sequential order, ending with a
double click for the final vertex to define a polygonal area of interest.
Create rectangle - Click on the map to define the first corner and drag to the opposite corner to create a
rectangular area of interest.
Define points... - Manually enter an area name, type and points for a rectangular, circular, polygonal or
polyline area of interest.
Import area of interest - Opens a previously saved area of interest in one of the following
formats: 1) CUT native XML, 2) ESRI Shapefile or 3) Google Earth KML.
Measure distance
This icon activates the measure tool. Distances can be measured between two points or the total distance covered
by a series of points in succession. To measure distances on the map: Move the cursor to the first point and click
to start measuring. Move the mouse to the second point of interest. As the mouse is moved the distance
Cryosat User Tool - © ESA All rights reserved - info: [email protected]
measured is displayed. If desired, click and continue adding points of interest. The distance displayed near the
cursor is the distance from the last point while the cumulative distance is displayed on the map after a mouse
click. Double click to exit the Distance tool.
Show wider swaths
This icon redraws the displayed swaths using a width of 200 km instead of the nominal 15 km in order to allow
easier visualisation. Note that region filtering always uses the nominal swath width.
Product context menu
Diagram 2. Map pane product context menu (for one product and for overlapping products).
The context menu for a product is activated when the right mouse button is clicked on a product and provides the
following commands:
•
•
•
•
•
•
•
Open HDR product(s) - Downloads, if necessary, and opens the HDR file(s) (XML compatible file) in one or
more tabs for viewing.
Get product(s)... - Downloads and saves the product(s).
Zoom on timeline - Zooms the Timeline pane to view the selected product(s).
Highlight this/these product(s) only - Dims all products leaving the selected product(s) undimmed
(highlighted).
Toggle product(s) highlighting - Toggles the highlighting such that all dimmed products are highlighted and
vice versa.
Reset product(s) highlighting - Reset all dimmed products to be shown again.
View properties - Displays the product details in the Properties pane.
Region context menu
Diagram 3. Map pane region context menu (for one region and for overlapping regions).
The context menu for a product is activated when the right mouse button is clicked on a product and provides the
following commands:
•
View this/these region(s) only - Turns off the display of all regions leaving only the selected region(s)
•
•
•
•
Filter this/these region(s) only - Turns off filtering of all areas except for the selected region(s).
Toggle region filter - Toggle the filtering status of the selected region.
Shift - The region can be shifted by dragging the region to the desired position (the shape/extent is maintained).
Resize - The region can be resized by dragging a vertex or creating new vertices by dragging the border of the
visible.
region. Double-click on the map to exit the editing mode.
Cryosat User Tool - © ESA All rights reserved - info: [email protected]
•
•
•
Change colour... - The colour used for the region can be changed.
View properties - Displays the region details in the Properties pane.
Delete region - Deletes the region.
Display
The display itself has a number of interesting features:
Live coordinate display
As the cursor moves over the Earth, the latitude and longitude of the cursor is given in real-time on the upper left
corner of the display. The Sun Zenith Angle for the cursor position is also displayed.
Live object display
If the cursor stops (briefly) over one or more visible objects (i.e. products or regions), the names of the objects
are displayed on the left side of the pane below the live coordinate display.
Time bar display
At the top of the pane, a transparent time bar is displayed indicating the temporal representation of the Earth. The
lighting, Earth and Sun locations correspond to the time given in the Time bar display. Moving the yellow vertical
bar (by dragging or clicking) will change the representation time. The time scale itself can be changed to go
backward and forward using the arrows on the side or to have a different scale factor by using the mouse wheel.
Scale display
When the Earth covers the bottom left corner of the pane, a scale is displayed giving an idea of the distances
represented in the map. This scale is updated as the zoom changes.
Compass display
At the top right of the pane, a compass is displayed to indicate the orientation of the map. Clicking on the arrows
will pan the map in the indicated direction. Clicking on the ring of the compass will rotate the map to have the
clicked compass direction at the top (hence, clicking the "N " will put North at the top.
Navigation banner
At the bottom right of the pane, a 2D map is shown indicating the centre of the current viewpoint.
Cryosat User Tool - © ESA All rights reserved - info: [email protected]
Timeline pane
The Timeline pane contains a Gantt chart showing the products available in the selected directory in the time domain. In
addition to the icon toolbar, the pane is divided into three main sections:
•
•
•
Date Time bar
Type column
Chart area
Diagram 1. Timeline pane.
Icon toolbar
At the top of the Timeline panes, there is the icon toolbar:
Fit in window
This zooms out so that all the products appear in the Timeline pane.
Zoom Back
This changes the display of the Timeline pane to the previous zoom level.
Zoom in
This zooms the display of the Timeline pane toward the middle of the timeline.
Zoom out
This zooms the display of the Timeline pane outward.
Filters menu
The filter function allows the operator to reduce the amount of products displayed (also reflected in the other
panes). A dialog box allows selection of the fields to filter (including product type) as well as selection of the
values to show or hide. When a filter is in effect, the icon label changes colour to indicate that filtering is active.
The following operations are provided in the menu:
•
•
Show/Hide Filter - Opens the filter dialog to set or change the filter parameters.
Remove All Filters - Removes the currently active filter and resets the display to show all products.
Measure time
This tool allows the measuring of times between events on the Timeline pane. Once activated, the time between
the currently dragged cursor position and the cursor position of when the mouse was first clicked is shown.
Hot track
This tool tracks the movement of the mouse as a time in the Timeline pane and draws the satellite and the
positions of the celestial bodies accordingly.
Multiple selection
This tool allows multiple selection of events for highlighting on the map, opening the HDR files or multiple
downloading. Click on the Chart area and a rubber band box is drawn, allowing you to select all events touching
the box.
Date Time bar
At the top of the Gantt pane, underneath the icons, the top portion of the pane is reserved for displaying the date and
time and other information. When the cursor is in the Chart Area, the time corresponding to the cursor position is shown.
Additional information is provided in this area as options are selected in the context menu. The context menu appears
when the right mouse button is clicked in the bar. Note that the activation of a display option can take a long time if the
Cryosat User Tool - © ESA All rights reserved - info: [email protected]
display time range is long. In order to improve performance, the view option may apply only to the visible portion of the
chart. The following view options are available:
Diagram 2. Date Time bar context menu.
•
•
•
Draw Orbits - Displays the orbit and track values and boundaries. Additionally, shaded vertical "zones" are
displayed corresponding to the orbit boundaries.
Draw Cycles - Displays the cycle values and boundaries. Additionally, shaded vertical "zones" are displayed
corresponding to the cycle boundaries.
Draw Eclipse Zones - Displays shaded vertical "zones" corresponding to the times when the satellite is in
eclipse (both umbra and penumbra).
Chart area
The central area of the Gantt pane occupying the majority of the space is the Chart area. Here the products are drawn. If
visible, the filter time range is shown in pink. When the time filter is not active, the time range is shown in light grey.
Navigation features
The zooming of the Chart area can be done either by selecting a time range with the left mouse button and
dragging or by using the mouse wheel. In the first method, the zoomed display of an event can be quickly
achieved by clicking and dragging the highlight "zone" around an event. In the second method, the turning of the
mouse wheel causes the display to zoom towards or away from the mouse position.
Mouse clicks
• Clicking on a product will display its parameters in the Properties pane and the product is also highlighted
in the Browser pane.
• Multiple selections can be made using the Ctrl-click combination to add or remove selected products.
• Double-clicking an empty space on the Chart area will reset all dimmed products to be shown again and, if
necessary, will exit the Block Selection mode.
Product context menu
The context menu for a product is activated when the right mouse button is clicked on a product and provides the
following commands:
Diagram 4. Product context menu.
•
Open HDR product(s) - Downloads, if necessary, and opens the HDR file(s) (XML compatible file) in the
•
•
•
•
•
•
•
Get product(s)... - Downloads and saves the product(s) (both the HDR and the DBL files).
Highlight selected - Dims all products leaving the selected product(s) undimmed (highlighted).
Zoom on Map - Zooms and positions the product in the centre of the 3D Map pane.
Toggle highlighting - Dim all highlighted products and vice versa.
Reset highlighting - Reset all dimmed products to be shown again.
Change colour(s) - Change the colour assigned to the product(s).
Show Contents - Displays a pop-up window showing the details of the product allowing copying to the
default application.
clipboard.
Cryosat User Tool - © ESA All rights reserved - info: [email protected]
Log pane
The log pane provides an area for informational and error messages regarding the FTP connection and the application in
general. The messages here are useful for providing feedback on the progress of CUT activities as well as diagnostic
information for debugging purposes. Messages can be deleted from this pane but will still be stored on disk
(C:\Documents and Settings\<user>\Application Data\Taitus Software\CUT\CUT.log).
Diagram 1. Log pane.
Cryosat User Tool - © ESA All rights reserved - info: [email protected]