1
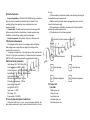
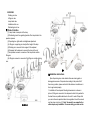
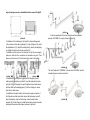
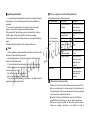
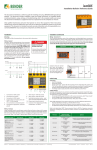
Content
Ⅰ Brief introduction..................................1
II Performance Summarize............................1
III Main technical parameters...........................1
KD-202-B-1/ KD-202B-2 Examination lamp
USER MANUAL
IV Security tips and symbol instructions................2
V Working Environment ...............................3
VI Product list.........................................3
Ⅶ Product interface...................................3
Ⅷ Installation instructions.............................4
Ⅸ operating instructions..............................6
Ⅹ Note..............................................6
Ⅺ Failure Judgment and Eliminating Methods..........7
Ⅻ After-sales service warranty .......................8
ⅩⅢTransportation and storage conditions..............8
ⅩⅣElectrical schematic diagram and components list...9
Ⅰ Brief introduction
Scope of application:KD-202-B-1/ KD-202-B-2ceiling examination
lamp (can also be classified as operation light, is suitable for the
auxiliary lighting in the operating room, examination room and
veterinary hospital.
Characteristic: The lamp uses the long-life and low-energy LED
light source which has the characteristics of simple operation, easy
installation, safety with low voltage, hard to be damaged.
Product component: Lamp holder, lifting arm, rotating arm etc.
of injury.
(1) Please read the instructions carefully, and operating according to
the specifications and requirements.
(2) Before cleaning the light, please unplugged the power cord and
close the total power supply.
(3)The maintenance, installation, commission of the light should be
operated by professional personnel.
(4)The introduction of the following symbols
Attention! Check the random documents!
II Performance Summarize
It is designed with the system of low voltage output cold lighting,
wide voltage power supply which can adapt to the voltage of the
countries all over the world.
The design and production of this light source strictly executes the
first part of the safety requirements of medical electrical equipment
GB4793.1-2007: general requirements are guaranteed in safety.
Protect the grounding!
Disconnect the power
Connect the power
Open the lamp
Close the lamp
Minimum brightness
Maximum brightness
III Main technical parameters
Input voltage: 90V~240V 50Hz-60Hz
Color temperature: 6000K±500K
Center Luminance: ≥80000lx+80000lx(1000mm point)
Spot diameter: 110~200mm(1000mm point)
Lighting depth: 200mm
Maximum wingspan length: 1800mm
Fluctuation displacement: 1100mm
Lamp rotating angle: 300°
Led light bulb: 3W*36
Input power: ≤120W
DC voltage: 12V
Fuse protector: F3A-250V
IV Security tips and symbol instructions
When the check lamp is in use, you should always abide by the
basic safety precautions in order to avoid fire, electric shock or the risk
VI Product list
1.KD-202B-1
Rotating arm: one
Lifting arm: one
Lamp holder: one
Installation disk: one
Disinfecting knob: one
2.KD-202B-2
Rotating arm: two
Lifting arm: two
Lamp holder: two
Installation disk: one
Disinfecting knob: two
Ⅶ. Product interface
(1) Lamp holder: luminophor of the lamp
(2) Disinfecting knob: the regulating handle of the lamp holder in the
operation process
(3) Operating box: light switch and brightness adjustment
(4) Lifting arm: supporting arm to adjust the height of the lamp
(5) Rotating arm: connector to the support of the subpanel
(6) Subpanel: the fixed device to connect the lamp to the roof
(7)Lamp holder connector: connector of the lamp holder and the
lifting arm.
(8) Lifting arm connector: connector of the lifting arm and the rotating
arm.
KD-202B-2
图6
Ⅷ Installation instructions
KD-202B-1
Open the packing box, check whether there are missing parts or
damage phenomenon of the products according to the product list. If
there is any problem, please contact with the dealer or manufacturer in
time to get solved properly.
1. Installation of the subpanel: Mounting dimensions is as shown in
picture 2, lifting arm connector in the subpanel must be firmly welded to
the steel frame or prefabricated steel in the roof. It needs 10 days that
you can do the next operation before the coagulation time of the cement
cast (as shown in picture 3-1). Note: You mustn’t use expand bolt or
other simple, easy installation. To ensure safety, you must use the
way of pouring concrete or embedded board to connect the light!!
picture 2
2. Installation of the rotating arm: first install it to the positioning stem
(16), and then set it into the ring flange (11) in the rotating arm (5), install
the adjustable nut (12). Adjust the rotating arm (2) level by the adjusting
nut, tighten the fixed nut (as shown in picture 2-2).
3. Installation of the top cover: first connect it to the AC power supply,
make sure that both the connection and insulation are good. Then
thrown up the top cover, fix it with screw nuts to make it immovable.
picture 4
Cover the guard board (14) in the lifting arm and the installation
process of KD-202B-1 is over (as shown in picture 5).
picture 5
The install method of KD-202B-2 is the same as KD-202B-2 and the
complete figure is as shown in picture 6.
picture 3-1
picture 3-2
picture 3-3
4. Installation of the lifting arm: first connect the lifting arm (4) and
rotating arm (5) (as shown in picture 3). Insert the electrode bar in the
joint point A of the lifting stem into point B, tighten the two fixed screws
and then throw up the adapting piece (7) into the rotating arm, screw
down the four fixed screw.
5. Installation of the lamp holder: joint the power supply connectors of
the lifting stem and the lamp holder, loosen the fixed screw in point D,
push the sheath up, take out the fixed pin, insert the lamp holder
connector (8) into the lifting arm, install the fixed pins, set down the slide
bushing and screw down the screws (as shown in picture 4).
picture 5
Ⅸ operating instructions
Ⅺ Failure Judgment and Eliminating Methods
The examination lamp consists of three parts: lamp holder, lifting arm
and rotating arm. You can electrify operate it when the installation is
completed.
1. There are four control buttons in the control box (3), namely the
power on, power off, the largest and smallest brightness.
2. By pressing ON, the lamp begins to work, pressing Min or Max can
adjust the light intensity, pressing Off the lamp stops working.
3. Adjusting the handle in the lamp external, you can adjust the lighting
angle.
4. Rotating disinfecting handle (2) can change the flare size.
(It should be operated by the professionals)
Fault phenomena
Fault cause
Power lines have no
electricity
Turn on the power
switch, the lamp is not
bright
Ⅹ Note
1. When installation, please assembly and reinforce according to the
instruction of the technical requirements.
2. Illuminating position in the operation process is controlled by the
handle of the disinfecting knob.
3. You should disinfect the disinfecting knob in time after operation.
4. Before cleaning the light, please unplugged the power cord and
close the total power supply.
5. Never put any item on the power line.
6. Do not use liquid spray to clean the light.
7. The maintenance, installation, commission of the light should be
operated by professional personnel.
The power cord is not
connected well
Fuse damage
(7) and (8) in picture 4
are not connected
well
Brightness adjustment
button is not open
System line fault
Other fault
Solution
Connect to the circuit
where there is
electricity supply
Reconnect the power
cord
Change the fuse
Reconnect them well
Re-install the bulb
firmly
Contact with the
after-sale service
department for
solution
Contact with the
after-sale service
department for
solution
Ⅻ After-sales service warranty
Warranty of 18 months, provide maintenance service all user’s life.
◆In the warranty period, in normally using, the trouble because of
the product quality, the consumer depends on the warranty slip and
invoice enjoys free maintenance service.
◆The bulb of the lamp is LED and the normal life of LED bulb is
about 50000 hours. Generally, you do not need to change them.
◆If the error caused by refitted or install other functions which is
without our company’s permission, is not within the scope of
warranty.
◆If the model, number, release date is modified, deleted, moved or
unrecognized, will not enjoy the maintenance service.
◆The error caused by human factor such as falling, squeezing, dip
in, wetting, etc. is not within the scope of warranty.
◆Once receiving the goods, please sign and accept it after opening
the package to inspect and confirm whether the instrument is
crushed, scratched or not. Make sure there is no special
unnumbered inside. If the goods are damaged and you did not
inspect before sign it, It will be at your own risk.
ⅩⅢTransportation and storage conditions
A. Environmental temperature: -40℃~55℃
B. Relative humidity: ≤70%
C. The atmosphere: 50Kpa~106Kpa
ⅩⅣElectrical schematic diagram and components list
N0.
1
2
3
4
5
6
7
8
9
10
11
12
13
14
15
16
17
18
19
20
21
22
23
24
25
26
27
28
29
30
Material name
Circuit board
Field-effect tube
Filter choke
Inductance
Capacitance
Capacitance
Capacitance
Electrolytic capacitor
Capacitance
Capacitance
Electrolytic capacitor
Filter capacitance
Resistance
Resistance
Resistance
Resistance
Resistance
Resistance
Resistance
Resistance
Resistance
Resistance
Diode
Diode
Diode
Audion
Thermistor
Piezoresistor
Integrated circuit
Rectifier bridge
Specification
Quantity Remark
7D1A
SL20C20U
220mH
470mH
F103M/2KV
22nj/T100V
102M/2KV
50V/1uf
222J/250V
102J/100P
50V/4.7uf
0.1uf
150K/0.25VA
15Ω /0.25VA
120KΩ /0.25VA
1.2KΩ /0.25VA
3.9KΩ /0.25VA
680KΩ /0.25VA
24Ω /0.25VA
3.9K/0.25VA
100Ω /3VA
680Ω /3VA
F107
IN4752
IN4148
1815
5D-15
10D471K
LM494
KBU810
1
1
1
1
3
1
1
1
1
1
3
2
1
2
1
1
1
1
2
2
1
1
6
2
2
3
1
1
1
1
31
32
33
34
lamp
LED
54
Power socket
1
Power line
1
Fuse block
2
Any products may be updated or improved. The change of circuit or
element specifications of the product will not with prior notice.
2012 edition
Warranty card
Company name:
Address
Product
name
Serial
Number
Sale date
Phone No.
Model
Manufacture
date
Fault description:
Remark: The warranty of our products is 18 months since the release
date.
(Please truthfully fill in this form, cut it according to the dotted line and
send it back to our company, thank you for your cooperation)
┄┄┄┄┄┄┄┄┄┄┄┄┄┄┄┄┄┄┄┄┄┄┄┄┄┄┄┄┄┄┄
Maintenance card
Company name:
Address
Product
name
Serial
Number
Sale date
Phone No.
Model
Manufacture
date
Fault description:
Remark: You can enjoy seventy percent discount for the maintenance
services even if you use this card over the quality assurance period.