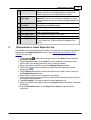
1
Report-IT Live User Manual
for
10 Pack & Enterprise 100 Pack
Software Version 3.0.7
Manual Version 3.0.7.1
September, 2011
2
Report-IT User Guide v.3.0.2
Table of Contents
Part I About Report-IT
3
Part II Release Notes v 3.0.7
4
Part III Getting Started: Report-IT 10/100
Packs
5
Part IV Home Screen Controls
10
Part V Retransmit or Insert Reports Live
11
Part VI Connection Quality & Statistics
12
Part VII Recording a Report
14
Part VIII Managing Reports
15
1 Renaming
...................................................................................................................................
a Report
16
2 Playback
...................................................................................................................................
of Reports
16
3 Trim
...................................................................................................................................
Reports for Playback
17
4 Cutting
...................................................................................................................................
and Pasting Audio
18
5 Adding
...................................................................................................................................
and Deleting Playlists
23
6 Add
...................................................................................................................................
and Remove Reports from Playlists
23
7 Locking
...................................................................................................................................
Reports
24
8 Deleting
...................................................................................................................................
Reports
25
9 Uploading
...................................................................................................................................
Reports via FTP
25
26
Part IX Configuring 10 and 100 Packs
1 Configuring
...................................................................................................................................
Codec Connections
27
2 Configuring
...................................................................................................................................
FTP Servers
33
3 Creating
...................................................................................................................................
& Managing User Accounts
39
4 Configuring
...................................................................................................................................
User Account Connections
41
5 Changing
...................................................................................................................................
the Administrator Password
50
6 Connecting
...................................................................................................................................
Two iPhones to one Codec
51
7 Offline
...................................................................................................................................
Recording Settings
53
8 Changing
...................................................................................................................................
Codec Profiles
53
9 Reconfigure
...................................................................................................................................
the Default Report Name
54
10 Show/Hide
...................................................................................................................................
Mute Button
55
Part X Customer Support
55
Part XI Software Licensing
55
Part XII Credit Notices
59
Index
60
Tieline Pty. Ltd. © 2011
About Report-IT
1
3
About Report-IT
Tieline Report-IT Live changes the newsgathering game by turning your iPhone into a
pocket-sized portable 15kHz live IP audio codec and ultra-slim high fidelity 20kHz audio
recorder. It is a simple application which allows a reporter to use an iPhone®¹ to:
Broadcast 15kHz live two-way interviews between the talent/reporter and the studio
live to air.
Take advantage of the inbuilt 20kHz quality mic on all 3G/3GS/4 iPhones, by
prerecording interviews to the phone and then FTP these 20kHz audio quality files
to the studio without needing a codec.
Prerecord interviews, trim them offline, build a user-friendly playlist of edited clips
and insert them into your live cross to the studio later (sometimes called wraparounds) - all from your iPhone
Report-IT Live
Overview of Report-IT 10
Pack
Powered by Enterprise
Ideal for freelance
Centrally manage a team of
journalists or
up to 10 reporters from the
individual reporters studio using a Report-IT
in small networks
administrator account
where remote
installed onto an iPhone.
network
Remotely configure, manage
management is not and secure all live Report-IT
critical.
10 Pack connections across
your IP networks.
Licensed for
Licensed for installation
installation onto a
single iPhone
onto up to 10 individual
iPhones
All settings
Create secure individual
managed within
the app on the
user login accounts for
phone itself
each user
Basic app
Manage all user accounts
provides 2 hours
via an iPhone administrator
of 'live-time'
account
broadcast hours
Purchase additional
In-app upgrade to
Report-IT 10 packs as
Pro version for
required and configure
unlimited 'liveeach under the same, or a
time' broadcast
separate administration
hours and other
account if preferred
features
TieServer back-up of all
No annual fee
configuration settings
No annual fee
Tieline Pty. Ltd. © 2011
Overview of Report-IT
Enterprise
100 Pack
Ideal for medium and large sized
broadcast networks. Centrally
manage a team of up to 100
reporters from the studio using
either an iPhone administrator
account, or a PC web-GUI
managment console. Configure,
manage and secure all live ReportIT Enterprise 100 Pack connections
across your IP networks.
Licensed for installation on up to
100 individual iPhones
Create secure individual user
login accounts for each user, or
share user accounts amongst
many users
Designed for remote talent/
contributors to download the app
onto their iPhone for free; enter a
username and password and be
interviewed live by the studio in
seconds!
Manage all user accounts via an
iPhone administrator account, or
the TieServer Management
Console
TieServer back-up of all
configuration settings
Annual subscription which
includes 100 additional licenses
each year
4
Report-IT User Guide v.3.0.2
Report-IT Live and Report-IT Live Pro
Report-IT is available as a free trial version called Report-IT Lite with limited recording
features. To purchase Report-IT Live go to the iTunes App Store and download the
Report-IT Live app. Upgrading to Report-IT Live Pro is performed via an in-app
purchase on the iTunes App Store.
Report-IT 10 Pack and Enterprise 100 Pack
Report-IT 10 Pack and Enterprise 100 Pack enables broadcast networks to centrally
manage multiple users from the studio using cloud computing concepts to configure,
manage and secure all live Report-IT connections across their IP networks.
Reporters, announcers and remote talent don't even need to configure Report-IT to
use it. Studio Engineers can use an iPhone with a special Report-IT administrator
login to remotely create a unique password and define specific connection settings
for each user.
All connection settings for connecting to specific Tieline studio codecs or FTP
servers are automatically downloaded into the application via TieServer when the
unique password is entered into the iPhone. This process not only makes it very
simple for users to connect, it also significantly enhances broadcast IP network
security by never exposing IP address details of studio codecs to reporters and
contributors in the field.
The TieServer Management Console is the ideal tool for managing many users and is
available to users of Report-IT Enterprise 100 Pack.
Where should I start?
If you want to learn how to configure connections for your user licenses see
Configuring 10 and 100 packs.
If you want to learn how to download Report-IT onto your iPhone and get connected
see Getting Started: Report-IT 10/100 Packs.
2
Release Notes v 3.0.7
New features implemented since v.3.0.2 of Report-IT include:
1. Support for G3 dual program; Supports selection of custom profiles in G3 codecs
using Report-IT (Requires minimum G3 firmware version 1.6.86. See http://www.
tieline.com/Support/Latest-Firmware/Current-G3-Firmware-Versions)
2. Ability to select different profiles when connecting.
3. The default prefix used when naming a new report can now be specified
4. The default report recording name prefix is now based on localisation settings, i.e.
language selection.
5. Inclusion of an "Allow Mute" setting to add and remove the Mute button from the
main connection screen; this is used to avoid accidental muting of incoming audio
from the studio.
Tieline Pty. Ltd. © 2011
Getting Started: Report-IT 10/100 Packs
3
5
Getting Started: Report-IT 10/100 Packs
To use Report-IT 10 Pack or
Report-IT Enterprise 100 Pack
simply download the FREE Tieline
Enterprise Edition app
from the
App Store and use the unique login
provided by the studio to
automatically log in to TieServer
and download all settings for
connecting to specific Tieline studio
codecs or FTP servers.
.
See Configuring 10 and 100
Packs if you are an
administrator wanting to
configure user accounts.
Important Note: It is possible to record a report without logging in to TieServer but
it is not possible to make live connections or FTP recorded reports until Report-IT
has logged into TieServer.
Dialing into the Studio
1. After downloading and installing the Enterprise Edition tap the Report-IT Live
Enterprise Edition
app symbol on the iPhone screen to run the application.
2. When the application opens you are prompted to enter the password provided to
you by the studio in order to sign in to TieServer. Enter the password and tap OK.
3. Report-IT will authenticate the password using TieServer and download all
configuration and connection settings configured by the studio. This may take
several seconds to complete.
Tieline Pty. Ltd. © 2011
6
Report-IT User Guide v.3.0.2
4. Use your finger to move the Input Slider and adjust input audio levels.
5. Tap Connect on the Report Live screen to dial the studio codec and use your
finger to move the Return Slider horizontally to adjust return audio levels from the
studio codec.
Dialing Different Connections
More than one connection can be configured by the studio, enabling users to dial
into more than one codec or FTP server at the studio. To select a different dialing
destination:
1. Tap the arrow symbol on the Report Live home screen to open the
Codecs page.
2. Tap to select a new codec.
3. Tap Connect on the Home screen to dial the newly selected codec.
Tieline Pty. Ltd. © 2011
Getting Started: Report-IT 10/100 Packs
FTP Reports to the Studio
There are two ways to perform FTP transfers.
Automatic FTP File Transfers
Report-IT can be configured to automatically prompt users to send a
recording after it has been disconnected. If this is configured:
1. Tap Disconnect to hang up the IP connection.
2. Tap Upload to commence uploading the recording to the server.
3. The recording is first encoded, then transmitted. The data transfer
upload is displayed on the progress bar.
Tieline Pty. Ltd. © 2011
7
8
Report-IT User Guide v.3.0.2
4. Data transfer may take several minutes, depending on the size of the
report and the upload connection bandwidth available. Confirmation is
displayed at the completion of the file transfer.
Important Notes:
Tap the File Name text box to display the onscreen keyboard and rename a
report prior to transfer if required. Tap Done when this is complete.
Tap the blue arrow symbol to open the FTP Settings screen and select a
different FTP server if required.
Tap Cancel to cancel a file transfer prior to completion.
Manually Configured FTP File Transfers
Recordings can also be selected and transferred manually.
1. Tap the Activity
button in the top-right corner of the Home screen
and then tap Manage Your Reports.
2. Tap a category playlist to find the report you want to select, then tap
the report to view it in the Report screen.
3. Tap FTP Report on the Report screen.
4. Tap the Upload button to upload the report to the FTP server entered
into Report-IT.
Adjusting Input/Output Audio Monitoring
Input audio monitoring is normally switched off by default prior to a connection being
made. This is usually the case because if input audio is being emitted from the
iPhone receiver when earphones are not being used, audio may be affected by echo
caused by input audio feeding back into the iPhone mic.
If earphones are being used it is possible for Report-IT administrators to configure the
app to monitor mic input audio prior to connecting. After a connection is made, return
audio can be monitored via either the iPhone earphone output or the receiver (default
Tieline Pty. Ltd. © 2011
Getting Started: Report-IT 10/100 Packs
9
setting). To adjust these settings as an administrator see Configuring User Account
Connections.
Disconnecting a Connection
1. Tap the Disconnect button on the Home screen to end the connection.
WARNINGS - To ensure your live or recorded operations are not interrupted by
incoming phone calls and other applications:
1. Configure call forwarding to voice-mail or another number; tap Settings >
Phone > Call Forwarding and then slide the switch to On.
2. Turn off the RINGER on the left-hand side of the iPhone to avoid SMS tone
interruptions. IMPORTANT NOTE: This will not prevent incoming SMS
messages and will only stop alert tones. If Report-IT is being used and an
SMS is received, a dialog box with Close and Reply buttons is displayed.
ONLY press Close in response to an SMS. If you press Reply Report-IT will
shut down and suspend your recording or transmission.
3. If you are recording a report only you can switch on Airplane mode via the
iPhone Settings application. In Airplane mode no phone calls or SMS
messages will be sent to the iPhone. When you have finished recording,
Airplane mode must be turned off to retransmit or FTP your recording.
4. In the Calendar application, ensure that there are no event alarms enabled
during the planned live/recording period.
5. Ensure that no Clock application alarms are enabled during the planned
recording period.
6. Do not plug in or unplug a headset during recording. Likewise, do not dock or
undock the device during recording.
7. Do not plug the iPhone into a power source during the recording. When an
iPhone gets plugged into power, it beeps or vibrates, according to user
settings.
8. DO NOT press the iPhone HOME button when reporting live or recording, or
you will exit the Report-IT Live application.
If you can't enable call forwarding before your report and you receive an
incoming call, decline the call ASAP using the Decline button on the iPhone
screen. From the time that the incoming call alert is shown, to the time the
decline button is pressed, recording will cease and silence will be transmitted.
Important Notes:
If Auto Reconnection is ON the Report-IT app will attempt to automatically
reconnect to the studio codec if the connection is temporarily lost. This
setting is configured by the studio administrator.
Use your finger to swipe left twice from the Report Live screen to view
connection Statistics and Renegotiate the connection bit-rate if this setting
is not disabled.
The Return PPM meter on the Home screen displays no audio until a
connection to the studio codec is created.
¹ iPhone is a tradem ark of Apple Inc., registered in the U.S. and other countries.
Tieline Pty. Ltd. © 2011
10
4
Report-IT User Guide v.3.0.2
Home Screen Controls
Feature
Description
1 Record/Connected Displays flashing green symbol when connected live
indications
(orange symbol while connecting) and REC flashes red
when recording
2 Input PPM
Displays microphone input level; keep levels peaking in the
green region of the PPM (as displayed). the PPM meters
in Report-IT display average power for audio and
represent the following:
First green indicator is -29.5dB.
First yellow indicator is -13.0dB.
First red indicator is -5.5dB
3 Return PPM
Displays return audio level from the studio codec when
connected and monitored input (if enabled); keep levels
peaking in the green region of the PPM (as displayed)
4 Codec connection Displays the codec to which Report-IT is configured to
connect; tap the arrow to select or configure a new
address (Note: IP address details are never displayed in
10 Pack and Enterprise 100 Pack versions of Report-IT)
5 Connect/
Tap the Connect button to establish a connection to the
Disconnect button studio codec; when connected, tap the red Disconnect
button to disconnect.
Tieline Pty. Ltd. © 2011
Home Screen Controls
6 Screen lock button
7 Home/Statistics
page toggle
8 Configuration
Information
9 Return slider/fader
10 Mute button
5
11
Tap to lock screen controls when connected to ensure
settings cannot be accidentally adjusted; buttons and
sliders are greyed out and disabled when locked
Tap to toggle between the Home screen and the
Statistics screen to view connection statistics. A swipe
gesture left/right can also be used to navigate between the
screens.
Tap to open the Configuration screen and adjust
Connection and Audio settings
Slide to adjust return/monitor audio levels
11 Input Slider/Fader
If displayed, Tap to mute return audio from the studio
codec (turns blue when muted)
Slide to adjust microphone input levels
12 Record Symbol
Indicates a report is either recording or not recording
13 Activity button
Tap to select the activity you want to perform with ReportIT Live; Report Live, Record a Report or Manage Your
Reports
Retransmit or Insert Reports Live
Recordings can be retransmitted to the studio or inserted into live reports using playlists
displayed on the Playback Reports screen. (See Add and Remove Reports from
Playlists for more info)
1. Tap the Activity
button in the top-right corner of the Home screen and then
tap Report Live.
2. Tap the Connect button on the Home screen to establish a connection to the
studio codec (see Getting Started for more connection details).
3. Swipe your finger to the left to reveal the Playback Reports screen.
4. Tap the arrow
to select the playlist you want from the default and custom
playlists displayed.
5. Tap the Report Live button in the top-left hand corner of the screen to return to
the Playback Reports screen.
6. Tap a report to select it from the playlist of recordings.
7. Press the play symbol to play the report. Note: this automatically mutes the iPhone
microphone during playback.
8. Tap Now Playing if you want to adjust the report playback level.
9. Swipe your finger to the right to return to the Report Live screen at the completion
of playback.
10.Tap the Disconnect button on the Report Live Home screen to end the
connection.
Tieline Pty. Ltd. © 2011
12
Report-IT User Guide v.3.0.2
Feature
1 Playlist button
Description
Tap to display all reports in the selected playlist
2 Now playing button Tap to display the currently selected recording
3 Current playlist
The name of the currently selected playlist
4 Select playlist arrow Press
to select a new playlist
5 Current report
Indicates the currently selected report
selected
6 Playback indicator Elapsed playback indication
7 Playback controls
6
Play, pause,and skip report controls
Connection Quality & Statistics
When a connection is live and you are viewing the Report Live screen, swipe to the left
twice to view the Statistics screen and view current connection statistics.
In order of viewing from the top of the screen you can see:
1. Cxn Duration: The duration of the current or last connection.
2. Cxn Data: the amount of data used over the current or last connection.
3. Bitrate: the bit-rate of an active connection.
4. Link Quality: the local and remote link qualities of an active connection.
5. Live Time Left: the amount of live time remaining if Report-IT Live Pro is not
purchased.
Tieline Pty. Ltd. © 2011
Connection Quality & Statistics
13
How to Adjust the Audio Bit-Rate when Connected
1. Use your finger to swipe left across the screen twice to view the Report Live
Statistics and Renegotiate screen.
2. Tap Up to increase the audio connection bit-rate, or Down to decrease the
audio connection bit-rate.
Latency and Report-IT Jitter Buffering
Behind the scenes Report-IT uses automatic Jitter Buffer settings with the default
setting being 'Best Compromise", which is the same default setting in all Tieline IP
audio codecs. It is designed to provide the safest level of good audio quality without
introducing too much extra delay. Tieline’s Jitter-buffer is smart because of its ability
to:
Remove duplicate packets.
Re-order packets if they arrive out-of-order.
Repair the stream in the event of packet loss (error concealment).
Manage delay dynamically based on current network congestion.
Manage forward error correction (FEC).
Over LANs, WANs and wireless networks the automatic jitter buffer generally works
extremely well and very reliably. It adapts automatically to the prevailing IP network
conditions to provide continuity of audio streaming and minimise delay.
Want to Learn More about Tieline Codecs?
To learn more about the audio functions available within the Report-IT application and
Tieline codecs, please visit www.tieline.com/support, select the codec that you have
installed at the studio and download the user manual for that codec. Online support is
also available via [email protected] and the Tieline forums at http://forums.tieline.
com.
Tieline Pty. Ltd. © 2011
14
7
Report-IT User Guide v.3.0.2
Recording a Report
When Report-IT Live is used to record audio, it makes use of whatever free memory is
available on your iPhone. The maximum duration of a recording is entirely dependant
upon how much memory you have available on your iPhone.
Automating the Recording of All Live Reports
It is possible to simultaneously record all reports and stream live audio after a live
connection to a studio codec is established.
1. Tap the Configuration Information symbol in the bottom-right corner of the
Home screen.
2. Use your finger to slide the Record ON Connect switch from Off to On.
Important Notes:
If Auto Reconnect is On then recording will not stop if disconnection occurs. T
ap the Information
symbol to open the Configuration page, then tap
Advanced > Auto Reconnection to view and adjust this setting.
If Auto Reconnect is Off then recording will stop if disconnection occurs.
If the application runs out of live time when connected then recording will stop
immediately after disconnection.
Record a Report without a Live Connection
Off-line interviews can be recorded for retransmission to a studio codec later or for
FTP file transfers.
1. Tap the Activity
button in the top-right corner of the Home screen and
then tap Record A Report.
2. Use your finger to move the Input Slider and adjust audio input levels.
3. Tap the Record button to start recording.
4. Tap the Stop Recording button when you have finished recording.
Managing Recorded Reports
Recorded reports can be managed by tapping the Activity
button in the top-right
corner of the Home screen and selecting Manage Your Reports. For more
information see Managing Reports.
Tieline Pty. Ltd. © 2011
Managing Reports
8
15
Managing Reports
To manage reports that have been recorded tap the Activity
button in the top-right
corner of the Home screen and then tap Manage Your Reports.
The Manage Reports screen categorises recorded reports and allows you to:
1. View reports easily.
2. Add and view playlists of reports.
Tap a category to find the report you want to select and open the Manage Report
screen.
Tap a report listed in the Manage Report screen to view it in the Report screen.
From here you can perform a variety of editing functions:
Tieline Pty. Ltd. © 2011
16
8.1
Report-IT User Guide v.3.0.2
Renaming a Report
1. Tap the Activity
button in the top-right corner of the Home screen and then tap
Manage Your Reports.
2. Tap a playlist to find the report you want to select, then tap the report to view it in the
Report screen.
3. Tap the Edit button in the bottom-left corner of the Report screen.
4. Tap the Name field on the screen.
5. Rename the report and tap the Report
button to return to the Report screen.
6. Tap the Done button in the bottom-left corner of the Report screen to save any
changes.
Report-IT 10 Pack and Enterprise 100 Pack users can configure new default report
names, see Reconfigure the Default Report Name.
8.2
Playback of Reports
1. Tap the Activity
button in the top-right corner of the Home screen and then tap
Manage Your Reports.
2. Tap a playlist to find the report you want to select, then tap the report to view it in the
Report screen.
3. Tap Play Report on the Report screen.
4. Tap the Play/Pause symbols to play and pause the current report.
5. Use your finger to slide the Playback Level Slider (top) and adjust audio playback
level.
6. Use your finger to slide the play-head along the Scrubber Bar and skip to any point
along the report timeline.
Tieline Pty. Ltd. © 2011
Managing Reports
Feature
1 Playback Level
Slider
2 Scrubber Bar
8.3
17
Description
Slide the marker to adjust playback audio levels
Slide the marker to skip to a point along the report timeline
Trim Reports for Playback
It is possible to trim the top and tail of a recorded report and store this setting for
playback.
Important Note: Trimming a report will not affect the original recording and only
affects live report playback of recordings. Reports that are sent via FTP are not
trimmed.
1. Tap the Activity
button in the top-right corner of the Home screen and then
tap Manage Your Reports.
2. Tap a category playlist to find the report you want to select and open Report
screen.
3. Tap Play Report on the Report screen.
4. Tap the Edit button in the bottom left-hand corner.
5. Tap the play symbol to playback audio and determine the playback start point for
the report. You can also use your finger to slide the play-head along the Scrubber
Bar and skip to any point along the report timeline.
6. When you are happy with the position tap Start to position the playback start
marker.
7. Next playback audio to determine the end-point of the report, then tap End.
8. Tap Done in the bottom-left corner of the screen to save the report settings.
Tieline Pty. Ltd. © 2011
18
Report-IT User Guide v.3.0.2
Feature
Description
1 Play/Pause Symbol Tap to play and pause the recording
8.4
2 Start button
Tap to configure the start point for report playback
3 End Button
Tap to configure the end point for report playback
4 Start/End markers
Time indication for start and end markers
5 Done/Edit button
Tap to edit and store settings
Cutting and Pasting Audio
It is possible to copy and paste audio between Report-IT Live and other iPhone Apps that
support either MAPI AudioCopy & AudioPaste or the Intua Paste Board (See http://www.
sonomawireworks.com/iphone/audiocopy and http://code.google.com/p/intua-audiosharing/wiki/CompatibleApps). Such apps include non-linear editing and effects apps.
Two common ways of integrating the cut and paste functions with Report-IT include:
Copy a report from Report-IT into a non-linear iPhone editing app, edit the report
and then paste it back into Report-IT as a new report. Alternatively you can append
or overwrite a previous recording.
Copy a report recorded and/or edited within a non-linear iPhone editing app and
then paste it into Report-IT as a new report.
Copy a Report into an Editing App
1. Tap the Activity
button in the top-right corner of the Home screen and then
tap Manage Your Reports.
2. Tap a playlist to find the report you want to select, then tap the report to view it in
the Report screen.
3. Tap Audio Copy and Paste Tools.
Tieline Pty. Ltd. © 2011
Managing Reports
19
4. Tap the Audio Copy symbol.
5. Tap the name of the file to open the onscreen keyboard and edit the name, or just
tap Copy Audio.
6. This initiates audio rendering and may take several seconds if the recorded file is
large.
7. Tap to either launch a compatible installed app, or download (from the iTunes App
Tieline Pty. Ltd. © 2011
20
Report-IT User Guide v.3.0.2
Store) one of the listed compatible applications and use it edit the audio file. See
http://www.sonomawireworks.com/iphone/audiocopy/ for more details on
AudioCopy and AudioPaste.
8. Consult your editing app's user documentation for details on how it performs nonlinear editing functions and exports audio files to compatible applications.
Paste Audio Back into Report-IT
1. After editing your report within a compatible non-linear editing app, choose the
audio copy function and select the file you want to transfer into Report-IT.
2. Select Report-IT Enterprise Edition when prompted to select the app you want
to paste the audio into.
3. Navigate to a report within the Manage Your Reports screen within Report-IT
(Tap the Activity
button in the top-right corner of the Home screen,then tap
Manage Your Reports, tap a playlist to find the report you want to select, then tap
the report to view it in the Report screen).
4. Tap Audio Copy and Paste Tools.
Tieline Pty. Ltd. © 2011
Managing Reports
21
5. Tap the Audio Paste symbol.
5. You can tap Paste, then tap OK to overwrite the currently selected audio report, or;
6. Alternatively you can tap either:
Paste to and End if you want to append the current recording by pasting to the
end of the selected report, then tap Done.
or Paste to and scroll to New Report if you want to create a new report, then
tap Done.
Tieline Pty. Ltd. © 2011
22
Report-IT User Guide v.3.0.2
7. Tap Paste to past the recording.
8. Confirmation is displayed if the paste is successful.
Closing the Audio Copy and Paste Function
Tap the arrow button in the top-right of the screen to close the Audio Copy and
Paste screen.
Tieline Pty. Ltd. © 2011
Managing Reports
8.5
23
Adding and Deleting Playlists
It is possible to create Report-IT Live playlists for sequential playout of recordings and
management of recordings. The three default playlists in Report-IT Live to which reports
are automatically added are:
1. All Reports.
2. Today's Reports.
3. Most Recent 10 Reports.
Adding a New Custom Playlist
Custom playlists can be created to allow you to manually add a recording to your own
playlist.
1. Tap the Activity
button in the top-right corner of the Home screen and
then tap Manage Your Reports.
2. Tap Add New Playlist.
3. Use the on-screen keypad to enter a playlist name.
4. Tap Done to create the new playlist.
Deleting a Custom Playlist
1. Tap the Activity
button in the top-right corner of the Home screen and then
tap Manage Your Reports.
2. Tap the Edit button in the bottom left-hand corner of the screen.
3. Tap the red delete
symbol adjacent to the playlist you want to delete.
4. Tap the Delete
button to remove the playlist.
8.6
Add and Remove Reports from Playlists
Custom user playlists need to be created before attempting to manually add a recording
to these playlists. Custom playlists are easily identifiable because they are displayed
separately below the default playlists. (See Adding and Deleting Playlists for more details
on adding playlists)
Tieline Pty. Ltd. © 2011
24
Report-IT User Guide v.3.0.2
Adding a Report to a Playlist
1. Tap the Activity
button in the top-right corner of the Home screen and then
tap Manage Your Reports.
2. Tap the default or custom playlist that contains the report you want to add to
another playlist.
3. Tap to select the report you want to configure.
4. Tap Playlists in the Report screen to view all custom playlists, then tap to select
each individual playlist the recording needs to be added to.
5. Tap the Report
button to return to the Report screen and save all changes.
Removing a Report from a Playlist
Removing a report from a custom playlist does not delete the actual recording itself.
To delete a recording see Deleting Reports.
1. Tap the Activity
button in the top-right corner of the Home screen and
then tap Manage Your Reports.
2. Tap the playlist that contains the report you want to remove.
3. Tap the Edit button in the bottom left-hand corner of the screen.
4. Tap the red
symbol adjacent to the report you want to remove.
5. Tap the Remove
button to remove the report.
6. Tap the Done button to finish editing.
8.7
Locking Reports
Locking a Report from Editing
1. Tap the Activity
button in the top-right corner of the Home screen and then
tap Manage Your Reports.
Tieline Pty. Ltd. © 2011
Managing Reports
25
2. Tap a category playlist to find the report you want to select, then tap the report to
view it in the Report screen.
3. Tap the Edit button in the bottom-left corner of the Report screen.
4. Use your finger to slide the Lock Report switch from OFF to ON.
5. Tap the Done button in the bottom-left corner of the screen to save the new
setting.
8.8
Deleting Reports
Reports can only be deleted from one of the default playlists:
All Reports.
Today's Reports.
Most Recent 10 Reports.
1. Tap the Activity
button in the top-right corner of the Home screen and then tap
Manage Your Reports.
2. Tap to select the default playlist that the report you want to delete is within.
3. Tap the Edit button in the bottom left-hand corner of the screen.
4. Tap the red delete
symbol adjacent to the recording you want to delete.
5. Tap the Delete
button to delete the report permanently.
6. Tap OK in the Confirm Delete dialog to confirm the deletion.
8.9
Uploading Reports via FTP
1. Tap the Activity
button in the top-right corner of the Home screen and then tap
Manage Your Reports.
2. Tap a category playlist to find the report you want to select, then tap the report to view
it in the Report screen.
3. Tap FTP Report on the Report screen.
4. Tap the Upload button to upload the report to the FTP server entered into the ReportIT app (see Configuring FTP Settings for more FTP configuration information).
Tieline Pty. Ltd. © 2011
26
9
Report-IT User Guide v.3.0.2
Configuring 10 and 100 Packs
Report-IT 10 Pack or Report-IT Enterprise 100 Pack enables broadcast networks to
centrally manage multiple users from the studio using cloud computing concepts to
configure, manage and secure all live Report-IT connections across their IP networks. To
configure 10 Pack or 100 Pack connections you need to use an administrator licence
login, supplied by Tieline with every system.
Administrators of Report-IT 10 pack can use an iPhone administrator login to configure all
user account settings. Report-IT Enterprise 100 Pack administrators can use either an
iPhone administrator login, or the PC TieServer Management Console. The TieServer
Management Console is the ideal tool for managing large numbers of users on your
network.
Depending on the workflow requirements of your network there are a number of options
for configuring Report-IT Live 10 Pack and Enterprise 100 Pack:
Secure Access to Codecs and FTP Servers:
Report-IT 10 Pack and 100 Pack is designed to deliver secure IP network
connections. All users have no visibility of IP addresses or other settings for codecs
and FTP servers in your network. All codec and FTP server configuration is
performed by authorised 'administrators' at the studio, then user accounts are
created for individuals which provide access to specific codecs or FTP servers.
Important Note: Administrators can see and use all codecs visible within the
administration screens. All these codecs are in their domain and are not visible to
Tieline Pty. Ltd. © 2011
Configuring 10 and 100 Packs
27
other broadcast networks.
What to do first...
When using Report-IT 10 Pack or Enterprise 100 Pack for live broadcasting it is
essential that you supply Tieline with the serial numbers of the codecs that your
iPhones will be connecting to before you commence configuration. This is required
because these serial numbers are used by TieServer to identify and secure the
codecs in your broadcasting network.
How does an Administrator Configure User Accounts?
Tieline will create an administrator account and domain name for your network on
TieServer and you can use this domain to configure all Report-IT user accounts.
Tieline will supply a username and password for your administrator account. Use
these to log in to your administrator account and configure user accounts.
Report-IT 10 Pack and Enterprise 100 Pack Administrators can configure:
1. Default domain settings for codec, FTP and connection settings. These apply
when no individual user account settings have been configured.
2. Individual user account settings: These settings override the 'global' default
domain settings when enabled.
Important Note: It is possible to connect live to a studio codec using an
administrator version of Report-IT to test codec, FTP and default domain
settings. Using administrator account iPhones for live broadcasting is not
recommended because any settings you apply become global default settings
for all your Report-IT Live user accounts and any changes may interfere with
their operation.
Recommended Configuration Process
Following is a suggested process for configuring Report-IT 10 Pack or Enterprise 100
Pack for the first time.
1. Configure any codecs you will be connecting to into Report-IT.
2. Configure any FTP servers you will be using into Report-IT.
3. Configure the Default Domain (user connection) settings into Report-IT.
4. Create user accounts and configure individual account settings for each 10
Pack or Enterprise 100 Pack license.
9.1
Configuring Codec Connections
Before commencing configuration of codec connections, ensure Tieline has recorded all
the serial numbers of the codecs in your network into TieServer.
Global and Individual User Account Codec Settings in Report-IT
There are two default codec settings in Report-IT 10 and Enterprise 100 Pack:
1. Global Default Domain Codec: nominating one of the codecs in your network
Tieline Pty. Ltd. © 2011
28
Report-IT User Guide v.3.0.2
as the default codec for all connections. This setting is used when no
individual user account default setting has been configured.
2. User Account Domain Codec: nominating one of the authorised codecs
available to an individual user as the default codec for their Report-IT
connections. This overrides the 'global' Default Domain Codec setting when
Use Defaults within user account settings is OFF.
To simplify configuration we recommend you configure all codecs into Report-IT prior
to creating individual user accounts, then:
1. Configure all studio codec settings into Report-IT.
2. Configure the 'global' default domain codec for all user accounts authorised to
use this codec.
3. Configure the default studio codec for individual user accounts as required.
Configure Studio Codecs into Report-IT
1. After downloading and installing the Enterprise Edition tap the Report-IT Live
Enterprise Edition
app symbol on the iPhone screen to run the application.
2. Enter the password provided to you by Tieline in order to sign in to TieServer as an
administrator, then tap OK.
3. Tap the Information
symbol in the bottom-left corner of the Report-Live
screen, then tap Administration.
4. Next, tap Codecs to view the codecs which have been entered into TieServer.
Note: initially the default name is the serial number of the codec.
5. Tap the first codec to display the codec settings, then tap Name to open the
onscreen keyboard and enter a name. Tap Done when this is completed. Note:
The codec name is the way a codec is identified within user accounts - no other
details are provided to ensure network security.
Tieline Pty. Ltd. © 2011
Configuring 10 and 100 Packs
29
6. Tap Codec Address to open the onscreen keyboard and enter the IP address of
the codec. (Note: preferably this should be a public static IP address). Tap Done
when this is completed.
7. UDP Audio Port and TCP Session Port settings are entered by default to
connect to Tieline IP codecs and should only be changed after consulting your IT
network administrator (see Changing Codec Port Settings for more information).
8. Tap Done when all configuration is complete to return to the Codecs screen, then
perform the same configuration for all other codecs in your network.
Global Configuration of the Default Codec for Report-IT Connections
1. In the Codecs screen (via Information
Default Domain Codec.
> Administration > Codecs), tap
2. Tap a codec displayed in the Default Codec screen to select it, then tap Done.
Tieline Pty. Ltd. © 2011
30
Report-IT User Guide v.3.0.2
3. This codec is now the default codec for all connections, unless this setting is
configured for individual user accounts.
Configuring Default Codec Settings for Individual User Accounts
Default codec settings for individual Report-IT 10 Pack or Enterprise 100 Pack users
can only be configured after user accounts have been created. See Creating User
Accounts for more details on creating new user accounts. Once you have created
individual Report-IT user accounts you can select a default codec for each user
account. This is the codec that will be dialed by default when a user opens Report-IT
and taps Connect.
1. Tap Information
> Administration > User Accounts.
2. Tap to select the user account you want to configure.
Tieline Pty. Ltd. © 2011
Configuring 10 and 100 Packs
31
3. Tap Codecs.
4. Tap to select the codecs in your list which the user will be authorised to
connect with.
Important Note: If the Default Codec reads Not Specified, then when the
user logs into Report-IT the Default Domain Codec will be used (as long as
the user is authorized to see that codec). If the user is not authorised to use
this default domain codec, the first codec they are authorized to see will dial
the connection.
5. Tap Default Codec to view the list of authorised codecs and tap to select the
default codec, then tap Codecs in the top-left of the screen to return to the
Codecs screen.
Tieline Pty. Ltd. © 2011
32
Report-IT User Guide v.3.0.2
6. Tap Done to save all settings and return to the User Account screen.
7. Users can also manually select a different codec to connect to if required.
See FTP Reports to the Studio for more details.
Editing Codec Connection Settings
1. Navigate to Information
> Administration > Codecs.
2. Tap to select the codec you want to edit, then tap to adjust the settings as required.
3. Tap Done in the top-left of the screen to save the edited settings on TieServer.
9.1.1
Changing Codec Port Settings
As a default, Report-IT Live uses TCP port 9002 to send session data with connection
information and UDP port 9000 to send audio. The session port always uses the TCP
protocol because this protocol is the most likely to get through firewalls – ensuring critical
session data (including dial, connect and hang-up data) will be received reliably.
In TCP/IP and UDP/IP networks the codec port is the endpoint of your connection and by
using different ports, several codecs in your studio
can use the same static public IP address. In this situation, when data is received from
Tieline Pty. Ltd. © 2011
Configuring 10 and 100 Packs
33
several remote codec devices at a single public IP address at the studio, port information
is translated from data packets to ensure the correct packets are sent to the correct
studio codecs. This process is performed by PAT (Port Address Translation), which is a
feature of NAT (Network Address Translation) devices.
If you need to reconfigure the default Report-IT Live port numbers, please consult your IT
system administrator for assistance on port allocation, or email [email protected] for
more information.
9.2
Configuring FTP Servers
Global and Individual User Account FTP Settings in Report-IT
There are two default FTP server settings in Report-IT 10 Pack or Enterprise 100
Pack:
1. Global Default FTP Destination: nominating one FTP server as the default
server for all user accounts. This is used when individual user account FTP
settings are not configured.
2. User Account Default FTP Destination: nominating one of the servers available
to an individual user account as the default FTP server for file transfers. This
overrides the global Default FTP Destination setting when Use Defaults within
user account settings is OFF.
We recommend you configure all FTP servers into Report-IT prior to creating
individual user accounts. This simplifies user account configuration. The best way to
proceed with FTP configuration is:
1. Configure all FTP server destinations into Report-IT.
2. Configure the default FTP server destination globally for all user accounts that
are authorised to use this server.
3. Configure the default FTP server destination for individual user accounts as
required.
Configure FTP Server Settings into 10 Pack or Enterprise 100 Pack
1. After downloading and installing the Enterprise Edition app, tap the Report-IT Live
Enterprise Edition
app symbol on the iPhone screen to run the application.
2. When the app opens enter the password provided to you by Tieline in order to sign
in to TieServer as an administrator, then tap OK.
3. Tap the Information
symbol in the bottom-left corner of the Report-Live
screen, then tap Administration.
Tieline Pty. Ltd. © 2011
34
Report-IT User Guide v.3.0.2
4. Next, tap FTP Destinations.
5. Tap the plus symbol in the top-right of the screen to open the FTP Destination
screen.
6. Tap Name to open the onscreen keyboard and enter a description for the FTP
server that will be visible to users, then tap Done in the bottom-left hand corner.
7. Tap Server Settings to open the FTP Server Config screen and add the
configuration settings for the server, then tap FTP Destination to return to the FTP
Destination screen.
Tieline Pty. Ltd. © 2011
Configuring 10 and 100 Packs
35
8. Tap Encoding Settings to adjust the encoding used to sent reports via FTP file
transfer, then tap FTP Destination to return to the FTP Destination screen.
9. Tap Done to save the server settings to TieServer and return to the main Domain
FTP Destination screen.
10.Add as many servers as you require in the same way.
Global Configuration of the Default FTP Server for Report-IT User
Accounts
To configure a default FTP server globally:
1. In the Domain FTP Destinations screen (via Information
>
Administration > FTP Destinations), tap Default Domain FTP Destination.
Tieline Pty. Ltd. © 2011
36
Report-IT User Guide v.3.0.2
2. Tap a server displayed in the Default FTP Destination screen to select it,
then tap Done.
3. This destination is now the default FTP server for all FTP file transfers, unless
an alternative FTP destination is configured for individual user accounts.
Configuring a Default FTP Destination for Individual User Accounts
Default FTP server settings for individual users can only be configured after user
accounts have been created. See Creating User Accounts for more details on
creating new user accounts. Once you have created individual Report-IT user
accounts you can select a default FTP Destination (server) for each user account.
This is the server that will be used by default when users send reports via FTP file
transfer.
1. Tap Information
> Administration > User Accounts.
Tieline Pty. Ltd. © 2011
Configuring 10 and 100 Packs
37
2. Tap to select the user account you want to configure.
3. Tap FTP Destinations.
4. Tap to select the Authorised FTP Destinations in your destination list,
which the user will be authorised to connect with.
Important Note: If the Default FTP Destination reads Not Specified, then
when the user logs in the Default FTP Domain Destination will be used (as
Tieline Pty. Ltd. © 2011
38
Report-IT User Guide v.3.0.2
long as the user is authorized to see that server). If the user is not authorised
to use this default domain server, the first FTP server they are authorized to
use will be selected.
5. Tap Default Domain FTP Destination to view the list of authorised FTP
server destinations and tap to select the default server; then tap Done in the
top-right of the screen to save the settings to TieServer and return to the
Domain FTP Destination screen.
6. Users can also manually select a different FTP destination instead of the
default setting if required. See Dialing Alternative Connections for more details.
Editing FTP Server Settings
1. In the Domain FTP Destinations screen (via Information
> Administration >
FTP Destinations), tap Default Domain FTP Destination.
2. Tap to select the server you want to edit, then tap to adjust the Server Settings or
Encoding settings as required.
3. Tap Done on the FTP Destination screen to save the edited settings on
TieServer.
Deleting FTP Servers
1. In the Domain FTP Destinations screen (via Information
> Administration >
FTP Destinations), tap Default Domain FTP Destination.
Tieline Pty. Ltd. © 2011
Configuring 10 and 100 Packs
39
2. Tap the Edit button in the bottom left-hand corner of the screen.
3. Tap the red delete
symbol adjacent to the server you want to delete.
4. Tap the Delete
button to remove the server.
9.3
Creating & Managing User Accounts
Important Note: To simplify user account configuration we recommend you enter
all codec and FTP servers into Report-IT 10 Pack or Enterprise 100 Pack prior to
creating individual user accounts
1. Tap the Report-IT Live Enterprise Edition
symbol on the iPhone screen to run
the app.
2. When the app opens enter the password provided to you by Tieline in order to sign in
to TieServer as an administrator, then tap OK.
3. Tap the Information
symbol in the bottom-left corner of the Report-Live screen,
then tap Administration.
4. Tap User Accounts.
5. Tap the plus symbol in the top right-hand corner of the screen to add a new user
Tieline Pty. Ltd. © 2011
40
Report-IT User Guide v.3.0.2
account. Note: if the symbol is greyed out you have reached the limit of your account
licences. Contact Tieline or your favorite dealer to purchase more licences if required.
6. Tap User Name to display the onscreen keyboard and add the user name, then tap
Done.
7. Tap Email to display the onscreen keyboard and add the user name, then tap Done.
8. Tap Done again to return to the User Account screen.
Important Notes:
The default user account password when you first create a user account is
password
Once you have created a user account you can adjust individual user settings by
navigating to Information
> Administration > User Accounts > Select a
user account > Settings. For more information see Configuring User Account
Connections.
Changing the Default User Account Password
To change the password for an individual user account from the default setting:
1. Navigate to Information
> Administration > User Accounts.
2. Tap to select the account you want to adjust.
3. Tap Password.
4. Enter the password and password verification, then tap Done in the top-right
corner of the screen to save the new settings to TieServer.
Enabling and Disabling User Accounts
When user accounts are first created in Report-IT they are Enabled by default. It is
also possible to disable accounts temporarily if required, without having to delete
them.
1. Navigate to User Accounts via Information
> Administration > User
Accounts.
2. Tap to select the account you want to enable or disable.
3. Tap the Enabled button to toggle between ON and OFF to change the setting
Tieline Pty. Ltd. © 2011
Configuring 10 and 100 Packs
41
as required.
Editing User Account Settings
User account settings can be edited after an account has been created. Simply
navigate to the account, adjust settings as required and tap Done to save them.
Important Note: Any changes made to user account configuration requires the
user to sign out and sign in again for them to take effect. Closing the Report-IT Live
app and reopening it also forces a user to sign in. Changes are visible to
administrators as soon as they are made and saved.
Deleting User Accounts
1. Navigate to User Accounts via Information
> Administration > User
Accounts.
2. Tap the Edit button in the bottom left-hand corner of the screen.
3. Tap the red delete
symbol adjacent to the account you want to delete.
4. Tap the Delete
button to remove the account.
Purchasing Additional User Account Licences
There is no limit on the number of additional account licences you can add to your
TieServer account. If you reach the limit of your account licences and require more
user accounts as your network grows, simply contact Tieline or your favorite dealer to
purchase more licences as required.
9.4
Configuring User Account Connections
Caution: If any changes are made to a user's account settings they will not be
enabled until the user signs out of Report-IT and signs in again. Closing the
Report-IT App down also forces the user to sign in.)
Global and Individual User Account Connection Settings
There are two levels of user account configuration available to administrators when
configuring connection settings for Report-IT 10 Pack or Enterprise 100 Pack:
1. Global default domain connection settings: Default domain settings apply for
codec, FTP and connection settings when no individual user account settings
have been defined.
2. Individual user account connection settings: User account settings for
individual users can also be configured, which override default domain settings
and allow studio engineers to enter unique settings for each user. This is only
possible when Use Defaults within user account settings is OFF.
Global settings make it easy to configure all accounts to connect to the studio in a
similar way. Additionally, individual user account settings allow administrators to tailor
account settings as required for different connection scenarios.
Tieline Pty. Ltd. © 2011
42
Report-IT User Guide v.3.0.2
To simplify user account configuration we recommend you add all codecs and FTP
servers into Report-IT prior to creating individual user accounts and configuring
connections. The best way to proceed with user account configuration is:
1. Configure default domain settings that will apply for all codec, FTP and
connection settings.
2. Configure individual user account settings, which will override default domain
settings, on an account by account basis.
Configuring Default Domain Connection Settings
1. Tap the Report-IT Live Enterprise Edition
symbol on the iPhone screen to
run the app.
2. Enter the password provided to you by Tieline in order to sign in to TieServer as an
administrator. Enter the password and tap OK.
3. Tap the Information
symbol in the bottom-left corner of the Report-Live
screen, then tap Administration.
4. Tap Default Domain Settings to view all global domain settings.
5. Adjust settings as required and tap Done to save all changes. For more details
about individual settings see Connection Configuration Settings Explained.
Important Note: If you don't configure individual user account settings the
default domain connection settings will apply.
Configuring Individual User Account Settings
By default each new user account uses the 'global' configuration settings. To adjust a
user account's settings individually:
1. Navigate to User Accounts via Information
> Administration > User
Tieline Pty. Ltd. © 2011
Configuring 10 and 100 Packs
43
Accounts.
2. Tap the account you want to configure.
3. Tap Settings.
4. Ensure Use Defaults is set to OFF. (If set to ON the global default domain
settings will apply to the user account and settings will be greyed out)
5. Adjust configuration settings as required and tap Done in the top-left of the
Settings screen to save all new settings for the individual user account.
These settings will now apply and override the global settings.
Adding a New User Account Password
The Report-IT 10 Pack or Enterprise 100 Pack user account password delivers
security to your broadcast IP networks by only allowing access to authorised users.
Important Note: The default user account password when you first create a
user account is password
To change the password for each user:
1. Navigate to Information
> Administration > User Accounts.
2. Tap to select the account you want to adjust.
3. Tap Password.
4. Enter the password and password verification, then tap Done in the top-right
corner of the screen to save the new settings to TieServer.
Connection Configuration Settings Explained
Following is a summary of the settings which can be adjusted globally by
administrators for all users, or for individual user accounts on a case-by-case basis.
To make adjustments:
Globally: navigate to Information
> Administration > Default Domain
Settings.
Individually: navigate to Information
> Administration > User Accounts >
Select a user account > Settings.
Tieline Pty. Ltd. © 2011
44
Report-IT User Guide v.3.0.2
Setting
1 Done button
2 Initial Audio Bitrate
Purpose
Tap to save all new settings
Configures the initial audio bit-rate of connections when they
are first dialed
3 Record On Connect Configures Report-IT to record talent audio on the iPhone
simultaneously when connected live to a studio codec
4 FTP On Disconnect If enabled, opens the FTP Report screen automatically when
a user disconnects to facilitate FTP file transfer
5 Advanced
Opens the Advanced screen menu with additional
connection options
6 Monitor Input
Enables audio monitoring of the iPhone mic input
7 Return Channel
Enables audio monitoring of the return audio from the studio
8 Allow Mute
Turn ON to display the Mute button on the main screen of
Report-IT
9 Bluetooth Input
Turn ON to pair a Bluetooth device with Report-IT; turn OFF
to avoid a device being accidentally paired with Report-IT
10 Set Own Password Enables users to set their own login password using ReportIT
11 Report Prefix
Tap to enter a new default name prefix which is applied to all
recorded reports
12 Logo
Use to configure a new logo into Report-IT
Advanced Settings Screen
Tap Advanced to access the following settings.
Tieline Pty. Ltd. © 2011
Configuring 10 and 100 Packs
Setting
1 Settings button
2 Auto Reconnect
3 Across Networks
4 Allow User Reneg
9.4.1
45
Purpose
Tap to return to the Settings screen
Enable setting to automatically reconnect if a connection is
lost
Enable setting to connect over Wi-Fi by default if the iPhone
is registered to a Wi-Fi network, and fail over to 3G if the WiFi network becomes unavailable
Enable setting to allow a user to renegotiate the connection
bit-rate
Adjusting the Audio Bit-rate
Initial Audio Bit-Rate when Connecting
There are two ways to configure the initial audio connection bit-rate in Report-IT 10
Pack or Enterprise 100 Pack:
1. Globally configure the initial audio bit-rate for all users: Navigate to Information
> Administration > Default Domain Settings > Settings > Initial Audio
Bitrate.
2. Configure the initial audio bit-rate for individual user accounts (overrides global
settings): Navigate to Information
> Administration > User Accounts >
Select a user account > Settings > Initial Audio Bitrate.
Tap to select the bit-rate setting required and then tap Done in the top-right of the
screen.
Allowing Audio Bit-Rate Adjustment when Connected
If Report-IT is connected live to the studio it is possible for users to adjust the audio
connection bit-rate upwards or downwards depending on the prevailing network
congestion. This capability needs to be enabled within Report-IT 10 Pack or
Enterprise 100 Pack before a user can make these adjustments.
Tieline Pty. Ltd. © 2011
46
Report-IT User Guide v.3.0.2
There are two ways to let users adjust the audio connection bit-rate:
1. Globally configure the same setting for all users: Navigate to Information
>
Administration > Default Domain Settings > Settings > Advanced > Allow
User Reneg.
2. Configure the initial audio bit-rate for individual user accounts (overrides global
settings): Navigate to Information
> Administration > User Accounts >
Select a user account > Settings > Advanced > Allow User Reneg. Note:
this setting is only active when Use Defaults within user account settings is
OFF.
Tap the Use Defaults button to toggle between ON and OFF, then tap Done in the
top-right of the screen to save the setting.
How to Adjust the Audio Bit-Rate when Connected
1. Use your finger to swipe left across the screen twice to view the Report Live
Statistics and Renegotiate screen.
2. Tap Up to increase the audio connection bit-rate, or Down to decrease the
audio connection bit-rate.
9.4.2
Customising Screen Logos
A cool feature on Report-IT Live is the ability to add your station logo to the screen when
reporting for additional branding opportunities in print and visual media.
Saving a Logo into Report-IT Live
Prior to adding your logo onto the Report-IT Live screen you need to save it into the
iPhone Camera Roll. One of the easiest ways to do this is to:
1. Email or SMS the image to your iPhone.
2. Tap the image, then tap the tap the Activity
corner of the screen.
3. Tap Save Image.
button in the bottom-left
Another easy way to get images into an iPhone is to just go to a web site and hold
your finger down on an image you want to save to the camera roll - a dialog will pop
Tieline Pty. Ltd. © 2011
Configuring 10 and 100 Packs
47
up asking if you want to save it.
Globally Configure the Logo Screen for All User Accounts
1. Open Report-IT Live and tap Information
> Administration > Default Domain
Settings > Logo.
2. Tap or use your finger to swipe the Display Logo switch from OFF to ON.
3. Tap the image displayed in the Logo Image pane and select the Camera Role
that your logo is saved within.
4. Tap the logo or image to select it, adjust and optimise the image size within the
visible 'safe area' box, then tap Choose in the bottom right-hand corner of the
screen.
5. The image should now be displayed in the Logo screen.
6. Tap Logo Byline to add a byline to your image, e.g. your station's call-sign or the
reporter's name, then tap Done.
7. Tap Configuration in the top left-hand corner of the Logo screen to exit logo
configuration.
8. Tap Done in the top left-hand corner of the Configuration screen to confirm
settings.
Customising the Logo Screen for Individual User Accounts
1. Open Report-IT Live and tap Information
> Administration > User Accounts.
2. Tap to select the user account you want to configure.
3. Tap Settings.
4. Tap Logo.
5. Tap or use your finger to swipe the Display Logo switch from OFF to ON.
6. Tap the image displayed in the Logo Image pane and select the Camera Role
that your logo is saved within.
7. Tap the logo or image to select it, adjust and optimise the image size within the
visible 'safe area' box, then tap Choose in the bottom right-hand corner of the
screen.
8. The image should now be displayed in the Logo screen.
9. Tap Logo Byline to add a byline to your image, e.g. your station's call-sign or the
reporter's name, then tap Done.
10.Tap Configuration in the top left-hand corner of the Logo screen to exit logo
configuration.
11.Tap Done in the top left-hand corner of the Configuration screen to confirm
settings.
Viewing the Logo Screen when Live
1. Open Report-IT Live and navigate to the Report Live screen.
2. Connect live and then swipe to the left three times to view the Logo screen.
Viewing the Logo Screen when Recording
1. Open Report-IT Live and navigate to the Record a Report screen.
2. Commence recording and swipe to the left to view the logo screen.
Tieline Pty. Ltd. © 2011
48
9.4.3
Report-IT User Guide v.3.0.2
3G and Wi-Fi Network Settings
Report-IT Live will operate over 3G wireless broadband networks and Wi-Fi connections.
By default the iPhone connects to an available Wi-Fi network that it has been registered
to, rather than a 3G network.
WARNING: The purchase price of Report-IT does not include network airtime/data
costs. Please check these fees and charges with your cell phone network provider.
Global and Individual Wireless Settings in Report-IT
There are two default wireless network settings in Report-IT 10 Pack and Enterprise
100 Pack:
1. Global default wireless settings: nominating the default wireless settings for all
user accounts when individual settings are not configured.
2. Individual User Account wireless settings: nominating wireless settings
available to an individual user account. This overrides the global default
wireless networks settings.
With Report-IT Live it is possible to connect in the following ways.
Globally Configure Connections over Wi-Fi Only
1. Register the iPhone to the wireless network you are operating within.
2. Open Report-IT Live, log in and tap Information
> Advanced > Default
Domain Settings > Advanced.
3. Ensure Across Networks is OFF.
4. Tap Settings at the top-left of the screen to return to the Settings screen.
5. Tap Done at the top-left of the screen to confirm the new settings.
Globally Configure 3G Wireless Connections Only
There are two different ways to make sure the iPhone will only connect over 3G
networks.
1. Tap Settings > Wi-Fi for your iPhone and use your finger to swipe and turn
the Wi-Fi setting to Off, or
2. If you connect initially over 3G but move across both 3G and Wi-Fi networks,
you can ensure that you will always connect over 3G if the connection is
temporarily lost.
Open Report-IT Live, login and navigate to Information
>
Administration > Default Domain Settings > Advanced > Across
Networks and make sure this setting is OFF. (Note: This allows you to
use both Wi-Fi and 3G when you are not using Report-IT Live).
To save the settings:
Tap Settings at the top-left of the screen to return to the Settings screen.
Tap Done at the top-right of the Settings screen to confirm the new
settings.
Tieline Pty. Ltd. © 2011
Configuring 10 and 100 Packs
49
Globally Connect over Wi-Fi with Automatic 3G Backup
Report-IT Live will connect over Wi-Fi by default if the iPhone is registered to a Wi-Fi
network. It can also failover to 3G as a backup if the Wi-Fi network becomes
unavailable.
1. Tap Settings > Wi-Fi for your iPhone and use your finger to swipe and turn
the Wi-Fi setting to On.
2. Open Report-IT Live, log in and tap the Information
> Advanced >
Default Domain Settings > Advanced.
3. Tap to select:
Auto Reconnect is ON
Across Networks is ON
4. Tap Settings at the top-left of the screen to return to the Settings screen.
5. Tap Done at the top-left of the screen to confirm the new settings.
When these settings are configured, if you lose a connection, the phone will attempt
to connect to the studio over 3G.
Important Note: If a Wi-Fi network is not available it will connect over 3G with
these settings. If a 3G network is not available and Wi-Fi is available, then WiFi will be the network selected for connecting. You can tell which network you
are connected to by checking for the Wi-Fi symbol in the top left-hand corner of
the iPhone screen.
It is also possible to configure global wireless network settings and create unique
user account settings as required.
Individual User Account Connections over Wi-Fi Only
1. Register the iPhone to the wireless network you are operating within.
2. Open Report-IT Live, log in and tap Information
> User Accounts > Select a
user account > Settings > Advanced.
3. Ensure Across Networks is OFF.
4. Tap Settings at the top-left of the screen to return to the Settings screen.
5. Tap Done at the top-left of the screen to confirm the new settings.
Individually Configure User Accounts to Connect over 3G Only
1. Tap Settings > Wi-Fi for your iPhone and use your finger to swipe and turn
Tieline Pty. Ltd. © 2011
50
Report-IT User Guide v.3.0.2
the Wi-Fi setting to Off, or
2. If you connect initially over 3G but move across both 3G and Wi-Fi networks,
you can ensure that you will always connect over 3G if the connection is
temporarily lost.
Open Report-IT Live, login and navigate to Information
> User
Accounts > Select a user account > Settings > Advanced. and make
sure this setting is OFF. (Note: This allows you to use both Wi-Fi and 3G
when you are not using Report-IT Live).
To save the settings:
Tap Settings at the top-left of the screen to return to the Settings screen.
Tap Done at the top-right of the Settings screen to confirm the new
settings.
Individually Configure User Accounts to Connect over Wi-Fi with Auto
Backup to 3G
1. Tap Settings > Wi-Fi for your iPhone and use your finger to swipe and turn
the Wi-Fi setting to On.
2. Open Report-IT Live, log in and tap the Information
> User Accounts >
Select a user account > Settings > Advanced.
3. Tap to select:
Auto Reconnect is ON
Across Networks is ON
4. Tap Settings at the top-left of the screen to return to the Settings screen.
5. Tap Done at the top-left of the screen to confirm the new settings.
When these settings are configured, if you lose a connection, the phone will attempt
to connect to the studio over 3G.
9.5
Changing the Administrator Password
1. Tap the Report-IT Live Enterprise Edition
app symbol on the iPhone screen to
run the application.
2. Enter the username and password provided to you by Tieline in order to sign in to
TieServer as an administrator, then tap OK.
3. Tap the Information
symbol in the bottom-left corner of the Report-Live screen,
then tap Change Password.
4. Enter the current password and then the new password and verify it.
Tieline Pty. Ltd. © 2011
Configuring 10 and 100 Packs
51
5. Tap Done in the top-right corner of the screen to confirm the new password settings.
9.6
Connecting Two iPhones to one Codec
It is possible to connect two separate Report-IT iPhone connections to a single Tieline
Commander or i-Mix G3 codec. These connections will always be routed to specific
outputs of the studio codec if configuration is performed as follows:
Important Notes:
This solution requires Report-IT version 3.0.7 and G3 codec firmware version
1.6.86. See http://www.tieline.com/Support/Latest-Firmware/Current-G3Firmware-Versions.
This solution requires studio codec configuration using Toolbox software to
ensure both Report-IT connections are consistently routed to the studio codec's
left (IP1) and right outputs (IP2). See http://www.tieline.com/files/
files/436_Bcast_Tech_note_20_Bidirectional_Dual_Program_Connections_rev1.pdf
1. Tap Information , then Administration > Codecs.
2. Select a Codec from those listed, then tap Profile.
3. The default Profile is Mono Program; tap Dual Program to select this option.
Tieline Pty. Ltd. © 2011
52
Report-IT User Guide v.3.0.2
4. Navigate back to the Codecs screen and you will see IP2 displayed for the
Alternative (second) connection.
5. Tap Done to upload the new settings into Tieline's TieServer. The studio codec
you have configured will now accept calls from two different iPhones using ReportIT simultaneously, and consistently route each incoming call separately.
6. Now configure your user account settings; navigate back to the Administration
screen and tap User Accounts.
7. Tap the User Account you want to configure.
8. Tap Codecs, then tap Default Codec.
9. Select IP1 or IP2 as the dedicated IP connection for the G3 audio codec to which
you want to connect. IP1 is automatically routed to codec channel 1 (left program
out) in the studio codec and IP2 is automatically routed to channel 2 (right program
out) in the studio codec. Note: if a Bridge-IT codec is displayed (e.g. Studio 1 in
the following image), only one IP connection is available.
10.Navigate back to the Codecs screen and tap Done to upload the new settings to
Tieline TieServer.
Tieline Pty. Ltd. © 2011
Configuring 10 and 100 Packs
53
11.Use the same procedure to configure the second Report-IT user account and
select the other IP connection.
9.7
Offline Recording Settings
Report-IT Report-IT 10 Pack and Enterprise 100 Pack is able to record reports offline,
which is useful when no wireless network access is available, or a user is not sure of
their password for logging in. These reports can be sent to the studio later via a codec or
FTP server when connections to the studio become available.
A small subset of Report-IT settings can be adjusted locally on each iPhone when
recording reports offline. These Offline Recording Settings are only visible in the
Configuration screen when a user is not signed in. When a user first opens Report-IT,
the Offline Recording Settings default to whatever the settings were when that
particular user account was last used.
After a user signs in with their username and password, the Offline Recording Settings
menu is hidden and Report-IT is automatically configured with the settings the
administrator has configured via TieServer.
9.8
Changing Codec Profiles
The default connection profile when connecting Report-IT is Mono Program and it is also
possible to select a different profile if required.
1. Tap Information , then Administration > Codecs.
2. Select a Codec from those listed, then tap Profile.
Tieline Pty. Ltd. © 2011
54
Report-IT User Guide v.3.0.2
Profile
Mono Program
Explanation
Changes the profile of a G3 codec to Mono Program during connection
(default setting)
Dual Program Changes the profile on a G3 coded to Dual Program - allowing two
independent connections to a single codec simultaneously
Codec Current This setting does not change the current profile on a G3 codec.
Runtime
WARNING: this setting relies on the studio codec having a compatible
Report-IT profile loaded
Other/Custom Select the number of a custom profile to load during connection
9.9
Reconfigure the Default Report Name
The default name given to reports is "Report" and then a sequential number, e.g. Report
1 then Report 2 etc. An administrator can also enter a custom 'report prefix' for each
user.
1. Tap Information , then Administration > User Accounts > 'Select an Account'
> Settings.
2. Ensure Use Defaults is set to OFF to allow changes to default settings.
3. Navigate down the screen and tap Report Prefix.
4. Ensure Default Prefix is set to OFF in the Report Prefix screen.
5. Use the on-screen keyboard to enter the new administrator-defined report prefix,
then tap Done.
Important Note: Enter %username% in the Default Prefix text box to add a
user's login name as the default prefix. For example, if a user's login is
[email protected], and you enter %username% the default report name
would be "john x". You can also add additional identifiers before or afterwards,
e.g. %username% election report
6. Tap Done in the top-right corner of the Settings screen to confirm the new user
settings.
Configure the Login Username as the Default Report Name for All Users
By configuring Default Domain Settings, Report-IT can also define the user login
name as the default report name prefix for all users.
1. Tap Information
Settings.
, then Administration > Default Domain Settings >
Tieline Pty. Ltd. © 2011
Configuring 10 and 100 Packs
55
2. Navigate down the screen and tap Report Prefix.
3. Ensure Default Prefix is set to OFF in the Report Prefix screen.
4. Use the on-screen keyboard to enter %username% as the new administratordefined report prefix, then tap Done.
5. Tap Done in the top-right corner of the Settings screen to confirm the new
settings for all users without individual user account settings.
Important Note: If the default prefix is "Report", the word displayed depends
on the iPhone language setting. E.g. in French "Report" = "Reportage"
9.10
Show/Hide Mute Button
Administrators can choose whether to display the Mute button on the main screen for
each user. This allows the user to mute incoming audio from the studio.
1. Tap Information , then Administration > User Accounts > 'Select an Account'
> Settings.
2. Ensure Use Defaults is set to OFF to allow changes to default settings.
3. Navigate down the screen to Allow Mute and ensure it is set to ON.
4. Ensure Default Prefix is set to OFF in the Report Prefix screen.
5. Tap Done in the top-right corner of the Settings screen to confirm the new
settings.
10
Customer Support
To access the customer support elements within Report-IT Live tap the Information
symbol from within the 'live' or 'record' mode screens to open the Configuration page,
then tap Advanced.
11
Software Licensing
Report-IT Live has been approved for use with the Apple iPhone and is subject to Apple's hardware and
software End User Licence Agreements (EULAs) for use of this device. See http://www.apple.com/legal/
sla/
Disclaimer
Whilst every effort has been made to ensure the accuracy of this manual we are not responsible for
any errors or omissions within it, or for incidental or consequential damage in connection with the
Tieline Pty. Ltd. © 2011
56
Report-IT User Guide v.3.0.2
furnishing, performance or use of this material. Tieline makes no warranty of any kind with regards to
this material, including the implied warranties of merchantability and fitness for a particular purpose.
The product specifications and descriptions within this manual will be subject to improvements and
modifications over time without notice, as changes to software and hardware are implemented.
Neither Tieline nor its suppliers shall be liable to you or to any third party for any damages either
direct, indirect, incidental, consequential or otherwise (including in each case, but not limited to,
damages for the inability to use the equipment or access and send data, loss of data, loss of
business, loss of profits, business interruption or the like) arising out of the use of or inability to use
Report-IT, even if Tieline has been advised of the possibility of such damages.
End User Licence Agreement (EULA) for TieServer
TIELINE TECHNOLOGY
TieServer END USER LICENSE AGREEMENT
Minimum End User License Terms
1. Recitals
Report-IT Live Enterprise Edition (hereinafter known as the “Application”) is a free iPhone Application that
allows users to access Tieline’s paid “TieServer” Service to connect with and control access to Tieline
studio audio codecs. This EULA governs the use of TieServer Services only.
This End User License Agreement terms and conditions form a legal contract between You: “the
TieServer account administrator” and Tieline Pty Ltd trading as Tieline Technology (hereinafter known as
“Tieline” and should be carefully read before downloading and using the Application.
2. Eligibility
In order to use TieServer Services using the Application, you will need:
(a) Apple iOS ™Report-IT Enterprise Edition compatible devices (accepting Apple’s standard EULA)
(b) To purchase a TieServer License pack from an authorised Tieline Dealer listed at http://tieline.
com/dealer
(c) To register complete details of your company, appointed administrator and codec serial numbers
(d) To accept this TieServer EULA via the online form located at http://www.tieline.com/register
"Service" means the TieServer online remote management service made available by Tieline. ”Users"
means Your employees, representatives, consultants, contractors, interviewees or agents who are
authorized to use the Service and have been supplied user identifications and passwords by You (or by
Tieline or Your reseller at Your request).
"You” and "Your" means the customer entity which has contracted to purchase licenses to use the Service
subject to the conditions of these End User License Terms.
3. Activation and Use of Service
a. Upon successful completion of the License application, Tieline undertakes to issue Service
Administrator licenses by the close of business on the next available working day between Monday to
Friday and excluding Western Australian public holidays.
b. Simultaneous use of a particular Administrator or User licensed login by different individuals is not
permitted, but may be reassigned from time to time to new Users who are replacing former Users
who no longer require use of the Service.
c. You (i) are responsible for all activities occurring under Your User or Administrator account; (ii) are
responsible for the content of all Your Data; (iii) shall use commercially reasonable efforts to prevent
unauthorized access to, or use of the Service, and shall notify Tieline at [email protected] promptly
of any such unauthorized use You become aware of; and (iv) shall comply with all applicable local,
state, federal and foreign laws and regulations in using the Service
d. You shall use the Service only for Your internal business purposes and shall not use the Service
to: (i) knowingly transmit through or post on the Service unlawful, immoral, libellous, tortuous,
infringing, defamatory, threatening, vulgar, or obscene material or material harmful to minors; (iv)
knowingly transmit material containing software viruses or other harmful or deleterious computer
code, files, scripts, agents, or programs; (v) knowingly interfere with or disrupt the
integrity or performance of the Service or the data contained therein; (vi) attempt to gain unauthorized
access to the Service, computer systems or networks related to the Service; or (vii) harass or interfere
Tieline Pty. Ltd. © 2011
Software Licensing
57
with another user's use and enjoyment of the Service.
e. You shall not (i) modify, copy or make derivative works based on the Service or its underlying
technology; or (ii) disassemble, reverse engineer or decompile any coition of the Service or its
underlying technology.
4. Services Provided
Tieline shall make the Service available to You pursuant to the terms and conditions set forth in this End
User License Agreement. Tieline will use commercially reasonable efforts to make the Service generally
available 24 hours a day, 7 days a week, except for: (a) planned downtime (of which Tieline shall give at
least 8 hours notice via the Service and which Tieline shall schedule to the extent reasonably practicable
during the weekend hours from 6:00 p.m. PT Friday to 3:00 a.m. PT Monday); or (b) any unavailability
caused by circumstances beyond Tieline reasonable control, including without limitation, acts of God,
acts of government flood, fire, earthquakes, civil unrest, acts of terror, strikes or other labor problems
(other than those involving Tieline. employees), computer, telecommunications, Internet service provider
or hosting facility failures or delays involving hardware, software or power systems not within Tieline's
possession or reasonable control, and network intrusions or denial of service attacks.
5. Data Collection and Use
You hereby agree that Tieline, its parent, subsidiaries, affiliates, and their respective successors and
assigns, may collect and use certain technical information associated with your use of the Software,
including, without limitation, any information provided in connection with any support or technical services
for the Software. This information shall be strictly used in accordance with the Tieline Privacy Policy.
6. Agreement
You agree that Tieline shall have a royalty-free, worldwide, perpetual license to use or incorporate into the
Service any suggestions, ideas, enhancement requests, feedback, recommendations or other
information provided by You or Your Users relating to the Service and hereby waive any claim on Tieline to
copyright of those ideas.
7. Fees and Charges
Contracts for fees for use of the Service represent a firm commitment order which cannot be cancelled or
redeemed during the term of the licenses, and the number of licenses contracted for cannot be reduced
in the middle of a license term. Tieline reserves the right to adjust the prices from one license term to the
next. You may incur charges from your mobile service provider for downloading and using the Application.
Any such charges are your sole responsibility and any matters regarding these charges should be raised
with your mobile service provider.
8. Telco Service Disclaimer
You acknowledge, that Your 3GIP or IP connectivity service, including content you transmit or receive, is
operated or supplied by third parties who are not controlled or authorised by Tieline.
You acknowledge that:
a) we do not warrant that your Internet Service will be uninterrupted or error free;
b) we cannot guarantee a timeframe for restoration of your Internet Service, should it fail; and
c) we are not liable to you for any loss or damage you may suffer as a result of using the Internet to
send or receive data which may contain viruses or other harmful software.
9. Termination
You may not cancel or terminate an executed license order. User subscriptions will automatically renew
for additional periods of (1) year at the list price in effect at the time of renewal unless You give Your
reseller notice of termination at least 30 days prior to the end of the relevant subscription term. Tieline
reserves the right to immediately terminate Your use of the Service without notice due to a breach of the
terms of this End User License Agreement by You or any User or any Administrator without
compensation.
10. Technical Support
You are entitled to standard support from Tieline consisting of telephone help desk or online support
Tieline Pty. Ltd. © 2011
58
Report-IT User Guide v.3.0.2
services, as outlined at www.tieline.com/support.
11. Upgrades and IP Protection
We may provide you with upgrades, updates or enhancements to the Service and Application from time to
time. You must not sublicense, assign, share, sell, rent, lease or otherwise transfer your right to use the
Service or Application except as specified in the product manual and within relevant literature released by
Tieline.
Except as permitted under international Copyright Law, you must not copy, translate, adapt, modify, alter,
decompile, disassemble, reverse engineer or create any derivative work of the Software or allow any other
person to do so. You must not alter or remove any notifications of Intellectual Property Rights applied to
the Software. You acknowledge that you do not acquire ownership of any Intellectual Property Rights in the
Software.
12. DISCLAIMER OF WARRANTY
THERE ARE NO REPRESENTATIONS OR WARRANTIES THAT APPLY OR THAT ARE MADE TO YOU IN
ANY WAY IN CONNECTION WITH THE SERVICE, OR APPLICATION USED IN CONNECTION WITH THE
SERVICE OR THIS EULA. TO THE MAXIMUM EXTENT PERMITTED BY LAW, WE DISCLAIM ALL
REPRESENTATIONS AND WARRANTIES WITH RESPECT TO THE SERVICE AND YOUR ACCESS TO
AND USE THEREOF, WHETHER EXPRESS OR IMPLIED, INCLUDING, WITHOUT LIMITATION, THE
IMPLIED WARRANTIES OF MERCHANTABILITY OR FITNESS FOR A PARTICULAR PURPOSE OR ANY
WARRANTIES OF TITLE, NON-INFRINGEMENT AND/OR ARISING FROM A COURSE OF DEALING OR
USAGE OF TRADE. WITHOUT LIMITING THE GENERALITY OF THE FOREGOING, THE SERVICE IS
MADE AVAILABLE TO YOU ON AN “AS IS” AND “AS AVAILABLE” BASIS AND TIELINE DOES NOT
GUARANTEE, WARRANT OR REPRESENT THAT THE SERVICE OR APPLICATION SHALL MEET YOUR
REQUIREMENTS OR THAT YOUR USE, OPERATION OR RESULTS OF USE OF THE SERVICE OR
APPLICATION SHALL BE UNINTERRUPTED, COMPLETE, RELIABLE, ACCURATE, CURRENT, OR
ERROR FREE. YOU ASSUME THE ENTIRE RISK OF DOWNLOADING, INSTALLING, COPYING,
OPERATING, USING AND/OR DISTRIBUTING ACCESS TO THE SERVICE AND APPLICATION.
13. LIMITATIONS OF LIABILITY
YOU UNDERSTAND, ACKNOWLEDGE AND AGREE THAT TO THE FULLEST EXTENT PERMISSIBLE BY
LAW, NEITHER TIELINE NOR ITS, SUBSIDIARIES, AFFILIATES, THEIR RESPECTIVE SUCCESSORS
AND ASSIGNS, OFFICERS, DIRECTORS, EMPLOYEES, AGENTS, LICENSORS, REPRESENTATIVES,
ADVERTISERS, BUSINESS AND PROMOTIONAL PARTNERS, OPERATIONAL SERVICE PROVIDERS,
SUPPLIERS, RESELLERS AND CONTRACTORS SHALL, UNDER ANY CIRCUMSTANCES, BE
RESPONSIBLE OR LIABLE FOR ANY CLAIM, LOSS OR DAMAGE, OF ANY KIND, DIRECT OR INDIRECT,
INCLUDING, WITHOUT LIMITATION, ANY AND ALL COMPENSATORY, CONSEQUENTIAL, INCIDENTAL,
DIRECT, INDIRECT, SPECIAL, EXEMPLARY OR PUNITIVE DAMAGES, IN CONNECTION WITH OR
ARISING FROM ANY USE OF THE SERVICE OR APPLICATION OR OTHERWISE IN CONNECTION WITH
THIS EULA.
YOU FURTHER ACKNOWLEDGE AND AGREE YOUR SOLE RIGHT AND EXCLUSIVE REMEDY FOR ANY
LOSS OR DAMAGE ASSOCIATED WITH THE SERVICE OR APPLICATION OR THIS EULA, EVEN IF YOU
CLAIM THAT SUCH REMEDY FAILS OF ITS ESSENTIAL PURPOSE, SHALL BE TO HAVE TIELINE, UPON
WRITTEN NOTICE FROM YOU, ATTEMPT TO REPAIR, CORRECT OR REPLACE THE SERVICE OR
APPLICATION. IF REPAIR, CORRECTION OR REPLACEMENT IS NOT REASONABLY COMMERCIALLY
PRACTICABLE IN THE SOLE AND ABSOLUTE DISCRETION OF TIELINE, EITHER YOU OR TIELINE
SHALL HAVE THE RIGHT TO TERMINATE AND DISCONTINUE YOUR USE OF THE SERVICE OR
APPLICATION.
14. Indemnification
You agree to defend Tieline, its parent, subsidiaries, affiliates and/or their respective successors and
assigns, officers, directors, employees, agents, licensors, representatives, advertisers, business and
promotional partners, operational service providers, suppliers, resellers and contractors (the “Tieline
Indemnified Parties”) against any and all claims, demands and/or actions and indemnify and hold the
Tieline Indemnified Parties harmless from and against any and all losses, damages, costs and
expenses (including reasonable attorneys’ fees), resulting from any breach or violation of this EULA,
infringement, misappropriation or any violation of the rights of any other party, violation or non
Tieline Pty. Ltd. © 2011
Software Licensing
59
compliance with any law or regulation, the breach or violation of any term or condition of your Agreement
with us, any use, alteration or export of the Service or Application or otherwise in connection with this
EULA. We reserve the right to assume, at our expense, the exclusive defense and control of any claims or
actions and all negotiations for settlement or compromise, and you agree to fully cooperate with us upon
our request.
15. Export Restrictions
Tieline may be subject to certain export restrictions of the United States Government. If you are (a) in a
country to which export from the United States is restricted for anti-terrorism reasons, or a national of any
such country, wherever located, (b) in a country to which the United States has embargoed or restricted
the export of goods or services, or a national of any such country, wherever located, or (c) a person or
entity who has been prohibited from participating in United States export transactions by any agency of the
United States Government, then you may not install, download, access, use, or license our Service or
Application. By accepting this License, you warrant and represent to Tieline that (1) you do not match the
criteria set forth in (a), (b), or (c) above, (2) that you will not export or re export the Service or Application to
any country, person, or entity subject to U.S. export restrictions, including those persons and entities that
match the criteria set forth in (a), (b), or (c) above, and (3) that neither the United States Bureau of Industry
and Security, nor any other U.S. federal agency, has suspended, revoked, or denied your export privileges.
16. U.S. Government Restricted Rights
The Service or Application licensed hereunder is provided with ‘RESTRICTED RIGHTS’ applicable to
private and public licenses alike. Without limiting the foregoing, any use, duplication, modification,
reproduction, operation, performance, release or disclosure thereof by the U.S. Government is subject to
restrictions as set forth in this EULA and as provided in DFARS 227.7202-1(a) and 227.7202-3(a) (1995),
DFARS 252.227-7013 (c)(1)(ii)(OCT 1988), FAR 12.212(a)(1995), FAR 52.227-19, or FAR 52.227-14, as
applicable. Manufacturer: Tieline Technology. 1/25 Irvine Drive, Malaga. Western Australia 6090
17. Governing Law and Interpretation
This EULA and all disputes, claims, actions, suits or other proceedings arising hereunder shall be
governed by, and construed in accordance with, the substantive law of the State of Western Australia
applicable to contracts wholly made and to be performed within the State of Western Australia. You agree
to irrevocably submit to the sole and exclusive jurisdiction of the courts of Western Australia State and the
Federal courts. You further irrevocably consent to the exercise of personal jurisdiction by such courts and
waive any right to plead, claim or allege that Western Australia is an inconvenient forum. No amendment,
modification, waiver or discharge of any provision of this EULA shall be valid unless made in writing and
signed by an authorized representative of Tieline. No failure or delay by Tieline to exercise any right or
enforce any obligation shall impair or be construed as a waiver or on going waiver of that or any or other
right or power, unless made in writing and signed by Tieline. If any provision of this EULA is held to be
illegal, invalid or unenforceable, the remaining provisions of this EULA shall be unimpaired and remain in
full force and effect.
You acknowledge that you have read the entire agreement, understand it, acknowledge that by selecting
the check box below, You are bound by this legal contract and agree to fully comply with all of its terms
and conditions.
Thi s document wa s l a s t modi fi ed on 23rd September, 2010, a nd i s effecti ve i mmedi a tel y.
© Copyri ght Ti el i ne Pty Ltd — Al l Ri ghts Res erved.
Other product na mes menti oned wi thi n thi s document ma y be tra dema rks or regi s tered tra dema rks , or a
tra de na me of thei r res pecti ve owner.
12
Credit Notices
1. iPhone, Apple, App Store and iOS are trademarks and/or registered trademarks of
Apple Inc., registered in the U.S. and other countries.
2. AudioCopy and AudioPaste by Sonoma Wire Works.
3. Other product names mentioned within this document may be trademarks or
registered trademarks, or a trade name of their respective owner.
Tieline Pty. Ltd. © 2011
60
Report-IT User Guide v.3.0.2
cutting and pasting reports
Index
-DDelay
12
Deleting a playlist
23
Deleting reports
25
Dialing other connections
Dialing the studio
5
Disclaimer
55
Disconnecting
5
Dual mono program
51
-33G
wireless network settings
48
-AAbout
55
About Enterprise Edition
26
Adding a playlist
23
Administrators
changing passwords
50
programming process, recommended
26
programming user accounts
26
secure codec and FTP connections
26
what to do first
26
Audio monitoring
5
-EEditing recordings
copy reports
18
non-linear editing
18
Editing reports
copy reports
18
non-linear editing
18
26
-F-
Bit-rate
adjustment up and down
45
initial audio connection
45
Features
5
FTP
automatic FTP file transfers
5
default FTP settings
33
deleting FTP servers
33
editing FTP settings
33
global FTP settings
33
manual FTP file transfers
5
programming FTP servers
33
user account FTP settings
33
-C-
Connecting two iPhones
51
Connection bitrate
5
Connection quality
12
Connection statistics
12
Controls
10
Credit Notices
59
Custom playlists
23
Customer Support
55
Cut and paste
5
Enterprise Edition explained
-B-
Codecs
default codec settings
27
editing codec settings
27
global codec settings
27
port settings
32
programming codecs
27
user account codec settings
18
27
FTP reports
25
FTP reports to the studio
5
-GGetting started
5
-HHome Screen Controls
How it works
26
10
Tieline Pty. Ltd. © 2011
Index
-I-
-R-
Input monitoring
Insert reports live
5
11
Recording
automating recording
14
managing recording
14
offline
53
-JJitter Buffer
Recording a Report
14
Release notes
4
Renaming a report
16
Report name
change default
54
default prefix setting
54
12
-LLatency
12
Licenses
purchasing additional
Locking reports
39
24
Report-IT Live
3
about
3
features
3
in-app purchase
purchase options
-MManaging Reports
15
Mute
show/hide button
55
Mute button
show hide
-O-
Reports
offline recording
53
Retransmit reports
11
-S-
5
-PPassword
administrator
50
changing user account password
39
default user account password
39
Playback report
16
Playlists
adding reports
23
removing reports
23
Screen logos
customising
46
global settings
46
individual user settings
saving
46
viewing when live
46
viewing when recording
Software Licensing
Support
55
-T-
Port settings
codecs
32
Prefix
report name
Trip report
54
Profiles
change codec profiles
53
17
-UUser accounts
Tieline Pty. Ltd. © 2011
3
3
Report-IT Pro
about
3
features
3
55
Output monitoring
Report-IT Lite
about
3
features
3
55
46
46
61
62
Report-IT User Guide v.3.0.2
User accounts
advanced settings
41
configure connection settings
connection settings explained
creating
39
creating passwords
41
deleting
39
disabling
39
editing
39
enabling
39
managing
39
program default settings
41
program user account defaults
purchasing additional
39
41
41
41
-WWarnings
5
Wi-Fi
wireless network settings.
48
Wireless networks
3G settings
48
global wireless settings
48
settings
48
user account settings
48
Wi-Fi settings
48
Tieline Pty. Ltd. © 2011