1
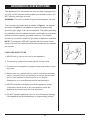
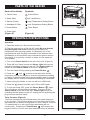
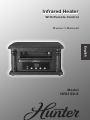
Infrared Heater
With Remote Control
Owner ,s Manual
English
Model
HFR15D-E
TABLE OF CONTENTS
2
81609-01 R20150420
INTRODUCTION
Thank you for choosing the Hunter Infrared Heater. This manual
gives you complete instructions for using your heater.
SAFETY AND WARNINGS
READ CAREFULLY BEFORE ATTEMPTING TO ASSEMBLE,
INSTALL, OPERATE OR MAINTAIN THE PRODUCT DESCRIBED.
PROTECT YOURSELF AND OTHERS BY OBSERVING ALL
SAFETY INFORMATION. FAILURE TO COMPLY WITH
INSTRUCTIONS COULD RESULT IN PERSONAL INJURY AND/OR
PROPERTY DAMAGE!
SAVE THESE INSTRUCTIONS FOR REFERENCE.
NOTE: When switching on the appliance for the first time, allow it to
run at full power for approximately two hours to get rid of the
unpleasant odour. Make sure that the room in which the appliance is
located is well ventilated during this operation. It is normal for the
appliance to emit small cracking sounds when you turn it on the first
time. Do not be alarmed.
IMPORTANT INSTRUCTIONS
When using electrical appliances, basic precautions should always
be followed to reduce the risk of fire, electric shock, and injury to
persons or property, including the following:
1. Read all instructions before using this heater.
2. This heater is hot when in use. To avoid burns, do not let bare skin
touch hot surfaces. Use handles when moving this heater. Keep
combustible materials, such as furniture, pillows, bedding, papers,
clothes and curtains at least 3' (0.9 m) from the front and top of the
heater and keep them away from the sides and rear. Keep the rear
grille away from walls or drapes so as not to block the air intake.
3. Extreme caution and supervision is necessary when any heater is
used by or near children or pets, and whenever the heater is left
operating and unattended.
4. Always unplug heater when not in use.
5. Do not operate heater with a damaged cord or plug or after the
heater malfunctions, or has been dropped or damaged in any
manner. Discard heater or return to an authorized service facility for
examination and/or repair.
6. Do not use outdoors.
7. This heater is not intended for use in bathrooms, laundry areas
and similar indoor locations. Never locate heater where it may fall
into a bathtub or other water container.
8. Do not run cord under carpeting. Do not cover cord with throw
rugs, runners, or similar coverings. Do not route cord under furniture
or appliances. Arrange cord away from traffic area and where it will
not be tripped over.
9. To disconnect the heater, turn control to OFF, then remove the plug
from the outlet.
10. Do not insert or allow foreign objects to enter any ventilation or
exhaust opening as this may cause an electric shock or fire, or
damage to the heater.
3
81609-01 R20150420
11. To prevent a possible fire, do not block air intakes or exhaust in
any manner. Do not use on soft surfaces, like a bed, where openings
may become blocked.
12. A heater has hot and arcing or sparking parts inside. Do not use it
in areas where gasoline, paint, or flammable liquids are used or
stored.
13. Use this heater only as described in this manual. Any other use
not recommended by the manufacturer may cause fire, electric
shock, injury to persons, or other damage to property.
14. Ensure the heater is on a stable, secure surface to eliminate the
potential of tipping it over.
15. To prevent overload and blown fuses, be sure that no other
appliance is plugged into the same outlet (receptacle) or into another
outlet (receptacle) wired into the same circuit.
16. It is normal for the heater’s plug and cord to feel warm to the
touch. A plug or cord which becomes hot to the touch or becomes
distorted in shape may be a result of a worn electrical outlet. Worn
outlets or receptacles should be replaced prior to further use of the
heater. Plugging heater into a worn outlet/receptacle may result in
overheating of the power cord or fire.
17. Always plug heaters directly into a wall outlet/receptacle. Never
use with an extension cord or relocatable power tap (outlet/power
strip).
18. Check your heater cord and plug connections. A loose fitting
outlet can cause the plug to overheat or cause a fire. Be sure plug fits
tight in the outlet. Check frequently during use to make sure plug and
outlet are not hot. If so, discontinue using heater and have outlet
replaced by a qualified electrician.
19. Note: Heaters draw more current than small appliances,
overheating of the outlet may occur even if it has not occurred with
the other appliances.
20. Check that neither the appliance nor the power cable has been
damaged in any way during transportation.
21. Make sure that no pieces of polystyrene or other packaging
material have been left between elements of the appliance. It may be
necessary to clean the appliance.
22. Connect to properly grounded outlets only.
23. This appliance has a grounded three-prong plug and is suitable
for grounded receptacle use only. An adapter is available for
connecting three-blade grounding-type plugs to two-slot receptacles.
The adapter must be properly grounded. Do not attempt to defeat
the purpose of this safety feature.
CAUTION:RISK OF ELECTRIC SHOCK. DO NOT OPEN.
NO USER SERVICEABLE PARTS INSIDE.
DANGER-HIGH TEMPERATURES MAY BE GENERATED
UNDER CERTAIN ABNORMAL CONDITION. DO NOT
PARTIALLY OR FULLY COVER OR OBSTRUCT THE
FRONT OF THIS HEATER.
FOR HOUSEHOLD USE ONLY
SAVE THESE INSTRUCTIONS
4
81609-01 R20150420
GROUNDING INSTRUCTIONS
Grounded
Plug
This appliance is for household use only and may be plugged into
any 120-volt AC electrical outlet (ordinary household current). DO
NOT use any other type of outlet.
WARNING: This unit is suitable for grounded receptacle use only.
Grounding
Pin
The cord has a grounded plug as shown in Figure 1. An adapter,
Grounded Outlet
Box Cover
Figure 1
as shown in Figure 2, is available for connecting three-blade
grounding-type plugs to two-slot receptacles. The green grounding
lug extending from the adapter must be connected to a permanent
ground such as a property grounded outlet box. The adapter
should not be used if a three-slot grounded receptacle is available.
NOTE: The adapters ARE NOT supplied with this heater. Read,
follow, and save the instructions that are included with the adapter
Adapter
you choose.
Metal
Screw
LINE CORD SAFETY TIPS
1. NEVER pull or yank on the cord or the appliance.
Grounding
Means
Grounded Outlet
Box Cover
2. To insert plug, grasp it firmly and guide it into the outlet.
Figure 2
3. To disconnect the appliance, grasp the plug and remove it from
the outlet.
4. Before each use, inspect the line cord for cuts and/or abrasion
marks. If any are found, the appliance should be serviced and
the line cord replaced. Please return it to our Service
Department or to an authorized service representative.
5. NEVER wrap the cord tightly around the appliance, as this
could place undue stress on the cord where it enters the
appliance and could cause it to fray and break.
6. DO NOT operate appliance if the line cord shows any damage,
if the appliance works intermittently or stops working entirely.
5
81609-01 R20150420
4
PARTS OF THE HEATER
Parts of the Heater
Symbols
2
1
1. Control Panel
Power Button
2. Safety Grille
H/L Heat Button
3. Remote Control
High Temperature Setting Button
4. Washable Air Filter
Low Temperature Setting Button
5. Power Switch
Timer Button
5
6
3
Figure 3
6. Power Light
(Figure 3)
(Figure 4)
OPERATING INSTRUCTIONS
Operation
1. Place the heater on a firm and level surface.
2. Plug the cord set into a 120 volt AC outlet. Be sure that the
plug fits tightly into outlet. When plugs fit loosely into
receptacles, they may slip partially or completely out of the
receptacle with only the slight movement of the attached cord.
Receptacles in this condition may overheat and pose a serious
fire hazard; if covered by a curtain or drape, the fire hazard is
even greater.
Figure 4
3. Turn on the Power Switch in the rear of the unit. (Figure 5)
Filter Cover
4. There will be a "beep" sound and Power Light will come on
indicating that there is power to the unit. The Power Light will
remain on until Power Switch is turned off. (Figure 5)
5. Turn the heater ON by pressing the Power Button
.
6. Press the
and
buttons at the same time for two
seconds to change the display to show the temperature reading
in Celsius. Press the same two buttons together again to change
the display back to show the temperature reading in Fahrenheit.
Power Switch
7. Upon turning the heater on, the unit will be in HIGH heat.
8. Press the
button to switch over LOW or HIGH heat.
Figure 5
9. To turn the heater OFF, press the Power Button
again.
The unit will turn off the heating elements. Then turn off the
Power Switch in the rear of the unit. Power Light will go out
indicating that the power is shut off. Unplug the unit by pulling the
plug from the electrical outlet.
Timer Function (Figure 6)
The timer function may be activated when the heater display is
in any function. This function allows you to set the length of time
the heater will run before turning itself off, from 0 hour to 12 hours.
"0" means there is no set running time and heater will run
continuously. Pressing the Timer Button
will increase the
length of time by 12 hour each time when this button is pressed.
6
Figure 6
81609-01 R20150420
After the display has shown "12", pressing the Timer Button
one more time will reset the heater to run continuously. The heater
will turn off when the set time has elapsed. The unit can be turned
back on by pressing the Power Button
.
Automatic Temperature Control
1. To set the room at a specific temperature, press the
or
buttons to the desired temperature. The heater is now in Auto
Temperature Mode .
2. The set temperature will show for several seconds and then the
display will return to indicate the current room temperature .
NOTE: The temperature display does not indicate the temperature
of the heated air being delivered by the heater.
3. When the room temperature reaches 2 degrees above the set
temperature, the heater will shut off. When the room temperature
reaches 2 degrees below the set temperature, the heater will turn
back on and continue to cycle off and on to maintain the set
temperature.
NOTE: It is normal for the fan to run for 30 seconds when the
heater shuts off after reaching the set temperature.
Remote Control (Figure 7)
1. The remote control uses two (2) "AA" batteries (not included)
for operation.
2. All the functions performed using the Remote Control work
identically to the Manual Controls.
Note: Change the batteries with new and same types if the
remote control does not operate well. Otherwise your remote
control may not operate properly. Remove the batteries out of the
remote control if you won't use the remote control for a long time.
Remaining batteries may damage your remote control.
Note: Do not mix old and new batteries. Do not mix alkaline,
standard (carbon-zinc), or rechargeable (nickel-cadmium)
batteries.
Battery Disposal - Please dispose of the used battery per
municipal or provincial law.
Figure 7
TIP-OVER SWITCH
This heater is equipped with a safety tip-over switch. This feature
cuts the main power to the heater if it gets knocked over. If the
heater does tip over, simply stand it upright in order to resume
operation.
THERMAL PROTECTION SYSTEM
This heater includes an Overheat Protection System that shuts the
unit off when the unit reaches excessively high temperature. If this
occurs, the heater can only resume its normal operation after
resetting it. To reset the heater:
1. Turn off the power switch in the rear of the unit.
2. Unplug the heater and wait 10 minutes for the unit to cool down.
3. After the 10 minutes, plug the unit in again and operate normally.
7
81609-01 R20150420
MAINTENANCE
1. Press the Power Button
and turn off the power switch in rear
of the unit to turn the heater OFF, unplug the heater before moving
or cleaning.
2. Interior dust can often be removed by using a vacuum cleaner
with a crevice tool attachment.
3. To clean the enclosure, use a clean, soft and lightly damp cloth
to gently wipe off the dirt from the surface of the unit. Be sure not
to wet the Heating Element and the switches. Allow the unit to dry
completely before use.
4. Do not use cleaning liquid or other chemicals to spray on the unit.
5. This heater is equipped with an easy to clean, washable static
filter. Regular cleaning and maintenance of your filter will ensure a
lifetime of trouble-free use.
Turn off heater, then locate the filter at the rear of the heater.
Loosen the 4 screws to remove the filter cover and take the filter
out of the bracket. (Figure 5)
Rinse the filter by spraying warm tap water through the rear
side of the filter (opposite of air intake direction) until the dust
and debris are cleared.
If the filter is extremely dirty or clogged with grease, you can
soak the filter in a mild solution of dish soap (such as Dawn) and
water, then brush with a soft brush and repeat rinsing process.
Shake the filter to remove excess water and lay on clean cloth
or paper towels to dry. Do not use heat source to dry the filter.
Replace the filter in the bracket. Align the holes of the filter cover
and tighten the 4 screws.
NOTE: Never operate heater without filter in place. Without the
filter in place, dust can accumulate on the infrared heaters causing
damage.
STORAGE
1. Perform the cleaning procedures described above.
2. Wipe all parts dry.
3. Pack the heater in a plastic bag and store it in a cool, dry place.
We recommend that you store the heater in its original carton.
TROUBLE SHOOTING
If your heater fails to operate:
Make sure the electrical outlet or circuit breaker is working.
Check for obstructions. If you find an obstruction, turn the
heater OFF, and UNPLUG THE UNIT. Carefully remove the
obstruction and follow the reset instructions.
TECHNICAL SUPPORT
If you have any additional questions or problems with your Hunter
Heater, please call:
USA: 1-888-880-3267
We open 24 hours a day, 7days a week. You may also reach us
online at www.HunterHomeComfort.com.
An electronic copy of this user manual can also be obtained online
at www.HunterHomeComfort.com.
8
81609-01 R20150420
FCC WARNING
FCC WARNING:
Changes or modifications to this unit not expressly approved by the
party responsible for compliance could void the user's authority to
operate the equipment.
NOTE :
This equipment has been tested and found to comply with the
limits for a Class B digital device, pursuant to Part 15 of the FCC
Rules. These limits are designed to provide reasonable protection
against harmful interference in a residential installation. This
equipment generates, uses and can radiate radio frequency energy
and, if not installed and used in accordance with the instructions,
may cause harmful interference to radio communications.
However, there is no guarantee that interference will not occur in
a particular installation. If this equipment does cause harmful
interference to radio or television reception, which can be
determined by turning the equipment off and on, the user is
encouraged to try to correct the interference by one or more of
the following measures:
Reorient or relocate the receiving antenna.
Increase the separation between the equipment and receiver.
Connect the equipment into an outlet on a circuit different from
that to which the receiver is connected.
Consult the dealer or an experienced radio/TV technician for help.
WARRANTY
Hunter Home Comfort makes the following limited warranty to the
user or consumer purchaser of this Hunter heater:
If your Hunter heater motor fails at any time within three years
after the date of sale to you due to a defect in material or
workmanship, labor to repair the defect will be provided free of
charge at our nearest service center or our Service Department
in Marietta, Georgia. You will be responsible for labor costs after
this three years period. The foregoing limited warranty applies
only to the motor itself, and does not apply to electronic controls
such as remote controls, remote control receivers or transmitters
used in conjunction with the motor. These electronic control items
are included in the one year limited warranty below.
ty
9
n
ra
IF THE USER OR CONSUMER PURCHASER CEASES TO
OWN THE HEATER, THIS WARRANTY AND ANY IMPLIED
WARRANTY WHICH THEN REMAINS IN EFFECT, INCLUDING
BUT NOT LIMITED TO ANY IMPLIED WARRANTY OF
MERCHANTABILITY OR FITNESS FOR A PARTICULAR
PURPOSE, ARE VOIDED. NO WARRANTY, EXPRESSED OR
ar
W
If any part of your Hunter heater other than the motor fails at any
time within one year after the date of sale to you due to a defect
in material or workmanship, we will repair or, at our option,
replace the defective part free of charge for parts and labor
performed at our nearest service center or at our Service
Department in Marietta, Georgia.
81609-01 R20150420
ar
W
ra
y
nt
IMPLIED, INCLUDING ANY WARRANTY OF MERCHANTABILITY
OR FITNESS FOR A PARTICULAR PURPOSE, IS MADE IN
RESPECT TO THE GLASS GLOBES OR LIGHT BULBS OR THE
FINISH ON ANY METAL PORTION OF THE HEATER. THIS
WARRANTY IS IN LIEU OF ALL OTHER EXPRESS
WARRANTIES. THE DURATION OF ANY IMPLIED WARRANTY,
INCLUDING, BUT NOT LIMITED TO ANY IMPLIED WARRANTY
OF MERCHANTABILITY OR FITNESS FOR A PARTICULAR
PURPOSE, IN RESPECT TO ANY HUNTER HEATER MOTOR
OR OTHER HEATER PART, IS EXPRESSLY LIMITED TO THE
PERIOD OF THE EXPRESS WARRANTY SET FORTH ABOVE
FOR SUCH MOTORS AND OTHER PARTS.
This warranty is voided if your Hunter heater is not purchased and
used in the USA.
This warranty excludes and does not cover defects, malfunctions
or failures of any Hunter heater which were caused by repairs by
persons not authorized by us, use of parts or accessories not
authorized by us, mishandling, improper installation, modifications,
or damage to the Hunter heater while in your possession, or
unreasonable use, including failure to provide reasonable and
necessary maintenance.
To obtain servicing, contact the nearest Hunter authorized service
center or the Hunter Home Comfort Service Department, 1831-A
West Oak Parkway, Marietta, GA 30062. Please contact us before
shipping your heater to us. If we authorize you to ship it to us, you
will be responsible for all insurance and freight or other
transportation charges to our factory service center. We will return
your Hunter heater freight prepaid. Your heater should be properly
packed to avoid damage in transit since we will not be responsible
for any such damage. Proof of purchase is required when
requesting warranty service. The purchaser must present sales
receipt or other document that establishes proof of purchase.
IN NO EVENT SHALL HUNTER HOME COMFORT BE LIABLE
FOR CONSEQUENTIAL OR INCIDENTAL DAMAGES.
SOME STATES DO NOT ALLOW LIMITATIONS ON HOW LONG
AN IMPLIED WARRANTY LASTS OR THE EXCLUSION OR
LIMITATION OF INCIDENTAL OR CONSEQUENTIAL DAMAGES
SO THE ABOVE LIMITATION MAY NOT APPLY TO YOU.
THIS WARRANTY GIVES YOU SPECIFIC LEGAL RIGHTS AND
YOU MAY ALSO HAVE OTHER RIGHTS WHICH VARY FROM
STATE TO STATE.
1831-A West Oak Parkway, Marietta, GA 30062
Hunter is a trademark of the Hunter Fan Company and
is used under license to Hunter Home Comfort.
Printed in China
10
81609-01 R20150420