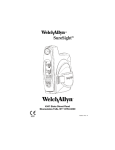
1
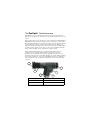
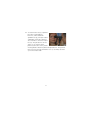
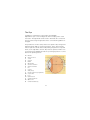
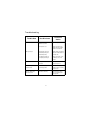
PanOptic™ Ophthalmoscope
118 Series
Directions
for use
Patent information
For patent information, please visit www.welchallyn.com/patents.
©2013 Welch Allyn, Inc. To support the intended use of the product
described in this publication, the purchaser of the product is permitted to
copy this publication, for internal distribution only, from the media provided
by Welch Allyn.
ii
Table of Contents
Symbols . . . . . . . . . . . . . . . . . . . . . . . . . . . . . . . . . . . . . . . .1
Warnings and Cautions . . . . . . . . . . . . . . . . . . . . . . . . . . . .2
The PanOptic™ Ophthalmoscope . . . . . . . . . . . . . . . . .4
Set-up Instructions. . . . . . . . . . . . . . . . . . . . . . . . . . . . . . . .5
Conducting an Examination with the PanOptic
Ophthalmoscope . . . . . . . . . . . . . . . . . . . . . . . . . . . . . . . . .7
Apertures and Filters . . . . . . . . . . . . . . . . . . . . . . . . . . . . .12
The Eye . . . . . . . . . . . . . . . . . . . . . . . . . . . . . . . . . . . . . . .14
Lamp Replacement Instructions . . . . . . . . . . . . . . . . . . . .15
Repairs . . . . . . . . . . . . . . . . . . . . . . . . . . . . . . . . . . . . . . . .16
Cleaning and Disinfection . . . . . . . . . . . . . . . . . . . . . . . . .16
Troubleshooting . . . . . . . . . . . . . . . . . . . . . . . . . . . . . . . . .17
Accessory and Replacement Parts List . . . . . . . . . . . . . . .19
Welch Allyn Technical Support: . . . . . . . . . . . . . . . . . . . . .20
PanOptic Ophthalmoscope Warranty . . . . . . . . . . . . . . . .20
Specifications. . . . . . . . . . . . . . . . . . . . . . . . . . . . . . . . . . .21
iv
Symbols
Attention. Read Operating Manual for Cautions and Instructions for Use.
Type BF applied part
Meets essential requirements of European Medical Device Directive 93/
42/EEC
Reorder number
Product Identifier
Manufacturer & Date of Manufacture (YYYY-MM-DD)
Professional use only
Consult operating instructions
Batch code
1
Authorized representative in the European Community
Global Trade Item Number
Warnings and Cautions
WARNING: The light emitted from the ophthalmoscope is
potentially hazardous. The longer the duration of exposure, the
greater the risk of ocular damage. Exposure to light from this
instrument, when operated at maximum intensity, will exceed
the safety guideline after 13 minutes when lit with a LED lamp
(blue base). Exposure times are cumulative for a 24-hour
period.
WARNING: When using Halogen illumination, no acute optical
radiation hazards are identified. However, Welch Allyn
recommends limiting the intensity of the light directed into the
patient’s eye to the minimum level that is necessary for
diagnosis. Infants, aphakes, and persons with diseased eyes
are at a greater risk. The risk is also increased if the examined
person has had any exposure with the same instrument or any
other ophthalmic instrument using a visible light source within
the previous 24 hours. This will apply particularly if the eye has
had exposure to retinal photography. The intended use of this
device is for routine ophthalmic exams on the order of typically
less than 60 seconds per eye. Although there is a benefit
versus risk factor in any medical procedure, these more
complicated exams should not exceed a three minute exam
time in 24 hours. Significant use of this device beyond its
intended use is not recommended; it may cause harm to the
eyes.
2
WARNING: To minimize lamp housing temperatures, ontime should not exceed 2 minutes with off-time not less than
10 minutes.
WARNING: Use only PanOptic Patient Eyecups with this
product.
WARNING: Rx only (for professional use).
WARNING: Lamps may be hot. Lamp should be allowed to
cool before removal.
WARNING: Equipment not suitable for use in the presence
of a flammable anesthetic.
Caution: Halogen lamps are pressurized to provide
maximum efficiency and illumination. Mistreatment may
cause shattering. Protect lamp surface against abrasion and
scratches. Verify power is off when replacing lamp. Dispose
of lamp with care.
Note
A graph of the relative spectral output of the instrument is
available upon request.
3
The PanOptic™ Ophthalmoscope
Transparency of the cornea, lens and vitreous humor permits the
practitioner to directly view arteries, veins, and the optic nerve of the
retina.
Direct observation of the structures of the fundus through a PanOptic
Ophthalmoscope may show disease of the eye itself or may reveal
abnormalities indicative of disease elsewhere in the body. Among the
most important of these are vascular changes due to diabetes or
hypertension and swelling of the optic nerve head due to papilledema
or optic neuritis. In this sense, the eye serves as a window through
which many valuable clinical evaluations may be made.
When a preliminary diagnosis of an imminently dangerous eye
condition, such as acute (angle-closure) glaucoma or retinal
detachment, is made by the examiner, prompt referral to an eye
specialist may prevent irreversible damage. Or, when distressing but
less urgent conditions, such as visual impairment due to cataract or
vitreous floaters, are recognized, the patient can be reassured and
referred.
A
F
B
E
C
D
A
Patient Eyecup
D
Aperture/Filter Dial
B
Patient’s Side
E
Focusing Wheel
C
Soft Grip Handle
F
Practitioner’s Side Brow Rest
4
Set-up Instructions
Attaching the Pan Optic
Ophthalmoscope head to a Welch
Allyn Power Source
Align cutouts in the PanOptic
Ophthalmoscope base with lugs on
power source. (The PanOptic
Ophthalmoscope fits all 3.5v Welch
Allyn power sources.) Push in slightly
and turn 90 degrees.
TURN HANDLE
COUNTERCLOCKWISE
Attaching the Patient Eyecup to PanOptic
WARNING: Use only PanOptic Patient Eyecups with this
product.
Insert eyecup into the patient’s side of
the instrument. Push and twist in one
motion until you feel the two “lock”
together.
TWIST
See “Accessory and Replacement
Parts List” on page 19 to reorder new
PanOptic Patient Eyecups.
5
Attaching Corneal Viewing Lens to PanOptic (Model 11820 only)
Insert Corneal Viewing Lens into patient’s side of the instrument. Push
and twist in one motion until you feel the two “lock” together as
shown on page 5, except replacing Patient Eyecup with the Corneal
Viewing Lens. Verify that the line on the lens housing is aligned with
the top seam of the PanOptic instrument.
6
Conducting an Examination with the PanOptic
Ophthalmoscope
1.
To examine the right eye, stand or sit to the patient’s right side.
2.
Remove Spectacles (preferred,
but not required).
3.
Look through the scope (from
the doctor’s side) with your
thumb on the focusing wheel.
Focus the scope on an object
roughly 15 feet away. (This
procedure will make any
adjustments for your own eye’s
corrective needs.)
4.
Start with the small aperture
(green line position on the
aperture dial).
7
5.
Turn the scope on (using any
Welch Allyn 3.5V power source).
Adjust light intensity rheostat to
desired position.
You are now ready to begin the examination:
6.
Examiner should be positioned
approximately 15 degrees to the
temporal side of the patient.
7.
Instruct the patient to look straight
ahead at a distant object.
8.
Begin from about 6 inches away,
looking through the scope and
shining the light at the patient’s
eye while looking for the red
retinal reflex.
9.
Rest your left hand on the
patient’s forehead. (optional)
8
10. Slowly follow the red reflex toward
the patient and into the pupil. Get
as close as possible for the
optimum view (the eyecup should
contact the patient’s brow).
11. Once you have a stable view of the
fundus rotate the focusing wheel
until you have a crisp view of the
optic disc and the vessels
surrounding it.
Note:
For the largest view, compress
the eyecup halfway against the
patient’s brow. This enables
the user to view the entire
optic disc plus many
surrounding vessels (about 25°
field of view) at one time.
9
12. Examine the optic disc for clarity of
outline, color, elevation and
condition of the vessels. Follow
each vessel as far to the periphery
as you can. To locate the macula,
focus on the disc, then move the
light approximately one (1) disc
diameter temporally. You may also
have the patient look at the light of
the ophthalmoscope, which will automatically place the macula in
full view. Examine for abnormalities in the macular area. The redfree filter facilitates viewing of the center of the macula, or the
fovea.
13. To examine the extreme periphery instruct the patient to:
A
B
C
D
look up for examination of the superior retina
look down for examination of the inferior retina
look temporally for examination of the temporal retina
look nasally for examination of the nasal retina.
This routine will reveal almost any abnormality that occurs in the
fundus.
10
14. To examine the left eye, repeat the
procedure outlined above.
However, unlike traditional
ophthalmoscopy, a unique feature
of PanOptic is that the examiner
does not have to switch to his/her
left eye. The practitioner can use
either eye to examine either
patient eye because of the greater
working distance between patient and practitioner. This permits
those who are strongly dominant in one eye to always use that
eye in the fundus exam.
11
Apertures and Filters
There is a wide range of practical apertures and filters to select from:
small spot, large spot, micro spot, slit aperture, red-free filter, cobalt
blue filter (optional), and half-moon aperture (optional).
1.
Small Aperture: Provides easy view of the fundus
through an undilated pupil. Always start the examination
with this aperture and proceed to micro aperture if pupil is
particularly small and/or sensitive to light. This position is
the “Home” position on the aperture dial and is denoted
by the green marking.
2.
Large Aperture: Standard aperture for dilated pupil
examination of the eye.
3.
Micro Spot Aperture: Allows easy entry in very small,
undilated pupils.
4.
Slit Aperture (Models 11810, 11820 only): Helpful in
determining various elevations of lesions, particularly
tumors and edematous discs.
5.
Red-Free Filter (Model 11810, 11820 only): This filter
excludes red rays from the examination field: this is
superior to ordinary light in viewing slight alterations in
vessels, minute retinal hemorrhages, ill-defined exudates and
obscure changes in the macula. The nerve fibers become visible
and the observer may note the disappearance of such fibers, as in
optic nerve atrophy. The background appears gray, the disc
appears white, the macula appears yellow, the fundus reflex is
intense and the vessels appear almost black. This filter is also
12
used to help distinguish veins from arteries; veins stay relatively
blue, but oxygenated arterial blood makes arteries appear blacker.
This greater contrast makes differentiation easier for the
examiner.
6.
Cobalt Blue Filter (Model 11820 only): In conjunction
with fluorescein dye applied topically to the cornea and an
add-on magnifying lens (included), this filter is helpful in
detecting corneal abrasions and foreign bodies. In this
way, it can be used as a surrogate to a Woods Light.
7.
Half-Moon Aperture (11810 Only): Provides a
combination of depth perception and field-of view.
13
The Eye
In addition to examination of the fundus, the PanOptic
Ophthalmoscope is a useful diagnostic aid in studying other ocular
structures. The light beam can be used to illuminate the cornea and
the iris for detecting foreign bodies in the cornea and irregularities of
the pupil.
The practitioner can also easily detect lens opacities by looking at the
pupil through an add-on corneal viewing lens. In the same manner,
vitreous opacities can be detected by having the patient look up and
down, to the right and to the left. Any vitreous opacities will be seen
moving across the pupillary area as the eye changes position or comes
back to the primary position.
A)
B)
C)
D)
E)
F)
G)
H)
I)
J)
K)
L)
M)
N)
O)
P)
Q)
R)
Macula
Vitreous humor
Sclera
Choroid
Retina
Ora Serrata
Canal of Schlemm
Anterior chamber
Iris
Cornea
Ciliary body
Zonule (Suspensory Ligament)
Conjunctiva
Lens
Hyaloid canal
Central retinal vein
Optic nerve
Central retinal artery
14
Lamp Replacement Instructions
WARNING: Lamps may be hot. Lamp should be allowed to
cool before removal. Use only Welch Allyn model 03800-U
or 03800-LED lamps with this product.
Caution: Halogen lamps are pressurized to provide
maximum efficiency and illumination. Mistreatment may
cause shattering. Protect lamp surface against abrasion and
scratches. Verify power is off when replacing lamp. Dispose
of lamp with care.
Use your fingernail or a
small prying instrument
to remove the lamp from
the ophthalmoscope
head base.
ALIGNTAB
15
To insert the new lamp,
align tab on lamp with
notch in the base of the
ophthalmoscope head
and push inward until
firmly seated.
Repairs
Repairs should be performed at the factory.
Cleaning and Disinfection
Lenses: PanOptic is a precision optical instrument. Do not use any
solvent-based cleaners on the lenses. Use only a clean optical grade
cloth to clean the lenses.
Housing: Wipe the PanOptic housing with an appropriate health care
low- or intermediate-level cleaner/disinfecting wipe that incorporates
either a 1:10 sodium hypochlorite (bleach) solution or isopropyl alcohol
as the active disinfection ingredient. Follow wipe manufacturer’s
instructions for appropriate use, contact times and applicable
warnings and precautions.
Do not excessively saturate the PanOptic.
Do not immerse PanOptic in any solution.
Do not sterilize the PanOptic.
After disinfection, inspect the PanOptic for visible signs of
deterioration. If evidence of damage or deterioration is present,
discontinue use and contact Welch Allyn or your area representative.
Patient Eyecup: Wipe the Patient Eyecup with an appropriate health
care low- or intermediate-level cleaner/disinfecting wipe that
incorporates isopropyl alcohol as the active disinfection ingredient or
soak in a glutaraldehyde-based solution. Follow product
manufacturer’s instructions for appropriate use, contact times and
applicable warnings and precautions.
Patient Eyecup can be autoclaved.
Do not use acetone based products or other harsh chemicals.
No other preventative maintenance is necessary for this product.
16
Troubleshooting
Trouble Area
Possible Cause
Corrective
Action
Aperture dial is inbetween positions
Rotate the aperture dial.
Lamp burned out.
Replace the lamp using
Welch Allyn part number
03800-U or 03800-LED.
Wrong lamp/ incorrect
Welch Allyn lamp/nonWelch Allyn lamp.
Replace lamp using Welch
Allyn part number 03800-U
or 03800-LED
The battery handle has
completely discharged.
Charge the handle, check
the battery, and/or the
charger.
Spot is not centered.
The aperture dial is not
centered.
Move aperture dial to the
full detent position.
Not achieving full or
expected view.
Unit is not in proper
operating position.
Ensure that the eyecup is
slightly compressed during
the procedure.
Can not obtain sharp
focus/hazy view.
The lenses are dirty.
Clean the lenses with a
clean/soft optical grade
cleaning cloth.
No Light output
17
Trouble Area
Possible Cause
Corrective
Action
Lamp pin not engaged in
slot.
Insert the lamp with pin
firmly seated in slot.
Film on Optics.
Clean the lenses with a
clean/soft optical grade
cleaning cloth.
The handle is not fully
charged.
Charge the handle, check
the battery and/or the
charger.
Glare in view
Fingerprints or dirt on the
objective (Patient’s Side)
lens.
Clean the objective
(Patient’s Side) lens with a
clean/soft optical grade
cleaning cloth.
Cannot attach to power
handle.
Lamp is not fully inserted.
Insert the lamp with pin
firmly seated in slot.
Dim Light Output
18
Accessory and Replacement Parts List
1
5
3
OR
2
4
Item
No.
Description
Product #
1
Corneal Viewing Lens
(model no. 11820 only)
11875
2
Patient Eyecups (Package of five (5) each
118092)
11870
3
Patient’s Side Bumper
118051
4
Lamps
03800-U or
03800-LED
5
Chrome Ring
118027
6
Practitioner’s Side Brow Rest
118052
19
6
Welch Allyn Technical Support:
http://www.welchallyn.com/about/company/locations.htm
PanOptic Ophthalmoscope Warranty
Welch Allyn, Inc. warrants the No. 11810, 11820 PanOptic
Ophthalmoscope to be free of original defects in material and
workmanship and to perform in accordance with manufacturer’s
specifications for a period of one year from the date of purchase. If
this instrument or any component thereof is found to be defective or
at variance with the manufacturer’s specifications during the warranty
period, Welch Allyn will repair or replace the instrument or
component(s) at no cost to the purchaser.
This warranty only applies to instruments purchased new from Welch
Allyn or its authorized distributors or representatives. The purchaser
must return the instrument directly to Welch Allyn or an authorized
distributor or representative and bear the costs of shipping.
This warranty does not cover breakage or failure due to tampering,
misuse, neglect, accidents, modification or shipping, and is void if the
instrument is not used in accordance with manufacturer’s
recommendations or if repaired or serviced by other than Welch Allyn
or a Welch Allyn authorized representative.
No other express or implied warranty is given.
20
Specifications
Model Number
11810 PanOptic Ophthalmoscope without Cobalt Blue Filter
11820 PanOptic Ophthalmoscope with Cobalt Blue Filter and Addon Corneal Viewing Lens
Dimensions
5.125”L x 1.4”W x 3.750”H without eyecup
Eyecup 1.45”L
Weight
.48 lbs without eyecup
.50 lb with eyecup
Conforms with
IEC/UL/CSA/EN 60601-1
ISO 10943
Equipment Classification
IPXØ
Equipment not protected against the ingress of water.
Environment
Temperature limitation
Operating: 59°F (10°C) -104°F (49°C)
Transport/storage: -4°F (-20°C ) - 120°F (55°C)
Humidity limitation
Operating: 30% - 90%
Transport/storage: 10% - 95%
Atmospheric pressure limitation
500 hPa - 1060 hPa
21
22
23
Welch Allyn, Inc.
4341 State Street Road
Skaneateles, NY 13153-0220
Tel: (800) 535-6663
www.welchallyn.com
Regulatory Affairs Representative
Welch Allyn Limited
Navan Business Park
Dublin Road
Navan, County Meath,
Republic of Ireland
Printed in U.S.A.
Material No. 720127 Rev. A
24