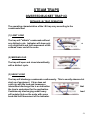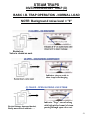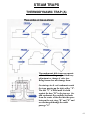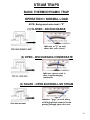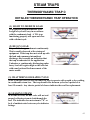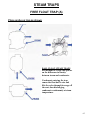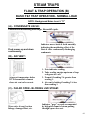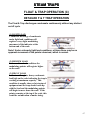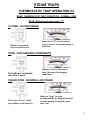
1
ELECTRONICS FOR INDUSTRY, INC.
DETECTION TOOLS
Model EI-500 Leak Detector
Model EI-300 Stethoscope
Pistol Style Detector
Used in:
Model W-7
Model EI-701L
Model EI-701S
1
Electronics For Industry, Inc.
6850 SW 79 Terrace
South Miami, Florida 33143-4440
305-233-1640 voice
305-666-4185 fax
[email protected] e-mail
www.e4i.com web site
Version NOV2010
User manual
Introduction to and Applications
For:
Ultrasonic Testing
Ultrasonic Tools
Their
Uses and Applications
Everything you always wanted to know about ultrasound
and ultrasonic detection and probably a lot of stuff you
really did not want to know.
2
INDEX
SECTION 1 - QUICK START
This section is for those who are familiar with Ultrasound
characteristics and have some familiarity with Ultrasonic
Testing Tools.
If you are new to Ultrasound and Ultrasonic Testing Tools
please first read the information on Ultrasound and
Ultrasonic tools which can be found in later sections.
It is suggested that you read the detailed information
sections before continuing and then return to the quick start
instructions.
PAGE
SECTION 1 - QUICK START
5
PISTOL STYLE LEAK DETECTOR
TUBULAR STYLE LEAK DETECTOR
TONE GENERATOR
PISTOL STYLE STETHOSCOPE
TUBULAR STYLE STETHOSCOPE
page 5
page 6
pages 7 & 8
page 9
SECTION 2 – KIT DESCRIPTION AND OPERATION
11
GENERAL DESCRIPTION OF KITS
page 11
KIT CONTENTS
pages 11 to 14
TECHNICAL SPECIFICATIONS
page 15
WARRANTY AND REPAIR INFORMATION page 16
CERTIFICATE OF CALIBRATION
page 17
SECTION 3 – INTRODUCTION TO ULTRASOUND
18
INTRODUCTION TO ULTRASOUND pages 18 to 22
ULTRASONIC LEAK DETECTION
pages 23 & 24
INTERFERENCE SOURCES AND SOLUTIONS
page 24
COMMON SOURCES OF INTERFERENCE page 26
ADVANCED DETECTION METHODS AND STUBBORN LEAKS page 27
SECTION 4 – USES & APPLICATIONS
28
USES AND APPLICATIONS FOR
THE ULTRASONIC TOOLS pages 28 to 34
3
SECTION 5 – MECHANICAL ULTRASONICS
35
ROTATING EQUIPMENT pages 35 to 38
GEARS, PUMPS AND MOTORS pages 39 to 41
SECTION 6 – ELECTRICAL
42
ELECTRICAL EQUIPMENT ANALYSIS USING ULTRASOUND (42-44)
SECTION 7 - STEAM TRAPS AND VALVES
45 to 50
STEAM TRAPS, GENERAL
EVALUATION, TESTING AND MAINTENANCE OF STEAM TRAPS
VALVES
SECTION 8 - STEAM TRAPS IN DETAIL
50 to 70
SPECIAL SECTION ON STEAM LOSS
(TRAP ANALYSIS AND READINGS USING THE ELECTRONICS FOR
INDUSTRY, Inc. PISTOL TYPE DETECTOR. SHOWING TYPICAL
METER READINGS AND SOUND PATTERNS.)
SECTION 9 – STEAM LOSS AND COST CHARTS
71 to 75
COST OF STEAM, TABLES AND CHARTS
SECTION 10 – BENEFITS OF THESE TOOLS
76 to 87
TOOL COST AND PAYBACK ANALYSIS. AIR LEAK CHARTS PLUS
A SPEECH GIVEN AT AMER. SOC. OF NON DESTRUCTIVE TESTING.
SECTION 11- FEATURES AND PRICE COMPARISONS
88
COMPETITIVE EQUIPMENT, COMPARISON AND PRICING.
SECTION 12–SPECIFIC USES AND APPLICATIONS 89 to 104
PRINTABLE SHEETS FOR INDIVIDUAL APPLICATIONS AND USES.
SECTION 13 - WHERE TO GET MORE INFORMATION
105
WEB LINKS TO PUBLISHED INFORMATION ON LEAK DETECTION
AND LEAK DETECTORS.
SECTION 13 – ADDENDUM
LAST MINUTE CHANGES AND ADDITIONS.
106
PLEASE CHECK HERE FOR ADDED INFORMATION.
4
SECTION 1 - QUICK START
OPERATION AS A LEAK DETECTOR
Pistol Style Detector
Insert the Leak Detection Module (the one with the grill opening at the front)
into the recessed front of the Detector body. Be sure that both connector
pins line up with the receptacles and that the Module seats fully in the recess.
Plug the headset cord connector into the receptacle in the bottom of the
“grip” of the gun. You are now ready to search for leaks of any gas or vapor
that is under pressure or vacuum.
To remove the Leak Detector module, pull it straight out from the pistol body
and store it in the storage slot in the die cut foam.
To search for leaks
1) Turn the Volume-Sensitivity control located on the underside of the pistol
just forward of the trigger all the way up. (a reading of 10 on the dial)
2) Hold the unit as you would any gun.
3) Depress and hold the trigger to turn on the detector.
4) Scan the area of possible leaks with the “muzzle” of the gun.
A leak sounds like a rushing sound in the headset accompanied by an
increase in the meter reading. As you approach a leak, the rushing sound
becomes louder and the meter reading continues to increase. A scanning or
sweeping back and forth motion of the muzzle helps pinpoint exact location
of the leak. As you approach the leak continuously reduce the sensitivity
using the knob just forward of the trigger to enable exact pinpointing of the
leak.
To demonstrate the approximate sound of a leak and the reaction of the
meter to it, hold your free hand in front of the detector and briskly rub your
fingers and thumb together, the resulting noise heard in the headset is from
the ultrasonic noise generated by the friction at your finger tips.
If the meter jumps too rapidly and bangs against the full-scale side of the
meter it may be desirable to reduce the meter sensitivity. Meter sensitivity is
adjusted by inserting the adjusting tool (small red screwdriver which came
with the kit) into the hole on the left side of the pistol body and setting the
desired meter sensitivity. This adjustment does not affect the detection
ability of the unit, only the meter sensitivity.
5
The leak detector is directional and you can follow it directly to a leak. As
you approach a leak point the meter may remain at full scale and/or you will
not be able to hear a difference in the sound level. When this occurs, start
reducing the sensitivity to keep the meter on scale. Continually reduce the
sensitivity until the leak point is pinpointed. If it is still too sensitive you can
additionally reduce the sensitivity by turning the module sensitivity
adjustment located on the top of the black module itself counterclockwise
using the black plastic screwdriver which came with the detector kit.
At times it may be desirable to restrict outside interfering ultrasonic noises or
to increase the directivity of the unit. To do this, slip the Rubber Focusing
Extension onto the front of the Leak Detection module. This also assists in
picking up sounds of a small leak in inaccessible locations such as on the
rear side of pipe fittings. It also allows one to drag the rubber font end
opening along seams and seals without creating a lot of interfering ultrasonic
noise.
As a reminder, the knob controls overall sensitivity of the detector, both
headset volume and the meter circuitry. To obtain near repeatability of
readings, both the knob and the meter sensitivity settings must be the same
as during previous tests. As a general rule, once the detector has been in
use for a short period of time, the meter sensitivity is seldom touched. You
will very quickly find a setting that is satisfactory for almost all your uses.
If when using your leak detector you find the unit is too sensitive, (the meter
remains at full scale), when the volume sensitivity knob is all the way down,
sensitivity can be reduced further by reducing the sensitivity of the Leak
Detector Module itself by adjusting the potentiometer located in the module
itself. Use the black plastic screwdriver supplied with your kit to turn down
the control through the hole on the top side of the module just forward of the
red housing until the meter remains on scale or until the desired sensitivity is
set.
Tubular Style Detector
Finding leaks with the Tubular Style detector is the same as when using the
Pistol Style detectors. The difference is that the tubular units do not have a
meter nor do they have plug in front end units, they are complete and self
contained. The rotary control on the top of the unit is the on off and
sensitivity control. After plugging a headset into the receptacle on the rear of
the detector you then rotate the control forward to turn it on and set the
sensitivity and volume level. Now the search is the same as described above.
Be sure to turn the unit off when not in use to conserve battery power. The 9Volt battery is located under the cover toward the rear of the detector unit.
Unscrew the two slotted head machine screws to access the battery.
6
TONE GENERATOR USE
To locate openings or leaks in systems not under pressure or vacuum, such
as wind or water leaks in vehicles, leaks around doors, windows, or roofs of
buildings, or leaks in vessels, chambers, containers or volumes, use the
Tone Generator.
The Tone Generator produces high intensity ultrasonic energy, which is
heard as a tone by your ultrasonic detector. Ultrasonic sound, like all sound,
will not penetrate a solid but will find its way through openings, cracks and
crevices.
The Tone Generator should be placed inside the enclosure. The interior
becomes “filled” with high frequency sound, which will leak through any
openings. Scan the surface, seams and seals with the detector, using the
leak detector module. Anywhere there is a leak the tone will be heard. As
stated before the leak source is the loudest point and as you approach the
source you may need to reduce sensitivity in order to pinpoint the exact spot.
Do not point the detector directly at the tone generator as the energy is so
intense it my block the detector, it will not harm the detector but you will not
hear any tone.
To test the Tone Generator, turn it on and point the detector away from the
Tone Generator when pulling the trigger on the detector.
The ultrasound produced by the Tone Generator is quite intense and can
cause a “Drum Head” type of transmission of energy if the enclosure is a thin
material, you can dampen this with a rag pressed lightly against the outer
side of the “can” being sure not to cover seams or seals.
Ultrasound will not pass through a solid so the “leak channel” must be dry as
water in the air path appears as a solid to the ultrasound. This is especially
true when looking for leaks in automobile windshields or roof leaks.
The following diagrams are examples of how the tone generator is used to
find leaks in various types of volumes but is by no means a complete list of
its uses.
7
Tone generator capacity for a closed
volume with hard reflective surfaces
and no blocking obstructions such as
baffles is approximately 1500 cubic feet
and is omni directional.
Tone
Leakage
Note: Additional transmitters can be
added to extend coverage.
Directional Application:
When a tone generator is placed with
emissions directed towards a surface
area to be tested the total volume is not
a consideration but you should aim the
generator at the general area being
inspected.
Multiple tone generators can be placed
so as to cover a larger area or multiple
areas.
One use here is for seams, seals,
gaskets, doors or window openings.
8
OPERATION AS A MICROSONIC STETHOSCOPE
Pistol Style Stethoscope Detector
Insert the Stethoscope Module (the one with the metal probe extending from
the front) into the recessed front of the Detector body. Be sure that both
connector pins line up with the receptacles and that the Module seats fully in
the recess. Be sure the metal probe is screwed into the front of the module
only “finger tight”. Over tightening could result in internal damage to the
Stethoscope Module.
Sensitivity adjustments and calibration are essentially the same as described
above for Leak Detector use with the following added stethoscope only
adjustment.
If when using your stethoscope you find the unit is too sensitive, (the meter
remains at full scale), when the volume sensitivity knob is all the way down,
sensitivity can be reduced further by reducing the sensitivity of the
Stethoscope Module itself by adjusting the potentiometer located in the
module itself. Use the screwdriver supplied with your kit to turn down the
control through the hole on the side of the module until the meter remains on
scale.
The Microsonic Stethoscope will detect internal sounds in the ultrasonic
range. It does not detect the sounds that the ear can hear, or other low
frequency sounds, such as a heartbeat. The friction between moving parts of
machinery generates ultrasonic sound. As a general rule, the ultrasonic
sound is very similar to the low frequency sound heard by your ears, a mirror
image but displaced in frequency. If you touch the probe to the case of a
mechanical watch, for example, the ticking sound is similar to that heard with
the unaided ear. The sound from the stethoscope, however, has much better
“definition”. Minute sounds are present that was not noticed before.
The stethoscope is detecting sound generated by the friction of the parts
rubbing together, and not just the clicking sounds of the escapement, or gear
wheels meshing.
9
As wear begins in machinery, ultrasonic sound from increasing friction is
building up long before the unaided ear can hear it. The Stethoscope is
valuable because of this. It forewarns you. The repair or maintenance can be
carried out at a more convenient time; rather than waiting for failure that
always occurs at the most inopportune time. Furthermore, damage is often
more severe during later stages of failure.
Since high frequency vibrations do not radiate as much as low frequency
vibrations, use of the Microsonic Stethoscope allows you to more readily
screen out some sounds and pay particular attention to others.
Internal flow can be heard with the Stethoscope to detect turbulence or
blockage in lines or process flow. It is easy to tell if a valve has shut
completely, is leaking, or bypassing. You can hear the action of the valve and
the flow. As the valve closes completely, flow ceases. If the valve stops
moving as if closed, and flow is still heard, the valve has not seated and
sealed properly.
The Ultrasonic Stethoscope is the tool of choice for detecting bad or
malfunctioning steam traps.
When using a grease gun to lubricate bearings, the stethoscope should be
placed on the housing in the vicinity of the bearing as the grease is added.
As you add grease the sound will continuously diminish until the optimum
grease point is reached, adding more grease will cause the sound to increase
and should be avoided as over greasing is as destructive as not greasing a
bearing. The Magnetic Stethoscope Module in combination with the Holster
makes this operation easier for a person working alone.
Tubular Style Stethoscope
Finding mechanical troubles with the Tubular Style Stethoscope is the same
as when using the Pistol Style Stethoscope. The difference is that the tubular
units do not have a meter nor do they have plug in front end units, they are
complete and self contained. The rotary control on the top of the unit is the
on off and sensitivity control. After plugging a headset into the receptacle on
the rear of the detector you then rotate the control forward to turn it on and
set the sensitivity and volume level. Now the search is the same as
described above for the Pistol Style Stethoscope. Be sure to turn the unit off
when not in use to conserve battery power. The 9-Volt battery is located
under the cover toward the rear of the detector unit. Unscrew the two slotted
head machine screws to access the battery. An additional sensitivity control
us located under the battery to further reduce sensitivity of you find the unit
too sensitive.
10
SECTION 2 - EFI DETECTION KITS
GENERAL DESCRIPTION OF THE KITS
DESCRIPTION (pictures follow the description pages)
In general an EFI pistol type detection kit is comprised of the EI-701 detector
body, a plug in probe (either LM-1 or SM-1) and a headset, either a lightweight
headset or deluxe headset (customers’ choice). The tubular detectors
(shown below) consist of the detector body and headset.
DELUXE HEADSET: The deluxe headset is designed to aid in reduction of
outside noises. The headband is usually worn over the top of the head but
may be worn at the back of the head to help accommodate a hardhat. The
earmuffs cover the ear and fit snugly against the head to block interfering
sound leakage.
LIGHTWEIGHT HEADSET: The lightweight headset (shown with tubular
detectors) is designed to be worn with the tubular band under the chin, this
allows for the wearing of a hard hat if necessary. Firmly placing the ear
elements in the ear will also provide for reduction of outside noises.
It is highly recommended that you use the headset when using your detector.
Listening as well as keeping your eyes on the meter, as much as is safe,
makes a search easier. The additional information you get, frequency,
repetition rate, and sound discrimination makes locating and pinpointing
problem areas much quicker. The meter displays only the sum of all the
sounds. However, use of the headset is not absolutely necessary; the
headset does not even have to be plugged in for operation of the pistol style
detector.
11
PISTOL STYLE DETECTORS
12
TUBULAR STYLE DETECTORS
EI-500 Leak Detector
KIT CONTENTS
13
KIT CONTENTS
MODEL W-7 "Microsonic Detection Kit" consists of the Pistol Style
Detector, Leak Detection Plug in Module, Stethoscope Plug in Module,
Rubber Focusing Extension, Tone Generator, Deluxe Headset, Carrying Case,
Stethoscope Sensitivity & Meter Adjust tools, This manual on a CD and
batteries.
MODEL W-5 "Wind Noise Test Set" consists of the EI-500 Tubular Style
Detector, Tone Generator, Rubber Focusing Extension, Headset (Specify
Light-Weight or Deluxe), and carrying case or carrying pouch depending on
which headset option is selected.
INDIVIDUAL DETECTOR UNITS
MODEL EI-701L "Microsonic Leak Detector" consists of the Pistol Style
Detector with a Leak Detector Plug In Module and Deluxe Headset.
MODEL EI-701S "Microsonic Stethoscope " consists of the Pistol Style
Detector with a Stethoscope Plug In Module and Deluxe Headset.
MODEL EI-500 " Microsonic Leak Detector" consists of the Tubular Style Leak
Detector, a Headset (Choice of Light-Weight or Deluxe), and a carrying case if
the Deluxe Headset is chosen or pouch if the Light-Weight headset is chosen.
MODEL EI-300 "Microsonic Stethoscope" consists of the Tubular Style
Stethoscope unit, a Headset (Choice of Light-Weight or Deluxe), and a
carrying case if the Deluxe Headset is chosen or pouch if the Light-Weight
headset is chosen.
There are several accessory items that are available such as:
TTG-2 'Tubular Tone Generator" for inserting a
tone into pipes or other such small opening
spaces.
H-1 "Pistol Holster" which allows the pistol detectors to be
worn on a belt. The holster has an additional pouch so
that a second module may be stored in it.
14
MSM-1 "Magnetic Stethoscope Module". A module that plugs into the front
end of the Pistol Style Detector with a five foot cord
leading to the actual Stethoscope Module which has a
rare-earth magnet assembly on the front to allow it to
be magnetically attached to the piece of machinery
being listened to. This is especially useful when the
operator needs both hands free such as when using a
grease gun to inject grease in a bearing and listening for the lowest sound
point which indicates the optimal grease point.
PK-1 "Probe Extension Kit". Three 12 inch extension
rods to extend the reach of the Stethoscope units.
Technical Specifications
Item
Weight
Housing
Length
Width
Power
Pistol Style Detector
1.5 Lbs.
Plastic
8"
2.75"
(1) 9V
Leak Detector
Module LDM-1
1.2 oz
Molded
Nylon
2.5"
1.5"
N/A
Stethoscope
Module SM-1
1.5 oz
Molded
Nylon
6.35"
1.5"
N/A
TG-2 Tone Generator
6.3 oz
ABS-T1000 Plastic
5.5"
2.5"
(4) 1.5V AA
Rubber Focusing
Extension RFE-1
2.1 oz
Rubber
Polymer Mix
8.5"
1.5"
N/A
Probe Extension
Kit PK-1
2.5 oz
Aluminum
12" to 36"
-
-
Tubular Style
Detector
6.1 oz
Aluminum
8.5"
1.25"
(1) 9V
Deluxe Headset
DH-1
9.2 oz
Molded Plastic
-
-
-
Light Weight
Headset SH-1
0.7 oz
-
-
-
Large Carrying
Case CC-800
1.5 Lbs.
-
-
Operating frequency
Operating Range
Sensitivity:
Intrinsically Safe:
Output:
Molded Plastic
Cordura
Case
14"
35 KHz to 45 KHz
40 + Feet
"Hear" pressure leaks of .001 @ 3 psi
Class 1, Division 1, Groups B, C & D
Audio/Visual
15
Safety Ratings
The EI-300, EI-500 and TG-2 have been rated intrinsically safe, and designed to
meet FM approval for Class 1, Division 1, Groups B, C & D when used with
standard carbon zinc batteries. The 701 (Pistol style) has been rated intrinsically
safe, and designed to meet FM approval for Class 1, Division 1, Groups C & D
when used with standard carbon zinc batteries.
EFI Detectors have been in the market over 45 years and are designed to
withstand a rigorous Industrial environment.
Warranty and Repair Service
Your Microsonic Detection Kit is manufactured with high quality components and
workmanship and is warranted to be free from failure for a period of one year from
date of purchase, battery excluded. This warranty shall not cover or apply (1) to
any failure caused by abuse, (2) if it has been tampered with, or (3) if repairs have
been attempted by anyone other than Electronics For Industry, Inc. trained service
personnel.
Many units returned to the factory for repair have only needed a fresh battery, be
sure to replace the battery with a fresh battery before sending your unit for repair.
The pistol unit uses a standard 9 volt battery located in the battery compartment on
the left side of the pistol housing grip area. The TG-2 Tone Generator uses four
standard AA size batteries located under the battery compartment cover on the left
side of the tone generator.
The tubular units use a standard 9 volt battery which is located under the battery
cover toward the rear of the unit and is accessed by removing the two slotted head
screws.
If a fresh battery does not cure a failure, carefully pack the kit and ship it to:
Service Department
Phone: 305-233-1640
Electronics For Industry, Inc.
Fax:
305-666-4185
6850 SW 79 Terrace
South Miami, Florida 33143-4440
Please include a short note describing your problem or troubles. Your unit will be
serviced promptly and returned to you. If it is a warranty repair please include proof
of purchase.
For your records, record the date of your purchase:___________________
For more information please visit our web site at: http://www.e4i.com
Our e-mail address is: [email protected] or [email protected]
16
(Sample)
CERTIFICATE OF CALIBRATION
This certificate attests to the manufacturing standards and equipment
calibration relating to the Electronics For Industry, Inc. line of Ultrasonic
Detection equipment.
The equipment meets all existing standards as required.
It is certified that these instruments meet or exceed the Electronics For
Industry, Inc. standards as outlined in the Electronics For Industry, Inc.
standard test and calibration procedures and all applicable ISO 9000 and CE
requirements.
All leak detection equipment meet the requirements of ASTME E1002-96 as
currently published.
All equipment used to calibrate the ultrasonic equipment is traceable to NBS
and is traceable to QEC Standard Meter QE-579 s/n 5225.
Prepared and attested to this date by:
George A. Harris
President
17
SECTION 3 - INTRODUCTION TO ULTRASOUND
What is Ultrasound?
Sound has been defined as vibration of an air column to which a human ear
would respond. Ultrasound is those frequencies that are above human
hearing. Humans can usually begin to hear low frequency sound at about 30
Hertz (cycles per second). This is comparable to the low bass frequencies in
a good music system. The upper range for high frequency hearing is usually
in the neighborhood of 15,000-20,000 Hertz or 15 to 20 Kilohertz. Near either
end of this range, hearing sensitivity has decreased significantly; sound has
to be louder to be heard. Maximum human hearing sensitivity is in the 2,000
to 4,000 Hertz range, which includes most speech frequencies.
As children age toward adulthood, they gradually lose some hearing
sensitivity. Deterioration generally affects the high frequency hearing ability
most, and affects males sooner than females. The discrimination might relate
to the size (and consistency) of the male eardrum as compared to the female.
The older one gets the more high frequency hearing loss is present.
Even though we humans don't have much sensitivity to the higher (or to us,
ultrasonic) frequencies, these sounds exist in nature. Bats use high
frequency sonar to zero in on flying insects at and after dusk. Crickets rub
their legs together and generate considerable high frequency noise as part of
the chirp that we hear. (It is interesting to listen to crickets or bats with an
EFI leak detector.) Some species of fish use very low frequencies for
communication of a sort, and others use high frequencies. Rodents can
communicate at frequencies far above our hearing range, up to 100,000 Hertz.
Dogs and cats have high frequency hearing sensitivity above our limits. The
so-called "silent dog whistles" generate high frequency sound that dogs can
hear but humans cannot.
As the frequency (or pitch) of sound rises toward and beyond our upper
hearing limit, its characteristics change considerably. If the source is
“directional”, such as inside a room with an opening, the low frequencies
tend to spread out from the opening (source) of sound. High pitch sounds
tend to form more of a beam, and the effect is more pronounced as the pitch
rises. Higher frequencies are more directional. We know that if a sound
source is distant, it does not sound as loud (the intensity is lower).
Sound is absorbed as it passes through air. High-pitched sound is absorbed
more than low-pitched sound. Think about distant thunder. We hear a low
pitch rumble. If lightning strikes nearby, we also hear a crackle with the
rumble. The crackle is the high frequency portion of the noise. The higher
frequencies are often absorbed before reaching us.
18
Relative humidity is a factor in sound absorption. Absorption is much
greater in a relative humidity of ten to twenty percent. As relative humidity
rises toward or beyond 40%-50%, the absorption for all frequencies is
considerably less. The relative humidity factor is emphasized for higher
frequencies. High frequency absorption in low humidity can be several times
greater than for low frequencies. The bats at Carlsbad Caverns in New
Mexico have to be closer to their flying prey to locate them, as compared to
more humid locations.
Please remember that we are explicitly referring to sound in air.
A PRACTICAL USE FOR ULTRASOUND
There was little widespread commercial use of ultrasonic sound until the
1950's and 1960's when many televisions were equipped with ultrasonic
receivers and external ultrasonic transmitters for remote control. Devices
using infrared light later replaced this type of remote control. Research on
devices using ultrasonic sound in air became relatively dormant after the loss
of the only major product in that field. Only a few engineers who were
especially interested in the field continued to work with high frequency
airborne sound. Few other commercial applications have surfaced since the
remote control era. Of course, if you see a bat flying toward you, you can
frighten it away by giving it a blast of ultrasonic sound, but one does not see
a bat flying toward one very often. Production of an ultrasonic Bat Chaser
doesn't seem practical. A very loud source of high frequency sound energy
can frighten mean dogs away. This is another practical application.
HOW AIRBORNE ULTRASOUND TOOL TECHNOLOGY WORKS
Ultrasounds, by definition, are beyond the limits of normal human hearing, so
an inspector uses a sophisticated tool to translate ultrasonic signals to the
range of human hearing.
The theory of ultrasonic detection is relatively simple. Frequency, the number
of times a sound wave cycles from trough to crest, is expressed in cycles per
second and measured in hertz. One kilohertz is 1000 cycles per second. The
best human ears can generally hear noises in the range of 20 to about 20,000
Hz (20kHz). Ultrasonic detectors work at approximately 40 kHz, far above
human hearing range. Thus, mechanics using the ultrasound tool can "hear"
what is going on in operating machinery.
19
Fluid and gas systems and other working machinery have constant
ultrasound patterns. When a leak occurs, the fluid passing through produces
turbulence with strong ultrasonic components. Changes in the "sonic
signatures" can be readily recognized as wear in components. An ultrasonic
detector senses subtle shifts in the signature of a component and pinpoints
potential source of failure before they cause costly damage.
The longer wavelengths of lower-pitched sounds travel easily and can be
heard without special equipment. Higher-frequency sounds cannot penetrate
solids; yet they slip through the tiniest of openings Ultrasound detectors are
ideal for isolating such leaks.
These lightweight tools are battery powered, so operators can easily move
from machine to machine. Their circuitry translates the high-pitched
ultrasounds to those in the human hearing range, enabling users to hear a
mirror image of the ultrasounds through headphones and gauge their
intensity by the increase in sound in the headset and increasing reading on
an analog meter.
Any ultrasonic tool should be checked for an intrinsically safe rating before it
is used in hazardous areas.
ULTRASOUND AND LEAKS
EFI started production of its line of leak detector tools in the early 1960's.
Then, as even now, the only generally practical alternative to these tools for
locating leaks is the slow, inconvenient painting of suspected leak areas with
soapy water, then watching for bubbles to appear. The EFI detectors are
extremely sensitive to the ultrasonic noise generated by leaking pressurized
air (or other gas, including steam), but they are as insensitive to ordinary
noise as our ears are to ultrasonic noises. The detectors convert ultrasonic
sound waves down to sounds that we can hear with our ears. This is similar
to the way radios convert radio waves to audible sound.
We all know that a gas/air leak generates noise; sometimes we can hear it.
Whether we can hear it or not depends on many factors. Some of those
factors are the amount of other noise in the vicinity to mask it, the size of the
leak, characteristics (especially the size and shape) of the hole that allows the
leakage, the type of material, and the pressure that forces the gas out of the
hole.
Leaks generate ultrasonic noise as well as noise that we can hear with our
ears. The problem with listening for leaks is that our ears are not sensitive
enough, especially for small leaks. They are not very directional due to their
20
design and purpose. Another problem is that there is almost always some
normal or machine noise in the vicinity, which would mask the leak source
sound.
Using a leak detector to listen for the ultrasonic signature of a leak is far
superior to using our ears to locate leaks.
Ultrasonic detectors can be made much more sensitive than the ear to detect
leaks. Ultrasonic noise is also much more directional, making it easier to find
the leak vicinity, move closer, and then pinpoint the source. In general, there
is not much ultrasonic background noise to mask the leak noise. If there are
other sources of ultrasonic noise, they are usually widely enough scattered
to be unimportant, since ultrasonic noise is absorbed much more as it
passes through a distance in air than is normal noise.
The detectors listen for noise in the 40-kilohertz region. This is a
compromise. Lower frequencies are more susceptible to common low
frequency noises. Higher frequencies are absorbed to a greater extent as
they pass through the air.
To better visualize leaks, consider a hose attached to a bib or faucet. The
water is turned on, and there is a shutoff nozzle on the end of the hose. You
might find a damp spot somewhere along the hose where a leak will soon be
apparent. There might be another spot with a very small hole that gradually
forms a drip. Surface tension of water tends to hold it together until there is
sufficient mass to pull it loose as a drop. There might also be a small hole in
the hose that squirts a very fine stream of water. Finally, there might be a
leak in the valve, with water coming out around the turn-off valve stem. If the
water pressure were quite low, all of these problems would be less apparent.
When the pressure is increased, each would be emphasized and become
more prominent.
Suppose now that the same system is drained and dry, and is pressurized
with air. The spot that was damp might or might not generate ultrasonic
noise. Increasing pressure would increase the likelihood of detection. The
source of the drip would probably be easy to detect. The air does not have
surface tension, and there would be a small steady leak from the hole. As the
air escapes from the holes, there would be turbulence and noise generated.
As the pressure increases, noise increases. The hole that had a very fine
stream of water should generate lots of noise and be detectable at a
considerable distance.
21
Remember that this noise is generated at the point where gas is liberated
from the higher-pressure area (inside the hose, through the hole) and out into
the lower pressure area. As the higher pressure leakage passes into lower
pressure outside, turbulence results, which creates the noise.
In the case of the faucet or any valve, and sometimes with threaded fittings, a
different condition can exist. The high to low pressure transition can occur
inside the structure, at the valve seat itself. This is the point of maximum
energy and maximum sound generation. The sound then must travel through
the air path following the threads or down the hose to the exit point, losing
energy as it travels.
An example of this would be a welding tank where the valve has not closed
completely. The leak is actually at the valve seat, this is the point of
maximum energy. The sound now travels down the hose, losing energy as it
travels, to the welding tip which is a much larger opening and also disburses
the energy instead of concentrating it as a smaller hole would. The result is
often less noise than would be expected, requiring the detector to be closer
to the leak.
Folded or rolled metal seams/joints on containers or high quality ductwork
can cause similar problems. A cross section of this type construction is
diagrammed below.
A situation somewhat related to the faucet/threaded-fitting condition is found
in searching for leaks in a vacuum system. More noise generating turbulence
exists inside the chamber than out, because the high-pressure area is
outside. The outside air is forcing its way through the hole into the lower
pressure area inside. Detectors on the outside can still be very useful even in
this adverse situation since turbulence will exist at the entrance point.
A quick example of the sensitivity of the leak detectors is to put on the
headset and turn on the detector. Hold your free hand a few inches away
from the front of the detector, and gently rub your thumb and forefinger tips
together. The noise you hear is friction generated ultrasonic noise converted
22
down to the audible sound.
A similar example is to hold the detector opening a couple inches from one
eye and then blink the eye rapidly. The friction of the eyelashes rubbing
together generates the noise. Yet the detector does not react to ordinary
sound in the vicinity. You do not hear people talking or machinery running.
ULTRASONIC LEAK DETECTION
Pressure & Vacuum Leaks
Leaks generates noise. Sometimes we can hear it with our ears, sometimes
not. Whether we can hear it or not depends on many factors such as:
1. The amount of other noise in the vicinity to mask it.
2. The size of the leak.
3. The characteristics (size and shape) of the hole that allows the leakage.
4. The type of material and its thickness.
5. The pressure or vacuum that forces the gas in or out of the hole.
Leaks generate turbulence, which generates ultrasonic noise as well as noise
that we can hear with our ears. The problem with listening for leaks with our
unaided ears is that our ears are not sensitive enough, nor directional
enough, especially for small leaks. Another problem is that there is almost
always some noise in the vicinity to mask the leak source sound.
Turbulence is produced as fluid or gas moves from high to low or low to high
pressure. This turbulence contains strong ultrasonic energy that is
detectable by the EFI detection units. This ultrasonic emission, once
detected, is heterodyned (shifted in frequency) into the audible range where it
can be heard by the human ear through earphones or viewed as an analog
readout on a meter.
Sensing ultrasounds generated by a leak, the Microsonic unit can be used to
locate leaks in pressurized systems regardless of the type of gas used. This
is especially beneficial in areas where there is a saturation of gases or where
a wide variety of gasses, pressurized vessels, and vacuum processes exist.
23
Time and convenience are also improved with ultrasonic detection since
equipment may be tested and leaks located while on-line and all the
machinery is still operating.
It can be generally noted that the larger the leak, the greater the ultrasound
level.
GENERAL LEAK DETECTION METHOD
Ultrasound is a high frequency, short wave signal. The intensity of the
ultrasound produced by a leak drops off rapidly as you move away from its
source. For this reason, the leak sound will be loudest at the leak site.
Ultrasound is fairly "directional" and therefore, pinpointing the source (i.e.
the location) of the leak is quite simple.
Using the leak detector, with the sensitivity set at maximum, scan the general
area of a suspected leak by waving the detector back and forth and listening
for an increase in the hissing sound, (similar to the sound you hear when you
fill a tire with air), in the headset and/or a peaking of the meter reading. Move
in the direction of the loudest sound. If it is hard to determine the direction of
the loudest sound, reduce the sensitivity until direction can be established.
Follow the sound and continue to reduce the sensitivity to determine the
direction of the leak. In order to confirm the leak site, move the detector back
and forth over the suspect area. The sound level will increase as you pass
over the exact leak point. In some loud factory environments shielding of the
transducer may be required by using the rubber focusing extension or other
shielding methods as explained below.
INTERFERENCE SOLUTIONS
If there is ultrasonic interference in the vicinity of leak you are searching for,
reduce the sensitivity of the detector and work closer to the item being
tested, or try one of the following:
x 1. Turn your back to the source of interference so that the detector is
facing away from the trouble source. Ultrasound is extremely
directional and your body acts as a sound block.
x 2. In extreme cases put an "ultrasound blocker", a "sound barrier",
between the interference source and the area you are searching. An
ordinary clipboard placed to reflect the sound back in the direction of
the interference works well. A flexible curtain will absorb some of the
sound, and reflect some back toward the source of the noise. Plastic
sheeting is often used; the smooth surface is especially effective in
reflecting the sound back toward the source. It is possible to make an
24
"ultrasonic soundproof" room or area in the midst of an otherwise noisy
area this way.
x 3. The rubber focusing extension is also helpful in screening out
ultrasonic noise interference. If there is too much ultrasound in the area,
reduce the sensitivity setting and continue to scan. If it is difficult to isolate the
leak due to competing ultrasound, place the rubber-focusing extension over the
detector module and scan the test area. Listen for a rushing sound while
observing the meter. Follow the sound to the loudest point. The meter will
show a higher reading as the leak is approached. In order to focus in on the
leak, keep reducing the sensitivity setting and move the tool closer to the
suspected leak site until you are able to confirm the exact leak point.
To confirm a leak, position the rubber focusing extension (on the leak detector
module) close to the suspected leak site and move it slightly back and forth in
all directions. If the leak is at this location, the sound will increase and
decrease in intensity as you sweep over it. In some instances, it is useful to
position the rubber focusing probe directly over the suspect leak site and push
down to seal it from surrounding sounds. If it is the leak, the rushing sound will
continue. If it is not the leak site, the sound will drop off.
x 4. Wrapping a shop rag or towel around the detector and rubber
focusing extension can also help block interfering ultrasonic noises.
x 5. Another method is to put the shop rag over the suspected leak
creating a void over the leak. Insert the end of the rubber focusing
extension (on the leak detection module) into the area of the suspected
leak. The area will be isolated from the surrounding ultrasound thus
making pinpointing much easier. Sometimes a gloved hand can create
the same effect.
SAFETY FIRST, ALWAYS AVOID ANY PERSONAL
CONTACT WITH MOVING, HOT/COLD, HIGH PRESSURE
OR ELECTRICALLY CHARGED SURFACES
25
Common Sources of Interference
Expansion Valves in high pressure refrigerant lines: As the high-pressure
liquefied refrigerant expands to gas, it can sound as if the entire surface of
the expansion valve is leaking. To find leaks in these systems, it is generally
better to shut the system down. While the high pressure is in the lines, make
an immediate search for the leaks.
Glass bottles on conveyers: Bottles rattling against each other on a moving
conveyer line can generate very high intensity ultrasonic noise. When
searching for leaks in the vicinity of these lines, it is often better to wait until
the line is stopped or to make a "sound proof" test area by enclosing the test
area with visquine.
Pneumatic equipment and tools: Some air operated equipment regularly
exhausts air, which amounts to a large leak. Try steps 1, 2, 3, above, if this
does not help you may have to wait until the interfering equipment is not in
use.
Grinders: Grinding machines and cutting wheels, especially when cutting
metal, create large amounts of ultrasound.
Computers: Computers are now found almost everywhere; they are often in
maintenance offices, and sometimes on factory floors to control equipment
or processes. Some computers and some computer displays (monitors)
generate ultrasonic noise. Transformers in both sometimes operate at an
electronic frequency comparable to that of the leak detectors. The
transformer structures can vibrate at the operating frequency and generate
ultrasonic noise. A noisy high voltage (flyback) transformer is an example.
This noise when heard using a leak detector does not sound like a leak, it
usually sounds more like a tone, buzz, or whistle. This is a good example of
where the meter reading would only tell part of the story. The meter would
read as if a leak were being detected but by listening you would be able to
identify the type of sound and know it was not a leak.
Arcing: Electrical arcing creates turbulence in the air, which creates
ultrasound. Again the signature is different from that of a leak. Low level
arcing, called corona, would sound like a 60 cycle buzz. Arcing or sparking as
around a defective spark plug wire would sound more like crinkling
cellophane.
26
ADVANCED METHODS OF FINDING STUBBORN OR HARD TO GET AT
LEAKS
WAVE GUIDES
When a suspected leak source has been identified by scanning an area that is
not easily accessible for leak verification, a simple wave guide can be used to
gain access to an
ultrasonic emission. A
simple wave guide can be
made from ¾ inch PVC
tubing cut to the desired
length. One open end is
extended to the suspected
area and the leak
detection unit (W7 or EI500) is inserted in the
other end. Ultrasonic
emission if present will
travel within the tube to
the detector. A flexible
wave guide can be made
from 1.75 inch rubber hose or the rubber focusing extension can be used.
LIQUID LEAK AMPLIFICATION
Liquid leak amplification is the use of a LOW surface tension fluid that
produces a thin film through which the escaping gas will pass. When it
comes in contact with a low flow of gas, it quickly forms a large number of
small bubbles that burst as soon as they form. This bursting effect produces
an ultrasonic shock wave that is heard as a crackling sound in the
headphones. In many instances the bubbles will not be seen, but they will be
heard. This method is capable of obtaining successful leak checks in
systems with leaks as low as 106 standard cc/sec.
If there are situations where a signal may be difficult to isolate, it may be
helpful to reduce sensitivity. Point the system toward the test area and
gradually reduce sensitivity until the weak signal becomes clearer and then
follow basic detection methods.
When testing for low volume pressure leaks, apply liquid at the test area and
scan with the leak detector. For valve stems, seams, flexible materials and
seals the contact probe can be used at the suspected leak point.
27
SECTION 4 - USES & APPLICATIONS
USES FOR THE TOOLS
Typical Applications:
x Pinpoint pressure and vacuum leaks of any gas, air, steam or vapor.
x Find leaks around seals, seams, welds, hatches, fittings, and bulkheads,
without pressure.
x Listen to internal, mechanical operations to predict failure or track wear
x Compressed air leaks.
x Steam systems (Traps - Valves - Gaskets - Boilers).
x Check bearings for wear and lack of lubrication.
x Motors, Pumps, Gear Boxes for internal wear.
x Electrical Systems for Arcing, Sparking and Corona.
x Hydraulic Systems (Valves, Seals, Controls).
x Drive Belts for cracks, wear and slippage.
x Enclosed Areas (Rooms, Containers, Roofs, Windows, etc.)
x Check Valves, Gaskets, Seals and Seam Leaks.
Identify and locate engine, transmission, or rear end noises:
The Microsonic Stethoscope allows you to hear the noises
from inside machinery without hearing all that is going on
around you. By contacting the housing in the vicinity of
the moving parts you will hear what is happening inside.
Is it a smooth normal sound or a rough, intermittent or
grinding sound? To listen to rear ends, differentials, rear
axles with the vehicle on a lift you listen at various points while turning the
wheels by hand to control the speed and better identify problems. Engines
are analyzed by listening to the individual valves and pistons. Since
ultrasound does not travel as normal sound does you can actually hear
individual valves.
Bad spark plugs, leaking transmissions, radiator or block leaks are best
found with the Microsonic Leak Detector.
Pinpoint Pressure or Vacuum Leaks:
The Microsonic Leak Detector hears the high frequency energy created by
any gas or vapor escaping in or out of an orifice. The Microsonic Detectors
do not hear sounds the normal ear hears so it is easy to
pinpoint leaks even in a very “noisy” shop.
By pointing the front of the detector at the leaking flange or
joint you will hear the rushing or hissing sound that indicates a
leak. Be sure to check the threaded fasteners that hold the
28
flange together, it may be one of these leaking, not the gasket.
In Manholes:
Steam pipes, compressed air, pressurized telephone cables
are just a few of the many things that are run under the
street that can develop leaks. Many of these leaks can be
heard by placing the front end of the Microsonic Leak
Detector at the “Pry hole” of the manhole before even
opening the manhole. Once you hear the leak in the manhole then you can
go into the manhole and pinpoint the tube, pipe or cable that is leaking and
then make repairs.
Hear unusual noises motors:
The Microsonic Stethoscope allows you to hear the
noises from inside machinery without hearing all that is
going on around you. By contact the housing in the
vicinity of the moving parts you will hear what is
happening inside. Is it a smooth normal sound or a
rough, intermittent or grinding sound? Do you hear the brushes arcing? Can
you hear the brush holders dragging? Is the shaft running true? Pinpoint
these and other problems at an early stage so you can plan maintenance and
have the necessary parts ready. Don’t wait for an emergency breakdown and
try and jury rig the repair because you do not have the right parts on hand.
Tires and Air Brakes:
Hear the leaks from a distance. Simply scanning the vehicle
will tell you if there is a leak in the air brake system or tires.
Once you hear the leak then you move closer and closer until
you pinpoint the exact source. When you do your walk
around to check the lights you can detect tire or brake problems that would
cause you trouble in today’s run.
Railroads:
As the train rolls by you can hear the sounds of an airbrake
leak but not the sounds of the train itself. With the
Microsonic Detectors you can also hear a dragging brake as
the train rolls by. Once the train has stopped you use the
detector to pinpoint the exact leak spot. The Microsonic
Detectors are good for finding leaks in the Diesel system,
around injectors and gaskets. Using the stethoscope you can hear pistons
moving, individual valves opening and closing and listen to the flow at the
injectors to “hear” clogged injectors. Using the stethoscope to listen to the
internal operation for correct sequencing facilitates trouble shooting
pneumatic and hydraulic system problems.
29
Bearings:
Over greasing a bearing is as bad as not greasing a
bearing. Too much grease results in too tight packing,
additional friction and pressure and heat build up. By
listening to the bearing with the Microsonic Stethoscope
while adding grease you can determine the optimum
grease point. Use the stethoscope to listen at the bearing housing and begin
pumping grease with your grease gun. As you add grease the sound
diminishes, at the optimum point the bearing is quietest, as you add still
more you will hear the sound begin to increase, stop, you have the optimum
grease. For ease of use we offer a magnetically positioned transducer to
leave both hands free while using your grease gun.
Leaking or Bypassing Valves:
How often have you turned off a valve to work downstream and when you
opened the system downstream you found the valve
had not shut off fully? Use the Microsonic Stethoscope
to listen at the valve as you shut it off. No noise, it is
off. Still hear noise, it did not shut off fully and you are
hearing flow, do not open the system downstream.
Prevent chemical spills.
Busses:
The Microsonic Detection Tools have many uses in
Bus maintenance and repair. Air brake system
leaks are readily detected and heard. Pneumatic
system leaks or mal functions are easy to trouble
shoot. Air conditioning problems and leaks are readily found. Tire and valve
stem leaks are quickly located and pinpointed. Water leaks around the
windows, door and baggage compartment seals are easily found and repaired
and re-checked using the Tone Generator, a water test is never needed.
Pumps:
Are the valves opening and closing, as they should? Is there
cavitation? Can you hear air in the chambers or lines? Is the
pump running as smoothly as it should? Are the seals
leaking? “Hear” the problem in its early stages so there is
time to plan repairs, don’t wait for disaster to strike.
30
Diesel or Gas engines:
Listen to pistons, valves, vacuum systems, head gasket
leaks. Find faulty injection systems, irregular firing as well
as carburetor and intake leaks. All these problems and
more are easy to find using the Microsonic Detectors
because you do not hear the background noise or the other noises that your
normal ear hears and that keep you from hearing and finding these problems
with your unassisted ears
Steam Traps:
Is it stuck open, is it stuck closed? Does it cycle
properly? Is my steam trap working as it should.
Listen with the Microsonic Stethoscope and you will
answer all these question with the greatest of ease.
Even with the plant noises at their highest level you can hear the “operation”
of your steam trap because the Microsonic detectors do not hear all that
other plant noise.
Wind Noise and Water Leaks in Vehicles:
Put the Tone Generator inside the vehicle and turn it on.
It fills the compartment with high intensity, high
frequency sound energy. Sound will not pass through a
solid but it will find any opening and work its way
through. A leak is an opening from the outside to the inside. Anywhere there
is an opening the high frequency energy will escape. Using the Microsonic
Detector you will hear the escaping energy as a tone or whistle in the headset
and there will be a rise in the meter reading. The closer you get the louder it
will be until you reach the source, as you pass it the sound diminishes. You
have now pinpointed the problem. Repair it and check it again, repair more if
needed but you never need to wet the car. All searching and repairing is
done while the vehicle is dry. No road testing for Wind Noise problems.
Boats:
Easily find where the water is entering around windows,
portholes, and hatch covers. Hull leaks and seals are
quickly checked using the Microsonic Detectors.
31
Boilers and Heat Exchangers:
Boiler tube leakage or blockages can be heard by listening on
the outside of the shell in the vicinity of the tubes. Leaking or
blocked tubes generate a different sound than normally
operating tubes.
Heat exchangers of all kinds can be tested using the Tone Generator. The
tone generator is set to impinge its energy on the outside of the tubes and
the Microsonic Detector is used at the tube ends to listen for the “tone” that
will be heard where there is a holed or leaking tube. If the leak is around the
end roll then the tone will be heard around the periphery of the tube in
question. Use of the Rubber Focusing Extension is recommended to make
pinpointing easier. For very large heat exchangers the use of multiple tone
generators to create a higher level of energy around the tubes is
recommended.
Compressors and Pneumatics:
Pinpoint leaks in pneumatic systems that cause your
compressor to run and run. Continuously running
compressors means wasted electricity and wasted
dollars. Continuously running compressors means
replacing compressors before their time.
Continuously running compressors means you are not getting the air (or
vacuum) to the tools that it is supposed to feed which means additional wear
on these tools or machines and loss of production time.
Easily pinpoint these leaks as you walk through your plant. Take the
Microsonic Detector with you and scan the plant as you walk. Make notes of
the leaks and then when there is time available you know exactly where to
send the repair person. Over a period of time you will clean up your plants
leaks and save many dollars.
Leaks in Pneumatic Controls and their lines means your machinery or
process is not working as it was designed. Pinpoint these leaks, Pressure or
Vacuum and get the process working efficiently again.
Any Gas or Vapor:
The Microsonic Detectors “hear” the sound of a leak. It
does not matter what is leaking, any gas of vapor.
Compressed air, steam, oxygen, nitrogen, freon, any gas
or vapor.
32
Aircraft:
Pressurization leaks, Pitot Static System leaks,
Instrument air or suction leaks, leaks around the
instrument faces, oxygen system leaks as well as
water leaks into the cabin or the baggage
compartment or the avionics area. Pinpoint and
stop the water incursion before serious damage
occurs. Find and fix those pesky wind noise whistles.
Using the stethoscope you can listen at the face of the gyro instruments to
tell which one is starting to have trouble, don’t wait until it fails in flight,
predict failure and fix it before it becomes critical.
Seams and Seals:
Find leaks around doors, chambers, around windows, in
roofs, refrigerators or compartments, virtually any
enclosed area.
Find leaks in soundproof rooms. Find where you are
losing air conditioning and heating. Seal your premise,
why pay to heat or air condition the great outdoors?
Place the Tone Generator on one side of the surface to be
tested (or inside the enclosure) and work the outside to
listen for the Tone that indicates a leak. Repair it, seal it
and then re check it to be sure it was done properly.
Delicate Machinery:
The extreme magnification of internal sound by the Microsonic Stethoscope
allows you to hear the changes in even the most delicate bearings or
machinery. If you know what you are listening to you can even hear the
mechanism of a fine safe or lock. By listening over a period of time, you will
develop a sound pattern that is normal for you machinery. When something
starts to go bad you will know it and be able to effect repairs before the
machine is damaged or the precision work it is supposed to do is
compromised.
Hydraulics:
Using the Microsonic Stethoscope you will readily hear
malfunctioning hydraulic systems. Bypassing
cylinders, mal functioning valves and other system
problems.
33
ELECTRICAL
Overhead Lines:
Hear the problem from the ground, no need to climb
the pole or tower to tell where the leak is.
Pressurization leaks in telephone overhead lines are
readily heard from the ground. Just walk the line
aiming the detector at the lines until the leak is
heard.
Electrical Discharge:
Corona Arcing and Sparking in overhead power lines and transformers and
other electrical equipment is readily detected.
Corona is heard as a 60 Hertz buzz, arcing and sparking sound like crinkling
cellophane, sparking is intermittent, arcing is continuous when heard using
the Microsonic Detectors.
Electrical problems in switch gear and substations are easily spotted. While
you are checking the sub station don’t forget to check air operated circuit
breakers and for nitrogen leaks in the transformers.
Leaking insulators cause insulator deterioration and radio and TV
interference. These corona or arcing problems can be detected from the
ground. The higher the voltage the higher the line is above the ground but
the higher the potential energy and thus the higher the ultrasonic energy that
is created allowing you to detect the problem from the ground even for the
high cross country lines.
Power Generation:
Power generating stations have most of the problems that are found
elsewhere in this document. Pinpoint Vacuum leaks,
pressure leaks, pneumatic controls, bearings, controls,
hydraulics, compressors, switch gear malfunction,
pumps, electrical corona arcing and sparking. All these
problem areas and more are areas of use for the
Microsonic Detectors.
34
SECTION 5 - MECHANICAL ULTRASONICS
Mechanical Ultrasonics
ROTATIONAL EQUIPMENT PRODUCES AN ULTRASONIC EMMISION
RESULTING FROM FRICTION BETWEEN MOVING PARTS
How Mechanical Inspection Works
Mechanical movements produce a wide spectrum of sound. By focusing on a
narrow band of high frequencies, the Ultrasonic unit detects subtle changes in
amplitude and sound quality. It then heterodynes these normally undetectable
sounds down into the audible range where they are observed on a meter (for
trending and comparison purposes) and heard through headphones.
Based on research by NASA, it was established that ultrasonic monitoring provides
early warning of bearing failure. Various stages of bearing failure have been
established. An 8 dB gain over baseline indicates pre-failure or lack of lubrication. A
12 dB increase establishes the very beginning of the failure mode. A 16 dB gain
indicates advanced failure condition while a 35-50 dB gain warns of catastrophic
failure.
Mechanical Ultrasonic Detection
Mechanical inspection - Ultrasonic inspection and monitoring of bearings is a
reliable method for detecting incipient bearing failure. The ultrasonic warning
appears prior to a rise in temperature or an increase in driving torque. Ultrasonic
inspection of bearings is useful in recognizing the beginning of fatigue failure,
brinelling of bearing surfaces, flooding of or lack or lubricant.
In ball bearings; as the metal in the raceway, roller, or bearing balls begins to
fatigue, a subtle deformation begins to occur. This deforming of the metal
will produce an increase in the emission of ultrasonic sound waves. When testing,
changes in amplitude of from 12 to 50 times the original reading is indication of
incipient bearing failure. When a reading exceeds any previous reading by 12 dB,
it can be assumed that the bearing has entered the beginning of the failure mode.
This information was originally discovered through experimentation performed by
NASA on ball bearings. In tests performed while monitoring bearings at
frequencies ranging from 24 through 50 kHz, the changes in amplitude indicated
the onset of, or incipient, bearing failure before other indicators; including heat
and vibration changes. (An ultrasonic system based on detection and analysis of
modulations of bearing resonance frequencies can provide subtle detection
35
capability, whereas conventional methods have difficulty detecting very slight
faults.) As a ball passes over a pit or fault in the race surface, it produces an
impact. A structural resonance of one of the bearing components vibrates or rings
by this repetitive impact. The sound produced is observed as an increase in
amplitude in the monitored ultrasonic frequencies of the bearing.
Brinelling of bearing surfaces will produce a similar increase in amplitude due to the
flattening process as the balls get out of round. These flat spots also produce a
repetitive ringing that is detected as an increase in amplitude of monitored
frequencies.
The ultrasonic frequencies detected by the system are reproduced as audible
sounds. This signal can greatly assist a user in determining bearing
problems. When listening, it is recommended that a user become familiar with the
sounds of a good bearing; often heard as a rushing or hissing noise. Crackling or
rough sounds indicate a bearing in the failure stage. In certain cases a
damaged ball can be heard as a clicking sound, whereas a high intensity, uniform
rough sound may indicate a damaged race or uniform ball damage. Loud
rushing sounds similar to the rushing sound of a good bearing only slightly rougher
can indicate lack or lubrication.
Pro-Active & Predictive Maintenance
Ultrasonic Technology 'Picks Up' what may be future failure.
Mechanical problems can be detected & avoided using ultrasound
Preventative Maintenance
Ultrasonic scanning instruments are fast becoming standard tools for
preventative maintenance programs in the food processing industry. The ability
to use ultrasound tools to pinpoint and repair faulty steam traps, bearings,
vacuum leaks and electrical problems before they cause serious disruptions is
saving food companies thousands of dollars in unscheduled downtime.
Ultrasound detection tools provide information in two ways: They let the operator
hear ultrasounds qualitatively through a noise-isolating headphone that blocks out
plant noise and they display quantitative, incremental readings on a meter. The
sensitivity of the tool can be adjusted to seek out particular sounds. The
detector can even record the sound of an eye blinking.
36
Avoiding costly bearing failures
Inland Empire Foods in Riverside, CA, pre-cooks, dehydrates and packages a
wide variety of beans for resale to other food processing companies. As part of
Inland's preventative maintenance program, it uses a lightweight ultrasonic
detection system to make monthly inspections of bearings throughout the plant.
Ultrasound testing allows operators to hear sounds the human ear cannot detect
under normal conditions. All operating equipment and most leakage problems
produce a broad range of sounds. The high-frequency, ultrasonic components of
these sounds have extremely short wave lengths and tend to be directional. By
pointing the ultrasonic tool in the direction of the object to be tested, the
signal is isolated from background plant noises and its location easily
detected. As subtle changes occur in mechanical equipment, the directional nature
of ultrasound permits potential warning signals to be detected before actual
equipment failure occurs.
According to plant manager Perry Sterner, "using ultrasound, we have the choice
of testing for bearing wear either during actual production or when the plant is shut
down. Wherever there is evidence of a problem," says Sterner, we use the
ultrasonic detection tool to provide confirmation of our vibration readings and
replace the faulty bearing.
"One of our biggest problems is dry bearings. Using the ultrasonic detector, we
can hear if the bearing is running dry or if there is a small particle of dirt on the ball. If
there is a flat spot on the ball hitting the raceway of the bearing, we'll hear it
randomly as the ball rotates."
Sterner schedules periodic greasing of the bearings and can listen with the
ultrasonic equipment as he pushes grease into the raceway. The meter
readings are recorded monthly and are used to indicate when the bearings need to
be replaced.
In addition to using the ultrasonic detector for predicting and preventing bearing
failure, Inland Empire Foods periodically checks for leaks in steam traps, inspects
motors for phasing problems, and checks starters for arcing with the sensitive
listening equipment.
Recently, Sterner discovered another use for his ultrasonic detector. "Our QC
department had placed a load of black-eyed peas on hold for possible
infestation and disposal. I was curious to know if the ultrasonic device could
detect the presence of insects in the tote bags. I put on the headphones and
placed the ultrasonic detector near the sack. It was amazing. You could
actually hear the insects crunching on the peas!“
Joe Coencas, Contributing Editor, Plant management
37
Comparative & Historic Testing (Mechanical)
There are two basic procedures of testing for bearing problems: comparative and
historical. The comparative method involves testing two or more similar bearings
and comparing potential differences. Historical testing requires monitoring a
specific bearing over a period of time to establish its history. By analyzing bearing
history, wear patterns at ultrasonic frequencies become obvious which allows for
early detection and correction of bearing problems.
Comparative Test - Use the contact (stethoscope) module. Select a test spot on
the bearing housing and mark it for future reference. Touch that spot with the
contact probe. In ultrasonic sensing, the more mediums or materials ultrasound has
to travel through, the less accurate the reading will be. Therefore, be sure the
contact probe is actually touching the bearing housing. If this is difficult, touch
a grease fitting or touch as close to the bearing as possible. For consistency,
always approach the test spot at the same angle. Reduce sensitivity until the meter
reads 20. Listen to the bearing sound through headphones to hear the quality of the
signal for proper interpretation. Select same type bearings under similar load
conditions and same rotational speed. Approach the bearings at the same
angle, touching approximately the same area on the bearing housing. Compare
differences of meter reading and sound quality.
Historical Bearing Test - Use the basic procedure as outlined above in the
comparative test. Note meter reading, and sensitivity selection on your bearing
history chart. Compare this reading with previous or future readings. On all future
readings, adjust sensitivity level to the original level recorded in the bearing
history chart. If the meter reading has moved form the original 20 mark up to or
past 100, there has been a 12 db increase. (Increments of 20 on the meter in the
linear mode is about 3 decibels; e.g., 20-40=3db, 40-60=3db, etc.) Note: Increase
of 12 db or greater indicates the bearing has entered a failure mode. Lack of
lubrication is usually indicated by an 8 db increase over baseline. It is usually heard
as a loud rushing sound. If lack of lubrication is suspected, after lubricating, retest. If readings do not go back to original levels and remain high, consider that the
bearing is on the way to the failure mode and recheck frequently.
If a vibration program already exists for bearing analysis, an ultrasonic bearing
monitoring program can be of assistance. Ultrasound detectors can be used to aid a
diagnosis. The high frequency, short wave characteristic of ultrasound allows the
signal to be isolated, so that a user can determine if a bearing has been correctly
diagnosed as failing.
At times there can be false signals generated by equipment connected to a particular
bearing. By adjusting the sensitivity and listening to the sound, it can be determined
whether it is the bearing, a rotor or something else that is the root of the problem.
38
The ability to hear what is going on can prove very important. Ultrasound
detectors work well on slow speed bearings. In some extreme cases, just being
able to hear some movement of a bearing through a well greased casing could
provide information about potential failure. The sound might not have enough
energy to stimulate classic vibration accelerometers, but will be heard via
ultrasonic detectors.
Sometimes there are so many bearings in a plant that not every piece of equipment
can be checked routinely by a limited staff of trained technicians. Since ultrasound
detectors require little training, a technician or the machine operator can determine
potential bearing problems and notify the vibration technician for follow-up.
Gears, Pumps & Motors - Inspection
OPERATION AS A MICROSONIC STETHOSCOPE
Insert the Stethoscope Module (the one with the metal probe extending from the
front) into the recessed front of the Pistol Detector body. Be sure that both
connector pins line up with the receptacles and that the Module seats fully in the
recess. Be sure the metal probe is screwed into the front of the module only “finger
tight”. Over tightening could result in internal damage to the Stethoscope Module.
Sensitivity adjustments and calibration are essentially the same as described above
for Leak Detector use with the following added stethoscope only adjustments.
If when using your stethoscope you find the unit is too sensitive, (the meter remains
at full scale), when the volume sensitivity knob is all the way down, reduce the
sensitivity of the Stethoscope Module itself by adjusting the potentiometer located
in the module. Use the screwdriver supplied with your kit to turn down the
control through the hole on the side of the module until the meter remains on
scale.
The Microsonic Stethoscope will detect internal sounds in the ultrasonic
range. It does not detect the sounds that the ear can hear, or other low
frequency sounds, such as a heartbeat. The friction between moving parts of
machinery generates ultrasonic sound. As a general rule, the ultrasonic sound
is very similar to the low frequency sound heard by your ears, a mirror image but
displaced in frequency. If you touch the probe to the case of a mechanical
watch, for example, the ticking sound is similar to that heard with the unaided
ear. The sound from the stethoscope, however, has much better “definition”.
Minute sounds are present that was not noticed before.
39
The stethoscope is detecting sound generated by the friction of the parts rubbing
together, and not just the clicking sounds of the escapement, or gear wheels
meshing.
As wear begins in machinery, ultrasonic sound from increasing friction is
building up long before the unaided ear can hear it. The Stethoscope is valuable
because of this. It forewarns you. The repair or maintenance can be carried
out at a more convenient time; rather than waiting for failure that always
occurs at the most inopportune time. Furthermore, damage is often more
severe during later stages of failure.
Since high frequency vibrations do not radiate as much as low frequency vibrations,
use of the Microsonic Stethoscope allows you to more readily screen out some
sounds and pay particular attention to others.
Internal flow can be heard with the Stethoscope to detect turbulence or blockage in
lines or process flow. It is easy to tell if a valve has shut completely, is leaking, or
bypassing. You can hear the action of the valve and the flow. As the valve closes
completely, flow ceases. If the valve stops moving as if closed, and flow is still
heard, the valve has not seated and sealed properly.
The Ultrasonic Stethoscope is the tool of choice for detecting bad or
malfunctioning steam traps.
OVER GREASING DESTROYS BEARINGS
When using a grease gun to lubricate bearings, the stethoscope should be
placed on the housing in the vicinity of the bearing as the grease is added. As you
add grease the sound will continuously diminish until the optimum grease
point is reached, adding more grease will cause the sound to increase and should
be avoided as over greasing is as destructive as not greasing a bearing.
40
Air Compressor - Inspection
DESCRIPTION
Compressors are the heart of any
compressed gas system. Routine inspection
and maintenance can prevent unplanned
downtime. Although any type of
compressor can be inspected ultrasonically,
the most common application centers on
larger reciprocating types. Specifically,
valve function in these compressors is
critical. Minor valve leaks can rapidly lead to
large leaks, which can effect production and
impact on plant safety.
How Ultrasonic Compressor Inspection Works
As with any mechanical movement, there is a "normal" operation and a "deviation". In
the case of valves, normal function is the typical open/close movement. Ultrasonically
this will be observed as a rhythmic movement. When valve movement changes due
to leakage or sticking, the sound pattern changes. Each condition has ultrasonic
components that can be sensed and monitored by the ultrasonic detection unit. Due
to the short wave, high frequency nature of ultrasound, the sounds produced by a
compressor valve can be isolated, which provides a clear test result.
Detection Method
For the "contact' method touch the valve with the contact probe and reduce the
sensitivity until it is possible to obtain a meter swing around mid-line and hear the
valve open/close movement. When testing, be sure to compare similar valves to each
other (i.e. intake to intake, exhaust to exhaust) and under the same conditions (i.e.
idling vs. working). For additional localization, use the leak detection module with
rubber focusing extension.
41
SECTION 6 - ELECTRICAL
Electrical inspection
x OVERVIEW OF ELECTICAL EQUIPMENT AND
ULTRASONICS
x OVERVIEW OF EQUIPMENT FOR HIGH VOLTAGE
INSPECTION
x ELECTRICAL DETECTION METHODS
Overview of Electrical - Inspection
Track Corona Discharges with Ultrasonic Detector
By Stan Bullock, Manager
Ultrasound detectors perfectly complement infrared instruments for the routine
examination of electrical equipment. While infrared inspections allow operators to
detect light that the eye cannot see, ultrasound allows them to detect sounds that
the ear cannot hear. Corona, arcing, and tracking, which may not show up on
infrared inspections, are revealed by ultrasound. Inspectors at Midwest Electrical
Testing & Maintenance now pack an ultrasonic detector to scan primary power on
all systems they inspect.
A person with no experience can learn to use the tool in about an hour. However, it
takes more experience to be able to identify individual sounds. Usually the operator
begins an inspection by fully opening the scale and broadly scanning the equipment.
If a noise is detected, the operator uses the tuning and directional capabilities of the
instrument to home in on the source.
Detect tracking on arresters
In surveys performed for one electric utility, potheads, bushings, and
arresters in substations were scanned (Fig 1). This utility was experiencing arrester
failures that caused troublesome power interruptions. The ultrasonic detector
indicated tracking on several of the arresters.
Further investigation isolated ultrasound coming from an area of intense
corona and arcing. On inspection, the connection was found to be pitted and
corroded. Fortunately the 138-kV equipment was only operating at 12% load at the
42
time. Had it been operating at full load, the connections would probably have
disintegrated, interrupting power to 80,000 to 100,000 customers.
Interlocked, metal-enclosed switchgear serving a large shopping mall was
examined with an ultrasonic detector. Ultrasound was detected in a very localized
area. Closer examination suggested arcing and tracing was occurring within the
switch. Utility and mall maintenance personnel were called to deenergize the
system and open the switch to perform a visual inspection. They found corona and
tracking had destroyed 35% of the switchblade and that the contact surface was
close to failure.
Transformer voltage taps that run hot cannot be detected with infrared
equipment because the heat from the transformer barrel is greater than that from
the loose connection. During inspection of a 1500-kVA dry transformer (Fig 3),
serious tracking and arcing was heard in the secondary voltage tap. When the
connections were dismantled, carbon buildup and arcing traces were found in the
tap contacts.
In each of these cases, problems were detected that could not have been found
without de-energizing the equipment. In some cases, even a visual inspection
would not have found the defects.
DESCRIPTION
When electrical apparatus such as switchgear, transformer, insulators or potheads
and splices fail, the results can be catastrophic. This is just as true in industrial plants
as it is in the power transmission and distribution side. Electrical discharges such as
arcing, tracking or coronas are all potential for equipment failure. In addition, the
problems of RFI and TVI impact on our valuable communication networks. All these
conditions produce ultrasound and are detected with the Ultrasonic detection
unit.
43
How Ultrasonic Electrical Detection Works
Arcing, tracking and corona all produce some form of ionization, which disturbs the
air molecules around it. The Ultrasonic unit detects the high frequency noise
produced by this effect and translates it, via heterodyning, down into the audible
ranges. The specific sound quality of each type of emission is heard in headphones
while the intensity of the signal is observed on a meter. Normally, electrical equipment
should be silent; although some may produce a constant 60cycle hum or some
steady mechanical noises. These should not be confused with the erratic, sizzling
frying, uneven and popping sound of an electrical discharge.
Detection Method
Before beginning any inspection of mid or high voltage equipment, be sure to review
your plant or company's safety procedures. Essentially, as in generic leak detection,
the area of inspection is scanned using a high sensitivity setting. As the direction is
determined and you approach the source, reduce the sensitivity until pinpointing is
possible. If it is not possible to remove covers, or plates, scan around the seams and
vent slots. Any potentially damaging discharges should be detected.
44
SECTION 7
STEAM TRAPS
x
Steam Traps and Valves explained.
x
How to analyze them using the Ultrasonic tools.
x
Determine good and bad traps and predict failure
PREFACE
Any method used to check the operating performance of steam
traps requires experience on the part of the individual conducting
the test. The reason is that a great number of variables exist
causing many different indicators being presented to our senses.
Ultrasonic testing eliminates some of these variables allowing us to
make a more accurate determination of the indications perceived.
This section describes the majority of indicators that exist under
the most common or “normal” operation. Indications other than
those covered in these instructions will require a more detailed
investigation of the trap question, or disassembly.
The accuracy of results will improve in a direct relationship with the
experience gained through continuing usage.
45
MAINTAINING STEAM TRAPS
Failed steam traps waste energy and adversely affect product
quality. Therefore, a maintenance program for steam traps is a good
investment.
Most plant and facilities professionals with steam systems in their
care have asked questions like the following:
x What are the signs of a malfunctioning steam trap?
x What inspection techniques are available?
x What testing instruments should we use?
x How do we start a steam trap maintenance management
program?
x What kinds of training resources are required?
Steam Trap Basics
Basically, all steam traps have the same function. They allow condensate and
non-condensable gases to escape while holding steam in a device where a
thermal or heat transfer process occurs. A regulator controls the input side of
the process, and the steam, after releasing energy to the process, condenses
and reverts back to its liquid state. The purpose of the steam trap is to retain
steam in the heating element and to release the non-condensable gases and
condensate. The principal design consideration is to balance the condensing
rate and the import rate of the control device on the input side with the
exiting condensate.
Stephen Banyacski, president of Nicholson Steam Traps (Walden, New York),
emphasizes the need to choose the appropriate steam trap. "Properly sized
traps relieve the condensate, react quickly to changes in load, and trap the
steam while allowing air and other non-condensable gases to escape," he
says.
Finding Malfunctioning Traps
As with any mechanical device, a steam trap can malfunction. "If the steam
trap fails closed," says Banyacski, "the device that should be draining will
flood, the heat transfer process will stop, and whatever product is being
produced…will no longer be up to the required quality standards. If the trap
fails open, there will be a waste of energy, steam will not be completely
consumed or condensed in the exchanger, and steam will blow through."
Banyacski notes that a plume of steam escaping from some part of the
condensate-return system signals such a condition. Banyacski ads that it is
46
difficult to determine whether a steam trap has failed just partially open,
indicating a slow leak and a developing failure. He continues, "Such
a…failure could persist for quite some time without any outward sign.
Therefore, a maintenance person should make periodic surveys of the
installed steam traps." Banyacski emphasizes that steam blowing through a
trap indicates that the trap needs to be repaired or replaced.
Trap Inspection Methods
Echoing Banyacski, Kevin Loken, manufacturers' representative and
distributor with Kelly Equipment (Milwaukee, Wisconsin), says, "Oftentimes,
a misapplied steam trap—too small, the wrong design—will malfunction."
According to Loken, ultrasonic, infrared temperature measurements, and
visual inspection have proven useful to maintenance personnel in checking
for malfunctioning steam traps. Of the three, Loken says that ultrasound is
the most reliable.
He points out that visual inspection requires an inspector to let a steam trap
discharge into the atmosphere. However, doing that changes the parameters
of the closed system and, therefore, can be unreliable.
Loken also says that there are enough variables in the system—
backpressure, for example—so that temperature is not the most reliable
indicator either. He recognizes, however, that portable infrared thermometers
provide close estimations of pressures on valves, traps, and coil heaters.
And he notes that these devices are also useful for spotting conditions such
as heat loss, the need for insulation, overheating, overloads, and cooling
failures. Thus, he recommends that an infrared thermometer be used along
with ultrasound.
Agreeing with Banyacski, Loken says that traps that have failed completely
open are easy to detect, but he points out that the object is to find failing
traps before they fail completely. Ultrasonic testing can do that. "In essence,
using an ultrasonic instrument is like putting the inspector inside the steam
trap and piping system, allowing him to detect a leaking steam trap," Loken
says. "Ultrasonic detectors translate ultrasonic emissions…into sounds the
human ear can hear."
Loken claims that technicians who use ultrasonic detectors on a daily basis
can achieve accuracy that exceeds 98%. And regarding frequency of
inspections, he recommends that process components of equipment as well
as drip, main steam traps should be checked twice a year. He suggests that
heating steam traps (in facilities that use steam for space heating) should be
tested annually. He also stresses the importance of instituting a reporting
system to keep tabs on the location, type, size, capacity, and condition of all
traps in a steam system.
47
Creating A Maintenance Program
Why go through the hard work of setting up a maintenance program for
steam traps?
Loken supplies the answer: "A steam trap maintenance management
program can pay for itself in less than a year. And the savings will multiply as
the years pass."
When valves or steam traps leak or fail, it can be extremely costly in terms of
product quality, safety and energy loss. Valve operation effects the way fluids
will flow through a system. There are great differences in the way particular
valves and steam traps work. Ultrasonic testing makes it easy to adjust for
these differences and readily determine operating conditions while valves
and traps are on-line.
How Ultrasonic Leak Detection works?
As fluid moves from the high-pressure side of a valve through the seat to the
low-pressure side, it produces turbulence. This turbulence generates
ultrasound, which is detected by the ultrasonic probe, and translated, via
heterodyning, down into the audible range. The translated ultrasounds are
heard through headphones and seen as intensity increments on a meter.
Leak Detection Method
Inspection methods vary depending on the type of valve or steam trap.
Therefore the primary rule is to know the details of your system, for example
the way a specific trap or valve may work under specific conditions. In order
to determine leakage or blockage: touch upstream of the valve or trap and
reduce the sensitivity of the tool until the meter reads about 50. It is
desirable to hear the specific sound quality of the fluid, simply adjust the
sensitivity until the sound you would expect to hear becomes clear. It's that
simple. Next, touch downstream of the valve or trap and compare intensity
levels. If the sound is louder down stream, the fluid is passing through. If the
sound level is low, the valve or trap is closed. Ultrasonic valve and steam trap
Inspection is considered a "positive" test in that an operator can instantly
identify sound quality and intensity differentials and thereby determine
operating condition accurately.
48
The Microsonic Stethoscope has proven to be an extremely effective tool for
testing steam traps for proper operation. Thousands are now being used for
this purpose, and our customers have realized substantial savings in both
maintenance costs and steam generation costs by using this method.
Energy costs will certainly continue to escalate, and an effective energy
conservation program can make the difference between profit and loss.
The passage of steam through an aperture generates ultrasound, as does the
friction between the operating components of a steam trap. With the EFI tool
we can hear these sounds, and by interpreting what we hear we can
determine if a steam trap is operating normally.
There are several types of steam traps on the market, but all have the same
purpose, that is to remove condensed steam, air and gasses from the system
and thereby improve efficiency and protect the system from damage. Steam
pressure, temperature, and capacities determine what type of trap will be
used in a particular application. A steam trap that fails in the open position
will discharge live steam, thereby wasting energy and degrading system
performance. A steam trap that fails in the closed position will not discharge
condensate, and damage may result to system components.
There are two main types of steam traps, those that discharge condensate
intermittently, and those that discharge continuously. In the first category
are the inverted bucket design and the disk (thermodynamic) design. Float,
thermostatic and float-thermostatic designs comprise the second category.
Testing methods are essentially the same for both types, and we assume that
the proper type trap has been selected for the particular application.
The first step in testing a steam trap is to determine if it is hot or cold. Place
a hand near the trap. If the trap is cold the problem could be a plugged
strainer upstream, or the trap outlet may be plugged with dirt. In an inverted
bucket type the bucket may have come unhooked. In the float and the
thermostatic type the thermostatic element may have failed shut or the float
may be jammed or collapsed. The disc may be jammed in a disc trap. Under
any of these conditions, no sound will be heard with the ultrasonic tool.
If the trap is hot, place the probe of the tool against the trap near the
discharge side. A continuous rushing sound suggests that the trap has
malfunctioned and is discharging live steam continuously. A properly
operating inverted bucket should discharge intermittently, as should a
properly operating disc trap, which will discharge 6 to 12 times per minute.
The discharge of live steam in a float and thermostatic trap is evidenced by a
higher than normal noise level and sound pitch.
These are but a few general guidelines for testing steam traps with the
ultrasonic tools. As with any type of testing, the test instrument only
49
provides evidence, which must be evaluated by the user. As the users
experience increases, so will the effectiveness of any testing program.
Valves
ULTRASONIC INSPECTION OF VALVES
Leak Detection Method
Inspection methods vary depending on the type of valve. Therefore the
primary rule is to know the details of your system, for example the way a
specific valve may work under specific conditions. In order to determine
leakage or blockage: touch upstream of the valve and reduce the
sensitivity of the instrument until the meter reads about 50. If it is
desirable to hear the specific sound quality of the fluid, simply adjust
sensitivity until the sound you would expect to hear becomes clear. It's
that simple. Next, touch downstream of the valve trap and compare
intensity levels. If the sound is louder down stream, the fluid is passing
through. If the sound level is low, the valve is closed. Ultrasonic valve
inspection is considered a "positive" test in that an operator can
instantly identify sound quality and intensity differentials and thereby
determine operating condition accurately.
SECTION 8 - SPECIAL SECTION
50
SECTION 8
STEAM TRAP TESTING AND ANALYSIS
Steam Traps and Valves Explained.
How to analyze them using the Ultrasonic
Tools.
Determine good and bad traps and predict
failure.
This section prepared by:
Mr. Alex Allison
Of
Allison Mechanical, Inc.
Des Moines, Iowa.
Our thanks to Mr. Allison
And more thanks to:
Mr. Doug McMordie
Who created the trap diagrams:
“Steam Traps, Where are they”.
51
STEAM TRAPS
PREFACE
Any method used to check the operating performance of
steam traps requires experience on the part of the individual
conducting the test. The reason is that a great number of
variables exist causing many different indicators being
presented to our senses. Ultrasonic testing eliminates
some of these variables allowing us to make a more
accurate determination of the indications perceived.
This section describes the majority of indicators that exist
under the most common or "normal" operation. Indications
other than those covered in these instructions will require a
more detailed investigation of the trap in question, or
disassembly.
The accuracy of results will improve in a direct relationship
with the experience gained through continuing usage.
All traps appear to be discharging steam as they
discharge condensate, but this is only flash steam!
52
STEAM TRAPS
Where Are They?
Process Traps
Typical Process Trap Application
53
STEAM TRAPS
Where Are They?
Drip Trap
Typical Drip Trap Application
54
STEAM TRAPS
Where are they?
Trace Traps
Typical Trace Trap Application
55
STEAM TRAPS
INVERTED BUCKET TRAP (A)
x The maximum pressure rating on the bucket trap should be shown on the
metal tag located on the trap.
x The pressure rating indicated on the "Tag" is the maximum steam
pressure the trap will handle effectively. If there is more steam pressure at
the trap than shown on the identifying tag you need to put in a different
valve mechanism (A.K.A. "pressure change assembly") to allow the trap to
operate.
x The size of the "hole" in the condensate discharge seat, along with the
steam pressure, determines the trap's capacity to discharge condensate.
Lower pressure steam traps have larger condensate discharge "holes"
than higher pressure rated steam traps.
56
STEAM TRAPS
INVERTED BUCKET TRAP (B)
INVERTED BUCKET TRAPS
Depend on a water seal and weep
hole for operation.
Because they discharge condensate
intermittently, they can be noisy.
PLACE PROBE ON TRAP AS SHOWN
57
STEAM TRAPS
INVERTED BUCKET TRAP (C)
DETAILED I.B. TRAP OPERATION
The operating characteristics of the I.B. trap vary according to the
condensate load.
(1) LIGHT LOAD
The trap will "dribble" condensate without
any distinct cycle. Indicator will show only
very slight back and forth movement at the
extreme lower end of the scale.
a
(2) MEDIUM LOAD
The trap will open and close intermittently
with a distinct cycle.
(3) HEAVY LOAD
The trap will discharge condensate continuously. This is usually observed at
start up of equipment. If trap does not
catch up with the load and commence
intermittent discharge this is an indication
that
the trap is undersized for the application.
Continuously discharging under heavy
load
will register high on the scale with some
back and forth movement of the indicator.
58
STEAM TRAPS
INVERTED BUCKET TRAP (D)
BASIC I.B. TRAP OPERATION - NORMAL LOAD
NOTE: Background noise level = "0"
Bucket up.
Valve is closed on seat.
Indicator rises on scale to
show trap is discharging
d
(3) FAILED - OPEN BLOWING LIVE STEAM
Bucket linkage, damaged bucket,
Badly worn valve & seat etc……
Indicator "Pegs" on scale along
with high-pitched sound of steam
passing through open valve seat.
59
STEAM TRAPS
INVERTED BUCKET TRAP (E)
NOTE: Background noise level = "0"
(4) LOSS OF PRIME
Badly worn linkage prevents valve from
seating properly, or loss of prime as a
result of "over-sizing" registers.
Erratic and rapid back & forth movement
of indicator accompanied by an audible
metallic ringing noise caused by the
bucket dancing inside the trap body.
(5) LEAKING STEAM
As a result of wear, the valve will not seal
properly, allowing steam to leak through
the seat.
Indicator needle does not return to "0" or
level of ambient noise between cycles
indicates leakage.
60
STEAM TRAPS
THERMODYNAMIC TRAP (A)
Thermodynamic disk traps can operate
within their working range without any
adjustment or change of valve size.
Being frozen does not damage them.
On startup, air & cool condensate reach
the trap, passing up the inlet orifice "F".
The disc "C" is lifted until it is held
against the boss "H" in the top cap. Air
and condensate flow radially outwards
from the center of the disc into the space
between the seat rings "D" and "E" and
are discharged through the outlet
passage "G"
61
STEAM TRAPS
BASIC THERMODYNAMIC TRAP
OPERATION = NORMAL LOAD
NOTE: Background noise level = "0"
(1) CLOSED - NO DISCHARGE
Indicator at "0" on scale
shows disc valve closed.
(2) OPEN - DISCHARGING CONDENSATE
Indicator rises on scale to
show trap discharging
condensate.
(3) FAILED - OPEN BLOWING LIVE STEAM
Indicator "pegs" on scale along
with high-pitched sound of steam
passing through open valve seat.
62
STEAM TRAPS
THERMODYNAMIC TRAP ©
DETAILED THERMODYNAMIC TRAP OPERATION
(1) LIGHT TO MEDIUM LOAD
Trap operates with intermittent cycle.
Length of cycle will vary in accordance
with the condensate load. A T.D. trap
functioning properly will open and close
with a distinct cycle
(2) HEAVY LOAD
Trap will discharge condensate continuously.
This is usually observed at the startup of
equipment. If the trap does not catch up with
the load and commence intermittent
discharge, this is usually an indication that
the trap is undersize for the application.
Undersize or continuously discharging under
heavy load will register high on the scale but
with some back and forth movement of the
meter needle.
(3) CHATTERING OR RAPID CYCLE
Wear of the disc valve & seat will cause the trap to operate with a rapid cycle resulting
in considerable steam loss. The trap should close between cycles for a period of at
least 15 seconds. Any shorter period of closure indicates the need for replacement.
(4) LEAKING STEAM
As a result of wear, the disc valve will not seal
properly allowing steam to leak through the
seat. The indicator does not return to "0" or
level of ambient noise between cycles indicates
leakage.
63
STEAM TRAPS
64
STEAM TRAPS
FREE FLOAT TRAP (A)
Place probe on trap as shown
BALL FLOAT STEAM TRAPS
are mechanical Traps and operate
on the difference in density
between steam and condensate.
Condensate entering the trap
causes the float ball to rise and
lifts the valve through leverage off
the seat, thus discharging
condensate continuously at steam
temperature.
65
STEAM TRAPS
FLOAT & TRAP OPERATION (B)
BASIC F&T TRAP OPERATION - NORMAL LOAD
NOTE: Background Noise Level = "0"
(A) - CONDENSATE VALVE:
Continuous modulating discharge, No on/off cycle.
Float moves up and down
continuously.
Indicator moves back & forth smoothly
indicating the modulating effect of the
float & valve continuously discharging
condensate
(B) - AIR VENT:
At pre-set temperature below
212 F thermostatic element
closes air vent valve on seat.
1. Note indicator reading.
2. Take reading on pipe upstream of trap
or bypass air vent.
3. Normal, if reading 2 is greater than
reading 1.
4. Air vent is leaking if reading 2 is less
than reading 1.
(C) - FAILED OPEN - BLOWING LIVE STEAM:
Worn valve & seat, broken
linkage, damaged float, etc.
Indicator "pegs" on scale accompanied
by high pitch sound of steam passing
through open valve seat.
66
STEAM TRAPS
FLOAT & TRAP OPERATION (C)
DETAILED F & T TRAP OPERATION
The Float & Trap discharges condensate continuously without any distinct
on/off cycle.
(1) LIGHT LOAD
Continuous discharge of condensate
under light load conditions will
register a very slight modulating
movement of the indicator at the
bottom end of the scale.
Note!: Under extremely light load conditions, at times there may be no
apparent movement of the pointer observed, which is normal.
(2) MEDIUM LOAD
Under medium load conditions the
modulating pointer will register higher
on the scale.
(3) HEAVY LOAD
Indicator will register heavy condensate
load high on the scale indicating the trap is
working at maximum capacity. This
condition is usually observed at startup of
equipment and the trap should catch up
with the load and the modulating pointer
will begin to move down the scale. If the
pointer remains at the top of the scale, this
would be an indication of under sizing.
67
STEAM TRAPS
THERMOSTTIC TRAP (A)
Place probe on trap as shown
68
STEAM TRAPS
THERMOSTATIC TRAP (B)
THERMOSTATIC TRAPS
THERMOSTATIC TRAP:
Cold condensate during startup
drains through the trap. As
temperatures reach 10 to 30
degrees Fahrenheit of
saturation, the trap closes.
During operation thermostatic
traps find an equilibrium point
to drain condensate which is
approximately 10 to 30 degrees
below saturation at a
continuous flow.
69
STEAM TRAPS
THERMOSTATIC TRAP OPERATION (C)
BASIC THERMOSTATIC TRAP OPERATION - NORMAL LOAD
NOTE: Background noise level = "0"
CLOSED - NO DISCHARGE
Bellows is expanded,
valve is closed on seat.
Indicator at "0" on scale shows
valve is closed. No steam leakage is
indicated.
OPEN - DISCHARGING CONDENSATE
The bellow is contracted,
the valve is open.
Indicator rises on the scale to
show the trap is discharging
condensate.
FAILED OPEN - BLOWING LIVE STEAM
Worn valve & seat, failed
open bellows or bi-metal etc.
Indicator "pegs" on scale
accompanied by the high pitch sound
of steam passing through the open
valve seat.
70
SECTION 9 - STEAM COST CHARTS
COST OF LOST STEAM
STEAM FLOW THROUGH STEAM TRAP ORIFICE TABLE
If you know the size of the discharge orifice in the steam trap you may use this table to estimate potential
steam loss through a trap that has failed open. Take the lb./hr. figure X 24 hrs. X 30 dys X .25 X $6.00 to
establish the approximate dollar loss.
Orifice
2 psi
5 psi
10 psi
15 psi
25 psi
50 psi
75 psi
Diameter
.31
.47
.58
.70
.94
1.53
2.12
1/32"
1.25
1.86
2.3
2.8
3.8
6.1
8.5
1/16"
2.81
4.20
5.3
6.3
8.45
13.8
19.1
3/32"
4.5
7.5
9.4
11.2
15.0
24.5
34.0
1/8"
7.8
11.7
14.6
17.6
23.5
38.3
53.1
5/32"
11.2
16.7
21.0
25.3
33.8
55.1
76.4
3/1"
15.3
22.9
28.7
34.4
46.0
75.0
104
7/32"
20.0
29.8
37.4
45.0
60.1
98.0
136
1/4"
25.2
37.8
47.4
56.9
76.1
124
172
9/32"
31.2
46.6
58.5
70.3
94.0
153
212
5/16"
37.7
56.4
70.7
85.1
114
185
257
11/32"
44.9
67.1
84.2
101
135
221
306
3/8"
52.7
78.8
98.8
119
159
259
359
13/32"
61.1
91.4
115
138
184
300
416
7/16"
70.2
105
131
158
211
344
478
15/32"
79.8
119
150
180
241
392
544
1/2"
Orifice
Diameter
1/32"
1/16"
3/32"
1/8"
5/32"
3/1"
7/32"
1/4"
9/32"
5/16"
11/32"
3/8"
13/32"
7/16"
15/32"
1/2"
100 psi
125 psi
150 psi
200 psi
250 psi
300 psi
2.7
10.8
24.4
43.4
67.9
97.7
133
173
220
272
329
391
459
532
611
695
3.3
13.2
29.7
52.9
82.7
119
162
212
268
331
400
476
559
648
744
847
3.9
15.6
35.1
62.4
97.4
140
191
250
316
390
472
561
659
764
877
998
531
20.3
45.7
81.3
127
183
249
325
412
508
615
732
859
996
1144
1301
6.3
25.1
56.4
100
156
226
307
401
507
327
758
902
1059
1228
1410
1604
7.4
29.8
67.0
119
186
268
365
477
603
745
901
1073
1259
1460
1676
1907
71
FAILED STEAM TRAP DOLLAR LOSS TABLE FOR RADIATOR TRAPS
Steam Cost @ $6.00/1000 lbs.
Pressure balanced thermostatic radiator traps are most commonly found on low
pressure (25 psig and under) steam heating systems. Located on radiators, convectors
and other radiant heat units, there may be literally hundreds of these scattered
throughout larger facilities. The operating unit within the trap, a pressure-balanced
disc or bellows, is filled with a distilled liquid to respond to the changes in temperature
(i.e. pressure) within the trap. The disc or bellows will generally "fail open" after three
to five years of hard work (after five years it has opened and closed hundreds of
thousands of times). The orifice sizes (*) shown, for all the steam traps, are
conservative estimates of the average size found in these traps. Actual dollar loss may
be more or less than shown.
Pressure
@ Trap
PIPE SIZE
1/2"
2
5
10
15
25
50
75
100
150
125 psig
psig
psig
psig
psig psig psig
psig
psig
psig
*Assigned orifice size in the steam trap styles and sizes per differential operating
pressures as shown.
*3/16
*1/4" *1/4" *1/4" *1/4" *1/4" *7/32" *7/32" *7/32" *7/32"
"
Dollar Loss/Month $22
3/4"
$40
$48
$65
$81
*5/16" *5/16" *5/16" *5/16" *5/16" *1/4"
Dollar Loss/Month $34
1"
$32
*3/8"
Dollar Loss/Month $48
$101
$143
$175
$151
*1/4"
*1/4"
*1/4"
*7/32
"
$147
$187
$229
$206
$50
$63
$76
*3/8"
*3/8"
*3/8" *3/8" *5/16" *5/16" *5/16" *5/16"
*9/32
"
$72
$91
$109
$341
$145
$106
$112
$165
$229
$294
$357
NOTE:
THE DOLLAR COST FIGURES SHOWN
ON ALL THESE CHARTS REFLECTS
THE COST OF STEAM IN THE 1980’S.
72
DOLLAR LOSS TABLE FOR FLOAT AND THERMOSTATIC TRAPS
Steam cost @ $6.00/1000 lbs.
Float & Thermostatic (F&T) traps are found where higher levels of condensate are
produced (Unit heaters, end-of-mains, heat exchangers, etc.) The modulating control
provided by the float allows for continuous discharge of condensate when necessary.
The air vent in this trap will generally "fail open" after three to five years of hard
work. The mechanism and float assembly, which allows the condensate to discharge,
may operate efficiently for eight to ten years, and will normally "fail closed" after this
time. However, sludge and debris accumulation may cause the assembly to fail open
and waste "big bucks" as shown. Actual dollar loss may be more or less than shown.
Pressure @ 2
5
10
15
25
100
125
150
50 psig 75 psig
Trap
psig
psig
psig
psig
psig
psig
psig
psig
LOSS FROM AIR VENT: The air vents in all the F&T traps generally utilize a 1/4" discharge
orifice.
Dollar
$22
$32
$40
$48
$65
$105 $147 $187 $229 $270
Loss/Month
*Assigned orifice size utilized by the mechanism assembly per sizes and
PIPE SIZE
differential pressures shown.
3/4 & 1"
*1/4" *1/4" *1/4" *1/4" *3/16" *1/8" *1/8" *3/32" *3/32" *3/32"
Dollar
$22
$32
$40
$48
$37
$26
$37
$26
$32
$38
Loss/Month
1 1/4"
*5/16" *5/16" *5/16 *5/16" *1/4" *3/16" *3/16" *1/8" *1/8" *1/8"
Dollar
$34
$50
$63
$76
$65
$60
$83
$47
$57
$67
Loss/Month
*13/32 *13/32 *13/32 *13/32
1 1/2"
*5/16" *7/32" *7/32" *5/32" *5/32" *5/32"
"
"
"
"
Dollar
$57
$85
$105 $129 $101 $81
$112 $73
$89
$105
Loss/Month
*15/32
2"
*1/2" *1/2" *1/2" *1/2"
*7/16" *7/16" *5/16" *5/16" *5/16"
"
Dollar
$86
$129 $162 $194 $228 $324 $516 $294 $357 $421
Loss/Month
73
DOLLAR LOSS TABLE FOR INVERTED BUCKET TRAPS
Steam Cost @ $6/1000
Inverted bucket traps are generally found on higher-pressure steam systems.
However, many like the long lasting characteristics of the trap and install them where
one might normally find float and thermostatic traps. Due to the many different orifice
sizes in the many different models of inverted bucket traps the guide below is a really
"rough" estimate of the potential steam loss. For example: An Armstrong model 883,
3/4" bucket trap made for 15 psig steam will utilize a 1/2" orifice for high condensate
capacity applications; whereas a model 881, 3/4" bucket trap for 15 psig steam will
utilize a 1/4" orifice. The differences in potential steam loss between the two are
significant. Therefore, we have tried to be very conservative when assigning the orifice
size in the table below. The actual dollar loss may be significantly different depending
upon the specific model of the trap.
The orifice sizes in the table below are referenced from the following Armstrong model
numbers: 1/2" pipe size = Model 881; 3/4" pipe size = Model 882; 1" pipe size = Model
883. Order Armstrong Bulletin # 301-H which contains a complete guide to the orifice
sizes in the different Armstrong bucket traps.
Pressure @ Trap 2 psig 5 psig 10 psig 15 psig 25 psig 50 psig
* Assigned orifice sizes employed in the traps below when
under the differential steam pressure shown.
PIPE SIZE
1/2"
*1/4"
*1/4"
*1/4"
*1/4"
*1/4"
*5/32"
Dollar
Loss/Month
3/4"
Dollar
Loss/Month
1"
Dollar
Loss/Month
$22
$32
$40
$48
$65
$41
*5/16"
$34
*5/16"
$50
*5/16"
$63
*5/16"
$76
*1/4"
$65
*3/16"
$60
*1/2"
$86
*1/2"
$129
*1/2"
$162
*1/2"
$194
*3/8"
$145
*11/32"
$199
Pressure @ Trap 75 psig 100 psig 125 psig 150 psig 200 psig 250 psig
* Assigned orifice sizes employed in the traps below when
under the differential steam pressure shown.
PIPE SIZE
1/2"
*1/8"
*1/8"
*1/8"
*7/64" *7/64" *3/32"
Dollar
$37
$47
$57
$53
$68
$72
Loss/Month
3/4"
*5/32" *5/32" *5/32"
*1/8"
*1/8"
*7/64"
Dollar
$57
$73
$89
$67
$87
$84
Loss/Month
1"
*9/32"
*1/4"
*1/4"
*7/32" *3/16" *3/16"
Dollar
$185
$187
$229
$206
$197
$244
Loss/Month
74
75
SECTION 10 - BENEFITS
BENEFITS OF THE TOOLS
THE HIGH COST OF PROCRASTINATION
Estimates of loss/year costs of air and Nitrogen have become staggering. The
cost savings of the relatively simple project of repairing leaks are
tremendous.
The estimated cost per year of on 1/8" air leak is $2,980.00. * If only one 1/8"
air leak was assumed for each of the main plant areas, the total annual loss
cost would be approximately $23,840.00. * Nitrogen leaks are even more
expensive events. One Nitrogen leak of only 1/16" costs a whopping
$10,700.00 (est.)** per annum. If we use the air leak scenario for the 1/16"
Nitrogen leak, the loss cost would be almost $75,000.00. A larger tank such
as a broken 1/4" OD instrument line will cost a plant $270.00 per day. THAT'S
OVER $90,000.00 per year in Nitrogen for ONE leak.
Total savings of nearly $1,000,000.00 annually just for repairing fourteen or
so small leaks . . . a fair return. There are likely more than that when one
considers the total number of possible leak sources there are in some plants.
The savings is more than sufficient to cover and definitely justifies the cost of
the repair staff, the detection equipment, all the tools, a man lift and the
materials needed to make the repairs.
Under these circumstances and with the costs involved in today's
competitive market, a leak detection program must be an imperative. As the
program progresses, routine leak monitoring could and should be
undertaken to assure that a high level of line leakage does not again become
a source of loss to the plant.
Information furnished by the Institute For Nondestructive Testing
*Air leak costs based on 100 psig, $0.22/Mcf, and 867 hrs/yr.
**Nitrogen leak costs based on 150 psig, $0.214/Ccf, 8670 hrs/hr
(industry standards for leakage and nominal area charges for Nitrogen.
cost/Ccf often INCREASES with excessive consumption)
76
PAY BACK ANALYSIS
STEAM LEAKS
In a steam system with 150 lbs. of pressure and a production cost of $6 per
thousand pounds, a leak 1/32" in diameter - no larger than the tip of a ball
point pen - can cost $249 per year.
In a 50 p.s.i. System with a production cost of $8/1000 pounds, a number of
small leaks totaling about 1/4" will cost $8,339.52 in one year. Double the
number of leaks to total 1/2" and the cost will be $33,358.08.
At Sun Co.'s Toledo, Ohio refinery, the ultrasonic testing identified 188
malfunctioning steam traps. Savings from replacing these traps have been in
the range of $56,000 per year based on reducing 450 p.s.i. steam
consumption by about 1,000 lb./hr.
Chevron USA, Perth Amboy NJ has six to eight thousand steam traps
throughout the plant. The plant generates close to 500,000 lb./hr. of steam. A
steam trap audit revealed the trap failure rate was up to 28%. The refinery has
increased its steam trap reliability by 15% within two years after ultrasonic
testing was put into use. The reduction in steam losses is savings at least
$50,000 a month.
Indiana University-Perdue University campus at Indianapolis has three to four
thousand steam traps. Technicians using the ultrasonic testing to monitor
steam traps and by-pass valves estimate they are saving $300,000 per year.
AIR LEAKS
In a 75 p.s.i. system with a production cost of $0.14/m cu. Ft., a number of
leaks totaling 1/4" will cost $5,734.15 in a year. Double that to 1/2" and the
cost of wasted air will be $22,940.25.
In a 100 p.s.i. system, based on nozzle coefficient of .65, and a production
cost of $0.10 per thousand cubic feet, a number of leaks totaling 1/8" will
result in the loss of 740,210 cubic feet of air per month, at a cost of $74.01 per
month. Triple that to 3/8" and the waste will be 6,671,090 cu. Ft. per month
and $667.19.
An electronics components company estimated ultrasonic testing would be
instrumental in saving them $25 per day in the cost of operating two 250 cfm
air compressors at 110 p.s.i. and eliminate the immediate need to purchase
an additional compressor.
77
BEARINGS
N-Ren . . . A bearing on one of their two 500 H.P. motors froze up and did
$2,500 damage. Using the stethoscope module, they picked up a bad bearing
noise on the second motor . . . resulting in immediate repair and avoiding a
complete shutdown in one area of the plant.
Anaconda Wire . . . On a Saturday, when the shop was shut down,
maintenance personnel used a regular stethoscope and picked up a bearing
noise with the machine running at low speed. The housing they listened to
contained two bearings at a cost of $1,500 each. Their stethoscope could not
determine which bearing was going bad. With the plant back in operation on
Monday, and all other machinery running, ultrasonic testing was used to
check the machine in question, while running at top speed. The ultrasonic
test identified the front bearing as being the culprit while the back bearing
was okay. They immediately replaced only the front bearing at a cost of
$1,500, and were back into production much sooner than would have been
the case had they replaced both bearings.
BENEFITS OF AN IN PLANT AIR LEAK SURVEY
BENEFITS AND METHODS OF AN IN-PLANT AIR-LEAK SURVEY
Contrary to conventional wisdom, air is not free. In fact, air costs more than
water, electricity, or steam. Air leaks slow down a plant's operation,
expending more power than necessary to supply compressed air, and can
lead to shutdown. Uninformed maintenance practices are often the culprit.
For example, recently a small manufacturing company considering the
purchase of a second, larger air compressor ordered an audit of its
compressed air system. The findings showed that more than $75,000 of the
$100,000 the company had been spending annually to run its primary air
compressor was being wasted because of air leaks, uncontrolled demand,
and poor applications. Installing a larger air compressor would only have
compounded the problem while increasing energy consumption. What the
company really needed was a program to educate its maintenance staff about
testing procedures and technologies that would eliminate waste and allow
the plant to run more efficiently.
Learning how to conduct an in plant air-leak survey is simple. A variety of
tools using airborne ultrasound technology allow inspectors to detect
deteriorating components and repair them before they fail. The results are
startling, and the impact on the company's bottom line will impress top
management.
78
What causes air leaks?
Audits generally turn up few leaks in the overhead distribution piping,
although such leaks can easily be detected from the ground with the right
equipment. Corrosion also is not a common cause of leaks. The real
problems are usually at ground level in hoses, hose connections and fittings,
quick couplers, filters, regulators, and lubricators.
Air cylinders often leak around the rod seals or piston packing. Pistonpacking leaks are apparent at the cylinder control valve exhaust port.
Pipefittings may be loose because equipment has been improperly installed
or because sealant was improperly applied during installation.
Poor quality materials also can be a cause. In other instances, the location of
the piping causes a leak. If a pipe connection is bumped occasionally by lift
trucks, pallet jacks, or other material handling equipment, the fittings may
become cracked.
Sometimes leaks are the result of human error. Workers may leave leaking
tools on, often beyond the inlet air isolation valves, or neglect to close valves
and halt the supply of air when there is no need for a particular application or
when production is shut down.
The audit
Any manufacturing plant will benefit from a compressed air system audit.
Typically, production demands account for only 50 percent of the total
demand for compressed air the remainder is lost. An audit pinpoints all air
leaks.
An audit at a small manufacturing plant revealed that the company was
spending about $34,000/year to run two air compressors; if they had repaired
the air leaks they could have run just as efficiently with one compressor. At a
larger facility, an audit showed that repairing all air leaks would reduce the
demand for air by approximately 900 scfm and save about $70,000/year.
It is also important to identify uncontrolled demand and improper pressure
regulation, and to address poor applications for air, including conventional
blow-off. Auditors evaluate the system's distribution and storage systems
and review specific problem areas. They also evaluate the operation of all air
compressors, determine the need for additional equipment or controls,
measure energy demand, and judge energy use. The auditors thoroughly
check all equipment, tagging leaks and noting their locations on a worksheet,
79
and provide a list of materials needed to fix the equipment.
The audit concludes with a report listing operating costs, the cost of
improvements, projected savings, and a plan to achieve successful results.
Maintenance professionals who pay close attention to the air-leak audit
quickly learn how to keep their plants operating efficiently. They assign
maintenance crews to fix all leaks and go back through the facility to retest
all the problem areas. An ultrasonic detector is the best tool for the job.
FINANCIAL RESULTS AND SAVINGS
In one plant repairing 324 air leaks lowered the demand for air an average of
750 cfm on the first shift, 475 cfm on the second shift, and 425 cfm on the
third shift and Saturdays. The air leaks cost $52,304/year.
Eliminating uncontrolled demand through proper pressure regulation lowered
the demand by an average of 570 dfm on the first shift, 330 cfm on the second
shift, and 280 cfm on the third shift and Saturdays. Uncontrolled demand cost
$37,008/year.
Installing high-efficiency, air-amplifying blow-off nozzles and eliminating or
controlling questionable applications for blow-of lowered the demand an
estimated 1035 cfm on the first shift, 570 cfm on the second shift, and 475
cfm on the third shift and Saturdays. Blow-off application improvements
saved $64,933/year.
These three major areas of improvement accounted for $154,245 of the
system's operating cost.
How to conduct an air-leak survey
All operating equipment should be checked every six months. The best plan
is to inspect the entire plant department by department, always following the
same pattern. However, if such a program seems too daunting, a plant might
limit periodic inspections to one or two departments. As maintenance crews
become more familiar with ultrasound and inspection techniques, the survey
can be expanded to include the entire operation.
80
Air-leak inspections can be conducted with the equipment on or off. As a
rule, technicians begin by determining at what kinds of loads the air
compressors are operating. They use the ultrasonic tools to establish sound
patterns of properly operating equipment. It is important to slowly scan the
entire air line system.
The technician aims the ultrasonic detector directly at the part of the machine
under inspection and makes small cross-pattern movements along all
exposed sections. The more sensitivity levels the instrument has, the better
it performs. If, for example, a one inch. pipe is suspected of leaking, the
technician should wave the gun an inch or two in each direction, moving
parallel to the pipe until finding the leak. Then the instrument's close focus
adapter can be honed in on the exact location of the leak. The problem may
actually be in the fitting.
When testing for leaks in air or blow-off applications near open air tubes, for
example, the technicians must focus the tool away from interfering noise and
isolate the ultrasonic sounds.
Every leak should be tagged with the location and an identification number.
A note should also record a description of each leak, including the size. The
make and serial number of equipment such as quick couplers, filters,
regulators, and lubricators that may be causing a chronic leakage problem
should be recorded so as to avoid purchasing the part again.
The technician should double-check each leak that is repaired before moving
on to the next area. Often new leaks are inadvertently created during the
repair stage and go unnoticed because the part is not retested. Using
confirmation and shielding techniques, such as sealing, always pays off
when the entire connection is checked one final time.
Confirmation techniques include moving the ultrasonic detector back and
forth over the leak site to confirm the loudest point. The technician places
the rubber-focusing extension over the suspect area to seal it from the
environment. If this area is the sources of the leak, the sound will continue; if
not it will diminish. For the shielding technique, the rubber-focusing
extension is used alone, or the technician can cup a hand over the end of the
probe to scan close to the surface of the test area.
After the equipment has been repaired, the tag is removed, but the recording
sheet should be kept for reference. Finally, the technician should monitor the
load of the air compressors are too large for its real air demands. Many
compressors are designed to operate most efficiently at or near full load. If a
81
compressor is consuming 80 percent of the input power to deliver 50 percent
of its capacity following repairs, the plant might be wise to consider smaller
air compressors. The savings can be substantial.
After the number of air leaks has been determined and repairs have been
made, it is important to document the program, including an estimate of
projected cost savings. The costs of labor, materials, cooling water, and
other related expenses must be factored in.
AIR LEAK COST CHARTS
(Information provided by The Institute For Nondestructive Testing, 1999)
Leak Diameter
Air Loss
Air Loss
Loss
in inches
Cfm
cu ft/day
$ per Day
1/64
0.5
576
$0.14
1/32
1.6
2,304
$0.58
3/64
3.7
5,270
$1.32
1/16
6.5
9,288
$2.32
3/32
14.5
20,880
$5.22
1/8
25.8
37,152
$9.29
3/16
58.3
83,952
$21.00
1/4
103.0
148,320
$37.08
5/16
162.0
233,280
$58.32
3/8
234.0
336,960
$84.24
Note: Based on 100 psig, $0.25/Mcf, 8760 hours/year)
Loss
Loss
$ per Month
$ per Year
$4.20
$50.40
$17.60
$211.00
$40.10
$481.00
$70.50
$846.00
$158.70
$1,904.00
$282.40
$3,389.00
$638.40
$7,661.00
$1,127.20
$13,526.00
$1,772.90
$21,275.00
$2,560.90
$30,731.00
DIAMETER
OF LEAKS
Cu. ft/DAY
AIR LOSS
DOLLARS
LOSS/DAY
DOLLARS
LOSS/MONTH
DOLLARS
LOSS/YEAR
1/32 inch
1,764
$.25
$7.50
$91.25
1/6 inch
7,100
$1.00
$30.00
$365.00
1/8 inch
27,486
$3.85
$115.44
$1,405.25
1/4 inch
112,233
$15.71
$471.38
$5,734.15
3/8 inch
251,950
$35.27
$1,058.10
$12,873.55
1/2 inch
448,933
$62.85
$1,885.52
$22,940.25
Costs based on 75 psi Syst. at a production cost of $0.14/MCF, with a run time of 8,760
Hours/Year
These charts do not address the cost of premature compressor wear or
replacement incurred from additional run time to accommodate air leakage.
82
83
SPEECH GIVEN AT MEETING OF NON DESTRUCTIVE TESTING
SOCIETY
THERMOGRAPHICS = LIGHT SIGNATURE YOU CANNOT SEE.
VIBRATION ANALYSYS = VIBRATION SIGNATURE YOU CAN NOT
FEEL.
ULTRA SOUND = SOUND SIGNATURE YOU CAN NOT HEAR
As the name Ultrasonic implies, this term deals with that branch of acoustics
whose frequency waves are above the highest frequency audible to the
human ear. Ultrasonic vibrations (Sound Waves) are measured in terms of
Hertz (Hz). One Hz is one wave cycle per second. The human ear is generally
assumed to hear sounds with a frequency of 16 Hertz up to a limit of 20 KiloHertz (20,000 cycles per second). However, most sounds, which we hear, are
in a very limited range, considerably below this theoretical limit.
Today the most generally accepted definition of Ultrasonics refers to sound
waves with a frequency greater than 16 Khz. The present upper limit of
detectable ultrasonic frequencies is approximately 100 Mega-Hertz
(100,000,000 cycles per second).
As the frequency of the sound wave changes, the way in which the sound
wave propagates also changes. Low frequency sounds tend to propagate
spherically with equal intensity in every direction. Higher frequency waves
particularly those over 20 kilohertz tend to propagate more directionally like a
beam. This makes the location easier to pinpoint. As the wave frequency
increases it becomes more and more attenuated by distance, requiring the
detector to be closer to the source or more sensitive to hear the vibration.
Leak Testing Objectives
Like other forms of nondestructive testing, leak testing has a great impact on
the safety or performance of a product. Reliable leak testing saves costs by
reducing the number of reworked products, warranty repairs and liability
claims. The time and money invested in leak testing often produces
immediate profit.
The three most common reasons for performing a
leak test are:
84
1. MATERIAL LOSS
With the high cost of energy, material loss is increasingly important. By leak
testing, energy is saved not only directly, through the conservation of fuels
such as gasoline and LNG but also indirectly, through the saving of
expensive chemicals and even compressed air.
2. CONTAMINATION
With stricter OSHA and environmental regulations, this reason for testing is
growing rapidly. Leakage of dangerous gases or liquids pollutes and creates
serious personnel hazards.
3. RELIABILITY
Component reliability has long been a major reason for leakage testing. Leak
tests operate directly to assure serviceability of critical parts from
pacemakers to refrigeration units.
MECHANISMS THAT PRODUCE ULTRASOUND
A number of different mechanisms produce translatable ultrasonic sound in
the 40 kilohertz region. These mechanisms are:
1) Turbulent fluid flow
2) Liquid movement
3) Mechanical movement
4) Sound generators
5) Electrical discharge
Turbulent Flow:
Sometimes called sonic or choked flow, turbulent flow is the most widely
recognized source of ultrasonic vibrations. Turbulent flow occurs with any
fluid whether a liquid or a gas. This type of flow is one of the three basic flow
modes. Laminar and molecular are the other two. Of the three, however, only
the turbulent flow of a fluid across a pressure boundary creates acoustic
waves. These waves can be transmitted through the medium of the fluid
itself, through the containment structure, or through the air surrounding the
containment structure. Thus, depending upon the situation, turbulent flow
can be detected in a variety of ways. Turbulent flow often occurs through
holes with a diameter of .015 inches to .0005 inches. It is generally assumed
that the smallest detectable flow through leaks this size is 1 x 10⁻² standard
cc/sec. (a rate equivalent to a pound of Freon leaking out of a container every
3 months). Besides instrument sensitivity two other controllable factors,
viscosity and velocity can improve test results. Lower viscosity fluids tend to
create greater turbulent energy and as a result, pressurization with a gas like
helium may allow the location of leaks, which could not be found with air. In
85
the same way, great velocity (or its complement, a greater pressure
differential) causes increased turbulent energy. For practical purposes
pressure differentials of 5 psi are at the lower limit of delectability but with
small holes in rigid material leaks with a pressure as small as one-half pound
pressure have been successfully detected. Higher pressures can cause the
acoustic waves to have a higher and more constant amplitude, making leak
testing easier and more reliable.
There has been considerable discussion as to which type of leak
configuration is more likely to cause acoustic vibrations. Several authors
have held that labyrinth type leaks such as threaded fittings or folded metal
edges would diffuse the turbulent vibrations to such an extent that turbulent
flow would be undetectable. Actual tests however have proven that even with
pressure differentials as low as 10 psi labyrinth leaks can be detected.
Liquid Movement:
Besides turbulent flow, liquid movements such as cavitation, flashing of a
liquid to a vapor, and bubble bursts can also produce high-energy ultrasonic
noise. Cavitation can be especially useful for finding small vacuum leaks,
which are usually considered difficult to find ultrasonically. By applying a
high surface tension liquid, (such as alcohol) on the area to be tested, the
ultrasonic energy produced as the film is broken by the vacuum, creates a
signal which is detectable at a distance of several feet. In the same way, small
bubbles from synthetic bubble fluids applied across a pressure boundary
create strong ultrasonic signals as they burst and reform. Bubbles, which are
often too small to be seen, can be heard easily ultrasonically. Soap and water
will not work for this technique. Soap or detergent solutions form a great
number of bubbles when applied. This makes it difficult to distinguish real
from apparent leaks. In addition, soap solutions form large rather than small
bubbles and as a result, they do not produce much ultrasonic energy nor do
they burst very often. For these and a number of other reasons soap or
detergent solutions have been banned by a number of regulatory agencies
such as ASTM and ASME for any leak detection use.
Mechanical Movement:
Another widely used source of ultrasonic energy results from contact
between metal parts and stress. Stressed material, which results in
stretching, shearing, abrading or other types of deformation releases high
levels of ultrasonic energy. Ultrasonic sound resulting from friction is often
used to monitor machines to prevent shutdowns and predict maintenance
needs. Examples of problems that are easy to detect are: Bearings with pits,
cracked races, loose parts, lubrication failure, misalignment, malfunctioning
valves or gears. By detecting defects such as insufficient oil film, worn
86
bearings, misalignment, or defective gears before significant increases in
vibration or temperature incipient failures can be prevented.
Sound Generation:
A technique for testing unpressurized containers involves the use of an
ultrasonic sound generator and a detector matched to the same frequency.
When used in a closed container with walls, which reflect rather than dampen
noise, the ultrasonic signals will pass through small leaks and can be
detected. This technique has been used successfully on items such as:
welded seams, airplane compartments, refrigerators, automobile windows,
condenser tubes and large tanks.
Electrical Discharge:
The fourth type of ultrasonic noise that can be detected is generated by
electrical discharges (corona), sparks, and flashovers. When an electrical
spark jumps from one object to another, the heated air expands rapidly and
produces an airborne shock wave. (This effect is similar to that of "thunder"
which accompanies a lightning stroke). The strong agitation of the air
produces ultrasonic noise. Therefore, the detection device can be used to
locate electrical defects, i.e., high-voltage corona discharges, arcs in cables,
on trolley arms, carbon brushes, transformers, motors, contactors,
insulators, reactors, distribution systems and other electrical installations
subject to electrical leakage or breakdown of insulation.
advance of a vibration or heat signature, making it very compatible Ultrasonic
testing will often detect an ultrasound signature in when used to determine
productive areas for the application of vibration analyses or thermographic
imaging.
Ultrasonic test equipment is inexpensive, easy to use, and highly portable.
87
SECTION 11
FEATURES AND PRICE COMPARISON
OF COMPETITIVE EQUIPMENT
¾ EFI- W-7 Microsonic Detection Kit
¾ UE Systems Ultraprobe 2000 Detection Kit
¾ SDT-USA 150 Detection Kit
EFI- Electronics for Industry
W-7 Industrial Detection Kit
UE- Systems
Ultraprobe 2000 Detection Kit
W7 Pistol style detector with
analog & audio indication
Ultrasonic Scanner Module
Ultrasonic Contact Module
Ultrasonic Tone Generator
Rubber Focusing Probe
Deluxe Headset
Inexpensive 9V batteries and AA
batteries. (You can’t use a
charger in the field)
2000 Pistol style detector with
analog & audio indication
Ultrasonic Scanner Module
Ultrasonic Contact Module
Ultrasonic Tone Generator
Rubber Focusing Probe
Deluxe Headset
Rechargeable batteries &
charger
(ni-cads = memory degradation)
Instruction Manual & Adjusting
Tool
Nylon With Foam Insert Carry
Case
Warranty (1) Year Parts/Labor
Manufactured – USA
KIT PRICE $1,270.00 plus
S/H
Instruction Manual
Haliburton Aluminum Carry
Case
Warranty (1) Year Parts/Labor
Manufactured – USA
KIT PRICE $4,495.00 plus
S/H
SDT USA
SDT-150 Ultrasonic
Detection Kit
150-Detector with LED and
audio indication
Ultrasonic Scanner Module
Ultrasonic Contact Module
Ultrasonic Tone Generator
Rubber Focusing Probe
Not Included
Rechargeable batteries &
charger
(ni-cads = memory
degradation)
Instruction Manual
Sturdy Carry Case
Unknown
Manufactured - Europe
KIT PRICE $4,416.00
plus S/H
88
SECTION 12
SPECIFIC USES AND APPLICATIONS
This section contains separate, printable, pages for many of
the more common problems that can be solved with the
Electronics For Industry, Inc. tools.
You may wish to print these pages and use them as
justification for buying and using Ultrasonic Tools in your
plant, shop, hospital or other applications.
89
INDUSTRIAL & COMMERCIAL
ULTRASONIC INSPECTION
DESCRIPTION
Inspection of mechanical equipment with EFI ultrasonic detection equipment has many advantages.
Ultrasound inspection provides early warning of bearing failure, detects lack of lubrication, detects leaks in
compressed-air and vacuum systems, prevents over lubrication and can be used on high as well as low
speed bearings. In addition, since ultrasound is a high frequency, short wave signal, it is possible to filter
out stray, confusing background noises and focuses on the specific item to be inspected. Basic inspection
methods are extremely simple and require very little training. In addition, ultrasonic testing works
extremely well with vibration technology. In fact the two technologies complement each other and enhance
any PDM, (Predictive Maintenance) program.
Some common areas for ultrasonic inspection in the industrial & commercial environment:
x
x
x
x
x
x
x
x
x
x
x
COMPRESSED-AIR/GAS SYSTEMS FOR LEAKS
VACUUM SYSTEMS FOR LEAKS
BEARINGS FOR WEAR
ELECTRIC MOTORS FOR BEARING WEAR AND ELECTRICAL SHORTING
PUMPS FOR INTERNAL WEAR
ELECTRIC PANELS FOR ARCING AND SHORTING
HYDROLICS FOR INTERNAL LEAKAGE
WIRE ROPE FOR EXTERNAL WEAR & FRAY
DRIVE BELTS FOR CRACKS AND WEAR (with equipment in operation & belt guards in
place)
ENCLOSED AREAS (ROOMS, CONTAINERS, VAULTS, TANKS, ETC.)
VALVES, GASKETS, SEALS
How Ultrasonic Detection Works
Compressed gases, when leaking produce a turbulent flow with strong ultrasonic components. By scanning
fittings, a leak will be heard as a distinct "hiss". Due to the high frequency, short wave nature of ultrasound,
the sound will be loudest at its point of origin. The Microsonic unit translates the ultrasonic leak signals
into recognizable audible signals where they are heard through headphones and seen as intensity
increments on a meter. A unique test incorporates a patented ultrasonic transmitter called a Tone Generator.
This device is placed in a cabin, tank or container where it floods the area with an intense ultrasonic signal.
The generated ultrasound will deflect off solid seals but will flow through a leak path.
Detection Methods
Pressurized air & gas leaks produce turbulence with high frequency components. To locate compressed air
and gas leaks, simply scan the test area with the hand held EFI Microsonic detector. If a leak is present,
ultrasonic sound not audible to the human ear is produced. This high frequency sound will be "heard" by
the EFI detector and converted into an audible "hissing" sound heard through the systems headphones.
Simply follow it to the loudest point. If it is difficult to discriminate the leaks location, reduce the
sensitivity and continue to follow to the loudest point.
REMEMBER, TO FIX IT…..FIRST YOU HAVE TO FIND IT!
90
BEARINGS, PUMPS & MOTORS
ULTRASONIC INSPECTION
DESCRIPTION
Inspection of mechanical equipment with ultrasonic instruments such as the Microsonic unit has many
advantages. Ultrasound inspection provides:
x
x
x
x
x
x
Early warning of Bearing failure
Early warning of Poor of lubrication
Prevent over lubrication during maintenance
Effective on High & Low speed bearings
Detect carbon brush “Hop” before damage to armature
Monitor pump internal components
In addition, since ultrasound is a high frequency, short wave signal, it is possible to filter out stray,
confusing background noises and focuses on the specific item to be inspected. Basic inspection methods are
extremely simple and require very little training. In addition ultrasonic testing works extremely well with
vibration technology. In fact the two technologies complement each other and enhance any PDM,
(Predictive Maintenance) program.
How Ultrasound Bearing and Mechanical Inspection Works
Mechanical movements produce a wide spectrum of sound. By focusing on a narrow band of high
frequencies, the Microsonic unit detects subtle changes in amplitude and sound quality. It then heterodynes
these normally undetectable sounds down into the audible range where they are observed on a meter (for
trending and comparison purposes) and heard through headphones.
Based on research by NASA, it was established that ultrasonic monitoring provides early warning of
bearing failure. Various stages of bearing failure have been established. An 8 dB gain over baseline
indicates pre-failure or lack of lubrication. A 12 dB increase establishes the very beginning of the failure
mode. A 16 dB gain indicates advanced failure condition while a 35-50 dB gain warns of catastrophic
failure.
Ultrasonic Bearing Inspection Method
There are two basic methods for ultrasonic bearing monitoring: comparative and historical. In order to
trouble shoot bearings or to establish a baseline, it is necessary to compare similar bearings for potential
differences in amplitude and sound quality. To do this, make a reference point on a bearing housing or use
the grease fitting, using the stethoscope module make contact with the machinery and reduce the sensitivity
until the bearing reads 20 on the meter. Then compare this base reading to other similar bearings. A failing
bearing will show an 8 dB gain. Once a series of bearings have been tested, and a base line set, data is
recorded and then compared to future readings for historical trending and analysis.
REMEMBER, TO FIX IT…..FIRST YOU HAVE TO FIND IT!
91
COMPRESSORS, PRESSURE & VACUUM
SYSTEM ULTRASONIC INSPECTION
DESCRIPTION
Compressors are the heart of any compressed gas system. Routine inspection and maintenance can prevent
unplanned downtime. Although any type of compressor can be inspected ultrasonically, the most common
application centers on larger reciprocating types. Specifically, valve function in these compressors is
critical. Minor valve leaks can rapidly lead to large leaks, which can effect production and impact on plant
safety.
How Ultrasonic Compressor Inspection Works
As with any mechanical movement, there is a "normal" operation and a "deviation". In the case of valves,
normal function is the typical open/close movement. Ultrasonically this will be observed as a rhythmic
movement. When valve movement changes due to leakage or sticking, the sound pattern changes. Each
condition has ultrasonic components that can be sensed and monitored by the Microsonic detection unit.
Due to the short wave, high frequency nature of ultrasound, the sounds produced by a compressor valve can
be isolated, which provides a clear test result.
Detection Method
For the "contact' method touch the valve with the contact probe and reduce the sensitivity until it is
possible to obtain a meter swing around mid-line and hear the valve open/close movement. When testing,
be sure to compare similar valves to each other (i.e. intake to intake, exhaust to exhaust) and under the
same conditions (i.e. idling vs. working). For additional localization, use the scanning module with rubber
focusing extension.
Pressure & Vacuum Systems
Compressed air and gas (Oxy, Nitrogen, LNG, CNG, etc) and vacuum systems are easily checked for leaks
or system flow. Fittings, valves, couplings, regulators, hoses, piping, auto-bleeders, pneumatic actuators,
gaskets & seals, etc are among the system components easily checked. Ultrasound is produced by the
passage of air or gas though an orifice under pressure or vacuum. The ultrasonic signature is “heard” by our
detectors and converted into a sound you can hear through headphones and seen as an indication on an
analog meter.
Detection method
Simply scan detector along system components (pipe, valves, connectors, etc) until leak is found.
Ordinary sounds such as background noise, talking or machinery (no matter how loud) are not detected.
But leaks are easily pinpointed even in otherwise deafening background sound levels.
REMEMBER, TO FIX IT…..FIRST YOU HAVE TO FIND IT!
92
STEAM TRAP, VALVE & FITTINGS
ULTRASONIC INSPECTION
DESCRIPTION
When valves or steam traps leak or fail, it can be extremely costly in terms of product quality, safety and
energy loss. Valve operation affects the way fluids will flow through a system. There are great differences
in the way particular valves and steam traps work. Ultrasonic testing makes it easy to adjust for these
differences and readily determine operating conditions while valves and traps are on-line.
How Ultrasonic Leak Detection works?
As fluid moves from the high-pressure side of a valve through the seat to the low-pressure side, it produces
turbulence. This turbulence generates ultrasound, which is detected by the ultrasonic probe, and translated,
via heterodyning, down into the audible range. The translated ultrasounds are heard through headphones
and seen as intensity increments on a meter. High frequency tuning allows users to adjust for differences in
fluid viscosity (i.e. water vs. steam) and reduce any interference from stray pipe noises.
Leak Detection Method
Inspection methods vary depending on the type of valve or steam trap. Therefore the primary rule is to
know the details of your system, for example the way a specific trap or valve may work under specific
conditions. In order to determine leakage or blockage: touch upstream of the valve or trap and reduce the
sensitivity of the instrument until the meter reads about 50. If it is desirable to hear the specific sound
quality of the fluid, simply tune the frequency until the sound you would expect to hear becomes clear. It's
that simple. Next, touch downstream of the valve or trap and compare intensity levels. If the sound is
louder down stream, the fluid is passing through. If the sound level is low, the valve or trap is closed.
Ultrasonic valve and steam trap inspection is considered a "positive" test in that an operator can instantly
identify sound quality and intensity differentials and thereby determine operating condition accurately.
REMRMBER, TO FIX IT…..FIRST YOU HAVE TO FIND IT!
93
PIPE, JOINTS, VAULTS, VALVES, & TANKS
ULTRASONIC INSPECTION
DESCRIPTION
Pipe is the heart of any gas or liquid distribution system. Inspection and maintenance can prevent
unplanned leaks and downtime. Any type of pipe can be inspected ultrasonically.
x
x
x
x
x
x
x
Concrete
PVC, PE
Steel
Iron
Aluminum
Copper
Fiberglass Filament Wound, Etc.
DON'T BURY A LEAK!!
Ultrasonic testing is done during assembly, WITHOUT WATER OR AIR PRESSURE, BEFORE
BURYING PIPE! Find Rolled or Pinched Gaskets, Cracks or Pinholes. Frequently this equipment pays for
itself with the first use! You may also use the EFI Microsonic tool to detect leaks underground after the
project is buried.
DETECTION METHODS
During assembly, a Microsonic tone generator is placed inside the pipe or other volume (Vault, Manhole,
etc,) this will saturate the inside area with high intensity ultrasonic sound, not audible to the human ear.
This high intensity ultrasonic sound will find and exit any hole in the pipe or joint. A hand held Microsonic
Detector is then used to scan the area being tested for leaks (seals, gaskets, cracks or pinholes). When a
leak is detected the operator will hear an audible indication in his headphones and will see an indication on
the analog meter built into the detector. It's that simple, Ultrasonic testing is quick, accurate and cost
effective.
Pressurized air & gas leaks produce turbulence with high frequency components. To locate compressed air
and gas leaks, simply scan the test area with the hand held EFI Microsonic detector. If a leak is present,
ultrasonic sound not audible to the human ear is produced. This high frequency sound will be "heard" by
the EFI detector and converted into an audible "hissing" sound heard through the systems headphones.
Simply follow it to the loudest point. If it is difficult to discriminate the leaks location, reduce the
sensitivity and continue to follow to the loudest point.
REMEMBER, TO FIX IT………FIRST YOU HAVE TO FIND IT!
94
TRANSPORTATION & EQUIPMENT
ULTRASONIC INSPECTION
DESCRIPTION
The most common areas for ultrasonic inspection in the transportation industry are: wind noise, water
leaks, air brakes, and emission systems. Until the advent of ultrasound, water leak and wind noise detection
involved many hours of trial and error with a water hose and flashlight. Often a few trips around the block,
listening with a doctor's stethoscope for a wind noise captured two people for many hours. Air brake leaks
and emission leaks can take hours to locate using conventional soap and water bubble testing. Not only can
service shops benefit from Ultrasonic Inspection, so can Quality Assurance departments by providing
accurate fast and simple testing.
How Ultrasonic Detection Works
Compressed gases, when leaking produce a turbulent flow with strong ultrasonic components. By scanning
fittings, a leak will be heard as a distinct "hiss". Due to the high frequency, short wave nature of ultrasound,
the sound will be loudest at its point of origin. The Microsonic unit translates the ultrasonic leak signals
into recognizable audible signals where they are heard through headphones and seen as intensity
increments on a meter. A unique test incorporates a patented ultrasonic transmitter called a Tone Generator.
This device is placed in a cabin, tank or container where it floods the area with an intense ultrasonic signal.
The generated ultrasound will deflect off solid seals but will flow through a leak path.
Some of the most common areas for ultrasonic inspection include:
x COMPRESSED AIR & BRAKE SYSTEMS
x CNG & LNG GAS SYSTEMS
x VACUUM SYSTEMS
x ENGINE INTAKE SYSTEM LEAKS
x EXHAUST SYSTEM LEAKS
x ENGINE INTERNAL DIAGNOSTICS
x DRIVE LINE DIAGNOSTICS
x BEARINGS, PUMPS & ELECTRIC MOTORS
x FUEL TANKS
x WIND NOISE & WATER LEAKS & TRUNK COMPARTMENT LEAKS
x DOOR, WINDOW, FLOOR & ROOF SEALS
x HYDROLICS
x FUEL INJECTORS
x DRIVE BELTS
x
Detection Methods
Pressurized air, gas & fluid leaks produce turbulence with high frequency components. To locate air, gas or
fluid leaks under pressure, simply scan the test area with the hand held EFI Microsonic detector. If a leak is
present, ultrasonic sound not audible to the human ear is produced. This high frequency sound will be
"heard" by the EFI detector and converted into an audible "hissing" sound heard through the systems
headphones. Simply follow it to the loudest point. If it is difficult to discriminate the leaks location, reduce
the sensitivity and continue to follow to the loudest point.
REMEMBER, TO FIX IT…..FIRST YOU HAVE TO FIND IT!
95
MARINE
ULTRASONIC INSPECTION
DESCRIPTION
Ultrasonic inspection can be used in practically every phase of the maritime industry. There are application
for marine vessels, dry docks, ship repair and shipbuilding. Some of the major areas of inspection cover
water tightness integrity of bulkheads, leak detection of hatches and vapor recovery systems, condensers,
steam systems, pressurized gas systems (including nitrogen blankets), valve leak detection/blockage and
steam traps. Mechanical applications include early warning of bearing failure, inspection of motors, pumps,
gears, gearboxes and compressors. Dry dock usage not only includes all of the above, but also extremely
large energy savings through compressed air leak detection.
How Ultrasonic Detection Works
High frequency sounds are produced by operating equipment and fluid flows. The Microsonic unit detects
subtle changes in mechanical equipment and turbulence produced by leakage to provide early warning.
Ultrasounds are translated into the audible range where the sound quality is easily recognized through
acoustically isolating headphones. The headphones are designed to be used in the extremely noisy
environment of the engine room. Intensity levels are read on a meter for trending, diagnosis and trouble
shooting purposes. A patented Tone Generator can be used to test for leaks in lieu of pressure by flooding
an area with intense ultrasound. The sound will deflect off a solid surface and penetrate leak sites.
Detection Methods
To locate leaks around pressure or vacuum systems simply scan the area while listening for a "hissing"
sound and follow it to the loudest point. Vapor recovery systems can be checked on-line in this manner.
Hatches and bulkheads may be tested with the patented ultrasonic Tone Generator. Place the generator on
one side (i.e. of the bulkhead) and scan the other side for sonic penetration, which will have a distinctive
tone sound. Scan the area to the loudest point of emission, which will indicate the leak site. For valves,
touch upstream and reduce the sensitivity to get a mid-line reading on the meter, then touch downstream
and compare intensity levels. A more intense reading downstream indicates leakage. No sound indicates
blockage. Set a baseline by selecting one test/reference point, touch that point with the contact probe, and
reduce the sensitivity to obtain a mid meter reading. An increase of 8 dB indicates "pre-failure" or lack of
lubrication, while an increase of 12-16 dB over baseline indicates the beginning of the failure mode. It's
that simple.
REMEMBER, TO FIX IT…..FIRST YOU HAVE TO FIND IT!
96
AIRCRAFT
ULTRASONIC INSPECTIONS
DESCRIPTION
Aircraft have many systems that can be checked ultrasonically. Some of the more common applications
include:
x
x
x
x
x
x
x
x
x
x
x
x
x
Locate leaks in oxygen systems
Locate cabin pressure leaks
Locate tire leaks
Locate problems in hydraulic valves and actuators
Locate leaks in cockpit windows & doors
Locate problems with bearings, pumps, motors and gears
Locate leaks in floatation devices
Locate leaks in fuel cells
Detect & locate corona affecting electronics
Detect & locate arcing & sparking in electrical systems
Locate vacuum and static system leaks
Detect instrument face leakage
Detect which gyroscopic instrument is starting to fail
How Ultrasonic Detection Works
Operating systems such as compressed gas systems, valves, motors, pumps, etc., all produce ultrasound.
Some high frequency sounds are generated from turbulence, others from friction. As components begin to
wear, fail or leak, there is a change in the normal ultrasonic pattern. This can be detected as an increase in
amplitude, a change in sound quality or a change in sound pattern. Since ultrasound is a high frequency,
short wave signal, it will isolate the signal by localizing the problems and detect subtle changes for early
warning detection.
The Microsonic test unit detects minute changes in ultrasound and converts these signals so that they may
be heard through headphones, and observed as intensity increments on a meter. By using plug-in modules
for either a scanning mode or a contact mode, equipment may be inspected for leakage or for mechanical
problems. Due to its portability and its' rating of Intrinsically Safe, class 1, Division 1, Groups A, B, C, &
D, the Microsonic unit may be used all around the aircraft.
Detection Methods
For general leak detection, in a scanning mode, move along the area to be tested with the sensitivity at high
and, using a slight waving motion, listen for the loudest "hissing" sound and follow the sound to the loudest
point. Use the patented Tone Generator to test for cabin pressure and cockpit window leaks in the same
manner. The only difference will be the sound, which is heard as a distinctive tone, with graduating
intensity. For valves and actuators, touch upstream and reduce the sensitivity to a mid-line reading.
Compare with the downstream reading. Test bearings and mechanical equipment by reducing the
sensitivity first and then tune the frequency until the desired mechanical sound is heard. Compare readings
over time for trending. It's that simple.
97
REMEMBER, TO
HAVE TO FIND
AMUSEMENT RIDE INDUSTRY
FIX IT…..FIRST YOU
IT!
ULTRASONIC INSPECTION
DESCRIPTION
Inspection of mechanical equipment with EFI ultrasonic detection equipment has many advantages.
Ultrasound inspection provides early warning of bearing failure, detects lack of lubrication, detects leaks in
compressed-air and vacuum systems, prevents over lubrication and can be used on high as well as low
speed bearings. In addition, since ultrasound is a high frequency, short wave signal, it is possible to filter
out stray, confusing background noises and focuses on the specific item to be inspected. Basic inspection
methods are extremely simple and require very little training. In addition, ultrasonic testing works
extremely well with vibration technology. In fact the two technologies complement each other and enhance
any PDM, (Predictive Maintenance) program.
Some common areas for ultrasonic inspection in the amusement ride industry include:
x COMPRESSED-AIR SYSTEMS FOR LEAKS
x AIR BRAKE SYSTEMS FOR LEAKS
x VACUUM SYSTEMS FOR LEAKS
x BEARINGS FOR EARLY WEAR
x ELECTRIC MOTORS FOR BEARING WEAR, BRUSH HOP, AND ELECTRICAL
SHORTING
x ELECTRIC PANELS FOR ARCING AND SHORTING
x DRIVE BELTS FOR CRACKS AND WEAR (with equipment in operation & belt guards in
place)
x PUMPS FOR INTERNAL WEAR & LEAKAGE
x HYDRAULIC SYSTEMS FOR INTERNAL LEAKAGE
x RAILS, TRACKS & SUPPORTS FOR LOOSE COMPONENTS & LEAKAGE
x FILTRATION SYSTEMS FOR FLOW
How Ultrasonic Detection Works
Compressed gases, when leaking produce a turbulent flow with strong ultrasonic components. By scanning
fittings, a leak will be heard as a distinct "hiss". Due to the high frequency, short wave nature of ultrasound,
the sound will be loudest at its point of origin. The Microsonic unit translates the ultrasonic leak signals
into recognizable audible signals where they are heard through headphones and seen as intensity
increments on a meter. A unique test incorporates a patented ultrasonic transmitter called a Tone Generator.
This device is placed in a cabin, tank or container where it floods the area with an intense ultrasonic signal.
The generated ultrasound will deflect off solid seals but will flow through a leak path.
Detection Methods
Pressurized air & gas leaks produce turbulence with high frequency components. To locate compressed air
and gas leaks, simply scan the test area with the hand held EFI Microsonic detector. If a leak is present,
ultrasonic sound not audible to the human ear is produced. This high frequency sound will be "heard" by
the EFI detector and converted into an audible "hissing" sound heard through the systems headphones.
Simply follow it to the loudest point. If it is difficult to discriminate the leaks location, reduce the
sensitivity and continue to follow to the loudest point.
REMEMBER, TO FIX IT…..FIRST YOU HAVE TO FIND IT!
98
Heat Exchangers, Boilers,
Condensers
DESCRIPTION
Leak Detection of heat exchangers, boilers and condensers most often involves inspection of
three generic areas: tubes, tube sheets and housings. The Microsonic detection unit can be used
to detect leaks three ways: pressure leaks, vacuum leaks or by utilizing a unique Tone
transmission method.
While it may be necessary to take a unit off-line to inspect for leaks, with ultrasound, it is often
possible to perform an inspection while on-line or at partial load.
How Ultrasonic Leak Detection Works
During a leak, the fluid will flow from high pressure to low pressure producing a turbulent flow at
the leak site. This turbulence has strong ultrasonic components, which are sensed and translated
(via heterodyning) into the audible range where they are heard in headphones and seen as
intensity increments on a meter.
Leak Detection Method
Most often leak detection is concerned with tube leaks. In heat exchangers and condensers,
there are situation where the end plates (headers) are removed or water boxes are isolated while
the unit is still on-line or at partial load. The tube sheet is scanned while listening for a distinct
"hissing" or "rushing" sound of a leak. By adjusting the sensitivity of the instrument to help
discriminate direction, move in the direction of the tube with the loudest sound. Should the unit
require off-line inspection, it is possible to use the Ultrasonic Tone transmission method. Using
ultrasonic transmitters such as the patented Tone Generators, the heat exchanger is flooded with
intense ultrasonic sound waves on the shell side and the tube sheet is scanned for a distinct tone
sound coming from the leak. As above, adjust the sensitivity to discriminate direction and follow
the sound to the loudest point, which will be the leaking tube. While under pressure or vacuum,
fittings and casings may also be checked for leakage in a similar manner.
REMEMBER, TO FIX IT…..FIRST YOU HAVE TO FIND IT!
99
ELECTRICAL
ULTRASONIC INSPECTION
DESCRIPTION
When electrical apparatus such as switch gear, transformer, insulators or pot heads and
splices fail, the results can be catastrophic. This is just as true in industrial plants as it is in
the power transmission and distribution side. Electrical discharges such as arcing, tracking
or coronas are all potential for equipment failure. In addition, the problems of RFI and TVI
impact on our valuable communication networks. All these conditions produce ultrasound
and are detected with the Microsonic detection unit.
How Ultrasonic Electrical Detection Works
Arcing, tracking and corona all produce some form of ionization which disturbs the air
molecules around it. The Microsonic unit detects the high frequency noise produced by this
effect and translates it, via heterodyning, down into the audible ranges. The specific sound
quality of each type of emission is heard in headphones while the intensity of the signal is
observed on a meter. Normally, electrical equipment should be silent, although some may
produce a constant 60-cycle hum or some steady mechanical noises. These should not be
confused with the erratic, sizzling frying, uneven and popping sound of an electrical
discharge.
Detection Method
Before beginning any inspection of mid or high voltage equipment, be sure to review your
plant or company's safety procedures. Essentially, as in generic leak detection, the area of
inspection is scanned using a high sensitivity level. As the discriminate direction, reduce the
sensitivity until this is possible. If it is not possible to remove covers, or plates, scan around
the seams and vent slots. Any potentially damaging discharges should be detected.
REMEMBER, TO FIX IT…..FIRST YOU HAVE TO FIND IT!
100
ULTRASONIC
DRY-PIPE FIRE SYSTEM SURVEY
Ultrasounds, by definition, are beyond the limits of normal human hearing. Using a sophisticated detector a
technician is able translate ultrasonic signals to the range of human hearing.
The theory of ultrasonic detection is relatively simple. Frequency, the number of times a sound wave cycles
from trough to crest, is expressed in cycles per second and measured in hertz. One kilohertz is 1000 cycles
per second. Human ears can generally hear noises in the range of 20 to about 20,000 Hz (20kHz). EFI
ultrasonic detectors start at approximately 20 kHz and can work upward to sound as high as 100kHz. Thus,
Technicians using the ultrasound instrument can tune to and "hear" what is going on in operating
machinery and pressurized systems. When a leak occurs, the fluid or gas passing through produces
turbulence with strong ultrasonic components. Higher-frequency sounds cannot penetrate most solids; yet
they slip through the tiniest of openings. Ultrasound detectors are ideal for isolating such leaks.
The pistol-shaped Microsonic detection unit is battery powered and lightweight. Operators can easily leak
test large sections of piping quickly and effectively. Leaks in pressurized Dry-Pipe systems are found by
simply sweeping the Microsonic detector over the area to be checked. Ultrasound generated at the leak
source is made audible in the headphones and visible on the unit's analog meter. Testing using a soap
solution and watching for bubbles is very time consuming and will frequently miss leaks altogether if the
tested area is not visible
Conducting an ultrasonic leak survey
The best plan is to inspect the entire plant department by department, always following the same pattern.
However, if such a program seems too daunting, a plant might limit periodic inspections to one or two
departments. As maintenance crews become more familiar with ultrasound and inspection techniques, the
survey can be expanded to include the entire operation.
The technician aims the ultrasonic scanner directly at the part of the system under inspection and makes
small cross-pattern movements along all exposed sections. The more sensitivity levels the instrument has,
the better it performs. If, for example, a 1 in. pipe is suspected of leaking, the technician should wave the
gun an inch or two in each direction, moving parallel to the pipe until finding the leak. Then the
instrument's close focus adapter can be honed in on the exact location of the leak. The problem may
actually be in the fitting.
Every leak should be tagged with the location and an identification number. A note should also record a
description of each leak, including the size.
The technician should double-check each leak that is repaired before moving on to the next area. Often new
leaks are inadvertently created during the repair stage and go unnoticed because the area is not retested.
Using confirmation and shielding techniques, such as sealing, always pays off when the entire connection is
checked one final time.
REMEMBER, TO FIX IT…..FIRST YOU HAVE TO FIND IT!
101
MILITARY VEHICLE GROUND SUPPORT
ULTRASONIC INSPECTION
DESCRIPTION
The most common areas for ultrasonic inspection in ground and air transportation are: air/water/gas leaks
into personnel & equipment compartments, pressurized systems leaks, air brakes, motors, pumps &
bearings. Until the advent of ultrasound, liquid and gas intrusion detection involved many hours of trial and
error with a water hose and flashlight. Often applying a liquid under pressure or listening with a
conventional stethoscope for a pressure leak, required two people for many hours. Air brake leaks, exhaust
and intake leaks can take hours to locate using conventional soap and water bubble testing. Not only can
service facilities benefit from Ultrasonic Inspection, so can Quality Assurance departments by providing
highly portable, fast, accurate, and simple testing.
How Ultrasonic Detection Works
Compressed gases, when leaking produce a turbulent flow with strong ultrasonic components. By scanning
fittings, a leak will be heard as a distinct "hiss". Due to the high frequency, short wave nature of ultrasound,
the sound will be loudest at its point of origin. The Microsonic unit translates the ultrasonic leak signals
into recognizable audible signals where they are heard through headphones and seen as intensity
increments on a meter. A unique test incorporates a patented ultrasonic transmitter called a Wave Form
Generator. This device is placed in a cabin, tank, container or compartment where it floods the area with an
intense ultrasonic signal. The generated ultrasound will deflect off solid seals but will flow through a leak
path.
Some of the most common areas for ultrasonic inspection include:
x
x
x
x
x
x
x
x
x
x
x
COMPRESSED AIR SYSTEMS
CNG & LNG GAS SYSTEMS
VACUUM SYSTEMS
INTAKE & EXHAUST SYSTEM LEAKS
ENGINE INTERNAL DIAGNOSTICS
DRIVE LINE DIAGNOSTICS
BEARINGS, PUMPS, MOTORS, SERVOS
AIR & VACUUM ACTUATORS
COMPARTMENT SEALS & GASKETS
HATCH, BULKHEAD, PORT, WINDOW, FLOOR & ROOF SEALS
HYDRAULICS
FUEL INJECTORS
DRIVE BELTS
Detection Methods
Pressurized air, gas & fluid leaks produce turbulence with high frequency components. To locate air, gas or
fluid leaks under pressure, simply scan the test area with the hand held EFI Microsonic detector. If a leak is
present, ultrasonic sound not audible to the human ear is produced. This high frequency sound will be
"heard" by the EFI detector and converted into an audible "hissing" sound heard through the systems
headphones. Simply follow it to the loudest point. If it is difficult to discriminate the leaks location, reduce
the sensitivity and continue to follow to the loudest point.
REMEMBER, TO FIX IT…..FIRST YOU HAVE TO FIND IT!
102
COLLISION REPAIR INDUSTRY -- ULTRASONIC INSPECTION
COME-BACKS AND RE-DO’S = LOST PROFIT & LOST CUSTOMERS
A major repair has been completed and everything is just right, with form, fit and finish reflecting your
shops reputation for quality work!
Your customer comes in to take delivery, inspects the repairs and expects all to be to pre-accident
condition. All is well, the repairs are paid for, forms are signed, and off drives another satisfied customer!
Most of the time this is how it goes!
On occasion a vehicle comes back with a concerned or irate customer complaining about some aspect of
the repair they feel was not done properly and frequently the complaint will involve:
x
x
x
A WATER LEAK AT THE REPAIRED AREA (door, trunk, floor, window)
AN AIR LEAK AT THE REPAIRED AREA
A NOISE THAT “WASN’T THERE BEFORE”
Ultrasonic testing as a quality control procedure during repair and as quality assurance during a predelivery inspection can have a significant affect on customer satisfaction. Ultrasonic testing when shown to
customers will also promote customer confidence and shop credibility.
ULTRASONIC TESTING CAN QUICKLY LOCATE AIR & WATER LEAKS AT:
DOORS, DECK LID, SUN-ROOF & T-TOP (seals, weather-strips, caulking, rust)
FLOOR PAN, ROCKERS, WHEEL-HOUSE, REAR BODY PANEL (caulking, welds, rust)
WINDSHIELD, BACK-GLASS & SIDE GLASS (seals & weather-strip, Rust)
WEATHER STRIPS, CAULKING & DRIP-CHECK
ULTRASONIC TESTING CAN SAVE TIME & MONEY BY QUICKLY LOCATING:
x
x
x
x
x
x
SQUEAKS & RATTLES
BEARING NOISES
EXHAUST LEAKS
DAMAGED BELTS
VACUUM LEAKS
INTERNAL ENGINE, TRANSMISSION & DIFFERENTIAL (WEAR or DAMAGE)
Until the advent of ultrasonic testing, leak detection could involve hours of trial and error
with the use of water testing, bubble testing, tracing fluids or compressed air and powder,
often requiring two technicians for hours. Frequently the results of these efforts were less
than satisfactory!
Ultrasonic testing is fast, simple and accurate. Saving time, money and resources, while
insuring customer satisfaction.
REMEMBER, TO FIX IT…..FIRST YOU HAVE TO FIND IT!
103
NEW CAR & TRUCK DEALERSHIP
¾ SERVICE DEPARTMENT
¾ BODY SHOP
¾ FACILITY MAINTENANCE
SERVICE DEPARTMENT
Ultrasonic testing as a quality control procedure during repair and as quality assurance during a
pre-delivery inspection can have a significant affect on customer satisfaction. Ultrasonic testing when
shown to customers will also promote customer confidence and shop credibility.
x
x
x
x
x
x
x
x
x
x
x
x
AIR AND WATER LEAKS INTO PASSENGER OR TRUNK AREAS
DOOR, WINDOW, FLOOR & ROOF SEALS FOR WATER, AIR OR EXHAUST ENTRY
POINTS
EXHAUST SYSTEM FOR LEAKS
SQUEAK AND RATTLE LOCATION
NEW VEHICLE PRE-DILIVERY INSPECTION
VACUUM SYSTEMS FOR LEAKS
ENGINE INTERNAL DIAGNOSTICS
DRIVE LINE DIAGNOSTICS
BEARINGS FOR EXCESSIVE WEAR
HYDROLIC SYSTEM DIAGNOSTICS OF VALVES, SEALS & PUMPS FOR INTERNAL
LEAKAGE
DRIVE BELTS FOR CUTS & CRACKS
REDUCE DIAGNOSTIC TIMES SIGNIFICANTLY
BODY SHOP
x AIR & WATER LEAKS AT DOORS, DECK-LID, SUN-ROOF, REMOVABLE ROOF PANELS
x AIR & WATER LEAKS AT WINDSHIELD, BACK-GLASS, SIDE GLASS
x AIR & WATER LEAKS AT SEALS, CAULKING, WELDS, RUSTED PANELS
x LOCATE SQUEAKS & RATTLES
x LOCATE EXHAUST SYSTEM LEAKS AND RATTLES
x DETECT DAMAGED ENGINE BELTS
x DETECT DAMAGED BEARINGS
FACILITY MAINTENANCE
x LEAK TEST SHOP COMPRESSED AIR SYSTEM (MAJOR SAVINGS POTENTIAL)
o SEE ATTACHED CHART INDICATING COSTS OF COMPRESSED AIR LEAKS
x LEAK TEST FACILITY DRY-PIPE FIRE SUPPRESANT SYSTEM
x LEAK TEST DOORS, WINDOWS, STORAGE AREAS
Until the advent of ultrasonic testing, leak detection could involve hours of trial and error with the
use of water testing, bubble testing, tracing fluids or compressed air and powder, often requiring two
technicians for hours. Frequently the results of these efforts were less than satisfactory!
Ultrasonic testing is fast, simple and accurate. Saving time, money and resources,
while insuring customer satisfaction.
REMEMBER, TO FIX IT…..FIRST YOU HAVE TO FIND IT!
104
SECTION 13
WHERE TO GET MORE INFORMATION
Resources with Web Links
http://compressorwise.com
CompressorWise.com is an independent research and publishing company
established to help compressor operators save money and get the most from
their compressed air systems. We use the internet to deliver information about
the best people and companies in the compressor business.
http://www.oit.doe.gov/bestpractices/steam
Government steam systems resource site (VERY GOOD)
http://www.oit.doe.gov/bestpractices/compressed_air/ Government
compressed air resource site (VERY GOOD)
http://enerchecksystems.com/index.html
Complete ultrasonic Dist./Mfg. (good how to site)
http://www.amgas.com/ldpage.htm
American gas & chemical Co. Ltd. Leak detection technology
http://leakzone.com
Large leak detection resource site
http://steamlink.com/1wdm.html
Steam trap resource site
http://uesystems.com/
Competing ultrasonic equipment Mfg. (good resource for applications, how to
information.)
http://www.maintenanceresources.com/referenceLibrary/ezine/ultrasonic.htm
Ultrasonic testing procedures for steam traps
http://knowpressure.org/
The Compressed Air Challenge is a voluntary collaboration of industrial users;
manufacturers, distributors, and their associations; consultants; state research
and development agencies; energy efficiency organizations and utilities.
http://www.e4i.com
Web site for Electronics For Industry, Inc.
105
SECTION 14
ADDENDUM – LAST MINUTE CHANGES AND ADDITIONS.
106
The End
Please visit our Web Site:
www.e4i.com
Thank You
107
108