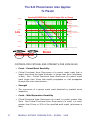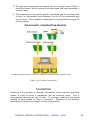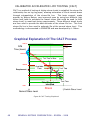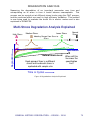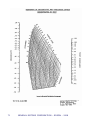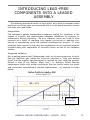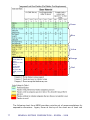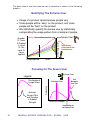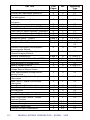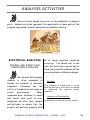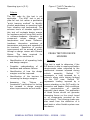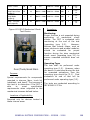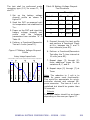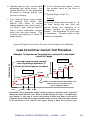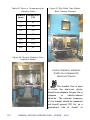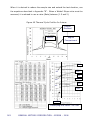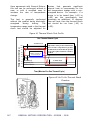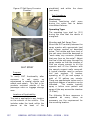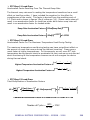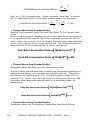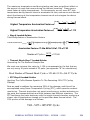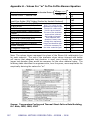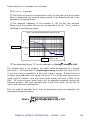
1
What More Could You Want To Know? Rev. 19 T H E GM W 3 17 2 USE R S G UID E THE ELECTRICAL VALIDATION ENGINEERS HANDBOOK SERIES ELECTRICAL COMPONENT TESTING Wait... I still have more to learn! Written By Larry Edson Revision 19 - 2/13/08 1 GENERAL MOTORS CORPORATION – EDSON - 2008 Table of Contents HOW TO USE THIS DOCUMENT.......................................................................... 10 THE QUICKSTART FLOWCHART....................................................................... 12 FREQUENTLY ASKED QUESTIONS.................................................................... 13 ABBREVIATIONS AND SYMBOLS....................................................................... 17 TECHNICAL KNOWLEDGE LIBRARY............................................................... 20 THE TWO BASIC GROUPINGS OF FAILURE MECHANISMS ..................................................................... 20 BASIC METAL FATIGUE ...................................................................................................................... 22 CRITERIA FOR FATIGUE AND STRENGTH PER GMW14048 ................................................................... 28 VIBRATION FATIGUE ......................................................................................................................... 31 THERMAL FATIGUE ........................................................................................................................... 33 ELECTRICAL CONNECTIONS AND CONTACTS .................................................................................... 35 Fretting Corrosion ....................................................................................................................... 35 Gold to Tin Connections .............................................................................................................. 35 The “Tin Commandments”: Guidelines For The Use of Tin on Connector Contacts................. 36 “Golden Rules”: Guidelines For The Use of Gold on Connector Contacts ............................... 37 STRESS-CORROSION-CRACKING ....................................................................................................... 38 CREEP ............................................................................................................................................... 38 TEMPERATURE AGING OR DIFFUSION BASED DEGRADATION ........................................................... 39 DEGRADATION FROM PHOTOCHEMISTRY ........................................................................................... 40 PROBLEMS WITH RED PHOSPHORUS FLAME RETARDANT................................................................. 40 HUMIDITY INGRESS INTO ELECTRONICS ........................................................................................... 40 DENDRITIC GROWTH ......................................................................................................................... 41 LEAD-FREE SOLDER .......................................................................................................................... 42 TIN-PEST ........................................................................................................................................... 47 TIN PEST ........................................................................................................................................... 47 KIRKENDALL VOIDS .......................................................................................................................... 48 TIN-WHISKER FORMATION ............................................................................................................... 49 CREEP-CORROSION OF LEAD-FREE CIRCUIT BOARDS .......................................................................... 50 ECONOMIC SELECTION OF LEAD-FREE SOLDER .................................................................................. 51 TERMS & CONSTRUCTION METHODS & STATISTICS................................ 51 INTERMETALLICS .............................................................................................................................. 51 WAVE SOLDERING PROCESS .............................................................................................................. 51 IR REFLOW SOLDER PROCESS ........................................................................................................... 52 WETTING........................................................................................................................................... 52 SEMICONDUCTOR COMPONENT CONSTRUCTION ................................................................................ 53 CRACKED CERAMIC CHIP CAPACITORS AND BALL GRID ARRAYS ................................................... 54 ANISOTROPIC CONDUCTIVE FILM (ACF) .......................................................................................... 54 “CHIP ON GLASS” CONSTRUCTION ................................................................................................... 56 “PIN IN PASTE” CONSTRUCTION ........................................................................................................ 56 SOLDERING ....................................................................................................................................... 57 “CHIP ON BOARD” CONSTRUCTION .................................................................................................. 58 COMPLIANT PIN CONSTRUCTION....................................................................................................... 58 SELECTIVE SOLDERING ..................................................................................................................... 60 GENERAL MOTORS CORPORATION – EDSON - 2008 2 PLATED THROUGH HOLE ...................................................................................................................60 INTERCONNECT STRESS TEST (IST) TESTING.....................................................................................62 HALT (HIGHLY ACCELERATED LIFE TESTING) .................................................................................63 SUCCESS-RUN TESTING .....................................................................................................................63 MULTIPLE LIFE TESTING ....................................................................................................................64 WEIBULL ANALYSIS ..........................................................................................................................66 WEIBULL SLOPE.................................................................................................................................66 CHARACTERISTIC LIFE .......................................................................................................................67 MEDIAN RANKS .................................................................................................................................67 RELIABILITY EVALUATION POINT (REP) ...........................................................................................68 SUDDEN DEATH TESTING...................................................................................................................69 CALIBRATED ACCELERATED LIFE TESTING (CALT) .........................................................................70 DEGRADATION ANALYSIS ..................................................................................................................71 INTRODUCING LEAD-FREE COMPONENTS INTO A LEADED ASSEMBLY ...................................................................................................................73 LEAD-FREE SOLDER REQUIREMENT FOR NEW PRODUCTS IN 2009+ ...74 THE ADV PLAN OVERVIEW..................................................................................81 MAJOR ELEMENTS THAT SHOULD BE INCLUDED IN THE PLAN .........................................................81 WHY ADV? .......................................................................................................................................81 ANALYTICAL TASKS ..........................................................................................................................84 DEVELOPMENT TASKS .......................................................................................................................84 VALIDATION TASKS ...........................................................................................................................86 STRESS-STRENGTH NON-INTERFERENCE ...........................................................................................87 THE REAL BIG PICTURE .....................................................................................................................91 GMW3172 CODES AND DESCRIPTION ...............................................................92 EXTERNAL STANDARDS/SPECIFICATIONS ..........................................................................................92 PARAMETER TOLERANCE ...................................................................................................................93 OPERATING TYPES .............................................................................................................................95 FUNCTIONAL STATUS CLASSIFICATION CODES ..................................................................................96 CODE DESIGNATION BY LOCATION IN THE VEHICLE ........................................................................97 CODE LETTER FOR ELECTRICAL LOADS ...........................................................................................101 CODE LETTER FOR MECHANICAL LOADS .........................................................................................102 CODE LETTER FOR TEMPERATURE LOADS ........................................................................................103 CODE LETTER FOR CLIMATIC LOADS ...............................................................................................105 CODE LETTER FOR CHEMICAL LOADS AND UV TESTING .................................................................108 CODE LETTER FOR INTERNATIONAL PROTECTION BY ENCLOSURES .................................................111 VALIDATION REQUIREMENTS..........................................................................124 QUOTING REQUIREMENTS ................................................................................................................124 TARGET LIFE....................................................................................................................................125 RELIABILITY ....................................................................................................................................125 RELIABILITY DESIGN REVIEWS ........................................................................................................126 THE TEST FLOWS EXPLAINED ..........................................................................................................130 UNIVERSAL ELECTRONIC DEVICE DURABILITY TEST FLOW .............................................................132 SMART SWITCH TEST FLOW .............................................................................................................132 ESTIMATED TOTAL TEST LEG DURATIONS ......................................................................................137 3 GENERAL MOTORS CORPORATION – EDSON - 2008 Leaded Solder ............................................................................................................................ 137 Lead-Free Solder ....................................................................................................................... 140 GMW3172 A/D/V TASK CHECKLISTS ............................................................................................ 144 GMW3172 A/D/V Task Checklist – DEVELOPMENT Procedures........................................... 147 GMW3172 A/D/V Task Checklist – DESIGN VALIDATION Procedures ................................. 151 GMW3172 A/D/V Task Checklist – PRODUCT VALIDATION Procedures ............................. 157 ANALYSIS ACTIVITIES ........................................................................................ 160 ELECTRICAL ANALYSIS ................................................................................................................. 160 Nominal And Worst Case Performance Analysis ...................................................................... 160 Short/Open Circuit Analysis ...................................................................................................... 161 Lead-Free Solder Checklist........................................................................................................ 161 MECHANICAL ANALYSIS ............................................................................................................... 162 Circuit Board (or Other Critical Element) Resonant Frequency Analysis................................ 162 High Altitude Shipping Pressure Effect Analysis....................................................................... 163 Snap Lock Fastener Analysis ..................................................................................................... 164 Bracket Fatigue Analysis ........................................................................................................... 165 Crush Test Analysis.................................................................................................................... 165 TEMPERATURE ANALYSIS ............................................................................................................. 166 High Altitude Operation Overheating Analysis ......................................................................... 166 Thermal-Fatigue Analysis.......................................................................................................... 168 ANALYTICAL RESULTS REVIEW ................................................................................................... 169 DEVELOPMENT AND EVALUATION ACTIVITIES....................................... 170 FUNCTIONAL AND DIMENSIONAL TESTS IN DEVELOPMENT ....................................................... 170 Functional Checks And Continuous Monitoring ....................................................................... 171 Dimensional ............................................................................................................................... 172 Visual Device Inspection and Dissection................................................................................... 173 ELECTRICAL TESTS IN DEVELOPMENT ........................................................................................ 174 Jump Start .................................................................................................................................. 174 Reverse Polarity ......................................................................................................................... 175 Over Voltage .............................................................................................................................. 176 Short Circuit Tests ..................................................................................................................... 177 Intermittent Short Circuit........................................................................................................... 178 Continuous Short Circuit ........................................................................................................... 179 Ground Interconnect Short To Battery ...................................................................................... 179 Electromagnetic Compatibility (GMW3097) ............................................................................. 180 Ground Path Inductance Sensitivity........................................................................................... 180 Device State Change Waveform Characterization .................................................................... 181 Processor Supervisor Performance Evaluation......................................................................... 182 Fault Injection............................................................................................................................ 182 MECHANICAL TESTS IN DEVELOPMENT....................................................................................... 183 Highly Accelerated Life Test (HALT) ........................................................................................ 183 Crush Test for Device Housing .................................................................................................. 184 Connector Installation Abuse..................................................................................................... 186 Mechanical Shock ...................................................................................................................... 188 Mechanical Shock – Pothole And Collision .......................................................................... 188 Door/Trunk/Hood Slam ......................................................................................................... 190 TEMPERATURE TESTS IN DEVELOPMENT .................................................................................... 191 GENERAL MOTORS CORPORATION – EDSON - 2008 4 Thermal Performance Development ...........................................................................................191 Thermocouple Method............................................................................................................191 Infrared Imaging Method........................................................................................................192 HUMIDITY TESTS IN DEVELOPMENT .............................................................................................192 Moisture Suseptability ................................................................................................................192 Highly Accelerated Stress Test (HAST) For Humidity ...............................................................194 DEVELOPMENT RESULTS REVIEW.................................................................................................195 DESIGN VALIDATION ACTIVITIES...................................................................196 ELECTRICAL TRANSIENT TESTS ....................................................................................................196 Parasitic Current ........................................................................................................................196 Reset Behavior at Voltage Drop .................................................................................................200 Battery Voltage Dropout.............................................................................................................201 Superimposed Voltage Tests .......................................................................................................203 Sinusoidal Superimposed Voltage Test Beyond Normal Levels............................................203 Pulse Superimposed Voltage Test Within Normal Levels .....................................................204 Open Circuit................................................................................................................................205 Open Circuit - Signal Line Single Interruption.......................................................................206 Open Circuit - Signal Line Multiple Interruption ...................................................................206 Open Circuit - Battery Line Interruption ................................................................................206 Open Circuit - Ground Line Interruption................................................................................207 Ground Offset..............................................................................................................................208 Power Offset................................................................................................................................209 Load Circuit Over-Current - modules ........................................................................................210 Load Circuit Over-Current - Bused electrical centers ...............................................................213 Isolation Resistance ....................................................................................................................214 Puncture Strength .......................................................................................................................215 Electromagnetic Compatibility ...................................................................................................216 CONNECTOR TESTS ........................................................................................................................216 Terminal Push-out ......................................................................................................................217 Connector to Connector Engage Force......................................................................................217 Locked Connector – Disengage Force .......................................................................................217 Unlocked Connector – Disengage Force....................................................................................217 Fretting Corrosion Degradation ................................................................................................217 MECHANICAL TESTS ......................................................................................................................220 Why The Vibration Test Is Different Between Cars And Trucks .........................221 Why We Superimpose Thermal Cycling On Top Of Vibration .................................222 A Basic Understanding Of Plastic As It Relates To Temperature And Vibration .................................................................................................................................................222 Vibration With Thermal Cycling.................................................................................................223 Demonstrating Reliability For Robustness to Vibration ............................................................224 Vibration (Sine + Random) – Mounting Location Engine/Transmission...............................227 Random Vibration – Mounting Location: Sprung Masses .....................................................229 Random Vibration – Mounting Location: Unsprung Masses .................................................230 Thermal Cycle Profile Used During All Vibration Tests .......................................................232 Custom Random Vibration Profile For A Bracket Or Electronic Device ..............................233 One Hour Vibration Test After Thermal Fatigue ...................................................................236 Evaluation Of Squeaks And Rattles Following Vibration With Thermal Cycling ......................236 Free Fall .....................................................................................................................................237 5 GENERAL MOTORS CORPORATION – EDSON - 2008 TEMPERATURE TESTS ................................................................................................................... 239 Low Temperature Wakeup ......................................................................................................... 239 High Temperature Durability .................................................................................................... 240 Thermal Fatigue Testing ............................................................................................................ 242 Demonstrating Reliability For Thermal Fatigue Robustness .................................................... 243 COMMON TEST THERMAL FATIGUE STRATEGY ........................................................................... 246 Thermal Shock Air-To-Air (TS).................................................................................................. 248 Power Temperature Cycle (PTC)............................................................................................... 250 HUMIDITY TESTS ........................................................................................................................... 252 Humid Heat Cyclic (HHC)......................................................................................................... 252 Humid Heat Constant (HHCO).................................................................................................. 254 CORROSION TESTS ........................................................................................................................ 255 Salt Mist ..................................................................................................................................... 256 Salt Spray ................................................................................................................................... 259 ENCLOSURES TESTS ....................................................................................................................... 261 Dust ............................................................................................................................................ 261 Water .......................................................................................................................................... 262 All Water Tests Except Seal Evaluation..................................................................................... 262 Seal Evaluation .......................................................................................................................... 263 Sugar Water Function Impairment ............................................................................................ 265 DESIGN VALIDATION RESULTS REVIEW....................................................................................... 266 PRODUCT VALIDATION ACTIVITIES ............................................................. 267 Vibration Shipping ..................................................................................................................... 268 Screening During Production .................................................................................................... 269 Evaluation Of Engineering Changes After Production ............................................................. 269 PRODUCT VALIDATION RESULTS REVIEW ................................................................................... 270 REVISIONS TO THIS MANUAL .......................................................................... 271 Table of Tables TABLE 1 CODE LETTERS BASED ON LOCATION IN THE VEHICLE ........................................................... 98 TABLE 2 CODE LETTER FOR ELECTRICAL LOADS ................................................................................ 101 TABLE 3 CODE LETTER FOR MECHANICAL LOADS .............................................................................. 102 TABLE 4 CODE LETTER FOR TEMPERATURE ........................................................................................ 104 TABLE 5 CODE LETTER FOR CLIMATIC LOADS .................................................................................... 107 TABLE 6 CODE LETTER FOR CHEMICAL LOADS .................................................................................. 110 TABLE 7 INTERNATIONAL PROTECTION CODES ................................................................................... 116 TABLE 8 SUMMARY OF FSC AND OPERATING TYPES .......................................................................... 117 TABLE 9 CELSIUS TO FAHRENHEIT CONVERSION................................................................................ 120 TABLES 10 (A,B,C,D,E) LEADED SOLDER TEST DURATION IN DAYS BY TEST LEG ............................. 137 TABLE 11 (A,B,C,D,E) LEAD-FREE SOLDER TEST DURATION IN DAYS BY TEST LEG .......................... 140 TABLE 12 JUMP START REQUIREMENT ................................................................................................ 175 TABLE 13 REVERSE POLARITY REQUIREMENT .................................................................................... 176 TABLE 14 OVER-VOLTAGE TEST ........................................................................................................ 177 TABLE 15 MECHANICAL SHOCK TESTS BY AREA OF VEHICLE AND BY TYPE OF VEHICLE ............... 189 TABLE 16 QUANTITY OF MECHANICAL SHOCKS FOR CLOSURES ........................................................ 191 GENERAL MOTORS CORPORATION – EDSON - 2008 6 TABLE 17 SLAM BASED MECHANICAL SHOCK LOADS .........................................................................191 TABLE 18 DESCRIPTION OF ONE 24 HOUR MOISTURE SUSCEPTIBILITY TEST CYCLE...........................193 TABLE 19 BATTERY VOLTAGE DROPOUT TEST DURATIONS ................................................................202 TABLE 20 BASELINE VIBRATION TEST DURATIONS FOR 23 PARTS ......................................................225 TABLE 21 DURATION FOR VIBRATION TESTS WITH REDUCED SAMPLE SIZE (6) AS SHOWN IN THE UNIVERSAL DURABILITY TEST FLOW ..........................................................................................226 TABLE 22 ENGINE/TRANSMISSION SINUSOIDAL VIBRATION SEVERITY ...............................................228 TABLE 23 RANDOM VIBRATION PROFILE ENGINE MOUNTED ..............................................................228 TABLE 24 RANDOM VIBRATION PROFILE FOR SPRUNG MASS .............................................................230 TABLE 25 RANDOM VIBRATION PROFILE UNSPRUNG MASS ................................................................231 TABLE 26 HOURS OF FIELD BASED RANDOM VIBRATION FOR BRACKETS ...............................235 TABLE 27 NUMBER OF THERMAL CYCLES WITH A SAMPLE SIZE OF 23 PARTS ..................................247 TABLE 28 NUMBER OF THERMAL CYCLES WITH A SAMPLE SIZE OF 18 PARTS ..................................247 TABLE 29 POWER TEMPERATURE CYCLING REQUIREMENTS ...............................................................252 TABLE 30 CYCLING HUMIDITY TEST REQUIREMENTS..........................................................................253 TABLE 31 CONSTANT HUMIDITY TEST REQUIREMENTS .......................................................................255 TABLE 32 SUMMARY OF SALT CORROSION TESTING ...........................................................................261 TABLE 33 SEAL EVALUATION REQUIREMENTS ....................................................................................265 TABLE 34 SHIPPING VIBRATION PROFILE .............................................................................................268 TABLE 35 MEDIAN RANKS FOR WEIBULL PLOTTING ...........................................................................280 TABLE 36 TEST TO FIELD CORRELATION VALUES ...............................................................................306 TABLE 37 DESIGN MARGIN GUIDELINES .............................................................................................306 Table of Figures FIGURE 1 PIN IN PASTE CONSTRUCTION ................................................................................................57 FIGURE 2 CHIP ON BOARD CONSTRUCTION ...........................................................................................58 FIGURE 3 COMPLIANT PIN CONSTRUCTION ............................................................................................59 FIGURE 4 GRAPHICS OF THE CROSS SECTION OF A PLATED THROUGH HOLE OR VIA...........................60 FIGURE 5 CROSS SECTION OF A PLATED THROUGH HOLE .....................................................................61 FIGURE 6 CRACKS IN THE WALLS OF THE PLATED THROUGH HOLE ......................................................61 FIGURE 7 SUDDEN DEATH TESTING EXPLAINED ....................................................................................69 FIGURE 8 CALT TESTING EXPLAINED ...................................................................................................70 FIGURE 9 DEGRADATION ANALYSIS EXPLAINED ...................................................................................71 FIGURE 10 CODE LETTER SEQUENCE REQUIREMENT ...........................................................................124 FIGURE 11 PROCESS FLOW FOR ELECTRICAL COMPONENT VALIDATION ............................................128 FIGURE 12 THE PRODUCT DEVELOPMENT AND VALIDATION TIMELINE ..............................................129 FIGURE 13 UNIVERSAL ELECTRONIC DEVICE DURABILITY TEST-FLOW FOR LEADED SOLDER ...........133 FIGURE 14 UNIVERSAL ELECTRONIC DEVICE DURABILITY TEST FLOW FOR LEAD-FREE SOLDER ......134 FIGURE 15 SMART SWITCH TEST FLOW FOR LEADED SOLDER ............................................................135 FIGURE 16 SMART SWITCH TEST FLOW FOR LEAD-FREE SOLDER .......................................................136 FIGURE 17 HALT CHAMBER BY THERMOTRON ...................................................................................184 FIGURE 18 FOOT LOAD APPLIED (METHOD B) TO TOP OF DEVICE HOUSING ......................................185 FIGURE 19 FOOT LOAD (METHOD B) CONNECTOR TEST .....................................................................187 FIGURE 20 100 G MECHANICAL SHOCK TEST DEVICE .........................................................................190 FIGURE 21 HAST CHAMBER WITH DOOR OPEN ..................................................................................194 FIGURE 22 HAST CHAMBER VIEW OF THE RACKS THAT HOLD THE PARTS .......................................195 FIGURE 23 HAST CHAMBER VIEW OF INTERNAL ELECTRICAL JUNCTION BLOCK ...............................195 FIGURE 24 SIMPLE PARASITIC CURRENT MEASUREMENT ....................................................................197 7 GENERAL MOTORS CORPORATION – EDSON - 2008 FIGURE 25 PARASITIC CURRENT EVALUATION: GOOD AND BAD BEHAVIOR WITH DECREASING VOLTAGE .................................................................................................................................... 199 FIGURE 26 VOLTAGE DROP TEST ........................................................................................................ 201 FIGURE 27 BATTERY VOLTAGE DROPOUT PROFILE ............................................................................ 202 FIGURE 28 LOAD CIRCUIT OVER-CURRENT TEST PROCEDURE FOR MODULES ................................... 212 FIGURE 29 CROSS SECTION OF AN ELECTRO-DYNAMIC SHAKER ....................................................... 224 FIGURE 30 SOURCES OF ENGINE VIBRATION ....................................................................................... 227 FIGURE 31 SINUSOIDAL VIBRATION FOR ENGINE OR TRANSMISSION.................................................. 228 FIGURE 32 RANDOM VIBRATION PROFILE FOR ENGINE MOUNTED DEVICES ...................................... 228 FIGURE 33 RANDOM VIBRATION PROFILE FOR SPRUNG MASSES ........................................................ 230 FIGURE 34 RANDOM VIBRATION PROFILE UNSPRUNG MASS .............................................................. 231 FIGURE 35 THERMAL CYCLE APPLIED DURING VIBRATION ................................................................ 232 FIGURE 36 THERMAL CHAMBER OVER HYDRAULIC SHAKER ............................................................. 233 FIGURE 37 SLIP-TABLE TYPE SHAKER WITH THERMAL CHAMBER ..................................................... 233 FIGURE 38 EXTRACT FROM ISO 16750-3 SHOWING HOW TO RUN THE FREE FALL DROP TEST ........ 238 FIGURE 39 LOW TEMPERATURE WAKEUP TEST PROFILE .................................................................... 240 FIGURE 40 THERMAL CYCLE PROFILES IN ARIZONA ........................................................................... 245 FIGURE 41 THERMAL SHOCK TEST PROFILE ....................................................................................... 249 FIGURE 42 AIR TO AIR THERMAL SHOCK CHAMBER .......................................................................... 249 FIGURE 43 PARTS INSIDE THE AIR TO AIR THERMAL SHOCK CHAMBER ............................................ 250 FIGURE 44 POWER TEMPERATURE CYCLE (LEAD-FREE DWELL TIMES SHOWN)................................. 251 FIGURE 45 CYCLIC HUMIDITY TEST PROFILE ...................................................................................... 253 FIGURE 46 NORTH AMERICA CORROSION MAP ................................................................................... 258 FIGURE 47 SALT SPRAY CORROSION CHAMBER .................................................................................. 259 FIGURE 48 SEAL EVALUATION TEST SETUP ........................................................................................ 265 FIGURE 49 WEIBULL PLOTTING EXAMPLE .......................................................................................... 279 FIGURE 50 LIMITER EXAMPLE USED IN SNAPFIT DESIGN ................................................................... 313 Table of Equations EQUATION 1 SUCCESS-RUN EQUATION3.............................................................................................. 277 EQUATION 2 SAMPLE SIZE EQUATION3. ............................................................................................... 277 EQUATION 3 OVER-TEST EQUATION ................................................................................................... 277 EQUATION 4 LEAD-FREE ACCELERATION FACTOR ............................................................................. 285 EQUATION 5 LEADED-SOLDER ACCELERATION FACTOR..................................................................... 293 EQUATION 6 MULTIPLE LIFE TESTING WHEN USING A REDUCED SAMPLE SIZE................................. 300 EQUATION 7 ACCELERATED VIBRATION STRESS-LIFE EQUATION ...................................................... 300 EQUATION 8 ADJUSTMENT FACTOR FOR SCALING PSD TO GRMS ....................................................... 301 EQUATION 9 ELECTRO-DYNAMIC SHAKER TABLE DISPLACEMENT .................................................... 302 EQUATION 10 ARRHENIUS EQUATION FOR ACCELERATED TEMPERATURE TESTING .......................... 303 EQUATION 11 ARRHENIUS-PECK ACCELERATION FACTOR FOR TEMPERATURE AND HUMIDITY ........ 304 Appendices APPENDIX A – GMW 3172 TEST PLAN TEMPLATE ................................................................. 274 APPENDIX B – RELIABILITY DESIGN REVIEWS..................................................................... 275 GENERAL MOTORS CORPORATION – EDSON - 2008 8 APPENDIX C – SUCCESS-RUN STATISTICS...............................................................................277 APPENDIX D – WEIBULL ANALYSIS AS APPLIED TO “VIBRATION TEST-TO-FAILURE” .....................................................................................................................................278 APPENDIX E – LEAD-FREE SOLDER CONSIDERATIONS .......................................................281 APPENDIX F – LEAD-FREE SOLDER GUIDELINES FOR THERMAL SHOCK TESTING AND POWER TEMPERATURE CYCLE TESTING.........................................................284 APPENDIX G – LEADED-SOLDER GUIDELINES FOR THERMAL SHOCK AND POWER TEMPERATURE CYCLE TESTING........................................................................292 APPENDIX H – VALUES FOR “M“ IN THE COFFIN-MANSON EQUATION...........................299 APPENDIX I – GUIDELINES FOR VIBRATION TESTING WITH A REDUCED SAMPLE SIZE .....................................................................................................................................300 APPENDIX J - GUIDELINES FOR HIGH TEMPERATURE DURABILITY TESTING ..............303 APPENDIX K - ACCELERATED HUMIDITY TESTING..............................................................304 APPENDIX L – RELATIONSHIP OF “RELIABILITY ON TEST” TO “RELIABILITY IN THE FIELD AND DESIGN MARGINS ............................................................................305 APPENDIX M - PLASTIC SNAPFIT DESIGN WORKSHEET ......................................................307 APPENDIX N – HARDWARE-SOFTWARE FUNCTIONAL ROBUSTNESS TESTING ............314 APPENDIX O – DESIGNING A BRACKET WITH ADEQUATE FATIGUE LIFE......................318 REFERENCES ...................................................................................................................................324 9 GENERAL MOTORS CORPORATION – EDSON - 2008 HOW TO USE THIS DOCUMENT This document was written to assist the engineering community in the proper use and interpretation of GMW3172. In any situation where there may appear to be a difference between this handbook and the most recent official specification, the official specification will always take precedence over this handbook. Let’s begin with a basic understanding of the concept of ADV. ADV stands for Analysis, Development and Validation and describes the sequence of activities that should occur during product development. Analysis refers to activities that can be carried out on the design without the need for a physical product. The analysis of the circuit design would be a typical task that can occur prior to making actual parts. Development refers to activities that can be carried out on a very small sample of product as soon as physical product is available. These are tests that are designed to reveal outlier weaknesses by testing with stress beyond the specification. This activity is designed as an early warning opportunity to correct weaknesses at a time when correction is most economical. These tests are not intended to demonstrate reliability. Validation refers to activities that prove out the final design before assembly into a vehicle. These activities fall into two categories: Qualitative Tests that have empirically shown their ability to discriminate between good and bad product. Quantitative Tests that reliability requirements. statistically demonstrate Begin with a review of the “Quick-Start Flowchart” and the “Frequently Asked Questions”. Study “The Universal Durability Test Flow” as this is a very valuable focal point for understanding and discussing the sequencing of the various tests. Identify your code sequence from table (1) and then use the “ADV Task Checklist” to identify what tests should, and should not be run on your product. This must be clearly conveyed to the supplier. Remember, not every test needs to be run on every product. GENERAL MOTORS CORPORATION – EDSON - 2008 10 Learn what each code letter means by reviewing tables (2) through (7). Every test will have a corresponding “Operating Type” code and “Functional Status Classification” code. You must learn and understand these codes. As you need additional knowledge regarding each individual test, look for the Wizard and the Wizard’s-Words, which will add background and explanation for each test. A review of the “ADV Plan Overview” will provide the background of the strategy behind GMW3172. It all boils down to one simple fact: “You must behave as if you were the only person responsible for the reliability of your product…. only you.” – L. Edson Why I Am Showing You Optical Illusions And Poetry To Accompany The Hardcore Science and Math! We all live with the illusion of boundaries that we cannot cross. Then, some brave soul crosses one of those boundaries and reveals the “can’t” as only an illusion. Illusions span our personal lives as well as our work lives. Remember, there was a time when many thought that the earth was flat, and a time when it was thought that your lungs would explode if you ran faster than a “4-minute mile,” and again, there was a time when it was thought that an accelerated test was interesting, but not realistic. Every illusion meets its day of reckoning as the pursuit of truth is relentless. The truth will stand firm as the illusions are eventually replaced with a deeper understanding of reality. The spirit of the “boundary crosser” glows brightly in the poems; “On Beyond Zebra,” by Theodor Seuss Geisel (1904 – 1991) and “The Deacon’s Masterpiece,” by Oliver Wendell Holmes (1809 – 1894). I hope your quest for developing reliable products is accompanied with the same degree of passion exemplified in these poems. In The Beginning…. Said Conrad Cornelius o’Donald o’Dell, My very young friend who is learning to spell: “The A is for Ape. And the B is for Bear. “The C is for Camel. The H is for Hare. “The M is for Mouse. And the R is for Rat. “I know all the twenty-six letters like that... 11 through to Z is for Zebra. I know them all well.” Said Conrad Cornelius o’Donald o’Dell. “So now I know everything anyone knows “From beginning to end. From the start to the close. “Because Z is as far as the alphabet goes.” But then something happened……. (Dr. Seuss – “On Beyond Zebra”) GENERAL MOTORS CORPORATION – EDSON - 2008 THE QUICKSTART FLOWCHART You at The Start Identify where in the vehicle your product will be located Turn to table (1) and write down the code sequence that is suggested based upon the location of your product in the vehicle Working from left to right, take each test category code letter, turn to the appropriate table for that code letter, and make sure this code letter properly describes your product. If necessary, change the letter to best fit your product based on tables (2) through (7). Proceed from letter to letter until all test categories have been reviewed. Write down your final choice for the code sequence. This code sequence must be identified in the SOR that is sent to the supplier Supplier You and The Supplier at The Finish Specifying tests and looking at test data is not enough. You must discuss the tests, the test setups, how the test was run, what was observed, when it was observed, and you need to see, touch, and inspect a sample of the parts that were tested. This hands-on, engineer-to-engineer discussion is essential in knowing and understanding how your product is really performing on test. This activity is also known as DRBTR and should be the focal point in the Reliability Design Reviews that are required by GMW3172. The cadence of the Reliability Design Reviews are identified in the ADV Process Flow Chart The code sequence establishes the major environmental parameters for many of the tests required by GMW3172. However, additional tests may be necessary based upon the requirements in the CTS. The total collection of tasks are required are to be identified on the ADVP&R form. Additionally, a GMW3172 Test Template should be completed with the assistance of a member of the GMW3172 Expert Team. Detailed definitions for each test will be documented in the Test Template by the supplier, and with final approval by the GMW3172 Expert, the completed Test Template will become the official Test Plan. The Test Plan should also be accompanied by an agreed upon version of the Test Flow as shown in this Handbook. GENERAL MOTORS CORPORATION – EDSON - 2008 12 FREQUENTLY ASKED QUESTIONS 1. What type of product does GMW3172 apply to? • This document is intended for electronic devices with circuit boards, however, the definition of environments and stress levels are appropriate for anything that is to be attached to the vehicle. The following concepts are all relevant for things involving vehicles, regardless of their electrical content: • Mechanical Shock from potholes • Vibration from rough roads • Thermal Cycling from the environment and use • Corrosion and Humidity from the environment • Water and Dust from the passengers and the environment 2. Why is GMW3172 so thick compared to other specifications, and why does it require a “Handbook”? • This document subscribes to the concept that a good specification must apply “a lesson plan” approach to QRD to ensure that the right activity occurs at the right time, thus ensuring a great product at the right time. A continued focus on improving “A” and “D” activities to prevent “V” problems is unique to this document. The Handbook provides a level of technical understanding not available elsewhere. 3. Who else uses GMW3172 besides me? • This is a global document and is used by GM in all of the countries where GM has a presence. Mexico, Germany, Sweden, Brazil, Australia, and East Asia are using this document right along with you. 4. Do Ford, Chrysler, and Toyota use a similar document? • 13 A similar, but not identical, set of documents exist in each of these other organizations. I have reviewed and studied the documents from Chrysler, Toyota, and Volkswagen, as a benchmarking effort, to ensure that GM requirements are not lacking in any particular area. Conclusion: GMW3172 is exceptionally comprehensive without being excessive. Our suppliers and competition recognize the value of the comprehensiveness of GMW3172. Companies like UPS have GENERAL MOTORS CORPORATION – EDSON - 2008 chosen to use GMW3172 for validation of vehicle aftermarket products. 5. A common question is often posed: The supplier is moving his circuit board assembly operation from Ajigistan to Bajigistan. What tests should be rerun? This is a case where one needs to return to the basic concepts behind the “physics of failure” (see the section on Failure Mechanisms). When product manufacturing is simply relocated there is a concern for assembly quality and ionic contamination. When design changes are made the concern increases. Please read the section entitled “Evaluation of Engineering Changes After production.” 6. How do I know what vibration requirement to use, and what does sprung and un-sprung mass mean? • 7. A sprung mass is anything attached to the body or the chassis. An un-sprung mass is anything attached to the wheels, tires, or suspension system below the springs of the vehicle. Determine where your product will be attached and use the corresponding random vibration test. My supplier is telling me that the vibration test in GMW3172 is too severe for the location where his product will be located. What should I do? • The vibration profiles defined in GMW3172 are the result of engineers from many different car companies and component suppliers pooling their data to derive a worst-case profile for each of the major location categories. This effort resulted in the formation of the ISO16750-3 international specification for vibration testing. For example, the sprung-mass profile defined in this document is the worst case for anywhere on the body or frame of the vehicle. Designing a component to meet this requirement means that it could be reused in another location, on a different vehicle, without the need to re-validate the product. The underlying strategy is to “have a requirement to design to” before a vehicle would ever be available. When an actual vehicle becomes available, it will be too late to economically change the product if improvement is needed. When a product will never change its location significantly, and when that product is located in a least-severe area of the location category, then you could decide to actually measure a similar vehicle to obtain the actual Power Spectral Density Plot (PSD) when that vehicle is driven on the Belgian Blocks. Remember, that the PSD you measure would need to be run from 252 hours to 1800 hours (standard durations X 3 to include all ases). These test durations should be reduced (normally reduced to GENERAL MOTORS CORPORATION – EDSON - 2008 14 24 hours) with a corresponding increase in GRMS level per the equations described in the vibration section and Appendix “G.” The data collection and analysis to derive the PSD and test is non-trivial. 8. Some suppliers want to run a vibration test called a “sine-sweep”. What is more severe, sine-sweep or random vibration? • The simple answer is; “the random vibration test is more severe.” ♦ Explanation: A device will experience fatigue damage when it experiences its resonance frequency. Electronic devices attached to the vehicle experience a broad spectrum of frequencies spanning 10 Hz. to 1000 Hz. The resonant frequency of all of our products resides within this range of frequencies. Random vibration will allow the device to resonate all of the time. A sinesweep will only allow the device to resonate for a brief period as the shaker sweeps through the resonant frequency of that product. 9. Why are the corrosion tests in GMW3172 more severe than what we see in other specifications? • 10. Why did you write this User’s Guide Handbook when we already have the specification? • The technical depth and widespread usage of GMW3172 has demanded that the engineering community be provided a complete understanding in the use of this document. • The constraints of specification structure and formatting prevent the opportunity to provide adequate explanations for complete understanding and efficient usage. The GM Specification Department suggested that a User’s Manual would be an acceptable solution toward providing all necessary information. 11. 15 The corrosion tests in GMW3172 have been calibrated to produce the same level of material loss seen in electrical products retrieved from the junkyards of Nova Scotia. The Salt Spray Test in GMW3172 has been calibrated against 10 years of field usage for underhood mounted engine controllers. The duration of the corrosion tests in GMW3172 have also been benchmarked against the work of Dr. Bo Carlsson of the Swedish Testing Institute in his paper “Accelerated Corrosion Test For Electronics”. Dr. Carlsson’s corrosion test for electronics is becoming an ISO specification. What specification should I use if I have a smart switch… do I use GMW3172 or do I use GMW3431? GENERAL MOTORS CORPORATION – EDSON - 2008 • 12. • You will need to use a composite of both specifications. Most of the environmental tests defined in GMW3431 direct the user to GMW3172. An example Smart Switch Test-Flow appears in this document. Who is responsible GMW3172? The chairman of the GMW3172 team is Larry Edson (that’s me). I have chosen to write this handbook as a personal initiative to help those who wish to better understand the depth and background of this specification. The GMW3172 Team is composed of the following individuals:: Hans-Peter Andrae (GME-Germany) Ishkan Kurdian (GME Sweden) Per Andreasson (GME-Sweden) Chris Lucarelli (GMNA) Markus Armbrust (GMNA-ISP) Carlos Pascon (GM Brazil) Silvestre Avila (GM Mexico) Qayoum Rezazada (GM-Canada) Larry Edson (GMNA) Bijay Rout (GM India) Greg Fleck (GM Powertrain) Heidi Schatton (GME-Germany) Tom Higgins (GME-ISP) Roland Schuh (GME-Germany) Yibo Hu (PATAC) Jennifer Senish (GMNA) Edward Jamieson (GM Holden) Sungwoo Shim (GMDAT) Tony Kruszewski (GMNA) Christian Dr Ziegler (GMEGermany) Then he almost fell flat on his face on the floor When I picked up the chalk and drew one letter more! A letter he never had dreamed of before! And I said, “You can stop, if you want, with the Z “Because most people stop with the Z “But not me! “In the places I go there are things that I see “That I never could spell if I stopped with the Z. “I’m telling you this ‘cause you’re one of my friends. “My alphabet starts where your alphabet ends! (Dr. Seuss – “On Beyond Zebra”) GENERAL MOTORS CORPORATION – EDSON - 2008 16 ABBREVIATIONS AND SYMBOLS A/D/V Analysis Development And Validation IEC International ElectroTechnical Commission AFD IP International Protection I/O Input/Output IRP Rated Current Of Protection L Number Of Lives To Be Tested β BEC Anticipatory Failure Determination Weibull Slope Bussed Electrical Center C Statistical Confidence CAN Controller Area Network m CTS Component Technical Specification Fatigue Exponent (Slope Of The S-N Line) N.A. Not Applicable PTC Power Temperature Cycles PV Product Validation DRBFM Design Review By Failure Mode DRBTR Design Review By Test Results DUT Device Under Test DV Design Validation PWA Printed Wiring Assembly Or or PCB Printed Circuit Board As Assembled With All Components E/E Electrical/Electronic QRD EMC Electromagnetic Compatibility Quality Reliability Dependability ESD Electrostatic Discharge R Reliability FSC Functional Status Classification REP Reliability Evaluation Point SAC Tin-Silver-Copper Solder GMNA General Motors North America SOR Statement Of Requirements TS Thermal Shock In Air Test GME General Motors Europe UA Gn Standard Acceleration Of Free Fall (Gravitational Constant), 9.80665 M/S2. Test Voltage Representing Alternator Operating UB Test Voltage Representing Alternator Not Operating HALT 17 Highly Accelerated Life Test GENERAL MOTORS CORPORATION – EDSON - 2008 Special Unit Conversions Used In This Document 1000 aches: 1 megahurtz Basic unit of laryngitis: 1 hoarsepower Ratio of an igloo's circumference to its diameter: Eskimo Pi Shortest distance between two jokes: A straight line! 2000 pounds of Chinese soup: Won ton 453.6 graham crackers: 1 pound cake 1 millionth of a mouthwash: 1 microscope 1 million-million microphones: 1 megaphone Time between slipping on a peel and smacking the pavement: 1 bananosecond 1 million bicycles: 2 megacycles Weight an evangelist carries with God: 1 billigram 365.25 days: 1 unicycle Time it takes to sail 220 yards at 1 nautical mile per hour: Knot-furlong 16.5 feet in the Twilight Zone: 1 Rod Serling 365 days of drinking low-calorie beer because it's less filling: 1 lite year! 2000 mockingbirds: two kilomockingbirds (Hint: think Gregory Peck!) Half of a large intestine: 1 semicolon 10 cards: 1 decacards 1000 grams of wet socks: 1 literhosen 1 kilogram of falling figs: 1 Fig Newton 1 millionth of a fish: 1 microfiche 8 nickels: 2 paradigms 2.4 statute miles of intravenous surgical tubing at Yale University Hospital: 1 I.V. League The Endless Triangle GENERAL MOTORS CORPORATION – EDSON - 2008 18 TECHNICAL KNOWLEDGE LIBRARY The environmental tests described in this document are designed to target certain failure mechanisms that have historically created field failures in the electronics industry. What’s a failure mechanism? A failure mechanism is the physical or chemical process that produces instantaneous or cumulative damage to the material that comprises the product. Many of these failure mechanisms are treated qualitatively, that is, a level and duration of stress is used, which has been shown to be a good discriminator between good and bad designs. However, this stress level and duration are not treated statistically to prove a reliability number. Examples of qualitative testing include humidity, dust, frost, salt-corrosion, water spray, and mechanical shock. In contrast, the failure mechanisms of Vibration Fatigue, Thermal Fatigue, and Fretting Corrosion in Bused Electrical Centers are statistically addressed with requirements for demonstrating a 97% level of reliability. Many qualitative tests are used as pre-treatments or post-treatments for other tests in the test flow. The sequencing of these tests is based on known interactions between the different stress types. Many of these interactions have become so significant over the years that they now merit their own failure mechanism name. Examples of these interactions can be seen in the following graphic, and are typified by Fretting Corrosion and Stress-Corrosion-Cracking. THE TWO BASIC GROUPINGS OF FAILURE MECHANISMS Simple Summary Of Failure Mechanisms Overstress – A Single Stress Excursion Exceeds the Strength • Performance Inadequacies Not Related to Material Damage – – – – • Example: 12 volt power supply that can only supply 10 volts Material Overstress Failure Mechanisms – – – – – – – 19 Electrical Mechanical Thermal Cosmetic Fracture Buckling Yielding and Brinnelling Electrical Overstress Electrostatic Discharge Dielectric Breakdown Thermal Breakdown Cumulative Damage – When Continued Use Exceeds the Endurance Limit Play • Wear • Corrosion • Fatigue • Metal Migration • Creep • Aging Fretting Corrosion Stress-Corrosion-Cracking Spalling Dendrite Shorts Opens From Loss Of Material Time Temperature – Interdiffusion – Depolymerization Diffusion Based Events – Embrittlement GENERAL MOTORS CORPORATION – EDSON - 2008 Why Focus On Failure Mechanisms? Failure mechanisms are the root cause of failure modes Failure mechanisms are limited in number and can be easily addressed Years of cumulative engineering knowledge of failure mechanisms is available and can be applied across all products and all industries (not product specific) A comprehensive understanding of failure mechanisms is fundamental in effectively using the tools “Design Review Based on Failure Mode” (DRBFM) and “Design Review Based on Test Results” (DRBTR) Good test flow design is based upon an understanding of failure mechanisms and their interactions We divide failure mechanisms into two major categories, those that are considered an Overstress, where a single occurrence produces failure, and those that require Cumulative Damage to produce failure. The manifestation of either type of failure mechanism is a failure mode. While there are only a handful of failure mechanisms, there are millions of failure modes. An example of a failure mode would be that “the part cracked at the bend in the metal” as a result of the failure mechanism of vibration fatigue. Focusing on the mechanisms of failure allows us to tackle the root of the reliability problem. Cumulative damage failure mechanisms often require a long duration of time for testing, or to produce failures. Validation Engineers apply accelerated testing to these cumulative damage failure mechanisms to better manage test time. Accelerated testing is accomplished with a strategy that addresses one or more of the following factors: 1. Larger sample size (Sudden Death Testing) 2. Increasing the rate of stress applications (faster switch cycling is a good example) 3. Selectively using only the most damaging levels of stress (4-poster testing only provides the most severe stresses while removing the non-damaging low level stresses using a Rain-Flow Method of analysis) 4. Increasing the level of stress (used frequently in this document) The basic model for damage as a function of stress is: Damage ≈ Number of Cycles × ( Stress ) m GENERAL MOTORS CORPORATION – EDSON - 2008 20 One can see that the first three methods of accelerated testing address the “Number of Cycles”, which has a linear relationship to damage accumulation. Only the last method of “Increasing the Stress Level” has a leveraged nonlinear ability to reduce test time. BASIC METAL FATIGUE Fatigue – The Loss Of Strength With Usage Fatigue is a cumulative damage process that occurs with usage over time. Fatigue is a localized damage process that develops with cyclic loading. The following stages are typically seen leading up to a fatigue failure: Crack Nucleation Time or Crack initiation period Cycles Short Crack most of the “life” spent in this phase Failure Growth Crack Size Number of Cycles Crack propagation period Long Crack Growth Final Fracture Appearance Of Fatigue Failures Crack Initiation Occurred In This Area Note: The “crack” does not propagate at a constant rate! May become polished smooth from rubbing Last “Lip” Of Metal To Give Way Crack Size Minute Rings Develop During Each Cycle Of Stress 21 GENERAL MOTORS CORPORATION – EDSON - 2008 Special Forms Of Fatigue Surface Fatigue Spalling Fatigue Rolling contact gear teeth and bearings Plastic particles in an peristaltic pump Fretting Development of micro-cracks from high pressure micro-motion (machine tools) Traditional S-N Curves Showing Stress As A Function Of Life Note: Longer tail is toward longer life Note: The endurance limit that we see with steel and iron does not exist with aluminum and copper Suspensions GENERAL MOTORS CORPORATION – EDSON - 2008 22 Fatigue - The Validation Engineers View Of The S-N Curve (Life As A Function Of Stress) Life vs. Stress 1.00E+8 1.00E+7 Infinite Life 1.00E+6 Hi Cycle Fatigue 1.00E+5 10000 Life Low Cycle Fatigue “N” 1000 100 10 1 “S” 100.00 Stress (Kpa) 1000.00 Beta=2.9, K=2.4567E-25, n=8.3048 The S-N Slope Of The Real Product Will Be Different Than What Is Shown In The Text Book The S-N curves shown in the back of text books assume a polished specimen without Change In S-N Slope Life any geometry characteristics that would Text Book Value concentrate the stress in one location…this 106 C loading type is seldom the case in real life. C surface finish Different types of loading will decrease the slope of the S-N curve as shown at the right (C loading type). C notch factor Rougher surface finishes will decrease the Mean Stress Effect slope of the S-N curve as shown at the right (C surface finish). 103 Geometric stress concentrations decrease the slope of the published S-N curve as Stress 90% Ultimate shown at the right (C notch factor) The Mean Stress Effect can also reduce the life (Life at 10 ) = (Life at 10 ) × C 6 3 loading type 23 × Csurface finish × Cnotch factor × Mean Stress Effect GENERAL MOTORS CORPORATION – EDSON - 2008 Example Values For The “C” Factors Loading Type “C” Values Loading Type Cloading type Pure Axial .9 Axial With Some Bending .7 Bending 1 Torsion - Steel Torsion – Cast Iron .58 .8 Typical Notch Factor “C” Values Notch Factor Default For Minor Shape Changes Small Holes In Plate Surface Finish Type “C” Values Cnotch factor .5 .33 Mean Stress Effects A mean stress produces a detrimental effect when tension opens micro-cracks. A mean stress has a larger effect on high cycle fatigue than on low cycle fatigue See reference book “Fatigue Testing and Analysis” for calculations Notch Factor Effects In Welds Stress risers produced by grain boundaries or surface defects GENERAL MOTORS CORPORATION – EDSON - 2008 24 Generally The Notch Factor Has The Greatest Influence On The Change In Life At Low Stress Testing Can Effectively Explore for the Existence of Un-expected High Notch Factor Effects Infinite Life Sharp Notches Reduce Fatigue Life Fatigue Limit 106 Hi Cycle Fatigue Fatigue life Notch Factor Effect Reduces Life more significantly at Lower Stress 103 Low Cycle Fatigue Typical values for steel are shown Stress Example of Notch Factor Effects 107 106 ges ift Sh Ch an lel ral Pa Sl o pe Life (cycles) 105 Alternating stress amplitude (psi x 10-3) Small changes in geometry will Stress shift the S-N 10 curve to the left. Very significant changes in geometry will also change the slope! 25 20 30 40 50 GENERAL MOTORS CORPORATION – EDSON - 2008 60 70 Notch Factor Effects (Continued) Note: Higher strength materials are more highly affected by “notch effects” Note: The reduction in life is most pronounced at the high cycle end of “high cycle fatigue” Corrosion-Fatigue Interaction Corrosion produces stress risers that decrease the fatigue life of stressed metals GENERAL MOTORS CORPORATION – EDSON - 2008 26 The S-N Phenomenon Also Applies To Plastic Cycoloy PC/ABS Resin Tensile Fatigue Life vs. Stress 1.00E+7 240 24 0 C 0C 80 800 Chrome Plated 1.00E+6 W 0C W i th 10000.00 N o Ch ro m e e m ro Ch m ro Ch Life No 80 ith 1.00E+5 W ith IPL/Weib 24 Deg. C Eta 5 F=19 | S=0 IPL/Weib 80 Degrees C No Chrome Eta 5 F=8 | S=0 IPL/Weib 80 Degrees C With Chrome Eta 5 F=8 | S=0 e 1000.00 100.00 1.00 10.00 (Kpa) Stress 800 Not Plated 100.00 Source: GE Plastics Beta1=4.0220, K1=4.1416E-10, n1=3.4942 Beta2=1.9168, K2=1.0207E-9, n2=4.3703 Beta3=9.7019, K3=3.6412E-9, n3=4.4245 CRITERIA FOR FATIGUE AND STRENGTH PER GMW14048 27 Crack – Parent Metal Durability Critical Functional Area: Occurrence of a parent metal crack that is longer than twice the metal thickness, or longer than 5mm (whichever is less). Non – Critical Functional Area: Occurrence of a parent metal crack longer than 10mm that rapidly propagates or, that propagates through the entire test duration. Strength The occurrence of a parent metal crack detected by unaided visual inspection. Crack – Weld Separation Durability Critical Functional Area: Occurrence of a crack, in a weld, greater than 5mm. Non-Critical Functional Area: Occurrence of a crack, in a weld, greater than 20mm or 20% of the specified weld length (whichever is less). GENERAL MOTORS CORPORATION – EDSON - 2008 Strength The occurrence of a crack detectable by unaided visual inspection. Note that stress relief cracks are to be documented when rapid propagation or propagation through the entire test duration occurs and the length exceeds the criteria. Rapid propagation is defined as observable crack growth beyond index in each consecutive inspection until end-of-test. Crack – Spot Weld Durability Occurrence of crack (detectable by unaided visual inspection) in or at the circumference of a spot weld, spot weld separated through the weld fused area, spot weld nugget pulled from one of the welded parts, or any separation or crack in MIG-welded parts. Strength Occurrence of a spot weld separated through the weld fused area, spot weld nugget pulled from one of the welded parts, or any separation/crack in the MIG-welded parts. Note that separation of greater than 20% in a spot weld grouping is to be documented. For additional information regarding spot weld groupings reference GM Engineering Standard “Automotive Resistance Spot Welds” (GM4488M). Crack – Forgings/Castings Durability The occurrence of crack longer than 1mm. Strength The occurrence of a crack in Cast or Forged Components. Note that crack lengths longer than 1mm may be acceptable based on the function (critical/non-critical), material properties, and cross-sectional area of the part. Crack/Tear – Polymer Composite Cosmetic Surfaces Occurrence of a crack/tear (detectable by unaided visual inspection) on cosmetic surfaces Structural Components The occurrence of crack/tear (detectable by unaided visual inspection) in the structure, exposing reinforcement fibers. GENERAL MOTORS CORPORATION – EDSON - 2008 28 29 Delamination – Polymer Composite Durability & Strength Separation of the adhesive bond interface with the composite and its mating surfaces Loss of Function Durability Loss of function, as defined in section 3.1.2.2 of GMW14048 “Functional Content” of Subsystem Technical Specification within test duration: - Separation. - Joint slippage greater than 1 mm Strength Loss of function, as defined in section 3.1.2.2 of GMW14048 Subsystem Technical Specification within test duration: - Separation. - Joint slippage greater than 3 mm. Loss of Trim Height Durability & Strength Reduction of 10mm or more in trim height, due to combined plastic deformation and sag. This value is measured at wheel centerline or equivalent. Fastener Torque Durability & Strength Critical Functional Area: Occurrence of fastener rotation and any loss of initial torque applied to the joint, or any indication of joint slippage. Non-Critical Functional Area: Occurrence of Fastener Rotation and loss of 25% of the initial torque that was applied to the joint, or any indication of joint slippage. Deformation of Structure Durability & Strength Change in structure exceeding the maximum allowable deformation as stated in the applicable SSTS requirements or that might affect function, packaging, or appearance. Deformation of Subsystem Interface Durability & Strength Change in structure exceeding the maximum allowable deformation as stated in the applicable SSTS requirements or that might affect function, packaging, appearance, or performance requirements of any interfacing subsystem. GENERAL MOTORS CORPORATION – EDSON - 2008 Tear – Elastomer Mount Durability & Strength Loss of static or dynamic performance of the elastomer mount when there is: more than 50% rubber crack in any planar section of any elastomeric element, or more than 50% separation in any particular bonded surface involving metal or plastic with elastomer. Leak – Fluid Filled Mount Durability Occurrence of leakage. Visible Exterior Cracks Durability Occurrence of cracks (detectable by unaided visual inspection) on cosmetic surfaces. Leak – Passenger Compartment Durability Occurrence of dust or water intrusion, or any other evidence of leaks, into the passenger compartment (including trunk). VIBRATION FATIGUE Vibration causes flexure in circuit boards with a resulting stress in component attachments and structure. The resulting cyclic strain from the cyclic stress will be concentrated in the lead wires or solder joints. The cumulative molecular damage (fatigue) that results from this flexure results in increased weakness to stress after continued application of the stress. This repetitive stress will produce failure that would not otherwise occur if this same level of stress was applied only once. Where is the board flexure the greatest? Board flexure is greatest in the center of the unsupported area of the circuit board when the board is supported at the four corners. The resulting arc of curvature in the circuit board is greatest in the direction parallel to the shorter side of a rectangular circuit board. Devices mounted in the center of the circuit board are more at risk, and those mounted parallel to the shorter side of the circuit board are most at risk. The following graphic should help you understand this concept. GENERAL MOTORS CORPORATION – EDSON - 2008 30 What is the relationship between the input displacement, frequency, and the G level? The relationship between the single amplitude displacement of the circuit board (inches), the frequency (Hz.), and the energy level (Gs) for the input vibration is as follows: f 2 × Y0 G= 9.8 or can be rewritten as: Y0 = G × 9.8 f2 From this equation we can see that if we required a fixed displacement across the full range of frequencies that the G level would go up exponentially with increasing frequency. The above equation portrays the input vibration. The product being vibrated will respond to the input vibration as a function of the products resonant frequency. The input vibration level will become “amplified” to a maximum level at the product resonant frequency. The amplification factor is expressed as the “Q” (transmissibility at resonance) value. While the above equation relates the input vibration variables, the output vibration takes on the following form: Y0 = G × 9.8 × Q f2 The value of “Q” as a function of a span of frequencies about the resonant frequency is shown in the following graphic: The “Q” Factor Effect At Different Frequencies Resonance And Maximum Displacement 20 Q factor Displacement out = Qfactor Displacement in 1 1/2 1 1.5 Finput Fresonant Ratio Of Input Frequency To Resonant Frequency You can see that the “Q” value has an effect from about ½ of the resonant frequency to 1½ times the resonant frequency. The “Q” value for a circuit board can be approximated by the following equation: 31 GENERAL MOTORS CORPORATION – EDSON - 2008 f n Q = .5 .6 G ( in ) .76 Where: • fn = resonant frequency • Gin = input gravity units acceleration (dimensionless) THERMAL FATIGUE A change in temperature produces stress between two bonding materials when those materials have different coefficients of thermal expansion (CTE). Under these conditions, temperature cycling produces cyclical stress, which becomes thermal fatigue. The cumulative molecular damage that results from thermal fatigue produces increasing weakness with the accumulation of thermal cycles until eventually the material fails. Such a failure would not occur when the first or second thermal cycle was applied. Stress Resulting From A Mismatch In The Coefficient Of Thermal Expansion (CTE) Fundamental Rule: A high level of stress may be produced under conditions of changing temperature when materials with different CTE values are bonded together without some form of compliance mechanism. Coefficient of Thermal Expansion (CTE) is an important consideration for electrical systems and mechanical system. The strain equation for CTE mismatch is as follows: Differential Change in Dimension = [CTE1 − CTE 2 ] × L × ∆Temperature Note: “L” is the longest distance of mutually confined length Solutions: Use materials with similar CTE values Provide a compliance mechanism to accommodate the relative change in dimensions. The effect expansion and contraction occurring over and over again produces fatigue in the connection points. The following graphic shows the stress and strain resulting from changes in temperature. GENERAL MOTORS CORPORATION – EDSON - 2008 32 Thermal Fatigue - Stress On Solder From CTE Mismatch Small Movement Legend Leaded-Solder Lead-Free Solder Stress Large Movement Compression Temp Elastic, Plastic & Creep Energy Strain Time Tension Repetitive Thermal Cycles The following graphic shows how creep damage in solder will continue to occur all the way down to 40% of the melting point of the solder in degrees Kelvin. How Much Dwell During Thermal Cycling Leaded Note: Homologous Temperature Consideration Creep is significant when Th >.4 (leaded and lead-free) Tem perature test Ttest ( 0 C ) + 273 0 Th = = 0 0 Tem perature m elt Tm ( C ) + 273 Max Damage Possible Accumulation of creep damage in solder as a function of dwell time Lead-Free Non Linear Relationship Dwell Time Hot and Cold Dwell Times = (3-4) Minutes for Leaded Solder and (10) minutes for Lead-Free Solder Tmax Dwell Ramp Rate Chamber Product 250 Tmin Thermal Inertia (Part Temperature) Dwell Time 33 GENERAL MOTORS CORPORATION – EDSON - 2008 ELECTRICAL CONNECTIONS AND CONTACTS FRETTING CORROSION Fretting corrosion is the development of a non-conducting “sludge” on the surface of contacts when micro-motion between the contacts is combined with corrosion of the abraded material. This condition will initially create intermittent contact until the build-up of the sludge is so great that a “sludge resistor” is formed. Current passing through this “sludge resistor” generates heat, which eventually creates many other problems. This problem can be prevented by ensuring that no relative motion occurs between the connection points. If that is not totally possible, then adequate contact pressure along with an anti-fretting corrosion lubricant is suggested. Micromotion is in the range of 10 to 200 micrometers, and is either caused by vibration or differential thermal expansion and contraction effects. Fretting corrosion is most prominent between tin-to tin connections, but will also occur between tin and gold, tin and silver, and tin and palladium. Diagram of the Fretting Corrosion Phenomenon GOLD TO TIN CONNECTIONS The connection of gold to tin is generally discouraged for the following reasons: During the connection process, there is a tendency for the tin to transfer to the gold. The transferred tin eventually forms a tin oxide layer on the gold (tin oxides very quickly at room temperature with normal levels of humidity). The gold surface is actually harder than the tin, and the oxide coating does not easily crack or rub off. The oxide layer can build up fairly GENERAL MOTORS CORPORATION – EDSON - 2008 34 quickly if fretting is present, resulting in an increase in resistance at the connection point. GM’s own internal experience has shown that tin to gold always results in problems and should be banned (Per Andreasson). However, it has been documented in the book “Electrical Contacts” by Paul G. Slade (Editor) that if the joint is lubricated prior to assembly, the problem is minimized because the lubrication reduces the rubbing off of tin and protects the surface from the effects of moisture (corrosion). However, the effectiveness of the lubricant only has a defined life span. THE “TIN COMMANDMENTS”: GUIDELINES FOR THE USE OF TIN ON CONNECTOR CONTACTS The following is published by AMP (Tyco Electronics Corp.): Tin or tin alloy coatings are cost effective and reliable alternatives to gold if used according to the following guidelines: 1. Tin coated contacts should be mechanically stable in the mated condition. 2. Tin coated contacts need at least 100 grams (3.53 ounces) of contact normal force. Higher forces are desirable whenever possible. 3. Tin coated contacts need lubrication. 4. Tin coating is not recommended for continuous service at high temperatures. At elevated temperatures, electrical contacts are degraded by the aging effects of the diffusion of copper and tin. It is recommended to use a nickel underlayer to prevent the brittle nonuniform resistive layer of the copper-tin intermetallic compound. 5. The choice of plated, reflowed, hot air leveled, or hot tin dipped coatings does not strongly affect the electrical performance of tin or tin alloy coated contacts. 6. Electroplated tin coatings should be at least 100 micro-inches thick. 7. Mating tin coated recommended. contacts to gold coated contacts is not 8. Sliding or wiping action during contact engagement is recommended with tin coated contacts. 9. Tin coated contacts should not be used to make or break current. 10. Tin coated contacts can be used under dry circuit or low level conditions. 35 GENERAL MOTORS CORPORATION – EDSON - 2008 “GOLDEN RULES”: GUIDELINES FOR THE USE OF GOLD ON CONNECTOR CONTACTS The following is published by Amp (Tyco Electronics Corp.). Gold is an excellent electrical conductor and a highly stable noble metal which exhibits the following contact properties: 1. Gold coatings are recommended for high reliability applications. 2. Gold coatings can be used in corrosive environments. 3. Gold coatings can be used for high durability. 4. Gold coatings can be used with low normal force (10 to 20 grams) and low wipe action (less than .25 mm). 5. Thin gold coatings (.03 microns to 2.5 microns) can establish a stable low resistance contact. 6. Gold is not susceptible to fretting degradation (However, it can be worn away resulting in problems with the underlying parent metal). 7. Gold contact performance can be enhanced with lubrication. 8. Gold coatings require the use of a suitable underlayer, such as nickel. The nickel underlayer provides the following: a. Pore-corrosion inhibitor b. Corrosion Creep inhibitor c. Diffusion barrier d. Mechanical support for contacting surfaces 9. Gold coating thickness depends on application requirements. The following approximate cycles to failure (wear through of hard gold over thick nickel underplate with 100 grams of normal force): a. .4 microns of gold = 200 cycles to failure b. .8 microns of gold = 1000 cycles to failure c. 1.3 microns of gold = 2000 cycles to failure 10. Gold can be used for low level circuit conditions. GENERAL MOTORS CORPORATION – EDSON - 2008 36 11. Gold contacts can be used at elevated temperatures. 12. Gold contacts should not be mated to tin contacts. 13. Gold contacts are not recommended for “Hot Make and Break” applications. STRESS-CORROSION-CRACKING Stress-corrosion-cracking is the combined effect of cyclic stress and crevice corrosion resulting in a reduction of material cross-section at a single crevice location. Most prominent in non-ferrous metals as the corrosion does not appear on the surface of the material but is actively at work at the tip of the corrosion crack. CREEP Creep is the slow plastic flow of material without fracture. Temperature accelerates the creep process. Creep is prominent in plastic material and in solder during thermal fatigue. 37 GENERAL MOTORS CORPORATION – EDSON - 2008 Solder Creep Over Time Primary Creep Strain Rate Secondary Creep Tertiary Creep 17 minutes 1200 C 1400 C Start of 10 Minute Dwell at 1400C Shear Stress 1000 C 750 C End of 10 Minute Dwell at 1400C 400 C 10 minutes 100 C/min Ramp Rate From 400 to 1400C Time TEMPERATURE AGING OR DIFFUSION BASED DEGRADATION Time at High Temperature: Molecules move faster at higher temperatures and can travel places beyond where they were originally intended to exist. This leads to the inter-diffusion of materials and can result in degraded performance in electronic components and degraded fatigue life of solder joints. This process will also result in plastics becoming more brittle with extended time at high temperature. Degradation From Ultra-Violet Light: Ultra-violet light produces molecular damage in plastics. This damage is accelerated with increased temperature. Water Vapor Diffusion: Water vapor can diffuse through the plastic encapsulation around a microprocessor core (die) and corrode critical connections or interfaces. Water vapor, upon entering a plastic, will also act as a solvent for the plasticizers and these plasticizers will be removed along with the water vapor during periods of “drying out.” This form of degradation is also accelerated with increased temperature. GENERAL MOTORS CORPORATION – EDSON - 2008 38 DEGRADATION FROM PHOTOCHEMISTRY Photochemistry Basics Photodegradation - (chain scission/crosslinking) activation of polymer macromolecule by photon absorption Photo-initiated degradation - light absorbed by photo initiators which are cleaved into free radicals which further initiate non-photochemical degradation Photo-thermal degradation - both photo degradation and thermal degradation occur simultaneously and one can accelerate the other Photo-aging - initiated by solar UV radiation, air and pollutants, water, organic solvents, temperature and mechanical stress enhance these processes PROBLEMS WITH RED PHOSPHORUS FLAME RETARDANT Plastic materials used for housings and die encapsulation employ a flame retardant to prevent runaway thermal incidents under conditions of unplanned high temperatures. The traditional flame retardants containing bromides and antimony oxides have been deemed environmentally unfriendly, and one alternative that has been used is red phosphorus. Red phosphorous begins as a natural forming stone and is processed into particles mixed into the plastic molding compound. Red phosphorous degrades producing phosphoric acid in the presence of humidity. This mixture becomes a strong electrolyte promoting electro-migration. Electro-migration is very similar to dendritic growth. Alternatives to red phosphorous are available and should be used in devices containing electronics. HUMIDITY INGRESS INTO ELECTRONICS Humidity can permeate into pores or defective openings in electronic devices and damage the inner materials. Humidity can travel through materials, such as plastic, by diffusing through the molecular structure of the base material. The effective molecular structure of the water molecule as a gas 39 GENERAL MOTORS CORPORATION – EDSON - 2008 (water vapor) is much smaller than the effective molecular structure of liquid water. This means that humidity is often a more severe test than liquid water. Humidity As A Failure Mechanism In Electronic Systems Water Vapor Diffusion – Water vapor can permeate through protective coatings or plastic encapsulations which cannot be permeated by liquid water. Water will penetrate openings larger than 2X10⁻³ cm through capillary condensation. Vapor will pass through smaller openings because there is no surface tension and the molecules are not bonded together. Water Molecule 3.4X10⁻⁸ cm Water Molecule 3.4X10⁻⁸ cm Water Molecule 3.4X10⁻⁸ cm Water Molecule 3.4X10⁻⁸ cm Water Molecule 3.4X10⁻⁸ cm Water Molecule 3.4X10⁻⁸ cm Pore Opening Is 2X10⁻³ cm Temperature increases the vapor pressure of the water vapor to accelerate it’s permeation through coatings or encapsulations. DENDRITIC GROWTH Dendritic growth is an electrolytic process in which the metal from the anode region migrates to the cathodic region. This phenomenon is accelerated with the presence of moisture and ionic contamination on the surface of the circuit board between two circuit traces with differing voltage potentials. The dendrite grows until a short circuit is formed, upon which the dendrite vaporizes leaving a residual line between the two circuit traces that looks like a pencil mark. GENERAL MOTORS CORPORATION – EDSON - 2008 40 Electromigration And Dendritic Growth Moisture, even in the form of humidity, combines with ionic contamination on a circuit board to form a solution that will conduct electric current and support copper migration. The “migrating copper” forms parasitic conductors known as dendrites. Dendrites grow between traces and can result in momentary “shorts”. The dendrites will vaporize themselves in the “shorting out process” and the circuit board will perform satisfactorily after the fact. Inspection of a circuit board following this process will reveal small black (burnt) traces that looks like pencil lines between traces. Dendrites Burnt Dendrite Residue Moisture, voltage, exposed copper, closely spaced traces, and ionic contamination are the key players. LEAD-FREE SOLDER Lead-Free solder is a composition that contains less than (.1%) lead by weight. The most common alloys of lead-free solder are composed of Tin+Silver+Copper (Sn+Ag+Cu = SAC). The best performance-cost composition is SAC305 (3% silver, 0.5% copper with the remainder being tin). The primary weaknesses of SAC type lead-free solder as compared to leaded solder are: Approximately 300C higher temperatures of surface mounted components during reflow assembly operations. Slower wetting of soldering surfaces during the solder assembly process. Double the cost for the raw material and the need for all new processing equipment. Environmental concerns with silver (Ag). 41 GENERAL MOTORS CORPORATION – EDSON - 2008 Lead-free solder is stiffer and stronger than leaded-solder but is less ductile. This results in lead-free sometimes being more reliable than leaded solder, and sometimes less reliable than leaded solder. This is shown in the following graphic: Circuit boards that have a high thermal mass, resulting from the use of large components, may require additional time at high temperature to ensure proper wetting during soldering of components to the circuit board. This means that small components may reach temperatures in excess of 2600C which surpasses the rating of some critical components. The following are examples of components that may be most at risk: Aluminum electrolytic capacitors which can suffer dielectric cracking at temperatures greater than 2450C. Large plastic ball grid array packages which are prone to warping at higher temperatures. Warping results in weak solder joints anywhere on the ball grid array. Expansion of the circuit board that is perpendicular to the surface of the circuit board can result in weakened or cracked plated through hole VIAs as is shown below: Cracks In The VIA Barrel GENERAL MOTORS CORPORATION – EDSON - 2008 42 Elevated temperatures can also result in blistering, delamination, and warping in the base circuit board. Circuit boards with higher glass transition temperature values may be required. Lead-Free Solder – What Are The Sources Of Environmental Lead? Electronics are not a major contributor to environmental lead Batteries 4,000,000 Tons – but recycling is in place Bullets 200,000 Tons – lead shot in shotgun shells eliminated Electronics 18,500 Tons – less than .5% of total Wheel weights – 100,000 Tons – being eliminated Elimination of lead from paint and gasoline has had the greatest effect. The Above Graphic From Dr. Ronald C. Lasky and Timothy Jensen (Indium Corp.) The Above Graphic From CALCE Shows The Similarity Of Performance Between Lead-Free And Leaded Solder 43 GENERAL MOTORS CORPORATION – EDSON - 2008 Solidus and Liquidus Values For Lead-Free Solder Increased Processing Temperature May Result In Damaged Components The Above Graphic From Dr. Ronald C. Lasky and Timothy Jensen (Indium Corp.) Leaded vs. Lead-Free Comparison Relative To Dwell Time Lead-Free Requires A Longer Dwell Time – Optimum Dwells Damage As A Function Of Dwell The Above Graphic From Dr. J.P. Clech GENERAL MOTORS CORPORATION – EDSON - 2008 44 Concerns With Bismuth Billet Heat Source Impurities More Concerns With Bismuth Mixing Bismuth With Lead Bismuth Without Lead The Above Graphics From Dr. Ronald C. Lasky and Timothy Jensen (Indium Corp.) Loss of Thermal Fatigue Life with Bismuth-Lead Mixtures 45 GENERAL MOTORS CORPORATION – EDSON - 2008 The Above Data And Graphics From Tom Woodrow “The Effects Of Trace Amounts Of Lead On The Reliability Of Six Lead-Free Solders”, IPC Lead-Free Conference Proceedings, San Jose, 2003Corp.) TIN-PEST TIN PEST Tin undergoes an allotropic transformation of beta-tin (body-centeredtetragonal with a silvery appearance) into alpha-tin (diamond-cubic with a gray appearance) at temperatures below 2860K (130C or 550F). This transformation results in a phenomenon known as “tin-pest”. The change in transformation is accompanied by an increase in tin volume by 26% and a significant increase in material brittleness of the tin. The following shows prolonged exposure of a tin-95%-copper-5% alloy to low temperature (-180C) over a 1.8 year period. Forty percent of the specimen surface was transformed into grey tin (alpha-tin) after 1.5 years, producing a gray wart-like appearance on the surface of the specimen. Degradation accelerated with 70% of the surface becoming transformed into gray tin after 1.8 years. An incubation period appears necessary as only a superficial film of gray tin was seen after 1 year. The transformation process results in the crumbling of the tin as expansion is combined with embrittlement. A tin-lead sample that was exposed to the same conditions exhibited no degradation what so ever. These facts indicate that tin pest has the potential for becoming a major hazard in applications where tinbased lead-free solder is exposed to low temperatures for prolonged periods of time. The test time needed to see significant degradation exceeds available time during product development and validation. GENERAL MOTORS CORPORATION – EDSON - 2008 46 Pictures Showing Tin Pest On TinCopper Bars Stored At -180C Alpha Phase Of Tin As A Crumbly Gray Substance Warts Of Alpha Phase Tin Appearing On Beta Phase Tin KIRKENDALL VOIDS Kirkendall voids are the formation of physical voids in the material (usually copper) as a result of metal migration away from the local area. Temperature is the accelerator of this phenomenon. An example of this problem occurs when copper is placed in direct contact with tin. The copper tends to diffuse into the tin leaving a layer of voids at the interface of the copper and tin. Tin Copper 47 Kirkendall Voids Develop At The Interface Of The Different Materials In The Metal Structure GENERAL MOTORS CORPORATION – EDSON - 2008 TIN-WHISKER FORMATION Tin-whisker formation is the spontaneous growth of fine crystals of tin outward from the surface of the tin plating without the need for high levels of stress or usage. Theory has it that the growth of the whiskers is an internal response to reduce compressive stresses in the tin layer. Tinwhiskers can be inspired to form with a pre-treatment of humidity followed by simple thermal cycling over a center point of 130C. The addition of mechanical compressive stresses will increase whisker formation. Tinwhiskers can form on products that are stored for a long time without use in normal warehouse environments. How To Make Tin-Whiskers Best Test for “Tin-Whisker Formation” (Qualitative only) Thermal aging - two weeks at 1000+C Humidity pre-treat with moderate levels of humidity and temperature for 1 week (50% to 80% RH and 500 C.) Accelerated diffusion of materials (like copper) into the tin to produce compressive stress Disrupts protective oxide layer and promotes whisker growth Thermal cycling crossing 130C. (-5 to +40) Circular growth rings are formed every time 130C. is crossed Moderate thermal ramp rate of 10 to 15 degrees per minute for 50 to 300 thermal cycles to produce Tin-Whiskers Thermal shock is not effective Compressive loading of joint will increase the rate of Tin-Whisker Formation (structural stress or vibration) A more quantitative and lengthy test method for tin-whisker formation is provided by JEDEC Standard JESD22A121 GENERAL MOTORS CORPORATION – EDSON - 2008 48 CREEP-CORROSION OF LEAD-FREE CIRCUIT BOARDS ABSTRACT Creep Corrosion of Lead-Free PCBs Randy Schueller, Ph.D. Dell Inc., Austin, Texas The significant and rapid changes required to eliminate lead from electronics in the short period of time required by Restriction of Hazardous Substance (RoHS) legislation was likely to result in new quality and reliability issues. The industry had been using the same materials for over 50 years with much data and experience to guide in the creation of design rules, manufacturing processes, appropriate reliability test methods, and in predicting failure mechanisms. Changing the solder alloy (and its material properties), the fluxes, termination plating materials, PCB surface finishes and soldering temperatures in a span of 1-2 years was a high risk undertaking; many in the industry predicted dire consequences. Indeed many new failure mechanisms were detected in Dell’s reliability testing and actions were taken to prevent these failures from occurring in the field. Product quality data shows this was an overall success. However, one new failure mechanism was not foreseen by Dell or the industry. Immersion silver (ImAg) was widely adopted to replace hot air solder level (HASL) as the surface finish on PCBs. ImAg was known to tarnish but it was a surprise to find that it suffered creep corrosion when exposed to high sulfur and humid environments. Failures could occur in as little as a few weeks in industries such as rubber manufacturing, water treatment, paper mills or fertilizer production (to name a few). The failure mechanism has been well characterized. Acceptable surface finishes and design rules to mitigate the risk of this failure mechanism are identified and discussed. Finally, some new corrosion test methods currently under development, and their effectiveness, are presented. 49 GENERAL MOTORS CORPORATION – EDSON - 2008 ECONOMIC SELECTION OF LEAD-FREE SOLDER Performance And Cost Summary Of Lead-Free Solder Sn/Ag/Cu (SAC) Is The Best High Reliability Option SAC305 Appears Best Overall Sn/Ag/Bi May Be Worth Consideration When Pb Contamination Is No Longer An Issue Long Term Relative Costs Sn/Pb = 1x SAC305 = 2.15x SAC387 = 2.3x SAC405 = 2.35x The Above Information From Dr. Ronald C. Lasky and Timothy Jensen (Indium Corp.) TERMS & CONSTRUCTION METHODS & STATISTICS INTERMETALLICS A chemical compound formed between the metals present in the solder, base metal and protective platings. Intermetallic formation is necessary for good solder joints, but excessive intermetallics can cause brittleness. WAVE SOLDERING PROCESS The circuit board is passed over a wave of solder, which laps against the bottom of the circuit board to wet the metal surfaces to be joined. Used primarily where through-hole device attachment is employed. GENERAL MOTORS CORPORATION – EDSON - 2008 50 IR REFLOW SOLDER PROCESS A soldering process that uses infrared (IR) light to generate heat to melt (reflow) a solder paste. The infrared light has a wavelength between visible light and microwave radiation. WETTING Wetting is the ability of liquid solder to attach itself to the surfaces being joined through the formation of intermetallic bonds. When lead-free components are introduced, a Wetting Balance Test (Meniscograph Test) should be run to verify that that the new part meets the minimum response that the supplier has determined is required for their process. Note: Lead-free solder has poorer wetting ability than does leaded solder. The following compares the solder. Notice how it takes adhesion to the base metal. soldering occurring at 2620C 51 wetability graphs of leaded solder to lead-free longer for the lead-free solder to develop good The following graphic shows wetting force with (higher than normal). GENERAL MOTORS CORPORATION – EDSON - 2008 The following graph compares the time needed to reach 66% of the maximum wetting force for leaded and lead-free solder. Notice how the lead-free solder must operate at the upper reaches of the curve in order to stay away from the destructive potential to components when temperatures rise above 2600C. Lead-Free Solder SEMICONDUCTOR COMPONENT CONSTRUCTION The following diagram shows the internal construction of a typical semiconductor component. Shown are the costs for the various elements in this type of device. GENERAL MOTORS CORPORATION – EDSON - 2008 52 CRACKED CERAMIC CHIP CAPACITORS AND BALL GRID ARRAYS Ceramic chip capacitors are small devices that are frequently surface mounted onto circuit boards. The ceramic material is brittle and cannot withstand bending stresses. Bending stresses result from separation of one board from another during manufacturing (depaneling), testing, general handling, connector attachment, free fall, or significant levels of mechanical shock as mounted in the vehicle. Placing these capacitors in a location and orientation where flexing can be damaging is one the most common mistakes made in electronic design. The following best practice design rules will minimize the risk from this phenomenon: Control all board bending events during manufacturing Use capacitors with a flexible termination Keep the capacitor away from the edge or point of flexure Orient the capacitor such that the natural bending action of the board does not apply stress along the longest axis of the capacitor Longer capacitors are more at risk than shorter capacitors. This problem expands to include ball grid arrays (BGA) devices, especially when using the stiffer lead-free solder. Cracking can occur in the BGA laminate, solder ball, or within the printed circuit board when a BGA device experiences flexure stress from circuit board bending. ANISOTROPIC CONDUCTIVE FILM (ACF) ACF is an adhesive that contains fine particles of silver or nickel to form a connection between two conductor pads in the “Z” direction. Corrosion problems with these materials have been improved through the use of nickel-Gold flashed polymer spheres and clorine free adhesives. Pressure during application creates particle-to-particle conduction in the “Z” axis, while the absence of pressure in the “X” and “Y” axis allows the particles to remain separated and not generate shorts between adjacent pads. ACF construction is affected by thermal cycling (stress on adhesive bonding) and cyclic application of humidity and drying. Humidity and oxygen will diffuse into the adhesive and cause oxidation on the surfaces of the particles and the conduction pads. Re-hydration following a drying period may result in the loss of conduction as the metal particles are separated from each other during expansion of the epoxy matrix. 53 GENERAL MOTORS CORPORATION – EDSON - 2008 Anisotropic Conductive Film (ACF) (Explanation - Not A Failure Mechanism) General Rule: Pad size and spacing should provide a gap between the pads that is about 4 times the diameter of the particles. Particle diameter is 2-3 µm. Pad-gap is 8-12 µm. Weaknesses are: Adhesive is a poor barrier to oxygen, thus oxidation of particles and metal surfaces can occur. Thermal cycling can fracture adhesive bonds or re-disperse silver particles with a loss of conductivity. Cookson Electronics Failure Mechanisms With ACF And “Chip On Glass” Thermal Cycling Silver Particles In Contact Silver Particles NOT In Contact Thermal Cycling Adhesive With Good Bond Adhesive With Fractured Bond Heat and Humidity Diffusion Of Oxygen And Moisture Through The Adhesive Results In Oxidation Of Metal Contact Surface Notes: These types of failures are possible – the latest improvements have done much to address all of the above. Cookson Electronics GENERAL MOTORS CORPORATION – EDSON - 2008 54 “CHIP ON GLASS” CONSTRUCTION Chip-on-glass construction involves the direct bonding of the silicon die to the electrical conduction pads on the back of the glass. This construction method is most often used with LCD backplane glass, and uses either Anisotropic Conductive Film (ACF) or something similar to form the bond and electrical connection. This construction is affected by the same stresses that are destructive to ACF bonding. “Chip On Glass” Attachment (Explanation - Not A Failure Mechanism) Two Designs Shown: Anisotropic Conductive Film (ACF) attachment requires high pressure in the Z axis to produce conduction between imbedded silver or nickel particles in the adhesive. Adhesive Palo Alto Research Center Si Chip Silver or Nickel Particles TM Stressed-Metal microsprings provide electrical connection with adhesive used for retention – high pressure not needed. Anisotropic Conductive Film Si Chip Micro springs “PIN IN PASTE” CONSTRUCTION The pin-in-paste (PIP) construction process can eliminate the need for wave soldering when through-hole components are used in conjunction with surface mounted components on the same circuit board. The basic process is as follows: 1. A stencil is used to allow the solder paste to be selectively applied to through-hole locations. 2. Solder paste is forced through the stencil and into the through-holes in the circuit board using a squeegee. 55 GENERAL MOTORS CORPORATION – EDSON - 2008 3. Through hole components are placed into the through-holes (VIA’s) in the circuit board, which contain the solder paste that was deposited in the prior step. 4. The temperature of the solder paste is increased past the melting point to form an intermetallic bond between the pin of the component and the VIA hole. The increase in temperature is accomplished using an IR reflow process. “PIN IN PASTE” CONSTRUCTION PROCESS The Above Graphic From Dr. Ronald C. Lasky and Timothy Jensen (Indium Corp.) Figure 1 Pin In Paste Construction SOLDERING Soldering is the process of forming intermetallic bonds between dissimilar metals in order to form a mechanical and an electrical bond. This is accomplished through the use of heat. In contrast, welding is the actual melting of both metals to form a connection. Soldering is not welding. Welding is an inherently stronger joint forming process. GENERAL MOTORS CORPORATION – EDSON - 2008 56 “CHIP ON BOARD” CONSTRUCTION The silicon die is directly attached to the circuit board without first being encapsulated in a plastic housing. The silicon die is covered over with a “glob” of non-conducting epoxy as a protective cover. This construction allows for high-density packaging without the use of solder. Thermal Fatigue Can Also Affect Chip On Board Construction Accelerated thermal cycle testing would use an exponent of 5.1 if you were only concerned about the breaking of gold bond wires. Generally we use the lowest numerical exponent value based on the materials of concern. The two photographs above illustrate the results of a failure analysis task carried out on a glob-top encapsulated chip-on-board (COB) device. In the original design, the CTE (thermal co-efficient of expansion) of the encapsulant material had not been well matched to the CTEs of the other materials in the assembly. During changes of temperature experienced during field operating conditions, the encapsulant expanded excessively with respect to the other materials and stressed the bond wires. This led to thinning and breakage of the bond wires at the illustrated points. Figure 2 Chip On Board Construction COMPLIANT PIN CONSTRUCTION A “compliant pin” type construction forms an electrical connection from one circuit board to another circuit board, or from a connector to a circuit board, by using a “pin” inserted into a VIA barrel which is located within a circuit board. The “pin” has a shape that resembles the “head of a needle” The inner hole in the needle head collapses to some degree as the pin is pressed into the VIA barrel opening. The force necessary to press the pin into the barrel is a function of the geometry and the coefficient of friction of the materials being 57 GENERAL MOTORS CORPORATION – EDSON - 2008 used. High levels of friction can result in high force requirements with possible damage resulting in the VIA barrel or bending of the circuit board or the pin. High forces may also result in the shedding of plating slivers during installation. These slivers can later lead to unintended shorting of nearby circuits. The pin should have an under-layer plating of nickel if the pin is over-plated with tin. This nickel under-plating is used to mitigate the potential for tin-whisker formation on the pin. Fretting corrosion may occur if the pin becomes loose in the barrel and the barrel-pin system experiences relative motion from thermal cycling or vibration. Pin Pressed Into Barrel Force Of Pressing Pin Into Barrel Produces Stress Points Noted by Blue Arrows Forces Circuit Board Forces VIA Barrel Figure 3 Compliant Pin Construction GENERAL MOTORS CORPORATION – EDSON - 2008 58 SELECTIVE SOLDERING Selective soldering is a process for soldering thru-hole components on the bottom side of an assembly. In a selective soldering process a robotic system is used to pick up the assembly and drag it over a single point select wave, or dip the assembly into multiple nozzles that are mounted on a product specific nozzle plate. In contrast, the soldering process utilizing traditional wave soldering equipment consists of transporting the entire assembly, by means of a conveyor system, over a liquid solder wave. PLATED THROUGH HOLE Figure 4 Graphics of The Cross Section of A Plated Through Hole or VIA The plated through hole or VIA is a method of interconnecting the different traces in a multilayer circuit board. Capture Pads are place on the outer most layers to capture the plated through hole and connect the surface traces to the plated through hole barrel. Holes are drilled through the capture pads and through the laminate circuit board material (usually FR-4). Chemical treatment of the hole allows uniform adherence of the copper material during the subsequent electro-plating operation. Clean cut holes and proper electro-plating chemistry are necessary to ensure a uniform wall 59 GENERAL MOTORS CORPORATION – EDSON - 2008 of plated material. The plated wall connects to intersected traces inside the “sandwich” that are exposed during the drilling operation. Plane layer traces that are not to connect to the barrel are designed with insulation gaps to prevent electrical connection. “Plated through holes” experience stress during thermal excursions in manufacturing and from thermal cycling in the field. When heated, the circuit board expands significantly more in the “Z” direction than in the “X” or “Y” direction. This “Z” axis expansion imposes significant tensile stress in the plated copper barrel. This phenomenon is aggravated with the use of lead-free solder as higher temperatures will occur during manufacturing. Poor design or poor quality constructions will result in cracking failures of the barrel during ESS testing or soon after the product is placed into service. The following two graphics show a cross section of a plated through hole and a barrel cracking failure in a plated through hole. Figure 5 Cross Section of A Plated Through Hole Figure 6 Cracks In the Walls of The Plated Through Hole GENERAL MOTORS CORPORATION – EDSON - 2008 60 INTERCONNECT STRESS TEST (IST) TESTING “IST” is the testing of coupons during circuit board manufacturing to ensure that interconnects such as VIAs have adequate strength. VIAs are often known as plated through holes. This screening test is composed of: › Several preconditioning thermal cycles from ambient to the peak temperature experienced during manufacturing (reflow or wave soldering) to replicate assembly and rework. This is followed by thermal cycling to failure, or to a pre-defined number of thermal cycles. › Thermal cycle testing to failure following the preconditioning process as noted above. Thermal cycling is generally conducted using a linear ramp thermal cycle from ambient to peak temperature occurring within three minutes. This is followed by a two minute cool down back to ambient temperature. This test is conducted using in-situ electrical resistance heating of the IST coupon to peak temperature. Fans cool the coupon using ambient air following the heating process. Recent studies using an elevated temperature beyond the Tg of the laminate material have proven very effective in reducing test time and this elevated temperature method is well correlated to normal field use with the Inverse Power model. 61 GENERAL MOTORS CORPORATION – EDSON - 2008 HALT (HIGHLY ACCELERATED LIFE TESTING) HALT is a type of qualitative test that uses high rates of all axis random vibration with extremely fast thermal ramp rates. HALT testing refers to tests performed in a HALT chamber, a specialized testing system that can apply thermal change and vibration simultaneously. The HALT test can be carried out in one to two days time. SUCCESS-RUN TESTING Success-run testing operates without the intention of producing failures. The test requires a specified number of samples, under a defined stress condition, for a defined duration of time or cycles. The reliability and confidence requirements dictate the number of samples that must be subjected to such a test. The success-run equation is used to determine the number of samples; however, the following nomograph can also be used to determine how many samples are required. Draw a line between the confidence desired on the right, and the reliability desired on the left. Read the number of samples at the intersection of your line and the “0” failure GENERAL MOTORS CORPORATION – EDSON - 2008 62 diagonal line. If a failure occurs on test, the revised reliability can be obtained by following the nearest curved line downward until you intersect the “one failure” line. Redraw a new line between this intersection point and the prior confidence value on the right scale to obtain the reliability value on the left scale. A full-scale version of this nomograph appears at the end of this section. Non-Parametric Success-Run Testing The Reverend Thomas Bayes, an English minister of the eighteenth century, develops a theorem of statistical inference relating reliability, confidence and sample size. This was later modified by Laplace, and is commonly referred to today as Bayes’ formula. The Success-Run Theorem (Bayes’ formula) is unaffected by the different shapes that life data may take and is seen most often in the following form : R = (1 − C ) 1 N And can be rewritten as: R = Reliability N= C = Confidence ln (1 − C ) ln ( R ) N = Sample Size MULTIPLE LIFE TESTING Testing beyond the specified number of cycles or hours in “one life” (REP) in order to make up for a reduction in the number of samples being tested. This technique is usually paired with a success-run test strategy, where the original sample size is determined from the success-run equation. A reduction in sample size is chosen based upon practical needs. The original sample size and the arbitrarily chosen reduced sample size are used in determining how many multiples of a “life” are needed to compensate for the reduced sample size. Multiple-Life-Testing uses the Weibayes equation to establish the relationship between sample size and test duration. This is a common technique, especially when a series of stresses need to be applied to a system. The series of stresses can be applied a multiple number of times using a smaller sample size. 63 GENERAL MOTORS CORPORATION – EDSON - 2008 How Can We Reduce The Number of Parts? By equating Bayes’ Theorem with Waloddi Weibull’s Distribution we obtain the The Lipson Equality (Weibayes) ( N old ) = X new ( N new ) X old Nold = original large sample size Xold = original life requirement Nnew = revised lower sample size Xnew = longer life requirement resulting from smaller sample size β = Weibull slope parameter (shape) of how this stuff fails β Or in easier form: Xnew = Xold × β ( Nold ) ÷ ( Nnew ) How To Use: Draw a line between the confidence you want and the reliability you want. Find where your line crosses the “0” failure diagonal line. Read the number of samples required along the diagonal edge of the graph. This is the number of samples that are to be tested to your “Design Life” objective with no failures occurring during the test. Find C=.50 and R=.90 Find C=.72 and R=.83 Find C=.72 and R=.99 GENERAL MOTORS CORPORATION – EDSON - 2008 64 WEIBULL ANALYSIS Referring to the type of analysis of data obtained from testing a group of products to failure. Waloddi Weibull (Swedish) was the engineer responsible for the statistical distribution that bears his name. Weibull plotting of failure data displays the cumulative failures on “log-of-the-log” by “log” paper. Special graph paper and software is available for performing this analysis. Moving From a PDF to a CDF PDF CDF Probability Density Function 0.01 Weibull CDF Unreliability vs Time Plot Probability - Weibull 1.00 Weibull Data 1 99.90 Weibull Data 1 W2 RRY - SRM MED W2 RRY - SRM MED F=0 / S=0 F=0 / S=0 Weibull Data 1 W2 RRY - SRM MED F=0 / S=0 90.00 8.00E-3 0.80 f(t) 4.00E-3 0.60 Unreliability, F(t) Unreliability, F(t)=1-R(t) 50.00 6.00E-3 0.40 10.00 5.00 2.00E-3 0.20 Larry Edson 0 Larry Edson 0 0 60.00 120.00 180.00 Time, (t) 240.00 300.00 0 β=2.0100, η=89.7400, ρ=0 40.00 80.00 120.00 Time, (t) 160.00 1.00 10.00 100.00 1000.00 Time, (t) β=2.0100, η=89.7400, ρ=0 Probability Density Function Larry Edson Larry Edson Consulting 7/6/2004 09:54 1.00 200.00 β=2.0100, η=89.7400, ρ=0 Cumulative Density But The “Y” Scale Is “Double Logged” Cumulative Density Function (Adding-up the Area Under the Curve) (Log of the Log) Using The Weibull CDF - Small Sample Size Note the increased variation about the line with a smaller sample Waloddi Weibull 1887-1979 99.00 Sample size of 6 from a distribution with a Slope = 2.5 and a Characteristic Life = 100 Weibull Data 1 Sample Size = 6 Order 50.00 Unreliability, F(t) A Small Sample Size Produces A Less Easily Identified Straight Line Highest Median Rank Lowest Median Rank 10.00 The Weibull Slope is the “rise over run” of the best-fit-line Probability Density Function 0.01 5.00 8.00E-3 Median Rank 28 10.9% 68 26.4% 85 42.1% 94 57.9% 100 73.6% 220 89.1% f(t) 6.00E-3 4.00E-3 β=1.64, η=111.56, ρ=0.96 2.00E-3 1.00 0 0 80.00 160.00 240.00 Time, (t) 320.00 β=1.6400, η=111.5600 400.00 10.00 100.00 1000.00 Hours On Test Until Failure WEIBULL SLOPE The Weibull distribution can take on many different shapes and the Weibull Slope parameter is the indicator of that shape. The Weibull Slope is the actual slope of the cumulative distribution line as shown above. Small slope numbers indicate a distribution that is spread out. Large slope numbers 65 GENERAL MOTORS CORPORATION – EDSON - 2008 indicate a distribution that is tightly packed. The Weibull Slope parameter is referred to as “Beta.” Weibull Slopes All Shapes? Probability Density Function 0.10 Multi-Plot point 5 The distribution moves from an exponential shape toward a compact normal shape with an increase in slope value 0.08 f(t) 0.06 .5 0.04 F=0 / S=0 slope 1 W2 RRX - SRM MED F=0 / S=0 slope 2 W2 RRX - SRM MED F=0 / S=0 slope 3 W2 RRX - SRM MED F=0 / S=0 slope 4 3 (Normal) 1 0.02 W2 RRX - SRM MED W2 RRX - SRM MED F=0 / S=0 slope 6 6 W2 RRX - SRM MED 2 F=0 / S=0 4 0 0 40.00 80.00 120.00 160.00 200.00 Time, (t) β1=0.5000, η1=89.7400, ρ=0 β2=1.0000, η2=89.7400, ρ=0 β3=2.0000, η3=89.7400, ρ=0 β4=3.0000, η4=89.7400, ρ=0 β5=4.0000, η5=89.7400, ρ=0 β6=6.0000, η6=89.7400, ρ=0 CHARACTERISTIC LIFE The other important parameter in the Weibull distribution, which is an indicator of the general location of the distribution, is the Characteristic Life. The Characteristic Life occurs 63% of the way through the distribution and can be thought of as “similar” to the average. The Characteristic Life is referred to as “Eta.” Using The Weibull Distribution (PDF) 0.01 Weibull Data 1 Weibull Probability Density Function 8.00E-3 My Distribution Will Accommodate All Shapes And All Sizes f(t) 6.00E-3 4.00E-3 Weibull Shape Parameter P=2, A=RRX-S F=100 | S=0 2.00E-3 63% 0 0 60.00 Characteristic Life β=2.01, η=89.74 120.00 180.00 240.00 300.00 Hours On Test Until Failure MEDIAN RANKS The Median Rank Values are used to define the “Y” axis plotting position for data plotted on Weibull Paper. The “time to failure” value is used as the “X” axis plotting position. GENERAL MOTORS CORPORATION – EDSON - 2008 66 j − .3 MR% = N + .4 ×100 ( Benard's approximation ) RELIABILITY EVALUATION POINT (REP) The number of cycles or hours of testing that is representative of “one life” in the hands of a severe use customer. 67 GENERAL MOTORS CORPORATION – EDSON - 2008 SUDDEN DEATH TESTING Testing subgroups of a large number of samples to identify the first failure from each subgroup (the un-failed parts are discarded). The Weibull plot of the “first failures of each subgroup” is used to predict the total population. This method is useful for small and inexpensive parts such as relays, light bulbs, and mechanical springs. Sudden Death Life Testing Probability - Weibull Identify the 50% point (square) on the Weibull plot of the 7 failures and extend a line downward until you reach the first median rank value (oval) based on the size of the subgroup Example: Our subgroup sample size is 10 thus the first median rank 6.7% value in 10 is 6.7% Draw a line through this point (oval) parallel to the original Weibull plot line This new line is the Weibull plot line as if all 70 parts were tested to failure 99.90 Line From Plot of Failures 90.00 Unreliability, F(t) Weibull Strength W2 RRY - SRM MED F=1 / S=0 50.00 10.00 This Line Derived From the Other Line 5.00 1.00 1.00 10.00 100.00 1000.00 Applications β=3.5000, η=299.8073 Figure 7 Sudden Death Testing Explained GENERAL MOTORS CORPORATION – EDSON - 2008 68 CALIBRATED ACCELERATED LIFE TESTING (CALT) CALT is a method of testing at higher stress levels to establish the stress-life relationship line on log-log paper, allowing estimation of life at normal stress through extrapolation of the stress-life line. This basic concept, made popular by Wayne Nelson, was improved upon by using two different high stress level tests to estimate the lowest stress that could be used (a third stress level) to meet test-timing requirements. Three different stress levels are then used to provide the best estimate of the stress-life line. This final stress-life line is then used to estimate life at the normal stress level. This methodology is documented in GMW8758 and was developed by L. Edson. Graphical Explanation Of The CALT Process 1.00E+5 IPL/Weibull Data 1 Eta Life Time (hours) 10000.00 Test Two or More 1000.00 Requirement Available Time Test Two Third Stress Level Identified 10.00 Stress Normal Stress Level Test Two Foolish Stress Level Figure 8 CALT Testing Explained 69 GENERAL MOTORS CORPORATION – EDSON - 2008 DEGRADATION ANALYSIS Measuring the degradation of an important parameter over time and extrapolating as to when in time it would become unacceptable. This process can be carried out at different stress levels using the CALT process, and the combined effect can result in high efficiency Validation. This method is now being used to evaluate the brush life in electric motors and is also explained in GMW8758. Multi-Stress Degradation Analysis Explained High Stress A Medium Stress B Normal Stress Lower Stress Modeling Change From Stress to Stress C E Degradation Specification Normal Stress Level Each group of lines is a different stress level and each stress is replicated with sample size E When will this line cross the specification line? Time or Cycles Figure 9 Degradation Analysis Explained GENERAL MOTORS CORPORATION – EDSON - 2008 70 71 GENERAL MOTORS CORPORATION – EDSON - 2008 INTRODUCING LEAD-FREE COMPONENTS INTO A LEADED ASSEMBLY The following provides direction to the supplier as to what is necessary when lead-free pre-tinned parts are introduced into a circuit board assembly process that uses a tin-lead solder. Assumptions: The component passes standardized component testing for resistance to the ingress of humidity and demonstrates adequate robustness for exposure to temperature during processing. No prior warranty issues are know to have occurred as a result of changing from leaded pre-tinning to lead-free pretinning of components using the planned manufacturing process. If such problems have occurred in the past, then explanation of such problems must be provided along with explanation of corrective action as part of the Validation activity. Suggested Validation: Run a wetting balance test (Meniscograph test) on the new component to verify that the lead-free part meets the minimum response in “time and wetting force” that the supplier has determined is required for their soldering process. Submit a copy of the Reflow, Wave, and / or Selective Solder Machine temperature profile with written verification that the profile meets the solder and component manufacturer's thermal requirements. An example is shown below: Time Above Liquidus GENERAL MOTORS CORPORATION – EDSON - 2008 72 LEAD-FREE SOLDER REQUIREMENT FOR NEW PRODUCTS IN 2009+ We have reached a major milestone of change in the world of electronics. We will now be switching from a lead based solder to a lead-free solder. The wording that has been placed in GMW3059 is as follows: “We believe that the European Union will meet in the fall of 2007 and will eliminate the current 60 gram exemption for lead on circuit boards for automotive electronics. A grace period will be provided.” The best estimate of the final ruling is that all circuit boards, including carryover products, will need to be lead-free by 2010. The following words from Ben Baker and Doris L. Hill should help clarify the situation: Doris: “Requirements and Compliance Strategy: The EU End of Life Vehicle Directive requires the elimination of Lead, Mercury, Hexavalent Chromium, and Cadmium. The timeline compliance is material specific, so elimination of these chemicals started in July 2003, and will continue phasing out for the next 10 years. Further, certain materials have been granted temporary exemptions due to technology limitations; thus a confusing landscape. GM has internalized these requirements into GMW3059: GM's restricted and reportable substances for parts specification. Our strategy is to segment the requirements, so that we are doing one major push at a time for both domestic and export parts. This allows both engineering and suppliers to focus on one set of applications at a time, reducing confusion. Our push on Hexavalent Chromium in corrosion preventative coatings started in 2000 and most work was done by early 2007. Our push on Lead in Bearings and Bushings, and Lead in Aluminum started in early 2007 and will finish in July 2008. Our push on Lead solder will begin in July 2008 and is expected to finish in July 2010. Any questions on the elimination of these chemicals can be directed to Doris L. Hill.” Ben: Tactical strategy for lead elimination in electrical/electronics: We have stated a requirement for lead-free starting in 2009 model year in order to set expectations within the supply base. We intend to carry over reuse components without material change/redesign/revalidation as long as feasible. Any new component design cycles must be designed with lead-free processes. Questions on lead-free specifics or strategies can be directed to Benjamin H. Baker. The following boxed words are those appearing in GMW3059. This material specification represents the enforcer in the move to lead-free solder. 73 GENERAL MOTORS CORPORATION – EDSON - 2008 General Motors is working to eliminate Lead (Pb) from electrical and electronic assemblies beginning with 2009 model year vehicles. Lead in Electronics: Will be Prohibited in solder and component finishes used in electrical and electronic components for all parts to be released the first time: for vehicle lines as of MY 2009 onwards and for powertrain units, safety applications, and applications requiring additional technical maturity as of MY 2012 onwards. Long term carryover components may continue to use lead after 2012 until the device is resourced or redesigned, at which time they must become lead-free. This lead elimination strategy shall include, but is not limited to: a. lead in solder used to connect the components to the circuit board b. lead in coatings on connector terminals and “pre-solder” of wires and components prior to soldering, crimping, etc. c. lead in solder for connection of components/devices within a higher assembly (e.g. motors) Lead in all other applications: Prohibited for all other applications: Exemptions to Prohibition according to Directive 2000/53/EC Annex II. Lead free in this regard is defined as below 0.1% lead in any homogeneous material. Materials and components which are generally exempted from the lead ban are described in the most recent version of Annex II of the EU ELV directive. (e. g. Batteries, electrical components which contain lead in a glass or ceramic matrix, lead in copper, etc) Tin-Silver-Copper (SAC) alloys should be used for soldering. Finishes shall be engineered to prevent copper migration into tin material. GMW3172 shall provide the appropriate validation criteria. Assembly processes shall be compatible with the change in components and finishes. The selection of parts and materials, which could affect system performance, must be approved by the Buyer’s Release Engineer and the Buyer’s Product Development Group. During Technical Reviews or other meetings the supplier is to provide details of process changes, controls, solder materials including fluxes used and all experience and learning using lead-free solder. Lead-free vehicle components shall be identified with readable markings showing the stricken through chemical symbol for lead. GENERAL MOTORS CORPORATION – EDSON - 2008 74 The current understanding of solder reliability is based on 75 years of using leaded solder alloys. The entire world is nervous concerning the use of a new material that plays such an important role in determining product reliability…or un-reliability of electronics. What Type Of Lead-Free Solder? - Lead-free solder is available in two basic “flavors”; SAC based solder (Tin-Silver-Copper) and “everything else.” SAC solder is the preferred material as it has been highly studied and has proven to be the most reliable. Bismuth based solders have the advantage of a lower melting point but pose many other reliability problems. General Motors, Ford Motor Company and many of our suppliers have chosen to ban the use of bismuth based solder because of the many reliability risks associated with this material. Of special note, is the problem of lead contamination with bismuth based solder. If a single component that has been “tinned” with a tin-lead alloy is used in a bismuth based soldering operation, there is a strong potential that there will be enough lead to form a localized contamination point where the lead combines with the tin and the bismuth. This three-way alloy will result in a localized mixture with the low melting point of 960 C. This low melting point is inadequate for automotive applications where temperature maximums vary from 850C to 1400C. Higher Processing Temperatures Are Detrimental To Components – Lead-free solders have a higher melting point than leaded solder by about 340C. The higher temperatures during re-flow or wave soldering will impact the components on the circuit board. Electrolytic capacitors are most at risk. Damaged components may become more prevalent during DV validation testing as companies apply lead-free processing with new components. IR reflow processing temperatures of 245-2500C are standard for lead-free solder, and it is well known that many components can tolerate 2600C for only a few seconds before these component are permanently damaged. Kirkendall Voids – Copper in direct contact with lead-free solder poses the risk of copper migration into the tin matrix. The migration of copper into the tin is accelerated with “time at high temperature”. This process produces two negative outcomes; the voids in the copper-to-tin-boundary become significant weaknesses when stressed with mechanical shock. The infused copper increases the compressive stresses in the tin and increases the potential for Tin-Whisker Formation. Tin-Whisker Formation – The scientific community is not absolutely sure what produces tin whiskers; however the current theory is that compressive stresses in the tin are primarily responsible for the formation of tin-whiskers. The tin, in an effort to relieve the stress, displaces material by spontaneously exuding tin whiskers from the surface of the tin. The tin whiskers may short between leads, or break off and generate electrical faults in other areas of the circuit board. There is a growing list of field failures resulting 75 GENERAL MOTORS CORPORATION – EDSON - 2008 from tin whisker formation. It does not require special or stressful conditions for the whiskers to form. They will easily form while the part is sitting on your desk or is placed in storage through the Service Parts Organization (SPO). Tin Whisker Tin Whiskers In The Space Shuttle Flight Controls 1975-1984 Acceptable Component Finishes – The portion of the component lead, which is not embedded in the attaching solder, is most at risk for tin whisker formation. These areas of the component retain the same metallurgy as when they were pre-tinning by the component supplier. Different finishes have significantly different probabilities of forming tin whiskers over extended periods of time. The following table from iNEMI divides the probability of tin whisker formation into 3 categories. Category 1 represents the lowest probability of tin whisker formation, and category 3 presents the greatest probability of tin whisker formation. The different finishes shown along the left column are color-coded into four groupings; those at the top in green and blue represent the least problematic, and those at the bottom in orange and red being of greatest risk. You can see that Tin-Copper finishes and Bright Tin finishes represent the greatest risk. The numbers shown in the table are the distribution of percentage values of iNEMI companies placing each material into the three different categories. For example, if we consider “Matte Tin (Sn) with Nickel Underplate,” we see that 9% of the companies would place this material in category one, and 91% of the companies would place this material in category two. This material, “Matte Tin (Sn) with Nickel Underplate,” is considered to be of very low risk for tin whisker formation as it resides near the top of the chart in the blue area. Card Cage Edge Guides Tin Whiskers GENERAL MOTORS CORPORATION – EDSON - 2008 76 Green Blue Yellow Matte Sn Semi-Matte Sn SnCu Bright Tin with Nickel Underplate Bright Tin Ag (over Ni) AgPd (over Ni) Ag Orange Red Green Blue Yellow Orange Red The following chart from iNEMI provides a similar set of recommendations for separable connectors. Again, those at the top of the chart are of least risk 77 GENERAL MOTORS CORPORATION – EDSON - 2008 while those at the bottom of the chart represent the greatest risk for tin whisker formation. Green Blue Yellow Orange Red Green Blue Yellow Orange Red GENERAL MOTORS CORPORATION – EDSON - 2008 78 Circuit Board Surface Finishes – A surface finish is applied to the copper traces and lands of the circuit board to prevent oxidation of these surfaces prior to circuit board assembly. The formation of oxidation on the copper surface degrades the solderability of the surface. The Hot Air Surface leveling (HASL) process using tin lead has been a successful and standard finish for the last 50 years. The lead-free initiative requires new surface finishes which do not contain lead. These new finishes include Organic Surface Preservative (OSP), immersion gold over electroless nickel, electroplated gold over electroplated nickel, Pb-free HASL, immersion silver, and immersion tin. Immersion tin is susceptible to the formation of pure tin whiskers and immersion silver is susceptible to the formation of silver sulfide dendrites. There have been no reported instances of tin whiskers on SnCu HASL finished PCBs. However, it should be noted that the use of SnCu HASL as a board finish has been very limited. Aside from whisker and dendrite growth, other aspects of the surface finishes will affect selection, including cost, shelf life, solderability, manufacturability, corrosion resistance, and technical limitations with certain assembly processes, component types, and board designs. You should know what your supplier is using, why he/she made that choice, and what risks may result. The Following Table From iNEMI The Following Table From Dr. Ronald C. Lasky and Timothy Jensen (Indium Corp.) 79 GENERAL MOTORS CORPORATION – EDSON - 2008 THE ADV PLAN OVERVIEW MAJOR ELEMENTS THAT SHOULD BE INCLUDED IN THE PLAN The ADV plan is to be formulated by the supplier and is documented in the ADVP&R form. The ADV tasks required by GM may only be a subset of the total activity of the supplier. However, the ADV tasks required by GM have been well thought out and are very thorough in addressing well-understood failure mechanisms and electrical performance criteria. The ADV plan draws its requirements from several GMW document sources. GMW3172 has become the cornerstone for electrical component validation plans. Environmental testing and general electrical robustness evaluations are described with reference to international standards from the International Standards Organization (ISO). The activities that are described in GMW3172 have dramatically evolved over the last 10 years and now represent a good role model for a comprehensive specification. GMW3097 defines the requirements for immunity and compatibility with radiated emissions. The testing defined in this document is often expensive and requires several iterations to meet the requirements. Attention should be focused early in the program to the needs of this specification. GMW3431 defines the requirements for devices that contain switches that will be activated by human touch. This document defines the requirements for mechanically cycling switches and draws heavily from the environmental tests defined in GMW3172. Devices with switches must have a test flow that encompasses the requirements of both GMW3172 and GMW3431. Electrical devices that also contain a mechanical mechanism should be tested for environmental robustness and fatigue life of the mechanical mechanism. This is a requirement in addition to GMW3172, GMW3431 and GMW3097. A suggested method of addressing the mechanical system fatigue life is by using the Calibrated Accelerated Life Test Method (CALT) defined in GMW8758. This method is also applicable to degrading wear processes such as horn contact life and relay contact life. WHY ADV? There was a time in GM history when we had the luxury of 5 years to develop and bring a vehicle to market. The demands of the market now require us to do in 18 months what we once did in 5 years. This means that we must increase the efficiency of what we do to meet our market objectives. The GENERAL MOTORS CORPORATION – EDSON - 2008 80 market also requires us to deliver much higher reliability now than was required in the past. This all translates into “more reliable in less time”. Our old methods needed to change dramatically in order to accommodate both timing and maturity level requirements. Fortunately other companies have traveled down this path before us and the methods have been developed and proven by others. Like good students, we listen and learn and adopt the methods that work the best. Don’t feel guilty, as others will be doing the same from us. Developing a product is simply a case of “life on a learning curve”. We seek out every opportunity to design reliability into the product, giving ourselves as many opportunities to learn as possible. The following graphic shows the general learning curve shape and how our methods can alter the steepness of the slope of the learning curve: “Fast Learning Cycles” Are Necessary In Each Phase To Achieve Product Maturity Through “Many Learning Cycles” Learning Curve Needed Today Maturity Deficit Product Maturity Production Now Starts Here Time Demand For Reliability is Greater Today Necessary Maturity of Product Reliability Learning Curve From Traditional Methods Production Used To Start Here The learning opportunities can be partitioned into three major groups: Analysis, Development and Validation. Our objective is to use these opportunities cumulatively. We cannot afford to only use one opportunity, such as only “V”. Trading one opportunity for another would also not benefit our cumulative learning desire, as we need every opportunity to develop product maturity. Therefore, we are not working a strategy to replace “V” activities with “A” activities, but rather to build a series of opportunity to develop product maturity. The following graphic portrays the development process with each of the major “screens” (A, D, V), detecting and removing design errors in the product development stream: 81 GENERAL MOTORS CORPORATION – EDSON - 2008 Using Every Opportunity Possible To Build Product Maturity Prior to Market Introduction Product development should act as a “series of screening opportunities” intended to filter out design errors, overlooked weaknesses, and move “strength” away from “stress” i ve Are these screens adequately discriminating? Underestimation A P sis y l na has D e lop ev e nt me Ph as e Weakness Are these screens occurring quick enough to make a difference? ua l =Q itat tion lida Va P e= h as Qu iv itat t n a e Weakness AQ2 as a Strategy Squeeze Out Time Speed of learning within each screen is essential to produce as many learning iterations as possible within each phase Therefore the two main strategy rules in GMW3172 are: Product Maturity = A + D + V And What is learned × Value of what is learned Maturity Value = Time needed to learn × Cost of learning These two rules dictate that inexpensive methods of learning occur as fast as possible at every possible opportunity. A wise person once said: “The greater the number of efficient learning opportunities, the greater the maturity value.” GMW3172 is partitioned into “Analysis Activities”, “Development Activities”, and “Validation Activities”, and are listed in that order in the ADV Task Checklist. Generally, these tasks should be performed in ADV order during product development. In a few situations, analytical methods have been used to replace, rather than supplement, the validation tests. GENERAL MOTORS CORPORATION – EDSON - 2008 82 ANALYTICAL TASKS Analytical Tasks - Most companies are not used to being asked to perform the analytical tasks or sharing the results of analytical tasks with GM. It is essential that you review the “what is to be learned” from the Analytical Task Checklist, and ask the supplier: “when were you planning to learn this in the product development process? Maybe you already know it…can you show me evidence that you already know your design margins by presenting data?” The following graphic shows how one could build the reliability requirement into the design process by inclusion of a pre-determined design margin corresponding to the reliability requirement: How Can I Affect Reliability During Analysis? Designing With Adequate Design Margin To Accomplish The Reliability Objective Probability Plot 99.90 Weibull Data 1 P=2, A=RRX-S F=1 | S=0 Unreliability, F(t) 50.00 50% 10.00 5.00 97% 1.00 1.00 Life ≅3 Lives 10.00 β=3.0 The design of a product that begins without adequate design margin can never be “grown” into a reliable product. Learn early and learn at minimum cost. DEVELOPMENT TASKS Development Tasks – We are all human beings and we all make mistakes, but we are also able to learn from our mistakes. We are unable to anticipate in our analysis those things that were never supposed to be. We only learn these things from testing the actual product. This is why we run Development Tasks; to learn what we could not anticipate. The Development Tasks will exercise the same failure mechanisms that are to be evaluated in Validation, and will reveal the same failure modes, but will not contain the time-based correlation that exists in Validation. We call these tests Qualitative Tests as they only address the qualitative nature of the product. Development is a time of very small sample sizes (1-3) and the objective is to discover unexpected weaknesses. The following graphic shows the basic developmental testing strategy; identify the varying inter-arrival times of different failure modes and eliminate those 83 GENERAL MOTORS CORPORATION – EDSON - 2008 weaknesses that will provide the greatest return on investment by their removal. You can see that you will reach a point of diminishing return as more and more weaknesses are removed. The decision of when to stop eliminating weaknesses during development will be driven simply by “return on investment.” Product improvements at this point in the program are going to be much less expensive than during Validation. Learn fast, learn with least cost. How Can I Affect Reliability During Development? Accelerated Reliability Growth Testing a single sample - each star will probably be a different failure mode Fix a failure mode and the expected overall variability in the total product decreases Uncovering weaknesses one by one until the limit of technology is reached (many things fail at the same time) Removal of “low hanging fruit” from a relative point of view improves the average time to failure for the total product Conducted As An Accelerated Test Limit of Technology Equals Design Maturity Patch It Up And Keep Testing Failed Cap Weak Loose Inductor Strong Time on Test The objective during the development phase is to eliminate the “low hanging fruit” weaknesses that would have reduced the efficiency of testing during Validation. This does not mean that Validation Testing is not necessary because even though we reduce product life variability (a good thing), we still do not know if we are “good enough”. The concept of “good enough” is shown as the difference between the first pair of rows and the second pair of rows in the following graphic: Developing Design Maturity To Reduce Variability Requirement Immature Design Good Enough Mature Design Time Lines During Testing Case 1 Case 2 Immature Design With Weak Materials Case 3 NOT Good Enough Mature Design With Weak Materials Case 4 GENERAL MOTORS CORPORATION – EDSON - 2008 84 VALIDATION TASKS Validation introduces the world of statistics and time based correlation to the test plan. We call these tests Quantitative Tests as they not only address the qualitative nature of the product, but they also establish the quantitative aspect of “when-in-time” failure is expected to occur. There are three major failure mechanisms that are quantitatively addressed in GMW3172. They are: Thermal fatigue (expansion and contraction) Vibration Fatigue (road induced vehicle vibration) Fretting Corrosion in Bused Electrical Centers (can be used for other applications where connection quality is a concern) Most of the tests have empirically evolved based on the ability of each test to distinguish “good designs from bad designs”. Some of the tests are used as pre-treatments to uncover weaknesses from interactions between different types of stress. Other tests are used as detection processes, to place the product into a detectable state to reveal failure resulting from prior tests. These concepts form the basis of the Test-Flow provided in GMW3172. The test flow will be discussed in detail later in this document, but let’s consider an example to clarify our point: We use the 500 (or 2000) hour high temperature test as a precursor to the mechanical shock test because the “time at high temperature” has the potential to create Kirkendall voids at the interface of copper traces and solder attachments. These voids then represent significant points of weakness when the product is subjected to Mechanical Shock. If these tests were not sequenced in this order then this major weakness could not be detected. The one-hour-vibration-test-with-a-single-thermal-cycle is a detection test following the thermal fatigue test-duo of Thermal-Shock-andPTC. Failures produced during thermal fatigue may only become detectable under a state of vibration at a certain temperature…or during a temperature transition. This one-hour vibration test is not intended to produce damage but rather place the product into a detectable state so that possible solder cracks formed during thermal fatigue can become detectable under a unique combination of temperature and vibration. Validation is also more comprehensive and contains many more tests than Analysis and Development combined. Someday this distribution of learning may change, but for now we rely upon Validation as the final criteria. Every year we strive to develop Analytical or Developmental methods that are equivalent to our Validation Tests to build upon our quick learning strategy. If there is a high risk Validation Test that is not being addressed by the current analytical or development task, then a small-sample-version of the Validation Test can be performed during Development to quickly learn if product improvement is necessary. This effort will “buy you the time” needed to effect the needed changes at minimum cost prior to the formal Validation process. 85 GENERAL MOTORS CORPORATION – EDSON - 2008 STRESS-STRENGTH NON-INTERFERENCE The basic concept behind Validation is to quantify the existence of adequate design margin between the stress distribution and the strength distribution. The stress distribution represents the variation between the severe user and the moderate user. The strength distribution represents the variation between a strong sample of the part and a weak sample of the part. How can samples have variation in strength? Small variations that result in stress risers will significantly reduce fatigue life. We can never escape the fact that there will be variation in stress and variation in strength. The interference between these two distributions represents the un-reliability of our product in the customer’s hands. Ideally we would like no interference, giving us a reliability of 100%. Because each distribution has a long, and theoretically, infinite tail, we can never achieve a reliability of 100%. We select a reliability requirement that meets a predetermined objective. The following graphic portrays this relationship: The Basic Concept of Stress-Strength “Non-Interference” The Word Strength Is “Generic” And Can Represent Many Forms Of “Resistance To Stress” Product Strength The World Of Stress Good The World Of Stress Not Good I Am The Extreme User Product Strength Reduced From Fatigue Movement Over Time We realize that we must satisfy the severe user in addition to the average user. In fact, certain areas of the country, such as Phoenix Arizona, are completely filled with severe users in terms of high temperatures. We therefore define our lab test based on the 99.8% severe user (only 2 people out of 1000 will be more severe) to ensure that all customers are accounted for. The process of quantifying the severe is non-trivial and makes extensive use of PUMA data, damage modeling, and Weibull analysis. GENERAL MOTORS CORPORATION – EDSON - 2008 86 The basic idea of how the extreme user is identified is shown in the following graphic: Identifying The Extreme User Usage of a product varies because people vary Some people will be “easy” on the product, and some people will be “hard” on the product We statistically quantify the severe user by statistically extrapolating the usage pattern from a sample of people Severe User Derived Requirement One Design Life Number Of Times A Product Is Used Or The Level Of Force Applied Sampling period Time Most Severe Observed In Our Small Sample 10 Yrs. Focusing On The Severe User Severe User Legend Distribution of Usage Stress Frequency Nominal Design Point and Variation in Product Strength Average User This Becomes Our Test Stress or Strength Unreliability for the Severe User 87 GENERAL MOTORS CORPORATION – EDSON - 2008 We test as if the world was filled with nothing but severe users. At first, it may appear that we are trying to make life harder than is necessary, but if we are clever, we can turn this into a strategic advantage. We can reduce our reliability-requirement-on-test if we define our test in terms of the severe user. Mathematical techniques allow us to calculate what level of reliability will result when the total population uses our product, where the total population is comprised of severe and moderate users. Even more cleverly, we can reverse engineer this process by determining what level of reliability we desire in the field (total population of mixed severity users) and then calculate what level of reliability we need on our severe test to achieve the desired field reliability. The following graphic shows the Weibull plot of user variability for cars and for trucks: The Severe User Defines The Test ReliaSoft's Weibull++ 6.0 - www.Weibull.com Probability - Weibull Car (1993-94 Opel J – Europe) 99.90 Truck (1996 T Utility) Weibull 100,000 mile car 99.8% Severe 90.00 User W2 RRY - SRM MED F=2 / S=0 150,000 mile truck W2 RRY - SRM MED 150 ,00 0 100 ,00 0 5.00 Tru ck @ 10.00 Ca r@ Unreliability, F(t) 50.00 Tes t Sp ecif icat ion F=3 / S=0 Strength On Test W2 RRY - SRM MED F=1 / S=0 R = 97% @ 7300 Thermal Cycles Larry Edson General Motors 8/23/2005 07:37 1.00 1.00 10.00 100.00 1000.00 Thermal Cycles 10000.00 100000.00 β1=1.5387, η1=1530.7178, ρ=1.0000 β2=1.6530, η2=2168.3744, ρ=0.9998 β3=2.0000, η3=4.1828Ε+4, ρ=0 We have chosen 7300 thermal cycles as our test, which corresponds to a 99.8% severe user for cars and a 99.7% severe user for trucks. We will establish our thermal cycling test based on 7300 thermal cycles. The process of reverse engineering allows us to determine that 97% on test will produce in excess of 99% in the field. The underlying strategy in GMW3172 is to have a reliability requirement that is significantly better than our nearest competitor. A benchmarking of Honda and Toyota electronic controllers showed their field reliability at 100,000 miles to be 99%. GM chose to establish a field reliability GENERAL MOTORS CORPORATION – EDSON - 2008 88 requirement of 99.5%, which is 50% more stringent than 99% in terms of a failure rate. The reliability requirement needed to achieve 99% field reliability is 97% when a 99.8% severe user test is utilized. This strategy provides many advantages during Validation Testing. A smaller reliability number will demand fewer samples and less time when Quantitative Testing methods are used in Validation. Internal Thermal Ramp Rate of 1.9 Degrees C/min Internal Thermal Ramp Rate of .6 Degrees C/min ReliaSoft's Weibull++ 6.0 - www.Weibull.com ReliaSoft's Weibull++ 6.0 - www.Weibull.com Probability - Weibull Probability - Weibull 99.90 99.90 Weibull 100,000 mile car Weibull 100,000 mile car W2 RRY - SRM MED W2 RRY - SRM MED F=2 / S=0 150,000 mile truck 90.00 F=2 / S=0 150,000 mile truck 90.00 W2 RRY - SRM MED W2 RRY - SRM MED F=3 / S=0 Strength On Test F=3 / S=0 Strength On Test W2 RRY - SRM MED 50.00 W2 RRY - SRM MED 50.00 F=1 / S=0 Unreliability Unreliability, F(t) Unreliability, F(t) Unreliability F=1 / S=0 10.00 10.00 5.00 5.00 Larry Edson General Motors 8/23/2005 07:37 1.00 1.00 10.00 100.00 1000.00 Thermal Cycles 10000.00 100000.00 Larry Edson General Motors 8/23/2005 07:44 1.00 1.00 10.00 100.00 1000.00 Thermal Cycles 10000.00 100000.00 β1=1.5803, η1=3775.2098, ρ=1.0000 β2=1.9184, η2=5648.3855, ρ=0.9999 β3=2.0000, η3=4.1828Ε+4, ρ=0 β1=1.5387, η1=1530.7178, ρ=1.0000 β2=1.6530, η2=2168.3744, ρ=0.9998 β3=2.0000, η3=4.1828Ε+4, ρ=0 Truck Car R = 99.7% R = 99.8% Truck Car R = 98.2% R = 99.1% "A new scientific truth does not triumph by convincing its opponents and making them see the light, but rather because its opponents eventually die and a new generation grows up that is familiar with it." Max Plank, Scientific Autobiography 89 GENERAL MOTORS CORPORATION – EDSON - 2008 THE REAL BIG PICTURE Summary - The Overall Reliability Model Design Margin By Analysis Before Parts Qualitative Evaluation In Development (HALT or Similar) Reliability Robustness Exit Criteria Quantitative Evaluation In Validation Design In Adequate Design-Margin Using Tools Such As: Steinberg Calculations, CALCE Tools, and Finite Element Analysis Developmental Physical Tests For Reliability Robustness •Fast Learning Cycles •Very Small Sample Sizes (1-3) Insure Robustness Parity with Previously Known Good Product Quantitative Testing Using Accelerated Testing Methods and Acceleration Factors •Reliability Number Demonstrated HASS (Pilot) HASA (Production) NOT REAL AND NOT THE BIG PICTURE Product Development GENERAL MOTORS CORPORATION – EDSON - 2008 90 GMW3172 CODES AND DESCRIPTION Two Heads Are Better Than One Good Idea Look for the Wizard; he will provide additional information on selected subjects. The font used for the Wizard’s explanations will be different from the font used for the original content of GMW3172. The Wizard’s discussion will provide important knowledge that is not contained in the formal specification. The 2008 version of GMW3172 appears in this document. EXTERNAL STANDARDS/SPECIFICATIONS These are expensive specifications to buy and usually cost more than $100.00 each. The supplier should only be required to purchase the specifications that will be required to run the required tests. IEC 60068-2-1 (Low Temperature) ISO12103-1 (Dust) IEC 60068-2-13 (High Altitude Operation) IEC 60068-2-29 (Mechanical Shock Repetitive Events – Potholes) IEC 60068-2-11ka (Salt Mist as referenced in ISO 16750-4) ISO16750 (2-4) Road Vehicles – Environmental Conditions and Testing for Electrical Equipment IEC 60068-2-14 (Thermal Shock) ISO8820 (Load Overcurrent) IEC 60068-2-27 (Mechanical Shock Non-Repetitive Events - Crash) ISO 20653 International Protection for Dust and Water IEC 60068-2-38 (Cyclic Humidity) SAE J726 (Dust Test) IEC 60068-2-78 (Constant Humidity) 91 GENERAL MOTORS CORPORATION – EDSON - 2008 PARAMETER TOLERANCE Unless stated otherwise, the following shall define the test environment parameters and tolerances to be used for all validation testing: Parameter Tolerance Ambient Temperature Spec. ± 3 °C Room Ambient Temperature (+23 ± 5) °C Test Time Spec. Room Ambient Relative Humidity 30% - 70% Chamber Humidity Spec. ± 5 % Voltage Spec. ± 0.1 V Current Spec. ± 5 % Resistance Spec. ± 10 % Vibration Spec. ± (0.2 X gn) or spec ± 20 % (whichever is greater) Shock Spec. ± 20 % Frequency Spec. ± 1 % Force Spec. ± 10 % Pressure Spec. ± 10 % Distance Spec. ± 10 % +2 −0 % Are Those “Straight Lines” Curved? GENERAL MOTORS CORPORATION – EDSON - 2008 92 TEMPERATURE AND VOLTAGE DEFINITIONS Temperature and Voltage Definition - It is very important to establish Tmin and Tmax as described in the table below, as these will be used in many tests. Please see the section on temperature codes for insight on how to choose the temperature code. Why is there no Storage Temperature Test? Cold storage does not affect any type of failure mechanism other than Tin-Pest. The re-paint temperature effectively handles high temperature storage. Phrase Symbol Definition Minimum Temperature Tmin Minimum limit value of the ambient temperature at which the system and/or E/E device are required to operate. Room Ambient Temperature TRT Room temperature Maximum Temperature Tmax Maximum limit value of the ambient temperature at which the system and/or E/E device are required to operate. TmaxPH Maximum limit value of the ambient temperature which may temporarily occur after vehicle cut-off and at which the system and/or E/E device may be operated for a brief period, e.g. on the engine and in its environment. Post Heating Temperature (soak back) Repaint and High Temperature Storage Minimum Voltage Nominal Voltage Maximum Voltage 93 TmaxRPS (Re-Paint and Maximum temperature which can occur during repainting, but at which the system is not operated. Also used to cover high temperature storage. Storage) Umin Unom Umax Minimum supply voltage at which the system and/or E/E device is operated during the test. Nominal supply voltage at which the system and/or E/E device is operated during the test. Maximum supply voltage at which the system and/or E/E device is operated during the test. GENERAL MOTORS CORPORATION – EDSON - 2008 OPERATING TYPES The Operating Types and FSC Codes are things you must know to complete the definition of how the test is to be run. There is an Operating Type defined for every physical test in this document and you and the supplier must understand and agree as to what that Operating Type is for each test. Generally, you should use (3.2) for everything where you require continuous monitoring or you really need to know if the product will work properly while the stress of the test is being applied. Operating types (1) pertain to no voltage being applied at all. Operating types (2) pertain to when the generator is not active but voltage could be coming from the battery. Operating types (3) pertain to when the vehicle is running and everything is connected and working. Operating Type 1 2 3 Electrical State No voltage is applied to the DUT. 1.1 Not connected to a wiring harness. Connected to a wiring harness simulating vehicle 1.2 installation, but no voltage applied. The DUT is electrically connected with supply voltage UB (battery voltage, generator not active) as in a vehicle with all electrical connections made. System or component functions are not activated (e.g. 2.1 sleep mode). Systems or components with electric operation and control 2.2 in typical operating mode. The DUT is electrically operated with supply voltage UA (engine/alternator operative) with all electrical connections made. 3.1 System or component functions are not activated. Systems or components with electric operation and control 3.2 in typical operating mode. GENERAL MOTORS CORPORATION – EDSON - 2008 94 FUNCTIONAL STATUS CLASSIFICATION CODES The Functional Status Classification describes how the device is allowed to behave during the test and after the test. You and the supplier must understand what FSC code applies to each test. The purpose and scope of the FSC is to provide a general method for defining the functional performance for the functions of automotive E/E devices upon exposure to test conditions or real world operation conditions. An unwanted operation of the DUT is not allowed in any of the following classes. The device must not create a hazard when operated with voltages outside of the design intent. This is applicable to all classes of FSC described above. 95 Class Definition of FSC Class A All functions of the device/system perform as designed during and after the test. B All functions of the device/system perform as designed during the test. However, one or more of them may go beyond the specified tolerance. All functions return automatically to within normal limits after the test. Memory functions shall remain class A. C One or more functions of a device/system do not perform as designed during the test but return automatically to normal operation after the test. D One or more functions of a device/system do not perform as designed during the test and do not return to normal operation after the test until the device/system is reset by simple “operator/use” action. E One or more functions of a device/system do not perform as designed during and after the test and cannot be returned to proper operation without repairing or replacing the device/system. GENERAL MOTORS CORPORATION – EDSON - 2008 CODE DESIGNATION BY LOCATION IN THE VEHICLE The following table is a good starting point for determining your test code sequence. Begin by identifying the area of the car you’re product will be located. Review each suggested letter and make adjustments in the letter suggested if necessary. Remember, the “Z” code is always available for special circumstances where you wish to define unique values for some of the specifications. Use the “Z” code with caution and experience. More than one set of codes can be used to cover multiple vehicle applications when necessary. 85 104 100 112 99 69 86 109 116 79 82 111 Temperatures Occurring Inside A South Facing Vehicle (Shown In Celsius) With An Outside Temperature Of 400C (1050F) On A Sunny Day GENERAL MOTORS CORPORATION – EDSON - 2008 96 This document distinguishes between the following mounting locations and defines the minimum Electrical, Mechanical, Thermal, Climatic, Chemical, Water and Dust Protection requirements. Other mounting locations are possible and can be addressed using a custom combination of code letters as described in the section entitled “Quoting Requirements”. Table 1 Code Letters Based on Location in the Vehicle Mounting Location Electrical Loads Mechanical Loads Temperature Loads Climatic Loads Chemical Loads Dust and Water Protection Code letter Code letter Code letter Code letter Code letter Code letter Per Table 2 Per Table 3 Per Table 4 Per Table 5 Per Table 6 Per Table 7 Engine Compartment High location, remote from engine and heat sources High location, close to engine or heat sources At/in engine, normal temperature load At/in engine, high temperature load 97 A–F Typically C A–F Typically C A–F Typically C A–F Typically C C F A E IP6K9K C H A E IP6K9K A or B I B E IP6K9K A or B Z B E IP6K9K A or B I B E IP6K9K E IP6K6K and IP6K8 or At/in transmission A–F Typically C Low mounted toward the front of the engine compartment (lower temp) Engine A- F mounted = Typically C A or B else = C or G Low mounted near the rear of the engine compartment (higher temp) Engine mounted = A–F A or B Typically C else = C or G E or F H A or B or C K or L A or B or C K or L IP6K9K and IP6K8 E GENERAL MOTORS CORPORATION – EDSON - 2008 IP6K6K and IP6K8 or IP6K9K and IP6K8 Mounting Location Electrical Loads Mechanical Loads Temperature Loads Climatic Loads Chemical Loads Dust and Water Protection Code letter Code letter Code letter Code letter Code letter Code letter Per Table 2 Per Table 3 Per Table 4 Per Table 5 Per Table 6 Per Table 7 Passenger Compartment Low temperature load (Under dashboard) Normal temperature load (Dashboard display or switch) High temperature load (Top of dashboard with sun load) Low mount/under seat A–F Typically C A–F Typically C A–F Typically C A–F Typically C C A-C D A/B IP5K2 C D E A IP5K2 C E E A IP5K2 D A D or F B IP5K2 IP5K8 Other Locations Trunk low mount Trunk high mount Doors and hatches (wet area) Doors and hatches (dry area) Exterior splash area Chassis and underbody Un-sprung mass A–F Typically C A–F Typically C A–F Typically C A–F Typically C A–F Typically C A–F Typically C A–F Typically C C or D A-C F D IP5K8 C or D A-C D D IP5K2 E B-C H B IP5K3 E B-C E-D A IP5K3 C A-C J F IP6K6K C A-C I or J or N F IP6K8 or IP6K6K F A-C J or N F IP6K8 or IP6K6K GENERAL MOTORS CORPORATION – EDSON - 2008 98 Mounting Location Electrical Loads Mechanical Loads Temperature Loads Climatic Loads Chemical Loads Dust and Water Protection Code letter Code letter Code letter Code letter Code letter Code letter Per Table 2 Per Table 3 Per Table 4 Per Table 5 Per Table 6 Per Table 7 Sealed body cavities Unsealed body cavities Exterior at the base of the windshield inside the Plenum or inside the engine compartment Roof mounted inside the vehicle cabin A–F Typically C A–F Typically C C A-C D B IP5K2 C A-C H-I F IP5K4K IP6K6K A–F Typically C A–F Typically C 1st C D-G I E C D D B GMW3172 Code Letter Sequence 2ed 3ed 4th 5th IP6K6K Electrical Code (Table 2) Mechanical Code (Table 3) Temperature Code (Table 4) Climate Code (Table 5) Chemical Code (Table 6) C C C D B (IP6K6K) Example Only 99 Dust and Water International Protection Code (Table 7) GENERAL MOTORS CORPORATION – EDSON - 2008 Also run Seal Evaluation if in plenum IP6K2 or IP5K2 CODE LETTER FOR ELECTRICAL LOADS The device must operate over a range of possible voltages. The code shown below defines that range. The “U” notation is referencing “voltage” as applied to the device in the test setup. Adjustments in Umax can be made for Regulated Voltage Control given adequate knowledge of how RVC is operating for this device. The car will most likely start when there is 11 or more volts on the lines. Codes A and B are used when there is a safety concern to ensure that a product, like the fuel pump, would always be ready to operate even if the engine would not start. The following table defines the steady state minimum and maximum test voltages to be used as measured at the connector of E/E device. The table should also be used in specifying the E/E device criteria requirements unless otherwise specified in the CTS. Table 2 Code Letter for Electrical Loads Code Code Letter A B C (most common) D E F Z Test Voltage Range (in Umin 4.5 6 9 9 10 12 As Agreed Upon Volts) Umax 16 16 16 18 16 16 • In the range of the given code letter the Functional Status Classification shall be class A. • In the voltage range of (–13.5 Volts to Umin) and (Umax to +26 Volts) the Functional Status Classification shall be at minimum class C. GENERAL MOTORS CORPORATION – EDSON - 2008 100 Nominal Voltage (Unom): The nominal voltage depends on the operating mode: Test voltage Unom (Volts) UA UB 14 V 12 V Generator Status Operating Not Operating CODE LETTER FOR MECHANICAL LOADS The Mechanical Loads Code Letter requires you to define the type of vehicle in which this component will be used, now or in the future because vibration testing duration is different between cars and trucks. What’s a Truck? A truck is defined as a pickup or commercial vehicle. What’s a Car? A passenger car, SUV, or crossover vehicle. Code letters “A” or “B”, and “G” through “J” should be used for pickup trucks and commercial vehicles, and “A” or “B”, and “C” through “F” should be used on everything else. Remember: A sprung mass is anything attached to the body or chassis. Table 3 Code Letter for Mechanical Loads Requirements 101 Code Letter Crush Test A Method A B Method A C Method A Random Vibration Engine Envelope 1 (without special balancing feature) Engine Envelope 2 (without special balancing feature) Car Duration Sprungmass Mechanical Closure Shock Slam Free Fall Yes No Yes Yes No Yes Yes No Yes GENERAL MOTORS CORPORATION – EDSON - 2008 Requirements Code Letter D E F G H I J K L Z Crush Test Random Vibration Mechanical Closure Shock Slam Car Duration Sprungmass Car Duration SprungMethod A mass Car Duration Method A Unsprung-mass Truck Duration SprungMethod A mass Truck Duration SprungMethod A & B mass Truck Duration SprungMethod A mass Truck Duration Method A Unsprung-mass Three To Five Cylinder Engine With Balancing Method A Feature (reduced level of vibration testing) Six or More Cylinder Engine With Balancing Method A Feature (reduced level of vibration testing) As Agreed Upon Method A & B Free Fall Yes No Yes Yes Yes Yes Yes No Yes Yes No Yes Yes No Yes Yes Yes Yes Yes No Yes Yes No Yes Yes No Yes Note: a reduced level of engine vibration resulting from special balancing features (like a balancing shaft) is addressed with codes “K” and “L”. These vibration profiles are not yet defined in GMW3172. CODE LETTER FOR TEMPERATURE LOADS The Temperature Code letter is very critical, as it will affect many different tests. The general rule-of-thumb is: Products that are inside the passenger and trunk compartment should use a code “C”. Products under the hood that are the farthest away from heat sources, or the accumulation of heat, should receive a code of “F”. An underhood product GENERAL MOTORS CORPORATION – EDSON - 2008 102 that is mounted low and forward, where post-heat would not accumulate should use a code of “E”. What is post-heat? Imagine driving quickly through the desert and then pulling into the “7-11” for a cold drink. The engine is hot and suddenly it is sheltered from any moving air that may cool the engine compartment. Heat radiating from the engine now rises and fills the engine compartment to a temperature level greater than during normal vehicle use. That’s post-heat. A product mounted high in the rear of the engine compartment should use a code letter “H”. Things mounted on the engine would use a code letter “I”. The product will actually experience these temperatures in the vehicle. The Tmax RPS affectively covers high temperature storage and one should look for warpage in plastic as stresses are relieved during this first hour of testing. Table 4 Code Letter for Temperature Used In “Thermal Shock”, “PTC” and “High Temperature Durability” Testing Code Letter A B C D E F G H 103 Tmin °C -40 -40 -40 -40 -40 -40 -40 -40 Tmax °C +70 +80 +85 +90 +105 +105 +120 +125 Used In “High Temperature Durability” Testing Tmax PH Tmax RPS Tmax Post-Heat °C Tmax Re-Paint & Storage °C Underhood Post-Heat: use for the first 5% of total high-temperature test Use for the first hour of the hightemperature test if greater than Tmax. Accounts for high temperature storage and paint booth exposure Product is Powered Product is not Powered +120 +140 +95 +95 +95 +95 N.A. N.A. N.A. N.A. GENERAL MOTORS CORPORATION – EDSON - 2008 Used In “Thermal Shock”, “PTC” and “High Temperature Durability” Testing Code Letter I Z Tmin °C -40 Tmax °C Used In “High Temperature Durability” Testing Tmax PH Tmax RPS Tmax Post-Heat °C Tmax Re-Paint & Storage °C Underhood Post-Heat: use for the first 5% of total high-temperature test Use for the first hour of the hightemperature test if greater than Tmax. Accounts for high temperature storage and paint booth exposure Product is Powered Product is not Powered +140 N.A. As Agreed Upon CODE LETTER FOR CLIMATIC LOADS The Climate Code letter is very critical as it dictates many important aspects of environmental testing. Consider the following: High Temperature Test: Underhood components will require 2000 hours of high temperature testing and passenger compartment/luggage/exterior areas will require 500 hours of high temperature testing. Thermal Shock Cycles: The correct number of thermal shock cycles required is defined in tables 26 and 27. The minimum number of thermal shock cycles shown below should be used when testing is not necessarily focused on the fatigue of solder joints. The underlying message is that almost everything should experience some thermal shock even when solder joints are not being considered. Remember, you should always have at least 100 PTC cycles in addition to the GENERAL MOTORS CORPORATION – EDSON - 2008 104 thermal shock cycles. Again, please use table 26 and 27 for the correct number of PTC cycles. Thermal shock my be eliminated, and all thermal fatigue testing should occur using PTC testing in situations where large panels may warp with thermal shock and produce abnormal failure modes. A large LCD screen would be one example of this situation. Thermal shock would cause unequal expansion-contraction of the product resulting in a momentary warping during thermal change and possibly produce abnormal seal failure. This is something that may not occur if the testing was conducted using only PTC testing, with its slower thermal ramp rate. Seal Evaluation Test: This is a very severe test to evaluate hermetically sealed enclosures, including potted devices. The DUT is heated to Tmax and then submerged three inches under ice cold salt water. This process will tend to ingest water resulting from the negative change in pressure. This process is carried out 15 times in a row on the same DUT. This test is required for all sealed and unsealed (Goretex patch) devices that are: Located within 20 inches of the ground on the exterior of the vehicle Products that are located in basin areas within the vehicle such as under the front seat or in the spare tire well All potted products. Salt Test: This is the corrosion test. Products inside the vehicle should receive the salt mist test (less than 10 days), and products outside the vehicle should receive the salt spray test (10 to 40 days). Cyclic Humidity and Constant Humidity: These tests are required for all products, including those that are sealed. Moisture Susceptibility Test: This test is required for all products. 105 GENERAL MOTORS CORPORATION – EDSON - 2008 Xenon Arc Testing: This test, or an outdoor equivalent, is required for those products that will be exposed to the sun. The details of this test are to be defined by the materials department. The “Z” is always available when you must compose a combination of these tests which is not shown in the following table. When choosing the “Z” code you must understand fully why or why not each test is necessary. You must also document your use of the “Z” code with a full explanation of your combination of each of the tests shown below. Table 5 Code Letter for Climatic Loads Code Letter High Temp Durability (Hours) Minimum Number Of Thermal Shock Cycles Water Splash Seal Salt (Days) *Mist Cyclic Humidity Constant Humidity Moisture Susceptibility Test Xenon Arc** A 2000 500 NO NO 10 YES YES YES NO B 2000 500 NO YES 20 YES YES YES NO C 2000 500 YES NO 10 YES YES YES NO D 500 300 NO NO 3 to 10* YES YES YES NO E 500 300 NO NO 3 to 10* YES YES YES YES F 500 300 NO YES 10* YES YES YES NO G 500 300 NO NO 10 YES YES YES NO H 500 300 NO NO 10 YES YES YES YES I 500 300 NO YES 10 YES YES YES NO J 500 300 YES YES 20 YES YES YES NO GENERAL MOTORS CORPORATION – EDSON - 2008 106 Code Letter High Temp Durability (Hours) Minimum Number Of Thermal Shock Cycles Water Splash Seal Salt (Days) *Mist Cyclic Humidity Constant Humidity Moisture Susceptibility Test Xenon Arc** K 2000 500 YES NO 40 YES YES YES NO L 2000 500 NO YES 40 YES YES YES NO M 500 300 YES NO 40 YES YES YES NO N 500 300 NO YES 40 YES YES YES YES Z As Agreed Upon ** Note: Xenon Arc or outdoor sun testing is to be specified by the material engineer and no details for this type of testing are included in GMW3172. CODE LETTER FOR CHEMICAL LOADS AND UV TESTING The Code Letter for Chemical Loads and UV Testing – In the past, we required certain chemicals be applied to the product using different methods of application as defined in GMW3172. We also required XenonArc Weatherometer testing for colorfastness and resistance to UV degradation. This was in addition to the requirements defined by the Materials Department. This often put GMW3172 into conflict with the Specifications from the Materials Department as specifications evolved. Now we only require that the Material Specifications be met based on where the device is located, however this also includes colorfastness testing as defined by the Materials Department. No additional testing is required over and above the requirements from the Material Specifications. You must work with your Materials Engineer to ensure that proper testing is planned and has been executed satisfactorily. The 107 GENERAL MOTORS CORPORATION – EDSON - 2008 following information comes from Alexandra-Brigitte Scholz of the GME materials organization. “Plastic Parts and Components located in the interior of the vehicle shall comply with material part performance per GMW14444 and GMW14651. Plastic Parts and Components located in the exterior of the vehicle shall comply with material part performance per GMW14650. Plastic Parts and Components located in the engine compartment of the vehicle shall comply with the following material part performance requirements: All materials shall be resistant to the media they contact, such as aliphatic and aromatic hydrocarbons, fuels, lubricants, oils, greases and alcohols, at their places of use per GMW14650. Resistance to Temperature: Temperature Cycle (temperature tolerance +/- 3 °C, ramp between temperatures maximum 1 h) Continuous temperature at 24 h 72 h 24 h installation position in the engine compartment <= 110 °C 130 °C 110 °C - 30°C 110 °C ... 130 °C 150 °C 130 °C - 30°C 130 °C ... 150 °C 170 °C 150 °C - 30°C > 150 °C TBD according to continuous - 30°C temperature at installation position in the engine compartment Requirement: Tested parts shall show no cracking, crazing, appreciable color changes, discoloration, cloudiness, blistering, objectionable shrinkage, deformation, or loss of adhesion to the substrate between layers of the composite or other changes detrimental to serviceability. Test pieces shall comply with the dimensions specified on the drawing after completion of the test. GENERAL MOTORS CORPORATION – EDSON - 2008 108 For parts made of PP: Plastic parts located in the engine compartment shall have an additional, particularly effective stabilization to avoid the degradation by oxidation of the material in hot air. Oxidation Stability, 336 h at +150+/-3°C, Requirement: No visible indication of local discoloration and/or brittleness by material degradation. For parts with large plain areas: Impact Resistance to GMW14093. Note: Test shall be conducted on components. If no specific area of the part is assigned on the drawing to meet the impact requirements, the entire part must meet these requirements. Impact resistance to GMW14093 - 3 / 5 J min. - In the as received condition. - After resistance to temperature” The Coding defines the requirements related to the position of the E/E Device in the vehicle and the appropriate tests for chemical loads. The table identifies chemical origins that are to be covered by the appropriate material specification. No additional testing is required by GMW3172. Table 6 Code Letter for Chemical Loads 109 Code letter Mounting Location for Chemical Loads A Cabin Exposed B Cabin Unexposed C Interior Door Mounted (Unexposed) D Trunk E Under Hood F Exterior Area GENERAL MOTORS CORPORATION – EDSON - 2008 CODE LETTER FOR INTERNATIONAL PROTECTION BY ENCLOSURES The International Protection Code covers dust and water intrusion. The water flow rates, test setups, and test durations are described in ISO-20653. Dust: Devices that use convective cooling heat sinks will loose their effectiveness if too much dust accumulates on the cooling structure. Devices that use optics for data transfer will be degraded if dust impedes the light transmission. Relays will experience degraded performance when dust is allowed to accumulate on contacts. Electromechanical devices will experience wear from dust, or become inoperative if the dust accumulates preventing motion. These represent the reasons that one should perform the dust test. In many situations, the dust test is not needed. A code of “X” indicates that the dust test does not need to be performed. A code of “0” indicates that the device does not need to be protected from dust, but a dust test may be required to evaluate overheating or malfunction from contamination. A code of “5K” or “6K” indicates that the dust test is to be run. A code of “5K” indicates that dust is allowed inside and one may need to run the test to quantify any negative effects based upon how dust affects products as described above. A code of “6K” indicates that the product is very sensitive to dust and dust may not enter the product. Water: Electronic devices need to be protected from the harmful effects of water. Water may produce short circuiting with an immediate negative outcome, or it may act as the catalyst when combined with ionic contamination resulting in corrosion or dendritic growth. It is anticipated that the water applied in this test would normally come from the following sources: GENERAL MOTORS CORPORATION – EDSON - 2008 110 Condensation or cleaning fluid: Dripping water or other fluids may drip down onto the device or may be transported onto the device by following the path of attachment wires. The “2” test produces dripping water at the rate of about 1 to 2 drips per second. Remember, water in the test will be clean and uncontaminated, but it may be very contaminated in real world situations. Do not dismiss any water reaching the circuit board as it may be a cleaning fluid or other substance in reality. Water or liquids that are mistakenly spilt in the vehicle by passengers (drinks and cleaning fluids). Hi-pressure sprayed water coming from a car wash. Very high-pressure sprayed water coming from the steam cleaning of the engine compartment. Code 2: The “2” test should be used for everything in the vehicle. All devices in the passenger and trunk compartment should provide a watershedding case design so that dripping or splashed water will not affect the electronics. Consider the fact that the connector is usually designed to be mounted in a downward facing direction. If you were to park the car on a hill then it could be possible that this connector would be facing in a more upwards direction than it would if parked on a horizontal surface. The product should be tested as if it was oriented while parked on a worst case incline of 14.2 degrees (worst case per San Francisco). Note: A 45 degree angle is considered a 100% grade. o Shown below, according to the city Bureau of Engineering, are the steepest roads in San Francisco in descending order (pun intended): 1. & 2. Filbert between Leavenworth and Hyde; 22nd Street between Church and Vicksburg, both 31.5 percent gradient. 111 GENERAL MOTORS CORPORATION – EDSON - 2008 3. Jones between Union and Filbert, 29 percent. 4. Duboce between Buena Vista and Alpine, 27.9 percent. 5. & 6. Jones between Green and Union; Webster between Vallejo and Broadway, both 26 percent. 7. & 8. Duboce between Divisadero and Alpine; Duboce between Castro and Divisadero, both 25 percent. 9. Jones between Pine and California, 24.8 percent. 10. Fillmore between Vallejo and Broadway, 24 percent. Using the above information we can compose the following example: o A device mounted inside the vehicle is designed such that the connector is oriented 50 downward from the horizontal when the car is parked on a flat surface that is horizontal to earth (150 downward is considered a best practice). o Now we park this car on the steep road (14.20) in San Francisco such that the connector is now facing (14.20 minus 50 = 9.20) in an upward direction. o Water that may condense and fall on this device will now be landing on the device with the connector facing upward 9.20from the horizon. o The IP lab test should test the device with the connector oriented upward at a 9.20 angle. Code 3: Luggage areas that may see more water from snow or sports should consider using a “3” level test. Code 6K: The 6K test is intended for exterior applications where a car wash may apply water at 125 psi. Consider using the 6K requirement for non-sealed systems that include non-sealed relays. Code 8: The Seal Evaluation Test (code 8) - Devices that are located underneath the vehicle should receive the seal evaluation test even if they employ a Gortex patch. The test will be used to ensure that all of the seals perform satisfactorily. This requirement should not be used to GENERAL MOTORS CORPORATION – EDSON - 2008 112 drive cost but rather to provide knowledge as to what may happen in severe usage situations. Devices located high up underneath the vehicle should be required to pass the 6K test and the Seal Evaluation Test. Devices that are required to pass the Seal Evaluation Test (code 8 in the table above) must pass 15 submergings. Code 9K: The 9k test is intended for underhood only applications and represents the effects of steam cleaning the engine compartment. All devices under the hood that could be directly sprayed should receive a code of “9K”. Devices under the hood that are protected from direct spray should receive a code of “6K”. Devices mounted where they could be sprayed (car wash) and submerged (as when backing a boat into the lake), should be assigned the code “6K”, and the Seal Evaluation Test (code number 8) should also be required. Special Notes: The dust test can be relocated in the test flow to become a pretreatment prior to mechanical cycling of a mechanism that may experience wear. The dust test can also be relocated in the test flow to become a pre-treatment prior to the high temperature durability test. This may be done in order to evaluate the possibility of overheating resulting from dust clogging critical convective heat transfer elements in the design. The product should be powered immediately following the completion of the water test to ensure proper function. Products should be designed to shed water, and in all cases, make sure that water is directed away from the circuit board. Good dissection at the end of the test is critical in detecting water on circuit boards. No water must ever reach the circuit board or the critical components, either by drip, splash or spray. Water must not accumulate within the case and then be allowed to reach the circuit board. A Door Zone Module (smart switch) or similar device, such as the mirror switch, should receive additional water drip testing to ensure 113 GENERAL MOTORS CORPORATION – EDSON - 2008 that the design properly deflects water away from the circuit board as well as critical elements in the switch system. The “IP5K3” test that would be typically called out for this device should be expanded into a “Z” code. The test should use water that has UV dye added, and the water should be dripped on to the switch as defined in the “2” code. Water should be dripped for 30 minutes as opposed to the standard 10 minutes. The switch exterior should be wiped dry and then the switch should be closely scrutinized with a black light to detect possible destructive water paths within the device. A simulated armrest environment should be used during the water drip process. General Motors uses a subset of the International Protection Codes. The coding behind the IP definitions is similar to ISO20653 requirements for dust and water intrusion. The following example explains the use of letters in the IP-Code. Example: Code Letter IP (International Protection) First Element For Dust Second Element For Water 5K 2 GENERAL MOTORS CORPORATION – EDSON - 2008 114 Table 7 International Protection Codes First IP Code Element – Dust Degree of protection for Dust First code element Brief description Requirements Not required None Not protected Testing may be conducted to evaluate overheating or malfunction from contamination. 5K Dustprotected Dust shall only penetrate in quantities which do not impair performance and safety. 6K Dust-tight Dust shall not penetrate. X 0 Second IP Code Element – Water Second code element 115 Degree of protection for Water Brief description Requirements X Not required None 0 Not protected Test may be conducted to evaluate effect on performance. GENERAL MOTORS CORPORATION – EDSON - 2008 Second code element Degree of protection for Water Brief description Requirements Water drips with enclosure inclined by 15° Vertical drips shall not have any harmful effects, when the enclosure is tilted at any angle up to 15° on either side of the vertical. 3 Water spray Water spray which sprays against the enclosure from any direction at a 600 angle shall not have any harmful effects. 4K Splash water with increased pressure Water which splashes against the enclosure from any direction with increased pressure shall not have any harmful effects. 6K Strong highvelocity water with increased pressure Water which is directed against the enclosure from any direction as a strong jet with increased pressure shall not have any harmful effects. 2 Seal Evaluation 8 Continuous immersion in water 9K* Water during highpressure/steamjet cleaning Z As Agreed Upon Water shall not penetrate in a quantity causing harmful effects if the enclosure is continuously immersed in water under conditions which shall be agreed between supplier and car manufacturer. Water which is directed against the enclosure from any direction shall not have any detrimental effect. Table 8 Summary of FSC and Operating Types Test Title Jump Start Reverse Polarity Over Voltage Intermittent Short Circuit Continuous Short Circuit Test Phase D D D D D FSC C C C C C GENERAL MOTORS CORPORATION – EDSON - 2008 Operating Type 3.1 and 3.2 2.1 and 2.2 3.1 and 3.2 3.2 3.2 116 Test Title Ground Interconnect Short To Battery Ground Path Inductance Sensitivity Device Initialization Waveform Characterization Processor Supervisor Performance Evaluation Fault Injection Highly Accelerated Life Test (HALT) Crush Test for Device Housing - Method A Crush Test for Device Housing - Method B Connector Installation Abuse - Method A Connector Installation Abuse - Method B Mechanical Shock - Pothole Mechanical Shock - Collision Door/Trunk/Hood Slam Thermal Performance Development – Thermocouple Method Thermal Performance Development – Infrared Imaging Method Moisture Susceptibility Highly Accelerated Stress Test (HAST) Parasitic Current Reset Behavior At Voltage Drop Battery Voltage Dropout Sinusoidal Superimposed Alternating Voltage Beyond Normal Levels Pulse Superimposed Voltage Within Normal Levels Open Circuit – Signal Line Single Interruption Open Circuit – Signal Line Multiple Interruption Open Circuit – Battery Line Interruption Open Circuit – Ground Line Interruption Ground Offset Power Offset Load Circuit Over-Current – Modules Load Circuit Over Current – Bused Electrical Centers Isolation Resistance Puncture Strength Connector Tests (Four) Fretting Corrosion Degradation 117 Test Phase D D D FSC C A A Operating Type 3.2 2.1 N.A. D A 3.2 D D D D D D D and V D and V D and V A N.A. C C C C A A A D A 3.2 3.2 1.1 1.1 1.2 1.2 1.2 or 3.1 1.2 and 3.2 (1.2 or 3.1) and 3.2 3.2 D A 3.2 D and V D V V V V A C N.A. C A A 2.1 and 3.2 2.1 and 3.2 2.1 and 2.2 3.2 2.1 and 3.2 3.2 V A 3.2 V C 3.2 V C 3.2 V V V V V V C C A A E C 3.2 3.2 3.2 3.2 3.2 3.2 V V V V N.A. N.A. N.A. N.A. 1.1 1.1 1.1 3.2 GENERAL MOTORS CORPORATION – EDSON - 2008 Test Title Vibration With Thermal Cycling Evaluation Of Squeaks and Rattle Following Vibration With Thermal Cycling Free Fall Low Temperature Wakeup High Temperature Durability Thermal Shock Air-to-Air (TS) Power-Temperature Cycle (PTC) Humid Heat Cyclic (HHC) Humid Heat Constant (HHCO) Salt Mist and Salt Spray Dust Water Seal Evaluation Sugar Water Function Impairment Vibration Shipping Test Phase V V FSC A N.A. Operating Type 3.2 N.A. V V V V V V V V V V V V PV N.A. A A A A A A A A A A A N.A. 1.1 and and 1.1 3.2 3.2 and and and and and and 1.1 2.1 2.1 2.1 1.2 1.2 1.2 1.2 1.2 3.2 3.2 3.2 3.2 3.2 3.2 3.2 3.2 f Table 9 Celsius To Fahrenheit Conversion °C °F °C °F °C °F °C °F °C °F -99 -146.2 1 33.8 101 213.8 201 393.8 301 573.8 -98 -144.4 2 35.6 102 215.6 202 395.6 302 575.6 -97 -142.6 3 37.4 103 217.4 203 397.4 303 577.4 -96 -140.8 4 39.2 104 219.2 204 399.2 304 579.2 -95 -139.0 5 41.0 105 221.0 205 401.0 305 581.0 -94 -137.2 6 42.8 106 222.8 206 402.8 306 582.8 -93 -135.4 7 44.6 107 224.6 207 404.6 307 584.6 -92 -133.6 8 46.4 108 226.4 208 406.4 308 586.4 -91 -131.8 9 48.2 109 228.2 209 408.2 309 588.2 -90 -130.0 10 50.0 110 230.0 210 410.0 310 590.0 -89 -128.2 11 51.8 111 231.8 211 411.8 311 591.8 -88 -126.4 12 53.6 112 233.6 212 413.6 312 593.6 -87 -124.6 13 55.4 113 235.4 213 415.4 313 595.4 -86 -122.8 14 57.2 114 237.2 214 417.2 314 597.2 -85 -121.0 15 59.0 115 239.0 215 419.0 315 599.0 -84 -119.2 16 60.8 116 240.8 216 420.8 316 600.8 GENERAL MOTORS CORPORATION – EDSON - 2008 118 119 °C °F °C °F °C °F °C °F °C °F -83 -117.4 17 62.6 117 242.6 217 422.6 317 602.6 -82 -115.6 18 64.4 118 244.4 218 424.4 318 604.4 -81 -113.8 19 66.2 119 246.2 219 426.2 319 606.2 -80 -112.0 20 68.0 120 248.0 220 428.0 320 608.0 -79 -110.2 21 69.8 121 249.8 221 429.8 321 609.8 -78 -108.4 22 71.6 122 251.6 222 431.6 322 611.6 -77 -106.6 23 73.4 123 253.4 223 433.4 323 613.4 -76 -104.8 24 75.2 124 255.2 224 435.2 324 615.2 -75 -103.0 25 77.0 125 257.0 225 437.0 325 617.0 -74 -101.2 26 78.8 126 258.8 226 438.8 326 618.8 -73 -99.4 27 80.6 127 260.6 227 440.6 327 620.6 -72 -97.6 28 82.4 128 262.4 228 442.4 328 622.4 -71 -95.8 29 84.2 129 264.2 229 444.2 329 624.2 -70 -94.0 30 86.0 130 266.0 230 446.0 330 626.0 -69 -92.2 31 87.8 131 267.8 231 447.8 331 627.8 -68 -90.4 32 89.6 132 269.6 232 449.6 332 629.6 -67 -88.6 33 91.4 133 271.4 233 451.4 333 631.4 -66 -86.8 34 93.2 134 273.2 234 453.2 334 633.2 -65 -85.0 35 95.0 135 275.0 235 455.0 335 635.0 -64 -83.2 36 96.8 136 276.8 236 456.8 336 636.8 -63 -81.4 37 98.6 137 278.6 237 458.6 337 638.6 -62 -79.6 38 100.4 138 280.4 238 460.4 338 640.4 -61 -77.8 39 102.2 139 282.2 239 462.2 339 642.2 -60 -76.0 40 104.0 140 284.0 240 464.0 340 644.0 -59 -74.2 41 105.8 141 285.8 241 465.8 341 645.8 -58 -72.4 42 107.6 142 287.6 242 467.6 342 647.6 -57 -70.6 43 109.4 143 289.4 243 469.4 343 649.4 -56 -68.8 44 111.2 144 291.2 244 471.2 344 651.2 -55 -67.0 45 113.0 145 293.0 245 473.0 345 653.0 -54 -65.2 46 114.8 146 294.8 246 474.8 346 654.8 -53 -63.4 47 116.6 147 296.6 247 476.6 347 656.6 -52 -61.6 48 118.4 148 298.4 248 478.4 348 658.4 -51 -59.8 49 120.2 149 300.2 249 480.2 349 660.2 -50 -58.0 50 122.0 150 302.0 250 482.0 350 662.0 -49 -56.2 51 123.8 151 303.8 251 483.8 351 663.8 -48 -54.4 52 125.6 152 305.6 252 485.6 352 665.6 -47 -52.6 53 127.4 153 307.4 253 487.4 353 667.4 -46 -50.8 54 129.2 154 309.2 254 489.2 354 669.2 -45 -49.0 55 131.0 155 311.0 255 491.0 355 671.0 GENERAL MOTORS CORPORATION – EDSON - 2008 °C °F °C °F °C °F °C °F °C °F -44 -47.2 56 132.8 156 312.8 256 492.8 356 672.8 -43 -45.4 57 134.6 157 314.6 257 494.6 357 674.6 -42 -43.6 58 136.4 158 316.4 258 496.4 358 676.4 -41 -41.8 59 138.2 159 318.2 259 498.2 359 678.2 -40 -40.0 60 140.0 160 320.0 260 500.0 360 680.0 -39 -38.2 61 141.8 161 321.8 261 501.8 361 681.8 -38 -36.4 62 143.6 162 323.6 262 503.6 362 683.6 -37 -34.6 63 145.4 163 325.4 263 505.4 363 685.4 -36 -32.8 64 147.2 164 327.2 264 507.2 364 687.2 -35 -31.0 65 149.0 165 329.0 265 509.0 365 689.0 -34 -29.2 66 150.8 166 330.8 266 510.8 366 690.8 -33 -27.4 67 152.6 167 332.6 267 512.6 367 692.6 -32 -25.6 68 154.4 168 334.4 268 514.4 368 694.4 -31 -23.8 69 156.2 169 336.2 269 516.2 369 696.2 -30 -22.0 70 158.0 170 338.0 270 518.0 370 698.0 -29 -20.2 71 159.8 171 339.8 271 519.8 371 699.8 -28 -18.4 72 161.6 172 341.6 272 521.6 372 701.6 -27 -16.6 73 163.4 173 343.4 273 523.4 373 703.4 -26 -14.8 74 165.2 174 345.2 274 525.2 374 705.2 -25 -13.0 75 167 175 347 275 527 375 707 -24 -11.2 76 168.8 176 348.8 276 528.8 376 708.8 -23 -9.4 77 170.6 177 350.6 277 530.6 377 710.6 -22 -7.6 78 172.4 178 352.4 278 532.4 378 712.4 -21 -5.8 79 174.2 179 354.2 279 534.2 379 714.2 -20 -4.0 80 176 180 356 280 536 380 716 -19 -2.2 81 177.8 181 357.8 281 537.8 381 717.8 -18 -0.4 82 179.6 182 359.6 282 539.6 382 719.6 -17 1.4 83 181.4 183 361.4 283 541.4 383 721.4 -16 3.2 84 183.2 184 363.2 284 543.2 384 723.2 -15 5.0 85 185.0 185 365.0 285 545.0 385 725.0 -14 6.8 86 186.8 186 366.8 286 546.8 386 726.8 -13 8.6 87 188.6 187 368.6 287 548.6 387 728.6 -12 10.4 88 190.4 188 370.4 288 550.4 388 730.4 -11 12.2 89 192.2 189 372.2 289 552.2 389 732.2 -10 14.0 90 194.0 190 374.0 290 554.0 390 734.0 -9 15.8 91 195.8 191 375.8 291 555.8 391 735.8 -8 17.6 92 197.6 192 377.6 292 557.6 392 737.6 -7 19.4 93 199.4 193 379.4 293 559.4 393 739.4 -6 21.2 94 201.2 194 381.2 294 561.2 394 741.2 GENERAL MOTORS CORPORATION – EDSON - 2008 120 °C °F °C °F °C °F °C °F °C °F -5 23.0 95 203.0 195 383.0 295 563.0 395 743.0 -4 24.8 96 204.8 196 384.8 296 564.8 396 744.8 -3 26.6 97 206.6 197 386.6 297 566.6 397 746.6 -2 28.4 98 208.4 198 388.4 298 568.4 398 748.4 -1 30.2 99 210.2 199 390.2 299 570.2 399 750.2 0 32.0 100 212.0 200 392.0 300 572.0 400 752.0 “Keeping It All Straight Is Not As Easy As It May Appear” 121 GENERAL MOTORS CORPORATION – EDSON - 2008 VALIDATION REQUIREMENTS QUOTING REQUIREMENTS Quoting Requirements – Section 4 of the CTS is the placeholder where the requirements for Validation are to be defined. GMW3172 may only be a subset of the total set of requirements and does not cover the non-electrical failure mechanisms. The dated version of GMW3172 should be identified (March 2008) along with the following words in section four of the CTS: Example CTS Reliability Paragraph: ”The analytical, developmental and validation mandatory tasks identified in GMW3172 must be performed to ensure adequate product maturity by the end of the product development life cycle. The component shall pass the Design Validation and Product Validation environmental and durability requirements of GMW3172. These requirements shall be clearly identified through use of the GMW3172 Coding System resulting from the location of the product in the vehicle. The code for this product is: _________________. A product reliability of at least 97%, with a statistical confidence of 50%, shall be demonstrated on test as described within GMW3172. The supplier must attain world-class reliability for this product. The test requirements contained in this document are necessary but may not be sufficient in all cases to meet this world-class field reliability requirement. The supplier is responsible for assuring that other actions are taken such that world class field reliability requirements are met.” The requirement code for this product must be clearly assigned in the CTS or SSTS. Supplemental testing for failure mechanisms not covered by GMW3172 must be specified in addition to GMW3172. These additional failure mechanisms may include wear or mechanical fatigue. Figure 10 Code Letter Sequence Requirement 1st GMW3172 Code Letter Sequence 2ed 3ed 4th 5th IP6K6K Electrical Code (Table 2) Mechanical Code (Table 3) Temperature Code (Table 4) Climate Code (Table 5) Chemical Code (Table 6) C C C D B (IP6K6K) Example Only GENERAL MOTORS CORPORATION – EDSON - 2008 Dust and Water International Protection Code (Table 7) 122 TARGET LIFE Target Life – It is important to understand that the Target Life defines a quantity of damage for each failure mechanism such that the damage is equivalent to that generated by the severe customer over some long period of time or miles driven (i.e. 10-15 years or 100,000 – 250,000 miles). For example, the target life for thermal fatigue for inside the passenger compartment is 7300 thermal cycles with a temperature-change range of 0 temperature of 43 C. We then use our established accelerated testing equations to compose a test that is of equal damage but of less duration using an increased temperature-change. From a vibration point of view, we establish target life as the damage generated by the GRMS value of the PSD profile of a vehicle driving on the Belgian Blocks for a specified number of hours. The PUMA Group quantifies the number of hours for a 99.8% severe customer for 100,000 – 250,000 miles of use. We then provide a test with 123 equivalent damage but of a shorter duration and increased GRMS value. • The target life for GM vehicles is 10 to 15 years. The number of miles associated with this target life is 100,000 to 250,000 miles, depending upon the type of vehicle. The failure mechanisms for which we demonstrate reliability or apply qualitative tests use this target life range as the baseline. No adjustment in any test defined in GMW3172 should be made for variation in mileage within the range of 100,000 and 250,000 miles. A difference in test duration for vibration remains in effect between cars and trucks (see table 20 and 21). However, this vibration test duration should not receive any additional adjustment for variation in mileage requirements as may be called out in the VTS if that value is within the 100,000 to 250,000 mile range. RELIABILITY Reliability – Please review the section on Stress-Strength Non-Interference at the front of this document to better understand why we require 97% reliability on test. 50% GENERAL MOTORS CORPORATION – EDSON - 2008 confidence as related to the specified reliability is used based upon GM policy and ease of conversion between “test to failure” and success-run methods. The R=97% has been reverse engineered from a field reliability requirement of R=99.5%. The reverse engineering process used a Customer Variability Ratio of three and a Weibull Slope of two when actual data was not available. The 99.5% field reliability has been benchmarked as world class from Toyota and Honda vehicles which demonstrated electronic device reliability values of 99%. A product reliability of at least 97%, with a statistical confidence of 50%, shall be demonstrated for the failure mechanisms of vibration fatigue (the vibration portion of “vibration with thermal”), thermal fatigue (thermal shock combined with PTC), and fretting corrosion (humidity with temperature change and vibration BEC’s only), relative to the target life. The test plan for reliability demonstration must encompass the important interactions between fatigue and other failure mechanisms described in this document. The “Universal Durability Test-Flow” provided in this document effectively evaluates these interactions and shall be used for product validation. The demonstration of 97% reliability on-test for a 99.8% severe user corresponds to a total population field reliability of (99.5%). RELIABILITY DESIGN REVIEWS Reliability Design Reviews are the primary way in which GM Engineers can take an active role in product development. In North America, GM engineers do not test a sample of the product in GM labs in addition to the testing performed by supplier. We must therefore rely only on the testing performed by the supplier. We must have a constant interaction with the supplier to understanding that the test is properly run and to be able to properly interpret the test results. Without this interaction there is little chance that we will have any impact on the product. Dissection and detailed inspection of parts that have been tested is essential in keeping the “engineering understanding” in the Validation process. Reliability design reviews are to be conducted as part of the Peer Review Process. The Reliability Design Review process should be structured GENERAL MOTORS CORPORATION – EDSON - 2008 124 to answer the questions described in Appendix “A”. Some of the Reliability Design Reviews should coincide with the Peer Review process as noted. Design Review #2 should occur within the Design Solution Peer Review, Design Review #3 should occur within the First Hardware Peer Review, and Design Review#4 should occur within the Production Design and Test Peer Review. The other Reliability Design Reviews should occur less formally between the Validation Engineer, the DRE, and the Supplier. The outcome of the Design Review may redirect planned activity for the next phase of the ADV Process…… be flexible. A Moment For Humor: A balloonist arranges for transportation for himself and his balloon to a precise place. After flying for some time, he realizes he’s lost. He reduces height and calls to a man on the ground, “Excuse me, I was supposed to meet a friend half an hour ago, but I’m not sure of my location?” The man on the ground says, “You are in a hot air balloon, hovering approximately 30 feet above this field. You are between 40 and 42 degrees north latitude, and between 58 and 60 degrees west longitude.” “You must be an engineer,” the balloonist says in frustration. “Yes, I am,” replies the man. “How did you know?” “Everything you have told me is correct, but you haven’t really helped me, in fact, I am still lost.” The man on the ground says, “You must be a manager.” “Yes, I am,” replies the balloonist. “How did you know?” “You don’t know where you are, where you’re going, or how to keep your promises, and after one question, it’s all my fault.” – Alex Porter. For want of a nail, a shoe was lost For want of a shoe, a horse was lost For want of a horse, a rider was lost For want of a rider, a message was lost For want of a message, a battle was lost For want of a battle, a kingdom was lost All for want of a nail. - George Herbert (1593-1632) The smallest things can make all the difference! 125 GENERAL MOTORS CORPORATION – EDSON - 2008 Figure 11 Process Flow For Electrical Component Validation GENERAL MOTORS CORPORATION – EDSON - 2008 126 Figure 12 The Product Development And Validation Timeline 127 GENERAL MOTORS CORPORATION – EDSON - 2008 THE TEST FLOWS EXPLAINED Let’s Talk About The “Test-Flow” The following Universal Durability Test Flows are designed to segregate failure mechanisms into individual test legs, while allowing interactions between stress types that produce synergistic failures. The sequence in test legs (1) through (5) is critical, and every effort has been made to produce as “lean” of a test plan as possible. Test Leg 0 – TIME AT HIGH TEMPERATURE: This test leg exists for leaded solder products only, allowing reduced overall test time when compared to lead-free solder by placing “the time at high temperature” test in a parallel test leg. Test Leg 1 – CRASH LEVEL MECHANICAL SHOCK: Test leg one separates the extreme forces resulting from a vehicle collision (approx. 35 mph) from other cumulative failure mechanisms. Failures in this test leg are indicative of products that do not have adequate strength in their attachments. Test Leg 2 – POTHOLE MECHANICAL SHOCK AND VIBRATION FATIGUE: This is the mechanical shock and vibration fatigue test leg. The high temperature test has been placed at the beginning of this leg for lead-free solder designs to screen for possible Kirkendall voiding problems unique to lead-free solder. If you are using a leaded solder device then the “time at high temperature” test can be placed in its own test leg “0”. The sample size of 6 for vibration has been considered when establishing the 24 hours test duration in the “Z” axis. In the vibration test only, the “Z” axis is defined as perpendicular to the circuit board and not necessarily perpendicular to earth. Good dissection at the end of this test is essential in identifying the onset (buds) of possible fatigue problems. Test Leg 3 – THERMAL FATIGUE AND WATER VAPOR INGRESS: Test leg three is generally the GENERAL MOTORS CORPORATION – EDSON - 2008 128 longest duration test leg, and the timing is primarily driven by the thermal fatigue testing composed of thermal shock followed by PTC. It is a requirement to demonstrate reliability for thermal fatigue. The number of thermal cycles along with the sample size is integral with the level of reliability being demonstrated. The two moisture tests following thermal fatigue testing are qualitative in nature, and follow thermal fatigue testing so that cracks in seals that may have developed in thermal cycling are made available for the penetration of water vapor. The “1-hour vibration with a thermal cycle” test is only a detection process and is not intended to create additional damage. This 1-hour vibration with thermal change test is designed to detect intermittent failures that may have been created during thermal fatigue or humidity testing. This detection test may be shortened by starting with the DUTs in a pre-cooled state (Tmin) and only applying vibration during a single thermal ramp to Tmax. 129 Good dissection at the end of this test leg is essential in identifying the onset (buds) of possible problems. Sectioning of some solder joints may be necessary during this dissection process. Test Leg 4 – CORROSION, DUST, AND WATER PROTECTION: This is primarily the corrosion test followed by dust and water testing. Environmental Protection Tests (dust and water) follow the corrosion test because corrosion could have caused a water leakage path that would be detected with the IP water Test. Test Leg 5 – WATER CONDENSATION: This is the moisture susceptibility test leg. Unlike humidity that is intended to diffuse water vapor into plastic encapsulated micro-circuits, the moisture susceptibility test is intended to produce the formation of dew (liquid water) on the circuit board. Test Leg 6 – PERFORMANCE ROBUSTNESS EVALUATIONS: This test leg is composed of the many robustness evaluation tests for non-cumulative damage type events. Each test should be run on GENERAL MOTORS CORPORATION – EDSON - 2008 at least three parts, but all of the tests do not need to be run on the same three parts. The supplier has discretion as to how these tests will be allocated over the available product samples. Test Leg 7 – KEY LIFE TEST FOR BUSSED ELECTRICAL CENTERS: This test leg is only to be run on Bused Electrical Centers (BEC’s). BEC’s should also be subjected to the other test legs. Fretting corrosion is a primary problem for BEC’s and this test will reveal “loss of good connection” resulting from the combination of vibration induced fretting and corrosion. UNIVERSAL ELECTRONIC DEVICE DURABILITY TEST FLOW The following figures provide a test flows that are to be used to validate products using the specific tests described in this document. The test legs should be run in parallel to minimize total test time. Synergistic failure mechanisms have been accounted for by series testing as shown. Deviations from this test flow require GM Validation Engineering approval. Surrogate test data, especially when using lead-free solder will not be accepted. A leaded and a lead-free version of the test flow is shown. Please note that all of the parts should be evaluated using the 5 point temperature and voltage evaluation prior to any other testing. We want to make sure that we are starting with parts that work at all necessary temperatures and voltages. Items in the test flow that are shown using a dashed box are optional tests, and may be required for some products and not for others. SMART SWITCH TEST FLOW A test flow for leaded and lead-free smart switches is also shown. These test flow show a suggested combination of GMW3172 and GMW3431. Smart switches are vulnerable to the failure mechanisms of both electronics and switches and thus a combined test plan is necessary. GENERAL MOTORS CORPORATION – EDSON - 2008 130 Figure 13 Universal Electronic Device Durability Test-Flow For Leaded Solder 131 GENERAL MOTORS CORPORATION – EDSON - 2008 Figure 14 Universal Electronic Device Durability Test Flow For Lead-Free Solder GENERAL MOTORS CORPORATION – EDSON - 2008 132 Figure 15 Smart Switch Test Flow For Leaded Solder 133 GENERAL MOTORS CORPORATION – EDSON - 2008 Figure 16 Smart Switch Test Flow For Lead-Free Solder GENERAL MOTORS CORPORATION – EDSON - 2008 134 ESTIMATED TOTAL TEST LEG DURATIONS The following tables are provided to help in the planning of total test duration. Test leg 6 is not shown; as these are short duration tests that do not need to occur in any specific sequence. Timing assumes an 8 hour work day, or 24 hour days for thermal chambers. The sample sizes used are those shown in the test flows. LEADED SOLDER Interior Module (Leaded Solder – Table 10a) Tables 10 (a,b,c,d,e) Leaded Solder Test Duration In Days By Test Leg Test Leg 1 Test Leg 0 Initial Temp+ Volts+ Para Eval 500 Hr. High Temp Test Leg 2 Initial Initial Temp+ Temp+ 1 Volts+ 1 1 Volts+ Para Para Eval Eval 100 G 25 G Mech. 21 Mech 1 1 Shocks Shock (Optional) 40 G Mech Shock (1) Closure Slam Test Vibration With Thermal Cycling Post Temp+ Volts+ Para Eval TOTAL Days 135 Post Post Temp+ Temp+ Volts+ 1 Volts+ Para Para Eval Eval 1 23 3 Test Leg 3 Test Leg 4 Test Leg 5 Test Leg 7 Initial Temp+ Volts+ Para Eval 1 Initial Temp+ Volts+ Para Eval 1 Initial Temp+ Volts+ Para Eval 1 Room Temp+ Unom Volts+ Para Eval Thermal Shock 21 Salt Corrosion 6 Moisture Susceptibility 10 PTC 10 Cyclic Or Constant Humidity 5 Detection Vibration with Thermal 1 Post Temp+ Volts+ Para Eval 8 To 9 Humidity 1 Fretting 3 Corrosion 10 IP Code Testing Dust 1 3 IP Code Testing Water 1 1 Post Temp+ Volts+ Para Eval 46 1 1 ISO 8820 Over 1 Current Test Post Temp+ Volts+ Para Eval 10 GENERAL MOTORS CORPORATION – EDSON - 2008 1 12 6 Underhood Module (Leaded – Table 10b) Test Leg 1 Test Leg 0 Test Leg 2 Initial Initial Initial Temp+ Temp+ Temp+ Volts+ 1 Volts+ 1 1 Volts+ Para Para Para Eval Eval Eval 2000 100 G 25 G Mech. Hr. High 83 Mech 1 1 Shocks Temp Shock (Optional) 40 G Mech Shock (1) Closure Slam Test Vibration With Thermal Cycling Post Temp+ Volts+ Para Eval Post Post Temp+ Temp+ Volts+ 1 Volts+ Para Para Eval Eval 1 TOTAL Days 85 Test Leg 3 Test Leg 4 Test Leg 5 Test Leg 7 Initial Temp+ Volts+ Para Eval 1 Initial Temp+ Volts+ Para Eval Initial Temp+ Volts+ Para Eval Room Temp+ Unom Volts+ Para Eval Thermal Shock 32 Salt Corrosion PTC 16 Cyclic Or Constant Humidity 5 Detection Vibration with Thermal 1 Post Temp+ Volts+ Para Eval 8 To 9 3 1 20 Moisture To Suscepti40 bility 1 10 1 Humidity 1 Fretting 3 Corrosion 10 IP Code Testing Dust 1 3 IP Code Testing Water 1 1 Post Temp+ Volts+ Para Eval 1 ISO 8820 Over 1 Current Test Post Temp+ Volts+ Para Eval 24 To 44 63 1 12 6 Engine Mounted Module (Leaded – Table 10c) Test Leg 0 Test Leg 1 Test Leg 2 Initial Initial Initial Temp+ Temp+ Temp+ Volts+ 1 Volts+ 1 1 Volts+ Para Para Para Eval Eval Eval 2000 100 G 25 G Mech. Hr. High 83 Mech 1 1 Shocks Temp Shock (Optional) 40 G Mech Shock (1) Closure Slam Test Test Leg 3 Test Leg 4 Test Leg 5 Test Leg 7 Initial Temp+ Volts+ Para Eval 1 Initial Temp+ Volts+ Para Eval Initial Temp+ Volts+ Para Eval Room Temp+ Unom Volts+ Para Eval Thermal Shock 61 Salt Corrosion PTC 31 Cyclic Or Constant Humidity 10 1 20 Moisture To Suscepti40 bility 1 10 1 Humidity 1 Fretting 3 Corrosion IP Code Testing Dust 1 GENERAL MOTORS CORPORATION – EDSON - 2008 ISO 8820 1 Over Current 136 Test Leg 1 Test Leg 0 Test Leg 2 Test Leg 3 Vibration With Thermal Cycling 5 Detection Vibration with Thermal 1 Post Temp+ Volts+ Para Eval Test Leg 4 Test Leg 5 Test Leg 7 Test Post Temp+ Volts+ Para Eval Post Post Temp+ Temp+ Volts+ 1 Volts+ Para Para Eval Eval 1 TOTAL Days 85 8 To 9 3 3 IP Code Testing Water 1 Post Temp+ Volts+ Para Eval 1 1 Post Temp+ Volts+ Para Eval 24 To 44 107 1 12 6 Low Exterior Mounted Sealed Module (Leaded – Table 10d) Test Leg 1 Test Leg 0 Initial Temp+ Volts+ Para Eval 500 Hr. High Temp Test Leg 2 Initial Initial Temp+ Temp+ 1 Volts+ 1 1 Volts+ Para Para Eval Eval 100 G 25 G Mech. 1 21 Mech 1 Shocks Shock (Optional) 40 G Mech Shock (1) Closure Slam Test Vibration With Thermal Cycling Post Temp+ Volts+ Para Eval 1 TOTAL Days 23 137 Post Post Temp+ Temp+ Volts+ 1 Volts+ Para Para Eval Eval 3 Test Leg 3 Test Leg 4 Test Leg 5 Test Leg 7 Initial Temp+ Volts+ Para Eval 1 Initial Temp+ Volts+ Para Eval Initial Temp+ Volts+ Para Eval Room Temp+ Unom Volts+ Para Eval Thermal Shock 21 Salt Corrosion PTC 10 Cyclic Or Constant Humidity 5 Detection Vibration with Thermal 1 Post Temp+ Volts+ Para Eval 8 To 9 1 20 Moisture To Suscepti40 bility 10 1 Humidity 1 Fretting 3 Corrosion 10 IP Code Testing Dust 1 3 IP Code Testing Water 1 1 Post Temp+ Volts+ Para Eval 46 1 1 ISO 8820 Over 1 Current Test Post Temp+ Volts+ Para Eval 24 To 44 GENERAL MOTORS CORPORATION – EDSON - 2008 1 12 6 High Mounted Exterior Sealed Module (Leaded – Table 10e) Test Leg 1 Test Leg 0 Initial Temp+ Volts+ Para Eval 500 Hr. High Temp Test Leg 2 Initial Initial Temp+ Temp+ 1 Volts+ 1 1 Volts+ Para Para Eval Eval 100 G 25 G Mech. 21 Mech 1 1 Shocks Shock (Optional) 40 G Mech Shock (1) Closure Slam Test Vibration With Thermal Cycling Post Temp+ Volts+ Para Eval Post Post Temp+ Temp+ Volts+ 1 Volts+ Para Para Eval Eval 1 TOTAL Days 23 Test Leg 3 Test Leg 4 Test Leg 5 Test Leg 7 Initial Temp+ Volts+ Para Eval 1 Initial Temp+ Volts+ Para Eval Initial Temp+ Volts+ Para Eval Room Temp+ Unom Volts+ Para Eval Thermal Shock 21 Salt Corrosion PTC 10 Cyclic Or Constant Humidity 5 Detection Vibration with Thermal 1 Post Temp+ Volts+ Para Eval 8 To 9 3 1 20 Moisture To Suscepti40 bility 1 10 1 Humidity 1 Fretting 3 Corrosion 10 IP Code Testing Dust 1 3 IP Code Testing Water 1 1 Post Temp+ Volts+ Para Eval 1 ISO 8820 Over 1 Current Test Post Temp+ Volts+ Para Eval 24 To 44 46 1 12 6 LEAD-FREE SOLDER Interior Module (Lead-Free – Table 11a) Table 11 (a,b,c,d,e) Lead-Free Solder Test Duration In Days By Test Leg Test Leg 0 Test Leg 1 Test Leg 2 Initial Initial Temp+ Temp+ Volts+ 1 Volts+ Para Para Eval Eval 100 G 500 Hr. Mech 1 High Temp Shock 25 G Mech. Shocks Test Leg 3 Test Leg 4 Test Leg 5 Test Leg 7 1 Initial Temp+ Volts+ Para Eval 1 Initial Temp+ Volts+ Para Eval 1 Initial Temp+ Volts+ Para Eval 1 Room Temp+ Unom Volts+ Para Eval 21 Thermal Shock 21 Salt Corrosion 6 Moisture Susceptibility 10 1 PTC 10 GENERAL MOTORS CORPORATION – EDSON - 2008 1 Humidity 1 Fretting 3 Corrosion 138 Test Leg 0 Test Leg 1 (Optional) 40 G Mech Shock Closure Slam Test Vibration With Thermal Cycling Post Post Temp+ Temp+ Volts+ 1 Volts+ Para Para Eval Eval TOTAL Days Test Leg 3 Test Leg 4 (1) Cyclic Or Constant Humidity 10 IP Code Testing Dust 1 5 Detection Vibration with Thermal 3 IP Code Testing Water 1 1 Post Temp+ Volts+ Para Eval 1 Post Temp+ Volts+ Para Eval Test Leg 2 29 To 30 3 46 Test Leg 5 1 Test Leg 7 ISO 8820 Over 1 Current Test Post Temp+ Volts+ Para Eval 10 1 12 6 Underhood Module (Lead-Free- Table 11b) Test Leg 0 Test Leg 1 Initial Initial Temp+ Temp+ Volts+ 1 Volts+ Para Para Eval Eval 100 G 2000 Hr. Mech 1 High Temp Shock 25 G Mech. Shocks (Optional) 40 G Mech Shock Closure Slam Test Vibration With Thermal Cycling Post Post Temp+ Temp+ Volts+ 1 Volts+ Para Para Eval Eval TOTAL Days 139 Test Leg 3 Test Leg 4 Test Leg 5 Test Leg 7 1 Initial Temp+ Volts+ Para Eval 1 Initial Temp+ Volts+ Para Eval Initial Temp+ Volts+ Para Eval Room Temp+ Unom Volts+ Para Eval 83 Thermal Shock 32 Salt Corrosion 1 PTC 16 (1) Cyclic Or Constant Humidity 5 Detection Vibration with Thermal 1 Post Temp+ Volts+ Para Eval Test Leg 2 3 91 To 92 1 20 Moisture To Suscepti40 bility 10 1 Humidity 1 Fretting 3 Corrosion 10 IP Code Testing Dust 1 3 IP Code Testing Water 1 1 Post Temp+ Volts+ Para Eval 63 1 1 ISO 8820 Over 1 Current Test Post Temp+ Volts+ Para Eval 24 To 44 GENERAL MOTORS CORPORATION – EDSON - 2008 1 12 6 Engine Mounted Module (Lead-Free – Table 11c) Test Leg 0 Test Leg 1 Test Leg 2 Initial Initial Temp+ Temp+ Volts+ 1 Volts+ Para Para Eval Eval 100 G 2000 Hr. Mech 1 High Temp Shock 25 G Mech. Shocks (Optional) 40 G Mech Shock Closure Slam Test Vibration With Thermal Cycling Post Post Temp+ Temp+ Volts+ 1 Volts+ Para Para Eval Eval TOTAL Days Test Leg 3 Test Leg 4 Test Leg 5 Test Leg 7 1 Initial Temp+ Volts+ Para Eval 1 Initial Temp+ Volts+ Para Eval Initial Temp+ Volts+ Para Eval Room Temp+ Unom Volts+ Para Eval 83 Thermal Shock 61 Salt Corrosion 1 PTC 31 (1) Cyclic Or Constant Humidity 5 Detection Vibration with Thermal 1 Post Temp+ Volts+ Para Eval 91 to 92 3 1 20 Moisture To Suscepti40 bility 1 10 1 Humidity 1 Fretting 3 Corrosion 10 IP Code Testing Dust 1 3 IP Code Testing Water 1 1 Post Temp+ Volts+ Para Eval 1 ISO 8820 Over 1 Current Test Post Temp+ Volts+ Para Eval 24 To 44 107 1 12 6 Low Exterior Mounted Sealed Module (Lead-Free – Table 11d) Test Leg 0 Test Leg 1 Test Leg 3 Test Leg 4 Test Leg 5 Test Leg 7 1 Initial Temp+ Volts+ Para Eval 1 Initial Temp+ Volts+ Para Eval Initial Temp+ Volts+ Para Eval Room Temp+ Unom Volts+ Para Eval 21 Thermal Shock 21 Salt Corrosion 1 PTC 10 (1) Cyclic Or Constant Humidity 5 Detection Vibration with Test Leg 2 Initial Initial Temp+ Temp+ Volts+ 1 Volts+ Para Para Eval Eval 100 G 500 Hr. Mech 1 High Temp Shock 25 G Mech. Shocks (Optional) 40 G Mech Shock Closure Slam Test Vibration With Thermal 1 20 Moisture To Suscepti40 bility 1 10 1 Humidity 1 Fretting 3 Corrosion 10 IP Code Testing Dust 1 3 IP Code Testing Water 1 GENERAL MOTORS CORPORATION – EDSON - 2008 ISO 8820 Over 1 Current Test 140 Test Leg 0 Test Leg 1 Test Leg 2 Test Leg 3 Cycling Post Post Temp+ Temp+ Volts+ 1 Volts+ Para Para Eval Eval Thermal TOTAL Days 1 Post Temp+ Volts+ Para Eval 29 To 30 3 1 Test Leg 4 Test Leg 5 Post Temp+ Volts+ Para Eval Post Temp+ Volts+ Para Eval 1 24 To 44 46 Test Leg 7 1 12 6 High Mounted Exterior Sealed Module (Lead-Free – Table 11e) Test Leg 0 Test Leg 1 Initial Initial Temp+ Temp+ Volts+ 1 Volts+ Para Para Eval Eval 100 G 500 Hr. Mech 1 High Temp Shock 25 G Mech. Shocks (Optional) 40 G Mech Shock Closure Slam Test Vibration With Thermal Cycling Post Post Temp+ Temp+ Volts+ 1 Volts+ Para Para Eval Eval TOTAL Days Test Leg 3 Test Leg 4 Test Leg 5 Test Leg 7 1 Initial Temp+ Volts+ Para Eval 1 Initial Temp+ Volts+ Para Eval Initial Temp+ Volts+ Para Eval Room Temp+ Unom Volts+ Para Eval 21 Thermal Shock 21 Salt Corrosion 1 PTC 10 (1) Cyclic Or Constant Humidity 5 Detection Vibration with Thermal 1 Post Temp+ Volts+ Para Eval Test Leg 2 3 29 To 30 1 20 Moisture To Suscepti40 bility Humidity 1 10 1 3 IP Code Testing Water 1 1 Post Temp+ Volts+ Para Eval 1 ISO 8820 Over 1 Current Test Post Temp+ Volts+ Para Eval 24 To 44 Test Legs? 141 10 1 Fretting 3 Corrosion IP Code Testing Dust 46 1 GENERAL MOTORS CORPORATION – EDSON - 2008 1 12 6 GMW3172 A/D/V TASK CHECKLISTS This is the list of all of the things that potentially should be done. You must review this list with the supplier and the DRE at the beginning of a program to make sure that everyone knows exactly what is expected, and what can be deemed un-necessary. Fill in the “This Program” column and use this as input for the ADVP&R form (GM-1829 form). Definition of Recommendations (Want): M --------- Mandatory for electronic modules M/C ----- Mandatory when condition or design feature exists R --------- Recommended – shall be conducted but may be waived only by GM under special circumstances. Recommended activities becomes Mandatory when so identified by General Motors C --------- Conditional task based on presence of feature, technology, risk, or vehicle location Procedure Want This Program Analytical Tasks Electrical Analysis Nominal and Worst Case Performance Simulation M Short/Open Circuit Analysis C Lead-Free Solder Checklist (Appendix “E”) M This checklist is essential at the beginning of the program to make sure that the supplier has full understanding of the impact of becoming lead-free. The supplier should be directed to the “iNEMI” website (www.inemi.org) for tutorial information on leadfree design and manufacturing. GENERAL MOTORS CORPORATION – EDSON - 2008 142 Procedure Want Analytical Tasks Mechanical Analysis R Circuit Board (Or Other Critical Element) Resonant Frequency Analysis This analysis is important if there is a large circuit board or if there are large mass items that do not seem to be well supported. Resolve these issues early in the program. This analysis may be skipped if the circuit board is small and very well supported, including the center. High Altitude Shipping Pressure Effect Analysis C The High Altitude Shipping Pressure Effect analysis is necessary when a device is hermitically sealed and may rupture or lose its seal when transported in a low pressure environment, as may occur in the luggage area of an airplane. Snap Lock Fastener Analysis (Appendix “M”) M/C This analysis is required when there will be plastic snapfit attachments that have not been previously field proven or if the snapfit design will be used with high mass and high heat applications. Bracket Fatigue Analysis (Appendix “O”) The analytical process described in Appendix “N” will assist the engineer in designing a bracket that will adequately support an electronic device without fracture over the life of the vehicle. This analysis should begin early in product development and will allow the designer to “design in” the required level of reliability. 143 GENERAL MOTORS CORPORATION – EDSON - 2008 M This Program Procedure Want Crush Test Analysis This Program R When a circuit board with a tall capacitor is designed too close to the surface of the case, it becomes possible for a misplaced elbow to deflect the surface of the case and cause a bending action to the circuit board. FEA analysis is frequently used to determine the extent of case deflection with the given loads defined in this document. Temperature Analysis High Altitude Operation Overheating Analysis C This analysis is necessary when a device is heat generating and uses convective cooling methods for heat dissipation. Air at high altitudes is significantly less dense than air at sea level and this fact will significantly diminish the ability of convective cooling designs to perform as intended. Thermal Fatigue Analysis C This analysis is necessary when large surface mounted components are attached to the circuit board. The large differential in the coefficient of expansion between the component and the circuit board will result in high stress in the solder attachments. Use FEA or Dave Steinberg’s calculations to perform this task (see reference list in GMW3172). Analytical Results Review Results Review of Analytical Tasks (DRBFM) GENERAL MOTORS CORPORATION – EDSON - 2008 M 144 GMW3172 A/D/V TASK CHECKLIST – DEVELOPMENT PROCEDURES Procedure Want Development Tasks Functional And Dimensional Tests Temperature-Voltage Functional and Parametric Evaluation for basic functions at different temperatures and different voltages. Dimensional Evaluation for packaging size and potential for change as a result of warpage with high temperature annealing. Electrical Tests Jump Start M The 26-volt jump-start is a critical design consideration. Devices could be in the “on” or “off” position during a jump start. Both “on” and “off” states should be tested. Reverse Polarity M Recent changes to require diodes across all of the motors in the vehicle will appear to present a problem in running this test. This test must still be run with the diode removed. Over Voltage M The over voltage test should be run to ensure that the product is immune to a failing generator or a “fast charge” with a high power charger. 145 GENERAL MOTORS CORPORATION – EDSON - 2008 This Program Procedure Want Short Circuit Tests M This Program Please read these tests carefully as not all tests need to be run on every product. 1. Intermittent Short Circuit 2. Continuous Short Circuit 3. Ground Interconnect to Battery 4. Short to Battery 5. Short to Ground EMC (GM3097) M This test should begin early in the program as it often takes several iterations to resolve problems. EMI testing should occur about the same time as the HALT test. The supplier must not walk in at the last minute to run this test or assume that it will be tested at the whole vehicle level. Ground Path Inductance Sensitivity M/C This test is only needed if there is flash memory that will be programmed with the wiring harness in place. Devices that may be programmed in the plant should receive this test. Device State Change Waveform Characterization R This test is needed to characterize the degree of transients produced during the state change of the device. GENERAL MOTORS CORPORATION – EDSON - 2008 146 Procedure Want Processor Supervisor Performance Evaluation M This evaluation is used to ensure proper function of the “supervisor” function in the circuit design. All microprocessor based devices should receive this evaluation. Fault Injection M Fault Injection Testing focuses systems where media or interactions with the customer may produce abusive effects. A good example of where this would apply is on radios with CD operations. Mechanical Tests Highly Accelerated Life Test (HALT) HALT is a qualitative test that provides a one-day-testduration insight into the temperature-design-margins and the vibration-design-margins for the product. This test should be used for most circuit board devices, but would not be required for very simple circuit boards or for large structural devices. This test represents the industry standard for fast-learning based upon the application of extreme vibration and temperature stresses. 147 GENERAL MOTORS CORPORATION – EDSON - 2008 R This Program Procedure Want Crush Test For Device Housing R This Program The Crush Test of the Device Housing is only needed if no analytical activity was in place to address this concern. A product that is to be mounted on the floor must be able to withstand stepping forces on the housing and on the connectors attached to the housing. Connector Installation Abuse R This test evaluates the susceptibility of the connector to damage during installation. Mechanical Shock Pothole And Collision R Imagine you have had a significant collision with a tree, but your car can be repaired. Having repaired the area that came in contact with the tree, should you also have to replace all of the electronics in the rest of the vehicle? No. The 100 G mechanical shock test is used to ensure that non-impacted electronics will continue to work properly following such an impact. This test should be run as a development test if there is concern for precariously supported electronics, hinged devices, or other mechanically non-robust structure. The pothole mechanical shock test should also be run. Door/Trunk/Hood Slam R This test is used to evaluate the robust of the device to the high slam Gs developed during closure events. Temperature Tests Thermal Performance Development R This series of activities are explained in GMW8288. Products should consider this extra attention when past thermal GENERAL MOTORS CORPORATION – EDSON - 2008 148 Procedure Want This Program problems have created delays in Validation or have produced field incidents. Humidity Tests Moisture Susceptibility M The moisture susceptibility test is used in development when a decision needs to be made regarding the need for conformal coating. Highly Accelerated Stress Test (HAST) For Humidity C This test is an extremely accelerated humidity test and can only occur above 1060C. HAST is only needed when there is a circuit board in a non-sealed enclosure located in an area of high temperature and high humidity. An unprotected circuit board located underhood would be a good candidate for this test. Development Results Review Results Review of Development Tasks (DRBTR) M The development tests are intended to give insight into product weakness and allow early product improvement. These tests may also provide a focus for “things to look for” during Validation. Visual inspection and dissection are a nature part of this process. GMW3172 A/D/V TASK CHECKLIST – DESIGN VALIDATION PROCEDURES Procedure Want Functional and Dimensional Tests Temperature-Voltage Functional & Parametric 149 M GENERAL MOTORS CORPORATION – EDSON - 2008 This Program Procedure Want Dimensional M This Program Electrical Tests Parasitic Current M Jump Start M Reverse Polarity M Over Voltage M Reset Behavior At Voltage Drop M Battery Voltage Dropout M Sinusoidal Superimposed Alternating Voltage Beyond Normal Levels M Pulse Superimposed Alternative Voltage Within Normal Levels M Open Circuit – Signal Line Single Interruption M Open Circuit – Signal Line Multiple Interruption M Open Circuit – Battery Line Interruption M Open Circuit – Ground Line Interruption M Ground Offset M Power Offset M Intermittent Short Circuit M/C Continuous Short Circuit M/C Ground Interconnect Short To Battery M/C Load Circuit Over-Current – Modules M/C Load Circuit Over-Current For Bused Electrical Centers M/C GENERAL MOTORS CORPORATION – EDSON - 2008 150 Procedure Want Isolation Resistance C Puncture Strength C Electromagnetic Compatibility M Connector Tests GMW3191 (Dec. 2007) Connector Tests 1. Terminal Push-out (section 4.8) 2. Connector to Connector Engage Force (section 4.9) 3. Locked Connector – Disengage Force (section 4.12) 4. Unlocked Connector – Disengage Force (section 4.13) M/C M/C M/C M/C Connector Installation Abuse M/C Fretting Corrosion Degradation R = 97% and C = 50% (Intended to be used only for Bussed Electrical Centers or special situations) M/C Mechanical Tests Vibration With Thermal Cycling M Reliability Demonstration required – (R=97% & C=50%). 151 Evaluation of Squeaks and Rattles Prior and Post Vibration With Thermal Cycling R Mechanical Shock – Pothole M Mechanical Shock – Collision M Door/Trunk/Hood Slam M/C Crush Test For Device Housing R Free Fall M GENERAL MOTORS CORPORATION – EDSON - 2008 This Program Procedure Want This Program Temperature Tests Low Temperature Wakeup M Performed at the beginning of all test legs along with a check at high temperature to make sure that all of the products work properly prior to durability testing. High Temperature Durability M Used as both a diffusion test and as a “preconditioning” prior to mechanical shock. This test must be run on all products. The post-heating temperature requirement and elevated re-paint and storage temperature requirement are to occur within this test. Thermal Shock Air-To-Air (TS) M Absolutely required with demonstration of a reliability number (R=97% & C=50%). This test, along with the PTC test, will require the greatest amount of test time when using leadfree solder. Plan early in order to meet program timing! Power Temperature Cycle (PTC) M Absolutely required with demonstration of a reliability number (R=97% & C=50%). This test must follow the Thermal Shock Test because this test will detect problems that may have been generated during the Thermal Shock Test. Do not separate PTC from TS or run them in reverse order. Humidity Tests Humid Heat Cyclic (HHC) M All products must pass this test to prevent dendritic growth type problems as well as internal corrosion of components. This test induces a breathing action of the water GENERAL MOTORS CORPORATION – EDSON - 2008 152 Procedure Want vapor and has proven very effective over many years. Humid Heat Constant (HHCO) M All products must pass this test to prevent long-term ingress of water vapor into components. This test also checks for dendritic growth type problems. Moisture Susceptibility M This test is required of all products to ensure adequate robustness against the formation of condensation on circuit boards. Corrosion Tests Salt Mist or Salt Spray M This test is intended to accomplish the following. The product should be washed clean following this test to evaluate appearance and loss of material: ⇒ Corrode pathways into the case that may allow moisture or salt water to reach the circuit. ⇒ Corrode exposed connector leads to the point that there is high-risk loss of parent material. Enclosure Tests Dust M The Dust Test may degrade convective cooling ability of temperature producing devices on the circuit board or may create wear when mechanical motion is involved. Dust may also contaminate unsealed relays. Water M The Water Tests vary based on where the device is 153 GENERAL MOTORS CORPORATION – EDSON - 2008 This Program Procedure Want This Program located on the vehicle. Interior devices should be tested with a water drip or splash type test to simulate condensation or things being cleaned/spilt in the vehicle. Seal Evaluation M/C This test is required by an “8” code in the water portion of the International Protection Code. The Seal Evaluation test is intended to evaluate the seal quality of devices that may be located within 20 inches of the road and may be submerged or excessively splashed when the vehicle is used. This test is also required of any potted device located any where on the vehicle. The Seal Test may also be required as an additional in combination with the high-pressure wash test (9K). This combination would be appropriate for low mounted devices under the hood of the vehicle. Sugar Water Function Impairment C This is a new test that replaces many of the “fluid compatibility tests” of the past. The Material Specifications originating from the Materials Department should cover the material tests for “fluid compatibility”. This Sugar Water Test should be used when there are moving knobs or sliders such that the drying of the sugar solution may result in sticking or poor feel. Not needed if there are no moving parts. Chemical Loads Tests Chemical Loads, Materials Testing, and UV Testing M You must work with the Materials Engineer to ensure that these tests, which are the responsibility of the Materials Department, are planned and executed properly. DV Results Review GENERAL MOTORS CORPORATION – EDSON - 2008 154 Procedure Want Results Review of Design Validation Tasks M This Program Essential activity in preparation for PV Test Planning. Visual inspection and dissection is a natural part of this process. GMW3172 A/D/V TASK CHECKLIST – PRODUCT VALIDATION PROCEDURES The following flow chart should provide a baseline of guidance in determining what tests should be run for Product Validation (PV). In addition to the tests defined in the flow chart, Audit Screening Activity is an optional activity that may be necessary for products that represent significant risk at the start of production. It is essential that thought be given to the basic failure mechanisms described in the beginning of this document when attempting to decide what PV tests should be run. The basic thought process is as follows: A new small component added – Humidity and Performance. A large component added – Thermal Fatigue and Vibration and Performance. Changes in trace layout – Frost, Humidity, and Performance. Changes in how the circuit board is supported – Vibration and Performance. Changes in the housing – Seal Evaluation, when applicable, and Environmental Protection Code testing. 155 GENERAL MOTORS CORPORATION – EDSON - 2008 The samples used during PV testing should contain solder repairs, typical in type and quantity that would exist during production. Begin with the assumption that 20% of the PV samples should include solder repairs. This number should be modified by past experience of the supplier on similar products being manufactured. Procedure Want This Program Product Validation Product Validation – Other tests may be added if the design changes between DV and PV due to corrective action or supplier driven design changes. If hardware produced from production tools/equipment is used for Product Validation, then Sample Selection for Product Validation must follow GMN10066 Multi-Vari Sample Selection Procedure for Product Validation. M Evaluation of Solder Repairs – Selective Tests Performed Using Parts That Have Typical Manufacturing Repairs M Vibration Shipping – Evaluate the effectiveness of the packaging to protect the product from scuffing and damage M Audit Screening Activity – ESS or HASA Per GMW8287 High Frequency Audit During Production Startup C Continuous Audit During Production C GMW8287 describes HALT testing and HASA/ESS Screening. Screening during production is intended to detect “quality spills” that develop during production. Screening is intended to detect these “quality spills” prior to these problems being passed on to the customer and detected in warranty. Startup screening may be required in situations where risk continues following Validation. Screening may also be used with a supplier that is having difficulty maintaining product quality during startup. Screening would taper off as the problems are resolved and production is brought under GENERAL MOTORS CORPORATION – EDSON - 2008 156 Procedure Want This Program Product Validation control. PV Results Review Results Review of Product Validation Tasks M The following PV Testing Decision Tree is intended to provide guidance for the transition between DV and PV. This is not intended to be used for running changes during production. PV Testing Decision Tree Select Starting Box Based Upon: “What Is Different Between DV And PV?” Nothing Except An Increase In Production Volume Soft Tools To Hard Tools And No Remaining DV Problems Added Manufacturing Line To Accommodate The Volume And No Remaining DV Problems •All Testing Needed To Verify Corrections •Frost Test (if not sealed) Verifying Correction Of Prior DV Problems •Frost Test •Frost Test (if not sealed) (if not sealed) •Shipping Vibration Test •Shipping Vibration Test •Cyclic Humidity •Cyclic Humidity •Seal Evaluation •Seal Evaluation (if sealed) (if sealed) Changes In Components And Circuit Board •All Testing Needed To Address Changes •Frost Test (if not sealed) •Shipping Vibration Test •Shipping Vibration Test •Cyclic Humidity •Cyclic Humidity •Seal Evaluation •Seal Evaluation •Seal Evaluation (if sealed) (if sealed) (if sealed) •Frost Test (if not sealed) •Shipping Vibration Test •Cyclic Humidity “Every truth passes through three stages before it is recognized, In the first, it is ridiculed, In the second, it is opposed, In the third, it is recognized as self evident.” Arthur Schopenhauer, Nineteenth-century German Philosopher (1788-1860) 157 GENERAL MOTORS CORPORATION – EDSON - 2008 ANALYSIS ACTIVITIES These activities should occur prior to the availability of physical parts. Analysis activities represent the opportunity to learn early in the program and prevent product delays during validation testing. ELECTRICAL ANALYSIS NOMINAL AND WORST CASE PERFORMANCE ANALYSIS The Nominal Performance Analysis is often expanded to include the variation in individual component tolerances and the effect of temperature extremes on circuit performance. Many companies have software to model this “worst case” point of view. Companies will alter their designs and software to ensure that the product will perform properly with all of these expected variations occurring. You should ask to see that this work has occurred and to know that potential problems will be prevented before Validation begins. Purpose: This analysis is performed to verify that the design of the circuit is capable of producing the required output response. Locations of Applicability: Applicable to all devices in the vehicle. GENERAL MOTORS CORPORATION – EDSON - 2008 158 Procedure: Use a circuit analysis program to analyze circuit performance using nominal and component tolerance extremes, along with expected extremes in temperature conditions. Criteria: Verify that the design of the circuit is capable of producing the required output response under all conditions. Must meet the requirements according to SSTS or CTS or GMW14082 meet FSC conditions. = C under short/open LEAD-FREE SOLDER CHECKLIST Purpose: Review changes in exposure to manufacturing temperatures and effects from the change in materials resulting from the use of lead-free soldering processes. Ensure that components are adequately robust against the higher processing temperatures and the need for humidity control of parts in storage. SHORT/OPEN CIRCUIT ANALYSIS Locations of Applicability: Purpose: Applicable to all devices in the vehicle. Performed to analyze how a circuit or systems response to potentially disruptive shorts to battery/supply voltages, short to ground and open circuit conditions. This analysis is also performed to verify the ability of components and conductors to survive short/open conditions. Locations of Applicability: Applicable to all devices in the vehicle. Procedure: Use Appendix “E” as a checklist for DRBFM activities. Criteria: Provide full disclosure throughout the supply chain regarding risks when lead-free solder is used. All risks are to be addressed and mitigated through the design review and DRBFM process. Procedure: Use a circuit analysis program to perform the Short/Open Circuit Analysis. Criteria: Verify ability of components and conductors to survive short/open conditions. No component limit value should be exceeded that may result in damage during the analysis. Must 159 GENERAL MOTORS CORPORATION – EDSON - 2008 MECHANICAL ANALYSIS CIRCUIT BOARD (OR OTHER CRITICAL ELEMENT) RESONANT FREQUENCY ANALYSIS The analysis of resonant frequencies can be performed with simple calculations as shown in the book “Vibration Analysis For Electronic Equipment” by David Steinberg (reference #1). This analysis can also be performed using Finite Element Analysis (FEA). The resonant frequency analysis will allow the designer to know if a circuit board is insufficiently supported given the mass that is attached to the circuit board and the overall size of the circuit board. The circuit board should have a resonant frequency greater than 150 Hz. A circuit board with a high resonant frequency will have a small displacement during resonance. A circuit board with a low resonant frequency will have a large displacement during resonance. Large displacements of the circuit board result in higher stress levels to the components that are attached to the circuit board. The high stress with vibration will result in fatigue failures. The above discussion may also apply to other critical elements other than a circuit board. Purpose: This analysis is to be performed for devices with internal printed circuit boards. Structural dynamic modal analysis is performed to determine the fundamental frequency of the circuit board and the resulting maximum board displacement. Low resonant frequencies and the resulting high displacement will cause excessive fatigue damage to interconnect wires and junctions on the circuit board. Locations of Applicability: Applicable to all devices in the vehicle. Procedure: Quantify the resonant frequency of the circuit board either by formal modal analysis or through the more simple models provided in reference (1) (Steinberg). Criteria: The resonant frequency of the circuit board must be greater than 150 Hz. Low resonant frequencies represent increasing risk of fatigue failure from increased board displacement. The supplier must provide evidence of appropriate corrective action when the resonant frequency is below 150 Hz. The corrective action is to be reviewed with the GM Validation Engineer. GENERAL MOTORS CORPORATION – EDSON - 2008 160 HIGH ALTITUDE SHIPPING PRESSURE EFFECT ANALYSIS aircraft up to an altitude of 15,240 meters (50,000 feet above sea level). Locations of Applicability: The High Altitude Shipping Pressure Effect Analysis is only required when there is significant risk of rupture of sealed devices from low external pressure occurring during air shipment in an un-pressurized airplane cargo hold. Devices with Gortex Vents are exempt from this analysis. The following analysis compares the stress resulting from the pressure differential between the low external pressure (11 kpa) and high (101.325 kpa) internal pressure to the structural strength of the hermetically sealed cavity. It is assume that the pressure was 101.325 Kpa (standard atmospheric pressure) at the moment the device was sealed. Please use the appropriate value if a different level of pressure was present within the device at the moment of sealing. Purpose: This test is applicable to devices that are hermetically sealed and may be susceptible to permanent damage when shipped in an un-pressurized 161 Applicable vehicle. to all locations in the Procedure: The following series of steps should be taken to ensure adequate robustness of the structure under pressure to the effects of the low pressure stress resulting from air shipment. 1. Quantify the average burst strength of the DUT under internal pressure using finite element analysis or a comparable method. 2. Use a worst case analysis process considering the variation of material parameters (such as the minimum wall thickness) and the effects of material weakening relative to temperature effects (glass transition temperatures). 3. Use table (37) to determine the multiple life design margin necessary (4.1) to ensure the required level of reliability (99% reliability should be used instead of 97% as this is a field based analysis process). a. Example: Worst case analysis shows that the burst pressure of the DUT is 500 Kpa (absolute pressure). b. At sea level the DUT is at equilibrium with the internal pressure (101.325 Kpa) equal to the external pressure (101.325 Kpa.) GENERAL MOTORS CORPORATION – EDSON - 2008 c. The pressure in the freight section of the airplane at 50,000 feet (15240 meters) is (11 kpa). d. The net internal pressure in the DUT is (90 Kpa) at 50,000 feet. (101 – 11 = 90). e. The burst pressure must be at least (4.1) times the functioning pressure of (90 kpa.) 90 X 4.1 = 369 kpa. f. Our worst case burst pressure is (500 Kpa), which exceeds our required value of (369 Kpa.) g. This product meets the requirement by analysis. Criteria: The worst case burst pressure of the DUT must exceed the functioning pressure during air shipment by a factor of (4.1). SNAP LOCK FASTENER ANALYSIS The inclusion of the Snap Lock Fastener Analysis is the result of many Validation and Field problems where the attachment of the device to the vehicle was inadequate. The Plastic Snapfit Design Worksheet in Appendix “K” will guide the engineer through the snapfit design process. Finite Element Analysis may also be used. This analysis requires that the short-term strain generated during assembly remain within the elastic limit for the material being strained during assembly (usually plastic). The overstraining of plastic snapfit attachments results in the stressed element exceeding its elastic limit, resulting in the permanent deformation of the attaching member. This permanent deformation results in a decrease in attachment engagement and the device can easily be dislodged with mechanical shock or vibration. The highly weakened over-stressed member will eventually fail from fatigue with road vibration. Purpose: The analysis of plastic snap lock features is performed to ensure the following: • Adequate retention force. • Acceptable ergonomic forces for assembly. • Designed in compliance mechanisms to prevent rattles. • Adequate design margin to ensure that flexing during installation does not exceed the elastic limit of the plastic. Locations of Applicability: Applicable to all locations in the vehicle that incorporate such features. GENERAL MOTORS CORPORATION – EDSON - 2008 162 Procedure: Complete the Plastic Snapfit Design Worksheet in Appendix “M”. Additional resources to assist in completing this worksheet are: Design of Integral Attachments and Snapfit Features in Plastic11. Alternatively, a finite element analysis maybe used. Purpose: Design reliability into the bracket by incorporating adequate design margin for vibration induced fatigue. Locations of Applicability: Applicable vehicle. to all locations in the Criteria: Procedure: Use the criteria as noted in the Plastic Snapfit Design Worksheet in Appendix “M” to insure that the elastic limits of the plastic material are not exceeded. Follow the detailed steps as shown by example in Appendix “O”. Criteria: BRACKET FATIGUE ANALYSIS The analytical process described in Appendix “O” will assist the engineer in designing a bracket that will have adequate fatigue life for 10 to 15 years of use in the vehicle. The example shown in Appendix “O” assumes that the device is mounted on the body or chassis, thus using the sprungmass vibration test as the source of stress. If the bracket is to be mounted on the engine or on an unsprung mass, then the appropriate vibration profile for these areas should be used instead of the sprung-mass as shown in the Appendix “O” analysis. 163 The design margin shall be large enough to meet the reliability requirement. Review table 37 for a description of how much design margin is required to meet the reliability requirement of 97%. CRUSH TEST ANALYSIS Purpose: This analysis of the case is performed to ensure that elbow or foot loads on the case will not cause damage to components on the circuit board. Locations of Applicability: Applicable to all locations in the vehicle where forces from assembly are possible. This may include use as a rest (supporting surface) for other assembly operations. Procedure: Use finite element analysis to insure that the requirements for crush test, GENERAL MOTORS CORPORATION – EDSON - 2008 as defined as a physical test, is met. The intended load must be identified as stemming from a person’s elbow or foot as described in the test portion for this concern. Criteria: The deflection of the device cover must not generate forces on components or the circuit board. Additionally, the deflection forces must not cause the cover to detach or “open up”. According to my calculations, I can support you as long as you don’t jump up and down! TEMPERATURE ANALYSIS HIGH ALTITUDE OPERATION OVERHEATING ANALYSIS Convectively cooled devices that are operated at “high altitude” and at “room temperature or above” may be at risk of overheating as a result of reduced air density at higher elevations. Air is less dense at high altitude, and as a result, the natural or forced convective cooling ability of the air is less at high altitude than it is at low altitude. Overheating problems of this type were originally experienced with avionics equipment in jet fighters in WWII. The following worked example showing how hot something convectively cooled will operate at 15,000 feet compared to how hot it will operate at approximately sea level. Example: The product contains a heat producing FET device with a convective cooling heatsink attached. The product is operated at room temperature in Michigan (elevation approximately 600 feet) with a thermal couple attached to the FET. The stabilized temperature of the FET is 50 degrees C. after several hours of operation. This product will be located within the passenger compartment (heated to “room temperature”). We are looking for answers to the following two questions: What will be the temperature of this device when operated within the vehicle at 15,000 feet? (Driving along Skyline Drive on Mt. Evans in Colorado) GENERAL MOTORS CORPORATION – EDSON - 2008 164 Is there adequate design margin for high temperature operation considering the device itself and the components and materials in the area around the device? The device reaches a stabilized temperature of 50 degrees C. in Michigan while operating in an ambient temperature of 23 degrees C. Taltitude − Tambient = (Tsea level − Tsea level , ambient ) × Multiplieraltitude ?− 23 = ( 50 − 23) ×1.33 Taltitude = ( 50 − 23) ×1.33 + 23 = 59 degrees C. In this example, we know that the device and all surrounding materials will show no degradation up to 750 C. Given that the device will only reach 590, no problems from overheating should be expected at high altitude. altitude up to 4572 meters (15,000 feet above sea level). Locations of Applicability: Applicable primarily to areas inside the passenger/luggage area where it is warm. External temperatures at altitudes are generally cold and overheating is not a problem. Procedure: The effect of convective cooling is reduced as the air density decreases. Air density is reduced as altitude is increased. The appropriate multiplier as shown in the following table can account for this phenomenon. The assumptions used to produce the multipliers are as follows: • The heat transfer coefficient in a naturally cooled system can be expressed as a function of the Gashoff and Prandtl numbers. The temperature and density dependence of the Grashoff number dictates the increase in case-toambient-resistance and thus the increase in operating temperatures. • Energy balance is used in a forced air system and the air temperature rise is inversely proportional to the density of air. • Power dissipation dominates the temperature rise in a high power fan cooling system. The effect of air density variation on the Reynolds number accounts for the increase in case to ambient resistance, which thus accounts for an increase in operating temperatures. Purpose: High altitude analysis is to be performed on all E/E devices that contain significant heat generating elements on their circuit board and are cooled by convection. The reduced air density at high altitude will reduce convective heat transfer and may cause marginal designs to overheat while operating within the vehicle. This analysis is used to determine if the DUT will suffer from overheating when operating the vehicle at a high 165 GENERAL MOTORS CORPORATION – EDSON - 2008 Altitude THERMAL-FATIGUE ANALYSIS Multiplier Meter (Feet) Fan Cooled (Low Power) Fan Cooled (High Power) Naturally Cooled (Convection) 0 1 1 1 4572 meters (15,000) ft. 1.77 1.58 1.33 Note: The bolded value of (1.33) will be the most frequently used value in GM calculations. The multipliers as noted are used to adjust the temperature rise for high altitude effects with the use of the following equation: Where: Taltitude − Tambient = (Tsea level − Tsea level , ambient ) × Multiplieraltitude You must know the temperature of the DUT while operating at full power at sea level. The multiplier (generally 1.33) is used to rescale the temperature differential for high altitude operation. Tambient is assumed to be the temperature of the surrounding product environment. You must solve for Taltitude using the above equation. Criteria: The process requires documented evidence of adequate design margin based on the operating specifications for the component generating heat and other sensitive components nearby. The Thermal Fatigue Analysis can be performed using the simple equations in the book “Vibration Analysis For Electronic Equipment” by David Steinberg (reference #1), or with Finite Element Analysis. Thermal fatigue results from the repetitive stress generated by cyclic temperature change when materials with different expansion/contraction rates (CTE) are attached to each other with a non-compliant system. The solder used to attach components to circuit boards becomes the focal point for the stress generated by the different expansion rates of the component and the circuit board. Leaded components have a built in compliant mechanisms in the lead itself, but surface mounted components have no leads, and thus all of the stress is concentrate in the solder joint. Purpose: The differential expansion and contraction rates of circuit board elements result in fatigue stress to the junctions involved (solder and lead wires). The differential expansion rates of different materials may also GENERAL MOTORS CORPORATION – EDSON - 2008 166 result in the unacceptable deformation of structure resulting in electrical or mechanical problems. ANALYTICAL RESULTS REVIEW Locations of Applicability: Applicable vehicle. to all locations in the Procedure: Identify the “most at risk” elements of the product as follows: • Identify the largest surface mounted component on the circuit board. • Identify components whose Coefficient of Thermal Expansion (CTE) differs the most from each other. Perform the analysis to quantify fatigue life and expansion/contraction differences that will result in problems. This cyclical stress (fatigue) can be modeled with the empirical models detailed in reference (1) (Steinberg), or through Finite Element Analysis. Criteria: The design margin shall be large enough to meet the reliability requirement. Review Appendix “L” for a description of how much design margin is required to meet the reliability requirement. 167 An analytical results review should be performed on the results of the analytical tasks with the intent of identifying where there is a lack of design margin. A refocusing of attention during development may be necessary as a result of this Analytical Results Review. Purpose: Identify weaknesses or lack of design margin and initiate corrective action now. A refocusing of attention during development or additional tests may result based upon the outcome of the analytical tasks. Procedure: Perform the Appendix “B”. design review per Criteria: Initiate corrective action as early as possible in the product development cycle. GENERAL MOTORS CORPORATION – EDSON - 2008 DEVELOPMENT AND EVALUATION ACTIVITIES These activities are designed to detect weaknesses or design oversights that were not comprehended during analysis or simply could not be evaluated during analysis. The development activities are not intended to prove reliability, but rather highlight outlier weaknesses that should be corrected prior to validation. FUNCTIONAL AND DIMENSIONAL TESTS IN DEVELOPMENT Let’s make sure that the product works at all temperatures and all voltages before we spend our hard earned money on durability tests! This is the first long bar across the top of the test flow and combines the basic temperaturevoltage functional and parametric evaluation with an extended test time at cold to cover the “wakeup” test. All Possible Temperature-Voltage Combinations All possible combinations are noted in the following table. However, an efficient subset of these combinations is defined below with the Five Point Evaluation. GENERAL MOTORS CORPORATION – EDSON - 2008 168 Sequence Temperature Voltage 1 Room Nominal Temperature Maximum Minimum 2 Minimum Minimum Temperature Nominal Maximum 3 Repaint (1 Hr. in high temperature durability test if required) No Voltage Applied Maximum Maximum Temperature Nominal Minimum Temperature-Voltage Functional & Parametric The Functional/Parametric Test may be performed at only five points with the approval of GM Engineering: FUNCTIONAL CHECKS AND CONTINUOUS MONITORING Products can demonstrate intermittent behavior during certain combinations of stresses and at different stress levels. We do not have the prior-knowledge to know what combination of stress levels will reveal a problem. Therefore, the continuous monitoring process is necessary to detect intermittent problems that may occur at certain times in a test. This is required during the vibration test, PTC test, high temperature test, constant humidity test, and cyclic humidity test. Continuous monitoring should occur as “frequently” as is reasonable, however it does not always need to be truly continuous or every millisecond. For example, during the PTC test, which may last for many days, it would not be unreasonable to monitor each circuit every several seconds. 1. (Tmin, Vmin) 2. (Tmin, Vmax) 3. (Troom, Vnom) 4. (Tmax, Vmin) The Functional Check Shall: (Example with Operating Type 3.1) 5. (Tmax, Vmax) 169 GENERAL MOTORS CORPORATION – EDSON - 2008 Check functionality, while the DUTs are exposed to the test environment. The DUT shall be powered up from a shut down power mode to a normal operation power mode. All DUT inputs/outputs (including on vehicle communications) shall be cycled and monitored for proper functional operation. The functional check shall be time limited to prevent self-heating of the device while being exposed to specific test environments. The input/output cycling and monitoring shall be automatic and shall not require human intervention or observation at any time during the test to detect and record a nonconformance. Test Criteria: The supplier is responsible for developing a detailed test criteria list, which will define the following: • How and which functional operations will be verified and/or continuously monitored. • The list of key parameters to be measured and recorded. • The list of build variation related parameters to be statistically analyzed. • The list of degradation related parameters to be statistically analyzed. • The nominal and range limit values for the measured parameters to ensure performance in accordance with the CTS. • The procedures must be submitted for approval to the GM Validation Engineer. After approval, the document shall be under change control and any future changes must be submitted for approval to the GM Validation Engineer. Continuous Monitoring Continuous Monitoring verifies that the functional requirements are met while the DUTs are being exposed to the test environment. Function is validated while the parts are exposed to the test environment, by continuously monitoring and recording exceptions to all outputs (both hardware and on vehicle communications) not being in the correct state for a given set of inputs and timing conditions. Sampling on a frequent basis is an acceptable form of continuous monitoring. The sampling rate shall be reviewed with and approved by GM Validation Engineering. If available, also Data from internal diagnostic systems shall be used and recorded. DIMENSIONAL The Dimensional Test shall be performed at room temperature after the product has been pre-treated with 2 hours at Tmax or Tmax-RPS, whichever is greater. All dimensional and physical requirements, including labels, on the GM released part drawing shall be validated and documented unless indicated otherwise by GM Engineering. Any Dimensional Test results that do not meet the part drawing requirements shall be considered a validation nonconformance issue. GENERAL MOTORS CORPORATION – EDSON - 2008 170 VISUAL DEVICE INSPECTION AND DISSECTION The visual inspection and dissection takes on a high degree of importance with the introduction of lead-free solder. The use of leadfree solder requires that we now look for tin-whisker formation and excessive void formation in solder joints. The inspection-dissection results should be used during DRBTR. The E/E device Internal & External Inspection is a visual microscopic review of the device’s case and internal parts at the completion of reliability testing as specified in the Validation Test Flow section. The purpose of this inspection is to identify any structural faults, material or component degradation or residues, and near to failure conditions caused by the reliability testing. The inspection shall use visual aids (i.e., magnifiers, microscopes, dyes, etc.) as necessary. The following are examples of items the inspection shall examine for: 1) DUT Mechanical and Structural Integrity: Signs of degradation, cracks, melting, wear, fastener failures, etc. 2) Solder/Component Lead Fatigue Cracks or Creep or Pad-lift: Emphasis on large integrated circuits, large massive components or connector 171 terminations (especially at the end or corner lead pins). Also, components in high flexure areas of the circuit board. 3) Damaged Surface Mount Components: Emphasis on surface mount components near circuit board edges, supports or carrier tabs. Also, surface mount components located in high flexure areas of the circuit board and near connector terminations. 4) Large Component Integrity and Attachment: Leaky electrolytic capacitors, contaminated relays, heat sink/rail attachments, etc. 5) Material Degradation, Growth, or Residues of Corrosion: Melted plastic parts; degraded conformal coatings, solder masks or seals; circuit board delaminations, lifted circuit board traces, signs of dendritic growth across circuit board traces, corrosion such as black silver sulfide spots on chip components, organic growths, or environmental residues due to dust, salt, moisture, etc. 6) Other Abnormal or Unexpected Conditions: Changes In Appearance Or Smell. 7) The Formation Of Tin-Whiskers When Lead-Free Solder Is Used: The test plan provided in this GENERAL MOTORS CORPORATION – EDSON - 2008 document will effectively precipitate the formation of tinwhiskers in lead-free solder if that possibility exists during normal life cycle manufacturing. A close examination of the circuit boards with a magnifying device should occur following PTC testing prior the vibration. The appearance of tin-whiskers during the test-flow process will indicate the probability of similar tin-whisker formations occurring in the field. The formation of tin-whiskers poses a risk to close pitched components, and may result in short-circuiting of products that are being used, or stored in a Service Parts Operation. 8) Absence of Dendritic Growth: The Circuit Board And All Components Must Be Free Of Dendritic Growth. 9) Solder joints should be sectioned to ensure that the formation of voids is kept to an acceptable minimum level. A summary of each DUT’s condition shall be documented and reported to GM engineering. The supplier may be required to perform further investigation to determine the degree or type of degradation. GM engineering will decide as to the necessity of corrective action. ELECTRICAL TESTS IN DEVELOPMENT JUMP START The Jump Start Test simulates the condition of being “jump started” with two 12-volt batteries in series. There are two documented situations when this may occur: A tow truck is called to jump start a vehicle with a dead battery in the winter in a parking lot. When a vehicle is found to have dead battery as it is being off-loaded from an ocean transport ship. Devices may have been left in the “on” or “off” position during the time of the “jump start”. Both “on” and “off” states should be tested using the 26-volt jump start. An evaluation of the robustness of the contacts of relays should be considered if relays may be called upon to operate during the 1 minute duration of the 26 volt jump start. Robustness of the contacts against GENERAL MOTORS CORPORATION – EDSON - 2008 172 “welding shut” resulting from the higher voltage should be evaluated. During the “jump the battery and get the car started” process, there could be a sequence of things being turned on and off. Consider a reasonable sequence of events or operating modes which should be applied during the test. This sequence should be agreed upon by the engineering team. Table 12 Jump Start Requirement Test Voltage (V) Test Time (min) +26 V 1 Criteria: Functional status should be at minimum class C. All functions needed to start the engine must be available at the test voltage, if not stated differently in the CTS. Purpose: This test specifies the procedure for testing the immunity of E/E devices to positive over-voltage. Locations of Applicability: Applicable to all devices in the vehicle that have connection to the 12 volt wiring system. Procedure: Monitoring: After the test during final evaluation. Operating Type: The test shall be performed under both operating types 3.1 (loads off) and again under 3.2 (loads on). Use the test method according ISO16750-2, Over Voltage, with the exceptions shown in table 12. 173 REVERSE POLARITY The Reverse Polarity Test recreates the condition when the customer or a service technician accidentally connects the battery terminals in reverse polarity. Electronic devices throughout the vehicle should not be destroyed because of the application of reversed battery polarity. Devices that include a motor with a diode across the inputs designed to prevent transient problems, should receive special attention when this test is administered. The diode should be removed from the system because this test will destroy that diode. GENERAL MOTORS CORPORATION – EDSON - 2008 Purpose: This test specifies the procedure for testing the immunity of E/E devices to reverse polarity voltage on the power inputs of the device. OVER VOLTAGE Locations of Applicability: Applicable to all devices in the vehicle that have connection to the 12 volt wiring system. Procedure: Monitoring: After the test during final evaluation. Operating Type: The test shall be performed under both operating types 2.1 (loads off) and again under 2.2 (loads on). Use the test method according ISO16750-2, Reverse Voltage with the following exemption: Test Time (min.) -13.5 V 2 When the generator regulator fails, resulting in an increase in output voltage from the generator. The electronic devices in the vehicle should be immune to these possible events. Table 13 Reverse Polarity Requirement Test Voltage (V) The Over-Voltage Test addresses the two possible conditions when excess voltage will be applied to the vehicle. These conditions are: During a fast charging process with a high voltage battery charger. Purpose: Criteria: Functional status minimum class C. should be at a Note: This test is not applicable to generators or devices that have an exemption stated in the CTS. The over-voltage test addresses two conditions: The condition where the generator regulator fails so that the output voltage of the generator rises above normal value. The second condition is in case of use of battery chargers with high voltage pulses. Locations of Applicability: Applicable to all devices in the vehicle that have connection to the 12 volt wiring system. GENERAL MOTORS CORPORATION – EDSON - 2008 174 Procedure: SHORT CIRCUIT TESTS Monitoring: After the test. Operating Type: The test shall be performed under both operating types 3.1 (loads off) and again under 3.2 (loads on). Perform a Functional/Parametric Test prior to application of each overvoltage event. • Connect the power supply to the battery inputs of the DUT and all loads that have battery inputs. • Turn on the power supply and subject the DUT to the required test voltage for the required test time as noted in the following table. • Perform a Functional/Parametric Test at Unom. Table 14 Over-Voltage Test Test Voltage (V) Test Time (min) Sweep between +16 and 18 at 1 volt per minute for 60 devices that are over minutes voltage protected. Provide a constant 18 volts 60 when no over voltage minutes protection is provided Criteria: Functional status minimum class C. 175 should be The Short Circuit Tests are designed to evaluate the ability of an electronic device to survive and produce no hazard to the vehicle occupants when a short circuit condition occurs. The short could be to ground, to battery voltage, or between other output lines. All combinations should be evaluated. Devices that operate with Smart Protection Circuits (current sensing or temperature sensing) should be evaluated using the following logic diagram for short circuit testing, which may include the intermittent, continuous, and through ground connection test. Devices without Smart Protection Circuits should be evaluated using the Load Circuit Over-current Test or the ISO 8820 test to evaluate the ability of the components and circuit traces to withstand the excess current flow while waiting for the fuse to open. The through ground connection test may also be required for devices that are only protected by the fuse. at GENERAL MOTORS CORPORATION – EDSON - 2008 The following graphic will help explain the logic of which tests are to be run: Logic For Short Circuit Testing Self-Protecting Smart Device Intermittent Short Circuit Test Continuous Short Circuit Test No Done Through Ground On Circuit Board? Yes Fuse Protected Not Smart Device No Bussed Electrical Center? Load Circuit Over-Current Test As Described In GMW3172 Yes ISO 8820 Test Ground Inter-Connect On Circuit Board Short To B+ Test 1. Raise and stabilize the chamber temperature to Tmax. 2. Apply Umax to the DUT 3. At t = 0 s, power mode the DUT from Off to On. The outputs under test shall be activated no later than t = 5 s. 4. At t = 15 s, apply all of the short circuit conditions described during a 5 minute period and then remove all short circuits for 2 minutes and 45 seconds (the combination of steps 3 and 4 should equal 8 minutes). 5. Power mode the DUT from On to Off. INTERMITTENT SHORT CIRCUIT Purpose: To determine if the E/E device is able to meet specified requirements when subjected to short circuit conditions. This test is only required for outputs that are specified to be short circuit protected by means of electronic current limiting. Locations of Applicability: All locations. Procedure: Monitoring: Proper function is not expected during shorting. Monitor for overheating and for return of proper function at end of test. Operating Type: The test shall be performed under operating type 3.2 (loads on). 6. Repeat 3 through 5 until 60 cycles are complete (total short circuit time equals 8 hours). After completing the 60 cycles, perform any required recycle, reset, cool down conditions and confirm the correct operation of the outputs with normal loads. 7. Adjust the battery voltage to Umin and repeat steps (3) through (7). 8. Stabilize the chamber temperature to Tmin and repeat steps (2) through (7). Note: If multiple shorts are applied simultaneously, then the supplier shall make sure that the test is valid for single shorts as well. Criteria: Functional Status shall be class C. The short circuit fault shall not prevent any other interface from meeting its GENERAL MOTORS CORPORATION – EDSON - 2008 176 requirements. The DUT shall pass all Functional/Parametric Tests. CONTINUOUS SHORT CIRCUIT Purpose: This test is required for short circuit protection output types that are specified to be protected by means of electronic current limiting. Locations of Applicability: All. Procedure: Monitoring: Proper function is not expected during shorting. Monitor for overheating and for return of proper function at end of test. Operating Type: The test shall be performed under operating type 3.2 (loads on). 6. Apply and 8 h continuous short circuit condition to the previously tested outputs. 7. Remove the short circuit condition and perform all required recycle, reset and cool down conditions. Criteria: Functional Status shall be class C. The external short circuit fault shall not prevent any other interface from meeting requirements. It is also required that the tested outputs be included in parametric measurements. These measurements shall be capable of detecting potential output degradation such as unacceptable current draw and voltage drop changes. GROUND INTERCONNECT SHORT TO BATTERY Purpose: 1. Raise and stabilize the chamber temperature to Tmax. 2. Apply Umax to the DUT. 3. Apply an 8 h continuous short circuit condition. 4. Remove the short circuit condition and perform all required recycle, reset and cool down conditions and confirm the correct operation of the outputs with normal loads. 5. Lower and stabilize the chamber temperature to Tmin. 177 This test evaluates the robustness of the interconnecting ground trace on the circuit board between grounding pins when subjected to over current conditions that may occur when one of the ground paths is disconnected from ground and shorted to battery. Generally, one of the ground pins on the back of the device connects to ground and the other “ground” pin connects to a wire that is providing a ground for another device. It is this “ground pin for the other device” that will be shorted to battery voltage in this test. GENERAL MOTORS CORPORATION – EDSON - 2008 Locations of Applicability: All locations, but feature exists. only where the Procedure: Monitoring: Proper function is not expected during shorting. Monitor for overheating during and after test. Operating Type: The test shall be performed under operating type 3.2 (loads on). 1. This test is to be run under room temperature conditions using Umax voltage and a fuse of the intended size. If the intended size is not known then use a 20 amp fuse. 2. Use an adequate length of wire from the device to the ground to produce 35 milliohms of resistance in the ground path. 3. Apply Umax to the other interconnected ground pin for as long as is necessary to allow the 20 amp fuse to open. 4. Remove the Umax voltage and evaluate, visually and electrically, the interconnecting circuit board trace for damage. Criteria: Functional Status shall be class C. There shall be no sustained heat damage to the trace or the circuit board. No smoke or thermal event shall result within the device during or after this test. The DUT shall pass all Functional/Parametric Tests following this test. ELECTROMAGNETIC COMPATIBILITY (GMW3097) Pre-prototype hardware shall be used to evaluate the capability of the device to meet the requirements of GMW3097, GMW3091, and GMW3103. GROUND PATH INDUCTANCE SENSITIVITY The Ground Path Inductance Sensitivity Test was developed in response to a problem where inductance in the wire harness prevented flash programming in the assembly plant. This test is optional and should only be required when a condition similar to the above will be present. Purpose: Identify potential problems that result from the natural inductance developed in the length and routing of the ground wire system. Inductance can prevent proper programming of flash memory in the vehicle. This phenomenon may not be observed in a bench test unless the inductance consideration is intentionally included. Locations of Applicability: All locations where programming will be required during vehicle assembly. Procedure: GENERAL MOTORS CORPORATION – EDSON - 2008 178 Monitoring: Proper function of flash programming during and at end of test. Operating Type: The test shall be performed under operating type (2.1). all of the above. The CTS should define the level of noise that is acceptable during this state change period. Purpose: Place a 5 micro-Henry inductor in the ground path of a bench test to evaluate the proper function of flash memory programming. Criteria: Programming should occur properly with the inductance in place. FSC = A. This procedure is used to characterize the transient waveform produced by the device during critical state change events. The output is reviewed in graphical form and a risk assessment to downstream devices is performed. One consideration in analyzing the waveform is to detect inadvertent actuation of outputs. Locations of Applicability: DEVICE STATE CHANGE WAVEFORM CHARACTERIZATION All locations. Procedure: The quality of the waveform during state changes, such as startup and shutdown, is important regarding hardware to hardware interactions and hardware to software interactions. This requirement has been introduced as a result of problems seen by the electrical community where a “noisy” signal is sent to the “downstream” devices during the initialization of the product with resulting problems. “State change” is defined as the energizing or deenergizing of the device during power-up, wake-up, power-down, or 179 A capture of output waveforms during state change should occur on several samples of the product. A waveform should be captured for each state change considered critical. See the CTS for details of capture duration and criteria for acceptability. Monitoring: N.A. Operating Type: N.A. Criteria: State change transients shall not produce disruptive levels of disturbance to downstream devices. FSC = A. GENERAL MOTORS CORPORATION – EDSON - 2008 PROCESSOR SUPERVISOR PERFORMANCE EVALUATION To be monitored continuously during the test. Operating Type: Operating type is (3.2). The following Processor Supervisor Performance Evaluation assesses the probability that the logic circuit does not prevent a “gridlock” in communications. Robustness evaluations are intended to confirm that the device “Does What It Is Supposed To Do”, and “Does Not Do, What It Is Not Supposed To Do.” An example of this problem may be when a product shuts down or locks up when confronted with a minor abnormality or behaves in an unsafe or unstable manner. These procedures are to be performed as development and validation activities. Purpose: This procedure is intended to verify that the systems supervisor circuit was correctly implemented and is effective at recognizing faults and initiating corrective action. Locations of Applicability: All system processor. Procedure: Monitoring: that include a micro- See Appendix “N”. Criteria: Ensure that disruptions and faults can be rapidly detected and corrected without inconvenience to the customer. FSC = A. FAULT INJECTION The following Fault Injection Testing assesses the probability that the logic circuit does not falter when encountering interaction problems with hardware or external media (CDs, etc.). The Fault Injection Test is the result of the CD player/radio not being robust against the use of damaged media or extreme customer use (random excessive button pushing). Robustness evaluations are intended to confirm that the device “Does What It Is Supposed To Do”, and “Does Not Do, What It Is Not Supposed To Do.” An example of this problem may be when a product shuts down or locks up when confronted with a minor GENERAL MOTORS CORPORATION – EDSON - 2008 180 abnormality or behaves in an unsafe or unstable manner. These procedures are to be performed as development and validation activities. MECHANICAL TESTS IN DEVELOPMENT HIGHLY ACCELERATED LIFE TEST (HALT) Purpose: Fault injection testing consists of a systematic series of evaluations where hardware and/or software elements are purposefully disrupted, disabled or damaged in order to test and grow the robustness of the whole system to deal with abnormalities. Locations of Applicability: Devices that will have interactions with people. direct The HALT test should be performed to understand and develop robustness to the stresses of temperature and vibration. This is a Qualitative Test and will take the product way beyond specification to develop an understanding of design margins. Purpose: Procedure: Monitoring: To be monitored continuously during the test. Operating Type: Operating type is (3.2). See Appendix “N”. Criteria: Verify that an E/E device is tolerant of potential system abnormalities. The FSC = A. The HALT test is not a “pass or fail” test, but rather a qualitative “quick learning method” to identify product weaknesses or operating limits from vibration and temperature. Locations of Applicability: All locations. This test method is most applicable to electronics and devices with circuit boards. This is not intended to be a structures test for larger mass devices. Procedure: The complete HALT process procedure is explained in detail in GMW8287. Monitoring: To be monitored continuously during the test. Operating Type: 181 GENERAL MOTORS CORPORATION – EDSON - 2008 Figure 17 HALT Chamber by Thermotron Operating type is (3.2). Criteria: The FSC code for this test is not applicable. The HALT test is not a pass-fail test but rather a qualitative “quick learning method” to identify product weaknesses or operating limits from vibration and temperature. The extreme levels of stresses applied in this test will evaluate design margin for hardware and will bring forth errors in software-hardware interaction as component values change with temperature and stress. Softwarehardware interaction problems at temperature extremes are expected to be resolved. Resolution of product improvement will be arrived at jointly through a design review with General Motors. The data required for determining this resolution is: • Identification of all operating limits and design margins. • Complete understanding of hardware and software failures. • Identification of how the design margins could be improved. • Identification of the barriers increasing the design margins. • Assessing the “Return on Investment” justification for limiting the increase in design margins when improvements are not made. all to CRUSH TEST FOR DEVICE HOUSING Purpose: This test is used to determine if the E/E device is able to meet specification requirements when subjected to the mechanical stresses imposed during vehicle assembly. Method “A” represents a load imposed by a person’s elbow while leaning forward on the DUT case. Method “B” represents loading imposed by a person standing on the DUT and/or its connector and header. Both conditions are representative of possible assembly plant abuse. The application of these forces should not generate damaging forces on the circuit board or on components mounted on the circuit board. The following loads may also result from the deflection of a seat back or other flexible system near the device. GENERAL MOTORS CORPORATION – EDSON - 2008 182 Locations of Applicability: All areas of the vehicle where forces from the hands and elbows of people may be applied to the device, as in vehicle assembly or servicing. Procedure: All areas of the vehicle where a person may stand upon the device during vehicle assembly or servicing. Monitoring: Monitor clearances to critical components on the circuit board. The circuit board should not be deflected. Method A. Monitoring: Monitor clearances to critical components on the circuit board. The circuit board should not be deflected. Operating Type: The test shall be performed under operating type (1.1). The DUT shall withstand, without electrical degradation or permanent physical damage, a simulated elbow load of 110 N. The DUT shall be set up to allow testing on all external surfaces with a 13.0 mm or larger diameter area. Subject the DUT to an evenly distributed 110 N force about any 13.0 mm diameter area for 1.0 s (this represents the force applied by a person’s elbow). A Functional and Parametric Test shall be performed at the end of test. Criteria: The device should function properly following the application of the above stress levels. No physical damage should be evident which may lead to subsequent failure with vibration induced stresses. Functional Status Classification = C. Operating Type: The test shall be performed under operating type (1.1). Functional Status Classification = C The DUT shall withstand, without electrical degradation or permanent physical damage, a simulated foot load of 890 N of a distributed force applied normally through a 50 mm x 50 mm (or appropriately sized) rigid steel plate for 1 min as shown in the following figure. Locate the steel plate on top of the DUT and apply the 890 N to the top of the device through the steel plate. Figure 18 Foot Load Applied (Method B) To Top of Device Housing Foot Applied Force To Case Normal Force Applied In The Middle Of The Steel Plate 50 mm X 50 mm Steel Plate Bridging The Gap Between “C” and “D” DUT Case Fastened To Support Header Structure C Connector D Support Structure Represents The Vehicle’s Floor Pan or Bracket Method B. Locations of Applicability: 183 GENERAL MOTORS CORPORATION – EDSON - 2008 Vehicle Harness Criteria: The device should function properly following the application of the above stress levels. No physical damage should be evident which may lead to subsequent failure with vibration induced stresses. Functional Status Classification = C. CONNECTOR INSTALLATION ABUSE Procedure: Method A – Side Forces From Hand Or Elbow Monitoring: Evaluate for damage and function at end of test. Operating Type: The test shall be performed under operating type (1.2). The final evaluation shall be performed at the end of the test under operating type (3.2). Functional Status Classification = C The Connector Installation Abuse Test is intended to ensure that a robust design is used so that stresses applied in the assembly plant during installation do not result in product damage. Purpose: Evaluate bending force weaknesses of the connector, or circuit boards to which the connector is attached. These human applied forces may be the result of side forces during connector attachment, or misplaced forces from hand or elbow during other assembly operations. This test is only applicable to connectors with at least 13 mm of area contained in a circle. The connector shall be set up to allow testing on all external surfaces with a 13.0 mm or larger diameter area. Subject the connector to an evenly distributed 110 N (24.7 lbs) force about any 13.0 mm diameter area for 1.0 s. This represents a simulated hand or elbow load that may possibly occur during vehicle assembly. Criteria: The connector/circuit board shall be able to withstand the above mechanical stress without any shear or yield or loss of function or loss of electrical isolation. Method B – Foot Loads From A Misplaced Step Locations of Applicability: All location where forces from a person’s hands or elbow may apply forces to the device during assembly or servicing. The Method B – foot loads are applied to the top of the device/connector to simulate conditions present in the assembly GENERAL MOTORS CORPORATION – EDSON - 2008 184 plant. A product located on the floor of the vehicle prior to the installation of the seats will be at risk from being stepped on when other assembly operations are performed. If you cannot design the product to pass this test then you better not put that product now, or in the future, on the floor of the vehicle. Purpose: Evaluate bending force weaknesses of the connector, or circuit boards to which the connector is attached. These human applied forces may be the result of side forces during connector attachment, or misplaced forces from a person’s foot during other assembly operations. This test is only applicable to connectors with at least 13 mm of area contained in a circle. Locations of Applicability: This represents a foot load that may possibly occur during vehicle assembly. The connector-header system shall withstand, without electrical degradation or permanent physical damage, a simulated foot load of 890 N of a distributed force applied normally through a 50 mm x 50 mm (or appropriately sized) rigid steel plate for 1 min as shown in the Connector Integrity sketch. This plate represents the sole of a person’s shoe. Apply this force to connector and DUT header as shown in the diagram below. The DUT shall be designed to prevent imposing such load when the connector system is unable to sustain such foot loads. Figure 19 Foot Connector Test Monitoring: Evaluate for damage and function at end of test. Operating Type: The test shall be performed under operating type (1.2). The final evaluation shall be performed at the end of the test under operating type (3.2). Functional Status Classification = C. 185 (Method B) Foot Applied Force Normal Force Applied In The Middle Of The Steel Plate 50 mm X 50 mm Steel Plate Bridging The Gap Between “C” and “D” Mating Connector Body DUT Case Fastened To Support Structure Header C This test is applicable to devices any where on the vehicle where a person could step upon the device during assembly or service. Load Connector D Vehicle Harness Support Structure Represents The Vehicle’s Floor Pan or Bracket Criteria: The connector-header system shall be able to withstand the above mechanical stress without any shear or yield or loss of function or loss of electrical isolation. Additionally, there shall be no degradation of the circuit board resulting from any of the forces that may be transmitted by this test. GENERAL MOTORS CORPORATION – EDSON - 2008 MECHANICAL SHOCK There are three mechanical shock tests: basic 1. The pothole test simulates the effect of hitting large potholes in the road while traveling at moderate rates of speed. The pulse that is generated from hitting a pothole results in a large “G” pulse with a half sine shape that occurs in all axes. The suspension rebound and the side-to-side reactions are the cause of the “all axes effect.” 2. The 100 G test simulates the effect of a significant vehicle impact that does not result in the vehicle being “totaled”. Those portions of the vehicle that were not directly affected by the collision would experience an approximate a 100 G half sine pulse. Electronic devices that existed outside of the impact area should not need replacing as a result of the impact force. The concept of “100 Gs” may seem excessive; however, dropping your calculator onto a hardwood floor from waist height will result in 500 Gs. The criteria for the 100 G. test is more lenient that for other mechanical shock tests. Some bending may be acceptable, however, nothing that would represent a hazard to the vehicle owner is allowed. 3. The 40 G door/hatch slam test is simulated on an Electro-Dynamic Shaker and represents the “G” level that would be experienced by the inner panel structure of the closure system (the door or the hatch). Mechanical Shock – Pothole And Collision Purpose: The purpose of this test is to determine if the DUT is able to meet specification requirements when subjected to the mechanical stresses like potholes, minor repairable collisions and door closures. Locations of Applicability: Test severity is different for different areas of the vehicle. Procedure: Monitoring: Proper function is not expected during application of mechanical shock GENERAL MOTORS CORPORATION – EDSON - 2008 186 events. The DUT is evaluated with monitoring at the end of the test (operating type 3.2). However, devices that include relays, such as wiper electronics and window modules, should be evaluated for proper function during the pothole mechanical shock event (operating type 3.2) to ensure unwanted activation does not occur. Nothing will be monitored during the collision mechanical shock. The test shall be performed under operating type (1.2). However, when the device is monitored during the test for unwanted activations, then the operating type should be (3.1). Final evaluation at end of test will be performed under operating type (3.2). Two shock tests have to be performed with different shock parameters. The tests are conducted according to IEC 60068-2-27 Ea. Operating Type: Region B Region C Region B Free Body Diagram And Region Definition For Mechanical Shock Region A Body Mounts Body Mounts Front Cradle Region C Full Frame On Trucks Rear Cradle Direction of Travel Shock Pulse Input From Pothole Note: the “six” as noted above refer to the six Cartesian directions of possible motion. Products that will or cannot be mounted in all possible directions should be tested in only the applicable directions of force. Criteria: Functional status shall be class A. Table 15 Mechanical Shock Tests By Area Of Vehicle And By Type Of Vehicle Pothole Mechanical Shock (Half Sine) Note: The Three Body Mounted Regions Contain The Same Shock Impulse Value Of (Peak G Times Duration) Car: Un-sprung mass Truck: Un-sprung mass Cars: Cradles 187 Collision Based Mechanical Shock (Half Sine) Truck # of Impacts Per Direction Peak (G) Duration (ms) # of Impacts For Cars or Trucks n/a Peak (G) Duration (ms) Car # of Impacts Per Direction 90 25 400 X 6 = 2400 n/a n/a n/a 50 25 n/a 4200 X 6 = 25200 100 11 40 10 400 X 6 = 2400 n/a 100 11 GENERAL MOTORS CORPORATION – EDSON - 2008 3X6= 18 3X6= 18 Trucks: Frames Cars or Trucks: Body Front & Rear (region C) Cars or Trucks: Body Middle (region A) Cars or Trucks: Body – Transition area (region B) 25 10 n/a 4200 X 6 = 25200 100 11 3X6= 18 25 10 400 X 6 = 2400 4200 X 6 = 25200 100 11 3X6= 18 7 35 400 X 6 = 2400 4200 X 6 = 25200 100 11 3X6= 18 12 20 400 X 6 = 2400 4200 X 6 = 25200 100 11 3X6= 18 Figure 20 100 G Mechanical Shock Test Device Procedure: Monitoring: Proper function is not expected during application of mechanical shock events. The DUT is evaluated with monitoring at the end of the test (operating type 3.2). However, devices that include relays, such as wiper electronics and window modules, should be evaluated for proper function during the slam mechanical shock event (operating type 3.2) to ensure unwanted activation does not occur. Door/Trunk/Hood Slam Purpose: Special requirements for components mounted in closures (door, trunk lid, hatchback, and hood). The purpose of this test is to determine if the DUT is able to meet specification requirements when subjected to the mechanical stresses defined below. Operating Type: The test shall be performed under operating type (1.2). However, when the device is monitored during the test for unwanted activations, then the operating type should be (3.1). Final evaluation at end of test will be performed under operating type (3.2). The tests are conducted according to IEC 60068-2-27 Ea. Locations of Applicability: Required only for devices located in these closure areas. GENERAL MOTORS CORPORATION – EDSON - 2008 188 Table 16 Quantity of Mechanical Shocks For Closures Closure Number of shocks (in the main direction) Driver’s Door 100 000 Passenger Door/Hatch Lid 50 000 Trunk Lid 30 000 Rear Doors 20 000 Hood 1500 Table 17 Slam Based Mechanical Shock Loads Acceleration Nominal shock duration Nominal shock 40 X gn 6 ms half sine Criteria: Functional status shall be class A. TEMPERATURE TESTS IN DEVELOPMENT THERMAL PERFORMANCE DEVELOPMENT Products that have historically had problems with heat should make extensive use of these 189 two tests. GMW8288 provides extra details on thermal performance development practices. Thermocouple Method Purpose: Devices that produce heat locally or in many areas should receive special attention to ensure that the components and materials embody adequate design margin relative to the “time at elevated temperature” produced by the device. Temperature measurements with thermocoupling are used to locate and visualize the DUT hot spots. A radio or amplifier is an example of such a device where the components, plastic materials, or media may be adversely affected by the continual production of contained heat. Locations of Applicability: All locations where heat produced within the device. may be Procedure: Monitoring: The operating temperatures are to during the test. stabilization be monitored Operating Type: The operating type shall be (3.2). Temperature measurements with thermocoupling are used to locate and visualize the DUT hot spots. Apply thermocouple near suspected “hot spots” and operate the device at maximum heat generating conditions GENERAL MOTORS CORPORATION – EDSON - 2008 (but within bounds of the specification per GMW3172). Quantify temperatures and evaluate design margin. Criteria: Modify the design, if necessary, per the guidelines in GMW8288. FSC = A. Criteria: The temperatures reached under the conditions identified in the procedure must be less than the maximum permissible for the components involved with an additional level of design margin to insure reliable function over time. The level of design margin necessary must be agreed upon with General Motors. FSC = A. Infrared Imaging Method Purpose: These methods may be used to enhance or replace the thermocouple methods. Infrared Thermography is used to locate and visualize the DUT hot spots during function and short circuit conditions. Locations of Applicability: All locations where heat produced within the device. may be Procedure: Monitoring: The operating temperatures are to during the test. be stabilization monitored Operating Type: The operating type shall be (3.2). Perform the evaluation procedure in GMW8288. per the HUMIDITY TESTS IN DEVELOPMENT MOISTURE SUSEPTABILITY The new moisture susceptibility test replaces the previous dew test and frost test. The new moisture susceptibility test repeatedly produces condensation on the circuit board twice a day over a 10-day test period. This test shall be used for all modules, whether sealed or not. Products such as radios may have difficulty passing this test. For example, the tuner circuit board portion of the radio cannot be conformal coated as that will reduce tuner performance. The uncoated tuner circuit board becomes sensitive to moisture condensation. Therefore, with products like radios, this test is to be run, and the time to failure in days noted for each product tested. The validation engineer will have engineering discretion in determining acceptability for the GENERAL MOTORS CORPORATION – EDSON - 2008 190 specific application. This determination of acceptability will be based upon the number of days of testing during which the product was able to continue to work acceptably. Purpose: This test evaluates the products robustness against electro-migration, dendritic growth, and resilience against high impedance surface moisture. These phenomenon can produce intermittent failures and sneak path circuits that my significantly effect function. be guaranteed, the test parameters have to be changed in the relevant specification. Table 18 Description of One 24 Hour Moisture Susceptibility Test Cycle Time Steps 1 2 3 4 5 6 7 Time 2 hr 3 min max. 4h 3 min max. 2 hr 3 min max. 16 hr The DUT shall be powered with Unom when power is to be applied. The Moisture Susceptibility Test consists of 10 days as follows: Locations of Applicability: The New Moisture Susceptibility Test All locations. Replaces The Frost Test And The Dew Test Repeat This 24 Hour Profile Every Day For 10 Consecutive Days < 3 minutes Procedure: Monitoring: The DUT is monitored continuously during the time that the DUT is energized. 850C and 95-98% Humidity Conditioning: Ensure that the surrounding air has free access to internal devices (printed circuit board) by the appropriate method (e.g. opening of the component, removing of covers). This requirement ensures meaningful results within 20 cycles (10 days). If free access to internal devices cannot 191 < 3 minutes 16 hrs. 4 hrs. Hot And Humid Frost Forms Frost Forms Dew Forms 0-20C Operating Type: The test shall be performed under operating type (2.1). The DUT will function under operating type (3.2) when energized and during the final evaluation at end of the. < 3 minutes 2 hrs. Dew Forms 2 hrs. Humidity Uncontrolled When Cold 24 hrs. Functional Cycling: The component shall be functionally cycled during the 85°C portion of the test sequence. The functional cycle and the number of cycles shall be individually specified in the relevant component specification or on the component drawing. Requirements of functional status (A) shall be met. GENERAL MOTORS CORPORATION – EDSON - 2008 Criteria: The requirements of functional status A shall be met throughout the test. HIGHLY ACCELERATED STRESS TEST (HAST) FOR HUMIDITY This is an extremely accelerated humidity test and can be Quantitative in nature per the Arrhenius-Peck equation defined in Appendix “I”. Use this test where a circuit board in an unsealed enclosure will be used in a humidity severe environment. The HAST Chamber will only operate above 1060C. Low temperature plastics will melt when placed in this chamber. HAST testing should be reserved for high temperature products or circuit boards. effectiveness of the protection from the housing. Procedure: Monitoring: The DUT parasitic current is monitored continuously during the time that the DUT is energized on test. Operating Type: The test shall be performed under operating type (2.1). The DUT will function under operating type (3.2) when energized during the final evaluation at end of the test. Conduct HAST per EIA/JEDEC Standard JESD22-A110-B. Use the equivalencies described in Appendix “K”. Criteria: The DUT shall not exhibit unacceptable levels of current rise during the test and should function properly following cool-down. FSC = C. Figure 21 HAST Chamber With Door Open Purpose: HAST5,6 (Highly Accelerated Stress Testing) employs increased temperature and pressure to elevate the vapor pressure of a noncondensing high humidity environment. Locations of Applicability: Severe areas of heat and humidity where there is uncertainty as to the GENERAL MOTORS CORPORATION – EDSON - 2008 192 Figure 22 HAST Chamber View Of The Racks That Hold The Parts Figure 23 HAST Chamber View of Internal Electrical Junction Block DEVELOPMENT RESULTS REVIEW A development results review should be performed on the results of the development tasks with the intent of identifying where there is a lack of design margin. A refocusing of attention during validation may be necessary as a result of this Development Results Review. Purpose: Identify weaknesses or lack of design margin and initiate corrective action now. A refocusing of attention during validation may result based upon the outcome of the analytical tasks. Procedure: Perform the Appendix “B”. design review per Criteria: Initiate corrective action as early as possible in the product development cycle. End of Development Activities 193 GENERAL MOTORS CORPORATION – EDSON - 2008 DESIGN VALIDATION ACTIVITIES ELECTRICAL TRANSIENT TESTS PARASITIC CURRENT The Parasitic Current Measurement Test – This test is only required if you have a device that goes to sleep or operates in a sleep-like state where less energy is required to sustain the product. The test duration only needs to be long enough to capture the total wakeup event. Different levels of wakeup may occur, and all wakeup events over a 40-day period must be comprehended in the final calculation of parasitic current. This does not mean that the test needs to last 40 days. The 40 days represents the maximum duration one would expect a person to be parked at the airport, and is only used in the final analytical calculations. Note: The process of measuring the current while dropping the voltage, as noted in step four, is required to check for unexpected behavior as following: described by the A vehicle is parked for a lengthy period of time at the airport, and as the battery voltage drops below the point where the car could ever be started, the very low battery voltage unexpectedly results in the “waking up” of the module, producing a continuous high current drain on the battery. The battery becomes depleted to the point where recharging is not effective and the battery must be replaced. The unexpected “waking up” should not occur, and any form of unexpected high current draw at very low voltages should also not occur as it may result in the destruction of the battery. Purpose: All of the functions that consume energy from the battery while the vehicle is in an ignition off state must be known and approved. Parasitic current is defined as the current drawn by electrical devices when the vehicle ignition switch is in the OFF position and all electrical accessories are turned OFF. This test defines the maximum acceptable average parasitic current of an electronic component. GENERAL MOTORS CORPORATION – EDSON - 2008 194 The following example should provide some guidance in how to apply the procedural explanations provided in the procedure section that follows. Locations of Applicability: All devices that will draw some current when the engine is turned off. Simple Example: Average Parasitic Current Calculation This test is only to define the parasitic loss from expected operations. Other devices may unknowingly wakeup this device, but that fact is not to be included in this test process. The ignition is turned off, and our example ECU becomes off-awake for two minutes, and then hibernates in an off-asleep state until the ignition is reactivated. • Immediately after being placed in the OFF power mode the ECU is off-awake for 2 minutes. • Following the above two minutes in the off-awake state, the ECU becomes off-asleep until the ignition is turned on 40 days later. Figure 24 Simple Parasitic Current Measurement Parasitic Current Simple Example Graphic Note: Values shown are for this example. You must measure your own values Parasitic Current Off-Awake 200 Milliamps .150 Milliamps Off-Asleep Two Minutes Remainder of Time Until The Ignition Is Turned Back On Ignition Off Time Ignition On During the time the module is off-awake it draws (200 mA). When in the offasleep state, the module draws (.150 mA). Both current ratings apply at 250C and 12 volts. The answer sought in this example is: “What is the average parasitic current draw over the 40-day period?” 195 GENERAL MOTORS CORPORATION – EDSON - 2008 Answer: Parasitic current is equal to minutes off-awake minutes off-asleep = Current when off-awake × + Current when off-asleep × minutes in 40 days minutes in 40 days 2 57600-2 + .150mA × = 0.157 mA. 57600 57600 Parasitic current = 200mA × Complex Example: Average Parasitic Current Calculation: This test is only to define the parasitic loss from expected operations. Other devices may unknowingly wakeup this device, but that fact is not to be included in this test process. An ECU is turned OFF and wakeup events follow the schedule shown below. • One hour after the OFF power mode the ECU is powered for 1 minute. • 24 hours after the OFF power mode the ECU is powered for 1 minute. • 5 days after the OFF power mode the ECU is powered for 1 minute. • 2 weeks after the OFF power mode the ECU is powered for 1 minute. • 4 weeks after the OFF power mode the ECU is powered for 1 minute. • 6 weeks after the OFF power mode the ECU is powered for 1 minute. (note: this is beyond 40 days) During the time the module is on it draws 350 mA. When in the off state, the module draws 0.200 mA. Both current ratings apply at 250C and 12.6 volts. The answer sought in this example is: “What is the average parasitic current draw over the 40-day period?” Answer: Parasitic current = Current when on × minutes on + Current when off × minutes off minutes in 40 days minutes in 40 days First, 6 weeks is equal to 42 days, so this current level is not used in estimating the average parasitic current. There are five, 1-minute intervals (1-5 above) when the ECU is powered in the 40 day interval and therefore (57,600 – 5) minutes when it isn’t. (40 days = 57,600 minutes) Thus, the average parasitic current is: 5 57600-5 Parasitic current = 350mA × + .200mA × = 0.230 mA. 57600 57600 Procedure: Monitoring: The current is measured in the various states of awake and asleep. No long term monitoring is to occur. GENERAL MOTORS CORPORATION – EDSON - 2008 196 Operating Type: The test shall be performed under operating type (2.1) and under operating type (2.2) as shown in figures 23 and 24. Monitor the current in all of the DUT supply lines and choose an appropriate current measuring device. The current measuring device must have a sampling frequency that is ten times higher than the smallest current peak the module creates, and the highest value of the peak generated by the DUT must be within the capability of the measuring device. The DUT should be equipped as installed in the vehicle. All inputs, outputs, and sensors are to be electrically connected and in their normal inactive state. 1. Connect the DUT to a variable power supply and adjust the input voltage to 12 volts. The system should be at a temperature of 250C. 2. Place the system into OFF mode. 3. Measure the current in the system over a time frame for a period that is ten times longer than the longest expected periodic repeated event of the module. Certain modules may experience periodic or occasional wakeups when OFF (OFF-Awake). The current, when in OFF-Asleep and under all OFF-Awake conditions, should be recorded. 4. While measuring the current, decrease the supply voltage by 1 volt/minute until one volts is reached. The criteria must be met throughout the decreasing voltage process. This process is looking for abnormal behavior of the device to a reduction in voltage. The current draw should gracefully lessen or remain the same as the voltage source is reduced. Figure 25 Parasitic Current Evaluation: Good and Bad Behavior With Decreasing Voltage Parasitic Current Evaluation With Decreasing Voltage X=X Bad Parasitic = X Good Parasitic = X UB = 12 Volts Objective: There Should Be No Change In Parasitic Current Resulting From A Lowering Of Supply Voltage Supply Voltage Measure The Average Steady State Parasitic Current Draw In This One Minute Time Interval While Product Is Off-Asleep One Minute 197 1 Volt 11 Minutes GENERAL MOTORS CORPORATION – EDSON - 2008 5. The test should be repeated for the various methods in which the DUT can enter the OFF-Asleep state. 6. This data will be used to calculate the average parasitic current experienced over a 40-day period. Note: Consider the fact that the product may draw different levels of current under conditions of varying temperature. If you believe that your product may be sensitive to this phenomenon then these measurements should also be taken at temperature extremes. Criteria: The average parasitic current should be calculated as the average current flow over a 40-day period. The maximum allowable average parasitic current shall be 0.250 mA if not provided in the CTS. The test report must include the following information: 1. Parasitic current draw when in the OFF-Asleep state. 2. Parasitic current draw under all OFF-Awake conditions and their time period. 3. Calculated average parasitic current draw over 40 days. 4. Parasitic current over the voltage range from 12 down to 1 volt. FSC code is not applicable to this test. RESET BEHAVIOR AT VOLTAGE DROP The Voltage Drop Test is looking for the misbehavior of smart devices when there are momentary losses of varying levels of voltage. Please notice that the test sequence is run twice. Once with a 5 second dwell at low voltage, and once with a 50-millisecond dwell at low voltage. Software-hardware interaction problems may also result from this test. Constant monitoring should be used. The interval of time between the voltagereductions can be as long as is necessary to properly evaluate the performance of the product. Purpose: This test verifies the proper reset behavior of the device. It is intended primarily for E/E devices with a regulated power supply or a voltage regulator. This test should also be used for microprocessor-based devices to quantify the robustness of the design to sustain short duration low voltage dwells. Locations of Applicability: All devices in any location that may be effected by a momentary drop in voltage. GENERAL MOTORS CORPORATION – EDSON - 2008 198 Procedure: Monitoring: The DUT is to be monitored during the entire test. Look for proper reset and return to function. Operating Type: The test shall be performed under operating type (3.2). Use the test methods in accordance with ISO 16750-2, Reset Behavior at Voltage Drop. This test is run twice, once at each of the two different durations specified for time at reduced voltage. Figure 26 Voltage Drop Test Functional status minimum class C. should be at BATTERY VOLTAGE DROPOUT The Battery Voltage Dropout Test is simulating the condition of battery depletion from lights (or some other load) being left on while the engine is not operating. This test is not intended to replicate the cranking of an engine during the starting process. Purpose: Determine if the E/E device is immune to decreases and increase in battery voltage. This condition may occur when lights are left on which results in rundown of the battery, or when the battery voltage increases during times of battery charging. Locations of Applicability: Apply the test pulse to all relevant inputs and hold this decreased voltage for at least 5 seconds. Check the reset behavior of the DUT. Repeat the test pulse with a hold time of 50 ms at each decreased voltage and check the reset behavior of the DUT. Note: the dwell periods between the voltage drops may be as long as needed for adequate product evaluation. Criteria: 199 All devices in any location that may be effected by a gradual drop or increase in voltage. Procedure: Monitoring: Continuous monitoring is required to detect intermittent faults. Operating Type: The test shall be performed under operating type (3.2) for zones E1, E2, and E3. GENERAL MOTORS CORPORATION – EDSON - 2008 The test shall be performed under operating type (2.1) for zones T1, T2 and T3. Table 19 Battery Voltage Dropout Test Durations Time (s) 1. Set up the battery voltage dropout profile as shown in figure 22. Variations T1 T2 T3 A 0.01 10 1 2. Soak the DUT un-powered until its temperature has stabilized to Tmin. B 0.1 600 10 C 0.5 3600 120 D 1 28800 7200 3. Power up the DUT and inject the battery voltage dropout test profile with the following parameters from variation “A” in Table 15. 4. Perform a Functional/Parametric Test at 14 volts (zone E1). Figure 27 Battery Voltage Dropout Profile Battery Voltage Dropout Profile 5. Proceed through the test profile and perform a Functional Check at Umin, between the T1 and T2 time intervals (zone E2). 6. Perform a Functional/Parametric Test after the T3 time interval at 10 volts (zone E3). To Be Run With Four Different Time Variations And At Two Different Temperatures 14 Volts T1 T2 T3 10 Volts Time FSC = A 1 Volt FSC = C FSC = C E3 FSC = C FSC = A E2 FSC = C E1 FSC = A Voltage Umin 7. Repeat steps (3) through (6) three additional times for the variations B, C, and D. 8. Repeat steps (2) through (7) at Tmax. Note: The reduction to 1 volt is to check for power reset functionality. This would be appropriate for microcontroller devices and external EEprom memories. The time at 1 volt is undefined but should be greater than 30 seconds. Criteria: Functional status should be as shown depending on the zone per figure 27. GENERAL MOTORS CORPORATION – EDSON - 2008 200 SUPERIMPOSED VOLTAGE TESTS Two different superimposed alternating voltage tests are shown. The “beyond normal levels” test simulates the condition where there are significant degrees of AC ripple on top of the base DC voltage under special circumstances such as when there is no battery in the car or when the generator is not providing adequate dampening of the ripple signal. The second superimposed alternating voltage test addresses normal operating conditions and evaluates the DUT’s robustness against pulse voltage inputs on the base 12 volt DC lines. The following are examples of problems which generated the need for this test: • Replacement of position light bulbs with switching buck converter driven single high intensity LED. Causing current consumption variations at feeding side smart electrical center and setting faulty open circuit fault codes 201 • Electronic Brake Modulator with parallel Vbatt feeds with separate serial diodes with different internal time constant on supply voltage variations leading to power ASIC destruction due to distributed supply pin voltage differences. • Variable Effort Steering VES with PWM controlled constant current actuator outputs. Output EMC LC Pi-filter driven at resonance frequency giving current spikes causing unintended short circuit protection shutdown Neither of these tests are intended to evaluate generator noise coming through the radio. Sinusoidal Superimposed Voltage Test Beyond Normal Levels Purpose: Verify the performance of the E/E device when the supply voltage is superimposed with a sinusoidal alternating voltage. This simulates the output of a poorly damped alternator over a full range of engine RPMS. Locations of Applicability: All devices in any location that may be effected by an extreme level of A/C ripple on the 12 volt wiring system. GENERAL MOTORS CORPORATION – EDSON - 2008 Procedure: Monitoring: Continuous monitoring is required to detect intermittent faults. Operating Type: The test shall be performed under operating type (3.2). Use the test methods in accordance with ISO 16750-2, Superimposed alternating voltage, Severity Level 2 (4Vp-p). Criteria: The functional status shall be class A. Pulse Superimposed Voltage Test Within Normal Levels loads, slave units or PWM controlled loads. Conditions of special interest would include situations where current consumption can be very low for some operating conditions or very high due to input LC-filter energy storage or output LC-filter resonance. Locations of Applicability: All devices in any location that may be effected by a normal level of A/C ripple on the 12 volt wiring system. Procedure: Monitoring: Continuous monitoring is required to detect intermittent faults. Operating Type: The test shall be performed under operating type (3.2). Purpose: Verify the performance of the E/E device when the supply voltage is superimposed with a voltage pulse within the normal operating voltage range. This voltage pulses will mimic a sudden high current load change to the battery supply line, causing a voltage drop or voltage rise at switch on or switch off. The pulse profiles used simulate loads with inrush current behavior like: Connect the DUT to the Uo output. Follow the given sequence Io output current capability 50A Rise time < 10us for a 2V step RC = 3.18ms (50 Hz f_low) Io Load_1 Vs C Us R DUT Uo Up Pg Load_n Uo = Us + Up Us = (Vmin + 2V) to 14 V DC voltage. Start at Us = 14V Up = Square wave -1.0V to +1.0V 50% duty cycle (2.0Vp-p) Up_frequency sweep range 1 Hz to 4 kHz Frequency sweep type: Logarithmic Sweep duration for one cycle: 120s for 1 Hz to 4 kHz to 1Hz Number of sweeps: 5 continuously After each five complete frequency sweeps decrease Us by 1.0 V Repeat until Us - 2V = Vmin • Motors • Incandescent bulbs • Long wire harness resistive voltage drops modulated by PWM controlled high loads. At room temperature TRT, at Tmin and at Tmax repeat this sequence. This test is also an important tool to test diagnostic behavior for open load detection and short circuit protection of high side drivers feeding intelligent For DUT:s with power output drivers the test shall be performed with real loads connected (Load_1 to Load_n) and the output currents driven in the GENERAL MOTORS CORPORATION – EDSON - 2008 202 full range from I_load_min I_load_max for each Us step to The Uo waveform will depend on the frequency, 1Hz, 100Hz and 4 kHz shown below for the case Us=14V. The functional status shall be class A during and after the test. No fault codes shall be generated during or after the test. Criteria: OPEN CIRCUIT The following version of the Open Circuit Test is suggested based upon validation experience in 2007. The duration of the open circuit test time has been extended compared to previous time. The following special Open Circuit tests are to determine 203 if the module design will allow any output circuitry to be left in a partially active state when all logic power or grounds become open circuit. When these circuits are not completely turned off or completely turned on they function much as a resistor and can become overheated and eventually become inoperative. GENERAL MOTORS CORPORATION – EDSON - 2008 Open Circuit - Signal Line Single Interruption Purpose: Determine if the device is able to suffer no damage due to incomplete contact conditions and to determine if the part functions properly immediately after the completion of the contacts. Locations of Applicability: Determine if the device is able to suffer no damage due to incomplete contact conditions and to determine if the part functions properly immediately after the completion of the contacts. Locations of Applicability: All locations. All locations. Procedure: Monitoring: Continuous monitoring is required to detect overheating and proper return to function. Operating Type: The test shall be performed under operating type (3.2). Procedure: Monitoring: Continuous monitoring is required to detect overheating and proper return to function. Operating Type: The test shall be performed under operating type (3.2). Use the test methods in accordance with ISO 16750-2, Single Line Interruption. Use the test methods in accordance with ISO 16750-2, Multiple Line Interruption. Criteria: Functional status minimum class C. should be at Open Circuit - Battery Line Interruption Criteria: Functional status minimum class C. should be at Open Circuit - Signal Line Multiple Interruption Purpose: Determine if the device is able to suffer no damage due to incomplete contact conditions and to determine if the part functions properly immediately after the completion of the contacts. Purpose: GENERAL MOTORS CORPORATION – EDSON - 2008 204 Locations of Applicability: All location, but only devices that have connections to the 12 volt wiring system. 7. Conduct this test at Vmax. 8. Conduct this test at Tmax except with agreement of GM Validation Engineer. Criteria: Procedure: Monitoring: Continuous monitoring is required to detect overheating and proper return to function. Operating Type: The test shall be performed under operating type (3.2). Use the test methods in accordance with ISO 16750-2, Single Line Interruption, with the following deviations: 1. Disconnect all battery lines simultaneously intended to provide power to the module logic. 2. Extend the duration of the interruption to 1 hour for each of power modes listed in the next step. 3. Disconnect the battery line(s) while in Off power mode with microprocessor asleep, Off power mode with microprocessor awake, Accessory power mode, and the Run power mode. 4. Each of the above tests shall be conducted with the outputs initially inactive and repeated with the outputs initially active. 5. All I/O is connected to actual or simulated loads. 6. Monitor all output drivers with infrared cameras or with thermocouples. 205 Functional status shall be at a minimum class C. During the test temperature of the driver shall not exceed its maximum storage temperature. Open Circuit - Ground Line Interruption Purpose: Determine if the device is able to suffer no damage due to incomplete contact conditions and to determine if the part functions properly immediately after the completion of the contacts. Locations of Applicability: All location, but only devices that have connections to ground. Procedure: Monitoring: Continuous monitoring is required to detect overheating and proper return to function. Operating Type: The test shall be performed under operating type (3.2). Use the test methods in accordance with ISO 16750-2, Single Line Interruption, with the following deviations: GENERAL MOTORS CORPORATION – EDSON - 2008 1. Disconnect all Ground lines simultaneously intended to provide ground to the module logic. GROUND OFFSET 2. Extend the duration of the interruption to 1 hour for each of power modes listed in the next step. The Ground Offset Test is required when the DUT has two or more grounding connections. This test simulates the condition where different portions of the vehicle may have different ground potentials. This could result from poor grounds or from different length ground wires. 3. Disconnect the battery line(s) while in Off power mode with microprocessor asleep, Off power mode with microprocessor awake, Accessory power mode, and the Run power mode. 4. Each of the above tests shall be conducted with the outputs initially inactive and repeated with the outputs initially active. 5. All I/O is connected to actual or simulated loads. 6. Monitor all output drivers with infrared cameras or thermocouples. 7. Conduct this test at Vmax. 8. Conduct this test at Tmax except with agreement of GM Validation Engineer. Purpose: This test shall determine if the device functions properly when subjected to ground offsets between platform modules. Locations of Applicability: All location, but only devices that have more than one ground wire attached to the device. Procedure: Criteria: Functional status shall be at a minimum class C. During the test temperature of the driver shall not exceed its maximum storage temperature. Monitoring: Continuous monitoring is required to detect intermittent faults. Operating Type: The test shall be performed under operating type (3.2). The offset shall be applied to each ground line separately and simultaneously. The voltage values shown apply to all interfaces of a module supplied with Unom. GENERAL MOTORS CORPORATION – EDSON - 2008 206 • Ground offset modules: between platform • Ground offset between platform modules and the powertrain: 1. Apply Umin to the DUT 1. Apply Umin to the DUT. 2. Subject ground line to a +0.8 V offset relative to the DUT ground. 3. Perform a Functional/Parametric Test under these conditions. 2. Subject ground line to a +1.0 V offset relative to the DUT ground. 3. Perform a Functional/Parametric Test under these conditions. 4. Repeat for next ground line. 4. Repeat for next ground line. 5. Repeat for lines simultaneously. 5. Repeat for lines simultaneously. 6. Repeat for a –0.8 V offset relative to the DUT ground. 6. Repeat for a –1.0 V offset 7. relative to the DUT ground. 7. Repeat (2) through (6) at Umax. 8. Repeat (2) through (6) at Umax. Criteria: The functional status shall be class A. Ground Offset Test Setup At Umin Wall Outlet Ground 1 = .8 Volts (Negative) Power Supply Ground POWER OFFSET .8 Volts B+ Power Supply 9 Volts DUT Swap Ground 1 And Ground 2 To Produce Opposite Voltage Effect Ground 2 = 0 Volts (Negative) Ground Offset Test Setup At Umax Wall Outlet Ground 1 = .8 Volts (Negative) Power Supply .8 Ground The Power Offset Test simulates the condition where different power feeds into a device may have slightly different levels of voltage potential. This could result from different length feed wires or unbalanced loading of power feed lines. Volts B+ Power Supply 16 Volts Purpose: DUT Swap Ground 1 And Ground 2 To Produce Opposite Voltage Effect 207 Ground 2 = 0 Volts (Negative) This test shall also determine if the device functions properly when subjected to power offsets. GENERAL MOTORS CORPORATION – EDSON - 2008 Locations of Applicability: All location on the vehicle, but only devices that have more than one power line. Power lines could be input from ignition or direct battery. Procedure: Monitoring: Continuous monitoring is required to detect intermittent faults. Operating Type: The test shall be performed under operating type (3.2). Power Offset Test Setup At Umin Wall Outlet Power Supply 2. Subject the applicable power line to a +1.0 V offset relative to the DUT power. 3. Perform a Functional/Parametric Test under these conditions. 4. Repeat for next applicable line. 5. Repeat for lines simultaneously. 6. Repeat for a –1.0 V offset relative to the DUT power. 7. Repeat (2) through (6) at Umax. 9 Volts B+ B+ Power Supply 10 Volts DUT Ground (Negative) Swap The Two B+ Lines To Produce The Opposite Voltage Effect Power Offset Test Setup At Umax Wall Outlet The test Setup For Power Ground Offset is shown below: 1. Apply Umin to the DUT. Ground Power Supply B+ Ground 16 Volts B+ Power Supply 15.2 Volts DUT Ground (Negative) Swap The Two B+ Lines To Produce The Opposite Voltage Effect Criteria: The functional status shall be class A. LOAD CIRCUIT OVER-CURRENT MODULES The Load Circuit OverCurrent Test for modules simulates a condition where the protection fuse does not immediately open when the specified current is exceeded. The product must not GENERAL MOTORS CORPORATION – EDSON - 2008 208 create a thermal or smoke hazard to the vehicle occupants. The following is a revised version of the previous years’ procedure and is very similar to the Short Circuit Test described in GMW3431. During this test one is hoping that the DUT will continue to function to the point that the upstream fuse “opens”, or the DUT fails “gracefully” in an over current condition. Graceful is defined as not producing smoke or creating an overheating condition. The worstcase scenario would be for the device to heat up internally without tripping the fuse and establish a high temperature balance point between the heat being generated and the heat being dissipated. This balance point may be just short of the heat needed to open the external fuse or any internal fusible links. This balance point condition could result in the generation of high heat on the circuit board and possible smoke. Purpose: The purpose of this test is to determine if the DUT is able to meet specified requirements when subjected to maximum current allowable by the external protection fuse. This test will destroy the device. 209 Locations of Applicability: All location, but only devices that do not have smart protection and are dependent only upon an upstream fuse for protection. Procedure: Monitoring: Graceful death is the expected outcome. Monitor only for overheating. Operating Type: The test shall be performed under operating type (3.2). All circuits are to be protected using the approved application circuit protection device as detailed on the part drawing or specification (fuse, circuit breaker, etc.) 1. Raise and stabilize the chamber temperature to Tmax. 2. Apply Unom to the DUT. 3. Short each output through an appropriate resistor value (variable resistor suggested) to draw a rated load current for 15 minutes. 4. Increase the current in increments of 1 ampere by changing the variable resistor value. Apply the increased current for a 15-minute dwell period. This is shown as phase one in figure 13. 5. Continue increasing the current until the protection device (fuse, circuit breaker) opens or any internal fusible link features in the DUT produce an open circuit. GENERAL MOTORS CORPORATION – EDSON - 2008 6. Identify when in time, and at what amperage level failure occurs. Pay special attention for the generation of smoke or thermal activity near the time of failure. 8. If the external fuse opens, record the current value at the time of opening. 9. Repeat Steps 1-8 at Tmin. Criteria: 7. If an internal failure occurs before the external fuse opens, then explore finer levels of current change between the current level of “no failure” and “internal failure”. Use a 5-step exploration process within this one amp interval. This is shown as phase two in figure 13 shown below. Functional Status shall be class E. At no time during the test shall the device exhibit any indication of a thermal incident or generation of smoke. The generation of some odor is acceptable. Graceful death of the device is acceptable. Figure 28 Load Circuit Over-Current Test Procedure For Modules Load Circuit Over Current Test Procedure Example: 10 amp fuse as the protection system with a rated load current of 3 amps Phase One 10 amps 11 amps 14 amps 13 amps 12 amps 3 amps (rated load current) Time Phase Two Current (Amps) Current (Amps) One amp change for each step with each step having a duration of 15 minutes (all of the steps are not shown) 13.2 amps 13.4 amps 15 Min. 13.6 amps 30 Min. 13.8 amps 45 Min. If failure occurs within the DUT upon making a one amp step then proceed to Phase Two (see the explanation below) 15 Min. 30 Min. 45 Min. Explanation: Use an appropriate variable resistor to produce a controlled “short” in the DUT. Identify the current when the “fuse” blows or the DUT develops an “open”. If the DUT opens upon making a 1 amp step in current, then proceed to Phase Two where a finer level of exploration occurs within the one amp step where failure occurred. Phase Two does not need to be per form ed if the exter nal f us e opens during a dwell during Phase One. GENERAL MOTORS CORPORATION – EDSON - 2008 210 LOAD CIRCUIT OVER-CURRENT BUSED ELECTRICAL CENTERS The Load Circuit OverCurrent Test for Bused Electrical Centers uses the simpler ISO 8820 test procedure. This procedure is derived from the process used to test fuses. Purpose: The purpose of this test is to determine if the Bused Electrical Center is able to meet specified requirements when subjected to maximum current allowable by the internal protection fuse. Locations of Applicability: All location, but only but only for Bused Electrical Center devices. Procedure: Monitoring: Monitor only for overheating while waiting for the fuse to open. Operating Type: The test shall be performed under operating type (3.2). All circuits are to be protected using the approved application circuit protection device as detailed on the part drawing or specification (fuse, circuit breaker, etc.). 1. Raise and stabilize the chamber temperature to Tmax. 211 2. Apply Unom to the DUT. 3. The load circuit shall be in operation. Apply a short circuit condition to the output so that the load current is 1.35 times the nominal fuse rate current (Irp) of protection. 4. Record the fuse blow times and verify that they are within the fuse specification. 5. Repeat with shunts in place of fuses and hold current to upper fuse specification blow time limit. 6. Repeat steps (3) to (5) with a short circuit condition so that the load current is 2 times the (Irp), and again with 3.5 times the (Irp). The test duration shall be derived from the corresponding fuse protection characteristic curve (ISO 8820, Operating Time Rating), considering the upper tolerance plus 10%. Criteria: Functional Status shall be class C. The external short circuit fault shall not prevent any other interface from meeting requirements. It is also required that the tested outputs be included in parametric measurements. These measurements shall be capable of detecting potential output degradation such as unacceptable current draw and voltage drop changes. GENERAL MOTORS CORPORATION – EDSON - 2008 ISOLATION RESISTANCE The Isolation Evaluation Test should only be performed when there is concern that the insulation quality between critical terminals may be inadequate, especially if the insulation material is moisture absorbing and the saturated insulator has a drastically reduced insulating ability. This becomes critical when conductors that are in close proximity are carrying significantly different levels of voltage. A voltage differential of 30 or more volts represents a good decision criteria for when this test should be required. Inductive voltage step-up devices may produce a situation where this test should be run. This test may also be required for certain sensors where change in current is critical to the function of the device. The Isolation Evaluation Test should be run following the 10 day constant humidity test. Following the 10 day constant humidity test, the DUT should be allowed to dry to the touch prior to running the isolation test. The isolation test shall always be run within three hours of completing the humidity test unless special accommodations are made. If the isolation test cannot be run within three hours of completing the humidity test, then special accommodations shall be made to ensure that all of the moisture does not escape from the circuit board. The DUT shall be allowed to dry to the touch and then sealed in a zip-lock type plastic bag. The isolation test can then be run within 24 hours after the humidity test. If the isolation test needs to be rerun in PV, then the 10 day constant humidity pre-treatment test can be replaced with 3 days of the same constant humidity test. Purpose: The loss of insulation quality between traces could lead to malfunction and other performance problems. This is often due to reduced spacing of traces or to the degradation of dielectric material from humidity ingress. The test may also be used to evaluate thin film insulator degradation from moisture, especially for inductive loads. Additionally, it may be used to evaluate degradation of an isolation material which is used internal to a device that is critical to its performance (e.g., sensors where change in current has to be precise). A detailed analysis during test planning must be performed to GENERAL MOTORS CORPORATION – EDSON - 2008 212 determine which inputs/outputs should be tested and at what voltage levels. The default voltage of 500 V as stated in the test procedure can be adjusted to a level specific for the component. E.g., in case of inductive components (like a motor) a test voltage of > 300 V would be suitable, whereas for a PCB with an inductive load (which creates voltages > 30 V) the test voltages must be suited to the tested circuits. This test shall be performed following a humid heat test (HHCO). Criteria: The isolation resistance shall be greater than 10 Million Ω. FSC is not applicable to this test. PUNCTURE STRENGTH The module may be destroyed through the application of this level of voltage. Locations of Applicability: All location. Procedure: Monitoring: Evaluate resistance between critical elements at end of test. Operating Type: The test shall be performed under operating type (1.1). Use the test methods in accordance with ISO 16750-2, Insulation resistance. Special Note: • Circuit boards with inductive loads: The resistance value is the criteria of interest. Less voltage (<100 V) can be used with electronic devices to prevent damage to susceptible components such as capacitors. • Inductive components such as motors: The resistance value is the criteria of interest. A test voltage greater than 300 volts is suitable for devices such as motors. 213 The Puncture Strength Test is only needed when more than 250 volts is present, and the condition exists where this high voltage may “puncture through” an insulator and pose a danger to another circuit or to a human being. This test will be used more often as high voltage hybrid battery packs are placed in the vehicle. Purpose: High voltages (>50V especially AC as well as switched DC, ref. to GMW 8670) could breakdown an insulator and pose a danger to another circuit or a human being. This test quantifies the possibility of breakdown of insulation in such applications. High voltage potentials could exist in: inductive devices with high step-up transformers, high-voltage battery systems, or within components connected to such inductive or highvoltage devices. A detailed analysis during test planning must be performed to determine which GENERAL MOTORS CORPORATION – EDSON - 2008 inputs/outputs should be tested and at what voltage levels. The DUT may be performing this test. damaged in Criteria: There shall be no puncture or arcing through the insulator. The FSC code is not applicable to this test. Locations of Applicability: All locations. Procedure: Monitoring: Evaluate for arching during the test or puncture of the insulator material at the end of the test. Operating Type: The test shall be performed under operating type (1.1). 1. Heat the DUT to stabilization at 350C and 50% relative humidity. 2. Apply a test voltage of 500 Volts alternating current with a frequency of 50 Hz. to 60 Hz. Apply this stress for a duration of 2 s to the DUT as follows: • Between electrically isolated and adjacent terminals, • Between electrically isolated terminals and electrically isolated metal housing, • Between electrically isolated terminals and an electrode wrapped around the housing (i.e. metal foil, sphere bath) in the case of plastic material housing. ELECTROMAGNETIC COMPATIBILITY The E/E device shall meet the requirements of GMW3091, GMW3097 and GMW3103 (EMC Test Plan). EMC data results must be supplied to the EMC Validation Engineer for final evaluation. CONNECTOR TESTS The following tests in GMW3191 shall be run on the DUT as an assembly: • Connector (Ergonomics) Mating Force • Connector Retention (Conector robustness) Force • Connector (Ergonomics) Force Disengage GENERAL MOTORS CORPORATION – EDSON - 2008 214 • Terminal Retention Force (retention of metal pins in the connector body) – minimum force required to displace the pin ≤.2mm longitudinally in either direction. All connectors shall meet the requirements defined in GMW3191. The following tests from GMW3191 shall be run on the DUT as an assembly: TERMINAL PUSH-OUT (GMW3191 Section 4.8) CONNECTOR TO CONNECTOR ENGAGE FORCE (GMW3191 Section 4.9) LOCKED CONNECTOR – DISENGAGE FORCE FRETTING CORROSION DEGRADATION The Fretting Corrosion Degradation Test should be applied to a Bussed Electrical Center. However, an altered form of this test could be used for connection systems where new designs represent high risk. Definition of Fretting Corrosion: “fretting corrosion (general) A form of accelerated oxidation that occurs at the interface of contacting materials undergoing slight, cyclic relative motion. All non-noble metals (tin) are susceptible to some degree and will suffer contact resistance increases.” (GMW3191 Section 4.12) Purpose: UNLOCKED CONNECTOR – DISENGAGE FORCE (GMW3191 Section 4.13) This test intends to induce degradation of contacts used in Bused Electrical Centers using a combination of humidity, temperature and vibration. A Reliability level of Reliability = 97% with a Confidence = 50% is to be demonstrated on this test with the degradation data analyzed using Weibull Analysis. This test may also be applied to other connection systems when fretting corrosion is consider to be high risk. Locations of Applicability: 215 GENERAL MOTORS CORPORATION – EDSON - 2008 1. A durability load of 90% of generator output shall be used. This test primarily intended for Bused Electrical Centers that may be placed any where on the vehicle. 2. The most critical circuits (15 to 30) shall be constantly monitored for circuit resistance. These circuits shall be predetermined through the use of analysis, thermography, or thermal mapping with thermocouples. Procedure: Monitoring: Monitoring of resistance continuously during the test. occurs Operating Type: The test shall be performed under operating type (3.2). • A set of 6 samples shall to be used for the following test: • Apply the Humid Heat Constant (HHCO) Test with a duration of 1 day as a pre-treatment for the test samples. Alternatively, the humidity pre-treatment can be eliminated if the humidity can be provided during the vibration and thermal cycling test. • 2. Superimpose a Thermal Cycle Profile according the Power Temperature Cycle Test (PTC) Profile. Three 8 hour thermal cycles shall be used per 24 hours of testing. • 1. The resistance of the circuit shall be measured while vibration is applied at the beginning of the test. 2. All subsequent resistance values shall be normalized to the original resistance, with the original resistance being established as 100%. The multiple of the original resistance shall be determined at the end of the 24 hour vibration test while vibration is still being applied. The DUTs are to be operated and monitored during the test. Subject the DUTs to random vibration according the Random Vibration Test appropriate for the mounting location of this device. (sprungmass, un-sprung mass or engine mounted). The following deviations from the standard vibration test shall apply: 1. Only 24h vibration in Z-axis shall be applied. When the DUT on test is a Bussed Electrical Center: Degradation of conductivity of each circuit of interest shall be evaluated as follows with the metric being the resistance of the circuit: 3. Weibull analysis will be performed on the six samples for each of the critical circuits. • Finally the Load Circuit OverCurrent Test shall be done with all samples. Criteria: • The FSC code is not applicable to this test. • No individual circuit shall have more than 20 milliohms of resistance at the beginning of the test. GENERAL MOTORS CORPORATION – EDSON - 2008 216 • All contacts shall meet the criteria for “resistance per connection point” defined in GMW3191. • Reliability as determined by the Weibull plot shall be quantified for each of the critical circuits with a sample size of six for each plot and a plot for each of the critical circuits. No circuit shall develop an increase in resistance that is more than 3 times that circuit’s original resistive value. Fretting Corrosion Degradation Test Starting Resistance Values Are Normalized To “100%” Failure Is Considered To Be 300% Resistance 300% Design Margin 100% Vibration Level Dependant Upon Mounting Location Weibull Probability Density Function Plot 24 Hours Of (With Thermal Cycling) Vibration Time During Vibration Test Weibull Analysis Of Fretting Corrosion Degradation Test Data Cumulative Distribution Of Increased Resistance 0.9 1.0 1.2 1.4 1.6 2.0 3.0 6.0 99.90 β Weibull Analysis Of Fretting Corrosion Data Weibull Data 1 W2 RRX - SRM MED F=6 / S=0 90.00 η 50.00 The Probability Of Some Portion Of The Distribution Exceeding 300% Is Less Than 3% (97% Reliability) 10.00 5.00 300% 1.00 100.00 Larry Edson General Motors 12/1/2007 10:13 1000.00 Normalized Increase In Resistance β=6.2039, η=167.0619, ρ=0.9899 217 GENERAL MOTORS CORPORATION – EDSON - 2008 MECHANICAL TESTS Mechanical Shock and Vibration testing is essential for anything that is attached to a vehicle. Mechanical shock is produced when the vehicle hits potholes in the road, and vibration is the result of the general roughness of road surfaces. Engine vibration is the result of the sinusoidal pulses of piston motion, and the random vibration of valve train function. The engine vibration is thousands of times more damaging than the body/chassis level of vibration. The story here is: “don’t mount something on the engine or transmission unless there is no other possible place to put it”. The vibration levels provided in this document for Body or Chassis mounted devices are identical to those defined in the ISO16750-3 specification. This vibration level is the composite of vehicle data from Mercedes Benz, BMW, Opel, Volkswagen, and a large number of electronic manufacturers such as Bosch, Hella and Visteon. Over 750 data sets were used to establish the vibration profile and damage level. The final vibration test provides an accelerated level of vibration that requires only 8 hours per axis. This short duration test at an increased GRMS level was derived from the lower GRMS level that would occur for a much longer period of time under road conditions. The process that was used in establishing the final vibration test is as follows: Vibration time history data was recorded with an accelerometer mounted on the vehicle over a uniquely rough stretch of road (Belgian Blocks). The time history vibration data was then converted into the frequency domain using Fast Fourier Transform. This effort resulted in a Power Spectral Density Plot (PSD). The PSD was then characterized into energy by quantifying the square root of the area under the curve. This value has the units of Gs Root Mean Square (GRMS). The duration of time that the vehicle would have been driven on GENERAL MOTORS CORPORATION – EDSON - 2008 218 that rough stretch of road (Belgian Blocks) is defined based on the type of vehicle being considered. For example, a full size pickup truck will spend 600 hours on the Belgian Block road for a lifetime of use. The combination of the on-road test time and the measured GRMS value is used in the following equation to solve for the increased level of GRMS given a shorter duration test. Test Timenormal Gaccelerated = Gnormal × m Test Timeaccelerated Where: Gnormal = as measured on the vehicle Test Timenormal = 600 hours Test Timeaccelerated = 8 hours How short of a vibration test should we have? The common practice is to condense the vibration into an 8-hour test, however one could choose to form a test of any duration. It is important to realize that the vehicle will generate vibration in all axes at the same time. We will run our test on an ElectroDynamic Shaker that operates in one axis only. Therefore, we will need to run our 8-hour test, one 219 axis at a time, until we have provided 8 hours of vibration in all 3 axes. The full test will take 24 hours. The calculated GRMS level for the accelerated test will be greater than that which was measured on the vehicle. However, small increases in GRMS energy are equivalent to large reductions in test time. The final outcome of this effort is the profile shown for the 8-hour each axis Body/Chassis (sprung mass) vibration test. A similar process was used for the engine vibration test and the un-sprung mass vibration test. Why The Vibration Test Is Different Between Cars And Trucks The following vibration tests reference different test durations for cars and for trucks. This document will define a “truck” as a vehicle that will be used in a commercial or semi-commercial environment. A pickup truck would be considered a “truck”, while an SUV or cross-over vehicle would be considered a car. The vibration test duration is significantly longer for “trucks” because the “vibration GENERAL MOTORS CORPORATION – EDSON - 2008 damage” per mile is noticeable greater for a truck than it is for a car. This can be evidenced by the fact that a truck is tested for 600 hour on the Belgian Blocks, while a car is tested for 85-150 hours on the Belgian Blocks. Both of these duration values for cars and trucks are per 100,000 miles of usage. Why We Superimpose Thermal Cycling On Top Of Vibration All Vibration Tests have superimposed thermal cycling during the vibration test. This requirement is necessary because a change in temperature can significantly increase or decrease the Modulus of Elasticity of plastic materials. The point on the temperature scale where this change occurs is known as the Glass Transition Temperature (TG) value. Glass Transition Temperature (TG) The TG can loosely be defined as a temperature point where a polymer experiences a significant change in properties. TG is when a polymer structure turns "rubbery" upon heating and "glassy" upon cooling. Amorphous polymers are structural below TG. Amorphous materials (such as ABS) go through one stage of the change from a glassy to a rubbery consistency with a simultaneous loss in stiffness (modulus of elasticity or Young's Modulus). This stage of going from stiff to flowing is over a wide temperature range. Crystalline, materials, on the other hand, go through a stage of becoming leathery before becoming rubbery. There is a loss of stiffness (modulus of elasticity or Young's Modulus) in both of these stages. However, crystalline materials have a sharp, defined melting point. A Basic Understanding Of Plastic As It Relates To Temperature And Vibration Long chains of repeated molecule units known as “mers” characterize polymeric materials. These long chains intertwine to form the bulk of the plastic. The nature by which the chains intertwine determine the plastic's macroscopic properties. Typically, the polymer chain orientations are random and give the plastic an amorphous structure. Amorphous plastics have good impact strength and toughness. Examples include acrylonitrilebutadiene-styrene (ABS), styreneacrylonitrile copolymer (SAN), polyvinyl chloride (PVC), GENERAL MOTORS CORPORATION – EDSON - 2008 220 polycarbonate (PC), and polystyrene (PS). If instead the polymer chains take an orderly, densely packed arrangement, the plastic is said to be crystalline. Such plastics share many properties with crystals, and typically will have lower elongation and flexibility than amorphous plastics. Examples of crystalline plastics include acetal, polyamide (PA; nylon), polyethylene (PE), polypropylene (PP), polyester (PET, PBT), and polyphenylene sulfide (PPS). Most plastics can be classified as either thermoplastic or thermoset, a label which describes the strength of the bonds between adjacent polymer chains within the structure. In thermoplastics the polymer chains are only weakly bonded (van der Waals forces). The chains are free to slide past one another when sufficient thermal energy is supplied, making the plastic formable and recyclable. In thermoset plastics, adjacent polymer chains form strong cross links. When heated, these cross 221 links prevent the polymer chains from slipping past one another. As such, thermosets cannot be reflowed once they are cured (i.e. once the cross links form). Instead, thermosets can suffer chemical degradation (denaturing) if reheated excessively. VIBRATION WITH THERMAL CYCLING The following vibration tests reference different test conditions for cars and for trucks. This document will define a “truck” as a vehicle that will be used in a commercial or semi-commercial environment. A pickup truck would be considered a “truck”, while an SUV or crossover vehicle would be considered a car. All Vibration Tests have superimposed thermal cycling during the vibration test. A device that is normally attached through a bracket should be tested without the bracket in place. The DUT shall be directly attached to the shaker table through an adequately rigid fixture. The bracket is to be evaluated per the Bracket Random Vibration test using the random vibration profile appropriate for the attachment location. GENERAL MOTORS CORPORATION – EDSON - 2008 Figure 29 Cross Section of an Electro-Dynamic Shaker DEMONSTRATING RELIABILITY FOR ROBUSTNESS TO VIBRATION The engine is the worst place you could ever mount something when it comes to vibration. The stress levels are the greatest and the test time is the longest. Do not mount electronics on the engine if possible. Remember… a sprung mass location is either on the body or the chassis. An un-sprung mass is located on the suspension members or the wheeltire-knuckle assembly. When something is to be mounted in a location other than on the engine, you must decide whether this application should really be called a truck or a car. SUVs and crossover vehicles should be considered “Cars” when it comes to vibration. The increased duration of vibration testing for a truck is the result of PUMA data showing that a GENERAL MOTORS CORPORATION – EDSON - 2008 222 commercial or semi-commercial duty vehicle sees more damaging use per mile than does a vehicle that would be family owned and driven. These vibration tests have been developed to encompass the “worst of the worst” in terms of global use. These tests will accommodate all mileage requirements from 100,000 miles to 200,000 miles without need for adjustment in stress level of test duration. Adjustments in test duration may be necessary to accommodate statistically induced effects when smaller sample sizes are used. The baseline test durations that would be used if 23 parts were tested (R=97% and C=50%) are as follows: Table 20 Baseline Vibration Test Durations for 23 Parts Location Engine Body Or Chassis Sprung-Mass Un-SprungMass X-Axis Duration (hours) Y-Axis Z-Axis Car 22 22 22 Truck Car 22 8 22 8 22 8 Truck 18 18 18 Car 8 8 8 Truck 18 18 18 Body Style The test flow provides a recommended sample size and the following table shows how the baseline test durations are to be changed to reflect the use of a smaller sample size. Vibration testing with a reduced sample size requires an increase in test duration. The statistically adjusted test duration needs to be determined according to Appendix “G”. A Weibull slope of (b = 2.5) has been used to reduce the sample size while increasing the test duration. *Special Note: If a device fails during vibration prior to the required number of hours in the Z-axis as listed below, the “success-run test plan” can be converted to a “test to failure test plan”. The remaining parts that have not failed should remain on test until 3 more failures occur. The total of 4 failures should be plotted on Weibull paper to determine if the 223 GENERAL MOTORS CORPORATION – EDSON - 2008 specification of R=97% at 8 hours has been met. plotting are described in Appendix “D”. Details of Weibull Table 21 Duration for Vibration Tests With Reduced Sample Size (6) As Shown In The Universal Durability Test Flow Location Engine Body Or Chassis Sprung-Mass Un-SprungMass Body Style Duration (hours) X-Axis Y-Axis Z-Axis Car 22 22 66* Truck 22 22 66* Car 8 8 24* Truck 18 18 54* Car 8 8 24* Truck 18 18 54* Note: For the vibration test only - The “Z” axis is defined as perpendicular to the plane of the circuit board and not relative to vehicle orientation. However, in situation where large mass items are attached to the circuit board, or the circuit board employs a daughter board attached at a 90 degree angle, then the vibration testing should be distributed across all axes that will stress the attachments. The statistical process used in the above is as follows: Standard Sample Size = Multiple Life Factor = β ln ( 1 − C ) ln ( R ) Standard Sample Size Desired Sample Size Test Duration = Standard Test Duration × Multiple Life Factor GENERAL MOTORS CORPORATION – EDSON - 2008 224 Vibration (Sine + Random) – Mounting Location Engine/Transmission Purpose: The vibration of a piston engine can be split up into the sinusoidal vibration, which results from the unbalanced mass forces in the cylinders, and the random noise due to all other vibration sources of an engine. The influence of bad road driving is comprehended in the frequency range from 10 Hz to 100 Hz. The main failure by this test is breakage due to fatigue. The severity and the duration of the vibration test is the same for cars and trucks. Locations of Applicability: This test is applicable to devices attached to the engine or the transmission of a car or a truck. Figure 30 Sources of Engine Vibration Pistons – The Primary Source Of Sinusoidal Vibration Procedure: Monitoring: Constant monitoring is required throughout the test to detect intermittent failures. Operating Type: The test shall be performed under operating type (3.2). Use test methods according 16750-3, Test I –Passenger engine. During vibration load testing the DUT shall be simultaneously subjected to vibration and temperature cycles according to the vibration test temperature cycle. The DUT shall be electrically operated and continuously monitored while on test. Sinusoidal followed by random vibration tests are to be performed on the same DUT. Combined sine on random testing may be performed in one test run if there is a desire to reduce the time on test. The specified test profiles apply to both gasoline and diesel engines. The test duration for both the sinusoidal and random vibration test is 22 hours each axis for a sample size of 23 parts. The test duration shall be adjusted using the Appendix for Success-Run Statistics when a smaller sample size is used. The suggested smaller sample size is six as shown in the test flow. Valves - The Primary Source Of Random Vibration 225 ISO car, GENERAL MOTORS CORPORATION – EDSON - 2008 Frequency sweep: ≤ 1 octave/min Envelope 1: For ≤ 5 cylinder engines Envelope 2: > 5 cylinder engines and 4 cylinder engines with a balance shaft. Sinusoidal Engine Vibration Figure 31 Sinusoidal Vibration For Engine or Transmission 200 200 (20.4) 150 150 (15.3) 240 200 (20.4) 440 150 (15.3) 270 100 (10.2) 440 100 (10.2) Random Engine Vibration Figure 32 Random Vibration Profile For Engine Mounted Devices Engine Mounted Random Vibration Profile Sinusoidal Vibration for Engine or Transmission 100 >5 cylinders (envelope 2) <=5 cylinders (envelope 1) ((m/s) 2 )2 /Hz Acceleration ((m/s)2) 250 200 150 100 10 1 50 0.1 0 100 1000 1 10 100 1000 10000 Frequency (Hz) Frequency (Hz) Note: A worst-case profile will use the highest level from either line. RMS Acceleration Value 181 (m/s2) rms = 18.4 Grms Table 23 Random Vibration Profile Engine Mounted Table 22 Engine/Transmission Sinusoidal Vibration Severity Envelope 1 Envelope 2 Freq. Maximum Freq. Maximum (Hz) Acceleration (Hz) Acceleration m/s2 (Gs) m/s2 (Gs) 100 100 (10.2) 100 Frequency Acceleration Power [Hz] Density Power Spectral Density (m/s2)2 /Hz g2/Hz 10 10 0.10 100 10 0.10 100 (10.2) GENERAL MOTORS CORPORATION – EDSON - 2008 226 300 0.51 0.0052 500 20 0.21 2000 20 0.21 Criteria: Functional Status shall be class A throughout the test. No objectionable squeaks or rattles should be present before or after the vibration test. Random Vibration – Mounting Location: Sprung Masses Purpose: This test evaluates the DUT for adequate design margin for fatigue resulting from random vibration induced by rough roads. Locations of Applicability: This test is applicable to all devices attached to the body or frame of the car or truck. Procedure: Monitoring: Constant monitoring is required during the entire test to detect intermittent failures. Use test methods according ISO 16750-3, Test IV – Passenger car, sprung masses (vehicle body). During vibration load testing the DUT shall be simultaneously subjected to temperature cycles according to the vibration test temperature cycle. The DUT shall be electrically operated and continuously monitored while on test. Cars: Test duration: 8h for a sample of 23 parts for each X,Y and Z coordinate axis (perpendicular to the plane of the circuit board) of the DUT for a base requirement of 100,000 to 200,000 miles. This test duration may need to be adjusted to offset a reduced sample size. Trucks: Test duration: 18h for a sample of 23 parts for each X,Y and Z coordinate axis (perpendicular to the plane of the circuit board) of the DUT for a base requirement of 100,000 to 200,000 miles. This test duration may need to be adjusted to offset a reduced sample size. Note: Devices that are always located in consistent areas of the vehicle, like clusters and radios, may receive a custom vibration test developed using the process described for brackets. Operating Type: The test shall be performed under operating type (3.2). 227 GENERAL MOTORS CORPORATION – EDSON - 2008 Figure 33 Random Vibration Profile For Sprung Masses Frequency Acceleration Power [Hz] Density Body or Chassis Mounted Random Vibration Profile 100 ((m/s)2)2/Hz Table 24 Random Vibration Profile For Sprung Mass 10 Power Spectral Density (m/s2)2/Hz g2/Hz 1 10 20 .208 0.1 55 6.5 .0677 180 .25 .0026 300 .25 .0026 360 .14 .00146 1000 .14 .00146 0.01 10 100 1000 Frequency (Hz) Sprung-Mass RMS Acceleration 27.8 (m/s2) rms = 2.84 Grms Criteria: Functional Status shall be class A through out the test. No objectionable squeaks or rattles should be present before or after the test. The responsible GM engineer should evaluate the severity of all squeaks and rattles that develop following the vibration test. The criteria for a mounting location that is close to the passenger’s ears should be more discriminating than for locations farther away. Random Vibration – Mounting Location: Unsprung Masses Purpose: This test is applicable for devices which are mounted on unsprung masses (e.g. wheel and wheel suspension). Vibration of unsprung masses is random vibration induced by rough-road-driving. Locations of Applicability: This test is applicable to all devices attached to the wheels, tires, and moving suspension elements of the car or truck. Procedure: Monitoring: Constant monitoring during the entire test is required to detect intermittent failures. GENERAL MOTORS CORPORATION – EDSON - 2008 228 Operating Type: The test shall be performed under operating type (3.2). Figure 34 Random Vibration Profile Unsprung Mass Unsprung Mounted Random Vibration Profile Test Duration Cars: Test duration: 8h for a sample of 23 parts for each X,Y and Z coordinate axis (perpendicular to the plane of the circuit board) of the DUT for a base requirement of 100,000 to 200,000 miles. This test duration may need to be adjusted to offset a reduced sample size. Test Duration Trucks: Test duration: 18h for a sample of 23 parts for each X,Y and Z coordinate axis (perpendicular to the plane of the circuit board) of the DUT for a base requirement of 100,000 to 200,000 miles. This test duration may need to be adjusted to offset a reduced sample size. Loads below 20 Hz are not covered by the test profile stated here. In practice, high amplitudes can occur below 20 Hz; therefore, loads acting on the component in this frequency range shall be considered separately. The loads between 10 Hz and 20 Hz shall be covered in the CTS. Frequencies above 1000 Hz can be ignored with the approval of GM Engineering. 229 1000 ((m/s)2)2/Hz Use test methods according ISO 16750-3, Test V – Passenger car, unsprung masses (wheel, wheel suspension). 100 10 1 0.1 10 100 1000 10000 Frequency (Hz) Un-Sprung-Mass RMS Acceleration Grms = 107.3 m/s2 10.95 Grms Table 25 Random Vibration Profile Unsprung Mass Hz Acceleration Power Density (m/s2)2/Hz Power Spectral Density g2/Hz 20 40 200 200 2.08 2.08 300 0.5 0.005 800 1000 0.5 3 0.005 0.031 2000 3 0.031 Criteria: Functional Status shall be class A. No objectionable squeaks or rattles should be present before or after the vibration test. The responsible GM engineer should evaluate the severity of all squeaks and rattles that develop following the vibration test. GENERAL MOTORS CORPORATION – EDSON - 2008 Thermal Cycle Profile Used During All Vibration Tests Note: The intermittent “powering off” may be considered optional. Because in vehicle vibration stress can occur together with extremely low or high temperatures, a simultaneous temperature cycle has to be used during the vibration tests. The temperature cycle profile used during the test should be according ISO 16750-3, General. The DUT shall be operated and continuously monitored (Operating Type 3.2) throughout the thermal cycle. Optionally, the device can be turned off for periods of one minute during the hot, cold and transition periods to evaluate the ability of the product to return to function under the condition of vibration with different temperatures. In the case where self-heating components may cause a problem, a deviated operating mode can be established with the approval of GM Engineering The Thermal Cycle Profile Used During All Vibration Tests is intended to allow the vibration process to occur at all possible temperatures between Tmin and Tmax. Some materials may significantly change their fatigue life with temperature and this combined test is effective in determining the severity of that possibility. The graphic shows the product being turned on and off periodically. In situations where turning the product off represents a significant problem, then the product should remain on continuously during the test. Figure 35 Thermal Cycle Applied During Vibration Thermal Cycle During Vibration Power Off Interrupts of 1 Minute Occur During Cold, Hot, and Transitions Temperatures Are To Extend From Tmax To Tmin Temperature (Celsius) 100 Tmax Power Off Interrupts 80 60 40 20 Powered and Monitored 0 Powered and Monitored Powered and Monitored The graphic shown portrays an eight hour thermal cycle. A six hour thermal would have the dwell periods reduced proportionately. A one hour thermal cycle would have no dwells and an increased ramp rate. -20 Tmin -40 Powered and Monitored -60 0 60 120 180 240 300 360 420 480 Time (Minutes For One Thermal Cycle) GENERAL MOTORS CORPORATION – EDSON - 2008 230 Table 20 Time vs. Temperature for Vibration Tests. Figure 37 Slip-Table Type Shaker With Thermal Chamber Duration Temperature (min) (°C) 0 20 60 -40 150 -40 210 20 300 Tmax 410 Tmax 480 20 Figure 36 Thermal Chamber Over Hydraulic Shaker Custom Random Vibration Profile For A Bracket Or Electronic Device The bracket that is used to retain the electronic device should have adequate fatigue life in response to vehicle-induced vibration. The resonant frequency of the bracket should be measured and should exceed 150 Hz. as a generalized “rule of thumb” to 231 GENERAL MOTORS CORPORATION – EDSON - 2008 minimize displacement and maintain adequate fatigue life. The electronic device that will be attached to the bracket could be tested using the bracket if all parts are available at the same time. If timing dictates that the bracket and electronic device be tested at separate times, then the following procedure should be followed for testing the bracket. The vibration profiles, durations, and energy levels defined in this document can be used with a simulated device mass to evaluate the fatigue life of the bracket. The PSD in GMW3172 is preferred and should be used as a default value since the alternative described below requires significant data collection and analysis resource. Alternatively, location specific vibration profiles can be quantified by acquiring time-domain vibration data taken while traveling on the Belgian Blocks at the Milford Proving Grounds. Vibration data should be taken to include frequencies up to 1000 Hz. This will require that 2000 data samples be taken every second in order to quantify energy at 1000 Hz. Only five minutes of vibration data needs to be taken while the vehicle is driven on the Belgian Blocks. This time-domain data must then be converted into the frequency domain using Fast Fourier Transform (FFT in Matlab). Use a “Hanning” windowing and linear average G values when performing the calculations. Do not use “peak hold” as that is an artificially elevated value. Ultimately, a PSD is generated so that the bracket with DUT mass can be tested on an ElectroDynamic Shaker. The total test time on the Belgian Blocks is defined in the following table for 100,000 miles. Alternatively, for example, if the VTS defines the life requirement to be 150,000 miles, then the test duration must be multiplied by (1.5). The vibration level should then be increased to the point where the test duration is reduced from the hours defined in the table above (table 22) to 8 hours. The test must be conducted for 8 hours in each axis to account for the multiaxial vibration in a vehicle. The GENERAL MOTORS CORPORATION – EDSON - 2008 232 calculations of converting a 600 hour test at one level of GRMS, to a shorter duration test at an increased level of GRMS is explained in Appendix “G”. Table 26 Hours of Field Based Random Vibration For Brackets 4WD Full Size Truck 600 hours of (PU or Utility) vibration 2WD Full Size Truck 600 hours of (PU or Utility) vibration 4WD Mid Size PU & Rec. Off Road 150 hours of vibration 2WD Mid Size PU & Rec. Off Road 150 hours of vibration 4WD Mid Size Utility 150 hours of vibration 2WD Mid Size Utility 150 hours of vibration Mid Size SUV (BFI) and Van 125 hours of vibration Passenger Vehicle 84 hours of vibration Resonant Frequency – A good design criterion for brackets is to design the bracket to have a resonant frequency greater than 150 Hz. 233 These design criteria would apply to the bracket without the product attached. Meeting this criterion will help insure that there will not be any problems with bracket fatigue. Measured Fatigue Life – The bracket, supporting the mass of the DUT, shall meet the R=97% and C = 50% requirement using appropriate sample size or test to failure. Cracks or deformation shall not occur at the point of reliability evaluation. Purpose: Evaluate bracket fatigue life over the full range of temperatures. The brackets used in attaching electronic devices are not being evaluated in the vibration tests defined previously. The amplification Q-factor resulting from the attaching bracket has already been factored into the GRMS values specified. Brackets should be evaluated separately using a reduced level of vibration to be defined in the ADVP&R or Test Template. Locations of Applicability: This test process is applicable to cars and trucks, where the duration of the test is dependent upon the type of vehicle per table 26, and the energy level (GRMS) has been measured at the location of interest. GENERAL MOTORS CORPORATION – EDSON - 2008 Procedure: Locations of Applicability: Monitoring: Constant monitoring during the entire test is required to detect intermittent failures of electronic devices, and the onset of cracks in brackets. This test is applicable to all devices following thermal fatigue and humidity. Operating Type: The test shall be performed under operating type (3.2) if electronic. A full hour may not be needed for low thermal mass products. There is no need to dwell at the temperature extremes other than to ensure that the product actually reaches the target temperature. Constant monitoring is essential during this test. The product may be pre-chilled to Tmin and the vibration run while the product transitions to Tmax. A full thermal cycle is not required. A cyclic reduction in vibration level is suggested (2.84 down to .5 and back up to 2.84 for a sprung-mass) to assist in detecting intermittent failures. Test the DUT for the required number of hours in each direction using the appropriate sample size to demonstrate the required level of reliability. Thermal cycling should occur during the time of the vibration test as described in the other vibration tests in this document. Criteria: The bracket or device must demonstrate a reliability of R= 97% with Confidence = 50% using the test derived from the process described above. One Hour Vibration Test After Thermal Fatigue Purpose: This test is used to detect intermittent failures that may have been created during the thermal cycling and humidity tests. This “one hour test” is not intended to “add damage” to the product, but is only intended to be a detection process. Vibration at all temperatures is the requirement and this should be accomplished in as short of a time as possible. Typically, this is one hour or less. Procedure: Criteria: No intermittent failures are allowed and the product should function as if the stress of temperature and vibration was not present. EVALUATION OF SQUEAKS AND RATTLES FOLLOWING VIBRATION WITH THERMAL CYCLING General Motors has published more complex squeak and rattle evaluation procedures (GMN14011) that may be used if required for devices such as radios, but the increased complexity GENERAL MOTORS CORPORATION – EDSON - 2008 234 significantly increases cost and test time. This simple procedure described below should be used for most electronic devices that are more remote from passenger’s ears. Testing by “shaking with your hand” may seem to be very subjective, but this can be more effective than testing on the shaker as the shaker makes so much noise that it becomes very difficult to hear any squeaks or rattles. Purpose: The DUT should be checked prior to and following the vibration test to ensure that no objectionable squeaks or rattles are present, or develop as a result of the test. and rattles. Alternatively, a more critical test (GMN14011) can be used for devices when “repeatability” and quantitative measurement are important. Criteria: No objectionable squeaks or rattles should be present before or after the vibration test. When GMN14011 is used to evaluate squeaks and rattles then the requirements for this test must be defined in the CTS. The responsible GM engineer should evaluate the severity of all squeaks and rattles that develop following the vibration test. The criteria for a mounting location that is close to the passenger’s ears should be more discriminating than for locations farther away. The FSC code is not applicable to this test. Procedure: Monitoring: Monitor for objectionable squeaks and rattles during the time that a vibration input is provided. Operating Type: Not Applicable. Squeak and rattle evaluation prior to vibration testing: The squeak and rattle assessment can be made by shaking the parts by hand, or by reducing the vibration level to (.5) Grms using the same PSD signature, and performing a simple listening test. Squeak and rattle evaluation following the vibration testing: These same procedures can be used at the end of the vibration test to evaluate squeaks 235 FREE FALL The Free Fall (Drop) Test simulates the device being dropped onto the concrete floor in the assembly plant. It is important to know if the product can be damaged internally from such a fall while showing no signs of the damage externally. Some suppliers will say that their product cannot pass this test and that it should not be performed. General Motors needs to know the risk if the dropping of GENERAL MOTORS CORPORATION – EDSON - 2008 the product was to occur in the assembly plant. The following is an excerpt from ISO16750-3 defining how the free fall test is to be run: Figure 38 Extract From ISO 16750-3 Showing How To Run The Free Fall Drop Test Purpose: A system/component may drop down to the floor during handling assembly. To determine the level of damage the DUT is subjected to the mechanical stresses. GENERAL MOTORS CORPORATION – EDSON - 2008 236 Locations of Applicability: This test is applicable to all devices that may be dropped during vehicle assembly or service. TEMPERATURE TESTS LOW TEMPERATURE WAKEUP Procedure: Monitoring: The DUT is only evaluated at the end of the test. Operating Type: The test shall be performed under operating type (1.1). Use free-fall test methods according to ISO 16750-3 Criteria: • The FSC code is not applicable to this test. • If there is no visible external damage to the DUT, then the DUT shall have no internal damage and shall pass the Functional/Parametric Test at the end of test. • • If there is visible external damage to the DUT and the damage is judged by GM Validation Engineer to be: • • 237 Insignificant, then the DUT shall have no internal damage and shall pass the Functional and Parametric Test at the end of test. Significant, then the DUT does not have to meet the performance requirements. The Low Temperature Wakeup Test evaluates the ability of the product to “wakeup” at low temperature with full functionality. This was once just a low temperature storage test, which is of little value. Changing the test to include the ability of the product to wakeup has improved the value of the low temperature test. This test is required of all products and is shown in the long horizontal bar at the beginning of the test-flow. Purpose: This test verifies DUT functionality after prolonged exposure to low temperature extremes. Locations of Applicability: All locations. Procedure: Monitoring: The DUT is only monitored during the wakeup portion of the test. Operating Type: The test shall be performed under operating type (2.1) while the DUT is cold soaked. The operating type is (3.2) during times of evaluation as shown in the diagram below. GENERAL MOTORS CORPORATION – EDSON - 2008 Testing shall be performed according to IEC 60068-2-1 Test Ab. Tmin of the operating temperature range is the low temperature that is to be used. At the start of a 24 h cycle, the test parts shall be energized at room temperature for 2 minutes and evaluated for proper function at Unom. The DUT shall then experience a cold soak condition for 24 hours at operating mode 2.1. At the end of 24 hours, and while still in the cold environment, the product is to be turned on, or awakened from its sleep state, and evaluated for proper function for 1 hour at operating mode 3.2. Figure 39 Low Temperature Wakeup Test Profile TRoom Temperature TMin Time Mode 3.2 Operating Mode Mode 2.1 2 Minutes 24 Hours 1 Hours Criteria: Functional status shall be class A. HIGH TEMPERATURE DURABILITY The High Temperature Durability Test exercises the stresses resulting from diffusion effects in materials and from thermal degradation. The duration of this test is empirically derived and we are also using this test as a pre-treatment test prior to mechanical shock to detect possible Kirkendall voiding failures when lead-free constructions are used. The effect of the “post-heat” temperature identified as (Tmax-PH), is comprehended in this test with 5% of the test duration occurring at the Tmax-PH temperature level. The one hour time at Tmax-RPS is used to evaluate the effects of storage temperate and evaluate the ability of the device to withstand the thermal stress of paint booth reheating. Testing at the Tmax-RPS temperature may reveal possible warpage effects in plastic as molding stresses are relieved (annealing). One-life of duty cycle should occur during this test and this should be used to compensate for times when one-life of duty cycles cannot be GENERAL MOTORS CORPORATION – EDSON - 2008 238 applied during PTC testing. Degradation of performance between the beginning and the end of this test should be evaluated. (3.2) during all remaining portions of the test. This test may be accelerated using the Arrhenius equation in Appendix “H” providing the foolish limit for materials is not exceeded. The test operating voltage shall be nominal for 80%, low (Umin) for 10% and high (Umax) for 10% of the functional tests and/or cycles. Duration of load is 500 h or 2000 h as per table (4), or per the CTS. In situations where an increase in temperature beyond Tmax is warranted due to post heating (as shown for codes “F” and “H”), the following shall apply: Purpose: To submit the DUT to a sustained high temperature to evaluate material degradation, performance degradation, and diffusion based failure mechanisms. The one hour temperature repaint and storage portion of the test (TMax-RPS) is designed to evaluate structural warpage effects. The temperature post heat portion of the test (TMax-PH), which is 5% of the total test time, is designed to add to the thermal degradation resulting from elevated post heat temperatures. Locations of Applicability: The 2000 hours of testing is required of all device under the hood of the vehicle, and the 500 hours of testing is required for all other locations. Procedure: Monitoring: Constant monitoring is required to detect intermittent failures. Operating Type: The test shall be performed under operating type (2.1) during testing at Tmax-RPS. The operating type shall be 239 Test according ISO16750-4, High Temperature Test, Operation, with the following exception: 5% of the required high temperature testing shall occur at the elevated post heating temperature level (TMax-PH). Interior parts that may see paint booth reheating shall be exposed to TMax-RPS for the first 60 minutes of the 500 or 2000 hour durability test. The DUT shall to be exercised for at least 1-life of electrical operational cycles during the High Temperature durability test. The functional cycling scheme shall exercise the DUT and allow for detection of degradation or failure. Tmax of the operating temperature range table (4) is the temperature load. Duration of load is 500 h, 2000 h, or per the CTS. In situations where an increase in temperature beyond Tmax is warranted due to post heating (temperature codes “F” and “H”) the following shall apply: 5% of the required high temperature testing shall occur at the elevated post heating temperature level (Tmax-PH) GENERAL MOTORS CORPORATION – EDSON - 2008 The test operating voltage shall be nominal for 80 %, low for 10 % and high for 10 % of the functional tests and/or cycles. Criteria: during and after the test. Any inputs/outputs in an incorrect state or any incorrect communication messages shall be considered a nonconformance to specification requirements. Functional status shall be class A. All functional requirements shall be met THERMAL FATIGUE TESTING The expansions and contraction of dissimilar materials resulting from changes in temperature will produce cyclic fatigue in the material that is used to bond the dissimilar materials together. This problem would not occur if the dissimilar materials had the same coefficient of thermal expansion (CTE). The effect of thermal cycling will have differing levels of severity depending upon the S-N slope of the material being stressed. In the following example, a device contains a stretched copper wire that is attached by a solder joint. At the normal range of thermal cycling (430C for an interior device) both the solder and the copper have the same “life”. However, during testing we increase the stress by increasing the range of thermal cycling (1250C is typical for an interior device). The increased stress is used to accelerate the test, but the steeper slope of the S-N line for copper results in the failure of the copper before the solder. Thermal cycling has a more profound effect upon the copper than the solder because of the difference in the slopes of the two S-N lines. In this example, if the copper fails first, then you should back calculate to determine if the copper would have failed before the requirement at normal stress. Lifenormal ∆T = Lifeaccelerated × accelerated ∆Tnormal m Note: the “m” value for copper is (5). GENERAL MOTORS CORPORATION – EDSON - 2008 240 If the copper would have failed before the requirement at normal stress then engineering action should be directed at the copper by adding a compliance loop in the wire. If the copper would not have failed before the requirement at normal stress, then the copper wire should be temporarily ruggedized to allow the test to continue beyond the previous copper failure to determine if the solder joint will meet its requirement. Effect Of S-N Slope On Accelerated Testing The Slope Of This Line Is The “m” Value In The Acceleration Factor Equation Log Of Life (N) The Copper Wire And The Solder Joint Are Equally Durable At Normal Stress Sol Co pp er The Copper Wire Fails Before The Solder Joint At Elevated Stress Normal Stress der Joi nt Wi re Log Of Stress (S) Elevated Stress DEMONSTRATING RELIABILITY FOR THERMAL FATIGUE ROBUSTNESS The following graph and table for thermal fatigue testing provides the lifetime damage equivalent of the vehicle in terms of thermal cycles and change in temperature. The baseline damage values, for example, delta-T = 43 degrees with 7300 thermal cycles, are used as the starting point to develop the accelerated test that produces equal damage in less time. The Modified Norris-Landzberg Equation provides the relationship 241 GENERAL MOTORS CORPORATION – EDSON - 2008 to correlate an accelerated thermal fatigue test to the baseline requirement. Explanations and sample calculations for developing the accelerated test from this baseline is provided in Appendix “E” and “F”. The following graph and table provide the starting point of defining the level of field damage expected for thermal fatigue. Conditions for Minnesota and Arizona are compared. The Arizona conditions define the more severe user, and Miner’s Rule was used to assemble the different delta-T values for each month in Arizona into a single delta-T value for testing. The origin of the field-based temperature range for interior, underhood, and on-engine thermal cycling testing is a technical SAE paper written by Jimmy M. Hu and Ken Salisbury of Ford Motor Company. The title of the technical paper is Temperature Spectrums Of An Automotive Environment For Fatigue Reliability Analysis. The following two graphics are from that Ford SAE paper. Explanation of the table and graph below: The thermal range experienced in the field is different for different months of the year. We can use Miner’s Rule to combine all of the damage from the different months into a single test with a constant thermal range. The damage model used with Miner’s Rule to perform this damage accumulation calculation relies upon the Coffin-Manson exponent for the type of material being stressed. We are applying our thermal fatigue to solder as the natural weak link in the system. The exponent for leaded or lead-free solder is in the range of (2.5) to (2.65). Modified Norris Landzberg Equation for lead-free solder: 2.65 ∆Ttest AF = ∆Tfield .136 Dwell timetest × Dwell timefield × 1.22 × ( ramprate ) −.0757 × e 1 1 2185× − Tfield max + 273 Ttest max + 273 Coffin-Manson Portion of the Modified Norris Landzberg Equation for lead-free solder: ∆Ttest AF = ∆Tfield 2.65 GENERAL MOTORS CORPORATION – EDSON - 2008 242 When it is desired to reduce the sample size and extend the test duration, use the equations described in Appendix “B”. When a Weibull Slope value must be assumed, it is advised to use a value (Beta) between (1.5 and 2). Figure 40 Thermal Cycle Profiles In Arizona Engine Mounted Interior Engine Compartment Az. 980 Minn. Az. 690 Minn. Az. 430 Minn. m=2.6 Developing One Delta-T for Test 243 GENERAL MOTORS CORPORATION – EDSON - 2008 Common Test Thermal Fatigue Strategy The GMW3172 committee has reviewed and discussed the merits and risks of the thermal fatigue equations defined in this document for leaded and lead-free solder. We agree globally that these equations express the best of what is currently known, but we also agree that a more simplistic approach may benefit everyone. On March 17, 2006, we agreed globally to use the following simplified default values. These values are the result of combining the equations with empirical experiences. The following “Simplified Number Of Leaded Or Lead-Free Thermal Cycles” shall be used, and shall take precedence over all detailed leaded or lead-free calculations. It was also agreed that a ten-minute dwell hot and tenminute dwell cold would be used for leaded and lead-free solder. No acceleration factor between “Thermal Shock” and “PTC” shall be used. Seventy-five percent of the total number of cycles should be executed using thermal shock and twenty-five percent of the number of cycles shall be executed using PTC testing. Additional thermal shock cycles can be used to offset an equal number of PTC when reduced test time is needed. No fewer than 100 PTC can be used. The detailed calculations in appendix “E” and “F” are provided only for reference but were used as the foundation for the values shown in tables 27 and 28. GENERAL MOTORS CORPORATION – EDSON - 2008 244 Table 27 Number Of Thermal Cycles With A Sample Size Of 23 Parts Code Letter For Temperature A, B, C, and D E and F G, H, and I Location In The Vehicle Inside the passenger compartment, luggage compartment, or attached to the exterior of the vehicle but not under the hood or above the exhaust system. Under the hood of the vehicle. Attached to or inside the engine. Combined Number Of Thermal Cycles With A Sample Size Of 23 Parts Combined = Thermal Shock + PTC Sample Size 23 Sample Size 23 Number Of PTC Cycles 750 Number Of Thermal Shock Cycles 563 1100 825 275 2000 1500 500 187 Table 28 Number Of Thermal Cycles With A Sample Size Of 18 Parts Code Letter For Temperature A, B, C, and D E and F G, H, and I Location In The Vehicle Inside the passenger compartment, luggage compartment, or attached to the exterior of the vehicle but not under the hood or above the exhaust system. Under the hood of the vehicle. Attached to or inside the engine. (total cycles = 2248) Combined Number Of Thermal Cycles With A Sample Size Of 18 Parts Combined = Thermal Shock + PTC Sample Size 18 Sample Size 18 Number Of PTC Cycles 843 Number Of Thermal Shock Cycles 632 1236 927 309 1236 927 309 211 Cyclic Humidity and Constant Humidity 1012 759 253 Note: Components that are temperature coded as “G”, “H” and “I”, shall be interrupted after 1236 thermal cycles to perform the Humidity tests. After completion of the Humidity tests, the remaining thermal cycles shall be completed using the combination of thermal shock and PTC as shown above. 245 GENERAL MOTORS CORPORATION – EDSON - 2008 Purpose: THERMAL SHOCK AIR-TO-AIR (TS) Air-to-Air Thermal Shock is used as a fast method to produce thermal fatigue in solder joints or circuit board structure. There is no real acceleration factor when this test is applied to lead-free solder, other than the basic increase in the number of thermal cycles that can be produced per unit of time. We try to produce 75% of the required total damage with thermal shock and the remaining damage with PTC testing. While the increased ramp rates shorten the duration to reach from one temperature to the other, the dwell periods should still remain at 10 minutes hot and 10 minutes cold as is specified for PTC testing. A single product must be thermocoupled as a pre-test assessment to determine the thermal lag time resulting from thermal mass. The thermal lag time is added to the dwell period to ensure that the product is within 30C of the target temperature when the dwell period begins. This is an accelerated test to evaluate failure modes driven by mismatches in the coefficients of thermal expansion between components and circuit boards under conditions of temperature change. Locations of Applicability: This test applies to all areas of the vehicle. Procedure: Monitoring: Monitoring is generally not possible during thermal shock because of the motion of the parts and the resulting fatigue of attaching wires. Operating Type: The test shall be performed under operating type (1.1). Use test methods according ISO 16750-4, Rapid Change of Temperature With Specified Transition Duration. The temperature cycle testing shall be performed according to IEC 60068-2-14 Na. The appropriate dwell time at each temperature needs to be proven by measurements. The dwell time at high or low temperature should be 10 min. The “Dwell Timer” shall begin when the inside of the product reaches Tmax (or higher) minus 3°C or Tmin (or lower) plus 3°C. The minimum number of cycles is given in Table (5). The appropriate number of cycles that must be run to demonstrate the required reliability requirement can be derived from the equations in Appendix E and F. GENERAL MOTORS CORPORATION – EDSON - 2008 246 Upon agreement with General Motors, this test can be performed without a case, or with a modified case to increase the rate of temperature change. This test is generally performed without the product being electrically energized during testing. The temperature range used in the thermal shock test should be adjusted for devices that generate significant internal heat to compensate for the lost temperature change with a nonenergized device. For example: if a device is to be tested from (-40) to (+85) per this specification, and generates an additional 10 degrees from self heat, then the thermal shock test should be run from (-40) to (+95). Figure 41 Thermal Shock Test Profile One Thermal Shock Cycle 10 Minute Dwell Temperature (Celsius) 120 100 80 Shown With 190C. Per Minute Occurring on the Circuit Board 60 40 Note: The dotted red line is the temperature on the product. Extra dwell time is needed to compensate for product thermal inertia to insure that the product receives the required duration of dwell as specified. 20 0 Extra Dwell Required For Thermal Inertia -20 -40 10 Minute Dwell -60 0 5 10 15 20 25 30 Time (Minutes For One Thermal Cycle) Figure 42 Air To Air Thermal Shock Chamber 247 GENERAL MOTORS CORPORATION – EDSON - 2008 Figure 43 Parts Inside The Air To Air Thermal Shock Chamber detection step in thermal fatigue testing. Constant monitoring is a requirement during PTC testing. Many of the problems in Validation are detected during this test. Back in the days of GM9123P (prior to 1999), there was no thermal shock but 1036 PTC were required, and that took months of testing. Testing now takes about 1/3 the time that it did before the turn of the century. Purpose: Criteria: Functional status shall be class A after this test. POWER TEMPERATURE CYCLE (PTC) The Power Temperature Cycle Test is the second half of the thermal fatigue test duo. This test produces the remaining 25% of the total thermal fatigue damage following thermal shock. Most importantly, this test is the The purpose of this test is to determine if the DUT is able to meet specification requirements when subjected to the power and temperature cycling stresses that cause failures related to mechanical attachments, integrated circuit dies, electromigration, and solder creep. Locations of Applicability: This test is applicable to all areas of the vehicle. This test is essential following thermal shock. Procedure: Monitoring: Constant monitoring is required during this entire test to detect intermittent failures. Operating Type: The test shall be performed under operating type (3.2). Perform as described in figure (44) and table (29). GENERAL MOTORS CORPORATION – EDSON - 2008 248 Criteria: Functional status shall be class A. The Power Temperature Cycle Test shall be performed according IEC 60068-2-14 Nb. The electrical input/output duty-cycle shall be scheduled such that the required minimum number of 1-life cycles is evenly distributed during the total PTC test. The control instrumentation must be capable of synchronizing the DUT on/off time with the chamber temperature transitions. Figure 44 Power Temperature Cycle (Lead-Free Dwell Times Shown) One PTC Thermal Cycle For Lead-Free Solder (Ramp Rate Shown Is 7 Degrees C/min.) 10 Minute Dwell 100 Note: The circuit board temperature is shown as a dotted red line. The chamber dwell periods must be extended to insure that adequate dwell occurs on the product. Temperature (C) 80 60 40 Extra Dwell Required Due To Thermal Inertia 20 10 Minute Dwell 0 -20 Shown With 70C. Per Minute Occurring on the Circuit Board -40 -60 0 10 20 30 40 50 Time (Minutes For One Thermal Cycle) This Is The Only Time When The Product Is Off And No Power Moding Is Occurring 249 GENERAL MOTORS CORPORATION – EDSON - 2008 60 70 Table 29 Power Temperature Cycling Requirements Temperature Range Operating type Temperature transition rate Dwell time Tmin to Tmax 3.2 (2 to 15 ± 1) °C/min with the understanding and approval of GM Engineering. A single product must be thermocoupled as a pre-test assessment to determine the thermal lag time resulting from thermal mass. A 10-minute hot dwell and 10-minute cold dwell is to be used once the product is within 30 of the target temperature. The “Dwell Timer” shall begin when the product reaches Tmax minus 3°C and Tmin plus 3°C. Minimum The damage generated with Power Temperature Cycling number of should represent at minimum 25% of the total damage by thermal cycles thermal cycling. The minimum number of cycles shall be 100. An appropriate number of cycles to reach the required reliability should be taken from the standard set of cycles in table 11. Appendices “E” and “F” are for reference. Power moded During high temperature dwell. on 100 s and 20 During the second half of the cold temperature dwell. s off with During all transitions. cycling of loads Power off Only as dictated by the 20 second off portion of power moding and the first portion of the cold dwell as shown in figure 42. Supply Voltage The test operating voltage shall be nominal for 80%, low for 10% and high for 10% of the functional tests and/or cycles HUMIDITY TESTS For the HHC and the HHCO humidity tests, the DUT shall be powered with a system test voltage of 11.0 V, (to minimize excessive localized heating of DUT components that could cause localized drying). The DUT shall be functionally active but continuously locked in a steady or holding state of inputs and outputs (I/O) and circuit activity (i.e. statically active rather than dynamically I/O exercising active). HUMID HEAT CYCLIC (HHC) The Humid Heat Cyclic Test provides two forms of stress. A breathing effect of humidity is created as the temperature and humidity level is varied. The 1.5 hour rapid change in temperature produces condensation on the DUT resulting in dendritic shorting GENERAL MOTORS CORPORATION – EDSON - 2008 250 phenomenon. The Cyclic Humidity Test may be more effective on devices with “seals”, where as the constant humidity would be more effective at producing diffusion through plastic encapsulations. Test according to IEC 60068-2-38Z/AD. Table 30 Cycling Requirements Purpose: The cyclic temperature/humidity test is designed to reveal defects in test specimens caused by the ingress of humidity and moisture condensation. The breathing effect produced by changes in humidity, condensation resulting from rapid changes in temperature, and the expansion effect of freezing water in cracks and fissures are the essential features of this composite test. Humidity High Temperature +65 °C Low Temperature -10 °C Middle Temperature +25 °C Duration 10 days Test The following graph (figure 45) shows a two day cycle that is to be repeated a total of five times (2 X 5 = 10 days). The humidity during high temperature is 90%-96% and drops to 80% during times of 250C. The humidity is uncontrolled when cold. Locations of Applicability: This test is applicable to all areas of the vehicle. Figure 45 Cyclic Humidity Test Profile Cyclic Humidity Test Temperature Profile (Perform The Following Profile Five Times = 10 Days) 70 Procedure: Monitoring: Continuous quiescent current is monitored for every DUT over the 10 day test period to detect malfunctions during the test. Temperature (Degrees C) 60 50 40 30 20 10 Temperature Change Is To Occur Within 1.5 Hours 0 -10 Pay Attention To Anomalies Resulting From Condensation Of Moisture -20 0 2 4 6 8 10 12 14 16 18 20 22 24 26 28 30 32 34 36 38 40 42 44 46 48 Hours Over Two Days Operating Types: Heat producing device - Operating Type (3.2) with device power cycled on and off to balance ingress of moisture and condensation formation, with ability to detect malfunction. Non-heat producing Operating type (3.2) constantly powered. 251 device – with device Criteria: Functional Status shall be class A. No significant changes in quiescent current or product performance should occur during any time during the test, or at the end of the test. GENERAL MOTORS CORPORATION – EDSON - 2008 HUMID HEAT CONSTANT (HHCO) The Humid Heat Constant Test provides increased vapor pressure with high humidity and an increase in temperature over normal operation. Water vapor molecules are smaller in diameter than water molecules and will permeate plastic encapsulations or seals on capacitors. The ingress of water vapor may lead to malfunction of components or create a change in parametric values. Intermittent operation may occur during this test and constant monitoring is required to detect dendrite shorting or malfunction from the ingress of moisture into the circuit board or the components on the circuit board. Unique products, such as a camera, may be monitored periodically rather than continuously because of condensation generated image blur. The humidity level of 85%…95% is really intended to produce the highest possible humidity level without generating extreme condensation or rain. Revision “G” of GMW3172 (2008) will require an increased temperature and test duration for the constant humidity test. The HHCO test temperature will 0 0 increase from 65 to 85 (or to Tmax if less than 850). The test duration for the HHCO test will increase from 7 days to 10 days. The reasons for increased temperature and duration are the result of recent field issues of electro-migration between layers in the PCB of a cluster. Special Concern For Fuses Within The Bussed Electrical Center: The zinc material used inside fuses becomes maximally reactive with high humidity and a temperature of 850 C. The Cyclic Humidity Test, when applied to Bussed Electrical Centers can be conducted as described above, however, fuse integrity should receive special attention. Purpose: Evaluate the functionality of DUTs during exposure to extreme humidity and temperature. GENERAL MOTORS CORPORATION – EDSON - 2008 252 Locations of Applicability: This test is applicable to all areas of the vehicle. Procedure: Monitoring: Permanent parasitic current monitoring is needed for every DUT over the 10 day test period to detect malfunctions during the test. Operating Type: The test shall be performed under operating type (2.1) during the test. The DUT shall be evaluated using operating type (3.2) at the end of the test. Test according to IEC 60068-2-56 Cb. With the following exceptions: Table 31 Constant Humidity Test Requirements Temperature (+85 ± 3)°C Duration 10 days Relative Humidity (85..95) % Special Note: This test can be accelerated through the use of the Arrhenius-Peck equation with the temperature not to exceed the service temperature of plastic components. This can represent a significant reduction in test time. Optional: If fungus growth is a concern then this test should be run at 42°C for 21 days. This cooler and longer test may be applicable when new materials or fluxes are being introduced. 253 Criteria: Functional Status shall be class A. The parasitic current that is measured during the test should not increase beyond that allowed by the parasitic current test. CORROSION TESTS The Salt Corrosion Tests are intended to do the following: Interior Mounted (Salt Mist Test): Devices • Evaluate for proper function in a salt water laden air environment. • Evaluate for proper function when salt water may drip upon the device. • Evaluate for proper function following cleaning at the end of the 3 to 10 day test. • Evaluate for base metal corrosion that may lead to loss of critical connections or circuit function. Exterior Mounted (Salt Spray Test): GENERAL MOTORS CORPORATION – EDSON - 2008 Devices • Corrode water path openings into sealed containers, allowing water to reach the circuit board. • Corrode connector terminals and terminal connections such that a high resistance condition is produced. • Corrode exposed traces or leads resulting in loss of connection. The Salt Mist Test is intended for interior located devices. It is very important that the device on test be energized as specified below if prone to salt water dripping. It is also important for the proper connector to the DUT be used and not disturbed during the duration of the test. The DUT does not need to be positioned in the in-car position during the salt mist test. The salt mist test is an accelerated test for an interior device and will produce condensation at a level that will not occur in the field. The DUT should be positioned in the salt mist chamber so that condensate will not collect in the DUT or upon the circuit board. The device on test should be washed clean following the corrosion test to permit close examination for material loss or degradation of critical surfaces. The device must function properly at the end of the test following cleaning. The Salt Spray Test is designed for areas outside the passenger/trunk area where a washing action of salt water is possible. The washing action increases the corrosion rate by removing the oxidation byproducts, increasing the exposure of bare metal. The 70-degree portion of the Salt Spray Test can be reduced to 50 degrees if the chamber system is not capable of reaching 70 degrees. European labs often do not have a salt spray chamber but do have a salt mist chamber. In this situation, the Salt Mist Test can be substituted for the salt spray test but must be run for the duration specified for the salt spray test. If this substitution does occur, the 3 days of ambient at the end of the test is not required. SALT MIST Purpose: This test is for products mounted within the passenger cabin or luggage storage area within the vehicle. The salt mist test for interior devices has three functions: GENERAL MOTORS CORPORATION – EDSON - 2008 254 • • • Verify functionality of the DUT following exposure to salt laden air as experienced in coastal regions. Evaluate functionality when salt water drips onto devices located in risk prone areas, such as the door armrest. Evaluate the loss of parent metal that may lead to loss of connection or broken leads. Locations of Applicability: This test is applicable to the passenger and luggage area (interior of the vehicle). Test Procedure: Monitoring: Monitoring shall occur during the time that the device is energized. Operating Type: The operating type shall be 3.2 during the time that the device is energized. The operating type shall be 1.2 during the time that the device is not energized. Test per setup from IEC60068-2-52kb. Test durations based upon IP water code per the following table: Area Passenger or Luggage Area 8 (seal evaluation) 10 (240) Sequence of test steps: 1. The first 2 hours of the total test duration should be run at a reduced fog level (0.25 - 0.5 milliliters per hour on 80 cm2) with the device energized and operating (3.2). The salt fog is to be a 5% solution with pH of (6.5 – 7.2) per IEC60068-252kb. This pre-test is a measure of the degradation of function resulting from a salt laden air environment with expectations of proper function of the device. 2. De-energize the device. 3. Soak in a humid environment for 22 hours per the IEC60068-252kb specification. 4. The remainder of the cycles (two hour salt fog followed by 22 hours of humidity) are to be run at the normal level of fog per IEC60068-2-52kb. Criteria: Location IP Water Code Days of Test (Hours) Passenger or Luggage Area 0 and 2 3 (72) 3 and 4k 6 (144) Passenger or Luggage 255 Functional Status shall be class A. The DUT will be evaluated for electrical and mechanical function after cleaning at the end of the test. The DUT will also be evaluated for critical loss of parent metal that may lead to loss of internal or external connections. GENERAL MOTORS CORPORATION – EDSON - 2008 Corrosion Of Steel Under A Water Droplet Figure 46 North America Corrosion Map GENERAL MOTORS CORPORATION – EDSON - 2008 256 Figure 47 Salt Spray Corrosion Chamber windshield, and (wet area). within the doors Test Procedure: Monitoring: Constant monitoring shall occur during the entire test to detect intermittent failures. Operating Type: The operating type shall be (3.2) during the time that the device is energized. SALT SPRAY Purpose: To verify DUT functionality after exposure to salt spray as experienced in coastal regions and salted road splash. This test is for products mounted outside of the passenger cabin or luggage storage area. Locations of Applicability: This test is applicable to any location on the exterior of the vehicle. This includes under the hood, within the plenum at the base of the 257 Mounting and Salt Spray Flow: Mount the DUT centrally between the spray nozzles with appropriate load and voltage applied as described below. The volume and force level of the salt spray should be designed to “wash away any corrosion products that may form on the metal”. Adjust the flow of the salt spray through the spray nozzles so that the streams of fluid are strong enough to hit the opposite wall of the chamber with the sample support walls removed. A typical chamber used to perform this test employs 12 nozzles, operating at 15 psi and sprays a total of 30 gallons per minute. These are approximate values and a significant degree of variation can be tolerated. The nozzles typically spray a hollow cone pattern and spray all the way across the chamber (3.5 feet). The following 24-hour sequence is repeated as many times as necessary per the requirement for the mounting location: GENERAL MOTORS CORPORATION – EDSON - 2008 The following sequence (1,2,3) is repeated three times for a total of 9 hours: 1. 1-hour at 700C with samples not energized. the 2. Turn off the chamber heat and energize the samples while spraying with a 5% saline solution for 1 hour. The spray booth should be approximately 350C with the spray solution at room temperature. The pH of the solution should be from (6.5) to (7.2). Operating type 3.2 is to be applied during this one hour operating evaluation period with a Functional Status Classification of “A”. 3. Turn off the salt spray and deenergize the samples while allowing the parts to cool for 1 hour at 250C. Humidity is uncontrolled during this hour and is expected to be high. Operating type 3.1. 4. A drying period of 15 hours at 250C with the power off. Humidity is uncontrolled, but is expected to be high. This 24-hour test sequence shall be repeated for multiple days as shown in the table. After the final cycle, perform a Functional/Parametric Test within 1 hour. The DUT should then be thoroughly washed with clean water to allow for detailed inspection of loss of parent metal or concentrated pitting corrosion that may lead to a loss of seal integrity. The enclosure protection test should follow the corrosion test. If seal integrity was lost during the corrosion test for a sealed module, the follow-up seal evaluation test will effectively detect the loss of seal integrity. Criteria: The functional status during and after the test shall be class A. The acceptance criteria for corrosion is not limited to conditions as observed at the end of the SaltSpray Test. Corrosion can start and continue at different times of the test sequence, thus the corrosion acceptance criteria applies to the entire sequence. Failure of any Functional/Parametric Test item during or at the end of the test is not acceptable. Structural corrosion damage that reduces any structural physical properties of a material by 25 % or more at the corrosion site is not acceptable. Structural corrosion damage is defined as corrosion related material loss or degradation that weakens the physical properties related to the structural integrity and strength of the device or assembly or packaging. These properties include, but are not limited to, yield strength, hardness, pierce strength, mass, buckling or flex resistance, etc. Degradation of cosmetic appearance over the exterior of the device or bracket is not allowed on surfaces exposed to vehicle occupants. Corrosion that does not penetrate deeper than 5% of the thickness or covers more than 10% of the surface area is acceptable in areas not exposed to the customer GENERAL MOTORS CORPORATION – EDSON - 2008 258 Table 32 Summary of Salt Corrosion Testing Location Passenger Compartment Days of The Test Cycle Total Test Hours 3-10 72-240 20 480 (Salt Mist) Door Interior (Salt Spray) Engine Compartment High Mount or Exterior High Mount dust intrusion from windblown sand and road dust to allow the DUT to continue to meet the performance requirements specified in the CTS. The accumulation of dust on heat sink devices will adversely affect heat dissipation. Dust may also combine with humidity and salt to produce unintentional conductive paths. Dust accumulation will adversely affect electro-mechanical devices resulting in increased friction or complete blockage of motion. Locations of Applicability: 20 to 40 480/960 This test is applicable to all areas of the vehicle. Procedure: (Salt Spray) Underbody (Salt Spray) 20 to 40 480/960 ENCLOSURES TESTS The Tests for Enclosures encompasses the dust test and the water tests. These tests can be as important for interior locations as they are for exterior locations. Monitoring: The DUT is not energized or monitored during the application of dust. The DUT is evaluated following the dust test and monitoring should occur during this evaluation. Operating Type: The operating type shall be (1.2) during the time that the device is being dust tested. The operating type shall be (3.2) during the post evaluation. DUST Test according to IEC 60529, 13.4 (pulsed dust injection using Talcum Powder) or the SAE J726 procedure (constant dust dispersal). This test shall be conducted using SAE J726 Fine Grade Dust and should occur for a period of 8 hours. Criteria: To determine if the enclosure provides sufficient protection from Functional Status shall be class A. The DUT shall experience no damage, loss of function, or degradation of performance when Purpose: 259 GENERAL MOTORS CORPORATION – EDSON - 2008 energized and evaluated following the dust test. The operating type shall be (1.2) during the water test. The operating type shall be (3.2) during the post test evaluation. WATER Devices that will be tested to the “code 2” requirement shall be oriented as follow: ALL WATER TESTS EXCEPT SEAL EVALUATION The water tests using the codes “2”, “3”, “4K”, “6K”, and “9K” are designed to ensure that the housing is effective at protecting the circuit board from the problems introduced by water contamination. Consider adding a UV soluble dye to the water for easier ingress detection with black during post evaluation. Purpose: Determine if the enclosure meets the International Protection Requirement when specified by the second characteristic IP code. Locations of Applicability: This test is applicable to all areas not subjected to the Seal Evaluation Test. Procedure: Monitoring: The device is only monitored during the post test evaluation. Operating Type: A device mounted inside the vehicle is designed such that the connector is oriented 50 downward from the horizontal when the car is parked on a flat surface that is horizontal to earth. Now we park this car on the steep road (14.20) in San Francisco such that the connector is now facing (14.20 minus 50 = 9.20) in an upward direction. Water that may condense and fall on this device will now be landing on the device with the connector facing upward 0 9.2 from the horizon. The IP lab test should test the device with the connector oriented upward at a 9.20 angle. Codes other than “2” shall have the device mounted in the “in-car” position, and this orientation to the horizon shall be maintained as the DUT is placed upon the horizontal support plate for test. Example: An underhood product that is mounted at a 45 degree angle in the car, and is required to pass the 9K test, will have portions of its underside sprayed as the spray nozzle travels down to the horizontal spray position. GENERAL MOTORS CORPORATION – EDSON - 2008 260 Test as specified by IEC 60529 Table VIII. Use DIN 40050, Part 9 for IP code 9K. Alternately, ISO20653 combines the requirements of the IEC and DIN specifications. For IP Codes 4K and 6K the following additions to Table VIII apply. Water Code 4K 6K Test Water Means Flow Rate As in item 3 IEC 60529, except 0.5 I/min ± with an 5 % per opening opening diameter (average) of 0.8 mm at ± 90 ° spray 75 I/min ± 5 % Note: As in item A reduced 6 IEC flow rate 60529 may be except accepted if nozzle 6.3 the mm pressure diameter and nozzle size are maintained Duration of Test 10 min (5 min in one position, 5 min turned 90 ° Minimum 3 min When the second IP code is 8, use the Seal Evaluation Test explained in the following section, unless stated otherwise in the CTS. elements. A design that employs a “circuit board within a box within a second box” may have water penetrate the outer box as long as it does not pass into the inner box and contact the critical electrical elements. Water management, as a strategy, is permitted as long as no water ever reaches the critical electronics or electrical connection points. It should be realized that the water used in this test is a convenience for the contaminated road splash that may reach the device in the real world application. We may see a few drops of water on the circuit board during this test and believe that it would have no effect. In the real world, those drops would be salt water and may lead to a serious corrosion problem. Functional Status shall be class A. The DUT shall experience no damage or degradation of performance. The part shall pass the Functional/Parametric Test during and at the end of the test. SEAL EVALUATION Criteria: Careful observation and good dissection of the DUT following the water test is essential in detecting the following requirements: Water must never reach the circuit board or critical electronic components or connections by means of drip, spray, splash or submersion as defined by the protection requirement code. Additionally, water may not accumulate within the container and reach the above defined critical 261 The Seal Evaluation Test is a severe process that evaluates the ability of the enclosure to seal out water. Pre-heating the device to Tmax before it is cold quenched in freezing salt water increases the test severity. This test is appropriate for underbody GENERAL MOTORS CORPORATION – EDSON - 2008 locations (within approximately 20 inches from the ground) that may become submerged or splashed. This test is also appropriate for devices that must be very well sealed based on prior field experience. Purpose: To verify the DUT functionality after exposure to thermal shocks induced by heating in air and cooling in water. The test should be used for sealed electrical devices to evaluate the effectiveness of the seals. This test is the default test when the second IP code is 8. Locations of Applicability: This test is applicable to areas that could possibly become submerged. Areas within the vehicle such as depressed areas in the floor pan or truck are also areas that could contain water. This test is also required of all devices that are to be potted. Procedure: Monitoring: The device is only monitored during the post test evaluation. minutes, or long enough to ensure that Tmax has been reached within the device. The device should not be electrically connected or energized during the high temperature soak. Remove the DUT, Connect the power and monitoring equipment, and immediately immerse the device into the test solution. The test solution should be a 5% saline solution doped with water soluble ultra-violet dye. Connect the power and monitoring equipment prior to each submergence period but keep the device un-powered for the first 20 minutes of the submergence period. The device should be energized during the last 10 minutes of the submergence period. The DUT shall remain submerged for a total of 30 min. Repeat this procedure and function the DUT until a total of (15) submerging cycles have occurred. Check all functions and parametric values during and at the end of the test. Special Note: The ground wire is to be placed under water along with the DUT during the test for all sealed controllers when the ground wire will be located low on the vehicle. Extra Special Note: Any device that is expected to keep out water should receive this test as an evaluation activity. Operating Type: The operating type shall be (1.2) during the heating portion of the test. The operating type shall be (3.2) during the water submerging portion of the test. Place the DUT in a temperature chamber at Tmax for at least 30 GENERAL MOTORS CORPORATION – EDSON - 2008 262 Table 33 Seal Evaluation Requirements SUGAR WATER FUNCTION IMPAIRMENT DUT Voltage Vmax Fluid Temperature 0°C DUT Temperature Above The Fluid Tmax Depth (76 ± 5.0) mm Figure 48 Setup Seal Evaluation Test Recording Device Power Supply Test Pigtail Fluid Level The Sugar Water Function Impairment Test evaluates the sensitivity of the product to the effects of condensing sugar water or the crystal precipitation of sugar water. This residue can impair the function of moving mechanisms or switches. This test in primarily intended for products located in the interior of the vehicle. Purpose: Depth DUT Loads DUT Ground To Case If Applicable Submerged Ground Connection If Applicable The purpose of this test is to determine if the DUT is able to meet specification requirements when exposed to dried fluids that once contained dissolved sugar. Locations of Applicability: Criteria: Functional Status shall be class A during and after the test. The DUT shall be opened and inspected for signs of leakage at the end of the test. An ultra-violet light source should be used to detect the potential ingress of saline solution containing ultra-violet dye. No leakage is permitted. 263 This test is applicable to areas that will become contaminated by sugar sweetened beverages and produce erratic motion in sliding systems. Procedure: Monitoring: No monitoring of the device occurs during the test. Monitoring for proper function occurs during post evaluation. GENERAL MOTORS CORPORATION – EDSON - 2008 Operating Type: The operating type shall be (1.2) during the test and operating type (3.2) during the post test evaluation. • Pour or splash 200 milliliters of sugar water into the DUT and wipe away any standing or surface liquid. • The device shall be mounted in its intended orientation with all bezels and covers in place. • The sugar water liquid shall be poured into horizontal devices from the vertical direction, and splashed into vertical devices from a horizontal direction. • Sugar water is defined as 200 milliliters of water with 10 grams of sugar fully dissolved. • Sugar water is to be applied from a distance of 30 centimeters. • The DUT shall remain undisturbed and allowed to dry at room temperature for 24 hours prior to the evaluation of function. Criteria: Functional status shall be A. Degradation in operational forces and audible quality of function (sticking and gritty controls) shall be compared to the specification. DESIGN VALIDATION RESULTS REVIEW A validation results review should be performed on the results of the validation tasks with the intent of identifying what tasks may need to be repeated for PV. Purpose: Identify weaknesses or lack of design margin and initiate corrective action now. A refocusing of attention during PV should occur based upon weaknesses remaining from DV and any changes necessary between DV and PV. Procedure: Perform the Appendix “B”. design review per Criteria: Initiate corrective action as early as possible in the product development cycle. GENERAL MOTORS CORPORATION – EDSON - 2008 264 PRODUCT VALIDATION ACTIVITIES The move to lead-free Product Validation tries to detect major weaknesses that develop as a result of changes occurring between DV and PV. Weaknesses can result from changes in location of manufacturing, major process changes, or product design changes. The type of engineering change and the degree of change will dictate what testing is necessary. Product Validation is not intended to statistically quantify the degree of variation occurring in production. The supplier and General Motors shall jointly determine exactly what testing is necessary for process validation and what sources of variation shall be included in the testing. Changes in location of manufacturing, major process changes, or product design changes should dictate what kind and amount of testing is necessary for product validation. Additionally, weaknesses in the design margins of the product as seen during Design Validation should be considered in developing the Product Validation plan. The supplier and General Motors shall jointly determine exactly what testing is necessary for Process Validation. Evaluation Of Solder Repaired Products: The move to lead-free solder changes many long established practices, including the process parameters for solder repairs performed during the manufacturing process. If the manufacturing process allows product to be repaired, then Process Validation should include 265 products that have been intentionally repaired using the established repair processes and equipment. Approximately 20% of the PV samples should contain common solder repairs if solder repair is permitted. The quality of solder repairs is of great concern with lead-free solder. GENERAL MOTORS CORPORATION – EDSON - 2008 VIBRATION SHIPPING The Vibration Shipping Test evaluates the ability of the packaging to protect the product from shipping damage prior to the product reaching the assembly line. Close examination of the product following this test is critical in detecting damage both functional and cosmetic. Purpose: This test augments all previous vibration testing. The shipping vibration test is intended to evaluate shipping container effectiveness in preventing damage during shipping by all forms of transportation. trucking, rail, and air profiles as specified in ASTM D4728. This test is to be conducted on one box of product in its final shipping container. Vibrate the shipping container for 25 hours in each of the three mutually perpendicular directions, for a grand total of 72 hours. Use a vibration test fixture that allows the shipping container (one box of product) to move freely in the vertical axis of the vibration table. A suggested fixture would consist of a base plate with four upright posts that are slightly larger than the shipping container. Provisions should be made to allow placement of the package in all three directions. Use the random vibration profile shown below in table (34): Locations of Applicability: All locations. Procedure: Monitoring: No monitoring occurs during the test. Evaluation for damage only is performed at the end of the test. Operating Type: The operating type shall be (1.1) during the test. The following is the same test as defined in GMW3431. The following shipping vibration profile is a “worst case composite” derived from the Table 34 Shipping Vibration Profile Frequency (Hz.) Energy (G2/Hz.) 1 .00005 2 4 .001 .001 12 .01 GENERAL MOTORS CORPORATION – EDSON - 2008 266 Frequency (Hz.) Energy (G2/Hz.) 100 .01 200 .00001 300 .00001 Criteria: The FSC code is not applicable to this test. The box of product is to be opened and thoroughly inspected for possible damage following the total 72-hour vibration test. Additionally, the product must meet the functional and parametric requirements specified in the CTS. The GM Design Release Engineer may allow a selected evaluation of a statistical sample of parts as opposed to all parts contained in the shipping container to be evaluated. Parts should be randomly chosen from all quadrants of the shipping container if only a sample is taken. SCREENING DURING PRODUCTION High risk and critical products may require screening during the startup of production to ensure that early quality spills are detected and prevented before reaching the vehicle assembly line. Screening is expensive and time consuming and should only be used when absolutely necessary. While screening may be frequent during product startup, it can be decreased in frequency as production processes are brought under stable control. Screening methodology is described in GMW8287. 267 EVALUATION OF ENGINEERING CHANGES AFTER PRODUCTION An abbreviated test plan is to be formulated to address post validation engineering changes using the ADV Task Checklist as a starting point. It is suggested that the following principles by applied in determining which tests are necessary: • If a surface mounted component is being made smaller, then there is little need for thermal fatigue testing. If a larger surface mounted device is being used then there may be a need for thermal fatigue testing. Physical dimensions are important when it comes to thermal fatigue because expansion and contraction GENERAL MOTORS CORPORATION – EDSON - 2008 stresses are directly related to the size of the component. • • If a heavy component is being added to the circuit board, or if an existing component will significantly increase in weight, then vibration testing may be required. If there are significant changes that reduce the support of the circuit board, then vibration testing may be required. If a different component is being used, and has never been used previously, then humidity testing may be required. The humidity test is required because of concern for the permeability of water vapor through the plastic encapsulation. If a different component is being used on this circuit board but has been used in a previously validated product, then humidity testing may not be necessary. When a “change” replaces a part with a near identical part in terms of size and mass, then some of the electrical tests should still be run even though the environmental tests are not required. Selected electrical tests should be run to ensure that the new part is as electrically robust as the old part. • Reverse Polarity • Over-Voltage • Voltage Dropout • Superimposed Alternating Voltage • Open Circuit Tests • Short Circuit Tests • Load Circuit Over-Current Test • EMC PRODUCT VALIDATION RESULTS REVIEW A PV results review should be performed on the results of the PV tasks with the intent of identifying if any issues remain and to identify whether there is for screening activity during start or product of this component. Purpose: Suggested electrical tests may include (but are not limited to): • Parasitic Current • Jump Start Confirm that this product can be placed into production with confidence that customers will be delighted and that GM reputation of quality and reliability is maintained. If additional effort must be made during start of production, such as GENERAL MOTORS CORPORATION – EDSON - 2008 268 Screening Activities, then this should be agreed upon during this final Product Validation Results Review. Procedure: Perform the design review per Appendix “B” and take appropriate action.. Criteria: This is the final opportunity to prevent warranty expense. Actions necessary to mitigate risks should be defined and discussed with management. REVISIONS TO THIS MANUAL Revision Number Green Cover first edition Date Change Oct. 2005 First Introduction of User Manual. Old thermal fatigue calculations – 12 copies. Blue Cover Nov. no revision 2005 number Official distribution to Validation Engineers with HP revised thermal fatigue calculations. Blue Cover Dec. revision 2005 number 1 Change to Load Circuit Over Current Test. Addition of Meniscograph Test. Small changes to test flows. Rev. 2 Jan. 2006 Addition of Ground Interconnect Short To Battery Test. Additional notes for thermal shock. Rev. 3 Feb. 2006 Expanded PV testing explanation. On or off during jump-start. Expanded vibration explanation. Any orientation during salt mist testing. Jump-start 26 ± (0.1V). Added full explanation of shipping vibration test. Appendix “M” added. Rev. 4 Mar. 2006 Expanded explanation of failure mechanisms and terms. Changes to thermal fatigue testing cycles: spec and handbook will agree. Change in criteria during salt mist corrosion testing. Clarification of tests for engineering changes. Rev 5 April 2006 Addition of the Validation Timeline, Pin-in-paste construction explained, iNEMI tables for lead-free added, North America corrosion map added. 269 GENERAL MOTORS CORPORATION – EDSON - 2008 Rev. 6 May 2006 Expanded the section on Failure Mechanisms and added explanation for step 4 of Parasitic Current Test. Rev. 7 June 2006 Added metal crack failure criteria and updated table 8. Rev. 8 June 2006 Corrections made for suggested codes in low temperature nderhood area. Added copper-solder example in thermal fatigue area. Added HALT graphic in HALT explanation. “Worst Case” added to Nominal Evaluation in Analysis Section. Rev. 9 Aug. 2006 Compliant pin explanation provided. Expanded explanation of tin-pest. Expanded explanations for lead-free. Clarification of testing for the soakback temperature and the Tmax testing from re-paint. Three cycles of Dew Test added as alternative to the Frost Test. Frost Test added to list of development tests. Missing “continuous short circuit test” added to task check list in appendix M. Rev 10 Oct. 2006 Added explanation for the 1 hour vibration with thermal test. Corrected drawing of thermal shock graph. Explanation given for Tmax re-paint used for high temperature storage. Vibration test durations clarified. Waveform analysis returned to checklist. Notes of deviation to the standard procedures for future programs to conform to the Canadian CAN/ULCS338-98 specification for Theft Deterrent and Electronic Immobilization” devices. Rev 11 Nov. 2006 Included missing Fault Injection Testing requirement in ADV Checklist. 100 G mechanical shock tester picture added. Rev 12 Dec. 2006 Expanded explanation about wetting times. Added table for water spray test conditions and durations. Clarified time at zero volts for battery voltage dropout test. Rev 13 Jan 2007 Correction for reference to table 26. Expanded use of Seal Evaluation Test. Cracked ceramic capacitor note. Temperature conversion table added. Rev 14 Mar 2007 Unified vibration test requirements for the range of 100,000 to 200,000 miles. GENERAL MOTORS CORPORATION – EDSON - 2008 270 Rev 15 May 2007 Improved criteria for water penetration during Enclosure Protection Testing. Additional Open Circuit Testing as a development test. Rev 16 Oct. 2007 Changes in Constant Humidity test temperature and duration, Moisture Susceptibility introduced to replace the Frost and Dew Test. Limited publication for Canada. Rev 17. Nov. 2007 Corrections to table five and expanded explanation of the Fretting Corrosion Test. Operating type changed for International Protection Dust and Water Testing. Rev 18 Dec. 2007 Many changes made for clarification, including new diagrams and procedures. Rev 19 Feb. 2008 Addition of Pulse Superimposed Alternating Voltage Within Normal Levels Test. Significant changes in mechanical shock testing and corrosion testing, with additional clarification provided in many other tests. Restructured to focus more on the ADV sequence. “Great spirits have always encountered violent opposition from mediocre minds.” Albert Einstein (1879-1955) 271 GENERAL MOTORS CORPORATION – EDSON - 2008 Appendix A – GMW 3172 Test Plan Template GENERAL MOTORS CORPORATION – EDSON - 2008 272 Appendix B – Reliability Design Reviews • Changed Product – Assessment Using “Design Review Based on Failure Mode” (DRBFM) – Design Review #1 & #2 o What aspect of this design is different or represents change from previous designs? What concerns result from this change (failure mechanisms) What impact will the “different-from-previous” have on the final customer or on other inter-related components in the system What measures will be taken to ensure that the concern does not become a field problem • New Product – Anticipatory Failure Determination10 (AFD) – Design Review #1 This method is to be used to quickly draw attention to potential weaknesses in the product and help in formulating the best ADV plan. AFD is a technique of inverting and accentuating the problem formulation. Normally in DFMEA one would ask: “How might this product fail?”. This embodies a natural “denial phenomenon” and does not help identify the mechanisms that would cause failure to occur. The AFD method inverts the basic question, so that instead of asking how could it fail, one asks: “How could we make it fail?”, and then: “How could we make it fail consistently?”. Subsequent questioning explores what conditions would be necessary to ensure that failure would occur consistently. The identification of these conditions leads to the identification of the most risk prone failure mechanisms and the conditions that must be managed to prevent failure. This process will also ensure that weighted attention is given to failure mechanisms that are believed to have a dominant effect. Special attention should be given to these failure mechanisms during test planning and product dissection following the test. While the name is trademarked, the general concepts of this method are in the public domain and can be used without contracted assistance. • 273 Does the test plan accommodate all of these failure mechanisms? How will we assess the design margins for these failure mechanisms? The management of problem prevention communication between elements of the Supply-Chain must be managed through the Design Review Process. The extent of this communication should extend to at least the Tier 3 level when possible. A documented communication process must be evident, and concerns between tiers must be communicated to the GM engineering team through the design review process. Example: If we begin to use lead-free solder at the Tier 1 supplier level, which results in a melting point increase of 300 over tin-lead solder, how will this be communicated to the Tier 2 GENERAL MOTORS CORPORATION – EDSON - 2008 suppliers that will be supplying discrete components that must now see this additional temperature rise? What is the feedback of risk level from the Tier 2 supplier for this situation? • Design Reviews Between ADV phases using “Design Review Based on Test Results” (DRBTR) – Design Reviews #3-#5 o Detailed dissection of the tested products is essential to uncover all available information. Looking for what is not obvious is essential and the results must be reviewed with General Motors. o How much design margin exists for each failure mechanism? How sensitive are the dimensions or processing parameters that affect the weak points in our design that limit our design margin? How can we minimize the effect of variation on these parameters on the design margin? How will these parameters be controlled in production? o What improvements can be made at each stage of product development for areas with low design margin and how/when will we know that these improvements were effective? o How should the test plan be modified in the next phase based on the results learned in the previous phase? My alphabet starts with this letter called YUZZ. It’s the letter I use to spell Yuzz-ama-Tuzz. You’ll be sort of surprised what there is to be found Once you go beyond Z and start poking around! So, on beyond Zebra! Explore! Like Columbus! Discover new letters! Like WUM is for Wumbus, My high-spouting whale who lives high on a hill And who never comes down ‘til it’s time to refill. So, on beyond Z! It’s high time you were shown That you really don’t know all there is to be known. (Dr. Seuss – “On Beyond Zebra”) GENERAL MOTORS CORPORATION – EDSON - 2008 274 Appendix C – Success-Run Statistics Calculating The Number Of Samples To Be Placed On Test To Demonstrate The Reliability Requirement: Equation 1 Success-Run Equation3 R = (1 − C ) 1 N This equation can be transformed into equation two as shown below: Equation 2 Sample Size Equation3. ln (1 − C ) N= ln ( R ) Where: R = the required reliability to be demonstrated on test C = the Confidence level. N = the sample size. Nreduced = the new reduced sample size For Example: If R = 0.97 and C = 0.50, then N = 23. If the testing of 23 samples is not desirable due to program timing or the supplier’s facilities then the sample size can be reduced if the test duration is increased. Calculations For Increased Testing With A Reduced Sample Size Equation 3 Over-Test Equation ln (1 − C ) Increased Overtest Factor = N × ln R ( ) reduced 1 β Example: We will use an assumed Weibull Slope of (2) for the following because source of failure could result from numerous pretreatments. 1 ln (1 − .5 ) 2 Increased Overtest Factor = = 1.124 18 × ln (.97 ) Revised Life Requirement = Original Life Requirement × 1.124 275 GENERAL MOTORS CORPORATION – EDSON - 2008 Appendix D – Weibull Analysis as Applied To “Vibration TestTo-Failure” The basic sprung-mass specification for a car requires the product to be tested at 2.84 Grms with a specified Power Spectral Density (PSD) for 8 hours in each axis. This set of test conditions represents one life for 100,000 miles for a car. The product should be tested for 8 hours in the “X” and then tested for 8 hours in the “Y” direction. The “X” and “Y” direction are defined as being in the plane of the circuit board. The “Z” direction is to be tested last. The “Z” direction is defined as being perpendicular to the plane of the circuit board. All vibration testing is performed with superimposed thermal cycling occurring simultaneously with vibration, and the product fully monitored. Testing in the “Z” direction will occur for the specified number of hours as listed in table (10). The strategy identified in the test flow and within table (10) is a “success-run” approach where no failures are expected and the 8 hours in the “Z” axis has been extended to compensate for the reduced sample size from (23) parts to (6) parts. If a failure does occur prior to the specified test duration then the testing should continue and a “test to failure” approach should be adopted. The vibration testing in the “Z” axis should continue at the 2.84 Grms level until at least a total of 4 of the six products fail. Product failure is essential in providing the data necessary for performing a Weibull Analysis. The analysis process that follows requires that all failure modes be similar. Example: Six devices are tested for 8 hours in the “X” direction and 8 hours in the “Y” direction with superimposed thermal cycling and with no failures. These same parts continue testing in the “Z” direction with superimposed thermal cycling. One of the products fails after 19 hours of testing in the “Z” direction (total vibration testing at this point is 8+8+19 = 35 hours). The remaining 5 parts must be tested to failure until at least 4 failures have been accumulated. Weibull analysis shall be performed on the “time to failure” values of the four failures. These values shall be plotted on Weibull paper and the reliability at the life requirement (8 hours) identified and documented using proper Weibull analysis methodology. An example of six parts tested until 4 failures have accumulated is shown below. The four failures are plotted on Weibull paper and a life prediction is made. The failure values are organized in ascending time value and their corresponding median rank value assigned. In this example, we will use the first 4 median ranks out of a total sample size of 6. We use these “4 out of 6” values because we had six parts on test during the time of accumulating the 4 failures. The paired plotting points using the median rank values for a sample of 4 are as follows: 1. [ (the earliest failure in your data), 10.9% ] 2. [ (the second failure in your data), 26.4% ] 3. [ (the third failure in your data), 42.1% ] 4. [ (the fourth failure in your data), 57.9% ] 5. [ (the fifth failure in your data), 73.5% ] (NOT USED) 6. [ (the sixth failure in your data), 89.1% ] (NOT USED) GENERAL MOTORS CORPORATION – EDSON - 2008 276 The product in this example meets the reliability requirement exactly because the best-fit Weibull line passes through the intersection of 8 hours (8 hours each axis for a total of 24 hours) and 97% reliability requirement (3% failure). Any line passing to the left of this point will not meet the requirement, and any line passing to the right of this point will more than meet the requirement. The slope of this line will vary as a function of the variability of the test data. Special Note: When the product is mounted on rubber isolators or grommets, the above test may generate excessive heat within the rubber, causing abnormal failure of the rubber isolators. The following process is suggested to prevent this problem: • Apply the standard specification level vibration to the rubber-mounted device for only a few minutes and measure the Grms value (Grms2) and PSD (PSD2) on the device downstream from the rubber isolator. • Test as explained in section (15) using the new Grms value (Grms2) and the new PSD (PSD2) as the requirement with the rubber isolators removed from the system. This will prevent the accelerated vibration level used in the specification from creating heat-based damage in the rubber isolators. Figure 49 Weibull Plotting Example Probability - Weibull 99.90 The test was suspended before these two failures were allowed to occur 90.00 First Failure Unreliability, F(t) 50.00 Last Failure 10.00 5.00 Requirement 1.00 1.00 b=2.5000 10.00 100.00 Hours of Vibration The median rank values shown in this table are the expected percentile plotting points to be used in Weibull Analysis. First select the total number of samples that were placed on test at one time. If six samples were placed on test and then the test was suspended after four failures, then you will use the first four median rank values out of a sample size of six. 277 GENERAL MOTORS CORPORATION – EDSON - 2008 Table 35 Median Ranks For Weibull Plotting I ramble, I scramble, through swampf and through swumpf Where the letters get better. Like letters like HUMPF. There’s a real handy letter. What’s handy about it ...? You just can’t spell Humpf-Humpf-aDumpfer without it. If you stay home with Zebra, You’re stuck in a rut. But on beyond Zebra, You’re anything but! (Dr. Seuss – “On Beyond Zebra”) GENERAL MOTORS CORPORATION – EDSON - 2008 278 Appendix E – Lead-Free Solder Considerations The global move to eliminate the use of lead in consumer products through legislative actions has growing applicability for the automotive industry. Circuit boards that reach landfills can create the potential for the lead on the circuit board to leach out of the circuit board and into the ground water. Lead represents the greatest threat to children, who have the greatest retention rate for this poisonous metal. Industry has responded with an alternative solder that is lead-free. The composition of this lead-free solder is usually tin/silver/copper (Sn/Ag/Cu). Lead-free solder has a reduced fatigue life as compared to leaded solder, even though the tensile strength of lead-free is greater than leaded solder. Lead-free solder also has greater variability in fatigue life as compared to leaded solder. The use of lead-free solder creates additional risks as described below. The following checklist should be reviewed with the supplier to prevent potential problems and provide for adjustments in test plans as noted: 279 • A comprehensive Failure Modes Effects Analysis (FMEA) or DRBFM must be performed to identify and address lead-free solder-specific failure mechanisms. • Lead-free components when used in either a leaded or lead-free assembly operation should receive a Meniscograph Test to ensure that the wetting quality will be compatible with the minimum response that the supplier has determined is required for their process. • Lead-free solders have higher melting points and poorer wetting capabilities as compared to leaded-solders. The temperature increase can be as much as a 340C over lead based solder. The increase in temperature results in electronic components being exposed to higher temperatures during assembly. These higher temperatures can also increase the probability of “popcorning” with plastic encapsulated components. Popcorning is the cracking or exploding of the plastic case of the component resulting from high pressures of superheated steam. The superheated steam is the result of trapped water vapor within the plastic matrix becoming superheated from the higher temperature soldering process. Special efforts may be necessary to control the humidity of the environment of stored components awaiting assembly. Discussions with the “Supply Chain” of component manufacturers must be conducted early in the program to prevent temperature related problems. • Thermal aging (time at elevated temperature) can lead to the formation of Kirkendall Voids at the interfaces of tin and copper. The formation of a string of these voids can produce a perforated tear line that represents a significant weakness relative to mechanical shock. The Universal GENERAL MOTORS CORPORATION – EDSON - 2008 Durability Test-Flow places the 500-hour thermal aging test prior to the first mechanical shock test specifically to address this concern. • Lead-free solder quickly shifts from a ductile material to a brittle material at a temperature of -300C. This phenomenon does not happen with leaded solder. This can represent a significant risk in high mechanical shock areas like the door, engine, and locations on unsprung-mass. The mechanical shock tests should be run at Tmin when lead-free solder is used in the most severe applications. • Flux residues from lead-free solder may be more inclined to produce ionic contamination when compared to lead based fluxes, and special attention should be given to the frost and humidity testing of lead-free solder assemblies. • Lead contamination in lead-free solder processes leads to intermetallic formations, resulting in further reduction of fatigue life of solder joints. Therefore, the mixing of leaded and lead-free technologies on the same circuit board, or within the same manufacturing environment, should be avoided (but is not forbidden). The use of lead-free components soldered onto a circuit board with leaded solder generally does not create a problem. One notable exception occurs when bismuth (Bi) is involved. Bismuth-tin can be used as the tinning material for components and can be used for component attachment to circuit boards. The addition of bismuth in the tin alloy for circuit fabrication has the advantage of a reduced melting point, thus reducing the temperature that the components will experience. However, bismuth combines with lead and tin to form a ternary phase material with a very low melting point of only 960C. This low melting point material is formed at attachment points and represents a significant risk for automotive applications. The addition of bismuth is also discouraged because it is a by-product of the lead mining industry. • A detrimental tin based phenomenon, known as “Tin Whisker Formation”, is most noticeable in lead-free solder. Internally developed compressive stresses from the cooling process or the diffusion of copper into tin, can cause tin whiskers to form as compressive stresses are reduced. This phenomenon will occur without any special environmental condition being imposed. Parts “on the shelf” at room temperature will develop tinwhisker formation almost as quickly as parts in service. Components that are soldered lead-free to the circuit board should have a boundary layer (an example would be nickel-plating) between the copper and the tin. The boundary layer will significantly reduce tin whisker formation by reducing the diffusion of copper into tin. • A second tin based phenomenon, known as “Tin-Pest”, is also possible when the tin is not protected. Wart-like formations on the tin will begin to appear in cold temperatures and will degrade the tin into a gray powder. GENERAL MOTORS CORPORATION – EDSON - 2008 280 The “tin-pest” phenomenon is cold temperature driven starting at (–130C) and reaches a maximum reaction rate at (–300C). The phenomenon can be eliminated as long as there are minute traces of lead in the tin. Four nine’s tin (extremely pure) should not be pursued as this will be more susceptible to Tin-Pest. 281 • No acceleration factor for thermal shock is to be applied to Lead-free solder14. Thermal shock does continue to be a desirable method for obtaining more thermal cycles per unit of time and will continue to be used per this specification. • Lead-free solder requires a longer hot and cold dwell than does leaded solder for creep to occur13.. While this has little bearing on field usage, it has a significant effect when lab based accelerated thermal cycling is used to evaluate fatigue life. Lead-free solder requires three times the dwell duration as does leaded solder to achieve optimum damage per unit of test time. Research14 has shown that a 10-minute dwell period is optimum for lead-free solder. The calculations shown in Appendix “E” provide an example for designing the thermal cycle testing for an interior module. GENERAL MOTORS CORPORATION – EDSON - 2008 Appendix F – Lead-Free Solder Guidelines for Thermal Shock Testing and Power Temperature Cycle Testing Understanding The Source Of Total Damage During Thermal Cycling In The Lab For Lead-Free Solder: The damage developed during thermal cycling is the product of four components. The acceleration factors from these four components are multiplied together to form the total acceleration factor used in testing: Increased strain resulting from extended thermal range applied in test (CoffinManson Equation). 2.65 ∆Ttest Coffin-Manson Acceleration Factor = ∆Tfield A dwell period at the end of each change of temperature allows the continuation of creep to occur within the solder until the stresses resulting from the temperature change have dissipated. The effect of testing with less dwell time than would occur in the hands of the customer must be comprehended in the calculations. Longer dwell times will result in more damage per cycle. However, damage accumulation is not linear with time. There is a diminishing level of damage accumulation with time and the optimum dwell time needed for “maximum damage per unit of time” for lead-free solder is approximately three times that needed for leaded solder. The optimum dwell period of lead-free solder is 10 minutes. Empirical testing has shown that the acceleration factor resulting from a decreased dwell period is: .136 Dwell Time test Dwell Time Acceleration Factor = Dwell Time field The rate of change of temperature has a small effect on lead-free solder. More damage is created with a slow ramp rate than with a fast ramp rate. This is the exact opposite of what occurs with leaded-solder. The effect of the ramp rate is defined in the following equation: Ramp Rate Acceleration Factor = 1.22 × ( Ramp Rate ) −.0757 The highest temperature reached during thermal cycling can have a significant effect on damage accumulation. Given equal thermal cycling ranges, the range with the highest temperature will generate the most damage. The acceleration factor that reflects this effect is as follows: Highest Temperature Acceleration Factor = e 1 1 2185× − T + T + 273 273 test max field max These acceleration factors are multiplied together in the following equation to be used as a devisor to reduce the number of thermal cycles defined by the Service Life. The total acceleration factor equation appears as follows: GENERAL MOTORS CORPORATION – EDSON - 2008 282 Equation 4 Lead-Free Acceleration Factor ∆Ttest Total Acceleration Factor = ∆Tfield 2.65 .136 Dwell timetest × Dwell timefield × 1.22 × ( ramprate ) −.0757 × e 1 1 2185× − Tfield max + 273 Ttest max + 273 Service Life Defined: The life of the E/E device has been defined as: 7300 thermal cycles with a service temperature change of: Delta-T = 43 °C for passenger compartment (45 minute dwells) Delta-T = 69 °C for underhood environments (45 minute dwells) Delta-T = 98 °C for on-engine applications (45 minute dwells) The 7300 cycles for one life is derived from cumulative damage modeling considering that each cycle may be of a different duration. For simplicity sake, the 7300 thermal cycles may also be expressed as “two cold starts per day for ten years” (2 X 365 X 10). The customer usage, as described above, allows for 45-minute dwell periods, hot and cold and this should be considered the “worst case”. Testing with shorter dwell periods will accumulate only a portion of the damage that would have been created by the customer with a 45-minute dwell. Acceleration Factor Defined: An acceleration factor is defined by the following equation. Life Duration Normal Acceleration Factor = Life Duration Accelerated This equation is transformed as follows: Life Duration Accelerated = Life Duration Normal Acceleration Factor Example for an Interior Module: We have used the following assumptions or calculated parameters: Tmax field = 850 Field Delta-T = 430 Tmax test-thermal shock = 950 (Notice that we are testing to a higher temperature during thermal shock to accelerate the test!) Tmin 283 test-thermal shock = -400 GENERAL MOTORS CORPORATION – EDSON - 2008 Tmax test-PTC = 850 (Notice that we are testing to the standard Tmax value during PTC and not the higher temperature as used in thermal shock because we will have the part functioning and it will be continuously monitored) Tmin test-PTC = -400 Thermal ramp rate thermal shock Thermal ramp rate PTC = 150C/min. = 70C/min. Thermal shock inertia lag in minutes = 5 Power Temperature Cycling inertia lag in minutes = 5 “m” = 2.65 (Notice that the “m” value for lead-free is higher than the (2.5) value used for leaded-solder) Weibull Slope (Beta) = 2 (A conservative value is being used because there could be many different locations where failure could occur) Sample size is = 18 Thermal Shock Step 1 Lead-Free: Partitioning One Field Service Life Damage Into The Thermal Shock Damage Target and The PTC Damage Target We wish to generate 75% of the total damage using thermal shock in the interest of faster and less expensive testing: 7300 × 75% = 5475 Thermal Cycles Thermal Shock Step 2 Lead-Free: Applying The Coffin-Manson Equation To The 75% Damage To Reduce The Number Of Thermal Cycles With Increased Thermal Range Testing We wish to generate an equivalent degree of damage using fewer cycles but will offset the fewer cycles with greater strain using expanded thermal range testing. The specification is –400C to +850C (delta-T of 1250C), however, in thermal shock we are generating thermal fatigue damage with the device unpowered and can use an expanded temperature range. We can extend the low temperature down to the Homologous Temperature point, and we can increase the high temperature, provided we do not exceed material limits. The product in this example can withstand –400C to +950C (Delta-T is 1350C) and we will use this “beyond specification” thermal test range to decrease the number of thermal cycles required on test. The Coffin-Manson Equation gives us the equivalent damage relationship: GENERAL MOTORS CORPORATION – EDSON - 2008 284 ∆T Test Coffin-Manson Acceleration Factor = ∆T field m Note: m = (2.65) for lead-free solder. Solder represents “worst case” in terms of the “m” values and that will be the target material used in this document. ∆T test Coffin-Manson Acceleration Factor = ∆T field m 135 = 43 2.65 = 20.73448 Thermal Shock Step 3 Lead-Free Solder: Applying The Acceleration Factor For Dwell Time Effect To The Thermal Shock Cycles We are using an optimum “damage per unit of time” dwell period during testing of 10 minutes both hot and cold. While this is optimum on a per-unit of time basis, it does not encompass all of the damage that would have been generated by the severe customer using a longer dwell period. The following acceleration factor accounts for the lost damage with a shorter dwell period: .136 Dwell Time test Dwell Time Acceleration Factor = Dwell Time field .136 10 Dwell Time Acceleration Factor = = .815 45 Thermal Shock Step 4 Lead-Free: Acceleration Factor Resulting From The Thermal Ramp Rate The thermal ramp rate used in making the temperature transitions has a small effect on lead-free solder. I have included the equation for this effect for completeness of the model. This factor is derived from the modeling work of J.P. Clech and is shown in figures 14a of reference (14). Slower ramp rates will result in an acceleration factor for lead-free solder while faster ramp rates will result in an acceleration factor for leaded-solder. Ramp Rate Acceleration Factor = 1.22 × ( Ramp Rate ) −.0757 Ramp Rate Acceleration Factor = 1.22 × ( 15 ) −.0757 = .9697 Thermal Shock Step 5 Lead-Free: Acceleration Factor For The Maximum Temperature Used During Testing 285 GENERAL MOTORS CORPORATION – EDSON - 2008 The maximum temperature used during testing can have a significant effect on the amount of creep that occurs during the thermal transition. Creep occurs much faster at higher temperatures. In this example, we will use a 950 high temperature during thermal shock to accelerate the test, and we are not worried about functioning at this temperature because we do not energize the device during thermal shock. Highest Temperature Acceleration Factor = e Highest Temperature Acceleration Factor = e 1 1 2185× − T + 273 T + 273 field max test max 1 1 2185× − 85 + 273 95 + 273 = 1.1804 Thermal Shock Step 6 Lead-Free: Total Multiplication of Acceleration Factors ∆T AF = t ∆Tf 2.65 Dwell timetest × Dwell timefield .136 −.0757 × e × 1.22 × ( ramprate ) 1 1 2185× − Tfield max + 273 Ttest max + 273 Combined Acceleration Factor = 20.73448 × .815 × .9697 × 1.1804 = 19.344 Number of Cycles = 5475 = 283.03 19.344 Thermal Shock Step 7 Lead-Free: Accounting For The Reduced Sample Size We must now increase this value by 1.124 to compensate for the fact that we are only using 18 parts instead of 23 parts (see appendix “B” for calculations): Final Number of Thermal Shock Cycles = 283.03 × 1.124 = 318.24 Cycles PTC Step 8 Lead-Free: Applying The Coffin-Manson Equation To The Remaining 25% Damage Now we need to address the remaining 25% of the damage, and this will be accomplished using Power Temperature Cycling (PTC), which permits constant monitoring. Thermal shock does not permit monitoring or product activation as the parts are transported back and forth between two different chambers. The PTC test keeps the parts stationary with the single thermal chamber producing a slower rate of temperature change on the part than does thermal shock. The 25% portion of the damage is as follows: 7300 − 5475 = 1825 PTC Cycles GENERAL MOTORS CORPORATION – EDSON - 2008 286 We will use the Coffin-Manson Acceleration Factor Equation to reduce the number of thermal cycles while increasing the strain with increased thermal cycling range. The PTC test generates damage but is also most critical in detecting problems. The product must be operated and monitored at all times during the PTC test. We will use the specification level temperature requirements of –400C to +850C (Delta-T = 1250C) for this test because the product will be functioning and constantly monitored during the test: PTC Step 9 Lead-Free: Applying The Coffin-Manson Equation To The 25% Damage PTC Cycles To Reduce The Number Of Thermal Cycles With Increased Thermal Range Testing We wish to generate an equivalent degree of damage using fewer cycles but will offset the fewer cycles with greater strain using expanded thermal range testing. The specification is –400C to +850C (delta-T of 1250C). The CoffinManson Equation gives us the equivalent damage relationship: ∆T Test Coffin-Manson Acceleration Factor = ∆T field m Note: m = (2.65) for lead-free solder. Solder represents “worst case” in terms of the “m” values and that will be the target material used in this document. ∆T test Coffin-Manson Acceleration Factor = ∆T field m 125 = 43 2.65 = 16.909 PTC Step 10 Lead-Free Solder: Applying The Acceleration Factor For Dwell Time Effect To The PTC Cycles We are using an optimum “damage per unit of time” dwell period during testing of 10 minutes both hot and cold. While this is optimum on a per-unit of time basis, it does not encompass all of the damage that would have been generated by the severe customer using a longer dwell period. The following acceleration factor accounts for the lost damage with a shorter dwell period: .136 Dwell Time test Dwell Time Acceleration Factor = Dwell Time field .136 10 Dwell Time Acceleration Factor = = .815 45 287 GENERAL MOTORS CORPORATION – EDSON - 2008 PTC Step 11 Lead-Free: Acceleration Factor Resulting From The Thermal Ramp Rate The thermal ramp rate used in making the temperature transitions has a small effect on lead-free solder. I have included the equation for this effect for completeness of the model. This factor is derived from the modeling work of J.P. Clech and is shown in figures 15a of reference (14). Slower ramp rates will result in an acceleration factor for lead-free solder while faster ramp rates will result in an acceleration factor for leaded-solder. Ramp Rate Acceleration Factor = 1.22 × ( Ramp Rate ) −.0757 Ramp Rate Acceleration Factor = 1.22 × ( 7 ) −.0757 = 1.02735 PTC Step 12 Lead-Free: Acceleration Factor For The Maximum Temperature Used During Testing The maximum temperature used during testing can have a significant effect on the amount of creep that occurs during the thermal transition. Creep occurs much faster at higher temperatures. In this example, we will use a 950 high temperature during thermal shock to accelerate the test, and we are not worried about functioning at this temperature because we do not energize the device during thermal shock. Highest Temperature Acceleration Factor = e 1 1 2185× − Tfield max + 273 Ttest max + 273 Highest Temperature Acceleration Factor = e 1 1 2185× − 85 + 273 85 + 273 =1 PTC Step 13 Lead-Free: Total Multiplication of Acceleration Factors ∆T AF = t ∆Tf 2.65 Dwell timetest × Dwell timefield .136 −.0757 × e × 1.22 × ( ramprate ) 1 1 2185× − Tfield max + 273 Ttest max + 273 Combined Acceleration Factor = 16.909 × .815 × 1.02735 × 1 = 14.158 Number of Cycles = 1825 = 128.9 14.158 GENERAL MOTORS CORPORATION – EDSON - 2008 288 PTC Step 14 Lead-Free: Accounting For The Reduced Sample Size We must now increase this value by 1.124 to compensate for the fact that we are only using 18 parts instead of 23 parts (see appendix “B” for calculations): Final Number of PTC Cycles = 128.9 × 1.124 = 144.9 Cycles The combined Thermal Shock plus Power Temperature Cycle testing should take approximately 2.5 weeks if the thermal chambers are used 24 hours per day. Lead-Free Summary: The same set of 18 parts will receive 318 Thermal Shock Cycles and will also receive 145 Power Temperature Cycles. The Validation Engineer’s Poem - “The Deacon’s Masterpiece Or The Wonderful One-Hoss-Shay” Oliver Wendell Homes Senior (1809-1894) Have you heard of the wonderful one-hoss shay, That was built in such a logical way It ran a hundred years to a day, And then of a sudden it -- ah, but stay, I'll tell you what happened without delay, Scaring the parson into fits, Frightening people out of their wits, -Have you ever heard of that, I say? Seventeen hundred and fifty-five. Georgius Secundus was then alive, -Snuffy old drone from the German hive. That was the year when Lisbon-town Saw the earth open and gulp her down, And Braddock's army was done so brown, Left without a scalp to its crown. It was on that terrible Earthquake-day That the Deacon finished the one-hoss shay. Now in building of shaises, I tell you what, There is always a weakest spot, -In hub, tire, felloe, in spring or thill, In pannel or crossbar, or floor, or sill, In screw, bolt, throughbrace, -- lurking still, Find it somewhere you must and will, -Above or below, or within or without, -And that's the reason, beyond a doubt, That a chaise breaks down, but doesn't wear out. But the Deacon swore (as deacons do, With an "I dew vum," or an "I tell yeou") He would build one shay to beat the taown 'n' the keounty 'n' all the kentry raoun'; It should be so built that it couldn' break daown: "Fer," said the Deacon, "'t's mighty plain Thut the weakes' place mus' stan' the strain; 'n' the way t' fix it, uz I maintain, is only jest 'T' make that place uz strong uz the rest." So the Deacon inquired of the village folk Where he could find the strongest oak, That couldn't be split nor bent nor broke, -That was for spokes and floor and sills; 289 H e s e n t fo r la n c ew o o d to m a k e th e th ills ; T h e c r o s s b a r s w er e a s h , fr o m th e th e s tr a ig h te s t tr e es T h e p a n n e ls o f w h itew o o d , th a t c u ts lik e c h e es e , B u t la s ts lik e ir o n fo r th in g s lik e th es e; T h e h u b s o f lo g s fr o m th e "S ettle r 's ellu m ," -L a s t o f it s tim b er , -- th e y c o u ld n 't s e ll 'em , N e v e r n o a x e h a d s ee n th e ir c h ip s , A n d th e w e d g e s fle w fr o m b e tw e en th eir lip s , T h e ir b lu n t en d s fr iz z led lik e c e le r y -tip s ; S te p a n d p r o p -ir o n , b o lt a n d s c r e w , S p r in g , tir e , a x le , a n d lin c h p in to o , S te el o f th e fin es t, b r ig h t a n d b lu e ; T h r o u g h b r a c e b is o n -s k in , th ic k a n d w id e ; B o o t, to p , d a s h er , fr o m to u g h o ld h id e F o u n d in th e p it w h e n th e ta n n er d ied . T h a t w a s th e w a y h e "p u t h e r th r o u g h ," "T h e r e !" s a id t h e D e a c o n , "n a o w s h e'll d e w !" D o ! I tell y o u , I r a th e r g u es s S h e w a s a w o n d er , a n d n o th in g les s ! C o lts g r ew h o r s e s , b e a r d s tu r n e d g r a y , D e a c o n a n d d ea c o n es s d r o p p e d a w a y , C h ild r e n a n d g r a n d c h ild r e n -- w h e r e w er e th ey ? B u t th er e s to o d th e s to u t o ld o n e-h o s s s h a y A s fr es h a s o n L is b o n -e a r th q u a k e-d a y ! E IG H T E E N H U N D R E D ; -- it c a m e a n d fo u n d T h e D e a c o n 's m a s te r p iec e s tr o n g a n d s o u n d . E ig h te en h in d r ed in c r e a s e d b y ten ; -"H a h n s u m k er r id g e" th e y c a lled it th en . E ig h te en h u n d r e d a n d t w e n ty c a m e ; -R u n n in g a s u s u a l; m u c h th e s a m e . T h ir ty a n d fo r ty a t la s t a r iv e, A n d th en c o m e fifty a n d F IF T Y -F IV E . L ittle o f a ll w e v a lu e h e r e W a k es o n th e m o r n o f its h u n d r ed th y e a r W ith o u t b o th fe elin g a n d lo o k in g q u ee r . In fa c t , th er e's n o t h in g th a t k ee p s it s y o u th , S o fa r a s I k n o w , b u t a tr e e a n d t r u th . (T h is is a m o r a l th a t r u n s a t la r g e ; T a k e it . -- Y o u 'r e w e lc o m e . -- N o e x tr a c h a r g e .) F IR S T O F N O V E M B E R , -- th e E a r th q u a k e -d a y , -T h e r e a r e tr a c es o f a g e in th e o n e-h o s s s h a y , A g e n e r a l fla v o r o f m ild d e c a y , B u t n o th in g lo c a l, a s o n e m a y s a y . T h e r e c o u ld n 't b e, -- fo r th e D e a c o n 's a r t Had made it so like in every part That there wasn't a chance for one to start. For the wheels were just as strong as the thills And the floor was just as strong as the sills, And the panels just as strong as the floor, And the whippletree neither less or more, And the back-crossbar as strong as the fore, And the spring and axle and hub encore. And yet, as a whole, it is past a doubt In another hour it will be worn out! First of November, fifty-five! This morning the parson takes a drive. Now, small boys get out of the way! Here comes the wonderful one-hoss shay, Drawn by a rat-tailed, ewe-necked bay. "Huddup!" said the parson. -- Off went they. The parson was working his Sunday's text, -Had got to fifthly, and stopped perplexed At what the -- Moses -- was coming next. All at once the horse stood still, Close by the meet'n'-house on the hill. First a shiver, and then a thrill, Then something decidedly like a spill, -And the parson was sitting upon a rock, At half past nine by the meet'n'-house clock, -Just the hour of the earthquake shock! What do you think the parson found, When he got up and stared around? The poor old chaise in a heap or mound, As if it had been to the mill and ground! You see, of course, if you're not a dunce, How it went to pieces all at once, -All at once, and nothing first, -Just as bubbles do when they burst. End of the wonderful one-hoss shay. Logic is logic. That's all I say. GENERAL MOTORS CORPORATION – EDSON - 2008 Appendix G – Leaded-Solder Guidelines for Thermal Shock and Power Temperature Cycle Testing Understanding The Source Of Total Damage During Thermal Cycling In The Lab For Leaded-Solder The damage developed during thermal cycling is the product of four components. The acceleration factors from these four components are multiplied together to form the total acceleration factor used in testing: Increased strain resulting from extended thermal range applied in test (CoffinManson Equation). 2.5 ∆Ttest Coffin-Manson Acceleration Factor = ∆Tfield A dwell period at the end of each change of temperature allows the continuation of creep to occur within the solder until the stresses resulting from the temperature change have dissipated. The effect of testing with less dwell time than would occur in the hands of the customer must be comprehended in the calculations. Longer dwell times will result in more damage per cycle. However, damage accumulation is not linear with time. There is a diminishing level of damage accumulation with time and the optimum dwell time needed for “maximum damage per unit of time” for leaded-solder is approximately 4 minutes. Empirical testing has shown that the acceleration factor resulting from a decreased dwell period is: Dwell Time Acceleration Factor = .768 × ( minutes ) .0667 The rate of change of temperature does not have a very large effect, however, unlike lead-free solder, a faster ramp rate represents test acceleration at the molecular level. Ramp Rate Acceleration Factor = .80094 × ( Ramp Rate ) .0964 The highest temperature reached during thermal cycling can have a significant effect on damage accumulation. Given equal thermal cycling ranges, the range with the highest temperature will generate the most damage. This effect with leaded solder is less pronounced than it is with lead-free solder. The acceleration factor that reflects this effect is as follows: Highest Temperature Acceleration Factor = e 1 1 1414× − Tfield max + 273 Ttest max + 273 These acceleration factors are multiplied together in the following equation to be used as a devisor to reduce the number of thermal cycles defined by the Service Life. The total acceleration factor equation appears as follows: GENERAL MOTORS CORPORATION – EDSON - 2008 290 Equation 5 Leaded-Solder Acceleration Factor 2.5 ∆T Total Acceleration Factor leaded-solder = test ∆Tfield × .768 × ( dwell minutes ) .0667 × .80094 × ( ramprate ).0964 × e 1 1 1414× − Tfield max + 273 Ttest max + 273 Service Life Defined: The life of the E/E device has been defined as: 7300 thermal cycles with a service temperature change of: Delta-T = 43 °C for passenger compartment Delta-T = 69 °C for underhood environments Delta-T = 98 °C for on-engine applications The 7300 cycles for one life is derived from cumulative damage modeling considering that each cycle may be of a different duration. For simplicity sake, the 7300 thermal cycles may also be expressed as “two cold starts per day for ten years” (2 X 365 X 10). The customer usage, as described above, allows for 45-minute dwell periods, hot and cold and this should be considered the “worst case”. Testing with shorter dwell periods will accumulate only a portion of the damage that would have been created by the customer with a 45-minute dwell. Acceleration Factor Defined: An acceleration factor is defined by the following equation. Life Duration Normal Acceleration Factor = Life Duration Accelerated This equation is transformed as follows: Life Duration Accelerated = Life Duration Normal Acceleration Factor Example for an Interior Module: We have used the following assumptions or calculated parameters: Tmax field = 850 Field Delta-T = 430 Tmax test-thermal shock = 950 (Notice that we are testing to a higher temperature during thermal shock to accelerate the test!) Tmin 291 test-thermal shock = -400 GENERAL MOTORS CORPORATION – EDSON - 2008 Tmax test-PTC = 850 (Notice that we are testing to the standard Tmax value during PTC and not the higher temperature as used in thermal shock because we will have the part functioning and it will be continuously monitored) Tmin test-PTC = -400 Thermal ramp rate thermal shock Thermal ramp rate PTC = 150C/min. = 70C/min. Thermal shock inertia lag in minutes = 5 Power Temperature Cycling inertia lag in minutes = 5 “m” = 2.5 (Notice that the “m” value for lead-free is higher than the (2.5) value used for leaded-solder) Weibull Slope (Beta) = 2 (A conservative value is being used because there could be many different locations where failure could occur) Sample size is = 18 Thermal Shock Step 1 Leaded-Solder: Partitioning One Field Service Life Damage Into The Thermal Shock Damage Target and The PTC Damage Target We wish to generate 75% of the total damage using thermal shock in the interest of faster and less expensive testing: 7300 × 75% = 5475 Thermal Cycles Thermal Shock Step 2 Leaded-Solder: Applying The Coffin-Manson Equation To The 75% Damage To Reduce The Number Of Thermal Cycles With Increased Thermal Range Testing We wish to generate an equivalent degree of damage using fewer cycles but will offset the fewer cycles with greater strain using expanded thermal range testing. The specification is –400C to +850C (delta-T of 1250C), however, in thermal shock we are generating thermal fatigue damage with the device unpowered and can use an expanded temperature range. We can extend the low temperature down to the Homologous Temperature point, and we can increase the high temperature, provided we do not exceed material limits. The product in this example can withstand –400C to +950C (Delta-T is 1350C) and we will use this “beyond specification” thermal test range to decrease the number of thermal cycles required on test. The Coffin-Manson Equation gives us the equivalent damage relationship: GENERAL MOTORS CORPORATION – EDSON - 2008 292 ∆T Test Coffin-Manson Acceleration Factor = ∆T field m Note: m = (2.5) for leaded-solder. Solder represents “worst case” in terms of the “m” values and that will be the target material used in this document. ∆T test Coffin-Manson Acceleration Factor = ∆T field m 135 = 43 2.5 = 17.465 Thermal Shock Step 3 Leaded-Solder: Applying The Acceleration Factor For Dwell Time Effect To The Thermal Shock Cycles We are using an optimum “damage per unit of time” dwell period during testing of 10 minutes both hot and cold. While this is optimum on a per-unit of time basis, it does not encompass all of the damage that would have been generated by the severe customer using a longer dwell period. The following acceleration factor accounts for the lost damage with a shorter dwell period: Dwell Effect Acceleration Factor = .768 × ( minutes ) Dwell Effect Acceleration Factor = .768 × ( 4 ) .0667 .0667 = .842 Thermal Shock Step 4 Leaded-Solder: Acceleration Factor Resulting From The Thermal Ramp Rate The use of faster thermal ramp rates in making the temperature transitions on leaded-solder produces an acceleration factor greater than one. This factor is derived from the modeling work of J.P. Clech and is shown in figures 14a of reference (14). Slower ramp rates will result in an acceleration factor for leadfree solder while faster ramp rates will result in an acceleration factor for leaded-solder. Ramp Rate Acceleration Factor = .80094 × ( Ramp Rate ).0964 Ramp Rate Acceleration Factor = .80094 × ( 15 ).0964 = 1.04 Thermal Shock Step 5 Leaded-Solder: Acceleration Factor For The Maximum Temperature Used During Testing 293 GENERAL MOTORS CORPORATION – EDSON - 2008 The maximum temperature used during testing can have a significant effect on the amount of creep that occurs during the thermal transition. Creep occurs much faster at higher temperatures. In this example, we will use a 950 high temperature during thermal shock to accelerate the test, and we are not worried about functioning at this temperature because we do not energize the device during thermal shock. Highest Temperature Acceleration Factor = e Highest Temperature Acceleration Factor = e 1 1 1414× − Tfield max + 273 Ttest max + 273 1 1 1414× − 85 + 273 95 + 273 = 1.113 Step 6 Leaded-Solder: Total Multiplication of Acceleration Factors Total Acceleration Factor leaded-solder ∆T = t ∆Tf 2.5 × .768 × ( dwell minutes ) .0667 × .80094 × ( ramprate ).0964 × e 1 1 1414× − Tfield max + 273 Ttest max + 273 Acceleration Factor = 17.46 × .842 × 1.04 × 1.113 = 17.02 Number of Cycles = 5475 = 321.68 17.02 Thermal Shock Step 7 Leaded-Solder: Accounting For The Reduced Sample Size We must now increase this value by 1.124 to compensate for the fact that we are only using 18 parts instead of 23 parts (see appendix “B” for calculations): Final Number of Thermal Shock Cycles = 321.68 × 1.124 = 361.57 Cycles PTC Step 8 Leaded-Solder: Applying The Coffin-Manson Equation To The Remaining 25% PTC Cycling Damage Now we need to address the remaining 25% of the damage, and this will be accomplished using Power Temperature Cycling (PTC), which permits constant monitoring. Thermal shock does not permit monitoring or product activation as the parts are transported back and forth between two different chambers. The PTC test keeps the parts stationary with the single thermal chamber producing a slower rate of temperature change on the part than does thermal shock. The 25% portion of the damage is as follows: 7300 − 5475 = 1825 PTC Cycles GENERAL MOTORS CORPORATION – EDSON - 2008 294 We will use the Coffin-Manson Acceleration Factor Equation to reduce the number of thermal cycles while increasing the strain with increased thermal cycling range. The PTC test generates damage but is also most critical in detecting problems. The product must be operated and monitored at all times during the PTC test. We will use the specification level temperature requirements of –400C to +850C (Delta-T = 1250C) for this test because the product will be functioning and constantly monitored during the test: PTC Step 9 Leaded-Solder: Applying The Coffin-Manson Equation To The 25% PTC Cycle Damage To Reduce The Number Of Thermal Cycles With Increased Thermal Range Testing We wish to generate an equivalent degree of damage using fewer cycles but will offset the fewer cycles with greater strain using expanded thermal range testing. The specification is –400C to +850C (delta-T of 1250C). The CoffinManson Equation gives us the equivalent damage relationship: ∆T Test Coffin-Manson Acceleration Factor = ∆T field m Note: m = (2. 5) for leaded-solder. Solder represents “worst case” in terms of the “m” values and that will be the target material used in this document. ∆T test Coffin-Manson Acceleration Factor = ∆T field m 125 = 43 2.5 = 14.408 PTC Step 10 Leaded-Solder: Applying The Acceleration Factor For Dwell Time Effect To The PTC Cycles We are using an optimum “damage per unit of time” dwell period during testing of 4 minutes both hot and cold. While this is optimum on a per-unit of time basis, it does not encompass all of the damage that would have been generated by the severe customer using a longer 45-minute dwell period. The following acceleration factor accounts for the lost damage with a shorter dwell period: .0667 Dwell Effect Acceleration Factor = .768 × ( minutes ) Dwell Effect Acceleration Factor = .768 × ( 4 ) .0667 = .842 PTC Step 11 Leaded-Solder: Acceleration Factor Resulting From The Thermal Ramp Rate The thermal ramp rate used in making the temperature transitions has an effect on leaded-solder. This factor is derived from the modeling work of J.P. Clech 295 GENERAL MOTORS CORPORATION – EDSON - 2008 and is shown in figures 14a of reference (14). A faster ramp rate will result in an acceleration factor greater than one. Ramp Rate Acceleration Factor = .80094 × ( Ramp Rate ).0964 Ramp Rate Acceleration Factor = .80094 × ( Ramp Rate ).0964 = .966 PTC Step 12 Leaded-Solder: Acceleration Factor For The Maximum Temperature Used During Testing The maximum temperature used during testing can have a significant effect on the amount of creep that occurs during the thermal transition. Creep occurs much faster at higher temperatures. In this example, our test temperature is equal to the maximum field temperature and the resulting acceleration factor is one. Highest Temperature Acceleration Factor = e 1 1 2185× − Tfield max + 273 Ttest max + 273 Highest Temperature Acceleration Factor = e 1 1 2185× − 85 + 273 85 + 273 =1 PTC Step 13 Leaded-Solder: Total Multiplication of Acceleration Factors ∆Ttest Total Acceleration Factor leaded-solder = ∆Tfield 2.5 × .768 × ( dwell minutes ) .0667 × .80094 × ( ramprate ).0964 × e 1 1 1414× − Ttest max + 273 Tfield max + 273 Acceleration Factor = 14.41× .842 × .97 × 1 = 11.72 Number of Cycles = 1825 = 155.73 11.72 PTC Step 14 Leaded-Solder: Accounting For The Reduced Sample Size We must now increase this value by 1.124 to compensate for the fact that we are only using 18 parts instead of 23 parts (see appendix “B” for calculations): Final Number of PTC Cycles = 155.73 × 1.124 = 175 Cycles The combined Thermal Shock plus Power Temperature Cycle testing should take approximately 2.22 weeks if the thermal chambers are used 24 hours per day. Note: A spreadsheet is available from Larry Edson ([email protected]), which will perform all of the necessary calculations for leaded or lead-free solder, and will calculate the estimated total test time. GENERAL MOTORS CORPORATION – EDSON - 2008 296 Appendix H – Values For “m“ In The Coffin-Manson Equation ∆Tempaccelerated Material Acceleration Factor = ∆Tempnormal Leaded-Solder – General Use m Lead-Free Solder (SAC Solder Studied by Hewlett-Packard) Cu and Lead frame alloy (TAB) Note: The values shown Al wire bond represent the slope of the Au4Al fracture in wire bonds Stress-Life relationship line for each material. PQFP Delamination /Bond failure The use of the shallower Copper slope values inherent Au wire Downbond heel crack with solder will assure that adequate test ASTM 6061 Aluminum alloy duration is used, even Alumina fracture-bubble memory though this represents Inter layer Dielectric cracking longer test duration than Silicon fracture Si fracture (cratering) Thin Film cracking would be necessary for the other material types. m 2.5 2.65 2.7 3.5 4 4.2 5 5.1 6.7 5.5 5.5+/-0.7 5.5 7.1 8.4 Note: The values shown represent the slope of the Stress-Life relationship line for each material. The use of the shallower slope values inherent with solder will assure that adequate test duration is used, even though this represents longer test duration than would be necessary for the other material types. The following table identifies the engineers who, over the years, were responsible for empirically deriving the values for “m”. Source: Temperature Cycling and Thermal Shock Failure Rate Modeling, R.C. Blish, IEEE, IRPS, 1997 297 GENERAL MOTORS CORPORATION – EDSON - 2008 Appendix I – Guidelines for Vibration Testing With A Reduced Sample Size Equation 6 Multiple Life Testing When Using A Reduced Sample Size 1 ln (1 − C) β Test Hours reduced sample size =Test Hours normal sample size × n ln R × ( ) reduced This section is used to determine the sample size for the vibration tests if a success-run plan is chosen instead of the preferred test-to-failure method explained in Appendix “B”. The reduced sample size will increase the test duration, and then one can increase the “energy level” of the test, through higher Grms values, to reduce the test time back to a desired duration. For R = 0.97, C = 0.5, assumed Weibull slope of 2.5, and n = 12 (Two sets of six samples before and after temperature cycling) and the standard test time of 8 hours along each of the 3 each axes: ln(1 − .5) Hoursnew = Hoursold × n × ln ( . 97 ) new ln (1 − .5) Hours new = 8 × 12 × ln (.97 ) 1 2 .5 1 2.5 = 10.33 Thus, a reduction in sample size from 23 to 12 results in an increase in test time from 8 hours to 10.33 hours while the stress level (Grms) remains the same. Now one can reduce the test time back to 8 hours, or even less if we choose, with a necessary increase in energy level (Grms). The following example (sprung mass for a car vibration profile) uses the Accelerated Vibration Testing Equation to allow a reduction in test time through an increase in vibration energy level: Equation 7 Accelerated Vibration Stress-Life Equation Gaccelerated Gnormal m Test Timenormal = Test Timeaccelerated = TAF GENERAL MOTORS CORPORATION – EDSON - 2008 298 Where: Gnormal= The normal loading (Car example: 2.84 Grms) Gaccelerated= The accelerated test loading m = Material Fatigue Constant: 6.4 for aluminum leads1 in electronic assemblies, 5 for an overall usage value10, 4 for connector fatigue or fretting Corrosion1 problems, and 3.3 for highly accelerated vibration for metal fatigue (greater than 3X original stress). The supplier is responsible for documenting the source of the material fatigue factor used for the device under test. Grms accelerated Grms = Grms accelerated normal × m = 2.84 × Test Time Normal Test Time Accelerated 6.4 10.33 = 2.96 8 The results of this car example show the following: • 23 parts need from Success-Run Equation. • 12 parts will be used with a resulting increase in test time from 8 hours to 10.33 hours. • Test time reduced back to 8 hours with a resulting increase in Grms on test from 2.84 Grms to 2.96 Grms. The Power Spectral Density values can be proportionately adjusted upward to generate the desired accelerated Grms value by using the Adjustment Factor defined in the following equation: Equation 8 Adjustment Factor for Scaling PSD to Grms Grms accelerate d Grms normal 2 = Adjustment Factor This Adjustment Factor is multiplied times each frequency set point level to establish a new overall energy level increase to match the new required Grms value of (2.96). Most electro-dynamic shakers can produce a maximum peakto-peak displacement of one inch, and this becomes the limiting factor when 299 GENERAL MOTORS CORPORATION – EDSON - 2008 increasing the GRMS value. A safety factor of reduction from this value should be used to prevent damage to the shaker device. The peak-to-peak displacement of an electro-dynamic shaker is calculated with the following equation using the lowest frequency of the required spectrum: Equation 9 Electro-Dynamic Shaker Table Displacement 2 G / Hz. D = 42.8 × flowest 3 Just Like Vibration, Appearances Can Be Deceiving! When you go beyond Zebra, Who knows...? There's’no telling What wonderful things You might find yourself spelling! Like QUAN is for Quandary, who lives on a shelf In a hole in the ocean alone by himself And he worries, each day, from the dawn's’early light And he worries, just worries, far into the night. He just stands there and worries. He simply can't’stop..Is his top-side his bottom? Or bottom-side top? (Dr. Seuss – “On Beyond Zebra”) GENERAL MOTORS CORPORATION – EDSON - 2008 300 Appendix J - Guidelines For High Temperature Durability Testing Running the test at a temperature higher than Tmax can reduce the test time of 500 h or 2000 h for the high temperature durability test. The test acceleration factor, TAF, can be determined from the Arrhenius relationship. Equation 10 Arrhenius Equation For Accelerated Temperature Testing 1 1 1 TAF = exp × E a − 273 + Tmax 273 + Ttest k Where: k = Boltsmann’s Constant = (1.380 658 ± 0.000 012) x 10-23 J/K Ea = Average Conservative Activation Energy = 1.28 x 10⁻¹⁹ J = 0.8 eV Example 1: For Tmax = +85°C. and a test time of 500 hours Ttest = +105°C for fewer hours: 1.28 x10⁻¹⁹ 1 1 TAF = exp × − = 3.94 −23 1.38 x10 273 + 85 273 + 105 500 3.94 = 127 hours The test time can be reduced from 500 h to 127 h if the temperature is increased from +85°C to +105°C. If this method is used, the supplier is responsible for documenting the source of the activation energy. Example 2: For Tmax = +125°C. and a test time of 2000 hours Ttest = +140°C for fewer hours: 1.28 x10⁻¹⁹ 1 1 TAF = exp × − = 2.36 −23 1.38 x10 273 + 125 273 + 140 2000 2.36 = 848 hours The test time can be reduced from 2000 hours to 848 hours if the temperature is increased from +125°C to +140°C. If this method is used, the supplier is responsible for documenting the source of the activation energy. 301 GENERAL MOTORS CORPORATION – EDSON - 2008 Appendix K - Accelerated Humidity Testing The effect of Humidity results in a mixture of failure mechanisms that are intrinsic to automotive use. HAST is a highly accelerated humidity diffusion test that can only operate above 1060C. This test is intended for electronic circuit boards and electronic components. This test is not intended for plastic-electronic assemblies because the temperature in this test exceeds the service temperature for most common plastics. This high stress environment will accelerate the effects humidity and temperature according to the Arrhenius-Peck relationship as shown below. A HAST test operated at 1300C and 90+% R.H. provides the following acceleration factors: • • • 1 day of HAST is equivalent to 21 days of 850/85% or 1 day of HAST is equivalent to 97 days of 650/85% or 1 day of HAST is equivalent to 1414 days of 350/85% Ten years of the effect of humidity for the ingress of water vapor into components and circuit boards can be accomplish in approximately two days of HAST testing at 1300C and 90+% R.H. The use of the Arrhenius-Peck 5. stress-life math model suggests that this is equivalent in damage to 4656 hours of 650C at 85% R.H., or 194 days of constant humidity testing, as defined in this document. Equally damaging tests of “lower-temperature-longer-durations” are permitted through use of the Arrhenius-Peck relationship as noted below: Equation 11 Arrhenius-Peck Acceleration Factor For Temperature and Humidity Humidity Acceleration factor = Humidity -2.66 low high Ea × 1 − 1 × e K T1 T2 Where: K = Boltsmann’s Constant = (1.380 658 ± 0.000 012) x 10-23 J/K or k = (8.6173 X 10 –5 eV·K) –1 Ea = Average Conservative Activation Energy = 1.28 x 10⁻¹⁹ J Ea= (0.8 eV) T2 = Higher Temperature (on test) T1 = Lower Temperature (ambient) Temperature is in Degrees Kelvin (Celsius plus 273) and humidity is in “% RH” GENERAL MOTORS CORPORATION – EDSON - 2008 302 Appendix L – Relationship of “Reliability On Test” To “Reliability In The Field And Design Margins Test To Field Correlation: The tests included in this specification are based on a severe user. The reliability that is required (.97) is based on these “severe user“ tests. The expected reliability of the product in the hands of the normal array of users is greater than what is demonstrated on test. Benchmarking activities where used to identify the level of reliability that was required in the field (.995), and the reliability on test (.97) was derived from that benchmarking effort. The following table provides an example of the test-to-field correlation for electronic products: The reliability of the device can be demonstrated analytically for the failure mechanisms of vibration and/or thermally induced fatigue. Special note: Weaknesses that were not anticipated during analysis may exist in the product and cause premature failures. Testing must occur to ensure that unexpected weaknesses are not present. Vibration: The analysis process must simulate the vibration procedure in the design validation section to demonstrate the reliability requirement for vibration. A good example of this process is explained in detail for a bracket in Appendix “N”. The process includes converting a long-duration-low-stress test into a higher stress test of much shorter duration. The stress under the short duration test is defined and then mapped against the S-N curve for the material being stressed. The three sigma levels of stress are included in this mapping using Miner’s Rule. Table (34) is used to determine what portion of the total life available will be “used up” by the summed combination of the three different sigma stress levels. Thermal Fatigue: The analysis procedure must simulate the thermal shock and power temperature procedures in the design validation section to demonstrate the reliability requirements. Example of Using Test To Field Correlation: Assume the situation of a test designed for the “severe user”, with a Customer Variability Ratio (CVR) of 3, and a failure distribution Weibull Slope of 2. Passing the reliability requirements of 97% on test, converts to reliability in the “field” of 99.5%. The “field” is composed of a wide array of severity users, some severe and some not so severe. The reliability in the field will theoretically be better than the reliability that was demonstrated on test. 303 GENERAL MOTORS CORPORATION – EDSON - 2008 Table 36 Test to Field Correlation Values Test is equivalent to a “severe user” under field conditions Adjusted Test Reliability at One Test Life Field Customer Variability Ratio (Severe User/Median User) – CVR Reliability 1 3 10 at One All Weibull Slope on Test (Beta) Weibull Slope on Test (Beta) Life Slopes 1 1.5 2 3 1 1.5 2 3 0.9999 0.99975 0.9995 0.99925 0.9999 0.99973 0.99958 0.99937 0.99876 0.99927 0.99854 0.99749 0.99484 0.99975 0.99932 0.99895 0.99844 0.99689 0.99827 0.99652 0.99404 0.98777 0.99865 0.99790 0.99686 0.99379 0.99660 0.99319 0.98833 0.97605 0.99925 0.99797 0.99685 0.99530 0.99068 0.99493 0.98986 0.98262 0.96449 0.9995 0.999 0.999 0.99730 0.99580 0.99373 0.98759 0.99327 0.98651 0.97696 0.95292 0.995 0.995 0.98652 0.97913 0.96896 0.93905 0.96689 0.93431 0.88924 0.77950 0.99 0.99 0.97314 0.95855 0.93861 0.88087 0.93461 0.87197 0.78735 0.59188 0.98 0.98 0.94670 0.91825 0.87995 0.77251 0.87238 0.75632 0.60883 0.31225 0.97 0.97 0.92068 0.87910 0.82395 0.67442 0.81321 0.65239 0.46181 0.14366 0.96 0.96 0.89507 0.84108 0.77055 0.58600 0.75695 0.55950 0.34324 0.05658 0.95 0.95 0.86987 0.80418 0.71970 0.50672 0.70357 0.47703 0.24967 0.01879 Design Margins: The analytical procedure must account for design variability. One method of accounting for variability is to assure that the life consumed during the analysis is less than the life multiples shown in the following table. The graphic entitled “How Can I Affect Reliability During Analysis?” in the section called “ADV Plan Overview” provides a deeper explanation as to how these numbers are derived. The following table provides the “multiple of life” that should be the target of design in order for the reliability objective to be achieved. Typical values are shown in bold. The design margin values in the right most column reflects the multiple of the specification that must be “design to” in order to achieve the intended test reliability level: Table 37 Design Margin Guidelines Test Reliability Weibull Slope 0.97 0.97 0.98 0.98 2 3 2 3 Minimum Design Margin for Simulation of GMW3172 Test 5.1 2.9 6.2 3.3 0.99 2 8.8 0.99 3 4.1 GENERAL MOTORS CORPORATION – EDSON - 2008 304 Appendix M - Plastic Snapfit Design Worksheet 1. The primary objective of the design should be to develop an interlocking integral attachment using engaging lugs in the direction of primary forces. The attachment strategy should utilize the engagement of interlocking lugs functioning in the primary direction of usage force. Plastic snapfit features should operate perpendicular to the primary direction of usage force to minimize stress on snapfit structure. Example: a sphere is made in two halves. The primary direction of force during use results in “pulling” the two halves apart. One could plan to snap the two halves together directly, but that would place primary forces on the snapfit features. The optimum strategy involves engaging the two halves through interlocking lugs with a small twisting motion. Radial snapfits would be designed to keep the lugs engaged. The snapfits must only resist an “unscrewing” motion, the least likely direction of usage force. • When an interlocking lug approach is not feasible because of motion constraints, a “hook and snapfit” should be considered. The hook is a very strong and robust retention feature that is also easy to mold. The hook acts as a retention feature, a locator, and controls the motion to better align the snapfit. The single snapfit completes the assembly. • When a hook-and-snapfit is not feasible because of motion constraints or geometry interferences, an over designed, minimum quantity snapfit system should be used. The “all snapfit approach” should be the last resort in the design strategy. 2. Ultimately, two different design forces will surface that must be specifically addressed in the design process. These two forces must be defined and understood before the design process can proceed. • The force that works to “disconnect” the attachment. • The force needed by a human being to assemble the attachment. a. The snapfit will, most probably, be required to retain a dynamically functioning force. This is certainly true in automotive applications. Vibration, usage forces, and the accidental “drop” must be comprehended by the retention requirement. First calculate the actual weight that the snapfit must hold and then calculate the “effective weight” that must be retained resulting from the dynamic effect of impact operating on that weight. Example: • 305 Retention force required under dynamic conditions • Our attachment must retain a 1 lb weight • 10 Gs are expected to operate on the 1 lb weight as a result of extreme pothole encounters. GENERAL MOTORS CORPORATION – EDSON - 2008 • • The retention force should be at least 10 times the weight of the part being retained (greater than 10 lbs retention force is required) My retention force requirement is:_______________________ lbs. b. Snapfits are generally designed to utilize a human assembly process. The forces required to repetitively make the assembly must be low enough to prevent human injury. The following forces have been established as upper limits by experts in the world of human factors for the following methods of assembly. The requirements are: • Allowable installation forces are not to exceed: • 27 Newtons (6 pounds) per hand • 11 Newtons (2.5 pounds) for a thumb • 9 Newtons (2 pounds) for a single finger • I expect that my assembly will be made using (one hand, two hands, finger, etc.) __________________________ • My maximum assembly force requirement is: ____________lbs. 3. Your assembly should not be allowed to move in any unwanted direction, and this includes rotation. You must document how you are controlling the motion of three axes of translation, and three axes of rotation. Show how you have constrained three translations and three rotations. Also show that you have not double constrained any rotation or translation. Multiple constraints in any one direction can create interference problems. 4. Establish whether this assembly will be designed for disassembly without damage. When disassembly is necessary, the snapfit geometries must allow for disassembly either through an applied force or by providing an access opening for a release tool. When the assembly is expected to come apart by applying force then the ramp angle that is used for retention must not exceed the “critical angle”. The critical angle is a value less than 90 degrees, but will act as if it was 90 degrees. If any value greater than the critical angle is used, the assembly will not come apart as desired. When a tool will be used to release the hook attachment, access must be provided and the use of a “limiter” is very important to ensure that the tool does not permanently damage the snapfit cantilever. • This assembly will be designed to be disassembled (yes or no?) ____________ 5. Identify the engineering parameters for the materials being used in this design. GENERAL MOTORS CORPORATION – EDSON - 2008 306 a. Identify the “permissible short term strain” for the plastic elements that will be experiencing strain during the flexing that occurs during assembly. The following are reasonable approximations for the basic types of plastic: • 1% for glass filled plastic • 2% for “ABS” • 2.5% for “ABS-Polycarbonate blend” • 3% for Polycarbonate • 4% for Acetyl and Nylon • 5% for “TPO” and polypropylene • The material that will be flexing in this design is:________________ • The maximum permissible strain for is:______________%. (Between 1 and 5 percent). this material b. Friction • Friction will be a critical factor in the forces necessary for assembly and for retention of serviceable designs. The “coefficient of friction” is a unit-less parameter (m) with a value between .2 and .8, with .5 a good average. • The expected coefficient of friction for the two materials that will be sliding against each other in this design is: __________________ 6. Engagement of the snapfit hook. • Adequate engagement of the snapfit hook is necessary to ensure robustness under conditions of dynamic loading, dirt, flash and dimensional variation. A Good Rule of Thumb for automotive applications: no less than two millimeters of engagement. Three to six millimeters is preferred for larger assemblies. • The larger engagements are necessary when there are strong dynamic forces working to disengage the parts. • The engagement that I believe is:_________________ mm. is necessary for this design 7. Effect of engagement variation on variation in force. • Situations that require “extra” control of variation in force to assemble should perform the following analysis: • 307 Variation in the degree of engagement will translate into variation in force needed to snap the assembly together. This translation GENERAL MOTORS CORPORATION – EDSON - 2008 between engagement variation and force variation can be calculated as follows: o Assume “k” is the spring constant that relates force of assembly to displacement of engagement feature as in force = k × displacement o Assume “4 times sigma displacement” is the range of variation expected 95% of the time in the engagement feature displacement and “sigma displacement” is the value we will use in our equation. o Assume 4 times sigma force” will be the range of variation expected 95% of the time in the assembly force o 4 times sigma force = 4 × k 2 × sigmadisplacement 2 o This variation (4 times sigma force ) will be centered about the nominal value calculated for the force to assemble • Smaller values of “k” will result in less variation. Smaller “k” values are often achieved through longer cantilevers. Many times, longer cantilevers are difficult to package due to space limitations and thus a compromise is established. 8. Environmental conditions. • The service temperature for the stressed plastic must be greater than the worst-case high temperature environmental conditions. • The high temperature condition is detrimental because it accelerates the creep phenomenon that may occur in continuously strained plastic. An automotive application will experience a maximum temperature either with the car running (underhood application), or parked in the Arizona sun (interior application). • The design margin for temperature is the service temperature minus the worst-case high temperature environmental temperature. The design margin should be a positive number, if not, either the material should be changed, the location changed to an area of a lower temperature, or the continuous stresses on cantilevers reduced to near zero. • The service temperature for the plastic that will be stressed in this design is ________ degrees C. • The worst-case temperature for the snapfit elements of this design is:______ degrees C. • The temperature design margin is ________ degrees C. 9. A compliant mechanism that absorbs looseness should be built into this design. This will prevent relative motion that creates squeaks and rattles GENERAL MOTORS CORPORATION – EDSON - 2008 308 while accommodating variation in parts. The compliant mechanism is usually accomplished in one of two ways. The angle of the locking ramp surface of the snap-fit feature provides the compliance, or a separate “spring like feature” is added to take up any looseness in the assembly. • 10. Show and explain the compliant mechanism that you have designed into this assembly to prevent squeaks and rattles. Quantify how much variation your compliant mechanism is capable of handling. Design The Actual Flexing Snapfit Feature The design strategy for the flexing cantilever should first address strain management and then forces. The following is a good process to follow: • Review the equations for strain and force when a cantilever is flexed. Note how some dimensions have a greater effect than others because they are squared or cubed in the equation. • Establish the amount of hook engagement desired for this application. • Establish the length of cantilever necessary for the amount of engagement planned. • 309 A good Rule of Thumb: the length of the cantilever should be 8 to 10 times the length of the hook engagement for plastics similar to ABS. • The thickness of the cantilever is often predetermined from wall thickness. When necessary (walls thicker than two millimeters), modifications to reduce the cantilever thickness should be considered to assist in controlling the strain in the cantilever. • Calculate the width of the cantilever to develop the forces desired. • Altering the width generally does not affect the strain in the cantilever, but does affect the forces. Increasing the width will increase the force proportionally, and vice versa. • Use thickness tapering and width tapering to make your design more efficient. See the tapering section in the references for the suggested ratio of the taper (usually 2 to 1). Tapering can be helpful when attempting to obtain the greatest degree of flexure from a short cantilever. • The forces that the flexing cantilever will exert depend on the plastic material being used. The Secant Modulus is a characteristic of the plastic and is used to determine how much force a particular type of plastic will exert in a flexing situation. Secant Modulus values for various plastics can be found in the reference material. • The equations necessary to perform the following are available in reference (11) Design Of Integral Attachments And Snapfit Features In Plastic. Commercial software is also available to improve the accuracy and speed of this analytical process. GENERAL MOTORS CORPORATION – EDSON - 2008 • Show the math that predicts the forces to assemble and disassemble. • Show the math that allows for disassembly, if disassembly is a requirement. • Show the math that predicts that the strain in the plastic will be less than the maximum permissible strain. This strain generally occurs during the time of maximum deflection during assembly. • Show the math that dictates the ramp angles for engagement and disengagement of the snapfit feature. Detail the profile of the ramps on the snapfits. • Show the math that dictates the dimensions and all proportions of the flexed snapfit feature. 11. Engineering is always a compromise. Write down what you believe are the two most prominent weaknesses of this snapfit attachment design, even though you have rigorously engineered this assembly. This information will assist the design team in understanding what key dimensions or handling/packaging considerations should receive special attention during manufacturing 12. “Guides” Should Be Employed To Act As Alignment Tools Outside Of The Snapfit Process The guide system should provide the effect of “fitting a shaft into a large cone”. Guides should provide full control of motion prior to the engagement of any snapfits. Guides are often used in a cumulative manner as explained in the following “Good Example”. • Good Example: The first guide is easily seen by the operator, and positions the engagement process in one axis. A second guide is engaged following the first, and begins to control rotation. No remaining attention must be given to alignment, and the operator has only to concentrate on insuring complete snapfit engagement through tactile/audible feedback. • Bad Example: A speaker grille is to be snapfit attached to a door inner panel. No guides are employed, and there are 12 snapfits around the perimeter that must be engaged, all at the same time. Placing the grille against the door obscures all vision of the snapfit engagements and the operator is left wondering if all 12 attachments were completed. • Identify the guide system you are employing and explain how it fully aligns the snapfits prior to their engagement. 13. Snapfits Often Lack Structural Robustness As A Result Of The Requirement To Flex During Assembly. An Additional Feature Can Be Added, Known As A “Limiter”, Which Protects The Snapfit Feature From Overextension Or Damage GENERAL MOTORS CORPORATION – EDSON - 2008 310 Damage can occur from the use of pry tools, shipping forces, or warpage occurring from the stacking of hot parts right out of the mold. See the figure below for an example of a “limiter”. The “limiter” can also become a “guide”, thus serving two functions. Identify and explain your use of limiters. If you will not be using a limiter then you must explain why not! Figure 50 Limiter Example Used In Snapfit Design Limiter and Guide Combination Cantilever Example of a Limiter Snapfit Release Access Hole The places I took him! I tried hard to tell Young Conrad Cornelius 'D‘nald 'D‘ll A few brand-new wonderful words he might spell. I led him around and I tried hard to show There are things beyond Z that most 311 people don't’know. I took him past Zebra. As far as I could. And I think, perhaps, maybe I did him some good... (Dr. Seuss – “On Beyond Zebra”) GENERAL MOTORS CORPORATION – EDSON - 2008 Appendix N – Hardware-Software Functional Robustness Testing Processor Supervisor Performance Evaluation Purpose: This procedure is intended to verify that that the system supervisor circuit was correctly implemented and is effective in recognizing faults and initiating corrective action attempts. Digital micro-processing devices use a “Dead-ManLike-Switch” supervision circuit known as a “Watchdog or “COP” (Computer Operating Properly) to monitor for the continued presence of a State of Health (SOH) indicator signal. To ensure that disruptions and faults can be rapidly detected and corrected, the supervisor circuit monitors special pulses sent by the microprocessor. Programmed pulses are sent by the microprocessor within specified time intervals as the result of hand shaking typically between timing interrupt routines and the main programming loop. If the supervisor is not toggled within the pre-defined time period, it is assumed that the processor is hung up or executing an endless loop. The supervisor then generates a pulse to the processor to warn that a fault has occurred, typically this directly or indirectly triggers a system reset. The reset process also triggers a diagnostics counter that documents the number of COP triggered resets over a specified number of system power up activation cycles. Preparation: This procedure only applies to devices with digital processors. Prior to performing this procedure a design review of the hardware and software of the supervisor system is to be performed with GM to ensure the basic design is correctly implemented. NOTE: It is unacceptable for both the SOH (positive going (Low-High) and negative going (High-Low) pulse events to be triggered by the same subroutine called from the same software structure. Achieving comprehensive processor and programming SOH coverage requires that one side of the SOH Signal is called from the main programming or operating system loop, and the reciprocating signal is called from an a interrupt triggered routine. Test Set up: The test procedure requires one production intent device, a system simulator, and an oscilloscope monitoring the device’s internal supervisor circuit stimulation input and reset trigger output signals. These are monitored for each processor element (Micro-controller, Microprocessor, Digital Signal Processor (DSP), Display processor, etc.) included in the EE Device. For each processing unit in the device, perform the following: prepare and load programming with test code that can be triggered by an operator command to separately disable each software handshaking element of the SOH stimulation signal. GENERAL MOTORS CORPORATION – EDSON - 2008 312 Procedure and Criteria: 1) With the device operating in a normal condition, disable the SOH stimulation signal from the interrupt triggered event. Monitor the supervisor circuit and the system to verify that the loss of the SOH signal results in an appropriate and timely system correction response signal. The processor must also respond by returning to, or resetting back, to normal operation in a manner that prevents erratic or unstable operation of the device. Verify that appropriate system diagnostic information is correctly logged, updated and resetting functions are performed correctly. Document the recovery time and diagnostic data for the test report, and note any observation of abnormalities exhibited by the device under test. NOTE: A momentary orderly suspension of tasks or signals during a system reset is acceptable. 2) With the device returned to normal operating condition, disable the SOH stimulation signal from the main programming loop. Monitor the supervisor circuit and the system to verify that the loss of the SOH signal results in an appropriate and timely system correction response signal. The processor must also respond by returning to, or resetting back, to normal operation in a manner that prevents erratic or unstable operation of the device. Verify that system appropriate diagnostic information is correctly logged, updated and resetting functions are performed correctly. Document the recovery time and diagnostic data for the test report, and note any observation of abnormalities exhibited by the device under test. Fault Injection Testing Purpose: Fault injection testing consists of a series of evaluations where hardware and/or software elements are purposefully disrupted, disabled or damaged in order to test and grow the robustness of the whole system to deal with abnormalities. The ultimate goal is to verify that an E/E device is tolerant of potential system abnormalities. This requires that: 1. The device will not be physically damage by an abnormal input or output. 2. That operation of the device will remain stable and ensure safe vehicle operation. 3. If the abnormality or disruption is removed, the device will resume normal operation. NOTE: The GMW3172 short circuit endurance tests are the primary procedures for verification that the device is not physically damaged by system 313 GENERAL MOTORS CORPORATION – EDSON - 2008 abnormalities. The fault injection procedures focus on functional stability during abnormalities. When possible, fault injection evaluations may be performed in combination with the physical short circuit tests, or they may be performed separately after the short circuit tests have confirmed the physical capabilities. Preparation: Prior to performing this procedure, a mechanization review of the device’s internal and external hardware and software is required in order to organize the device into logical functional subsystems of related inputs and outputs. This may include I/O that is internal to the device and does not directly connect to the vehicle. The supplier shall develop a detailed test script that shall be in the form of a table or matrix that contains a section for each function, with a sectional line item for each disruptive event applied to each I/O relevant to the function. Space shall be reserved on each line to document the system response to each disruption injection, and if the response is acceptable or if stability improvements are needed. Detailed software test scripts that determine the sequence of which I/O shall be disrupted during which phases of functional operation may also be required for complex systems. Special attention shall be given to dynamic sequences with position feedback and/or timing critical signals. The test plan is to be reviewed and approved by the GM Product Development Team. When function critical parameters come from digital values, delivered over a data link, the denial or disruption of this data shall also be included as line items in the fault tolerance evaluation plan. Test Set Up: The procedure requires one production-intent-device, a system simulator and a breakout box that allows each signal to be shorted to ground, shorted to its supply voltage or battery voltage, and open circuited. A data link simulator, with the data stream controllable by the tester, is also required when control or command information is delivered via a data link. Procedure: 1)r each test case in the test plan, set up the appropriate functional operating conditions, and for each I/O related to the function sequentially apply: 4) Short to ground condition 2. A short to supply or battery voltage 3. An open circuit condition. Apply each fault injected state long enough to identify any functional effects and/or to verify the correct activation of relevant fault identification, recovery and diagnostic GENERAL MOTORS CORPORATION – EDSON - 2008 314 algorithms. Document the observation and the acceptability judgment on the test script matrix. When inputs are in the form of digital values the fault injection format shall be: 1. Outside of valid data range - –Low Value 2. Outside of valid data range - –High Value 3. Data absent or withheld. Apply each fault injected state long enough to identify any functional effects and/or to verify the correct activation of relevant fault identification, recovery and diagnostic algorithms. 2) Move sequentially, I/O by I/O, data link value by data link value, and function by function through the detailed test plan until all test conditions are completed. Acceptance Criteria: 1) It is acceptable for the injection of a disruptive condition to discrete I/O circuits to falsely trigger or prevent activation of its related function. 2) It is not acceptable for a fault injection on an analog circuit to disrupt functionality. The valid range of all analog inputs shall be scaled so that hard ground shorts, voltage shorts, and open circuits are outside a valid operation range so that fault conditions can be recognized by the processor and appropriate diagnostic codes set. Verify that appropriate diagnostic codes are correctly set. 3) It is not acceptable for a fault injection to create a system or software runaway condition, or a lock up condition such as a continuous loop, waiting for an action to occur. Verify that I/O time-out conditions, and any related diagnostics are functioning properly. 4) It is not acceptable for a fault injected on one circuit or function to cause a disruption in a any other circuit or function. 315 GENERAL MOTORS CORPORATION – EDSON - 2008 Appendix O – Designing A Bracket With Adequate Fatigue Life The vibration test requirements defined in this document are based on the ISO 16750-3 specification. This specification provides the worst-case vibration for any location in the vehicle within the specified grouping (sprung-mass, unsprung-mass, engine). Testing to this specification ensures that the product will be robust if used in different locations on different vehicles, or if relocated in a re-use application. The test levels are significantly different between the different groupings (sprung-mass, un-sprung-mass, engine) and a product would need to be re-validated if relocated from a body mounted location to an engine mounted location. Certain locations within a grouping can be significantly less stressful than others, from a vibration point of view, especially if they are located toward the center of the vehicle. Products like the Energy Storage Box for a hybrid vehicle, bolted to the floor pan beneath the rear seat of a pickup truck, will see approximately (.3) Grms in the vehicle when driven on the Belgian Blocks, with the corresponding 8 hour vibration test expanded to (1.1) Grms. Products mounted closer to the ends of the wheelbase, or cantilevered beyond the wheelbase will see vibration levels similar to those specified in GMW3172. The process of designing a bracket to hold an electronic device should begin with a clear understanding of what level of vibration should be used. The safest bet is to use the vibration profiles defined in GMW3172 as they currently exist. In special situations, as described above, a reduced level of vibration could be used. The reduced level of vibration will require that a vehicle be instrumented with an accelerometer attached to the mounting location of interest, and the vehicle driven over the Belgian Blocks at the Milford Proving Grounds. A few minutes of vibration data is collected and processed into a Power Spectral Density Plot. This PSD should be applied to the device under test, in each axis, for as long as the vehicle would be tested on the Belgian Block Road during the durability test. The “time on the Belgian Block road” is shown below: 4WD Full Size Truck (PU or Utility) 600 hours of vibration 2WD Full Size Truck (PU or Utility) 600 hours of vibration 4WD Mid Size PU & Rec. Off Road 150 hours of vibration 2WD Mid Size PU & Rec. Off Road 150 hours of vibration 4WD Mid Size Utility 150 hours of vibration 2WD Mid Size Utility 150 hours of vibration Mid Size SUV (BFI) and Van 125 hours of vibration Passenger Vehicle 84 hours of vibration No engineer wants to run a vibration test for these many hours in each of the three axes, so the test is accelerated by increasing the Grms value while GENERAL MOTORS CORPORATION – EDSON - 2008 316 decreasing the test duration. The equations in Appendix “G” are used for this purpose. Whatever level of vibration is used, the basic profile in GMW3172 should be used, however, the profile must be rescaled to fit the Grms level desired. We must begin with an understanding that the bracket will go into resonance if the resonant frequency of the bracket occurs within the range of frequencies provided by the input PSD. A bracket will experience the greatest degree of fatigue damage when exposed to its resonant frequency. Resonance is powered by the level of energy (Pin) provided at the resonant frequency. This value is read from the “Y” axis (Pin) at the resonant frequency (Fn) from the PSD graph. This energy level is amplified by the phenomenon of resonance, with a degree of magnification provided by the calculated value of (Q). Let’s begin our bracket-designing example by assuming that we will use the sprung-mass vibration specification defined in GMW3172 for a car or SUV. This specification says that the bracket with the product attached needs to survive a one-life requirement of 2.84 Grms applied for 8 hours in each of the three major axes. The total one-life test duration would be (8+8+8)=24 hours. We begin by defining the following: The weight of the bracket and the device it will carry (W assembly) The location of the “Center of Gravity” of the bracket and device as it will be assembled in the vehicle (CG) The resonant frequency of the bracket and device assembly – performed by Finite Element Analysis (Fn) The level of G2/Hz (Pin) that occurs at the resonant frequency (Fn). This value is read off of the “Y” axis of the Power Spectral Density graph (PSD) at the resonant frequency (Fn). The approximate level of dampening (Q) given the assumption that this is a lightly damped system ( Q = 2 × Fn ) The acceleration level operating on the weight of the bracket plus device is π equal to = Gout = × ( Pin ) × Fn assembly × ( Q ) 2 ( 317 ) GENERAL MOTORS CORPORATION – EDSON - 2008 These values for our example are as follows: W assembly = 2 pounds. The Center of Gravity is marked with a red X on the part (this will be used latter to determine the moment being applied to the bracket and aid in the calculation of internal stress). The resonant frequency of the bracket is 150 Hz but the resonant frequency of the bracket with the device attached is 85 Hz. The Pin value is identified in the following graph: Body or Chassis M ounted Random Vibration Profile G^2/Hz 1 0.1 Pin = .02 0.01 0.001 10 100 85 Hz. 1000 Frequency (Hz) The dampening factor “Q” for this assembly is Q = 2 × Fn = 2 × 85 = 18.43 The vibration level is not constant, but rather varies as described by a normal distribution. The force level of Gout × Weight = Force1 (pounds) will occur 68.3% of the time using a probability of plus and minus 1 sigma. A higher level of vibration (plus and minus two sigma) will occur 27.1% of the time, and an even higher level of vibration (plus and minus three sigma) will occur 4.33% of the time. All three of these stress levels will be operating randomly during the vibration process. We must calculate each of the force levels, as they will be used in the next set of calculations. First we need to calculate the G level of acceleration that the assembly will experience during resonance: π Gout = × ( .02 ) × ( 85 ) × ( 18.43 ) = 7.01 2 GENERAL MOTORS CORPORATION – EDSON - 2008 318 The force acting on the Center of Gravity during resonance, given the PSD identified above is: 68.3% Of The Time The Force Will Be: 1 Sigma Force = Weight × 7.01 = 2 × 7.01 = 14.02 pounds (plus & minus 1 sigma of stress) This force will occur on every reversal of motion of the vibrating bracket-device assembly. We need to apply this force in the FEA model and identify the highest level of stress occurring in the bracket (use a stress concentration factor “k” of at least 3). We will identify this stress as Stress1max. 27.1% Of The Time The Force Will Be: 2 Sigma Force = 2 × 14.02 = 28.04 pounds We need to apply this force in the FEA model and identify the highest level of stress occurring in the bracket (use a stress concentration factor “k” of at least 3). We will identify this stress as Stress2max. 4.33% Of The Time The Force Will Be: 3 Sigma Force = 3 × 14.02 = 42.06 pounds We need to apply this force in the FEA model and identify the highest level of stress occurring in the bracket (use a stress concentration factor “k” of at least 3). We will identify this stress as Stress3max. We know from Miner’s Rule that we can build the cumulative damage model as follows: Miners Index Calculation: n1 n2 n3 Miners Index Value = + + N1 N2 N3 Where the Miners Index Value represents the fraction of life “used up” by the collection of different stresses applied “n1,2,…” number of times. 319 GENERAL MOTORS CORPORATION – EDSON - 2008 In our example the “n” values are calculated as follows: n1 = 85cycles × 60 sec second n2 = 85cycles min × 60 sec second n3 = 85cycles × 60 sec second min min × 60min × 24 hr × 68.3% = 5,016,686 cycles (reversals ) hr × 60min × 24 hr × 27.1% = 1,990,224 cycles (reversals ) hr × 60min × 24 hr × 4.33% = 317,995 cycles (reversals ) hr Applying each of the three forces (1-Sigma-Force, 2-Sigma-Force, and 3-SigmaForce) in our FEA model provides the following three stress level within the bracket: Stress1max = 28 Ksi. Stress2max = 37 Ksi. Stress3max = 45 Ksi. We know from our calculations of n1, n2, and n3 that: Stress1max will occur for 5,016,686 cycles Stress2max will occur for 1,990,224 cycles Stress3max will occur for 317,995 cycles We turn to our S-N curve for the material that the bracket is made from and identify the number of cycles to failure at each of the three stress levels. An example S-N curve for steel is shown on the following page. The “cycles to failure” values are obtained by finding the stress level on the “X” axis and moving up the “Y” axis until the S-N Line is encountered. The intersection of the stress level and the S-N line provides the life expectancy at that stress level (read life from the “Y” axis). This process must be carried out for each of the three stresses. The three “life values will give us the “big N values”, N1, N2, and N3 that are to be used in our Miner’s Index Calculation. Performing this calculation for our example shows that the total sum of the damage from this test will only remove 10.6% of the total life from the bracket. If the Miner’s Index Percentage approached 100%, then we would have reason to believe that the bracket may break during the test. 317,995 5,016,686 1,990,224 Miners Index Percent = + + × 100 = 10.6% ∞ ∞ 3,000,000 GENERAL MOTORS CORPORATION – EDSON - 2008 320 We compare this percentage value against the following criteria: A value less than 33% will meet the reliability requirements of GMW3172. A value less than 70% will produce an acceptable product with some degree of reliability, but less than that required by GMW3172. A value close to but less than 100% means that the bracket will not break on the test if you are very, very lucky…. so I have just one question for you:…. “are you feeling lucky today?” Life “N” 1.00E+8 Life vs Stress ∞ ∞ Infinite Life 3,000,000 1.00E+7 High Cycle Fatigue 1.00E+6 1.00E+5 10000 Stress1max Low Cycle Fatigue 1000 Stress2max 100 Stress3max 10 1 10 “S” 100 Stress (Ksi) Because, finally, he said: "This is really great stuff! "And I guess the old alphabet ISN'T enough!" NOW the letters he uses are something to see! 321 Most people still stop at the Z... But not HE! (Dr. Seuss – “On Beyond Zebra”) GENERAL MOTORS CORPORATION – EDSON - 2008 References 1. Steinberg, Dave E.: Vibration Analysis For Electronic Equipment, Third Edition, John Wiley and Sons, 2001. 10. 2. Hobbs, Gregg K.: Accelerated Reliability Engineering – HALT and HASS, John Wiley and Sons, 2000 11. 3. 12. Lipson, Charles and Sheth, Narendra J.: Statistical Design and Analysis of Engineering Experiments 4. Nelson, Wayne: Accelerated Life Testing, John Wiley and Sons, 1990. 5. Peck, D. Steward: Comprehensive Model for Humidity Testing Correlation, IEEE Catalog # 86CH2256-6, 1986. 6. Technology Report #5 Fundamental Concepts of Environmental Testing in Electricity and Electronics, Tabai Espec Corp., 1998. 7. Azar, Kaveh,: Electronics Cooling – Theory and Applications, Short Course, 1998. Clark, Dana W.: AFD and Inventive Troubleshooting, Ideation International Inc., 2000. Edson, Larry, Design Of Integral Attachments And Snapfit Features In Plastic, GM Publication. Giacomo, Giulio, et-al, CBGA and C4 Fatigue Dependence On Thermal Cycle Frequency, 2000 International Symposium on Advanced Packaging Materials, 2000. 13. Clech, Jean-Paul, SAC Solder Joint Reliability: Test Conditions and Acceleration Factors, SMT/Hybrid/Packaging Conference, Nurnberg, Germany, April 19, 2005 14. Clech, Jean-Paul, Acceleration Factors And Thermal Cycling Test Efficiency For Lead-Free Sn-Ag-Cu Assemblies, SMTA International Conference, Chicago, Il. September 2005 15. White, F.M.: Fluid Mechanics, Second Edition, Pg. 60, McGraw-Hill, New York, 1986. Kurdian, Ishkan, Learning To “Take It Easy” When Giving Birth To World Class Reliability, International Conference On Test Development, GME Engineering Center, Russelsheim Germany, 2005 9. Clech, Jean-Paul, Solder Reliability Solutions: From LCCCS to Area-Array Assemblies, Proceedings From Nepcon West 1996. 16. There are letters yet to be discovered... With us every day, just waiting to be uncovered… Will you be the one who dispels the illusion.. Helping us all to clear the confusion… The boundary crossers are few… But we all thank God for those that do. Now you say: "This is really great stuff! "And I guess the old alphabet ISN'T enough!" NOW the letters I use are something to see! Most people still stop at the Z... But not me! 8. Henshall, Greg, et-al Hewlett-Packard, An Acceleration Model for Sn-Ag-Cu Solder Joint Reliability Under Various Thermal Cycle Conditions, SMTA International Conference, Chicago, Il. Sept 25-29, 2005 (L. Edson – “A Day In The Life”) GENERAL MOTORS CORPORATION – EDSON - 2008 322