1
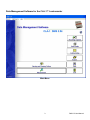
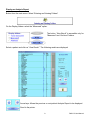
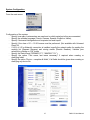
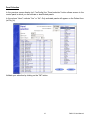
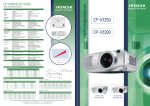
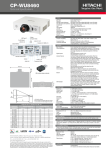
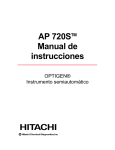
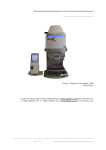
Data Management Multilanguage Software
for the CLA-1™ Luminometer
Version 2.5
User Manual
Hitachi Chemical Diagnostics, Inc.
Hitachi Europe, Ltd.
Whitebrook Park
Lower Cookham Road
Maidenhead, Berkshire, SL6 8YA
United Kingdom
Tel: +44 (0) 1628 585 590
Hitachi Chemical Diagnostics, Inc.
630 Clyde Court
Mountain View, CA 94043
Tel: (650) 961-5501
Doc.No.0718-ENG Rev. 02
www.hcdiagnostics.com
Table of Contents
Page
LABEL PRINTING ............................................................................................................................ 4
ENTERING AND VIEWING FOLDERS ............................................................................................ 5
DISPLAY AN ANALYSIS REPORT ................................................................................................. 8
MEASUREMENT .............................................................................................................................. 9
Patient selection:................................................................................................................ 10
HOW TO “SEND RESULTS” TO LIS OR NETWORK................................................................... 12
HOW TO “RECEIVE REQUESTS” FROM LIS OR NETWORK .................................................... 12
ARCHIVE........................................................................................................................................ 13
SAVING DATA ...............................................................................................................................14
RESTORING DATA........................................................................................................................ 14
SYSTEM CONFIGURATION .......................................................................................................... 15
PANEL SELECTION ...................................................................................................................... 16
2
DMS 2.5 User Manual
Data Management Software for the CLA-1™ Luminometer
Main Menu
3
DMS 2.5 User Manual
Label printing
Button on the main menu:
Only patient accession numbers to be measured are displayed here.
Pette bar code labels can be used when starting measurements. The characters on the bar code
label include the patient accession number and the type of pette panel to be measured.
Patient accession numbers are sorted in sequential order by the DMS application.
There are three ways for printing pette bar code labels:
-
Select specific patient numbers by using the bar code reader (read bar code labels on
patient serum tubes then, Print selected folders.)
Print a single label (Print only one folder)
Print all labels (Print all folders to be processed).
A line number can be used to specify printing on a specific line of the label sheet (for economy,
where label sheets are already started).
4
DMS 2.5 User Manual
Entering and Viewing Folders
Button on the main menu:
This module displays all folders stored in the database (to be measured, measured, archived).
The selector below displays folders depending on status (to be measured, measured or archived):
The “New” button allows the operator to create a
new patient to measure. See next page.
Search command (by patient number or patient
name).
5
DMS 2.5 User Manual
Print all results:
After measurements, this command allows the operator to print all results of the day.
To add patient folders to be measured manually, click on the “New” button of the previous
screen display:
The operator has to input data manually (through keyboard). Only the patient accession number,
and pette type are required fields.
Patient numbers can include letters, digits, special characters like: - (dash character),
or _ (underscore character).
It is recommended that the Space character, * (star), / (slash), and \ (backslash) are not used in the
patient number format.
6
DMS 2.5 User Manual
You can also use the Doctor database to select the patient’s attending doctor, if selected the name
and address of the doctor will be printed on the printout of results.
By clicking on this button you access a selection table in which all doctors names and addresses
are displayed:
Or you can create a new doctor record by navigating to the main menu and selecting “Doctor” then
“New” or “Update”. The “New” window allows doctors to be added to the database. The “Update”
window allows doctors to be added, modified, deleted or print the entire doctor list.
7
DMS 2.5 User Manual
Display an Analysis Report
Button from the main menu: Select “Entering and Viewing Folders”
On the Display folders: select the “Measured” option:
The button “View Result” is accessible only for
“Measured” and “Archived” folders.
Select a patient and click on “View Result.” The following results are displayed:
Arrow keys: Allows the previous or next patient Analysis Report to be displayed.
Send to the printer.
8
DMS 2.5 User Manual
Measurement
Before measuring, be sure Luminometer(s) are configured correctly. Refer to the DMS 2.5
Installation Guide and the CLA-1 manual.
Button on the main menu: Select “Measurement”
1 – Click and place the cursor into the first field under the “Luminometer 1” button. Note: Up to
four luminometers can be installed with DMS 2.5 full version.
2 – The bar code reader can be used to read the bar code labels on the back of the pettes. The
patient accession number can also be entered through the keyboard or by clicking on the
“Luminometer” button (see next page). Note: Select luminometers and measurement positions
sequentially, do NOT randomized or operational errors may result.
3 – Verify that all patient numbers are in the work list by clicking on the “Check N°” button.
4 – Test RS232 communication between the PC and luminometers, before measuring. Click on the
« Testing comm. » button and follow instructions displayed on the TESTCOM windows to disable
the Luminometer printers.
5 – To start measuring, the Luminometer printer must be disabled, then click on “Start” button. The
Luminometer’s doors will open automatically. Insert your rack(s) and then press on “OK” on the
message “Insert a rack into luminometer x.” Note: Do not press any buttons on the
Luminometer(s) while measuring; allow the DMS application to control the CLA-1
luminometer.
9
DMS 2.5 User Manual
Patient selection:
You can also manually select the patients to be measured. For each Luminometer, click on
selected “Luminometer” button to display all patients to be measured on the “Folders to be
measured” window:
Select a maximum of 5 patients sequentially with the left button of the mouse or select different
patients by keeping the “Ctrl” key pressed and clicking the left button of the mouse on the patients
you wish to measure. Then click on “Select line and click here” button.
Selected patients are displayed in the list “Folders selected”. Press on “OK” to validate your
selection. Selected patients are now displayed in their respective positions:
10
DMS 2.5 User Manual
When the measurements are finished, the software will request if the operator wants to see the
measured results, in order to verify that the “Positive Control” is correct.
A warning message indicates to the operator if the positive control is incorrect (less than 243 LU).
A warning message indicates to the operator if the negative control is incorrect (greater than 33
LU) or greater than 69 LU for OPTIGEN®.
If a low positive control is encountered, the patient panels must be re-measured.
Note: There is not an « equivocal » class (12-26 lumens) for the panel « Universal Panel 20 ».
Press on the "EXIT" button to view the next result.
11
DMS 2.5 User Manual
How To “Send results” To LIS or Network
Button on the main menu: Select “Send results”
Patient folders are sent to the host computer by using a shared directory on the network.
The access path and the filename of the result file are defined in the maintenance menu (see
“System configuration” page 15). Note: Result files are overwritten each time a new file is sent
to the LIS or Network destination.
Results are recorded in an ASCII text file format.
Patient folders are automatically archived.
How To “Receive requests” From LIS or Network
Button on the main menu:
By clicking on this button, the software will open and read the work list sent by the Host computer.
The access path and the filename of the work list file sent by the LIS or Network are defined in the
maintenance menu (see “System configuration” page 15).
12
DMS 2.5 User Manual
Archive
Patient folders can be also archived manually, when results do not have to be sent to the LIS or
Network destination (see example below).
Archive all patients by clicking on the button “Archive all folders” or select some patients by
maintaining the “Ctrl” key pressed and click with the left button of the mouse on patients you wish
to archive then click on the button “Archive selected folders”.
13
DMS 2.5 User Manual
Saving Data
To avoid problems, we recommend data to be saved:
1 – after reception of the work list from the LIS or Network.
2 – after measurements.
Click on the “Save” button and follow instructions.
We recommend that one diskette be used per day.
Restoring Data
This option enables data to be restored from a floppy disk. Follow instructions.
Warning existing data in the database will be overwritten.
14
DMS 2.5 User Manual
System Configuration
From the main menu:
Configuration of the system:
- Specify how many Luminometers are used and on which serial ports they are connected,
- Specify the software language (French, German, Spanish, English or Italian),
- Specify if horizontal histograms must be printed on result report.
- Specify if the class « 0/1 » 12-26 lumens must be performed. (Not available with Universal
Panel 20)
- If LIS (i.e. LIS or Network) connection is installed, specify the network paths for reading the
working list (Request filename) and storing results (Results filename). Validate your
selection by clicking on “OK” button
- Specify the Date format (“DD/MM/YYYY”, “MM/DD/YYYY”).
- Specify the option “First name, last name necessary” if required when creating or
modifying folder.
- Specify the option “Doctor – complete all fields”, if all fields should be given when creating or
modifying any doctor file.
15
DMS 2.5 User Manual
Panel Selection
In the previous screen display (ref. FrmConfig) the “Panel selection” button allows access to the
control panel in which you can activate or deactivated panels.
In the column “Used”, indicate “Yes” or “No”. Only activated panels will appear on the Patient form
(ref Da_fic).
Validate your selection by clicking on the “OK” button.
16
DMS 2.5 User Manual