1
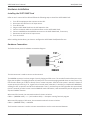
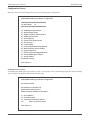
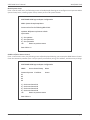
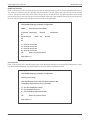
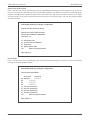
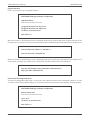
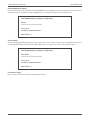
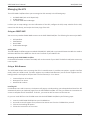
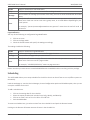
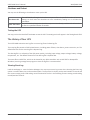
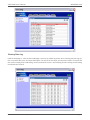
XVRT-SNMP
Web/SNMP Card
User & Installation Manual
www.xpcc.com | © 2015 Xtreme Power Conversion Corporation. All rights reserved. (Rev 2/25/15)
XVRT-SNMP User’s Manual
Web/SNMP Card
Table of Contents
Introduction.................................................................................................4
Hardware Installation.................................................................................. 6
Installing the XVRT-SNMP Card........................................................................................................6
Hardware Connections....................................................................................................................6
Configuration Guide.....................................................................................7
Using Telnet.....................................................................................................................................7
Using Terminal.................................................................................................................................7
Configuration Screen.......................................................................................................................8
Managing the UPS..................................................................................... 15
Using an SNMP NMS..................................................................................................................... 15
Using a Web Browser.....................................................................................................................15
Using the XVRT-SNMP Device Manager.........................................................................................16
Security......................................................................................................16
Login..............................................................................................................................................16
Setup Community (Password).......................................................................................................17
Setup for Shutdown Feature.......................................................................17
Shutdown Settings........................................................................................................................ 17
Configuring Events........................................................................................................................ 18
Dependent Shutdown................................................................................................................... 19
Setup for Notification Feature....................................................................19
Notification Methods.................................................................................................................... 19
Configuring Events........................................................................................................................ 19
Scheduling.................................................................................................21
Controlling Your UPS..................................................................................22
Shutdown and Reboot...................................................................................................................23
Testing the UPS..............................................................................................................................23
The History of Your UPS..............................................................................23
Viewing Event Log......................................................................................................................... 23
Xtreme Power Conversion Corporation
Page 2
XVRT-SNMP User’s Manual
Web/SNMP Card
Viewing Data Log...........................................................................................................................24
Configuring Logs............................................................................................................................25
OnEvent.....................................................................................................26
Overview........................................................................................................................................26
Installing the OnEvent....................................................................................................................26
Starting the OnEvent Program.......................................................................................................26
Configuring the OnEvent...............................................................................................................27
Sending Messages to OnEvent...................................................................................................... 27
Upgrading Firmware.................................................................................. 29
Xtreme Power Conversion Corporation
Page 3
XVRT-SNMP User’s Manual
Web/SNMP Card
Introduction
XVRT-SNMP
The XVRT-SNMP Card/Box is primarily used to provide the network management function for your UPS. After plugging it into the UPS, you can manage the UPS remotely via an SNMP NMS (Network Management System) or a
web browser. The following sections brief all the features provided by the XVRT-SNMP Card/Box. For more detailed
information, see the XVRT-SNMP Package User’s Manual.
Safety For Everyone On The LAN
A UPS can supply power to more than one computer, so there could be more than one computer necessary to be
shut down before turning off the UPS. The XVRT-SNMP Card/Box will send out a Shutdown signal to anyone on the
LAN before shutting down the UPS. Each computer with OnEvent agent installed on the LAN will shut down the
system automatically when receiving the Shutdown signal.
Notifications
When an event occurs, like a power failure or a low battery condition, the XVRT-SNMP will notify people who need
to know the event via the following ways:
• Page users.
• Send e-mail to users.
• Send OnEvent message to users.
Network Management
In general, network management system consists of two entities:
• Manager, used to view and control the managed object remotely.
• Managed Object, which can be viewed and controlled by manager system.
Here, the XVRT-SNMP provides two types of network management: SNMP and Web-Enabled. It allows you to view
the UPS status and control the UPS remotely over LAN or Internet, no matter how far you are away from the UPS.
SNMP
The SNMP (Simple Network Management Protocol) seems to be the most popular way to network management.
The XVRT-SNMP supports SNMP, you may use any SNMP NMS (Network Management System, i.e., SNMP manger)
to retrieve the information of the UPS and/or control the UPS remotely.
Xtreme Power Conversion Corporation
Page 4
XVRT-SNMP User’s Manual
Web/SNMP Card
The follow list some popular SNMP NMS:
•
•
•
•
HP OpenView.
IBM NetView.
Novell NMS.
Sun SunNet Manager.
Web-Enabled
Speaking of Internet, everybody thinks about web sites and web browsers. The XVRT-SNMP would create a web
site for the UPS so that you can access to the UPS via a standard web browser.
XVRT-SNMP Device Manager
In addition to SNMP NMS and web browser, we provide the XVRT-SNMP Device Manager for Windows users. You
may use it to manage your UPS.
Information Management
The XVRT-SNMP allows you to view the information and status of the UPS remotely. It presents the information in
graphic format from some different points of view, including inside activity, power meters, and scope chart.
Scheduling
The XVRT-SNMP allows you to set up the schedule for your UPS so that it can shutdown/startup the system or initiate self-test automatically according to your settings. In addition, for some UPS models, it allows you to set up the
schedule for every single outlet separately.
Flexible Event Action
You can define actions for each event. The XVRT-SNMP will do actions according to your definitions when an event
occurs. The actions include logging, network notification, email, paging, and system shutdown.
It also allows you to customize the warning messages as you like.
Controlling the UPS
With the XVRT-SNMP, you can control the UPS remotely, including performing UPS test, shutting down the system,
starting up the system, and resetting the system (cycling the power of the system).
Configuring the UPS
The XVRT-SNMP allows you to configure your UPS parameters remotely.
Security
You can define who has the rights to access to the UPS. The XVRT-SNMP can secure your UPS accordingly.
Protecting your investment
Whenever we offer a more powerful version of firmware, you may upgrade it to your existed card. You do not
need to buy a new one.
Xtreme Power Conversion Corporation
Page 5
XVRT-SNMP User’s Manual
Web/SNMP Card
Hardware Installation
Installing the XVRT-SNMP Card
Refer to user’s manual of the UPS and follow the following steps to install the XVRT-SNMP Card:
1.
2.
3.
4.
5.
6.
7.
8.
Turn off the equipment that connects to the UPS.
Disconnect the UPS from its AC input source.
Turn off the UPS.
Plug the XVRT-SNMP Card into the UPS expansion slot.
Connect a network cable to the LAN connector on the XVRT-SNMP Card.
Connect a MODEM to the MODEM connector on the XVRT-SNMP Card, if necessary.
Reconnect the UPS to its AC input source.
Turn on the UPS.
After installing the hardware, you have to configure the XVRT-SNMP Card/Box before use.
Hardware Connections
The follow shows you the hardware connections diagram:
The LAN connector is used to connect to the network.
The MODEM connector has three usages: Console, Paging and PPP server. The console function allows you to configure the Card/Box. The paging function will notify user of an event via paging method when an event occurs. The
PPP function allows you to dial in directly from a remote computer. Each time the system is started, it detects if
anyone presses the ESC key. If so, it goes to the Console mode; otherwise, it would try to initialize the MODEM by
sending out ATZ. It spends 5 seconds for that detection. That is, you have to press ESC right after the system boots
(within 5 seconds) to make it enter into the CONSLOE mode. Otherwise, it will automatically start all programs and
skip the CONSOLE function.
When used for Console, the connection method is shown as below:
CARD <---(MODEM cable)---> <---(null modem cable)---> Computer running Terminal program
When used for paging or PPP server, the connection method is shown as below:
CARD <---(MODEM cable)---> MODEM
The Extension connector is used to connect external device such as environmental detector.
Xtreme Power Conversion Corporation
Page 6
XVRT-SNMP User’s Manual
Web/SNMP Card
Configuration Guide
You must configure the XVRT-SNMP Card/Box before it can operate properly. You have two methods to configure
the XVRT-SNMP Card/Box: Using telnet or terminal.
Using Telnet
1. Make sure the XVRT-SNMP Card/Box is plugged in the UPS properly.
2. Connect a network cable to the LAN connector on the XVRT-SNMP Card/Box.
3. Telnet to the XVRT-SNMP Card/Box as below:
telnet 192.168.1.254
4. Use dnpower for the User Name and for the Password.
5. A Configuration Screen is displayed.
Note: The default IP address of the Card is 192.168.1.254. The default login user name and and password are both
dnpower.
Using Terminal
1.
2.
3.
4.
Make sure the XVRT-SNMP Card/Box is plugged in the UPS properly.
Connect the modem cable to the MODEM connector on the XVRT-SNMP Card/Box.
Connect a null modem cable to the end of the model cable.
Connect the other end of the null modem cable to a serial port on your computer.
XVRT-SNMP <---(MODEM cable)---> <---(null modem cable)---> Computer running Terminal program
5. Make sure the serial port is not used by any program on your PC.
6. Run a terminal program, such as HyperTerminal.
7. Configure the serial port for 9600 bps, no parity, 8 data bits, 1 stop bit, and no flow control.
8. Reboot the XVRT-SNMP Card/Box.
9. Press ESC key right after reboot. The Card/Box will detect if the user presses a ESC key for 5 seconds. If so,
it will allow the user to log in; otherwise, it will try to initialize the external MODEM for other usages. So
you have to press the ESC key as quickly as possible. You may keep holding the ESC without releasing it
right after the system is started to make sure it will not be too late or missing.
10. Use dnpower for the User Name and for the Password.
11. A Configuration Screen is displayed.
Note: The default login user name and and password are both dnpower.
Xtreme Power Conversion Corporation
Page 7
XVRT-SNMP User’s Manual
Web/SNMP Card
Configuration Screen
When you enter into the Configuration Screen, the following menu is displayed:
XVRT-SNMP SNMP agent adapter Configuration
###############################
<# Main Menu #>
###############################
1) SNMP Agent IP Parameter
2) MIB-II System Group
3) SNMP read/write Access Control
4) SNMP Trap Receivers
5) UPS Properties
6) System Time & Time Server
7) User Account
8) E-mail Setting
9) Environmental Monitoring Module
w) Web and Telnet Service Setting
u) Upgrade firmware
r) Restore Default Configuration Data
b) Reboot SNMP agent adapter
s) Save & Reboot
Exit Without Saving
Enter Choice >>
SNMP Agent IP Parameter
To configure the SNMP agent IP parameters, enter a 1 at the main menu. The following screen will appear allowing
you to configure IP address, Subnet Mask and Gateway.
XVRT-SNMP SNMP agent adapter Configuration
IP Parameter Setup
My IP Address: 192.168.1.254
Subnet Mask: 255.255.255.0
Router/Gateway IP Address: 192.168.1.1
1) Set IP Address
2) Set Subnet Mask
3) Set Router/Gateway IP Address
<0> Return to previous menu
Enter Choice >>
Xtreme Power Conversion Corporation
Page 8
XVRT-SNMP User’s Manual
Web/SNMP Card
MIB-II System Group
Enter a 2 at the main menu, the following screen will be displayed allowing you to configure some important MIB-II
System Group items, including system name, contact person and system location.
XVRT-SNMP SNMP agent adapter Configuration
MIB-II System Group Setup Menu
Current values for the following MIB-II OID:
sysName: NETpower sysContact: admin
sysLocation:
1) Set sysName
2) Set sysContact
3) Set sysLocation
<0> Return to previous menu
Enter Choice >>
SNMP read/write Access Control
Enter a 3 at the main menu, the following screen will be displayed allowing you to setup the SNMP Access Control.
Enter the community number (from 1 to 4) to specify a community string, an IP address, and the access privilege.
XVRT-SNMP SNMP agent adapter Configuration
SNMP Access Control Setup Menu
Community name IP address #1
#2
#3
#4
Access
1) Set Access Control #1
2) Set Access Control #2
3) Set Access Control #3
4) Set Access Control #4
<0> Return to previous menu
Enter Choice >
Xtreme Power Conversion Corporation
Page 9
XVRT-SNMP User’s Manual
Web/SNMP Card
SNMP Trap Receivers
Enter a 4 at the main menu, the following screen will be displayed allowing you to setup the SNMP Trap Receivers.
The Severity includes Any, Server, Warning and Informational. The Any means any event will be sent to the trap
receiver. The Severe means only severe events will be sent to the trap receiver. The Warning means only warning
events will be sent to the trap receiver. The Informational means only informational events will be sent to the trap
receiver. The Generation item is used to enable or disable trap generation.
XVRT-SNMP SNMP agent adapter Configuration
SNMP Trap Receiver Setup Menu
IP address Community Severity Generation
#1
#2 192.168.1.2 public any disable
#3
#4
1) Set trap receiver #1
2) Set trap receiver #2
3) Set trap receiver #3
4) Set trap receiver #4
<0> Return to previous menu
Enter Choice >>
UPS Properties
Enter a 5 at the main menu, the following screen will be displayed allowing you to setup the UPS Properties, including UPS Identification Name, UPS Attached Device and Last Battery Replacement Date.
XVRT-SNMP SNMP agent adapter Configuration
UPS Properties Setup
UPS Identification Name: UPS UPS Attached Device: NA
Last Battery Replacement Date: 12/31/1969
1) Set UPS Identification Name
2) Set UPS Attached Device
3) Set Last Battery Replacement Date
<0> Return to previous menu
Enter Choice >>
Xtreme Power Conversion Corporation
Page 10
XVRT-SNMP User’s Manual
Web/SNMP Card
System Time & Time Server
Enter a 6 at the main menu, the following screen will be displayed allowing you to setup System Time. In this option, you can setup the date and time for the XVRT-SNMP Card/Box. The SNTP Server and Time Zone settings are
used for time adjustment. Specify the SNTP Server and Time Zone, then choose 4 Adjust System Time to adjust
your system time. If the values retrieved from the Internet are not what you want, you can still change the date
and time manually.
XVRT-SNMP SNMP agent adapter Configuration
System Time & Time Server Setup
System Time: 01/07/2003 11:08:37
Time Server IP Address: 200.49.40.1
Time Zone: +0
1) Set System Time
2) Set Time Server IP Address
3) Time Zone
4) Adjust System Time
<0> Return to previous menu
Enter Choice >>
User Account
Enter a 7 at the main menu, the following screen will be displayed allowing you to setup user accounts those who
can login to the XVRT-SNMP Card/Box.
XVRT-SNMP SNMP agent adapter Configuration
User Account Setup Menu
User name
Password
#1dnpower
********
#2
********
#3
********
#4
********
1) Set User Account #1
2) Set User Account #2
3) Set User Account #3
4) Set User Account #4
<0> Return to previous menu
Enter Choice >>
Xtreme Power Conversion Corporation
Page 11
XVRT-SNMP User’s Manual
Web/SNMP Card
E-mail Setting
Enter an 8 at the main menu, the following screen will be displayed allowing you to setup SMTP server. You have
to setup it correctly so that the XVRT-SNMP device can sent out mails when an event occurs.
XVRT-SNMP SNMP agent adapter Configuration
Email Parameter Setup
SMTP Server IP Address:
1) Set SMTP IP Address
<0> Return to previous menu
Enter Choice >>
Environmental Monitoring Module
Enter a 9 at the main menu to setup the Environmental Monitoring Module. You have to install Environmental
Monitoring Module before setup.
Web and Telnet Service Setting
Enter w at the main menu to enable/disable Web/Telnet service. Enable Web Service when you want to monitor
the UPS via a web browser. Enable or disable Telnet Service to specify whether it allows users to login via telnet.
XVRT-SNMP SNMP agent adapter Configuration
Web and Telnet Service Setup Menu
Web Service: disable
Telnet Service: enable
1) enable Web Service
2) disable Telnet Service
<0> Return to previous menu
Enter Choice >>
\
Xtreme Power Conversion Corporation
Page 12
XVRT-SNMP User’s Manual
Web/SNMP Card
Upgrade firmware
Enter u at the main menu to upgrade firmware.
XVRT-SNMP SNMP agent adapter Configuration
Upgrade firmware
==========================
1) Upgrade firmware from tftp server
2) Upgrade firmware from http server
<0> Return to previous menu
Enter Choice >>
When you choose 1, the following screen is displayed asking you to input the tftp server and the filename of the
latest firmware. To make it work, you must have a tftp server installed and copy the firmware file to the tftp server.
Input the tftp server address >> 192.168.1.1
Input the file name >> dnpower.bin
When you choose 2, the following screen is displayed asking you to input the url pointed to the firmware file. To
make it work, you must have a web server installed and copy the firmware file to the web server.
Input the URL (Example: http://192.168.1.1/dnpower.bin) >>
http://192.168.1.1/dnpower.bin
Restore Default Configuration Data
To reset the configuration data, enter r at the main menu. When the next menu is displayed, choose 1 to reset
all values to their factory default settings, or choose 0 to return to the previous menu without resetting the data.
XVRT-SNMP SNMP agent adapter Configuration
Restore default data
==========================
1) Yes, Do it
<0> Return to previous menu
Enter Choice >>
Xtreme Power Conversion Corporation
Page 13
XVRT-SNMP User’s Manual
Web/SNMP Card
Reboot SNMP agent adapter
Enter b at the main menu to reboot the XVRT-SNMP device. All settings will not be saved. When the next menu is
displayed, choose 1 to reboot the XVRT-SNMP device, or choose 0 to return to the previous menu.
XVRT-SNMP SNMP agent adapter Configuration
Reboot
==========================
1) Yes, Do it
<0> Return to previous menu
Enter Choice >>
Save & Reboot
To save configuration data and reboot, enter s at the main menu. When the next menu is displayed, choose 1 to
save configuration data and reboot the XVRT-SNMP device, or choose 0 to return to the previous menu.
XVRT-SNMP SNMP agent adapter Configuration
Save & Exit
==========================
1) Yes, Do it
<0> Return to previous menu
Enter Choice >>
Exit Without Saving
Enter x at the main menu to exit the Configuration Screen.
Xtreme Power Conversion Corporation
Page 14
XVRT-SNMP User’s Manual
Web/SNMP Card
Managing the UPS
The XVRT-SNMP Card/Box allows you to manage the UPS remotely in the following ways.
• An SNMP NMS (such as HP OpenView)
• A Web Browser
• The XVRT-SNMP Device Manager
It allows you to setup settings, view the information of the UPS, configure the UPS, setup schedule for the UPS,
control the UPS directly, and analyze the history logs of the UPS.
Using an SNMP NMS
You can use any standard SNMP NMS to access to the XVRT-SNMP Card/Box. The following list some major NMS’s:
•
•
•
•
HP OpenView
IBM NetView
Novell NMS
SUN SunNet Manager
Adding MIBs
The XVRT-SNMP Card/Box supports standard UPS MIB (RFC 1628) and our private UPS extension MIB. You need to
add these MIS files to the NMS first. See the user’s manual of your NMS for this.
Accessing to the XVRT-SNMP Card/Box
For detailed information on how to use NMS, refer to the manual of your NMS. The default read/write community
name is public.
Using a Web Browser
The XVRT-SNMP allows users to manage the UPS via a web browser. It provides two options: a graphic interface
mode, and a pure HTML mode. The latter supports any standard web browsers, but the former supports the following browsers and requires JRE (Java Run Time Environment) 1.3.1 or above:
• Internet Explorer 4.0 or above
• Netscape 6.0 or above
• Mozilla 0.96 or above
Installing JRE
For Windows users and Linux users, the browser will pop up a window asking you to download and install the JRE
automatically when you load web pages from the XVRT-SNMP Card/Box. You may just follow the instructions on
screen to complete the JRE installation. To do this, you must be able to connect to the Internet.
Or, you can install JRE from the CD-ROM come with the XVRT-SNMP Card/Box by the following steps:
1.
2.
3.
4.
Insert the XVRT-SNMP CD-ROM into your CD-ROM drive.
An Install screen will appear. If not, execute the autorun.exe from the CD-ROM drive yourself.
Click on the Installing JRE option.
Follow the instructions on the screen.
Xtreme Power Conversion Corporation
Page 15
XVRT-SNMP User’s Manual
Web/SNMP Card
For other users, you may need to download and install it by yourself. You can download JRE from SUN’s web site or
the web site of your operating system’s provider.
Loading the Web Pages
Start your web browser, address the XVRT-SNMP Card/Box by its IP Address or DNS name (if configured) like the
following format:
http://123.123.123.1/
http://www.somewhere.com/
http://hostname/
When the following page is displayed, type in the password, then push on the Login button to begin the management. The default password is public. You can change the password later.
Using the XVRT-SNMP Device Manager
For Windows users, you can choose to use the XVRT-SNMP Device manager to management the UPS with a
XVRT-SNMP Card/Box.
Installing the XVRT-SNMP Device manager
If you have installed any XVRT-SNMP Software Package onto your system before, you may have the XVRT-SNMP
Device Manager already.
Follow the following steps to install the XVRT-SNMP Device Manager:
1.
2.
3.
4.
Insert the XVRT-SNMP CD-ROM into your CD-ROM drive.
An Install screen will appear. If not, execute the autorun.exe from the CD-ROM drive yourself.
Click on the Installing XVRT-SNMP Device Manager option.
Follow the instructions on the screen.
Starting the XVRT-SNMP Device manager
To start it, choose the Device Manager option from the XVRT-SNMP folder in the Program Files.
When the following screen is displayed, type in the hostname and the password to begin the management. The
Host can be an IP address or a hostname which addresses the XVRT-SNMP Card/Box. The default password is public. You can change the password later.
Security
To prevent everybody from touching your UPS without permission, you need a security function. The XVRT-SNMP
uses SNMP’s community as its security foundation.
Login
When you load the web page or start the Device Manager, a Login screen is displayed asking you to input the password. It allows you to view and control the UPS only when the password is valid. Once installing the XVRT-SNMP,
the default password is public.
Xtreme Power Conversion Corporation
Page 16
XVRT-SNMP User’s Manual
Web/SNMP Card
Setup Community (Password)
Load the web page or start the Device Manager, then choose the Network option. You can modify the Community
List to include all the valid community names. You can consider each community name a valid password. That is,
when logging in, the XVRT-SNMP will match the password you type in the Login screen with each one in the Community List. If matched, it allows you to access to the UPS, otherwise, it rejects the access to the UPS.
Setup for Shutdown Feature
Shutdown Settings
The XVRT-SNMP will perform the shutdown sequence when you click the Shutdown button in the Control option,
or when a particular event occurs according to your Event Action settings. The shutdown sequence includes the
following steps:
1. Broadcast the shutdown signal over the LAN telling OnEvent Agent started on the computers connected to
the LAN to begin their shutdown sequence.
2. Shut down the UPS.
After loading the web page or starting the Device Manager, choose Settings option, Shutdown option, then you
can specify the following settings:
Shut Down UPS Delay
The delay time before shutting down the UPS. Before shutting down the UPS, the XVRTSNMP will send a shutdown signal to all computer running OnEvent agent over the
LAN. This delay time is used for the Depend Shutdown feature. This delay allows other
computers on the LAN to shut down themselves safely.
Xtreme Power Conversion Corporation
Page 17
XVRT-SNMP User’s Manual
Shutdown Depend
Web/SNMP Card
A list specifying those who should perform their shutdown sequence before the UPS is
turned off. The XVRT-SNMP will send the shutdown signal to each one in the list before
shutting down the UPS. Each item can be either a host name or IP address. Each item is
delimited by ‘;’. For examples, the following list means you want host1, 192.168.12.3,
and host3 to be shut down dependently.
host1;192.168.12.3;host3
See below for more information about Depend Shutdown feature.
Configuring Events
The XVRT-SNMP uses an event driven mechanism. You can specify what events will trigger the shutdown procedure. After loading the web page or starting the Device Manager, choose Configuration option, Event Action option, you will see the following screen:
Click on an event first, then click on the Shutdown action. Lastly, Check the Enable button and specify the Delay
time.
For example, if you want XVRT-SNMP to perform the shutdown sequence after 5 minutes in the event of a power
failure. You may do the following:
1. click on the Power Failure event.
2. click on the Shutdown action.
3. Check the Enable button and specify the Delay time with 300 seconds.
Xtreme Power Conversion Corporation
Page 18
XVRT-SNMP User’s Manual
Web/SNMP Card
Dependent Shutdown
The XVRT-SNMP has a dependent shutdown feature that can protect every computer on the LAN.
Before shutting down the UPS, the XVRT-SNMP will broadcast a shutdown signal over the LAN. Come along with
the
XVRT-SNMP, there is the OnEvent agent, you must install it on those computers who need to be shut down dependently. When the OnEvent agent receives the shutdown signal sent by the XVRT-SNMP, it will begin the graceful
shutdown sequence immediately.
See top of this page for more information on how to configure it.
Setup for Notification Feature
Notification Methods
When an event occurs, such as a power failure or a low battery condition, the XVRT-SNMP will notify people who
need to know the event via the following ways:
• Send network message to users. Page users.
• Send e-mail to users.
• Send OnEvent message to users.
Configuring Events
After loading the web page or starting the Device Manager, choose Configuration option, Event Action option,
you will see the following screen:
Xtreme Power Conversion Corporation
Page 19
XVRT-SNMP User’s Manual
Web/SNMP Card
Click on an event first, then click on one of the notifications action. Lastly, check the Enable button and specify the
necessary settings according to the notification method.
Network Message Notification
You may do the following to configuration Network Message Notification:
1. Click on an event.
2. Click on the Notify action.
3. Check the Enable button and specify the settings accordingly.
The settings include the following:
Enable
Delay
Message
Period
Users
Enable or disable the Network Message Notification.
It defines how long the event must last before sending the network message.
You can define the message you want to send.
There are two keywords for the event message definition. #HOSTNAME# will be replaced with
the actual host computer’s name, and #DOWNTIME# will be replaced with the actual countdown timer. For example, if a power failure occurs on a computer whose computer name is
“network01”, and there is two minutes left until shutdown, and the message is defined as “Power
failed, #HOSTNAME# will be down in #DOWNTIME# min!”. Since #HOSTNAME# will be replaced
with the actual computer name “network01”, and the #DOWNTIME# will be replaced with the
actual countdown timer, you will see “Power failed, NETWORK01 will be down in 2 min!”.
It defines how often to send the message when the event lasts. The value of 0 indicates to send
the message only once.
Specify who will receive the message. Setting it to broadcast means all users on the LAN. If you
want to send the message to more than one user, add ‘;’ in between users. Each user can be a
host name or IP address.
For example, “personA;123.12.12.3;personX” means that the message will send to three computers.
This setting is used for OnEvent only, for notification methods other than OnEvent, the XVRTSNMP will always broadcast to all users on the LAN.
In order to receive the message, the receiver must have at lease one of the following software:
• WinPopup
• OnEvent agent
Email Notification
You may do the following to configuration Email Notification:
1. Click on an event.
2. Click on the Email action.
3. Check the Enable button and specify the settings accordingly.
The settings include the following:
Xtreme Power Conversion Corporation
Page 20
XVRT-SNMP User’s Manual
Enable
Delay
Message
Users
Web/SNMP Card
Enable or disable the Email Notification.
It defines how long the event must last before sending the email.
You can define the message (the content of the mail) you want to send. See definition described
above.
Specify who will receive the mail. If there is more than one user you want to send, add ‘;’ in between users. Each user can be a user name, group name, or an email address depending on your
e-mail system.
For example, “personA;[email protected];personX” means that the mail will send to
three users.
Page Notification
You may do the following to configuration Page Notification:
1. Click on an event.
2. Click on the Page action.
3. Check the Enable button and specify the settings accordingly.
The settings include the following:
Enable
Delay
Message
Users
Enable or disable the Page Notification.
It defines how long the event must last before page the users.
You can define the page code you want to send.
Specify who will receive the page. If there is more than one user you want to send, add ‘;’ in between users. Each user can be a page number.
For example, “12345678;23451234;” means to page two users.
Please note that you must connect a standard MODEM with the MODEM cable come along with the package.
Scheduling
The XVRT-SNMP allows you to setup schedule for the UPS so that it can do self test or turn on/off the system automatically.
Load the web page or start the Device Manager, choose Configuration option and Schedule option, then you can
set up the schedule for the UPS.
To add a schedule item:
•
•
•
•
Click on the starting date for the schedule.
Select the repeat period which includes Once, Daily, Weekly, and Monthly.
Click on an action, such as Turn On UPS or Turn Off UPS.
Push the Add button.
To remove a schedule item, just select an item from the schedule list and push the Remove button.
Pushing on the Remove All button removes all items in the schedule list.
Xtreme Power Conversion Corporation
Page 21
XVRT-SNMP User’s Manual
Web/SNMP Card
Controlling Your UPS
The XVRT-SNMP allows you to control the UPS remotely. You may choose the Control option from the management
page to control the UPS.
Xtreme Power Conversion Corporation
Page 22
XVRT-SNMP User’s Manual
Web/SNMP Card
Shutdown and Reboot
You may use the following to shut down or start up the UPS:
Shut Down UPS
Cyber The Power
The XVRT-SNMP will begin the shutdown sequence after the specified number of seconds.
Setting it to 0 will cause the shutdown to occur immediately. Setting it to -1 will abort the
countdown.
The XVRT-SNMP will begin the shutdown sequence immediately , and the UPS will turn back
on after the specified number of seconds.
Testing the UPS
You may push on the Initial Self Test button to test the UPS. The testing result will appear in the Testing Result field.
The History of Your UPS
The XVRT-SNMP maintains two log files: an event log file and a data log file.
The event log file contains all UPS-related events, including power failures, shut downs, power recoveries, etc. The
default filename for the event log file is dnpower.log.
The data log file is a collection of the UPS power quality, including input voltage, output voltage, battery voltage,
temperature, etc. The default filename for the data log file is dnpower.dat.
These two file are ASCII files, which can be viewed by any ASCII text editor such as DOS EDIT or Notepad for
Windows, but using management program to view the log files is recommended.
Viewing Event Log
Load the web page or start the Device Manager. You may see an event log screen when choosing the Event Log
option. It contains date, time, and event description. The top of the list shows you the total number of records and
the current starting record and ending record contained in the list in the following format: starting record-ending
record/total # of records.
Xtreme Power Conversion Corporation
Page 23
XVRT-SNMP User’s Manual
Web/SNMP Card
Viewing Data Log
Load the web page or start the Device Manager. You may see a data log screen when choosing the Data Log option. It contains date, time, and event description. The top of the list shows you the total number of records and
the current starting record and ending record contained in the list in the following format: starting record-ending
record/total # of records
Xtreme Power Conversion Corporation
Page 24
XVRT-SNMP User’s Manual
Web/SNMP Card
The items shown on the screen include the following:
Date
Time
In-V
Out-V
Batt-V
Freq
Load
Temp
The date of the data recorded. The date format is month / day / year.
The time of the data recorded in 24 hour format.
The input voltage of the UPS in volts.
The output voltage of the UPS in volts.
The battery voltage of the UPS in volts.
The output frequency of the UPS in Hz.
The percentage of the UPS power capacity presently being used.
The UPS temperature in degree Celsius.
Configuring Logs
After loading the web page or starting the Device Manager, you may choose the Log Settings option to configure
the settings. It includes the following items:
Maximum
File length
Data
Recording
Interval
This setting specifies the maximum length (in bytes) of the log file. The XVRT-SNMP will cut the
first half of the file whenever the file exceeds this maximum length.
Range: 1 to 2000 KB
Default: 32 K bytes
This setting specifies the number of seconds to wait between each recording.
Range: 0 to 60 minutes (setting it to 0 will disable this function)
Default: 60 seconds
Xtreme Power Conversion Corporation
Page 25
XVRT-SNMP User’s Manual
Web/SNMP Card
OnEvent
Overview
OnEvent is a new technology for message notifications. It is used to receive messages and display them or do
something according to the messages. When a power event occurs, a multimedia message box will be displayed on
each computer with this module installed. It is also a shutdown agent for the Dependent Shutdown feature. That
is, it will shut down the computer system when receiving a shutdown command sent by the XVRT-SNMP Service
running on another computer.
Installing the OnEvent
Follow the following steps to install the XVRT-SNMP OnEvent:
1. Insert the XVRT-SNMP Management CD-ROM into your CD-ROM drive.
2. If your system supports Auto Run, just click on the XVRT-SNMP OnEvent option on screen. Otherwise,
open the folder regarding to the operating system of your computer under /manager/onevent/ directory,
then execute install.exe or install.bin. (For example, /manager/onevent/hpux/install.bin is the installation
program for HP-UX, and /manager/onevent/ibmos2/install.exe is the installation program for IBM OS/2)
3. Follow the instructions on the screen.
Note: For UNIX users, if you want to install it in console mode (text mode), execute the following command:
sh install.bin -i console
After install, you have to reboot your system to start it (for Windows and OS/2 users), or you have to start it manually or add it to the initial table. See the next section for more detailed information.
Starting the OnEvent Program
The following table describes how to start or stop the OnEvent program on different platforms.
Windows
95/98
Windows
NT/2000/XP
Linux/UNIX
Novell
NetWare
IBM OS/2
It starts automatically each time system boots. When it starts, you can find an OnEvent icon
inside the Windows taskbar. You may stop it by right clicking on the icon and choosing the Stop
the OnEvent Service. You may start it manually by choosing the XVRT-SNMP OnEvent from the
XVRT-SNMP folder in the Program Files.
It is a NT Service program, which will be started automatically each time system boots. When it
starts, you can find a OnEvent icon inside the Windows taskbar (not for Windows NT 3.51). You
may stop it by stopping the OnEvent from the Services in the Control Panel or right clicking on
the icon and choosing the Stop the OnEvent Service. You may start it manually by starting the
XVRT-SNMP OnEvent from the Services in the Control Panel.
It does not start automatically each time system boots. If you want to start it, you can execute
the onevent program manually or add it to the initial table. To stop it, just kill the process.
OnEvent is not offered for Novell NetWare server at present time.
It starts automatically each time system boots. To stop it, click on the OnEvent icon and choose
the Stop the OnEvent Service.
Xtreme Power Conversion Corporation
Page 26
XVRT-SNMP User’s Manual
Web/SNMP Card
Configuring the OnEvent
When OnEvent is started, it will load its configuration file and configure itself. The configuration file is located in
the directory where you install the OnEvent program. The filename is onevent.cf.
The following is an example.
# EnableShutdown enables or disables the shutdown feature, specifying 1 means to
# enable the shutdown feature; otherwise, the OnEvent agent will not shut down the
# system even when it receives the shutdown message.
EnableShutdown 1
# ShutdownExec is used to specifiy the shutdown command program.
# The specified program will be executed before shutting down the operating system
# ExecDelay specifies the max execution time (in seconds) for the specified program
# The OnEvent will start shutting down the system when the shutdown command program
# is finished or the ExecDelay time has expired.
ShutdownExec notepad.exe
ExecDelay 30
# BrowseProgram specifies the browse program.
# The OnEvent will use this browse program to display messages when it receive any
# messages sent from anyone.
BrowseProgram C:\Program Files\Interneshuttingt Explorer\IEXPLORE.EXE
# Language settings specifies the language system. It can be
# en, tw, cn, fr, es, de, it, ja, or ru representing
# English, Taiwanese, Chinese, French, Spanish,
# German, Italian, Japanese and Russian.
Language en
Each line started with # is used for comment. There are five items you can set at present time: EnableShutdown,
ShutdownExec, ExecDelay, BrowseProgram and Language. Their meanings are described in the above file.
By default, the shutdown feature is enabled. As to the display feature, OnEvent for Windows uses its own display
program by default. For UNIX, NetWare or OS/2 users, you have to install a web browser and set the BrowseProgram option in the configuration file.
Sending Messages to OnEvent
OnEvent is used to receive messages and display them or do something according to the messages. You can configure the UPS monitoring program to send out messages to OnEvent program when a particular event occurs.
Xtreme Power Conversion Corporation
Page 27
XVRT-SNMP User’s Manual
Web/SNMP Card
After loading the web page or starting the Device Manager, choose Configuration option, Event Action option,
you will see the following screen:
You may do the following to configuration Network Message Notification:
1. Click on an event in the Event list.
2. Click on the Notify in the Action list.
3. Check the Enable button and specify the settings accordingly.
The settings include the following:
Enable
Delay
Enable or disable the Network Message Notification.
Enable or disable the Network Message Notification.
You can define the message you want to send.
There are two keywords for the event message definition. #HOSTNAME# will be replaced with the
actual host computer’s name, and #DOWNTIME# will be replaced with the actual countdown timer.
Message For example, if a power failure occurs on a computer whose computer name is “network01”, and
there is two minutes left until shutdown, and the message is defined as “Power failed, #HOSTNAME#
will be down in #DOWNTIME# min!”. Since #HOSTNAME# will be replaced with the actual computer
name “network01”, and the #DOWNTIME# will be replaced with the actual countdown timer, you will
see “Power failed, NETWORK01 will be down in 2 min!”.
It defines how often to send the message when the event lasts. The value of 0 indicates to send the
Period
message only once.
Xtreme Power Conversion Corporation
Page 28
XVRT-SNMP User’s Manual
Web/SNMP Card
Specify who will receive the message. Setting it to broadcast means all users on the LAN. If you want
to send the message to more than one user, add ‘;’ in between users. Each user can be a host name
or IP address.
Users
For example, “personA;123.12.12.3;personX” means that the message will send to three computers.
Or set it to “xxx.xxx.xxx.255”. For example, setting it to “192.168.1.255” means to send message to
all“192.168.1.xxx” sub network (such as 192.168.1.1 to 192.168.1.254).
In order to receive the message, the receiver must have OnEvent installed.
Upgrading Firmware
Follow the following steps to upgrade the firmware of the XVRT-SNMP Card/Box:
1. Make sure the hardware is installed and configured properly.
2. Load the upgrade page from the XVRT-SNMP Card/Box as the below format:
http://ip-address/upgrade.htm
or
http://host-name/upgrade.htm
where ip-address or host-name addresses the XVRT-SNMP Card/Box.
3. type in the firmware file name and push on the Upgrade button on the page.
After upgrading the firmware, you have to re-configure the XVRT-SNMP Card/Box.
Xtreme Power Conversion Corporation
Page 29


![How to open your Preferences Windows Control Panel [Windows only]](http://vs1.manualzilla.com/store/data/005787188_1-657759d9a2a48c6bde523f6baebed157-150x150.png)