1
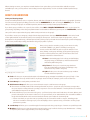
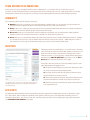
LPFM:
RADIO SPARK USER MANUAL
Hello, and thanks for reading! This guide is designed to help navigate RadioSpark, Prometheus Radio Project’s
community-driven website for low-power radio applicants and the groups and individuals looking to support them.
RadioSpark offers services similar to Wikipedia, Craigslist, and Yahoo! Answers, but with a user base focused
specifically on applying for an LPFM license, as well as providing support for those applicants.
In order to use RadioSpark, you’ll need to register for an account at www.radiospark.org. On the right-hand side of the site,
you’ll see the section that says join RadioSpark and Rfree – simply enter in your first and last name, preferred login and your
e-mail address.
Once you’ve submitted that information, you’ll receive
an e-mail that contains a link to log in – clicking that
link will take you to a screen where you’ll set up your
permanent password, contact info, public profile info,
and preferred settings for notifications from RadioSpark.
If you do not receive this email in 15 minutes, be sure to
check your spam folder. If you are still having trouble,
contact [email protected].
Once you’re logged on, this is what you’ll see on the
homepage. From here, there are plenty of options to
explore, but where you’ll want to start is dependent
upon your own situation.
Enter in your information on the right to register your account.
Welcome to RadioSpark!
IF YOU ARE AN LPFM APPLICANT
You’ll first want to create an applicant profile – this will allow you to be listed in the applicants section of RadioSpark, and will
also notify Prometheus Radio that you’re applying – they offer resources above and beyond what is available on RadioSpark.
Here’s how to sign up for that account:
}} Click on the Applicants tab located just below the RadioSpark logo.
}} From there, you’ll be taken to a new page that displays all public applicants on Radiospark – on the right, you should see a large purple button that says NEW APPLICANT PROFILE. Click that.
}} From there, you’ll be taken to a fairly comprehensive form asking you for your station’s basic information, areas of focus, plan for building your station, and whether you want assistance from Prometheus/RadioSpark members or not. Not all of this information is mandatory, but the more you fill out, the better.
}} Once you’re done, click the SAVE button at the very bottom of the page, and your applicant profile will be created!
}} You’ll also want to check out Rfree at some point – this is a site that will help you identify available channels in your area and plan where you can place your transmitter and tower based on current FCC broadcast maps. You can find Rfree by clicking the green USE RFREE button on the right side of the website (for documentation on how to use Rfree, click the GET SUPPORT link directly beneath Use Rfree.
Radio Spark User Manual
1
IF YOU ARE NOT AN LPFM APPLICANT,
OR HAVE ALREADY CREATED YOUR
APPLICANT PROFILE:
One of the biggest features that RadioSpark offers is the
ability to share your resources and materials with others
– RadioSpark makes it very easy to share that content
– on the right-hand side of the site, you’ll see a large
purple button that says SHARE RESOURCES.
Clicking it will cause seven new purple buttons to appear,
with each one representing a different category – click
on the appropriate button to begin submitting your info.
The categories are:
Sharing resources, with the options on the right!
}} Documents - Users can submit a helpful document. They have the option of naming the document via a headline, and can either attach the document to the post, or simply copy/paste the document into the body of the post, or do both.
}} Station Equipment – Users can submit equipment that applicants may use. Selecting this option will allow you to provide an attachment (generally a photograph or manual for the equipment), describe the equipment in the body of the post, and provide a location for the equipment.
}} Station software – Users can submit software that LPFM applicants can use for station operation – software can cover anything from audio editing to office management to on-air traffic scheduling. Selecting this option will allow you to add a description of the software in the body of the post, a screenshot, the homepage of the software’s manufacturer, and a link to download.
}} Space – Users can submit a space for LPFMs to use for hosting their on-air location and/or antenna. Selecting this option will allow you to to add a description of the location in the body of the post, the terms of use (whether you’re leasing it or it’s free to use), and the type of space the location is (warehouse, office, etc).
}} Legal Support – Users can submit info on legal counsels that are able and willing to support LPFM organizations during
their application process. Selecting this option will allow you to add the name, location and contact info for the practice, their consulting rates, and the specific areas of expertise the counsel offers.
}} Engineering Support – Users can submit an engineer or engineering firm that will provide support to LPFM applicants. Selecting this option will allow you to add the name, location and contact information of the engineer(s), the fees they charge, and certifications/specializations.
}} Training Material – This is essentially the same as submitting a document, but will allow for additional filtering for people searching for specific resources.
Once you’ve added your material, it will be available to everyone with a RadioSpark account under the RESOURCES tab at the
top of the website. Resources will be listed with the most recently submitted resources at the top – users can also search for
specific kinds of resources as well via this tab.
You can view a full list of all resources you’ve submitted via the following steps:
}} Hover your mouse over the MY STUFF tab just under the RadioSpark logo. Some new options will appear.
}} Click the MY CONTENT option – this will re-direct you to a new page where it displays all content that has not been read. You’ll see another option called MY CONTENT. Click this, and you’ll be taken to a list of all content you’ve posted to the website.
}} Click on the item you’d like to edit, and you’ll be taken to its listing on RadioSpark. There should be an EDIT link at the top of the listing – clicking that will allow you to edit or delete your content.
Radio Spark User Manual
2
When viewing resources, you may have noticed that there’s an option Once you’ve browsed the available resources
and added your own, you may want to start seeking out more targeted help. It’s time to check out RadioSpark’s Groups
feature!
GROUPS ON RADIOSPARK
Joining and Creating Groups
Groups on RadioSpark allow users to organize, discuss, and share information around specific issues or geographic locations.
You can access the groups by holding your mouse over the COMMUNITY tab, then selecting the GROUPS option. This will
take you a listing of all groups on the RadioSpark site, with the most recently created groups listed first.
If you find a group you’d like to be a part of, there will be a blue JOIN or REQUEST MEMBERSHIP button to the right of the
group listing, depending on how the group administrator has decided to handle that (you may also see INVITE ONLY, in which
case you’ll need to request that the group admin send you an invite to the group).
If you’d like to create your own group, simply click the large purple button that says CREATE A GROUP – this can be found
on the right-hand side of the website when you’re viewing the Groups tab. You’ll need to input the group name, a short
description for the general listing, a full description/listing of the group’s goals and mission statement, the preferred language
for the event, membership settings, and whether the group is public or private.
Once you’ve joined or created a group, you can access it easily
via the MY GROUPS tool, which is found by hovering your
mouse over the MY STUFF tab at the top of the website. From
there, clicking on the group will bring up the general group page.
You’ll see several options here, with 5 of them above the event
description and three of them below it:
}} Home is the landing page for the Group, and will display the group image, its description, and recent discussions and activity within the group.
}} By Term will allow you to search any tags that have been associated with posts. Users can add tags to any document or file posted to the group.
The group page, from a member’s view.
}} Q&A will take you to the section where group members can ask and answer questions.
}} Feeds will show you any external subscription feed that the group manager has added to the group (if any) – if the group manager has set up an RSS feed for any Google alert for LPFM, for example, you’ll see the results here.
}} Leave Group does exactly what you think it does!
}} Add Content to Group will allow you to start a discussion topic or add an event to the group.
~~ Discussions essentially function like a message thread in any forum – people can post, and users can respond to the post. Anyone creating a thread or posting a response in one can select whether or not they’d like to be notified when additional responses are added
~~ Events will allow you post an event to the group – you’ll need to input the start & end times, the street address, and provide a description of the event in order for it to be posted. Once you’ve submitted this, the event will be added to the global calendar which can be accessed under the Events option under the Community tab.
»» Please note that if you post the event to a public group, the event will be visible to anyone, including people who are not members of that group. If you’re attempting to share a private event, you’ll need to set the group’s permission to private.
}} Search Group will allow you to search through all content posted to the group via type of content or specific keywords.
}} Members will allow you to view the members currently in the group. It will also list the group administrators – clicking on anyone’s photo via this page will take you to their profile page.
Radio Spark User Manual
3
OTHER RESOURCES ON RADIOSPARK
At this point, we’ve gone through the main functions of RadioSpark – you should be able to use the system to post
resources, search for helpful documents, and organize with others around specific interests. RadioSpark offers several other
functionalities, which we’ll go through now, section by section, beginning with the tabs just under the RadioSpark logo.
COMMUNITY
The community tab has the following sub-categories:
}} Members takes you to a listing of every registered member of RadioSpark. You can search for specific members via this page as well. Clicking on the photo of any member will take you to their personal profile.
}} Groups takes you to a listing of all groups that have been created on RadioSpark, with the most recently created being on top. You can search for specific groups and join them via this page.
}} Discussions shows you every discussion listed in a public group, with the most recent discussion being listed first. Clicking on the title of a discussion will show you the full post, along with any responses.
}} Events takes you to a calendar that displays all public events that have been created by RadioSpark members. Clicking on a specific event will cause a pop-up window with more details on the event to appear – additionally, there will be a link at the bottom of the pop-up window that will take you to the full event listing on RadioSpark.
QUESTIONS
Clicking the questions tab will take you to a Q&A section – members
can post questions to the site which other members can answer. The
questioner can also select a best answer if their question receives
multiple responses. To post a question, simply click the large purple
button that says POST A QUESTION on the right, or use the Ask a
Question form located at the bottom of this page.
You can also filter the questions via several clickable options on the
page. Clicking them will apply the filter:
}} All Questions will display (you guessed it) all questions, with
the most recent question being displayed first.
}} Resolved Questions will show all questions that have been
answered with a best answer selected.
}} Unresolved Questions will show all questions that have been
answered, but that have not had a best answer selected yet.
The questions page. Please note you can ask a question either by
clicking the button on the right, or by using the Ask A Question
form below the list.
}} Unanswered Questions will show all questions that have not
been responded to yet.
APPLICANTS
The Applicants tab will display all of the organizations who have registered for a RadioSpark account, are planning to apply
for a radio station, and are listing their applicant profile publicly. Clicking on any of the applicants should give you more
information about them. You can also create your own appicant profile at this point by clicking the large purple button that
says NEW APPLICANT PROFILE on the right.
Radio Spark User Manual
4
MY STUFF
The My Stuff tab is essentially another way to filter content on RadioSpark – things that you’ve produced, joined or engaged
with on RadioSpark will show up here. There are several sub-options under this tab:
}} My Profile will take you to a brief profile that contains your contact info and a small activity feed that lists the latest things that you’ve done on RadioSpark, with links to each. For example, it may show that you’ve created a discussion, left a comment on software that someone has listed under the Resources page, and created an event in a group.
}} My Bookmarks will allow you to revisit all the posts, discussions or resources that you’ve bookmarked for easy reference – you’ll see all of your bookmarked items here. Clicking on them will take you to the original listing for that item on RadioSpark.
}} My Groups provides a quick list of all the groups you’re currently in. Clicking on a group name will take you to the page for that group.
}} My Content shows you all of the content that’s directly related to your activity on RadioSpark. There are three sub-
options available here:
~~ My Unread Content is the default option that displays when you click My Content – it shows all new content that
has been posted to groups you belong to since the last time you logged in.
~~ My Content shows you a comprehensive list of everything you’ve posted to RadioSpark, from discussion comments
to support documents.
~~ All Content shows you everything posted in the groups you belong to, whether you’ve previously viewed it or not.
}} My Relationships shows you a list of your relationships to other users – relationships are established on RadioSpark when someone follows someone else via their profile listing.
This guide was generously created by Brown Paper Tickets.
Radio Spark was developed and is hosted and maintained by Prometheus Radio Project.
www.prometheusradio.org
Radio Spark User Manual
5