1
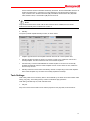
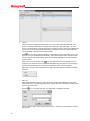
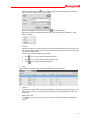
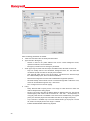
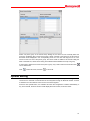
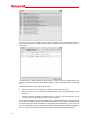
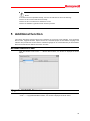
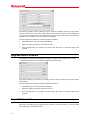
X-618 Public Address and Voice Alarm System Commissioning Manual M_2000060634_EN_2.3 Copyright © 2012 Life Safety A/V (Guangzhou) Co., Ltd. All rights reserved. No part of this document may be reproduced in any form without the written permission of the copyright owner. Disclaimer The contents of this document are subject to revision without notice due to continued progress in methodology, design, and manufacturing. Honeywell shall have no liability for any error or damage of any kind resulting from the use of this document. Trademark List All trademarks mentioned herein are the property of their respective owners. These are shown in the document Trademark Information. Content Preface ............................................................................................................................................. 1 Brief Introduction ......................................................................................................................... 1 Intended Reader .......................................................................................................................... 1 Relevant Documents ................................................................................................................... 1 Use Instructions ........................................................................................................................... 1 1 Overview ................................................................................................................................... 3 Software Features ....................................................................................................................... 3 2 Software Installation ................................................................................................................. 3 Run Environment ......................................................................................................................... 4 Software Installation .................................................................................................................... 4 Software Uninstallation ................................................................................................................ 5 3 Basic Operations ...................................................................................................................... 6 Running the Software .................................................................................................................. 6 Exiting the Software ..................................................................................................................... 6 Main Window Introduce ............................................................................................................... 7 Menu Bar..................................................................................................................................... 7 Navigation Buttons ...................................................................................................................... 7 Project Explorer View .................................................................................................................. 8 4 Configuration Guide ................................................................................................................. 8 5 Preparation................................................................................................................................ 10 Project Settings ......................................................................................................................... 10 New ..................................................................................................................................... 10 Open ................................................................................................................................... 11 Save as ............................................................................................................................... 11 Recent projects.................................................................................................................... 12 Project Saving Setting ............................................................................................................... 12 DCS Settings ............................................................................................................................. 12 Device Settings.................................................................................................................... 12 Task Settings....................................................................................................................... 17 Operation Setting................................................................................................................. 23 NPM Settings ............................................................................................................................ 25 Device Settings.................................................................................................................... 26 Task Settings....................................................................................................................... 29 Operation Settings ............................................................................................................... 29 NRI Setting ................................................................................................................................ 30 Device Settings.................................................................................................................... 30 Task Settings....................................................................................................................... 35 Upload Setting ........................................................................................................................... 37 Additional function ................................................................................................................. 39 Browse Record Files.................................................................................................................. 39 Upgrade DCS/NRI Firmware...................................................................................................... 39 Upgrade NPM Firmware ............................................................................................................ 40 Export Device List ...................................................................................................................... 40 Download Configuration File ...................................................................................................... 41 Select Language........................................................................................................................ 41 New Software Languages Adding .............................................................................................. 41 Preface Thank you for purchasing the X-618 Public Address and Voice Alarm System. Please carefully read this manual prior to product use so as to ensure correct use of the system. Brief Introduction This manual describes the basic operations and settings for the X-618 Config software, contained in the following sections: Chapter 1: Overview This section introduces the basic functions, runtime environment, and the necessary preparation required before operating or configuring the software. Chapter 2: Software Installation This section describes the runtime environment and the installation and uninstallation procedures for the X-618 Config software. Chapter 3: Basic Operations This section describes the basic operations of the X-618 Config software. Chapter 4: Configuration Guide This section describes various details regarding the settings and operations for the X-618 Config software. Chapter 5: Additional function This section describes special functions and operations of the X-618 Config software. Intended Reader This manual is mainly for personnel who need to install, operate, maintain, and understand the X618 Config software. Relevant Documents The following documents can be used as a reference when reading this manual: X-618 Public Address and Voice Alarm System Product Description X-618 Public Address and Voice Alarm System Installation Manual X-618 Public Address and Voice Alarm System Operation Manual X-DCS2000/EN Digital Integrated System Manager Product Instructions X-NPMI Configurable Network Paging Console Product Instructions X-NRI/EN Network Resource Interface Product Instructions Use Instructions All content including figures in this manual are to be used only for reference. The product may be subject to change from time to time without notice. Users of this product are recommended to carefully read all warnings and precautions in this manual. 1 2 Carefully read this manual before using the product and keep it as a reference for future use. This manual has been reviewed with its accuracy is ensured. In case of any doubt or dispute of the product description, the final interpretation given by Life Safety A/V (Guangzhou) Co., Ltd. shall prevail. Life Safety A/V (Guangzhou) Co., Ltd is not liable for any consequences caused by user mistakes when using the product or user misunderstandings of the manual content. 1 Overview The X-618 provides a series of complete multiple sound source public audio management solutions. The system allows users to customize the configuration to meet their own requirements. The X-618 Config software is a specialized tool for configuring the system. The user-friendly UI allows users to easily understand and operate the system, as well as configure complex settings. The X-618 Config software can be configured online or offline. If the software is configured offline, the configuration data is saved as a project file. The configuration file is uploaded to the device system, once the configuration software has been installed on a computer and that computer is connected to the system. After the system receives the configuration data, the system reboots automatically to allow the configuration settings to take effect. Software Features The X-618 Config software has the following features: Project File Management This feature includes the following functions: a. The ability to create new projects, save projects, and open projects b. Manages configuration settings and audio files System Configuration The configuration settings include basic property settings and broadcast function configurations. a. Basic property settings include the system component and parameter settings, such as the device type, device name, network IP address, time, partitions, and troubleshooting. b. The broadcast configuration settings are mainly for broadcast operations, such as the broadcast function triggered by the dry contact inputs, timed broadcasts, and other key operations. Output Settings These settings specify how configuration project files are generated, as well as related settings that include error checking and compiling settings for generating the final configuration file. Audio Source Conversion Audio source files can be converted to the format specified by system in terms of the audio sampling rate, digitalizing bit, and channel numbers. Network Communication The configuration software oversees uploading configuration files, audio files and timing data to devices such as the DCS and NPM through the network. The system reboots to allow new configurations to take effect upon successfully receiving and processing the configuration files. 2 Software Installation This chapter describes the runtime environment and installation and uninstallation procedures of the X-618 Config software. 3 Run Environment The X-618 Config software sends configuration data to devices within the system through the network. The computer on which the software is installed must meet the following requirements: Windows XP, Windows Vista or Windows 7 operating system (The software is untested in other Windows operating systems.) 1GHz or higher CPU At least 128MB of RAM At least 1GB of available disk space 10M/100M Ethernet interface Running at 1024X768 resolution or higher The software should be granted network access by firewall. Software Installation The X-618 Config software is easy to install by following an installation wizard. 1. Put the X-618 system CD into the CD-ROM drive, click X-618 System Commissioning Tool in the Autorun view or double-click the installation program X-618 Config.exe, and the X-618 Config installation wizard window displays as shown in Figure 1. Figure 1 X-618 Config Installation Wizard Page 2. Click Next. The License Agreement page is displayed. 3. Select I Agree on the page. 4. Click Next. The information page is displayed. Read the important information on this page before proceeding to the next step. 5. 4 Click Next. The page shown in Figure 2 is displayed. The default installation directory is C:\Program Files\X-618 Config. If this directory must be changed, click Browse to choose a different destination location. Figure 2 Select Destination Location 6. Click Next. The Additional Tasks page is displayed. 7. To create a desktop shortcut for running the software, select Create a desktop shortcut option. 8. Click Next. The Ready to Install page is displayed. 9. Click Install. The Installing page is displayed. The X-618 Config software is then installed on the computer. The installation progress is displayed. 10. Click Next. The information page is displayed. Read the information carefully on this page before proceeding with the installation. 11. Click Next. The X-618 Config Completion page is displayed. 12. If you need to start the X-618 Config software immediately, select the option Launch X-618 Config. Finally, click Finish to complete the software installation. Software Uninstallation To uninstall the X-618 Config software, follow the steps below: 1. Click Start at the lower left of your computer desktop, and select Program X-618 Config Uninstall X-618 Config. A prompt dialog appears with the message “Are you sure to remove the X-618 Config and its all components?”. 2. Click Yes to uninstall the X-618 Config software and all of its components. The prompt dialog “Some content cannot be deleted, you can manually remove them” is displayed. 3. Click OK. 5 Note: If you want to delete the remaining files manually, you can find and delete the X-618 Config software folder within the installation directory. 3 Basic Operations This chapter describes the basic operations of the X-618 Config software. Running the Software Note: Make sure X-SMART software and the X-618 Config software can’t be operated at the same time. If the X-SMART software is running, only it has been closed, the X-618 Contig software can be run. The steps for running the software are as follows: 1. Click Start at the lower left of your computer desktop, and select Program X-618 Config X-618 Config. 2. Select the menu commands Tools Select Language, the Select Language window is displayed, and the user can select the befitting language as needed, and click OK. The main window which is shown in English is displayed as shown in Figure 3. Figure 3 X-618 Config Software Initial Window Exiting the Software Select the menu commands Project Exit or click the “X” icon on the upper right corner, and a prompt dialogue displays. Click Yes in this prompt dialogue to exit the software. 6 Main Window Introduce The identifiers of the various views in the Config software main window are shown in Figure 4. And users can understand the descriptions in this manual easier. Title bar Menu bar Navigation buttons Project explorer view Main view l Figure 4 Main Window introduce Menu Bar Menu bar includes Project, Tools and Help, and provides some basic operations. Project Users can do the operations through the Project menu as follows:”New”, “Open”, “Save as”, “Recent projects”,”Close”,”Exit”. Tools The Tools menu provides some special operations, such as:” Browse Record Files”,” Upgrade Firmware”,” Export Device List” and “Select Language”. Help The Help menu of the X-618 Config software provides the software version information and the help information for the operation of the software. Navigation Buttons For making system configuration convenient, there are 4 navigation buttons in the top of the view. So the users can find the specific setting subjects quickly. Device The Device button leads to set the basic function parameters of the devices. The setting items which depend on the device type mainly include: Properties, Time, Supervision and so on. Task Click the Task button to set broadcast task. The users can set the various broadcast operations as the X-618 system needed. Mainly include: Play List, Task and Task Serial. Operation Click the Operation button to set the various operation functions, such as the keys and the appointed tasks for them, contact input, timing. 7 Upload Click the Upload button to verify that configurations are correct or not. If errors are found, an error list will be shown. If all the configurations are correct, then it will enter the configuration upload window. Project Explorer View The project explorer view mainly shows all devices and groups in the system. It is necessary to select the devices to make the relevant configurations one by one. Project Explorer Structure The Project explorer is shown in a tree - like structure. The first level show the project name, the second level shows the groups, and the third level shows all the detailed devices. Just as shown in Figure 5 Figure 5 Project Explorer Structure Device and Group The devices may be classified into different groups according to different project structures and building’s characteristics. When fire alarm signals are detected, the devices in the same group will connect with each other and respond at the same time. According to Right-click, the users can add, delete or rename the devices and groups. 4 Configuration Guide The DCS, NPM, NRI can be configured through the X-618 Config software. Note: 8 Each group is able to configure up to 32 DCS. Devices within a group can respond to the fire alarm signal at the same time. The numbers of the other devices are free. X-Config Configurations Flow: New project Edit project Open project Group operation (Add, Rename, Delete) Device operation (Add, Copy, Paste, Rename, Delete) Set the basic parameters of the device Device Set the audio files and play list Task Operation Upload Set the task list and the task serial Set the tasks or the task serial for the keys, contact and timing Upload the audio files, configuration files and timing data to the devices The configuration content is different, according to the device type. 1. The DCS enables configuring the following settings: Device - Properties - Time - Supervision - AVC - Standby Task - Play List - Task - Task serial Operation -Operation - Timing 2. The NPM enables configuring the following settings: Device 9 - Properties - Devices - Groups Task - Play List - Task Operation -Operation 3. The NRI enables configuring the following settings: Device - Properties - Supervision Task - Play List Operation None Preparation Before configuring the system, the following must be prepared: Make clear the types and the qty of the devices to form the system. Make clear the system need to provide all the functions for broadcast. Make sure the IP address and the device IP address in the same segment if want to upload the configuration file. Project Settings All the settings for the X-618 system are based on the concept of a “project”. A project comprises of many groups which form from DCS subsystems, NPM and NRI. Each subsystem is a system unit that has a DCS with a power amplifier and corresponding speaker circuits. Every new project has a unique folder which creates in a specified storage path at first, for storing the related project files. The project folder name and the project *.gpa file name are by default the project name. The project folder contains project file, audio files and the other temporary files. New The New icon in the menu bar is used for creating a project. The steps are as follows: 1. Select the menu command Project New in the X-618 Config software window, as show in Figure 4. The New Project window is displayed, as shown in Figure 6. 2. Refer to the example shown in Figure 6 to set the Project name, Location, and Device Group Name as necessary. The default directory for the project file is “My Documents”. This directly path can be changed. Click the different directory. 10 icon at the right side of the Location path field to select a Figure 6 New Project Window 3. Click the OK button to create the project. The window as shown in Figure 7 is displayed. Figure 7 Created Project Sample 4. Right-clicking the mouse in the Project explorer view causes a menu to pop-up to add, rename or delete Group, and also to add, copy, paste, rename or delete Device. Right-click “Project 1” ,the Group can be added; Right-click one Group, the device of the Group can be added, pasted, renamed or deleted; Right-click one device, the device can be copied, renamed or deleted, and another device can be added or pasted. 1. Select the menu command Project Open in the X-618 Config software window, as show in Figure 4.The Open window is displayed. 2. Find and open the project file. 3. Click the Open button. The selected project is then opened. 1. Select the menu command Project Save as in the X-618 Config software window, as show in Figure 4.The Save as window is displayed. Open Save as 11 2. Enter the new project name and select the storage directory for the project file. 3. Click the OK button. Then the project is saved as another file. Recent projects 1. Select the menu command Project Recent projects in the X-618 Config software window, as show in Figure 4. 2. The menu will show 5 projects recently opened. Click the project item as necessary to open it. Project Saving Setting There is no special save menu or button in this software to make the operation easier and clearer. As project setting, the software will save it automatically. DCS Settings Select the DCS in the Project explorer view, the three navigation buttons in the top left of the view, as shown in Figure 4, refer users to configure the following settings: Device - Properties - Time - Supervision - AVC - Standby Task - Play List - Task - Task serial Operation -Operation - Timing Device Settings The basic function parameters for the DCS can be set under this tab. These items such as Properties, Time, Supervision, AVC, and Standby will be set in turn. 1. Properties “Properties” is used to set the requisite parameters for the DCS working normally, as shown below: 12 Base Setting Base Setting includes DCS ID, DCS Name, DCS Type and Work Mode. a. DCS ID is the only device identification in the system, which in the range of 1~999. b. The Work Mode can be set to one of the following: The A Mode: Power Matrix Direct setting configures a system consisting of power amplifiers and speaker zones. The size of the matrix is determined by the actual number of the amplifiers and zones. Any zone in the matrix can select any audio source. The B Mode: Amplifier Direct Driver setting configures a system that drives one or more zones through each audio channel power amplifier, which can improve the output power of each zone. Each zone corresponding to the same amplifier broadcasts the same content. Amplifier Setting Amplifier Setting used to set the amplifiers’ type. The selected items include X-DA1500, XDA2250, and X-DA4125 etc. The configured amplifiers must be the same as the one in real installation. The detail messages please refer to the corresponding power amplifier product Instructions. Network Setting Used to set the DCS network parameter. Old IP is the IP address before setting, and New IP is the IP address after setting. For updating the network parameters of the system devices, it shall be connected to computer whose IP should be in the same segment with the old IP of DCS. Click the Update button for setting the IP of DCS, the two IP address would be the same after updating successfully. The default IP address is 192.168.2.200. If the upload of settings to the devices failed, or if the specified IP address has been forgotten, the default IP address can be obtained by pressing the appropriate button to reset the IP address. Fire Alarm Interface This item is used to set the fire alarm interface, including Disabled, Contact inputs, LPIModBus, Network-NRI. The default setting is disabled. a. If select Contact inputs, the DCS contact inputs will receive the fire alarm signal directly. To fulfill the fire alarm function, the corresponding tasks of the Physical Contact Input List need to be set in the Operation tab. b. If select LPI-ModBus, the DCS can communicate with fire alarm panel by LPIModBus directly. DCS shall be in the slave mode at that time, and the Slave Address 13 has to be set, and the range is 1~31. The introduction of LPI-ModBus module, please refer to LPI-ModBus converter User’s Manual. c. If select Network-NRI, the fire alarm control panel should be connected with NRI ports, the fire alarm signal will be transmitted to NRI, and according to the preset linkage relationship to enabled the DCS emergency voice alarm function. The corresponding settings please refer to the section of NRI Setting in this manual. Zone List The Zone List setting function allows users to enable/disable the zones and set the Zone Name and Power. Check the check box shown as to enable the corresponding zone. And shows the zone is disabled. Click directly one zone name or power in the zone list to edit it. The power setting used to determine if the amplifiers are appropriate. Select one zone, and click the icon in the right of the Zone List, the rest of power can be set as the same as the selected zone’s. So the same power value will be set for all the zones quickly. Used space The users can view the used space intuitively in this bar 2. Time "Time” is used to set the requisite parameter for the DCS working clock, as shown below: Time synchronization “Time synchronization” is the function to synchronize the time for DCS through NTP protocol. Default setting is off. a. If select Time Server, DCS will be set as a time server, the all other devices synchronize the time with it. In other words, the all other devices’ time would be in conformance with this DCS’s. b. If select Time Client, DCS automatically synchronize the time with time server. And need to set the Server IP address and Period. Date& Time “Date& Time” used to view and manually update the device’s date and time. Click on Get icon to get the device’s date& time. Only click on Update icon but on checking All Devices to conform this DCS’s date& time to PC, otherwise not only click on Update icon but also check the check box to conform all devices’ date & time, which included all DCS and NRI, to PC at the same time. 14 3. Supervision “Supervision” is used to set the supervision functions enabled or disabled, and the requisite parameter for check as shown below: Enable/ disable Supervision Through the software, users can set the fault supervision for the AC Power, DC Power, Power Amplifier, PTT Mic check, Communication, Line impedance or Earth Fault enabled/disabled. Line impedance tolerance If Line impedance is enabled, users can respectively enable/disable the line check function of the enabled broadcast zones and set the line tolerance parameters. When the line impedance tolerance is lower than the lower limit, the device s determines a short in the speaker line. When the impedance tolerance is higher than upper limit, the device determines an open in the speaker line. Here the unit for impedance tolerance is “%”. Select the one line, and click the icon in the right of the Line impedance tolerance list, the rest of parameters can be set as the same as the selected one’s. Line check interval time DCS provides regular check mode. The users can set the interval time between two checks, in the range of 1~1800 seconds. Supervise Loudspeaker lines while playing normal audio task. NOTE: This function is required by EN54 part 16. When this function is enabled, the device supervises all loudspeaker lines by pilot tone with preset interval. It may lead to slight interruption within 1 second on the consistency of audio playing. 4. AVC 15 The AVC Setting function allows users to set the parameters for the AVC, as shown below: AVC Input Select the AVC input channel, and check the Enabled check box to enable the AVC function of the selected channel. AVC parameter setting a. Collection time is used to set the checking interval of the ambient noise, which in the range of 200~10000millisecond. The default setting is 800millisecond. b. Reaction level shows the critical value to enable/disable the AVC, and the unit is dB. If the sound pressure level is greater than or equal to the specified value, the AVC function starts to work, and the device automatically adjusts the output volume; otherwise, the output volume is the minimum. c. Sensor deviation shows the deviation between the SPL measured by the noise sensor and the actual SPL measured by sound pressure meter. During the debugging, an invariable noise signal such as the white noise or the sine wave signal is broadcasted on site, and measured by the device and the sound pressure meter to get the deviation value between them. Make sure there is on disturbance sound. d. The Level deviation (min) is used to set the minimum volume of the adjusting range. e. The Level deviation (max) is used to set the maximum volume can be adjusted through the AVC. f. Factor provides the function to set the volume adjusting ratio, Same kind of sound change, the bigger the adjusted ratio, the bigger the volume change. Output Volume= (Ambient Noise+ Sensor Deviation- Reaction Level) X Factor+ Level deviation (min) Set the output channel Select the amplifier channel need to adjust the volume through the AVC. 16 Ambient Noise Collection Data Used to read the ambient noise data collected by the device. Click the Read Data check box to enable the read function, convenient for system debugging. And the list items include AVC Input, Collection Time, Ambient Noise SPL (dB)-Test Value, Ambient Noise SPL (dB)-Real Value, Reaction level, Level deviation (dB) and PA Channel. NOTE: Only the device works in the mode of B, the AVC function can be enabled; the AVC will be disabled automatically when the DCS work mode is A. 5. Standby The option provides amplifier standby function, as shown below: Amplifier Type shows the four amplifier channels which be set in the Properties view. Standby Amplifier provides the function to check the check box to enable the channel as a standby amplifier. And the unchecked ones are the master amplifiers. Auto Recovery is used to enable/disable the master amplifier to recover from the standby amplifier automatically, after the master amplifier back to normal. Check the box, enable the auto recovery function. Standby Channel is used to select the standby channel corresponding to the master amplifier. Each master amplifier only can select one standby amplifier as a backup. Task Settings Task mainly used set the necessary task for the broadcast by the DCS. Each task includes audio library, play policy, zone setting and dry contact to fulfill all the play operations. Task setting includes Play List, Task and Task serial. 1. Play List Play List is used to set the audio source and the play lists for the play tasks, as shown below: 17 Library The users have to configure the audio library first, if they want to play the audio files in the system. All the audio files’ basic messages, such as file name, size and length, would be shown in the audio library. And the total size can be gotten in the top of the Library.DCS would share the audio library with NPM and NRI during configuration. And the required audio files can be uploaded to the devices through the system. Click icon, the Open window is displayed. And the users can find and select one or more audio files from PC to add the audio file library. This software supports MP3 and WAV audio formats. And the other audio formats can be converted automatically to the audio format as system needed. Select one or more audio files, click icon, the selected ones can be deleted from the library list. If the audio file wants to be deleted has added into some play list, the information window would be displayed to show that the file has been used, cannot be deleted. Right click in the list for Add and Delete menu also can do the audio files addition or deletion operation. Play List After finishing the library setting, the play list can be created, and classified into two types: Public and Private. The public play lists can be used by all the DCS and NPM. And the private ones just for current DCS. Click the icon in the Play List view, the Add window is displayed as below: Enter the play list name, select the type from the drop - down menu, and click OK to create a new play list. 18 Select one play list and click icon or double-click the list, the Edit window for editing the play list name as needed, is displayed as below: Select some playlists in the Play List view click icon to delete them. Right click in the list for Add Edit and Delete menu also can do the play list addition, edit or deletion operation. Contents Select some play list, the all the audio files of that list would be displayed in the Contents view. Left click and drag the audio files in the library into the Contents view, and the audio files have been added in the play list. The user can reorder the audio files as needed: a. Click icon to move forward the selected audio file. b. Click icon to move backward the selected audio file. c. Click icon to delete the selected audio file. 2. Task Task is used to view, add, modify or delete broadcast task, as shown below: Task List There are many parameters of the all tasks displayed in the task list, such as task name, type, audio source, zones, dry contact, priority, loop, delay, recovery, and audition, busy wait, full and record. Adding Play Task Click below: icon in the upper right corner of the task list ,and the Add window is displayed as 19 Set the following parameters as needed: a. b. c. d. 20 Task: enter the task’s name to identify the task’s effect. Type: Normal or Emergency. Normal is used for the public address such as the normal background music, operation broadcast, voice broadcast etc. Emergency is used for the fire emergency broadcast. Audio Type: Play List, DCS local AUX input, DCS Record File, Net Audio or DCS PTT Play List: usually used for voice broadcast, background music etc. The users also can add the prompt tone files into the play list as needed. AUX: External audio sources, such as DC player, connected to the device through the 4 DCS auxiliary inputs, AUX1~AUX4 are selectable. Record File:Configured in the DCS and broadcasted through DCS operation. Net Audio: Mainly external audio sources connected through NRI or NRI inner voice, which can be selected through the drop - down menu. PTT: Configure a PTT to DCS for paging. Policy: Delay: Edit this field to specify a time in the range of 0~600 second for which the audio is delayed before being played. Priority: The range of the value is different based on different task type. The Normal and Emergency task values must be between 56 ~ 255 and 1 ~ 55 respectively. If many play tasks are set to broadcast to the same zones simultaneously, the highest priority one would be played. And the smaller the value is, the higher the priority. Loop: This item is available only to that the selected audio type is play list or record file, used to set the play times in the range is 1~65535. Endless: Enable/disable endless loop playback. e. Audition: Check the check box or not to enable/disable the function which supports confirming the play contents according to auditioning them by the device’s built-in speakers in advance. Busy wait: check the check box to enable the lower priority task which was in conflict with a higher priority one plays when the running task finished. Otherwise the task would be canceled automatically. Recovery: Enable or disable the shortcut task which was be broken off by the higher priority task resumes automatically when the insert task finished. Full: Check the check box to enable the audio source broadcasting keeps integrality in the new added zones. In the other word, when the task is running, unless the playing voice finishes, the next audio source will be broadcasted in the new zones. This function is mainly used for voice broadcast. Zones: Select the appropriate broadcast zones. Because of the tasks configured for DCS only can be broadcasted in the local zones, the most 8 zones can be selected. Click f. to select all, and click to cancel all. Dry Contact: Check the dry contact match zones check box, and the dry port output corresponds one-to-one with the zones. For example, the Zone 1 runs the Port 1 enables. The function is used for volume controller Dry Port equal Zone ID: If this function is set, the device starts the dry port output when the play task begins. The dry port output corresponds one-to-one with the zones. Click OK to save the settings. Editing Play Task Select one play task in the task list, and click icon in the upper right corner of the task list or double left click, the Edit window is displayed. The user can edit the parameters like those above as needed. Deleting play task Select one play task in the task list, and click icon in the upper right corner of the task list, the deleting confirmation window is displayed, and click YES to delete that task. NOTE: The users can right-click the task list to add, copy, paste, edit or delete play task. 3. Task Serial When the more complex operation, which enables multiple tasks to play with one trigger, through the dry contacts, is needed, the users can set the task serial. The task serial contains many tasks is triggered, the tasks will follow respective play policies to run. As shown below: 21 Task List The task list displays all of the tasks in current setting, includes task name and type. Serial List The serial list displays the task serials have already existed, and provides the Add, Edit and Delete operation. Click below: icon in the upper right corner of the serial list ,and the Add window is displayed as Enter the serial name and click OK button. Select one task serial in the serial list, and click icon in the upper right corner of the task list or double left click, the Edit window is displayed. The user can edit the serial name as needed. Select one task serial in the serial list, and click icon in the upper right corner of the task list, the deleting confirmation window is displayed, and click YES to delete it. NOTE: The users can right-click the Serial List to add, edit or delete task serial. 22 Serial Detail Select some task serial, all the tasks of that serial list would be displayed in the Serial Detail view. Left click and drag the tasks in the Task List into the Serial Detail view, and the tasks have been added in the serial list. If the users want to delete the tasks, select them can click click Delete from the pop- up menu. icon or right-click them and Operation Setting Operation setting is used to set the tasks for the DCS key, PTT, contact input and timing operation. 1. Operation Key List Key List used to set the tasks for manual operation by the DCS key or PTT. Click the Key1~Key4 or PTT respectively corresponding task cells, and select the tasks have been configured in the phase of Task. Normal PTT and Emergency PTT can only select the tasks which selected PTT as audio source; the software will filter them automatically. a. Key 1~Key 4 respectively correspond to the 4 sound source selection buttons on the DCS front panel. b. Normal PTT corresponds to the DCS PTT operation in the normal state. The task has to be selected those set the PTT as audio source and normal as the task type. c. Emergency PTT corresponds to the DCS PTT operation in the emergency state. The task has to be selected those set the PTT as audio source and Emergency as the task type. Contact Input List There are 2 types of dry contact input on the DCS: Physical and Virtual. a. Physical dry contact input is the signal which is sent from corresponding physical ports on the device. b. Virtual dry contact input is the signal which is set through the system inner software for operation convenience, and it can be applied to linkage control, for example links with FAS system according to LPI-ModBus. If the fire alarm interface is Net-NRI, the evacuation tasks and alert tasks of the each DCS corresponding virtual dry contacts can be set in the section of NRI Task Setting. 23 Only one task or task serial can be selected for each contact input port. The steps are following: a. Check the Enable check box as needed. b. Each port respectively corresponding task cell, when click, provides a drop-down menu with a list of selectable task or task serial options. c. Select one task or task serial as needed. 2. Timing Setting The timing broadcast function can be set through the configure software, and DCS can work automatically according to the preestablished timing. The timing setting includes Daily, Weekly and Special. The daily timing is the foundation of the timing function, but it can’t be executed directly. Before configuring any timing schedule, create a daily schedule first. Then use the daily schedule to configure the weekly and special schedules as needed. Daily Each DCS can set up to14 daily schedules. Click one cell of the Day Timing List, and enter the schedule name. And then click the corresponding Start Time, End Time and Task to set the detailed contents of the timing in the Day Timing Contents. Each daily schedule can set 40 timing contents at most. NOTE: Make sure the daily timing was set within 24 hours, and the End time must be at least 5 seconds after start time. Weekly Click Weekly and the setting view would be displayed. Select a daily timing for everyday within a week. If the content of one day is empty, means that day has no timing schedule. 24 Special Special timing is the schedule beyond the weekly timing. For example, set a special play task suits the festival atmosphere or rest in a holiday. The setting steps are simply: select the Start Date, End Date and Day Program one by one. If want to delete one item, just need to select it and click icon. Note: The priority of special schedule is higher than weekly schedule. In other word, when one day has been set a special timing, the weekly timing will be ignored. NPM Settings Select the NPM in the Project explorer view, the three navigation buttons in the top left of the view, as shown in Figure 4, refer users to configure the following settings: 25 Device - Properties - Device - Group Task - Play List - Task Operation -Operation Device Settings The basic function parameter for the NPM can be set under this tab. These items such as Properties, Device and Groups will be set in turn, 1. Properties “Properties” is used to set the requisite parameter for the NPM working normally, as shown below: Base Setting Base Setting includes NPM ID, NPM Name, Password, Trigger Type and Emergent button. a. NPM ID is the only device identification in the system, which in the range of 5000~6000. b. Enter a name to mark the device for the convenience of user’s identification. c. Password implements operator authorization management. It can allow nulls. But if a password has been set, only the users enter the right password can operate the device. d. The Trigger Type can be set to one of the following: e. f. 26 Press: Press and hold the TALK button to begin paging, and then release the button to release the selected zones and stop paging. Toggle: Press the TALK button a second to begin paging, and then press it again to release the selected zones and stop paging. The Emergent button is used to set the priority of the NPM. Microphone Monitoring is use to enable /disable the microphone fault detection function of NPM. Network Setting Used to set the NPM network parameter. Old IP is the IP address before setting, and New IP is the IP address after setting. For updating the network parameters of the system devices, it shall be connected to computer whose IP should be in the same segment with the old IP of NPM. After click Upload, the IP will update successfully, and the two IP address would be the same. The default IP address is 192.168.2.100. If the upload of settings to the devices failed, or if the specified IP address has been forgotten, the default IP address can be obtained by pressing the appropriate button to reset the IP address. Voice Multicast IP is used to set the NPM microphone paging multicast IP, the default setting is 224.0.3.*. Make sure the voice multicast IP of the every NPM is different, is not incompatible with X-Smart multicast IP too. 2. Devices “Devices” is used to select the DCS for operation and the NPM for full duplex intercom, as shown below: DCS List The DCS List displays all the DCS in the system. Check the check box to enable the corresponding DCS can be operated through NPM. And then, another click the selected box to cancel it. NPM List The NPM List displays all the NPM in the system. Check the check box to select the corresponding NPM which are wanted to initiate the full duplex intercom function with them. And then, another click the selected box to cancel it. 3. Groups For user's convenience, there some groups can be set for the NPM through config software. Each group can contain many zones. The Groups window is displayed as shown below: 27 DCS List & Zones List After finishing the DCS List setting in the step of Devices, all of the selected DCS would be displayed in the DCS List in this step. Select one DCS, and all zones connected to it would be displayed in the Zone List. Group List a. First of all, the user has to create a group in the Group List. Click the Group List view, the Add window is displayed as below: icon in the Enter the Group Name, and click OK to create a new group. b. Select one group and click icon or double-click the list, the Edit window for editing the play list name as needed, is displayed as below: c. Select one or more groups in the Group List, and then click icon to delete them. For user's convenience, all groups can be share with all of NPM in the system. The user just need to check the check box ahead of the group, that group would be applied to the current NPM. If the different NPM need the same group, the setting steps would be reduced. NOTE: Right click in the list for Add Edit and Delete menu also can do the play list addition, edit or deletion operation. Group Detail Select one group, the all the zones of that group would be displayed in the Zone Detail view. Left click and drag the zones into the Group Detail view. And the zones have been added. If left click and drag the DCS in the DCS List, all the zones belong to that DCS would be added into the Group Detail. If users want to delete some zones, only need to select the zones and click them. 28 icon to delete Task Settings Task mainly used set the necessary tasks for the broadcast by the NPM. Each task includes audio source, play policy, zone setting and dry contact to fulfill all the play operations. Task setting includes Play List and Task. The ways and means for setting are almost as the same as DCS’s, except the following points: a. Only the play list whose type is Public can the NPM add and use. b. The record and audition options are not provided in the NPM task, and because of the NPM has to select zones manually, the zones setting is needless too in the NPM task. The parameters of the NPM task is shown as below: Operation Settings Operation mainly used set the tasks which are triggered by the 4 sound sources buttons in the NPM interface. Either List-Normal or Key List-Emergency, click the Key1~Key4 or PTT respectively corresponding task cells, and respectively select the normal tasks or emergency tasks, which had been configured in the phase of Task. Normal PTT and Emergency PTT can only select the tasks which selected PTT as audio source. The software will filter them automatically. Key List-Normal a. Key 1~Key 4 respectively correspond to the 4 sound source selection buttons on the NPM interface, when the NPM running under general-purpose broadcasting state. b. Normal PTT corresponds to paging operation under the normal state. The task has to be selected those set the PTT as audio source and normal as the task type. 29 Key List-Emergency a. Key 1~Key 4 respectively correspond to the 4 sound source selection buttons on the NPM interface, when the NPM running under emergency broadcasting state. b. Emergency PTT corresponds to paging operation under the emergency state. The task has to be selected those set the PTT as audio source and emergency as the task type. NRI Setting Select the NRI in the Project explorer view, the two available navigation buttons in the top left of the view, as shown in Figure 4, refer users to configure the following settings: Device - Properties - Supervision Task - Play List Device Settings The basic function parameters for the NRI can be set under this tab. These items such as Properties and Supervision will be set in turn. 1. Properties “Properties” is used to set the requisite parameters for the NRI working normally, includes Base Setting, Network Setting, Date & Time, Fire Alarm Interface List and Audio Source Setting, as shown below: 30 Base Setting Base Setting includes Device ID, Device Name and Storage. a. Device ID is the only device identification in the system, which in the range of 7000~8000. b. Enter a name to mark the device for the convenience of user’s identification. c. Storage used to select the audio files’ storage position. Built-in 500MB flash (Max. 96 minutes) and 4GB (Support max. 32GB) SD card are selectable. Master is used to set the current NRI as a master one or not. d. NOTE: If the NRI is set to be a master one, the fault status of all the equipments in the same device group will be sent to this mater NRI. When the system has any fault, the NRI will send out acousto-optic warning and the dry contact fault signal: short circuit signal when in normal; open circuit signal when some fault occurs. Only one NRI can be set as master in each device group. Network Setting Used to set the NRI network parameters. Old IP is the IP address before setting, and New IP is the IP address after setting. For updating the network parameters of the system devices, it shall be connected to computer whose IP should be in the same segment with the old IP of NRI. Click the Update button for setting the IP of NRI, the two IP address would be the same after updating successfully. The default IP address is 192.168.2.200. If the upload of settings to the devices failed, or if the specified IP address has been forgotten, the default IP address can be obtained by pressing the appropriate button to reset the IP address Date& Time “Date& Time” used to view and manually update the device’s date and time. Click on Get icon to get the device’s date& time. Only click on Update icon enabled to conform this NRI’s date& time to PC, otherwise either not only click on Update icon but also check the check box to conform all devices’ date & time, which included all DCS and NRI, to PC at the same time. 31 Used space The users can view the used space intuitively in this bar. Fire Alarm Interface This item is used to set the NRI’s fire alarm interface mode: Disabled, Contact inputs or LPIModBus. The default setting is disabled. a. If select Contact inputs, it supports up to 32 trigger signal inputs. b. If select LPI-ModBus, it supports up to 256 zones of 32 DCS. Register Num has to be set, click the button, and the window is displayed as shown below: Because of NRI supports up to 32 DCS fire alarm linkage, there are 32 status registers and 32 control registers in the NRI. Each DCS corresponds to 1 status register and 1 control register. And the numbers of each module corresponding the control register and status register have to be set. The total control register numbers cannot be more than 32, so do the status register. Besides, the corresponding setting of LPI-ModBus has to be done. The setting method, please refer to LPI-ModBus converter User’s Manual. NOTE: If the fire alarm interface of NRI is enabled, the fire alarm interface of DCS has to select NetworkNRI. Audio Source Setting Audio Source Setting mainly used to set the parameters for 5 audio sources which send from NRI to the Network. The setting contents include: enable/disable, source name, multi-case IP and audio source. There are 5 audio sources through an Ethernet network, 4 inputs that can connect to external audio sources, and 1 built-in audio source. And the external audio source interfaces have 2 types: auxiliary input and balance input. a. Check the check box or not to enable/ disable the audio source as needed. b. Set the source name, so the correct audio source can be selected when the play task is set. c. Click the cell of Audio Source, and select the audio source from the drop - down menu as needed, including Auxiliary Input, Balance Input and the play list of the NRI. d. Only make sure the actual interfaces for the external audio sources are consistent with configuration can NRI works normally. Dry Contact Output If the Function cells are empty, the corresponding ports are disabled. 32 If the “General Fault Output” has been selected for some port, the corresponding dry contact will send out the system’s fault signal: the short circuit signal when in normal; open circuit signal when any fault occurs in the device group. But it is only fit for the NRI that had been set as Master one. 2. Supervision “Supervision” is used to set the supervision functions enabled/disabled, and the requisite parameter for check as shown below: Through the software, users can respectively set the fault supervisions for the AC power, DC power, Communication, 32 Contact Input Monitoring and Fault Output Dry Contact enabled or disabled. means enable; means disable. 3. Fire Alarm Relation Fire Alarm Relation is used to set the fire alarm linkage function for NRI. Enable to set the zones are linked by each contact input, as shown below: 33 One column corresponds to one contact input, according to the fire alarm interface setting foregoing, the contact inputs can be the dry contact input signal, or the fire signal send from the fire alarm system through LPI-ModBus. One page can display up to 32 contact inputs, users can select the other pages through clicking the drop - down list. One low corresponds to one zone; drag the scroll bar to view more contents. For example, as shown above, the contact inputs 1~8 respectively relate with zone1~zone8 of DCS2, and give an alarm in the ±1 adjacent zones. Before fire alarm relation setting, click Select DCS to select DCS to be related by NRI. The list only displays the DCS which is not be selected yet in the group, as shown below: Click the check box before the device ID to select the corresponding DCS, click again to deselect. Finish selection, click OK to return the fire alarm relation view, the zones of the all selected DCS are displayed. The zones, linked by each contact input, can be set. There are some setting tools in the upper right: Evacuation: Used to set the evacuation zones, which are related by the contact inputs. Alert: Used to set the alert zones, which are related by the contact input. Clear: Used to cancel the setting of some cell. Clear current DCS flags: Used to cancel all the zones’ setting of the DCS whose region is focus on by the cursor. Clear all flags: Used to cancel all the cells’ setting in the view. Select: Used to select cells. 34 Click icon or icon, and then click the zones’ cells to set to be related by the contact input. Use the clear tools can cancel the setting. Note: When communicate with fire alarm system through, the devices in the same group can linkage with each other. Fire alarm relation setting should be consistent with task setting. If only the evacuation task is set in a fire, only the evacuation zones need to be set in the fire alarm relation view, the alert setting is invalid. If DCS works in B mode and automatic emergency broadcast can be evacuation audio and alert audio, it is recommended that each contact input linkage 2 zones which correspond to the same power amplifier channel at the same time, if the 2 zones respectively broadcast evacuation audio and alert audio, the evacuation audio first. Task Settings Task setting mainly used to set the NRI inner play list. 1. Play List The ways and means for setting are almost as the same as DCS’s, except that: The play list type has to be Private immovably. 2. Task The task types include: Evacuation, Alert and Telephone, as shown below: Click icon, the Add window is displayed as below: 35 The ways and means for setting are analogous to DCS, except the following contents: The task types include: Evacuation, Alert and Telephone, for Evacuation task and Alert task, the play list (DCS inner audio source) and the Net audio (NRI audio source) can be selected; for Telephone task, only the external audio source of the NRI can be selected. If users have selected LPI-ModBus as the NRI fire alarm interface, and set the evacuation task or the alert task, the software will automatically distribute these tasks to the virtual contact input of the DCS that has been related in the Fire Alarm Relation. The setting status will be viewed in the virtual contact input window in the Operation tab. When users set the telephone task, they need to set up to 128 phone groups. Click Group Setting button in the lower left of the telephone task add window, the Phone Group Setting window is displayed as shown below: 36 Select one phone group in the Phone Group Setting list, the Zone List, lies vertically below the group list, will display all the zones of that group. Select one DCS in the DCS List, the all zones of that DCS will be displayed in the corresponding Zone List. Left click and drag the one or more zones into the zone list of the phone group, the zones would be added. If left click and drag the DCS in the DCS List, all the zones belong to that DCS would be added into the phone group. If users want to delete some zones of the phone group, only need to select the zones and click icon to delete them. Click to select all zones, and click to cancel all. Upload Setting Please confirm all the configuration items had be set already before upload setting, but also confirm the PC had been connected with the X-618 system through an Ethernet network. And the IP address of PC and devices has to be set in the same segment. And then click Upload button, the software will check the configuration contents automatically. If any errors existed, the Error window would display all the error items, as shown below: 37 According to the error tips, please correct the all error contents one by one. Unless there are no errors that need correction, clicking the Upload button would lead to the Upload window directly, as shown below: If a large amount of devices had be set in the project, in order to choose the needed devices and contents to upload conveniently, DCS, NPM and NRI are respectively distributed to 3 unattached tab. As needed, there are 3 select methods as following: Select the contents such as configure file, audio file or timing data one by one. Check the All check box to select all the uploaded contents of the corresponding device at the same time. Check the All DCS, All NPM or All NRI check box on the top of the upload window, the all contents of the corresponding device types would be selected. Finish contents selecting, and then click Upload button to upload data through an Ethernet network. If any DCS’s configuration file has been selected and upload, the whole project’s configuration file (not include audio file) will be uploaded the corresponding DCS automatically, in other word, the project’s configuration file will be backup in all the DCS those have finished uploading configuration files. The device corresponding progress bar and text tip remind the current state of upload. 38 NOTE: If the data cannot be uploaded normally, the user can deal with the errors as following: Check if the PC connects with device normally. Check if the PC or the devices’ IP address is correct. Check if the software is granted network access by firewall. 5 Additional function This section describes special functions and operations of the X-618 Config software, such as Browse Record Files, Upgrade firmware, Export Device List, Download project file and Select Language. This software also provides the function that the software language can be customized freely as area needed. Next we will describe the detail of the function as follow: Browse Record Files Click the software menu:”Tools” --- >”Brower Record Files”, the window is displayed as shown below: Upgrade DCS/NRI Firmware The application of DCS and NRI can be upgraded through this software. Click software menu: “Tools” ” --- >”Upgrade DCS/NRI Firmware”, the window is displayed as shown below: 39 The following software version message or items, such as IP address, device type, file system version, Kernel version, App version, MAC address, MCU version and device ID, are displayed in the upper of the window. Enter the IP address of the device, click Firmware Query, and the above software version message of the current device would appear. If want to upgrade the firmware, the following steps are needed: Click Select button, the Open window is displayed. Select the object program file, whose format is*.bin. Click Upgrade button, the progress bar and the text tips below it remind the state of the upgrade. Upgrade NPM Firmware The application of NPM can be upgraded through this software. Click software menu: “Tools” ” -->”Upgrade NPM Firmware”, the window is displayed as shown below: Enter the IP address of the device, click Query, and the version message of the current device would appear. If want to upgrade the firmware, the following steps are needed: Click Select button, the Open window is displayed. Select the object program file, whose format is*.bin. Click Upgrade button, the progress bar and the text tips below it remind the state of the upgrade. Export Device List This software provides device list exporting function. It supports that the all devices’ data, include device type and quantity, had configured in the project file, can be exported to a *.xls form sheet file, according to a prescribed list form. 40 Click software menu: “Tools” ” --- >”Export Device List”, the Save window is displayed. Select the directory path and enter file name, and then click Save button to export a device list. Download Configuration File If users lost the configuration file, it is available to download the file from any DCS in the system. Please follow the following instruction to operate: Click the menu: Tools--- >Download Configuration File, the window is displayed as shown below: Enter the IP address of any DCS in the system, click “Download”, and the project’s configuration files (except audio files) can be downloaded and saved to an appointed path. Select Language This software support multilingual UI. Click software menu: “Tools” ” --- >”Select Language”, the window is displayed as shown below: The users can select the language from the drop-down menu as needed, click OK to change the UI language. The software only provides 2 default language options: Simplified Chinese and English. Another language options can be added freely by the users, the details please refer to the next section---New Software Language Adding. New Software Languages Adding To satisfy some countries and regions’ UI language demand, the users, professionals are recommended, can add a new UI language for the software, as described the steps below: Open the language_cfg.xls file in the installation directory of software. The language file contents are shown as below: A new language can be added in column E as needed, and so on. To delete a language, directly delete the column of the language, and then save the file. Restart Config software. The new language is displayed in the language dropdown list. 41 NOTE: The contents cannot be too long, this maybe results in software UI language display wrongly or incompletely. 42 www.honeywellav.com Life Safety A/V (Guangzhou) Co., Ltd Address: No. 257 Junye Road, Guangzhou GETDD East 510530, China Tel: +86 (0)20 2839 9600 Fax: +86 (0)20 2820 8706 © 2012 Life Safety A/V (Guangzhou) Co., Ltd. All rights reserved.