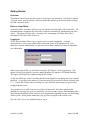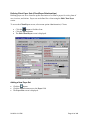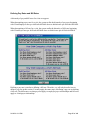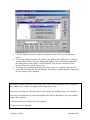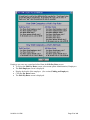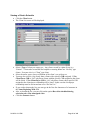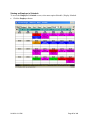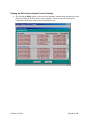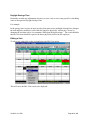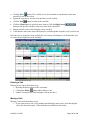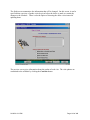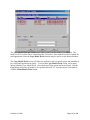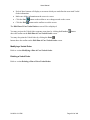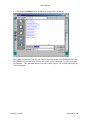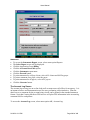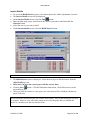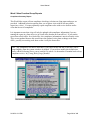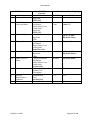
1
€ COPYRIGHT 1998-2006 Last Updated 1/18/2006 Build 3.0.68 Getting Started .........................................................................................................................13 Overview.......................................................................................................................................... 13 Back vs. Front Office....................................................................................................................... 13 Logging-In ....................................................................................................................................... 13 Definitions................................................................................................................................14 Back Office ...................................................................................................................................... 14 Front Office ..................................................................................................................................... 14 Payer................................................................................................................................................ 14 Client ............................................................................................................................................... 14 Patient.............................................................................................................................................. 14 Facility ............................................................................................................................................. 14 Staff Employee ................................................................................................................................ 14 Field Employee ................................................................................................................................ 14 Contract Employee.......................................................................................................................... 14 How List and Data Screens Work ............................................................................................15 Terms............................................................................................................................................... 15 Buttons............................................................................................................................................. 15 Date Fields ....................................................................................................................................... 15 Explanation ..................................................................................................................................... 16 Defining Payers........................................................................................................................20 Profile Page...................................................................................................................................... 20 Vitals Section.............................................................................................................................................. 20 Billing / Clinical Requirements Section ....................................................................................................... 22 Requirements Page.......................................................................................................................... 24 Skills and Codes Page...................................................................................................................... 25 Changing Revenue Code, HCPC Codes or Modifiers for a Payer................................................. 27 Calendar Page ................................................................................................................................. 28 Billing Period Section.................................................................................................................................. 28 Payer Billing Periods Section ...................................................................................................................... 28 Defining Clients .......................................................................................................................29 Client Profile ................................................................................................................................... 29 Vitals Section.............................................................................................................................................. 29 Vitals Section (continued) ........................................................................................................................... 31 Self-Pay Billing Info Section ....................................................................................................................... 32 Client Skills and Codes ................................................................................................................... 33 Client Attributes Page..................................................................................................................... 34 01/18/06 3:13 PM Page 2 of 448 Attributes Section........................................................................................................................................ 35 Want Employees That Can/Are Section ....................................................................................................... 35 Client Ancillary Info ....................................................................................................................... 35 Client Race ...................................................................................................................................... 36 Readmitting a Client ....................................................................................................................... 37 Viewing Client Visit History ........................................................................................................... 38 Defining Client Payer Sets (Client/Payer Relationships) ............................................................... 41 Adding a New Payer Set.................................................................................................................. 41 Payer Information Section ........................................................................................................................... 42 Insured’s Information Section...................................................................................................................... 43 Policy Information Section .......................................................................................................................... 43 Invoicing Information Section ..................................................................................................................... 43 Adding Client-Payer Requirements................................................................................................ 44 Requirements List Section ........................................................................................................................... 44 Adding Client-Payer Requirements Skills and Codes.................................................................... 45 Defining Client Insurance Authorization Compliance Rules......................................................... 47 Defining Pay Rates and Bill Rates .................................................................................................. 50 Adding Pay Rates ............................................................................................................................ 51 Deleting Pay Rates........................................................................................................................... 52 Printing Pay Rates........................................................................................................................... 53 Copying Pay Rates .......................................................................................................................... 53 Updating Visits ................................................................................................................................ 54 Defining Bill Rates........................................................................................................................... 56 Deleting Clients ............................................................................................................................... 56 Defining Employees .................................................................................................................57 Finding an Employee....................................................................................................................... 58 Adding an Employee ....................................................................................................................... 59 Profile Page...................................................................................................................................... 60 Vitals Section.............................................................................................................................................. 60 Payroll / Billing Section .............................................................................................................................. 62 Miscellaneous Section ................................................................................................................................. 62 Taxes Page ....................................................................................................................................... 63 Exempt from Withholding Section............................................................................................................... 64 Federal Section............................................................................................................................................ 64 State Section ............................................................................................................................................... 64 City Section ................................................................................................................................................ 64 Additional Tax Section................................................................................................................................ 64 Miscellaneous Section ................................................................................................................................. 65 Skills/Attributes Page...................................................................................................................... 65 Skills & Sub-Skills Section.......................................................................................................................... 65 Attributes Section........................................................................................................................................ 65 01/18/06 3:13 PM Page 3 of 448 Employee Skills & Attributes Section.......................................................................................................... 65 Preferences/Bonuses Page ............................................................................................................... 66 Client Preferences Section ........................................................................................................................... 66 Bonuses Section .......................................................................................................................................... 67 Employee Photo............................................................................................................................... 67 Employee Tracking ......................................................................................................................... 69 Specifying Employee Availability ................................................................................................... 70 Shift Availability ............................................................................................................................. 71 Day Availability............................................................................................................................... 71 Viewing Employee Visit History ..................................................................................................... 73 Defining Employee Pay Rates ......................................................................................................... 75 Adding Pay Rates ............................................................................................................................ 77 Deleting Pay Rates........................................................................................................................... 78 Printing Pay Rates........................................................................................................................... 78 Copying Pay Rates to Employee within Current Office................................................................. 79 Scheduling................................................................................................................................80 Getting to the Scheduler Screen...................................................................................................... 80 Viewing a Client’s Schedule............................................................................................................ 81 Moving to a Different Week’s Schedule....................................................................................................... 82 Viewing an Employee’s Schedule.................................................................................................... 85 Viewing the Scheduler in Different Modes ..................................................................................... 87 The Visit Menu................................................................................................................................ 89 Changing the Text That Appears on a Visit ................................................................................... 90 Creating a Phone Log Entry Not Based Upon a Visit .................................................................... 91 Schedule Summary Display Screen ................................................................................................ 93 Viewing the Rules Governing the Current Schedule...................................................................... 94 Viewing the Visit Legend ................................................................................................................ 95 Creating a Visit ............................................................................................................................... 96 Daylight Savings Time .................................................................................................................... 99 Editing a Visit.................................................................................................................................. 99 The Verification Process – Weekly Payroll .................................................................................. 100 Verifying Visits by Employee........................................................................................................ 101 Verifying Visits by Client.............................................................................................................. 102 Deleting a Visit .............................................................................................................................. 105 Moving a Visit ............................................................................................................................... 105 View Order .................................................................................................................................... 107 01/18/06 3:13 PM Page 4 of 448 Specify Employee .......................................................................................................................... 107 Employee Matching....................................................................................................................... 108 Visit Phone Log (Canceling a Visit) .............................................................................................. 111 Copying a Visit .............................................................................................................................. 112 Copy Visit Wizard......................................................................................................................... 114 Update Visit Wizard...................................................................................................................... 116 Assignment Matching.................................................................................................................... 121 Compliance Checking ................................................................................................................... 123 Setting, Viewing, and Clearing Model Week................................................................................ 126 Adding Supply Items..................................................................................................................... 129 Adding Supply Items Associated with Visits.............................................................................................. 129 Adding Supply Items Associated with Clients............................................................................................ 130 Using the Edit Supply Item Screen ............................................................................................................ 131 Master Supplies Section ............................................................................................................................ 132 Supply Item Section .................................................................................................................................. 132 Adding Service Items .................................................................................................................... 132 Adding Pay Items .......................................................................................................................... 135 Show Compliance .......................................................................................................................... 138 Show Employee OT (*).................................................................................................................. 138 Printing Post-Verification Reports ............................................................................................... 138 Calculating Overtime at the Front Office...............................................................................139 Closing the Week after Verification at the Front Office .............................................................. 141 Overtime Report ........................................................................................................................... 142 Salaried Visits Information........................................................................................................... 144 Verified Visit Report with Overtime ............................................................................................ 144 Patient Management ..............................................................................................................145 Defining a Patient.......................................................................................................................... 145 Finding a Patient ........................................................................................................................... 145 Admitting a Patient into the Agency.......................................................................................148 Modifying a Patient’s Agency Status ............................................................................................ 151 Non Admitting a Patient into the Agency ..................................................................................... 151 Placing a Patient on Hold in the Agency....................................................................................... 154 Discharging a Patient from the Agency ........................................................................................ 157 Plan of Care Management .....................................................................................................160 Entering a New Plan of Care ........................................................................................................ 160 Assigning the Primary Physician to the Plan of Care .................................................................. 164 01/18/06 3:13 PM Page 5 of 448 Assigning the Case Manager to the Plan of Care ......................................................................... 165 Defining Plan of Care/Verbal Order Diagnoses ........................................................................... 166 Entering a New Diagnosis ......................................................................................................................... 167 Modifying a Diagnosis .............................................................................................................................. 168 Deleting a Diagnosis ................................................................................................................................. 169 Modifying Diagnoses Priorities ................................................................................................................. 170 Defining Plan of Care/Verbal Order Orders Paragraph ............................................................. 170 Defining Plan of Care/Verbal Order Goals Paragraph................................................................ 173 Defining Plan of Care/Verbal Order Medications........................................................................ 174 Entering a New Medication ....................................................................................................................... 174 Modifying a Medication ............................................................................................................................ 176 Deleting a Medication ............................................................................................................................... 177 Modifying Medication Priorities................................................................................................................ 177 Defining Plan of Care/Verbal Order Surgical Procedures........................................................... 178 Entering a New Surgical Procedure............................................................................................................ 178 Modifying a Surgical Procedure ................................................................................................................ 180 Deleting a Surgical Procedure.................................................................................................................... 180 Defining Plan of Care/Verbal Order Supplies.............................................................................. 181 Entering a New Supply.............................................................................................................................. 181 Modifying a Supply................................................................................................................................... 183 Deleting a Supply...................................................................................................................................... 183 Defining Plan of Care Safety Measures, Nutritional Requirements, Allergies, Functional Limitations, Activities Permitted, Mental Status, Prognosis ....................................................... 184 Modifying a Plan of Care/Verbal Order....................................................................................... 186 Deleting a Plan of Care/Verbal Order.......................................................................................... 187 Recertifying/Copying a Plan of Care............................................................................................ 188 Printing, Previewing and Exporting Plans of Care and Verbal Orders ...................................... 190 Printing/Previewing from the Edit Plan of Care/Verbal Order screen.......................................................... 191 Exporting from the Edit Plan of Care/Verbal Order screen ......................................................................... 192 Printing, Previewing or Exporting from the Plan of Care/Verbal Order Report screen................................. 195 Exporting from the Edit Plan of Care/Verbal Order Report screen.............................................................. 197 Importing Signed Plans of Care and Verbal Orders.................................................................... 199 Admitting/Discharging/Readmitting a Patient to/from a Payer .................................................. 201 Modifying the Payer Start of Care for a Payer ............................................................................................ 202 Discharging a Patient from a Payer ............................................................................................................ 204 Readmitting a Patient to a Payer ................................................................................................................ 206 Verbal Order Management.....................................................................................................208 Entering a New Verbal Order....................................................................................................... 208 Defining Verbal Order Contents .................................................................................................. 211 Modifying a Verbal Order ............................................................................................................ 212 Deleting a Verbal Order................................................................................................................ 212 Doctor Order Management ....................................................................................................213 Entering Plan of Care/Verbal Order Doctor Orders ................................................................... 213 01/18/06 3:13 PM Page 6 of 448 HCFA 485 Locator Mapping .................................................................................................217 OASIS Assessment Management ...........................................................................................218 Entering a New OASIS Assessment.............................................................................................. 218 Modifying a OASIS Assessment ................................................................................................... 221 Deleting a OASIS Assessment....................................................................................................... 223 Printing a OASIS Assessment....................................................................................................... 223 Exporting OASIS Assessments...............................................................................................225 How to Submit an Inactivation Record ........................................................................................ 229 Importing OASIS Assessments...............................................................................................231 Calculating Overtime at the Back Office................................................................................233 Processing Weekly Payroll .....................................................................................................235 Closing the Week at Back Office .................................................................................................. 235 Overtime Report ........................................................................................................................... 236 Salaried Visits Information........................................................................................................... 238 Exporting Payroll (Interface)........................................................................................................ 239 Reports Available for “Closed” Weeks ...................................................................................242 Reports Available for “Closed” Weeks ...................................................................................243 Payroll Report ............................................................................................................................... 243 Sales (Item) Report........................................................................................................................ 243 Combined Sales Report................................................................................................................. 243 Balancing the Sales (Item) Report with the Combined Sales Report .......................................... 243 Balancing Sales (Item) Report, Royalty Report, GL Sales Report, Worker’s Compensation Report ............................................................................................................................................ 243 Balancing Receivables Against Sales ............................................................................................ 244 Royalty Report .............................................................................................................................. 244 Billing.....................................................................................................................................245 Billing Diagram and Payroll Work Flow Diagram ...................................................................... 245 Invoices & Claims Diagram .......................................................................................................... 246 Invoice & Item Adjustments Diagram.......................................................................................... 246 Invoice & Item Adjustments Diagram.......................................................................................... 247 Entering Payments & Cash Applications Diagram...................................................................... 248 Billing Medicare PPS Diagram..................................................................................................... 249 Medicare PPS Invoices & Claims Diagram.................................................................................. 250 Entering Medicare PPS Payments & Cash Applications Diagram.............................................. 252 01/18/06 3:13 PM Page 7 of 448 Creating Invoices/Claims .............................................................................................................. 253 Creating Invoices/Claims for Payers Billed Weekly..................................................................... 253 Creating Invoices/Claims for Payers Billing per Calendar Period.............................................. 254 Creating Invoices/Medicare PPS .................................................................................................. 255 Print/Transmit Screen............................................................................................................260 Printing Self-Pay Invoices ............................................................................................................. 261 Printing Invoices for Payers.......................................................................................................... 262 Printing Claims for Payers............................................................................................................ 265 Creating Claims Manually for Multiple Invoices......................................................................... 267 Transmitting Claims to Electronic Bulletin Board Systems ........................................................ 268 Sending an ECS File via HyperTerm ......................................................................................................... 268 Invoice Register Report – Tracking Which Bills Were Sent (Finalized) ..................................... 270 View Invoices/Claims .................................................................................................................... 271 Viewing or Printing an Invoice ..................................................................................................... 271 Viewing, Editing, Creating, or Deleting a Claim for an Invoice .................................................. 272 Payments and Cash Application.............................................................................................276 Entering a Payment for One Invoice and Applying Cash............................................................ 278 Entering a Payment for Multiple Invoices and Applying Cash ................................................... 282 Payment and Cash Applications and Adjustments for Medicare PPS ........................................ 284 Payment Log and Bank Reconciliation......................................................................................... 285 Payment Adjustments Report Option on Payment Log screen ................................................... 286 Logging Collection Comments (at the Invoice Level)................................................................... 287 Add a Collection Log ................................................................................................................................ 288 Modify a Collection Log ........................................................................................................................... 288 Delete a Collection Log............................................................................................................................. 289 Logging Collection Comments (at the Account Level)................................................................. 289 Apply Cash via 835........................................................................................................................ 289 Payment Adjustments.............................................................................................................293 Entering a Fix to a Payment Check Amount................................................................................ 294 Entering a Refund of a Payment................................................................................................... 295 Determining Which Refunds Have Had AP Checks Written ...................................................... 296 Recouping a Payment.................................................................................................................... 296 Tracking Receivables .............................................................................................................296 Invoice Aging Report .................................................................................................................... 296 Invoice Aging ........................................................................................................................................... 296 Generating Statements .................................................................................................................. 297 Statements................................................................................................................................................. 298 01/18/06 3:13 PM Page 8 of 448 The Account Log Screen ............................................................................................................... 298 Add a Account Log ................................................................................................................................... 300 Modify a Account Log .............................................................................................................................. 300 Delete a Account Log................................................................................................................................ 300 Item and Invoice Adjustments ...................................................................................................... 301 Item Adjustments .......................................................................................................................... 301 Visit Adjustment ........................................................................................................................... 303 Service Item Adjustment............................................................................................................... 304 Supply Item Adjustment ............................................................................................................... 306 Pay Item Adjustment .................................................................................................................... 307 Item Rebills.................................................................................................................................... 308 Invoice Adjustments...................................................................................................................... 309 Invoice Rebills ............................................................................................................................... 312 Creating Contractual Allowance Invoice Adjustment In Batch .................................................. 313 Accepting and Rejecting Adjustments.......................................................................................... 315 Adding Missing items to invoices.................................................................................................. 317 Handling Payer Denials when Item Must Be Rebilled to Self Pay at “Street” Rate.................... 317 Closing a Period and the General Ledger Interface...............................................................318 GL Sales, Cash, Adjustment, and Worker’s Compensation Reports .......................................... 318 Closing a Period ............................................................................................................................ 320 Creating the SBT General Ledger Interface File ......................................................................... 321 Unemployment Reporting.......................................................................................................322 Administration and Configuration.........................................................................................323 Maintaining Offices....................................................................................................................... 323 Office OASIS Header Info ........................................................................................................................ 324 Office Logo............................................................................................................................................... 325 Maintaining Users ......................................................................................................................... 327 Creating a New User ................................................................................................................................. 327 Modifying User Information...................................................................................................................... 332 Deleting a User ......................................................................................................................................... 332 Change Password .......................................................................................................................... 332 Copy Client Environment ............................................................................................................. 334 Copy Employee.............................................................................................................................. 335 Check Login Count ....................................................................................................................... 336 Clear Function Locks .................................................................................................................... 336 Command Window ....................................................................................................................... 336 Defining Accounting Periods ........................................................................................................ 337 01/18/06 3:13 PM Page 9 of 448 Defining Skills ............................................................................................................................... 338 Defining Sub-Skills ........................................................................................................................ 339 Defining Attributes........................................................................................................................ 341 Defining Employee Tracking Items .............................................................................................. 342 Defining Supplies........................................................................................................................... 343 Defining Services ........................................................................................................................... 345 Defining Affiliations ...................................................................................................................... 346 Defining Referral Sources ............................................................................................................. 347 Defining Physicians ....................................................................................................................... 348 Managing Standard Plan of Care Phrases ................................................................................... 351 Data Exchange/Reindex.........................................................................................................352 Exchange Now ............................................................................................................................... 352 View Exchange Log....................................................................................................................... 353 Reindex (Fox Pro Databases Only)............................................................................................... 354 View Reindex Log ......................................................................................................................... 355 Workstation Environment Size..................................................................................................... 356 Reports ...................................................................................................................................357 Report Options .............................................................................................................................. 357 Weekly Reviews ......................................................................................................................358 Client Payer List............................................................................................................................ 358 Employee Tax Withholding Report.............................................................................................. 358 Visit Compliance Report............................................................................................................... 358 Employee Tracking Report........................................................................................................... 359 Visit Report ................................................................................................................................... 359 Billing Application Group Reports.........................................................................................360 Accounts Receivable Function Group Reports ............................................................................ 360 401k and Paycheck Reporting.................................................................................................................... 360 Adjustment Report .................................................................................................................................... 361 General Ledger Cash – AR Summary ........................................................................................................ 362 General Ledger Reports............................................................................................................................. 363 Invoice Aging Report ................................................................................................................................ 364 Invoice Register ........................................................................................................................................ 365 Medicare Episode Report .......................................................................................................................... 366 Payroll Interface Report............................................................................................................................. 369 Payroll Report........................................................................................................................................... 370 Sales (Invoice) Report ............................................................................................................................... 371 Sales (Item) Report.................................................................................................................................... 374 State Unemployment Reporting and Electronic File Creation ..................................................................... 376 Statements................................................................................................................................................. 378 01/18/06 3:13 PM Page 10 of 448 Client/Payer Function Group Reports.......................................................................................... 379 Client Payer List Report ............................................................................................................................ 379 Scheduling Application Group Reports..................................................................................380 Employee Function Group Reports .............................................................................................. 380 Employee Dispatch Report ........................................................................................................................ 380 Employee List Report................................................................................................................................ 381 Employee Tax Withholding Report............................................................................................................ 382 Employee Tracking Report........................................................................................................................ 383 Pay Rate Report ........................................................................................................................................ 384 Potential Overtime Report ......................................................................................................................... 385 Timesheets................................................................................................................................................ 386 Client / Payer Function Group Reports........................................................................................ 388 Bill Rate Report ........................................................................................................................................ 388 Client Dispatch Report .............................................................................................................................. 389 Client List Report...................................................................................................................................... 390 Client Payer List Report ............................................................................................................................ 392 Payer List Report ...................................................................................................................................... 393 Work / Sales Function Group Reports ......................................................................................... 394 Compliance Summary Report.................................................................................................................... 394 Expiring Compliance Rules Report............................................................................................................ 395 Filled Visit Report..................................................................................................................................... 396 On-Call Report.......................................................................................................................................... 397 Pay Item Report ........................................................................................................................................ 399 Payroll Interface Report............................................................................................................................. 400 Payroll Report........................................................................................................................................... 401 Salaried Visit Report ................................................................................................................................. 402 Service Item Report................................................................................................................................... 403 Service List Report.................................................................................................................................... 404 Supply Item Report ................................................................................................................................... 405 Supply List Report .................................................................................................................................... 406 Visit Report............................................................................................................................................... 408 Clinical Application Group Reports .......................................................................................409 Patient Function Group Reports .................................................................................................. 409 Blank 485/487........................................................................................................................................... 409 Blank Verbal Order ................................................................................................................................... 409 OASIS Potential Problem Log ................................................................................................................... 409 OASIS Tracking Report ............................................................................................................................ 412 Plan of Care / Verbal Order ....................................................................................................................... 413 Plan of Care Tracking Report .................................................................................................................... 414 Recertification Due Report ........................................................................................................................ 415 Office Function Group Reports .................................................................................................... 416 Census (Episode) Report ........................................................................................................................... 416 If “clients” are included in the report, any clients that have an “entry date” after the “to” date in the selected date range for the report will not be included.............................................................................................. 419 Medication Profile Report ......................................................................................................................... 420 Phrases Report .......................................................................................................................................... 421 Physician List Report ................................................................................................................................ 422 Strategic Planning Report .......................................................................................................................... 423 DLL Reports...........................................................................................................................425 DLL Error Report...................................................................................................................................... 425 01/18/06 3:13 PM Page 11 of 448 This report will include any error message generated by attempt to import into this systems database. ........ 425 DLL Transaction Register ......................................................................................................................... 426 UB92 Locator Mapping..........................................................................................................432 Massachusetts Medicaid Form #9..........................................................................................438 Summary of System Specifications.........................................................................................442 Creating Labels Using Reports, Microsoft Excel and Word...................................................442 SAM.INI Variables........................................................................................................................ 447 01/18/06 3:13 PM Page 12 of 448 Getting Started Overview This manual shows how to use this system in your day-to-day operations. The table of contents will point you to specific sections of interest so that this manual can be used as both a teaching tool and a reference guide. Back vs. Front Office At the back office, users have full access to all of the data and functions of the front office. All information that is changed at the back-office location is automatically transmitted to the front offices. This means the back office can audit, track, and manage all of their front offices’ information if the back office chooses to. Logging-In This is the screen that allows a user to gain access to system components. A system representative or your system administrator will assign your user ID and password. Users marked as ‘System Administrator’ are the only users with the authority to create and maintain user information. When you log into SAM, you will notice an option “XP Themes” on the login pop up. This option will only be displayed if you are running Windows XP and have XP Themes enabled. This option will display the windows using the XP format. To log into SAM, type in the User Name that has been assigned to you along with your assigned password. As you type each character of your password, the system will echo the character with a “*”. It does this so that someone looking over your shoulder cannot learn your password by reading from the screen. You get three tries to enter a correct User Name and password. After three unsuccessful attempts, the system gives up on you and denies you access to the system. If this happens, take a deep calming breath and call the person in your organization responsible for the care and feeding of this system. If that person cannot help you, give the nice people at RiverSoft a call. Press the “Esc” key to exit without having to log in. 01/18/06 3:13 PM Page 13 of 448 At the back office it is important which office you log into when using SAM. You will only be able to see the information for the office to which you are logged-in. If you want to change the logged-in office, use the ‘Select Office and User’ function from the Login menu. Definitions Back Office The site that performs the payroll, the bulk of the billing, and handles accounts payable and general ledger for the provider offices (front offices). The office representing this site is called the Headquarters (or Admin) office. Front Office Site at which client charts and SAM is used to coordinate and document the care and service provided to clients. Payer Payer of services provided. The payer may be Medicare, Medicaid, an insurance company, or a third party who is not the client. Client The Client is the person receiving the service. When a client pays for his or her own service, we call the client a “self-pay” client. Patient This is a particular type of client for which a plan of care must be created and maintained. When you add a client record, you can choose to denote the client as a regular client, a patient, or a facility. By choosing patient, you can admit the client into your agency as a patient and create a plan of care and OASIS Assessment. Facility This is a particular type of client for which you may be supplying “staffing” type of services. Multiple employees normally provide “Facility” type clients service. Examples of facility clients are hospitals and nursing homes. Staff Employee A staff employee is one who is paid a salary. SAM has the ability to pay staff employees a specific pay rate for visits over and above a number of visits that are expected as a part of an employee’s salary. Field Employee A field employee is one who is paid on a weekly basis for the time-slips and notes they turn in. Contract Employee A contract employee is one who works for an agency that provides employees. Contract employees are paid by their own organizations. Those organizations invoice your agency and you pay those organizations through your accounts payable system. 01/18/06 3:13 PM Page 14 of 448 How List and Data Screens Work Terms Click Select Double Click Shift-Click Control-Click Right Click Drag click the left mouse button while the mouse pointer is on the item click the item then click the select button click the item twice quickly click the item while holding the “Shift” key click the item while holding the “Ctrl” key click the item using the right mouse button click and hold down the left mouse button and then move the mouse pointer to a new position on the screen and release the left mouse button Buttons Navigation Buttons moves displayed data through a collection of records Find Button displays a screen used to create a collection of records from which a record to display/edit may be selected New Button presents a blank data entry screen for creating a new record Save Button saves all changes made to the currently displayed record Delete Button deletes the currently displayed record Restore Button restores the currently displayed record to the data last saved Exit Button closes the current screen and redisplays the previous screen Date Fields Date Fields “T” or “t”: Move to today’s date in the calendar “Enter”: Accept current date and exit calendar “Esc”: Return to original date and exit calendar Click on left arrow to move back one month Click on right arrow to move ahead one month Click on month to select a month Click on year, then click on down arrow to go back one year Click on year, then click on up arrow to forward one year Click on today to go to today’s date Keyboard Hot Keys include: Up-Arrow = Move back one week Down-Arrow = Move forward one week Left-Arrow = Move back one day Right-Arrow = Move forward one day Page-Up = Move back one month Page-Down = Move forward one month Ctrl+Page-Up = Move back one year Ctrl+Page-Down = Move forward one year Home = Move to beginning of month End = Move to end of month 01/18/06 3:13 PM Page 15 of 448 Explanation When working with information regarding clients, employees, physicians, skills, plans of care, doctor orders, etc., the user interface uses the windows standard of data and list screens. The data screen will show you one record within a list of records (for instance one client within a list of clients). When you choose a screen from a menu, the data screen will display the last record you were looking at. If it is the first time you have entered the screen, the fields on the screen may be disabled because no record is current. For instance, the first time the Client menu option is chosen, the following screen appears: 01/18/06 3:13 PM Page 16 of 448 You choose a client by using the Find appear: button. This will cause the client list screen to You create a list of clients by filling out the selection criteria fields and clicking the Generate button. You find a client quickly by clicking on any client row and then typing the first few letters of the client’s last name. You select a client by double-clicking on the client’s row or by clicking on the client’s row and then clicking the Select button. This will cause the client screen to appear displaying information about the client you have chosen: 01/18/06 3:13 PM Page 17 of 448 Use the navigation buttons to quickly move to other clients in the list. To create a new client record, click the New ready for you to add a new client: 01/18/06 3:13 PM button. The client screen will clear and will be Page 18 of 448 After you have changed or added client information, click the Save button to save your work. If you have mistyped information, click the Restore button to restore the currently displayed record to the data last saved. To delete the record you are looking at, click the Delete button. To exit the screen, click the Exit 01/18/06 3:13 PM button. Page 19 of 448 Defining Payers To access the Payer screen, select menu option Administration | Payers. The Edit Payer screen contains tabs for pages of related information. The pages on the Edit Payer screen are Payer Profile, Payer Requirements, Payer Skills & Codes and Payer Calendar. The Profile page is the first page displayed upon entry to the Edit Payer screen. Profile Page The Profile page is used to enter general information about a payer. On the Edit Payer screen, click the New button on the toolbar to add a new payer. Vitals Section Enter the name of the payer in the Payer Name field. If you no longer want to see the payer in payer pull-downs or list, select Do Not Use. This will remove the payer from all lists, effectively hiding it from you in the future. This is handy if you have incorrectly entered a payer but have closed visits belonging to it. Marking a payer as “Do Not Use” will also mark the following records as related to this payer as “Do Not Use”: All Payer Skills and Code All Client/Payer relationships All Client/Payer Skills and Codes 01/18/06 3:13 PM Page 20 of 448 All Schedule Orders When this system was first installed in your office, an office was designated as the “Administrative” office. When you add a new payer in the “Administrative” office, by default, it will be saved as a “National Payer.” If it has been saved as a “National Payer” the payer will be added to all offices (including the pay and bill rates.) Skills & Codes are copied to the front office only if the skill/pay unit/bill unit combination does not already exist in the front office(s). Subsequently, if you modify any data on the National Payer in the “Administrative” office, only the data that matched before the modification are modified in the other offices. The exception to this is Pay and Bill Rates and Skills and Codes. Only new Pay and Bill rates and/or new Skills and Codes will be copied to the other offices, no modifications will be saved to the other offices. You cannot change a “National Payer” back to a local payer, so be careful when adding a payer as a “National Payer.” National Payers may not be edited or deleted while logged into a front office database. Enter the Provider Representative in your office for this payer. This name will appear on UB92 Claims in Locator 85, on HCFA 1500 claims on FL 31 and Massachusetts #9 claim on FL 38. Enter the Provider ID that applies to this payer. Enter the payer’s address in the Address fields. The first address line is for street address or PO Box numbers. The second line is for apartment or suite numbers, etc. If a street address is long and will not fit in line one, its okay to overlap it on line two (avoid splitting a word in half when you use two lines for the address, if you can, because it is printed with a space where the split occurs). Enter a Zip Code. If you do not know the entire zip code, you must enter at least the first three digits. After you enter the zip code, a list of cities with the given zip code appears in the combo box below the zip code. Select the correct city from the combo box under the Zip Code field. Use up or down arrows on the keyboard to find the city; or click the down arrow on the combo box to display the list of cities, and then click the city. If you are changing the Payer’s address and would like ALL client/payer associations for this payer to be changed also (for ALL Offices), press the Update Client-Payer Addresses button. Enter the payer’s telephone number(s) in the Phone 1 & (or) Phone 2 field. Enter a telephone extension number in the Extension field, if needed. Enter a FAX number in the FAX field if you have this information. This FAX number will also print on the Invoice Aging report. Enter the name of a contact person at the payer’s office in the Contact field. Enter the initials of the person at your office responsible for acquiring a contract with this payer in the Sales Rep field. Choose the Pay Rate Source for this payer: Service Skill—if service skill is selected, pay rates for the employee is calculated based on the skill assigned to the visit. Employee Skill—if employee skill is selected, pay rates for the employee is calculated based on the skill of the employee. 01/18/06 3:13 PM Page 21 of 448 Enter any comments about this payer in the Comment field Billing / Clinical Requirements Section Select a payer class from the Payer Class combo box. Select a payer program from the Payer Program combo box. Enter the unique id to a claim submitter that the payer provides in the Submitter ID field. Select the ECS Style (Electronic Claims Submission Style) if you will be sending electronic transmissions of your claims to your payer. This field tells SAM how to create an electronic claims file for the payer. Enter the Bill Type Mask to determine what is printed on the UB92 Locator 4 Type of Bill field. If the first character of the Bill Mask field is not numeric, the system will place a “3” in the first character of the Bill Field. If it is numeric, the numeric value is what will be placed in the first character of the Bill Field. If the second character of the Bill Mask field is not numeric, the system will place a “2” in the second character of the Bill Field. If it is numeric, the numeric value is what will be placed in the second character of the Bill Field. If the third character of the Bill Mask field is not numeric, the following applies. If it is numeric, the numeric value is what will be placed in the third character of the Bill Field. 1 - If patient is admitted and discharged during the period of the claim 2 - If patient is admitted during the period of the claim 3 - If patient is continuing service 4 - If patient is discharged during the period of the claim Note: For Medicare PPS Claims, the third character is “2” for RAPs and “9” for EOEs. The Payer’s Bill Mask’s 3rd character will also determine what is placed in the UB92 claim status field (locator 22.) If it is not numeric, the patient’s status will be used. If it is numeric, the numeric value is what will be placed in the status field on the UB92 claim. Check the 15 Min Units checkbox if the payer wants hourly work broken into 15-minute units. If you want the individual start and end times of visits to appear on invoices, click the Show Times check box. Choose the Bill Site for this payer: Front Office—if a payer is billed at the front office, claims may only be edited at the front office. Back Office—if a payer is billed at the back office, claims may only be edited at the back office. Note that national payers may only be billed at the back office. 01/18/06 3:13 PM Page 22 of 448 Choose the Billing Frequency options: Weekly Bi-Weekly Monthly Calendar Invoicing for this payer will occur for this payer at the end of each week. Invoicing for this payer will occur for this payer at the end of each two weeks. Invoicing for this payer will occur for this payer at the end of each month. If a payer is not billed weekly, billing periods must be defined for the payer, which determine when invoicing should occur. Note that when Weekly, Bi-Weekly or Monthly is selected, the Calendar tab is disabled; and when Calendar is selected; the Calendar tab is enabled to allow you to enter billing periods. We recommend when adding new Medicare Payers that you set their Billing Frequency equal to “Calendar” and enter only one billing period on the Calendar screen. SAM will then allow billing of Medicare PPS at any time. We also recommend that the Bill Rates for “ANY” skill is input as a 0 (zero) bill rate. SAM will automatically calculate the episode payment based on the OASIS Assessment. Enter the required frequency of supervisory visits in the Supervisory Visit Freq field. This is entered as one visit every [required number] of days, weeks, or months. The Differentials fields define the custom bill rate differentials for this payer. Typically, the default values are used; but for special payers, you may want to pay your employees more or less based on the differential. The Weekend differential is a dollar amount, not a multiplier. The Invoice Terms field shows up on invoices for this payer. Generally, this reads simply, “Net Due Upon Receipt”. The Bill Notes field is used to customize how a bill is created for this payer. You only need to populate this field if directed by RiverSoft. You can direct SAM to place “D9” in occurrence code 1 of a UB92 claim for those patients who are 65 years of age or older by putting the following in the Payer’s bill notes field: “:65D9”. By default, SAM populates the “Remit To” address on UB92 and HCFA 1500 claims to the SAM office’s “lock box address.” You can now direct SAM to populate these fields using the SAM offices “office address” by typing in the following in the payer’s “bill notes” field: “:REMITTOOFFICE” Click the Requirements tab to go to the next page. 01/18/06 3:13 PM Page 23 of 448 Requirements Page The Requirements page is used to define the payer’s billing requirements. For Claim requirements, select one of the following: UB92 required—Used for payers that require UB92 claims. Selecting Billing Period will show billing period dates in locator 6. Selecting Service Dates will show the span of service dates for the work items on the claim locator 6 HCFA 1500 required—Used for payers that require HCFA 1500 claims. Selecting 0 Decimals will report 0 decimal places for the work item units. Selecting 2 Decimals will attempt to report 2 decimals for the work item units. The space for work units is very small, and if the unit is greater than or equal to 10, only 1 decimal place will be printed. Signed Plan of Care (and billable visit) – If this is turned “on” and if the payer is “Medicare”, SAM will not create a EOE if it finds that the Plan of Care or Verbal Orders during the certification period do not have a date in the “received signed” field. In addition, if a billable visit is not found during the certification period, the RAP will not be created. Also, when creating initial RAPs (60%), the RAP will not be created if the first billable visit does not occur on the certification begin date. If the payer requires that Supplies be summarized to one line on the claim, click on the Summarize Supplies option. 01/18/06 3:13 PM Page 24 of 448 Note that when creating claims for a client, the requirements set on a Client/Payer relationship will take precedence over the requirements set on the payer. Click the Skills and Codes tab to go to the next page. Skills and Codes Page The Skills and Codes page is used to define: 1. Valid skills/sub-skill (that the payer will pay for services.) A valid skill must be added on the Skills and Codes Page in order to add Pay/Bill rates for the skill on the payer. 2. For each of those skills a. The Pay and Bill Unit. (Hours or Visits) b. The Revenue Codes and HCPC Codes to be printed on a UB92 billing claim (if applicable.) These can be different by shift (1, 2, and 3) or by day (Mon, Tues, etc.) c. The HCPC Codes and Modifiers to be printed on a HCFA 1500 billing claim (if applicable.) These can be different by shift (1, 2, and 3) or by day (Mon, Tues, etc.) 01/18/06 3:13 PM Page 25 of 448 Note that when a claim is created, if service codes have not been defined, the following will be used as the default: Visit 0571 0551 0551 0551 0561 0431 0571 0421 0441 Hour 0572 0552 0552 0552 0562 0432 0572 0422 0442 Skill HHA RN LPN LVN MSW OT PCA PT ST Skill Home Health Aide Registered Nurse Licensed Practioner Nurse Licensed Vocational Nurse Social Worker Occupational Therapist Personal Care Assistant Physical Therapist Speech Therapist Rev Code G0156 G0154 G0154 G0154 G0155 G0152 G0151 G0153 To add a new skill, click Add button. For each Skill, input the Pay Unit and Bill Unit. (Hours or Visits) For each Skill, enter the Revenue Codes and HCPC Codes to be printed on a UB92 billing claim (if applicable.) These can be different by shift (1, 2, and 3) or by day (Mon, Tues, etc.) For each Skill, enter the HCPC Codes and Modifiers to be printed on a HCFA 1500 billing claim (if applicable.) These can be different by shift (1, 2, and 3) or by day (Mon, Tues, etc.) Once you have entered the information for the skill, click the Update List button to add it to the list. If the skill is no longer valid, you may remove the skill or mark it as “Do Not Use.” Removing the skill will remove the Revenue Codes, HCPC codes and Modifiers, so if you still need these for billing we would recommend that you mark the skill as “Do Not Use” until you no longer need the codes and then remove the skill. To remove a skill, select the skill and click the Remove button. To mark a skill as “Do Not Use”, select the skill and click the “Do Not Use” check box. If you modify Revenue Code(s), HCPC Code(s) or Modifier(s) on a payer, SAM will automatically update any client/payer relationships for that payer with the updated codes. However, only those codes on the client/payer relationship that match the payer’s codes before the update are changed. This information will be used as the default when you add Client/Payer relationships skill and codes, but it may be overwritten for each Client/Payer relationship. After you have added the Payer and input all of the valid skills and the appropriate information for each skill, you will be ready to associate Clients with Payers. 01/18/06 3:13 PM Page 26 of 448 SAM offers two special types of Skill Categories “SN” and “SN Staffing” (Skilled Nursing). If you add a valid skill of “SN’, you may assign a RN, a LPN or a LVN type of skill to a visit. If you add a valid skill of “SN Staffing”, you may assign a RN Staffing or LPN Staffing type skill to a visit. The Skill Category “SN” is delivered with your software; if you wish to have the Skill Category “SN Staffing”, please contact your software representative. When creating invoice, if you have a “SN” skill identified on the client/payer Skills & Codes screen, but the codes are blank, the system will search for the skill on the visit (RN, LPN, etc.) for the appropriate codes. If you have selected the “Billing Frequency” to be “Calendar” on the Payer Profile, click the Calendar tab to go to the next page. Changing Revenue Code, HCPC Codes or Modifiers for a Payer If the payer is a national payer, make the modifications to the Revenue Code(s), HCPC Code(s) or Modifier(s) on the payer in each office. Do not remove the skill and re add it, this will cause the skill to be marked as “Do Not Use” for all of the client/payer relationships which in turn can delete all compliance rules for that skill. If you modify Revenue Code(s), HCPC Code(s) or Modifier(s) on a payer, SAM will automatically update any client/payer relationships for that payer with the updated codes. However, only those codes on the client/payer relationship that match the payer’s codes before the update are changed. 01/18/06 3:13 PM Page 27 of 448 Calendar Page The Calendar page is used to define billing periods for payers that are not billed on a weekly, biweekly or monthly basis. The Calendar page is enabled only if the Bill Calendar option on the Billing/Clinical Requirements Section on the Payer Profile Page is selected. Billing Period Section Enter the begin date for a billing period. Enter the end date for a billing period. Click the Add >> button to add the billing period to the Payer Billing Periods list. Payer Billing Periods Section Click a billing period then click the Remove button to delete it from the Payer Billing Periods list. Click the Remove All button to delete all billing periods from the Payer Billing Periods list. Note that billing periods cannot overlap. Also note that if a payer is not billed weekly, bi-weekly or monthly and no billing periods are defined, no invoices will be created for the payer. Click the Profile tab to go back to the first page. Click the Save button to save your data. Click the Pay Rates button to add custom pay rates for this payer. (See section, Defining Pay Rates and Bill Rates.) 01/18/06 3:13 PM Page 28 of 448 Click the Bill Rates button to add custom bill rates for this payer. (See section, Defining Pay Rates and Bill Rates.) Defining Clients To access the Client screen, select menu option Administration | Clients. The Edit Client screen contains tabs for pages of related information. The pages on the Edit Client screen are Client Profile, Client Skills & Codes (Self-Pay), Client Attributes, Client Ancillary Info and Client Race. The Client Profile page is the first page displayed upon entry to the Edit Client screen. Client Profile The Client Profile page is used to enter general information about a client. On the Edit Client screen, click the New button on the toolbar to add a new client. Vitals Section Select one of the client types from the Client Type combo box: 1. Client—an individual for which clinical information is NOT required. For example, someone who will receive flu shots, specimen analysis, etc. 2. Patient—an individual for which clinical information is required. To define clinical information on a client, they must be defined as a “Patient.” 3. Facility—an organization to which employees are sent to work on a temporary basis, such as, hospitals or other health care providers. 01/18/06 3:13 PM Page 29 of 448 Enter the client’s name in the Client Name fields. For a Client Type of “Client” and “Patient”, enter their first name, middle initial and last name. For “Facility” Client Type, enter the name of the facility. Enter the client’s address in the Address fields. The first address line is for street address or PO Box numbers. The second line is for apartment or suite numbers, etc. If a street address is long and will not fit in line one, its okay to overlap it on line two (avoid splitting a word in half when you use two lines for the address, if you can, because it is printed with a space where the split occurs). Enter a Zip Code. If you do not know the entire zip code, you must enter at least the first three digits. After you enter the zip code, a list of cities with the given zip code appears in the combo box below the zip code. Select the correct city from the combo box under the Zip Code field. Use up or down arrows on the keyboard to find the city; or click the down arrow on the combo box to display the list of cities, and then click the city. If needed, select an affiliation from the Affiliation combo box. The affiliation attribute is used as an aid to employee/client matching. Clients and employees may be assigned to locations. It is beneficial to assign employees to clients that are within the same location to reduce travel time and cost. Locations are defined per office and are usually geographically based. Client and employee list and dispatch reports as well as sales reports are available by affiliation. This lets you “sub-divide” your office into different sections. The Status combo box works as follows for each client type: 1. Patient— the Status combo box shows “Incomplete” when adding a client with a Client Type of “Patient” and is disabled. The status for a “Patient” can only be changed using the Edit Patient Status screen via the Administration | Clinical Information menu option. 2. Client or Facility — after you have entered and saved the preliminary information for the client or facility the “Edit Status” button will become enabled. When adding a new client or facility, SAM will automatically add an “Active” status on the Edit Client Status screen. If you wish to add a new status for the client or facility, the available statuses are Active, Hold, and Inactive. As a client or facility’s status changes within the agency, you can add the status and status date to the Edit Client Status screen, keeping a history of their status in the agency. Click the New button on the toolbar to add a new client or facility’s status. Select the appropriate status from the Status combo box. Once you have selected a status, enter a date in the Status Date field. Click the Save button on the toolbar to save the new status. The list on the Edit Client Status screen now displays a row with the Date column containing the status and date that you entered. You will use this screen to enter any client or facility statuses in order to keep a history of all client or facility status. 01/18/06 3:13 PM Page 30 of 448 Click the Exit button on the toolbar to exit the Edit Client Status screen. If you wish to remove a status from the Edit Client Status screen, click on the status you wish to remove then click the Delete button. Vitals Section (continued) Enter the client’s telephone number(s) in the Phone #(s) field(s). Enter the client’s Birth Date. Enter the client’s Sex. Enter client SSN. Enter client’s Tax Territory. This field is only used at installations using the ACCPAC (SBT) payroll accounting package. This is a set of withholdings that you configure in SBT. Normally only used if the payroll withholding for work done for this client is different than normal withholding for employee. Select the appropriate CSR for this client. The Client List may be narrowed down to just those clients with a specific CSR assigned when scheduling visits. The Comments field is used to describe attributes about a client. These comments will appear on the bottom of the schedule when viewing visits for this client. If the client was referred, select the desired referral source by clicking the Referral button. When the Referral List screen appears, click one of the list items and then click the Select button; or simply double click one of the list items. If the referral source does not appear in your list click the Cancel button. The selected referral source will be displayed in the Referral field. If you would like to “clear” the current referral selection, click the Clear Selection button. (You may enter new referral sources to be displayed in the Referral List using the Referral Sources option on the Administration menu to display the Edit Referral Sources screen.) 01/18/06 3:13 PM Page 31 of 448 Self-Pay Billing Info Section The billing fields are used for addressing Self-Pay invoices. If the billing name and address is the same as the client’s name and address click the Same button to automatically fill the billing fields. Otherwise, enter the name, address, zip code, and city to where invoices should be mailed. Select the appropriate Payer Class to be assigned to this client for any Self-Pay billing, from the Payer Class combo box. Select the appropriate Payer Program to be assigned to this client for any Self-Pay billing, from the Payer Program combo box. Select the appropriate service location from the Service Location combo box. This is the location where a client was treated, or a service was rendered. Choose the Billing Frequency options: Weekly Bi-Weekly Monthly Invoicing for this client, for self-pay services will occur at the end of each week. Invoicing for this client, for self-pay services will occur at the end of each two weeks. Invoicing for this client, for self-pay services will occur at the end of each month. The Supervisory Visit Frequency should be entered if the client pays for their own services and supervised visits are required. If supervisory visits are scheduled, the Census (Episode) report will tell you when the last and next supervisory visit for all clients. The Differentials fields define the custom employee pay rate differentials for this client. Typically, the default values are used; but for special clients, you may want to pay your employees more or less. The Tax Exempt ID field is only enabled when adding a client with a Client Type of “Facility”. If you want the individual start and end times of visits to appear on invoices, click the Show Times check box. The Bill Notes field is used to customize how a bill is created for this client. You only need to populate this field if directed by RiverSoft. Click the Skills & Codes tab to go to the next page. 01/18/06 3:13 PM Page 32 of 448 Client Skills and Codes The Skills and Codes page is used for “Self-Pay” (private pay, facilities, etc.) to define: 1. Valid skills/sub-skills (that the self-pay client will pay for services.) A valid skill must be added on the Skills and Codes Page in order to add Pay/Bill rates for the skill on the client. 2. For each of those skills a. The Pay and Bill Unit. (Hours or Visits) b. The Revenue Codes and HCPC Codes to be printed on a UB92 billing claim (if applicable.) These can be different by shift (1, 2, and 3) or by day (Mon, Tues, etc.) c. The HCPC Codes and Modifiers to be printed on a HCFA 1500 billing claim (if applicable.) These can be different by shift (1, 2, and 3) or by day (Mon, Tues, etc.) To add a new skill click Add button. For each Skill, input the Pay Unit and Bill Unit. (Hours or Visits) For each Skill, enter the Revenue Codes and HCPC Codes to be printed on a UB92 billing claim (if applicable.) These can be different by shift (1, 2, and 3) or by day (Mon, Tues, etc.) For each Skill, enter the HCPC Codes and Modifiers to be printed on a HCFA 1500 billing claim (if applicable.) These can be different by shift (1, 2, and 3) or by day (Mon, Tues, etc.) Once you have entered the information for the skill, click the Update List button to add it to the list. If the skill is no longer valid, you may remove the skill or mark it as “Do Not Use.” Removing the skill will remove the Revenue Codes, HCPC codes and Modifiers, so if 01/18/06 3:13 PM Page 33 of 448 you still need these for billing we would recommend that you mark the skill as “Do Not Use” until you no longer need the codes and then remove the skill. To remove a skill, select the skill and click the Remove button. To mark a skill as “Do Not Use”, select the skill and click the “Do Not Use” check box. The system offers two special types of Skill Categories “SN” and “SN Staffing” (Skilled Nursing). If you add a valid skill of “SN’, you may assign a RN, a LPN or a LVN type of skill to a visit. If you add a valid skill of “SN Staffing”, you may assign a RN Staffing or LPN Staffing type skill to a visit. The Skill Category “SN” is delivered with your software; if you wish to have the Skill Category “SN Staffing”, please contact your software representative. Click the Attributes tab to go to the next page. Client Attributes Page The Attributes page is used to help in the assignment of employees to a client that has specific needs. These attributes are used in the employee matching function of Scheduling when assigning an employee to a visit. Generally, it is not necessary to define skills and attributes to clients; but some cases do need them. These attributes are also used to fill in the PHC and CBA formats of the Timesheet report. 01/18/06 3:13 PM Page 34 of 448 Attributes Section Click any attribute in the list, then click the bottom Add >> button next to the list to add it to the Want Employees That Can/Are selection list. Want Employees That Can/Are Section When an attribute is selected in this section, you may click the Reverse button to alternately add/remove a NOT qualifier to the attribute. Such as, “Spanish Speaking,” or “NOT Spanish Speaking.” When a skill or attribute is selected in this section, you may click the Remove button to delete it from the list. You may click the Remove All button to remove all skills and attributes from the list. Click the Ancillary Info tab to go to the next page. Client Ancillary Info The Ancillary Info page is used to define miscellaneous information about the client. All fields on this page are optional. Select a marital status from the Marital Status combo box. Select an employment status from the Employment Status combo box. 01/18/06 3:13 PM Page 35 of 448 Select an accident type from the Accident combo box if appropriate. If a patient’s “Accident” field has been set, SAM fills in the UB92 occurrence code as follows (along with the injury date.) Auto Accident = 01 Employment = 04 Other = 05 If an accident type is selected, enter the date of injury in the Injury Date field. If an accident type of “Automobile” is selected, enter the state code for client’s automobile insurance in the Auto Insurance State field. Client Race The Client Race page is used to define the race of the client. This is an optional entry. Note: you may select more than one race. Click the Client Profile tab to return to the first page. Click the Save button to save your data. Click the Readmit button to create a new admission for a client. This button is only enabled for a client who’s current Status is “Discharged” or “Non Admitted”. (See section, Readmitting a Client) 01/18/06 3:13 PM Page 36 of 448 Click the Payers button to add payer sets for this client. Payer sets associate a client to a payer for visits, plans of care, invoices, and claims. (See section, Defining Client Payer Sets.) Click the Visits button to view a history of visits scheduled for this client. (See section, Viewing Client Visit History) Click the Pay Rates button to add custom pay rates for this client. Generally, custom pay rates per client are not needed; however, in special cases, they are. (See section, Defining Pay Rates and Bill Rates.) Click the Bill Rates button to add custom bill rates for this client. Generally, custom bill rates per client are not needed; however, in special cases, they are. (See section, Defining Pay Rates and Bill Rates.) Click the Auth button to add insurance authorizations (compliance rules) for the client (for self-pay only.) (See section, Insurance Authorization.) This button will only be enabled if skills have been added on the Client Skills & Codes (Self-Pay) screen. Readmitting a Client A client with a status of “Discharged” may be readmitted into an organization using the Readmit button on the Edit Client screen. To access the Client screen, select menu option Administration | Clients. The Edit Client screen is displayed. Use the Find button to display the Client List screen. Select the discharged or non-admitted client to be readmitted. Once the details of the client are displayed on the Profile page of the Edit Client screen, the Readmit button becomes enabled. Click the Readmit button. The Edit Client screen will be refreshed as if the New button has been clicked, and a copy of All of the client’s information is displayed. Notice: The beginning of the Client # will remain the same, but the last two characters after the dash will increment. These last two digits are the client’s Admit # which is also displayed on the Client List screen. The Admit # will begin with an “A” if the patient is readmitted in the back office. Also note that the Status combo box now contains “Active” if the Client Type is “Client” or “Incomplete” if the Client Type is “Patient”. Change any information on the Edit Client screen as necessary and then click the Save button. The client has now been readmitted. This new client record should be selected from this time on when dealing with this client. 01/18/06 3:13 PM Page 37 of 448 Viewing Client Visit History A client Visit History List may be generated using the Visit History Criteria screen. This list is very useful to view all or a subset of visits scheduled for a client. To access the Client screen, select menu option Administration | Clients. The Edit Client screen is displayed. Click the Visits button. The Visit History Criteria screen is displayed. By default, visits for the current client and all employees will be displayed. You can choose one specific employee by clicking the Select Employee option and clicking the Select button. This will cause the Employee List screen to be displayed. Selecting an employee from this list will cause the Visit History Criteria screen to be redisplayed with the selected employee displayed. You can choose to view visits for all orders associated with the client or you can select one specific order from the Orders combo box. Optionally, you can enter in the range of service dates for the visit history you wish to see in the Date Range fields. You can choose to look at visits of only a certain status by selecting it in the Status combo box. Click the Generate button to view the list of visits. 01/18/06 3:13 PM Page 38 of 448 The Visit History List screen is displayed containing all the client’s visits that meet the selected criteria. You can order the list by date, client, or employee by clicking on those corresponding sort options. For each visit, the employee, client, date, skill, and status of the visit are shown. Click the Print List button to send a copy of the Visit History List to the printer. To view more information about a particular visit, double-click the visit or select the visit and then click the View button. The Visit Summary screen is displayed containing details of the visit. 01/18/06 3:13 PM Page 39 of 448 Click the X in the upper right corner of the screen to exit. Click the Exit button to exit the Visit History List screen. Click the Exit button to exit the Visit History Criteria screen to return to the Profile page of the Edit Client screen. 01/18/06 3:13 PM Page 40 of 448 Defining Client Payer Sets (Client/Payer Relationships) Defining payer sets for a client sets up the association of a client to payers for visits, plans of care, invoices, and claims. Payer sets are defined for a client using the Edit Client/Payer screen. To access the Client/Payer screen, select menu option Administration | Clients. Click the button to find the client. Click the Payers button. The Edit Client/Payer screen is displayed. Adding a New Payer Set Click the button. Click the Select button next to the Payer field. The Payer List screen is displayed. 01/18/06 3:13 PM Page 41 of 448 Click the name of the payer you want to add. Click the Select button. The Add Client/Payer screen is displayed. Payer Information Section You may enter a “Bill Name” for each client/payer relationship. The Bill Name field may be used to change the name of the payer, which appears on invoices and claims for that specific client. Confirm that the payer’s Contact field is correct. This should be the name of a person at the insurance company. Confirm that the payer’s Address fields are correct Confirm that the payer’s Zip Code and City fields are correct Confirm that the payer’s Phone #’s and Extension fields are correct. You may assign a different CSR to a specific Client/Payer relationship than what was assigned to the client. Generally, the default information that is provided in the fields of the Payer Information section should NOT be changed. Some clients, however, have special cases where some fields need to be changed (such as Contact, Address, etc.). If the default information is simply wrong, the data should be corrected on the Edit Payer screen (See section, Defining Payers). Otherwise, you will have to change it here every time the payer is added to a payer set. If you have made modifications to the payer information on this screen and would like to replace it with the default information for the payer, click the Payer Default button. This will set the payer information back to the information that was defined for the payer. 01/18/06 3:13 PM Page 42 of 448 Insured’s Information Section Confirm that the insured’s Relation field is correct. Confirm that the insured’s Name field is correct. Confirm that the insured’s DOB (Date of Birth) field is correct. Confirm that the insured’s Sex field is correct. Confirm that the insured’s Employer field is correct. Policy Information Section If the payer is not to be used anymore for the client, click on the Do Not Use check box. Marking this client/payer relationship as “Do Not Use” will also mark the skills and codes and schedule orders for this client/payer relationship as “Do Not Use.” Enter the Insured’s ID of the insured party. This field is set to upper case automatically. Enter the Authorization # given by the insurance company, if required. This field is set to upper case automatically. Enter the Group Name of the insurance policy, if there is one. Enter the Group Number of the insurance policy, if there is one. This field is set to upper case automatically. Enter the Policy Number of the insurance policy. This field is set to upper case automatically. Enter the Authorized Dates of the insurance policy. Changing the Payer Authorization end date on a client/payer relationship may only be done if the date is after any verified or closed visits. It is important that these fields are completed as much as possible. Many of these fields appear on claims that are submitted to insurance companies. The Insured’s ID is used to fill in Locator 1 (Patient’s HI Claim No) on a HCFA 485 when the client has a plan of care. The Authorized Dates information is used to determine if the visit (paid by this payer) for a client are in-compliance (see section on Compliance Checking). Click on “Use this payer for all Point-of-Care information”, if this is the single payer that should be used for any clinical information or visits that may be imported by a Point-of-Care system that is interfacing with SAM. Invoicing Information Section Select an invoice method: Percent—if the insurance policy pays a percentage of the cost of service; select this invoice method and enter the percentage that the insurance company pays (may be as much as 100%). Co-Pay—if the insurance policy requires that the client co-pay a portion of the cost of visits, select this invoice method and enter the dollar amount per visit the client is to co-pay. Enter the frequency of supervisory visits for this client in the Supervisory Visit Freq field. The payer’s default value is displayed. 01/18/06 3:13 PM Page 43 of 448 The Bill Notes field is used to customize how a bill is created for this client/payer relationship. You only need to populate this field if directed by RiverSoft. Click the button to save the new client/payer relationship. Adding Client-Payer Requirements Client-Payer requirements are used to override the payer’s default billing requirements. Certain clients may have different billing requirements than that is normal for this payer. Normally, the payer’s default requirements are sufficient. Click the Client/Payer Requirements tab on the Edit Client/Payer screen to override the payer’s default requirements. The Client/Payer Requirement screen is displayed. Requirements List Section This section lists the available billing requirements that may be assigned to an invoice: The Requirements page is used to define the client/payer’s billing requirements. For Claim requirements, select one of the following: UB92 required—Used for payers that require UB92 claims. Selecting Billing Period will show billing period dates in locator 6. Selecting Service Dates will show the span of service dates fir the work items on the claim locator 6 HCFA 1500 required—Used for payers that require HCFA 1500 claims. 01/18/06 3:13 PM Page 44 of 448 Selecting 0 Decimals will report 0 decimal places for the work item units. Selecting 2 Decimals will attempt to report 2 decimals for the work item units. The space for work units is very small, and if the unit is greater than or equal to 10, only 1 decimal place will be printed. Signed Plan of Care (and billable visit) – If this is turned “on” and if the payer is “Medicare”, The system will not create a EOE if it finds that the Plan of Care or Verbal Orders during the certification period do not have a date in the “received signed” field. In addition, if a billable visit is not found during the certification period, the RAP will not be created. If the payer requires that Supplies be summarized to one line on the claim, click on the Summarize Supplies option. The right side of the screen displays what has been defined for the Payer. Adding Client-Payer Requirements Skills and Codes The Skills and Codes page is used to select from the Skills added to the Payer, those that may have services scheduled for this particular client. No visits may be scheduled for the client until valid skills have been identified. A valid skill must be added on the Skills and Codes Page in order to add Pay/Bill rates for the skill on the client-payer relationship. In addition, if the Revenue Codes, HCPC Codes or Modifiers are different for this client than what has been entered for the payer, they may be entered on this screen. 01/18/06 3:13 PM Page 45 of 448 To add a new skill click Add button. Select from the Skill/Sub-Skill (Pay Unit/Bill Unit) pick list (entered for the Payer) those that are valid for this client/payer relationship. For each Skill, (if different from the Payer) enter the Revenue Codes and HCPC Codes to be printed on a UB92 billing claim (if applicable.) These can be different by shift (1, 2, and 3) or by day (Mon, Tues, etc.) For each Skill, (if different from the Payer) enter the HCPC Codes and Modifiers to be printed on a HCFA 1500 billing claim (if applicable.) These can be different by shift (1, 2, and 3) or by day (Mon, Tues, etc.) Once you have entered the information for the skill, click the Update List button to add it to the list. If the skill is no longer valid, you may remove the skill or mark it as “Do Not Use.” Removing the skill will remove the Revenue Codes, HCPC codes and Modifiers, so if you still need these for billing we would recommend that you mark the skill as “Do Not Use” until you no longer need the codes and then remove the skill. To remove a skill, select the skill and click the Remove button. To mark a skill as “Do Not Use”, select the skill and click the “Do Not Use” check box. The system offers two special types of Skill Categories “SN” and “SN Staffing” (Skilled Nursing). If you add a valid skill of “SN’, you may assign a RN, a LPN or a LVN type of skill to a visit. If you add a valid skill of “SN Staffing”, you may assign a RN Staffing or LPN Staffing type skill to a visit. The Skill Category “SN” is delivered with your software; if you wish to have the Skill Category “SN Staffing”, please contact your software representative. 01/18/06 3:13 PM Page 46 of 448 When creating invoice, if you have a “SN” skill identified on the client/payer Skills & Codes screen, but the codes are blank, the system will search for the skill on the visit (RN, LPN, etc.) for the appropriate codes. Defining Client Insurance Authorization Compliance Rules An insurance authorization type of compliance rule can be entered when an insurance company wants to define what care and services are covered in the insurance policy of the client, such as, dictating the skill and frequency of visits; and you want to perform compliance checking against the insurance authorization. To access the Insurance Authorization Compliance Rule screen, select menu option Administration | Clients, click the Payer button and click the Ins Auth button. Note: Any compliance rule that is older than 1 year (based on the end date of the rule) will be purged nightly by default. If you wish to modify this default time-frame, add the following line to your n:\sam.ini file (where # is the number of months back to keep compliance rules): Ini_Comp_Rules_Purge_Month,# The Edit Compliance Rule screen may be displayed in one of two ways: 1. If you are building compliance rules for Self-Pay clients (including facilities), select menu option Administration | Clients, click the Auth button. The Auth button will only be enabled if you have entered valid skills for the client on the Client Skills and Codes (Self-Pay) screen because compliance rules may only be added for valid skills. 2. If you are building compliance rules for Client/Payer relationships (not Self-Pay), select menu option Administration | Clients, click the Payer button and click the Ins Auth button. The Ins Auth button will only be enabled if you have entered valid skills for the client on the Client/Payer Skills and Codes screen because compliance rules may only be added for valid skills. The Edit Compliance Rule screen is displayed. 01/18/06 3:13 PM Page 47 of 448 Click the button, to add a new insurance authorization. Notice that the Rule Type defaults to “Insurance Authorization.” Enter an Authorization Number if applicable. This Authorization Number will be printed on the UB92 claim and may be optionally printed on the visit report. Select the Skill/Subskill for the Insurance Authorization from the list. This list of Skill/Subskills is derived from the valid skills you have entered either on the Client Skills and Codes (Self-Pay) or the Client/Payer Skills and Codes screens. Compliance rules may only be entered for valid skills. Enter the minimum and maximum number of hours or visits defined in the insurance authorization. Click the visit type option: Hours or Visits. Specify a frequency for the number of hours or visits from the combo box: “A Day”, “A Week”, “A Month”, or “As Needed.” Enter the duration as a number of days, weeks, or months. Click the duration type: “Days”, “Weeks”, or “Months”. If appropriate, enter the Interval as a number of days, weeks or months. Enter the Start Date and End Date of the insurance authorization. Click the Save button. If the new compliance rule overlaps an existing Insurance Authorization compliance rule, the Overlapping Compliance Rules screen will be displayed. 01/18/06 3:13 PM Page 48 of 448 If the new insurance authorization represents visits to be done in addition to what is already authorized, choose Save New Rule as Addition to Existing Rules. The system will save the rule as is. If the insurance authorization replaces what is currently authorized, choose Save New Rule as Replacement for Existing Rules. This will cause the system to adjust the dates on the current insurance authorization to end as the new rule begins. For a complete discussion of compliance rules and compliance checking, see the Compliance Checking presentation located in the” n:/users manuals” folder of your server. The compliance rule will be checked each time a change is made to the client’s schedule. If a visit of the same client-payer-skill/sub-skill combination breaks any part of the rule, the visit will be given a status of out-of-compliance (displayed as black) due to insurance authorizations. If Out-of-compliant visits are verified and closed, they are still paid and billed. For more on compliance checking, see the section on compliance checking in this manual. 01/18/06 3:13 PM Page 49 of 448 Defining Pay Rates and Bill Rates A hierarchy of pay and bill rates for visits are support. When determining a pay rate for a visit, the system walks the hierarchy of pay rates beginning with Client/Employee rates per skill/sub-skill/shift down to default rates per skill/sub-skill/shift. When determining a bill rate for a visit, the system walks the hierarchy of bill rates beginning with Client/Payer rates per skill/sub-skill/shift down to default rates per skill/sub-skill/shift. Defining a pay rate is similar to defining a bill rate. Therefore, we will only describe how to define a pay rate in this section. You may apply the same steps of defining a pay rate to defining a bill rate. The differences are that pay rates apply to employee/payer relationships and bill rates apply to client/payer relationships. 01/18/06 3:13 PM Page 50 of 448 Pay rates are created and edited from the Edit Pay Rates screen. Depending on where in the system you called this screen (level of hierarchy), you may or may not be able to select the payer name. For the purposes of this description we will assume that you can. Adding Pay Rates Select the payer that is associated with the pay rates you are going to define by clicking the Select button next to the Payer field; then select a payer from the Payer List form. Or, click the Default button next to the Payer field to default to all payers. Note that either an Employee field or a Client field is displayed next to the Payer field depending on where you are in the system and the name in the field may be “Default.” Click the Add Mode 01/18/06 3:13 PM button to add a new rate. Page 51 of 448 Select the pay UNIT for the rate: Hours or Visits. Select a skill/sub-skill (or “Any”) from the Skill combo box. Only those skills that have been identified as “valid” on the Skills and Codes screen will be listed as a skill that may have a rate associated with it. This is the case for Client, Client/Payer Relationships and Payers. Enter the starting Effective Date of the new rate. Use the Shifts and Rates buttons to select the shifts to which the rate is applied. Then enter the rates per shift (including weekends). Click the Update button to add the new rate to the list. Continue to add rates until finished. When finished, click the Stop button to get out of add mode. Click the Save button. Deleting Pay Rates Select the payer that is associated with the pay rates you are going to delete by clicking the Select button next to the Payer field; then select a payer from the Payer List form. Or, click the Default button next to the Payer field to default to all payers. Note that either an Employee field or a Client field is displayed next to the Payer field depending on where you are in the system and the name in the field may be “Default.” Click the rate that you want to delete from the list. 01/18/06 3:13 PM Page 52 of 448 Click the Remove button. Note that every rate for the selected skill and effective date is removed regardless of shift. Click the Save button. Printing Pay Rates Click the Print List button to print a list of the pay rates. Copying Pay Rates Click the Copy button to copy rates to other offices, employees, etc. The Copy Pay Rates screen is displayed. 01/18/06 3:13 PM Page 53 of 448 Select the Office option “Current Office”. The front office cannot copy pay rates to other offices. Select the employee to which the rates are to be copied by clicking the Select button next to the Employee field. Select the employee from the Employee List screen. Select the payer to which the rates are to be copied by clicking the Select button next to the Payer field. Select the payer from the Payer List screen. Select which rates by pay unit you want to copy: Hours or Visits. Click the Copy button. Updating Visits This feature should be used when you have been made a rate change and you would like to update all visits affected by the rate change or any other rate changes made since midnight last night. It is important to remember to press the Save pressing the “Update Visits” button. button after your rate changes and before Click the Update Visits Button 01/18/06 3:13 PM Page 54 of 448 Click the Yes button if you would like to update the rates or No if you would like to cancel. If you answer Yes, the system will scan all visits with the same skill and on or after the earliest effective date of any rate change made today. If the rate should be updated by the change that you have made, it will be updated. This process could take several minutes if there are a lot of visits to scan. A message will be displayed showing how many visits were “scanned”; this does not necessarily mean that they were all changed. Only those visits that should be changed by the rate changes will be changed. Note that if you have modified a rate for an “ANY” skill or have deleted any rates, if you press the “Update Visits” button, no changes will be made to any visits. Only visits occurring on or after the effective date on any rate modified today will be updated. Only those visits that have the same skill (and any sub-skills for that skill) as any rate modified today will be updated. Visits marked with override(s) will not be updated. Closed visits are not changed. 01/18/06 3:13 PM Page 55 of 448 Defining Bill Rates This works exactly the same as defining payer rates with one exception. When entering a bill rate, type of invoice or reimbursement. Invoices are created with the invoice bill rates. The Print/Transmit screen allows the creation of automatic contractual allowance adjustments for any invoice selected. In this way, the difference between what a payer is billed and what they actually are expected to pay can be accounted for and the Invoice Aging report reflects invoices at the reimbursement amount (via contractual allowance invoice adjustments.) Deleting Clients If you choose to delete a client click the Delete button at the top right of the profile page. When deleting a client they cannot have an invoice, plan of care (clinical information), closed visits, closed supply items, closed service items, and/or closed pay items. The system will warn you before deleting a client if the client is associated with verified visits, verified supply items, verified service items, and/or verified pay items. When you request to delete a client, the system will delete the schedule order if there are no visits on the order. 01/18/06 3:13 PM Page 56 of 448 Defining Employees To access the Employee screen, select menu option Administration | Employees. The Edit Employee screen is displayed. The Edit Employee screen contains tabs for pages of related information. The pages on the Edit Employee screen are Employee Profile, Employee Taxes, Employee Skills/Attributes, Employee Preferences/Bonuses, and Emp Photo. The Profile page is the first page displayed upon entry to the Edit Employee screen. 01/18/06 3:13 PM Page 57 of 448 Finding an Employee Click the Find button. The Employee List screen will be displayed. Select a Skill of the employee you want to see. Select the Type of employee you want to see. Select the Status of the employee you want to see. Select the Affiliation of the employee you want to see. If you wish to shorten the list, you can type in the first few characters of a last name in the Name Beginning With field. Also, to shorten the list, you can click on the option “Has visits scheduled during selected week.” Click the Generate button. 01/18/06 3:13 PM Page 58 of 448 Select an employee from the generated list. The Edit Employee screen is redisplayed. Adding an Employee On the Edit Employee screen, click the New employee. The Add Employee screen is displayed. 01/18/06 3:13 PM button on the toolbar to add a new Page 59 of 448 Profile Page The Profile page is used to enter general information about an employee. Vitals Section Enter the employee’s first name, middle initial, and last name in the Employee Name fields. Enter the employee’s Social Security Number in the SSN field. Enter the employee’s address in the Address fields. The first address line is for street address or PO Box numbers. The second line is for apartment or suite numbers, etc. If a street address is long and will not fit in line one, its okay to overlap it on line two (avoid splitting a word in half when you use two lines for the address, if you can, because it is printed with a space where the split occurs). Enter a Zip Code. If you do not know the entire zip code, you must enter at least the first three digits. After you enter the zip code, a list of cities with the given zip code appears in the combo box below the zip code. Select the correct city from the combo box under the Zip Code field. Use up or down arrows on the keyboard to find the city; or click the down arrow on the combo box to display the list of cities, and then click the city. If needed, select a location from the Affiliation combo box. The affiliation attribute is used as an aid to employee/client matching and selecting on some reports. Clients and employees may be assigned to affiliations. It is beneficial to assign employees to clients that are within the same affiliation to reduce travel time and cost. Affiliations are defined per office and are usually geographically based. 01/18/06 3:13 PM Page 60 of 448 Enter the employee’s telephone number(s) in the Phone #’s fields. Select the employee’s sex using the Sex option buttons. Enter the employee’s Birth Date. After you have entered and saved the preliminary information for the employee the “Edit Status” button will become enabled. When adding a new employee, you must press the “Edit Status” button to add a status for the employee. To make the employee active you will press this button when it becomes enabled. The available statuses are Active, Applicant, Claim Pending, Do Not Use, Inactive, Not Hired, and Terminated. As an employee’s status changes within the agency, you can add the status and status date to the employee status screen, keeping a history of their status in the agency. Click the New button on the toolbar to add a new Employee status. The status will default to “Active” in the Status combo box. You may change this status to any of the following: Applicant, Claim Pending, Do Not Use, Inactive, Not Hired or Terminated, Once you have selected a status, enter a date in the Status Date field. The Reason field is only enabled for a status of “Terminated”. Click the Save button on the toolbar to save the new status. The list on the Edit Employee Status screen now displays a row with the Date column containing the status and date that you entered. You will use this screen to enter any employee statuses in order to keep a history of all employee status. Click the Exit 01/18/06 3:13 PM button on the toolbar to exit the Edit Employee Status screen. Page 61 of 448 If you wish to remove a status from the Edit Employee Status screen, click on the status you wish to remove then click the Delete button. Enter the employee’s Email address. Payroll / Billing Section Select one of the employee types from the Employee Type combo box: 1. Contractor— if the worker is contracting with your home care agency to provide care, choose contractor. 2. Field Employee— if the worker is paid for the service they provide and does not receive a base salary, choose field employee. 3. Staff Employee— if the worker receives a salary, choose staff employee. Staff employees can also be paid by the visit – see the Salaried Visits field for an explanation. If the Employee Type is a “Contractor”, enter the federal ID of the worker’s company in the Federal ID field. Select the appropriate skill from the Primary Skill combo box. Enter the employee’s professional Licenses #’s. The first license number will appear on the invoice on each line item representing service performed for this employee. Select how the employee’s paycheck is to be sent to the employee from the Check Handling combo box. Enter the maximum number of hours the employee wants to work into the Max Hours field. Scheduling will use this information in the employee matching function. If the employee should not receive premium rates for working overtime, check the Exempt from Overtime check box. If the Employee Type is a “Staff Employee” (salaried) and the employee has agreed to perform a certain number of visits for their salary but visits over that number should be paid over and above their salary, enter the number of salaried visits into the Salaried Visits field. Make sure that the pay rate for the visits performed by the employee are at the rate they should receive if they were being paid over and above their salary. When the week is closed, the verified visits are automatically counted and the visits falling within the salaried quota are marked as “already paid” and are not counted in the week’s payroll. All visits for the employee over the salaried quota are counted and paid in the week’s payroll. If you want to pay the employee an amount more than the normal pay rates defined for your agency, enter the additional amount per hour and per visit in the Merit Pay fields. This is assuming you have created default pay rates at the skill level for you organization. If you want to pay the employee an amount more than the normal pay rates defined for your agency for the work they perform on the weekends, enter the additional amount per hour and per visit in the Weekend Differentials fields. This is assuming you have created default pay rates at the skill level for you organization. Miscellaneous Section If the employee is a case manager, click the Case Manager check box. This will allow you to build a list of case managers from which you can choose when creating plans of care. 01/18/06 3:13 PM Page 62 of 448 If the employee was referred, select the desired referral source by clicking the Referral button. When the Referral List screen appears, click one of the list items and then click the Select button; or simply double click one of the list items. If the referral source does not appear in your list click the Cancel button. The selected referral source will be displayed in the Referral field. If you would like to “clear” the current referral selection, click the Clear Selection button. (You may enter new referral sources to be displayed in the Referral List using the Referral Sources option on the Administration menu to display the Edit Referral Sources screen.) The Comments field is used to describe scheduling and work habits associated with an employee. These comments will appear on the bottom of the schedule when viewing visits for this employee. Use this field to show information about the employee that effects how you schedule work for them. For instance, if an employee routinely misses morning appointments, you could enter “assign to visits later in the day” or “prefers live-in assignments.” Click the Taxes tab to go to the next page. Taxes Page The Taxes page is used to record the information required to pay the employee. This information is available on the Employee Tax Withholding Report. If you are using the ACCPAC SBT payroll accounting package, basic employee and tax withholding information, such as name, address, SSN, federal and state filing statuses, and 01/18/06 3:13 PM Page 63 of 448 number of exemptions will automatically be exported into the SBT payroll system. Other withholding information must be entered directly into the SBT payroll system. The Employee Tax Withholding Report should be run on a weekly basis so that changes may be entered into the payroll system. Exempt from Withholding Section If the employee is exempt from tax withholding, you can record this information in this system so that it can be entered into the payroll system. Choose the type of tax from which the employee has been exempted. When you choose a type of tax, the information panel for that tax will become disabled. If your agency is in an area subject to head taxes, the “no longer exempt” date field will not be enabled. If your area has a head tax, use this field to record when an employee is no longer exempt. Federal Section Select the employee’s Filing Status. Select the employee’s EIC Status (Earned Income Credit). Enter the number of federal exemptions the employee is claiming into the # of Exemptions field. If an additional amount is to be withheld per paycheck, enter the amount in the Additional Amt field. If an additional percentage is to be withheld per paycheck, enter the percentage in the Additional % field. State Section Select the employee’s state Filing Status. Enter the employee’s resident and non-resident state # of Exemptions. Enter the amount that should be subtracted from the gross before the state withholding calculations are performed into the Exempt Amount field. If an additional amount is to be withheld per paycheck, enter the amount in the Additional Amt field. If an additional percentage is to be withheld per paycheck, enter the percentage in the Additional % field City Section If an additional amount is to be withheld per paycheck, enter the amount in the Additional Amt field. If an additional percentage is to be withheld per paycheck, enter the percentage in the Additional % field Additional Tax Section If the employee has any other taxes to be withheld like garnishments, enter the information here. This information will print on the Employee Tax Withholding Report. 01/18/06 3:13 PM Page 64 of 448 Miscellaneous Section These fields are used for interfaces to payroll systems. Click the Skills/Attributes tab to go to the next page. Skills/Attributes Page The Skills/Attributes page is used to define skills and attributes that an employee has. These skills and attributes are used in the employee matching function of scheduling when assigning an employee to a visit. Skills & Sub-Skills Section Click any skill in the list, then click the top Add >> button next to the list to add it to the Employee Skills & Attributes selection list. Click the Primary Skills Only check box, so that it is unchecked, to see all sub-skills. Attributes Section Click any attribute in the list, then click the bottom Add >> button next to the list to add it to the Employee Skills & Attributes selection list. Employee Skills & Attributes Section When a skill or attribute is selected in this section, you may click the Remove button to delete it from the list. You may click the Remove All button to remove all skills and attributes from the list. Click the Preferences/Bonuses tab to go to the next page. 01/18/06 3:13 PM Page 65 of 448 Preferences/Bonuses Page The Preferences/Bonuses page is used to provide a way to give an employee more or less priority in employee matching and premium pay on a client-employee relationship basis. Client Preferences Section To add a client-employee relationship: Click the Add button Click the Select button next to the Client field. This will display the Client List screen. Use the attributes to shorten the list of clients. Click the Generate button. Select a client from the generated list. Choose from the three employee-client relationships. Client Prefers to See will give the employee more priority when employee matching is used to fill unassigned visits for this client. Client Never Wants to See and Employee Never Wants to See will exclude the employee when employee matching is used to fill unassigned visits for this client. If you want to comment why the relationship exists, enter this information into the Comment field. Click the Update List button to complete the addition of the employee-client relationship. Click the Cancel button to cancel the addition of the employee-client relationship. 01/18/06 3:13 PM Page 66 of 448 Bonuses Section To give the employee a bonus over and above the normal pay rate scheme when performing service for a particular client: Click the Add button Click the Select button next to the Client field. This will display the Client List screen. Use the attributes to shorten the list of clients. Click the Generate button. Select a client from the generated list. Enter the additional amount per hour and per visit into the Amount fields. If you want to comment why the bonus exists, enter this information into the Comment field. Click the Update List button to complete the addition of the employee-client bonus information. Click the Cancel button to cancel the addition of the employee-client bonus information. Click the Emp Photo tab to go to the next page. Employee Photo The Employee Photo page is used to optionally store a picture of the employee. To add photo click the Add Photo button and the Open Picture screen will be displayed. 01/18/06 3:13 PM Page 67 of 448 Enter the path and filename where the photo file resides on your workstation or network. You may add a picture (.jpg, .bmp, etc.) < 100 KB in size. To remove an employee photo, click the Delete Photo button. 01/18/06 3:13 PM Page 68 of 448 Employee Tracking Tracking information may be defined for an employee using the Tracking Information screen. This information can be used in scheduling when assigning an employee to a visit. All tracking information entered into this screen is available from the Employee Tracking Report. This report allows you to build a list of employees whose items (like license dates) are coming up for renewal. To access the Tracking Information screen, select menu option Administration | Employees, use the Find button to find your employee, click the Tracking button. The Tracking Information screen is displayed. The master list of tracking items is created and maintained in Employee Tracking Items accessible from the Configuration menu. To track each item for an employee, select the tracking item from the pull-down list and click the Add button on the left of the screen. If the item has sub-tracking items, like classes attended that make up In-Service hours, click the add button on the right of the screen while the tracking item pointer is pointing to the correct parent tracking item. Fill in the description, number of units (value) and date of the sub-tracking item. The total of the sub-tracking items will show in the value of the parent Tracking Item. To remove a tracking item from an employee, click on the row of the tracking item and then click the Remove button. To keep the changes you have made click the Keep button. To discard the changes you have made click the Cancel button. 01/18/06 3:13 PM Page 69 of 448 The Profile page of the Edit Employee screen will be redisplayed. Click the Save button to save the employee tracking information. Note: If the tracking item has been check as “Always Required for this Office”, the tracking item cannot be deleted and will always report on the Employee Tracking report. Specifying Employee Availability Employee availability is defined using the Employee Availability Calendar screen. To access the Employee Availability Calendar screen, select menu option Administration | Employees, use the Find button to find your employee, click the Availability button. The Employee Availability Calendar screen is displayed. To view earlier or later weeks, click the left arrow and right arrow buttons. To go directly to a calendar that contains a certain date, click the calendar button and choose the date. To exit and return to the Profile page of the Edit Employee screen, click the Exit button. 01/18/06 3:13 PM Page 70 of 448 Shift Availability To define the days of the week and the shifts that an employee is available to work, click the Shift Availability button. The Edit Shift Availability screen will be displayed. For each day and shift of the workweek, click next to the Always, Maybe, or Never option. This information will be used when the scheduling features are used to fill an unassigned visit. If an employee’s availability is the same for every day of the week, you should edit the first day and then click the Duplicate 1st Day button to copy your selection to the rest of the days of the week. Click the Save redisplayed. button and the Employee Availability Calendar screen will be Day Availability To define certain days or portions of days that an employee may not be available, click the Day Availability button. The Edit Day Availability screen will be displayed. 01/18/06 3:13 PM Page 71 of 448 Click the New button to add an entry. Enter the dates of the employee’s non-standard availability in the Dates fields. This may be because the employee is going on vacation, a training class, or any situation that falls outside of their normal availability. Enter the times during the days of the employee’s non-standard availability in the Times fields. Choose the Availability type: Always, Maybe, or Never. Optionally, enter a comment in the Comment field. Click the Save button. Add additional entries as needed by repeating the above steps. To add availability (single days) quickly to the Employee Availability screen, use the following method: 1. Click the New button 2. Enter availability information 3. Right click on the Date Field 4. Using the Calendar, double click on the date. This will add the entry in the window. This method will leave you in New Mode, press the Restore button to exit New Mode. Click the Exit 01/18/06 3:13 PM button. The Employee Availability Calendar screen will be redisplayed. Page 72 of 448 Viewing Employee Visit History An Employee Visit History may be generated using the Visit History Criteria screen. This list is very useful to view all or a subset of visits scheduled for the employee. To access the Visit History Criteria screen, select menu option Administration | Employee, use the button to find the employee, click the Visits button. The Visit History Criteria screen is displayed. By default, visits for the current employee and all clients will be displayed. You can choose one specific client by clicking the Select Client option and clicking the Select button. This will cause the Client List screen to be displayed. Selecting a client from this list will cause the Visit History Criteria screen to be redisplayed with the selected client displayed. You can choose to view visits for all orders associated with the client or you can select one specific order from the Orders combo box. Optionally, you can enter in the range of service dates for the visit history you wish to see in the Date Range fields. You can choose to look at a visit of only a certain status by selecting it in the Status combo box. Click the Generate button to view the list of visits. 01/18/06 3:13 PM Page 73 of 448 The Visit History List screen will be displayed containing all the employee’s visits that meet the selected criteria. You can order the list by date, client, or employee by clicking on those corresponding sort options. For each visit, the employee, client, date, skill, and status of the visit are shown. Click the Print List button to send a copy of the Visit History List to the printer. To view more information about a particular visit, double-click the visit or select the visit and then click the View button. 01/18/06 3:13 PM Page 74 of 448 The Visit Summary screen is displayed containing details of the visit. Click the X in the upper right corner of the screen to exit. Click the Exit button to exit the Visit History List screen. Click the Exit button to exit the Visit History Criteria screen to return to the Profile page of the Edit Employee screen. Defining Employee Pay Rates Hierarchies of pay and bill rates for visits are supported. When determining a pay rate for a visit, the hierarchy of pay rates is read beginning with Employee/Payer rates per skill/sub-skill/shift down to default rates per skill/sub-skill/shift. When determining a bill rate for a visit, the hierarchy of bill rates is read beginning with Client/Payer rates per skill/sub-skill/shift down to default rates per skill/sub-skill/shift. 01/18/06 3:13 PM Page 75 of 448 Employee pay rates are created and edited from the Edit Pay Rates screen. To access the Edit Pay Rates screen, select menu option Administration | Employees. The Edit Employee screen is displayed. Display the details of the employee. (See section, Finding an Employee) Click the Pay Rates button. The Edit Pay Rates screen is displayed. 01/18/06 3:13 PM Page 76 of 448 Adding Pay Rates Select the payer that is associated with the pay rates you are going to define by clicking the Select button next to the Payer field; then select a payer from the Payer List form. Or, click the Default button next to the Payer field to default to all payers. Note that the Employee field displayed next to the Payer field contains the name of the employee the pay rates are being defined for Click the Add Mode 01/18/06 3:13 PM button to add a new rate. Page 77 of 448 Select the pay unit for the rate: Hours or Visits. Select a skill/sub-skill (or “Any”) from the Skill combo box. Enter the starting Effective Date of the new rate. Use the Shifts and Rates buttons to select the shifts to which the rate is applied. Then enter the rates per shift (including weekends). Click the Update button to add the new rate to the list. Continue to add rates until finished. When finished, click the Stop button to get out of add mode. Deleting Pay Rates Select the payer that is associated with the pay rates you are going to delete by clicking the Select button next to the Payer field; then select a payer from the Payer List form. Or, click the Default button next to the Payer field to default to all payers. Note that the Employee field displayed next to the Payer field contains the name of the employee the pay rates are being deleted for. Click the rate that you want to delete from the list. Click the Remove button. Note that every rate for the selected skill and effective date is removed regardless of shift. Printing Pay Rates Click the Print List button to print a list of the pay rates. 01/18/06 3:13 PM Page 78 of 448 Copying Pay Rates to Employee within Current Office Click the Copy button to copy rates to other employees. The Copy Pay Rates screen is displayed. Select the Office option “Current Office”. The front office cannot copy pay rates to other offices. Select the employee to which the rates are to be copied by clicking the Select button next to the Employee field. Select the employee from the Employee List screen. Select the payer to which the rates are to be copied by clicking the Select button next to the Payer field. Select the payer from the Payer List screen. Select which rates by pay unit you want to copy: Hours or Visits. Click the Copy button. 01/18/06 3:13 PM Page 79 of 448 Scheduling Getting to the Scheduler Screen To access the Scheduling screen, select menu option Schedule | Display Schedule. The Month view of the Scheduler screen is displayed for the current week. 01/18/06 3:13 PM Page 80 of 448 Viewing a Client’s Schedule Click the Client button. The Client List screen will be displayed. Select a Type of client you want to see. Any client covered by a plan of care is a “Patient”. Clients who are staffed like hospitals or nursing homes are “Facility” type clients. Everyone else is a “Client” type client. Select the status, payer class or affiliation of the client’s you wish to see. You may also receive a list of only those clients with a specific CSR assigned. If Use Client/Payer CSR is “Off” only those clients with the specific CSR assigned to the client will be listed. If Use Client/Payer CSR is “On” only those clients with a specific CSR assigned to the client/payer relationship will be listed. In this case the client/payer relationship must be current and not set to “Do Not Use.” If you wish to shorten the list, you can type in the first few characters of a last name in the Name Beginning With field. Also, to shorten the list, you can click on the option Has visits scheduled during selected week or Has unassigned visits. Click the Generate button. 01/18/06 3:13 PM Page 81 of 448 Select a client from the generated list by double clicking on the client or highlighting the client and pressing the Select button. The Scheduler screen will be displayed with the client’s schedule for the current month. Moving to a Different Week’s Schedule In the upper left corner of the Scheduler screen, there is an arrow button pointing left. Click this previous week button to view the previous week’s schedule. In the upper right corner of the screen, there is an arrow pointing right. Click this next week button to view the next week’s schedule. FAST REWIND: If you RIGHT click on the previous week button, the system searches for the first visit before the beginning of the current schedule (skipping over empty weeks) and displays the week of that visit at the top of the schedule. If no visit was found the schedule does not move. FAST FORWARD: If you RIGHT click on the next week button, the system searches for the first visit after the end of the current schedule (skipping over empty weeks) and displays the week of that visit at the bottom of the schedule. If no visit was found the schedule does not move. 01/18/06 3:13 PM Page 82 of 448 Above and to the left of the right arrow button, there is a calendar button. Click on the calendar button to get the Change Schedule Date screen. The Change Schedule Date screen is displayed. Double click on a day contained within the week of the schedule you wish to view, or click the day and then the X in the upper right corner. You may have to change the month or year to view the appropriate month. 01/18/06 3:13 PM Page 83 of 448 Moving to a Different Client’s Schedule In the upper right corner of the Scheduler screen, there are four buttons with red arrows called the Navigation buttons, two pointing left and two pointing right. The button pointing left to a line will take you to the first client in the list you generated when you entered the scheduling screen and used the client list screen to select your client. The other left-pointer button will take you to the previous client in the list you generated when you entered the scheduling screen. The button pointing right to a line will take you to the last client in the list you generated when you entered the scheduling screen. The other right-pointer button will take you to the next client in the list you generated when you entered the scheduling screen. To go directly to a particular client’s schedule, follow the instructions in the section in this manual, Viewing a Client’s Schedule. 01/18/06 3:13 PM Page 84 of 448 Viewing an Employee’s Schedule To access the Employee’s Schedule screen, select menu option Schedule | Display Schedule. Click the Employee button. 01/18/06 3:13 PM Page 85 of 448 The Employee List screen will be displayed. Select a Skill of the employee you want to see. Select a Type of the employee you want to see. Select a Status of the employee you want to see. Select the Affiliation of the employees you want to see. If you wish to shorten the list, you can type in the first few characters of a last name in the Name Beginning With field. Also, to shorten the list, you can click on the option Has visits scheduled during selected week. Click the Generate button. 01/18/06 3:13 PM Page 86 of 448 Select an employee from the generated list. The Scheduler screen will be displayed with the employee’s schedule for the current week. Viewing the Scheduler in Different Modes The schedule may be view in four different modes: Time List Month Week Visit is represented by box positioned and sized by date and time and color coded for status. Each visit is represented by one row of information and color coded for status. Four weeks of visits is displayed at one time. Within each day, visits are stacked and color-coded for status. If a day has more visits than can be viewed at one time in this mode, the day will have a scroll bar that can be used to scroll through the visit. Also, to view more visits at once, click the “+” button. One week of visits is displayed at one time. Within each day, visits are stacked and color-coded for status. This is very handy when multiple employees are visiting the same client at the same time. To switch the viewing mode you are in, click on the drop-down field to the right of the Legend button. This will show you the possible viewing modes. Select the mode you want. The Scheduler screen will be re-displayed in the selected mode. All of the previous screen shots are in the Month viewing mode. 01/18/06 3:13 PM Page 87 of 448 This is the scheduler screen in the List viewing mode. This is the scheduler screen in the Week viewing mode. In all modes, right-clicking a visit will cause the Visit Menu to appear. This means that you can perform all scheduling functions from any mode. 01/18/06 3:13 PM Page 88 of 448 The Visit Menu Right clicking on a visit in any view will cause the visit menu to be displayed. From the visit menu, you can… 1. Create a visit (from either the Client or Employee Schedule) 2. Edit the current visit 3. Delete the visit (not available if the visit is “Verified” or “Closed”) 4. Move the visit (not available if the visit is “Verified” or “Closed”) 5. View Order 6. Specify Employee (not available if the visit is “Verified” or “Closed”) 7. Employee Match (not available if the visit is “Verified” or “Closed”) 8. Visit Phone Log (not available if the visit is “Closed”) 9. Copy Single Visit (not available if the order is “full” (has 99999 visits)) 10. Copy Visit Wizard (not available if the order is “full” (has 99999 visits)) 11. Update Visit Wizard 12. Employee/Client View - Switch to the employee or client view of the schedule based on the view you are currently in and the current visit 13. Compliance - Run a compliance check 14. Set, view, or clear the model schedule week for the current client’s schedule (not available from the employee schedule) Each of these items operations will be explained in later sections. This is the scheduling screen when a visit has been right-clicked. 01/18/06 3:13 PM Page 89 of 448 Changing the Text That Appears on a Visit On the Scheduler screen, click the Prefs button. The Schedule Preferences screen will be displayed. Choose one of the options: Name (client or employee name), Skill Compliance Status Payer Visit No (order number – visit number) CSR If there is a problem with all text fitting within the boundaries of the visit box, check the option Use Small Font Click the X in the upper right corner of the screen to exit. The visits will be redisplayed according to the preference you have selected. 01/18/06 3:13 PM Page 90 of 448 Creating a Phone Log Entry Not Based Upon a Visit On the Scheduler screen, click the Phone button. This will display the Edit General Phone Log Entry screen. If you are on a client’s schedule, any phone log entry of Call Type “Business” will be tied to the client. If you are on an employee’s schedule, any phone log entry of Call Type “Business” will be tied to the employee. If you click the Call Type “Personal” option, the phone log entry will be tied to the person who is logged in. Click the New 01/18/06 3:13 PM button. Page 91 of 448 Select the Message Type and type in the Details you wish to record about the conversation. The Call Date and Time will be saved and displayed. Any Modification date will also be saved and displayed. Click the Save button. Click the Exit button. 01/18/06 3:13 PM Page 92 of 448 Schedule Summary Display Screen Based on the week or month of schedules being viewed via the Display Schedule function, the Sum button will show a summary of hour and visit counts across clients, grouped by visit status. 01/18/06 3:13 PM Page 93 of 448 Viewing the Rules Governing the Current Schedule By clicking the Rules button, you can see the insurance authorizations and doctor’s order that are in effect at the time of the current schedule. These are the rules used by the compliance checking to mark visits as compliant or not. 01/18/06 3:13 PM Page 94 of 448 Viewing the Visit Legend By clicking the Legend button, you can see the legend explaining the different colors, etc. used to denote important information. 01/18/06 3:13 PM Page 95 of 448 Creating a Visit To create a visit, click on any white space in any view of the schedule screen. The schedule screen will look like this. Choose the Create Visit option and the Create Visit screen will appear. 01/18/06 3:13 PM Page 96 of 448 Select the appropriate Payer/Skill/Pay Unit/Bill Unit combination for the visit. This information was previously entered when the Client was associated with a Payer and the valid skill combinations were entered; or when the valid skill combinations were entered for the Client for a “Facility” type client or a “Self-Pay” situation. (Refer to section Defining Client Payer Sets (Client/Payer Relationships).) Once you have selected the appropriate Payer/Skill, the remaining fields for the visit will become enabled. To assign an Employee to the visit you may either assign a specific employee by clicking the Employee button or search for available employee’s by clicking the Emp Match button (press the Save button to enable this feature.) If you click the Employee button, the Employee List will be displayed, displaying the skill of the visit. You may then select the employee to be assigned to the visit. If the visit is saved without choosing an employee (the normal occurrence) the visit is saved and displayed on the screen as an unassigned visit. If the skill category “SN” (skilled nursing) has been selected, you can assign a RN, a LPN or a LVN type of skill. If the skill category “SN Staffing” has been selected, you can assign a RN Staffing or LPN Staffing type skill. The Skill Category “SN” is delivered with your software; if you wish to have the Skill Category “SN Staffing”, please contact your system support representative. If you click the Emp Match button, the Employee Matching screen will be displayed. Please refer to the Employee Matching section in this manual for detailed information on how to use this feature. When creating invoices, if you have a “SN” skill identified on the client/payer Skills & Codes screen, but the codes are blank, SAM will search for the skill on the visit (RN, LPN, etc.) for the appropriate codes. 01/18/06 3:13 PM Page 97 of 448 If a sub-skill should be assigned to the visit, click the Sub-Skill button and select the appropriate Sub-Skill. A sub-skill is normally used if there is a specific bill or pay rate for the sub-skill, or if there is a different Revenue Code, HCPC or Modifier (billing claims) for the sub-skill. The Date will default to the date that you performed the “right-click” on, this may be modified. Right click on the date field to access a calendar for ease in choosing your date. Press “T” to fill the field in with today’s date or use the spin controls to “spin” through dates. When creating a new visit, the time will default to 9:00 am and the length will be determined by the number of hours assigned to a normal visit in the Skill database. Enter any time that you do not wish to be counted for billing or payroll in the Break times. You may input in 12-hour or 24-hour (military) format for all visit times. The Pay Type may either be “Regular” or “Holiday.” Selecting “Regular” will pick up the regular pay rate (without applying holiday differential) and selecting “Holiday” will apply the holiday pay differential to the pay rate. The pay and bill rates will be defaulted from the pay and bill rate tables. These values are defaulted any time this screen is invoked. If you choose to override the pay bill units or rates and do not want them to recalculate the next time the screen is invoked (for this visit only), click the Override option next to the pay or bill rate. The computed pay and bill rates to the right will always be displayed to the right. The Qual field may either be “Qualified” or “Unqualified.” This information must be entered the for the FIRST visit using the Payer/Skill/Pay Unit/Bill Unit combination, then any subsequent visits created will use your input as their default. Specify “Qualified” for any visits that you wish to be included in your Medicare Cost reporting. By default the Specific Times option is checked signifying that the times assigned to this visit correspond to when the visit should be done. In some cases, employees set there own schedule and the time of the visits are not known at the time they are assigned to an employee. In this case, the Specific Times option should be unchecked. This will cause the text of the visit box on the schedule to appear in italics. If the visit represents a supervisory visit or an assessment visit in addition to the normal service provided, check the Supervisory Visit and/or the Assessment Included options. Supervisory visits are reported on the Census (Episode) report. You can enter a comment specifically for this visit and a short message, which will print on the invoice underneath the normal invoice line for the visit. If the visit is a “Confirmed” status, the Timeslip Verified check box will be enabled. Note that checking this box changes the status of the visit to “Verified.” If the employee has already been paid for this visit or the employee has a salary, check the Already Paid check box. This prevents the payroll entry for this visit to be exported to the payroll system. Enter any travel money to be paid to the employee, this information may not be known until after the visit has occurred. Enter any travel money to be billed to the payer, this information may not be known until after the visit has occurred. Enter any sales tax, this information may not be known until after the visit has occurred. To save the unassigned visit, click on the Save button and press the Exit button to return to the schedule screen. The new visit will be displayed on the schedule screen. 01/18/06 3:13 PM Page 98 of 448 Daylight Savings Time Remember to make any adjustments necessary to your visits to correct any payroll or scheduling issues with regard to Daylight Savings Time. For example: In the spring (when we lose an hour) on a day that spans across midnight when the time changes, the shift might be modified to reflect that the employee physically worked only 7 hours by changing the end time with a visit comment “Shift spans daylight savings.” The result should be that the visit hours should be equal to the hours physically worked by the employee. Editing a Visit To edit a visit, right click on the visit and select the Edit Visit option. This will cause the Edit Visit screen to be displayed. 01/18/06 3:13 PM Page 99 of 448 Visits may be edited until they are “Closed” as a part of the weekly payroll processing. Once a visit is closed, it may not be edited. It may however be adjusted. If you modify the Payer/Skill, the Payer No, Payer Set and Visit Number will automatically be changed for you. If the office is a Texas office, a 2067 button will be displayed on the “Edit Visit” screen. For each client the “To:” address must be entered in the non-scheduling comments field on the client’s Ancillary Info screen. Example: 2067to:Jane Doe 123 Main Street, Suite 4 San Antonio, TX 12345 On the visit screen, enter into the visit comment “2067:text goes here.”. Up to 300 characters will fit. SAM will do the word wrapping automatically, so don't hit the enter key when keying the comment. The Verification Process – Weekly Payroll Visits are verified against documents submitted by employees that reflect what services were actually performed for a given week. For the purposes of training, we will call these documents timesheets. Perform the following steps to verify visits for an employee. To verify visits, select menu option Schedule | Display Schedule. The Scheduler screen is displayed. Adjust the Scheduler screen to display the week for the visits listed on the timesheet. 01/18/06 3:13 PM Page 100 of 448 If your timesheets have information by employee you will probably want to verify visits by employee; but if your timesheets have information by client you will probably want to verify visits by client. Verifying Visits by Employee Click the Employee button to display the Employee List screen. Click the checkbox labeled, Has visits scheduled during the selected week. Click on the Generate/Refresh button to generate a list of all employees that have scheduled visits during the week displayed on the schedule. Click the employee listed on the timesheet, and then click the Select button. Or simply, double click the employee. All visits assigned to the selected employee are now displayed on the Scheduler screen. To verify the visits, right-click on the first visit of the week. A popup menu appears. Click the Edit Visit menu option to display the Edit Visit screen. Confirm that the correct client is displayed. Confirm that the correct skill is displayed. Confirm that the correct payer/skill/pay unit/bill unit combination is displayed. Confirm that the correct date is displayed. 01/18/06 3:13 PM Page 101 of 448 Confirm that the correct start and end times are displayed and that the visit has the correct total hours. Confirm that the correct pay type is displayed: “Regular” or “Holiday.” Confirm that the correct pay rate and pay unit is displayed. Confirm that the correct bill rate and bill unit is displayed. If you know that start and end times are specific and not estimates, check the Specific Times check box. (Note that this is just for informational purposes.) If any part of the visit was supervisory, check the Supervisory Visit check box. Supervisory visits are counted on several reports. (Note that if the sub-skill is “Supervisory,” this box is checked for you.) If any part of the visit was an assessment, check the Assessment Visit check box. (Note that if the sub-skill is “Assess,” this box is checked for you.) Ignore the Status combo box. (Status will change to “Verified” later.) Enter any comments about the visit. Enter any description about the visit to appear on the invoice. If all documents are present and in order click the Timeslip Verified check box. Note that checking this box changes the status of the visit to “Verified.” If the employee has already been paid for this visit or the employee has a salary, check the Already Paid check box. This prevents the payroll entry for this visit from being exported to the payroll system. Enter any travel money to be paid to the employee. Enter any travel money to be billed to the payer. Enter any sales tax. Click the Save (next) button which is located to the left of the “Timeslip verified” check box field. This button will save the visit and “jump” to the next visit, speeding up the verification process. Click the Find button to locate the next confirmed visit you would like to verify. Repeat the steps above for each visit until they are all verified. Click the Exit button to return to the schedule. Click the Employee button to select the next employee or Click the Right Arrow button to advance the schedule to the next employee in the current list. Repeat until all visits for all employees have been verified. Verifying Visits by Client This is the same process as verifying by employee except for one key difference. The schedule is viewed in from the client perspective. Click the Client button to display the Client List screen. Click the checkbox labeled, Has visits scheduled during the selected week. 01/18/06 3:13 PM Page 102 of 448 Click on the Generate/Refresh button to generate a list of all clients that have scheduled visits during the week displayed on the schedule. Click the client listed on the timesheet, then click the Select button. Or simply, double click the client. All visits assigned to the selected client are now displayed on the Scheduler screen. Right-click the first visit of the week. A popup menu appears. Click the Edit Visit menu option to display the Edit Visit screen. Confirm that the correct employee is displayed. Confirm that the correct skill is displayed. Confirm that the correct payer/skill/pay unit/bill unit combination is displayed. Confirm that the correct date is displayed. Confirm that the correct start and end times are displayed and that the visit has the correct total hours. Confirm that the correct pay type is displayed: “Regular” or “Holiday.” Confirm that the correct pay rate and pay unit is displayed. Confirm that the correct bill rate and bill unit is displayed. If you know that start and end times are specific and not estimates, check the Specific Times check box. (Note that this is just for informational purposes.) If any part of the visit was supervisory, check the Supervisory Visit check box. Supervisory visits are counted on several reports. (Note that if the sub-skill is “Supervisory,” this box is checked for you.) If any part of the visit was an assessment, check the Assessment Visit check box. Assessment visits are counted on several reports. (Note that if the sub-skill is “Assess,” this box is checked for you.) Ignore the Status combo box. (Status will change to “Verified” later.) Enter any comments about the visit. Enter any description about the visit to appear on the invoice. If all documents are present and in order click the Timeslip Verified check box. Note that checking this box changes the status of the visit to “Verified.” If the employee has already been paid for this visit or the employee has a salary, check the Already Paid check box. This prevents the payroll entry for this visit from being exported to the payroll system. Enter any travel money to be paid to the employee. Enter any travel money to be billed to the payer. Enter any sales tax. Click the Save (next) button which is located to the left of the “Timeslip verified” check box field. This button will save the visit and “jump” to the next visit, speeding up the verification process. Click the Find button to locate the next confirmed visit you would like to verify. Repeat the steps above for each visit until they are all verified. Click the Exit 01/18/06 3:13 PM button to return to the schedule. Page 103 of 448 You may distribute the hours of a visit to holiday hours and see where the system is deriving the pay and bill rates by clicking the Split Hours button. If the week consists of many visits done by the same employee with the same skill, the whole week of visits may be verified together using the Verify Week button on the Verify Week screen. 01/18/06 3:13 PM Page 104 of 448 Click the Save button. The verified visit is saved and the screen advances to the next unverified visit for this client. Repeat the steps above for each visit until they are all verified. Click the Exit Click the Client button to select the next client or Click the Right Arrow button to advance the schedule to the next client in the current list. Repeat until all visits for all clients have been verified. Visits that are alike (same Payer/Skill) may be verified together using the verify week screen button to return to the schedule. Once the visit or visits have been verified, the visit’s status will change to verified and the visit or visits will turn light blue on the schedule. Deleting a Visit Deleting a visit can be done three ways: 1. By using the delete option on the visit menu. 2. Clicking the Delete button while editing a visit. 3. Update visit wizard (to delete multiple visits at one time.) Moving a Visit Moving a visit can be done three ways: 1. If you want to move one visit to another time during the same week, click and drag the visit to the desired location. (This method is not available in list mode.) 01/18/06 3:13 PM Page 105 of 448 2. If you want to move one visit to another time frame, right-click on the visit. The Visit Menu will appear. Select the Move Visit option. The Move Visit screen will appear. Enter the New Visit Start Date and New Visit Start Time. You may input in 12hour or 24-hour (military) format. Click the X in the upper right corner of the screen to exit. The Scheduler screen will appear with the moved visit displayed. If you moved the visit to another week, you will have to navigate to that week to see it. 3. Update visit wizard (to move multiple visits at one time.) 01/18/06 3:13 PM Page 106 of 448 View Order To view an Order, right click on any visit to display the visit menu and then choose the View Order option. Orders are “containers” that hold all of the visits by Payer/Skill combination. This will cause the Edit Schedule Order screen to be displayed. This is an informational display only screen. Specify Employee This is a very quick way to assign an employee to a visit. It is important to note that if you use this feature, the system assumes you know that the employee is available and no scheduling conflict or employee tracking warnings will be displayed. 01/18/06 3:13 PM Page 107 of 448 Employee Matching On the Scheduler screen, right click on a visit (normally an unassigned visit). This will display the Visit Menu. On this menu, select either the Edit Visit or the Employee Match option. If you select the Edit Visit option, when the Edit Visit screen is displayed, click the Emp Match button. This will cause the Employee Match screen to be displayed. If you click the Search button, the system will build a list of employees whose primary skill matches the skill of the visit. Each employee in the list is available or may be available during the time of the visit, is not in an overtime situation, is not scheduled elsewhere, and matches the Type, Status, Affiliation, and Sex on the Miscellaneous panel of the Employee Match screen. 01/18/06 3:13 PM Page 108 of 448 Upon clicking the Search button, the Employee Candidate List screen will be displayed. You may double click on any employee or choose the View Visits button to see the visits that the employee is already confirmed on. You may quickly assign an employee to the visit by pressing the Assign button. The purpose of this screen is to help you call employees in sequence and offer the visit to them. To do this, highlight the employee you want to call and click the Phone Log button. The Add Visit Phone Log Entry screen will be displayed. 01/18/06 3:13 PM Page 109 of 448 Call the employee – the employee phone number(s) are displayed in the upper right panel. Based on the outcome of the phone call, select the appropriate Message Type. Enter any other information including a Message as needed. Click the Save button and then click the Exit button. If the employee accepted, clicking the Save button will not only save the phone log entry but will also assign the employee to the visit and redisplay the Scheduler screen. If the employee refused the assignment, the Employee Candidate List screen will be redisplayed and in the “Called?” column for the employee just called, you will see an “*”. This tells you that the employee has been called for this visit. 01/18/06 3:13 PM Page 110 of 448 Visit Phone Log (Canceling a Visit) The Visit Phone Log is a powerful feature that allows you to track information regarding changes to visits. It is especially useful when visits are cancelled. On the Scheduler screen, right click on a visit (normally an assigned visit). This will display the Visit Menu. On this menu, select the Visit Phone Log option. This will cause the Visit Phone Log screen to be displayed. If any phone log entries exist, the last one that was added will be displayed. To edit an existing phone log, click the Find existing phone logs. To add a new phone log, click the New Select the appropriate Message Type: 1. Accepted – if the employee has accepted assignment of the visit. (Also used while performing Employee Matching) 2. Cancelled – Client – if the Client is canceling the visit 3. Cancelled – Employee – if the employee is canceling the visit 4. Cancelled – Office – if the office is canceling the visit 5. Left Message – if you have left a message for the employee regarding the visit (also used while performing Employee Matching) 6. No Answer – if you attempted to reach the employee regarding the visit but there was no answer (also used while performing Employee Matching) 7. No Show – if the employee did not show up for the visit. 8. Other – if none of the other message types apply, be sure to input a comment. 01/18/06 3:13 PM button to select from a list of the button. Page 111 of 448 9. Refused – if the employee has refused assignment of the visit (Also used while performing Employee Matching) Input an appropriate comment in the Message field for later reference. Press the Visit Summary button to see more information regarding the visit. Visit Phone logs can be searched and printed by choosing the Schedule menu option and selecting Search Phone Log. Copying a Visit Copying a visit can be done three ways: 1. If you want to copy one visit to another time or day on the same scheduling screen, control-drag the visit to the desired location. (This method is not available in list mode.) 2. If you want to copy one visit to another time frame, right-click on the visit. The Visit Menu will appear. Select the Copy Single Visit option. The Copy Visit screen will appear. 01/18/06 3:13 PM Page 112 of 448 Enter the New Visit Start Date and New Visit Start Time. You may input in 12hour or 24-hour (military) format. Click the “X” button in the upper right of the Copy Visit screen. The Scheduler screen will appear with the copied visit displayed. If you copied the visit to another week, you will have to navigate to that week to see it. 3. Copy Visit Wizard (to copy multiple visits at one time.) 01/18/06 3:13 PM Page 113 of 448 Copy Visit Wizard The copy visit wizard offers two ways to copy visits: specifying each visit individually, and copying the current week or month forward. The first way to use the copy visit wizard is by choosing each individual day to which the current visit should be copied Clicking on the day on the calendar to which you want the current visit to be copied does this. As you click the days, they are added to the scrolling list of Selected Dates. To remove any selected dates, click on the select date and then click the Remove button. The number of visits per day to be copied may be entered. 01/18/06 3:13 PM Page 114 of 448 The next screen allows you to define what information on the selected visit should be copied and what type of checking should be done when the new visits are created. Clicking the Next button will invoke the copy wizard’s finish screen. 01/18/06 3:13 PM Page 115 of 448 The second way to use the copy visit wizard is to use the current week or month as the copy template. When this method is chosen, the following screen allows you to define what is to be copied (the week or the month, specific or all schedule orders) and how many weeks or months or schedule are to be created. This screen also allows monthly, weekly, and daily intervals to be inserted into the created schedules. The Next button will invoke the standard copy wizard configuration screen and the screen after that is the copy wizard finish screen. Update Visit Wizard The update visit wizard allows a set of visits to be updated at the same time. To do this, the system must first be told what visits should be updated. This is done using the Step 1 screen. 01/18/06 3:13 PM Page 116 of 448 Once the system knows what visits are to be updated, it must be told what information about the selected visits should be changed. The Step 2 screen allows the user to select what should be updated. 01/18/06 3:13 PM Page 117 of 448 The Step 3 screen allows the user to define whether or not shift availability and scheduling conflicts should be checked for. By default, this checking is done. 01/18/06 3:13 PM Page 118 of 448 The finish screen summarizes the information that will be changed. On this screen, it can be specified that a preview of update visits be given before the choice is made to commit the changes to the schedule. There is also the option of choosing the delete visits instead of updating them. The preview screen gives information about the update of each visit. The visit updates are committed to the schedule by clicking the Continue button. 01/18/06 3:13 PM Page 119 of 448 Employee – Client View From the client view of the schedule, normally the visits display the name of the employee servicing the client. To see a visit employee’s view of the schedule, right click on the visit and choose the Employee View option. This will cause the schedule screen to refresh with in the employee’s view of the current month’s schedule. 01/18/06 3:13 PM Page 120 of 448 You may switch back to the client view by right clicking on one of the client’s visit and choosing the Client View option. Assignment Matching 01/18/06 3:13 PM Page 121 of 448 In the employee view of the schedule, a function called assignment matching is available. This function allows a scheduler to find an assignment for an employee when an employee calls in. To use the function, display the employee’s schedule and right-click on any white space. Selecting the Assignment Match option of the short visit menu causes the following screen to appear. This screen will allow a search for all unassigned visits to which the current employee could be assigned. Clicking the Search button causes the list of visit assignments to be displayed. 01/18/06 3:13 PM Page 122 of 448 The scheduler may then view details or summary about each visit, edit a visit, or assign one, several, or all of the visits to the current employee. In this way, employees calling the agency looking for assignments can be offered assignments and scheduled while the calling employee is still on the phone. Compliance Checking By choosing the compliance option on the visit menu, the system will check all visits in the current schedule for compliance with all doctor order and insurance authorization compliance rules entered for this client. The system will run a compliance check anytime the schedule is changed. A compliance check may optionally be run manually by right clicking on one of the visits belonging to a schedule order and choosing the Compliance option. 01/18/06 3:13 PM Page 123 of 448 The Compliance Summary screen will be displayed with the results of the check. The information consists of two parts: the top window shows each compliance rule broken into units of frequency (like weeks) with the total visits associated with the rule. The number of visits under the minimum allowed for the rule (Under) and the number of visits that can still be schedule and be within the maximum are displayed (Avail). The bottom window shows visits that are out of compliance along with the reason (Payer Set Dates (Payer Authorization Dates), Dr Order, or Insurance Authorization). 01/18/06 3:13 PM Page 124 of 448 How SAM Checks for Compliance: 1. Any visit associated with a client and payer that is outside of the client-payers authorization date range will be marked in the schedule as out-of-compliance. This means the visit will turn black on the schedule. 2. Beyond payer authorization date checking, if insurance authorization rules or doctor order compliance rules exist for visit’s client-payer-skill, each visit not covered by a rule will be marked out-of-compliance on the schedule. 3. If a rule authorized more visits than are scheduled, the compliance summary screen will show how many more visits are authorized under the rule. 4. The compliance summary screen will also list all out-of-compliance visits. 5. Visits for a client-payer-skill/sub-skill are only checked for compliance if there is a related rule. Visits occurring before the start date of the first rule are not checked for compliance – they are considered in-compliance. 6. If you have created rules for a client that include a rule for the skill level and the sub-skill level, it is important to note that the rule at the sub-skill level will be used first and then the rule at the skill level will be used. For example: If you have a rule for a LPN 3 visits a week and a rule for a LPN-HighTech 3 visits a week. If schedule 4 LPN-HighTech visits in a week and only 2 LPN visits in the same week, all visits are in compliance because the 4th LPN-HighTech visit was compliant under the LPN rule. We typically recommend that rules either be entered at the skill level OR at the sub-skill level. For more information on compliance checking, see the Compliance Checking presentation in N:\user manuals. 01/18/06 3:13 PM Page 125 of 448 Tip: The compliance checking feature may slow down the verification process. If this is a problem, you may either turn off compliance checking while verifying or delete old compliance rules for patients where compliance checking is slow. Setting, Viewing, and Clearing Model Week You may create model schedule weeks per client and then copy these models, all at once, using the copy model week function. This allows agencies that perform the same services, week after week, for certain types of clients, to have the system automatically create the future schedules. First, the model week for a client is set. Do this by right clicking on a visit (from the client view) within the week to be made the model and selecting the Set Model Week option. To view the current model week, right click on a visit within the week and select the View Model Week option. 01/18/06 3:13 PM Page 126 of 448 The View Model Week per Client screen allows visits from the model to be removed. The model week for a client can be cleared from the Visit menu. Once models have been created for each appropriate client, the Copy Model Week function may be used to create future schedules. The Copy Model Weeks screen will allow the models for all or a specific payer and scheduler to be viewed and copied into the future. To access the Copy Model Weeks screen, select menu option Schedule |Copy Model Week. Once the desired copy option has been selected, click the Copy button will cause all models to be copied as directed. To view the current client models, click the Client Model Weeks button. 01/18/06 3:13 PM Page 127 of 448 This information screen shows how the current models are displayed. 01/18/06 3:13 PM Page 128 of 448 When creating client models, it may be useful to know which clients have not had models set. Clicking the Missing Model Weeks button on the Copy Model Weeks screen can show this. Adding Supply Items Supply items are entries that record what supplies have been used, how much they cost, and how much is billed to payers. Supply items may be recorded two ways: 1) they may be associated with the visit, or 2) they may be associated with clients. Adding Supply Items Associated with Visits If your company wants to associate supply items to visits, perform the following steps to get to the Edit Supply Item screen: Click the Edit Visit menu option to go to the Edit Visit screen. From here, you can click the Supplies button to get to the Edit Supply Item screen. 01/18/06 3:13 PM Page 129 of 448 Note that the title of the screen includes “Visit-Related” and that the visit ID is displayed on the top of the screen. Adding Supply Items Associated with Clients If your company wants to associate supply items to clients, perform the following steps to get to the Edit Supply Item screen: From the Scheduler screen, click the Client button to get to the Client List screen. Click the client to whom you want to associate a supply item and then click the Supply Items button to go to the Edit Supply Item screen. 01/18/06 3:13 PM Page 130 of 448 Using the Edit Supply Item Screen Click the New 01/18/06 3:13 PM button to add a supply item. Page 131 of 448 Master Supplies Section This section contains a list of supplies. By default the list displays all supplies in the database. You have three options for listing supplies in the list: Standard—Click on this option if you want to list supplies that are standard across all offices. Local—Click on this option if you want to list supplies that are customized to your office. All—Click on this option to list standard and local supplies. Click the supply from the list, and then click the Select button. Or simply, double-click on the supply. If the supply is selected correctly, it will be displayed in the Supply field in the Supply Item section. The Supply Database button will take you to the supply database. Supply Item Section This section defines the attributes of the supply item you want to add. The name of the supply is displayed in the Supply field. If the supply has an SKU, it is displayed in the SKU field. If the supply has been assigned a Revenue Code (UB92), HCPC (UB92 & HCFA 1500) or Modifier (HCFA 1500), these will also be displayed. Default values for unit cost, unit bill, quantity, and total sales tax of the supply item are displayed. Edit these values appropriately. Enter the date the supply was used. Enter an invoice description for the supply. (Optional) Select the appropriate payer set from the combo box who is to pay for the supply. Note that the list of available payer sets is dependent on the date the supply was used. Click the Save button to save the supply item. Click the New button again to add another one. Click the Find button to view existing supply items. Click the Exit button to leave the screen. Adding Service Items Service items are entries that record what services have been rendered, how much they cost, and how much is billed to payers. Service items are always associated with clients. Perform the following steps to get to the Edit Service Item screen: From the Scheduler screen, click the Client button to get to the Client List screen. 01/18/06 3:13 PM Page 132 of 448 Click the client to whom you want to associate a service item and then click the Service Items button to go to the Edit Service Item screen. Click the New 01/18/06 3:13 PM button to add a service item. Page 133 of 448 Master Services Section This section contains a list of services. By default the list displays all services in the database. You have three options for listing services in the list: Standard—Click on this option if you want to list services that are standard across all offices. Local—Click on this option if you want to list services that are customized to your office. All—Click on this option to list standard and local services. Click the service from the list, and then click the Select button. Or simply, double-click on the service. If the service is selected correctly, it will be displayed in the Service field in the Service Item section. The Service Database button will take you to the service database. Service Item Section This section defines the attributes of the service item you want to add. The name of the service is displayed in the Service field. Default values for unit cost, unit bill, quantity, and total sales tax of the service item are displayed. Edit these values appropriately. Enter the date the service was rendered. Enter an invoice description for the service. (Optional) Select the appropriate payer set from the combo box who is to pay for the service. Note that the list of available payer sets is dependent on the date the service was used. Click the Save button to save the service item. Click the New button again to add another one. Click the Find button to view existing service items. NOTE: When creating Medicare PPS invoices, the system will automatically create PPS RAP and PSP EOE type service items. These types of service items maybe viewed, but you cannot delete them. Click the Exit 01/18/06 3:13 PM button to leave the screen. Page 134 of 448 Adding Pay Items Pay items are entries that record special tasks performed by an employee (not related to visits), how much is paid to the employee, and how much is billed to payers. Pay items are always associated with employees. Perform the following steps to get to the Edit Pay Item screen: From the Scheduler screen, click the Employee button to get to the Employee List screen. Click the employee to whom you want to associate a pay item and then click the Pay Items button to go to the Edit Pay Item screen. 01/18/06 3:13 PM Page 135 of 448 Click the New button to add a pay item. Pay Item Section This section defines how much is paid to the employee. Click on the pay item you want to add from the Pay Item combo box. Note that some fields are enabled or disabled depending on which pay item you select. For example: If you select the “Bonus (affect Overtime), you will have the option to select a start/end date. This reflects the payroll week that the OT should be calculated for. If you enter a date that does represent the start of end of a week, the system will “snap” to the start or end of the week. Enter the date the pay item occurred. If an end date is required for the pay item, enter it too. If the pay item is paid as a flat dollar amount, enter the amount in the Dollar Amount field. If the pay item is paid hourly, enter the hourly rate and the number of hours in the Rate X Hours fields. Reimbursement Information Section If the client’s payer may reimburse the pay item, this section defines how much is billed. Click the Select button to identify the client involved in the service. Select the appropriate payer set from the Payer combo box. Note that the list of available payers is dependent on the date the pay item occurred. Enter the proper bill amount in the Bill Amount field. Enter an invoice description. (Optional) 01/18/06 3:13 PM Page 136 of 448 Click the Save button to save the pay item. Click the Find button to view existing pay items. Click the Exit button to leave the screen. The following are the type of Pay Items: Pay Item Description Bonus (affects overtime) Note: The bonus $ is added to the “total amount $” before “average $” is calculated Bonus (doesn’t affect overtime) Holiday In-House Training In-Office Temp On-Call Other No Tax Other Tax Reimbursement Show Up Sick Uniform Allowance Vacation 01/18/06 3:13 PM Rate and Hours No Dollar Amount Affects OT Taxable Yes Yes Yes No Yes No Yes Yes Yes Yes No No No No No Yes No Yes No No No Yes Yes Yes Yes Yes No Yes No Yes Yes Yes No No No No No Yes No Yes Yes Yes Yes Yes No Yes No Yes Yes No Yes Page 137 of 448 Show Compliance Selecting this menu option will toggle the “Show Compliance” on/off. If “Show Compliance” is on, all visits that are out of compliance will be display as “black” and compliance checking will be processed when adding, modifying or deleting visits. If “Show Compliance” is off, out of compliance visits will not be displayed as blank and compliance checking will not be processed when adding, modifying or deleting visits. Turning off this option will speed up the process of scheduling your visits. Show Employee OT (*) Selecting this menu option will toggle the “Show Employee OT” on/off. If “Show Employee OT” is on, visits that occur in a week where the employee is in an overtime situation have a “*” displayed. If “Show Employee OT” is off, visits that occur in a week where the employee is in an overtime situation will not have a “*” displayed. If you would like to suppress any of the warnings regarding an employee going into an overtime situation, you can add the following line to your n:\sam.ini file: Ini_Show_Overtime_Warning, F Printing Post-Verification Reports Before closing the week, the following reports should be generated and reviewed: 1. Verified Visit 2. Pay Item 3. Service Item 4. Supply Item 5. Transportation For instructions see the section on Reports. 01/18/06 3:13 PM Page 138 of 448 Calculating Overtime at the Front Office In order to assure that critical processes are working with static data, the system will not allow this process if anyone is doing any of the following in the database: Close Week, Calculate Overtime, Create Invoices, Create Automatic Contractuals, Transmit Claims, Make Adjustments (Items, Invoices, Rebills, Reviewing and accepting, etc.), Payroll Export and Updating Visit Rates. You may choose to calculate overtime at anytime. An overtime screen will pop up and display the overtime cases. Overtime is calculated across all offices for the previous week. SAM now offers 2 ways to calculate overtime pay for your employees: Algorithm A: Overall Average Rate Algorithm A is the default overtime calculation. This algorithm calculates an overtime rate based on the overall average pay rate of an employee per week. The average rate is computed by dividing the total pay for the week by the total hours for the week (of visits and/or pay items that count towards overtime). One-half the average pay rate is then ADDED to each overtime hour. Algorithm B: Item Average Rate Algorithm B calculates n individual overtime rate per visit and/or pay item. The overtime rate is computed by determining the average rate of the individual visit/pay item (considering regular pay, holiday pay, etc.), then REPLACING the pay rate of the visit/pay item with 1.5 times the average. This algorithm is consistent with existing overtime laws. Note: All employees must agree to the use of this algorithm before its use. To activate this overtime option, add the following line to your n:\sam.ini file: Ini_ot_algorithm,B If you choose to use overtime option B, it will be important to update the n:\sam.ini file for your back office and all of your front offices, so that all of your offices are calculating overtime using the same option. By default, 40 hours of work by an employee in one week is what will trigger any additional hours in the week to go into overtime. You can control the number of hours that will trigger overtime for an employee. If you do not have this variable set, SAM will use the default of 40 hours. To use this feature, enter the following line in your n:\sam.ini file where ## is the number of hours that should trigger overtime (example: 48): Ini_weekly_ot, 48 To Calc Overtime, select menu option AR | Calc Overtime. If Overtime is found, the following information screen will be displayed 01/18/06 3:13 PM Page 139 of 448 Click on the Print button to print an overtime report. Click on the Cancel button to exit from this screen. 01/18/06 3:13 PM Page 140 of 448 Closing the Week after Verification at the Front Office In order to assure that critical processes are working with static data, the system will not allow this process if anyone is doing any of the following in the database: Close Week, Calculate Overtime, Create Invoices, Create Automatic Contractuals, Transmit Claims, Make Adjustments (Items, Invoices, Rebills, Reviewing and accepting, etc.), Payroll Export and Updating Visit Rates. After all verification is finished and all work items are ready for payroll, the next step is to close the week. This locks down the work items so that they cannot be edited and prepares them for payroll and invoicing. The week may be closed many times, so that one segment of the business within an office can be verified, closed, patrolled and billed before another segment of the business. The week is closed first at the front office. Once the Data Exchange has occurred, either automatically or on demand, the office must be closed at the back office before payroll or billing can occur. This gives the back office the opportunity to re-verify the week’s information before performing the final close. To Close Week, select menu option AR | Close Week. Selecting this option causes the Close Week screen to be displayed. The Close Week screen displays a list of the offices in the front office’s database. This is normally one office but it is possible to separate a site into multiple offices. The week is closed for an office by highlighting the office and clicking the Close Week button. 01/18/06 3:13 PM Page 141 of 448 Overtime Report If the close week function detects that some employee have overtime, an overtime screen will pop up and display the overtime cases. It is a good practice to print this overtime list every time it is displayed; then cancel the close week process to correct any overtime problems, and/or print a new verified visit report that shows the overtime information. SAM now offers 2 ways to calculate overtime pay for your employees: Algorithm A: Overall Average Rate Algorithm A is the default overtime calculation. This algorithm calculates an overtime rate based on the overall average pay rate of an employee per week. The average rate is computed by dividing the total pay for the week by the total hours for the week (of visits and/or pay items that count towards overtime). One-half the average pay rate is then ADDED to each overtime hour. Algorithm B: Item Average Rate Algorithm B calculates n individual overtime rate per visit and/or pay item. The overtime rate is computed by determining the average rate of the individual visit/pay item (considering regular pay, holiday pay, etc.), then REPLACING the pay rate of the visit/pay item with 1.5 times the average. This algorithm is consistent with existing overtime laws. Note: All employees must agree to the use of this algorithm before its use. To activate this overtime option, add the following line to your n:\sam.ini file: Ini_ot_algorithm,B If you choose to use overtime option B, it will be important to update the n:\sam.ini file for your back office and all of your front offices, so that all of your offices are calculating overtime using the same option. By default, 40 hours of work by an employee in one week is what will trigger any additional hours in the week to go into overtime. You can control the number of hours that will trigger overtime for an employee. If you do not have this variable set, SAM will use the default of 40 hours. To use this feature, enter the following line in your n:\sam.ini file where ## is the number of hours that should trigger overtime (example: 48): Ini_weekly_ot, 48 Click on the Print button to print an overtime report. Click on the Cancel button to cancel the close week function. 01/18/06 3:13 PM Page 142 of 448 01/18/06 3:13 PM Page 143 of 448 Salaried Visits Information If verified visits exist for salaried employee and these visits cause the employees to surpass the number of hours they are normally expected to work as a part of their salary, the following screen is displayed. Visits within the limit are not exported to payroll. Visits beyond the limit are exported to payroll with the pay rate associated with the visits. Pressing the Continue button on this screen will cause the close week processing to complete. The week will be marked as closed and the status of all verified visits will be changed to a status of closed. Closed visits cannot be edited. They can only be adjusted using the “Make Adjustments” function. Verified Visit Report with Overtime After overtime calculations have been encountered during the close week function, a Verified Visit Report should be reprinted to show the overtime calculations. Please refer to the Visit Report section in the manual. 01/18/06 3:13 PM Page 144 of 448 Users Manual Patient Management Defining a Patient Once it is determined that a patient is to receive services from the agency, a patient must be admitted into the agency. A patient is admitted into the agency using the Clinical Information function to specify patient clinical information. After a patient is admitted, Plans of Care and/or OASIS Assessments may be entered for the patient using the Clinical Information function. All patients that you will track clinical information for are originally defined as clients with a client type of “Patient” using the Client function. The list of patients presented on the Patient List screen associated with the Edit Patient screen contains all of the clients currently defined in your system with a client type of “Patient”. Finding a Patient To access the Patient screen, select menu option Administration | Clinical Information. The Edit Patient screen will be displayed. 01/18/06 3:13 PM Page 145 of 446 Users Manual On the Edit Patient screen, click the Find button on the toolbar. The Patient List screen will be displayed. Select the Status of the patient you would like to see. Select the Type of the patient you would like to see. You may also enter part or the patient’s entire last name in the Name Beginning With field. Click the Generate button to generate a list of patients who meet the criteria you have specified. 01/18/06 3:13 PM Page 146 of 446 Users Manual Select a patient in the list and click the Select button. The Edit Patient screen will be displayed. You will notice that the Patient Vitals section is filled in with the selected patient’s information that was entered on the Client’s profile. The Clinical Information will be blank except the Agency Current status field will display “Incomplete”. 01/18/06 3:13 PM Page 147 of 446 Users Manual Admitting a Patient into the Agency In order to admit a patient into the agency, the patient’s Agency Start of Care date must be entered and the patient’s Agency Current Status must be changed from “Incomplete” to “Active” (which will in turn set the patient’s Agency Admit Date). This is accomplished using the Edit Patient screen associated with the Define Patient function. To access the Define Patient screen, select menu option Administration | Clinical Information. The Edit Patient screen is displayed. Display the details of the patient you want to admit. (See section, Finding a Patient) NOTE: It is important to understand that admitting a patient into the agency is based on the first service that the patient is to receive from the agency no matter which payer is paying for the service. The Agency Current Status, the Agency Start of Care date, and the Agency Admit Date fields on the Edit Patient screen are all based on the care date of the first service the patient receives from the agency. It does not matter whether a private insurance company, Medicare, or Medicaid pays for the service, or whether the patient pays for the service himself or herself as “Self-Pay”. Enter the patient’s Agency Start of Care date. This date should be the earliest date the patient receives care from the agency no matter which payer is paying for the service. (The Entry Date displayed on the screen is the date the patient information was first entered into the system using the Client function and may be used as a reference.) 01/18/06 3:13 PM Page 148 of 446 Users Manual Click the Edit button next to the Agency Current Status field in order to change the patient’s status. The Edit Patient Agency Status screen will be displayed. Click the New button on the toolbar to add a new Patient Agency Status. Make sure the status of “Active” is displayed in the Status combo box. Enter a date in the Status Date field. This date should be the date the patient is admitted into the agency. This date will become the patient’s Agency Admit Date. (The Agency Start of Care date displayed at the top of the screen may be used as a reference for this value.) The Reason field is disabled for a status of “Active”, but will be enabled for other statuses. 01/18/06 3:13 PM Page 149 of 446 Users Manual Click the Save button on the toolbar to save the new status. Verify that the list on the Edit Patient Agency Status screen now displays a row with the Date column containing the correct Agency Admit Date value and the Status column containing “Active” for the Agency Current Status value. Click the Exit button on the toolbar to exit the Edit Patient Agency Status screen. The Edit Patient screen will be redisplayed. You will notice that the Clinical Information section now contains an Agency Start of Care date, the Agency Current Status is now “Active”, and the Agency Admit Date is filled in. At this time you may finish entering the patient’s clinical information. Make sure the Patient Type combo box value is correct. Select the patient’s Disaster Code value (this field is not required). Select the appropriate Source of Admission for any Medicare patients. This will be included on Medicare RAP and EOE UB92 claims. Select the appropriate choice for Do Not Resuscitate, if this box is checked it will print in Locator 21 (Orders) on the Plan of Care. Click the Save button on the toolbar to save the patient’s clinical information. The patient is now admitted into the agency. You now have several options: 01/18/06 3:13 PM Page 150 of 446 Users Manual 1. You may now define a Plan of Care for the patient by clicking the Define Plan of Care/Verbal Order button (See section Entering a New Plan of Care). 2. You many now define an OASIS for the patient by clicking the Define OASIS Information button (See section Entering OASIS Information). 3. You may continue admitting other patients using the Edit Patient screen. 4. You may exit the Edit Patient screen by clicking the Exit button. Modifying a Patient’s Agency Status After a patient has been admitted into the agency (see section Admitting a Patient into the Agency), a patient’s Agency Current Status may be modified using the Edit Patient screen. A patient’s status may be “Incomplete”, “Non Admitted”, “Active”, “Hold”, “Discharged”, or “Transferred”. A date is associated with each status. You may add a “Discharge” status on the same day as the “Active” status, but no other statuses may be added for the patient on the same day as the “Active” status. You cannot add another status after a status of “Discharged.” The status of “Transferred” would be used for clients that have not been discharged by the agency but the file may have been transferred to another office within the agency. It is important to not modify the existing status of the patient by overwriting the patient’s current status record. Instead a new patient status record should be created containing the new patient status. In this way, a history of the change in the patient’s status is maintained. The following sections describe how to add a new patient status record whenever the patient’s status changes. Non Admitting a Patient into the Agency Patients are defined as clients with a client type of “Patient” using the Client function. All new patients will have a default status of “Incomplete”. If it is decided that a patient is not to be admitted into the agency for services (and therefore does not need a Plan of Care defined), the patient’s Agency Current Status may be changed to “Non Admitted”. This is accomplished using the Edit Patient screen associated with the Clinical Information function. To access the Edit Patient screen, select menu option Administration | Clinical Information. The Edit Patient screen will be displayed. Display the details of the patient you want to Non Admit. (See section, Finding a Patient) 01/18/06 3:13 PM Page 151 of 446 Users Manual You will notice that the Patient Vitals section is filled in with the selected patient’s information that was entered in Client screen. The Clinical Information will be blank except the Agency Current Status field will display “Incomplete”. It is not necessary to enter the patient’s Agency Start of Care date since care is not to be provided. Click the Edit button next to the Agency Current Status field in order to change the patient’s status to “Non Admitted”. 01/18/06 3:13 PM Page 152 of 446 Users Manual The Edit Patient Agency Status screen will be displayed. Click the New button on the toolbar to add a new Patient Agency Status. A message will be displayed “Patient does not have a Start of Care date. Only status available is “Non-Admitted.” Press any key to clear this message. The status of “Non Admitted” will be automatically filled in the Status combo box. Enter a date in the Status Date field. This date should be the date it was determined the patient is not to be admitted into the agency. Select a Reason that is appropriate. 01/18/06 3:13 PM Page 153 of 446 Users Manual Click the Save button on the toolbar to save the new status. Verify that the list on the Edit Patient Agency Status screen now displays a row with the Date column containing the correct date value and the Status column containing the value “Non-Admitted”. Click the Exit button on the toolbar to exit the Edit Patient Agency Status screen. The Edit Patient screen will be redisplayed. You will notice that the patient’s Agency Current Status is now “Non Admitted”. Placing a Patient on Hold in the Agency If all of the patient’s services from the agency are to be put on hold, the patient’s Agency Current Status may be changed to “Hold”. To access the Edit Patient screen, select menu option Administration | Clinical Information. The Edit Patient screen is displayed. Display the details of the patient you want to place on hold. (See section, Finding a Patient) 01/18/06 3:13 PM Page 154 of 446 Users Manual Click the Edit button next to the Agency Current Status field in order to change the patient’s status to “Hold”. The Edit Patient Agency Status screen is displayed. Click the New button on the toolbar to add a new Patient Agency Status. Select the status of “Hold” in the Status combo box. Enter the hold date in the Status Date field. 01/18/06 3:13 PM Page 155 of 446 Users Manual Select the reason the patient is being placed on hold in the Reason combo box. Click the Save If you had selected the Reason “Hospitalized”, the Edit Hospital Stays screen will be displayed allowing you to enter the hospital stay start and end dates. Click the New button on the toolbar to save the new status. button on the toolbar to add a hospital stay record. Enter the information if desired, and then click the Save Click the Exit Click the Exit 01/18/06 3:13 PM button. button to exit the Edit Hospital Stays screen. button on the toolbar to exit the Edit Patient Agency Status screen. Page 156 of 446 Users Manual The Edit Patient screen will be redisplayed. You will notice that the patient’s Agency Current Status is now “Hold”. Discharging a Patient from the Agency If all of the patient’s services from the agency are to be ended and the patient is to be discharged from the agency, the patient’s Agency Current Status may be changed to “Discharged”. Once you have discharged a patient from the agency, you cannot add any other new statuses for the patient. To access the Edit Patient screen, select menu option Administration | Clinical Information The Edit Patient screen will be displayed. Display the details of the patient you want to discharge. (See section, Finding a Patient) 01/18/06 3:13 PM Page 157 of 446 Users Manual Click the Edit button next to the Agency Current Status field in order to change the patient’s status to “Discharged”. The Edit Patient Agency Status screen is displayed. Click the New button on the toolbar to add a new Patient Agency Status. Select the status of “Discharged” in the Status combo box. Enter the discharged date in the Status Date field. Select the reason the patient is being discharged in the Reason combo box. Click the Save 01/18/06 3:13 PM button on the toolbar to save the new status. Page 158 of 446 Users Manual Click the Exit button on the toolbar to exit the Edit Patient Agency Status screen. The Edit Patient screen will be redisplayed. You will notice that the patient’s Agency Current Status is now “Discharged” and the Agency Discharge Date is filled in. Note: A new Plan of Care or Verbal Order cannot be created for a patient with a status of “Discharged”. Also, you may not add any new statuses for the patient after a “Discharged” status. A patient is readmitted using the Client function. Use the Readmit button on the Edit Client screen. (See section, Client) 01/18/06 3:13 PM Page 159 of 446 Users Manual Plan of Care Management A patient’s Plan of Care includes all the information necessary to produce a HCFA 485 form (Home Health Certification and Plan of Care). This information includes Certification Period, Payer, Physician, Orders, Goals, Diagnoses, Surgical Procedures, Medications, Supplies, Safety Measures, Nutritional Requirements, Allergies, Functional Limitations, Mental Status, and Prognosis. Entering a New Plan of Care A Plan of Care may only be entered for patients that have been admitted into the agency and whose Agency Current Status is not “Discharged”. Refer to section Admitting a Patient into the Agency in this manual. Entering a new Plan of Care is essentially the same as entering a new Verbal Order. They are both created using the Edit Plan of Care/Verbal Order screen. The main difference between the two is that the Type field will contain “Plan of Care” instead of “Verbal Order” on the screen. The information entered for a new Plan of Care will result in the creation of a HCFA 485 form (refer to the end of this section for a HCFA 485 Locator Mapping). The information entered for a new Verbal Order will result in the creation of a Revision to Plan of Care form. There are two New buttons on the Edit Plan of Care/Verbal Order screen to assist in entering a new Plan of Care vs. a new Verbal Order. The New Plan of Care button is the button containing the blank piece of paper icon. The New Verbal Order a piece of paper with a V on it. button contains an icon of In order to create a new Plan of Care for a patient, you are required at a minimum to select the New Plan of Care button, enter the Cert Begin and Cert End dates, and select a Payer. Once this information is saved, you have created a Plan of Care shell. At this point, you may click the Define Doctor Orders button to define Doctor Orders for the Plan of Care if you wish to do compliance checking on the patient’s visits. After the Doctor Orders have been defined, the CSR responsible for scheduling the visits for the patient may proceed with creating the visits. Then, the rest of the contents of the Plan of Care (Medications, Orders, Goals, etc.) may be completed at a more leisurely pace. To enter a new Plan of Care: To access the Edit Plan of Care/Verbal Order screen, select menu option Administration | Clinical Information. The Edit Patient screen will be displayed. Select the correct patient that you would like to enter a new Plan of Care for Confirm that the patient has been admitted into the agency by noting that the Agency Start of Care field and the Agency Admit Date field contain values in the Clinical Information section of the screen. (Refer to section Admitting a Patient into the Agency in this manual.) Click on the Define Plan of Care/Verbal Order button. 01/18/06 3:13 PM Page 160 of 446 Users Manual The Edit Plan of Care/Verbal Order screen will be displayed with the Patient Name field filled in with the name of the patient selected. Notice that the patient’s Agency Start of Care and Agency Current Status are displayed on this screen for reference. Click the Define Plan of Care/Verbal Order button add a new Plan of Care. 01/18/06 3:13 PM Page 161 of 446 Users Manual The Add Plan of Care/Verbal Order screen will be displayed. Press the New The Type field will contain “Plan of Care”. Enter the Cert Begin date for the Plan of Care. (This date must be equal to or greater than the patient’s Agency Start of Care date displayed on the screen.) button to create a new Plan of Care. The Cert End date is automatically filled in with the date 60 days after the Cert Begin date you entered if you are not editing an existing Plan of Care. The Cert End may be modified. The Payer combo box is positioned to no payer but it is filled in with “Self Pay” and other valid payers for this patient for the certification period entered. Make sure the Cert End date contains the date you want for the Plan of Care. Select the correct payer for the Plan of Care in the Payer combo box. Enter the Verbal Start of Care (optional – this date will be placed in Locator 23 on the HCFA 485). At this time you have entered the preliminary information for a new Plan of Care shell. Make sure that all of the information displayed on the Edit Plan of Care/Verbal Order screen is correct. This includes the fields: Type, Cert Begin, Cert End, and Payer. Click the Save button on the toolbar to save the patient’s new Plan of Care shell. The POC # will be filled in with a unique number that the system assigns to the Plan of Care. 01/18/06 3:13 PM Page 162 of 446 Users Manual NOTE: The Start of Care date on the HCFA 485 (Locator 2) associated with a Plan of Care is filled in with the contents of the Payer Start of Care field on the Edit Plan of Care/Verbal Order screen, not the contents of the Agency Start of Care field. If the date in the Payer Start of Care field is not the correct Start of Care date for this Plan of Care, use the Edit Payer Status button to change the Payer Start of Care date. Refer to section Modifying the Payer Start of Care for a Payer. Do a final review of the contents of the Edit Plan of Care/Verbal Order screen to verify that all the information is now correct for the new Plan of Care. You may preview the Plan of Care contents at any time by clicking the Preview button (contains paper/magnifying glass icon) above the toolbar on the Edit Plan of Care/Verbal Order screen. You may also print the Plan of Care by clicking the Print button (contains printer icon) above the toolbar on the Edit Plan of Care/Verbal Order screen. It is highly recommended that you complete the following at this time: Select the Primary Physician for the Plan of Care. Refer to section Assigning the Primary Physician to the Plan of Care. Select the Case Manager for the Plan of Care. Refer to section Assigning the Case Manager to the Plan of Care. Select the Primary Diagnosis for the Plan of Care. Refer to section Assigning the Primary Diagnosis to the Plan of Care. All of the essential initial pieces of a new Plan of Care shell have now been entered. Now that a new Plan of Care shell has been entered, you have several options: 1. You may continue defining other parts of the Plan of Care including: Medications, Surgical Procedures, Supplies, Safety/Etc, Orders, and Goals. Refer to the section Defining Plan of Care/Verbal Order Orders Paragraph, etc. 2. You may continue defining other Plans of Care using the Edit Plan of Care/ Verbal Order screen 3. You may exit the Edit Plan of Care/Verbal Order screen by clicking the Exit the toolbar button on New Plan of Care Notes: A new Plan of Care can only be created for patients that have been admitted into the agency. A new Plan of Care cannot be created for a patient with an Agency Current Status of “Discharged”. A new Plan of Care cannot have the same Cert Begin, Cert End, Payer, and Prime Physician as another Plan of Care. This would make the Plan of Care not unique and you will not be allowed to save a Plan of Care that is not unique. 01/18/06 3:13 PM Page 163 of 446 Users Manual Assigning the Primary Physician to the Plan of Care It is highly recommended when entering a new Plan of Care that the patient’s Primary Physician be selected as soon as possible, however this is not required to save the new Plan of Care. Click on the Select button next to the Prime Physician field. Select the primary physician’s name by clicking on it in the list on the Select Physician screen and then click the Select button on that screen. 01/18/06 3:13 PM Page 164 of 446 Users Manual The Edit Plan of Care/Verbal Order screen will be redisplayed with the Prime Physician field filled in with your selection. If the patient’s physician is not in the list on the Select Physician screen: Click on the Physician DB button under the Select button on the Edit Plan of Care/Verbal Order screen and create a new record in the Physician Database for the physician. Click on the Select button next to the Prime Physician field again. Select the primary physician’s name by clicking on it in the list on the Select Physician screen and then click the Select button on that screen. The Edit Plan of Care/Verbal Order screen will be redisplayed with the Prime Physician field filled in with your selection. Refer to the section Defining Physicians on how to add, edit or delete physicians from the Physician Database. Assigning the Case Manager to the Plan of Care It is recommended when entering a new Plan of Care, that the patient’s Case Manager be assigned as soon as possible, however this is not required to save the new Plan of Care. Click on the Select button next to the Case Manager field in the section titled Miscellaneous. 01/18/06 3:13 PM Page 165 of 446 Users Manual Select the case manager’s name by clicking on it in the list on the Select Case Manager screen and then click the Select button. The Edit Plan of Care/Verbal Order screen will be redisplayed with the Case Manager field filled in with your selection. Defining Plan of Care/Verbal Order Diagnoses To access the Edit Plan of Care/Verbal Order (Diagnoses) screen, select menu option Administration | Clinical Information. The Edit Patient screen will be displayed. Select the correct patient that you would like to enter a new Plan of Care for Confirm that the patient has been admitted into the agency by noting that the Agency Start of Care field and the Agency Admit Date field contain values in the Clinical Information section of the screen. (Refer to section Admitting a Patient into the Agency in this manual.) Click on the Define Plan of Care/Verbal Order button. Confirm that you are editing the correct Plan of Care/Verbal Order. Click on the Diagnoses button. 01/18/06 3:13 PM Page 166 of 446 Users Manual The Edit Diagnoses screen will be displayed. Entering a New Diagnosis Verify that the information section at the top of the Edit Diagnoses screen describes the Plan of Care/Verbal Order you want to enter new diagnoses for. Click the New button on the toolbar on the Edit Diagnoses screen to add a new diagnosis to the Plan of Care/Verbal Order. The Priority Order will be filled automatically. The first diagnosis in the list is the patient’s Primary Diagnosis for the Plan of Care. Fill in the ICD-9-CM field by entering the value or by clicking the Select button next to the field to select the value from the Select ICD9 Code (Diagnosis) screen. 01/18/06 3:13 PM Page 167 of 446 Users Manual Either choose the Code option and enter a code range, or choose the Description option and enter a verbal description of the diagnosis and click the Generate button. Click a diagnosis in the list and then click the Select button. The Description field will be filled in once a valid ICD-9-CM field value is entered. Enter the onset or exacerbation date in the Date field. Select a Status of either “Onset”, “Exacerbation” or “History” that is associated with the Date. For Verbal Orders, select the Verbal Order Status of either “New” or “Discontinued”. Make sure that all the information is correct for the new diagnosis. Click the Save button on the toolbar to save the new diagnosis. The new diagnosis will be displayed in the list on the screen. The first diagnosis in the list is the patient’s Primary Diagnosis for the Plan of Care. At this point, you may enter other new diagnoses by repeating the steps above. Click the Exit button on the toolbar to exit the Edit Diagnoses screen. The Edit Plan of Care/Verbal Order screen will be redisplayed. Modifying a Diagnosis Refer to section Defining Plan of Care/Verbal Order Diagnosis to display the Edit Diagnosis screen. Verify that the information section at the top of the Edit Diagnoses screen describes the Plan of Care/Verbal Order you want to modify diagnoses for. 01/18/06 3:13 PM Page 168 of 446 Users Manual On the Edit Diagnoses screen, select the diagnosis you would like to modify by clicking on it in the list on the screen. The details of the selected diagnosis will be displayed in the fields on the lower section of the screen. You may modify any of the fields displayed in this section. Make sure all the modified information about the diagnosis is correct. Click the Save button on the toolbar to save the modified diagnosis. The modified diagnosis will be redisplayed in the list on the screen At this point, you may modify other diagnosis information by repeating the steps above. Click the Exit button on the toolbar to exit the Edit Diagnoses screen. The Edit Plan of Care/Verbal Order screen will be redisplayed. Deleting a Diagnosis Refer to section Defining Plan of Care/Verbal Order Diagnosis to display the Edit Diagnosis screen. Verify that the information section at the top of the Edit Diagnoses screen describes the Plan of Care/Verbal Order you want to delete diagnoses from. On the Edit Diagnoses screen, select the diagnosis you would like to delete by clicking on it in the list on the screen. The details of the selected diagnosis will be displayed in the fields on the lower section of the screen. Make sure that the diagnosis displayed is the one you want to delete. Click the Delete button in the lower section of the screen. Click on the Yes button in the popup screen that asks, “Delete displayed Diagnosis?” The deleted diagnosis will be removed from the list on the screen. This may cause the priority of the remaining diagnoses to be automatically adjusted. At this point, you may delete other diagnoses by repeating the steps above. Click the Exit button on the toolbar to exit the Edit Diagnoses screen. The Edit Plan of Care/Verbal Order screen will be redisplayed. 01/18/06 3:13 PM Page 169 of 446 Users Manual Modifying Diagnoses Priorities On the Edit Diagnoses screen, click the Reorder button under the toolbar on the screen. Click on the button and drag a payer in the list to reorder its position within the list. Click the Save Order button to save your changes. The Edit Diagnosis screen will now be displayed with the diagnoses reordered as you selected. Click the Exit button on the toolbar to exit the Edit Diagnoses screen. The Edit Plan of Care/Verbal Order screen will be redisplayed. Defining Plan of Care/Verbal Order Orders Paragraph The Orders button on the Edit Plan of Care/Verbal Order screen is used to create the paragraph corresponding to the HCFA 485 Locator 21 paragraph, Orders for Discipline and Treatments. This paragraph typically contains Doctor Order information and interventions associated with the Doctor Order skills. To access the Edit Plan of Care/Verbal Order (Orders) screen, select menu option Administration | Clinical Information. The Edit Patient screen will be displayed. Select the correct patient that you would like to enter a new Plan of Care for 01/18/06 3:13 PM Page 170 of 446 Users Manual Click on the Define Plan of Care/Verbal Order button. On the Edit Plan of Care/Verbal Order screen, make sure the correct Patient Name is displayed and the correct Plan of Care/Verbal Order you want to modify for the patient is displayed. Click on the Orders button. The Edit Orders Paragraph will be displayed. Verify that the information section at the top of the screen describes the Plan of Care/Verbal Order you want to create the Orders paragraph for. The paragraph may be edited like any standard word processor window (i.e. you may highlight sections to copy and paste, etc.) To copy text, highlight the text and press Ctrl+C. To paste text, press Ctrl+V. When you are entering text for Goals and Orders, if you want the text to occur on a new line, click [Enter] and it will force a line break. 01/18/06 3:13 PM Page 171 of 446 Users Manual Click the Select Phrases button to select Intervention phrases from the Phrases Database to be place into the paragraph. The Select Phrases for Orders screen is displayed. Highlight the phrase you would like to insert and either double click or press the Add button. The phrase will be displayed in the Selected Phrases area of the screen. Click on the button and drag a phrase in the list to reorder its position within the list. Click the Keep button to save your changes. After phrases have been selected, a dashed line will appear in the paragraph and the new phrases will be displayed below the line. Edit the paragraph so that it contains exactly what you would like to see in the Orders paragraph for the Plan of Care or Verbal Order. Click the Save button on the toolbar to save the Orders paragraph. Click the Exit button on the toolbar to exit the Edit Orders Paragraph screen. The Edit Plan of Care/Verbal Order screen will be redisplayed. 01/18/06 3:13 PM Page 172 of 446 Users Manual Defining Plan of Care/Verbal Order Goals Paragraph The Goals button on the Edit Plan of Care/Verbal Order screen is used to create the paragraph corresponding to the HCFA 485 Locator 22 paragraph, Goals/Rehabilitation Potential/Discharge Plans. This paragraph typically contains goals, rehabilitation potentials, and discharge plans associated with the skills of the service being provided. To access the Edit Plan of Care/Verbal Order (Goals) screen, select menu option Administration | Clinical Information. The Edit Patient screen will be displayed. Select the correct patient that you would like to enter a new Plan of Care for Click on the Define Plan of Care/Verbal Order button. On the Edit Plan of Care/Verbal Order screen, make sure the correct Patient Name is displayed and the correct Plan of Care/Verbal Order you want to modify for the patient is displayed. Click on the Goals button. The Edit Goals Paragraph screen will be displayed. Verify that the information section at the top of the screen describes the Plan of Care/Verbal Order you want to create the Goals paragraph for. The paragraph may be edited like any standard word processor window (i.e. you may highlight sections to cut and paste, etc.) To copy text, highlight the text and press Ctrl+C. To paste text, press Ctrl+V. When you are entering text for Goals and Orders, if you want the text to occur on a new line, click [Enter] and it will force a line break. The Select Phrases button works the same as on the Edit Orders Paragraph screen. 01/18/06 3:13 PM Page 173 of 446 Users Manual Defining Plan of Care/Verbal Order Medications To access the Edit Plan of Care/Verbal Order (Goals) screen, select menu option Administration | Clinical Information. The Edit Patient screen will be displayed. Select the correct patient that you would like to enter a new Plan of Care for Click on the Define Plan of Care/Verbal Order button. On the Edit Plan of Care/Verbal Order screen, make sure the correct Patient Name is displayed and the correct Plan of Care/Verbal Order you want to modify for the patient is displayed. Click on the Medications button. The Edit Medications screen will be displayed. Entering a New Medication Verify that the information section at the top of the Edit Medications screen describes the Plan of Care/Verbal Order you want to enter new medications for. Click the New button on the toolbar on the Edit Medications screen to add a new medication to the Plan of Care/Verbal Order. Fill in the Medication Name field by entering the value or by clicking the Select button. The Select Medication screen is displayed. 01/18/06 3:13 PM Page 174 of 446 Users Manual Select a medication and then the Edit Medications screen is redisplayed. Select a Status of “Existing”, “New”, “Changed”, or “Discontinued”. Enter a Start Date for the medication if desired (this field is not required). Enter a Discontinued Date for the medication if desired (this field is required if the Status is “Discontinued”). There are 2 different ways to enter detailed information about each medication: 1. Free Type Enter the text in this field in the exact format that you would like to see it printed on the Plan of Care output. This is a quick data entry type. 2. Tabular Select a Quantity if desired (this field is not required). The choice of “Other” enables a text area where you may enter any quantity value. Select a Dosage if desired (this field is not required). The choice of “Other” enables a text area where you may enter any dosage value. Select a Route. The choice of “Other” enables a text area where you may enter any route value. Select a Frequency. The choice of “Other” enables a text area where you may enter any frequency value. Make sure that all the information is correct for the new medication. Click the Save 01/18/06 3:13 PM button on the toolbar to save the new medication. Page 175 of 446 Users Manual The new medication will be displayed in the list on the screen. At this point, you may enter other new supplies by repeating the steps above. Click the Exit button on the toolbar to exit the Edit Medications screen. The Edit Plan of Care/Verbal Order screen will be redisplayed. Modifying a Medication Refer to section Defining Plan of Care/Verbal Order Medications to display the Edit Medications screen. Verify that the information section at the top of the Edit Medications screen describes the Plan of Care/Verbal Order you want to modify medications for. On the Edit Medications screen, select the medication you would like to modify by clicking on it in the list on the screen. The details of the selected medication will be displayed in the fields on the lower section of the screen. You may modify any of the fields displayed in this section. Make sure all the modified information about the medication is correct. Click the Save button on the toolbar to save the modified medication. The modified medication will be redisplayed in the list on the screen. At this point, you may modify other medication information by repeating the steps above. Click the Exit button on the toolbar to exit the Edit Medications screen. The Edit Plan of Care/Verbal Order screen will be redisplayed. 01/18/06 3:13 PM Page 176 of 446 Users Manual Deleting a Medication Refer to section Defining Plan of Care/Verbal Order Medications to display the Edit Medications screen. Verify that the information section at the top of the Edit Medications screen describes the Plan of Care/Verbal Order you want to delete medications from. On the Edit Medications screen, select the medication you would like to delete by clicking on it in the list on the screen. The details of the selected medication will be displayed in the fields on the lower section of the screen. Make sure that the medication displayed is the one you want to delete. Click the Delete button in the lower section of the screen. Click on the Yes button in the popup screen that asks, “Delete displayed Medication?” The deleted medication will be removed from the list on the screen. At this point, you may delete other medications by repeating the steps above. Click the Exit button on the toolbar to exit the Edit Medications screen. The Edit Plan of Care/Verbal Order screen will be redisplayed. Modifying Medication Priorities On the Edit Medications screen, click the Reorder button under the toolbar on the screen. Click on the button and drag a payer in the list to reorder its position within the list. Click the Save Order button to save your changes. 01/18/06 3:13 PM Page 177 of 446 Users Manual The Edit Medications screen will now be displayed with the medications reordered as you selected. Click the Exit button on the toolbar to exit the Edit Medications screen. The Edit Plan of Care/Verbal Order screen will be redisplayed. Defining Plan of Care/Verbal Order Surgical Procedures To access the Edit Plan of Care/Verbal Order (Surgical Procedures) screen, select menu option Administration | Clinical Information. The Edit Patient screen will be displayed. Select the correct patient that you would like to enter a new Plan of Care for Click on the Define Plan of Care/Verbal Order button. On the Edit Plan of Care/Verbal Order screen, make sure the correct Patient Name is displayed and the correct Plan of Care/Verbal Order you want to modify for the patient is displayed. Click on the Surg Procs button. The Edit Surgical Procedures screen will be displayed. Entering a New Surgical Procedure Verify that the information section at the top of the Edit Surgical Procedures screen describes the Plan of Care/Verbal Order you want to enter new surgical procedures for. 01/18/06 3:13 PM Page 178 of 446 Users Manual Click the New button on the toolbar on the Edit Surgical Procedures screen to add a new surgical procedure to the Plan of Care/Verbal Order. Fill in the ICD-9-CM field by entering the value or by clicking the Select button. The Select ICD9 Code (Surgical Procedure) screen is displayed. Either choose the Code option and enter a code range, or choose the Description option and enter a verbal description of the surgical procedure and click the Generate button. Click a procedure in the list and then click the Select button. The Description field will be filled in once a valid ICD-9-CM field value is entered. Enter the date of the surgical procedure in the Date field. For Verbal Orders, select the Verbal Order Status of either “New” or “Discontinued”. Make sure that all the information is correct for the new surgical procedure. Click the Save 01/18/06 3:13 PM button on the toolbar to save the new surgical procedure. Page 179 of 446 Users Manual The new surgical procedure will be displayed in the list on the screen. At this point, you may enter other new surgical procedures by repeating the steps above. Click the Exit button on the toolbar to exit the Edit Surgical Procedures screen. The Edit Plan of Care/Verbal Order screen will be redisplayed. Modifying a Surgical Procedure Verify that the information section at the top of the Edit Surgical Procedures screen describes the Plan of Care/Verbal Order you want to modify surgical procedures for. On the Edit Surgical Procedures screen, select the surgical procedure you would like to modify by clicking on it in the list on the screen. The details of the selected surgical procedure will be displayed in the fields on the lower section of the screen. You may modify any of the fields displayed in this section. Make sure all the modified information about the surgical procedure is correct. Click the Save button on the toolbar to save the modified surgical procedure. The modified surgical procedure will be redisplayed in the list on the screen. At this point, you may modify other surgical procedure information by repeating the steps above. Click the Exit button on the toolbar to exit the Edit Surgical Procedures screen. The Edit Plan of Care/Verbal Order screen will be redisplayed. Deleting a Surgical Procedure Verify that the information section at the top of the Edit Surgical Procedures screen describes the Plan of Care/Verbal Order you want to delete surgical procedures from. On the Edit Surgical Procedures screen, select the surgical procedure you would like to delete by clicking on it in the list on the screen. The details of the selected surgical procedure will be displayed in the fields on the lower section of the screen. Make sure that the surgical procedure displayed is the one you want to delete. Click the Delete button in the lower section of the screen. Click on the Yes button in the popup screen that asks, “Delete displayed Surgical Procedure?” The deleted surgical procedure will be removed from the list on the screen. At this point, you may delete other surgical procedures by repeating the steps above. Click the Exit button on the toolbar to exit the Edit Surgical Procedures screen. The Edit Plan of Care/Verbal Order screen will be redisplayed. 01/18/06 3:13 PM Page 180 of 446 Users Manual Defining Plan of Care/Verbal Order Supplies To access the Edit Plan of Care/Verbal Order (Supplies) screen, select menu option Administration | Clinical Information. The Edit Patient screen will be displayed. Select the correct patient that you would like to enter a new Plan of Care for Click on the Define Plan of Care/Verbal Order button. On the Edit Plan of Care/Verbal Order screen, make sure the correct Patient Name is displayed and the correct Plan of Care/Verbal Order you want to modify for the patient is displayed. Click on the Supplies button. The Edit Supplies screen will be displayed. Entering a New Supply Verify that the information section at the top of the Edit Supplies screen describes the Plan of Care/Verbal Order you want to enter new supply for. Click the New button on the toolbar on the Edit Supplies screen to add a new supply to the Plan of Care/Verbal Order. Fill in the Description field by clicking the Select button. The Select Supply screen is displayed. 01/18/06 3:13 PM Page 181 of 446 Users Manual Select a Type of supply from the combo box. Select a supply category: Standard, Local, or All. Standard—Click on this option if you want to list supplies that are standard across all offices. Local—Click on this option if you want to list supplies that are customized to your office. All—Click on this option to list standard and local supplies. Click on the supply in the list and click the Select button. The Edit Supplies screen will be displayed and the Description field is filled with the selected supply. For Verbal Orders, select the Verbal Order Status of either “New” or “Discontinued”. Make sure that all the information is correct for the new supply. Click the Save 01/18/06 3:13 PM button on the toolbar to save the new supply. Page 182 of 446 Users Manual The new supply will be displayed in the list on the screen. At this point, you may enter other new supplies by repeating the steps above. Click the Exit button on the toolbar to exit the Edit Supplies screen. The Edit Plan of Care/Verbal Order screen will be redisplayed. Modifying a Supply Refer to section Defining Plan of Care/Verbal Order Supplies to display the Edit Supplies screen. Verify that the information section at the top of the Edit Supplies screen describes the Plan of Care/Verbal Order you want to modify supplies for. On the Edit Supplies screen, select the supply you would like to modify by clicking on it in the list on the screen. The details of the selected supply will be displayed in the fields on the lower section of the screen. You may modify any of the fields displayed in this section. Make sure all the modified information about the supply is correct. Click the Save button on the toolbar to save the modified supply. The modified supply will be redisplayed in the list on the screen At this point, you may modify other supply information by repeating the steps above. Click the Exit button on the toolbar to exit the Edit Supplies screen. The Edit Plan of Care/Verbal Order screen will be redisplayed. Deleting a Supply Verify that the information section at the top of the Edit Supplies screen describes the Plan of Care/Verbal Order you want to delete supplies from. On the Edit Supplies screen, select the supply you would like to delete by clicking on it in the list on the screen. The details of the selected supply will be displayed in the fields on the lower section of the screen. Make sure that the supply displayed is the one you want to delete. Click the Delete button in the lower section of the screen. Click on the Yes button in the popup screen that asks, “Delete displayed Supply?” The deleted supply will be removed from the list on the screen. At this point, you may delete other supplies by repeating the steps above. Click the Exit button on the toolbar to exit the Edit Supplies screen. The Edit Plan of Care/Verbal Order screen will be redisplayed. 01/18/06 3:13 PM Page 183 of 446 Users Manual Defining Plan of Care Safety Measures, Nutritional Requirements, Allergies, Functional Limitations, Activities Permitted, Mental Status, Prognosis To access the Edit Plan of Care/Verbal Order (Saftey, Etc.) screen, select menu option Administration | Clinical Information. The Edit Patient screen will be displayed. Select the correct patient that you would like to enter a new Plan of Care for Click on the Define Plan of Care/Verbal Order button. On the Edit Plan of Care/Verbal Order screen, make sure the correct Patient Name is displayed and the correct Plan of Care/Verbal Order you want to modify for the patient is displayed. Click on the Safety/Etc. button. The Plan of Care Safety/Etc. screen will be displayed. The screen consists of three pages of information to be placed on the HCFA 485. Safety /Nutritional Measures /Allergies Functional Limitations/Activities Mental Status/Prognosis. The Safety/Nutritional/Allergies page is currently displayed. Click on the tab of any page to display the page. Enter information on each page as desired. 01/18/06 3:13 PM Page 184 of 446 Users Manual This is the Functional Limitations/Activities page. This is the Mental Status/Prognosis Page. Make sure all the information on all of the pages is correct. Click on the Safety Measures/Nutritional/Allergies tab to redisplay the first page. 01/18/06 3:13 PM Page 185 of 446 Users Manual Click the Save button on the toolbar to save the Safety/Etc. information on all pages. Click the Exit button on the toolbar to exit the Plan of Care Safety/Etc. screen. The Edit Plan of Care/Verbal Order screen will be redisplayed. Modifying a Plan of Care/Verbal Order Modifying a Plan of Care or a Verbal Order is done in essentially the same way. They are both modified using the Edit Plan of Care/Verbal Order screen. The main difference between the two is that the Type field will contain “Plan of Care” for Plans of Care and “Verbal Order” for Verbal Orders. To access the Edit Plan of Care/Verbal Order screen, select menu option Administration | Clinical Information. The Edit Patient screen will be displayed. Select the correct patient that you would like to enter a new Plan of Care for Click on the Define Plan of Care/Verbal Order button. On the Edit Plan of Care/Verbal Order screen, make sure the correct Patient Name is displayed and the correct Plan of Care/Verbal Order you want to modify for the patient is displayed. Click the Find button on the Edit Plan of Care/Verbal Order screen. The Plan of Care/Verbal Order List screen will be displayed. Click on the Plan of Care/Verbal Order you would like to modify and click the Select button. 01/18/06 3:13 PM Page 186 of 446 Users Manual The Edit Plan of Care/Verbal Order screen will be redisplayed containing the details of the selected Plan of Care/Verbal Order. You may modify any of the Plan of Care/Verbal Order fields displayed on the screen. Make sure all the information on the screen is correct. Click the Save button on the toolbar to save the changes made to the Plan of Care/Verbal Order. Click on any of the following buttons to modify the Plan of Care/Verbal Order associated information. Refer to the sections associated with defining each of these parts. Orders Goals Medications Diagnosis Surg Procs Supplies Safety/Etc. (not available on a Verbal Order) Each of these buttons will display a screen on which you can modify the associated Plan of Care/Verbal Order information. Make sure all the information on the screen is correct. Click the Save button on the toolbar to save changes made on the screen. Click the Exit button on the toolbar to exit the screen. The Edit Plan of Care/Verbal Order screen will be redisplayed. Modifying Plan of Care/Verbal Order Notes: A modified Plan of Care cannot have the same Type, Cert Begin, Cert End, Payer, and Prime Physician as another Plan of Care. This would make the Plan of Care not unique and you will not be allowed to save it. You will be given a warning and asked if you want to continue when you modify a Plan of Care/Verbal Order that has had its Final Document printed. Deleting a Plan of Care/Verbal Order Deleting a Plan of Care or a Verbal Order is done in essentially the same way. They are both deleted using the Edit Plan of Care/Verbal Order screen. The main difference between the two is that the Type field will contain “Plan of Care” for Plans of Care and “Verbal Order” for Verbal Orders. 01/18/06 3:13 PM Page 187 of 446 Users Manual To access the Edit Plan of Care/Verbal Order screen, select menu option Administration | Clinical Information. The Edit Patient screen will be displayed. Select the correct patient that you would like to enter a new Plan of Care for Click on the Define Plan of Care/Verbal Order button. On the Edit Plan of Care/Verbal Order screen, make sure the correct Patient Name is displayed and the correct Plan of Care/Verbal Order you want to modify for the patient is displayed. Click the Find button on the Edit Plan of Care/Verbal Order screen. The Plan of Care/Verbal Order List screen will be displayed. Click on the Plan of Care/Verbal Order you would like to delete and click the Select button. The Edit Plan of Care/Verbal Order screen will be redisplayed containing the details of the selected Plan of Care/Verbal Order. Make sure that the Plan of Care/Verbal Order displayed is the one you want to delete. Click the Delete button on the toolbar to delete the Plan of Care/Verbal Order. Click on the Yes button in the popup screen that asks, “Delete displayed Plan of Care/Verbal Order?” The detailed information about the deleted Plan of Care/Verbal Order will be removed from the Edit Plan of Care/Verbal Order screen and from the Plan of Care/Verbal Order List screen. At this point, you may delete other Plan of Care/Verbal Orders by repeating the steps above. Click the Exit screen. button on the toolbar to exit the Edit Plan of Care/Verbal Order Recertifying/Copying a Plan of Care Recertifying or Copying a Plan of Care is the function of the Recert or Copy buttons on the Edit Plan of Care/Verbal Order screen. Verbal Orders cannot be recertified or copied. To Recertify a Plan of Care, simply press the Recert button, the certification dates for the next episode will default for you. You may keep the same Payer and Prime Physician as the original Plan of Care. To Copy a Plan of Care, simply press the Copy button. You may then enter new episode dates, and optionally change the Payer and Prime Physician. To access the Edit Plan of Care/Verbal Order screen, select menu option Administration | Clinical Information. The Edit Patient screen will be displayed. Select the correct patient that you would like to enter a new Plan of Care for Click on the Define Plan of Care/Verbal Order button. 01/18/06 3:13 PM Page 188 of 446 Users Manual On the Edit Plan of Care/Verbal Order screen, make sure the correct Patient Name is displayed and the correct Plan of Care/Verbal Order you want to modify for the patient is displayed. Click the Find button on the Edit Plan of Care/Verbal Order screen. The Plan of Care/Verbal Order List screen will be displayed. Click on the Plan of Care you would like to recertify or copy and click the Select button. The Edit Plan of Care/Verbal Order screen will be redisplayed containing the details of the selected Plan of Care. Make sure that the Plan of Care displayed is the one you want to recertify or copy. Click the Recertify or Copy button above the toolbar. The Recertify or Copy Plan of Care screen will be displayed. Verify that the information section at the top of the screen describes the Plan of Care you want to recertify or copy. Change any of the “New” field values so that they contain the values you want associated with the new Plan of Care. These fields include: New Cert Begin, New Cert End, New Payer, and New Prime Physician. If you have selected to recertify, the New Cert Begin date will default to the start of the next episode and the End date is automatically filled in with the date x (x being the number of days in the original cert period) days after the New Cert Begin. Once the certification period is changed, the New Payer combo box may be positioned to a new 01/18/06 3:13 PM Page 189 of 446 Users Manual payer if the original Payer for this patient is no longer valid for the new certification period entered. Make sure that all of the information displayed on the Recertify or Copy Plan of Care screen is correct. Click the Recert or Copy button to create the new Plan of Care or click the Cancel button to cancel the recert or copy. Click on the Yes or No button in the popup screen that asks, “Do you want to copy the Orders and Goals paragraphs?” Answering Yes to this question will copy the orders and goals information from the Plan of Care that you selected to the new Plan of Care. Answering No to this question will not copy the orders and goals information. Click on the Yes or No button in the popup screen that asks, “Do you want to append verbal order information to the new recert POC?” Answering Yes to this question will ALL verbal order information (except for comments) to the new Plan of Care in addition to the previous Plan of Care’s information. It is then up to you, the user to edit the resulting recert Plan of Care to reflect the correct information. Answering No to this question will not copy the verbal order information to the new Plan of Care. Once the Plan of Care is recertified or copied, a message will appear containing the unique POC # that the system has assigned to the new Plan of Care. If the end date for the new Plan of Care is after the payer set end date for the client/payer relationship reflected on the Plan of Care, SAM will automatically extend the payer set end date to reflect the end date on the new Plan of Care. Recertifying or Copying Plan of Care Notes: The new Plan of Care cannot have the same Cert Begin, Cert End, Payer, and Prime Physician as another Plan of Care. This would make the Plan of Care not unique and you will not be able to save it. The following Plan of Care information is copied from the original Plan of Care to the new Plan of Care when the Recert or Copy button is clicked: Medications, Diagnoses, Surgical Procedures, Supplies, Safety Measures, Nutritional Requirements, Allergies, Functional Limitations, Activities Permitted, Mental Status, Prognosis, and Case Manager. Printing, Previewing and Exporting Plans of Care and Verbal Orders Plans of Care and Verbal Orders may be printed or previewed on the screen at any time after they are created. Plans of Care may also be exported to an .XML file that may then be used to import to a Care Plan Oversight and eSignature System (CPOS). There is a XML interface to the following CPOS systems: 01/18/06 3:13 PM Page 190 of 446 Users Manual Ancillary Care Management ACM EClickMD Alacare There are two screens that may be used to print or export: the Edit Plan of Care/Verbal Order screen and the Plan of Care/Verbal Order Report screen. The Edit Plan of Care/Verbal Order screen allows you to create an .XML file with only one Plans of Care/Verbal Order in it; the one currently displayed on the screen. The Plan of Care/Verbal Order report allows multiple Plans of Care/Verbal Orders to be sent to one .XML file. When printing a Plan of Care or Verbal Order, you must decide if you want to print the Final Document, otherwise you will be printing a draft copy of the document and it will be printed with the word “DRAFT” across each page. A Final Document will be printed clean without the word “DRAFT” so it may be mailed to the physician. You will be given a warning that the Final Document has been printed any time you try to modify or delete an existing Plan of Care or Verbal Order. Once a Final Document has been printed, the Final Document Printed field on the Edit Plan of Care/Verbal Order screen will contain the value “YES” and all other screens associated with the Plan of Care/Verbal Order will contain the text “Final Document Printed”. In order to print a Final Document, the Plan of Care or Verbal Order must have an assigned Primary Physician. Printing/Previewing from the Edit Plan of Care/Verbal Order screen To access the Edit Plan of Care/Verbal Order screen, select menu option Administration | Clinical Information. The Edit Patient screen will be displayed. Select the correct patient that you would like to enter a new Plan of Care for Click on the Define Plan of Care/Verbal Order button. On the Edit Plan of Care/Verbal Order screen, make sure the correct Patient Name is displayed and the correct Plan of Care/Verbal Order you want to modify for the patient is displayed. Click the Find button on the Edit Plan of Care/Verbal Order screen. The Plan of Care/Verbal Order List screen will be displayed. Click on the Plan of Care/Verbal Order you would like to print/preview and click the Select button. The Edit Plan of Care/Verbal Order screen will be redisplayed containing the details of the selected Plan of Care/Verbal Order. 01/18/06 3:13 PM Page 191 of 446 Users Manual Make sure that the Plan of Care/Verbal Order displayed is the one you want to print/preview. Click the Print button above the toolbar to print the Plan of Care/Verbal Order or Click the Preview button above the toolbar to preview the Plan of Care/Verbal Order on the screen. You will be prompted whether or not you would like to “Print locator 26 and 28 verbiage?” You may choose Yes, No, or Cancel. If Print was selected, you will be prompted whether you would like to print the Final Document. You may choose Yes, No, or Cancel. If you choose the print the Final Document, the document will be sent to the printer and the Final Document Printed field will display “YES” on the Edit Plan of Care/Verbal Order screen. If you answered “Yes” to “Print Final Document?” you will prompted whether or not you would like today’s date to automatically be filled in the mailed date? You may choose Yes, No, or Cancel. If Preview was selected, once the screen preview is displayed, you may click the Print button on that screen to print the Plan of Care/Verbal Order or click the Exit button to redisplay the Edit Plan of Care/Verbal Order screen. Exporting from the Edit Plan of Care/Verbal Order screen There is some initial setup required before you may export of a Plan of Care to an .XML file. 01/18/06 3:13 PM Page 192 of 446 Users Manual 1. First you will need to edit the file SAM.INI on the “N:” folder. This file must contain your ACM, EClickMD and/or Alacare Provider ID in the following format (you may have a line per care plan oversight system): Ini_ACM_ProviderID,RIVER001 And/or Ini_Alacare_ProviderID,RIVER001 And/or Ini_EclickMD_ProviderID,RIVER001 2. Those physicians who are registered with a Care Plan Oversight system will need to have their records modified in the physician’s database in SAM. The name of the CPOS (“acm”, “alacare” and/or “eclickmd”) must be placed in the POC/VO Email Addr field of the physician’s record. 3. For physicians that you will be sending a Plan of Care for, you will need to verify that you have the correct UPIN, the system will not export Plans of Care for physicians without valid UPINs. UPIN beginning with OTH, VAD, INT, PHS, RES and RET are not considered valid. To access the Edit Plan of Care/Verbal Order screen, select menu option Administration | Clinical Information. 01/18/06 3:13 PM Page 193 of 446 Users Manual The Edit Patient screen will be displayed. Select the correct patient that you would like to enter a new Plan of Care for Click on the Define Plan of Care/Verbal Order button. On the Edit Plan of Care/Verbal Order screen, make sure the correct Patient Name is displayed and the correct Plan of Care/Verbal Order you want to modify for the patient is displayed. Click the Find button on the Edit Plan of Care/Verbal Order screen. The Plan of Care/Verbal Order List screen will be displayed. Click on the Plan of Care/Verbal Order you would like to export and click the Select button. The Edit Plan of Care/Verbal Order screen will be redisplayed containing the details of the selected Plan of Care/Verbal Order. Make sure that the Plan of Care displayed is the one you want to export. Click the Generate Internet File button above the toolbar to export the Plan of Care. You will be prompted for a path and filename for the file to be created. The system will default to storing the files on the folder “N:\XML Files\ExportFiles” and naming the file with a unique name based on your Care Plan Oversight system and Provider ID (in the SAM.ini file) and the current date and time. This may be overwritten. After the file has been created, and Plans of Care/Verbal Orders exported to the file are updated in SAM as having been mailed on that date. They are also marked as having their final document printed. 01/18/06 3:13 PM Page 194 of 446 Users Manual Once you have saved the .XML file, this file may be uploaded to the Care Plan Oversight website for signature. Please refer to the Care Plan Oversight’s documentation for the download process. After the Plans of Care/Verbal Orders have been signed, your Care Plan Oversight system will allow you to create a .XML file of these signed order that you can re-import back into SAM to populate the “Received Signed” date on the orders. Please see the Import Signed POC/VO section in this manual. Printing, Previewing or Exporting from the Plan of Care/Verbal Order Report screen To access the Select Report screen, select menu option Reports. The Select Report screen will be displayed. Click the Clinical Information and Patient options. Select the Plan of Care / Verbal Order report. Click the Proceed button. 01/18/06 3:13 PM Page 195 of 446 Users Manual The Plan of Care/Verbal Order Report screen will be displayed. Generate a list containing the Plan of Care/Verbal Order you would like to print, preview or export by filling in the Name Beginning With field or the Cert Begin Range fields as desired and then clicking the Create List button. If you office is located in the state of Texas, the option to print your Plan of Care using the Texas Medicaid format is displayed. 01/18/06 3:13 PM Page 196 of 446 Users Manual If you would like to print the Plan of Care/Verbal Order, click the Report Options button. Set the Default Printer option in the Destination section of the Report Options screen (the default is Screen Preview). Click the Exit button to exit that screen. Select the Plan of Care or Verbal Order to print/preview from the list. To select one Plan of Care/Verbal Order, click on the item in the list. To select multiple Plans of Care/Verbal Orders, control-click on each item or shift-click on the first and last item. Click the Generate Draft or Generate Final button. The Plan of Care/Verbal Order will be sent to the printer or be displayed on the screen depending on the setting of the Destination option on the Report Options screen. Exporting from the Edit Plan of Care/Verbal Order Report screen There is some initial setup required before you may export of a Plan of Care to an .XML file. 1. First you will need to edit the file SAM.INI on the “N:” folder. This file must contain your ACM, EClickMD and/or Alacare Provider ID in the following format (you may have a line per care plan oversight system): Ini_ACM_ProviderID,RIVER001 01/18/06 3:13 PM Page 197 of 446 Users Manual And/or Ini_Alacare_ProviderID,RIVER001 And/or Ini_EclickMD_ProviderID,RIVER001 2. Those physicians who are registered with a Care Plan Oversight system will need to have their records modified in the physician’s database in SAM. The name of the CPOS (“acm”, “alacare” and/or “eclickmd”) must be placed in the POC/VO Email Addr field of the physician’s record. 3. For physicians that you will be sending a Plan of Care for, you will need to verify that you have the correct UPIN, the export will not export Plans of Care for physicians without valid UPINs. UPIN beginning with OTH, VAD, INT, PHS, RES and RET are not considered valid. Select the Plan of Care to export from the list. To select one Plan of Care, click on the item in the list. To select multiple Plans of Cares, control-click on each item or shift-click on the first and last item. Click the Generate Internet File button to export the Plan of Care. You will be prompted for a path and filename for the file to be created. The system will default to storing the files on the folder “N:\XML Files\ExportFiles” and naming the file 01/18/06 3:13 PM Page 198 of 446 Users Manual with a unique name based on your Care Plan Oversight system and Provider ID (in the SAM.ini file) and the current date and time. This may be overwritten. After the file has been created, and Plans of Care/Verbal Orders exported to the file are updated in SAM as having bee mailed on that date. They are also marked as having their final document printed. Once you have saved the .XML file, this file may be uploaded to the Care Plan Oversight website for signature. Please refer to the Care Plan Oversight’s documentation for the download process. After the Plans of Care/Verbal Orders have been signed, your Care Plan Oversight system will allow you to create a .XML file of these signed order that you can re-import back into SAM to populate the “Received Signed” date on the orders. Please see the Import Signed POC/VO section in this manual. Importing Signed Plans of Care and Verbal Orders Signed Plans of Care and Verbal orders may have their “Received Signed” date imported into SAM from an .XML file created by a Care Plan Oversight and eSignature System (CPOS). There is a XML interface to the following CPOS systems: Ancillary Care Management ACM EClickMD Alacare 01/18/06 3:13 PM Page 199 of 446 Users Manual To import a XML file of signed Plans of Care/Verbal Orders, it is very important to first install the RiverSoft XML reader on any workstation that you will be using to import the XML files. To install: 1. Double Click on n:\tools\rs_xml\rs_xml_stuff.msi 2. Click on the Next button on each of the screen, accepting all defaults. 3. On the last installation screen, click the Close button. After you have installed the RiverSoft XML reader, to import the signed Plans of Care/Verbal Orders, you should first move any XML files to be imported into SAM into the n:\xml files\importfiles folder. To access the Import Signed Poc/VO screen, select menu option File | Import | Signed POC/VO. The XML Import Option screen will be displayed. Click on the Continue button on the XML Import Option screen. 01/18/06 3:13 PM Page 200 of 446 Users Manual Select the file to be imported on the Open screen. SAM will import each Plan of Care or Verbal Order in the .xml file and then display a processing results log on your screen. You may print this log. Click the Exit button to exit. The file that you chose to import will be moved to the n:\xml files\importfiles\imported folder so that you can maintain a history of the files imported. The processing results log file is also stored in this directory and its filename begins with the name of the file you imported followed by “_log.” For each signed Plan of Care/Verbal Order, SAM will fill in the “Received Signed” date based on the date that was in the XML file. Admitting/Discharging/Readmitting a Patient to/from a Payer SAM gives the user the capability to admit, discharge, and readmit a patient at both the agency level and the payer level. A patient has an Agency Current Status (“Incomplete”, “Active”, “Hold”, or “Discharged”). The Agency Current Status is the patient’s status in the agency no matter how may payers the patient has (i.e. Self Pay, Unisys, and Medicare). The patient is only discharged from the agency when the patient is no longer receiving any care by the agency. A patient is admitted and discharged from the agency by first selecting the Clinical Information menu option to display the Edit Patient screen, then pressing the Edit button on the Edit Patient screen, which in turn brings up the Edit Patient Status screen. Refer to the sections Admitting a Patient into the Agency, Discharging a Patient from the Agency, and Modifying a Patient’s Agency Status for more information on setting the patient’s Agency Current Status. A patient is admitted to a payer simply by defining the client/payer relationship via the Client feature. SAM also gives the user the capability to discharge a patient from a payer without 01/18/06 3:13 PM Page 201 of 446 Users Manual discharging the patient from the agency and then to readmit the patient to the payer. This feature is used in an “invisible” fashion and does not have to be used! This capability allows offices that have patients receiving some care covered by one payer (i.e. Medicare) and also some other care covered by a private insurance company (or Self Pay) a way to discharge the patient from Medicare only (not the agency – since the patient is still receiving care covered by another payer); and to specify a Discharge Date specific to the Medicare payer (to be printed on the Medicare Claim). At a later date, the offices may readmit the patient to Medicare and specify a new Start of Care Date specific to the Medicare payer (to be printed on the HCFA 485 and the Medicare Claim). The capability to change a Start of Care date, and to discharge and readmit a patient from/to a payer is accomplished using the Edit Plan of Care/Verbal Order screen: The date that is displayed in the Payer Start of Care field is the date used to fill in Locator 2 (Start of Care Date) on the HCFA 485 and on the Claim associated with the Plan of Care displayed on the screen. The date that is displayed in the Payer Discharge Date field the date used on the Claim associated with the Plan of Care displayed on the screen. The default dates supplied are usually the dates most users will want to use without change. However, if the default Payer Start of Care date or the default Payer Discharge Date are not the dates the user wants used on the HCFA 485 or Claims, the dates may be changed using the Edit Payer Status screen. This screen is displayed by pressing the Edit Payer Status button on the Edit Plan of Care/Verbal Order screen. The only times a user would want to use the Edit Payer Status button to edit the Payer Status, Payer Start of Care, or Payer Discharge Date are when: The patient has received care by the agency which was paid for by one payer and now care is to be paid for by a new payer (In this case the Agency Start of Care will be earlier than the new Payer Start of Care so the Payer Start of Care should be modified) The patient is to be discharged from a payer and not the agency The patient is to be readmitted to a payer after being discharged from the payer and a new Start of Care date is required. Modifying the Payer Start of Care for a Payer The Payer Start of Care date may be modified to be different from the Agency Start of Care date (the default date). The date that is displayed in the Payer Start of Care field on the Edit Plan of Care/Verbal Order screen is the date used to fill in Locator 2 (Start of Care Date) on HCFA 485s and the Start of Care on Claims associated with Plans of Care for this payer. 01/18/06 3:13 PM Page 202 of 446 Users Manual Whenever the HCFA 485 and Claim Start of Care for a payer are different than the Agency Start of Care, the user should modify the Payer Start of Care for the payer. To access the Edit Plan of Care/Verbal Order screen to modify the payer status dates, select menu option Administration | Clinical Information. The Edit Patient screen will be displayed. Select the correct patient that you would like to modify the payer start of care date for. Click on the Define Plan of Care/Verbal Order button. Use the Find button to select a Plan of Care associated with the payer whose Payer Start of Care is to be modified. Click on the Plan of Care you would like to modify, and click the Select button. Once the Plan of Care is displayed, make sure the Payer field contains the correct payer name. Click the Edit Payer Status button near the bottom of the screen. The Edit Payer Status screen will be displayed filled in with information about the payer selected. The Payer field contains the payer Set # (same as the Set # on Edit Client/Payer screen) followed by the payer name. The Payer Start/End Date fields contain the payer set Start/End Date (same as the Start/End Date on the Edit Client/Payer screen). To modify the displayed Payer Start of Care date for the displayed payer: Enter the desired date in the Payer Start of Care field. Click the Save 01/18/06 3:13 PM button to save the new status and date. Page 203 of 446 Users Manual The Edit Plan of Care/Verbal Order screen will be redisplayed with the Payer Start of Care field filled in with the saved start of care date. The Payer Start of Care is now available to be used as the Start of Care on all HCFA 485s and Claims associated with all Plans of Care for this payer. Discharging a Patient from a Payer To discharge a patient from a specific payer and not the agency (i.e. Medicare): To access the Edit Plan of Care/Verbal Order screen to modify the payer status dates, select menu option Administration | Clinical Information. The Edit Patient screen will be displayed. Select the correct patient that you would like to discharge from a payer. Click on the Define Plan of Care/Verbal Order button. Use the Find button to select the latest Plan of Care associated with the payer the patient is to be discharged from. NOTE: Selecting the latest Plan of Care for the payer is especially important after the patient has already been discharged and then readmitted to the payer in the past. Click on the Plan of Care you would like to modify, and click the Select button. Once the Plan of Care is displayed, make sure the Payer field contains the correct payer name. Click the Edit Payer Status button near the bottom of the screen. 01/18/06 3:13 PM Page 204 of 446 Users Manual The Edit Payer Status screen will be displayed filled in with information about the payer selected. The Payer field contains the payer set Set # (same as the Set # on the Edit Client/Payer screen) followed by the payer name. The Payer Start/End Date fields contain the payer set Start/End Date (same as the Start/End Date on the Edit Client/Payer screen). To discharge the displayed patient from the displayed payer: Select the status of “Discharged” in the Payer Status combo box. The Payer Discharge Date field will become enabled. Enter the Payer Discharge Date. Click the Save button to save the new status and discharge date. The client/payer authorization end date will be set equal to the discharge date plus one day. The Edit Plan of Care/Verbal Order screen will be redisplayed with the Payer Status field filled in with “Discharged” and the Payer Discharge Date filled in with the saved discharge date. The patient is now discharged from the payer. The Payer Discharge Date is now available to be used as the Discharge Date on all Claims associated with all Plans of Care for this payer. 01/18/06 3:13 PM Page 205 of 446 Users Manual Readmitting a Patient to a Payer A patient may be readmitted to a payer that the patient has been previously discharged from (Refer to the previous section, Discharging a Patient from a Payer). First, a new payer (another payer set with the same payer as the payer the patient was discharged from) must be defined for the patient before a new Plan of Care may be defined using the payer. To readmit a patient to a specific payer and not the agency (i.e. Medicare), first create a new payer set for the payer for the patient: Use the Edit Client/Payer screen to create a new payer set for the payer the patient is to be readmitted to. Refer to section Defining Client Payer Sets for screen pictures. To access the Client/Payer screen, select menu option Administration | Clients and click the Payers button. After the client is selected, use the Find button to select the payer the patient is to be readmitted to. After the Edit Client/Payer screen is redisplayed containing the correct payer, modify the End Date to be the same as the Certification End Date of the last valid Plan of Care before the patient was discharged from the payer. Click the Save Click the New button (to create a new payer set for the same payer). Use the Select button next to the Payer field to select the payer the patient is to be readmitted to. Enter the Insured’s ID and any other information desired. Fill in the Start/End Date with the Certification Begin Date and the Certification End Date for the new Plan of Care that is going to be created for this patient for this payer. 01/18/06 3:13 PM button to save the change. Page 206 of 446 Users Manual Click the Save button to save the new payer. A message will appear: “WARNING: This Payer Has Already Been Assigned to the Current Client – Continue Save?” Click the Yes button Now create the new Plan of Care using the new payer set: Display the Edit Plan of Care/Verbal Order screen. Once the Edit Plan of Care/Verbal Order screen is displayed, make sure the correct Patient Name is displayed on the screen. Use the Find button to select the last valid Plan of Care associated with the payer the patient was discharged from. Once the Plan of Care is displayed, make sure the Payer field contains the correct payer name. Click the Copy button to copy the old Plan of Care to the new Plan of Care. Enter the New Cert Begin date Enter the New Cert End date Select the payer the patient is to be readmitted to in the New Payer combo box. If the Start/End Dates on the Edit Client/Payer screen were entered correctly for both the old and new versions of the payer, only the newer version of the payer should be showing up in the New Payer list. Click the Copy button to save the new Plan of Care. The Edit Plan of Care/Verbal Order screen will be redisplayed positioned to the new Plan of Care. Verify that the Cert Begin, Cert End, and Payer are correct. The Payer Start of Care, Payer Discharge Date, and Payer Status are set to their default values. To change the Payer Start of Care (which will fill in Locator 2 (Start of Care) on the HCFA 485) to be different than the default value of the Agency Start of Care: Click the Edit Payer Status button near the bottom of the screen. The Edit Payer Status screen will be displayed filled in with information about the payer selected. To modify the displayed Payer Start of Care date for the displayed payer: Enter the desired date in the Payer Start of Care field. Click the Save button to save the new status and date. The Edit Plan of Care/Verbal Order screen will be redisplayed with the Payer Start of Care field filled in with the saved start of care date. The Payer Start of Care is now available to be used as the Start of Care on all HCFA 485s and Claims associated with all Plans of Care for this payer. The patient is now readmitted to the payer and the shell for the initial Plan of Care has been created. At this point the contents of the Plan of Care may be modified and completed correctly. 01/18/06 3:13 PM Page 207 of 446 Users Manual Verbal Order Management Entering a New Verbal Order A Verbal Order should be created for a patient whenever the physician has decided to make a revision to the original Plan of Care for the patient. The original Plan of Care should not be modified, but instead the change is documented by creating a Verbal Order associated with the Plan of Care. The Verbal Order form created is titled Revision to Plan of Care. A Verbal Order documents change to any part of the Plan of Care including: Medications, Diagnoses, Surgical Procedures, Supplies, Orders, and Goals. A new Verbal Order is created for a patient using the Edit Plan of Care/Verbal Order screen. You are required at a minimum to select the New Verbal Order button, enter the Cert Begin and Cert End dates, select a Payer, select a Physician, and enter the Verbal Order Date. It is very important that the Verbal Order has the same Cert Begin and Cert End dates, Payer, and Physician as the original Plan of Care that this Verbal Order is documenting a change to. To access the Verbal Order screen, select menu option Administration | Clinical Information. The Edit Patient screen will be displayed. Select the correct patient that you would like to enter a new Verbal Order for. Click on the Define Plan of Care/Verbal Order button. The Edit Plan of Care/Verbal Order screen will be displayed with the Patient Name field filled in with the name of the patient selected Once the Edit Plan of Care/Verbal Order screen is displayed, make sure the correct Patient Name is displayed on the screen. 01/18/06 3:13 PM Page 208 of 446 Users Manual Click the Find button on the Edit Plan of Care/Verbal Order screen. The Plan of Care/Verbal Order List screen will be displayed. 01/18/06 3:13 PM Page 209 of 446 Users Manual Click on the Plan of Care you would like to associate the new Verbal Order with and click the Select button. The Edit Plan of Care/Verbal Order screen will be redisplayed containing the details of the selected Plan of Care. Make sure that the Plan of Care displayed is the one you want to create the Verbal Order for. Click the New Verbal Order button on the toolbar to add a new Verbal Order. The Add Plan of Care/Verbal Order screen is displayed. The Type field will contain “Verbal Order”. The Cert Begin date will be filled in with the Cert Begin date of the Plan of Care. The Cert End date will be filled in with the Cert End date of the Plan of Care. The Payer combo box will display the Payer of the Plan of Care. The Prime Physician field will be filled in with the Prime Physician of the Plan of Care. The Sec Physician field will be filled in with the Sec Physician of the Plan of Care. The Verbal Start of Care date will be filled in with the Verbal Start of Care date of the Plan of Care. The Case Manager field will be filled in with the Case Manager of the Plan of Care. Enter the Verbal Order Date associated with the new Verbal Order. Make sure that all of the information displayed on the Edit Plan of Care/Verbal Order screen is correct. Click the Save 01/18/06 3:13 PM button on the toolbar to save the Verbal Order. Page 210 of 446 Users Manual The POC # will be filled in with a unique number that the system assigns to the Verbal Order. You may preview the Verbal Order contents by clicking the Preview the toolbar. button above New Verbal Order Notes: A new Verbal Order can only be created for patients that have a Plan of Care. The Verbal Order is associated with the Plan of Care by having the same Cert Begin and Cert End dates, Payer, and Physician as the Plan of Care. A new Verbal Order cannot be created for a patient with an Agency Current Status of “Discharged”. Defining Verbal Order Contents Once the essential parts of a new Verbal Order are entered (refer to Entering a New Verbal Order), you must then decide what part of the original Plan of Care this new Verbal Order is documenting a change to. This will determine what button on the Edit Plan of Care/Verbal Order screen you will use to fill out the rest of the Verbal Order. For example, if the physician changed the Medications, click the Medications button on the Edit Plan of Care/Verbal Order screen and enter the medication information associated with the change. If the physician ordered a change to the patient’s scheduled care (i.e. more SN visits are now required than previously ordered) and you wish to do compliance checking on the patient’s visits, then you will click the Compliance Rules button to enter the new Doctor Order. It is only necessary to define Doctor Orders if the physician has ordered a change to the patient’s care that changes the services to be rendered. Refer to the section associated with defining each of these parts of the i.e. Defining Plan of Care/Verbal Order Orders. Fill out the contents of the Verbal Order as follows. Click on any of the following buttons to enter the Verbal Order associated information: Orders Goals Medications Diagnosis Verbal Order Surg Procs Supplies 01/18/06 3:13 PM Page 211 of 446 Users Manual Each of these buttons will display a screen on which you can define the associated Verbal Order information. Make sure all the information on the screen is correct. Click the Save button on the toolbar to save changes made on the screen. Click the Exit button on the toolbar to exit the screen. The Edit Plan of Care/Verbal Order screen will be redisplayed. You may preview the Verbal Order contents at any time by clicking the Preview above the toolbar on the Edit Plan of Care/Verbal Order screen. button You may also print the Verbal Order by clicking the Print button above the toolbar on the Edit Plan of Care/Verbal Order screen. Modifying a Verbal Order Refer to section Modifying a Plan of Care/Verbal Order. Deleting a Verbal Order Refer to section Deleting a Plan of Care/Verbal Order. 01/18/06 3:13 PM Page 212 of 446 Users Manual Doctor Order Management Entering Plan of Care/Verbal Order Doctor Orders A Doctor Order describes a type of service the patient is to receive as prescribed by the physician. The Doctor Order becomes a rule governing how a specific skill of service should be administered to the patient. A Doctor Order consists of a skill, frequency, duration, optional interval, start date, and an end date. Note: Any compliance rule that is older than 1 year (based on the end date of the rule) will be purged nightly when the system reindexes. You can change the timeframe for deleting these rules by adding the following line to your n:\sam.ini file: Ini_Comp_Rules_Purge_Months,# Where # is the number of months (back from today) to keep compliance rules. Scheduling interprets the “rules” as set up in the associated Doctor Orders to do Compliance Checking on the scheduled visits. In this way, it can then be determined whether visits are in or out of compliance with the physician’s prescribed care. To access the Compliance Rule screen for Doctor Orders, select menu option Administration | Clinical Information. The Edit Patient screen will be displayed. Select the correct patient that you would like to enter Doctor Orders for. Click on the Define Plan of Care/Verbal Order button. The Edit Plan of Care/Verbal Order screen will be displayed. On the Edit Plan of Care/Verbal Order screen, make sure the correct Patient Name is displayed and the correct Plan of Care/Verbal Order you want to add Doctor Orders to is displayed. 01/18/06 3:13 PM Page 213 of 446 Users Manual Click on the Compliance Rules button. The Edit Compliance Rule screen will be displayed. Click the New button on the toolbar to add a new doctor order type compliance rule. The Add Doctor Order screen is displayed. 01/18/06 3:13 PM Page 214 of 446 Users Manual Notice that the Rule Type defaults to “Doctor Order.” Select the Doctor Order skill and sub-skill in the Skill/Sub-skill combo box. This list of Skill/Subskills is derived from the valid skills you have entered either on the Client Skills and Codes (Self-Pay) or the Client/Payer Skills and Codes screens. Compliance rules may only be entered for valid skills. Enter the minimum number of times (frequency) that a visit should occur within the specified time unit in the field before the word to. Enter the maximum number of times (frequency) that a visit should occur within the specified time unit in the field after the word to. Indicate whether the frequency for the Doctor Order applies to a number of Hours or Visits by clicking on the option. Specify the frequency unit (A Day, A Week, A Month, As Needed) in the frequency combo box that corresponds to the number of Hours/Visits entered. Enter the duration of the Doctor Order in the field after the word for. Specify the time unit corresponding to the entered duration by selecting the Days, Weeks, or Months option. Enter the interval of the Doctor Order in the field after the word every. Specify the time unit corresponding to the entered interval by selecting the Days, Weeks, or Months option. Enter the first day that a visit can be scheduled for this order in the Start Date field. Enter the date that visits can no longer be scheduled for this order in the End Date field. Make sure all the information about the Doctor Order is correct. Click the Save button on the toolbar to save the Doctor Order. If the new compliance rule overlaps an existing Doctor Order compliance rule, the Overlapping Compliance Rules screen will be displayed. 01/18/06 3:13 PM Page 215 of 446 Users Manual If the new doctor order represents visits to be done in addition to what the doctor has already order, choose Save New Rule as Addition to Existing Rules. The rule will be saved “as is.” If the doctor order replaces the current order, choose Save New Rule as Replacement for Existing Rules. This will cause the system to adjust the dates on the current order to end as the new rule begins. For a complete discussion of compliance rules and compliance checking, see the Compliance Checking presentation in the “n:/users manuals” folder of your server. The compliance rule will be checked each time a change is made to the client’s schedule. If a visit of the same client-payer-skill/sub-skill combination breaks any part of the rule, the visit will be given a status of out-of-compliance (displayed as black) due to Dr Orders. If Out-ofcompliant visits are verified and closed, they are still paid and billed. For more on compliance checking, see the section on compliance checking in this manual. 01/18/06 3:13 PM Page 216 of 446 Users Manual HCFA 485 Locator Mapping HCFA 485 Locator Field or Edit Plan of Care/Verbal Order screen Button 1 Patient’s HI Claim No. Clients, Payers, Insured’s ID 2 Start of Care Date Payer Start of Care 3 Certification Period Cert Begin and Cert End 4 Medical Record No. Client # 5 Provider No. Payers, Provider ID 6 Patient’s Name and Address Clients, Client Name, Address 7 Provider’s Name and Address Define Offices, Office Name, Address 8 Date of Birth Clients, Birth Date 9 Sex Clients, Sex 10 Medications Medications button 11 Principal Diagnosis Diagnoses button 12 Surgical Procedure Surg Procs button 13 Other Pertinent Diagnoses Diagnoses button 14 DME and Supplies Supplies button 15 Safety Measures Safety/Etc. button 16 Nutritional Requirements Safety/Etc. button 17 Allergies Safety/Etc. button 18AFunctional Limitations Safety/Etc. button 18BActivities Permitted Safety/Etc. button 19 Mental Status Safety/Etc. button 20 Prognosis Safety/Etc. button 21 Orders and Discipline and Treatments Orders button 22 Goals, Rehab Potential, Discharge Plans Goals button 23 Nurse’s Signature and Date of Verbal SOC Verbal Start of Care 24 Physician’s Name and Address Prime Physician and Physicians Database 01/18/06 3:13 PM Page 217 of 446 OASIS Assessment Management SAM provides the ability to maintain OASIS Assessments for patients. Using SAM you are able to input, modify, delete or export the OASIS Assessment. Export of an OASIS Assessment will create a text file that you may then send to your state’s OASIS website. Entering a New OASIS Assessment An OASIS Assessment may only be entered for patients that have been admitted into the agency. Refer to section Admitting a Patient into the Agency in this manual. To access the OASIS Assessment screen, select menu option Administration | Clinical Information. The Edit Patient screen will be displayed. Select the correct patient that you would like to enter a new OASIS Assessment for. Confirm that the patient has been admitted into the agency by noting that the Agency Start of Care field and the Agency Admit Date field contain values in the Clinical Information section of the screen. (Refer to section Admitting a Patient into the Agency in this manual.) Click on the Define OASIS Assessment button. The Edit OASIS screen will be displayed with the Patient Name field filled in with the name of the patient selected. Once the Edit OASIS screen is displayed, make sure the correct Patient Name is displayed on the screen. Click the New button to create a new OASIS Assessment. Answer “Yes” or “No” to the prompt “Associate Assessment with a Plan of Care?” Associating an OASIS Assessment to a Plan of Care will copy any information available from the Plan of Care to the new OASIS Assessment. For Medicare PPS billing it is important to associate the OASIS Assessment with the correct Plan of Care. If you answer “Yes” to this question, a screen listing the existing Plans of Care will be displayed. Select the Plan of Care that you want to associate the OASIS Assessment with. Users Manual Enter the Assessment type for the OASIS Assessment. The status field will default to “In Use” for a new OASIS Assessment. Depending on the Assessment type selected, the system will default the “Reason (M0100)” to the first acceptable reason for the assessment type. Enter the information all of the fields that you have the information for. Click the Save button to save the initial OASIS Assessment screen. Warning messages will be displayed if any required information has not been entered. After you have saved the initial OASIS Assessment screen, the buttons along the top of the screen to allow access to input more assessment information become available. (Note: it will depend on the Assessment “Reason M0100” selected as to whether or not each button is made available.) The Agency Info button will display a screen that shows your agency information. This information may be entered using the Offices feature. It is important that this information be entered for each office before any OASIS Assessments are exported. In addition, the Assign POC button will become available. If for any reason you need to reassign an OASIS Assessment to a different Plan of Care, click this button. A screen listing the existing Plans of Care will be displayed. Select the Plan of Care that you want to associate the OASIS Assessment with. You may now continue to enter the information for the remainder of the OASIS Assessment. If you place your cursor to “hover” over each of the button, a yellow tool tip will show you the M0xxx numbers that may be defined by pressing each button. 01/18/06 3:13 PM Page 219 of 448 Users Manual Click the button for the information that you wish to enter. Click the New button to create new assessment information. Enter the assessment information. You may notice that some fields are not available for input. The disabling/enabling of fields is based on your answers to other fields. This is defined by the OASIS Specification provided by Medicare. The screen may include multiple tabs (multiple screens.) To access another tab, click on the title of the tab. Once all of the assessment information has been entered, press the Save button to save the information. If the screen is comprised of multiple tab (multiple screens), click on the title of the first tab to access the Save button. Warning messages will be displayed if any required information has not been entered. Press the Exit After you have entered ALL of the information for the OASIS Assessment, change the status on the assessment to “Completed” by selecting “Completed” from the Status drop down. Warning messages will be displayed if any required information has not been entered. button to return to the initial OASIS Assessment screen. At any time you may click the Summary button to see display warning messages or errors if any required information has not been entered. If the Plan of Care associated with the OASIS Assessment is for a Medicare payer, the Summary button will also give you PPS billing information. You will either see a display warning messages for why PPS information cannot be displayed, or PPS billing information will be displayed that will include: PPS Payment for the Episode HHRG Code HIPPS Code Version Key Wage Index Case Mix Weight HIPPS Code Note - On a Medicare OASIS, when you press the Summary button, the pertinent information will be displayed from the Grouper.DLL (from HCFA.) Included in this information is the HIPPS code. If this code’s last value is a value other than “1”, there is an error in the OASIS. When you press the OK button on the screen that displays the HIPPS code, another screen will be displayed titled “HIPPS Check Error.” This screen will document what M00 fields that are in error and should be corrected. Some of the warning messages for why PPS information cannot be displayed includes: M0100 must be equal 1-Medicare (traditional fee-for-service) M0825 must be equal to Yes or No 01/18/06 3:13 PM Page 220 of 448 Users Manual The effective date for the assessment must be equal to or later than 9/1/2000 to be considered a version 1.10 OASIS. After you have changed the status for the assessment to completed and there are no longer any errors being reported, change the status to “Locked” by selecting “Locked” from the Status drop down. Warning messages will be displayed if any required information has not been entered. The Lock Date will default to the current date. Assessments that have a status of “Locked” are ready for export. Modifying a OASIS Assessment You may need to make modification to an existing OASIS Assessment due to a rejection, etc. To access the OASIS Assessment screen, select menu option Administration | Clinical Information. The Edit Patient screen will be displayed. Select the correct patient that you would like modify an OASIS Assessment for. Confirm that the patient has been admitted into the agency by noting that the Agency Start of Care field and the Agency Admit Date field contain values in the Clinical Information section of the screen. (Refer to section Admitting a Patient into the Agency in this manual.) Click on the Define OASIS Assessment button. The Edit OASIS screen will be displayed with the Patient Name field filled in with the name of the patient selected. Once the Edit OASIS screen is displayed, make sure the correct Patient Name is displayed on the screen. Press the Find button to locate the OASIS Assessment you want to Modify. A screen will be displayed that lists the OASIS Assessments for the patient. Highlight the assessment you want to modify and either double click or click on the Select button. 01/18/06 3:13 PM Page 221 of 448 Users Manual The Edit OASIS screen is then displayed with the OASIS Assessment that you selected. You may modify any of the assessment fields displayed on the screen. Make sure all the information on the screen is correct. Click the Save button on the toolbar to save the changes made to the OASIS Assessment Click on any of the available buttons at the top of the screen to modify the remaining OASIS assessment information. Modify the assessment information as necessary. You may notice that some fields are not available for input. The disabling/enabling of fields is based on your answers to other fields. This is defined by the OASIS Specification provided by Medicare. The screen may include multiple tabs (multiple screens.) To access another tab, click on the title of the tab. Once all of the assessment information has been entered, press the Save button to save the information. If the screen is comprised of multiple tab (multiple screens), click on the title of the first tab to access the Save button. Warning messages will be displayed if any required information has not been entered. Press the Exit button to return to the initial OASIS Assessment screen. If you have already exported the OASIS Assessment (the status is equal “Exported”), be sure to input a new correction number on the initial OASIS Assessment screen. The Edit OASIS screen will be redisplayed. 01/18/06 3:13 PM Page 222 of 448 Users Manual Deleting a OASIS Assessment You may need to make modification to an existing OASIS Assessment due to a rejection, etc. To access the OASIS Assessment screen, select menu option Administration | Clinical Information. The Edit Patient screen will be displayed. Select the correct patient that you would like delete an OASIS Assessment for. Confirm that the patient has been admitted into the agency by noting that the Agency Start of Care field and the Agency Admit Date field contain values in the Clinical Information section of the screen. (Refer to section Admitting a Patient into the Agency in this manual.) Click on the Define OASIS Assessment button. The Edit OASIS screen will be displayed with the Patient Name field filled in with the name of the patient selected. Once the Edit OASIS screen is displayed, make sure the correct Patient Name is displayed on the screen. Press the Find button to locate the OASIS Assessment you want to Delete. A screen will be displayed that lists the OASIS Assessments for the patient. Highlight the assessment you want to delete and either double click or click on the Select button. The Edit OASIS screen is then displayed with the OASIS Assessment that you selected. Make sure that the OASIS Assessment displayed is the one you want to delete. Click the Delete button on the toolbar to delete the OASIS Assessment. Click on the Yes button in the popup screen that asks, “Delete displayed OASIS Assessment?” The detailed information about the deleted OASIS Assessment will be removed from the Edit OASIS Assessment screen and from the OASIS Assessment List screen. At this point, you may delete other OASIS Assessments by repeating the steps above. Click the Exit button on the toolbar to exit the Edit OASIS Assessment screen. Printing a OASIS Assessment You may print OASIS Assessments to a printer or to a .pdf formatted files to be stored electronically. To access the OASIS Assessment screen, select menu option Administration | Clinical Information. The Edit Patient screen will be displayed. Select the correct patient that you would like print an OASIS Assessment for. Confirm that the patient has been admitted into the agency by noting that the Agency Start of Care field and the Agency Admit Date field contain values in the Clinical 01/18/06 3:13 PM Page 223 of 448 Users Manual Information section of the screen. (Refer to section Admitting a Patient into the Agency in this manual.) Click on the Define OASIS Assessment button. The Edit OASIS screen will be displayed with the Patient Name field filled in with the name of the patient selected. Once the Edit OASIS screen is displayed, make sure the correct Patient Name is displayed on the screen. Press the Find button to locate the OASIS Assessment you want to Modify. A screen will be displayed that lists the OASIS Assessments for the patient. Highlight the assessment you want to modify and either double click or click on the Select button. The Edit OASIS screen is then displayed with the OASIS Assessment that you selected. Make sure that the OASIS Assessment displayed is the one you want to print. Click the Print button on the screen to print the OASIS Assessment. You will be prompted with the same message as if you had clicked the Summary button. After answering the prompts, your assessment will be displayed in a “Report View Windows.” From this Report View Window you may view, print or save the .pdf file. Click the button to exit the Report View Window. At this point, you may print other OASIS Assessments by repeating the steps above. Click the Exit 01/18/06 3:13 PM button on the toolbar to exit the Edit OASIS Assessment screen. Page 224 of 448 Users Manual Exporting OASIS Assessments You may export your OASIS Assessments to a file. SAM does not submit the file to your state’s OASIS website, this will need to be done after exporting the file. Note that OASIS Assessments will not be listed on the OASIS Export screen if the patient was less than 18 years of age at the time that the assessment was completed per HCFA Version 1.40 OASIS specifications. To access the Export OASIS Assessments screen, select menu option File | Export | OASIS Assessments. The Export OASIS Assessments screen will be displayed. To see a list of OASIS Assessments to be exported, click the Generate button. OASIS Assessments with a status of “Locked” will be displayed. To reduce or sort this list to specific Assessments you may use any of the following options: Enter the beginning letter(s) of the name for the patient(s) in the Name Beginning With field. Enter dates in the Lock Date Range fields. Select the type of Assessment. Select whether or not to include Only Medicare/Medicaid Assessments. Select whether or not to include Assessments Previously Exported. 01/18/06 3:13 PM Page 225 of 448 Users Manual To sort the list, click on the field that you would like to sort from in the Sort Order section. Click the Generate button. To select assessments to be exported: Click the Select All button to select all assessments displayed in the list. Click the Select None button to un-select all assessments displayed in the list. Click the single assessment to be exported. To select multiple invoices, control-click on each invoice or shift-click on the first and last invoice. 01/18/06 3:13 PM Page 226 of 448 Users Manual To export the selected OASIS Assessments, click the Export Normal button. The OASIS Submission Option screen will be displayed: Click on the Production Submission button (the Test Submission button will export, but not change the status to “exported”) to export the OASIS Assessments selected and change their status to “exported.” 01/18/06 3:13 PM Page 227 of 448 Users Manual Click on the Continue button, the Save As screen will be displayed. The system will default to saving your OASIS export file to the N:\OASISExport directory. The filename will default to the current date with a .txt file extension. You may overwrite this filename. Click the Save button to save the OASIS export. The OASIS export log file will be displayed. 01/18/06 3:13 PM Page 228 of 448 Users Manual The log file will report each OASIS assessment you have selected to export and any Errors or Warnings in each of the assessments. If an error is reported, you should edit the OASIS assessment to correct the errors and then export the assessments again. This log file is also created on the N:\OASISExport directory. Once your have created your XX_XX_XX.txt OASIS export file, this file may be submitted to your state’s OASIS website. Remember, the LOG file is name xx_xx_xx_log.txt, do not submit this file; submit the xx_xx_xx.txt file. How to Submit an Inactivation Record Once it has been determined that an inactivation record must be submitted for an assessment (a key field such as the Social Security Number needs to be changed) you may create an inactivation export. While on the Export OASIS Assessments Screen: 1. Generate a list of assessments (narrow the search by utilizing the Attribute fields). 2. Select those assessments that require an inactivation record. 3. Press the Export Inactivation Button to create an inactivation file. The inactivation file is found in the N:\OASISExport directory just like the normal OASIS export files. The inactivation file is prefixed with “INACT_” (to distinguish it from the normal export files) followed by the date that the file is created. 01/18/06 3:13 PM Page 229 of 448 Users Manual 4. The system will change the status on the OASIS Assessment(s) to “Inactivated.” You can use the OASIS Tracking Report to generate a list of any OASIS Assessments with a status of “Inactivated.” 5. Submit the inactivation file to the state system in the same manner as you would the OASIS export file. 6. Once the inactivation record has been accepted by the state (use your OASIS Final Validation Report), you may make changes to the assessments that require key field changes. Do this by changing the status on the OASIS Assessment to “In Use” and click the Save button. Then make the changes necessary to the key fields, make sure that the Correction # field is “0”, change the status to “Locked” and click the Save button. 7. Then, using the Export OASIS Assessments option, select the assessment that is to be resubmitted and create a normal export file. 8. Submit the normal export file to the state system in the usual way. Note: The Correction # Field should be set to “0” for a newly submitted OASIS (this includes an OASIS that has been “Inactivated” due to changes in key fields.) If an assessment has been submitted and accepted by the state, and the home health agency staff determines that corrections must be made to non-key fields only, you should do the following: 1. Revise any non-key fields necessary in the new assessment record. 2. Increment the Correction # Field by one digit in the new assessment record”, change the status to “Locked” and click the SAVE button. 3. Submit the corrected assessment to the state system in the usual way. 01/18/06 3:13 PM Page 230 of 448 Users Manual Importing OASIS Assessments You may import OASIS Assessments into SAM. The import file must be in the standard format that is submitted to the state for OASIS. Note that it is important that the header information in the import file match the “OASIS Agency Info” in this system. You can locate this information on the Edit OASIS screen, by pressing the “Agency Info” button. The information can be entered using the Offices feature. To access the OASIS Import Options screen, select menu option File | Import | OASIS Assessment. The Import OASIS Assessments screen will be displayed. Select Test Import if you would like to process the file first to see any errors that may occur (no assessments are actually imported.) We recommend that you run this option first and correct any errors before importing with the Production Import option. It is important to note, that all records will be processed in the file, even if you have imported the file previously. However, SAM will not import duplicate assessments. It is recommended that you only import an OASIS file only one time with the Production Import option. This option will process the file, report any error assessments (not importing any assessments in error, assessments with warnings reported will be imported) and import all valid assessments. All assessments will be imported with a status of “Locked.” 01/18/06 3:13 PM Page 231 of 448 Users Manual A processing log report of the import is created in your n:\oasisimport folder. The office to import the assessment into is located based on the client name and a few other demographic fields. If you have the same client in multiple offices (with duplicate demographic information), then the import will not be able to determine which office to import the assessment into and will report an error for that assessment. If you have the same client in the same office (with duplicate demographic information), then the assessment will be imported for the last occurrence of the client that it finds. You may not import OASIS assessments for “Client” or “Facility” type clients. Duplicate assessments will be determined based on M0090_INFO_COMPLETED_DT, M0100_ASSMT_REASON, CORRECTION_NUM and the appropriate dates associated with the assessment reason – M0030_SOC_DT, M0032_ROC_DT, M0906_DC_TRAIN_DTH_DT and M0903_LAST_HOME_VISIT. You may currently only import OASIS version 1.40 data. 01/18/06 3:13 PM Page 232 of 448 Users Manual Calculating Overtime at the Back Office In order to assure that critical processes are working with static data, the system will not allow this process if anyone is doing any of the following in the database: Close Week, Calculate Overtime, Create Invoices, Create Automatic Contractuals, Transmit Claims, Make Adjustments (Items, Invoices, Rebills, Reviewing and accepting, etc.), Payroll Export and Updating Visit Rates. You may choose to calculate overtime at anytime. An overtime screen will pop up and display the overtime cases. Overtime is calculated across all offices for ALL verified visits up to and including the last day of the previous week. Only one person may close any office at any one time. SAM now offers 2 ways to calculate overtime pay for your employees: Algorithm A: Overall Average Rate Algorithm A is the default overtime calculation. This algorithm calculates an overtime rate based on the overall average pay rate of an employee per week. The average rate is computed by dividing the total pay for the week by the total hours for the week (of visits and/or pay items that count towards overtime). One-half the average pay rate is then ADDED to each overtime hour. Algorithm B: Item Average Rate Algorithm B calculates n individual overtime rate per visit and/or pay item. The overtime rate is computed by determining the average rate of the individual visit/pay item (considering regular pay, holiday pay, etc.), then REPLACING the pay rate of the visit/pay item with 1.5 times the average. This algorithm is consistent with existing overtime laws. Note: All employees must agree to the use of this algorithm before its use. To activate this overtime option, add the following line to your n:\sam.ini file: Ini_ot_algorithm,B If you choose to use overtime option B, it will be important to update the n:\sam.ini file for your back office and all of your front offices, so that all of your offices are calculating overtime using the same option. By default, 40 hours of work by an employee in one week is what will trigger any additional hours in the week to go into overtime. You can control the number of hours that will trigger overtime for an employee. If you do not have this variable set, SAM will use the default of 40 hours. To use this feature, enter the following line in your n:\sam.ini file where ## is the number of hours that should trigger overtime (example: 48): Ini_weekly_ot, 48 01/18/06 3:13 PM Page 233 of 448 Users Manual To Calculate Overtime, select menu option AR | Calc Overtime. If any overtime is found, Click on the Print button to print an overtime report. Click on the Cancel button to exit from this screen. 01/18/06 3:13 PM Page 234 of 448 Users Manual Processing Weekly Payroll If an office has both a front and back office component, the front office verification and close process must be performed. Refer to section The Verification Process – Weekly Payroll. If there is no front office or the front office close has been performed, the back office may be closed. Closing the Week at Back Office In order to assure that critical processes are working with static data, the system will not allow this process if anyone is doing any of the following in the database: Close Week, Calculate Overtime, Create Invoices, Create Automatic Contractuals, Transmit Claims, Make Adjustments (Items, Invoices, Rebills, Reviewing and accepting, etc.), Payroll Export and Updating Visit Rates. Early each week, after each front office has verified their previous week’s schedule, the office’s information is transmitted to the back *office via Data Exchange. Normally, each front office is expected to “close” the previous week’s information on a certain day and the payroll for that office is processed at the back office the next day. If the front office is late in “closing the week”, the front office calls the back office when they have “closed” and the back office performs an immediate Data Exchange, overriding the normal Data Exchange schedule. Once the data is received at the back office (this takes only a few minutes), the back office can perform a re-verification or can simply close the week. After reviewing the visits, the back office closes the week to lock the data permanently. Also, when the back office performs a close week, overtime is recalculated across all offices (including shared employees across offices.) 01/18/06 3:13 PM Page 235 of 448 Users Manual The Close Week screen displays all the offices in the database and whether they have been closed in the front and/or back office for the current week. If an office has been closed at the back office, it will show “Closed” in the back office column. If an office has been closed at the front office, it will show the date that it was closed in the front office column. If no date appears in the front office column for an office, that office cannot be closed at the back office. The only way to change a visit after it is closed is through an adjustment. Visits must be closed to appear on the sales report, to be invoiced, to be interfaced to payroll, or to be interfaced to the general ledger. Perform the following steps to close the week: To access the Close Week screen, select menu option AR | Close Week. The Close Week screen will be displayed. Select the office(s) to close from the list and click the Close Week button. Overtime Report If the close week function detects that some employee have overtime, an overtime screen will pop up and display the overtime cases. It is a good practice to print this overtime list every time it is displayed; then cancel the close week process to correct any overtime problems, and/or print a new verified visit report that shows the overtime information. 01/18/06 3:13 PM Page 236 of 448 Users Manual Click on the Print button to print an overtime report. Click on the Cancel button to cancel the close week function. We cancel the close week function when we encounter overtime so that we can print a new Verified Visit Report that includes the overtime calculations. Or you could Calc OT, then print the Verified Visits Report and then Close the week. 01/18/06 3:13 PM Page 237 of 448 Users Manual Salaried Visits Information If verified visits exist for salaried employee and these visits cause the employees to surpass the number of hours they are normally expected to work as a part of their salary, the following screen is displayed. Visits within the limit are not exported to payroll. Visits beyond the limit are exported to payroll with the pay rate associated with the visits. Pressing the Continue button on this screen will cause the close week processing to complete. The week will be marked as closed and the status of all verified visits (with a care date on or before last Friday) will be changed to at status of closed. Closed visits cannot be edited. They can only be adjusted. 01/18/06 3:13 PM Page 238 of 448 Users Manual Exporting Payroll (Interface) In order to assure that critical processes are working with static data, the system will not allow this process if anyone is doing any of the following in the database: Close Week, Calculate Overtime, Create Invoices, Create Automatic Contractuals, Transmit Claims, Make Adjustments (Items, Invoices, Rebills, Reviewing and accepting, etc.), Payroll Export and Updating Visit Rates. There is a payroll interface to the following payroll systems: ACCPAC (SBT) Paychex Automatic Data Processing (ADP) Millennium Ultipro MAS 200 Advanced Payroll Systems PrimePay Simple Payroll Time Clock After closing the week at the back office, employee payroll information should be exported to the payroll system so that payroll checks can be printed. Payroll information can be exported by office or by all offices at once. If an employee is shared among two or more offices and you would like the employee to receive one paycheck, you must process the checks for all the employee’s offices together. 01/18/06 3:13 PM Page 239 of 448 Users Manual Perform the following steps to export payroll: To access the Export Payroll screen, select menu option File | Export | Payroll. The Export Payroll screen will be displayed. Select the office(s) to export from the list. Choose when interface option you wish and click the Export button. If you are exporting to ACCPAC SBT, all employee profile and tax information will be exported to SBT. For all payroll-posting file options; all visits, pay items and adjustments will be exported. Any payroll information for Employee’s with a type of “Contractor” will not be exported. All Contractor payroll information will, however, be “marked as payrolled” so that if at any time they are change to a “Staff” or “Field” employee, their old payroll information will not be exported. Employee(s) receiving adjustments for additional pay will receive additional pay. Employee(s) receiving adjustments causing a deduction in pay will have deductions taken from their normal pay. If deductions are to be taken and there is not enough pay in the current week, all postings for the employee will be held until the next payroll that has sufficient pay to cover the deductions. A visit or pay item adjustment may be performed that will cause one of two situations: 1. An employee’s payroll amount for a specific pay type (like regular or overtime) for the week is negative; or … 2. An employee’s payroll amount for the week is negative. In the first case, the adjusted dollars will be subtracted from other postings in the employee’s payroll for the week. The largest postings are subtracted from first so that the fewest number of postings will be affected. The export will show a screen report of the original postings and the adjusted postings during the payroll export. In the second case, a screen report will show all of the employee’s postings for the week. None of the postings will be exported. In both cases, the payroll report can be used to show an employee’s current and historic payroll, and the payroll interface report can be used to show what has been exported. 01/18/06 3:13 PM Page 240 of 448 Users Manual This is an example of a reimbursement pay item being adjusted from $30.75 to $10. Because it is the only payroll for the employee for the week, the employee will not be paid this week (they owe $20.75). As soon as they accumulate another $20.75 in payroll, the employee’s payroll can be exported. When the employee earns more (in this case $20.75), during the payroll export, the export adjusts the current postings to recuperate the money owed. The posting before the recuperation and after are shown on the screen, with the option to print. The posting(s) shown after the adjustment is applied is what is exported to the payroll system. 01/18/06 3:13 PM Page 241 of 448 Users Manual To get a list of the payroll adjustments done for each office, follow these instructions to print the adjustment report. To access the Adjustment Report screen, select menu option Reports. The Select Report screen will be displayed. Click the Billing application group. Click the Accounts Receivable option. Click the Adjustment Report and press the Proceed button. Enter the start and end dates of the adjustment you want to see. Set the start date far enough back to include any payroll adjustments that were entered prior to last week’s payroll. Select the completed adjustment status. Select Adjustment Type(s) “Visits” and “Pay Items” Select the “Payroll Only” option Select “Any” Employee or Client/Payer Note: 1. If you are using the SBT ACCPAC payroll system and are using a version later than 7.1, you should put the following lines in your n:\sam.ini file: Ini_Payroll_Vendor,ACCPAC:7.1 (to designate you are using the new version) Ini_Payroll_Vendor,n:\pro50\prdata (to designate where SAM should send export the postings files to) 2. If you are using the SQL version of the SBT ACCPAC payroll system, you should put the following line in your n:\sam.ini file, where “companyname” is the name of the company in SBT. Ini_ACCPAC_Company,companyname 01/18/06 3:13 PM Page 242 of 448 Users Manual Reports Available for “Closed” Weeks Payroll Report This report shows the detail items paid to an employee. It can even be used to create detailed employee check stubs. This report shows only closed or verified visits and pay items. This report can be used to instruct your payroll vendor how to cut your payroll. Sales (Item) Report The sales (item) report has many functions. It can report sales and cost by date, payer, payer class, payer program, skill, bill unit (Medicare like and non-Medicare like visits), location, and referral source. It can be sorted multiple ways and can output its results to an Excel spreadsheet for further manipulation. It can be run by either date of service or the week ending date associated with an item when it was paid/billed. Combined Sales Report The combined sales report allows reporting across offices. It is normally run by accounting period or for certain weeks within an accounting period. It can be found with the other general ledger reports by choosing the Sales and Cost Entries option. See General Ledger Reporting. Balancing the Sales (Item) Report with the Combined Sales Report The sales (item) report will agree with the combined sales report if the sales (item) report is run in the following manner… 1. Use the same date range as the combined sales 2. Choose the Payroll Dates option 3. Choose the All Transactions option The all transactions option will cause the sales (item) report to include adjustments made during the date range, even if the adjustment was to visit that is not in the date range. Because the reports assimilate data in very different ways, it is not unusual that the dollar totals on the two reports will be off by a few pennies. Balancing Sales (Item) Report, Royalty Report, GL Sales Report, Worker’s Compensation Report The Sales (item) report and the GL Sales and Cost Entries Report will agree when they are both run for the same date range within an open period. The Sales (item) report options “All Transactions” and “Payroll Dates” must be selected. The total count, sales, and cost should match the GL Sales Report (the transportation component of sales and cost must be summed on the GL Sales Report). The Weekly Licensed/Unlicensed Sales report will match the sales of either of the sales (item) reports if the sales (item) reports are run for the specific week date range matching the Weekly Licensed/Unlicensed Sales report and any service items are subtracted from the sales (item) report. However, if the GL Sales and Weekly Licensed/Unlicensed reports are run for the last week in a period, they will not balance by the amount of item adjustments made after the last week ending date and before the end of the period. If the GL Sales report is run for the last week 01/18/06 3:13 PM Page 243 of 448 Users Manual of the period and the first week of the next period and added together, it will balance with the summed royalty reports run for these two week endings. The total pay on the Worker’s Compensation report will match the total cost on the GL Sales Report if the following things are subtracted from the GL Sales Report “Cost”: 1. Contractor Costs 2. Services and Supplies Costs 3. All pay item costs that have 0 hours (reimbursements, bonuses, show-ups, etc.) Balancing Receivables Against Sales The total receivables for an office plus the total cash applied for an office should equal the total sales billed. The aging report prints the total receivables for an office. The “Payment Cash Application Report” on the Payment Log report prints total cash applied. Totals sales billed are calculated by running the sales (item) report for the entire year, “billed items only”, and subtracting out any invoice adjustment made during the time period. Royalty Report We recommend that you use the Weekly Licensed/Unlicensed Sales report. This format will report licensed and unlicensed information by payer class. This information may then be used to report royalty information. It can be found with the other general ledger reports. See General Ledger Reporting The body of the report includes visit information for the Medicare Payer Class; this is information only and should not be used for reporting royalties. Medicare PPS RAP and EOE information is included at the bottom of the report and this is the information that should be reported for Medicare. 01/18/06 3:13 PM Page 244 of 448 Users Manual Billing Billing may be done in parallel with payroll. The only requirement is that the week is closed. The first step in billing is creating the invoices. Billing Diagram and Payroll Work Flow Diagram Visits Unassigned Required: Client, Payer, Skill, Date, Time Confirmed Required: Client, Payer, Skill, Date, Time, and Employee Verified Service Items Pay Items and Non-visit related Supplies Required: Client, Payer, Skill, Date, Time, Employee, Pay Rate, Bill Rate, Pay Unit, Bill Unit, Pay Type, and Employee Time slip Optional: Travel Pay/Bill and visit related Supplies Closed Required: Client, Payer, Skill, Date, Time, Employee, Pay Rate, Bill Rate, Pay Unit, Bill Unit, Pay Type, Employee Time slip, and Week ending date must be completed Payroll Billing Payroll Report Sales Report 01/18/06 3:13 PM Page 245 of 448 Users Manual Invoices & Claims Diagram AR Menu Calculate Overtime (Optional) Close week Calculate Overtime (Automatic) Create Invoices And Claims View an Invoice or Claim View Invoices & Claims Print / Transmit View all versions of Invoices Print an Invoice or Claim View Multiple Invoices or Claims Create a Claim Print Multiple Invoices or Claims Delete a Claim Create Multiple Claims Edit a Claim Transmit Multiple Claims Convert a HCFA 1500 to a UB92 Change a Claim Create Automatic Contractual Allowances 01/18/06 3:13 PM Page 246 of 448 Users Manual Invoice & Item Adjustments Diagram AR Menu Make Adjustments Note: Adjustment Report or Sales Report Item Adjustment 1. 2. 3. 4. Visit Pay Item Service Item Supply Item Adjust Invoice Detail Line Note: All invoice detail line adjustments except re-bills must be reviewed and accepted before they will take effect. If item is re-billed, you must create invoices for the new payer. Collection Log (Optional) Re-bill Invoice Detail Line Note: A new version will be created of the old invoice. Change Pay Rate Change Bill Rate Change Hours Change Travel Pay Change Employee 01/18/06 3:13 PM Invoice Adjustment The Whole Thing (the entire invoice) Adjust Whole Invoice Note: All invoice adjustments except re-bills must be reviewed and accepted before they will take effect. If an invoice is rebilled, you must create invoices for the new payer. Re-bill Whole Invoice Note: A new version will be created of the old invoice. Manual Contractual Allowances Shift Payment Responsibility Write-Off Invoice Page 247 of 448 Users Manual Entering Payments & Cash Applications Diagram AR Menu Enter/Apply Payments Note: Add Payment into SAM Find Invoices with balance due that belong to payment balance due Apply cash to invoices 01/18/06 3:13 PM Payment Report Invoice Aging Report Statements Invoice Register General Ledger Cash Report View or Find Payment in SAM Find Invoices with balance due that belong to payment balance due Account Log Manual account log entries and PPS Billing Information Manually log entries by the following attributes: Office Payer Class Payer Client Client Status PPS Billing Information Automatically entered when generating PPS Billing Apply cash to invoices Page 248 of 448 Users Manual Billing Medicare PPS Diagram Patient’s Plan of Care shell must be entered into SAM SOC Date, Cert Dates, Payer ”Medicare”, Primary Diagnosis and Physician Patient’s Oasis information must be entered and OASIS assessment must be associated with the patient’s Plan of Care AR Menu Create Invoices Note: Select PPS option PPS Log (Automatically generated) 1. View PPS log 2. Print PPS Log 3. View errors and missing information 4. View possible adjustment information for invoices that may need PEP, LUPA, or SCIC adjustments. 01/18/06 3:13 PM PPS RAP service item created on invoice and UB92 claim PPS EOE service item created on invoice and UB92 claim 1. Must have Plan of Care with payer of Medicare. 1. If the Medicare Plan of Care cert end date is included in the last closed week. 2. Must have OASIS associated with Plan of Care 2. If a patient is discharged from the agency in Care Manager or if the Payer is discharged from the Plan of Care. Page 249 of 448 Users Manual Medicare PPS Invoices & Claims Diagram AR Menu Collection Log (Optional) View an Invoice or Claim View Invoices & Claims Print / Transmit View all versions of Invoices Print an Invoice or Claim View Multiple Invoices or Claims Create a Claim Print Multiple Invoices or Claims Delete a Claim Create Multiple Claims Edit a Claim Transmit Multiple Claims Convert a HCFA Create Automatic Contractual Allowances 1500 to a UB92 Change a Claim Note: The initial RAP invoice and UB92 claim will only contain the amount for the initial RAP service item. When the EOE service item gets created all the related visits and supplies will appear on both the EOE invoice and UB92 claim. At this time you can then adjust the EOE if required by the patient’s status etc… You cannot do Contractual Allowances, Shift Payment Responsibilities, and Write-Offs to Medicare invoices. You must instead do an item adjustment to the RAP or EOE service items. 01/18/06 3:13 PM Page 250 of 448 Users Manual Medicare PPS Invoice & Item Adjustments Diagram AR Menu Make Adjustments Note: Adjustment Report or Sales Report Invoice Adjustment Item Adjustment 1. 2. 3. 4. Visit Pay Item Service Item, RAP, EOE, etc… Supply Item Adjust Invoice Detail Line Note: All invoice detail line adjustments except re-bills must be reviewed and accepted before they will take effect. If item is re-billed, you must create invoices for the new payer. Re-bill Invoice Detail Line Note: A new version will be created of the old invoice. Change Pay Rate Change Bill Rate Change Hours Change Travel Pay Change Employee 01/18/06 3:13 PM Collection Log (Optional) The Whole Thing Note: You cannot do Contractuals, Shift Payments, and Write-Offs for PPS Invoices! You must do an item adjustment on the RAP and EOE invoices. Adjust Whole Invoice Note: All invoice adjustments except re-bills must be reviewed and accepted before they will take effect. If an invoice is rebilled, you must create invoices for the new payer. Re-bill Whole Invoice Note: A new version will be created of the old invoice. Manual Contractual Allowances Shift Payment Responsibility Write-Off Invoice Page 251 of 448 Users Manual Entering Medicare PPS Payments & Cash Applications Diagram AR Menu Enter/Apply Payments Note: Add Payment Find Invoices with balance due that belong to payment Apply cash to invoices 01/18/06 3:13 PM Payment Report Invoice Aging Report Statements Invoice Register General Ledger Cash Report View or Find Payment Find Invoices with balance due that belong to payment Account Log Manual account log entries and PPS Billing Information Manually log entries by the following attributes: Office Payer Class Payer Client Client Status PPS Billing Information Automatically entered when generating PPS Billing Apply cash to invoices Page 252 of 448 Users Manual Creating Invoices/Claims In order to assure that critical processes are working with static data, the system will not allow this process if anyone is doing any of the following in the database: Close Week, Calculate Overtime, Create Invoices, Create Automatic Contractuals, Transmit Claims, Make Adjustments (Items, Invoices, Rebills, Reviewing and accepting, etc.), Payroll Export and Updating Visit Rates. The Create Invoices screen is used to create invoices and claims for closed visits. Invoices are created for the office you are currently logged into. Creating Invoices/Claims for Payers Billed Weekly By default, the Create Invoices screen is set to create invoices/claims for payers that are billed weekly, bi-weekly or monthly. It displays only those payers that do not have billing calendars. Invoices and claims (for the payers that require claims) are created at the same time. Perform the following steps to creating invoices and claims for payers billed weekly, biweekly or monthly: To access the Create Invoices screen, select menu option AR | Create Invoices. The Create Invoices screen will be displayed. Select the Billed Weekly, Bi-Weekly or Monthly option. Select the payer to invoice by clicking on the payer in the list. If you want to invoice just one client related to the selected payer, select the client from the Client combo box. Otherwise, just click the Create Invoices button. 01/18/06 3:13 PM Page 253 of 448 Users Manual Creating Invoices/Claims for Payers Billing per Calendar Period To invoice for payers that are not billed weekly, every two weeks, or monthly—click on the Billed per Calendar Period option on the Create Invoices screen. The payer list box changes to display only those payers that have billing calendars. Billing calendars for a payer are defined in using the Payers function. Invoices and claims (for the payers that require claims) are created at the same time. Perform the following steps to creating invoices and claims for payers billed per payer calendar: To access the Create Invoices screen, select menu option AR | Create Invoices. The Create Invoices screen will be displayed. Select the Billed per Calendar Period option. Select the payer and the period(s) you want to bill by clicking on the payer and calendar period in the list. If the period has been billed previously, the date will appear in the column next to the period dates. Click the Create Invoices button Closed items that have not been billed which have care dates between the selected billing dates will be billed. The invoice date will be the date of last week’s ending date. 01/18/06 3:13 PM Page 254 of 448 Users Manual Creating Invoices/Medicare PPS Before you generate PPS Invoices, make sure you have the following: 1. A Medicare or Episodic Insurance payer. 2. Branch ID entered for the office. 3. Clients associated with the Medicare or Episodic Insurance payer. 4. First skilled billable visit (on the cert begin date for 60% RAPs) 5. Plan of Care for the Medicare or Episodic Insurance payer (no overlapping plans of care for same payer.) 6. A Start of Care, Resumption of Care, Recert or follow-up OASIS Assessment for the patient. 7. The OASIS Assessment is associated with the appropriate Plan of Care. 8. The OASIS Assessment has a status of “locked” or “exported.” 9. You can click the “summary” button on the OASIS Assessment and get the PPS Episode amount with no assessment errors reported. 10. If the Medicare client is “Medicare Secondary Payer”, placing “MSP” in the client's “Bill Notes” field will cause all RAP and EOE claims to be created with occurrence code 1 = '05’, occurrence date 1 = RAP date, and the remark will read "Services provided by our agency are not associated with previous MSP." Perform the following steps to creating invoices and claims for Medicare PPS: To access the Create Invoices screen, select menu option AR | Create Invoices. The Create Invoices screen will be displayed. Select the PPS option. The payer list box will not list any payers. Optionally select a specific Client to create the invoices for. Click on the Create Invoices button. Invoices and claims (for the payers that require claims) are created at the same time. The PPS billing will step through each “Patient” type Client that has a Plan of Care defined for a Medicare or Episodic Insurance payer that has a Cert Begin date that is equal to or after 9/1/2000. A billing log report will be displayed on the screen. This log will report any errors or warnings regarding the creating of the PPS invoices. This report will sort entries based on the Plan of Care certification begin date. Some of the types of errors or warnings that will be reported include: Although the episode has ended, the week the episode ended within has not been closed so a PPS EOE service item and final claim will not yet be created. First skilled billable visit for Doe, John not found on xx/xx/xxxx. Initial RAP PPS bill will not be created. (where xx/xx/xxxx is the certification begin date for the Plan of Care.) Note: For a 60% RAP the first billable visit date must match the certification begin date for the Plan of Care or you will get a rejection. RAP created for patient name on date falls within previous episode for patient. PEP coding is required. 01/18/06 3:13 PM Page 255 of 448 Users Manual You do not need to adjust your claim. Medicare is aware of PEPs and will pay accordingly. You will only be paid “short” if a LUPA occurs or if another agency picks up your patient within your original cert period. After you receive your payment for the episode, you will need to adjust your EOE service item to match the remittance. Patient is qualified for OUTLIER payment. You do not need to adjust your claim. Medicare counts your visits on your EOE claim, and adjusts your payment accordingly if you have reached the threshold amount for an outlier. After you receive your payment for the episode, you will need to adjust your EOE service item to match the remittance. Patient’s original condition has changed (SCIC). The original HIPPS code is FIRST_HIPPS. As of SCIC_DATE, the new HIPPS code is HIPPS with a Case Mix Weight of CMW. A SCIC adjustment may be appropriate. Only adjust the claim if the SCIC will cause the episode amount to increase. Adjust the EOE claim before transmitting: Adjust the current EOE detail line (0023 line) to reflect the number of days (in the days/units field) appropriate (from the pps log) for the original HIPPS code. Add a new line as follows: description = “PPS EOE”, code = “0023”, HCPCS/rate = new HIPPS code (from pps log), date of service = date of SCIC (from pps log), days/units = days for new HIPPS code (from pps log). Skilled billable visit for patient not found on or after date. RAP PPS bill was created BUT be sure a billable visit was done. Adjust the claim to reflect the date of the skilled billable visit in locator 46 (serv date) to be equal to locator 6 (statement period covers dates) from date before you transmit the RAP claim. The episode patient for the date plan of care has only x visits and qualifies as a LUPA. The RAP payment for this episode was $. The EOE payment for this episode is $. The total episode payment should be REDUCED by $. Medicare will pay the episode at the LUPA rate. Adjust the RAP as usual to reflect the “take back.” Adjust the EOE, making the episode equal to the payment. In addition, the billing log will include information about the service items created and any adjustment advice. The billing log is saved as N:\pps.log and is appended to each time the Create Invoices option is processed. An additional billing log in Microsoft Excel format (n:\ppslog.xls) is also created which will contain all of the information last appended to the billing log (n:\pps.log) (only current information.) This will allow you to easily sort the file by name, messages, etc. Long messages such as “OUTLIERS” or “SCICS” are truncated to 254 characters in the .xls file. If the Plan of Care does not already have a PPS RAP service item, a PPS RAP service item will be created, also created are an invoice and a UB92 claim. 01/18/06 3:13 PM Page 256 of 448 Users Manual If the Plan of Care does already have a PPS RAP service item and the episode for that patient is over, and the End of Episode (EOE) date is on or before the last week ending date, a PPS EOE service item is created, also an invoice and UB92 claim. The PPS billing that the episode for the patient is over if the billing date is after the Plan of Care cert end date or patient discharge date. If Partial Episode Payment (PEP), a Low Utilization Payment Adjustment, a Significant Change in Condition or a Outlier is detected, PPS billing will issue adjustment advice on how to adjust the PPS service items so that the total amount billed for the episode equals the amount to be paid. The billing log will not report a possible PEP (Partial Episode Payment) where the patient was discharged with a reason of “Normal Discharge – Goals Achieved.” All adjustment advice is placed onto the PPS billing log and in the client’s account log. This is an example of the type of advice that will be added to the client’s account log. Note that the account log information will optionally print on the aging report. Please refer to section The Account Log for more information regarding this screen. You can use this checklist to trouble shoot any problems reported on the billing log: 1. What is the “payer set #” for the client/payer relationship to the Medicare payer? 2. Are all of the Medicare visits on that payer set? 3. Is the Plan of Care for that payer set? 4. Is the OASIS Assessment associated with the correct plan of care? 01/18/06 3:13 PM Page 257 of 448 Users Manual 5. Are all of the OASIS Assessments associated with the correct plan of care? 6. Do you have a first skilled billable visit: For a 60% RAP must be equal to the cert begin date For a 50% RAP must be within cert period 7. Have you discharged the patient from the payer prior to the first billable visit? If PPS billing has advised you to adjust your PPS payment, you will need to adjust the PPS service item(s). Please refer to section Item and Invoice Adjustments. The PPS service items that are created will have an invoice description that shows the percentage of the payment requested (on the RAP), the HHRG and HIPPS codes. PPS billing uses the grouper.dll provided by HCFA to derive these codes. Per the Medicare instructions: PPS billing will set the RAP service item date equal to the first billable visit’s date. The first billable visit for an initial RAP (60%) is a skilled visit with a status of “confirmed”, “verified” or “closed.” The first billable visit for a subsequent RAP (50%) is a skilled or unskilled visit with a status of “confirmed”, “verified” or “closed.” If no billable visit is found, the date will be set to the certification begin date. On the UB92 claim, locator 6 dates will be set equal to the RAP service item date. On subsequent RAP claims, locator 6 dates will reflect the certification begin date. On EOE claims, locator 6 dates will reflect the certification period. The date in locator 6 on the EOE UB92 must match the date in locator 6 of the RAP UB92. For this reason, it is important that the date of the first billable visit be known at the time the RAP is created. If this is not the case, BOTH the RAP and EOE claims must be edited and resubmitted. If you need to edit the claims, check with your clinical staff to make sure that the OASIS Assessment and scheduled visit information are correct. If not, they may need to make adjustment to the assessment(s) or schedule before you recreate the RAP/EOE claims. Note: You can set “Creating Medicare PPS Invoices” to only look for visits with a status of “closed” or “verified” (not include “confirmed” visits). To enable this feature, add the following line to your N:\sam.ini file: Ini_FBV_visit_status_list,T-V Also on the claims, the Patient status (locator 22) will be populated as follows: 01 = discharged to home or self-care. 30 = still patient or expected to return for outpatient services (if the cert end date is the end of episode.) Note: A transfer is a type of discharge. Do not use the transfer patient status as this means, “transfer within the organization” and not to another agency. 01/18/06 3:13 PM Page 258 of 448 Users Manual The Claim created for End of Episode (EOE) contains line items for visits and supplies closed at the time the episode is detected to be over. PPS billing will default to code 270 for Medicare Supplies. If those supplies are wound care, the claim must be edited and the code for the wound care supplies changed to 623. Please refer to section View Invoices/Claim on how to edit the UB92 claim. The Sales (item) report can be used to show PPS sales activity for Medicare. On the report selection screen, choose your Medicare payer, then un-select all but “service” type items. Enter the service dates that cover the episode dates for the sales you wish to see. The report will show all PPS service items and all adjustments to these service items. It will also indicate what type of adjustment was done (PEP, LUPA, SCIC, and Outlier). By exporting this to Excel, the adjustment description can be used to create sums for PEP, LUPA, SCIC, and Outlier adjustments. The General Ledger reports will show cost and sales from Medicare visits and supplies as well as the service items and adjustments that represent the RAP and EOE sales. Your Glaccount table should be updated to place the RAP and EOE service items into NEW accounts in your general ledger. We recommend when adding new Medicare Payers that you set their Billing Frequency equal to “Calendar” and enter only one billing period on the Calendar screen. You may then perform PPS billing at any time. PPS billing will automatically calculate the episode payment based on the OASIS Assessment. If the Medicare client is “Medicare Secondary Payer”, placing “MSP” in the client's “Bill Notes” field will cause all RAP and EOE claims to be created with occurrence code 1 = '05’, occurrence date 1 = RAP date, and the remark will read "Services provided by our agency are not associated with previous MSP." 01/18/06 3:13 PM Page 259 of 448 Users Manual Print/Transmit Screen The Print/Transmit screen is used for printing multiple invoices or claims, creating multiple claims for invoices requiring claims, and transmitting multiple claims electronically. To access the Print Transmit screen, select menu option AR | Print/Transmit. If you would like to view Invoices (not Claims), select the Invoices option. If you would like to view Self Pay Invoices check the Self Pay box. If you would like to view UB92 Claims, select the UB92 option. If you would like to view HCFA 1500 Claims, select the HCFA 1500 option. If you would like to see All Versions of the Form that you have selected, select the All Versions option. Making adjustments creates additional versions. Selecting Creation Dates (the date that the invoice was created) or Invoice Dates (the week ending date that the invoice was created) will control which items are displayed and what date type is displayed in the date column. 01/18/06 3:13 PM Page 260 of 448 Users Manual Printing Self-Pay Invoices The Print/Transmit screen may be used to print multiple self-pay invoices at once. When creating Self-Pay invoices, you now have the option to direct SAM to print “Terms: Due by xx/xx/xxxx.” The date printed will be the last day of service on the invoice + ## of days. If that date is before the current date, then the current date will be printed instead. To enable this feature, add the following line to your n:\sam.ini file: INI_Self_Pay_Invoice_Net_Days, ## (## being the number of days to be added to the last day of service on the invoice. Perform the following steps to print self-pay invoices: To access the Print Transmit screen, select menu option AR | Print/Transmit. The Print/Transmit screen will be displayed. In the FORMS section, select the Invoices option and check the Self Pay? check box. Click the Generate button. To select one invoice, click on the invoice in the list. To select multiple invoices, control-click on each invoice or shift-click on the first and last invoice. Click the Print button to print the invoice(s), or the Preview button to see the invoice(s) on the screen. Each time you print an invoice, the Print Options screen will appear. 01/18/06 3:13 PM Page 261 of 448 Users Manual Print vs. Do Not Print - This option is used in conjunction with the “Convert Draft copies to Final copies…” You may choose to actually print the invoice or not print the invoice while converting it to a final copy or not converting it to a final copy. Convert "Draft" copies to "Final" copies – This option, if selected, will convert all Draft copies of invoices to Final copies of invoices. Invoices are created in the draft state and are printed with the word “DRAFT” on them. Final copies do not print with the word “DRAFT”. Final copies may be mailed to the payers. Print "Clean" Invoices (no adjustment lines) - When invoices have items with adjustments, the adjusted items appear on the invoice as gray lines. If this option is selected, any invoice with adjustments will print only the final adjusted values with no gray items. Print "Client Copy" Invoices (excluding self-pays) - Sometimes a client wants a copy of an invoice (that was mailed to their insurance company) sent to them for their records. This option prints invoices with the client’s mailing address and the caption “Client Copy – For Your Records Only.” Print Invoices without Employee Names – This option, if selected, will print the invoices without the employee name on the work items. If you do not choose any of these options, invoices will print according to their current state. Click on the Continue button. The invoice will be printed. If you select multiple invoices and then click the Preview button, each invoice will be shown to you on the screen. When each invoice is displayed, you must select the Exit the next invoice. button to view Printing Invoices for Payers The Print/Transmit screen may be used to print multiple invoices for payers at once. 01/18/06 3:13 PM Page 262 of 448 Users Manual Perform the following steps to print payer invoices: To access the Print Transmit screen, select menu option AR | Print/Transmit. The Print/Transmit screen will be displayed. In the FORMS section, select the Invoices option. Make sure that the Self Pay? check box is NOT checked. In the STATE section: Select the All option to list all invoices regardless of the progress within the billing cycle Select the Ready option to list invoices that have satisfied their invoice requirements Select the Suspended option to list invoices that have NOT satisfied their invoice requirements (for instance a claim has not been created) Select the Draft option to list invoices that are in a draft state Select the Final option to list invoices that have been printed in the final state or have been transmitted Select the Not Transmitted option to list invoices associated with claims that have not been transmitted In the INVOICE DATES section, enter the week ending date range of the service covered by the invoices you want to print. You can leave the “To” date empty to retrieve all invoices later than the “From” date. To retrieve only invoices for a particular payer(s), click the Select button next to the Payer field. This will cause the Select Payer screen to be displayed. On this screen you can either type in some or all of the payer’s name and click the Generate button, or you can leave the name blank and click the Generate button to get a list of all payers. Or you may select by Payer Number if you know the payer number in the system. Select a payer by double clicking on the payer in the list OR by clicking on the payer and clicking on the Select button. To select multiple payers, control-click on each payer or shift-click on the first and last payer. To retrieve only invoices for a particular client, click the Select button next to the Client field. This will cause the Select Client screen to be displayed. On this screen you can either type in some or all of the client’s name and click the Generate button, or you can leave the name blank and click the Generate button to get a list of all clients. Or you may select by Client Number if you know the client number in the system. Select a client by double clicking on the client in the list OR by clicking on the client and clicking on the Select button. If you would like to select invoices for a particular Electronic Claims Submission type, select from ECS drop down the ECS style that applies. If the ECS style selected supports multiple payers in one transmission file, the Transmit button will be enabled. Click the Generate button. To select one invoice, click on the invoice in the list. To select multiple invoices, control-click on each invoice or shift-click on the first and last invoice. Click the Print button to print or the Preview button to see the invoices on the screen. Each time you print an invoice, the Print Options screen will appear. 01/18/06 3:13 PM Page 263 of 448 Users Manual Print vs. Do Not Print - This option is used in conjunction with the “Convert Draft copies to Final copies…” You may choose to actually print the invoice or not print the invoice while converting it to a final copy or not converting it to a final copy. Convert "Draft" copies to "Final" copies – This option, if selected, will convert all Draft copies of invoices to Final copies of invoices. Invoices are created in the draft state and are printed with the word “DRAFT” on them. Final copies do not print with the word “DRAFT”. Final copies may be mailed to the payers. If you convert the invoice from “Draft” to “Final” the claim is also converted to “Final.” Print "Clean" Invoices (no adjustment lines) - When invoices have items with adjustments, the adjusted items appear on the invoice as gray lines. If this option is selected, any invoice with adjustments will print only the final adjusted values with no gray items. Print "Client Copy" Invoices (excluding self-pays) - Sometimes a client wants a copy of an invoice (that was mailed to their insurance company) sent to them for their records. This option prints invoices with the client’s mailing address and the caption “Client Copy – For Your Records Only.” Print Invoices without Employee Names – This option, if selected, will print the invoices without the employee name on the work items. If you do not choose any of these options, invoices will print according to their current state. Click on the Continue button. The invoice will be printed. If you select multiple invoices and then select preview, each invoice will be shown to you on the screen. When each invoice is displayed, you must select the Exit invoice. 01/18/06 3:13 PM button to view the next Page 264 of 448 Users Manual Printing Claims for Payers The Print/Transmit screen may be used to print multiple claims at once. Selecting claims and clicking the Print button will print claims. Perform the following steps to print claims: To access the Print Transmit screen, select menu option AR | Print/Transmit. The Print/Transmit screen will be displayed. In the FORMS panel, select the UB-92 or HCFA 1500 option specifying the type of claim you wish to print/preview. Make sure that the Self Pay? check box is NOT checked. In the STATE section: Select the All option to list all claims regardless of the progress within the billing cycle Select the Ready option to list claims that have satisfied their invoice requirements Select the Suspended option to list claims that have NOT satisfied their invoice requirements (for instance a claim has not been created) Select the Draft option to list claims that are in a draft state Select the Final option to list claims that have been printed in the final state or have been transmitted Select the Not Transmitted option to list claims that have not been transmitted In the INVOICE DATES section, enter the week ending date range of the service covered by the claims you want to print. You can leave the To date empty to retrieve all claims later than the From date. To retrieve only claims for a particular payer(s), click the Select button next to the Payer field. This will cause the Select Payer screen to be displayed. On this screen you can either type in some or all of the payer’s name and click the Generate button, or you can leave the name blank and click the Generate button to get a list of all payers. Or you may select by Payer Number if you know the payer number in the system. Select a payer by double clicking on the payer in the list OR by clicking on the payer and clicking on the Select button. To select multiple payers, control-click on each payer or shift-click on the first and last payer. To retrieve only claims for a particular client, click the Select button next to the Client field. This will cause the Select Client screen to be displayed. On this screen you can either type in some or all of the client’s name and click the Generate button, or you can leave the name blank and click the Generate button to get a list of all clients. Or you may select by Client Number if you know the client number in the system. Select a client by double clicking on the client in the list OR by clicking on the client and clicking on the Select button. If you would like to select claims for a particular Electronic Claims Submission type, select from ECS drop down the ECS style that applies. If the ECS style selected supports multiple payers in one transmission file, the Transmit button will be enabled. Click the Generate button. To select one claim, click on the claim in the list. To select multiple claims, control-click on each claim or shift-click on the first and last claim. Click the Print button to print or the Preview button to see the claims on the screen. Each time you print a claim, the Print Options screen will appear. 01/18/06 3:13 PM Page 265 of 448 Users Manual Print vs. Do Not Print - This option is used in conjunction with the “Convert Draft copies to Final copies…” You may choose to actually print the claim or not print the claim while converting it to a final copy or not converting it to a final copy. Convert "Draft" copies to "Final" copies – This option, if selected, will convert all Draft copies of claims to Final copies of claims. Claims are created in the draft state and are printed with the word “DRAFT” on them. Final copies do not print with the word “DRAFT”. Final copies may be mailed to the payers. If you convert a claim from “Draft” to “Final”, the invoice is also converted to “Final.” Print Claim on Red form – You may print the claims on the standard Red form. This requires placing the Red form in your printer and then selecting the claim to print, and then selecting this option. If you have selected a “HCFA”, two additional options will be displayed 1. Place ICD9 codes in locator 24e - If you select this option, then the ICD9 codes will be printed in locator 24e. 2. Print Claim on 2003 Red Form - If your HCFA 1500 Red Form claim has a Revision at the bottom of the page for “10/2003” please use this option. If you do not choose any of these options, claims will print according to their current state. Click on the Continue button. The claim will be printed. You may print a UB92 claim to a printer using a non-postscript printer driver. This version of the UB92 claim will print “units” showing 2 decimal places. To enable this feature, add the following line to your n:\sam.ini file: INI_PCL_UB92_RED, yes 01/18/06 3:13 PM Page 266 of 448 Users Manual Creating Claims Manually for Multiple Invoices The Print/Transmit screen may be used to create claims for multiple invoices that require claims. Selecting invoices and clicking the Create Claim button will create claims for each selected invoice that does not already have a claim and requires one. Perform the following steps to manually create claims for invoices: To access the Print Transmit screen, select menu option AR | Print/Transmit. The Print/Transmit screen will be displayed. Follow the instructions in the Printing Invoices for Payers section except: Click the Create Claim button to create a claim for the selected invoices. This function allows you to create claims for multiple invoices at once. Note however that claims will only be created for invoices that require a claim but do not have one. The type of claim created is the type required by the invoice. 01/18/06 3:13 PM Page 267 of 448 Users Manual Transmitting Claims to Electronic Bulletin Board Systems In order to assure that critical processes are working with static data, the system will not allow this process if anyone is doing any of the following in the database: Close Week, Calculate Overtime, Create Invoices, Create Automatic Contractuals, Transmit Claims, Make Adjustments (Items, Invoices, Rebills, Reviewing and accepting, etc.), Payroll Export and Updating Visit Rates. The Print/Transmit screen may be used to transmit claims to an electronic bulletin board system (BBS). If a payer has an electronic claims submission interface, this option may be used to send electronic claims to the payer via a modem directly from this system. Perform the following steps to transmit claims: To access the Print Transmit screen, select menu option AR | Print/Transmit. The Print/Transmit screen will be displayed. If you would like to submit claims for a specific ECS style that will support the submission of multiple payers on one transmission file, select the ECS style from the ESC drop down. If the ECS style supports the submission of multiple payers on one transmission file, the Transmit button will be enabled. Follow the instructions in the Printing Claims for Payers section except (it is important to select a payer so transmitting will know what format to use for the file): After generating the list of claims click the Transmit button. A Save As screen appears which shows you the name of the transmission file and its default directory that is to be created. The default directory is “N:\Claims Transmission”. Click the Save button to create the transmission file. This is the file you will actually transmit to the electronic claims bulletin board; therefore it is important to note its name. Up to two files may actually be created. The first file is the actual claim transmission file that has a filename extension of ECS. The second file is a log file that summarizes the transmission and has a filename extension of LOG. After the claim file is created, HyperTerm may be invoked to allow you to connect to the electronic claims bulletin board. See section on “Sending an ECS File via HyperTerm.” If it is not invoked you will be responsible to submit the file to the BBS. If there are missing or invalid items on any claim, you will be given a message and the claim will not be included in the transmission file. Sending an ECS File via HyperTerm A HyperTerm session is started from either the Print/Transmit screen (refer to Transmitting Claims to Payers section) or possibly an icon available to you at your site. The following steps describe an example HyperTerm session to North Carolina Medicaid Bulletin Board: 01/18/06 3:13 PM Page 268 of 448 Users Manual 1. After HyperTerm starts, note the session name at the top window label. It should read North Carolina Medicaid - HyperTerminal. If it is correct, continue; otherwise, click the Cancel button on the Connect window, exit out of HyperTerm, and call your support personnel. 2. If you can print from your workstation, and you would like to print a copy of you HyperTerm session to your default printer, continue with step 3; otherwise go to step 6. 3. Click the Cancel button on the Connect window. 4. Select Transfer from the HyperTerm menu, and then click Capture to Printer. 5. Select Call from the HyperTerm menu, and then click Connect. 6. Click the Dial button on the Connect window. At this time, the modem on your workstation will dial into the bulletin board. If the modem does not connect properly, click the Cancel button and go back to step 5 to try again. 7. If the modem connects correctly, you will see the bulletin board banner. Type in your ECS Authorization Number. 8. Type in your password. 9. Type the “S” command (Send Transactions) to place the bulletin board in a mode to receive your ECS file. 10. When the bulletin board is ready to receive your file, select Transfer on the HyperTerm menu, and then click Send File… 11. The Send File window now appears. Click the Browse button on the Send File window and locate the file to transmit. The file should be in the default directory “N:\Claims Transmission”. 12. After the file is located, click the Send button. 13. A transmission status window now appears during the transmission until it completes. 14. After the file is transmitted, type the “G” command (Goodbye) to log off the bulletin board. 15. Type “Y” to confirm that you want to disconnect. 16. Exit out of HyperTerm. 17. If you selected Capture to Printer in step 4 above, a printout of the session is sent to your printer. 01/18/06 3:13 PM Page 269 of 448 Users Manual Invoice Register Report – Tracking Which Bills Were Sent (Finalized) When an invoice is printed or transmitted, billing marks it as finalized. This is an agency’s way of knowing which invoices have been actually billed. The invoice register report is not only for generating lists of invoices but can be used to generate lists of invoice that have not been billed. This is a powerful report for selecting, sorting and reporting your invoices. You may also report invoices that should have claims created, but for some reason, the claim is missing. If you select to “Include Skill Totals Report”, then the detail of the invoices will be sorted by skill. 01/18/06 3:13 PM Page 270 of 448 Users Manual View Invoices/Claims The View Invoices/Claims screen lets you view the details of an invoice, print or preview an invoice; and create, view, edit, print or preview a claim associated with the invoice. Viewing or Printing an Invoice To access the View Invoices and Claims screen, select menu option AR | View Invoices/Claims. The Invoice Details screen will be displayed. Click the Find button. Enter From and To dates of the invoice associated with the claim you want to edit. Either select a payer or leave the payer field blank. See the section Printing Invoices for Payers for instruction for selecting a payer. Either select a client or leave the client field blank. See the section Printing Invoices for Payers for instruction for selecting a client. Select an invoice by double clicking on the invoice in the list OR by clicking on the invoice and then clicking on the Select button. The Adjustment Status column will display “DC” for the invoice if it has had “detail item adjustments completed” to it or “IC” if it has had “invoice adjustments completed”. This means that it is not the current invoice; there is a newer invoice that is a clean correct version. This column will display “DP” for the invoice if it has “detail item adjustment pending” or “IP” if it has an “invoice adjustment pending”. This means that adjustments have been made for this invoice, but they have not been accepted. . 01/18/06 3:13 PM Page 271 of 448 Users Manual The Invoice Details screen will be displayed for the selected invoice. To preview the actual invoice, click the Preview button. To print the actual invoice, click the Print button. To see what cash had been applied to this invoice, press View Cash Applied button. DSO Ignore – if an invoice has this option marked, the invoice will be ignored in the calculations for DSO (days sales outstanding) and BPSO (best possible days sales outstanding) on the Invoice Aging report. The User logged into SAM must have System Administrator Privileges to set this option. Viewing, Editing, Creating, or Deleting a Claim for an Invoice While viewing an invoice on the Invoice Details screen, click the Edit Claim button. In order to assure that critical processes are working with static data, the system will not allow this process if anyone is doing any of the following in the database: Close Week, Calculate Overtime, Create Invoices, Create Automatic Contractuals, Transmit Claims, Make Adjustments (Items, Invoices, Rebills, Reviewing and accepting, etc.), Payroll Export and Updating Visit Rates. 01/18/06 3:13 PM Page 272 of 448 Users Manual If a claim does not exist for the displayed invoice, the Claim Options screen is displayed. This screen notifies you that no claim exists for this invoice and tells you if a claim is required for the invoice, and if so, which kind: UB92 or HCFA1500. Even though an invoice may require one type you may choose to create either type, or cancel. Choose the UB92 button to create a UB92 claim. Choose the HCFA1500 button to create a HCFA1500 claim. Choose the Cancel button to cancel the claim creation If a claim does exist, based on the claim type, either the Edit UB92 Claim or the Edit HCFA1500 Claim screen set will be displayed. Make the necessary edits to the claim and click the Save button. 01/18/06 3:13 PM Page 273 of 448 Users Manual To preview the claim, click the Preview button. To print the claim, click the Print button. To delete the claim, click the Delete button. If you would like to change the claim type, for instance, you no longer want a HCFA 1500 for this invoice; you would instead like a UB92 claim. Simply delete the HCFA 1500 claim, then return to the Invoice Details screen, click the Edit Claim button and choose which claim you would like created (HCFA 1500 or UB92.) Even though this screen may be used to add/change data on a claim, it is NOT recommended that you do so—unless it is your last resort or you are editing a Medicare PPS claim. The information that appears on a claim is generally stored somewhere else in this system. If you can find the source of the data that appears on your claim, fix the data there, instead of on the actual claim. If you fix the data at its source, you will not have to fix each subsequent claim. It is recommended that you use the “Claim Mapping” tables at the end of this document to pinpoint where claim data can be found in this system. After correcting the data at its source, you should delete the erroneous claim, and then recreate it using the steps described above. 01/18/06 3:13 PM Page 274 of 448 Users Manual Medicare PPS Claims: The Claim created for End of Episode (EOE) contains line items for visits and supplies closed at the time the episode is detected to be over. PPS billing will default to code 270 for Medicare Supplies. If those supplies are wound care, the claim must be edited and the code for the wound care supplies changed to 623. 01/18/06 3:13 PM Page 275 of 448 Users Manual Payments and Cash Application Payments are entries made to represent checks or remittance advices received from payers. Cash application is the term used to describe when cash from a payment is applied to an invoice. The Payment List screen and Edit Payment screen are displayed below. You may select a payment to work with from this screen or click on the “Apply Cash” button to apply cash from the payment to the invoice. The column labeled “C” will have display a “*” if the payment occurs in a Closed Period. Entering Multiple Payments Make sure you are logged into the office to which the payments are to be credited on the bank reconciliation. When payments are reported by office, the office you are logged into at the time the payment is entered is associated with the payment. If you enter a payment from a national payer that pays for invoices in several offices, it is a good idea to be logged into the headquarters office so you can find the payment later. To access the Edit Payment screen, select menu option AR | Enter/Apply Payments. The Edit Payment screen will be displayed. 01/18/06 3:13 PM Page 276 of 448 Users Manual Click the New button to create a new payment. Select the payer who sent the payment (this may be either a payer or a client) by clicking the Identify Payer button. The Identify Payer screen will be displayed. 01/18/06 3:13 PM Page 277 of 448 Users Manual On the Identify Payer screen: You can either type in some or all of the payer’s name in the Name Starts With field or you can leave the field blank. (In the case of a client, this is the client’s last name.) Check the Self Pay? check box if you would like to generate a list of clients to choose from. (You may also specify other information about the payers that you would like in the list.) Click the Generate button to generate the list of payers. Select a payer by double clicking on the payer in the list OR by clicking on the payer and then clicking on the Select button. The Edit Payment screen will be redisplayed with the Payer and Payer Office fields filled in with your selection. Enter the date of the payment in the Payment Date field (the default is today’s date). Enter the check or remittance advice number in the Check/RA No field. Enter the amount of the check or remittance advice in the Check Amount field. The Adjusted Check Amount, Unallocated Amount, and Payment Balance fields will be filled in for you with the Check Amount value entered. Enter an optional Comment. Click the Save button. The Payment ID, Payment Office, and Status fields will be filled in for the payment. Enter the next payment by clicking the New When you have entered the last payment, click Exit Clicking the Update Cash Date button will change the date on all cash applications for this payment to be equal to the payment date. button and repeating the steps above. button. Entering a Payment for One Invoice and Applying Cash Make sure you are logged into the office to which the payment is to be credited on the bank reconciliation. When payments are reported by office the office you are logged into at the time the payment is entered is associated with the payment. If you enter a payment from a national payer that pays for invoices in several offices it is a good idea to be logged into the headquarters office so you can find the payment later. To access the Edit Payment screen, select menu option AR | Enter/Apply Payments. The Edit Payment screen will be displayed. Click the New button to create a new payment. Select the payer who sent the payment (this may be either a payer or a client) by clicking the Identify Payer button. The Identify Payer screen will be displayed. On the Identify Payer screen: You can either type in some or all of the payer’s name in the Name Starts With field or you can leave the field blank. (In the case of a client, this is the client’s last name.) 01/18/06 3:13 PM Page 278 of 448 Users Manual Check the Self Pay? check box if you would like to generate a list of clients to choose from. (You may also specify other information about the payers that you would like in the list Click the Generate button to generate the list of payers. Select a payer by double clicking on the payer in the list OR by clicking on the payer and then clicking on the Select button. The Edit Payment screen will be redisplayed with the Payer and Payer Office fields filled in with your selection. Enter the date of the payment in the Payment Date field (the default is today’s date). Enter the check or remittance advice number in the Check/RA No field. Enter the amount of the check or remittance advice in the Check Amount field. Enter the Deposit No of the check if applicable. The Adjusted Check Amount, Unallocated Amount, and Payment Balance fields will be filled in for you with the Check Amount value entered. Click the Save button. The Payment ID, Payment Office, and Status fields will be filled in for the payment. Click the Apply Cash button to display the Apply Cash to Invoice screen. Click the Add button on the Apply Cash to Invoice screen. On this screen you can sort the invoices listed by clicking on the “Invoice No” or “Client Name” buttons. The column labeled “C” will have display a “*” if the cash application occurs in a Closed Period. 01/18/06 3:13 PM Page 279 of 448 Users Manual Enter the invoice number of the invoice you would like to apply cash to in the Invoice No field; or you may select the invoice number by clicking on the Invoice List or Identify Invoice buttons. The Invoice List button displays a screen from which you can select the invoice from a generated list of invoices. (You may also select multiple invoices at one time from this list.) 01/18/06 3:13 PM Page 280 of 448 Users Manual The Identify Invoice button displays a screen from which you can select the invoice once you have seen the details of the invoice. The Cash Applied field will be filled in with the maximum amount that can be applied to the invoice that is available from the payment. Press the tab key to accept the default value. 01/18/06 3:13 PM Page 281 of 448 Users Manual The Date field will be filled in with the Payment Date. Press the tab key to accept the default date. The Comment field may be filled in with any information desired. This field is optional. Information in this field will show on the aging report if you select to include payment information. If an invoice is short-paid and you want to record what wasn’t paid and why, use this field. Click the Update List button to see the new cash application item displayed in the list. Click the Save button to save the changes. Click the Exit button. If the invoice number you enter in the Invoice No field on the Apply Cash to Invoice screen does not exist, you will be given a message that the invoice number is invalid. Entering a Payment for Multiple Invoices and Applying Cash Make sure you are logged into the office to which the payment is to be credited on the bank reconciliation. When payments are reported on by office, the office you are logged into at the time the payment is entered is associated with the payment. If you enter a payment from a national payer that pays for invoices in several offices, it is a good idea to be logged into the headquarters office so you can find the payment later. To access the Edit Payment screen, select menu option AR | Enter/Apply Payments. The Edit Payment screen will be displayed. 01/18/06 3:13 PM Page 282 of 448 Users Manual Click the New button to create a new payment. Select the payer who sent the payment (this may be either a payer or a client) by clicking the Identify Payer button. The Identify Payer screen will be displayed. On the Identify Payer screen: You can either type in some or all of the payer’s name in the Name Starts With field or you can leave the field blank. (In the case of a client, this is the client’s last name.) Check the Self Pay? check box if you would like to generate a list of clients to choose from. (You may also specify other information about the payers that you would like in the list Click the Generate button to generate the list of payers. Select a payer by double clicking on the payer in the list OR by clicking on the payer and then clicking on the Select button. The Edit Payment screen will be redisplayed with the Payer and Payer Office fields filled in with your selection. Enter the date of the payment in the Payment Date field (the default is today’s date). Enter the check or remittance advice number in the Check/RA No field. Enter the amount of the check or remittance advice in the Check Amount field. The Adjusted Check Amount, Unallocated Amount, and Payment Balance fields will be filled in for you with the Check Amount value entered. Click the Save button. The Payment ID, Payment Office, and Status fields will be filled in for the payment. Click the Apply Cash button to display the Apply Cash to Invoice screen. Click the Add button on the Apply Cash to Invoice screen. Based on information provided on a check or remittance advice, you can select invoices to apply cash to by using the Invoice List button or the Identify Invoices button. If the remittance advice contains any of the following fields, click on the Invoice List button (invoice number, client name, invoice date, service dates, or invoice amount) On the Apply Cash to Invoice Selection List screen, click either the Invoice Dates or Service Dates option based on the information on the remittance advice. Enter Start and End dates. If the remittance is for just one client, select the client. Click the Generate button. Select the invoice you want to apply cash to. To select multiple invoices, control-click on each invoice or shift-click on the first and last invoice. Click the Select button. The Apply Cash to Invoice screen will be redisplayed. Review all of the cash application items now displayed in the list for the selected invoices for correctness. The Cash Applied column will be filled in with the maximum amount that can be applied to each invoice that is available from the payment. You may change the Cash Applied amount on any of these invoices at this time. Click the Save button to save the information in the list once it is correct. The Unallocated Amount for the payment is automatically adjusted. 01/18/06 3:13 PM Page 283 of 448 Users Manual Click the Exit button. If the remittance advice contains very little information and you need very detailed information to determine which invoice the remittance applies to, click on the Identify Invoices button. On the Invoice Details screen, click the Find button. Enter Start and End dates. If the remittance is for just one client, select the client. Click the Generate button. Select the invoice you want may want to apply cash to. Click the Select button. On the Invoice Details screen, look at the invoice line items to determine if this is the correct invoice to apply cash to. If this is the correct invoice, click the Apply Cash button. The Apply Cash to Invoice screen will be redisplayed. Review the new cash application item now displayed in the list for the selected invoice for correctness. The Cash Applied column will be filled in with the maximum amount that can be applied to the invoice that is available from the payment. You may change the Cash Applied amount on the invoice at this time. Click the Save button to apply cash to the selected invoice. The Unallocated Amount for the payment is automatically adjusted. Repeat as necessary. Click the Save button. Click the Exit button. Payment and Cash Applications and Adjustments for Medicare PPS 1. When you get a remittance, add that as a payment in SAM and record the “EFT #”, “Check #” or “Remit #” as the payment number. 2. If there is a payment for a RAP, apply the cash to the RAP invoice. 3. If there is a recoup for a RAP, apply a negative cash application to the RAP invoice AND adjust the RAP service item to 0. 4. If there is a payment for an EOE, (at this point it should be payment for the entire episode) 1) apply the cash to the EOE invoice and then 2) adjust the EOE service item to match the amount paid for the EOE. If you follow these steps for Medicare remittance, you should be able to balance to each of your remittance. 01/18/06 3:13 PM Page 284 of 448 Users Manual Payment Log and Bank Reconciliation To access the Payment Log screen, select menu option Reports. The Select Report screen will be displayed. Click the Accounts Receivable option. Select the Payment Log report and click the Proceed button. The Payment Log screen will be displayed. Enter the From and To payment dates (this is the Payment Date entered when the payments were created; or leave the fields blank for all payments regardless of date.) Select the appropriate sort criteria. Select the Office for the payment (this is the office logged into when the payments were created; or select “ALL” for all offices.) Make sure the Payment Log print option is selected. Click the Generate button. This report can be used to reconcile the deposits made to your bank account. The Payment Log report shows only the payments credited to the office for which the report is selected. If you enter a payment from a national payer who pays for invoices in several offices, it is a good idea to be logged into the headquarters office so you can find the payment later. But don’t despair. On the payment screen, you can ask to see payments for all offices. That way, you can find your payment by payer name and payment date. 01/18/06 3:13 PM Page 285 of 448 Users Manual The Payment Log may also be generated for a specific payer: Select “ALL” in the Office combo box. Click the Select Self Pay button if the payer you wish to select is a client. The Select Client screen will be displayed. Generate the list and select the desired client. The client’s name will appear in the Payer field on the Payment Log screen. Click the Select Payer button if the payer you wish to select is a payer. The Select Payer screen will be displayed. Generate the list and select the desired payer. To select multiple contiguous payers, click on the first payer and then while holding down the Shift key, click on the last payer then click the OK button. To select multiple non-contiguous payers, hold down the Ctrl key and click on each payer, then click the OK button. The payer’s name will appear in the Payer field on the Payment Log screen. If you wish to create the Payment Log for payments only associated with a specific office for the selected payer, change the Office combo box to display the office name. Make sure the Payment Log print option is selected. Click the Generate button. Payment Cash Application Report Option on Payment Log screen A Payment Cash Application Report may be generated using the Payment Log screen. This option produces a report of cash applied for payments depending on the selection criteria. On the Payment Log screen: Enter the From and To cash application dates (this is the Date entered when the cash application record was created; or leave the fields blank for all cash application records regardless of date.) Select the appropriate sort criteria. Note: when the Payment Cash Application Report print option is selected, the sort criteria “Invoice No” becomes enabled. This sort is useful when trying to identify what cash has been applied to a specific invoice. Select the Office for the cash application records (this is the office associated with the invoices the cash was applied to; or select “ALL” for all offices.) Make sure the Payment Cash Application Report print option is selected. Click the Generate button. The Payment Cash Application Report may also be generated for a specific payer as described above for the Payment Log. Payment Adjustments Report Option on Payment Log screen A Payment Adjustments Report may be generated using the Payment Log screen. This option produces a report of payment adjustments and refunds for payments depending on the selection criteria. 01/18/06 3:13 PM Page 286 of 448 Users Manual On the Payment Log screen: Enter the From and To adjustment dates (this is the Date entered when the adjustment record was created; or leave the fields blank for all adjustment records regardless of date.) Select the appropriate sort criteria. Select the Office for the adjustment records ((this is the office logged into when the payments were created; or select “ALL” for all offices.) Make sure the Payment Adjustments Report print option is selected. Click the Generate button. The Payment Adjustments Report may also be generated for a specific payer as described above for the Payment Log. Logging Collection Comments (at the Invoice Level) To access the Edit Collection Log screen, select menu option AR | View Invoices and Claims. The Invoice Details screen will be displayed. On the Invoice Details screen, click the Find button. Enter Start and End dates. Either select a payer or leave the payer field blank. See the Printing Invoices for Payers section for instruction for selecting a payer. Either select a client or leave the client field blank. See the Printing Invoices for Payers section for instruction for selecting a client. Click the Generate button. Select the invoice on which you want to place the comment. Click the Collection Log button. 01/18/06 3:13 PM Page 287 of 448 Users Manual The last collection log that was entered for the invoice will be displayed. Add a Collection Log To add a new collection log, click the New button. You can right click on the white space to enlarge the memo entry area as shown above. Click inside the large white text window and type in the comment. This window works like any standard word processor. Click the Save button. Each collection log is saved as a unique log entry along with the creation date and time. These logs may optionally be printed on the Invoice Aging report. Modify a Collection Log To modify a collection log, click the Find button. A Log List screen will be displayed of all of the collection logs for the current invoice. Click on the collection log you wish to modify and click the Select button. You can right click on the white space to enlarge the memo entry area as shown above. Click inside the large white text window and type in the comment. This window works like any standard word processor. Click the Save button. Each collection log is saved as a unique log entry along with the creation date and time. These logs may optionally be printed on the Invoice Aging report. 01/18/06 3:13 PM Page 288 of 448 Users Manual Delete a Collection Log To delete a collection log, click the Find button. A Log List screen will be displayed of all of the collection logs for the current invoice. Click on the collection log you wish to delete and click the Select button. Once the collection log you wish to delete is displayed, click the Delete answer Yes to the prompt “Are you sure you want to delete this log?” button and Logging Collection Comments (at the Account Level) See the Account Log screen Apply Cash via 835 This option will read from electronic R&S reports and EOB's from the Texas Department of Human Service to automatically create the payment cash application records in this system. To access the 835 Automatic Cash Application screen, select menu option AR | Apply Cash via 835. The Open screen will be displayed. This screen will default to look for the 835 files in the N:\Claims Transmission folder. If the files exist in a different folder, use the “Look In” drop down to select the correct folder. Then click on the filename of the 835 that you would like to import and press the OK button. The Save As screen will be displayed. 01/18/06 3:13 PM Page 289 of 448 Users Manual This screen will default to save the results file in the N:\Claims Transmission folder. If you would like to save the file in a different folder, use the “Look In” drop down to select the correct folder. Then enter the filename you would like for the result file or leave the default name, and press the OK button. The import will process the 835 file and display the results of the process. 01/18/06 3:13 PM Page 290 of 448 Users Manual In the example above, the import has created 4 new payments and 1029 cash applications totaling $131,043.66. The payment and cash application dates will be set to the date this process was run. The results file will contain detailed information on what payments and cash application were created in this system. Both the payment and cash applications will have the comment “Auto Added.“ 01/18/06 3:13 PM Page 291 of 448 Users Manual 01/18/06 3:13 PM Page 292 of 448 Users Manual Payment Adjustments Once a payment is closed by the closed period function, it cannot be changed. However, closed and non-closed payments may be adjusted. There are two types of adjustment – adjustment of payment check amounts and refunds. If an error was made when the payment was originally entered, the check amount of the payment can be changed using an adjustment. A refund adjustment is entered when part of the original payment is to be refunded to the payer. The Adjust Payment function is available via the Adjust button the Edit Payment screen. 01/18/06 3:13 PM Page 293 of 448 Users Manual Entering a Fix to a Payment Check Amount If the check amount of a payment was entered in error, it can be “fixed” after the payment is closed by creating a payment adjustment of the type “Adjustment” and entering the correct check amount. On the Edit Payment screen, display the payment whose check amount is to be adjusted. Click the Adjust button on the Edit Payment screen to display the Apply Payment screen. Click the Add button on the Adjust Payment screen. Select the Type of “Adjustment”. Enter the correct check amount for the payment in the Adjusted Check Amount field. (Note: The adjusted check amount cannot be less than the amount already allocated from the payment.) Enter the date of the adjustment in the Date field (the default is today’s date). Enter a comment in the Comment field if desired (this comment appears on the Payment Adjustment Report). Click the Update List button to see the new adjustment item displayed in the list. Click the Save button to save the changes. Click the Exit button. 01/18/06 3:13 PM Page 294 of 448 Users Manual Entering a Refund of a Payment If all or a portion of a payment is to be refunded to a payer after a payment is closed, the refund amount can be entered by creating a payment adjustment of the type “Refund”. In this way, the total payment balance from the payer can be maintained. On the Edit Payment screen, display the payment whose portion of is to be refunded. Click the Adjust button on the Edit Payment screen to display the Apply Payment screen. Click the Add button on the Adjust Payment screen. Select the Type of “Refund”. Check the AP Check Written checkbox if a refund check has been written from Accounts Payable. Enter the amount of the payment to be refunded the Refund Amount field. (Note: The refund amount cannot be greater than the unallocated amount of the payment.) Enter the date of the adjustment in the Date field (the default is today’s date). Enter a comment in the Comment field if desired (this comment appears on the Payment Adjustments Report). Click the Update List button to see the new adjustment item displayed in the list. Click the Save button to save the changes. Click the Exit button. 01/18/06 3:13 PM Page 295 of 448 Users Manual Determining Which Refunds Have Had AP Checks Written When a check is written to refund a payment to a payer from the accounts payable system, you can track this by checking the “AP Check Written” checkbox on the Adjust Payment screen for the associated refund payment adjustment. This information will be included on the Payment Adjustments Report. In this way, you can track what refunds entered during a period of time have been processed via accounts payable. Recouping a Payment When a payer is over-billed and sends a remittance advice with instructions of how to apply the overage to some other invoice on its account, the process is called a recoup. Recouping is done in two steps: first cash is un-applied from the invoice that was incorrectly billed to the payer. Then, the new unallocated cash is applied according to the directions on the remittance advice. The side effect of a recoup is that there is now an invoice that does not have cash applied to it. This invoice must be re-billed to the appropriate payer. Tracking Receivables There are many tools specifically designed to make tracking an agency’s receivables a simple, straightforward process. The invoice aging report, the account log screen, and the statement report all work together to provide an agency with a clear picture, both at the detail and summary level, of what is owed and what has been paid to an agency. Invoice Aging Report Invoice Aging To access the Invoice Aging Report screen, select menu option Reports. The Select Report screen will be displayed. 01/18/06 3:13 PM Page 296 of 448 Users Manual Click the Application Group Billing. Click the Accounts Receivable option. Click the Invoice Aging Report. Click the Proceed button. Select all or one office, all or one payer class, all or one payer, all or one client. Select whether you want invoices with balances only to be the only invoices printed. If more than the opened invoices are to be reported, you must specify the oldest invoice you want on the report. Select whether you want the invoices to be aged based on the date that the invoice was created (Age Creation Date) or the end of the billing period’s week for the invoice (Age Invoice Date.) Select the appropriate PRINT option – collection logs are kept at the invoice level and account logs on maintained on client, payer, or client-payer basis. Input a date that you want to “Show Logs From.” You may also optionally include adjustments, the original amount & service, creation and last transmitted dates. Select the appropriate SORT BY option. Select the day you want to age by – this default to today. Enter the number of days in each aging bucket if the default values are not appropriate. The Invoice Aging report by payer will report a Best Possible Days Sales Outstanding value in addition to the Days Sales Outstanding (DSO) value. Enter a date range used to calculate the “period days”. This date range will default to the last 13 weeks ending with the last week ending date. You may optionally change this date range. The following is the calculation for both values: (Days Sales Outstanding) DSO = Total AR / (period sales / period days) (Best Possible Day Outstanding) BPDSO = Period AR / (period sales / period days) DSO Ignore – if an invoice has this option marked, the invoice will be ignored in the calculations for DSO (days sales outstanding) and BPSO (best possible days sales outstanding) on the Invoice Aging report. You may also optionally filter to only those clients or payers based on their balance. Click the Generate button. In order to choose a client, one office must be selected. If a payer class is selected, you may not select a payer or client. If you choose all offices, only the national payers are selectable. SORT BY Office, Class, Payer, and Client will give you a payer based aging. SORT BY Office, Client, and Payer will give you a client based aging. Generating Statements Statement can be generated for a client showing all invoices, adjustments, and payments for the client, regardless of payer. Statements can be generated for a payer showing all invoices, adjustments, and payments for the payer. 01/18/06 3:13 PM Page 297 of 448 Users Manual Statements To access the Statements Report screen, select menu option Reports. The Select Report screen will be displayed. Click the Application Group Billing. Click the Accounts Receivable option. Click the Statements report name. Click the Proceed button. To print statements for self-pay clients, select ALL clients and Self-Pay payer. To print a statement for a payer, select the payer. To print statements for all payers, select ALL payers. Click the Generate button. The Account Log Screen The account log screen gives an on-line look at all accounts across all offices for an agency. It is an instant reference and documentation tool for users performing collection duties. From the detail screen, a statement for the account being viewed can be printed in the standard statement format. Note that Creating Medicare PPS invoices will place PPS information in the account log comment field for each patient. To access the Account Log screen, select menu option AR | Account Log. 01/18/06 3:13 PM Page 298 of 448 Users Manual To select the appropriate account log, you may choose by any combination of office, payer, pay class, client or client status. Click the Generate button. Each account name is listed based on how you defined the attributes at the top of the screen. Then each sub-account name is listed followed by the office name. Select the account/subaccount that you wish to add, modify or delete an account log for. 01/18/06 3:13 PM Page 299 of 448 Users Manual Add a Account Log To add a new account log, click the New button. You can right click on the white space to enlarge the memo entry area as shown above. Click inside the large white text window and type in the comment. This window works like any standard word processor. Click the Save button. Each account log is saved as a unique log entry along with the creation date and time. These logs may optionally be printed on the Invoice Aging report. Modify a Account Log To modify an account log, click the Find button. A screen will be displayed of all of the account logs for the current account. Click on the account log you wish to modify and click the Select button. You can right click on the white space to enlarge the memo entry area as shown above. Click inside the large white text window and type in the comment. This window works like any standard word processor. Click the Save button. Each account log is saved as a unique log entry along with the creation date and time. These logs may optionally be printed on the Invoice Aging report. Delete a Account Log To delete an account log, click the Find button. A screen will be displayed of all of the account logs for the current account. Click on the account log you wish to delete and click the Select button. Once the account log you wish to delete is displayed, click the Delete Yes to the prompt “Are you sure you want to delete this log?” 01/18/06 3:13 PM button and answer Page 300 of 448 Users Manual Item and Invoice Adjustments Individual adjustments can be made to items on an invoice—such as, visits, pay items, services, and supplies. Adjustments can be made to entire invoices to change the outstanding amounts due to contractual allowances, write-offs, payment shifts, accrued interest or other. Item Adjustments In order to assure that critical processes are working with static data, the system will not allow this process if anyone is doing any of the following in the database: Close Week, Calculate Overtime, Create Invoices, Create Automatic Contractuals, Transmit Claims, Make Adjustments (Items, Invoices, Rebills, Reviewing and accepting, etc.), Payroll Export and Updating Visit Rates. The Item List screen is used to display items that are closed and available for adjustments. A user generates a list of items based on selection criteria, and then selects the items to be adjusted. To access the Item List screen, select menu option AR | Make Adjustments | Items. The Item List screen will be displayed. Enter the Start date for the date range (date of care for the item(s) you are looking for) Optionally enter the End date If you know the employee, click the employee option and the Select button by the employee field. Enter in the first few letters of the employee’s last name and click the Generate button. Select the employee from the list. 01/18/06 3:13 PM Page 301 of 448 Users Manual If you know the client and payer, click the client/payer option and the Select button by the client/payer field. Enter the first few letters of the client’s last name. Or you may select by client number if you know the client number in the system. Select the client from the list. Once selected, the client’s payer sets will appear in the Payer Set select box. Select the correct payer from this list. Now, on the Item List screen, click the Generate button The item list screen requires a date and either employee or client/payer information before you can generate a list of items. This is done to keep the item list to a reasonable length. Select the row corresponding to the visit, service, supply, or pay item you want to adjust. If you want to change something about the item, like changing the employee who did the visit, or the number of hours, or the pay and bill rate, click the Adjust button. Note that if the item is on an invoice that already has cash applied to it, you will get a warning. You may not adjust an item that is on an invoice that is the result of a shift payment. In this case, invoice adjustments will need to be done to change the value of the invoice. 01/18/06 3:13 PM Page 302 of 448 Users Manual Visit Adjustment Change any of the following fields: bill units, skill/sub-skill, service location, hours, bill rate, bill hours, travel billed, sales tax, pay rate, pay hours, travel paid, or employee. If you want to change how the total hours are allocated, click the Multiple button and change the regular, holiday, overtime, and double time hours, pay rates, and bill rates. If you click on “Sent to Payroll” this will flag the payroll export to ignore this adjustment when exporting payroll. Type an Invoice description if you want a comment about the adjustment to appear on the invoice. Click the Save button. Click the Exit button. The “Invoice Description” may be used to enter a description that describes why the adjustment was done. If the visit is not yet on an invoice, this field will not be displayed. Remember that adjustments are not actually applied until they are accepted (Refer to section Accepting and Rejecting Adjustments). 01/18/06 3:13 PM Page 303 of 448 Users Manual Service Item Adjustment Change any of the following fields: service item, quantity, unit cost, unit bill, and total sales tax Click the Save button. Click the Exit button. 01/18/06 3:13 PM Page 304 of 448 Users Manual If you are adjusting a Medicare PPS service item the screen will look slightly different: Change the unit bill amount. Select an Adjustment Type based on the type of PPS adjustment that is appropriate. This is a required field. Type an Invoice description if you want a comment about the adjustment to appear on the invoice. Click the Save button. Click the Exit button. Remember that adjustments are not actually applied until they are accepted (Refer to section Accepting and Rejecting Adjustments). 01/18/06 3:13 PM Page 305 of 448 Users Manual Supply Item Adjustment Change any of the following fields: supply item, quantity, unit cost, unit bill, and total sales tax Click the Save button. Click the Exit button. Remember that adjustments are not actually applied until they are accepted (Refer to section Accepting and Rejecting Adjustments). 01/18/06 3:13 PM Page 306 of 448 Users Manual Pay Item Adjustment Change any of the following fields: pay item type, regular hours, overtime hours, doubletime hours, regular pay rate, overtime pay rate, double-time pay rate, employee, and bill amount. If you click on “Sent to Payroll” this will flag the payroll export to ignore this adjustment when exporting payroll. Click the Save button. Click the Exit button. Remember that adjustments are not actually applied until they are accepted (Refer to section Accepting and Rejecting Adjustments). 01/18/06 3:13 PM Page 307 of 448 Users Manual Item Rebills If the item was billed to the wrong payer, click the Rebill button. The Rebill Item screen is displayed. Select the appropriate payer to bill the item to from the After Rebill payer list. Make sure you have the correct payer with the correct dates. Click the Save button. Click the Yes button when asked, “Re-bill this item to the selected Payer Set?” On the Item List screen, click the Exit button. When you rebill an item to a new payer, the work items will be refreshed with the new payer’s bill rates. Rebilling individual Medicare PPS RAP/EOE service items is not allowed; however, you may rebill the entire PPS invoice. All Item rebills are processed together when you exit the Item List screen. They do not need to be reviewed or accepted. However, you will need to create invoices for the payer that you rebilled the items to, in order to see these items on an invoice/claim. 01/18/06 3:13 PM Page 308 of 448 Users Manual Invoice Adjustments In order to assure that critical processes are working with static data, the system will not allow this process if anyone is doing any of the following in the database: Close Week, Calculate Overtime, Create Invoices, Create Automatic Contractuals, Transmit Claims, Make Adjustments (Items, Invoices, Rebills, Reviewing and accepting, etc.), Payroll Export and Updating Visit Rates. To Make Invoice Adjustments, select menu option AR | Make Adjustments | Invoices. The Invoice Details screen will be displayed. On the Invoice Details screen, click the Find The Invoice List screen will be displayed. Enter the date range, payer, and client for the invoice you want to adjust and click the Generate button. Select the invoice you want to adjust. 01/18/06 3:13 PM button. Page 309 of 448 Users Manual To see what cash had been applied to this invoice, press View Cash Applied button. DSO Ignore – If an invoice has this option marked, the invoice will be ignored in the calculations for DSO (days sales outstanding) and BPSO (best possible days sales outstanding) on the Invoice Aging report. On the Invoice Details screen, click the Adjust Invoice button 01/18/06 3:13 PM Page 310 of 448 Users Manual Adjusting individual Medicare PPS RAP/EOE invoices is not allowed; however, you may adjust individual items on the invoice. Note that if the invoice has cash applied to it, you will get a warning. Note that if there is any pending adjustment for any invoices on the same “bill” (such as shift payments), adjusting will not allow invoice adjustments until the pending adjustments are accepted. Choose the appropriate adjustment type. If you want to apply a contractual allowance or discount to the invoice, choose the Contractual Allowance option. If you want to write some or the entire invoice off as a bad debt, choose the Write Off option. If you want to shift responsibility for payment from one payer to another or the patient, choose the Shift Payment Responsibility option. If you select the Shift Payment Responsibility option, you must choose the payer to shift the responsibility to in the Shift To list. If you want to adjust the invoice to increase the invoice amount for accrued interest, choose the Accrued Interest option. If you want to adjust the invoice for reason other than those above, choose the Other option. Enter the adjusted amount of the invoice. The difference between the Before and After amounts is the amount of the adjustment. Enter the description of the adjustment that will appear on the new invoice. Click the Save Now, on the Invoice Details screen, click the Exit button. On the Review Adjustments screen, accept the adjustment. In the case of a “shift payment” adjustment, you will see two adjustments on the review screen. Accepting either one accepts them both. Click the Exit button. If you use the All Versions? option on the Print/Transmit screen, you will see an invoice showing the original payer’s invoice has been reduced and a new invoice has been created for the new payer. button. Invoice adjustments are used to correct the amount of money expected to be paid by a payer. Adjustments may be needed because the original payer is denying payment and passing responsibility to another payer (shift in payment responsibility), when a payer has negotiated a discount (contractual allowance), or when the payer decides that they are simply not responsible for payment (write-off). If the payer finds a problem with the invoice that is not covered by one of the above adjustments, see the section on Item Adjustments. 01/18/06 3:13 PM Page 311 of 448 Users Manual Invoice Rebills To access the Rebill Invoice screen, select menu option AR | Make Adjustments | Invoices. The Invoice Details screen will be displayed. On the Invoice Details screen, click the Find button. Enter the date range, payer, and client for the invoice you want to rebill and click the Generate button. Select the invoice you want to rebill. On the Invoice Details screen, click the Rebill Invoice button Note that if the invoice has cash applied to it, you will get a warning message. The Rebill Invoice screen is displayed. Select the new payer to bill the item to from the After Rebill payer list. Make sure you have the correct payer with the correct dates. Click the Save button. Click the Yes button when asked, “Re-bill this invoice to the selected Payer Set?” When you rebill an ivnoice to a new payer, the work items will be refreshed with the new payer’s bill rates. Invoice rebills are processed when you click the Save button. They do not need to be reviewed or accepted. However, you will need to create invoices for the payer that you rebilled the invoice to, in order to see the new invoice/claim. 01/18/06 3:13 PM Page 312 of 448 Users Manual Creating Contractual Allowance Invoice Adjustment In Batch In order to assure that critical processes are working with static data, the system will not allow this process if anyone is doing any of the following in the database: Close Week, Calculate Overtime, Create Invoices, Create Automatic Contractuals, Transmit Claims, Make Adjustments (Items, Invoices, Rebills, Reviewing and accepting, etc.), Payroll Export and Updating Visit Rates. Because SAM can record the difference between the rates that a payer will be invoiced (invoice bill rates) and the rates that a payer will pay (reimbursement bill rates), billing can automatically create contractual adjustments for groups of invoices. Although the invoices sent to the payer will be for the invoice bill rates, after creating and accepting your contractual allowance adjustment your AR will show what is actually owed on each invoice. We recommend that you create the contractual allowance adjustments after you have sent the invoice to the payer. But before running it is important to make sure that the invoice rates and the reimbursement rates have been defined correctly. This information is entered for the payer on the Bill Rates screen. The screen below shows a HHA “Invoice” rate: And this screen shows a HHA “Reimbursement” rate: 01/18/06 3:13 PM Page 313 of 448 Users Manual Once the rate information has been added you can create the Contractual Allowances on the Print/Transmit screen: Select the invoices that need contractual allowances and then click the Create Contractual button. Billing will create a contractual allowance invoice adjustment to account for the difference between the invoices invoice rates and reimbursement rates. The contractual 01/18/06 3:13 PM Page 314 of 448 Users Manual allowance invoice adjustments then must be accepted in the Review Adjustments screen to be applied. A contractual allowance will not be created where there is an item adjustment on the invoice. Accepting and Rejecting Adjustments In order to assure that critical processes are working with static data, the system will not allow this process if anyone is doing any of the following in the database: Close Week, Calculate Overtime, Create Invoices, Create Automatic Contractuals, Transmit Claims, Make Adjustments (Items, Invoices, Rebills, Reviewing and accepting, etc.), Payroll Export and Updating Visit Rates. When item or invoice adjustments are requested, the adjustments need to be reviewed and processed (accepted or rejected) before the adjustments take effect and invoices are revised. This process is done from the Review Adjustment screen. To access the Review Adjustments screen, select menu option AR | Review Adjustments. The Review Adjustments screen will be displayed. Select an adjustment from the list. To look at the details of an adjustment, select the adjustment and then click the Show Detail button. This will display the details of the adjustment in a read only mode. Information that 01/18/06 3:13 PM Page 315 of 448 Users Manual will change due to the adjustment will appear in yellow. Use the Exit button to leave the screen. To accept the adjustment, click the Accept button. The screen will refresh and the selected adjustment will disappear. To reject the adjustment, click the Reject button. The screen will refresh and the selected adjustment will disappear. Upon exiting the screen, all adjustments that have been accepted will be processed into new invoices. No adjustment is processed until the Review Adjustment screen is used to accept or reject the adjustment. Rebill adjustments do not need to be reviewed or accepted. 01/18/06 3:13 PM Page 316 of 448 Users Manual Adding Missing items to invoices If visits, supplies, services, and/or pay items are missing from an invoice, the following steps will add items to an invoice: Add the missing visits, supplies, services, and/or pay items using the Scheduling function. Make sure you enter the items with dates that are covered on the current invoice. (You may either view them in scheduling or print off reports of the specific items to confirm the dates.) Close the week to make the items available for invoicing. Rebill the current invoice to the SAME payer set. Make sure the dates are the same. Create Invoices for the office, payer, and client associated with the old invoice. A new invoice is created that contains the missing items. Note that the old invoice was zeroed out and the new invoice has a new invoice version number. Handling Payer Denials when Item Must Be Rebilled to Self Pay at “Street” Rate To access the Item List screen, select menu option AR | Make Adjustments | Items. The Item List screen will be displayed. Generate the list and then select the item you want to rebill from the list. Click the Rebill button. The Rebill Item screen is displayed. Select the “Self Pay” payer to bill the item to from the After Rebill payer list. Click the Save button. Click the Yes button when asked, “Re-bill this item to the selected Payer Set?” Review the new version of the original payer’s bill. (Use the Print/Transmit screen with the All Versions? option selected). When you rebill an invoice to a new payer, the work items will be refreshed with the new payer’s bill rates. Create the self-pay invoice using the Create Invoices function. Print the self-pay invoice. You first rebill the visit so that it will be adjusted off of the original payer’s invoice. Rebilling an item causes the item to think that it has never been billed. This means that to get the item on an invoice, you must create invoices. 01/18/06 3:13 PM Page 317 of 448 Users Manual Closing a Period and the General Ledger Interface All sales, cost, payment, cash applications, payment adjustments, and invoice adjustments flow to the general ledger through an interface. The date associated with each item is used to determine what period the item belongs to. All visits, supplies, services, and pay items belong to the period that their payroll date falls in. Payments, cash applications, payment adjustments (fixes, recoups, and refunds), and invoice adjustments each have an associated item date. Each item belongs to the period that this date falls into. When closing a period, first run the GL sales, cash, adjustment, and Worker’s Compensation reports for the period. This causes data to be extracted from the “live database” into the GL database. Each time the reports are run against an open period, the data is re-extracted and refreshed in the GL database. Once the period is closed, the GL database entries for the closed period are locked and all subsequent reports for the period are done from the locked data in the GL database. You will notice that it takes much longer to run the GL reports for an open period than for a closed period. That is because reporting on open periods cause an extraction to occur from the live database. While a period is open, values on reports may change because they reflect the live database. Once the period is closed, the values on the reports for the period will, of course, never change. Below is how to run the GL reports. GL Sales, Cash, Adjustment, and Worker’s Compensation Reports To access the General Ledger Reports screen, select menu option Reports. The Select Report screen will be displayed. Click the Accounts Receivable option. Click the General Ledger Reports report. Select the office from the Office combo box or choose “All”. Select the period - you may choose any closed or open period. If you want to select by service dates, click the Service option and enter the service date ranges for the report. For sorting and grouping the sales and cost report, refer to the panel on the right side labeled Sort Sales Report By. By dragging an item to a new position, you can cause the report to be sorted in any order you wish. By default, the report will generate for the period or date range you have selected. However, if you would like quarter-to-date figures, select the Quarter To Date option. If you would like year-to-date figures, select the Year To Date option. By default, only the Sales/Cost report will be generated. If you want a Cash report, click the Report Cash Entries option. If you want an Adjustments report, click the Report Adjustment Entries option. If you want a Worker’s Compensation report, click the Report Worker’s Compensation option. If you want only the totals for each Worker’s Compensation code, click the Summary Only option. 01/18/06 3:13 PM Page 318 of 448 Users Manual If you would like Excel spreadsheets created instead of reports, click the Create Excel Files Instead Of Reports option. Click the Generate button. This Sales/Cost Report will balance to the Sales (Item) Report if run for the same payroll dates. Only the Sales/Cost Report is available for service dates. All other reports must be run by period. 01/18/06 3:13 PM Page 319 of 448 Users Manual Closing a Period Once you have run the GL Reports and Sales (Item) Report for the period and are satisfied that all the sales, cost, cash, and invoice adjustments have been done for the period, you should close the period. To access the Close Period screen, select menu option AR | Close Period. The Close Period screen will be displayed. Select the office(s) to be closed and then click the Close Period button. Although visits, service items, supply items, pay items, are not changeable once closed during the normal weekly close operation, other items could be changed (payments, cash applications, etc.). That is why the period should be closed. When a period is closed, payment and cash application information is locked down. The whole reason behind closing a period is to ensure that reports run for the period any time in the future yield the same results. 01/18/06 3:13 PM Page 320 of 448 Users Manual Creating the SBT General Ledger Interface File Once the sales/cost, cash, adjustment, licensed/unlicensed, and sales reports have been run and verified, the period should be closed. Closing the period causes transactions within the period to be locked so that they cannot be changed. This should be done before creating the GL export file to ensure that the journal entries made automatically by the system agree with the database. To create an ACCPAC GL export file, you must select one office. Click the “Create SBT GL Import File” option and click the generate button. To create a standard Excel GL Import File, click the “Create Excel GL Import File”. Upon clicking the “Save” key, the file that you will import into the SBT general ledger is automatically created. If entries are found without associated account numbers in the SBT general ledger, a report will be generated that can be printed. It is suggested that the created import file not be imported into the SBT general ledger until these accounts exist. To verify this, it is good practice not to import any file that was created if ANY accounts where found to be missing. 01/18/06 3:13 PM Page 321 of 448 Users Manual Unemployment Reporting You may generate both state and federal unemployment reports. The report does this by accessing the SBT database. Besides providing a report, this function will also generate an electronic file suitable for submission to the state unemployment agency. Current states supported are North Carolina, Florida, and Texas, Maine, Massachusetts, Connecticut, Rhode Island, and the city of Wilmington. This screen will allow the selection of one or multiple offices as long as they are in the same state and company. It will also, alternatively, allow the selection of a company for reporting. You must enter the year and the quarter you wish the report for. The report will show total wages, non-taxable wages, and taxable wages on a quarter-to-date and year-to-date basis. Once the report is done, another screen allowing the entry of state specific items will appear. Entering information into this screen will allow cause the generation of the state specific electronic file. 01/18/06 3:13 PM Page 322 of 448 Users Manual Administration and Configuration Maintaining Offices SAM allows you to maintain information about your organization’s offices. Only users with an access level of “System Administrator” have the authority to log into the Offices screen. These users may modify certain portions of office information as needed. This is accomplished using the Edit Office screen. NOTE: To add new offices to your system, you must call your software representative. To access the Edit Office screen, select menu option Configuration | Offices. Display the details of the office that needs modification by using the Navigation buttons or the Find button. Many of the fields may be blacked-out. This means they are disabled and you cannot change their contents. The only fields available for modification are described below. If the office address needs to be modified: Enter the office’s new address in the Address fields. The first address line is for street address or PO Box numbers. The second line is for apartment or suite numbers, etc. If a street address is long and will not fit in line one, its okay to overlap it on line two (avoid splitting a word in half when you use two lines for the address, if you can, because it is printed with a space where the split occurs). 01/18/06 3:13 PM Page 323 of 448 Users Manual Enter a Zip Code. If you do not know the entire zip code, you must enter at least the first three digits. After you enter the zip code, a list of cities with the given zip code appears in the combo box below the zip code. Select the correct city from the combo box under the Zip Code field. Use up or down arrows on the keyboard to find the city; or click the down arrow on the combo box to display the list of cities, and then click the city. If the office telephone number(s) needs to be modified: Enter the office’s telephone number in the Office Phone field or the fax number in the FAX field. If the compensation/taxes information for an office needs to be modified: Enter the day the office has set for the end of a payroll week in the Week Ends On field. Enter the Rate Differentials for Overtime and Holiday as desired. Check the Daily Overtime box if the office is subject to daily overtime. If checked, overtime will be automatically calculated as a part of closing a week. Enter the times for Shift 1 Start, Shift 2 Start, and Shift 3 Start as desired. These values are used in scheduling for staffing assignments. The Shift 1 End, Shift 2 End, and Shift 3 End times will be adjusted depending on the values of the start times entered. After all the office information has been modified correctly, click on the Save button. Office OASIS Header Info OASIS Header information may be entered for each office on the “Office OASIS Header Info” page on the Offices screen. OASIS header information is stored for each office. This information is used for each OASIS Assessment export. 01/18/06 3:13 PM Page 324 of 448 Users Manual It is important the information on this screen be completely filled in. You may not have a Street Address 2, Ext, Unique HHA ID Code or Branch ID Number. The Branch ID Number is validated against the OASIS 1.40 specifications. This information is used to create the header record for each of your OASIS Assessments that you submit to the state. If the information does not match EXACTLY with the state records, your OASIS Assessment will be rejected. Once you have entered all of the information, click on the Office Profile screen to save your information, the click the Save button. Office Logo The Office logo may be entered for each office on the “Office Logo” page on the Offices screen. The logo should be entered for each office. Any .bmp file may be used. Optimally the .bmp file should have an aspect ration of (2h x 3w.) The .bmp file should be placed in your n:\logos folder and then added to the office. This logo will be used for invoices and statements. 01/18/06 3:13 PM Page 325 of 448 Users Manual 01/18/06 3:13 PM Page 326 of 448 Users Manual Maintaining Users In order for someone to use this system, they must be able to log in and in order to log in they must be registered as a user in SAM. This user registration process is accomplished by defining users using the Edit User screen. Only users with the access level of ‘System Administrator’ are able to create and maintain users. This is accomplished using the Edit User screen. If you access the Edit User screen in the front office database (physically in the front office), you may only make modifications to a user’s password. To access the Edit User screen, select menu option Configuration | Users. The Edit User screen is displayed. Creating a New User On the Edit User screen, click the New button on the toolbar to add a new user. Enter the Full Name of the new user. This name is for reference only. Enter the User Code for the new user. This code must be unique across all users defined in your system and may be up to 3 characters in length. This code is used to mark all records created or modified by the user. If you do not know a unique code, press the Get Unique Code button and the system will generate a new unique code for you. Enter the User Name for the new user. This will be the User Name that the user will use to login. The User Name may be up to 10 characters in length. Enter the Password the new user will use when logging in. The Password may be up to 10 characters in length. As the Password is entered, it is echoed back as asterisks. 01/18/06 3:13 PM Page 327 of 448 Users Manual Note: SAM has an option for valid users to change their own password. To access the Change Password screen, select menu option Login | Change Password. Grant the new user access to one or more offices in the organization by double clicking on the office name in the office list at the bottom of the screen. An X will appear in the Selected column in the list. A user may not log into an office without this association. Click the Select All check box to select all of the offices in the list. Click the Clear All check box to unselect all of the offices in the list. A user may be marked as “Do Not Use.” Any users marked as such, will no longer be able to log in. A user may be marked as a “System Administrator.” A System Administrator will have access to ALL functions within this system. The following are features that a System Administrator will have access to: 1. Offices 2. Users 3. Accounting Periods 4. Worker’s Comp Rate 5. Run Maintenance Program 6. Copy Client Environment 7. Copy Employee Environment 8. Check Login Count 9. Clear Function Locks 10. Command Window 11. Split Office You may “Copy Permits from Another User.” This screen will prompt you for what user you would like to copy from and then will make the current user’s permissions equal to the permissions for the user you are copying from. There is a screen for each module with detailed permission for features within each module. Press on each screen’s title and select the module name to give the user permission to that module. Once you have turned on permission to the module, you will have access to optionally give permission to each feature within the module. The following are the features for each module that you may selectively give access to by user: 0. Scheduling – if this option is “off, access to Scheduling features will be disabled. (Scheduling features include Clients, Employees, Payers, Pay Rates, Bill Rates, Referral Sources, Affiliations, Display Schedule, Copy Model Week, Search Phone Log, Visit History, Reassign CSR Clients, Supplies, Services, Attributes, Skills, SubSkills and Employee Tracking Items.) 1. Close Week – if this option is “off”, the menu option “Close Week” will be disabled. 2. Edit Pay Rates – if this option is “off”, the buttons for “new”, “remove” and “save” are disabled on the pay rate screens and the pay rate field on editing a visit is disabled. View Pay Rates must be “on” to select to Edit Pay Rates. 3. View Pay Rates - If this option is turned off for a user, the following will apply for that user in SAM: a. The “Pay Rates” button will be disabled on the Edit Client, Edit Client/Payer, Edit Employee and Edit Payer screens. 01/18/06 3:13 PM Page 328 of 448 Users Manual b. The following fields on the Edit Employee screen are not displayed: Merit Pay (per hour/per visit), Weekend Differential (per hour/per visit) and Bonus Amount (per hour/per visit.) c. The Visit Summary screen will not display the skill’s pay rates. d. The Edit Visit screen will not display the pay rate for the visit. In addition, the Split Hours screen accessible from the Edit Visit Screen will not display the pay rates. e. The Employee Matching Employee Candidate list (screen display and printed list) will not display the pay rates. In addition, the Other Unassigned Visits screen will not display the pay rates. f. The Visit Phone Log Entry screen will not display the pay rates. g. The List mode of the display of the schedule will not display the pay rates. h. The Assignment Match screen will not display the merit pay rates. In addition, the Assignment Match Assignment List screen will not show the employee bonus rates or pay rates. i. The Update Visit Wizard will not display the pay rates or allow the user to change the pay rate. j. The Phone Log Search results (phone log report) will not display pay rates. k. The “Pay Items” button on the Employee List in Display Schedule is disabled. l. When viewing a Client or Employee schedule, the display of summary information for the visit at the bottom of the screen will not include pay rates. m. The On-Call report will not include pay rates. n. The General and Verified Visit report will not include pay rates. o. When Calculating Overtime, the report for showing visits for salaried employee will not include pay rates. 4. Edit Bill Rates – if this option is “off”, the buttons for “new”, “remove” and “save” are disabled on the bill rate screens and the bill rate field on editing a visit is disabled. 5. Edit Clients - if this option is “off”, the menu option “Clients” will be disabled. 6. View Client SSN – if this option is “off”, the display of the Client SSN from the screen preview of reports is disabled. If the user has the permit “Edit Client” enabled, they will be able to view the Client SSN. In addition, if the user has the permit “View and Print OASIS” enabled, he is able to view the Client SSN. 7. Edit Employees - if this option is “off”, the menu option “Employees” will be disabled. 8. Edit Employee Statuses - if this option is “off”, the button “edit status” on the Employee screen is disabled. 9. View Employee SSN – if this option is “off”, the display of the Employee SSN from the screen preview of reports is disabled. If the user has the permit “Edit Employee” enabled, they will be able to view the Employee SSN. 10. not currently used 11. Edit Payers - if this option is “off”, the menu option “Payers” will be disabled. 12. View Payers – if this option is “off’, the “Save” and “Delete” buttons on the Payer screen are disabled. 13. Add/Delete National Payer – if this option is “off”, when adding a new payer in the Admin office, it will default to a non-national payer and the “national payer” check 01/18/06 3:13 PM Page 329 of 448 Users Manual box is disabled. Also, if this option is “off”, the user will not be permitted to delete a national payer in the Admin office. 14. Verify Visits – if this option is “off”, the “timeslip verified” check box and “verify week” button on editing a visit is disabled. It is recommended for those users that you wish to not see pay rates, that you also turn off access to the Pay Rate, Pay Item, Sales and Adjustment reports. 0. Clinical - if this option is “off, access to clinical features will be disabled. (Clinical features include Import Signed POC/VO, Import OASIS Assessments, Export OASIS Assessments, Patients, POC/VO, OASIS Assessments, 485 Phrases, and Physicians.) 1. View and Print Plan of Care/Verbal Order– if this option is “off”, on the Define Patient screen, the “Define Plan of Care/Verbal Order” button will be disabled. 2. View and Print OASIS – if this option is “off”, on the Define Patient screen, the “Define OASIS Assessment” button will be disabled. 3. Change OASIS Lock Date – if this option is “off”, the user will not be able to edit the Lock Date field on OASIS Assessments. 4. Edit Phrases - if this option is “off”, the “new” and “save” buttons are not displayed on the Phrases screen in the Admin office. 0. AR – if this option is “off, access to billing features will be disabled. (Billing features include Export Payroll, Create Invoices, View Invoices/Claims, Print/Transmit, Account Log, Enter/Apply Payments, Apply Cash via 835, Make Adjustments, Review Adjustments and Close Period. 1. Close Week – if this option is “off”, the menu option “Close Week” will be disabled. 2. Create Invoices – if this option is “off”, the menu option “Create Invoices” will be disabled. 3. View Invoices – if this option is “off”, the menu option “View Invoices/Claims” will be disabled. 4. Print/Transmit - if this option is “off”, the menu option “Print/Transmit” will be disabled. 5. Payments/Apply Cash - if this option is “off”, the menu option “Enter/Apply Payments” will be disabled. 6. Request Adjustments - if this option is “off”, the menu option “Make Adjustments” will be disabled. 7. Review Adjustments - if this option is “off”, the menu option “Review Adjustments” will be disabled. 8. Close Period - if this option is “off”, the menu option “Close Period” will be disabled. 9. Export Payroll - if this option is “off”, the menu option “Payroll Export” will be disabled. 01/18/06 3:13 PM Page 330 of 448 Users Manual 0. Configuration – if this option is “off, access to configuration features will be disabled. (Configuration features include Offices, Users, Supplies, Services, Attributes, Skills, Sub-Skills, Employee Tracking Items, Accounting Periods, Worker’s Comp Rates, Data Exchange/Reindex.) 1. Add Standard Supply – if this option is “off”, when adding a new supply in the Admin office, it will default to a non-standard supply and the “standard” check box is disabled. 2. Add Standard Service – if this option is “off”, when adding a new service in the Admin office, it will default to a non-standard service and the “standard” check box is disabled. 3. Edit Attributes - if this option is “off”, the “new” and “save” buttons are not displayed on the Attributes screen in the Admin office. 4. Edit Sub-Skills - if this option is “off”, the “new” and “save” buttons are not displayed on the Sub-Skills screens in the Admin office. 5. Edit Tracking Items - if this option is “off”, the “save” button is not displayed on the Employee Tracking Items screen in the Admin office. This option must be “on” to set the “Add/Delete Tracking Items” option “on.” 6. Add/Delete Tracking Items - if this option is “off”, the “new” and “delete” buttons are not displayed on the Employee Tracking Items screen in the Admin office. 7. Data Exchange/Reindex – if this option is “off”, the menu option “Data Exchange/Reindex” will be disabled. 0. Maint – if this option is “off, access to the maintenance features will be disabled. (Maintenance features include Run Delivery Program, Run Maintenance Program, Command Window, Copy Client Environment, Copy Employee, Delete Invoice, Check Login Count, Clear Function Locks and Split Office.) 1. Run Delivery - if this option is “off”, the menu option “Run Delivery Program” will be disabled. 0. Misc– if this option is “off, access to the miscellaneous features will be disabled. (Misc features include Change Password.) 1. Change Password - if this option is “off”, the menu option “Change Password” will be disabled. 0. Reports – if this option is “off, access to Reports will be disabled. In order for a user to be given access to “Reports”, at least one of the following must be permitted: Scheduling, Clinical or AR. 01/18/06 3:13 PM Page 331 of 448 Users Manual 1. 401K and Paycheck Reporting - if this option is “off”, the Reports menu option “401K and Paycheck Reporting” will be disabled. 2. State Unemployment Reporting - if this option is “off”, the Reports menu option “State Unemployment Reporting” will be disabled. 3. Payroll Report - if this option is “off”, the Reports menu option “Payroll Report” will be disabled. 4. Payroll Interface Postings Report - if this option is “off”, the Reports menu option “Payroll Interface Postings Report” will be disabled. 5. Pay Rate Report - if this option is “off”, the Reports menu option “Pay Rate Report” will be disabled. 6. Pay Item Report - if this option is “off”, the Reports menu option “Pay Item Report” will be disabled. 7. Sales (Item) Report - if this option is “off”, the Reports menu option “Sales (Item) Report” will be disabled. 8. Adjustment Report - if this option is “off”, the Reports menu option “Adjustment Report” will be disabled. 9. Plan of Care/Verbal Order – if this option is “off”, the report menu option “Plan of Care/Verbal Order” will be disabled. After all the user information has been entered correctly, click on the Save the first “User Profile” screen. button on Modifying User Information Any portion of the user’s information may be modified (except the User Code), including the user’s password. On the Edit User screen, display the details of the user to be modified using the Navigation buttons or the Find Modify any of the fields on the screen. button. After all the user information has been modified correctly, click on the Save button. Deleting a User On the Edit User screen, display the details of the user to be modified using the Navigation buttons or the Find button. Click the Delete button. Click the Yes button when prompted “Delete Displayed User?” The deleted user’s information will be removed from the Edit User screen. Change Password SAM has an option for valid users to change their own password. To access the Change Password screen, select menu option Login | Change Password. 01/18/06 3:13 PM Page 332 of 448 Users Manual Enter you Old Password. Enter your New Password. Enter your New Password again to Confirm. Click the OK button. Your password for you User Name will be permanently changed to the new password. 01/18/06 3:13 PM Page 333 of 448 Users Manual Copy Client Environment This feature will allow you to copy a client (and associated information) from one office to another. After copying a “client environment” you should be all ready to start scheduling visits for the copied client in the target office. Select the From Office to copy the client environment from. Select the From Client name that should be copied. Select the To Office to copy the client environment to. The copy feature will copy the client to the target office with a new client number with the same admission number that the source client had. The following client information is copied: Client demographic information (excluding referral.) Dr Orders and Insurance Authorizations for the client. Clinical Patient information for the client, including patient status and hospital stay history. The most recent Plan of Care (only the last Plan of Care is copied.) It is important to note that the Plan of Care in the target office will not be considered for Medicare PPS billing. All client/payer relationship and associated skills, codes and rates. All payers (on the client/payer relationships) and associated skills, codes and rates. All employees that occur on any visits for the client in the source office. The employee availability and tracking information is also copied. The copy feature will not allow the copy of the client in the following circumstances: 01/18/06 3:13 PM Page 334 of 448 Users Manual You may not copy a client to the same office. The client will not be copied if the payer number already exists (in the target office) with a different payer name. The client will not be copied if the client already exists (in the target office) with the same name and SSN (social security number, phone number or birth date. Copy Employee This feature will allow you to copy an employee (and associated information) from one office to another. Select the From Office to copy the employee from. Select the From Employee name that should be copied. Select the To Office to copy the employee to. The employee will be copied to the target office with a new employee number. The following employee information is copied: Employee demographic information (excluding client preferences and bonuses.) Employee availability information. Employee tracking information. Employees pay rates. The copy feature will not allow the copy of the employee in the following circumstances: You may not copy an employee to the same office. The employee will not be copied if the employee already exists (in the target office) with the SSN (social security number.) 01/18/06 3:13 PM Page 335 of 448 Users Manual Check Login Count This feature will allow you to see how many users are logged in at any given time. To access the Check Login Count screen, select menu option Maintenance | Check Login Count and select the Check Login Count menu item A screen will be displayed that will show the: Distinct Network Users – by network login. Distinct Workstations – by workstation name. Actual SAM Login Entries – an occurrence for each SAM application logged into. For SQL databases, only current SQL connections are displayed. Clear Function Locks This feature may be used to clear functions that are locked from running due to SAM reporting that another user is running that function. If in fact, that user is not running the function, you can select this option to clear the function locks. Note that ALL function locks are cleared when this option is selected. This feature may only be run by a user that has been designated as a “System Administrator.” Command Window This feature gives access to a Visual Fox Pro command window and has been added for troubleshooting purposes. 01/18/06 3:13 PM Page 336 of 448 Users Manual Defining Accounting Periods The accounting periods your company uses must be entered into so that all the information for a period may be “locked down” and transferred to the General Ledger. Accounting periods are defined using the Edit Accounting Periods screen. To access the Edit Accounting Periods screen, select menu option Configuration | Accounting Periods. The Edit Accounting Periods screen is displayed. If no accounting periods have been defined, you must add them. Click the New button. Type in the Fiscal Year (four digits). The Quarter will default to “1” - press the tab key to accept this default or type over the value. The Period Number will default to “01” - press the tab key to accept this default or type over the value. Enter the period Start Date. The End Date will default to the end of the start date’s month - press the tab key to accept this default or type over the value. Click the Save To add another period, click the New button. Notice that all fields will default to the next month-based period. Complete the information for the new period and click the Save 01/18/06 3:13 PM button. button. Page 337 of 448 Users Manual You cannot modify a period – you must delete it and add it using the Delete and New buttons. This is done because it is assumed that the periods for fiscal years are entered for the next several years during the same editing session. This screen is optimized to make this one session simple and quick. The periods are used on the General Ledger reports screen to organize sales, cost, payments, cash applications, and adjustments into date ranges. Before information for a period can be transferred to the general ledger, the period must be closed. Defining Skills SAM is delivered with a standard set of predefined skills, but an organization may define additional skills. Skills are associated with employees in order to determine the type of work they are capable of doing (i.e. Registered Nurse, Homemaker). Skills can also be associated with a client in that the client needs employees that have certain of skills. The skills of the employee and the needed skills on a client are used by the Employee Matching function. Because Skills are such a important part of the infrastructure for your SAM setup, adding and saving Skills have been restricted to the “RiverSoft” login. Please contact RiverSoft for access. Refer to the Defining Clients and Defining Employees for information on associating skills with employees and clients. Skills are also associated with doctor orders, schedule orders, and visits to determine the type of service that is being requested. The Employee Matching function on visits matches the desired skill on a visit with employees who have the skill. Each predefined skill delivered has an associated account used in the General Ledger. These accounts are used in tracking cost and sales information for visits associated with the skills. Other skills may be defined by an office and added to the skills database using the Edit Skill screen. These new skills will be grouped into one default General Ledger account. If it is necessary to track these skills individually in the General Ledger, your software representative must be contacted to set up the General Ledger accounts. 01/18/06 3:13 PM Page 338 of 448 Users Manual Skills can only be added or modified at the back office. To access the Skills screen, select menu option Configuration | Skills. The Edit Skill screen is displayed. Click the New button to add a new skill. Enter a unique Skill Code for the new skill. Enter a Skill Description for the new skill. This description is used in all skill lists and combo boxes. Enter the amount of time that a visit represents for this new skill in the Visit Hours field. This is the number of credit hours an employee receives per visit for this skill. This is important because these default hours per visit will count towards the employee hours for the week and may effect when they go into overtime. Check the Skilled checkbox if doctor orders should be present for visits for this new skill. Be very careful to review the skill information on the screen before saving because new skills cannot be deleted after they are saved. Click the Save button. Click the Exit button to exit the Edit Skill screen. Defining Sub-Skills Sub-skills are associated with skills and help further describe the type of work related to the skills (i.e. Registered Nurse sub-skill of Cardiac Rehab). Sub-skills may be associated with the predefined skills delivered with this system, or they may be added to new skills defined by an organization. Sub-skills are normally added to provide specific service codes (for billing on claim forms) or specific bill rates for specific types of skills. 01/18/06 3:13 PM Page 339 of 448 Users Manual Sub-skills can only be added or modified at the back office. To access the Sub-Skills screen, select menu option Configuration | Sub-Skills. The Edit Sub-Skill screen is displayed. Click the New button to add a new sub-skill. Enter a Sub-Skill Description for the new sub-skill. This description is used in all skill/sub-skill lists and combo boxes throughout the system. Select a skill to associate the new sub-skill to from the Skill combo box. Enter the amount of time that a visit represents for this new sub-skill in the Visit Hours field. Be very careful to review the sub-skill information on the screen before saving because new sub-skills and their skill/sub-skill associations cannot be deleted after they are saved. Click the Save button. The selected skill and hours will be displayed in the Related Skills list. If the sub-skill is to be associated with another skill: Select the other skill to associate the new sub-skill to from the Skill combo box. Enter the amount of time that a visit represents for this new sub-skill in the Visit Hours field. After making sure the information is correct, click the Save button. The newly selected skill and hours will be added to the Related Skills list. Click the Exit 01/18/06 3:13 PM button to exit the Edit Sub-Skill screen. Page 340 of 448 Users Manual Defining Attributes SAM is delivered with a standard set of predefined attributes, but an organization may define additional attributes. Attributes are associated with employees just as skills are and they usually describe something the employee is capable of doing (i.e. Able to Lift Over 150 Lbs., Spanish Speaking). Attributes can also be associated with a client in that the client needs employees that have certain attributes. The attributes of the employee and the needed attributes on a client are used by the Employee Matching function. Refer to the Defining Clients and Defining Employees for information on associating attributes with employees and clients. Attributes can only be added or modified at the back office. To access the Attributes screen, select menu option Configuration | Attributes. The Edit Attribute screen is displayed. Click the New button to add a new attribute. Enter a Description for the new attribute. Be very careful to review the attribute information on the screen before saving because new attributes cannot be deleted after they are saved. Click the Save button. Click the Exit button to exit the Edit Attribute screen. 01/18/06 3:13 PM Page 341 of 448 Users Manual Defining Employee Tracking Items Employee tracking items are a set of items that can be associated with an employee such as license expirations, inoculation dates, and training credits. All employee tracking items are defined by an organization. These items can be used by the Employee Matching function and can be reported using the Employee Tracking Report Refer to the Defining Employees for information on associating tracking items with employees. If you are logged into your “admin” office you may add, edit or delete tracking items. Adding a tracking item will add the tracking item for all offices. Modifying a tracking item will not modify the tracking item in other offices. Deleting a tracking item will delete the tracking item for all offices. If you are logged into a “non-admin” office on the back office database, you may modify the tracking items for the office but you may not add or delete tracking items. If you are logged into a “non-admin” office and are not on the back office database (are logged into a front office database), you may not make any changes to the employee tracking items. To access the Employee Tracking Items screen, select menu option Configuration | Employee Tracking Items. In this example we are logged into the back office. The Edit Employee Tracking Item screen is displayed. 01/18/06 3:13 PM Page 342 of 448 Users Manual Click the New button to add a new tracking item. Enter a Description for the new tracking item. Select the Info Type of “Date” or “Number”. Select a skill from the Associated Skill combo box or select “ALL”. If the tracking item is to be used in scheduling (warnings will be given when creating, modifying, moving or copying a visit) and for employee matching, check the Restriction for Scheduling and Employee Matching check box. If the Info Type is “Number” and Restriction for Scheduling and Employee Matching is checked, enter the value of the number that will cause scheduling and employee matching to allow the employee to be scheduled. If the tracking item should be a required item for the office you are logged into, check the Always Required for this Office checkbox. It will not be possible now to delete these tracking items for employees in this office. In addition, the Employee Tracking report offers an option to report “Only Show Empty Required Items.” If the tracking item should not be used anymore for the office you are logged into, check the Do Not Use checkbox. This item will no longer be listed for any employee’s in this office. Click the Save button. Click the Exit button to exit the Edit Employee Tracking Item screen. Defining Supplies Supplies are billable items used during a visit with a client such as a 10 cc Syringe. SAM is delivered with a standard set of predefined supplies, but an organization may define additional supplies or replace the supplies database completely if a supply vendor is being used and the vendor has its own database. To access the Supplies screen, select menu option Configuration | Supplies. The Edit Supply screen is displayed. 01/18/06 3:13 PM Page 343 of 448 Users Manual Click the New button to add a new supply. Select a type for the new supply from the Type combo box. Enter a Description for the new supply. Enter the SKU Number for the supply if a vender is providing the supply information. (This field is optional) Enter a Revenue Code (UB92) for the new supply. Enter the HCPCS Code (UB92 & HCFA 1500) that should appear on claim forms for the supply. Enter a Modifier (HCFA 1500) that should appear on claim forms for the supply. Enter the cost of the supply in the Unit Cost field. Enter the amount to bill for the supply in the Unit Bill field. Only the back office can specify that a supply is standard by checking the Standard Supply check box. Extra care should be taken in defining standard supplies because they cannot be deleted after they are saved. Once entered at the back office, standard supplies are copied to all front offices. Click the Save button. Click the Exit button to exit the Edit Supply screen. 01/18/06 3:13 PM Page 344 of 448 Users Manual Defining Services Services are billable services provided to a client but are not employee specific (i.e. Urine Analysis or Patient Monitoring). SAM is delivered with a standard set of predefined services, but an organization may define additional services. To access the Services screen, select menu option Configuration | Services. The Edit Service screen is displayed. Click the New button to add a new service. Enter a Description for the new service. Enter the cost of the service in the Unit Cost field. Enter the amount to bill for the service in the Unit Bill field. Only the back office can specify that a service is standard by checking the Standard Service check box. Extra care should be taken in defining standard services because they cannot be deleted after they are saved. Once entered at the back office, standard services are copied to all front offices. Click the Save button. Click the Exit button to exit the Edit Service screen. 01/18/06 3:13 PM Page 345 of 448 Users Manual Defining Affiliations Affiliations can be a geographical affiliation used to describe an area where a client is to be serviced or an area where an employee provides service. Affiliations can also describe a care team in which clients belong to the care team and certain employees provide services to the members of the care team. The affiliation associated with an employee and/or a client is used by the Employee Matching function and on some reports for filtering purposes. To access the Affiliations screen, select menu option Administrations | Affiliations. The Edit Affiliation screen is displayed. Click the New button to add a new affiliation. Enter a Description for the new affiliation. Click the Save button. Click the Exit button to exit the Edit Affiliation screen. 01/18/06 3:13 PM Page 346 of 448 Users Manual Defining Referral Sources A referral source is an agency that refers clients and/or employees to the organization for service. Referral sources are associated with a client and/or employee when the client or employee is initially defined. An option is available on the Sales (Item) Report to report on sales based on referral sources for clients. Refer to the Defining Clients for information on associating a referral source with a client. Refer to the Defining Employees for information on associating a referral source with an employee. To access the Referral Sources screen, select menu option Administration | Referral Sources. The Edit Referral screen is displayed. Click the New button to add a referral source. Enter the referral source’s name in the Name field. Enter the referral source’s address in the Address fields. Enter a Zip Code. If the entire zip code is not known, enter at least the first three digits. After the zip code is entered, a list of cities with the given zip code appears in the combo box below the zip code. Select the correct city from the combo box under the Zip Code field. Enter the Phone #’s for the referral source. Enter the phone Extension is appropriate. 01/18/06 3:13 PM Page 347 of 448 Users Manual Click the Save button. Click the Exit button to exit the Edit Referral screen. Defining Physicians Physicians are associated with the patients Plan of Care and Verbal Orders. To access the Physicians screen, select menu option Administration | Physicians. The Edit Physicians screen is displayed. Click the New button to add a new physician. Enter a unique UPIN for the new physician. Click the Select button to search for the physicians UPIN. A physician UPIN may be up to 12 characters. The UPIN must be unique per physician. SAM only allows input of UPINs where first character is “alpha” followed by 11 “alpha numeric” characters. Special characters and punctuation characters are not allowed. How UPINs appear on claims: A standard UPIN begins with an alpha letter and is followed by 5 numeric digits. If a UPIN has less than 3 characters, therefore, not standard, the claim will show OTH000. If you do not know the UPIN for the physician you may use one of the following standard UPINs. 01/18/06 3:13 PM Page 348 of 448 Users Manual INT - Prefix is used for INTERNS without standard UPINs. Input the UPIN as INT000 followed by a unique 3 characters for the physician. The UPIN will print as INT000 on the claim. PHS – Prefix is used for Public Health Service physicians. Input the UPIN as PHS000 followed by a unique 3 characters for the physician. The UPIN will print as PHS000 on the claim. RET – Prefix is used for RETIRED physicians. Input the UPIN as RET000 followed by a unique 3 characters for the physician. The UPIN will print as PHS000 on the claim. RES – Prefix is used for RESIDENT physicians. Input the UPIN as RES000 followed by a unique 3 characters for the physician. The UPIN will print as RES000 on the claim. VAD – Prefix is sued for Veteran’s Administration physicians. Input the UPIN as VAD000 followed by a unique 3 characters for the physician. The UPIN will print as VAD000 on the claim. OTH – Prefix is used for other physicians without a standard UPIN. Input the UPIN as OTH000 followed by a unique 3 characters for the physician. The UPIN will print as OTH000 on the claim. Enter the physician’s first name, middle initial and last name in the Physician Name fields. If the physician is not to be used anymore, click on the Do Not Use check box. Enter a title for the physician in the Physician Title field. This may be MD or Dr., etc. Enter the physician’s address in the Address fields. The first address line is for street address or PO Box numbers. The second line is for apartment or suite numbers, etc. If a street address is long and will not fit in line one, its okay to overlap it on line two (avoid splitting a word in half when you use two lines for the address, if you can, because it is printed with a space where the split occurs). Enter a Zip Code. If you do not know the entire zip code, you must enter at least the first three digits. After you enter the zip code, a list of cities with the given zip code appears in the combo box below the zip code. Select the correct city from the combo box under the Zip Code field. Use up or down arrows on the keyboard to find the city; or click the down arrow on the combo box to display the list of cities, and then click the city. Enter the physician’s telephone numbers in the Phone # and Fax fields if known. Enter the physician’s License Number; Licenses Date and Date Verified if known. Enter the physician’s Email address in the General Email Addr field if known. If the Plan of Care or Verbal Orders are to be sent to the physician using the XML interface, the POC/VO Email Addr field should be populated with one or more character strings describing the Care Plan Oversight system that will be used. (“acm”, “eclickmd” or “alacare”) Select whether the Plan of Care and Verbal Orders should be sent to the physician via Mail or Email if known If the physician has a specific ID for a program, i.e. Medicare, enter the ID in the Claim ID field. Click the Save 01/18/06 3:13 PM button. Page 349 of 448 Users Manual Click the Exit 01/18/06 3:13 PM button to exit the Edit Physician screen. Page 350 of 448 Users Manual Managing Standard Plan of Care Phrases Standard Plan of Care phrases are configurable for each organization and can be uses as standard building blocks with verbiage is added to different parts of the plan of care. In this way, descriptions of similar or exact situations can be standardized. Phrases are stored and accessed by category, code, ICD9 type and by skill code. The ICD9 Code for phrases is limited to the first three characters of the ICD9 Code. This, in effect, means that the phrase is for that ICD9 Code and all levels beneath it. To access the Phrases screen, select menu option Administration | 485 Phrases. 01/18/06 3:13 PM Page 351 of 448 Users Manual Data Exchange/Reindex To setup the Data Exchange/Reindex options, select menu option Configuration | Data Exchange/Reindex. To setup Data Exchange to process automatically in your back office: 1. Access the Data Exchange/Reindex Configuration screen. 2. On this screen, you may specify the times of day, the days of the week, and the office(s) for which data will be exchanged. 3. Click the Set Defaults button. 4. Exit the screen. SAM’s RiverSoft Process Monitor service (which is automatically running continually on your server(s)) will automatically process the requested data exchanges. For your front offices, there is no need for any setup in SAM, the function that processes data exchange files will be done automatically by the RiverSoft Process Monitor service. Exchange Now If for any reason you would like to exchange data with an office immediately (for instance, you would like their payroll information NOW), select the target office and click the “Exchange 01/18/06 3:13 PM Page 352 of 448 Users Manual Now” button. SAM will send a request to the RiverSoft Monitor Process service to begin a Data Exchange. Data for the front office will be extracted, a connection with the office will be established, and the file will be sent to the office. This will take about a minute. After the file is delivered, the screen will wait 5 minutes to give the program in the front office time to process the received file and produce an export file of its own. Then a connection with the office will be reestablished and the file will be pulled from the front office and imported into the back-office database. If you are using a modem and phone line to communicate with your front office(s): In order for the Remote Access Service modem connections to work, it is imperative that the computer running AutoDEX is logged into the network with the “RiverSoft” username. Also, each RAS dialup entry should be manually tested, meaning that you should be able to connect to the front office (without being prompted for a password) and successfully map to the remote database. To exchange data to a front office, a dialup entry must be added to your Dialup Networking folder named using the following format: SAM-9999-FrontOfficeName, where 9999 is the office code of your front office or DEX-9999-FrontOfficeName. If you are using the network to communicate with your front office(s): Data Exchange will first try to locate either the server name or IP address defined for the office. If located, the data exchange will occur over the network. If not located, data exchange will then use RAS dialup to connect to the front offices. To exchange data to a front office, a dialup entry must be added to your Dialup Networking folder named using the following format: SAM-9999-FrontOfficeName, where 9999 is the office code of your front office or DEX-9999-FrontOfficeName. The dialup entries are still required in the Dialup Networking folder to inform Data Exchange of the offices to exchange with; however, the phone numbers are not used. View Exchange Log This function allows you to see what Data Exchange has been doing. In it you will see when offices were called, what files were sent where, and dial-up connection errors. This log keeps the last seven days of entries. 01/18/06 3:13 PM Page 353 of 448 Users Manual Reindex (Fox Pro Databases Only) To setup Reindexing to process automatically in your back or front office: 1. Access the Data Exchange/Reindex Configuration screen. 2. On the Reindex screen, mark the times you would like SAM to reindex your data. 3. Click the Set Defaults button. 4. Exit the screen. SAM’s RiverSoft Process Monitor service (which is automatically running continually on your server(s)) will automatically process the requested reindexes. Each night at midnight, 3 am, or 5 am, this screen will perform database maintenance (including reindexing the database) and save a zipped version of the database. If the database maintenance does not occur, users logging in will be notified by the message “The indexing program did not run last night.” Also, Data Exchange imports will be blocked until the database maintenance process has successfully occurred. This database maintenance process can be manually run by clicking the Reindex Now button. When you request “reindex now”, SAM sends the request to the new RiverSoft Process Monitor service which is automatically running at all times on your server. 01/18/06 3:13 PM Page 354 of 448 Users Manual If you request “reindex now”, then exit the reindex log screen, SAM will automatically close SAM and restart SAM. Therefore, we recommend you leave the reindex log screen open until the reindex has completed so you can see when it is finished. You may redirect where the “SAMDB#.ZIP” file (a backup of your database) is created by entering a new record in your N:\SAM.INI file for “INI_SAMDB_PATH,”. For example: INI_SAMDB_PATH,c:\backup View Reindex Log This function allows you to see what Reindex has been doing. In it you will see when the database was indexed and when a backup copy of your database was made. This log keeps the last seven days of entries. 01/18/06 3:13 PM Page 355 of 448 Users Manual Workstation Environment Size If your workstation PC gets the error, “Out of Environment Space,” while running “Update Software from Server,” perform the following steps, then restart your computer: Click Start Button Click Run Type sysedit in the Open box then click OK Click the Config.sys file Add the following Shell command at the bottom of the file, or replace any existing Shell command with the following line: SHELL=C:\WINDOWS\COMMAND.COM /E:4096 /P 01/18/06 3:13 PM Page 356 of 448 Users Manual Reports Report Options All of the Reports may be conditioned using the Report Options feature to output to any of the following Destinations: Default Printer – the report will print on the printer that has been defined as the default for the current workstation. Specify Printer/Pages – this option will display a screen where you may specify the printer and/or define what pages you would like printed. Screen Preview – the report will be previewed on your screen, and may be printed from the print preview. Excel File – you will be prompted to specify the path and filename for the .xls file that will be created. Reports will default to N:\Excel Files. DBF File – you will be prompted to specify the path and filename for the .dbf (and .dbt file if any comments are included) that will be created. Reports will default to N:\DBF Files. Comma Delimited ASCII – you will be prompted to specify the path and filename for the .csv file that will be created. Reports will default to N:\CSV Files. Using Microsoft Access to read Report DBF Report Files Use the Report Options button on any report screen and select format DBF. This creates a FoxPro free table in folder N:\DBF Files Open Microsoft Access. Create/Open an Access database with a name such as Report DBF Files Click the following menu items: File->Get External Data->Link Tables… From the Link screen, field Files of Type:, select option ODBC Databases() From the Select Data Source screen, click the Machine Data Source tab. If this is your first time using Access for Report DBF files, you must create a data source. Otherwise, skip to the next bullet. o Click the New button. o From the Create New Data Source screen, select the User Data Source option, and then click the Next button. 01/18/06 3:13 PM Page 357 of 448 Users Manual o Select diver Microsoft Visual FoxPro Driver (read carefully), click Next button, and then the Finish button. o From the ODBC Visual FoxPro Setup screen, field Data Source Name type a name such as Report DBF Files. On the Database Type option, select Free Table Directory. In the Path field, type N:\DBF Files. Then click the OK button. Back on the Select Data Source screen, select data source Report DBF Files, and then click the OK button. Back on the Link screen, select one or more of the DBF files, and then click the OK button. Access likes to have unique fields on the tables to allow it to update records properly. When asked for a unique field, look for field names beginning with primekey. At this time, the DBF files should be listed in the Access database. Weekly Reviews The following reports are good reports to run weekly. Client Payer List Use this report to review newly entered client-payer relationships for the week. The most important thing to check is that each relationship is correctly entered and that valid skills and their associated codes are entered correctly. These valid skill(s) are what determines what type of visits can be scheduled. This report is available in the Scheduling application group under the Client/Payer function group. Employee Tax Withholding Report Run this report each week to determine if any employee’s withholding information has changed. Any changes in the comment area must be manually entered into your payroll system, such as SBT. Garnishments are tracked in the comment area and any changes to these must be manually updated before payroll checks are generated. This report is available in the Scheduling application group under the Employee function group. Visit Compliance Report This report will show what visits are out of compliance and why. It is a good idea to use this report on an audit bases to see how the front offices are using the compliance checking features. This report is available in the Scheduling application group under the Work/Sales function group. Note: Any compliance rule that is older than 1 year (based on the end date of the rule) will be purged nightly when the system reindexes by default. If you wish to modify this default timeframe, add the following line to your n:\sam.ini file (where # is the number of months back to keep compliance rules): Ini_Comp_Rules_Purge_Month,# 01/18/06 3:13 PM Page 358 of 448 Users Manual Employee Tracking Report This report will help you determine when employee’s professional requirements are expiring. It is a good idea to run this weekly at the front office and notify employees when they must complete course work or renew a license. It is also a good idea to run this at the back office to audit how well employee’s professional requirements are being tracked. This report is available in the Scheduling application group under the Employee function group. Visit Report This report may be run to check for any late time-slips. You may condition the report to those visits that have been confirmed but never verified. This report is available in the Scheduling application group under the Work/Sales function group. 01/18/06 3:13 PM Page 359 of 448 Users Manual Billing Application Group Reports Accounts Receivable Function Group Reports 401k and Paycheck Reporting This report uses the SBT data to report 401k eligibility, contributions, paycheck information, and State W2 (currently for Massachusetts only) information. If you are not using SBT, this report will not report any information. 01/18/06 3:13 PM Page 360 of 448 Users Manual Adjustment Report This report shows all item and invoice adjustments in the system. 01/18/06 3:13 PM Page 361 of 448 Users Manual General Ledger Cash – AR Summary This report will show cost, sales, adjusted sales, payments, cash applications, AR sales – cash applied, hours and shifts. It is important to run one of the General Ledger Reports to populate the general ledger table for the period selected, prior to running this report. 01/18/06 3:13 PM Page 362 of 448 Users Manual General Ledger Reports These reports show cost and sales, unqualified / qualified sales and cost by discipline, payments and cash, invoice adjustments and workers compensation information for past periods, the current period or a date range, for one or multiple offices. For Interim agencies, we recommend running the “Weekly Licensed/Unlicensed Sales” report to report weekly royalty sales to Interim Corporate. 01/18/06 3:13 PM Page 363 of 448 Users Manual Invoice Aging Report This report shows invoice aging information. Receivables are aged into seven separate buckets. The total amount outstanding for each invoice is displayed, as well as any cash applied to the invoice and collection comments. Payer-Based Aging By choosing the Office, Class, Payer, Client sort option, a payer-based aging may be produced. This report will show all invoices for a given class, payer sorted by each payer. The Invoice Aging report by payer will report a Best Possible Days Sales Outstanding value in addition to the Days Sales Outstanding (DSO) value. Enter a date range used to calculate the “period days”. This date range will default to the last 13 weeks ending with the last week ending date. You may optionally change this date range. The following is the calculation for both values: (Days Sales Outstanding) DSO = Total AR / (period sales / period days) (Best Possible Day Outstanding) BPDSO = Period AR / (period sales / period days) Client-Based Aging By choosing the Office, Client, Payer sort option, a client-based aging may be produced. This report will show all invoices for a given client sorted by each payer associated with the client. This is especially useful as a reference tool when talking with the client about their account. 01/18/06 3:13 PM Page 364 of 448 Users Manual Invoice Register This report lists invoices by Invoice Number, Client or Payer. If you select to “Include Skill Totals Report” a report will be generated after the Invoice Register report that will give you a summary by skill. If you choose this option, the Invoice Register report will sort the invoice details by skill. 01/18/06 3:13 PM Page 365 of 448 Users Manual Medicare Episode Report This report is especially useful for Medicare Cost Reporting. You can input an average cost per visit per skill so that an episode cost and gross margin can be calculated. Visits with a skill of ST, ST Eval and ST Assistant will be shown in the ST column. Visits with a skill of PT, PT Eval and PT Assistant will be shown in the PT column. Visits with the skill of OT, OT Eval and OT Assistant will be shown in the OT column. If you select to send the report to Excel, all of the OASIS questions that determined the PPS payment are available in the Excel file. If you select multiple offices, the average visit copy per skill entered for each office will be used. However, the fields will be disabled for entry. To enter average visit cost per skill per office select one office. 01/18/06 3:13 PM Page 366 of 448 Users Manual An example of the Medicare Episode Report: 01/18/06 3:13 PM Page 367 of 448 Users Manual Payment Log/Cash Application Report This report shows details about payments received and is used to perform bank reconciliation. The Cash Application Report is also available from this screen and shows the amount of cash that has been applied to invoices from payments. To select payers, click the “Select Payer” button and click the “Generate” button. To select multiple payers, click on the first payer and then while holding down the Shift key, click on the last payer then click the OK button. To select multiple non-contiguous payers, hold down the Ctrl key and click on each payer, then click the OK button. 01/18/06 3:13 PM Page 368 of 448 Users Manual Payroll Interface Report This report will list postings created when a Payroll Export was processed to a payroll system. 01/18/06 3:13 PM Page 369 of 448 Users Manual Payroll Report This report can be used to send to an outside payroll vender to perform your agency’s payroll. When run for just an agency’s contractor employees, this report can be used to check against invoices received by the accounts receivable department. If a comment exists for a pay item, it will be included on this report. 01/18/06 3:13 PM Page 370 of 448 Users Manual Sales (Invoice) Report The Sales (Invoice) Report is invoice based and will report all “activity” on invoices during a selected date range. Because this report is invoice based, it can be used to balance an earlier Invoice Aging Report to a later Invoice Aging Report. First Aging Total AR + Total Change in Sales (*on the sales invoice report) - Cash Applied to Aging During Date Range (*) = Later Aging Total AR To balance the Invoice Aging report and the Sales (Invoice) report it is necessary to run the Invoice Aging report using the “Invoice Creation Date” option and run the Sales (Invoice) Aging report using a date range equal to the period between the first and later Aging reports. For example, if you are balancing an Aging for 12/31/02 and an Aging for 1/31/03, the date range for the Sales (Invoice) Aging report should be 1/01/03 through 1/31/03. To balance the Sales (Item) report and Sales (Invoice) report for Medicare (Only): 1. Run a Sales (Item) report for Medicare for a date range for service items only, by payroll dates, all transactions. This will give you a total items sales figure. 2. Run a Sales (Invoice) report for the Medicare payer for the same date range. This report now gives you three figures: a. Total change in sales - the total change in invoice activity during the date range b. Total change in sales due to invoice line items with trans dates outside date range - the portion of the figure in a. that are due to RAP or EOE service items that have “Trans dates” (payroll dates) outside the date range. This means these sales do not show on the Sales (Item) report. c. If there are any invoices that have RAP or EOE service items with “Trans dates” within the reporting date range, yet their invoice creation dates are before the date range, a second Sales (Invoice) report will appear proving the Total change in sales for invoices before the date range. Medicare Sales (Item) Report Sales = Medicare Sales (Invoice) Report (Total change in sales - Total change in sales due to invoice line items with trans dates outside date range) + Total change in sales for invoices before the date range for services that appear on the sales item report 01/18/06 3:13 PM Page 371 of 448 Users Manual 01/18/06 3:13 PM Page 372 of 448 Users Manual Sales (Misc) Report Use this report to report sales by “Service Location”. The Sales (Misc) report that will create 2 Excel (.xls) files: 1. medicaresalesbyservloc###.xls – this file reports the total sales for Medicare by “Service Location.” 2. nonmedicaresalesbyservloc###.xls – this file reports the total sales for all Non-Medicare by “Payer Class”, and “Service Location.” Also included are total costs, transportation sales and cost, sales tax and invoice adjustment totals. 01/18/06 3:13 PM Page 373 of 448 Users Manual Sales (Item) Report This is an excellent report to run to report almost any information regarding closed visits. To select skills, click the “Select Skills” button and click the “Generate” button. To select multiple contiguous skills, click on the first payer and then while holding down the Shift key, click on the last payer then click the OK button. To select multiple non-contiguous payers, hold down the Ctrl key and click on each payer, then click the OK button. Adjustments: Just Items – Will report only the work items, no adjustments. Just Adjustments – Will report only the adjustments, no original work items. Adjusted Items – Will report the work items only, after the adjustments are applied. All Transactions – Will report both the work items and the adjustments. Adjustments reported are based on the care date of the work item adjusted. Items with Adjustments by Date Adjusted – Will report both the work items and the adjustments. Adjustments reported are based on the date of the adjustment. Below is an example of how the different “Adjustment” options will affect your report. This example is for Care Dates 9/1/02 – 9/10/02. This report will find any work items selected (hours, visits, pay items, etc.) that fall within that date range. In addition, this report will find any adjustments for those work items, regardless of when the adjustment was made. Just Items Date 9/1/02 Bill Unit 5h Sales $25 Total Adjusted Items 5h $25 Date 9/1/02 Bill Unit Sales 7h $35 Total Desc Visit Just Adjustments Desc Visit 7h 01/18/06 3:13 PM $35 Date Desc 9/1/02 Adj-9/15/02 9/1/02 Adj-9/15/02 Total All Transactions Bill Unit 7h (5h) 2h Date 9/1/02 9/1/02 9/1/02 Total Bill Unit Sales 7h $35 (5h) $(25) 5h $25 7h $35 Desc Adj-9/15/02 Adj-9/15/02 Visit Sales $35 $(25) $10 Page 374 of 448 Users Manual Output Options Output Options, if selected will generate Microsoft Excel (.xls) spreadsheets for the data selected providing the following information: By County and Age Client, Visits, Hours, OT by Payerclass Client, Employees, Visits, Hours by Skill Payer-Client AR (Payroll Dates Only) Hours by County and Skill Patient Summary 01/18/06 3:13 PM Page 375 of 448 Users Manual State Unemployment Reporting and Electronic File Creation Some states require that quarterly unemployment reporting be made electronically if you have over a certain number of employees. SAM gives you both a report for quarterly unemployment and the ability to create an electronic file for your state in the state’s accepted format. You will need to know the password to run this report. To create the electronic file, you must enter some state specific information. 01/18/06 3:13 PM Page 376 of 448 Users Manual Before creating the file, you are given a chance to name the file and tell the system where to create it. Each state has filename that they require – these are the default names the system uses. The file may then be copied to a floppy and sent to the state. In some instances, the state may provide you with an E-mail address to which you can mail the file. 01/18/06 3:13 PM Page 377 of 448 Users Manual Statements This Accounts Receivable report gives account statements for payers and/or clients. 01/18/06 3:13 PM Page 378 of 448 Users Manual Client/Payer Function Group Reports Client Payer List Report This Client/Payer-type report shows the relationships of an agency’s clients with the agency’s payers. 01/18/06 3:13 PM Page 379 of 448 Users Manual Scheduling Application Group Reports Employee Function Group Reports Employee Dispatch Report This Employee report consists of a list of visits in the specified date range that is assigned to the specified employee(s). The visit information on the report includes the employee’s name, the client’s name and phone number, and the visit date, start time, and end time. You may optionally generate the report in “Report” and/or “Calendar” format. If you select the “Report” format, the visit information on the report includes the employee’s name, the client’s name and phone number, and the visit date, start time, and end time. You may also include the client comment on the “Report” format. If you select the “Calendar” format, the visit information will include the employee’s name, the client’s name in calendar format including the start and end times of the visit. The “End of Week” will default to the end of week defined for the office; however, you may change this for the calendar format. In addition, you can control the vertical size of each calendar week. The size will be the minimum of either the value you enter or the number of visits that occur on each day. You may optionally select to Show Time, or Show Only AM/PM or to not show times. This will affect the report and calendar output. 01/18/06 3:13 PM Page 380 of 448 Users Manual Employee List Report This Employee report is a list of employees defined in the system. It can be run for all office or one office in particular office. If you select to report “shared employees”, only those employees that exist in more than one office will be reported. If “ALL” offices is selected, the most recently updated shared employee record is reported. If a particular office is selected, the shared employee record for the selected office is reported. 01/18/06 3:13 PM Page 381 of 448 Users Manual Employee Tax Withholding Report This Employee-type report details all the tax withholding information entered in the system for employees. 01/18/06 3:13 PM Page 382 of 448 Users Manual Employee Tracking Report This Employee report shows detailed information about specified employee tracking item on employees. This report can also be used to print a list of all employees’ start dates or birth dates. To track an employee required in-service training credits or hours, refer to section Employee Tracking. This report will show an employee’s tracking items as well as itemized sub-tracking items (like the titles of individual in-service courses attended by the employee). You can use this report to delete hours/credits tracking items from your employee’s by using the Purge option. You must select “Select Individual Item” and select the tracking item to be deleted. Then enter the date range that you wish to delete. For example: Selecting “Inservice Hours 2004” with date range of 01/01/2004 – 12/31/2004, SAM will delete ALL occurrences of this tracking item within the selected date range for all employees in the current office. 01/18/06 3:13 PM Page 383 of 448 Users Manual Pay Rate Report This report shows all defined pay rates in the system including default pay rates and pay rates defined for payers, employees, payer/employee, client, payer/client and client/employee. 01/18/06 3:13 PM Page 384 of 448 Users Manual Potential Overtime Report This report shows employees that have potential overtime hours scheduled (confirmed or verified.) Potential overtime includes hours from pay items (that affect overtime) and visits, across all offices. Employee schedules are examined from the current week forward. The report includes the option to sort by “Week Ending Date” or by “Employee.” 01/18/06 3:13 PM Page 385 of 448 Users Manual Timesheets This report will report non-closed visits from the saved model weeks or scheduled visits sorted by employee or client. All Timesheets: Timesheets can be generated for all employees, one employee, or selected groups of employees. Timesheets can be generated for all payer programs or one specific payer program. Timesheets can be ordered by employee or by client alphabetically when generated. The source of the services to be provided to the client on the timesheets can be gathered from either the pre-scheduled confirmed visits in the date range chosen or a client’s pre-defined model week. Your software vendor must set up the attributes for the assigned tasks to be displayed on the timesheets in advance in order for the timesheets to automatically populate the values represented in the client profile’s attributes. “Other” Timesheet: Must be run for 1 or 2 full week range. No partial weeks are allowed. If a time sheet is generated for a 1 week date range, the total hours displayed will represent 1 week only not 2 weeks. If a day has two visits, the timesheet will correctly display the total hours. If more than two visits are found on a day, there will be a second timesheet generated with the additional visit. If a date range containing two weeks is chosen, the correct unique visits will appear on the first and second week. Note: If more than 1 visit is scheduled for a day in either week, the timesheet may not represent the correct totals and week’s schedule because of the way this timesheet is formatted. The “Other” timesheet cannot be generated for the “1st –15th” or “16th – EOM (end of month)” date format options. “3670” Timesheet: This timesheet may be generated with all three date format options “entered”, “1st –15th”, or “16th – EOM.” All date ranges entered must fall within the same month. Up to two visits per day can be displayed on the timesheet. If more than 2 visits per day are entered an additional timesheet will automatically be generated for that date range. When using the “1st –15th”, or “16th – EOM date format options, you must enter a full week date range. When using the “entered” date format option to generate a partial week, your date selection must either begin on the week begin date or end on the week ending date. This timesheet only has the ability to display up to 14 assigned attributes. Any attributes after the 14th will not show on the timesheet. “PHC, CBA, and CLASS” Timesheets: Can be generated with all three date format options “entered”, “1st –15th”, or “16th – EOM. 01/18/06 3:13 PM Page 386 of 448 Users Manual All date ranges entered must fall within the same month. Up to two visits per day can be displayed on the timesheet. If more than 2 visits per day are entered, an additional timesheet will automatically be generated for that date range. When using the “1st –15th”, or “16th – EOM date format options, you must enter a full work week date range ending with a valid work week ending date. When using the date format option “Entered” to generate a partial week, your date selection must either begin on the week begin date or end on the week ending date. The CBA and PHC formats of the Timesheet Report will include a client signature line above the employee signature line if the n:\sam.ini file contains the following line: Ini_CBA_PHC_Client_Signature, T 01/18/06 3:13 PM Page 387 of 448 Users Manual Client / Payer Function Group Reports Bill Rate Report This Client/Payer-type report shows defined bill rates in the system including default bill rates and bill rates defined for payers, clients, and payer/client relationships. 01/18/06 3:13 PM Page 388 of 448 Users Manual Client Dispatch Report This Client/Payer-type report consists of a list of visits in the specified date range that is scheduled for the specified client(s). The visit information on the report includes the client’s name, the employee’s name, and the visit date, start time, and end time. You may optionally generate the report in “Report” and/or “Calendar” format. If you select the “Report” format, the visit information on the report includes the client’s name, the employee’s name, and the visit date, start time, and end time. You may also include the visit comment on the “Report” format. If you select the “Calendar” format, the visit information will include the client’s name, the employee’s name in calendar format including the start and end times of the visit. The “End of Week” will default to the end of week defined for the office; however, you may change this for the calendar format. In addition, you can control the vertical size of each calendar week. The size will be the minimum of either the value you enter or the number of visits that occur on each day. You may optionally select to Show Time, or Show Only AM/PM or to not show times. This will affect the report and calendar output. You may optionally select to Show Name or Show Skill. This will affect the calendar output only. 01/18/06 3:13 PM Page 389 of 448 Users Manual Client List Report This Client/Payer-type report is a list of clients defined in the system. It can be run for all office or one office in particular office. Choosing a status and then entering in a date range will show only the client’s that were given the selected status within the selected date range. In this way, you can show all patients admitted or discharged between two date ranges. There are four report formats available: 1. The Client List format reports brief information about each client (you may select what information is included). This reports multiple clients per page. 2. The Client Profile format report more information regarding a client. This report includes information defined on the Edit Client screen, Payers and Compliance Rules. 3. The Discharge/Transfer Summary format reports the patient’s status and reason defined for that status on a Discharge/Transfer Summary form. 4. The Case Information form reports client information on a Case Information form. If you would like to select one or multiple clients, click on the Multi Pick Client button. After you have filled in this screen with the conditioning you would like for the report, and then click the Generate button, the report will display a list of all clients that meet your conditioning criteria. To select one client, click on the client then click the OK button. To select multiple contiguous clients, click on the first client and then while holding down the Shift key, click on the last client then click the OK button. To select multiple non-contiguous clients, hold down the Ctrl key and click on each client, then click the OK button. The Client List report uses the following logic when selecting by payer class or by payer: 01/18/06 3:13 PM Page 390 of 448 Users Manual 1. When selecting a specific payer class, all clients with payer-sets (that are not "do not use") that have the associated payer class, combined with, all self-pay clients with the associated payer class that have self-pay allowed skills (skills that are not "do not use") are included in the report. 2. When selecting the payer "Private Pay," all clients with payer-sets (that are not "do not use") that have the payer class "Private Pay," combined with, all self-pay clients with payer class "Private Pay" that have self-pay allowed skills (skills that are not "do not use") are included in the report. 01/18/06 3:13 PM Page 391 of 448 Users Manual Client Payer List Report This Client/Payer-type report shows the relationships of an agency’s clients with the agency’s payers. 01/18/06 3:13 PM Page 392 of 448 Users Manual Payer List Report This report shows payer information. The report may be filtered on various fields and optionally includes different information defined for the payer. 01/18/06 3:13 PM Page 393 of 448 Users Manual Work / Sales Function Group Reports Compliance Summary Report This Work/Sales report will run compliance checking (selection on client status and payer are provided. Additional selection options allow you to ignore visits with $0 bill rates and/or supervisory visits.). You may optionally report compliance rules with service deficits and/or visits that are out of compliance. It is important to note that visits will only be updated with compliance information if you are running the report in a front office (or in a back office that has no front offices.) If you run the report from a back office for a front office, the compliance information is not saved on the visits. They are not updated because this would cause the updated visit to data exchange to the front office, possibly overwriting work done on the visit by the front office. Note: Any compliance rule that is older than 1 year (based on the end date of the rule) will be purged nightly when the system reindexes by default. If you wish to modify this default timeframe, add the following line to your n:\sam.ini file (where # is the number of months back to keep compliance rules): Ini_Comp_Rules_Purge_Month,# 01/18/06 3:13 PM Page 394 of 448 Users Manual Expiring Compliance Rules Report This report may be used select a specific time frame and report compliance rules (Dr Orders, Insurance Authorization and/or Payer Authorization Dates) that are going to expire in that time frame. Note: Any compliance rule that is older than 1 year (based on the end date of the rule) will be purged nightly when the system reindexes by default. If you wish to modify this default timeframe, add the following line to your n:\sam.ini file (where # is the number of months back to keep compliance rules): Ini_Comp_Rules_Purge_Month,# 01/18/06 3:13 PM Page 395 of 448 Users Manual Filled Visit Report This report is useful in Staffing situations to get a clear picture of where visits or shifts are not being “filled”. The report includes the number of hours and shifts by each visit type, e.g. Unassigned, Confirmed, Verified, Client Cancelled, Employee Cancelled, Office Cancelled, Closed, Other and includes a % Filled column. 01/18/06 3:13 PM Page 396 of 448 Users Manual On-Call Report This report shows detailed information about visits within a specified date range that have not been verified or closed. This report is generated and given to the on-call person so that they have the information they need to record scheduling changes after the agency office hours. The “On-Call Spreadsheets” are specifically designed to report all information that On-Call might need. These spreadsheets can then be copied to a PDA device or Pocket PC for use by On-Call. If you choose this option, and you do not have an “Ini_oncall_file_path” defined in your n:\sam.ini file, SAM will by default place the spreadsheet files in your n:\excel files folder. If wish to have these files saved elsewhere, edit your n:\sam.ini and define an “Ini_oncall_file_path”. Example: Ini_Oncall_File_Path,C:\Documents and Settings\RiverSoft\My Documents\Pocket_PC My Documents\Business\ 01/18/06 3:13 PM Page 397 of 448 Users Manual The following spreadsheets are created: 1. 2. 3. 4. 5. Clients.xls – This contains a list of active clients. The following are the columns in the .xls file: a. Client name b. Phone c. Address 1 d. Address 2 e. City f. Comment Client_schedules.xls – This contains visits for active clients within the date range selected. The following are the columns in the .xls file: a. Client name b. Visit date c. Visit time (in 24 hour format) d. Employee name e. Skill of the visit f. Hourly pay rate g. Hourly bill rate Employees.xls – This contains a list of active employees. The following are the columns in the .xls file: a. Employee name b. Skill of the employee c. Phone d. Alt Phone e. Address 1 f. Address 2 g. City h. Comment Employee_schedules.xls – This contains visits for active clients within the date range selected. The following are the columns in the .xls file: a. Employee name b. Visit date c. Visit time (in 24 hour format) d. Client Name e. Skill of the visit f. Hourly pay rate g. Hourly bill rate Emp_sch_extended.xls – This contains visits for active clients within the date range selected. The following are the columns in the .xls file: a. Employee name b. Visit date c. Visit time (in 24 hour format) d. Client Name e. Skill of the visit f. Hourly pay rate g. Hourly bill rate h. Client Address 1 i. Client Address 2 j. Client City k. Client Zip l. Visit Status Each time you process the report with the option “On-Call Spreadsheets” chosen, these .xls files will be recreated (overwriting any existing .xls files of the same name.) 01/18/06 3:13 PM Page 398 of 448 Users Manual Pay Item Report This report shows all pay items that have not yet been “closed” within a specified date range. A specific employee and/or pay item may also be specified. If you wish to report “closed” pay items, we recommend you use the Sales (Item) Report. 01/18/06 3:13 PM Page 399 of 448 Users Manual Payroll Interface Report This report will list postings created when a Payroll Export was processed to a payroll system. 01/18/06 3:13 PM Page 400 of 448 Users Manual Payroll Report This report can be used to send to an outside payroll vender to perform your agency’s payroll. When run for just an agency’s contractor employees, this report can be used to check against invoices received by the accounts receivable department. If a comment exists for a pay item, it will be included on this report. Selecting the “Summary Spreadsheet” will generate a Microsoft Excel (.xls) file that will have a 1 line summary for each employee including a column for “average hours worked” which is the average number of hours worked for the time-frame selected. 01/18/06 3:13 PM Page 401 of 448 Users Manual Salaried Visit Report This report summarizes the number of jobs and hours performed by Office, Payer Class, Week Ending, Skill, Pay Unit and Bill Unit and then provides totals by Office and Payer Class performed by your Salaried employees. 01/18/06 3:13 PM Page 402 of 448 Users Manual Service Item Report This report shows all service items in the system within a specified date range. A specific client and/or service may also be specified. 01/18/06 3:13 PM Page 403 of 448 Users Manual Service List Report This report shows all service items that may be chosen to add as service items for clients. You may select to report your Standard and Local services, Standard only or Local only. 01/18/06 3:13 PM Page 404 of 448 Users Manual Supply Item Report This report shows all supply items in the system within a specified date range. A specific client and/or supply may also be specified. If you select to “Create text file of supplies instead of report”, a text file will be created that could be used to send to your vendor for reordering of supplies. The following is the text file format: Start ----1 7 13 28 35 45 75 77 Length -----6 Unique Office ID 6 PO Number 15 SKU - Left Justify with hyphens 7 Quantity "0" Fill 10 Cost "0" Fill, no decimal, 5 decimal places 30 Description 2 "99" 22 Space Fill 01/18/06 3:13 PM Page 405 of 448 Users Manual Supply List Report This report shows all supply items that may be chosen to add as supply items for clients. You may select to report your Standard and Local services, Standard only or Local only. 01/18/06 3:13 PM Page 406 of 448 Users Manual Transportation Report This report shows all travel expenses in the system within a specified date range. A specific client and/or employee may also be specified. This report will only report transportation on Verified visits. If you wish to report transportation on closed visits, please use the Sales (Item) Report. If you wish to report transportation on confirmed visits, please use the Visit Report. 01/18/06 3:13 PM Page 407 of 448 Users Manual Visit Report This Work/Sales-type report shows detailed information about visits in the system. Selecting the “Verified Visit Report” option will report only verified visits in the week ending specified. Selecting the “General Visit Report” give you the option of defining the report time frame and the type of visits to include. You may optionally have the authorization number defined on the Insurance Authorizations reported, providing a report to verify that you can use to check if you have insurance authorizations for all visits. You may also optionally report only those visits that were imported into the office using the DLL interface with another vendor’s system (telephony, point of care, etc.) 01/18/06 3:13 PM Page 408 of 448 Users Manual Clinical Application Group Reports Patient Function Group Reports Blank 485/487 This report will allow you to print blank 485 and a blank 487. Blank Verbal Order This report will allow you to print blank Verbal Order. OASIS Potential Problem Log This report can be used to find potential issues with your OASIS Assessments. Currently you may report the following problems: 1. Patient admitted without Start of Care Assessment – reports patients that were admitted to the agency on or after the date you specify, but they do not have a start of care assessment. 01/18/06 3:13 PM Page 409 of 448 Users Manual 2. 3. 4. 5. 6. 7. 8. 9. 10. 11. 12. 13. Patient changed from hold to active without Resumption of Care Assessment – reports patients that were placed on hold on or after the date you specify, but there is not a corresponding resumption of care assessment. Patient hold done without a Transfer Assessment locking within 7 days – reports patients that were placed on hold on or after the date you specify, there is a corresponding transfer assessment, but it was not locked within 7 days of the date that the assessment was completed. Patient hold done without a Transfer Assessment - reports patients that were placed on hold on or after the date you specify, but there is not a corresponding transfer assessment. Patient discharged without Discharge or Transfer Assessment – reports patients that were discharged on or after the date you specify, but there is not a corresponding discharge or transfer assessment. Plan of Care without related OASIS assessment – reports patients that have a Plan of Care with a cert begin date on or after the date you specify, but there is not an assessment “associated” with the Plan of Care. MO825 answered No, EOE created, yet 10 or more therapy visits closed – reports patients that have the “Therapy Need” question on the OASIS Equip/Therapy screen answered as No, an EOE has been created for the associated Plan of Care on or after the date you specify, yet 10 or more closed therapy visits (skills PT, OT, ST, PN (PT Assistant), PE (PT Eval), OA (OT Assistant), OE (OT Eval), SA (ST Assistant) and SE (ST Eval)) were found between the Plan of Care’s cert begin and cert end dates. MO825 answered Yes, EOE created, yet less than 10 therapy visits closed – reports patients that have the “Therapy Need” question on the OASIS Equip/Therapy screen answered as Yes, an EOE has been created for the associated Plan of Care on or after the date you specify, yet less than 10 closed therapy visits (skills PT, OT, ST, PN (PT Assistant), PE (PT Eval), OA (OT Assistant), OE (OT Eval), SA (ST Assistant) and SE (ST Eval)) were found between the Plan of Care’s cert begin and cert end dates. MO825 answered No, yet 10 or more therapy visits scheduled – reports patients that have the “Therapy Need” question on the OASIS Equip/Therapy screen answered as No on a assessment completed on or after the date you specify, yet 10 or more scheduled (confirmed, verified or closed) therapy visits (skills PT, OT, ST, PN (PT Assistant), PE (PT Eval), OA (OT Assistant), OE (OT Eval), SA (ST Assistant) and SE (ST Eval)) were found between the Plan of Care’s cert begin and cert end dates. MO825 answered Yes, yet less than 10 therapy visits scheduled – reports patients that have the “Therapy Need” question on the OASIS Equip/Therapy screen answered as Yes on a assessment completed on or after the date you specify, yet less than 10 scheduled (confirmed, verified or closed) therapy visits (skills PT, OT, ST, PN (PT Assistant), PE (PT Eval), OA (OT Assistant), OE (OT Eval), SA (ST Assistant) and SE (ST Eval)) were found between the Plan of Care’s cert begin and cert end dates. LUPA predicted – 4 or fewer visits scheduled for RAP – report patients that currently have 4 or fewer visits scheduled for the episode reported. Plan of Care ends within 5 days of report date with no recert plan of care – reports patients that have their plan of care ending within 5 days of “From” date and do not currently have a recert plan of care entered. New admission falls within patient’s last episode – PEP should be applied – reports patients with RAP service items that have another RAP service item for the client (for 01/18/06 3:13 PM Page 410 of 448 Users Manual any admission) within the next 59 days. The RAP detected should be coded as a PEP claim. Delinquent RAP and EOE invoices - will report the following conditions for any episodes after the “from” date entered: 1. Episode ended, but RAP not created. 2. Episode ended and RAP created, but RAP not transmitted. 3. Episode ended and RAP transmitted (xxx) days ago, but EOE not created. 4. Episode ended and RAP transmitted (xxx) days ago, but EOE not transmitted. You may optionally select that this feature only search: o Medicare (patient’s with a client/payer relationship to a Medicare payer that is not marked as DNU) o Home Health / Non Medicare (patients without a client/payer relationship to a Medicare payer that is not marked as DNU AND is marked as “Home Health” on the Edit Patient screen.) o Both (Medicare or Home Health, this would not include any patients marked as Continuous Care and are non-Medicare. You may select which problems to report, print or send the results to any available report options (screen preview, printer, excel, etc.), select your sort option and select the office(s) to report on. When this feature is searching for matching assessments, there is a built-in date tolerance of 14 days. This is how many days the assessment’s complete date can be after the status date that you have entered to be considered. 01/18/06 3:13 PM Page 411 of 448 Users Manual OASIS Tracking Report This Office-level report provides the capability to get a listing of clients with an OASIS Assessment by assessment type and/or status. You may also optionally select to report patients that do not have an OASIS Assessment defined. 01/18/06 3:13 PM Page 412 of 448 Users Manual Plan of Care / Verbal Order This report prints a Plan of Care (HCFA 485) form and Addendum to the Plan of Care (HCFA 497) form for the selected patient(s), or a Revision to Plan of Care (physician’s verbal order) form for the selected patient(s) depending on the selection criteria. You may also export Plans of Care/Verbal Orders to a XML file to be sent to a Care Plan Oversight system for signature. 01/18/06 3:13 PM Page 413 of 448 Users Manual Plan of Care Tracking Report This Office-level report provides the capability to get a listing of Plans of Care or Verbal Orders that have not been mailed or that have been mailed but have not been received signed. 01/18/06 3:13 PM Page 414 of 448 Users Manual Recertification Due Report This Office-level report provides a list of Plans of Care that have a certification end date that falls within the dates specified indicating that they are due for Recertification. 01/18/06 3:13 PM Page 415 of 448 Users Manual Office Function Group Reports Census (Episode) Report Based on the Cert Period Date entered, the report creates one line of the report for each clientpayer relationship and shows plan of care information on each line if the plan is in effect during the entered Cert Period Date. Every active Plan of Care for the Cert Period Date selected will be reported (including “Self-Pay”). If there is not an active Plan of Care for the Cert Period Date selected, “No Active POC” will be noted. The information on the report includes supervisory visit details; patient’s county, agency and payer start of care dates, payer, and certification begin & end date, case manager, physician, and disaster code. Optionally you may include diagnosis, Dr Orders, patient address and phone number, allowed skills and discharge dates. You may also filter the report to show clients with one or more of the following conditions; continuous care, home health, continuous care/home health (both), Medicare/Medicaid, DNR’s, or patients with active Plans of Care only. You may sort the report by: 1. Case Manager/Client: Orders the report by the case manager whom has to be specified by checking the case manager box in under the employee demographics and the same employee (case manager) has to be associated with an active Plan of Care of the patient. The report lists the clients alphabetically per case manager. 2. Case Manager/Next Supervisory Visit: Orders the report the same as above but lists the next supervisory visit per case manager. 3. Certification end date: This option orders the report by the ending date for the cert period based on the dates chosen for the certs active. 01/18/06 3:13 PM Page 416 of 448 Users Manual 4. Client name: Orders the report alphabetically by client name. 5. Disaster code (risk code): This will sort the report by the risk code of the client. The disaster code has to be filled out in the client ancillary information on the Client screen or the Edit Patient screen for the report to populate this field. 6. Next supervisory visit: Orders the patients by next supervisory visit. 7. Physician: Orders the report by physician from the patients POC. 8. Affiliation/Client: If you chose an office and that office has defined affiliations you may order your report by checking this box. 9. Status/Client: This option lists the report by the clients status which is listed after the client number by a letter (i.e. A=active, D=discharged, H=hold, N=not admitted, T=transferred, and I=incomplete) 10. Race/Client: Sorts by the patients race as entered on the client. If you condition the report by Payer, Payer Class or Medicare/Medicaid only, only patients with active Plan of Cares based on the Cert Period Date will be reported. To track supervisory visits with this report, simply schedule a visit with a supervisory sub-skill for client. The visit must be closed and the patient has to have an active Plan of Care in order to show on report. Ensure the supervisory visit frequency is not set to zero for the client-payer or client (for self-pay situations.) This report will show the last supervisory visit done for a clientpayer or client, the supervisory visit frequency, and the date the next supervisory visit is due. If Supervisory Frequency information has been entered for a patient in the Self-Pay Billing Info area of the Client screen, an additional line will be reported for the patient. The Census (Episode) report also offers an “Output Daily Census Spreadsheet.” If this option is “On”, after the report is generated, an Excel spreadsheet file will be generated (it will prompt you for the path and filename.) The “.xls” file will report how many of the patients on the census report were active each day of the report range. Once you have this spreadsheet, using Excel you can calculate the average, median and mode daily census. You may even graph it. It is important to note, that if you have a patient that is admitted and discharged on the day, they are not counted in the daily active count in the spreadsheet. 01/18/06 3:13 PM Page 417 of 448 Users Manual The last page of this report shows a summary of calculated census information: These values are calculated as follows: Duplicated Census Summary: 1. Number of episodes = total episodes active within the specified date range. This will include “clients” if they were included in the report. 2. Active patients (includes hold(s) as of xx/xx/xx (date = Cert Active During end date) = total number of patients that were active as of xx/xx/xx including those patients that were on hold as of xx/xx/xx. 3. Patient admitted during date range = patients with admit status date within the date range. 4. Patients non-admitted during date range = patients with non-admitted status date within the date range. 5. Patients discharged during date range = patients with discharge status date within the date range. (Discharged from the agency) 6. Active patients (does not include holds) as of xx/xx/xx (date = Cert Active During end date) = patients that were active as of xx/xx/xx not including those patients that were on hold as of xx/xx/xx. 7. Incomplete patients as of xx/xx/xx (date = Cert Active During end date) = patients that were incomplete as of xx/xx/xx. 8. Number of patients on hold as of xx/xx/xx (date = Cert Active During end date) = patients that were on hold as of xx/xx/xx. 01/18/06 3:13 PM Page 418 of 448 Users Manual 9. Patients active at any time during the date range = patients that were active at any time during the date range. Difference between Duplicated and Unduplicated Census Summary: Unduplicated counts will only count the first admit (not subsequent admit #'s for the client). Duplicated counts will count all admits for the client. Number of Duplicated client episodes due to recerts and multiple payer sources = each patient recert or another episode for an additional payer within the date range will be counted. If “clients” are included in the report, any clients that have an “entry date” after the “to” date in the selected date range for the report will not be included. 01/18/06 3:13 PM Page 419 of 448 Users Manual Medication Profile Report You provide a “As Of” date and SAM will report all medications (found in plans of care and verbal orders) that are current as of the date entered. You may also select by Physician, Payer and/or Client. 01/18/06 3:13 PM Page 420 of 448 Users Manual Phrases Report This report is a list of intervention, goal, rehabilitation potential, and discharge plan phrases defined in this system. 01/18/06 3:13 PM Page 421 of 448 Users Manual Physician List Report This Office-level report is a list of physicians in the physician’s database. 01/18/06 3:13 PM Page 422 of 448 Users Manual Strategic Planning Report This report shows patient referral source, payer, cert begin date, diagnosis (primary) and physician. If the patient does not have current plan of care, then the first active client/payer relationship will be reported as the payer. 01/18/06 3:13 PM Page 423 of 448 Users Manual North Carolina DMA 3000 This Patient report prints a North Carolina DMA 3000 Plan of Care for the selected patient(s). This is a North Carolina state-specific Plan of Care form and is available only in those offices that are located in North Carolina. There is also the ability to print a blank version of this report. 01/18/06 3:13 PM Page 424 of 448 Users Manual DLL Reports These report(s) are used at offices that are using the SAMDLL technology to interface to another vendor software system. To access the DLL Reports, select menu option File | Print DLL Reports. DLL Error Report This report will include any error message generated by attempt to import into this systems database. 01/18/06 3:13 PM Page 425 of 448 Users Manual DLL Transaction Register This report will include transactions of data that have been imported into this systems database. 01/18/06 3:13 PM Page 426 of 448 Users Manual HCFA 1500 Locator Mapping HCFA 1500 Locator No. 1 Description Health Insurance Type 1a Insured’s ID Number 2 Patient’s Name 3 Patient’s Birth Date/Sex 4 Insured’s Name 5 Patient’s Address/Telephone Street City State/Zip Code Telephone Patient’s Relationship to Insured 6 7 Insured’s Address: 8 (Only if patient is the insured party) Patient Status: 9a-d Marital Employment Other Insured’s Info 01/18/06 3:13 PM Initial SAM Data Location Name Administration Payers Profile Payer Class Administration Clients Define Payer Sets Insured’s ID Administration Clients Client Profile Client Name Administration Clients Client Profile Birth Date/Sex Administration Clients Define Payer Sets Name Administration Clients Client Profile (Under Client Name) Administration Clients Define Payer Sets Relation Administration Clients Profile (Under Billing Name) Administration Clients Insurance Info Marital/Employment N/A Edit Claim Screen Data Mapping Tab Title Insurance Type Field Insurance I.D. # HCFA1500 Patient Name HCFA1500 DOB/Sex Insurance Insured Name HCFA1500 (Under Patient Name) HCFA1500 Insured Relation Insurance (Under Insured Name) HCFA1500 Marital Status Employment Status Insurance (Under Other Page 427 of 448 Users Manual HCFA 1500 Locator No. 10ac 10d Description Patient’s Condition Related To: Employment Auto Accident Other Accident Reserved For Local Use 11 Insured’s Policy Group or FECA Number 11a Insured’s Date of Birth / Sex 11b 11c Employer’s Name Insurance Plan or Program Name 11d Another Health Benefit Plan Patient Release of Medical Information: Signature/Date or Signature on File Insured Authorization of Payment: Signature or Signature on File Date of Illness, Injury, or Pregnancy Illness, Injury, or Pregnancy First Date of Similar Illness Unable to Work Dates 12 13 14a 14b 15 16 01/18/06 3:13 PM Initial SAM Data Location Name Edit Claim Screen Data Mapping Tab Title Field Insured) Accident Administration Clients Ancillary Info Accident HCFA1500 N/A Physician/D iagnosis Local Use 1 Administration Clients Define Payer Sets Policy Number Administration Clients Define Payer Sets DOB/Sex N/A Administration Clients Define Payer Sets Group Name N/A Insurance Policy # Insurance DOB Sex Insurance Insurance Employer Group Name N/A N/A (Default to Signature on File) HCFA1500 Signature on File/Date (Default to Signature on File) Insurance Signature on File N/A HCFA1500 Illness Date N/A Care Reason N/A Physician/ Diagnosis HCFA1500 N/A HCFA1500 Unable to Work Dates Similar Date Page 428 of 448 Users Manual HCFA 1500 Locator No. 17 Description Name of Referring Physician 17a Physician ID Number 18 Hospitalization Dates 19 Reserved for Local Use Outside Lab? Charges Diagnosis Codes 20 21 22 23 Medicaid Resubmission Code/ Reference Number Prior Authorization Number Initial SAM Data Location Name Clinical Information Edit Patient Define Plan of Care/ Verbal Order Prime Physician Administration Physicians UPIN Clinical Information Edit Patient Edit Hospital Stays Start Date/End Date N/A (Default to NO) Clinical Information Edit Patient Define Plan of Care/ Verbal Order Diagnoses ICD-9-CM N/A Edit Claim Screen Data Mapping Tab Title Physician/ Diagnosis Field Physician Physician/ Diagnosis UPIN HCFA1500 Hospital Dates Physician/ Diagnosis Physician/ Diagnosis Physician/ Diagnosis Local Use 2 Physician/D iagnosis Resubmit Code Original Ref # Insurance Auth # Detail Lines Svc Dates Detail Lines Location Outside Lab? Charges Diagnosis Code 1 Diagnosis Code 2 Diagnosis Code 3 Diagnosis Code 4 24a Dates of Service 24b Place of Service Administration Clients Define Payer Sets Authorization # Schedule Display Schedule Visit (Right Click) Edit Visit Date (Default to “012”) 24c Type of Service (Default to “01”) Detail Lines Svc Type 24d Procedures, Services, or : CPT/HCPCS Modifier Visits: Administration Client/Payer Skills & Codes or Payer Skills & Codes Detail Lines HCPCS Modifier 01/18/06 3:13 PM Page 429 of 448 Users Manual HCFA 1500 Locator No. 24e Description Initial SAM Data Location Name Edit Claim Screen Data Mapping Tab Title Supplies: Schedule Display Schedule Supply Items (Client Related or Visit Related) HCPC Codes and Modifier N/A Detail Lines Diagnosis Code Ref (Bill Rate * Units) Detail Lines Charges Field 24f Diagnosis Code Reference Number Charges 24g Days or Units (Number of Visits) Detail Lines Days/Units 24h EPSDT N/A Detail Lines EPSDT 24i EMG N/A Detail Lines EMG 24j COB N/A Detail Lines COB 24k Reserved for Local Use Federal Tax ID Number N/A Detail Lines Local Use Configuration Offices Federal ID HCFA1500 Fed ID # (Invoice Number) N/A (Invoice Number) (Default to NO) Insurance Accept Assignment? 25 27 (EIN Always) Patient’s Account Number Accept Assignment? 28 Total Charge (Sum of Charges) Detail Lines HCFA Total 29 Amount Paid (Default to $0.00) Detail Lines Amount Paid 30 Balance Due (Default to $0.00) Detail Lines Balance Due 31 Administration Payer Provider Rep (Invoice Date) N/A N/A N/A 32 Signature of Physician or Supplier Date of Bill Outside Facility 33a Billing Name Configuration Physician/ Diagnosis HCFA1500 (Outside Facility Fields) (Office Fields) 26 01/18/06 3:13 PM Page 430 of 448 Users Manual HCFA 1500 Locator No. Description Address 33b PIN# 33c GRP# 01/18/06 3:13 PM Initial SAM Data Location Name Offices (Address / Lock Box) N/A Administration Payers Provider IDs Edit Claim Screen Data Mapping Tab Title Field HCFA1500 PIN Insurance Prov ID Page 431 of 448 Users Manual UB92 Locator Mapping UB92 Locator No. 1 Description Provider Name, Address, Telephone 2 3 4 (Untitled) Patient Control Number Type of Bill 5 Federal Tax Number 6 Statement Covers Period 7 Initial SAM Data Location Name Configuration Offices (Address / Lock Box) N/A (Invoice Number) Edit Claim Screen Data Mapping Tab Title UB92 Field (Under Office) N/A N/A N/A (Invoice Number) UB92 Bill Type UB92 Fed ID # UB92 Dates Covered Days Administration Payers Bill Mask Configuration Offices Federal ID Billing Period: Either weekly or by billing calendar. N/A UB92 Days Covered 8 Noncovered Days N/A UB92 Not Covered 9 Coinsurance Days N/A UB92 Coins Days 10 N/A UB92 Life Res Days Administration Physicians Claim ID Clinical Codes Locator 11 12 Lifetime Reserve Days (Untitled) NC Medicaid Carolina Access Number Patient’s Name UB92 Patient Name 13 Patient’s Address UB92 (Under Patient Name) 14 Patient’s Birth Date UB92 DOB 15 Patient’s Sex Administration Clients Profile Client Name Administration Clients Profile (Under Client Name) Administration Clients Profile Birth Date Administration UB92 Sex 11 01/18/06 3:13 PM Page 432 of 448 Users Manual UB92 Locator No. Description Initial SAM Data Location Name Clients Profile Sex Administration Clients Insurance Info Marital Clinical Information Edit Patient Admit Date Edit Claim Screen Data Mapping UB92 Marital Status UB92 Admit Date Tab Title Field 16 Patient’s Marital Status 17 Admission Date 18 Admission Hour N/A UB92 Admit Hour 19 Type of Admission N/A UB92 Admit Type 20 Source of Admission N/A UB92 Src 21 Discharge Hour N/A UB92 Dischrg Hr 22 Patient Status 23 Medical Record Number Condition Codes Medicare: UB92 01 = discharged to home or self-care. 30 = still patient or expected to return for outpatient services (if the cert end date is the end of episode.) All Others: The Payer’s Bill Mask’s 3rd character will determine what is placed in the UB92 claim status field (locator 22.) If it is not numeric, the patient’s status will be used. If it is numeric, the numeric value is what will be placed in the status field on the UB92 claim. Client_No+Admit_No UB92 2430 31 (Untitled) 01/18/06 3:13 PM Patient StatusAM wound care - BID wound care New Wound Care Orders for Toe rcd 5/16mask Medical Record # N/A Payer Codes Condition Codes 1-7 N/A N/A N/A Page 433 of 448 Users Manual UB92 Locator No. 3235 Description Occurrence Codes and Dates 36 Occurrence Span Codes and Dates 37 Internal Control Number Provider Name and Address 38 3941 Value Codes and Amounts 42 Revenue Code 43 Initial SAM Data Location Name N/A Medicare: If there is a ICD9 that is a trauma code, will be = “05” and the date will be = date on the trauma ICD9. N/A N/A Administration Payers Payer Name Medicare: Value Code 1 is MSA Code (Client County) where “through” date is < 1/1/06 - CBSA Code where through date is => 1/1/06) Visits: Administration Client/Payer Skills & Codes or Payer Skills & Codes Supplies: Schedule Display Schedule Supply Items (Client Related or Visit Related) Revenue Code Revenue Description (Revenue Description by Payer and Skill) Edit Claim Screen Data Mapping Tab Title Field Payer Codes Occurrence Codes 1-8 Page Tab Occurrence Payer Codes Span/Dates Fields N/A N/A Page Tab Fields Insurance (Under Billing) Payer Codes Value Codes/Dates 15 Detail Lines Revenue Code Detail Lines Desc Detail Lines HCPCS/Rates Dr. Orders (Compliance Rules) Authorization Number 44 HCPCS/Rates 01/18/06 3:13 PM N/A Page 434 of 448 Users Manual UB92 Locator No. 45 Description Service Date 46 Service Units 47 Total Charges 48 49 50 Non-Covered Charges (Untitled) Payer Identification 51 Provider Number 52 Release of Information Assignment of Benefits Indicator Prior Payments 53 54 55 56 57 58 Estimated Amount Due (Untitled) (Untitled) Insured’s Name 59 Patient’s Relationship to Insured 60 Insurance ID 61 Group Name 01/18/06 3:13 PM Initial SAM Data Location Name Schedule Display Schedule Visit (Right Click) Edit Visit Date (Number of visits) (Qty for detailed supplies) (Bill Rate * Units) Edit Claim Screen Data Mapping Tab Title Detail Lines Field Date of Service Detail Lines Days/Units Detail Lines Total Charges N/A Detail Lines Non-Covered Charges N/A N/A N/A Administration Payers Profile Payer Name Administration Payers Provider IDs (Default to ‘Y’) Insurance Payer Name Insurance Prov # Insurance Release Info (Default to ‘Y’) Insurance Assigned Benefit N/A Insurance Prior Payments N/A Insurance Estimated Amt Due N/A N/A N/A N/A N/A N/A Administration Clients Define Payer Sets Name Administration Clients Define Payer Sets Relation Administration Clients Define Payer Sets Insured’s ID Administration Insurance Insured’s Name Insurance Relation Insurance Cert-SSN-HIC-ID no Insurance Group Name Page 435 of 448 Users Manual UB92 Locator 62 Insurance Group Number 63 Treatment Authorization Code 64 Employment Status Code 65 Employer Name Initial SAM Data Location Name Clients Define Payer Sets Group Name Administration Clients Define Payer Sets Group Number Administration Clients Define Payer Sets Authorization # Administration Clients Insurance Info Employment N/A 66 Employer Location 67 Principal Diagnosis Code 6875 Other Diagnosis Codes 76 Admitting Diagnosis 77 78 79 No. 80 Description Edit Claim Screen Data Mapping Tab Title Field Insurance Group Number UB92 Auth Code UB92 Employer Status UB92 Employer Name N/A UB92 Location Clinical Information Edit Patient Define Plan of Care/ Verbal Order Diagnoses ICD-9-CM Clinical Information Edit Patient Define Plan of Care/ Verbal Order Diagnoses ICD-9-CM (Same as principal diagnosis) Clinical Codes Diagnosis Codes Principal Clinical Codes Diagnosis Codes Other 1-8 Clinical Codes Admit Diag Code E-Code N/A Clinical Codes E Code (Untitled) Procedure Coding Method Principal Procedure Code and Date N/A N/A N/A (Default to ‘9’) Clinical Codes Clinical Codes Code Meth 01/18/06 3:13 PM Clinical Information Edit Patient Define Plan of Care/ Verbal Order Procedure Codes Principal Page 436 of 448 Users Manual UB92 Locator No. Description 81 Other Procedure Codes and Dates 82a Physician ID 82b Physician Name 83a Other Physician ID 83b Other Physician Name 84 Remarks 85 Provider Representative Signature Date 86 01/18/06 3:13 PM Initial SAM Data Location Name Surg Procs ICD-9-CM Clinical Information Edit Patient Define Plan of Care/ Verbal Order Surg Procs ICD-9-CM Administration Physicians UPIN Clinical Information Edit Patient Define Plan of Care/ Verbal Order Prime Physician Administration Physicians UPIN Clinical Information Edit Patient Define Plan of Care/ Verbal Order Sec Physician Medicare: Trauma Code Descriptions Administration Payer Provider Rep (Invoice Date) Edit Claim Screen Data Mapping Tab Title Field Clinical Codes Procedure Codes Other 1-5 Insurance ID No - (Under Physician Name) Insurance Physician Name Insurance ID No - (Under Physician Other) Insurance Physician Other Insurance Remarks N/A N/A N/A N/A Page 437 of 448 Users Manual Massachusetts Medicaid Form #9 Form #9 Locator No. 1 2 3 4 5 6 7 Description Provider’s Name, Address & Telephone Number Pay To Provider Number Billing Agent Number Prior Authorization Number Servicing Provider Name Servicing Provider Number Referring Provider’s Name 8 Referring Provider Number 9 Recipients Name 10 Recipient ID Number 11 Date Of Birth 01/18/06 3:13 PM Initial SAM Data Location Name Configuration Offices Lock Box Address Administration Payers Provider ID N/A Edit Claim Screen Data Mapping Tab Title HCFA 1500 Field Office Fields Insurance Provider I.D. # N/A N/A Administration Clients Payers Authorization # N/A Insurance Auth # N/A N/A N/A N/A N/A Administration Clients Payers Group Name Administration Clients Payers Group Number OR Administration Physicians Claim ID Administration Clients Profile Client Name Administration Client Payers Insured’s ID Administration Clients Profile Birth Date Insurance Group Name Insurance Group # HCFA 1500 Patient Name Insurance ID # HCFA1500 DOB Page 438 of 448 Users Manual Form #9 Locator No. 12 Description Sex 13 14 Other Insur. Patient Account Number 15 16A 18 19 Place Of Service Is Recipient Being Treated As A Result Of An Accident If Yes, Type Date Of Accident Is Recipient Being Treated As A Result Of A PGH Screening? L.O.F. Patient Status 20 21 Discharge Date Diagnosis Code 22 Diagnosis Name 23 Diagnosis Code 16B 16C 17 01/18/06 3:13 PM Initial SAM Data Location Name Administration Clients Profile Sex N/A (Defaults to Last 4 letters of client last name, last 4 digits of invoice number & a letter equal to page number) (Defaults to “02”) (Defaults to “No”) Edit Claim Screen Data Mapping Tab Title HCFA 1500 Field Sex N/A N/A N/A N/A N/A N/A N/A N/A N/A N/A (Defaults to “No”) N/A N/A N/A N/A N/A Administration Clients Payers Policy Number N/A Clinical Information Edit Patient Define Plan Of Care/ Verbal Order Diagnoses ICD-9-CM (Primary) Clinical Information Edit Patient Define Plan of Care/ Verbal Order Diagnoses Diagnosis Description Clinical Information Edit Patient Define Plan Of Care/ Verbal Order Diagnoses N/A Insurance N/A Policy # N/A Physician/ Diagnosis N/A Diagnosis Code 1 Physician/ Diagnosis Diagnosis Code 1 Physician/ Diagnosis Diagnosis Code 2 Page 439 of 448 Users Manual Form #9 Locator No. Description 24 Diagnosis Name 25 26 Line Dates Of Service 27 Description Of Service Procedure CodeModifier 28 29 30 Initial SAM Data Location Name ICD-9-CM (Secondary) Clinical Information Edit Patient Define Plan Of Care/ Verbal Order Diagnoses Diagnoses Description N/A Schedule Display Schedule Visit (Right Click) Edit Visit Date N/A Edit Claim Screen Data Mapping Tab Title Field Physician/ Diagnosis Diagnosis Code 2 N/A Detail Lines N/A Svc Dates N/A N/A Administration Clients Client/Payer Skills & Codes or Payer Skills & Codes N/A N/A Detail Lines CPT/HCPCS & Modifier N/A N/A N/A N/A (Number of Units) Detail Lines Days/Units 31 Treat Rel. To Diag. Treat Rel. To Fam. Pl Units Of Service 32 Usual Fee (Bill Rate) Detail Lines Charges 33 34 35 36 Other Paid Amount Emerg. Serv. Remarks: Total Usual Fee N/A N/A N/A (Sum Of Usual Fees) N/A N/A N/A Detail Lines N/A N/A N/A HCFA Total 37 Total Other Paid Amount Authorized Signature N/A N/A N/A Administration Payers Provider Rep (Invoice Date) N/A N/A N/A N/A Local Use 2 N/A N/A 38 39 Billing Date 40 Adjustment Resubmittal 01/18/06 3:13 PM Where the “Local Use 2” has an “A” in the left most character, the Locator 40’s Page 440 of 448 Users Manual Form #9 Locator No. Description Initial SAM Data Location Name Edit Claim Screen Data Mapping Tab Title Field adjustment box is marked with an “X.” If the left most character is an “R”, the Locator 40’s resubmission box is marked with an “X.” 41 42 Former Transaction Control No. Local Use 2 For Office Use Only N/A 01/18/06 3:13 PM N/A N/A N/A N/A Locator 41 takes the 3rd -12th characters from “Local Use 2” to complete the ICN boxes. Page 441 of 448 Users Manual Summary of System Specifications Invoice Aging Report – There is a limitation for multi-selecting payers of “30” if you select a specific office, a specific client and a specific client status. If you would like to report all Payers, use the default selection of “ALL”. If you would like to select a large group of payers use the Payer Class option. Creating Labels Using Reports, Microsoft Excel and Word 1. In order to create labels, choose the report that contains the information you need on your label. For instance, if you want physician labels, use the physician report. If you want patient labels, use the client list report. If you want employee labels, use the employee list report. 2. Select the criteria for the report so all the labels you want will be represented on the report. 3. From report options, choose the destination option of Excel file 4. Run the report and note the name and path of the Excel file that is created. 5. Open Microsoft Word and create a new document. 6. From the tools menu, scroll down to the “Letters and Mailings” heading and a new box will appear. From this box choose the heading “Show Mail Merge Toolbar”. Once this is done, a new toolbar should appear above your new document. 7. Place your mouse pointer over any of the new buttons without clicking on the button and a display will appear saying what that button does. Once you have found the button that says “Open Data Source” click on that button. The window below should pop up. Now find the Excel file you created earlier. 01/18/06 3:13 PM Page 442 of 448 Users Manual 8. Once you have found the file you created, click “OPEN” and the box below will appear. Once this box appears, and the highlighted file in the table is the one you selected, click “OK”. 9. Next you want to find the button that says “Main document setup” by once again placing your mouse pointer over the buttons without clicking the button. Once you have found the “Main document setup” button click on it and the window below will appear. Select the “Labels” tabs and click “OK”. 01/18/06 3:13 PM Page 443 of 448 Users Manual 10. Once you click “OK”, the window below will appear. Once this window appears, select the type of label you want. We suggest you choose one of the Avery Standard labels. Once you pick the label you want click “OK”. 11. Once you have clicked “OK” a bunch of lines will appear forming the layout of the labels, but there will be no information in the labels and the cursor will be in the top left label. Now you want to find the button “Insert Merge Fields” in the same manner you did before and click on it. Once you have clicked it the window below will appear. 01/18/06 3:13 PM Page 444 of 448 Users Manual 12. Once this window appears, you want to highlight the first field you want shown and click “Insert”. Once you have click “Insert” you want to hit the “Close” button (the “Cancel” button will turn into the “Close” button once you have inserted at least one field). 13. Now you will be back in the top left label and you want to do one of the following: If you want a space in between fields (such as FirstName MiddleInitial LastName), click the space bar once If you want a comma and then a space in between fields (such as City, State), hit comma and then the space bar once If you want to go to the next line (such as go from the name line to the address line), hit the enter key once 14. Once you have done the one of the above three choices, click the “Insert Merge Fields” button again to bring up the same window as above. Once you bring up that window, choose the next field you want displayed and click insert. Now click the “Close” button again and edit the label by doing one of the three steps I listed above and then clicking the “Insert Merge Fields” button again and inserting the next field you want. 15. Continue to do this until the label is in the format you want. It should look similar to the format below: ˆfirst_name‰ ˆmid_init‰ ˆlast_name‰ ˆaddress1‰ ˆaddress2‰ ˆcity‰, ˆstate‰ ˆzip‰ The last name field might go down to the second line depending on how big the label you chose is so don’t worry about that. Once you create the labels it will create correctly. 01/18/06 3:13 PM Page 445 of 448 Users Manual 16. Once your label is in the format you want, you need to populate the same label format throughout all the labels. To do this you find the button “Propagate Labels” and click on it. Once you do this the same format you have in the top left label will copy into all the labels. 17. Next, you want to find the button “Merge to New Document” and click on it. Once you have clicked on it, the window below will pop up. Once this window pops up hit “OK”. 18. Once you hit “OK” a new document will be created and this will have all your labels on it and can be printed. The final document might look like the one below. 01/18/06 3:13 PM Page 446 of 448 Users Manual SAM.INI Variables In order to make SAM more flexible and powerful for our diverse user community, we have developed a way to set a variable to a specific value that will then affect the way SAM processes. By using this method, SAM can be customized. Below is a list of the variables that can be added to the “N:\sam.ini” file, the valid settings and how each will affect SAM. N:\sam.ini variable How it affects SAM… Example Ini_Path_Model Directs SAM to compare the workstation’s software with the software in this path to determine if the user should run “Update Software from Server” to update the workstation’s software to newer software in this path. In addition, “Update Software from Server” will run the “updwkst.bat” from this path. This could be used in a case where you have setup multiple “database” areas with only one “model” area. Directs the SAM_DLL “ToSAMVisit” function to only verify existing visits on or before the imported visit’s “care_date” Directs the SAM_DLL to keep the SAM_DLL log files on n:\dll for the number of days specified, older files are purged. Directs the SAM_DLL to keep the records in the n:\database\DLLLOG.dbf for the number of days specified, older records are purged. The DLL Error Report reports records from this file. Directs the SAM_DLL to keep the records in the n:\database\DLLREG.dbf for the number of days specified, older records are purged. The DLL Transaction Register Report reports records from this file. Identifies the ACM Provider ID for export Plans of Care to an .XML file that may then be used to import to a Care Plan Oversight and eSignature System (CPOS). Identifies the Alacare Provider ID for export Plans of Care to an .XML file that may then be used to import to a Care Plan Oversight and eSignature System (CPOS). Identifies the EclickMD Provider ID for export Plans of Care to an .XML file that may then be used to import to a Care Plan Oversight and eSignature System (CPOS). For a Fox Pro database installation, this will direct SAM where to store the SAMdbxx.zip backup files. For a SQL database installation, this will direct SAM where to find the “Server Name” for the SQL database. For a SQL database installation, this will direct SAM where to find the “Database Name” for the SQL database. For a SQL database installation, directs SAM whether or not to display the warning message “The xxxx database has not been backed up. Please notify your system administrator. “If it is determined that the SQL database has not be backed up. If there is not a entry in the SAM.INI file, this option will default to (Y)es. Directs SAM to save the On Call report spreadsheets to this network path. This should be set to the network path of the folder that is used for file synchronization with the PDA (i.e). If it is not defined, the spreadsheets will go to n:\excel files and must be moved manually to sync with the PDA. Directs SAM to use a specific version of the SBT ACCPAC files when exporting payroll and running the 401 and Paycheck report. Specifically used when using ACCPAC version 7.1 Directs SAM to create the posting with the correct company name in the filename of the posting file. Ini_Path_Model,N:\Model Ini_DLL_Visit_On_Or_Before Ini_Dll_Files_Days_To_Keep Ini_DllLog_Days_To_Keep Ini_DllReg_Days_To_Keep Ini_ACM_ProviderID Ini_Alacare_ProviderID Ini_EclickMD_ProviderID Ini_SAMdb_Path Ini_SQL_Server_Name Ini_SQL_Database_Name Ini_SQL_Backup_Check_Enable d Ini_oncall_file_path Ini_Payroll_Vendor Ini_ACCPAC_Company 01/18/06 3:13 PM Ini_DLL_Visit_On_Or_Befor e,T or blank Ini_Dll_Files_Days_To_Keep ,7 Ini_DllLog_Days_To_Keep,6 0 Ini_DllReg_Days_To_Keep,6 0 Ini_ACM_ProviderID, RIVER001 Ini_Alacare_ProviderID, RIVER001 Ini_EclickMD_ProviderID, RIVER001 Ini_SAMdb_Path,N:\DEX\ Ini_SQL_Server_Name,RS10 1 Ini_SQL_Database_Name,SA MDatabase Ini_SQL_Backup_Check_Ena bled,N Ini_oncall_file_path,C:\Docu ments and Settings\RiverSoft\My Documents\Pocket_PC My Documents\Business\ Ini_Payroll_Vendor,ACCPA C:7.1 Ini_ACCPAC_Company,01 Page 447 of 448 Users Manual Ini_Payroll_Path Directs SAM to read/write to SBT ACCPAC files in this network path. Ini_PCL_UB92_red Directs SAM to print the UB92 red form to a printer that is using a nonpostscript printer driver. Directs the SAM_DLL to keep compliance rules in the SAM database for the number of months specified (based on end date), older records are purged when the database (when a FoxPro database is reindexed, at midnight for SQL databases) By default, compliance rules older than 1 year will be deleted. Directs SAM’s Medicare PPS Billing to only look for closed and verified visits when looking for the first billable visit. Directs SAM to print on Self Pay invoices Number of days to use when setting the "Net Due" on the Term: portion of self pay invoices. Directs SAM to allow users to continue running in SAM after the "New Software Exists" alert has been displayed. This should only be used when C: drives are shared by multiple users. Directs SAM to not allow the entry of a new Plan of Care or Verbal Order in SAM. Assumes using Golden Rule PDA point of care software to send the Plan of Care/Verbal Order to SAM via the SAMDLL. Directs the he CBA and PHC formats of the Timesheet Report to include a client signature line above the employee signature line. Directs Scheduling to suppress any of the warnings regarding a employee going into an overtime situation Ini_Comp_Rules_Purge_Months Ini_FBV_visit_status_list Ini_Self_Pay_Invoice_Net_Days Ini_Ignore_New_Software_Alert Ini_poc_master Ini_CBA_PHC_Client_Signature Ini_Show_Overtime_Warning Ini_Payroll_Vendor,n\pro50\p rdata Ini_PCL_UB92_red,Y Ini_Comp_Rules_Purge_Mon ths,24 Ini_FBV_visit_status_list,T-V Ini_Self_Pay_Invoice_Net_D ays,10 Ini_Ignore_New_Software_Al ert,T Ini_poc_mst, golden rule Ini_CBA_PHC_Client_Signat ure, T Ini_Show_Overtime_Warning ,F Directs SAM to not report message “Plan of Care for patient on xx/xx/xx was not signed. Claim ### cannot be transmitted until POC/VOs are signed” when transmitting claims for Connecticut Medicaid (ECS=50). Directs SAM to not populate OASIS M0032 (Start of Care Date) with the patient’s start of care date. In some cases, when you have multiple payers for the patient, you may not want this date to default to the patient’s start of care date. Directs SAM to not automatically extend the Payer Authorization End Date on the Client/Payer Relationship when you “Recert” a Plan of Care. Ini_POC_Xmit_Blocker,F Ini_UQ_Visit Directs SAM to default the “Qual” field on ALL new visits to (U)nqualified or (Q)ualified Ini_UQ_Visit,x (where x is either “U” for unqualified or “Q” for qualified) ini_use_skills_visit_hrs Directs SAM to use the “Visit Hours” defined for a Skill or Sub-Skill as the default for hours for a new visit. The default hours only work for the initial skill of the visit. If anything is changed after that, including changes to the sub-skill, the hours must be changed manually. ini_use_skills_visit_hrs,T Ini_POC_Xmit_Blocker,F Ini_Inherit_Oasis_SOC Ini_Ext_Payerdt_On_485Copy 01/18/06 3:13 PM Ini_Inherit_Oasis_SOC,F Ini_Ext_Payerdt_On_485Cop y,F Page 448 of 448