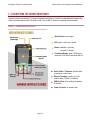
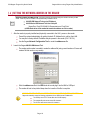
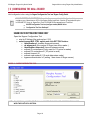
1
System Galaxy Quick Guide CONFIGURATION AND OPERATION Sagem Finger-Only | MA1xx SG 10.2.0 MAR 2013 (SG 8.2.4 or later) Page 1 SG/Sagem Finger-Only Quick Guide Sagem MA1xx using Finger-Only Identification Quick Step Guide for Sagem MA1xx This document describes setup of System Galaxy to interface with Sagem Biometric MorphoAccess™ Terminals (MA1XX) using human fingerprint data. Always refer to the Manufacturer’s documentation for information about devices not manufactured by Galaxy. using Identification Mode (Fingerprint Only 1:N) Information in this document is subject to change without notice. No claims are made, express or implied, as to the completeness or accuracy of this document. System Galaxy Setting up System Galaxy to capture and load finger prints to the Sagem MA1xx Reader using Identification Mode (1:N) [ SG 8.2.4 or later ] At the time this document is written, Galaxy Control Systems supports installing and using the enrollment devices described herein on workstations running Windows XP Pro, or Vista Ultimate/Business. Windows Server operating systems are not supported for this enrollment interface. This document does not supersede or suggest any installation or operating requirements/compatibility/limitations for Sagem or any other products not manufactured by Galaxy Control Systems. No claims are made, express or implied, about operating system compatibility or system requirements for 3rd party applications or devices. first edition Copyright © 2011 Galaxy Control Systems All rights reserved No part of this document may be reproduced, copied, adapted, or transmitted, in any form or by any means, electronic or mechanical, for any purpose, without the express written consent of Galaxy Control Systems. Copyright protection claims include all forms and matters of copyrighted material and information, including but not limited to, material generated from the software programs, which are displayed on the screen such as icons, look and feel, etc. Microsoft®, Windows®, Windows NT®, Active Directory®, MS-DOS®, SQL Server®, and Windows Server System®, are registered trademarks of the Microsoft Corporation in the U.S. and other countries. “Morpho” and the Sagem logo are U.S. registered trademarks of Sagem Sécurité or Sagem SA. HID, iClass, MIFARE, all other products are trademarks, trade names, registered trademarks, or registered trade names of their respective holders. Adobe® and Acrobat® are registered trademarks of Adobe Systems Inc. Galaxy Control Systems Technical illustrations are creations of the technical author. 3 North Main Street Walkersville MD 21793 301-845-6600 www.galaxysys.com Revision 1.2 | APR 2011 Page 2 SG/Sagem Finger-Only Quick Guide Sagem MA1xx using Finger-Only Identification TABLE OF CONTENTS CHAPTER 1: INTRODUCTION & REFERENCES.....................................................................6 WHAT’S IN THIS GUIDE ….............................................................................................................................6 WHAT’S IN THIS GUIDE ….............................................................................................................................7 LIST OF SUPPORTING MANUALS … ...........................................................................................................7 FINGERPRINT ENROLLMENT PROCESS ~ OVERVIEW & DIAGRAM .......................................................8 CHAPTER 2 : COMPATIBILITY & REQUIREMENTS...............................................................9 SYSTEM GALAXY DEVICE COMPATIBILITY…............................................................................................9 INTEGRATION REQUIREMENTS & NOTICES….........................................................................................10 SYSTEM GALAXY SOFTWARE REQUIREMENTS ....................................................................... 10 SG HARDWARE & READER REQUIREMENTS ............................................................................ 11 WIRING REQUIREMENTS TO GALAXY PANEL .................................................................. 11 READER CONFIGURATION & NETWORK CONNECTION REQUIREMENTS.................... 11 SG ENROLLMENT WORKSTATION REQUIREMENTS ................................................................ 12 ENROLLMENT DEVICE REQUIREMENTS ........................................................................... 12 FINGERPRINT ENROLLMENT REQUIREMENTS (SG CARDHOLDER) ............................. 12 REQUIREMENTS TO LOAD FINGERS TO THE READER FROM SG ................................. 13 CHAPTER 3 : INSTALLING MA100/110 READERS...............................................................14 PROCESS FOR INTEGRATING SAGEM READER TO SYSTEM GALAXY ...............................................14 QUICK STEPS: INTEGRATING SAGEM HARDWARE TO SG ..................................................... 14 [ 1 ] IDENTIFYING THE READER INTERFACES .........................................................................................15 [ 2 ] WIRING THE READER TO THE GALAXY CONTROL PANEL ............................................................16 [ 3 ] CONNECTING THE READER TO THE ETHERNET NETWORK (LAN) ..............................................17 [ 4 ] SETTING THE NETWORK ADDRESS IN THE READER .....................................................................18 [ 5 ] CONFIGURING THE MA1xx READER..................................................................................................19 SAGEM 100/110 SETTINGS FOR FINGER-ONLY................................................................ 19 OUTPUT FORMAT SETTING................................................................................................. 20 SEND WIEGAND ID / SITE CODE (DOES NOT APPLY TO DATA/CLOCK FORMAT) ....... 20 READER INDICATORS OR OPERATION ............................................................................. 20 Page 3 SG/Sagem Finger-Only Quick Guide Sagem MA1xx using Finger-Only Identification SETTING FAILURE ID’s ( optional ) ....................................................................................... 20 [ 7 ] INSTALLING THE MSO-300 FINGERPRINT ENROLLMENT DEVICE ................................................21 INSTALLING THE SAGEM MSO-300 DRIVER............................................................................... 21 CONNECTING THE SAGEM MSO-300 FINGER SCANNER ......................................................... 21 CHAPTER 4 : CONFIGURING SG FOR BIOMETRIC SUPPORT...........................................22 [ 1 ] ABOUT INSTALLING SYSTEM GALAXY .............................................................................................22 SG HARDWARE ASSUMPTIONS................................................................................................... 22 FOR UPGRADING EXISTING BIOMETRIC SYSTEMS.................................................................. 23 UPGRADING SG 8.2.4 OR NEWER SYSTEMS .................................................................... 23 UPGRADING SG 8.2.3 OR OLDER SYSTEMS ..................................................................... 23 FOR NEW SOFTWARE INSTALLS................................................................................................. 24 [ 2 ] REGISTERING SYSTEM GALAXY FOR BIOMETRICS .......................................................................25 [ 3 ] IMPORTING .FGR TEMPLATES (UPGRADES ONLY).........................................................................27 IMPORT EXISTING .FGR FILES INTO SYSGAL DATABASE....................................................... 27 RECREATE BASES AND LOAD EXISTING SAGEM 200/300 READERS.................................... 28 CREATE BASES AND LOAD NEWLY INSTALLED MA110 READERS....................................... 28 INTEGRATION WITH OTHER READER TYPES ............................................................................ 29 [ 4 ] CONFIGURING THE SYSTEM SETTINGS............................................................................................29 [ 5 ] CONFIGURING THE GALAXY OPERATOR PRIVILEGES ..................................................................30 ABOUT MASTER OPERATOR PRIVILEGES................................................................................. 30 ABOUT ENROLLMENT OPERATOR PRIVILEGES....................................................................... 30 [ 6 ] CONFIGURING THE TRIPLE-SCAN OPTION IN SG............................................................................31 [ 7 ] SYSTEM GALAXY PROGRAMMING ....................................................................................................33 CONFIGURING SYSTEM GALAXY READER PROPERTIES........................................................ 33 [ 8 ] LOADING CONFIGURATION TO GALAXY CONTROLLER ................................................................34 LOADING SYSTEM PROGRAMMING TO CONTROL PANELS.................................................... 34 CHAPTER 5 : ENROLLING FINGERPRINTS IN SG...............................................................35 CAPTURING FINGERPRINTS IN SG............................................................................................................35 ABOUT LOADING INDIVIDUAL FINGERS FROM SG CARDHOLDER SCREEN ......................................38 ABOUT LOADING ALL FINGERS FROM GALAXY’S LOADER UTILITY ..................................................39 MANAGING THE SAGEM READERS VIA GCS MA-LOADER....................................................................40 Page 4 SG/Sagem Finger-Only Quick Guide Sagem MA1xx using Finger-Only Identification MANAGING BASES......................................................................................................................... 40 DELETE CARD BEFORE LOADING OPTION................................................................................ 40 CONFIGURING READER RECOGNITION MODE.......................................................................... 41 IMPORTING FGR FILES................................................................................................................................42 SETTING UP FOR FGR FILE IMPORT ........................................................................................... 42 IMPORTING FGR FILES INTO DATABASE ................................................................................... 43 CHAPTER 6 : TROUBLESHOOTING TIPS FOR MA1XX .......................................................44 FINGER IS NOT GRANTED ACCESS BY SG ..............................................................................................44 FINGER IS NOT ACCEPTED AT THE READER ..........................................................................................45 FINGER SENSOR IS OFF................................................................................................................ 45 FINGER SENSOR IS ON BUT READER REJECTS FINGER ........................................................ 47 GLOSSARY : ...........................................................................................................................51 LIST OF TABLES AND FIGURES Table Table Table Table Table 1 : Reader Models ........................................................................................................................... 9 2 : Reader WIRING .......................................................................................................................... 16 3 : MA1 XX ETHERNET CONNECTIONS .................................................................................................. 17 4 : normal UPGRADE scenario ...................................................................................................... 23 5 : new install typical scenario ............................................................................................... 24 Figure 1 - System Galaxy Biometric interface ....................................................................................... 8 Figure 2 - Sagem reader interfaces ...................................................................................................... 15 FIGURE 3 - WIRING DIAGRAM FROM MA1XX TO GALAXY ACCESS CONTROL PANEL............................................... 16 Figure 4 - SAGEM CONFIGURATION TOOL ..................................................................................................... 19 Figure 5 - SYSTEM galaxy REGISTRATION SCREEN ...................................................................................... 26 Figure 6 - SG SYSTEM SETTINGS SCREEN ..................................................................................................... 29 FIGURE 6 - OPENING THE ADMINISTRATOR SETUP OPTIONS SCREEN .................................................................. 31 FIGURE 7 - configuring SYSTEM GALAXY triple-scan feature ................................................................. 32 Figure 8 – CONFIGURING SYSTEM GALAXY Reader Properties FOR SAGEM SUPPORT .................................... 33 Figure 9 - LOADING THE GALAXY ACCESS CONTROL PANEL ........................................................................... 34 Figure 10 - creating valid card record ............................................................................................... 36 Figure 11 - Capturing fingerprints in System Galaxy .......................................................................... 37 Figure 12 – loading fingerprints from cardholder screen ............................................................... 38 Figure 13 - loading fingerprints from gcs ma_loader ....................................................................... 39 Figure 14 - Setting Reader Recognition mode ....................................................................................... 41 Figure 15 - pointing to FGR Files for import ........................................................................................ 42 Figure 16 - importing .FGR files from ma_loader ................................................................................. 43 Figure 17 - correct finger placement at SAGEM reader....................................................................... 47 Figure 18 - correct finger placement at mso-300 enrollment device ............................................... 49 Page 5 SG/Sagem Finger-Only Quick Guide Sagem MA1xx using Finger-Only Identification CHAPTER 1: INTRODUCTION & REFERENCES INTEGRATING SAGEM MA100/110 FOR FINGER-ONLY RECOGNITION / IDENTIFICATION MODE System Galaxy v 10 (or later) supports fingerprint enrollment from either the MSO-300 or an online Sagem MA Reader. This is true for both the 100-series and 500-series readers. IMPORTANT: If you are using smart cards as part of the credentialing process, then you must refer to the SG MA110 & HID iClass Integration Guide for requirements and instructions related to iClass smart card enrollment and encoding. WHAT’S IN THIS GUIDE … This guide provides the requirements, installation, configuration, and operation instructions for the hardware and software as follows… 1. Sagem MA100/110 reader: requirements, wiring & configuration to integrate with System Galaxy Reader Wiring to the SG access control panel* & related installation requirements Reader management: reader modes, loading and deleting fingers, setting HID conversion value, site code, and card format in the reader. Using the MA1xx reader to capture & enrollment of fingerprints 2. MSO-300 Finger Capture Device: requirements, installation and enrollment operation 3. System Galaxy software: Requirements* related to Sagem Biometrics. System Registration & System Settings for biometric support and readers. Reader configuration related to Sagem Biometrics. Enrolling and Loading credentials: finger-only identification and iClass smart card. ALSO SEE STANDARD DOCUMENTATION: All System Galaxy standard requirements, configuration, and operation of (Hardware/Software) outside the scope of this guide is found in the main Galaxy documentation. SEE THE LIST OF SUPPORTING MANUALS ON NEXT PAGE. Page 6 SG/Sagem Finger-Only Quick Guide Sagem MA1xx using Finger-Only Identification WHAT’S IN THIS GUIDE … Quick Guide Outline: this manual covers the following for Sagem MA100/110 readers: CHAPTER 1 - introduction and concept diagrams of the biometric integration CHAPTER 2 - requirements and compatibility CHAPTER 3 - installing MA100/110 readers & MSO-300 driver wiring the MA1XX reader to the Galaxy access control panel addressing and configuring the MA1XX reader operation CHAPTER 4 - configuring System Galaxy software to integrate with Sagem readers importing FGR templates (upgrades only) programming reader properties and loading SG control panels CHAPTER 5 - enrolling (capturing and loading) fingerprints in System Galaxy CHAPTER 6 - troubleshooting finger identification issues LIST OF SUPPORTING MANUALS … Supporting manuals are found on Disk-2 of the Galaxy Software Install Suite and the Galaxy website at www.galaxysys.com SAGEM MANUFACTURER’S GUIDES & TOOLS Sagem MA1xx Installation Guide Sagem USB Network Configuration Tool & Guide Sagem Remote Management Config Tool & Guide OTHER GALAXY BIOMETRIC GUIDES SG MA110 & HID iClass Integration Guide SG MA520 & MIFARE Integration Guide GALAXY HARDWARE GUIDES 600/635‐series Hardware Install Manual 600‐series Configuration Tool Guide 635‐series Web‐based Configuration Tool Guide 508i‐series Hardware Addendum GALAXY SOFTWARE GUIDES SG Software Installation Guide (& on CD Help) SG Software Installation Help (top link on Install CD) SG Software User Manual MANUFACTURER’S DOCUMENTATION: The Sagem manuals and network/config tools should come with your MA reader. These may also be included on the System Galaxy Installation CD set. Page 7 SG/Sagem Finger-Only Quick Guide Sagem MA1xx using Finger-Only Identification FINGERPRINT ENROLLMENT PROCESS ~ OVERVIEW & DIAGRAM CAPTURE FINGERPRINTS: prints are enrolled by Operator at the System Galaxy workstation* using either the MSO-300 Enrollment Device or the finger scanner of a biometric reader that is online and configured. SAVE/LOAD FGR TEMPLATES to MA1xx: prints are loaded when card record is saved in System Galaxy or when loaded via the GCS MA Loader utility (valid cardholder criteria applies**). PRESENT FINGER at MA READER: Human finger is compared to the FGR template. LED = green if print is identified/match is found. LED = red if print is not found. MA110 outputs data to the Galaxy controller for an access decision. The person is granted or denied access based on the access rules and schedules at the Galaxy access control panel. Access Control Event is logged to the System Galaxy database and Event monitoring screen. * A valid card ID is created in SG even if real cards are not issued (i.e. Finger Only Identification mode). This is required so that access decisioning can be controlled for the credentials. ** The Load Morpho option must be “checked”; Loop and Access Privileges must be assigned; and a valid card ID# is required in order for the credentials to be sent to the MA1xx. Figure 1 - System Galaxy Biometric interface Card encoding does not apply to Finger Only mode. (100 METERS) (for Data, REX, contact, LED) Page 8 SG/Sagem Finger-Only Quick Guide Sagem MA1xx using Finger-Only Identification CHAPTER 2 : COMPATIBILITY & REQUIREMENTS USING MA100/110 IN IDENTIFICATION (FINGER ONLY) MODE SYSTEM GALAXY DEVICE COMPATIBILITY… System Galaxy software versions 10.2 or later with valid registration & maintenance agreement. Galaxy Access Control Panels: System Galaxy 600/635-series &508i-series control panels. Morpho Smart Optical (MSO300) Enrollment Station for fingerprint capture at SG workstation. MA100/110 Reader: System Galaxy can capture prints from the reader sensor. IMPORTANT UPGRADE NOTICE : If the site is upgrading existing MSO-100 workstations, the MSO100 driver must be uninstalled before the MSO-300 driver can be installed. OPERATING SYSTEM NOTICE: The MSO Finger Scanner may have operating system limitations such as Microsoft Server platforms. Contact Sagem for details. Sagem MA100 and MA110 readers: Table 1 : Reader Models MA 100 Contactless Reader* ISO 14443 No Not used in finger only mode Contactless Card* Operation Mode MA 110 1:500 identification mode 1:500 identification mode 1:1 authentication mode * * authentication and contactless card use and card encoding are not covered in this manual – see the SG Guide for MA110. REMOTE MANAGEMENT OF READER: the Galaxy MA_Loader utility provides a user interface to manage bases and set reader modes from the client workstation for MA1XX. Page 9 SG/Sagem Finger-Only Quick Guide Sagem MA1xx using Finger-Only Identification INTEGRATION REQUIREMENTS & NOTICES… Requirements are consolidated here for quick reference and troubleshooting. This section includes the known requirements to integrate MA1xx with System Galaxy. This manual does not claim to supersede requirements or limitations from the manufacturer (Sagem). Consult Sagem for manufacturer’s requirements and limitations. SYSTEM GALAXY SOFTWARE REQUIREMENTS These requirements specifically refer to biometric integration. The SG System Recommendation Guide provides system-wide requirements. UPGRADING SYSTEM GALAXY DATABASE w/ EXISTING FGR FILES: 1. A valid maintenance agreement is required to perform an upgrade. 2. Always back-up .FGR files to a safe location BEFORE upgrading SG software/database. 3. You can transfer existing .FGR files into the new SysGal database, Use the GCS MALoader utility after the System Galaxy database and software upgrades are properly completed. SG SOFTWARE: System Galaxy 10 (or later) can interface with MA100/110 readers. 1. System Galaxy Software installation (or upgrade) must be completed at all servers/workstations (i.e. the main communication server, database, and client workstation(s)). SG INSTALL DOCS: see System Galaxy Software Install Guide (HTML on CD Help or PDF guide). Adobe Acrobat Reader is needed to view manuals in PDF format. Acrobat v9.1 required if you run Vista or later platforms. Acrobat v9.1 is free to download from Adobe.com or from the SG v9 CD Suite. SYSTEM REGISTRATION: You can add a biometric reader to an existing 8.2.4 or later version of SG provided you register the system for the biometric feature. 1. You must “check/enable” the Biometric Support option in the System Registration screen during the registration process (available in Corporate and Enterprise product levels). 2. You must set the Number Of Biometric Readers for the system. 3. You must enter a valid Registration Code. If you are adding the biometric feature to an existing system, you must get a new Registration Code (valid maintenance agreement is needed). 4. You must restart System Galaxy software after system registration is completed. SYSTEM SETTINGS: in the System Settings screen/General options tab, you must default the system to use “Sagem” biometrics. Leave the ‘Smart Card’ option unchecked/disabled. SG READER PROPERTIES: In the SG Reader Properties screen, the following must be done: The reader type must be set to the correct MA reader model The correct IP Address assigned to the reader must be entered into the General tab. This address is used by SG to load fingerprints to the reader. This address does not have anything to do with importing fingerprints into SG database as a part of upgrading databases. System Galaxy must be restarted after reader programming is completed. Page 10 SG/Sagem Finger-Only Quick Guide Sagem MA1xx using Finger-Only Identification SG HARDWARE & READER REQUIREMENTS These requirements specifically refer to reader installation and operation with System Galaxy. Always consult manufacturer’s documentation for in-depth product information. WIRING REQUIREMENTS TO GALAXY PANEL 1. Wiring distance is 500 ft from reader to panel. 2. Wiring from the reader to the Galaxy panel 22 AWG 10-conductor, stranded / shielded cable. Access Card composite cable is also compatible. 3. The MA1xx reader must use a separate power supply and common the grounds on power supply. 4. You must ground the data wire shielding to the DPI. 5. The MA1xx must have a TCP/IP (LAN) connection to perform configuration and load the fingerprint templates. READER CONFIGURATION & NETWORK CONNECTION REQUIREMENTS 6. Initial reader configuration of the MA1xx is required. Sagem Tools & Docs are on Galaxy CD-2 7. The Sagem MA1XX USB Network Config Tool is used to make the address.csv file that sets up the IP parameters. The MA1xx must have a valid IP address (static recommended). You MUST use a USB thumb drive to transfer your address.csv file to the MA reader. The key must FAT16 (FAT) formatted. The file name cannot exceed 12 characters and the complete file path cannot exceed 56 characters. 8. The Sagem Configuration Tool is used to set initial reader options (app.cfg, adm.cfg, bio.cfg) using the IP Address you set with the Network Config Tool. The reader default port is 11010 You must set the reader output format to either Wiegand or ABA format. This format must match the card type you intend to issue if you are issuing physical cards; or it must match the format type used in System Galaxy for the card record linked to the prints. (Wiegand only) the site code in the reader must match the facility code used in SG cardholder and panel ( “7” is the default if you are not issuing cards. If issuing cards, you must use the site code on the cards). 9. You must create the base before you can load finger data. 10. The reader recognition mode must be set to Finger Only (Identification mode) CONFIGURING READER RECOGNITION MODES – if the Bio Ctl settings are not correct, the reader will not operate as desired. If your credentials work differently than desired or you are unsure how to set the bio ctl options, you can set the reader options using the Galaxy GCS MA Loader utility found in C:\Program Files\System Galaxy\Utilities. Identification Mode is the same as Finger Only operation. If you are using authentication on the MA110 with cards and prints, you must consult the SG MA110 Guide. Page 11 SG/Sagem Finger-Only Quick Guide Sagem MA1xx using Finger-Only Identification SG ENROLLMENT WORKSTATION REQUIREMENTS The biometric requirements for the system must be met, including registering for biometrics and configuring the reader in System Galaxy for the proper reader type and IP address. See previous sections in this chapter. ENROLLMENT DEVICE REQUIREMENTS 1. (if present) You must remove/uninstall the MSO100 driver from the enrollment workstation PC 2. You must install the MSO‐300 driver at the workstation PC where fingerprint capture occurs. In SG10 or later you can also enroll finger credentials at the Sagem Reader without having an MSO‐ 300 installed. 3. You must connect the MSO‐300 Optical Finger Scanner to the workstation PC’s USB serial port. USB port must be high‐speed (2.0 or higher). FINGERPRINT ENROLLMENT REQUIREMENTS (SG CARDHOLDER) Finger templates can be loaded to the reader (individually or en masse), provided the card record is valid. o o Individual loading as a person is enrolled occurs when the operator clicks the APPLY button in the SG Cardholder screen. Loading fingers en masse (batch) is done using the MA_Loader utility. 4. You must scan fingers into a valid Card Record in the System Galaxy Cardholder screen. Even if you do not issue a physical card, the card code, format, and other parameters must be valid to send fingers to the reader. You must choose a valid card format (i.e. ABA, Wiegand) that matches the output format set at the reader. You must create a valid card code even if you do not issue physical cards. The Galaxy access panel uses the card code to link the print with its access privileges. (Wiegand only) you must enter a valid Facility Code that matches the facility code set at the reader. 5. You must assign the valid Loop/Cluster to the card record. 6. You must assign a valid Access Group to the card record (**unlimited** or a custom group/profile). 7. You must check/enable the “LOAD MORPHO” option on the card record. 8. You must capture 2 unique fingerprints for the card record. These must be two different prints that are not already assigned to another card record or do not already existing in the reader base. Page 12 SG/Sagem Finger-Only Quick Guide Sagem MA1xx using Finger-Only Identification REQUIREMENTS TO LOAD FINGERS TO THE READER FROM SG 9. The Sagem reader must be configured and connected to the network / online. 10. SG Reader Properties: the reader’s IP address and correct model type must be configured. 11. The reader base(s) must be created. This can be done with the GCS MA_Loader if the above requirements met. 12. The reader recognition mode must be set to ‘finger only’ (or a mode that accepts fingers – note that some models may support card only. Additional modes are covered in the full SG Biometric Guides for MA110 or MA520). 13. The reader will not accept duplicate fingers. If a finger is captured on more than one record then the reader will not accept the second record until the first one is deleted. You must use unique fingers. 14. Enrollment requirements must be met – see next section. Page 13 SG/Sagem Finger-Only Quick Guide Sagem MA1xx using Finger-Only Identification CHAPTER 3 : INSTALLING MA100/110 READERS INTEGRATING WITH SYSTEM GALAXY HARDWARE This section covers basic steps for integrating the MA100/110 to the System Galaxy perspective. PROCESS FOR INTEGRATING SAGEM READER TO SYSTEM GALAXY PC TOOLS AND MANUALS NEEDED LOCATION ON THE GALAXY CD MA100 Series Installation Guide.pdf () MA1XX USB Network Tool.exe (set IP Address) MA100 USB Network Tool User Guide.pdf MA1XX Configuration Tool.exe () MA100 Configuration Tool User Guide.pdf USB thumb drive will be needed to transfer the IP address to reader (formatted to FAT16) “Sagem\Docs Tools CD 550\MA1XX Documentation and Tools\Docs” “Sagem\Docs Tools CD 550\MA1XX Documentation and Tools\Tools” “Sagem\Docs Tools CD 550\MA1XX Documentation and Tools\Tools” “Sagem\Docs Tools CD 550\MA1XX Documentation and Tools\Docs” WARNING: DO NOT remove the thumb drive while the Reader is in update mode (purple flashing LED). when you use the USB thumb drive to transfer the IP address to your MA Reader, REFER TO THE MA100 Series USB Network Tool User Guide.pdf and follow instructions carefully QUICK STEPS: INTEGRATING SAGEM HARDWARE TO SG [1] Identify reader interfaces [2] Wire reader to Galaxy panel [3] Connect reader to network [4] Set network address in reader [5] Configure reader settings [6] Set reader recognition mode [7] Install MSO-300 enrollment driver & device Page 14 SG/Sagem Finger-Only Quick Guide Sagem MA1xx using Finger-Only Identification [ 1 ] IDENTIFYING THE READER INTERFACES The user interface on the MA100/110 supports fingerprint identification. The MA110 model additionally supports HID iClass contactless cards and HID Conversion mode. See the MA110 Guide for integrating contactless cards. Figure 2 - Sagem reader interfaces Optical Sensor: scans finger ………………… LED: green = valid / red = denied ………………… Buzzer: identified = high beep not found = low beep Contactless Reader: reads 125 KHz prox cards and 13.526 KHz iClass cards (MA110) Data 0 & Data 1 Terminals: are wired back to the access control panel Ethernet Terminals: wired to a Cat-5e network cable (T-568-B / 100 Meters) USB Host Port: is for installing the network IP Address Power Connector: for reader power Page 15 SG/Sagem Finger-Only Quick Guide Sagem MA1xx using Finger-Only Identification [ 2 ] WIRING THE READER TO THE GALAXY CONTROL PANEL Mounting the MA reader must follow Sagem’s documented requirements. Once the reader is mounted, it wires to the Galaxy control panel as shown in the figure below. Wire the reader to a separate power supply which can be mounted inside the Galaxy control panel. Common the power supplies together. WIRING SPECIFICATIONS FOR DATA LINES: 22 AWG, 10 Conductor shielded /twisted or card access composite with appropriate rating. This includes wiring for Door Contact, REX and Reader. Ground drain wire on only one end of the wire run. POWER SPECIFICATIONS: wire the MA1xx to a separate power supply; rated at 12Vdc ± 5% / 0.5A. Reference Sagem Installation Guide for your model. Common power supply grounds together. The second power supply can be installed inside the Galaxy 8-door panel. FIGURE 3 - WIRING DIAGRAM FROM MA1XX TO GALAXY ACCESS CONTROL PANEL Table 2 : Reader WIRING Sagem MA1xx Galaxy 600 DPI Galaxy TX- / D0 D0 Green(5) TX+ / D1 D1 Red(2) LED 1 LED Brown(1) GND GND Yellow(4) 508i * NOTE: MA1xx also can be wired to 508i backplane using D0, D1 and GND terminals as indicated. Page 16 SG/Sagem Finger-Only Quick Guide Sagem MA1xx using Finger-Only Identification [ 3 ] CONNECTING THE READER TO THE ETHERNET NETWORK (LAN) The MA1xx reader uses Ethernet connection to load fingers and perform remote set up. You must wire the Cat-5e straight-through cable as shown in the table below. Table 3 : MA1 XX ETHERNET CONNECTIONS CAT 5e (straight-thru cable) SAGEM MA1XX ETHERNET TERMINALS Orange/white Orange Green/white Green TX + TX RX + RX - 100 meters max distance from the hub/switch to the MA1XX reader Page 17 SG/Sagem Finger-Only Quick Guide Sagem MA1xx using Finger-Only Identification [ 4 ] SETTING THE NETWORK ADDRESS IN THE READER MANUFACTURER’S DOCUMENTATION: The Sagem manuals and network/config tools should come with your MA reader. These may also be included on the System Galaxy Installation CD set. MA1XX USB Network Tool.exe (set IP Address) MA100 Series USB Network Tool User Guide.pdf “Sagem\Docs Tools CD 550\MA1XX Documentation and Tools\Tools” (a USB thumb drive will be needed to transfer the address.csv file to reader) 1. After the reader is properly installed and physically connected to the LAN, power on the reader Consult the network administrator for getting the static IP Address that is valid on their LAN. You may find a factory-default IP address may be present in the reader (134.1.32.214 ). Use the Sagem Network Configuration Tool to create the address.csv file. 2. Launch the Sagem MA1XX USB Network Tool: The reader serial number is needed to create the address file (using a serial number of 9 zeros will create a file that works on any reader). Write the address.csv file to the USB thumb drive and plug it into the MA1xx USB port. The reader will emit a low-pitched beep when the transfer of the file is complete. WARNING - READER UPDATE: DO NOT REMOVE THE USB WHILE THE UPDATE IS IN PROGRESS. Sagem documentation states the following requirements for the USB drive and IP Address file. The USB key must FAT16 format; Max size 512 MB capacity. The complete file path cannot exceed 56 characters. The CVS file name cannot exceed 12 characters. Page 18 SG/Sagem Finger-Only Quick Guide Sagem MA1xx using Finger-Only Identification [ 5 ] CONFIGURING THE MA1xx READER Initial configuration is done using the Sagem Configuration Tool and Sagem Config Guide. MANUFACTURER’S DOCUMENTATION: Consult the Sagem manuals for initial Configuration. Galaxy provides a copy of these items on CD-2 of the System Galaxy Install Suite. Start the CD and select the option to ‘BROWSE CD”, the go to ‘Sagem\Docs Tools CD 550\MA1XX Documentation and Tools\Docs’ MA1XX Configuration Tool.exe (configure reader) MA100 Series Configuration Tool User Guide.pdf SAGEM 100/110 SETTINGS FOR FINGER-ONLY Open the Sagem Configuration Tool enter the IP Address of the reader and port 11010 select/expand BIO CTRL option and click GET FILE button: identification=1 (enables fingerprint sensor) nb attempts=2 (the number of finger tries at the reader ) identification timeout=5 (timeout between retries) authent ID contactless=0 (only used for 110 prints in reader) authent PK contactless=0 (110 prints in card) authent timeout=10 authent card mode=0 (110 card determines mode) bypass authentication =0 (setting 1 here turns off finger sensor) Figure 4 - SAGEM CONFIGURATION TOOL NOTE ‐ GALAXY’S MA_LOADER UTILITY WILL ALSO SET THE READER INTO IDENTIFICATION MODE WITH THE CLICK OF A BUTTON. Page 19 SG/Sagem Finger-Only Quick Guide Sagem MA1xx using Finger-Only Identification OUTPUT FORMAT SETTING You will set the Sagem reader output format to match the card code format used by System Galaxy during fingerprint enrollment. Either configure the send ID Wiegand or send ID ABA-Clock/Data. OUTPUT FORMAT: Keeping in mind that Galaxy requires a valid card code assigned to the card record with the fingerprints in order to link access privileges in the Galaxy panel to the prints. If you are not issuing physical cards, you can use either format. However you still must create a vaiid card record for the prints that uses a format that matches the reader’s format output. All enrollment requirements must be met. If you are issuing cards, you must set up the format at the reader that matches the cards. You can issue cards and enroll fingers that are saved at the reader even if you are using Finger Only /Identification mode. SEND WIEGAND ID / SITE CODE (DOES NOT APPLY TO DATA/CLOCK FORMAT) If you are choosing Wiegand format, the Sagem reader uses a default facility code = 7 . If you are not issuing physical cards you can use the default code of 7 in the reader and in the System Galaxy cardholder enrollment screen. Max valid wiegand ID is 65535. If you are issuing physical cards, you must set the reader’s facility code to match the physical card. This means that if the card uses facilty code 20, then the reader and SG card record must use 20. REMOTE MANAGEMENT: once initial configuration is completed, the GCS MA_Loader Utility can be used to set or change the output format, facility code, reader modes, create/delete bases, load fingerprints, etc. MA100 MODEL: the MA100 Reader supports finger-only Identification mode (no card reader). MA110 MODEL: the MA110 Reader is compatible with HID Prox and HID iClass 16x16 Cards. Supports Identification and Authentication / Multi-factor modes. System Galaxy supports card encoding. See the Galaxy MA110 Guide for more in-depth information. READER INDICATORS OR OPERATION Reader LED and Sensor states are indicated as follows: BLUE LED flashing = it is waiting for a card (MA110) PURPLE LED flashing = getting data from PC / remote management update YELLOW LED= base not set up or no fingers loaded Sensor ON/RED = waiting for finger Sensor OFF = no finger / authentication bypass ( card only or card pass-thru) SETTING FAILURE ID’S ( OPTIONAL ) Setting the Failure ID’s to unique values can help you troubleshoot reader behavior when you are getting the system up and running. Set unique ID’s for each one (example 65530-65535). Page 20 SG/Sagem Finger-Only Quick Guide Sagem MA1xx using Finger-Only Identification [ 7 ] INSTALLING THE MSO-300 FINGERPRINT ENROLLMENT DEVICE System Galaxy 8.2.4 (or later) is compatible with the MSO-300 Enrollment device. UPGRADE COMPATIBILITY: The MSO-100 driver is not compatible and must be uninstalled before installing MSO-300 driver. MSO-300 DRIVER: The MSO-300 DRIVER is compatible with non-server platforms. You must consult with Sagem for up-to-date information on which operating systems and server platforms are compatible. NOTE: System Galaxy is fully compatible with current non-server operating systems (e.g. Windows XP, Vista Ultimate/Business) as well as Windows Server OS. See the SG System Requirements Guide for details. NOTE: In SG 10 or later, it is possible to enroll finger credentials at the Sagem reader. SG REGISTRATION: In order to scan fingers, Biometric Support must be checked in System Registration INSTALLING THE SAGEM MSO-300 DRIVER Uninstall the MSO-100 Driver, if present The MSO-300 Driver can be installed from disk-1 of the Galaxy Install CD – Go to: Installers\ Drivers\ Sagem\ Sagem MorphoSmart USB Driver. Double click “setup” file to install the MSO Driver. CONNECTING THE SAGEM MSO-300 FINGER SCANNER Once the driver is installed, simply connect the MSO-300 Finger Scanner to a USB port (2.0 or higher) at the Galaxy Workstation PC that will be used for enrollment. Page 21 SG/Sagem Finger-Only Quick Guide Sagem MA1xx using Finger-Only Identification CHAPTER 4 : CONFIGURING SG FOR BIOMETRIC SUPPORT SETTING UP THE SYSTEM GALAXY SOFTWARE This chapter covers the following: Brief pointers on installing and registering System Galaxy Upgrading an existing systems Creating system operators Importing existing FGR files into the SysGal database Programming the biometric readers in System Galaxy Setting up the Triple-scan options in the Administrator Setup screen IMPORTANT: you must be logged in as a master operator to program the software. [ 1 ] ABOUT INSTALLING SYSTEM GALAXY System Galaxy 10 or later supports the biometric features described in this manual. SG HARDWARE ASSUMPTIONS 1. You have installed the System Galaxy hardware, panels, door locks and contacts, etc. 2. You have installed and connected the Sagem Reader to the SG access control panel 3. You have connected the Sagem reader to the Ethernet network and configured the IP Address 4. You have configured the Sagem reader’s initial biometric settings, output format, etc. 5. You have already installed the Sagem MSO-300 fingerprint driver and scanner at the SG Workstation ALSO SEE: the Hardware Install Guide for detailed instructions about installing System Galaxy hardware. Page 22 SG/Sagem Finger-Only Quick Guide Sagem MA1xx using Finger-Only Identification FOR UPGRADING EXISTING BIOMETRIC SYSTEMS UPGRADING SG 8.2.4 OR NEWER SYSTEMS Any system that is starting from SG 8.2.4 or later will already store fingerprints in the database. Thus, they will not need to run the Fingerprint Import Procedure. Follow normal database upgrade scenario, which includes backing up the database and all asset files before running the software and database upgrades. UPGRADING SG 8.2.3 OR OLDER SYSTEMS Any system that is starting from a version SG 8.2.3 or older stored fingerprints in .FGR files in the System Galaxy directory (or wherever the designated location for that system was set to store them). Back up the database and asset files such as photographs, badge templates and any other files you need (signatures, graphic images, icons, floor plans, reports, etc.). Back up the FGR files to a safe location off the PC/Workstation. The default location for FGR files in c:\Program Files\System Galaxy\Sagem MA folder on the enrollment station. Table 4 : normal UPGRADE scenario Database Server (only) Communication Server Enrollment Workstation back up your database back up any asset files used by Galaxy to a separate location back up any asset files used by Galaxy to a separate location IMPORTANT: Be sure you have backed up your FGR files to a separate location if you are starting from SG 8.2.3 or older, Part-1 Prerequisites Part-1 Prerequisites Part-1 Prerequisites Part-2 Install SQL Native Part-2 Install SQL Native Part-2 Upgrade Database Client components only Client components only NOTE: Install CD-1 has HELP Part-3 Run Option C: Galaxy Part-3 Run the option that instructions on how to perform Software only fits the Comm server used: the SG database upgrade. Click the link on the top of the CD splash screen. Help opens in a browser. Navigate to Option A: Galaxy Software & GCS Services Option B: GCS Services only Part-3 (not required ) SEE: the Galaxy Software Install Guide (or Install Help Link on CD-1) for detailed instructions about installing or upgrading the SG Databases and Software. SEE: the Galaxy PC Requirements Guide for information on System Requirements. SEE: the Galaxy Software User Guide for information on backing up the database and assets. Page 23 SG/Sagem Finger-Only Quick Guide Sagem MA1xx using Finger-Only Identification FOR NEW SOFTWARE INSTALLS For new installs, run all three parts of the Install (1-Prerequisites, 2-SQL, 3-Galaxy Software) on every Server and Client Workstation. SYSTEM ARCHITECTURE: Keep in mind that some systems may combine the Database server and Communication Server. This affects machine requirements. Please see the Galaxy PC Requirements Guide for specifications. SEE: the Galaxy Software Install Guide (or Install Help Link on CD-1) for detailed instructions about installing or upgrading the SG Databases and Software. SEE: the Galaxy PC Requirements Guide for information on System Requirements. Table 5 : new install typical scenario Database Server (only) Communication Server Enrollment Workstation Part-1 Prerequisites Part-1 Prerequisites Part-1 Prerequisites Part-2 Install SQL Database Part-2 Install SQL Native Client components only Part-2 Install SQL Native Client components only Part-3 Install the option that fits the Comm server use: Part-3 Install Option C: Galaxy Software only Part-3 (not required ) Option A: Galaxy Software & GCS Services Option B: GCS Services only Page 24 SG/Sagem Finger-Only Quick Guide Sagem MA1xx using Finger-Only Identification [ 2 ] REGISTERING SYSTEM GALAXY FOR BIOMETRICS System Galaxy must be registered for biometric support. This option is found in the System Registration screen. 1. To start System Galaxy, double-click the System Galaxy icon (located on the PC’s desktop) a. choose your product level, b. create a master operator login, and then sign into the system with it. c. If the Loop Wizard opens up, you can close it and proceed with the registration. 2. Open the Registration Wizard from the following menu selections: Configure >> Options >> Registration >> Wizard CAUTION FOR REGISTRATION: The ability to use the Card Import Utility to setup users/cardholders could be impacted by system registration. CARD IMPORTING: Card Importing is a purchased option. System Galaxy permits a 14‐day grace period before registration must be done. During this grace period cards can be imported. Make sure you finish your card import before you register the system. FGR File Importing: Importing FGR files is covered in a following section in this guide. Page 25 SG/Sagem Finger-Only Quick Guide Sagem MA1xx using Finger-Only Identification 3. The System registration screen must be properly filled out. Dealer online registration system is available from the Galaxy Control System’s website at www.galaxysys.com and through Customer Service department. 4. Log on as a master operator and complete all the fields necessary to match the purchase order, remembering to set the following a) CHECK (enable) the biometric support option b) set the maximum number of biometric readers to be allowed c) enter the registration code d) click the APPLY button Figure 5 - SYSTEM galaxy REGISTRATION SCREEN This image is cropped to fit the focus. You must fill out any/all required fields to match your purchase order and maintenance agreement . Page 26 SG/Sagem Finger-Only Quick Guide Sagem MA1xx using Finger-Only Identification [ 3 ] IMPORTING .FGR TEMPLATES (UPGRADES ONLY) This part is for biometric sites that upgraded from SG 8.2.3 or older. Skip this part if you are a new install or have upgraded from SG8.2.4 or newer. Once the system and database upgrade is finished, you can import your FGR templates into the SysGal database. Your backed up FGR files need to be in placed on the machine they were originally residing. In previous versions of SG, the fingerprint templates were stored in the Sagem folder under the System Galaxy directory. This is typically found in c:\Program Files\System Galaxy\Sagem MA folder. When the software installation / upgrade was completed, the GCS MA Loader utility was installed in the System Galaxy folder. It is recommended you use the MA Loader from the PC that is normally responsible for connecting to the Sagem readers. Do not move the MA Loader to a different location. You can make a desktop shortcut to point to the MA Loader in the System Galaxy folder. IMPORTANT: If the customer is keeping any of their existing Sagem 200 / 300-series MA Terminals, they MUST recreate their bases and reload fingers (see below for details). IMPORT EXISTING .FGR FILES INTO SYSGAL DATABASE 1. Start/Run the GCS MA_Loader from the same PC/workstation that the customer used in the previous version to load fingerprints to Sagem readers. a. Click the [Applications Settings] button on the main MA_Loader screen. The MA_Loader should already be pointed to the data source for the SysGal database and correct SagemMA directory that stored the FGR templates. b. Test the data source connection by clicking the [Test Connection] button. A dialog message should display “Connection Successful”. . c. Verify the path to SagemMA in the MA_Loader. For typical installs, this path should be C:\Program Files\System Galaxy\SagemMA\ Although the finger files are stored in subfolders, you must point to the SagemMA folder. Page 27 SG/Sagem Finger-Only Quick Guide Sagem MA1xx using Finger-Only Identification 2. From the MA_Loader main screen, select the File menu and “Import Finger Files into Database”. The MA_Loader searches the SysGal database for indicators for employees that have fingerprints on file, and then writes the fingerprint files into the SysGal database. a. When MA_Loader is finished, a message displays showing how many records were updated. b. If MA_Loader cannot locate any FGR files, the message “0 finger files imported” displays. IMPORTANT: you should randomly spot-check (compare) fingerprints for several users to verify the prints imported correctly. This is done in the Galaxy Cardholder screen. NOTE: You should keep a backup of your SagemMA directory and .FGR files until you are sure your imported files are correctly stored and credentials are working. RECREATE BASES AND LOAD EXISTING SAGEM 200/300 READERS If the customer is keeping existing Sagem 200/300-series readers, the bases must be recreated – do the following steps: (also applies to MA100/500) a. Execute “delete all bases” and then “get all DB configuration” to verify “0” bases exist. b. Execute “create all bases”, then “get all DB configuration” to verify bases are recreated. c. Execute “load finger data”, then choose “get all DB configuration” to verify users are loaded. CREATE BASES AND LOAD NEWLY INSTALLED MA110 READERS If the customer is adding MA110 readers to the system, the MA110 must be properly installed according to Sagem documentation and must be configured into System Galaxy according to the instructions in this addendum. Note wiring to the Galaxy panel is covered in Hardware Manuals Page 28 SG/Sagem Finger-Only Quick Guide Sagem MA1xx using Finger-Only Identification INTEGRATION WITH OTHER READER TYPES If the customer is keeping or adding other technology, such as iClass or Prox readers, etc., you must do the following: a. Determine which cards will be ordered, (single- or dual-technology cards) and properly order the configuration of the card chip. b. If iClass readers are used, the MA110 should be set up for HID compatibility and the iClass cards should be encoded with the HID compatible ID and Site Code. HID iClass cards for the MA110 reader must be 16k x 16k cards in order to encode biometric data. c. If Prox or other type readers are used, the site can order dual-technology cards. The dealer must order the 125kHz chip to be programmed for the type of reader being used. Contact Galaxy Customer Service for assistance. [ 4 ] CONFIGURING THE SYSTEM SETTINGS In the System Settings screen on the General Options tab, you must ensure that the system is set for “Sagem” and that the ‘Smart Card’ option is OFF/unchecked for finger-only operation. 1. To start System Galaxy, double-click the System Galaxy icon (located on the PC’s desktop) and sign into the system with a master operator login. 2. Open the System Settings from the menu: Configure >> Options >> System Settings 3. On the General Options tab, ensure that the system is set for “Sagem Morpho” and the Smart Card Support Enabled checkbox is OFF/unchecked for finger-only capture. Figure 6 - SG SYSTEM SETTINGS SCREEN Note: You will uncheck this option if you are only capturing fingers and not encoding cards. Page 29 SG/Sagem Finger-Only Quick Guide Sagem MA1xx using Finger-Only Identification [ 5 ] CONFIGURING THE GALAXY OPERATOR PRIVILEGES Galaxy recommends creating separate Operator logins for each SG Operator. GCS MA LOADER: features / operations of the MALoader Utility are not affected by SG Operator privileges. ABOUT MASTER OPERATOR PRIVILEGES A master operator will have full privileges to operate all features including capturing and loading fingerprints view & edit all fields in every System Galaxy screen see the [ Admin Setup Options ] button on the Cardholder Finger Capture screen change the Triple-scan option on fingerprint capture. ABOUT ENROLLMENT OPERATOR PRIVILEGES Non-master operators cannot change administrative settings. The triple-scan option must be turned on or off by a master operator. SEE: the Galaxy Software User Guide for information on creating system operators. Page 30 SG/Sagem Finger-Only Quick Guide Sagem MA1xx using Finger-Only Identification [ 6 ] CONFIGURING THE TRIPLE-SCAN OPTION IN SG When using Finger-Only mode, the only biometric administrator setting you need to configure is the Triple-Scan feature. When the option is checked it is enabled and the enrollment operator will capture each print three times. When unchecked, the option is off and user must capture each print one time. See the next chapter for instructions on enrolling fingerprints. Log into System Galaxy as a master operator Open the Cardholder screen from the SG menu Configure > Cards > Cardholders 1. 2. 3. 4. 5. Select any Cardholder from the list Select a cardholder from the droplist and click Edit button (or open a new record) Select the Card/Badge Settings tab Select the Scan Fingers button Select the Administrator Set Up Options button to open the settings screen. FIGURE 7 - OPENING THE ADMINISTRATOR SETUP OPTIONS SCREEN <CONTINUE INSTRUCTIONS ON NEXT PAGE> Page 31 SG/Sagem Finger-Only Quick Guide Sagem MA1xx using Finger-Only Identification Once the Admin Setup Options screen is open, set the triple-scan feature as desired. If the Triple-Scan option is checked, the operator will acquire each fingerprint three times. If the Triple Scan option is unchecked, the operator will only acquire each fingerprint once. Click OK to save changes and exit the Setup screen. FIGURE 8 - configuring SYSTEM GALAXY triple-scan feature Page 32 SG/Sagem Finger-Only Quick Guide Sagem MA1xx using Finger-Only Identification [ 7 ] SYSTEM GALAXY PROGRAMMING Schedules, access groups, controllers, boards, etc. are covered in detail in the main SG Software manual. This section covers information that is directly related to programming the Sagem options. CONFIGURING SYSTEM GALAXY READER PROPERTIES To set up the Reader Properties for a Sagem reader, you will do the following: Open the Reader Properties screen from the SG menu Configure > Hardware > Reader Ports, 1. Select the correct Loop/Cluster 2. Select the correct Control Panel that the reader belongs to. 3. Select the Reader Name that you will configure to work with Sagem reader (readers are added when you add the boards (or DPIs) in the Controller Programming screen). 4. Click the EDIT button to edit the reader name and settings You may give the reader a unique name so you can easily identify the reader. In the example “Clean Room-MA100 WGN”, indicates that the MA100 is using Wiegand format and is located at the ‘clean room’ door. 5. Select the correct Reader Type that matches the Sagem model and format you are using. If you are using ABA format, you must set MA100 Data/Clock. Otherwise choose the Wiegand model. 6. On the General tab enter the Reader’s IP Address in the IP field at the bottom of the screen. 7. Click APPLY to save your settings. Once this is done, the GCS MA Loader should be able to connect to the reader. You must Load Data to the Galaxy Control Panel once your programming is complete. Figure 9 – CONFIGURING SYSTEM GALAXY Reader Properties FOR SAGEM SUPPORT Page 33 SG/Sagem Finger-Only Quick Guide Sagem MA1xx using Finger-Only Identification [ 8 ] LOADING CONFIGURATION TO GALAXY CONTROLLER This section assumes you have finished all necessary programming – note that cardholder data can be configured and loaded later as needed.. LOADING SYSTEM PROGRAMMING TO CONTROL PANELS To load the system programming, do the following steps. Open the GCS Loader screen from the SG Hardware Tree as follows: 1. Right-click the Loop Name in the Hardware Tree 2. Choose ‘Load’ option from the shortcut menu 3. Select the correct Loop/Cluster in the Loader screen 4. Select the correct Control Panel you wish to load and ACK from. 5. Select the correct CPU 6. On the Load Data tab, all options should be checked (Card Data can be loaded now or later) 7. Click the LOAD NOW button. Note that the message ‘Recalibrating Controller Ports’ will display in the Status box at the end of the load process. Figure 10 - LOADING THE GALAXY ACCESS CONTROL PANEL Page 34 SG/Sagem Finger-Only Quick Guide Sagem MA1xx using Finger-Only Identification CHAPTER 5 : ENROLLING FINGERPRINTS IN SG CREATING VALID CARD RECORDS AND CAPTURING/LOADING PRINTS This chapter covers the following: Creating a valid Card ./ Cardholder record Capturing Fingerprints System Galaxy Loading Fingerprints to the Sagem Reader NOTE 1: The main SG Software Manual covers information that is not covered in this manual. NOTE 2: A unique card number is a required in the SG cardholder to associate fingerprints with the access rules. A card number is always required even if the fingerprint is the only credential used. NOTE 3: Fingerprints are stored in the SG database and are loaded to the reader when the record is saved, provided the Load Morpho option is ON/CHECKED and loop/access privileges are valid. Prints can also be loaded to readers via the MA_Loader utility – the same provisions apply. NOTE 4: In SG 10 a cardholder can have more than one set of biometric credentials. Prior versions supported only one set of biometric credentials per Cardholder. CAPTURING FINGERPRINTS IN SG 1. Open the Cardholder screen and click Edit 2. Enter the cardholder’s information such as Name, Department, etc. 3. Click the Card/Badge Settings tab and choose the card technology 4. Enter a valid and unique Card ID number by manually keying in the card number or by presenting the card at an enrollment reader if used, a. if you are using 26 bit Wiegand you must enter a valid facility code that matches the card FAC and the reader’s site code ( 7 is the default if you are not issuing physical cards) b. if you are using the data/clock “USER SETS NUMBER” option to get an ID, then you can click the NEXT CODE button. A valid ID is required always for the SG hardware. Page 35 SG/Sagem Finger-Only Quick Guide Sagem MA1xx using Finger-Only Identification 5. Choose the correct Loop in the Loop privileges tab 6. Choose at least one valid Access Group or profiles that is either UNLIMITED or an access group name that is assigned to a schedule. 7. check the Load Morpho option (this must be checked to load the finger data to reader) 8. Click the SCAN FINGERS button to open the Sagem Enrollment screen Figure 11 - creating valid card record Page 36 SG/Sagem Finger-Only Quick Guide Sagem MA1xx using Finger-Only Identification 9. Choose the finger you will scan in the droplist (e.g. left index, right thumb) 10. Click the ACQUIRE FINGER button to capture the finger 11. When the Acquisition Window opens, place the human finger on the sensor of the enrollment station in the correct position. When the scanner window changes from red to green and displays the message “remove finger” you have captured a fingerprint. NOTE: you will see fingerprint icons appear when the fingers are captured. IMPORTANT: Clicking the RESET button will erase both fingerprints. 12. Repeat steps 8 thru 11 to capture the second finger 13. Click OK on the Capture / Encode window and finish any card programming you need to do such as expiration date, personal options, miscellaneous data fields, etc. 14. Click APPLY on the Cardholder screen to save these changes and load print to the readers. Figure 12 - Capturing fingerprints in System Galaxy Page 37 SG/Sagem Finger-Only Quick Guide Sagem MA1xx using Finger-Only Identification ABOUT LOADING INDIVIDUAL FINGERS FROM SG CARDHOLDER SCREEN In System Galaxy, fingerprints are enrolled in the cardholder screen. The loop privileges and access rules are assigned to the card as needed. When the cardholder record is saved using the APPLY button, the fingerprints for that individual are automatically loaded to all the biometric readers on any loop(s) that are assigned to the card record. The card ID and access rules are also loaded to any control panels on the assigned loop(s). When the finger is presented, the reader will find the print it’s base and forward the card ID to the access control panel. The access control unit will determine whether the person has access to the door based on schedules and access rules. IMPORTANT: the SG Software will not load the prints from cardholder screen if you have not restarted SG since you configured the reader properties. Also, you must have a valid card code, loop and access privileges, two unique prints that do no already exist in the reader, and the LoadMorpho option enabled (checked). Figure 13 – loading fingerprints from cardholder screen Page 38 SG/Sagem Finger-Only Quick Guide Sagem MA1xx using Finger-Only Identification ABOUT LOADING ALL FINGERS FROM GALAXY’S LOADER UTILITY The GCS MA Loader Utility is designed to load all the valid fingerprints to the Sagem Reader. IMPORTANT: the MA Loader will only load the prints for valid records. You must have a valid card code, loop and access privileges, two unique prints that do no already exist in the reader and the Load Morpho option enabled (checked). LOADING PRINTS FROM THE MA_LOADER: When you choose to execute a ‘Load Finger Data’ action from the MA_Loader, all cardholders’ prints in the SG database are sent to the chosen reader. 1. Select the Loop 2. Select the Reader 3. Select the action to Load Finger Data 4. Click EXECUTE ACTION button IMPORTANT: Card records must have valid loop and access privileges, correct card code/FAC code, and the load morpho option checked. Also the card record must have two different fingers captured that do not already exist in the reader. Invalid records or duplicate fingers are not sent. NOTE: Once you load finger data, you can execute a ‘Get DB information’ action to see how many users are in your reader base. Figure 14 - loading fingerprints from gcs ma_loader Page 39 SG/Sagem Finger-Only Quick Guide Sagem MA1xx using Finger-Only Identification MANAGING THE SAGEM READERS VIA GCS MA-LOADER System Galaxy makes managing the Sagem biometric reader very easy from the MA_Loader utility. The likelihood that a site has more than one Sagem reader and are using different models dictates the capabilities that Galaxy built into the MA_LOADER. The GCS MA_Loader is an SG tool that allows a Technician to … Manage the base(s) of Sagem readers (create or delete and get the database info. Load users / finger data into the readers (see section 5.3). Import FGR files (for upgrades – also see Chapter 4). Configure the Recognition modes, output format and related options of the readers. NOTE: You should run the MA_Loader from the System Galaxy directory on the computer you normally use to connect to the readers. You can make a desktop shortcut to make it easier to open the MA_Loader from its home directory. The MA_Loader does not need to kept running (hidden) all the time since SG is designed to add fingers automatically as they are enrolled. MANAGING BASES The MA_Loader allow you to delete bases, which also deletes all users. If you need to get old records out of the bases, you will use this option. Also you can create a single base or all bases for the readers as is appropriate. The Select Action droplist contains a list of actions or commands that the MA_Loader can run when it is connected to the Sagem Reader. Click the EXECUTE ACTION button to send the command to the chosen reader. The actions allow you to delete and create bases, get DB configurations and load finger data to the reader. The MA110 has one base that holds 500 users. The MA520 has multiple bases that hold up to 1 base with 3,000 users with the standard memory allocation and up to 5 bases with 50,000 users with the extended memory license. DELETE CARD BEFORE LOADING OPTION In the MA_Loader has an option to delete card before loading. To find this option open the MA_Loader and click on the Applications Settings button. Look for the option at the bottom of the screen. When checked the option will delete the card being loaded if it existed in the reader already and then load it into the reader. To maintain database integrity it is recommended to use this option. However, be aware that this could slow down large loads and can be unchecked to speed up loading fingers to the reader. Page 40 SG/Sagem Finger-Only Quick Guide Sagem MA1xx using Finger-Only Identification CONFIGURING READER RECOGNITION MODE You can set the recognition mode for the selected reader from the GCS MA_Loader utility, which is found in the c:\Program Files\System Galaxy\Utilities. 1. Select the desired Loop 2. Select the desired reader 3. Click the CONFIGURE READER button 4. Choose the desired recognition mode 5. Click SEND TO MA TERMINAL button to send the configuration to the reader. The commands will display on the main screen as they are sent to the reader. You can set the reader’s date and time to match the PC time. You can reboot the reader also. It is recommended to reboot the reader after it has loaded a new recognition mode. Figure 15 - Setting Reader Recognition mode Page 41 SG/Sagem Finger-Only Quick Guide Sagem MA1xx using Finger-Only Identification IMPORTING FGR FILES You only need to import FGR files if you are upgrading from a prior version of System Galaxy such as v 8.2.3 (or older) and you have captured FGR files in that version. IMPORTANT: The upgrade should not disturb your FGR files, however it is always good practice to backup assets whenever you are upgrading a computer. SETTING UP FOR FGR FILE IMPORT Open the MA_LOADER utility from c:\Program Files\System Galaxy\Utilities folder on the machine that normally loaded fingerprints to the reader before the upgrade. 1. Click the APPLICATION SETTINGS button 2. Click the TEST CONNECTION to ensure you have a good connection to the SG database 3. Verify that the path to the FGR files is correct 4. Check the Delete Cards before Loading option 5. Click OK to complete setup Figure 16 - pointing to FGR Files for import Page 42 SG/Sagem Finger-Only Quick Guide Sagem MA1xx using Finger-Only Identification IMPORTING FGR FILES INTO DATABASE You should have checked the import path and tested the database connection in the previous section. 1. click the FILE menu on the main window of the MA_Loader utility 2. Select the IMPORT option and allow the import to complete. Figure 17 - importing .FGR files from ma_loader Page 43 SG/Sagem Finger-Only Quick Guide Sagem MA1xx using Finger-Only Identification CHAPTER 6 : TROUBLESHOOTING TIPS FOR MA1XX SYMPTOMS AND WHAT TO LOOK FOR This section does not cover every possible exception condition. It provides basic validation tips. FINGER IS NOT GRANTED ACCESS BY SG System Galaxy determines whether a user/cardholder is granted access at a door based on the access privileges assigned to the cardholder in SG. ? If the finger is given a GREEN LED at the reader, then the reader recognizes the user’s prints and the reader forwards data to the SG access control panel. The panel looks up the access privileges for the user and grants or denies access based on whether the user should have access to that door at that time. The SG Controller Loader is used to program the access control panel with the cardholders and access rules. 1. VERIFY that the schedule assigned to the cardholder’s access group allows access (green) during the time period in question. 2. Verify that the Access Group has correctly been assigned to the card that holds the fingerprints. 3. Verify that the correct Loop has been assigned to the card that is associated with the reader/ door in question. 4. Verify whether other users can access the door 5. Verify the door has not been issued a disable command by the SG operator or by crisis mode. 6. Verify that the loop is online with the GCS Services and that the panel has been correctly loaded with all cardholder data. The appropriate system operator should be able to load all the data to the panel. Make sure you Load all cardholders as well as all other options (schedules, rules, etc.) 7. Have user confirm whether they can get in at the reader after reloading the panel Page 44 SG/Sagem Finger-Only Quick Guide Sagem MA1xx using Finger-Only Identification FINGER IS NOT ACCEPTED AT THE READER A finger is rejected at the reader when the reader returns a low buzzer and the LED turns RED after the finger is scanned. There could be a number of reasons why credentials do not work at a Sagem reader. The reader could be in the wrong mode, or finger may not be in the reader, or the person’s prints are not good quality. FINGER SENSOR IS OFF ? Before the finger is presented at the reader, the Finger Sensor should be ON. When reader is in Identification Mode and is idle/ready, the Sensor is ON and the LED is OFF. FINGER SENSOR IS OFF AND LED IS BLUE Verify that the reader is correctly configured for IDENTIFICATION MODE: Using the Sagem Configuration Utility… 1. Using the Sagem Configuration Tool.exe (found on Galaxy CD-2 in the Sagem folder) to connect with the IP Address of the reader. 2. Select “Application” option and click GET FILE 3. Expand BIO CTL and verify the following options are set as indicated Identification option= 1 Authent Bypass option = 0 all Authentication options = 0 NB of retries = 2 (default) See Chapter 3 part 5 of this guide and Sagem documentation as needed. 4. Reboot reader from the config tool if you had to make any changes. Using the System Galaxy’s MA Loader Utility… The reader recognition mode can be set to IDENTIFICATION MODE from the GCS MA Loader Utility if you have the reader IP address configured in System Galaxy reader properties. See Configuring Reader Recognition Mode in Chap 5 page 39. Page 45 SG/Sagem Finger-Only Quick Guide Sagem MA1xx using Finger-Only Identification FINGER SENSOR IS OFF AND LED IS SLOW YELLOW When Sensor is OFF the blinking yellow LED indicates there no fingers are in the reader base. Load fingers to the reader using the MA_Loader. 1. Open the MA_LOADER from the System Galaxy Utilities folder (c:\Program Files\System Galaxy\Utilities ) 2. Select the correct Loop that the reader is assigned to 3. Select the correct Reader from that loop’s list of readers 4. Choose to Get DB Base Information and click the [EXECUTE ACTION] button (this returns the serial number of the reader and confirms that PC is able to communicate with the reader) o NOTE: If you cannot Get DB Information, you should verify the reader is online and can be pinged from the same PC that the MA_Loader is using. 5. Choose to Load Finger Data and click the [EXECUTE ACTION] button (this will return the banks of records loaded to the reader as they load) o NOTE: If you can Load Finger Data, but your missing finger still doesn’t work, you can … a) Click the APPLICATION SETTINGS button and CHECK/enable the Delete Card Before Loading option; then go back to main screen and Load Finger Data (allows existing card record to be replaced). b) Select the Delete All Fingers option on the main screen and click EXECUTE ACTION, then reload the finger data ( this makes sure both of the fingerprints in question will not be blocked due to an existing duplicate). Page 46 SG/Sagem Finger-Only Quick Guide Sagem MA1xx using Finger-Only Identification FINGER SENSOR IS ON BUT READER REJECTS FINGER ? The reader will reject a human finger if it cannot identify or find in its base. When the reader rejects a finger it makes a low buzz and the LED turns RED. When the reader accepts a finger it makes a high beep and the LED turns GREEN. NOTE: Data is not sent to the access control panel if finger is not found in reader base or is rejected at the reader for any reason. Data is only sent to the control panel if the finger is accepted. USING WRONG FINGER Verify the correct finger is being used: Try the finger on the opposite hand incase you forgot which finger is enrolled. Try the alternate (second) print. If only the first print is rejected then use the second print until you can recapture the first print at the SG enrollment workstation. If both prints are being rejected, the prints may not have been correctly captured or the record may not have been loaded to the reader base. See troubleshooting tips about Creating Valid Cardholder Records. See troubleshooting tips about Loading Fingerprints to the Reader. FINGER PLACEMENT INCORRECT Verify finger is placed correctly on the Reader Sensor: Sagem recommends that the finger be placed level and straight (not angled or tilted) on the sensor, both when enrolling and when presenting print at reader. Try repositioning the finger on the sensor. A yellow flashing LED at the reader indicates the reader is having trouble with the print quality or position. Present the finger the same way at the reader as when you captured the fingerprint at the MSO-300. Make sure you use the correct finger orientation (not slanted, tilted or turned). Figure 18 - correct finger placement at SAGEM reader Page 47 SG/Sagem Finger-Only Quick Guide Sagem MA1xx using Finger-Only Identification BOTH PRINTS ARE NOT RECOGNIZED IN READER If both fingers are not recognized, the prints need to be loaded to the reader: Load all fingers using the GCS MA_Loader: the MA_Loader utility loads all the prints of all valid cardholder records in the SG database. 1. Open the MA_Loader from the System Galaxy Utilities folder (c:\Program Files\System Galaxy\Utilities ) 2. Select the correct Loop that the reader is assigned to 3. Select the correct Reader from that loop’s list of readers 4. Select Get DB Base Information and click EXECUTE ACTION (this ensures you have connection to the reader) 5. Select Load Finger Data and click EXECUTE ACTION (data loads to reader) See Chapter 5 Loading Users section for instructions and screen shot. Load fingers from the SG Cardholder screen: prints of an individual cardholder are loaded when the cardholder is ‘saved’ in SG. 1. Use MA_Loader Get All DB Information to see how many users are in reader base. 2. In System Galaxy, open the cardholder screen and select the cardholder name. 3. Click EDIT button to put the record in edit mode and correct the following a) in the Personal tab verify the cardholder ‘Inactive’ option is off/unchecked b) In the Card/Badge Tab choose the card record that holds the prints c) verify the card ID is valid and using the correct format type (Wiegand vs. ABA) and is using the correct Site Code if Wiegand is used d) verify the card is not expired and Card Disabled option is off/unchecked e) verify that the correct LOOP , Access Group or door are assigned f) verify that the LOAD MORPHO option is on/CHECKED g) Open the Sagem Capture finger window and use the COMPARE button to compare the user’s prints with what is saved in the SG database (you must have captured two different fingers). Recapture the prints as needed – be sure to select from the droplist which finger you are capturing so you have a reference in the system indicating which finger was captured. 4. Close the Capture window and click APPLY on the cardholder screen to save and cause the prints to load to the reader 5. In MA_Loader Get All DB Information to verify the user count incremented in reader. 6. Have user confirm whether they can get in at the reader after reloading See Chapter 5 Capturing Fingerprints in SG for steps and screen shot. See the following sections to determine why the finger does not load Page 48 SG/Sagem Finger-Only Quick Guide Sagem MA1xx using Finger-Only Identification FINGER CAPTURED BACKWARDS Verify that the finger is not captured backwards on the MSO-300 during enrollment: When you capture the fingerprint at the MSO-300, make sure you place the finger in the correct direction. It is possible to scan the finger backwards on the optical sensor. A backwards fingerprint will successfully save in SG and will load to the reader base, but it will be rejected at the reader because the person cannot present their finger backwards at the reader. To eliminate any possibility of improper capture, you can clear prints in SG and re-capture them on the same cardholder record, then re-load them to the reader. See troubleshooting tips about Creating Valid Cardholder Records. See troubleshooting tips about Loading Fingerprints to the Reader. Figure 19 - correct finger placement at mso-300 enrollment device FINGER QUALITY LOW Verify that the finger is clean (but not too dry) and not cold: if a print is difficult to read at the MA1xx, then the reader will rapidly blink a yellow LED Sagem recommends brushing the print on the side of your nose to correct for skin that is too dry. The fingerprint must be clear enough – choose a finger that has the best print for capture. Page 49 SG/Sagem Finger-Only Quick Guide Sagem MA1xx using Finger-Only Identification DUPLICATE PRINTS IN READER If for some reason the user’s prints are loaded in the reader under a different record, the reader will not accept the prints again. Both fingers must be unique and cannot already exist in the reader base in order for the record to load. Delete and Reload Fingers using the GCS MA_Loader. 1. Open the MA_Loader from the System Galaxy Utilities folder (c:\Program Files\System Galaxy\Utilities ) 2. Select the correct Loop that the reader is assigned to 3. Select the correct Reader from that loop’s list of readers 4. Select Get ALL DB Base Information and click EXECUTE ACTION (notice the number of users reported in the reader base). 5. Select Delete Finger Data and click EXECUTE ACTION 6. Select Load Finger Data and click EXECUTE ACTION (notice that the number of users in the reader base incremented). 7. Have user confirm whether they can get in at the reader after reloading See Chapter 5 Loading Users section for instructions and screen shot. READER BASE HAS BECOME CORRUPT If for any reason the reader base becomes corrupt, you can use the MA_Loader to rebuild the base and reload the prints into the reader. Delete and Reload Fingers using the GCS MA_Loader. 1. Open the MA_Loader from the System Galaxy Utilities folder (c:\Program Files\System Galaxy\Utilities ) 2. Select the correct Loop and Reader 3. Select Get ALL DB Base Information and click EXECUTE ACTION (notice the number of users reported in the reader base). 4. Select Delete ALL Bases and click EXECUTE ACTION 5. Select Create Base and click EXECUTE ACTION (create base creates the single base in the MA1XX Reader; Create All Bases creates all the bases for a 500 series reader) 6. Select Load Finger Data and click EXECUTE ACTION (notice that the number of users in the reader base incremented). 7. Have user confirm whether they can get in at the reader after reloading See Chapter 5 Loading Users section for instructions and screen shot. Page 50 SG/Sagem Finger-Only Quick Guide Sagem MA1xx using Finger-Only Identification GLOSSARY : SG: abbreviation for System Galaxy. GCS: abbreviation for Galaxy Control Systems. GCS services and utilities are part of the System Galaxy software suite. GCS MA Loader: (or MA_Loader Utility) is a Galaxy utility program that allows the operator to perform common operations such as manage bases, get user info, load and delete fingers, setup reader modes, output formats, etc. This utility does not allow finite control over all reader setup options. The Sagem Config Tool is used for initial setup and granular control of reader options. Fingerprint Enrollment Station: the MSO-300 fingerprint capture device (including its driver). This device is used at the SG enrollment workstation to scan the fingerprints from the SG Cardholder screen. Minutiae Data: also known as ‘finger data’ or ‘fingerprint templates’; is the .FGR file that contains the captured fingerprint data. From within System Galaxy, two unique fingers are scanned using the Sagem MSO-300 enrollment reader. This data is stored in the SG database and pushed or loaded to the MA100/110 reader base when the cardholder record is saved. Operation Modes: are the modes the MA reader is using (i.e. either Authentication (1:1) or Identification (1:n) mode [where :n represents the max base storage which may vary with model] ). Identification Mode (1:n): is known as ‘finger only’ mode; in this mode the reader scans the human finger and searches its base to find a matching fingerprint template. Authentication Mode (1:1): this mode reads a contactless card, then scans the finger to compare it with the template that is associated with the card ID in its base. Authentication mode is not covered in this guide. Reader ‘Recognition’ Mode: “Recognition Mode” refers to the state the MA reader is given from the GCS MA_Loader. This state sets reader settings to accept and handle user credentials in a certain order. EXAMPLE OF RECOGNITION MODES Identification Finger Only Mode Authentication “Prints in Card” Recognition Mode Sets reader to only accept fingers Finger is compared to prints stored in reader Sets reader to accept cards with prints encoded on card Card is presented and finger is compared to prints stored in card Note: Prints in Card recognition mode is one of several recognition modes available when using Authentication with the MA110 Reader. See the full MA110 Integration Guide for details on for Authentication/Multi-factor modes. Page 51