1
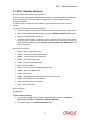
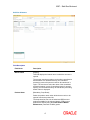
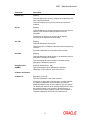
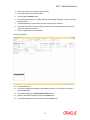
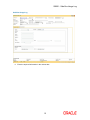
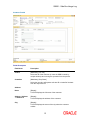
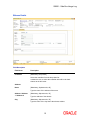
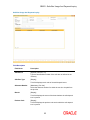
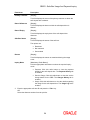
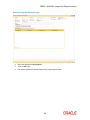
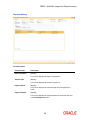
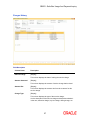
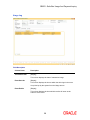
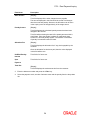
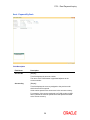
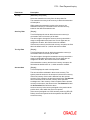
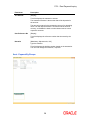
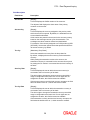
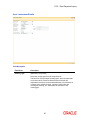
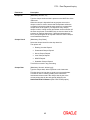
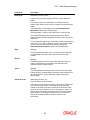
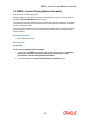
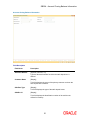
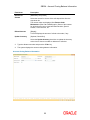
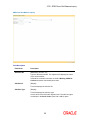
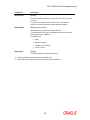
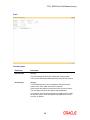
Oracle FLEXCUBE Safe Deposit Box User Manual Release 4.4.0.0.0 Part No E52076-01 Safe Deposit Box User Manual Table of Contents (index) 1.1. 8057 - Safe Box Allotment ................................................................................................... 3 1.2. SB001 - Safe Box Usage Log .............................................................................................. 9 1.3. SB002 - Customer Waitlist ................................................................................................. 17 1.4. SB003 - Safe Box Usage And Payment Inquiry ................................................................. 22 1.5. 1701 - Rent Payment Inquiry ............................................................................................. 31 1.6. SB004 - Account Closing Balance Information .................................................................. 50 1.7. 1720 - SDB Close Out Balance Inquiry .............................................................................. 54 8057 - Safe Box Allotment 1.1. 8057 - Safe Box Allotment Using this option you can allot a safe deposit box. When a new safe deposit box is being allotted, the transaction processing application performs a check, using the given Customer IC and the category type, on the centralized customer information database. A maximum of three customers can be related to a safe deposit box at the time of account opening. The account opening includes the following steps: Check for customer existence: Check existence of all the customers linked to the account. Open Account: Allot a new safe deposit box using the Safe Box Allotment Screen option. Specify Account Operating Instructions. Customer Account Linking: A maximum of three customers can be linked to the account using this option. If there are more than three customers to be linked to the account, the same needs to be linked using the Customer Account Relationship Maintenance (Fast Path: CI142) option. Definition Prerequisites BAM17 - Branch Type Maintenance CHM01 - CASA Product Master Maintenance BAM97 - Currency Codes Cross Reference BAM30 - Tax Codes Maintenance CIM08 - Customer Type Maintenance 8053 - Customer Addition CI142 - Customer Account Relationship Maintenance SMM02 - User Profile Maintenance IVM01 - Stock Codes SBM01 - Safe Deposit Box product and inventory cross reference IVM03 - Inventory Branch Cross Reference IVM04 - Stock Branch Cross Reference IV001 - Stock Transactions Modes Available Not Applicable To allot a safe box deposit 1. Type the fast path 8057 and click Go or navigate through the menus to Transaction Processing > Customer Transactions > Safe Box Allotment. 2. The system displays the Safe Box Allotment screen. 3 8057 - Safe Box Allotment Safe Box Allotment Field Description Field Name Description Branch Name [Display] This field displays the branch name in which the account is opened. The account opening procedure can be either centralized or decentralized. In a centralized setup, one centralized processing center will open accounts for all branches of a region. The user has to select the name of the centralized processing branch in case of centralized setup for account opening. In Decentralized setup, the transaction processing branch name is displayed. Product Name [Mandatory, Drop-Down] Select the product name under which the account is to be opened from the drop-down list. The drop-down list has a list of authorised SDB account products available for the selected branch. SDB account products are defined using the CASA Product Master Maintenance (Fast Path: CHM01) option. 4 8057 - Safe Box Allotment Field Name Description Product Ccy [Display] This field displays the currency assigned to the product at the time of product definition. This is the default currency for the product and cannot be modified. A/C No [Display] This field displays the account number at the time of account opening, if the account number generation is set as Automatic. The structure of the account number can be defined according to the requirements of the bank. A/C Title [Display] This field displays the account title. The account title is defaulted to the short name of the primary customer. This field is displayed on successful account creation. Serial No [Display] This field displays the serial number, if the automatic account generation is enabled for the bank. Type the appropriate serial number if automatic account generation is disabled for the bank. Doing Business As(DBA) [Optional, Alphanumeric, 100] Type the description which indicates the operating relationship of the customer at the account level. Customer Information Customer IC [Mandatory, Pick List] Type the identification code of the customer. A customer IC along with customer type is a unique method of customer identification across the bank (covering all branches). Based on the IC and Customer Type, the system can identify the customer as an existing customer even when the customer opens a new account in another branch. A social security number, passport number, birth certificate or corporate registration can be used as a customer IC. 5 8057 - Safe Box Allotment Field Name Description Category [Mandatory, Drop-Down] Select the category of the customer from the drop-down list. For example, Tax Paying Individual, Church, Foreign Corporate, etc. A user can select multiple customer types to segregate the customers using the Customer Types Maintenance (Fast Path: CIM08) option. Further processing such as tax applicable, SC charges, etc., are levied based on the customer type. IC Type [Display] The IC type of the customer, based on the category to which the customer belongs. It is maintained in the Customer Types Maintenance (Fast Path: CIM08) option. Short Name [Display] This field displays the short name of the customer displayed from the Customer Addition (Fast Path: 8053) option. The customer short name can be changed through the IC No – Short Name Change (Fast Path: 7101) option. Birth / Reg Date [Display] This field displays the birth or registration date of the customer after validation. If the customer already exists, then the Birth/Reg Date is displayed. Else the Customer Addition (Fast Path: 8053) option is displayed where more details about the customer can be entered. Relations [Mandatory, Drop-Down] Select the appropriate relation from the drop-down list. The customer is linked to the account by way of a relations tag. This list contains different relations. For example, Sole Owner, Joint And First, Joint and Other and other relations. For successful account opening transaction, a customer with primary relationship viz. Sole Owner, Joint And First, or Joint Or First must be linked. If primary relationship linked is Joint And First or Joint or First, customer with secondary relationship viz. Joint and other or Joint or other must be linked to the account. A maximum of three customers can be linked to an account in the account-opening screen. Customer Account Relationship Maintenance (Fast Path: CI142) option can be used to attach additional customers to the accounts. 6 8057 - Safe Box Allotment Field Name Description Customer ID [Display] This field displays the customer ID. A customer ID is an identification number, generated by the system after customer addition is completed successfully. This running number, unique to a customer across the system, is generated after the system has identified the customer IC and Customer Category combination to be nonexistent in the system. This ID is used for searching and tracking the customer in the system. Officer ID [Mandatory, Drop-Down] Select the officer ID from the drop-down list. Each account can be assigned to a separate officer. The officer who is assigned to an account will act as the relationship officer for the account. The officer ID are created using the User Profile Maintenance (Fast Path: SMM02) option. Date of Allotment(dd/mm/yyyy) [Optional, dd/mm/yyyy] Rental Period (in [Mandatory, Numeric, Two] months) Type the period for which the SDB is allocated to the customer. Date of Expiry(dd/mm/yyyy) [Display] Type the process date of allotment of the safe deposit box to the customer. This field displays the date on which the validity of the safe deposit box ends. The expiry date depends on the rental period and is displayed accordingly. Number of Rentals to be waived [Mandatory, Numeric, Three] Type the number of rentals to be waived. The waiver would include the rental portion only and not the allotment fees. The number of rentals once entered cannot be modified later. However if required, the period can be extended by using the SC Package Changes at Account (Fast Path: SCM03) option to waive for a further period. Deposit Amount [Mandatory, Numeric, 10] Type the amount of deposit paid by the customer to avail of the SDB facility. The deposit amount will be returned to the customer on SDB closure. Deposit Remarks [Mandatory, Alphanumeric, 30] Type the remarks related to the SDB deposit made. 7 8057 - Safe Box Allotment 3. Select the product name from the drop down list. 4. Select the customer IC and the relation. 5. Click the Val. Customer button. 6. For an existing customer, the system displays the message "Existing Customer...Proceed with data entry". 7. Click the Ok button to open another account for the existing customer. 8. Select the officer ID from the drop-down list and enter the rental period in years and the number of rentals to be waived. 9. Enter the deposit amount and remarks. Safe Box Allotment 10. Click the Ok button. 11. The system displays the message "Authorisation required. Do You Want to Continue?". Click the Ok button. 12. The system displays the Authorization Reason screen. 13. Enter the relevant information and click the Grant button. 14. The system displays the account number. Click the Ok button. 8 SB001 - Safe Box Usage Log 1.2. SB001 - Safe Box Usage Log Using this option, you can capture the time and other relevant details of the safe box operation. You can enter the details related to safe box user and witness details. The system also provides safe box details such as safe box type, date of allotment, date of expiry, safe box status, etc. The witness / user details tab displays the details of the witness or user for the action of access or drill respectively. However, the witness details are mandatory to maintain at the time of drilling operation. Definition Prerequisites 8057 - Safe Box Allotment Modes Available Add By Copy, Add, Modify, Inquiry. For more information on the procedures of every mode, refer to Standard Maintenance Procedures. To add safe box usage log 1. Type the fast path SB001 and click Go or navigate through the menus to Transaction Processing > Account Transactions > SDB Account Transactions > Other Transactions > Safe Box Usage Log. 2. The system displays the Safe Box Usage Log screen. Safe Box Usage Log 9 SB001 - Safe Box Usage Log Field Description Field Name Description Safe Box ID [Conditional, Numeric, Nine] Type the unique identification number assigned to the safe box. If the Allotment Number is selected, the system will display the safe box id corresponding to the selected allotment number. Safe Box Type [Display] This field displays the safe box type. The safe box type represents the stock code of the safe deposit boxes. Allotment Number [Conditional, Pick List] Select the allotment number for the Safe Deposit Box from the pick list. If the safe box ID is entered, the system will display the allotment number corresponding to the safe box id entered. Branch [Display] This field displays the safe deposit box branch where the safe deposit box is opened Product Code [Display] Primary Customer [Display] Date Of Allotment [Display] Date of Expiry [Display] This field displays the product code under which the safe deposit box is opened. This field displays the primary name of the account holder, to whom the safe deposit box is allotted. This field displays the allotment date of safe deposit box. This field displays the expiry date of the safe deposit box allotment. This field is editable only in the Modify mode. Deposit Amount [Display] Deposit Remarks [Display] This field displays the deposit amount entered in the Safe Box Allotment (Fast Path: 8057) option. The user can modify this value, in the Modify mode. This field displays the remarks entered in the Safe Box Allotment (Fast Path: 8057) option. This field is editable only in the Modify mode. 10 SB001 - Safe Box Usage Log Field Name Description Usage Event [Mandatory, Drop-Down] Select the appropriate type of usage event from the drop-down list. The options are: Access Drill Key Lost Restrict Revoke For the purpose of service charge the system will use this field. The system will trigger the service charge as and when the event for which service charge is attached is selected and the transaction is committed. Safe Box Status [Display] Reason [Mandatory, Alphanumeric, 120] This field displays the current status of the safe box. Type the reason for usage event. By default, the system displays the reason based on the Usage Event selected. 3. Click the Add button. 4. Enter the safe box ID and press the <Tab> key. OR Select allotment number from the pick list 5. Select the usage event from the drop-down list. 11 SB001 - Safe Box Usage Log Safe Box Usage Log 6. Enter the required information in the various tabs. 12 SB001 - Safe Box Usage Log Customer Details Fields Description Field Name Description Cust Id [Mandatory, Pick List] Select the ID of the customer (in case the SDB is owned by multiple holders) who is doing the operation from the pick list. Custodian [Mandatory, Drop-Down] Select the user who will operate safe box ID on behalf of the bank from the drop-down list. Address Name [Display] This field displays the full name of the customer. Address / Address 1 / Address 2 [Display] City [Display] This field displays the address of the customer. This field displays the name of the city where the customer resides. 13 SB001 - Safe Box Usage Log Field Name Description Country [Display] This field displays the name of the country where the customer resides. State [Display] This field displays the name of the state where the customer resides. Zip [Display] This field displays the zip code of the city where the customer resides. It is divided into two sections. The first section contains the first 5 numeric characters (this is the basic zip code) and the second part contains the remaining 4 numeric characters of the zip code. Phone Number [Display] This field displays the phone number of the customer. Operation Details Narration [Optional, Alphanumeric, 40] Type the narration. The narration is the brief description of the safe box usage. Time In [Display] This field displays the time in. The time in is the time when the teller logs in the event. Time Out [Display] This field displays the time out for the event. The time out is the end time of the event, entered by the teller. This field is editable only in the Modify mode. 14 SB001 - Safe Box Usage Log Witness Details Field Description Field Name Description Custodian [Mandatory, Drop-Down] Select the custodian from the drop-down list. It allows the user to select the custodian who will be the bank witness to the drill event. Address Name [Mandatory, Alphanumeric, 40] Type the name of the witness of the event. Address / Address 1 / Address 2 [Mandatory, Alphanumeric, 35] City [Mandatory, Alphanumeric, 35] Type the address of the witness. Type the name of the city where the witness resides. 15 SB001 - Safe Box Usage Log Field Name Description Country [Mandatory, Pick List] Select the name of the country where the witness resides from the pick list. State [Mandatory, Pick List] Select the name of the state where the witness resides from the pick list. Zip [Mandatory, Numeric, Five, Four] Type the zip code of the city where the witness resides. It is divided into two sections. The first section contains the first five numeric characters (this is the basic zip code) and the second part contains the remaining four numeric characters of the zip code. Phone Number [Optional, Numeric, Five,15] Type the phone number of the witness. Operation Details Narration [Optional, Alphanumeric, 120] Type the narration. The narration is the brief description of the witness of the event. 7. Click the Ok button. 8. The system displays the message "Record Authorised...". Click the Ok button. 16 SB002 - Customer Waitlist 1.3. SB002 - Customer Waitlist Using this option you can maintain the list of prospective customers who have requested for safe boxes. You can also capture, modify, delete or inquire the customers who have requested for the safe boxes. It is maintained at branch level. The teller can also maintain the priority for safe box allotment and the priorities are high, medium and low. Definition Prerequisites 8053 - Customer Addition 8057- Safe Box Allotment Modes Available Add By Copy, Add, Modify, Delete, Cancel, Amend, Authorize, Inquiry. For more information on the procedures of every mode, refer to Standard Maintenance Procedures. To add a customer waitlist 1. Type the fast path SB002 and click Go or navigate through the menus to Transaction Processing > Customer Transactions > Customer Waitlist. 2. The system displays the Customer Waitlist screen. Customer Waitlist 17 SB002 - Customer Waitlist Field Description Field Name Description Serial Number [Display] This field displays the serial number. The serial number is a unique number generated by the system. The number will be incremental for each safe box. Date of Logging [Mandatory, Pick List, dd/mm/yyyy] Select the date on which the branch logs in the details of the customer, from the pick list. Safe Box Type [Mandatory, Drop-Down] Select the type of safe box from the drop-down list. Branch [Mandatory, Pick List] Select the branch in which the customer has the safe box from the pick list. Existing Customer [Optional, Check Box] Select the Existing Customer check box if the customer is an existing customer. Allocation Priority [Mandatory, Drop-Down] Select the priority in which the safe box will be allocated from the drop-down list. The options are: High Medium Low By default the system displays the priority as Medium. Customer Details All the customer information related fields are Display fields for an existing customer. Search Criteria [Conditional, Drop-Down] Select the search criteria to search for the customer from the drop-down list. This field is enabled if the Existing Customer check box is selected. The options are: Customer short name: The short name of the customer. Customer Ic: The unique code for customer identification. Customer ID: The unique identification given by the bank. 18 SB002 - Customer Waitlist Field Name Description Search String [Conditional, Alphanumeric, 20] Type the search string, to search for a customer, corresponding to the search criteria selected in the Search Criteria field. This field is enabled if the Existing Customer check box is selected. If the search criterion is specified as customer's short name or customer IC. then any part of the short name or customer Ic. can be entered. The system displays the pick list of all those customers having those letters in their respective criteria. Select the appropriate customer from the existing customer list. For example, The customer's short name is George Abraham. One can search the above customer by entering Geo in the Search String field. Customer ID [Display] This field displays the unique customer identification number assigned to the customer. Name [Conditional, Alphanumeric, 40] Type the full name of the customer. The name of the customer is displayed, if the Existing Customer check box is selected. Address1 [Conditional, Alphanumeric, 35] Type the first line of the address of the customer. The address of the customer is displayed, if the Existing Customer check box is selected. Address2 [Conditional, Alphanumeric, 35] Type the second line of the address of the customer. The address of the customer is displayed, if the Existing Customer check box is selected. Address3 [Conditional, Alphanumeric, 35] Type the third line of the address of the customer. The address of the customer is displayed, if the Existing Customer check box is selected. City [Conditional, Alphanumeric, 35] Type the name of the city or emirate where the customer resides. The address of the customer is displayed, if the Existing Customer check box is selected. 19 SB002 - Customer Waitlist Field Name Description Zip [Conditional, Numeric, Five, Four] Type the zip code of the city where the customer resides. The zip code is displayed, if the Existing Customer check box is selected. It is divided into two sections. The first section contains the first 5 numeric characters (this is the basic zip code) and the second part contains the remaining 4 numeric characters of the zip code. Country [Conditional, Pick List] Select the name of the country where the customer resides from the pick list. The country name is displayed, if the Existing Customer check box is selected. State [Conditional, Pick List] Select the name of the state or emirate where the customer resides from the pick list. The state name is displayed, if the Existing Customer check box is selected. Phone Number [Conditional, Numeric, Three, Three, Four] Type the phone number of the customer. The phone number of the customer is displayed, if the Existing Customer check box is selected. E-mail [Conditional, Alphanumeric] Type the e-mail address of the customer. The e-mail address of the customer is displayed, if the Existing Customer check box is selected. Remarks [Optional, Alphanumeric, 40] Type the remarks for the event. 3. Click the Add button. 4. Select the safe box type, branch and the allocation priority from the drop-down list. 5. Select the search criteria from the drop-down list. 6. Enter the search string and press the <Tab> key and select the customer from the pick list. 7. Enter the remark for the waitlist customer. 20 SB002 - Customer Waitlist Customer Waitlist 8. Click the Ok button. 9. The system displays the message "Record Added... Authorisation Pending.. ". Click the Ok button. 10. The customer waitlist details are added once the record is authorised. 21 SB003 - Safe Box Usage And Payment Inquiry 1.4. SB003 - Safe Box Usage And Payment Inquiry Using this option you can inquire about the details of the safe deposit box usage, service charge and its payment. The system provides information on safe box details like date of allotment, date of expiry, safe box status, etc. The payment enquiry mode provides details on date of payment, amount, payment mode, etc. The service charge enquiry mode provides details on date of charge, amount assessed, amount due and charge type. The usage log detail provides information on date, time, operation performed, etc. Definition Prerequisites 8057- Safe Box Allotment 8053 - Customer Addition Modes Available Not Applicable To view the details of the safe deposit box usage 1. Type the fast path SB003 and click Go or navigate through the menus to Transaction Processing > Account Transactions > SDB Account Transactions > Inquiries > Safe Box Usage And Payment Inquiry. 2. The system displays the Safe Box Usage And Payment Inquiry screen. 22 SB003 - Safe Box Usage And Payment Inquiry Safe Box Usage And Payment Inquiry Field Description Field Name Description Safe Box ID [Optional, Numeric, 16] Type the identification number of the safe box as defined in the inventory. Safe Box Type [Display] This field displays stock code of the safe deposit boxes. Allotment Number [Mandatory, Pick List] Select the allotment number for which the rent is to be paid from the pick list. Branch [Display] This field displays the name of the branch where the safe deposit box is opened. Product Code [Display] This field displays the product code under which the safe deposit box is opened. 23 SB003 - Safe Box Usage And Payment Inquiry Field Name Description Primary Customer [Display] This field displays the name of the primary customer to whom the safe deposit box is allotted. Date of Allotment [Display] This field displays the date on which the safe deposit box is allotted. Date of Expiry [Display] This field displays the expiry date of the safe deposit box allotment. Safe Box Status [Display] This field displays the status of the safe box. The options are: Reason Restricted Not restricted Surrendered [Display] This field displays the reason as mentioned during the usage event. Inquiry Mode [Mandatory, Radio Button] Click the appropriate radio button to select the required inquiry mode. 3. Payment: Click this radio button to view the payment details for the safe deposit box. The Payment History tab is enabled. Service Charge: Click this radio button to view the service charge details for the SDB. The Charges History tab is enabled. Usage: Click this radio button to view the details regarding the usage for the safe deposit box. The Usage Log tab is enabled. Enter the appropriate safe box ID and press the <Tab> key. OR Select the allotment number from the pick list. 24 SB003 - Safe Box Usage And Payment Inquiry Safe Box Usage And Payment Inquiry 4. Select the appropriate Inquiry Mode. 5. Click the Ok button. 6. The system displays the details related to the selected inquiry mode. 25 SB003 - Safe Box Usage And Payment Inquiry Payment History Field Description Column Name Description Date of Payment [Display] This column displays the date of the payment. Amount Paid [Display] This column displays the amount of payment. Payment Mode [Display] This column displays the mode through which the payment is made. Payment Details [Display] This column displays the payment details as entered by the user in the Rent Payment screen. 26 SB003 - Safe Box Usage And Payment Inquiry Charges History Field Description Column Name Description Date Of Charge [Display] This column displays the date of raising the service charge. Amount Assessed [Display] This column displays the amount of service charge that is raised. Amount Due [Display] This column displays the amount due from the customer for this service charge. Charge Type [Display] This column displays the type of the service charge. It is the description of the service charge and describes whether it is the rent, allocation charge, key lost charge, drilling charge, etc. 27 SB003 - Safe Box Usage And Payment Inquiry Usage Log Field Description Column Name Description Transaction Date [Display] This column displays the date of transaction/usage. Event Start At [Display] This column displays the time at which the teller logs in the event. It is picked up by the system from the Usage screen. Event End At [Display] This column displays the time which the teller will enter as the end time of the event. 28 SB003 - Safe Box Usage And Payment Inquiry Column Name Description Operation Performed [Display] This column displays the type of operation performed at the event. The options are: Custodian Access Drill Key Lost Restrict Revoke [Display] This column displays the custodian ID as selected during the usage. 7. Double click on the appropriate Usage Log record. The system displays the Usage Details tab. Usage Details 29 SB003 - Safe Box Usage And Payment Inquiry Field Description Field Name Description Cust Id [Display] This field displays the ID of the customer who has done the transaction. Customer Details Customer Name [Display] This field displays the name of the customer who has done the transaction. Address [Display] This field displays the address of the customer. City [Display] This field displays the city of the customer. Zip [Display] This field displays the zip code of the customer. Country [Display] This field displays the country of the customer. State [Display] This field displays the state of the customer. Phone Number [Display] This field displays the phone number of the customer. 8. Click Cancel button to delete the record. OR Click the Close button. 30 1701 - Rent Payment Inquiry 1.5. 1701 - Rent Payment Inquiry Using this option you can pay rent for a safe deposit box. The modes of rent payment are: Cash Cheque Account Transfer GL Depending on the option selected in the Payment Mode drop-down list, the system displays the relevant transaction screen and requisite particulars have to be eneterd.You can also perform a backdated rent payment but the mode supported for this back dated credit will be through GL only. Definition Prerequisites BAM97 - Currency Codes Cross Reference BAM32 - Transaction Rate Cross Reference 8051 - CASA Account Opening 8057- Safe Box Allotment Screen GLM02 - Chart of Accounts STM59 - Settlement Bank Parameters STM54 - Routing Branch Maintenance Modes Available Not Applicable To view rent payment 1. Type the fast path 1701 and click Go or navigate through the menus to Transaction Processing > Account Transactions > SDB Account Transactions > Transfer > Rent Payment Inquiry. 2. The system displays the Rent Payment Inquiry screen. 31 1701 - Rent Payment Inquiry Rent Payment Inquiry Field Description Field Name Description Value Date [Mandatory, dd/mm/yyyy] Type the date on which the entry is to be passed to the allotment number. The system will default the date to current date, but the user can input any back date in the field. No future date is allowed. Allotment No [Mandatory, Numeric, 16] Type the allotment number for which the rent is to be paid. The name of the SDB Account holder is populated adjacent to the allotment number. Account Currency [Display] This field displays the currency that is assigned to the product under which the account is opened. All the entries posted in the account are in the account currency. 32 1701 - Rent Payment Inquiry Field Name Description Safe Box ID [Display] This field displays the identification number of the safe box as defined in inventory. Safe Box Type [Display] This field displays the safe box type. This denotes the stock code of the safe deposit boxes. Payment Mode [Mandatory, Drop-Down] Select the appropriate mode of payment for rent from the dropdown list. The options are: Number of Advance Rents Cash Cheque Account Transfer GL [Mandatory, Drop-Down] Select the number of rents in advance which the customer will be paying from the drop-down list. By default, the system displays the value as 0. However, the user can enter values up to 9. Penalty [Mandatory, Drop-Down] Select the appropriate type of penalty from the drop-down list. The options are: No Penalty Fixed Penalty Percentage Penalty On selecting one of the options, the system will calculate the penalty. The basis for calculation will be defined at the Product Inventory cross reference. By default, the system will default the choice to no penalty. Outstandings Rent Due [Display] This field displays the total rental amount due for the particular allotment number. Advance Paid [Display] This field displays the rental amount paid by the customer as advance, if any. 33 1701 - Rent Payment Inquiry Field Name Description Other Arrears [Display] This field displays all the other charges that are payable. The amount displayed in this field would be a total of all charges other than rent and penalty. However, the bifurcation can be seen in the enquiry mode of charges history of the usage screen. Penalty Arrears [Display] This field displays the calculated penalty arrears that have been charged to the account. This field will be showing the total of the penalty amount which is due till date. Since the penalty is always on cash basis, there would be no accrued penalty arrears. The method of calculation of penalty is mentioned under SC head. Allocation Fee [Display] This field displays the allocation fee, if any, that is payable by the customer. Once the allocation fee has been paid, then the value displayed in this field will be zero. UnBilled Penalty Interest This field is for future use. Upto This field is for future use. Payment Total Due [Display] This field displays the total amount due from the customer. 3. Enter the allotment number and press the <Tab> key. 4. Select the payment mode, number of advance rents and the penalty from the drop-down list. 34 1701 - Rent Payment Inquiry Rent Payment Inquiry 5. Click the Ok button. 6. The system displays the message "Do You Want to continue?". Click the Ok button. 7. Depending up on the option selected from Payment Mode drop-down list, the system displays the relevant transaction screen. 8. Enter the required information in the displayed screen. 35 1701 - Rent Payment Inquiry Rent - Payment By Cash Field Description Field Name Description Account No [Display] This field displays the account number. The name of the CASA holder is populated adjacent to the account number. Account Ccy [Display] This field displays the currency assigned to the product under which the account is opened. All the entries posted in the account are in the account currency. For example, if the currency assigned to a CASA product is USD, then by default the account opened under that product has USD as its account currency. 36 1701 - Rent Payment Inquiry Field Name Description Txn Ccy [Mandatory, Drop-Down] Select the transaction currency from the drop-down list. The transaction currency is the currency in which the transaction will take place. While posting the transaction entries to the account, the transaction currency is converted into the account currency, based on the defined transaction rate. Acct Ccy Rate [Display] This field displays the rate at which the account currency is converted to the local currency of the bank. The teller's right to change the account currency rate within a range is configurable at the bank level. If such rights are not assigned to the teller, this field becomes non-editable. If the account currency and the local currency are same, the field takes the default value as 1, which cannot be modified. Txn Ccy Rate [Display] This field displays the rate at which the transaction currency is converted to the local currency of the bank. The teller's right to change the transaction currency rate within a range is configurable at the bank level. If such rights are not assigned to the teller, this field becomes non-editable. If the transaction currency and the local currency are same, the field takes the default value as 1, which cannot be modified. Account Amt [Display] This field displays the cash to be deposited. The amount will be calculated in the account currency. The system posts the entries to the accounts in the account currency. If the local currency of the bank is different from the account currency of the customer, the amount entered in the Txn Amount field is converted to the account currency at the specified exchange rate. If the currency of the local bank and the account currency are the same, the amount in the Txn Amount field and the Account Amt field will be the same. Account currency is the currency assigned to the product at the product level, under which the account is opened. If the currency assigned to a CASA account product is USD (US Dollar), the account opened under that product has USD as its account currency. 37 1701 - Rent Payment Inquiry Field Name Description Txn Amount [Display] This field displays the transaction amount. The transaction amount is the amount that will be deposited in the account. The amount is entered in the transaction currency for depositing cash. The cash deposit amount is converted into the account currency, to facilitate the bank to make relevant entries in their respective accounts. User Reference No [Display] This field displays the reference number that is entered by the user. Narrative [Mandatory, Alphanumeric, 120] Type the narration. This field displays the default narration based on the transaction. The user can change the narration, if required. Rent - Payment By Cheque 38 1701 - Rent Payment Inquiry Field Description Field Name Description Account No [Display] This field displays the CASA number of the customer. The adjacent field displays the short name of the primary customer to the account. Account Ccy [Display] This field displays the currency assigned to the product, under which the account is opened. By default, it is defaulted from the account details maintained. All the entries are posted in the account in the account currency based on the exchange rate set up for the transaction. The exchange rate values must be defined and downloaded. For example, if the currency assigned to a CASA product is USD (US Dollar), the account opened under that product has USD as its account currency, by default. Txn Ccy [Mandatory, Drop-Down] Select the transaction currency from the drop-down list. By default, it displays the account currency as the transaction currency. While posting the transaction entries to the account, the transaction currency is converted into the account currency and for posting the GL entries it is converted into the local currency of the bank. Acct Ccy Rate [Display] This field displays the rate at which the account currency is converted to the local currency of the bank. The teller's right to change the account currency rate within a range is configurable at the bank level. If such rights are not assigned to the teller, this field becomes non-editable. If the account currency and the local currency are same, the field takes the default value as 1, which cannot be modified. Txn Ccy Rate [Display] This field displays the rate at which the transaction currency is converted to the local currency of the bank. The teller's right to change the transaction currency rate within range is configurable at the bank level. If such rights are not assigned to the teller, this field becomes non-editable. If the transaction currency and the local currency are same, the field takes the default value as 1, which cannot be modified. 39 1701 - Rent Payment Inquiry Field Name Description Txn Amount [Display] This field displays the transaction amount in the local currency of the bank. Account Amt [Display] This field displays the amount which will be reflected on the CASA. If the local currency of the bank is different from the account currency of the customer, the amount of the transaction entered in the Txn Amount field will get converted in the currency of the account at the exchange rate specified above. If the currency of the local bank and that of the account is the same, the amount will be same for both the Amount field as well as the Account Amount field. The account amount is derived as follows: Account Amount = Txn Amount * Txn Ccy Rate / Account Ccy Rate User Reference No [Display] This field displays the reference number that is input by the user. Narrative [Mandatory, Alphanumeric, 120] Type the narration. This field displays the default narration based on the transaction. The user can change the narration, if required. 9. 10. Click the Ok button. The system displays the Instrument Details screen. 40 1701 - Rent Payment Inquiry Rent - Instrument Details Field Description Field Name Description Clearing Type [Mandatory, Drop-Down] Select the clearing type from the drop-down list. The bank can set up multiple clearing types, where cheques that are required to be cleared at different times of the day are deposited so that they can be treated differently. All processes for a cheque from outward clearing, running of value date, and marking late clearing, etc., takes place on the basis of the clearing type. 41 1701 - Rent Payment Inquiry Field Name Description Cheque No [Mandatory, Numeric, 12] Type the cheque number which is present on the MICR line of the instrument. When the cheque is deposited into any payees account, the cheque number is used to ensure that the duplicate entries are not made in the system (that the same cheque is not deposited multiple times in the system.). On deposit of every cheque, cheque number, routing number and drawer account number (all the three are present on the MICR line) are used to check for the presence of duplicate instrument. If duplicate instruments are found, cheque deposit will be rejected unless the earlier cheques are all marked as Returned. Cheque Literal [Mandatory, Drop-Down] Select the cheque literal from the drop-down list. The options are: Drawing Voucher Deposit Guaranteed Cheque Deposit House Cheque Deposit Local Cheque Deposit MO/PO Deposit Outstation Cheque Deposit This field is not used in any processing. Cheque Date [Mandatory, Numeric, dd/mm/yyyy] Type the cheque date, which is present on the instrument. This date has to be less than or equal to current posting date. This date is used in checking validity of the instrument. Instruments become stale if the cheque date is prior to the current posting date by the stale period (defined in the Settlement Bank Parameters (Fast Path: STM59) option). 42 1701 - Rent Payment Inquiry Field Name Description Routing No [Mandatory, Numeric, Nine] Type the routing number against which the cheque has been drawn. The routing number is a combination of the bank code, the branch code, and the sector code from where the instrument was drawn. The combination can be obtained from the Routing Branch Maintenance (Fast Path: STM54) option. Routing Number = Sector Code / Bank Code + Branch Code For a deposited cheque, this routing number is used by the system to determine the float days and thus the value date of the instrument. For an inward clearing cheque, this routing number should belong to the bank. The order, in which the codes in the routing number are to be entered, is determined by the set up using the Settlement Bank Parameters (Fast Path: STM59) option. Bank [Display] This field displays the bank name to which the cheque belongs, corresponding to the bank code extracted from the routing number. Branch [Display] This field displays the branch name from where the cheque is drawn, corresponding to the branch code and bank code extracted from the routing number. Sector [Display] This field displays the clearing sector name to which the cheque branch belongs, corresponding to the sector code extracted from the routing number. Sector Codes are defined using Sector Master option. Drawer Acct No [Mandatory, Numeric, 16] Type the drawer account number. The drawer account number is the account number of the person who has issued the cheque. The drawer account, generally printed on the cheque leaf is the account from where the funds will come into the nominee account. If the cheque is drawn on a different bank, the drawer account number will not be validated by the system. If the cheque is drawn on your own bank, the system will validate the drawer account number for its correctness. 43 1701 - Rent Payment Inquiry Field Name Description Value Date [Display] This field displays the value date of the cheque. When a cheque is deposited on an account, the system uses the routing number to check the float days from the Endpoint Float Maintenance (Fast Path: BAM28) option and the working days from the Calendar for End Point (Fast Path: BAM27) option to generate the value date of the cheque. The value date is the date on which the cheque is expected to be cleared. On the value date, the system updates the customer’s available balance and credits the account with the cheque amount and reduces the un-cleared funds on the account. For more information on maintaining value date, refer to the Clearing Definitions chapter in the Definitions Users Guide. Late Clearing [Display] This field displays the values Y or N for late clearing. The options are: Y: If the late clearing is marked N: If the late clearing is not marked This field displays Y when a customer deposits a cheque after the clearing cut-off time is over, for current posting date for the selected clearing type. The instruments that are deposited in late clearing will be considered as Late for clearing. Such instruments will be treated as deposit for the next working date for all value date calculation. Chg. Commission [Display] This field is currently not used in any processing. Reg CC Float Package [Optional, Drop-Down] Select the float package defined under regulation CC from the drop-down list. 44 1701 - Rent Payment Inquiry Rent - Payment By Transfer From Savings Field Description Field Name Description Allot No [Display] This field displays the safe deposit box allotment number for which the rent payment is being made The short name of the primary customer of the CASA is populated adjacent to the account number. From Acct Currency [Display] This field displays the currency assigned to the product, under which the account is opened. All the entries posted in the account are in the account currency. For example, if the currency assigned to a CASA product is USD (US Dollar), the account opened under that product has USD as its account currency, by default. 45 1701 - Rent Payment Inquiry Field Name Description Savings Account No [Mandatory, Numeric, 16] Type the account from which the funds will be transferred. The short name of the primary customer of the CASA is populated adjacent to the account number. If the ‘from’ and ‘to’ accounts do not belong to the same customer, the system will give a warning to that effect. Saving Acct Ccy [Display] This field displays the currency assigned to the product, under which the account is opened. All the entries posted in the account are in the account currency. For example, if the currency assigned to a CASA product is USD (US Dollar), the account opened under that product has USD as its account currency, by default. From Ccy Rate [Display] This field displays the rate at which the account currency is converted to the local currency of the bank. The teller's right to change the account currency rate within a range is configurable at the bank level. If such rights are not assigned to the teller, this field becomes non-editable. If the account currency and the local currency are same, the field takes the default value as 1, which cannot be modified. To Ccy Rate [Display] This field displays the rate at which the account currency is converted to the local currency of the bank. The teller's right to change the account currency rate within a range is configurable at the bank level. If such rights are not assigned to the teller, this field becomes non-editable. If the account currency and the local currency are same, the field takes the default value as 1, which cannot be modified. Rent Amount [Display] This field displays the rent amount based on the value entered in the Txn Amount field. This is the amount that will be credited as rent. The value in this field is calculated by the system using the amount entered in the From Amount, From Currency Rate, To Currency Rate and SC fields. 46 1701 - Rent Payment Inquiry Txn Amount [Display] This field displays the amount that will be debited from the provider account. User Reference No [Optional, Alphanumeric, 30] Type the user reference number. Narrative [Mandatory, Alphanumeric, 120] Type the narration. This field displays the default narration based on the transaction. The user can change the narration, if required. Rent - Payment By GL 47 1701 - Rent Payment Inquiry Field Description Field Name Description Account No [Display] This field displays the account number. The short name of the primary customer linked to the CASA holder is populated adjacent to the account number. Acct Ccy [Display] This field displays the currency assigned to the product under which the account is opened. All the entries posted in the account are in the account currency. The exchange rate values must be defined and downloaded. For example, if the currency assigned to a CASA product is USD (US Dollar), the account opened under that product has USD as its account currency, by default. GL Ccy [Mandatory, Drop-Down] Select the currency assigned to the GL that is to be debited from the drop-down list. This currency can differ from the local currency of the bank and the account currency. GL Acct No [Mandatory, Pick List] Select the GL account which will be debited for crediting the customer account from the pick list. The system will display the name of the GL account in the adjacent field. Acct Ccy Rate [Display] This field displays the rate at which the account currency is converted to the local currency of the bank. The teller's right to change the account currency rate within a range is configurable at the bank level. If such rights are not assigned to the teller, this field becomes non-editable. If the account currency and the local currency are same, the field takes the default value as 1, which cannot be modified. GL Ccy Rate [Display] This field displays the rate at which the GL account currency is converted to the local currency of the bank. The teller's right to change the account currency rate is within a range configurable at the bank level. If such rights are not assigned to the teller, this field becomes non-editable. If the GL account currency and the local currency are same, the field takes the default value as 1, which cannot be modified. 48 1701 - Rent Payment Inquiry Field Name Description Account Amt [Display] This field displays the amount that will be credited as rent for the safe deposit box. The system posts the entries to the accounts in the account currency. GL Amount [Display] This field displays the amount that will be debited to the GL account, in GL currency after applying the SC applicable for this transaction. Select the SC tab to modify the applied SC. The amount will be calculated in the GL account currency. Reference No [Display] This field displays the reference number for the transaction. User Reference No [Optional, Alphanumeric, 30] Type the user reference number. Narrative [Mandatory, Alphanumeric, 120] Type the narration. This field displays the default narration based on the transaction. The user can change the narration, if required. 11. Click the Ok button. 12. The system displays the message "Authorisation required. Do You Want to continue?". Click the OK button. 13. The system displays the Authorization Reason screen. 14. Enter the relevant information and click the Grant button. 15. The system displays the message "Transaction Sent For Authorisation". Click the Ok button. 16. The system displays the transaction sequence number. Click the Ok button. 49 SB004 - Account Closing Balance Information 1.6. SB004 - Account Closing Balance Information Account closure is a two-step process. Using this option you can retrieve the account closing details and close an account, and then perform the Closeout Withdrawal from the branch. The status of the account changes to account closed today, after this transaction is processed. The next step of actual payout from the branch has to accompany this transaction, so that the account is marked as closed. You have to close or delete all the account facilities like overdraft limit, SI, sweep in and others before marking the account for closure. The accounts with debit balance or uncleared funds cannot be closed. Definition Prerequisites 8057- Safe Box Allotment Modes Available Not Applicable To view account closing balance information 1. Type the fast path SB004 and click Go or navigate through the menus to Transaction Processing > Account Transactions > SDB Account Transactions > Other Transactions > Account Closing Balance Information. 2. The system displays the Account Closing Balance Information screen. 50 SB004 - Account Closing Balance Information Account Closing Balance Information Field Description Field Name Description Allotment Number [Optional, Numeric, 16] Type the allotment number for which the safe deposit box is allotted. Customer Name [Display] This field displays the name of the primary customer to whom the safe deposit box is allotted. Safe Box Type [Display] This field displays the type of the safe deposit boxes. SafeBox Id [Display] This field displays the identification number of the safe box as defined in inventory. 51 SB004 - Account Closing Balance Information Field Name Description Reason For Closure [Mandatory, Drop-Down] Select the reason for closure of the safe deposit box from the drop-down list. The reason codes are displayed from Reason Code Maintenance (Fast Path: BAM40) option. Some of the reasons for which the account is closed are Bank Decision, Special Reason, Court Decision, etc. Refund Amount [Display] This field displays the amount of refund to be made, if any. Update Inventory [Optional, Check Box] Select the Update Inventory check box to update the inventory at the time of closure to enable re-allotment of safe box. 3. Type the allotment number and press the <Tab> key. 4. The system displays the account closing balance information. Account Closing Balance Information 52 SB004 - Account Closing Balance Information 5. Click the Ok button. 6. The system displays the message "Authorisation Required. Click Ok to continue". Click the OK button. 7. The system displays the Authorization Reason screen. 8. Enter the appropriate information and click the Ok button. 9. The system displays the message "The account has been closed successfully". Click the Ok button. 53 1720 - SDB Close Out Balance Inquiry 1.7. 1720 - SDB Close Out Balance Inquiry Using this option, you can refund the advance rent paid for the safe deposit box at the time of its closure. The closure of an account should first be reflected in the Host database, after which the close out withdrawal activity is allowed. On successful completion, the safe box balance is set to zero. Depending on the option selected in the Refund Mode drop-down list the system displays the relevant transaction screen and the user has to enter the required particulars. Definition Prerequisites BAM09 - Issuer Maintenance STM59 - Settlement Bank Parameters STM54 - Routing Branch Maintenance BAM14 - Rewards and Service Charge Code MaintenanceSB004 - Account Closing Balance Information 8057- Safe Box Allotment Modes Available Not Applicable To view the SDB close out balance 1. Type the fast path 1720 and click Go or navigate through the menus to Transaction Processing > Account Transactions > SDB Account Transactions > Transfer > SDB Close Out Balance Inquiry. 2. The system displays the SDB Close Out Balance Inquiry screen. 54 1720 - SDB Close Out Balance Inquiry SDB Close Out Balance Inquiry Field Description Field Name Description Allotment No [Mandatory, Numeric, 16] Type the allotment number. The adjacent field displays the name of the account holder. It should be an allotment number on which a Marking CASA for Closure transaction has already been done. Safe Box ID [Display] This field displays the safe box ID. Safe Box Type [Display] This field displays the safe box type. It is the stock code of the safe deposit boxes. The safe box types are defined in the Stock Codes (Fast Path: IVM01) option. 55 1720 - SDB Close Out Balance Inquiry Field Name Description Account Ccy [Display] This field displays the balance amount in the account at the time of closure. This amount is in the currency of the account. The Banker's cheque is issued for this amount after deducting charges. Refund Mode [Mandatory, Drop-Down] Select the refund mode from the drop-down list. The refund mode is the type of repayment. Here the user will be selecting the mode of payment. The options are: Refund Amt Cash Banker's Cheque Transfer to GL Account Funds Transfer [Display] This field displays the total refund amount. 3. Enter the account number and press the <Tab> key. 4. Select the safe box type and refund mode from the drop-down list. 56 1720 - SDB Close Out Balance Inquiry SDB Close Out Balance Inquiry 5. Click the Ok button. 6. The system displays the message "Do You Want to continue?". Click the OK button. 7. Depending up on the option selected from Repayment Mode drop-down list, the system displays the relevant transaction screen. 8. Enter the required information in the displayed screen. 57 1720 - SDB Close Out Balance Inquiry Cash Field Description Field Name Description Allotment No [Display] This field displays the allotment number that is being closed. The close out withdrawal settlement will be made for this account. Account Ccy [Display] This field displays the currency assigned to the product at the product level, under which the account is opened. All the entries are posted in the account in the account currency. The exchange rate values are defined and downloaded. For example, if the currency assigned to a CASA product is USD, the account opened under that product has USD as its account currency, by default. 58 1720 - SDB Close Out Balance Inquiry Field Name Description Txn Ccy [Mandatory, Drop-Down] Select the transaction currency from the drop-down list. This field, by default, displays the account currency as the transaction currency. While posting the transaction entries to the account, the transaction currency is converted into the account currency and for posting the GL entries it is converted into the local currency of the bank. Acct Ccy Rate [Display] This field displays the rate at which the account currency is converted to the local currency of the bank. The teller's right to change the account currency rate within a range is configurable at the bank level. If such rights are not assigned to the teller, this field becomes non-editable. If the account currency and the local currency are same, the field takes the default value as 1, which cannot be modified. Txn Ccy Rate [Display] This field displays the rate at which the transaction currency is converted to the local currency of the bank. The teller's right to change the transaction currency rate within range is configurable at the bank level. If such rights are not assigned to the teller, this field becomes non-editable. If the transaction currency and the local currency are same, the field takes the default value as 1, which cannot be modified. Refund Amt [Display] This field displays the balance in the account at the time of account closure in the account currency. The account balance amount is calculated in the account currency, to facilitate the bank to make relevant entries in their respective accounts. Txn Amount [Display] This field displays the close out amount to be paid, in the transaction currency. The close out withdrawal amount is calculated in the account currency, to facilitate the bank to make relevant entries in their respective accounts. The amount is converted into the transaction currency for the payout of the close out withdrawal amount. User Reference No [Optional, Alphanumeric, 30] Type the user reference number assigned to the customer. 59 1720 - SDB Close Out Balance Inquiry Field Name Description Narrative [Mandatory, Alphanumeric, 120] Type the narration. This field displays the default narration based on the transaction. The user can change the narration, if required. Bankers Cheque 60 1720 - SDB Close Out Balance Inquiry Field Description Field Name Description Allotment No [Display] This field displays the allotment number defaulted from the Close Out Balance Inquiry option. This is the account number which is closed and for which the close out withdrawal is done by means of a Banker's cheque. The safe deposit box holder name is displayed in the adjacent field to the allotment number. Account Ccy [Display] This field displays the currency of the account that is being closed. The currency is based on the product under which the account was opened and this currency cannot be changed later. Whenever any transaction is posted to the account, it is converted into the account currency based on the exchange rate set up for the transaction. The currency code is a number and the currency name is usually displayed in its short form. It is set up and downloaded. Bank Code [Mandatory, Drop-Down] Select the bank on whom the Banker's cheque is drawn from the drop-down list. The list of banks on whom Banker's cheques can be issued are maintained in the Issuer Maintenance (Fast Path: BAM09) option and downloaded to the branch. Normally, banks issue Banker's cheques of their own bank. Txn Ccy [Mandatory, Pick List] Select the transaction currency from the pick list. This field, by default, displays the account currency as the transaction currency. While posting the transaction entries to the account, the transaction currency is converted into the account currency and for posting the GL entries it is converted into the local currency of the bank. Acct Ccy Rate [Display] This field displays the rate at which the account currency is converted to the local currency of the bank. The teller's right to change the account currency rate within a range is configurable at the bank level. If such rights are not assigned to the teller, this field becomes non-editable. If the account currency and the local currency are same, the field takes the default value as 1, which cannot be modified. 61 1720 - SDB Close Out Balance Inquiry Field Name Description Tcy Rate [Display] This field displays the rate at which the transaction currency is converted to the local currency of the bank. The exchange rate values are defined and downloaded. The teller's right to change the transaction currency rate is configurable at the bank level. If such rights are not assigned to the teller, this field becomes non-editable. If the transaction currency and the local currency are the same, the field takes a default value as 1, which cannot be modified. Acct Amt [Display] This field displays the balance amount in the account at the time of closure. This amount will be in the account currency. Charges (Lcy) [Display] This field displays the charges levied by your bank on whom the Banker's cheque is drawn. The charges will be denominated in the local currency of your bank. The service charge codes are added and maintained in the Rewards and Service Charge Code Maintenance (Fast Path: BAM14) option. The service charges can be attached at the product level, transaction mnemonic level or at the issuer maintenance level. The service charges are levied in the local currency of the bank. The system displays the total of all the service charges if more than one SC code is attached to the transaction. Cheque Amount [Display] This field displays the amount of Banker's cheque that will be issued to the nominee. This amount is in the currency of the transaction and includes the charges as well as the Banker's cheque amount. Cheque Date [Mandatory, dd/mm/yyyy] Type the cheque date. This field, by default displays the posting date as cheque date, on which the Banker's cheque is issued. 62 1720 - SDB Close Out Balance Inquiry Field Name Description Serial No [Display] This field displays the serial number. For a remittance instrument such as a banker's cheque or a DD, at the time of issue, the system generates a serial number comprising the branch code and a running serial number. The serial number for each instrument type is maintained separately and on reversal of an instrument issue, the instrument serial number will not be reused for the next instrument issue. When an instrument comes for clearing, it may be referred by the MICR number, which needs to be maintained for each instrument, if it is expected to come through an inward clearing batch. If an instrument is liquidated by the teller, the instrument serial number is sufficient, as this is the number by which FLEXCUBE Retail tracks the instrument uniquely. Micr No [Mandatory, Alphanumeric, 12] Type the MICR number. For every remittance instrument, it is necessary to maintain the MICR number that will be printed on the instrument, if the instrument is expected to come for clearing through inward clearing. A cross-reference is maintained with the system generated serial number, so that the instrument can be tracked by the system, whether it is liquidated or enquired upon by the MICR number or the serial number. Routing No [Mandatory, Numeric, Nine] Type the routing number against which the cheque has been drawn. The routing number is a combination of the bank code and the branch code. The combination can be obtained from the Routing Branch Maintenance (Fast Path: STM54) option. Routing Number = Sector Code / Bank Code + Branch Code For a deposited cheque, this routing number is used by the system to determine the float days and thus the value date of the instrument. For an inward clearing cheque, this routing number should belong to the bank. The order, in which the codes in the routing number are to be entered, is determined by the set up using the Settlement Bank Parameters (Fast Path: STM59) option. Beneficiary Name [Mandatory, Alphanumeric, 40] Type the name of the beneficiary for the banker's cheque. 63 1720 - SDB Close Out Balance Inquiry Field Name Description Passport / IC No [Mandatory, Alphanumeric, 14] Type the passport or IC number. This is an identification collected from the beneficiary of the banker's cheque at the time of liquidation. Beneficiary Addr [Mandatory, Alphanumeric, 40] Type the contact address of the beneficiary. This is normally needed for record purposes and provided as an additional information. User Reference No [Optional, Alphanumeric, 30] Type the user reference number assigned to the customer. Narrative [Mandatory, Alphanumeric, 120] Type the narration. This field displays the default narration, based on the transaction. The user can change the narration, if required. Fund Transfer 64 1720 - SDB Close Out Balance Inquiry Field Description Field Name Description From Allotment No [Display] This field displays the account number that is being closed. The name of the CASA holder is populated adjacent to the account number. The close out withdrawal settlement will be made for this account. From Allotment Ccy [Display] This field displays the currency assigned to the product at the product level, under which the account is opened. All the entries are posted in the account in the account currency. The exchange rate values must be defined and downloaded. For example, if the currency assigned to a TD product is USD (US Dollar), the account opened under that product has USD as its account currency, by default. To Account No [Mandatory, Numeric, 16] Type the account number to which the funds will be transferred. To Ccy [Display] This field displays the currency assigned to the product at the product level, under which the account is opened. All the entries are posted in the account in the account currency. The exchange rate values must be defined and downloaded. For example, if the currency assigned to a TD product is USD (US Dollar), the account opened under that product has USD as its account currency, by default. From Ccy Rate [Display] This field displays the rate at which the account currency is converted to the local currency of the bank. The exchange rate values are defined and downloaded. The teller's right to change the account currency rate is configurable at the bank level. If such rights are not assigned to the teller, this field becomes non-editable. If the account currency and the local currency are same, the field takes the default value as 1, which cannot be modified. 65 1720 - SDB Close Out Balance Inquiry Field Name Description To Ccy Rate [Display] This field displays the rate at which the account currency is converted to the local currency of the bank. The exchange rate values are defined and downloaded. The teller's right to change the account currency rate is configurable at the bank level. If such rights are not assigned to the teller, this field becomes non-editable. If the account currency and the local currency are same, the field takes the default value as 1, which cannot be modified. From Amount [Display] This field displays the transaction amount. This is the amount that will be debited from the provider account. The transferred cash amount is converted into the account currency, to facilitate the bank to make relevant entries in their respective accounts. To Amount [Display] This field displays the transaction amount based on the value entered in the From Amount field. This is the amount that will be credited to the beneficiary account. The amount is entered in the To Account currency for transferring funds. The transferred cash amount is converted into the account currency, to facilitate the bank to make relevant entries in their respective accounts. User Reference No [Optional, Alphanumeric, 30] Type the user reference number assigned to the customer. Narrative [Mandatory, Alphanumeric, 120] Type the narration. This field displays the default narration, based on the transaction. The user can change the narration, if required. 66 1720 - SDB Close Out Balance Inquiry Transfer to GL Account 67 1720 - SDB Close Out Balance Inquiry Field Description Field Name Description Allotment No [Display] This field displays the allotment number that is being closed. The name of the CASA holder is populated adjacent to the account number. The close out withdrawal settlement will be made for this account. Account Ccy [Display] This field displays the currency assigned to the product at the product level, under which the account is opened. All the entries are posted in the account in the account currency. The exchange rate values must be defined and downloaded. For example, if the currency assigned to a TD product is USD (US Dollar), the account opened under that product has USD as its account currency, by default. Txn Ccy [Mandatory, Drop-Down] Select the transaction currency from the drop-down list. This field, by default, displays the account currency as the transaction currency. While posting the transaction entries to the account, the transaction currency is converted into the account currency and for posting the GL entries it is converted into the local currency of the bank. Acct Ccy Rate [Display] This field displays the rate at which the account currency is converted to the local currency of the bank. The teller's right to change the account currency rate within a range is configurable at the bank level. If such rights are not assigned to the teller, this field becomes non-editable. If the account currency and the local currency are same, the field takes the default value as 1, which cannot be modified. Txn Ccy Rate [Display] This field displays the rate at which the transaction currency is converted to the local currency of the bank. The teller's right to change the transaction currency rate within range is configurable at the bank level. If such rights are not assigned to the teller, this field becomes non-editable. If the transaction currency and the local currency are same, the field takes the default value as 1, which cannot be modified. 68 1720 - SDB Close Out Balance Inquiry Field Name Description GL Acct No [Mandatory, Pick List] Select the GL account number to which the close out funds will be transferred from the pick list. The description of the GL account is populated adjacent to the GL account number. Account Amt [Display] This field displays the net balance of the CASA account at the time of closure. This amount is calculated in the CASA account currency. Txn Amount [Display] This field displays the close out amount to be paid, in the transaction currency. The close out withdrawal amount is calculated in the account currency, to facilitate the bank to make relevant entries in their respective accounts. The amount is converted into the transaction currency for the payout of the close out withdrawal amount. Reference No [Optional, Numeric, 30] Type the appropriate reference number of the transaction. User Reference No [Optional, Alphanumeric, 30] Type the user reference number assigned to the customer. Narrative [Mandatory, Alphanumeric, 120] Type the narration. This field displays the default narration, based on the transaction. The user can change the narration, if required. 9. Click the Ok button. 10. The system displays the message "Authorisation required. Do you want to continue?". Click the OK button. 11. The system displays the Authorization Reason screen. 12. Enter the appropriate information and click the Grant button. 9. The system displays the transaction sequence number. Click the Ok button. 69 Safe Deposit Box User Manual Jan 2012 Version : 4.4.0.0.0 Oracle Corporation World Headquarters 500 Oracle Parkway Redwood Shores, CA 94065 U.S.A. Worldwide Inquiries: Phone: +1.650.506.7000 Fax: +1.650.506.7200 www.oracle.com/ financial_services/ Copyright © 2012 Oracle and/or its affiliates. All rights reserved. No part of this work may be reproduced, stored in a retrieval system, adopted or transmitted in any form or by any means, electronic, mechanical, photographic, graphic, optic recording or otherwise, translated in any language or computer language, without the prior written permission of Oracle Financial Services Software Limited. Due care has been taken to make this document and accompanying software package as accurate as possible. However, Oracle Financial Services Software Limited makes no representation or warranties with respect to the contents hereof and shall not be responsible for any loss or damage caused to the user by the direct or indirect use of this document and the accompanying Software System. Furthermore, Oracle Financial Services Software Limited reserves the right to alter, modify or otherwise change in any manner the content hereof, without obligation of Oracle Financial Services Software Limited to notify any person of such revision or changes. All company and product names are trademarks of the respective companies with which they are associated. [Type a quote from the document or the summary of an interesting point. You can position the text box anywhere in the document. Use the Text Box Tools tab to change the formatting of the pull quote text box.]