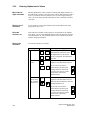
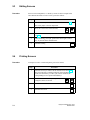
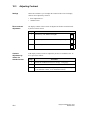
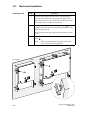
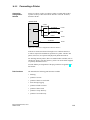
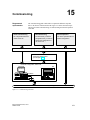
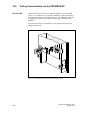
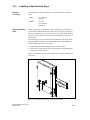
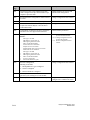
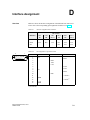
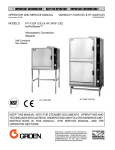
1
Preface, Contents
1
Part I
Introduction
2
3
SIMATIC HMI
Part II Basic Functions
OP7, OP17
Operator Panel
Equipment Manual
10
11
Part III Expanded, Configurable
Functions
13
14
Part IV Commissioning and
Description of Devices
16
A
Part V Appendix
F
Glossary, Index
6AV3991–1AE05–1AB0
Release 04/99
Safety Guidelines
!
!
This manual contains notices which you should observe to ensure your own personal safety, as
well as to protect the product and connected equipment. These notices are highlighted in the
manual by a warning triangle and are marked as follows according to the level of danger:
Warning
indicates that death, severe personal injury or substantial property damage can result if proper
precautions are not taken.
Caution
indicates that minor personal injury or property damage can result if proper precautions are not taken.
Note
draws your attention to particularly important information on the product, handling the product, or
to a particular part of the documentation.
Qualified Personnel
Equipment may be commissioned and operated only by qualified personnel. Qualified personnel
within the meaning of the safety notices in this manual are persons who are authorized to commission, ground and identify equipment, systems and circuits in accordance with safety engineering
standards.
Correct Usage
Note the following:
!
Warning
The equipment may be used only for the applications stipulated in the catalog and in the technical description and only in conjunction with other equipment and components recommended or
approved by Siemens.
Startup must not take place until it is established that the machine, which is to accommodate this
component, is in conformity with the guideline 89/392/EEC.
Faultless and safe operation of the product presupposes proper transportation, proper storage,
erection and installation as well as careful operation and maintenance.
Trademarks
SIMATIC is a registered trademark of Siemens AG.
Some of the other designations used in these documents are also registered trademarks; the
owner’s rights may be violated if they are used be third parties for their own purposes.
Impressum
Editor and Publisher: A&D PT1
Copyright Siemens AG 1996 All rights reserved
Disclaimer of Liability
The reproduction, transmission or use of this document or its
contents is not permitted without express written authority.
Offenders will be liable for damages. All rights, including rights
created by patent grant or registration of a utility model or design, are
reserved.
We have checked the contents of this manual for agreement with the
hardware and software described. Since deviations cannot be precluded entirely, we cannot guarantee full agreement. However, the
data in this manual are reviewed regularly and any necessary corrections included in subsequent editions. Suggestions for improvement are welcomed.
Siemens AG,
Automation & Drives
SIMATIC Human Machine Interface
Postfach 4848, D-90327 Nuernberg
Siemens Aktiengesellschaft
Technical data subject to change.
Siemens AG 1996
Order No. 6AV3991–1AE05–1AB0
Equipment Manual OP7, OP17
Preface
Guide through the
manual
Conventions
The “OP7, OP17 Operator Panel” equipment manual is divided into five
parts:
Part
Chapter
Contents
1–2
Overview of the OPs and their range of functions.
3 – 10
Step-by-step instructions on how you control the
OPs with the standard screens.
11 – 13
Expanded functions of the OPs (online changes
to system settings, PLC jobs and the scheduler).
14 – 16
– Mechanical and electrical installation
– Commissioning
– Detailed information about the OPs and their
maintenance
Appendix
A–F
Contains general tables and a list of the technical terms used in this manual.
The following conventions are used in this manual:
Motor off
Text on the display of the OP is shown in
“typewriter” style.
Variable
Symbolic names representing variable values on the
display are shown in italic ”typewriter” style.
Screens
Functions which you can choose are shown in
normal italics.
Screens → Print
Steps that are performed in succession are linked by
an arrow.
ESC
The names of keys are shown in a different typeface.
Equipment Manual OP7, OP17
Release 04/99
i
Preface
History
The various editions of this equipment manual correspond to the following
firmware and ProTool versions:
Edition
Other support
Remark
ProTool Version
09/96
First edition of the “OP7, OP17 Operator Panel” equipment manual
V 2.5 or higher
04/99
Technical revision
V5.01 or higher
In the case of technical queries, please contact your local Siemens in the subsidiaries and branches responsible for your area. Refer to Appendix F of this
equipment manual for a list of addresses.
SIMATIC Customer Support Hotline
Available worldwide, at all times:
Nuernberg
Johnson City
Singapur
Simatic Basic Hotline
Nuernberg
Johnson City
Singapur
SIMATIC BASIC Hotline
SIMATIC BASIC Hotline
SIMATIC BASIC Hotline
Local time:
Mon - Fri 8:00 to 18:00
Local time:
Mon - Fri 8:00 to 17:00
Local time:
Mon - Fri 8:00 to 17:30
Telephone:
+49 (911) 895-7000
Telephone:
+1 423 461-2522
Telephone:
+65 740-7000
Fax:
+49 (911) 895-7002
Fax:
+1 423 461-2231
Fax:
+65 740-7001
E-Mail:
simatic.support@
nbgm.siemens.de
E-Mail:
simatic.hotline@
sea.siemens.com
E-Mail:
simatic@
singnet.com.sg
SIMATIC Premium Hotline
(charged, only with
SIMATIC Card)
Time:
Mon - Fri 0:00 to 24:00
Telephone:
+49 (911) 895-7777
Fax:
+49 (911) 895-7001
ii
Equipment Manual OP7, OP17
Release 04/99
Preface
SIMATIC Customer Online Services
SIMATIC Customer Support offers comprehensive additional information
concerning SIMATIC products through its Online services as follows:
Up–to–date general information is provided
– in Internet under http://www.ad.siemens.de/simatic
– via Fax-Polling under 08765-93 02 77 95 00
Up–to–date product information and downloads for practical use can be found:
– in Internet unter http://www.ad.siemens.de/support/
html–00/
– via the Bulletin Board System (BBS) in Nürnberg (SIMATIC Customer Support Mailbox) under +49 (911) 895–7100
In order to contact the mailbox, please use a modem with up to 28.8
kBaud (V.34) capacity. Set the parameters as follows: 8, N, 1, ANSI,
or dial for connection via ISDN (x.75, 64 kBit).
Abbreviations
The abbreviations used in this equipment manual have the following meanings:
AM
Alarm message
AS 511
Protocol of the PU interface to the SIMATIC S5
ASCII
American Standard Code für Information Interchange
CPU
Central Processing Unit
EEPROM
Electrically erasable programmable read-only memory
EM
Event message
FB
Function block
HMI
Human Machine Interface
IF
Interface designation
LCD
Liquid-crystal display
LED
Light-emitting diode
MPI
Multitpoint Interface
OP
Operator Panel
PLC
Programmable Logic Controller
PPI
Point to Point Interface
PU
Programming Unit (German abbreviation: PG)
RAM
Random access memory (working memory)
TD
Text Display
TP
Touch Panel
Equipment Manual OP7, OP17
Release 04/99
iii
Preface
iv
Equipment Manual OP7, OP17
Release 04/99
Contents
Part I
1
2
Introduction
Product Description . . . . . . . . . . . . . . . . . . . . . . . . . . . . . . . . . . . . . . . . . . . . . . . . . . . . .
1-1
1.1
Configuration and process control phases . . . . . . . . . . . . . . . . . . . . . . . . . . .
1-1
1.2
Visualizing and controlling processes . . . . . . . . . . . . . . . . . . . . . . . . . . . . . . .
1-3
1.3
Design of Operator Panel OP7 . . . . . . . . . . . . . . . . . . . . . . . . . . . . . . . . . . . . .
1-6
1.4
Design of Operator Panel OP17 . . . . . . . . . . . . . . . . . . . . . . . . . . . . . . . . . . . .
1-8
Functionality . . . . . . . . . . . . . . . . . . . . . . . . . . . . . . . . . . . . . . . . . . . . . . . . . . . . . . . . . . . .
2-1
Part II Basic Functions
3
4
5
6
General Operation . . . . . . . . . . . . . . . . . . . . . . . . . . . . . . . . . . . . . . . . . . . . . . . . . . . . . . .
3-1
3.1
3.1.1
Integrated keyboard . . . . . . . . . . . . . . . . . . . . . . . . . . . . . . . . . . . . . . . . . . . . . .
System Keys . . . . . . . . . . . . . . . . . . . . . . . . . . . . . . . . . . . . . . . . . . . . . . . . . . . .
3-1
3-2
3.2
3.2.1
3.2.2
3.2.3
3.2.4
Entering Values . . . . . . . . . . . . . . . . . . . . . . . . . . . . . . . . . . . . . . . . . . . . . . . . . .
Entering Numerical Values . . . . . . . . . . . . . . . . . . . . . . . . . . . . . . . . . . . . . . . .
Entering Alphanumeric Values . . . . . . . . . . . . . . . . . . . . . . . . . . . . . . . . . . . . .
Entering Symbolic Values . . . . . . . . . . . . . . . . . . . . . . . . . . . . . . . . . . . . . . . . .
Entering Timer Values . . . . . . . . . . . . . . . . . . . . . . . . . . . . . . . . . . . . . . . . . . . .
3-6
3-7
3-8
3-11
3-12
3.3
Help Text . . . . . . . . . . . . . . . . . . . . . . . . . . . . . . . . . . . . . . . . . . . . . . . . . . . . . . .
3-14
Using the OP with Its Standard Functions . . . . . . . . . . . . . . . . . . . . . . . . . . . . . . . . .
4-1
4.1
Operating Levels . . . . . . . . . . . . . . . . . . . . . . . . . . . . . . . . . . . . . . . . . . . . . . . . .
4-1
4.2
Standard Screens . . . . . . . . . . . . . . . . . . . . . . . . . . . . . . . . . . . . . . . . . . . . . . . .
4-3
4.3
Branching in Standard Screens . . . . . . . . . . . . . . . . . . . . . . . . . . . . . . . . . . . .
4-5
Screens . . . . . . . . . . . . . . . . . . . . . . . . . . . . . . . . . . . . . . . . . . . . . . . . . . . . . . . . . . . . . . . . .
5-1
5.1
Screen Entries . . . . . . . . . . . . . . . . . . . . . . . . . . . . . . . . . . . . . . . . . . . . . . . . . . .
5-2
5.2
Selecting Screens . . . . . . . . . . . . . . . . . . . . . . . . . . . . . . . . . . . . . . . . . . . . . . . .
5-3
5.3
Editing Screens . . . . . . . . . . . . . . . . . . . . . . . . . . . . . . . . . . . . . . . . . . . . . . . . . .
5-4
5.4
Printing Screens . . . . . . . . . . . . . . . . . . . . . . . . . . . . . . . . . . . . . . . . . . . . . . . . .
5-4
Password Protection . . . . . . . . . . . . . . . . . . . . . . . . . . . . . . . . . . . . . . . . . . . . . . . . . . . .
6-1
6.1
Password Levels and Access . . . . . . . . . . . . . . . . . . . . . . . . . . . . . . . . . . . . . .
6-1
6.2
Logging-in and logging-out on the OP (LOGIN/LOGOUT) . . . . . . . . . . . . .
6-3
6.3
Password Management . . . . . . . . . . . . . . . . . . . . . . . . . . . . . . . . . . . . . . . . . . .
6-4
Equipment Manual OP7, OP17
Release 04/99
v
7
8
9
10
vi
Messages . . . . . . . . . . . . . . . . . . . . . . . . . . . . . . . . . . . . . . . . . . . . . . . . . . . . . . . . . . . . . . .
7-1
7.1
7.1.1
7.1.2
7.1.3
Message types . . . . . . . . . . . . . . . . . . . . . . . . . . . . . . . . . . . . . . . . . . . . . . . . . .
Event and alarm messages . . . . . . . . . . . . . . . . . . . . . . . . . . . . . . . . . . . . . . . .
Alarm messages . . . . . . . . . . . . . . . . . . . . . . . . . . . . . . . . . . . . . . . . . . . . . . . . .
System messages . . . . . . . . . . . . . . . . . . . . . . . . . . . . . . . . . . . . . . . . . . . . . . .
7-2
7-2
7-4
7-6
7.2
7.2.1
7.2.2
7.2.3
Displaying Messages . . . . . . . . . . . . . . . . . . . . . . . . . . . . . . . . . . . . . . . . . . . . .
Display Sequences . . . . . . . . . . . . . . . . . . . . . . . . . . . . . . . . . . . . . . . . . . . . . . .
Scrolling through Waiting Messages at Message Level . . . . . . . . . . . . . . . .
Viewing Event and Alarm Message Text . . . . . . . . . . . . . . . . . . . . . . . . . . . . .
7-7
7-8
7-8
7-9
7.3
Message Buffers . . . . . . . . . . . . . . . . . . . . . . . . . . . . . . . . . . . . . . . . . . . . . . . . .
7-10
7.4
7.4.1
7.4.2
7.4.3
Deleting Messages . . . . . . . . . . . . . . . . . . . . . . . . . . . . . . . . . . . . . . . . . . . . . . .
Deleting alarm message and event message buffers upon buffer overflow
Deleting alarm and event messages via standard screens . . . . . . . . . . . . .
Automatically Deleting the System Message Buffer upon Buffer Overflow
7-12
7-12
7-13
7-13
7.5
7.5.1
7.5.2
Printing Messages . . . . . . . . . . . . . . . . . . . . . . . . . . . . . . . . . . . . . . . . . . . . . . .
Direct Message Logging . . . . . . . . . . . . . . . . . . . . . . . . . . . . . . . . . . . . . . . . . .
Printing the Message Buffer . . . . . . . . . . . . . . . . . . . . . . . . . . . . . . . . . . . . . . .
7-14
7-14
7-15
Recipes . . . . . . . . . . . . . . . . . . . . . . . . . . . . . . . . . . . . . . . . . . . . . . . . . . . . . . . . . . . . . . . . .
8-1
8.1
Creating and Editing Data Records . . . . . . . . . . . . . . . . . . . . . . . . . . . . . . . . .
8-4
8.2
Copying Data Records . . . . . . . . . . . . . . . . . . . . . . . . . . . . . . . . . . . . . . . . . . . .
8-6
8.3
Transferring Data Records . . . . . . . . . . . . . . . . . . . . . . . . . . . . . . . . . . . . . . . .
8-7
8.4
Deleting Data Records . . . . . . . . . . . . . . . . . . . . . . . . . . . . . . . . . . . . . . . . . . . .
8-10
STATUS/FORCE VAR with the OP . . . . . . . . . . . . . . . . . . . . . . . . . . . . . . . . . . . . . . . . .
9-1
9.1
FORCE VAR . . . . . . . . . . . . . . . . . . . . . . . . . . . . . . . . . . . . . . . . . . . . . . . . . . . .
9-2
System Settings . . . . . . . . . . . . . . . . . . . . . . . . . . . . . . . . . . . . . . . . . . . . . . . . . . . . . . . . .
10-1
10.1
Selecting a Language . . . . . . . . . . . . . . . . . . . . . . . . . . . . . . . . . . . . . . . . . . . .
10-1
10.2
Modifying Parameters in Online Mode . . . . . . . . . . . . . . . . . . . . . . . . . . . . . .
10-2
10.3
Adjusting Contrast . . . . . . . . . . . . . . . . . . . . . . . . . . . . . . . . . . . . . . . . . . . . . . .
10-4
10.4
Setting OP Modes . . . . . . . . . . . . . . . . . . . . . . . . . . . . . . . . . . . . . . . . . . . . . . . .
10-5
Equipment Manual OP7, OP17
Release 04/99
Part III Expanded, Configurable Functions
11
Process-Dependent Operator Guidance . . . . . . . . . . . . . . . . . . . . . . . . . . . . . . . . . . .
11-1
11.1
Branching by Means of Soft Keys and Function Keys . . . . . . . . . . . . . . . . .
11-1
11.2
Self-Defined Screen Hierarchy . . . . . . . . . . . . . . . . . . . . . . . . . . . . . . . . . . . . .
11-3
12
Schedulers (OP17 only) . . . . . . . . . . . . . . . . . . . . . . . . . . . . . . . . . . . . . . . . . . . . . . . . . .
12-1
13
Controlling the OP from the PLC . . . . . . . . . . . . . . . . . . . . . . . . . . . . . . . . . . . . . . . . .
13-1
Part IV Commissioning and Description of Devices
14
15
16
Installation . . . . . . . . . . . . . . . . . . . . . . . . . . . . . . . . . . . . . . . . . . . . . . . . . . . . . . . . . . . . . .
14-1
14.1
Mechanical Installation . . . . . . . . . . . . . . . . . . . . . . . . . . . . . . . . . . . . . . . . . . . .
14-2
14.2
14.2.1
14.2.2
14.2.3
14.2.4
14.2.5
Electrical Installation . . . . . . . . . . . . . . . . . . . . . . . . . . . . . . . . . . . . . . . . . . . . . .
Connecting the Power Supply . . . . . . . . . . . . . . . . . . . . . . . . . . . . . . . . . . . . .
Connecting a Configuration Computer . . . . . . . . . . . . . . . . . . . . . . . . . . . . . .
Connections to PLC . . . . . . . . . . . . . . . . . . . . . . . . . . . . . . . . . . . . . . . . . . . . . .
Loop-Through Mode (OP17 only) . . . . . . . . . . . . . . . . . . . . . . . . . . . . . . . . . .
Connecting a Printer . . . . . . . . . . . . . . . . . . . . . . . . . . . . . . . . . . . . . . . . . . . . . .
14-3
14-4
14-5
14-6
14-8
14-9
Commissioning . . . . . . . . . . . . . . . . . . . . . . . . . . . . . . . . . . . . . . . . . . . . . . . . . . . . . . . . .
15-1
15.1
Initial commissioning . . . . . . . . . . . . . . . . . . . . . . . . . . . . . . . . . . . . . . . . . . . . .
15-3
15.2
Recommissioning . . . . . . . . . . . . . . . . . . . . . . . . . . . . . . . . . . . . . . . . . . . . . . . .
15-4
15.3
Start-up Behavior . . . . . . . . . . . . . . . . . . . . . . . . . . . . . . . . . . . . . . . . . . . . . . . .
15-5
15.4
Testing the Configuration in OFFLINE Mode . . . . . . . . . . . . . . . . . . . . . . . . .
15-6
15.5
Testing the Configuration in Conjunction with the PLC . . . . . . . . . . . . . . . .
15-7
15.6
Testing Communication via the PROFIBUS-DP . . . . . . . . . . . . . . . . . . . . . .
15-8
Device Description . . . . . . . . . . . . . . . . . . . . . . . . . . . . . . . . . . . . . . . . . . . . . . . . . . . . . .
16-1
16.1
OP7 . . . . . . . . . . . . . . . . . . . . . . . . . . . . . . . . . . . . . . . . . . . . . . . . . . . . . . . . . . . .
16-1
16.2
OP17 . . . . . . . . . . . . . . . . . . . . . . . . . . . . . . . . . . . . . . . . . . . . . . . . . . . . . . . . . . .
16-3
16.3
Labeling of the Function Keys . . . . . . . . . . . . . . . . . . . . . . . . . . . . . . . . . . . . .
16-5
16.4
Optional Backup Battery for the OP17 . . . . . . . . . . . . . . . . . . . . . . . . . . . . . .
16-8
16.5
Maintenance . . . . . . . . . . . . . . . . . . . . . . . . . . . . . . . . . . . . . . . . . . . . . . . . . . . .
16-9
Equipment Manual OP7, OP17
Release 04/99
vii
Part V Appendix
A
Brief Description of Standard Screens . . . . . . . . . . . . . . . . . . . . . . . . . . . . . . . . . . . .
A-1
B
System Messages . . . . . . . . . . . . . . . . . . . . . . . . . . . . . . . . . . . . . . . . . . . . . . . . . . . . . . .
B-1
C
Technical Data . . . . . . . . . . . . . . . . . . . . . . . . . . . . . . . . . . . . . . . . . . . . . . . . . . . . . . . . . .
C-1
D
Interface Assignment . . . . . . . . . . . . . . . . . . . . . . . . . . . . . . . . . . . . . . . . . . . . . . . . . . . .
D-1
E
SIMATIC HMI Documentation . . . . . . . . . . . . . . . . . . . . . . . . . . . . . . . . . . . . . . . . . . . . .
E-1
F
Siemens Worldwide . . . . . . . . . . . . . . . . . . . . . . . . . . . . . . . . . . . . . . . . . . . . . . . . . . . . .
F-1
viii
Equipment Manual OP7, OP17
Release 04/99
Part I
Introduction
Product Description
1
Functionality
2
2-2
Equipment Manual OP7, OP17
Release 04/99
Product Description
Applications of
OP7 and OP17
1
Operator Panels OP7 and OP17 allow operating states, current process values
and malfunctions of a connected PLC to be visualized. In addition, inputs can
be made on the OP which can be written directly to the PLC. Some functions
relating to machine diagnostics can also be executed on the Operator Panel.
The Operator Panels feature a number of standard functions. The displays
and operation of the devices can be optimized by the configurer to meet the
requirements of the process.
The Operator Panels are suitable for fitting into switching cabinets and control desks. A printer can be attached to the OP for logging processes during
automation operation.
1.1
Configuration and process control phases
Creating data
areas
Before an OP can go into service, it has to be prepared for its job of
visualizing data from the PLC, i.e. it has to be configured. As far as the PLC
is concerned, data areas used by the OP to communicate with the PLC have
to be created in the memory.
Configuration with
ProTool
The configuration for the OP is created on a computer (PC/PU) using
ProTool configuration software under Microsoft WindowsTM. When the
configuration is ready, it is transferred to the OP. Before this can be done,
however, the computer has to be connected to the Operator Panel. Following
transfer of the configuration, the OP has to be connected to the PLC.
The OP now communicates with the PLC and reacts to program flows on the
PLC on the basis of the configured requirements.
figure 1-1 depicts the configuration and process control phases described
above:
Equipment Manual OP7, OP17
Release 04/99
1-1
Figure 1-1
Static and variable
text components
Configuration and Process Control Phase
Text which is required to be displayed on the OP has first to be created on the
PC/PU with ProTool and then transferred to the OP. If, for example, text for
display is required to comprise static and variable components, the tags have
to be configured and the static text for explaining the tags has to be entered for example:
Temperature Variable1 C of Furnace1
Here, Temperature C of Furnace1 is the static text and Variable1 is the tag that is read from the memory area of the PLC.
Further
information
1-2
You will find information on configuring the OP in the ProTool/ Lite User’s
Guide. The Communication User’s Guide provides information on connecting
the OP to the PLC.
Equipment Manual OP7, OP17
Release 04/99
1.2
Visualizing and controlling processes
Display and
control functions
The basic functions of an OP consist in displaying process states and in controlling the process. The following display and control functions can be configured on Operator Panels OP7 and OP17:
screens
event messages
alarm messages
recipes
help text
logging
languages
schedulers for the OP17
Screens
Data supplied by the PLC may be displayed together on a screen and modified individually, if required. A screen consists of several screen entries
since, for example, more related data are required for describing a machine
state than can normally be displayed in the window of a screen. Therefore
data on operating temperature, fill level, speed and running time can illustrate the current machine state.
The OP7 and OP17 are Operator Panels with text based displays. Accordingly, a screen on the display comprises text items which may include static
text and current state values.
Screens may be combined on the OP in a directory. You can use the directory
to display, print and edit screens.
Event messages
Event messages are information and operating notes on current machine and
process states during regular production operations. Event messages may
contain process values. Process values are displayed either numerically - for
example,
Motor running at 3000 revs
or symbolically - for example,
Motor running normally,
where a specific control value is assigned to normally.
The classification of a message as an event message is done at the configuration stage.
Equipment Manual OP7, OP17
Release 04/99
1-3
Alarm messages
Alarm messages show, in contrast to event messages, critical machine states
dur ing production operations. Due to their urgency, they have to be acknowledged before any other action is possible.
Alarm messages may contain process values. Process values are displayed
either numerically - for example
Motor speed 4500
or symbolically - for example
Motor speed too high,
where a specific control value is assigned to too high.
This type of message has a higher display priority than an event message. If
an alarm message is issued, any event message or screen that is being displayed is replaced with a flashing alarm on the display.
The classification of a message as an alarm message is made at the configuration stage.
Recipes
When a product is made up of various ingredients in certain ratios, this information is stored in a so-called recipe.
Take orange juice for example. Its production and bottling requires that
orange concentrate and water be mixed in a certain ratio. These values are
stored as tags in a recipe.
Each recipe can be made up of several data records containing different values for the recipe.
The data can be edited in the OP, transferred to the PLC and read out from
the PLC.
In the OP, the recipes are combined by recipe number and title in a recipe
directory.
Help text
Help text consists of configurable additional information and operator instructions relating to event messages, alarm messages and screens. If for example an alarm message arises, this enables additional information on how to
eliminate faults to be displayed.
Help text can also be displayed by pressing a key, if required, when the
HELP LED is on.
Logging
1-4
Messages can be printed in online mode by means of the printer connected to
the OP. Furthermore, there is a possibility of printing all the event and alarm
messages that have accumulated in the buffer concerned.
Equipment Manual OP7, OP17
Release 04/99
Multilinguality
Message text, screens, help text and system messages may be displayed in
several languages. Up to three of the languages listed below can be loaded
simultaneously on the same OP and presented to the operator for selection on
line:
German
English
French
Italian
Spanish
Russian (Cyrillic characters).
Schedulers
A scheduler is a regularly recurring point in time (i.e., hourly, daily, weekly,
annually) at which a certain function is to be executed. When a scheduler
time is reached, the configured bit is set in the interface area of the PLC and
the configured function is executed.
The following functions are available:
Print alarm message buffer
Print event message buffer
Select screen
Print screen
Print data record
Equipment Manual OP7, OP17
Release 04/99
1-5
1.3
Design of Operator Panel OP7
OP7 versions
The OP7 has a plastic housing with a touch-sensitive front and is therefore
suitable for ungrounded installation. The coloring of the front foil conforms
with machinery directive EN 60204.
The OP7 is available in the following versions:
OP7/PP,
OP7/DP and
OP7/DP-12.
The versions differ only in their communication options. figure 1-2 shows the
design of Operator Panel OP7.
SIMATIC OP7
Display
Function
keyboard
F1
F2
F3
F4
K1
K2
K3
K4
HELP
7
Numerical
keypad
D
5
1
A
2
.
9
8
4
SHIFT
E
B
6
F
3
C
0 +/–
ESC
ACK
SHIFT
INS
DEL
HELP
ENTER
Interface connections
Figure 1-2
1-6
Design of Operator Panel OP7
Equipment Manual OP7, OP17
Release 04/99
LCD
High-contrast LC display with LED back-lighting. Display of up to 4 lines
each having a maximum length of 20 characters; the height of the characters
is 8 mm.
Function keyboard
8 keys (F1 to F4 and K1 to K4) for calling freely programmable, generally
valid standard functions. The green LEDs embedded in keys K1 to K4 can be
driven by the PLC.
Soft keys
All eight function keys may alternatively be configured as soft keys. Each of
these keys can be configured with different functions for the various screens.
System keyboard
22 keys for calling universally valid, standard functions (keypad, arrow keys,
etc.).
Data buffer
The OP7 operates without a battery and is therefore maintenance-free. Operating data are retained in a non-volatile state in the flash memory on the OP.
Interfaces
1 x RS232/TTY for connecting to the PLC/computer/printer
1 x RS422/485 for connecting to the PLC/computer
Fuse
Maintenance-free electronic fuse.
Compatibility
The OP7 is upwards compatible with the OP5. All cabling can be continue to
be used. Existing OP5 configurations can be converted automatically for the
OP7 by means of the ProTool configuration software.
Equipment Manual OP7, OP17
Release 04/99
1-7
1.4
Design of Operator Panel OP17
OP17 versions
The OP17 has a plastic housing with a touch-sensitive front and is therefore
suitable for ungrounded installation. The coloring of the front foil conforms
with machinery directive EN 60204.
The OP17 is available in the following versions:
OP17/PP,
OP17/DP and
OP17/DP-12.
The versions differ only in their communication options. figure 1-3 shows the
design of Operator Panel OP17.
SIMATIC OP17
Display
F1
F2
F3
F4
F5
F6
F7
F8
K1
K2
K3
K4
K5
K6
K7
K8
K9
K10
K11
K12
K13
K14
K15
K16
HELP
Function
keyboard
7
Numerical
keypad
4
1
8
D
A
5
2
9
E
B
6
3
0
F
C
.
+/–
SHIFT
Interface connections
Figure 1-3
1-8
Design of the OP17
Equipment Manual OP7, OP17
Release 04/99
LCD
High-contrast LC display with LED back-lighting. The following displays
can be configured:
4 lines each of 20 characters; height of characters is 11 mm
8 lines each of 40 characters; height of characters is 6 mm.
Function keyboard
24 keys (F1 to F8 and K1 to K16) for calling freely configurable functions.
The two-color LEDs (red/green) embedded in keys K1 to K16 can be driven
by the PLC.
Softkeys
16 function keys (F1 to F8 and K1 to K8) can be used as function keys too.
Soft keys can be configured with functions which vary from screen to screen.
System keyboard
22 keys for calling universally valid, standard functions (keypad, arrow keys,
etc.).
Data buffer
The OP7 operates without a battery and is therefore maintenance-free. Operating data are retained in a non-volatile state in the flash memory on the OP.
The message buffer is backed up for several hours after the power supply is
turned off.
The internal hardware clock has reserve power for several days after the
power supply is turned off.
The OP17 can be optionally upgraded with a lithium battery. The battery is
not supplied with OP as a standard component.
Interfaces
1 x RS232/TTY active, for connecting to the PLC/computer/printer
1 x RS232/TTY passive, for connecting to the PLC/computer/printer
1 x RS422/485 for connecting to the PLC/computer
Fuse
Maintenance-free electronic fuse.
Compatibility
The OP17 is upwards compatible with the OP15/C. All cabling can be continue to be used. Existing OP15/C configurations can be converted automatically for the OP17 by means of the ProTool configuration software.
Equipment Manual OP7, OP17
Release 04/99
1-9
1-10
Equipment Manual OP7, OP17
Release 04/99
2
Functionality
table 2-1 below summarizes the range of functions of Operator Panesl OP7 and OP17. The values quoted are the maximum values that can be managed by the OP.
Table 2-1
Functionality of OP7 and OP17
Event messages
g
Alarm messages
g
Message
g acquisition
q
Tagg input
p
Actual-value display
Function
OP7
OP17
Number
499
999
Length (characters)
80
Display
Print
Display event message texts
Number of entries in event message buffer
256
Display event message buffer
Print event message buffer
Delete event message buffer
Number
Equipment Manual OP7, OP17
Release 04/99
999
Length (characters)
80
Display
Print
Display alarm message texts
Number of entries in alarm message buffer
256
Display alarm message buffer
Print alarm message buffer
Delete alarm message buffer
Time of occurrence
Date, Time
Message event
Arrive, Depart,
Acknowledged
Digits or letters
By means of symbolic tags
Numerical and symbolic
Combined actual-value display/setpoint entry
Limit monitoring
499
On inputs by operator
2-1
Table 2-1
Functionality of OP7 and OP17, continued
Function
Password p
protection
OP7
Number of passwords
50
Password levels
Screens
Recipes
p
99
Display
Print
Screen entries per screen
99
Number of fields per screen
300
Number of fields per screen entry
32
Number
99
Display
Print
Recipe entries per recipe
99
Store/retrieve data record in/from OP
Length (characters)
320
–
48
Number
8
24
Of which can be configured as soft keys
8
16
Integrated LEDs
4
16
STATUS/FORCE VAR
Configurable OP languages
2-2
Loop-through operation for configuration computer
Online language change
20
99
Reports
Diagnostics function
4
Data records per recipe
Schedule times
Function keys
y
9 (1..9)
Number
Recipe memory size (kbytes)
Help text
OP17
German, English,
French, Italian,
Spanish, Russian
(Cyrillic characters)
Number of languages
3
Equipment Manual OP7, OP17
Release 04/99
Table 2-1
Functionality of OP7 and OP17, continued
Function
Communication
OP7
OP17
SIMATIC S5
– AS511
PP, DP-12
– FAP
PP, DP-12
– PROFIBUS-DP up to 1.5 Mbaud
DP, DP-12
– PROFIBUS-DP up to 12 Mbaud
DP-12
SIMATIC S7/M7
– PPI
DP, DP-12
– MPI
DP, DP-12
– PROFIBUS-DP up to 1.5 Mbaud
DP, DP-12
– PROFIBUS-DP up to 12 Mbaud
DP-12
SIMATIC 500/505
– NITP
PP, DP-12
Loadable NATIVE drivers
(separat bestellbar)
Time response of
data updating
– Allen-Bradley (DF1)
PP, DP-12
– AEG/Modicon (Modbus)
PP, DP-12
– Mitsubishi (FX)
PP, DP-12
– Telemecanique (Adjust and Uni-Telway)
PP, DP-12
With the OP7 and the OP17, updated and newly created data are stored in a
non-volatile flash memory. This means that current data are immediately
available following an OP re-start.
The flash memory cannot be accessed while data are being updated, and the
OP cannot be operated. The update rate is determined by the time response of
the delete and write cycles of the flash memory. For technological reasons,
this rate is slower than the access time for volatile memories.
A system message is output to the OP while data updating is in progress.
Equipment Manual OP7, OP17
Release 04/99
2-3
2-4
Equipment Manual OP7, OP17
Release 04/99
Part II
Basic Functions
General Operation
3
Using the OP with Its
Standard Functions
4
Screens
5
Password Protection
6
Messages
7
Recipes
8
STATUS/FORCE VAR
with the OP
9
System Settings
10
2-6
Equipment Manual OP7, OP17
Release 04/99
3
General Operation
3.1
Keypads
Integrated keyboard
The OP7 and OP17 operator panels are controlled via the keyboard.. The
keyboard of the OPs consists of two functional blocks:
System keys (Numeric keypad and control keys)
Function keys
figure 3-1 shows the keyboard of the OP7, by way of an example.
Function
keys
F1
F2
F3
F4
K1
K2
K3
K4
7
Numeric
keypad
9
8
4
D
1
A
.
5
E
6
F
2
B
3
C
0 +/–
ESC
ACK
SHIFT
INS
DEL
HELP
ENTER
Control keys
System keys
Figure 3-1
Keyboard of the OP7
Note
Simultaneous pressing of more than one key may result, among other things,
in erroneous input.
Equipment Manual OP7, OP17
Release 04/99
3-1
3.1.1
System Keys
Function keys for
global function
assignment
A “function key for global function assignment” always activates the same
action on the OP or in the PLC irrespective of the screen currently displayed
(global meaning on the OP). Examples of such actions include:
Opening a screen
Starting a screen printout (Print Screen)
The following keys can be assigned global functions:
Function keys for
local function
assignment (soft
keys)
OP7:
F1 to F4 and K1 to K4,
OP17:
F1 to F8 and K1 to K16.
A “function key for local function assignment” or ”soft key” has a screenspecific (local) meaning.
The function of soft key can differ from screen to screen.
The following keys can be assigned local functions:
OP7:
F1 to F4 and K1 to K4,
OP17:
F1 to F8 and K1 to K8.
Two-tier soft keys are particularly suitable for implementing binary states
and machine functions – for example:
System keys
3-2
ON
START
+
OFF
STOP
–
The system keys are used to make inputs on the OP. They are divided up into
input keys for numerical and alphanumeric characters (numeric keypad) and
control keys (see Figure 3-1).
Equipment Manual OP7, OP17
Release 04/99
Key functions
The system keys of the OPs have the following functions:
Key
Function
Shift
SHIFT
Purpose
Enable the second function of dual-assignment keys –
for example, shift of numeric keys 1 to 6 for inserting
characters A to F or switching from DELETE mode to
INSERT mode.
The enabled SHIFT key is indicated by the SHIFT
LED. The second function of a dual-assignment key
can then be called.
The SHIFT LED is located on the right of the function
keys.
INS
DEL
SHIFT
HELP
INS
DEL
Delete
When entering values in a field with string format, the
character located at the current position of the cursor is
deleted. All subsequent characters are moved one position to the left.
Insert
When entering values in a field with string format, a
space (blank) is inserted at the current position of the
cursor. All subsequent characters are moved one position to the right.
Display Help text
(Help)
If the HELP LED linked with this key comes on, you
can open a context-sensitive Help text specifically about the screen currently displayed (see chapter 3.3).
The HELP LED is located on the right of the
function keyboard.
ENTER
ACK
Enter
Enter and terminate your input. This means that,
among other things, you also change from message
level to screen level.
Acknowledge
Acknowledge alarm messages. The ACK LED
is on, when at least one unacknowledged alarm
message is present,
flashes, when only acknowledged alarm messages are
still queued.
The ACK-LED (icon
function keys.
Equipment Manual OP7, OP17
Release 04/99
) is located on the right of the
3-3
Key
ESC
Function
Escape
Purpose
The ESC key has the following functions:
Cancel
Cancel field inputs provided that they
have not been terminated by pressing
ENTER
Branch backward
Within a screen, you branch back to the configured
cross-jump destination (by default, the last position
called) and, finally, from the start screen to the
message level.
Hide system message
Hide a non-serious system message.
Cancel display of help text
Cancel the display of help text to return
to the previous display.
Reset while scrolling through messages
Cancel scrolling through messages to reset the
display to the current message.
Cancel Download mode
Cancel Download mode as long as data are not
being downloaded to the OP. The OP acknowledges
the abort by issuing a system message.
Move cursor
Depending on the operating situation, the cursor is
moved one character, field, entry or display to the left,
right, up or down.
The arrow keys have a repetitive function, i.e. if you
keep a key pressed, your input is repeated after a short
delay until you release the key.
3-4
Equipment Manual OP7, OP17
Release 04/99
Key
combinations
The table below shows key combinations that can be used to activate functions from the OP.
Keys
SHIFT
+/–
SHIFT
Function
Purpose
Adjust contrast
Adjusting the contrast of the display.
Scrolling in
symbolic lists
Scrolling in symbolic lists and calling of the extended
character set (see chapters 3.2.2 and 3.2.3).
ESC
ESC
ACK
Inhibit alarm messages
Download
It is possible to quit Download mode provided data are
not being downloaded from the PC or PU to the OP.
ESC
ESC
Loading of firmware and configuration is aborted and
the system switches to Download mode.
Overall Reset
Equipment Manual OP7, OP17
Release 04/99
With this key combination, you erase the configuration
memory when turning on the OP’s power supply.
3-5
3.2
Entering Values
General procedure
In input fields, values can be entered on the OP and transferred to the PLC.
To do this, proceed as follows:
Step
Procedure
1
Branch, as described in section 4.3, initially to the screen you
require and then to the corresponding screen entry.
2
Using the arrow keys, select the input field you require within the
screen entry.
3
Then enter your value. Depending on how
the field has been configured, values may be input as
numerical values (see chapter 3.2.1)
alphanumeric values (see chapter 3.2.2)
symbolic values (see chapter 3.2.3)
timer values (see chapter 3.2.4)
4
Confirm your input with
ENTER
You can cancel any incorrect input by pressing
The original value is then automatically reinserted in
the field. Insert the correct value and then enter the
corrected value by pressing
5
ESC
ENTER
Position the cursor in the next input field, insert the next value
etc.
You can also use the arrow keys to move the cursor to the left or
right to the previous input field to insert a different value in it.
6
Close the screen.
ESC
3-6
Equipment Manual OP7, OP17
Release 04/99
3.2.1
Entering Numerical Values
Entering via
system keys
You enter numerical values character-by-character (digit-by-digit) via the
input keys of the system keyboard. If the field already contains a value, this
entire value is deleted from the field as soon as you enter the first new character. Once you have begun entering a value, you can no longer quit this field
until you have confirmed or canceled your input.
Possible values
The following values can be entered in numerical input fields:
Possible values
Decimal value
Keys
0
...
Description
The input keys of the system keypad belong to the numerical key
assignment.
9
.
+/–
,
Hex value
A
0
Digital value
F
...
...
0
Right-justified
input
9
1
,
To enter characters A...F, the input
keys must be switched over to the
alphanumerical key assignment.
The input keys belong to the numerical key assignment.
In numerical fields, input initially is normally right-justified. Digits that have
already been entered are moved to the left (pocket calculator format).
Exception:
Input fields for tags in KM format – for instance, when calling the functions
Status/Force Var – are changed to left-justified. When input begins, the old
value does not disappear from the display completely but its bit pattern is
overwritten one character at a time. You move the cursor in this type of field
by pressing
or
with activated Shift Lock mode.
Limit-value check
You can configure limit values for numerical input fields. In this type of
field, a limit-value check takes place, i.e. the entered values are applied only
if they lie within the configured limits. If a value outside these limits is entered, a system message is displayed and, after it has been canceled, the old
value is restored in the field.
Decimal places
If a numerical field has been configured with a certain number of decimal
places and too many have been entered, they are ignored; if too few have
been entered, the field is padded with zeroes.
Equipment Manual OP7, OP17
Release 04/99
3-7
3.2.2
Entering Alphanumeric Values
Mixed input of
digits and letters
Entering alphanumeric values consists of entering both digits and letters. If
the field already contains a value, this entire value is deleted from the field as
soon as you enter the first new character. Once you have begun entering a
value, you can no longer quit this field until you have confirmed or aborted
your input.
Entering A to F
characters
A to F characters can be entered directly with activated Shift Lock mode
using numeric keys 1 to 6.
Extended
character set
If the characters available on the keypad are not sufficient for the alphanumeric input, you can select additional letters and special characters from the
extended character set. The extended character set is available for all fields
with the String representation.
Entering the
characters
You enter the characters as follows:
Step
1 Enter digits
Keys
0
...
Description
If necessary, press the Shift key
SHIFT
beforehand to switch back from
the alphanumeric to the numerical key assignment. The Shift LED
goes out.
9
.
+/–
,
Enter letters
A to F
A
Enter characters from
the extended
character set
Switch to the alphanumeric key assignment. The Shift LED comes on.
SHIFT
SHIFT
...
F
If you enter several letters
consecutively, the Shift Lock
setting remains activated and
you move the cursor by means
of the cursor control keys
illustrated here.
Switch to the alphanumeric key assignment. The Shift LED comes on.
Select the desired characters from the
extended character set.
If you enter several letters
consecutively, the Shift Lock
setting remains activated and
you move the cursor by means
of the cursor control keys
illustrated here.
3-8
Equipment Manual OP7, OP17
Release 04/99
Step
Keys
2 Apply input
ENTER
Description
The input becomes valid.
The keypad switches back from the
or
alphanumeric to the numeric key
assignment.
cancel
input
ESC
The input cursor is deleted.
The keypad switches back from the
alphanumeric to the numeric key
assignment.
The “old” input becomes valid
again.
Left-aligned input
Inputs in alphanumeric fields begin at the left edge, i.e. they are left-aligned.
Each time you enter a character, the cursor is moved one position to the right.
If the maximum possible number of characters is exceeded, the OP overwrites the last character with each additional input.
Correcting input
If you have made a mistake when entering characters in a field, the following
options are available for making corrections before you apply the input.
Incorrect
input
Character incorrect
Remedy
Switch to the alphanumeric key assignment. The Shift LED comes on.
Using keys
SHIFT
Move the cursor to the incorrect character.
,
Enter A...F or characters from the ex
extended character set
or
switch to the numeric key assignment
(the Shift LED goes out) and enter a
digit.
Equipment Manual OP7, OP17
Release 04/99
SHIFT
3-9
Incorrect
input
Remedy
Using keys
Character too
many
With the keypad set to the numerical
key assignment, delete the character
at the cursor position. The gap that arises is closed through the characters
being moved from right to left.
Character too
few
Switch to the alphanumeric key assignment. The Shift LED comes on.
Insert a space at the cursor position.
The existing input starting from the
cursor position is moved to the right.
INS
DEL
SHIFT
INS
DEL
Overwrite the space.
Example of an
alphanumeric
input
You want to enter “Fig. 05”. You do so by carrying out the following steps.
Key
Display
SHIFT
F
,
,
.
,
SHIFT
0
,
5
ENTER
3-10
Apply input
Equipment Manual OP7, OP17
Release 04/99
3.2.3
Entering Symbolic Values
Text instead of a
value
When you enter a symbolic value, text is displayed instead of the value. If a
field has to be filled by entering symbolic values, take the value from a list of
options. To do so, proceed as follows:
Step
1 Activate
selection
list
Keys
SHIFT
2 Select input
3 Apply input
Description
The Shift LED comes on.
The selection list with the configured
symbolic inputs is activated.
Move cursor line by line.
ENTER
The value that belongs to the selected input becomes valid.
The selection list is deactivated.
or
cancel input
ESC
The “old” value becomes valid
again.
The selection list is deactivated.
Equipment Manual OP7, OP17
Release 04/99
3-11
3.2.4
Entering Timer Values
Entering via
system keys
You enter timer values character-by-character (digit-by-digit) via the input
keys of the system keyboard. If the field already contains a value, this entire
value is deleted from the field as soon as you enter the first new character.
Once you have begun entering a value, you can no longer quit this field until
you have confirmed or canceled your input.
Possible values
The following values can be entered in input fields used to display timers:
Possible values
Decimal value
Keys
0
...
Description
9
The input keys of the system keypad belong to the numerical key
assignment.
.
Right-aligned
input
Inputs in fields used to display timers usually begin at the right edge, i.e.
they are right-aligned. Digits entered are moved to the left (pocket calculator
format).
Limit check
Limits can be configured for input fields used to display timers. A limit
check is performed in these fields. The values entered are only applied if they
are within the limits configured. If a value is entered that is not within these
limits, a system message is displayed. After you have canceled this message,
the old input value is re-entered in the field.
Digits to the right
of the decimal
point (with S7-200)
If a field used to display a timer has been configured with a specific number
of digits to the right of the decimal point, excess digits to the right of the
decimal point are ignored and digit spaces that have not been used are zerofilled after you confirm your input.
3-12
Equipment Manual OP7, OP17
Release 04/99
Entering a
timer value
A timer can be assigned a start value by means of an input field. These values must be entered in a specific manner depending on the PLC being used.
Proceed as follows:
SIMATIC S5 and SIMATIC S7-300/400
You enter the value for the timer in seconds. You select the time base of
the timer depending on the range of values in which the value entered is
and on how many digits have been entered to the right of the decimal
point of the value.
Range of values
Max.
permissible
number of
digits to right of
decimal point
Time base (dep.
on number of
digits to right of
decimal point)
Input example
1000 s – 9990 s
0
10 s (0)
1960 (s)
100 s – 999 s
0
1 s (0)
179 (s)
10.0 s – 99.9 s
1
100 ms (1)
1 s (0)
78.5 (s)
78 (s)
0.01 s – 9.99 s
2
10 ms (2)
100 ms (1)
1 s (0)
9.54 (s)
9.5 (s)
9 (s)
SIMATIC S7-200
The time base is set automatically in the PLC program as soon as the timer is selected. The program always operates with a timer value in milliseconds.
You have already specified in the configuration how many digits the value displayed has to the right of the decimal point. Now enter on the OP
the required number of digits to the right of the decimal point in the input
field.
The table below contains a few examples:
Equipment Manual OP7, OP17
Release 04/99
Digits to right of
decimal point
Input example
Value in the S7-200
0
1960 (ms)
1960 ms
1
78.5 (s)
78500 ms
2
9.54 (s)
9540 ms
3
0.179 (s)
179 ms
3-13
3.3
Help Text
Purpose
Help text is written when configuring with ProTool and provides additional
information in the language set at the OP. Info text can be configured for
event messages and alarm messages,
screens,
screen entries,
input fields and dual I/O fields,
recipes, recipe entries,
schedulers.
Help text can be used to convey, for example, information to the user on the
current assignment of the soft keys. Help text relating to an alarm message
may contain additional hints, for example, on the possible cause of the alarm
and how to remedy it.
Displaying help
text
The availability of help text is indicated by the HELP LED being lit. Configured help text can be output by pressing the HELP key on the OP.
If the cursor is positioned in an input field or in an I/O field for which help
text is available (lit LED), the help text is output by pressing the HELP key.
Pressing the HELP key a second time displays help text associated with the
screen entry, if configured.
If the HELP key is pressed in a field for which help text is not available, help
text associated with the screen entry, if configured, is displayed directly.
Configured information text associated with a screen is obtained either by
pressing the HELP key in the directory when the cursor is positioned on the
corresponding screen.
Scrolling through
help text
3-14
The keys
and
are used to scroll through help text, if appropriate. The ESC key terminates display of help text, and the previous display is
shown again.
Equipment Manual OP7, OP17
Release 04/99
Using the OP with Its Standard Functions
4
Loading a
configuration
Once the operating voltage has been connected, you have to load a configuration into the OP so that you can operate it. The OP is in Download mode until a configuration is loaded.
Using standard
screens
The configuration software supplied to you, ProTool, includes a configuration
which contains standard screens. You can choose all the functions required
for operating the OPs by using these standard screens. The different functions
are described in this manual with reference to the standard screens.
4.1
Operating Levels
Message level and
screen level
In OP operation, you have to distinguish between two distinct operating levels, between which you can switch:
Message level
The message level is the highest level on the OP. At message level, waiting event messages, alarm messages and system messages are displayed.
After the OP starts up, it changes to message level if
– a system message or an alarm message is waiting to be displayed
– a start screen has not been defined in the configuration. In this case,
the OP displays the standby message (refer to section 7.1.1).
– Screen level
At the screen level, functions are chosen, serviced and executed. If a
start screen has been defined in the configuration, the OP changes to
screen level after it starts up and calls the start screen. From the start
screen you branch, depending on the configuration, to other screens.
On the screens, you view current process values, can enter values and
initiate functions by means of soft keys.
Screen hierarchy
The linking of individual screens is referred to as a ”screen hierarchy”. If you
go to the bottom of the screen hierarchy, you go back one stage by pressing
key ESC, right back to the start screen should you wish. From here you can
return to the message level by pressing the ESC key. You can also return
directly to the message level from a screen, depending on the configuration.
Equipment Manual OP7, OP17
Release 04/99
4-1
Changing
operating levels
The operating level is changed either by the operator or automatically by the
OP (figure 4-1).
Change by the operator:
Press key
ENTER
to change the operating level from message level to screen level,
ESC
to change the operating level from screen level to message level.
You cannot branch backward from the message level by pressing ESC. The
key is designed to terminate the display of a system message at this level.
Forced change to message level:
You exit from the screen level automatically whenever a system message
or an alarm message is waiting to be displayed. The OP then changes to
message level to display the message. You cannot exit from the message
level while a system message or unacknowledged alarm message is being
displayed. The display of an unacknowledged alarm message is indicated
on the OP by flashing of
– the alarm message and
– the ACK-LED (icon
).
Press key
ACK
to acknowledge an alarm message,
ESC
to hide a system message.
After the alarm message has been acknowledged, the ACK LED goes off
and, after the system message has been hidden, the OP returns to the point
from which it changed to the message level.
ENTER
ACK
ESC
Figure 4-1
4-2
Changing between Message Level and Screen Level
Equipment Manual OP7, OP17
Release 04/99
4.2
Standard Screens
Basic operations
with standard
screens
The standard screens contain functions that are fundamental to OP operation.
They include, for instance, calling and printing message buffers, editing passwords and modifying parameters in online mode. Process-specific implementations, such as event messages or screens for the process, are not included.
Functions on
standard screens
Standard screens are called from a basic screen by means of a soft key. From
the basic screen, a jump is made to the following screens:
Event messages
At this point the event buffer is called, printed or deleted.
Alarm messages
At this point the alarm buffer is called, printed or deleted.
Screens
At this point the screen directory is called to edit or print screens. All the
screens which were given the ”directory” attribute are listed here. If you
still have not created any screens of your own, the directory will be
empty.
Data records
At this point you can set up, edit and print data records. You can also
transfer data records from the OP to the PLC and back.
Status tag
At this point the PU function STATUS VAR is called; you can use it to
display PLC operands.
Force tag
At this point the PU function FORCE VAR is called; you can use it to
display and modify PLC operands.
System settings
At this point you can modify settings in online mode. This includes, for
example, printer parameters, interface parameters, mode, and language
changing.
Edit password
At this point the superuser assigns passwords for the different password
levels. Furthermore, login and logout are included here.
Figure 4-2 shows an overview of the screen hierarchy of standard screens.
You will find detailed information on functions and handling standard screens
in the relevant chapters of this manual.
Equipment Manual OP7, OP17
Release 04/99
4-3
#!
$
!
"
!
#$
%!
$
!
"
!
#$
%!
!
!
!
!
!!" Figure 4-2
4-4
& !
! & & ! "
!
!
!
$
"!
!
Screen Hierarchy of Standard Screens for the OP7 and OP17
Equipment Manual OP7, OP17
Release 04/99
4.3
Branching in Standard Screens
ENTER
Branching to
screen level
With
you change from message level to screen level. At this point you
can control and monitor the process by means of suitable screens and standard screens and perform system settings.
With reference to the standard screens, a description is provided below of the
procedure for branching between individual screens within the screen hierarchy.
Branching using
soft keys
Call in your configured screen hierarchy the tandard basic screen. Its name
is displayed on the first line. Depending on the OP version and the number of
lines to be configured (OP17), the next lines include a different number of
text elements of the current entry. These text elements show the name of
other standard screens to which you can branch by using the assigned soft
keys.
Using the soft keys beneath the symbols << and >>, you can move the displayed screen segment of the current screen. You branch to the next screen by
pressing the soft key beneath the appropriate text indicating the name of the
screen to be called.
Figure 4-3 shows the branch principle on a configured 8-line display (in this
instance, the OP17). figure 4-4 shows the branch principle of the 4-line display of the OP7.
Basic screen OP17
Events
Alarms
StatVAR
F1
Figure 4-3
Equipment Manual OP7, OP17
Release 04/99
F2
Screens
ForceVAR
F3
F4
Records
System
F5
F6
Password
F7
F8
Branching at Screen Level (for an OP17, 8x40 representation)
4-5
Basic screen OP7
Events
|
F1
Figure 4-4
Selecting screens
F2
Alarms
|
>>
F3
F4
Branching at Screen Level (for OP7)
You select a screen by pressing the soft key assigned to it during configuration.
Use the horizontal scroll function << and >> if the required screen segment is
not within the visible display area.
Calling functions
Functions are called by means of the soft keys assigned to them during configuration.
As protection against unauthorized use, a password having a specific password level has to be entered first for some functions (refer to chapter 6).
4-6
Equipment Manual OP7, OP17
Release 04/99
5
Screens
Displaying and
influencing the
process on
screens
On the OP, the process – for example, a processing machine or a mixing unit
– is displayed on screens and manipulated. The screens are configured by the
configurer for specific users.
On screens, associated process values are acquired and provide an overview
of a process or system. In addition to this alphanumeric ”imaging” of the process, screens provide a means of entering process values and, consequently,
of controlling the process.
Process values on a screen can be randomly assigned to subject-related
groups. An example of this is shown in figure 5-1.
Furn1
Furn1
Furn2
Valv2
Figure 5-1
Screen
components
temp.:
cont.:
temp.:
press:
80 °C
1200 l
78 °C
normal
Example of Process Values Grouped by Subject on a Screen
Every screen contains
a title (optional, maximum number of characters: display width minus 3),
max. 99 entries.
a return destination reached by pressing
ESC
Possible return destinations are
– the message level
– another screen
– a directory
– the point at which the current screen was selected.
Screen directory
Screens can be grouped during configuration in a screen directory, which
is used to display them on screen or print and edit them. A screen can be retrieved from its screen directory by its screen number and its screen title, if
configured.
Equipment Manual OP7, OP17
Release 04/99
5-1
5.1
Screen Entries
Displaying a
screen entry
Screens consist of entries. Every screen may contain up to 99 entries. Irrespective of the configured number of lines, precisely one entry is displayed
per display page on the OP. Lines which may have not been fully configured
are displayed as blank lines.
An example of a screen entry is the two lines in the afore mentioned example
(figure 5-1)
Furn1 temp.: 80 °C
Furn1 cont.: 1200 l.
Components of a
screen entry
A screen entry consists of the following components:
entry text
The static text contains explanations for the operator. It may also include
information on how the soft keys have been assigned.
fields for the
– output of PLC actual values, date, time,
– input of PLC tags which are immediately transferred to the PLC after
being entered,
– combined I/O of PLC tags.
soft keys
Different function calls for the different screens are assigned to the soft keys.
Updating values in
screen entries
The configuration defines the intervals at which PLC values are updated, i.e.
read again from the PLC and displayed.
With large screens containing more than 159 actual values or setpoint-actual
values, ”partial screen updating” is automatically enabled. To enhance performance, only those values are updated which are currently present on the
display. This may mean that an older value is briefly displayed when scrolling through screen entries. Updating of the visible actual values is faster as a
result, however.
I/O fields
Output fields display actual values of the PLC in numerical or symbolic
form; input fields define tags in numerical or symbolic form. In input fields,
the flashing cursor is visible.
For symbolic I/O fields, you can configure up to 256 text elements which you
can call on the OP using a selection field and apply to the screen entry.
With inputs of numerical values, configured number formats and limit values
apply with respect to the number of places before and after the decimal point.
5-2
Equipment Manual OP7, OP17
Release 04/99
5.2
Selecting Screens
Methods of
selecting screens
Screens can be viewed on the OP and serviced (edited) and printed. Before
this is possible, they have to be selected. A screen can readily be selected by
means of
soft key,
function key,
directory,
PLC job.
Selecting with
soft key
With soft keys, you can branch from one screen to another. The branch is
defined in the configuration.
Selecting with
function key
The configured assignment of the function keys, unlike the soft keys, is valid
globally. In this way the screen that was permanently defined during configuration can be selected in any operating situation.
Selecting with
screen directory
Step
Procedure
Result
1
Depending on the action you
want to take, call on of the two
standard screens
The screen directory is shown.
It contains only screens which
were included in the directory
during configuration –
for example:
Screens Edit or
Screens Print.
09
14
15
17
2
Select a screen
3
Confirm selection
ENTER
Fill level
Parameter_A
Parameter_B
Report
Depending on the standard
screen called in step 1, the
screen you select is
displayed or
printed.
Selecting with PLC
job
To implement operator guidance, a screen can be selected from the PLC by
means of a PLC job. In this instance, the cursor is already positioned in a
specified entry or in an input field, in which the operator can perform his
input.
Equipment Manual OP7, OP17
Release 04/99
5-3
5.3
Editing Screens
Procedure
Screens can be manipulated, i.e. edited, by means of entries in input fields
and combined I/O fields. To edit a screen, proceed as follows:
Step
1
Procedure
Select the screen you wish to edit as described in section 5.2.
The cursor jumps to the first input field.
5.4
2
Move the cursor to the field concerned.
3
Perform the modifications you wish to make as described in section 3.2.
4
After confirming your input, position the cursor again, if necessary, to perform further modifications.
5
Terminate editing
Printing Screens
Procedure
To output a screen to a connected printer, proceed as follows:
Step
5-4
ESC
Procedure
1
Select the screen you want to edit as described in section 5.2.
The screen directory is displayed (but not when selecting by
means of a function key or a PLC job; in these instances, the
corresponding screen is printed immediately).
2
Scroll to the screen number you require or, if
configured, to the screen title
3
Print the screen selected
4
Terminate the action
ENTER
ESC
Equipment Manual OP7, OP17
Release 04/99
Password Protection
Access protection
6.1
6
Password protection can be configured for function keys/soft keys and input
fields in order to permit only authorized persons to work with the OP.
Password Levels and Access
Password
hierarchy
When configuring with ProTool, the function keys/soft keys and input fields
are assigned hierarchically ordered password levels from 0 to 9, 0 being the
lowest and 9 the highest level in the hierarchy. The password levels of the
standard screens are listed in Appendix A.
At the same time as you assign a password to an operator or to an entire
group of operators, you also assign them authorization to execute functions of
a certain password level.
When you log in with the OP under a password of a certain password level,
you are given the authority to execute functions of this password level and
functions from lower levels.
Password level 0
At this level, the lowest in the hierarchy, functions are assigned which, when
executed, have no or little effect on the course of the process; these are normally calls of functions not having input options – for example, viewing message buffers.
You do not have to enter a password to call a function of password level 0. If
you call a function that is assigned a higher level, the OP prompts you to enter a password.
Password levels
1 to 8
Levels 0 to 8 are assigned to functions of ascending importance. A password
level is assigned to a password by the superuser as part of his password management responsibilities.
Password level 9
Permission to execute functions of password level 9 is the sole responsibility
of the superuser, who has access to all OP functions. Only the superuser is
allowed to perform password management.
Equipment Manual OP7, OP17
Release 04/99
6-1
Supervisor
password
The supervisor password is specified during configuration. The default setting in the standard configuration is “100”. This setting can be changed on
the OP.
Format
The password must be a minimum of 3 and a maximum of 8 characters long.
It can be made up of digits and the characters A to F. Leading zeros are not
permissible.
Standard screen
The standard screen Edit Password offers you the following functions:
logging-in and logging-out on the OP (login/logout)
changing and deleting passwords
viewing the password list
6-2
Equipment Manual OP7, OP17
Release 04/99
6.2
Logging-in and logging-out on the OP (LOGIN/LOGOUT)
Login
You can log into the OP
via the standard screen Password processing Login
by calling a function for which the current password level is too low.In
this case, the OP automatically prompts you to enter a password.
Logging in via
standard screen
Step
Procedure
Result
1
Select the standard screen
Password processing Login.
The password input screen is
shown on the display. This
screen is similarly displayed
when a function call is made
for which the current password
level is too low. The cursor is
located in the first field of the
input area.
2
Enter the password by means
of the system keyboard.
The input begins left-aligned.
Each character entered is represented by an asterisk (*).
3
Confirm your input
by pressing
ENTER
– If the password is valid, the
standard screen is exited.
– If the password is invalid,
you can either repeat your
input or cancel.
or cancel the input
by pressing
ESC
Automatic call
If a higher password level than the one currently valid is required for operating a function key/soft key or an input field, the OP automatically prompts
you to enter a suitable password beforehand.
Logout
If you do not make an input at the OP during a configured time period, the
current password level is automatically reset to zero and the OP branches to
the message level. This ensures that the OP cannot be operated by unauthorized persons.
You can also log out of the OP via the standard screen.
Logging out via
standard screen
Select the standard screen Password processing Logout. The OP then
switches from the currently valid password level to the password level zero
and branches to the message level.
Equipment Manual OP7, OP17
Release 04/99
6-3
6.3
Password Management
Functions
The standard screen Password processing contains the following functions for
managing the passwords:
viewing the password list
configuring passwords and assigning password levels
deleting passwords
changing passwords and password levels.
These functions can only be called in password level 9. For this purpose, log
in beforehand using the supervisor password via Password processing Login.
Displaying
password list
The password list contains all the passwords configured on the OP. The supervisor password is also displayed.
The table below shows how you open, look through and exit the password
list. figure 6-1 demonstrate what a password list looks like.
Step
6-4
Procedure
Result
1
Select the standard screen
Password processing Edit.
The password list appears on
the display.
2
You can use the
cursor keys to scroll
line by line through the
list if required.
The password index, password
and password level are displayed inverted at the current
cursor position.
3
Cancel the procedure
by pressing
ESC
You exit the standard screen.
Equipment Manual OP7, OP17
Release 04/99
nn
nn
nn
nn
pppppppp
pppppppp
pppppppp
pppppppp
Password level
Password
Password index
Figure 6-1
Password List (Example: 4 x 20 representation)
Password index
The passwords are numbered consecutively with a two-digit password index.
If no password is entered under a password index, the fields for the password
and for password level are contain dashes.
Configuring a
password
A maximum of 50 different passwords can be configured on the OP. Password level 9 (supervisor) can be assigned only once.
To assign a password and password level, proceed as follows:
Equipment Manual OP7, OP17
Release 04/99
Step
Procedure
Result
1
Select the line for the password
entry in the password list.
The cursor is positioned on the
first character of the field in
which the password is to be
entered.
2
Enter a password that does not
already exist and conENTER
firm it by pressing
The cursor jumps back to the
first character of the input
field.
3
Position the cursor
in the field for the
password level.
4
Enter a password level 1...8 for
the password and con- ENTER
firm it by pressing
The cursor jumps back to the
first character of the input
field.
5
Exit the standard
screen by pressing
The new password is stored in
the OP.
ESC
6-5
Deleting a
password
Changing a
password and
password level
6-6
Step
Procedure
Result
1
Select the line in the password
list, that contains the password
entry to be deleted.
The cursor is positioned on the
first character of the field in
which the password is to be
entered.
2
Overwrite the first character of
the password with a zero and
confirm your input by
ENTER
pressing
The cursor jumps back to the
first character of the input
field.
3
Exit the standard
screen by pressing
The password is deleted.
ESC
Step
Procedure
Result
1
Select the line in the password
list, that contains the password
entry to be changed.
The cursor is positioned on the
first character of the field in
which the password is to be
entered.
2
Overwrite the old password
with the new one
and confirm you input
ENTER
by pressing
The cursor jumps back to the
first character of the input
field.
3
Position the cursor
in the field for the
password level.
4
Enter the new password level
1..8 for the password
ENTER
and confirm by pressing
The cursor jumps back to the
first character of the input
field.
5
Exit the standard
screen by pressing
The password is changed.
ESC
Equipment Manual OP7, OP17
Release 04/99
7
Messages
Overview
Messages displayed on the OP indicate events and states in the control process. A message consists of at least static text and can also include tags.
The following types of message are displayed on the OP:
event messages,
alarm messages and
system messages.
Event and alarm messages displayed are stored in the OP in their own message buffers. The messages stored in the buffers can be shown on the display
and printed out on the printer in the form of a log.
Message states
Event and alarm messages can have the following events:
Arrive:
identifies the occurrence or arrival of the message.
Depart:
cause of the message is no longer available.
Acknowledged (alarm messages only):
Message has been noticed and confirmed by the operator or the PLC.
These message states are detected by the OP with accurate timing and output
when a message page or the message buffer is displayed.
Equipment Manual OP7, OP17
Release 04/99
7-1
7.1
Message types
Event and alarm
messages
Event and alarm messages are configured. Event messages indicate a status
in the process, alarm messages indicate faults/errors. Event and alarm messages are initiated by the PLC. Due to their critical nature, alarm messages
have to be acknowledged.
System messages
System messages are initiated by the OP. They are not configured. They
provide information on operating states of the OP or maloperations and
breakdowns in communication.
7.1.1
Event and alarm messages
Definition
The process states indicated by event messages and those indicated by alarm
messages are defined during configuration.
Messages that provide information on regular processes or states should be
categorized as event messages – for example
Temperature reached or
Motor running.
Messages on malfunctions referring to processes or states should be categorized as alarm messages – for example
Motor temperature too high or
Valve will not open.
Due to their critical nature, alarm messages have to be acknowledged. In doing so, the operator confirms that he has noticed the alarm message. Messages can also be acknowledged by the PLC.
Apart from status messages, information on operation can also be configured
as event or alarm messages. If, for example, a machine operator wants to
start the bottling process but has forgotten to open the water intake valve on
the mixer, a message such as
Open water intake valve
can prompt him to rectify the error.
Presentation
Event and alarm messages can be configured in such a way that any text
components can be made to stand out from the remaining message text by
means of flashing or a large font size. Alarm messages that have not been
acknowledged always flash.
Messages may contain static text and tag fields. The tag fields display current
actual values of the PLC in numerical or symbolic form. In addition, the date
and time can also be output in messages.
7-2
Equipment Manual OP7, OP17
Release 04/99
Standby message
A sub-category of the event message is the standby message. The standby
message is the event message number 0. It appears on the display when the
OP is operating at the message level and event or alarm messages are not
waiting.
The standby message is stored in the firmware and contains the version and
the device type – for example
OP7
Vx.xx
4 x 20 char.
Figure 7-1
Example of Standard Standby Message on OP7
Depending on the configuration, the standby message can be represented by
other text – for example a company logo. It can contain the date and time but
not tags.
Alarm and event
buffers
Alarm and event messages are written to alarm and event buffers, respectively, on the OP when they arrive.
The message buffer of the OP can store up to 256 events. Events are the:
arrival of a message,
acknowledgment of a message,
departure of a message.
The following details are entered in the buffer in chronological order:
incident of events
arrival, departure and achnowledgement
message numbers
values of tags at the time of arrival and departure.
Overflow warning
During configuration, you can define a remaining buffer space. When this
remaining buffer space has been reached, an automatic overflow warning is
issued – for example
EM remaining buffer.
Messages continue to be inserted into the buffer even after the remaining
buffer space has been reached.
Equipment Manual OP7, OP17
Release 04/99
7-3
Message bit
procedure
7.1.2
If there is a condition present in the current process for a message to be
issued – for example, a tag has been reached – a bit is set by the PLC application program in the data area for event and alarm messages. The OP
reads the data area after a configured polling time. In this way, a message is
detected as having ”arrived”. The bit is reset by the PLC when the condition
for issuing the message no longer exists. The message is then regarded as
having ”departed”.
Alarm messages
Acknowledging an
alarm message
Due to their critical nature, alarm messages have to be acknowledged. This
can be done manually by the operator or automatically by the PLC.
To acknowledge an alarm message manually, press this system key.
ACK
The OP displays unacknowledged alarm messages in flashing mode.
The LED assigned to the Acknowledge key (icon ) also flashes.
After all the alarm messages have been acknowledged, the ACK LED display
changes from flashing to permanently on. Not until all the acknowledged
alarm messages have departed is the LED turned off. In this way, it is impossible for you to forget an alarm message.
If several alarm messages are waiting to be displayed, after one has been
acknowledged the next one is shown, which similarly has to be
acknowledged.
If no more alarm messages are waiting to be displayed, the OP reverts to the
operating level from which it branched to the message level to display the
alarm messages.
Acknowledgement
groups, group
acknowledgement
During configuration, you can combine several alarm messages to form an
”acknowledgement group”. In this way you can acknowledge all the other
alarm messages (consequential faults) in that acknowledgment group by acknowledging the first alarm message – for example, the cause of the fault –
without all of them having to be output to the display on the OP (group acknowledgement). You can configure up to four acknowledgment groups.
If alarm messages are not assigned to an acknowledgment group, only the
one that happens to be on the display is acknowledged if more are waiting.
Inhibiting the
display of alarm
messages
7-4
There is the possibility of inhibiting the display of frequently occurring alarm
messages for the time being until the OP starts up as a result of a cold or
warm start. Before you can inhibit the display of an alarm message, you must
have logged onto the OP with a password having a password level of at
least 8.
Equipment Manual OP7, OP17
Release 04/99
Operation
To inhibit an alarm message, press the following keys
simultaneously
ESC
ACK
The OP acknowledges inhibition of the alarm message by means of system
message $ 335. After that, this message will not be displayed until the next
time the OP starts up.
Inhibited alarm messages are no longer inserted into the alarm buffer from
the time of inhibition, either. They are stored in the alarm buffer only from
the time they first occur until such time as the display is inhibited.
Note
The alarm message inhibit function should be used only during the commissioning phase of the OP.
Equipment Manual OP7, OP17
Release 04/99
7-5
7.1.3
System messages
Definition
System messages indicate operating states within the OP. For example, they
draw your attention to maloperations or a breakdown in communication. This
message type has top display priority. If a relevant fault occurs on the OP, the
active event message or alarm message is removed from the display and a
system message is issued in its place.
After the system message has been hidden, the OP returns to the point from
which it branched.
Serious and nonserious system
messages
System messages are classified as serious and non-serious system messages.
A serious system message is based on an error that can be rectified only by a
cold or warm restart of the OP. All other errors generate a non-serious system
message – for example, when printing has been initiated but a printer has not
been connected to the OP.
If the display of a non-serious system message is not automatically
canceled after a short while, you can do so manually by pressing
this system key.
ESC
Display of a non-serious system message can also be canceled automatically
when a configured display time has expired.
A list of possible system messages and their explanations will be found in the
appendix B of this manual.
Inhibiting system
messages
Display of system messages (with the exception of internal errors 7xx) can be
inhibited at the configuration stage. System messages whose display has been
inhibited continue to be inserted into the system message buffer and thus can
be viewed on the display later.
System message
buffer
The system message buffer can store up to 100 messages. System messages
are inserted into it with their message number and their arrival; their departure is not recorded. Some minor errors and operator errors are not logged in
the system message buffer. Messages from the system message buffer are
displayed in the same order as they arrived, i.e. first in first out, last in last
out.
7-6
Equipment Manual OP7, OP17
Release 04/99
7.2
Displaying Messages
Display
Event and alarm messages are always output to the display at message level
and are displayed according to display and message priorities.
If several messages having identical display and message priorities exist simultaneously, the most recent is displayed in all cases, for both event and
alarm messages.
Display priorities
System messages always have top priority in so far as display is concerned;
unacknowledged alarm messages always have the second highest priority.
Otherwise, messages are displayed in different sequences depending on
whether separate or together output of event and alarm messages was configured.
Message priorities
Message priorities of
1 (low) to
4 (high)
can be set within event and alarm messages in the configuration according to
their importance. If several messages of the same display priority exist simultaneously, they are displayed according to their message priorities, those with
the highest message priority being shown first and those with the lowest last.
Displaying the
first/last message
Depening on the setting, either the oldest message (First) or the newest message (Last) is displayed when there are several alarm messages present. You
can change this setting on the OP online via the standard screen System Settings. To do this, select the standard screen System Settings DispMsg and
set the appropriate parameter.
Equipment Manual OP7, OP17
Release 04/99
7-7
7.2.1
Display Sequences
Message length
Event and alarm messages can be configured with up to 80 characters and
displayed either separately or together.
Single message
display (setting
”separate”)
With this display sequence, only one alarm message, event message or
system message is shown on the display. On the OP17 four messages are
displayed in the case of 8 x 40 representation.
If several messages are queuing, the messages are displayed in succession
and output according to the following priorities:
1. System message, the most recent one, if there are several.
2. Unacknowledged alarm message.
3. Event message yet to depart.
4. Acknowledged alarm message yet to depart.
5. Standby message.
Combined
message display
(setting
”together”)
7.2.2
If there is no system message, the alarm and event messages having the highest priority are displayed simultaneously one on top of the other. On the
OP17, two event messages and two alarm messages are displayed with the
8 x 40 representation.
Scrolling through Waiting Messages at Message Level
Meaning of keys
If there are neither system messages nor unacknowledged alarm messages,
you can scroll at message level through the messages that have not yet departed. To do this, use the following keys:
Key
Purpose
Return/continue to older/newer alarm message
Return/continue to older/newer event message
ESC
Return to the current (newest) message
The message currently waiting will be displayed if there is no operator input
on the OP for one minute.
7-8
Equipment Manual OP7, OP17
Release 04/99
Example
The event messages (EM) and alarm messages (AM) illustrated below are
queued on the OP.
Message level
7.2.3
11:50
EM 02
12:00
EM 04
12:08
EM 07
11:54
AM 01
11:55
AM 05
12:01
AM 08
Viewing Event and Alarm Message Text
Viewing Messages
Irrespective of the current contents of the event or alarm buffer, all configured event and alarm message text can be shown on the OP. To do so, proceed as follows:
Step
1
Procedure
Choose the standard screen
Alarms → Text to display alarm messages or
Events → Text to display event messages.
2
Equipment Manual OP7, OP17
Release 04/99
By using the arrow keys, you can now scroll
through the list of configured message text.
7-9
7.3
Message Buffers
Purpose
Messages displayed on the OP are written to the message buffer concerned.
The message buffers can be called to view message history by means of
standard screens.
The times of occurrence, acknowledgment and departure are displayed in
chronological order for all messages.
Back-up
OP7
The data in the message buffers are lost when the OP7 is turned off or
following an interruption of the power supply.
OP17
The data in the message buffers remain stored for several hours when the
OP17 is turned off or following an interruption of the power supply.
Viewing
mssage buffer
Select the corresponding standard screen:
Alarms View
Events View
System settings SysMsg
The messages contained in the message buffer are displayed in the message
list on the OP. They contain the following information:
Alarm
messages
Event
messages
System
messages
Message number
Date and time
Message status:
A = arrived
D = departed
K = acknowledged
–
–
–
–
–
–
Acknowledgement
group
7-10
Equipment Manual OP7, OP17
Release 04/99
Cursor keys
You can use the cursor keys to select and deselect the message texts of a message and to scroll through the message list.
Key
Result
Displays the message text for the message selected.
Deselects the message text and returns to the message
list.
Scroll through the message list.
,
Viewing number of
messages in alarm
message buffer or
event message
buffer
In order to gain an overview of the sum of all alarm and event messages in
the buffer and of the number of alarm and event messages still queued, select
the appropriate standard screen:
Alarms Number
Events Number
Equipment Manual OP7, OP17
Release 04/99
7-11
7.4
Deleting Messages
Purpose
All message events for event and alarm messages are automatically stored in
the event message buffer or alarm message buffer respectively. Each of these
buffers has space for up to 256 events. To prevent a buffer overflow, event
and alarm messages must be deleted from their buffers.
Message events from the event message buffer or alarm message buffer are
deleted
automatically when buffer overflow occurs
by means of the appropriate standard screen.
System messages are deleted automatically only when the buffer overflows.
7.4.1
Deleting alarm message and event message buffers upon buffer
overflow
Overflow warning
When the specified remaining buffer capacity for the alarm and event message buffers is reached, an overflow warning is output by default. Output of
this overflow warning can be activated and deactivated online via the corresponding standard screen:
Alarms Overflow
Events Overflow
Deleting upon
buffer overflow
If the alarm or event message buffer has insufficient space to accept any
more message events, message events are automatically deleted until the specified remaining buffer capacity is reached. Deletion is carried out in the following order:
The oldest departed messages.
For departed event messages, the message events ’arrival’ and ’departure’
are deleted. For departed alarm messages, the message events ’arrival’,
departure’ and ’acknowledged’ are deleted.
Queued messages.
If there is still insufficient space for new events, the oldest queued messages are deleted in the case of event messages.
In the case of alarm messages, deletion is carried out in the following order:
Acknowledged alarm messages yet to depart
Unacknowledged alarm messages that have already departed
Unacknowledged alarm messages yet to depart.
Automatic printout
7-12
If “Printout Overflow” has been configured and a printer is connected to the
OP and switched on, a forced printout of all deleted messages is initiated.
Equipment Manual OP7, OP17
Release 04/99
7.4.2
Deleting alarm and event messages via standard screens
Procedure
Standard screens can be used to delete
all (not individual) acknowledged and departed alarm messages
all (not individual) arrived and departed event messages.
To delete event and alarm messages, proceed as follows:
Step
1
Procedure
Depending on the type of message you want to delete, choose
one of two standard screens
Alarms → Delete for alarm messages or
Events → Delete for event messages.
2
7.4.3
Press
ENTER
to delete buffer,
ESC
to not delete buffer.
Automatically Deleting the System Message Buffer upon Buffer
Overflow
Procedure
If the system message buffer is completely full, the oldest message is deleted
automatically from the buffer when another system message occurs. There is
no overflow warning or forced printout of the deleted message, in the case of
event and alarm messages.
Equipment Manual OP7, OP17
Release 04/99
7-13
7.5
Printing Messages
How to print out
You can print alarm and event messages
as a direct message log (refer to section 7.5.1),
as a full printout of the message buffer (refer to section 7.5.2),
upon buffer overflow (refer to section 7.4.1).
7.5.1
Direct Message Logging
Print time
Event and alarm messages can be printed upon arrival and departure (alarm
messages upon acknowledgment, too) if this was set when the message was
configured. System messages are not logged directly.
If direct message logging follows another print function, the header of the
direct message log is re-printed.
Temporary storage
if the printer is
disabled
If the printer is disabled, not ready or assigned to another print function, up to
16 messages are stored temporarily. Temporary storage of the messages for
the message log is independent of the message buffer concerned.
Activating/
deactivating direct
message logging
You can activate and deactivate direct message logging online at the OP via
the standard screen System Settings Printer. You do this by selecting the
symbolic input field Message log in the list of parameters and setting the
value ON or OFF.
The table below shows the interdependency between the settings on the OP
and the settings configured in ProTool.
Settingg in
P T l
ProTool
7-14
Setting on OP
Message logging ON
Message logging OFF
Message event
Messages are logged
Messages are not logged
Buffer overflow
Messages are logged
Buffer overflow is printed
out
OFF
Messages are logged
No effect
Equipment Manual OP7, OP17
Release 04/99
7.5.2
Printing the Message Buffer
Sequence
Messages from the alarm or event buffers, but not the system buffer, can be
printed
chronological,
all messages contained in the buffer of the message type concerned are
printed in the order in which they are contained in the buffer
together,
all messages contained in the buffer of the type of message concerned are
printed in ascending message number order. If a message occurs more
than once, it is slotted according to time-related subcriteria.
Procedure
Choose the standard screen
Alarms → Print to print alarm messages or
Events → Print to print event messages.
The default setting is Chronological. The default setting can be modified during configuration. A choice of either Chronological or Together online on
the OP is possible only when it has been configured.
Equipment Manual OP7, OP17
Release 04/99
7-15
7-16
Equipment Manual OP7, OP17
Release 04/99
8
Recipes
Purpose
Recipes are combinations of tags for a certain purpose. The purpose of
recipes is to transfer data together to the PLC. This involves synchronization
between the OP and PLC.
Data records
When configuring you define not only the recipe but the data structure too.
The structure is assigned data at the OP. This data structure (recipe) can be
used repeatedly and assigned different data. Recipes assigned data are referred to as “data records“. Data records are stored in the OP. This saves
memory space in the PLC.
Example of a
recipe
Orange nectar, orange drink and orange juice are to be produced using the
same bottling station at a fruit juice plant. The mixing proportions are different for each drink, but the ingredients are always identical. The production
details are configured in this example as the recipe called ”Mixture”.
Mixing station
TANK
1
TANK
2
TANK
3
To the bottling
station
MIXER
M
Example: OP17
PLC (e.g., SIMATIC S7)
Figure 8-1
Equipment Manual OP7, OP17
Release 04/99
Example of a fruit juice plant
8-1
Components of a
recipe
A recipe consists of a series of recipe entries. Each entry contains a maximum of one input field (i.e., tag). Depending on the configuration,
either direct or symbolic value input can be used in an input field.
The recipe called Mixture could be set up from the following entries.
Name:
Orange:
Water:
Sugar:
Flavoring:
l
l
kg
g
Input fields (tags)
In contrast to screens, several entries are displayed on the OP simultaneously
for recipes.
Data records on
the OP
On the OP, the tags allocated to the input fields are assigned with values and
stored on the OP. Together, these values form one data record of the recipe.
Several data records can be created for one recipe. This permits a fruit juice
plant to operate with different types of drinks, for example, by using a different data record for each type of drink.
Name:
Orange:
Water:
Sugar:
Flavoring:
Entries of the recipe
”Mixture”
Drink
90 l
10 l
1.5 kg
200 g
Nectar
70 l
30 l
1.5 kg
400 g
Data record 1
Data record 2
Juice
95 l
5 l
0.5 kg
100 g
Data record 3
All data records are stored in the OP. Only the data record which is active at
the moment is stored in the PLC. This saves memory space in the PLC.
Identification of
recipes and data
records
A recipe is identified by a recipe number and a recipe title specified during
configuration. A data record is identified by a data record number and a data
record name assigned in the OP.
The clear and unmistakable identification factor for a data record is the data
record number and not the data record name.
This means that, although several data records with the same name may
exist, several data records with the same number cannot exist. If no name is
assigned to a data record, it is assigned the name ”data record”.
8-2
Equipment Manual OP7, OP17
Release 04/99
Standard screen
for data records
The standard screen Records offers you the following functions:
Record Edit:
Creating, editing and deleting data records.
Record Print:
Printing out data records on a printer.
Record Transfer:
Transferring data records from the OP to the PLC or from the PLC to the
OP.
Directory for
recipes
Recipes are combined into a recipe directory which can be used to indicate
them on the OP, and to print and edit them. A recipe is located in the recipe
directory under its recipe number and its recipe title.
Transferring data
records
The OP offers a transfer screen for transferring data records from the OP to
the PLC and back. Transfer a data record to the PLC when required by the
PLC.
The data record in the PLC can be overwritten by another data record stored
on the OP.
The active data record can also be transferred from the PLC to the OP and
stored on the OP.
Note
Only one recipe data record at a time can be active on the PLC.
Transmission of data records between OP and PLC is synchronized to prevent
uncontrolled overwriting.
Equipment Manual OP7, OP17
Release 04/99
8-3
8.1
Creating and Editing Data Records
Default
The OP automatically creates a data record with the number 1 and the name
”data record” for each recipe. All values of the data records are preset with 0.
You can edit this data record.
To create more data records, either
copy this data record (see chapter 8.2), or
edit this data record and save it under a different name.
Editing data
records
Proceed as follows to change existing recipe, data record values.
Step
Procedure
1
Select standard screen Record ! Edit
2
Select the desired recipe in the recipe directory.
3
Select the data record to be edited in the data record directory.
Note:
You can have the recipe title displayed by paging up in the first
entry.
4
Position cursor on the value to be changed.
5
Enter numeric or symbolic value.
6
Confirm the value. If you want to change more values, position
the cursor in the input field of the next entry and change the
value there.
7
To conclude editing data records after the last modified
value has been accepted, press
ESC
You will then be asked whether you want to save the data record.
8
Save:
Position cursor on theYes field and
confirm with
Do not save:
Press
ENTER
ESC
Since the data record number already exists, you will then be
asked whether you want to overwrite the data record.
9
10
8-4
Overwrite:
Press
Do not overwrite:
Press
Exit standard screen with
ENTER
ESC
ESC
Equipment Manual OP7, OP17
Release 04/99
As long as you have not confirmed an input value, you can terminate editing
with ESC. The old value is then displayed again.
Storing a changed
data record as a
new data record
To save a changed data record as a new data record, do not overwrite the
called data record when exiting the input screen. Instead, enter a new data
record number and, if necessary, a new data record name before saving the
data record.
Proceed as follows:
Step
1
Procedure
Position cursor in the field for the data record number.
Enter the number, and confirm.
2
Position cursor in the field for the data record name.
Enter the name, and confirm.
The data record name may not exceed 12 characters.
The next time you call the data record directory, you will find the new data
record listed under the new data record number.
Equipment Manual OP7, OP17
Release 04/99
8-5
8.2
Copying Data Records
Overview
There are two ways to copy a data record.
You can call an existing data record for editing, and save it unchanged
under a new number and, if necessary, under a new name. Then make
your changes.
Save an existing record via data record transfer under a new number and,
if necessary, under a new name. Then make your changes in the copy.
Procedure
Proceed as follows to obtain a copy of a data record whose values you want
to change later.
Step
Procedure
1
Call the data record to be copied via the standard screen
Record ! Edit.
2
Instead of changing a value in the data record, exit the
displayed data record again immediately by pressing
ENTER
When the standard screen is exited, you will be asked whether
you want to save the data record regardless of whether values
have been changed or not.
3
Position cursor in the field for the data record number.
Enter the number, and confirm.
4
Position cursor in the field for the data record name.
Enter the name, and confirm.
The next time you call the data record directory, you will find the new data
record in the list.
8-6
Equipment Manual OP7, OP17
Release 04/99
8.3
Transferring Data Records
Overview
A transfer screen offering the following functions is available for transferring
data records.
OP ! PLC
Before a changed or newly set up data record in a recipe can become
effective in the PLC, it must first be transferred via data record transfer to
the PLC.
PLC ! OP
Transfer the data record which is active in the PLC to the OP under a new
number and a new name.
OP ! OP
Copy an already existing data record on the OP.
Transfer screen
The transfer screen is called via Record ! Transfer. It is shown below.
1
Source:
Juice
Dest.:
Accept
OP:
PLC:
3
Figure 8-2
Specifying source
and destination
2
1
No. of the source data
record
2
No. of the destination data
record
3
Only with SIMATIC S5:
The recipe/data record active
in the PLC
4
Recipe number selected on
the OP
4
Transfer screen (Example: OP7)
The data record numbers for the source data record and the destination data
record must be entered in the transfer screen.
The PLC data record is always ”0” for both directions of transfer.
The OP data record must always be specified as a number > 0.
Equipment Manual OP7, OP17
Release 04/99
8-7
Example of entering source and destination:
OP ! PLC Transfer
Source
Destination
Description
11
0
Source data record 11 is an existing data record on the OP and
is to become the active data record on the PLC (destination).
PLC ! OP Transfer
Source
Destination
Description
0
22
The source data record 0 is the active data record on the PLC
which is to appear on the OP (destination) after the transfer
under data record number 22.
If data record number 22 already exists, it can be overwritten
or not if requested.
OP ! OP Transfer (i.e., copying)
Source
Destination
Description
33
44
Source data record 33 is an already existing data record on the
OP which is to be copied as data record 44.
If data record number 44 already exists on the OP, it can be
overwritten or not if requested.
Note
Symbolic value entries in the input fields source and destination:
The data record numbers from data records already stored on the OP can be
taken from a data record selection list.
”PLC” stands for data record 0 in the selection list.
8-8
Equipment Manual OP7, OP17
Release 04/99
Using the transfer
screen
Proceed as follows to transfer a data record.
Step
Procedure
1
Select the standard screen Record ! Transfer.
2
Select the recipe in the recipe directory
3
Position the cursor on the Source field in the transfer screen.
Depending on the direction of transfer desired, enter the
appropriate source number (see examples), and confirm.
4
Position the cursor on the Destination field.
Depending on the direction of transfer desired, enter the
appropriate destination number (see examples), and confirm.
5
Position the cursor on the Accept field, and confirm transfer.
During the data transfer, an asterisk (”*”) is indicated in the
acceptance field.
6
Equipment Manual OP7, OP17
Release 04/99
Exit the standard screen with
ESC
8-9
8.4
Deleting Data Records
Note
Data records of a recipe can be deleted from the data record directory. These
data records are then no longer available for the recipe.
When a data record which is active in the PLC is deleted from the directory
of the OP, this data record still continues to be active in the PLC.
Procedure
Proceed as follows to delete data records.
Step
Procedure
1
Select Record ! Edit in the standard screen.
2
Select the desired recipe from the recipe directory.
3
Using the cursor keys, select the data record to be deleted from
the data record directory.
4
Press
5
To delete:
Press
To not delete:
Press
6
INS
DEL
ENTER
ESC
Repeat steps 3 and 4 as necessary.
If only one single data record exists, this record cannot be
deleted.
7
8-10
Exit the standard screen with
ESC
Equipment Manual OP7, OP17
Release 04/99
STATUS/FORCE VAR with the OP
Purpose
9
The operator panel offers you the two functions STATUS VARand FORCE
VAR which enable you to display and modify operand values from the connected SIMATIC S5/S7/M7 PLC via standard screens.
In online mode, this means that PLC operands can be edited directly on the
OP without having to connect a programming unit/PC to the PLC.
STATUS VAR
You can use STATUS VAR to display the status of operands of a
SIMATIC S5/S7/M7.
FORCE VAR
You can use FORCE VAR to control operands of a SIMATIC S5/S7/M7 by
modifying their tag values and transferring them back to the PLC.
After calling the STATUS VAR and FORCE VAR functions, the OP prompts
you to enter the MPI or PPI address, respectively.
Equipment Manual OP7, OP17
Release 04/99
9-1
9.1
FORCE VAR
You call FORCE VAR by means of the standard screen ForceVAR. Following
the call, the operand list is displayed. Depending on the display, an operand is
displayed on either one or two lines.
Figure 9-1 shows the display for the SIMATIC S5 on the OP17 (8 x 40 representation). Figure 9-2 shows the display for the SIMATIC S7/M7 on the OP7.
DB34
T 1
ADR122
KM = 00010010
KT = 3.4 s
00110100 *
Value field
Format field
Numbers field
Operand field
Figure 9-1
Updating in progress
Display of PLC Operands for SIMATIC S5 (OP17, 8x40 representation)
Operand field
DB34 ADRxx
INT = 999
Format field
Figure 9-2
9-2
*
Updating in progress
Value field
Display of PLC Operands for SIMATIC S7/M7 (4x20 representation)
Equipment Manual OP7, OP17
Release 04/99
Displaying PLC
operands
Step
1
Procedure
Press
SHIFT
Select the data type you wish to have displayed using
the cursor keys.
2
Press
ENTER
The corresponding data format is set automatically in the
format field. Shift Lock mode is de-activated at the same time.
Going to numbers
fields
Step
Procedure
1
Go to the numbers field using
2
Enter in the numbers field the number of the operand you
want to display or modify by means of the keypad and
confirm it by pressing
3
Modify the default data format using
ENTER
SHIFT
Refer to the table at the end of this chapter for the valid S5/S7/M7 operands
and data types.
Equipment Manual OP7, OP17
Release 04/99
9-3
Entering values
Within the lines and value fields, the cursor can be moved horizontally.
A total of ten lines can be assigned. Confirm inputs by pressing
.
ENTER
The values of the operands you select are displayed in the value field in the
specified format.
Inserting and
changing lines
If the cursor is located in the first field and if input has not been started and
updating is not in progress, you can insert a new tag line in front of the current line using the Insert key and you can delete the current line with the Delete key.
If the cursor is located in a value field (not KM) containing at least one
character, use INS to delete the character at the cursor location.
DEL
Updating values
When you have finished editing the operand list, the values on the PLC have
to be updated. This is not done immediately after an individual value has
been entered. Not until you press the Enter key again after entering the final
value is updating of all the new values explicitly initiated. During updating, a
flashing asterisk, *, is visible in the top right corner of the display. If the
asterisk does not flash, this means that the OP did not succeed in establishing
a logical link to the PLC.
Inputs cannot be made while updating is in progress. Updating can be
canceled by pressing
.
ESC
9-4
Equipment Manual OP7, OP17
Release 04/99
Operand
Data type
SIMATIC S5
DW
MW
AW
EW
Z
T
KH
KF
KG
KM
KS
KY
KT
KC
KH
KM
KC
(Output only)
KH
KM
KT
(Output only
SIMATIC S7-200
MW
CHAR
INT
WORD
REAL
BOOL
STRING
T
TIMER
Z
COUNTER
VW
EW
AW
SIMATIC S7-300/400
Equipment Manual OP7, OP17
Release 04/99
DB, M
CHAR
INT
WORD
REAL
BOOL
STRING
TIMER
COUNTER
E, PE, A, PA
CHAR
INT
WORD
REAL
BOOL
STRING
T
TIMER
Z
COUNTER
9-5
9-6
Equipment Manual OP7, OP17
Release 04/99
10
System Settings
In this chapter
This chapter informs you of functions that can be triggered by standard
screens to perform system settings. They include:
Selecting a language,
Modifying parameters for OP interfaces, printers, message display, date
and time,
Adjusting display contrast,
Setting OP mode.
10.1
Selecting a Language
Languages
available
The configuration can be loaded on the OP in up to three languages simultaneously. You can switch between the separate languages online at any time.
After switching over, all language-dependent text is displayed in the new
language. The following languages are available for OP7 and OP17:
German
English
French
Italian
Spanish
Russian (Cyrillic characters)
Procedure
To choose another language, proceed as follows:
Step
Procedure
1
Choose the standard screen System settings → Language.
2
Select the language you require by means of a symbolic input.
The selection list contains only the languages which have been
loaded on the OP.
The OP performs a cold restart and loads all elements of language-dependent text in the new language.
Equipment Manual OP7, OP17
Release 04/99
10-1
10.2
Modifying Parameters in Online Mode
Modifying interface parameters
The parameters set as default parameters for the OP interfaces during configuration can be modified by means of standard screens.
To do this, proceed as follows:
Step
Modifying printer
parameters and
setting message
logging ON/OFF
Procedure
1
Depending on the OP you are using, choose one of the standard
screens marked System settings → IF..
2
Scroll through the parameter list on the display using the
arrow keys to the parameter you require. Some of the
parameters displayed cannot be modified.
3
Choose the value for the parameter by using a symbolic value.
4
Exit from the standard screen by pressing
ESC
The default settings configured for printouts on the connected printer can
be modified by means of a standard screen. In this instance, you can set the
following:
characters per line (parameter values: 20, 40 or 80)
lines per page (parameter values: 60 to 72)
message log (ON, OFF).
When message logging is active (ON), each message event (arrival and departure; for alarm messages also acknowledge) is printed out. When set to
OFF, message logging is deactivated.
To set the parameters for your printer, proceed as follows:
Step
10-2
Procedure
1
Choose the standard screen System settings → Printer.
2
Scroll through the parameter list on the display using the
arrow keys.
3
Choose the value for the parameter at the cursor location by
using a symbolic input.
4
Exit from the standard screen by pressing
ESC
Equipment Manual OP7, OP17
Release 04/99
Setting first/last
message display
To define whether the oldest or the most recent alarm messages (for first/last
message refer to section 7.2) is displayed when several are waiting to be
displayed, proceed as follows:
Step
Setting date and
time
Procedure
1
Choose the standard screen System settings → DispMsg.
2
Select the corresponding parameter, i.e. either First or Last.
3
Exit from the standard screen by pressing
ESC
You can adjust the current date and time on the OP – for example, to allow
for summer or winter time. Any change you make will affect all messages
and screens for which a date or time tag has been defined. The display format
for date and time is defined in your configuration and cannot be changed by
means of the menu system on the OP.
Step
1
Procedure
Choose the standard screen System settings → Dat/Time.
Use the arrow keys to move the cursor from the date field
to the clock field and back again.
To move the arrow keys within the input field for the
date or time, activate Shift Lock mode beforehand so
that the LED is on.
SHIFT
Change the day of the week using a symbolic input and the date
and time of day by means a numeric input.
2
Confirm your input by pressing
3
Exit from the standard screen by pressing
ENTER
ESC
Note
OP7
Date and time are generated by software. This information has to
be updated every time the OP7 starts up.
OP17
Without a backup battery (upgradable option), the OP17 continues
to count the date and the time for several days following interruption of the power supply. If the OP17 starts up after this stored
energy time has expired, the internal hardware clock has to be
updated.
Equipment Manual OP7, OP17
Release 04/99
10-3
10.3
Adjusting Contrast
Settings
On the OP7 and OP17, you can adjust the contrast of the LCD. The display
contrast can be adjusted by means of
direct adjustment or a
standard screen.
Direct contrast
adjustment
The display contrast of the LCD can be adjusted at all times in normal mode
by means of direct control:
Step
Contrast
adjustment by
means of a
standard screen
10-4
Procedure
1
Press the key. The SHIFT LED lights.
2
Press the key to set the contrast to the value you require.
3
Press the key. The SHIFT LED is off.
SHIFT
+/–
SHIFT
LCD display contrast can also be adjusted by means of a standard screen. To
do so, proceed as follows :
Step
Procedure
1
Choose the standard screen System settings → Language.
2
Move the cursor to Contrast.
3
Select the contrast value you require by means of symbolic input
(1 for minimum contrast, 16 for maximum contrast).
Equipment Manual OP7, OP17
Release 04/99
10.4
Setting OP Modes
Modes
You can set the following OP modes by means of standard screens:
Online,
Offline,
Download and
Loop-Through (OP17 only).
Online
This the default operating mode for unrestricted control and visualization of
the process. In Online mode, there is a logical link between the OP and the
PLC, or the OP tries to establish a link.
Offline
In Offline mode, a logical link does not exist between the OP and the PLC.
The OP does not even attempt to establish a link. You can still operate the
OP. It is not possible to control and visualize the process.
Download
In Download mode, data can be downloaded from the configuration computer to the OP. There is no logical link between the PLC and the OP in this
mode. You are not able to operate the OP in download mode.
Loop-Through with
OP17
While the OP is being commissioned, troubleshooting or optimization of the
PLC program is often necessary. For this purpose, the PU or PC can be connected to the second interface of the OP17 in Loop-Through mode. This way
it is possible to communicate between PC/PU and the PLC through the OP17.
For the restrictions which have to be taken into account in Loop-Through
mode refer to section 14.2.4.
Jobs from the PLC to the OP17 can be initiated only when the OP17 is either
working in online mode or has been switched to loop-through mode.
Setting the OP
mode on standard
screens
To set OP modes, proceed as follows:
Step
Procedure
1
Choose the standard screen System settings → OpMode.
2
Set the mode you require by means of a symbolic input.
3
Exit from the standard screen by pressing
ESC
You will find further information on OP modes in chapter 15 of this manual.
Equipment Manual OP7, OP17
Release 04/99
10-5
10-6
Equipment Manual OP7, OP17
Release 04/99
Part III Expanded, Configurable
Functions
Process-Dependent Operator
Guidance
11
Schedulers (OP17 only)
12
Controlling the OP from the PLC
13
10-8
Equipment Manual OP7, OP17
Release 04/99
Process-Dependent Operator Guidance
Situation-specific
process control
11
Different action is normally required or allowed in different operating
situations. To support changing requirements during process control, you can
configure the following measures, which provide the operator with situationspecific purposeful help:
screen-dependent soft keys,
global function keys and
user-defined screen hierarchies.
11.1
Branching by Means of Soft Keys and Function Keys
Soft keys:
function keys with
a tag assignment
You can assign function calls to the function keys on the OP7 and the OP17.
We distinguish in this instance between local and global assignment. Global
means that the assignment applies to the entire configuration. Local means
that the assignment applies to one screen entry only. This makes it possible
for the operator to initiate functions as and when required by the situation.
When the assignment of function keys may vary from screen entry to screen
entry, the keys are referred to as soft keys.
The following keys can be assigned as soft keys on the different devices:
OP7
The two tiers of keys F1 to F4 and K1 to K4 of the function keyboard
may be configured both as soft keys and global function keys.
OP17
The two tiers of keys F1 to F8 and K1 to K8 of the function keyboard
may be configured both as soft keys and global function keys.
Function keys K9 to K16 can be assigned only globally.
While configuring soft keys, you must make sure that function calls which
are required to be permanently available, i.e. also during screen editing, are
not assigned to keys which you intended to be soft keys.
Equipment Manual OP7, OP17
Release 04/99
11-1
Assignments of
function keys and
soft keys
You can assign the following functions to function keys and soft keys:
branch to message level,
select screen,
initiate a print job,
display directory,
modify parameters in online mode.
Password level
assignment
A password level may be assigned to a function key or a soft key. This means
that you can make functions, such as ”Modify parameters in online mode”,
available only to authorized persons.
Special feature
with function keys
If a function can be called in a given situation by means of a specific function key, the LED assigned to the function key can be turned on by the PLC.
in this manner.
OP7
Function keys K1 to K4 are all provided with a green LED.
OP17
Function keys K1 to K16 are all provided with a two-color LED
(red/green).
Convenient operator prompting can be implemented by means of the option
of activating the LEDs on function keys (refer to Chapter 13).
Special feature
with soft keys
A bit can be configured in a tag for every soft key. This insures that a bit is
set in the PLC when a soft key is pressed. In this instance, the OP always
transfers the whole tag to the PLC instead of the individual bits and overwrites the information it contains.
When the key is released or upon a change of display which modifies softkey assignment, the bit is reset.
11-2
Equipment Manual OP7, OP17
Release 04/99
11.2
Self-Defined Screen Hierarchy
Defining the
screen hierarchy
The screen hierarchy can be adapted to system-specific requirements and be
modified either in part or in whole. Screens can be removed or added.
Screens can be linked together in random order. The design, sequence of the
link, inclusion in the screen directory and the relevant cross-jump destinations are defined during configuration with ProTool.
Branching using
soft keys and
cross-jump
destinations
You branch between the different screens by means of soft keys and configured cross-jump destinations. Branching from entries of different screens to
one and the same screen is possible (figure 11-1). Cross-jumps are not restricted to screen level, but can branch to the message level too.
Defining the start
screen
Another feature that is configured is the picture you want to have displayed
on the OP as your start screen.
Figure 11-1 Principle of a Screen Hierarchy
An overview is presented below, with reference to an example, of the design
of a screen hierarchy. Detailed information on configuration will be found in
the ProTool/Lite User’s Guide.
Equipment Manual OP7, OP17
Release 04/99
11-3
Example
The OP is used to operate and monitor a system for producing and bottling
different fruit juices. The system consists basically of a mixing unit and a
bottling machine.
Mixing unit
The ingredients for the fruit juices are contained in three tanks. Depending on
the juice that you wish to manufacture, ingredients are mixed in certain ratios.
Bottling machine
After it has been mixed, the fruit juice flows into the bottling tank after a
valve has been opened and then bottled in the correct quantities. The bottles
are conveyed on a belt. Before being filled, they are checked for breakages
After they have been filled, the bottles are capped, labeled and transferred to
pallets.
The configured basic screen could look – for example, on the OP7 display –
like the one shown in figure 11-2. It consists of static text only.
Unit 1
<<
Mix
|
Bottle
|
>>
Figure 11-2 Start Screen of the System (Example)
The screen segment on the display can be moved horizontally with the soft
keys below the symbol << and >>.
Pressing the soft key beneath the ”Mix” entry allows you to view the entry
shown in figure 11-3. It similarly consists only of static text which refers to
other screens (”Tank2”, ”Tank3” and ”Mixer”).
Mixer unit
Tank2
<< |
Tank3
|
Mixer
|
Figure 11-3 Screen with Static Text (Example)
11-4
Equipment Manual OP7, OP17
Release 04/99
If you press the ”Tank2” soft key, the entry displayed in figure 11-4 appears.
This entry contains static text and two output fields (Tank Contents and Set
Temperature) as well as an input field (Valve Position) The position of the
tank valve can be set in the input field by means of a symbolic value input –
for example, OPEN or CLOSED).
Tank2
Contents: 371 liters
Temp.:
17,0 °C
Valve:
OPEN
>>
Figure 11-4 Screen with Input and Output Fields (Example)
Equipment Manual OP7, OP17
Release 04/99
11-5
11-6
Equipment Manual OP7, OP17
Release 04/99
Schedulers (OP17 only)
Definition
12
Depending on the configuration, you can specify so-called schedulers for the
OP17. A scheduler is a regularly recurring point in time (i.e., hourly, daily,
weekly, annually) at which a certain function is to be executed. Up to 48
schedulers and their corresponding functions can be configured
A scheduler is contained in a screen entry where it can be entered, changed
or deactivated when the screen is displayed.
When a scheduler time is reached, the configured bit is set in the interface
area of the PLC.
See User’s Guide Communication for detailed information on the interface
area of the PLC.
Equipment Manual OP7, OP17
Release 04/99
12-1
Functions
The following functions can be called via schedulers.
Print alarm message buffer (chronologically or together)
Print event message buffer (chronologically or together)
Select screen
Print screen
Print data record
Displaying
schedulers
The schedulers have already been preset via configuration. A scheduler can
be changed or deactivated via input fields in a screen entry.
The scheduler is activated as long as a time is displayed in the input field.
Activated means that the configured function will be executed when the
scheduler time is reached. If the input field contains ???, the scheduler is
deactivated.
Changing
schedulers
Proceed as follows to set a scheduler time.
Step
1
Procedure
Select input field.
You can use the cursor keys to switch between scheduler type
and day of the week field, and date field and time field.
2
Enter scheduler time.
– Date and time are entered via the system keyboard. Activate
the SHIFT-LOCK combination to control the cursor
SHIFT
within the input field for date or time using
– The day of the week is set via a symbolic entry.
3
Confirm entry with
ENTER
The scheduler is now activated.
Deactivating
schedulers
12-2
INS
DEL
You can delete the scheduler time in a screen entry by pressing
.
The scheduler is then deactivated (i.e., the configured function will not be
executed).
Equipment Manual OP7, OP17
Release 04/99
Controlling the OP from the PLC
13
Common data
areas
The OP and the application program communicate with each other by alternately reading from and writing to the data areas in the memory of the PLC.
Thus the PLC and the OP can make each other execute different actions by
evaluating data areas.
PLC jobs
PLC jobs are functions that are initiated on the OP – for example, selecting
screens, printing screens, transferring the date and time from the OP to the
PLC. Jobs are stored with a job number and parameters on the PLC.
The PLC, for example, can call a screen on the OP to draw the operator’s
attention to a particular condition or to the fact that inputs are required.
You will find a complete list of all the PLC jobs with their parameters and a
description of all the data user areas that have to be configured on the PLC in
the Communication User’s Manual.
LED control
The LEDs on the function keys of the OP can be driven from within the PLC.
This means it is possible to signal to the operator by means of a lit key LED
that it is advisable to press a specific key in a certain situation.
For LED control, it is necessary to create an LED image on the PLC. In the
configuration, two bits are assigned to every LED in the LED image area.
These two bits can be used to implement four different LED states:
Evaluating the
screen number
OP7
Off, Permanently On, Low-Speed Flashing, High-Speed Flashing.
OP17
Off, Green Permanently On, Red Permanently On, Red Flashing.
The OP stores information about the object type called in the screen number
area of the PLC. Thus it is possible for information about the current display
contents of the OP to be transferred to the application program on the PLC
and, from there, for certain reactions to be initiated – for example, calling
another screen.
Equipment Manual OP7, OP17
Release 04/99
13-1
Function keyboard
image
With pressing a function key, it can be used to set a bit on the PLC, where it
is evaluated by the application program.
For this, you must have created the necessary data area on the PLC for the
keyboard image and have specified the appropriate area pointer in the configuration for assigning the key to a bit.
At most, the activation of two simultaneously pressed keys can be
transferred.
System keyboard
image
A bit is permanently assigned to every key on the system key board – apart
from the arrow keys – in the data area for system keyboard bits. The bit remains set for as long as the corresponding key is pressed. The bit is reset
when you release the key.
Owing to the evaluation of this data area, the operator’s attention can be
drawn to the wrong operation of a key – for example, by means of an error
message.
Date and time
Transfer of date and time can be initiated from the OP by means of a PLC job
in order to synchronize the OP and PLC.
PLC OP
acknowledgment
area
By creating a suitable data area, it is possible for alarm messages to be
acknowledged by the PLC instead of on the OP.
OP PLC
acknowledgment
area
If the PLC is required to announce that an alarm message has been
acknowledged, this can be done following creation of a suitable data area.
13-2
Equipment Manual OP7, OP17
Release 04/99
Part IV Commissioning and
Description of Devices
Installation
14
Commissioning
15
Device Description
16
13-4
Equipment Manual OP7, OP17
Release 04/99
14
Installation
Mounting location
and conditions
Operator Panels OP7 and OP17 are suitable for fitting into control cabinets
and consoles.
Before you install an OP, you must cut out a section of the front panel (mounting cutout) (see chapter 16). The front panel must not be thicker than 6 mm.
No other drilled holes are required for mounting.
You will find mounting depth details in chapter 16.
Make sure at the location where you plan to install the OP that there is a
clearance of at least 50 mm beneath its housing to accommodate protruding
connectors.
!
Caution
The OP must be brought to room temperature before it is commissioned.
In the event of moisture condensation, do not turn on the OP until it is
absolutely dry.
The OP was subjected to function testing before being supplied to you.
Should a fault occur for all that, please enclose a precise description of
the fault on returning the OP.
To prevent the OP from overheating in operation,
– the device must not be exposed to direct sunlight (this simultaneously
prevents fading of the foil front) and
– the ventilation slits in the device housing must remain free after
mounting.
On opening the panel, certain parts of the system become accessible that
may conduct hazardous voltage.
Degree of
protection
The IP65 degree of protection on the front panel can be insured only when
the gasket on the front panel of the OP fits properly.
Prior to
installation
Should you wish to modify the labels on the function keys, replace the
labeling strips before you install the OP. You will find tips on how to replace
labeling strips in section 16.3.
Equipment Manual OP7, OP17
Release 04/99
14-1
14.1
Mechanical Installation
Installing the OP
Step
1
Procedure
Push the enclosed gasket from the rear over the housing and
insert the OP from the front in the prepared mounting cutout.
Take suitable measures to prevent the OP from falling out of the
front panel before it is finally fixed in position.
2
Insert the retaining hooks of the screw type clamps enclosed with the OP into the corresponding mounting locations
in the housing of the OP.
You require four screw type clamps for the OP7 and five for the
OP17.
3
Tighten the OP from behind in the front panel using a screwdriver .
Note:
Make sure that the gasket fits properly on the front
plate. Avoid excessively high torques.
OP17
OP7
Front panel
14-2
Equipment Manual OP7, OP17
Release 04/99
14.2
Electrical Installation
Electrical
connections
The OP requires the following electrical connections
to the power supply,
to the configuring computer (PC or programming unit),
to the PLC.
The electrical connection to the configuration computer is required only to
download the firmware and configuration.
Interference-proof
hardware design
!
The basis for interference-free operation is interference-proof hardware
design of the PLC in accordance with EMC guidelines and the use of
interference-proof cables. The guidelines for interference-proof design of
your PLCs also apply accordingly for installation of the OP.
Caution
Use only shielded cable for all signal connections.
Screw down or lock all plug connections.
Do not install signal lines in the same cable ducts as high voltage lines.
Siemens AG accepts no responsibility whatsoever for malfunctions and
damage arising from the use of self-made cables or cables from other
manufacturers.
Polarity reversal
protection
The OPs have polarity reversal protection. This does not work if there is already a link to another unit via an RS232 interface. For this reason, always
proceed as follows whenever commissioning the OP:
1. Connect the power supply.
2. Switch on the OP. If the OP does not run up, swap over the connections
because their polarity is reversed.
3. Once the OP has run up, connect the configuration computer or I/O device.
Equipment Manual OP7, OP17
Release 04/99
14-3
14.2.1
Connecting the Power Supply
Terminal Block
There is a two-pin screw-type terminal on the lower side of the OP housing
for connecting the power supply. The screw-type terminal is designed for
cables having a cross-section not larger than 2.5 mm2. The terminal screws
are accessible via drill holes in the rear panel.
figure 14-1 shows the location of the screw-type terminals on the OP7 and
OP17.
OP7
OP17
terminal block
Figure 14-1 Connecting the Power Supply (View of Underside of OP)
!
Caution
With a 24 V supply, make sure the extra-low voltage is isolated safely.
Use only power supplies complying with ICE 364-4-41 or HD 384.04.41
(DE 0100. Part 410).
The voltage supply must be within the permissible voltage range for the
device in question (see chapter C), otherwise it is not possible to exclude
the possibility of failures.
Chassis ground
14-4
Connect the chassis ground
ground.
on the bottom of the device to the cabinet
Equipment Manual OP7, OP17
Release 04/99
14.2.2
Connecting a Configuration Computer
Connection
Configuration
Scheme
Figure 14-2 shows you how to connect an OP7 and an OP17 temporarily to
a configuration computer (PU or PC) for downloading the firmware and configuration data. Standard cables are available for the connections shown in
the figure (refer to the ST80.1 catalog).
PC
RS232
COM1/2
(9-pin)
Operator Panel
PC
RS232
OP7
IF1 A
OP17
IF2
COM1/2
(25-pin)
TTY active
1) 2)
TTY/RS232
converter
PG 7xx
TTY passive
RS232
COM1
(25-pin)
COM2
(9-pin)
1) Not with OP7-DP and OP17
2) Do not use the converter cable from Siemens for connecting via TTY, since
OP7-DP and OP17 do not supply 20 mA.
Figure 14-2 Connection Configuration Scheme for Configuration Computers
Equipment Manual OP7, OP17
Release 04/99
14-5
14.2.3
Connections to PLC
Connection
Configuration
Scheme
Figure 14-3 shows the basic options for connecting the OP to the PLC. For
further details concerning the different OP versions please refer to Tables
16-1 and 16-2 in Chapter 16. Standard cables are available for the connections shown in the figure (refer to the ST80.1 catalog).
SIMATIC S5
CPU
PU interface
TTY active
TTY active
OP7
IF1 A
OP17
IF2
SI 2
TTY active
CP521 SI
RS232
CP523
PC
COM1/2
(9-pin)
RS232
RS232
COM1/2
(25-pin)
TTY active
1) 2)
TTY/RS232
converter
PU
RS232
COM1/2
(9/25-pin)
TTY passive
SIMATIC 500/505
RS232
RS232
(9/25-pin)
RS422/RS485
RS422 (9-pin)
RS232/TTY
Other-make
PLCs
RS422/RS485
OP7,
OP17
IF1 B
SIMATIC S7/M7
3)
PROFIBUS-DP
1) Not with OP7-DP and OP17-DP
2) Do not use the converter cable from Siemens for connecting via TTY, since
OP7-DP and OP17-DP do not supply 20 mA.
3) Any PROFIBUS bus terminal (except FSK)
Figure 14-3 Connection Configuration Scheme for PLCs
14-6
Equipment Manual OP7, OP17
Release 04/99
Configuring
interface IF1B
You can configure interface IF1B using the DIP switch at the rear of OP
versions DP and DP-12. This involves changing over the RS422 receive data
and the RTS signal. By default, the RTS signal is not required by the communicating peer.
The table shows the permissible settings for the DIP switch.
Switch Position
C
Communication
i ti via
i
1
2
3
4
OFF
ON
ON
OFF
RTS at Pin 4
(default)
ON
OFF
OFF
OFF
RTS at Pin 9
(as PG)
OFF
OFF
OFF
ON
No RTS on
connector
OFF
OFF
OFF
OFF
RS422/RS485
PROFIBUS-DP
You will find the interface assignments of the different OP versions in
appendix D of this manual.
Equipment Manual OP7, OP17
Release 04/99
14-7
14.2.4
Loop-Through Mode (OP17 only)
Connection
Configuration
Scheme
The IF1 interface of the OP17 is optionally available for the loop-through
mode of a configuration computer (PU or PC). This enables communication
between the PU or PC and the PLC via the OP17.
Standard cables are available for the connections in AS511 loop-through
mode shown in Figure 14-4 (refer to the ST80.1 catalog).
OP17
TTY passive
COM1
(25-pin)
IF2
RS232
IF1A/B
PC/PU 7xx
PLC
Figure 14-4 Connnection Configuration Scheme for AS511 Loop-Through Mode
Constraints in
loop-through
mode
Print functions of the looped-through OP cannot be used.
The OP does not perform life-bit monitoring, i.e. it cannot detect whether
the PLC is in Stop mode, for example. Life-bit monitoring continues to be
performed on the PLC.
System performance may deteriorate due to higher loading of the interface to the PLC.
Particularities for
connection of a PU
If PU status functions are activated (message on PU: ”Status processing in
progress ” – for example, for STATUS VAR, FORCE VAR),
the following system message is displayed on the Operator Panel
”$340 Status in progress, loop- through mode”,
the OP can no longer be operated,
communication between the OP and the PLC is stopped. There is therefore little sense in evaluating error number 115 of the standard FB on the
PLC in this particular instance.
Upon termination of status functions by means of the ESC key on the PU, OP
functions are resumed.
If ”Apply” is pressed once only with Force VAR after a value has been
entered, the value you entered is transferred to the PLC, and the status
function of the PU is still not active. This value (for example, a message bit
or an actual value) can still be read by the looped-through OP and processed
(for example, display of the associated message or the actual value). Not
until ”Apply” is pressed a second time is the PU status function activated.
14-8
Equipment Manual OP7, OP17
Release 04/99
14.2.5
Connecting a Printer
Connection
Configuration
Scheme
Figure 14-5 shows you how to connect a printer to an OP7 and an OP17.
A printer is always connected to the PU interface of the OP. To do this,
disconnect the PU.
Operator Panel
Y cable
TTY/RS232
OP7
TTY/RS232
RS232
OP17
Printer
IF1A
IF2
TTY/RS232
PLC
Printer
Printer
Figure 14-5 Connection Configuration Scheme for Printers
If the OP is connected to the PLC through a TTY or RS232 interface, a
Y cable is required for simultaneous operation of a printer. The PLC and
printer, in this case, are operated with physically different interfaces.
For attaching Siemens printers, there are standard cables available (refer to
Catalog No. ST80.1). For other printers, you have to use the cables supplied
or specially manufactured ones.
You will find the pin assignments of the plug connectors in appendix D of
this manual.
Print functions
The OP makes the following print functions available:
hardcopy
printout of screens
printout of alarm or event buffer
direct message logging
printout on buffer overload
printout of data records
printout of recipe directory
printout of screen directory
Equipment Manual OP7, OP17
Release 04/99
14-9
Settings
The settings of parameters for the print functions, the printer interface and
the printer are configured.
Section 10.2 describes how you can modify the default printer parameters in
Online mode. You will find the requisite printer settings in the User’s Manual
for your printer.
Print function
settings
You can configure headers and footers for the print functions in various configurations and text with different attributes – for example, underline, italics).
The text attributes have to be stored in ProTool for the different printers
under System ! Printer ! Settings by using different control characters.
14-10
Equipment Manual OP7, OP17
Release 04/99
15
Commissioning
Diagrammatic
representation
The commissioning guide which follows explains the different steps that
have to be taken to commission the OP. Figure 15-1 shows the most important steps for initial commissioning, recommissioning and normal operation
of the OP.
Initial Commissioning
Recommissioning
Normal Operation
No configuration/firmware
exists on the OP.
The OP already contains a
configuration but you want to
change the configuration or
use a new one.
The OP is operated with the
loaded configuration.
Switch on power supply of the OP
Switch the OP to download mode
during the startup phase
(see chapter 15.2).
Download configuration data to OP
OP
ProTool
COM1/2
Start screen or standby message
Figure 15-1 Commissioning Flowchart
Equipment Manual OP7, OP17
Release 04/99
15-1
Before
commissioning
!
Before commissioning the OP, take note of the following:
Caution
With the SIMATIC S5, compression of the internal program memory of
the PLC (PU ”Compress” function, integrated COMPR FB) is not allowed when an OP is connected. Compression modifies the absolute addresses of the blocks in the program memory. As the OP reads the address list only during start-up, it does not detect any address modifications and accesses the wrong memory areas.
If compression is inevitable during routine operation, turn off the OP
prior to compression.
Do not disconnect while circuit is live unless location is known to be
nonhazardous.
15-2
Equipment Manual OP7, OP17
Release 04/99
15.1
Procedure
Initial commissioning
Initial commissioning comprises loading the firmware required to enable the
OP to function and the configuration onto the OP. You do this as follows:
Step
Procedure
1
Switch on the OP’s power supply. 1)
Since a configuration has not yet been loaded at this point in
time, the OP automatically switches to download mode and waits
for data to be downloaded from the configuration computer
(PC/PU).
You are not able to operate the OP in this mode.
2
Using a suitable standard cable, connect the configuration computer to the interface of the OP:
IF1A for OP7
IF2 for OP17
3
Start the download operation to the OP on the PC or PU.
The OP checks the link to the PC or PU. If a link is not available
or if it is not functioning properly, the OP issues a corresponding
error message.
If the link is in order, downloading of the configuration from the
PC or PU is initiated to the OP.
As long as data are not being downloaded to the OP, you
can cancel Download mode by pressing
1)
ESC
Switch on the power supply before you connect the OP to the configuration computer.
If you don’t, the internal polarity reversal protection function of the OP can be rendered
ineffective is the polarity of the power supply is reversed.
Note
Please refer to the ProTool/Lite User’s Guide for the ProTool settings
required for downloading.
Once the configuration has been successfully downloaded, the OP runs up
again. If a start screen has been defined in the configuration, it is opened. If a
start screen has not been defined, the OP displays the standby message.
Equipment Manual OP7, OP17
Release 04/99
15-3
15.2
Recommissioning
Procedure
If you want to replace a configuration already loaded on the OP with another
one, proceed as follows:
Step
1
Procedure
Using a suitable standard cable, connect the configuration computer (PU or PC) to the interface of the OP:
IF1A for OP7
IF2 for OP17
2
Switch on the power supply of the OP.
3
There are two ways to switch the OP to download mode:
While normal operation is in progress
By calling the standard screen System settings OpMode Download.
If necessary, enter the password for the required password
level beforehand.
During the startup phase of the OP
When switching on the power supply of the OP, press these
three keys at the same time.
ESC
+
+
This key combination (”overall reset”) deletes the configuration memory.
The OP then switches to download mode and waits for data to
be downloaded from the PC/PU.
4
Start the download operation to the OP on the PC or PU. The OP
checks the link to the PC or PU. If a link is not available or if it
is not functioning properly, the OP issues a corresponding error
message.
If the link is in order, downloading of the configuration from the
PC or PU is initiated to the OP. In doing so, the present configuration on the OP is overwritten by the new one.
As long as data are not being transferred between the PC/PU and
the OP, you can cancel Download mode by pressing
ESC
Once the configuration has been successfully downloaded, the OP runs up
again. If a start screen has been defined in the configuration, it is opened. If a
start screen has not been defined, the OP displays the standby message.
Fault diagnosis
Any fault occurring during commissioning or in operation is normally displayed by means of an error message on the display of the OP.
You will find an overview of the most important system messages together
with notes on troubleshooting in an appendix to this manual.
15-4
Equipment Manual OP7, OP17
Release 04/99
15.3
Start-up Behavior
After the power supply has been turned on, the OP performs a
self test. In the test, it checks the operability of the most important device components and displays the test results.
Self test
OP starts up
If there is not a configuration on the OP, the OP switches automatically to Download mode.
No configuration exists
or
keys
ESC
+
+
pressed?
No
Yes
Download
mode
Initialization
Establish connection
to PLC
The OP then performs various internal initializations.
In this start-up phase, the OP attempts to establish a connection
to the PLC.
If communication is not possible – for example, because the cable to the PLC has not been inserted – the OP displays a system
message.
Start screen or
standby message
Equipment Manual OP7, OP17
Release 04/99
After start-up, the OP displays the configured start screen. If a
start screen has not been defined, the standby message is displayed.
15-5
15.4
Testing the Configuration in OFFLINE Mode
Purpose
In OFFLINE mode, you can test the different functions and the configurations downloaded from the PC or PU independently of the PLC.
In OFFLINE mode, tags are not updated.
Procedure
End of test
15-6
Step
Procedure
1
Switch the OP to OFFLINE mode using the standard screen
System settings ! OPMode.
2
Check all configured screens for proper display.
3
Check the screen hierarchy.
4
Check the input fields.
5
Test the soft keys.
6
Check the different items of message text.
7
Test the function keys.
If errors occur when you perform the tests, you must download the configuration again.
Equipment Manual OP7, OP17
Release 04/99
15.5
Testing the Configuration in Conjunction with the PLC
Test with PLC
connected
Once the tests in OFFLINE mode have been performed successfully, the OP
is tested in conjunction with the PLC that you connected. This test determines whether the correct data areas have been configured.
Procedure
Step
Procedure
1
Connect the OP to the PLC.
2
Proper connection is indicated on the OP by a corresponding
message.
3
Acknowledge this message.
4
Switch the OP to ONLINE mode by means of the standard screen
System settings ! OPMode.
You can now test all items in your configuration for which
communication with the PLC is necessary. Depending on the
configuration, this might be
Tip
event and alarm messages,
buffers for event messages and alarm messages,
print functions,
automatic message printout,
screen selection, etc.
The OP17 has the built-in ”loop-through mode” function.
The loop-through mode facilitates testing with the PLC during commissioning since there is then no need to keep on plugging the configuration computer alternately into the PLC and the OP.
Equipment Manual OP7, OP17
Release 04/99
15-7
15.6
Testing Communication via the PROFIBUS-DP
Bus fault LED
Mounted on the rear side of unit variants DP and DP-12 is a bus fault LED
(figure 15-2). When the OP is connected to SIMATIC S7, this LED indicates
that communication between the OP and the PLC over PROFIBUS-DP is OK
by lighting up constantly. If the LED is constantly OFF, communication is
disturbed.
The LED can be used for rapid diagnosis of any problems that might occur
during communication.
Figure 15-2 Location of the Bus Fault LED at the Rear of the OP
15-8
Equipment Manual OP7, OP17
Release 04/99
16
Device Description
In this chapter
16.1
This chapter describes the versions, dimension drawings and connection
elements of Operator Panels OP7 and OP17.
OP7
170
180
116,5
Dimensions
144
134
Mounting cutout
The OP7 requires the following mounting cutout (WxH):
135 +1 mm x 171 +1 mm.
Equipment Manual OP7, OP17
Release 04/99
16-1
Connection
elements
The OP7 is available in versions PP, DP and DP-12. The versions differ only
in as far as their communication options are concerned (refer to table 16-1).
Figure 16-1 shows the connection elements on the underside of the OP7.
IF 1B
IF 1A
Figure 16-1 Locations of the Connection Elements on the Underside of the OP7
Table 16-1
Communication Options Featured by Different OP7 Versions
Connections
OP7
PP
DP
DP-12
– AS511 (TTY)
IF 1A
—
IF 1A
– FAP (TTY/RS232)
IF 1A
—
IF 1A
– PROFIBUS-DP up to 1.5 MBd
—
IF 1B
IF 1B
– PROFIBUS-DP up to 12 MBd
—
—
IF 1B
– PPI
—
IF 1B
IF 1B
– MPI
—
IF 1B
IF 1B
– PROFIBUS-DP up to 1.5 MBd
—
IF 1B
IF 1B
– PROFIBUS-DP up to 12 MBd
—
—
IF 1B
– RS232
IF 1A
—
IF 1A
– RS422/RS485
IF 1B
—
IF 1B
– RS232/TTY
IF 1A
—
IF 1A
– RS422/RS485
IF 1B
—
IF 1B
PC/PU (TTY)
IF 1A
—
IF 1A
PC/PU (RS232)
IF 1A
IF 1A
IF 1A
Printer (TTY)
IF 1A
—
IF 1A
Printer (RS232)
IF 1A
IF 1A
IF 1A
SIMATIC S5
SIMATIC S7/M7
SIMATIC 500/505
Other PLCs
16-2
Equipment Manual OP7, OP17
Release 04/99
16.2
OP17
194
204
132
Dimensions
240
230
Mounting cutout
The OP17 requires the following mounting cutout (WxH):
231 +1 mm x 195 +1 mm.
Equipment Manual OP7, OP17
Release 04/99
16-3
Connection
elements
The OP17 is available in versions PP, DP and DP-12. The versions differ only
in as far as their communication options are concerned (refer to table 16-2).
Figure 16-2 shows the connection elements on the lower side of the OP17.
IF 2
IF 1B
IF 1A
Figure 16-2 Locations of the Connection Elements on the Underside of the OP17
Table 16-2
Communications Options Featured by Different OP17 Versions
Connections
OP17
PP
DP
DP-12
– AS511 (TTY)
IF 1A
—
IF 1B
– FAP (TTY/RS232)
IF 1A
—
IF 1B
– PROFIBUS-DP up to 1.5 MBd
—
IF 1B
IF 1B
– PROFIBUS-DP up to 12 MBd
—
—
IF 1B
– PPI
—
IF 1B
IF 1B
– MPI
—
IF 1B
IF 1B
– PROFIBUS-DP up to 1.5 MBd
—
IF 1B
IF 1B
– PROFIBUS-DP up to 12 MBaud
—
—
IF 1B
– RS232
IF 1A
—
IF 1A
– RS422/RS485
IF 1B
—
IF 1B
– RS232/TTY
IF 1A
—
IF 1A
– RS422/RS485
IF 1B
—
IF 1B
PC/PU (TTY/RS232)
IF 2
IF 2
IF 2
Printer (TTY/RS232)
IF 2
IF 2
IF 2
SIMATIC S5
SIMATIC S7/M7
SIMATIC 500/505
Other PLCs
16-4
Equipment Manual OP7, OP17
Release 04/99
16.3
Labeling of the Function Keys
Situation
on delivery
Replacing labeling
strips
The function keys of the OP7 and OP17 are labeled as follows when delivered:
– OP7:
F1 to F4 and
K1 to K4.
– OP17:
F1 to F8,
K1 to K8 and
K9 to K16.
All the function keys are labeled by means of labeling strips, which are inserted in the keyboard from the rear of the OP. For this purpose, the OP has
been provided with an easy-to-use feed-in device. By replacing the labeling
strips, you are in a position to customize the function keys on your OP for a
given system.
Two labeling strips are provided for the OP7 and three for the OP17. Labeling strips should be replaced only when the OP has been disassembled. To
replace labeling strips, proceed as follows:
1. Remove from the OP the labeling strips you wish to replace.
2. Insert the new strips from the rear of the OP into the corresponding slits
located on the side of the OP.
Figure 16-3 illustrates, by way of an example, how to replace labeling strips
on an OP7.
Figure 16-3 Replacing Labeling Strips (Shown Here for an OP7)
Equipment Manual OP7, OP17
Release 04/99
16-5
Note
Take note of the following points before you insert labeling strips:
Labeling on strips must be smudge-proof before they can be inserted. If a
keyboard overlay is soiled on the inside, it cannot be cleaned and has to
be returned to the manufacturer for replacement.
Protect the labeled side with transparent adhesive tape. In this way, you
prevent the labeling from being worn out prematurely.
Making labeling
strips
Make labeling strips from transparent foil so that the LEDs on function keys
remain visible. Use a printer or a smudge-proof pen to label the foil. Cut
strips as shown in the examples illustrated in figures 16-4 (OP17) and 16-5
(OP7).
Transparent LED window
Key area for labeling
Figure 16-4 Dimensions of Labeling Strips for the OP17
16-6
Equipment Manual OP7, OP17
Release 04/99
Transparent LED window
Key area for labeling
Figure 16-5 Dimensions of Labeling Strips for the OP7
File
Together with the ProTool configuration software in the PROTOOL\
UTILITY folder the Word files SLIDE_07.DOC and SLIDE_17.DOC
are supplied. The files contain formatted samples of the labeling for function
keys on the OP7 and OP17. This means that you can readily edit and print
your own labeling strips.
Equipment Manual OP7, OP17
Release 04/99
16-7
16.4
Optional Backup Battery for the OP17
Function
You can upgrade the OP17 with an optional backup battery. When the power
supply is interrupted, the backup battery ensures that
the operating data in the OP17 message buffer are retained and
the hardware clock continues to run on its internal reserve power.
Source of supply
You can obtain the backup battery from the Siemens spare parts service. It is
shipped ready for installation with a cable and a plug connector. Please refer
to our ST80.1 catalog for the order number.
Lifetime
Under normal operating conditions, the battery has a typical lifetime of
approximately four years. The discharge degree of the battery is not monitored by the OP17.
Installing the
battery
To install the battery, proceed as follows:
Step
16-8
Procedure
1
Remove the cover of the battery compartment at the rear of the
OP17.
2
Insert the battery into the holding fixture. The snap-in plastic
supports hold the battery in its compartment.
3
Insert the plug connector on the battery lead in the two-pin plug
connector above the battery compartment. The plug connector is
coded and is thus protected from accidental polarity reversal.
4
Stow any excess length of lead in the battery compartment and
close the compartment again.
Equipment Manual OP7, OP17
Release 04/99
General
information
!
Please comply with the safety information that is included with the battery
and informs you how to handle and dispose of lithium batteries in the proper
manner.
Warning
S Explosion hazard! There is a danger of the lithium battery exploding if it
is not handled properly.
S Batteries
– Never charge
– Do not open
– Do not short circuit
– Do not reverse the polarity
– Do not heat up to above 100_C
– Protect against direct sunlight
S Never allow moisture to condense on batteries.
S If it becomes necessary to transport the batteries, always comply with
the Dangerous Goods Ordinance for the mode of transport used (labeling
obligation).
S Dead lithium batteries are classified as hazardous waste and must be
disposed of accordingly. Wrap each battery separately in a sealed plastic
bag before disposing of it along the approved lines.
16.5
Scope
Maintenance
Operator panels OP7 and OP17 are designed for low-maintenance operation.
Maintenance of the OPs is limited to
S regular cleaning of the keyboard membrane and the display,
S changing the optional buffer battery of the OP17 (refer to Section 16.4).
Cleaning
Clean the keyboard overlay and the OP display at regular intervals with a
damp cloth. The unit must be OFF when it is cleaned. In this way, you ensure
that you don’t unintentionally trigger any functions while wiping the keyboard overlay.
Use only water and commercially available washing-up liquid for dampening
the cloth. Never use aggressive solvents or scouring agents.
Equipment Manual OP7, OP17
Release 04/99
16-9
16-10
Equipment Manual OP7, OP17
Release 04/99
Part V
Brief Description of
Standard Screens
A
System Messages
B
Technical Data
C
Interface Assignment
D
SIMATIC HMI Documentation
E
Siemens Worldwide
F
Appendix
P-12
Equipment Manual OP7, OP17
Release 04/99
A
Brief Description of Standard Screens
The table below presents an overview of all the standard screens for Operating Panels OP7 and OP17.
Apart from a brief comment on functions, mention is made of the requisite password level. The ”Level
1” column lists the screens that you can choose from the basic screen. These screens allow you to make
different calls, which are listed under ”Level 2”.
Level 1
Level 2
Function
Password Level
Alarms →
View
Display alarm messages in alarm buffer
Display message text for message selected in alarm buffer.
Alarms →
Print
Print alarm messages as history, i.e. all message events (arrive, depart, 2
acknowledge) in chronological order of their occurrence.
Alarms →
Number
Display the messages entered in buffer, divided into ’messages over- 0
all’ and ’queuing messages’.
Alarms →
Delete
Delete all acknowledged and departed alarm messages from the buffer.
6
Alarms →
Overflow
Enable and disable a system message upon over flow of the alarm
buffer.
4
Alarms →
Text
Display all text elements of alarm messages
0
Events →
View
Display event messages in event buffer.
Display message text relating to a message selected in event
0
0
buffer.
Events →
Print
Print event messages as history, i.e. all message events (arrive, depart) 2
in chronological order of their occurrence.
Events →
Number
Display messages entered in the buffer, divided into ’messages over- 0
all’ and ’queuing messages’.
Events →
Delete
Delete all event messages in the event buffer that have arrived and
departed.
6
Events →
Overflow
Enable and disable system message upon overflow of event buffer.
4
Events →
Text
Display all text elements of event messages
0
Screens →
Edit
0
Screens →
Print
Equipment Manual OP7, OP17
Release 04/99
Display directory for screens.
Display screens and edit fields
Display directory for screens.
2
Output selected screen to printer.
A-1
Level 1
Level 2
Function
Record→
Edit
Record→
Transfer
Password Level
Display directories for recipes
1
Display and edit data records
Copy data record
1
Transfer data record from PLC to OP
Fetch data record from PLC to OP
Record→
Print
Print recipe with selected data record
2
System settings
→
OPMode
Set OP operating modes:
Online, Offline, Download, Loop-through
8
System settings
→
DispMsg
Set whether the oldest (first) or latest (last) alarm message is displayed when there is more than one message waiting.
4
System settings
→
SysMsg
Display system buffer.
0
System settings
→
Language
Select language.
2
System settings
→
Dat/Time
Set date and time
4
System settings
→
Printer
Set printer parameters.
2
System settings
→
IF1A/RS232
IF1A/TTY
IF1B
OP7 only:
Set interface parameters.
6
IF1A/B
IF2
OP17 only:
Set interface parameters.
StatVAR
Display S5S7 operands
0
ForceVAR
Display and modify S5S7 operands.
8
Password
processing →
Login
Log in a user by entering a password.
0
Password
processing →
Logout
Log out a user and branches backward to message level.
0
Password
processing →
Edit
Display password list.
Allocate and modify passwords and password levels.
Delete passwords.
9
A-2
Equipment Manual OP7, OP17
Release 04/99
System Messages
B
Error messages at
OP startup
The following messages indicate a hardware failure on the memory module
specified:
– EPROM memory failure,
– RAM memory failure,
– Flash memory failure
Message number
OP system messages can be subdivided into various categories.
The information as to which category a system message belongs to is contained
in the message number as indicated below.
Message number
Message text
0
1
2
3
4
5
6
7
Driver error
Startup message
Warning
Information message
Operator error
Other message
Configuration error
Internal error
The message category enables you to identify the general area in which the
cause of the fault is to be found.
Below you will find a selection of system messages listed together with details
of under what circumstances they occur and, where applicable, how the cause
of the fault can be eliminated.
Self-explanatory system messages are not included.
Note
System messages are displayed in the language selected in the configuration.
If the OP does not have access to any configuration data, the messages are
displayed in English.
Equipment Manual OP7, OP17
Release 04/99
B-1
Procedure for
”internal errors”
In the case of all system messages that relate to ”internal errors”, please follow
the procedure outlined below.
a) Switch off the OP, set the PLC to STOP mode and then restart both units.
b) During startup, set the OP to download mode, downlaod the configuration
again and then restart the OP and PLC again.
c) If the fault recurs, please contact your nearest Siemens representative.
When doing so, please quote the number of the error that has occurred and
any variables referred to in the message.
Message
Cause
Remedy
Please wait
Mode change in progress or recipe function
started.
Ready for transfer
Waiting for data from PU/PC
Data transfer
Data transfer between PU/PC and OP in progress
Firmware not
compatible
The firmware can not be used for the current
configuration
EPROM
memory failure
Memory module defective or internal hardware fault
Send unit for repair quoting details of error
g
message
Memory module defective or transmission error
Retransfer configuration or send OP for repair
RAM memory
failure
Flash memory
failure
B-2
Equipment Manual OP7, OP17
Release 04/99
Message
Cause
005
Internal error:
Error message returned if nothing configured for
a system message
006
Error during data transfer in download mode.
Two variables are transferred with this message
which contain information about the function in
which the error has occurred (variable 1) and the
cause of the error (variable 2).
Remedy:
Repeat data transfer after first chekking the physical connection if necessary.
Variable 1:
0
Initialize function
1
Receive data
2
Send data
3
Send message block
4
Terminate function
Variable 2:
1
Internal error
3
Timeout error
5
Parity error
6
Framing error
7
Overrun error
8
Break in line
9
Receive buffer overflow
10
Control character error when receiving
11
Logging error
040
Driver error
If FAP is set, the character delay time setting may
be too short.
041
Check physical connection with
PLC.
Modify character delay time.
Fault in connection with PLC.
Possible causes:
–
–
Fault on the transmission link, e.g. connecting cable
defective
Incorrect interface parameters set on OP or on communication peer.
045
No connection with PLC established.
100
Restart due to RAM failure.
101
Restart following termination of COM-UNI mode
103
Startup following cancellation of COM-UNI
mode
104
Transfer cancelled by operator. Connection with
OP is still open, the OP is waiting.
105
Fault resulting in wait message has been eliminated.
107
Restart following activation of COM-UNI mode
108
OP is in download mode.
Equipment Manual OP7, OP17
Release 04/99
Set different CPU under ”PLC –>
Parameters”.
B-3
Message
Cause
Remedy:
109
Restart after change of operating mode from offline to online.
110,
113
OP is in ”normal” mode.
114
PLC has been restarted.
115
Establishment of logical link with PLC in progress.
117
Connection with PLC is OK again following a
fault.
119
Automatic restart.
120
Restart after change of S5 protocol.
124
Restart following selection of different language.
129
SINEC L1 or SINEC L2 parameter has been
changed
130,
132
Startup due to loop-through operation when
online.
134
Restart due to offline operation.
136
PLC not responding.
Check program sequence on PLC.
Check physical connection.
138
Data block not available on PLC
Set up relevant memory area.
201
Hardware fault on timer module.
Send unit for repair.
202
Error reading date
Send unit for repair.
203
Error reading time
Send unit for repair.
204
Error reading day
Send unit for repair.
205
Printer not ready and internal storage of print jobs
is no longer possible.
Make sure printer is ready or disable
message logging.
206
Printer not ready. Print job placed in temporary
storage.
Make sure printer is ready.
207
Buffer printout or print screen function cancelled.
Check printer, cable and connectors.
210
Internal error
OP co-ordination area not receivable during startup.
Press restart button.
212
Internal error
Bit for changing operating mode has been inverted erroneously.
Restart OP.
213
Offline mode not possible at present.
Try change of operating mode again
later.
214
The job number sent by the PLC or configured in
a function field is too large.
Check PLC program and configured
screen.
B-4
Equipment Manual OP7, OP17
Release 04/99
Message
Cause
Remedy:
217,
218
Overlapping specified/actual values.
Check configuration of actual/specified values in the process link.
219
Hardware fault: relay or port could not be set.
Send unit for repair.
220
Print buffer overflow due to overload. Printout
not possible.
Messages have been lost.
221
Print buffer overflow due to overload. Printout of
overflow messages not possible.
Messages have been lost.
222
Warning: the event message buffer is full apart
from the specified remaining buffer space.
Clear the buffer or configure a smaller figure for the remaining buffer
space.
224
The event message buffer has overflowed.
If a printer is connected and buffer
overflow has been configured, the
overflow messages will automatically be printed out.
225
Warning: the alarm message buffer is full apart
from the specified remaining buffer space.
Clear the buffer or configure a smaller figure for the remaining buffer
space.
227
The alarm message buffer has overflowed.
If a printer is connected and buffer
overflow has been configured, the
overflow messages will automatically be printed out.
229
No keyboard connected (internal keyboard with
ribbon cable).
230
The minimum value is greater than the maximum
value for variable limits.
Correct the limit settings.
231
The minimum value is equal to the maximum value for variable scales.
Correct the scale on the OP.
303
Fault in connection with PLC.
S5: this error may occur when transferring large
data records. In such cases the watchdog is activated.
Check PLC status.
S5: set value in data word 98 to at
least 2000.
304
Illegal S5 job number or job parameters in a function field.
305
Data block number missing.
Set up data block or change configuration.
306
Incorrect CPU specified under ”PLC –> Parameters”.
Change configuration and retransfer.
307 ...
311
Variable not present on PLC
Check configuration of process link.
312
The printer is already processing a print job and
can not accept this next job at present.
Wait until the printer is free again
and repeat the print job.
313
Information message: print job completed.
Equipment Manual OP7, OP17
Release 04/99
B-5
Message
Cause
Remedy:
314
S7 diagnostics buffer not present.
315
No information text available.
317
Input is password protected.
318
Incorrect password entered when attempting to
log in.
319
An existing password was entered when editing
the password.
320
You have attempted to alter the level of or delete
the supervisor password.
321
You have attempted to alter the level of an invalid
password.
First enter the password then specify
the level.
322
The password entered is too short.
Password must be at least three characters long.
323
You have pressed <– Statistics or Message Text
–> on a buffer screen but there is no entry for the
current message.
––
324
The entry number specified does not exist on the
selected screen.
––
325
The FM/NC (= MPI peer) has no alarm messages
buffer.
A node does not have the required
functional capability.
326
You have attempted to collect a recipe number
other than the active recipe number from the
PLC.
Select the appropriate recipe number.
327
There is no recipe number when a recipe is selected.
Configure missing recipe or select a
different one.
328
Recipe number >99 when selecting a recipe.
329
The same number has been entered for source and
destination on the ”Data Record Transfer” screen.
330
Full details of source and destination not entered
when initiating data record transfer function.
331
The data record specified as the source does not
exist.
332
Data record number >99 when selecting a recipe
screen.
333
Data record number not present when selecting a
recipe screen.
335
Information message: alarm message will be suppressed.
336
No process screens have been configured.
337
No recipes have been configured.
B-6
The CPU has no diagnostics buffer
(hardware problem).
Enter password.
Enter a different password.
Enter differing numbers.
Equipment Manual OP7, OP17
Release 04/99
Message
Cause
338
OP can not establish a connection with the printer.
339
Startup completed.
340
Status processing in progress on PU/PC. The OP
can not be used while this is going on.
341
Internal error
With non-Siemens connections: data block error
342
Network node has illegal address.
Remedy:
1. Printer is not switched on,
2. Printer is not ready,
3. Connecting lead between printer
<––> OP is not connected or defective,
4. No interface module inserted.
Communication with PLC has been
resumed.
Max. addresses:
S7-MPI:
PROFIBUS-DP:
32
128
353
The minimum value is greater than the maximum
value for variable scales.
Minimum and maximum values are
being confused by OP. To prevent
this, enter correct minimum and maximum values.
359
The CPU is in STOP mode.
System error message issued if S7
messages are not available.
366
– The mode you require is already active.
– The CPU key-operated switch is not set to
RUN-P.
– The command is not supported by the CPU.
367
Set PLC parameters are incorrect.
368
Communication error S7 module; error class and
error number will be read out.
369
The command cannot be executed in the S7 mode
selected.
392
– No alarm messages are queued on the NC.
– Acknowledgement is not possible in the NC
mode set.
393
The password is incorrect or you cannot enter a
password in the NC mode set.
394
Acknowledgement is not possible on the NC set.
395
– No part programs have been configured.
– The PLC specified (FM or NC) is not ready.
396
– The part program specified does not exist.
– The PLC specified (FM or NC) is not ready; in
the case of FM: no user data area has been created
on the PLC.
Equipment Manual OP7, OP17
Release 04/99
B-7
Message
Cause
397
– The part program specified does not exist.
– The record specified does not exist.
– The PLC specified (FM or NC) is not ready.
398
– The command cannot be executed in the MCU
mode selected.
– The command is not supported by the MCU version.
399
– The PLC does not have a directory of tool corrections.
– The tool correction specified does not exist.
Remedy:
400
Illegal key pressed.
401
Value entered could not be converted.
402
Operator error on STATUS VAR or FORCE VAR
screen:
403
Incorrect time entered
404
Incorrect date entered
406
Operator error on STATUS VAR or FORCE VAR
screen
407
You have attempted to delete the only data record
for a recipe.
409
Lower limit violated: you have attempted to enter
a setpoint that is below the configured lower limit.
Enter a value that is greater than or
equal to the specified value. No limit
is indicated for data of the type
DOUBLE.
410
Upper limit violated: you have attempted to enter
a setpoint that is above the configured upper limit.
Enter a value that is less than or
equal to the specified value. No limit
is indicated for data of the type
DOUBLE.
411
Illegal screen selection because incorrect PLC
type specified (external driver)
Change configured interface
parameter.
500...
503
Scheduler, counter, date or time data can not be
sent.
504
Free ASCII Protocol: operator input value could
not be sent.
This error can occur if the PLC is
temporarily
p
y overloaded or if the
f
i block
bl k is
i not invoked
i k d for
f
function
more than 1.5 s.
505
The data record can not be sent as the recipe disable bit on the PLC is set or because transfer of a
recipe is still in progress.
Try sending again later when the
PLC has released the recipe mailbox.
506
Overload: too many message blocks with the
same block number in transit.
This error occurs if the PLC sends
too many jobs using ’collect message
area’ within a certain period of time.
B-8
only 10 entries are permitted (after
pressing INS if 10th line already
used).
Values can only be changed after update operation has been cancelled
(BREAK key).
Equipment Manual OP7, OP17
Release 04/99
Message
Cause
Remedy:
507
Transfer of the data record was not acknowledged
by the PLC within a certain period.
Checking of data records by the user
at the PLC end must be carried out
more quickly (< 10 s).
509
Firmware version is different from standard FB
version.
Please contact the SIMATIC Hotline.
510
Data record not present.
A process link with a non-existent
data block has been configured in a
recipe or the recipe data contains errors.
511
You have used a PLC job to select a recipe or a
request data record that does not exist.
512
Configured data block length is too short.
The variable transferred with the message
identifies the number of the data block.
Change configuration and retransfer.
516
SINEC L2 protocol configured but no interface
module inserted.
Change configuration and retransfer.
518
Interface module inserted and protocol configured
do not match.
Change configuration and retransfer.
520
Excessive number of saved returns has meant that
maximum nesting level has been exceeded.
Go to Message Level (by pressing
ESC key if necessary).
521,
522
Screen can not be constructed or selected because
You can optimize memory availabithere is not enough memory available.
lity by
Message 522 triggers a restart with memory opti- 1. Removing unused fields from the
mization.
configuration
2. Configuring the screen with fewer
fields, or splitting it into more than
one screen
3. Creating fewer recipe data records
523
No text found.
524
Object class does not exist.
525
Illegal operand.
526
Loop-through operation is set on the OP.
527
Access to recipe data is not possible at present.
528
Recipe does not exist.
529
File does not exist.
530
Data record not present.
531
Data record can not be loaded.
532
Information message: data record memory is full.
533
Floppy connection unclear.
Equipment Manual OP7, OP17
Release 04/99
Change mode from “Loop-through
operation” to ”Normal operation”.
B-9
Message
Cause
Remedy:
534
Information message: disk is full.
535
Disk access error.
536
Disk transfer error.
537
Information message: disk is blank.
538
Simultaneous accessing of data record by job and
operator.
Repeat uncompleted accessing operation.
539
The data records in the RAM for recipe no. x contained errors and have been deleted.
If data records are stored in the Flash
memory they will remain valid.
540
The maximum number of data records has already been created.
541 ...
550
Specified variable not available on PLC
Change configuration and retransfer.
551
An MPI/PPI connection to the PLC cannot be
established using the specified station address.
Check MPI station addresses and wiring.
570
Variable contains errors: variable name from ProTool is used as parameter.
Check configuration. Frequently occurs with NC variables and when
multiplexing.
571
S7 system diagnosis/ALARM_S returns error if
OP logs on/off.
CPU operating system out of date.
600
Configuration error: overflow warning at basic
setting 1
601
Configuration error: message logging at basic
setting 1
602
Configuration of remaining buffer space incorrect.
Correct the remaining buffer space
and retransfer configuration.
604
Message does not exist.
Configure message.
605
Process link is only configured symbolically.
Change
g configuration
g
and retransfer.
606
Too many message variables configured.
607
Data type configured does not exist.
608
The process screen number does not exist.
609
Special object or operator object for message text
does not exist or is not permissible.
610
Operator object for header or footer does not exist
or is not permissible.
611
Special operator object for buffer printout does
not exist or is not permissible.
613
Data block not available or too short.
Create data block of required length
on the PLC.
614
No entry present for log (header and footer not
present).
Configure log fully.
B-10
Check the physical connection.
Change
g configuration
g
and retransfer.
If the fault is not corrected by performingg a restart,, please
contact the SIp
H li
MATIC Hotline.
Equipment Manual OP7, OP17
Release 04/99
Message
Cause
Remedy:
615
The line to be output is larger than the amount of
print memory reserved for it or the number of
control sequences is too great.
Check configuration as regards
logging.
616
Internal error
Incorrect data format in process link.
Correct the data format.
617
Internal error
Incorrect word length in process link.
Correct the word length.
618
Configuration error in actual control value (bit
number > 15).
Bit number for actual control variable must be < 15.
619
Error presetting setpoint (error in data structures).
Change configuration and retransfer.
620
Illegal keyboard ID: module number too high or
number of keys does not match keyboard ID.
Enter configuration to match hardware.
621
Incorrect parameter transferred: message type
Set required value by way of standard screen or PLC.
622
Configured recipe does not fit in recipe mailbox
on PLC (> 512 data words).
Reduce configured size of recipe and
retransfer configuration.
623
Internal error
Screen object for “Send Recipe“ is not a recipe
type (fixed by COM TEXT).
If the fault is not corrected by performing a restart, please contact the SIMATIC Hotline.
624
No recipe entries found.
Set up area pointers and retransfer
configuration.
625
Recipe number does not exist.
Reconfigure
g
recipe.
p
626
No setpoints have been configured.
627
Internal error
Configured keyboard block number too high.
Correct the block number.
628
Recipe does not fit in mailboxes.
Increase configured size of recipe
mailbox or succeeding recipe mailbox.
629
LED assignment area too small.
Increase size of LED assignment
area according to bit numbers used.
630
Keyboard assignment area too small.
Increase size of keyboard assignment
area according to bit numbers used.
631
Message configuration incomplete or incorrect.
Complete configuration.
If the fault is not corrected by performing a restart, please contact the SIMATIC Hotline.
Variable x:
1, 2
Alarm message triggered not configured
3
Process link only created symbolically.
4
Actual-value field only created symbolically.
5, 6
Event message triggered not configured
7
Symbolic actual-value field only created symbolically.
21..24 Field texts for symbolic actual value do not exist
25
Illegal field type
8..20 Internal error
Equipment Manual OP7, OP17
Release 04/99
B-11
Message
632
Cause
Configuration error:
Variable x:
1, 4
Information text does not exist
2
Information text ID for messages does not exist
3, 6..8, Internal error
11, 13
5
Field only created symbolically.
9
Screen or recipe entry created symbolically only
12
Process screen or recipe does not contain any entries
634
Configuration error:
Variable x:
0..8, 34 Internal error
18
Screen or recipe title not configured
635
Configuration error:
Variable x:
1
Screen or recipe entry created symbolically only
3
Field only created symbolically.
6
Message, entry or information text not configured
for current language
7...9, Internal error
19, 28,
41...43
18
Screen or recipe title not configured
20
Process link only created symbolically.
21
Information text only created symbolically.
22
Symbolic field only created symbolically.
23
Fewer than 2 field texts configured for symbolic
field
24
Current field type for symbolic field not configured
25
Illegal data format for symbolic field (only KF
and KY permissible)
26
Recipe setpoint configured with data format KC
33
Illegal data format for setpoint field
35
Data format for scheduler too short
36
Illegal data format for actual control value
44
With a permanently programmed Return to
menu: menu item not present
45
With permanently programmed Return to screen:
entry or field number not present
46
Too many control actual values on screen (no
more than 200 allowed)
48
Too many fields on process screen
50
Process link for soft keys does not exist
51
Soft key number too high
53
Information text for soft key not configured or
not configured in all languages
55
Soft key specified in entry does not exist
636
B-12
Event message is not configured
Remedy:
Check the configuration.
If the fault is not corrected by performing a restart, please contact the SIMATIC Hotline.
Screen or recipe title not configured
If the fault is not corrected by performing a restart, please contact the SIMATIC Hotline.
Check the configuration.
If the fault is not corrected by performing a restart, please contact the SIMATIC Hotline.
Configure event message (–> message
number) fully.
Equipment Manual OP7, OP17
Release 04/99
Message
Cause
Remedy:
Configure
event message
g
g ((–> message
g
b ) fully.
f ll
number)
637
Missing configuration for an event message
638,
639
Actual value field for event message has only
been created symbolically.
640
Alarm message is not configured
641
Alarm message triggered is not configured
Configure
g
alarm message
g (–>
( message number).
b )
642,
643
The actual value field for alarm message has only
been created symbolically.
Reconfigure alarm message (–> message number).
645
Internal error
PLC co-ordination area not receivable during
startup.
Press key to restart.
If the fault is not corrected by performing a restart, please contact the SIMATIC Hotline.
648
The driver number configured can not be interpreted.
649
Internal error
Driver number configured can not be interpreted.
If the fault is not corrected by performing a restart, please contact the SIMATIC Hotline.
650
Missing area pointer.
Configure an area pointer.
651
Internal error
There is not at least one data record for every recipe.
If the fault is not corrected by performing a restart, please contact the SIMATIC Hotline.
652
Configuration is not compatible with S5
Change configuration and retransfer.
If the fault is not corrected by performing a restart, please contact the SIMATIC Hotline.
653
The configured user version number does not
match the version number stored on the PLC.
Change configuration and retransfer.
654
The PLC acknowledgement area has not been
configured to follow on physically from the message area.
655
PLC acknowledgement area does not physically
follow on from the alarm messages area (–> no
startup).
656
Configured protocol is not possible.
Check protocol in configuration.
657
Configured PLC protocol is not possible.
Use current firmware version or configure different protocol.
658
Configured PLC protocol is not possible.
659
Illegal process link in recipe, destination does not
exist.
Change configuration and retransfer.
660
Invalid destination configured for return reference
in menu.
Break key on OP; complete configuration and retransfer
Equipment Manual OP7, OP17
Release 04/99
B-13
Message
Cause
Remedy:
661
On process screen: recipe setpoint or previous
value configured in recipe: field is neither recipe
setpoint or previous value.
Change field type or remove field
and retransfer configuration
662
Invalid destination configured for return reference
in screen.
Change configuration and retransfer.
663
Data record memory full (during startup)
664
Standard data records for the configured recipes
require more than 20 Kbytes. Unit switches to
COM TEXT mode.
Configure fewer or smaller recipes.
665
Configuration of interfaces incorrect, printer/PLC
interfaces have same physical characteristics.
Check interface parameters.
667
Configuration error:
Variable x:
1
Data type is not DB
2
DB number is greater than 15
3
DB length is greater than 1024
4
DW is in data block header
5
Actual value not in send block
6
Setpoint not in receive block
7
Setpoint/actual value not in receive block
8
Initial value not in send block
9
Data type is not DB
10
DB number is greater than 15
11
DB length is greater than 1024
12
DW is in data block header
13
Area is in wrong DB
14
Sum of data blocks too great
668
Incorrect configuration.
Meaning of variables:
1: Incompatible PLC types configured
2: No PLC configured
3: Incorrect baud rate configured
669
Too many actual values (> 512) have been configured for cyclic reading in a screen/variable.
670
Too many variables requested simultaneously.
B-14
x = 1..8: Change the configuration of the
process link and retransfer.
x = 9..13:Change configuration of area
pointer and retransfer
x = 14: Restrict configuration and retransfer.
Change configuration and retransfer.
Lengthen standard clock pulse or
configure fewer variables on screen.
Equipment Manual OP7, OP17
Release 04/99
Message
685
Cause
Configuration error. Two tags that supply information about the faulty function (Tag 1) and the
faulty parameter (Tag 2) are transferred together
with this message.
Variable 1:
535
Conversion, Linear 1
536
Conversion, Linear 2
537
Increment, variable
539
Increment current
545
Convert value
Remedy:
If you are dealing with a configuration error: delete the function and reconfigure.
Or if the OP tries to determine the
value of a tag while no PLC is connected: connect a PLC.
Variable 2:
This specifies the parameter of the function in
which an error has arisen (e.g. Tag 2 = 3: parameter 3 of the Tag 1 function is faulty).
686
Too many variables.
701
Internal error
Incorrect assignment of “head –> res“ when receiving variable.
702
Job can not be executed.
Change interface or configure area
pointer.
703
Flash memory full.
Restrict the configuration.
704
Incorrect CPU specified under ”PLC –> Parameters”.
Change configuration and retransfer.
705
An acknowledged message can not be entered in
the buffer because the corresponding message or
a message in the same acknowledgement group is
missing.
706
Recipe request will not be processed as another
request is already active.
707
Internal error
S7 message task error.
708
Internal error
Incorrect mailbox type
709
Internal error
Invalid mailbox type.
710
Internal error
Incorrect mode.
711
Internal error
Display status invalid.
712
No submenu configured.
713
Internal error
No special operator object configured.
Equipment Manual OP7, OP17
Release 04/99
B-15
Message
Cause
714
Internal error
Menu number invalid.
715
Internal error
Mailbox type of received message is incorrect.
716
Internal error
The setting for the maximum number of messages
is too high (variable overflow).
717
Internal error
Incorrect message status when entering in statistics.
718
Internal error
Incorrect message status when entering in event
message buffer.
719
Internal error
Incorrect message status when entering in alarm
message buffer.
720
Internal error
Error reading messages from message buffer.
721
Internal error
Configuration message error
722
Internal error
Incorrect mailbox type received (OP15 –> OP5)
723
Internal error
OP5: more than 500 messages are specified in the
area pointer lists.
724
Internal error
Mailbox type not implemented.
725
Internal error
Block number does not exist.
726
Internal error
Incorrect mailbox type
727
Internal error
Illegal screen type
728
Internal error
Return reference number incorrect
729
Internal error
Error in internal mailbox buffer management for
direct message logging.
B-16
Remedy:
Change area pointer list.
Equipment Manual OP7, OP17
Release 04/99
Message
Cause
731
Internal error
Transfer parameter LEDSTATUS is incorrect in
RIO function “Change LED Status“
732
Internal error
Key number can not be higher than 7/15/23
(8-key/16-key/24-key keyboard)
733
Internal error
Key number must be less than 4 as a maximum of
4 keys is possible.
734
Internal error
The module number must be 0.
735
Internal error
Illegal RIO function.
736
Internal error
Keyboard driver error.
737
Internal error
Too many keyboard assignment areas (mailboxes)
being transferred to PLC.
738
Internal error
Mailbox type of received message is incorrect.
739
Internal error
Key acknowledgement received when message
already acknowledged.
740
Internal error
Message status not permitted for first alarm/event
message.
741
Internal error
Buffer type different from event or alarm message
buffer.
742
Internal error
Message type different from event or alarm message buffer.
743
Internal error
Configuration message error
744
Internal error
Incorrect mailbox type received.
746
Internal error
Actual control value and process link are identical
on a screen.
Equipment Manual OP7, OP17
Release 04/99
Remedy:
The following are permissible: Read,
Write (LEDs, outputs) and Initialize.
In COM TEXT: change address
B-17
Message
Cause
747
Internal error
Buffer type different from event or alarm message
buffer.
748
Internal error
Message type different from event or alarm message buffer.
749
Internal error
Error in data structure of a buffer function screen.
750
Internal error
Error in data structure of the password function
screen.
751
Internal error
Error in data structure of screen for setting time.
752
Internal error
Error in data structure of the Login screen.
753
Internal error
Error in data structure of other type of function
screen.
754
Internal error
Error in data structure of ”Average Statistics”
screen.
759
Internal error
Error group (task ID) does not exist.
760
Internal error
The message number for this error group does not
exist.
761
Internal error
Communication: Mailbox type of received message is incorrect.
762
Internal error
Configuration error: message for which there is
no text expected. 761 received instead.
763
Internal error
Configuration error
764,
765
Internal error
There are two variables:
Var. 1: Message number,
Var. 2: Number for error location
767,
769
Internal error
With stop, TD10 – TD/OP20 different.
B-18
Remedy:
In COM TEXT: IHV recipes affected
Occurs if, for example, new firmware is being used with old COM
TEXT version.
Equipment Manual OP7, OP17
Release 04/99
Message
Cause
771
Internal error
Error during communication (→ messages).
773
Internal error
Error reading area pointer
774
Error on reading from “Basic Settings→ General
parameters“
775
Internal error
Data record memory full
776
Internal error
Too many schedulers in transit
779
Internal error
Internal error during MPI download; possibly due
to buffer problems.
780
Internal error
Undefined error from communication with PLC.
781
An ”Online Setter” function has been incorrectly
defined in ProTool.
783
Internal error
Error in NC messages
Equipment Manual OP7, OP17
Release 04/99
Remedy:
Reset and repeat MPI download.
B-19
B-20
Equipment Manual OP7, OP17
Release 04/99
C
Technical Data
OP7
Housing
Overall dimensions W x H
xD
PP
OP17
DP
DP-12
DP
240 mm x 204 mm x 54 mm
135 mm x 171 mm
231 mm x 195 mm
38.5 mm
50 mm
Mounting depth
Degree of protection
– front
– rear
IP65
IP20
Weight approx.
PP
Flash memory for
configuration data
and data records
0.430 kg
0.960 kg
OP7
OP17
DP
DP-12
PP
DP
128 kbytes
PP
DP
Type
Number of lines
Characters per line
Font size
Equipment Manual OP7, OP17
Release 04/99
DP-12
256 kbytes
OP7
Display
DP-12
144 mm x 180 mm x 42.5 mm
Mounting cutout B x H
Memory
PP
OP17
DP-12
PP
DP
DP-12
LCD with LED backlighting
4
4 or 8 (configurable)
20
20 or 40 (depending on number of lines)
8 mm
11 mm or 6 mm
(depending on number of lines)
C-1
OP7
Keyboard
PP
DP
Type
OP17
DP-12
PP
DP
DP-12
Touch-sensitive keyboard
Number of system keys
22
Number of LEDs
7
19 (16 of which two two-color)
Number of function keys
8
24
of which soft keys
8
16
OP7
OP17
Voltage supply
PP
DP
DP-12
Rated voltage
PP
DP
DP-12
+24 V DC
Permissible range
+18 ... +30 V DC
Max. perm. transients
35 V (500 ms)
Time between two
transients
min. 50 sec
Power input (at 24 V)
pical
– ttypical
– max. contin. current
190 mA
240 mA
340 mA
390 mA
Fusing
– internal
– external
electronic fuse
1.6 A, quick-acting
OP17
Buffering for OP17
Internal
External backup battery 2)
(optional)
PP
Message buffer
DP
typ. 1 day at 40
DP-12
°C 1)
Hardware clock
several days at 40 °C 1)
Type
Lithium battery
Voltage/capacity
3.6 V/approx. 1.5 Ah
Message buffer/hardware clock
> 4 years
1) The specified backup times apply only when the OP17 has been connected to the power supply for more than
12 hours
2) Subject to change
C-2
Equipment Manual OP7, OP17
Release 04/99
OP7
Interfaces
PP
DP
RS232
1
1
TTY
1
RS422/485
OP17
DP-12
PP
DP
1
2
2
2
–
1
2
1
2
1
–
1
1
–
1
PPI/MPI/
PROFIBUS-DP
(up to 1.5 Mbd)/
RS422/485
–
1
1
–
1
1
PPI/MPI/
PROFIBUS-DP
(up to 12 Mbd)/
RS422/485
–
–
1
–
–
1
OP7
Ambient conditions
PP
DP
DP-12
OP17
DP-12
PP
DP
DP-12
Operating temperature
– vertical installation
– horizontal installation
0 °C ... 50 °C
0 °C ... 35 °C
Transportation, storage
–25 °C ... 70 °C
Relative humidity
– operation
– transportation, storage
≤ 95% no dew
≤ 95%
Shock resistance
– operation
– transportation, storage
5 g/11 ms
25 g/6 ms
Vibration
– operation
0.075 mm(10 Hz ... 58 Hz)
1g
(58 Hz ... 500 Hz)
– transportation, storage
3.5 mm ( 5 Hz ... 12 Hz)
1g
(12 Hz ... 500 Hz)
Max. pressure difference
(front, rear)
2 hPa
Air pressure
– operation
– transportation, storage
Equipment Manual OP7, OP17
Release 04/99
706 ... 1030 hPa
581 ... 1030 hPa
C-3
OP7
imm nit
Noise immunity
EN 50082-1
PP
DP
OP17
DP-12
PP
DP
Static discharge
(contact discharge)
EN 61000-4-2 class 3
RF irradiation
ENV 50140 class 3
Pulse modulation
ENV 50204 (900 MHz $5 MHz)
RF conduction
ENV 50141 class 3
Burst interference
EN 61000-4-4 class 3
OP7
Emitted interference
RFI suppression level
in accordance with
EN 55011
C-4
PP
DP
DP-12
OP17
DP-12
PP
DP
DP-12
class A
Equipment Manual OP7, OP17
Release 04/99
D
Interface Assignment
Overview
Table D-1 shows the interface configuration of the different OPs. Entries D-2
to D-5 refer to the corresponding pin assignments in Tables D-2 to D-5.
Table D-1
Interface assignment OP7 and OP17
OP version
Interface
OP7
PP
OP7
DP
OP7
DP-12
OP17
PP
OP17
DP
OP17
DP-12
IF1A
D-2
D-2
D-2
D-2
D-2
D-2
IF1B
D-3
D-4
D-5
D-3
D-4
D-5
–
–
–
D-2
D-2
D-2
IF2
Table D-2
8
15
1
Pin assignment 15-pin sub-D socket
Pin
1
2
3
4
5
6
7
8
9
10
11
12
13
14
15
9
General
RS232
TTY
n.c.
RxD–
RxD
TxD
CTS
TxD+
TxD–
n.c.
RxD+
RTS
+20 mA1)
GND
+20 mA1)
+5 V
GND
1) Not with IF2
Equipment Manual OP7, OP17
Release 04/99
D-1
Table D-3
5
9
1
Pin
1
2
3
4
5
6
7
8
9
6
Table D-4
5
9
1
Table D-5
5
9
1
6
General
Pin
1
2
3
4
5
6
7
8
9
RS422
RS485
n.c.
(GND)1)
TxD (B)
RxD (B)
Data B
TxD (A)
RxD (A)
Data A
GND
+5 V
(P24-In)1)
Pin assignment 9-pin sub-D socket
Pin
1
2
3
4
5
6
7
8
9
6
Pin assignment 9-pin sub-D socket
General
PROFIBUS-DP
n.c.
(GND)1)
Data B
RTS2)
GND (floating)
+5 V (floating)
(P24-In)1)
Data A
RTS2)
Pin assignment 9-pin sub-D socket
General
PROFIBUS-DP
RS422
RS485
n.c.
(GND)1)
Data B
RTS2)
TxD (B)
RxD (B)2)
Data B
Data A
RTS2)
TxD (A)
RxD (A)2)
Data A
GND (floating)
+5 V (floating)
(P24-In)1)
1) Reserved for future use. From current-limited source < 1A only.
2) Can be switched by means of the DIP switch (for switch settings refer to
Section 14.2.3)
D-2
Equipment Manual OP7, OP17
Release 04/99
SIMATIC HMI Documentation
E
Target groups
This manual is part of the SIMATIC HMI documentation. The documentation
is aimed at the following target groups:
Newcomers
Users
Configurers
Programmers
Commissioning engineers
How the documentation is organized
The SIMATIC HMI documentation consists of the following components:
User’s Guides / User’s Manuals for:
– Configuration software
– Runtime software
– Communication between PLCs and operating units
Equipment Manuals for the following operating units:
– MP (Multi Panel)
– OP (Operator Panel)
– TP (Touch Panel)
– TD (Text Display)
– PP (Push Button Panel)
Online Help on the configuration software
Start–up Guides
First Steps
Overview of complete documentation
The following table provides an overview of the SIMATIC HMI documentation and shows you when you require the different documents.
Equipment Manual OP7, OP17
Release 04/99
E-1
Documentation
Target Group
Content
First Steps with ProTool
Newcomers
This documentation guides you step by step through the
configuration of
Product Brief
a screen with various objects
changing from one screen to another
a message.
This documentation is available for:
OP3, OP5, OP7, OP15, OP17
OP25, OP27, OP35, OP37, TP27, TP37
Windows-based systems
ProTool
Configuring
Windows-based Systems
Configurers
Provides information on working with the ProTool/Pro configuration software. It contains
information on installation
basic principles of configuration
a detailed description of configurable objects and func-
User’s Guide
tions.
This documentation is valid for Windows-based systems.
ProTool
Configuring
Graphics Displays
Configurers
Provides information on working with the ProTool configuration software. It contains
information on installation
basic principles of configuration
a detailed description of configurable objects and func-
User’s Guide
tions.
This documentation is valid for graphic display operating
units.
ProTool
Configuring
Text-based Displays
Configurers
Provides information on working with the ProTool/Lite configuration software. It contains
information on installation
basic principles of configuration
a detailed description of configurable objects and func-
User’s Guide
tions.
This documentation is valid for text-based display operating
units.
ProTool
Online Help
ProTool/Pro Runtime
User’s Guide
Configurers
Provides information on the configuration computer while
working with ProTool. Online Help contains
context-sensitive help
detailed instructions and examples
detailed information
all the information from the user guide.
Commissioning en- Provides information on working with ProTool/Pro Runtime
gineers,
software. It contains
Users
installation of the ProTool/Pro Runtime visualization
software
commissioning and running the software on
Windows-based systems.
Copy Protection
Start–up Guide
E-2
Commissioning en- The ProTool/Pro Runtime visualization software is a copygineers,
right product. This manual contains information on the installation, repair and uninstallation of authorizations.
Users
Equipment Manual OP7, OP17
Release 04/99
Documentation
Target Group
Content
Application Example
Newcomers
ProTool is supplied with example configurations and the
corresponding PLC programs. This documentation describes
how you
Start–up Guide
load the examplesonto the operating unit and PLC
run the examples and
upgrade the connection to the PLC to suit your own specific application.
MP270
Equipment Manual
Commissioning en- Describes the hardware and the general operation of Multi
gineers,
Panel MP270. It contains
Users
installation and commissioning instructions
a description of the equipment
operating instructions
instructions for connecting the PLC, printer and programming computer,
maintenance instructions.
OP37/Pro
Equipment Manual
Commissioning en- Describes the hardware, installation and inclusion of upgineers,
grades and options for the OP37/Pro.
Users
TP27, TP37
Equipment Manual
Commissioning en- Describes the hardware and general operation.
gineers,
It contains
Users
installation and commissioning instructions
OP27, OP37
Equipment Manual
OP25, OP35, OP45
Equipment Manual
OP7, OP17
Equipment Manual
OP5, OP15
Equipment Manual
Equipment Manual
PP7, PP17
connecting the PLC, printer and programming computer
operating modes
operation
description of the standard screens supplied with the operating unit and how to use them
fitting options
maintenance and fitting of spare parts.
TD17
Equipment Manual
OP3
operating unit description
Commissioning en- Describes the hardware of the OP3, its general operation and
gineers,
the connection to the SIMATIC S7.
Users,
Programmers
Equipment Manual
Commissioning en- Describes the hardware, installation and commissioning of
gineers,
push-button panels PP7 and PP17.
Users
Communication
Programmers
User’s Manual
Provides information on connecting text-based and graphics
displays to the following PLCs:
SIMATIC S5
SIMATIC S7
SIMATIC 500/505
drivers for other PLCs
This documentation describes the
configuration and parameters required for connecting the
devices to the PLC and the network
user data areas used for exchanging data between operationg unit and PLC.
Equipment Manual OP7, OP17
Release 04/99
E-3
Documentation
Target Group
Content
Communication for
Windows-based Systems
Programmers
Provides information on connecting Windows-based systems
to the following PLCs:
User’s Manual
SIMATIC S5
SIMATIC S7
SIMATIC 505
Allen Bradley PLC 5/SLC 500
This documentation describes the
configuration and parameters required for connecting
devices to the PLC and the network
user data areas used for exchanging data between operating unit and PLC.
Other PLCs
Programmers
Online Help
Provides information on connecting devices to PLCs, such
as:
Mitsubishi
Allen Bradley
Telemecanique
Modicon
Omron
SIMATIC WinAC
When the drives are installed, the relevant Online Help is
installed at the same time.
ProAgent for OP
User’s Manual
Configurers
Provides the following information about the ProAgent optional package (process diagnosis) for OPs
configuring system-specific process diagnosis
detecting, locating the cause of and eliminating process
errors,
customizing standard diagnostic screens supplied with
the software.
E-4
Equipment Manual OP7, OP17
Release 04/99
F
Siemens Worldwide
In this Appendix
In this appendix you will find a list of:
All cities in the Federal Republic of Germany with Siemens Sales Offices
and
All European and non-European Siemens Companies and Representatives
Siemens Sales
Offices in the
Federal Republic
of Germany
The following table lists all Siemens Sales Offices in the Federal Republic of
Germany.
Aachen
Kassel
Augsburg
Kempten/Allg.
Bayreuth
Kiel
Berlin
Laatzen
Bielefeld
Leipzig
Bonn
Lingen
Bremen
Magdeburg
Brunswick
Mainz
Chemnitz
Mannheim
Coblenz
Munich
Cologne
Münster/Westf.
Constance
Nuremberg
Darmstadt
Osnabrück
Dortmund
Regensburg
Dresden
Rostock
Duisburg
Saarbrücken
Düsseldorf
Siegen
Erfurt
Stuttgart
Essen
Ulm
Frankfurt am Main
Wetzlar
Freiburg
Wilhelmshaven
Hamburg
Wuppertal
Heilbronn
Würzburg
Karlsruhe
Equipment Manual OP7, OP17
Release 04/99
F-1
European
Companies and
Representatives
The following table lists all European Siemens Companies and
Representatives.
Austria
Finland
Siemens AG Österreich
Siemens Oy
Bregenz
Espoo, Helsinki
Graz
France
Innsbruck
Siemens S.A.
Linz
Siemens N. V.
Antwerp
Great Britain
Bosnia-Herzegovina
Siemens plc
Salzburg
Vienna
Belgium
Siemens S.A.
Brussels
Liège
Generalexport Predstavnistvo Sarajevo
Sarajevo
Bulgaria
Siemens AG, Bulgaria Representative
Sofia
Croatia
Siemens d. o. o.
Zagreb
Cyprus
GEVO Ltd.
or
Jolali Ltd.
Nicosia
Czech Republic
Siemens AG
Haguenau
Lille, Seclin
Lyon, Caluire-et-Cuire
Marseille
Metz
Paris, Saint-Denis
Strasbourg
Toulouse
Birmingham, Walsall
Bristol, Clevedon
Congleton
Edinburgh
Glasgow
Leeds
Liverpool
London, Sunbury-on-Thames
Manchester
Newcastle
Greece
Siemens A.E.
Athens, Amaroussio
Thessaloniki
Hungaria
Brno
Mladá Boleslav
Prague
Siemens Kft
Denmark
Reykjavik
Siemens A/S
Copenhagen, Ballerup
Budapest
Iceland
Smith & Norland H/F
Ireland
Siemens Ltd.
Dublin
F-2
Equipment Manual OP7, OP17
Release 04/99
Italy
Romania
Siemens S.p.A.
Siemens birou de consultatii tehnice
Bari
Bukarest
Bologna
Russia
Brescia
Siemens AG
Casoria
or
Florence
Mosmatic
Genoa
Moscow
Milan
Siemens AG
Padua
Ekaterinburg
Rome
Turin
Luxemburg
Siemens S.A.
Luxemburg
Malta
J. R. Darmanin & Co. Ltd.
Valletta
Netherlands
Siemens Nederland N.V.
The Hague
Rijswijk
Norway
Siemens A/S
Bergen
Oslo
Stavanger
Trondheim
Poland
Siemens GmbH
Gdansk-Letnica
Katowice
Warsaw
Portugal
Siemens S.A.
Slovak Republic
Siemens AG
Bratislava
Slovenia
Siemens d. o. o.
Ljubljana
Spain
Siemens S.A.
Barcelona
Bilbao
Gijón
Granada
La Coruña
Las Palmas de Gran Canaria
León
Madrid
Málaga
Murcia
Palma de Mallorca
Pamplona
Sevilla
Valencia
Valladolid
Vigo
Zaragoza
Albufeira
Sweden
Coímbra
Siemens AB
Lisbon, Amadora
Matosinhos
Porto
Equipment Manual OP7, OP17
Release 04/99
Göteborg
Jönköping
Malmö
Sundsvall
Upplands Väsby, Stockholm
F-3
Switzerland
Turkey
Siemens-Albis AG
SIMKO
Basel
Bern
Zürich
Siemens-Albis S.A.
Renens, Lausanne
Adana
Ankara
Bursa
Istanbul
Izmir
Samsun
Ukraine
Siemens AG
Kiev
Non-European
Companies and
Representatives
The following table lists all non-European Siemens Companies and
Representatives of Siemens AG.
Africa
The following table lists all Siemens Companies and Representatives of
Siemens AG in Africa.
Algeria
Morocco
Siemens Bureau d’Alger
SETEL
Alger
Société Electrotechnique et de Télécommunications S.A.
Angola
Casablanca
TECNIDATA
Mozambique
Luanda
Siemens Liaison Office
Bophuthatswana
Maputo
Siemens Ltd.
Namibia
Mafekeng
Siemens (Pty.) Ltd.
Egypt
Windhoek
Siemens Technical Office
Nigeria
Cairo-Mohandessin
Electro Technologies Nigeria Ltd. (ELTEC)
Siemens Technical Office
Lagos
Alexandria
EGEMAC S.A.E.
Cairo-Mattaria
Rwanda
Etablissement Rwandais
Kigali
Ethiopia
Sambia
Addis Electrical Engineering Ltd.
Electrical Maintenance Lusaka Ltd.
Addis Abeba
Lusaka
Ivory Coast
Simbabwe
Siemens AG
Electro Technologies Corporation (Pvt.) Ltd. (ETC)
Abidjan
Harare
Libya
Siemens AG, Branch Libya
Tripoli
F-4
Equipment Manual OP7, OP17
Release 04/99
South Africa
Swaziland
Siemens Ltd.
Siemens (Pty.) Ltd.
Cape Town
Mbabane
Durban
Tanzania
Johannesburg
Tanzania Electrical Services Ltd.
Middelburg
Dar-es-Salaam
Newcastle
Tunesia
Port Elizabeth
Sitelec S.A.
Pretoria
Tunis
Sudan
Zaire
National Electrical & Commercial Company (NECC)
Khartoum
America
SOFAMATEL S.P.R.L.
Kinshasa
The following table lists all Siemens Companies and Representatives of
Siemens AG in America.
Argentina
Canada
Siemens S.A.
Siemens Electric Ltd.
Buenos Aires
Montreal, Québec
Toronto
Còrdoba
Chile
Mendoza
INGELSAC
Rosario
Santiago de Chile
Bahía Blanca
Bolivia
Colombia
Sociedad Comercial é Industrial Hansa Ltda.
Siemens S.A.
La Paz
Belém
Belo Horizonte
Costa Rica
Brasilia
Siemens S.A.
Campinas
Panama
San José
Brazil
Siemens S.A.
Curitiba
Fortaleza
Pôrto Alegre
Recife
Rio de Janeiro
Salvador de Bahia
São Paulo
Vitória
Equipment Manual OP7, OP17
Release 04/99
Barranquilla
Bogotá
Cali
Medellín
Cuba
Respresentación
Consult iva EUMEDA
La Habana
Ecuador
Siemens S.A.
Quito
F-5
El Salvador
Paraguay
Siemens S.A.
Rieder & Cia. S.A.C.I.
San Salvador
Asunción
Guatemala
Peru
Siemens S.A.
Siemsa
Ciudad de Guatemala
Lima
Honduras
United States of America
Representaciones Electroindustriales S de R.L. Relectro
Siemens Industrial Automation Inc.
Tegucigalpa
Automation Division
Alpharetta, GA
Mexico
Numeric Motion Control
Siemens S.A. de CV
Elk Grove Village, Illinois
Culiacán
Uruguay
Gómez Palacio
Conatel S.A.
Guadalajara
Montevideo
León
Venezuela
México, D.F.
Monterrey
Puebla
Nicaragua
Siemens S.A.
Caracas
Valencia
Siemens S.A.
Managua
Asia
The following table lists all Siemens Companies and Representatives of
Siemens AG in Asia.
Bahrain
India
Transitec Gulf
Siemens Limited
Manama
Bangladesh
Siemens Bangladesh Ltd.
Dhaka
Brunei
Brunei Darussalam
Hong Kong
Siemens Ltd.
Hong Kong
Ahmedabad
Bangalore
Bombay
Calcutta
Madras
New Delhi
Secúnderabad
Indonesia
P.T. Siemens Indonesia, P.T. Siemens Dian-Grana
Elektrika, Representative Siemens AG
Jakarta
F-6
Equipment Manual OP7, OP17
Release 04/99
Iraq
People’s Republic of China
Samhiry Bros. Co. Limited
Siemens AG Representation
or
Baghdad
Beijing
Guangzhou
Shanghai
Iran
Philippine Islands
Siemens S.S.K.
Maschinen & Technik Inc. (MATEC)
Teheran
Manila
Japan
Qatar
Siemens K.K.
Trags Electrical Engineering and Air Conditioning Co.
Tokyo
Doha
Korea
Saudi Arabia
Siemens Ltd.
Arabia Electric Ltd. (Equipment)
Changwon
Seoul
Ulsan
Al-Khobar
Jeddah
Riyadh
Kuwait
Singapore
National & German Electrical and Electronic Services
Co. (NGEECO)
Siemens (Pte.) Ltd.
Siemens AG (Iraq Branch)
Kuwait, Arabia
Singapore
Sri Lanka
Lebanon
Dimo Limited
Ets. F.A. Kettaneh S.A.
Colombo
Beirut
Syria
Malaysia
Siemens AG, Branch (A.S.T.E.)
Siemens Electrical Engineering Sdn. Bhd.
Damascus
Kuala Lumpur
Taiwan
Nepal
Siemens Ltd., TELEUNION Engineering Ltd.
Amatya Enterprises (Pvt.) Ltd.
or
Kathmandu
TAI Engineering Co., Ltd.
Waleed Associates
Taichung
Taipei
Muscat
Thailand
Pakistan
Berti Jucker Co. Ltd.
Siemens Pakistan Engineering Co., Ltd.
Bangkok
Oman
Islamabad
Karachi
Lahore
Peshawar
Quetta
Equipment Manual OP7, OP17
Release 04/99
F-7
United Arab Emirates
Vietnam
Electro Mechanical Co.
OAV Representative Office
or
Hanoi
Siemens Resident Engineers
Yemen (Arab. Republic)
Abu Dhabi
Tihama Tractors & Engineering Co., Ltd.
Scientechnic
or
or
Siemens Resident Engineers
Siemens Resident Engineers
Sanaa
Dubai
Australia
The following table lists all Siemens Companies and Representatives of
Siemens AG in Australia
Australia
New Zealand
Siemens Ltd.
Siemens Ltd.
Auckland
Wellington
F-8
Adelaide
Brisbane
Melbourne
Perth
Sydney
Equipment Manual OP7, OP17
Release 04/99
Glossary
A
Alarm message
Draws attention to particularly urgent operating states; alarm messages have
to be acknowledged for this reason.
Area pointer
Required for enabling data transfer between the OP and the PLC. It contains
details of the location and size of data areas in the PLC.
Arrival of a
message
The time at which a message is initiated by the PLC or OP.
C
Configuration
Definition of system-specific basic settings, messages and screens using
ProTool configuration software.
D
Departure of a
message
The time at which a message is withdrawn by the Programmable Logic PLC
Display function
Function resulting in the contents of the display being changed – for example, ”Display message level”, ”Display alarm buffer” and ”Display screen”.
Download mode
Operating mode of the OP in which data are transferred from the Programming Unit to the OP.
Duration of display
Time between the arrival of an event message and its departure.
Equipment Manual OP7, OP17
Release 04/99
Glossary-1
E
Event message
Draws attention to specific operating states in the machine or system
connected to the PLC.
F
Fault time
The time between the arrival and departure of an alarm message.
Flash memory
Programmable memory which can be deleted quickly and then re-written.
Field
”Placeholder” in configured or permanent text, used to output and/or input
certain values.
Forced printout
Automatic printouts of alarm or event messages that are deleted upon a
buffer overflow.
H
Hardcopy
Output of display contents to an attached printer.
Help text
Additional, configurable information about messages, screens, screen entries
and selection fields.
L
Loop-through
mode
Operating mode of OP17. Includes normal operation and also permits communication between the PU or PC and the PLC through the second interface
of the OP17. This operating mode is possible only when the interface to the
PLC is established by means of the AS511 protocol.
M
Message level
Glossary-2
OP control level at which initiated messages are displayed.
Equipment Manual OP7, OP17
Release 04/99
Message logging
Configurable printout of alarm and event messages concurrently with output
on display.
N
Normal mode
OP operating mode in which messages are displayed and screens can be
manipulated.
O
Output field
Field for displaying an actual value.
P
Password
Password level
To use a protected function, it is necessary to enter a Password identifying a
given password level. A password level defines the permissions of an operator. The requisite password level is preset by means of configuration and can
range from 1 (the lowest level) to 9 (the highest level).
PLC job
Initiation of a function by the PLC.
S
Screen
Form of display for associated process data, which can be shown together on
the OP and modified individually.
Screen entry
Element of a screen; consists of text, tags and soft keys.
Screen level
Editing level of the OP at which screens can be viewed and manipulated.
Selection field
Field for setting values of parameters (one of several defined values can be
selected).
Soft key
Key that can be assigned with different functions (depending on displayed
screen entry).
Equipment Manual OP7, OP17
Release 04/99
Glossary-3
Startup test
Check on the status of the central processing unit and memories each time
the supply voltage is applied.
System message
Draws attention to internal conditions on the OP and the PLC.
Glossary-4
Equipment Manual OP7, OP17
Release 04/99
Index
A
Access, 6-1
Access protection, 6-1
ACK key, 3-3, 4-2
ACK-LED, 4-2
Acknowledge key, 3-3, 4-2
Acknowledging, alarm messages, 4-2, 7-4
Acknowledgment area, 13-2
Acknowledgment groups, 7-4
Activating
message logging, 7-14
overflow warning, 7-12
Additional information, 1-4
Address, MPI/PPI, 9-1
Address list, 15-2
Adjust report, 2-3
Adjusting, contrast, 3-5
AEG/Modicon, 2-3
Air pressure, C-3
Alarm buffer, 7-3
Alarm message buffer
deleting, 7-12
printing, 12-2
Alarm message text, view, 7-9
Alarm messages, 1-4, 4-3, 7-2
acknowledging, 4-2, 7-4
delete, A-1
deleting, 7-13
display, 4-2
display text, A-1
forced printout, 7-12
max. length, 2-1
max. number, 2-1
number, A-1
overflow, A-1
print, A-1
scrolling, 7-8
suppressing, 7-4
unacknowledged, 4-2
view, A-1
Allen–Bradley, 2-3
Alphanumeric input, example, 3-10
Alphanumeric value input, 3-6, 3-8
Ambient conditions, C-3
Equipment Manual OP7, OP17
Release 04/99
Arrived message, 7-4
Arrow keys, 3-4, 5-3
AS511
connection, 16-2, 16-4
report, 2-3
Assigning, password, 6-5
Assigning the, password level, 11-2
Assignment
global, 11-1
local, 11-1
soft key, 5-2
Automatic login, on OP, 6-3
Automatic printout, 7-12
B
Back-lightning, 1-7, 1-9
Backup battery, 1-9, C-2
upgrading, OP17, 16-8
Back-up time, 10-3
Backup time, 1-7, 1-9, 7-10
Basic functions, 1-3
Basic operations, 4-3
Basic screen, 4-3, 4-5
Battery, upgrading, OP17, 16-8
Branch
in standard screens, 4-5
with soft keys, 11-1
Branch backward, 3-4
Branching, with softkeys, 4-5
Brightness, 10-4
Buffer overflow, 7-12, 7-13
alarm messages, 7-12
event messages, 7-12
Bus Fault LED, 15-8
C
Cable cross-section, 14-4
Calling, help text, 3-14
Cancel, 3-4
help text display, 3-4
transfer mode, 3-4, 15-3
Index-1
Canceling, download mode, 15-4
Capacity, backup battery, C-2
Category, System message, B-1
Causes, System message, B-2
Change of operating level, 4-2
Change over, RTS signal, 14-7
Changing
configuration, 15-4
data record, 8-3
lines, 9-4
memory addresses, 15-2
operating level, 4-5
screen hierarchy, 11-3
Character, delete, 3-3
Character height, 1-7, 1-9
Character set, 1-5
extended, 3-5, 3-8
Characters
move, 3-3
per line, 1-7, 1-9, C-1
Characters A–F, input, 3-8
Characters per line, 10-2
Chassis ground, 14-4
Choice, of screens, 5-3
Chronological, 7-15
Cleaning, keyboard and display, 16-9
Color, LED, 13-1
Colored LEDs, 1-9
Combinations, keys, 3-5
Combined I/O fields, 5-2
Combined message display, 7-8
Commissioning, 14-1, 15-1
Communication
OP/PLC, 13-1
testing, online, 15-8
Communication modes, 2-3
Communication options
OP17, 16-4
OP7, 16-2
Compatibility, 1-7, 1-9
Components
screen, 5-1
screen entry, 5-2
Components of a recipe, 8-2
Computer, connecting, 1-7, 1-9
Configurable languages, 2-2
Index-2
Configuration, 1-1
changing, 15-4
computer, 14-5, 14-6, 14-8
deleting, 15-4
download, 15-3, 15-4
IF 1B interface, 14-7
interfaces, D-1
loading, 4-1, 15-3
replacing, 15-4
testing, 15-6, 15-7
Configuration computer, 15-3, 15-4
Configuration phase, 1-1
Configuration software, 1-1
Configuring, password, 6-5
Connecting, 14-5
configuration computer, 14-5
PC or PG, 16-4
PC/PU, 16-2
power supply, 14-4
printer, 16-2
Connection
attaching a printer, 14-9
printer, 16-4
Connection configuration scheme, 14-5, 14-6,
14-9
Connection elements
OP17, 16-4, D-1
OP7, 16-2, D-1
Connection types, 14-6
OP17, 16-4
OP7, 16-2
Connections, electrical, 14-3
Connector, computer, 14-5, 14-6, 14-8
Connectors
OP17, 16-4, D-1
OP7, 16-2, D-1
Continuous current, C-2
Contrast, adjust, 3-5
Control, functions, 1-3
Control of the OP, via keyboard, 3-1
Control value, 1-3
Controlling, processes, 1-3
Controlling the OP, from the PLC, 13-1
Correcting, input, 3-9
Correcting an input, 3-9
Equipment Manual OP7, OP17
Release 04/99
Creating
data records, 8-3
labeling strips, 16-6
screen hierarchy, 11-3
Creating an, LED image, 13-1
Creating data areas, 1-1
Critical machine state, 1-4
Cross-jump destination, 3-4, 5-1
Cross-jumps, 11-3
Cross-section, connection cables, 14-4
Cursor, 5-2
Customizing, screen hierarchy, 11-3
Cutting, labeling strips, 16-6
Cyrillic characters, 1-5
D
Data areas, 13-1
Data buffer, 1-7, 1-9
Data record, 1-4, 8-1
changing, 8-3
printing, 8-3, 12-2
processing, 8-3
transferring, 8-3
Data record name, 8-2, 8-9
Data records, 1-4, 4-3, 8-2
copying, 8-6
transferring, 8-7
creating, editing, 8-4
directory, deleting, 8-10
printing, 8-3, 12-2
storing, 8-5
Data structure, 8-1
Data updating, 2-3
Date, 10-3, 13-2, A-2
Deactivating
message logging, 7-14
overflow warning, 7-12
Decimal point, 3-12
Decimals, 3-7
Default setting, Supervisor password, 6-2
Degree of protection, C-1
Delete
alarm messages, A-1
character, 3-3
event messages, A-1
system message buffer, 7-13
Delete key, 3-3
Delete mode, 3-3
Equipment Manual OP7, OP17
Release 04/99
Deleting
alarm message, 7-13
alarm message buffer, 7-12
configuration, 15-4
data record, 8-3
event message, 7-13
event message buffer, 7-12
password, 6-6
Departed message, 7-4
Depth, housing, C-1
Design
EMC, 14-3
OP17, 1-8
OP7, 1-6
Design guidelines, 14-3
Device description, 16-1
DF1 report, 2-3
Digits to the right of the decimal point, 3-12
Dimensions
labeling strips, 16-6
OP17, 16-3, C-1
OP7, 16-1, C-1
DIP switch, IF 1B interface, 14-7
Direct adjustment, display contrast, 10-4
Direct message logging, 7-14
Directory, 5-1
recipes, 1-4
screens, 1-3, 5-3
Discharge degree, of backup battery, 16-8
Display
adjust contrast, 3-5
adjusting contrast, 10-4
alarm message, 4-2
messages, 7-7
priorities, 7-7, 7-8
type, C-1
Display first message, 10-3
Display functions, 1-3
Display last message, 10-3
Display priority, 1-4, 7-6
Display sequences, 7-8
Display time, 7-6
Displaying
password list, 6-4
screen entry, 5-2
standby message, 15-3, 15-4
start screen, 15-3, 15-4
Displaying first message, 7-7
Displaying last message, 7-7
Index-3
Disposal, battery, 16-9
Document associated reference, 1-2
Documentation, E-1
Download mode, 4-1, 10-5, 15-3, 15-5
canceling, 15-4
Downloading
configuration, 15-3
firmware, 15-3
Drivers, for additional PLCs, 2-3
Driving
LED, 13-1
LEDs, 11-2
E
Edit, screen, 5-4, A-1
Edit password, 4-3
Editing, data record, 8-3
Electrical Connections, 14-3
Electrical Installation, 14-3
Electronic fuse, 1-7, 1-9
EMC, design, 14-3
Emission, radio interference, C-4
Emitted interference, C-4
Enter key, 3-3, 4-2
Entering
alphanumeric value, 3-6, 3-8
numerical value, 3-6, 3-7
password, 4-6, 6-1, 6-3
special characters, 3-8
symbolic values, 3-6
timer value, 3-13
timer values, 3-6, 3-12
Entering digits, 3-8
Entering letters, 3-8
Entering values, 9-4
alphanumeric, 3-6, 3-8
numerical, 3-6, 3-7
symbolic, 3-6
timer, 3-6, 3-12
Entry text, 5-2
EPROM failure, B-1
Error handling, B-2
Error messages, Memory, B-1
Errors, internal, B-2
ESC key, 3-4, 4-1, 4-2
Escape key, 3-4, 4-1, 4-2
Evaluation of screen number , 13-1
Event buffer, 7-3
Event message buffer
deleting, 7-12
printing, 12-2
Index-4
Event message text, view, 7-9
Event messages, 1-3, 4-3, 7-2
delete, A-1
deleting, 7-13
display text, A-1
max. length, 2-1
max. number, 2-1
number, A-1
overflow, A-1
print, A-1
scrolling, 7-8
view, A-1
Events, 7-3
indicating, 7-1
Example
alphanumeric input, 3-10
labeling strips, 16-6
recipe, 8-1
scrolling through messages, 7-9
Explanations, screen entry, 5-2
Extended character set, 3-5, 3-8
External PLC, connection, 16-2, 16-4
F
FAP, 2-3
FAP connection, 16-2, 16-4
Fault description, 14-1
Fault diagnosis, 15-4
Fault on the, OP, 14-1
Field inputs, canceling, 3-4
Fields, 5-2
date, 5-2
I/O fields , 5-2
numerical, 3-7
PLC actual value, 5-2
PLC setpoint, 5-2
time, 5-2
timer, 3-12
File, labeling strips, 16-7
Firmware, 7-3
loading, 15-3
Flash memory, C-1
Flash memory failure, B-1
Flashing, LED, 13-1
Flashing cursor, 5-2
Flashing display, 7-2
alarm messages, 1-4
Foil, labeling strips, 16-6
Font size, C-1
Force tag, 4-3
FORCE VAR, 9-1, A-2
Equipment Manual OP7, OP17
Release 04/99
Forced printout, 7-12, 7-14
Foreign languages, 1-5
Front panel cutout
OP17, 16-3
OP7, 16-1
Front view
OP17, 16-3
OP7, 16-1
Full printout, 7-14
Function keyboard
OP17, 1-9
OP7, 1-7
Function keyboard image, 13-2
Function keys, 3-1, 5-3, 11-1, C-2
global, 3-2
labeling, 16-5
LED, 11-2
local, 3-2
number, 2-2
Functionality, 2-1
overview, 2-1
Functions
calling, 4-6
data records, 8-3
keys, 3-3
of the OP, 2-1
Fuse, 1-7, 1-9, C-2
Fusing, C-2
FX report, 2-3
G
Global assignment, 11-1
Global function assignment, 3-2
Global function key, 3-2
Glossary, Glossary-1
Guidelines, interference immunity, 14-3
H
Hardware clock, safeguarding, 16-8
HELP key, 1-4
Help LED, 3-3, 3-14
Help text, 1-4, 2-2, 3-14
calling, 3-14
scrolling, 3-14
Help text LED, 3-3
Hiding
system message, 3-4
system messages, 4-2
Equipment Manual OP7, OP17
Release 04/99
Housing, C-1
Humidity, C-3
I
I/O fields, 5-2
Identification of recipes, 8-2
IF 1B interface
configuring, 14-7
switch, 14-7
Image, LED, 13-1
Incorrect input, canceling, 3-6
Index, password, 6-5
Indicating, events and states, 7-1
Information, asigning soft keys, 5-2
Initial commissioning, 15-1, 15-3
Initialization, 15-5
Initiating, messages, 7-2
Input
canceling, 3-4
characters A – F, 3-8
confirming, 3-3
left-aligned, 3-9
left-justified, 3-7
mixed, 3-8
right-aligned, 3-12
right-justified, 3-7
symbolic values, 3-11
Input field for timer, 3-12
Input fields, 5-2
Insert, space, 3-3
Insert key, 3-3
Insert mode, 3-3
Inserting
labeling strips, 16-5
lines, 9-4
Inserting a space, 3-3
Installation, 14-1, 14-2
electrical, 14-3
mechanical, 14-2
Installing
battery, 16-8
OP, 14-2
Integrated keyboard, 3-1
Interface
PLC/computer, 1-7, 1-9
printer, 1-7, 1-9
Interface assignment, D-1
Interface parameters, 4-3
modify, 10-2
Index-5
Interfaces, C-3
IF 1B, 14-7
MPI, 16-2, 16-4
OP17, 1-9, 16-4
OP7, 1-7, 16-2
PPI, 16-2, 16-4
RS232, 1-7, 1-9
RS422, 1-7, 1-9
RS485, 1-7, 1-9
TTY, 1-7, 1-9
Internal errors, B-2
Interruption, power supply, 16-8
Interval, updating values, 5-2
K
Key
ACK, 4-2
Acknowledge, 3-3
confirm input, 3-3
contrast adjustment, 3-5
Delete, 3-3
Enter, 3-3, 4-2
ESC, 4-1, 4-2
Escape, 3-4
HELP, 1-4
Insert, 3-3
second function, 3-3
Shift, 3-3
Key assignment, system keys, 3-2
Key combinations, 3-5
overall reset, 15-4
Key functions, 3-3
Keyboard, 3-1, C-2
integrated, 3-1
Keyboard overlay, 16-6
Keys
arrow keys, 3-4
system keys, 3-2
L
Labeling, function keys, 16-5
Labeling example, function keys, 16-6
Labeling strips, 16-5
Language, A-2
Language changing, 4-3
Language selection, 10-1
Languages, 1-5
Index-6
LCD
OP17, 1-9
OP7, 1-7
Technical Data, C-1
LED, 1-4, 11-2
ACK, 4-2
acknowledgment, 3-3
alarm message, unacknowledged, 4-2
Bus Fault, 15-8
color, 13-1
driving, 11-2, 13-1
Help, 3-3
help text, 3-3
Shift, 3-3
state, 13-1
LED control, 13-1
LED image, 13-1
LEDs, 1-9
number, C-2
Left-aligned input, 3-9
Left-justified input, 3-7
Length, message, 7-8
Lifetime, backup battery, 16-8
Limit, 3-12
Limit check, 3-12
Limit value, 3-7
Limit-value check, 3-7
Lines
inserting, 9-4
number, 1-7, 1-9, C-1
Lines per page, 10-2
Linking screens, 4-1, 11-3
List
languages, 10-1
passwords, 6-4
symbolic, scrolling, 3-5
System messages, B-1
List of options, 3-11
Literature, E-1
Lithium battery, 1-9, C-2
Loadable enhanced drivers, 2-3
Loading
configuration, 4-1, 15-3
firmware, 15-3
Local assignment, 11-1
Local function assignment, 3-2
Log, messages, 7-1
Logging, upon overflow, 7-12
Logging in, 6-3
Logging out, 6-3
Equipment Manual OP7, OP17
Release 04/99
Login, 4-3, 6-3, A-2
Logo, 7-3
Logout, 4-3, 6-3, A-2
Loop-through mode, 10-5, 14-8, 15-7
constraints, 14-8
particularities, 14-8
M
Machine diagnostics, 1-1
Machine functions, 3-2
Machine state, 1-3, 1-4
Maintenance, 16-9
Making, labeling strips, 16-6
Mechanical installation, 14-2
Memory, C-1
Message
arrived, 7-4
chronological, 7-15
departed, 7-4
display priority, 7-8
together, 7-15
Message bit procedure, 7-4
Message buffer, 7-3
print, 7-15
viewing, 7-10
Message buffers, 7-1, 7-10
Message display, 10-3
separate, 7-8
together, 7-8
Message length, 7-8
Message level, 3-3, 4-1
Message log, 7-14, 10-2
Message number, B-1
Message priorities, 7-7
Message states, 7-1
Message text, 7-9
Message types, 7-1
Messages, 7-1
alarm messages, 7-2
delete, 7-12
displaying, 7-7
event messages, 7-2
first, 7-7
last, 7-7
number of alarm messages, 7-11
number of event messages, 7-11
print, 7-14
scroll (message level), 7-8
system messages, 7-6
Mitsubishi, 2-3
Mixed input, 3-8
Equipment Manual OP7, OP17
Release 04/99
Mixing station, 8-1
Mixture, recipe, 8-1
Modbus report, 2-3
Mode, 4-3
Loop-through, 10-5
Offline, 10-5
Modes, 10-5
Modify
interface parameters, 10-2
screen, 5-4
Modify settings, 4-3
Modifying parameters, 10-2
Modifying printer parameters, 10-2
Moisture, 14-1
Moisture condensation, 14-1
Mounting conditions, 14-1
Mounting cutout, 14-1, C-1
OP17, 16-3
OP7, 16-1
Mounting depth, C-1
Mounting dimensions
OP17, 16-3
OP7, 16-1
Mounting location, 14-1
Move, characters, 3-3
Moving, screen segment, 4-6
MPI
address, 9-1
connection, 16-2, 16-4
report, 2-3
Multilinguality, 1-5
N
NATIVE drivers, 2-3
NITP report, 2-3
Noise immunity, C-4
Non-serious system messages, 7-6
Normal operation, 15-1
Notes to operators, 7-2
Number
alarm messages, A-1
event messages, A-1
messages in alarm message buffer, 7-11
messages in event message buffer, 7-11
Numeric keypad, 3-7, 3-12
Numerical field, 3-7
Numerical value input, 3-6, 3-7
Index-7
O
Offline, 10-5, 15-6
Online mode, 10-5
OP
functions, overview, 2-1
installing, 14-2
start-up, 4-1
OP modes, A-2
OP17
connection elements, 16-4
description, 16-3
design, 1-8
function keyboard, 1-9
interface assignment, D-1
interfaces, 1-9
LCD , 1-9
soft keys, 1-9
system keyboard, 1-9
versions, 1-8
OP5 compatibility, 1-7
OP7
connection elements, 16-2
description, 16-1
design, 1-6
function keyboard, 1-7
interface assignment, D-1
interfaces, 1-7
LCD , 1-7
soft keys, 1-7
system keyboard, 1-7
versions, 1-6
Operand list, 9-2
Operand value
displaying, 9-1
modifying, 9-1
Operating data, saving, 16-8
Operating level
changing, by key, 4-2
forced change, 4-2
Operating levels, 4-1
Operating mode, download, 15-3
Operating modes, A-2
Operating temperature, C-3
Operator control and monitoring, 4-5, 5-1
Operator guidance, 5-3
Operator instructions, 1-4
Operator prompting, process-dependent, 11-1
Other PLCs, connection, 16-2, 16-4
Output field, 5-2
Overall dimensions, OP7, OP17, C-1
Overall reset, 3-5, 15-4
Index-8
Overflow
alarm messages, A-1
event messages, A-1
message buffer, 7-12
Overflow warning, 7-3, 7-12
message buffer, 7-12
Overheating, prevention, 14-1
P
Panel, 14-1
Password
changing, 6-6
deleting, 6-6
edit, A-2
entry, 4-6
hierarchy, 6-1
Password index, 6-5
Password level, 4-6, A-1
assigning, 11-2
changing, 6-6
Password levels, 6-1
Password list, displaying, 6-4
Password management, A-2
Password protection, 6-1
PC, 15-3, 15-4
PC or PU, connecting, 16-4
PC/PU, connecting, 16-2
Plan view
OP17, 16-3
OP7, 16-1
PLC
Allen–Bradley, 2-3
AEG/Modicon, 2-3
SIMATIC 500/505, 2-3
SIMATIC M7, 2-3
SIMATIC S5, 2-3
SIMATIC S7, 2-3
Telemecanique, 2-3
PLC actual value, 5-2
PLC job, 5-3, 10-5
PLC jobs, 13-1
PLC operands, 4-3
PLC setpoint, 5-2
PLCs
connecting, 1-7, 1-9
for use with
OP17, 16-4
OP7, 16-2
Pocket calculator format, 3-7, 3-12
Polarity reversal, battery connector, 16-8
Equipment Manual OP7, OP17
Release 04/99
Polarity reversal protection, 14-3
Power input, C-2
Power supply, 14-4
backup battery, 16-8
connecting, 14-4
PPI
address, 9-1
connection, 16-2, 16-4
report, 2-3
Pressure difference, C-3
Print
alarm message buffer, 12-2
alarm messages, A-1
data record, 12-2
event message buffer, 12-2
event messages, A-1
message buffer, 7-15
messages, 7-14
screens, 5-4, 12-2, A-1
Print functions, 14-8, 14-9
Print time, 7-14
Printer
attaching, 1-7, 1-9
attaching a printer, 14-9
connecting, 16-2
connection, 16-4
set parameters, A-2
settings, 14-10
Printer parameters, 4-3
Printing
automatic printout, 7-12
data record, 8-3
forced printout, 7-12
Printout, 1-4
upon overflow, 7-12
Priorities, display, 7-8
Priority
display priority, 7-7
message display, 1-4
message priority, 1-4
Process, operator control and monitoring, 4-5
Process control phase, 1-1
Process state, 1-3
Process values, 1-3, 1-4
viewing, 4-1
Process-dependent operator prompting, 11-1
Processing, data record, 8-3
Product description, 1-1
PROFIBUS-DP, 2-3, 16-2, 16-4
testing communication, 15-8
Programming unit, 15-3, 15-4
Prompting, process-dependent, 11-1
Equipment Manual OP7, OP17
Release 04/99
Protection
against unauthorized access, 4-6
against unauthorized operation, 6-1
ProTool, 1-1
PU, 15-3, 15-4
PU function, 4-3
PU functions, 9-1
FORCE VAR, A-2
STATUS VAR, A-2
Q
Queued messages, 7-11
R
RAM failure, B-1
Rated voltage, C-2
Recipe directory, 8-3
Recipe title, 8-2
Recipes, 1-4, 2-2, 8-1
example, 8-1
Recommissioning, 15-1, 15-4
Relative humidity, C-3
Remaining buffer space, 7-3
Remedies, System message, B-2
Repeat function, 3-4
Replacing, configuration, 15-4
Replacing labeling strips, 16-5
Report
Adjust, 2-3
AS 511, 2-3
DF1, 2-3
FAP, 2-3
FX, 2-3
Modbus, 2-3
MPI, 2-3
NITP, 2-3
PPI, 2-3
PROFIBUS-DP, 2-3
Uni-Telway, 2-3
Reserve power, hardware clock, 1-9
Returning the OP, 14-1
RF, conduction, C-4
RF conduction, C-4
RFI suppression level, C-4
Right-aligned input, 3-12
Right-justified input, 3-7
Room temperature, 14-1
Index-9
RS232
connection, 16-2, 16-4
interface, 1-7, 1-9
RS422
connection, 16-2, 16-4
interface, 1-7, 1-9
RS485
connection, 16-2, 16-4
Interface, 1-7
interface, 1-9
RTS signal, changing over, 14-7
S
Safeguarding
operating data, 16-8
time, 16-8
Schedule times, 2-2
Scheduler, definition, 1-5
Schedulers, 12-1
acitvated, 12-2
changed, 12-2
deactivated, 12-2
functions, 12-2
time, 12-2
Schedulers time, 1-5, 12-1
Screen, printing, 12-2
Screen components, 5-1
Screen entries, 5-1, 5-2
Screen entry
components, 5-2
displaying, 5-2
Screen hierarchy, 4-1, 11-3
creating, 11-3
defining, 11-3
Screen level, 3-3, 4-1
Screen number, 5-1
evaluate, 13-1
Screen segment, moving, 4-5, 4-6
Screen selecting, 12-2
Screen title, 5-1
Screen updating, 5-2
Index-10
Screens, 1-3, 4-3, 5-1
directory, 1-3, 5-1
edit, A-1
editing, 5-4
linking, 11-3
max. number, 2-2
print, A-1
printing, 5-4
selecting, 4-6, 5-3
Screw-type clamps, 14-2
Scroll function, 4-6
Scrolling
in symbolic lists, 3-5
screen segment, 4-6
Scrolling in
directory, 5-3
help text, 3-14
messages, 3-4
messages (message level), 7-8
Securing, OP, 14-2
Selection field, 5-2
Self test, 15-5
Self-healing fuse, 1-9
Serious system messages, 7-6
Setting bits, 11-2
Shift key, 3-3
Shock resistance, C-3
Side view
OP17, 16-3
OP7, 16-1
SIMATIC 500/505, 2-3
connection, 16-2, 16-4
SIMATIC HMI documentation, E-1
SIMATIC M7, 2-3
connection, 16-2, 16-4
SIMATIC S5, 2-3
connection, 16-2, 16-4
SIMATIC S7, 2-3
connection, 16-2, 16-4
STATUS/FORCE VAR, 9-1
Single display, 7-8
Situation-specific operator prompting, 11-1
Equipment Manual OP7, OP17
Release 04/99
Size
labeling strips, 16-6
OP17, 16-3
OP7, 16-1
SLIDE.DOC, file, 16-7
Soft key, setting bits, 11-2
Soft keys, 3-2, 4-5, 5-2, 5-3, 11-1
assignment, 5-2
number, 2-2, C-2
OP17, 1-9
OP7, 1-7
Source of supply, backup battery, 16-8
Spare parts service, 16-8
Special characters, 3-8
Standard screen
alarm messages
number, 7-11
vew, 7-10
event messages
number, 7-11
overflow, 7-12
view, 7-10
password
edit, 6-4
login, 6-3
records, 8-3
system settings
message display, 7-7
OP mode, Download, 15-4
printer, 7-14
system messages, 7-10
Standard screens, 4-1, 4-3
branching in screen hierarchy, 4-5
Standby message, 4-1, 7-3, 15-3, 15-4
Start screen, 4-1, 11-3
Start-up Behavior, 15-5
Start-up of the OP, 4-1
State
indicatiog, 7-1
LED, 13-1
Static text, 1-2, 5-2
Status messages, 7-2
Status tag, 4-3
STATUS VAR, 9-1, 14-8, A-2
Storage conditions, C-3
Stored energy time, 10-3
Structure, data, 8-1
Structure of the documentation, E-1
Sum
alarm messages, 7-11
event messages, 7-11
Superuser, 4-3, 6-1
Equipment Manual OP7, OP17
Release 04/99
Supervisor, 6-4
password, 6-2
Suppressing, alarm messages, 7-4
Switching on, OP, 15-3, 15-4
Switching over
message logging, 7-14
overflow warning, 7-12
Symbolic
display, actual values, 5-2
list, scrolling, 3-5
value input, 3-6
Synchronize, date and time, 13-2
System, operator control and monitoring, 4-5
System keyboard
OP17, 1-9
OP7, 1-7
System keyboard image, 13-2
System keys, 3-1, 3-2, C-2
entering, 3-7, 3-12
System message, 7-6
hiding, 4-2
System message buffer, 7-6
delete, 7-13
display, A-2
System message display, hiding, 4-2
System messages, 7-2
inhibit, 7-6
List of, B-1
System settings, 4-3
display messages, A-2
interface parameters, A-2
OP mode, A-2
printer parameters, A-2
select language, A-2
set date and time, A-2
T
Target groups, E-1
Technical data, C-1
Telemecanique, 2-3
Temperature, C-3
Template, labeling strips, 16-6
Temporary storage, 7-14
Terminal block, 14-4
Test, communication, online, 15-8
Testing the configuration
in Offline mode, 15-6
with PLC, 15-7
Index-11
Text
replaces value, 3-11
static, 5-2
Text attributes, 14-10
Time, 10-3, 13-2
safeguarding, 16-8
set, A-2
Time response, updating data, 2-3
Timer, value input, 3-6, 3-12
Title, screen, 5-1
Together, 7-15
Touch-sensitive front, 1-6, 1-8
Transfer
date, 13-2
time, 13-2
Transfer mode, cancel, 3-4, 15-3
Transfer screen, 8-7
Transferring, data record, 8-3
Transferring data records, 8-3
Transients, C-2
Transportation conditions, C-3
TTY
connection, 16-2, 16-4
interface, 1-7, 1-9
Turning on the, OP, 14-1
Two-color LEDs, 1-9
Type
backup battery, C-2
display, C-1
keyboard, C-2
U
Unauthorized access, 4-6
Unauthorized operation, 4-6
Uni-Telway report, 2-3
Updating
PLC values, 5-2
speeding up, 5-2
values, 9-4
Index-12
Upgrading, battery, 1-9, 16-8
Using OPs, 1-1
V
Value, input, 3-6
Values
changing, 3-7, 3-8, 3-12
updating, 5-2, 9-4
Variable text, 1-2
Versions
OP17, 1-8
OP7, 1-6
Vibration, C-3
View
alarm message text, 7-9
alarm messages, A-1
event message text, 7-9
event messages, A-1
Viewing
message buffer, 7-10
number of messages, 7-11
Visualization, 1-1
Visualizing, processes, 1-3
Visualizing and controlling processes, 1-3
Voltage, backup battery, C-2
Voltage supply, C-2
W
Warning, buffer overflow, 7-12
Weight, C-1
Y
Y cable, 14-9
Equipment Manual OP7, OP17
Release 04/99