1
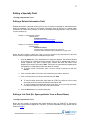
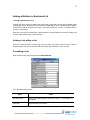
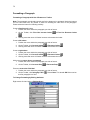
LEXI-COMP, INC.
Information Management System
User Manual
November 2012
2
Copyright © by Lexi-Comp, Inc.
Lexi-Comp, Inc. makes no warranty of any kind with respect to the completeness or
accuracy of this document. Lexi-Comp, Inc. may make improvements and/or changes to
this product and/or associated programs described in this document at any time and
without notice.
No part of this document may be reproduced, stored in a retrieval system, transmitted, or
distributed, in any form or by any means, electronic, mechanical, photocopying,
recording, or otherwise, without Lexi-Comp’s prior written permission.
3
TABLE OF CONTENTS
WELCOME TO THE LEXICOMP INFORMATION MANAGEMENT SYSTEM .............................. 6
INSTALLATION
SYSTEM REQUIREMENTS ............................................................................................................... 7
INSTALLATION PROCESS ................................................................................................................ 7
OPENING A DATABASE ............................................................................................................... 8
EXPLORING THE SCREEN ........................................................................................................... 9
EXPLORING THE TOOLBAR ...................................................................................................... 10
SHARING
EDITABLE SHARING...................................................................................................................... 11
Editing a Shared Field (break share) .................................................................................... 11
To Re-Establish a Share ....................................................................................................... 11
LOCKED SHARING ........................................................................................................................ 11
COPYING TEXT FROM A LEXICOMP SOURCE .................................................................................. 11
USER SETTINGS
USER PRIVILEGES OVERVIEW ...................................................................................................... 13
VIEWS
CREATING A NEW VIEW................................................................................................................ 14
REORDERING FIELDS IN A VIEW .................................................................................................... 14
ACTIVATING A VIEW FOR EDITING ALL MONOGRAPHS IN LIMS ....................................................... 15
CHANGING A VIEW FOR A SINGLE MONOGRAPH ............................................................................. 15
DELETING A VIEW ........................................................................................................................ 15
ASSIGNING A VIEW TYPE .............................................................................................................. 15
SETTING DEFAULTS FOR VIEWS.................................................................................................... 16
SHORT CUT KEYS
CUTTING, COPYING, AND PASTING TEXT ....................................................................................... 17
EMPHASIZING TEXT ..................................................................................................................... 18
FIND / REPLACE ........................................................................................................................... 18
INSERTING SYMBOLS ................................................................................................................... 19
PREVIEW / EDIT MODE ................................................................................................................. 19
PRINTING .................................................................................................................................... 19
SAVING / QUITTING ...................................................................................................................... 20
SPELL CHECKING ........................................................................................................................ 20
MONOGRAPHS
OPENING A MONOGRAPH ............................................................................................................. 22
SEARCHING MONOGRAPHS .......................................................................................................... 22
Advanced Searching ............................................................................................................. 22
ADDING A MONOGRAPH ............................................................................................................... 23
Blank Document .................................................................................................................... 24
Sharing Only ......................................................................................................................... 24
Share & Populate .................................................................................................................. 24
DELETING A MONOGRAPH ............................................................................................................ 25
ADDING A FIELD TO A MONOGRAPH .............................................................................................. 25
EDITING A FIELD .......................................................................................................................... 25
4
General Information .............................................................................................................. 25
EDITING A SPECIALTY FIELD ......................................................................................................... 27
Editing a Related Information Field ....................................................................................... 27
Editing a List Field (Ex: Synonym/Index Term or Brand Name) ........................................... 27
Editing a Therapeutic Class / Category Field ....................................................................... 28
DELETING A FIELD FROM A MONOGRAPH....................................................................................... 28
UNDELETING A FIELD FROM A MONOGRAPH BEFORE SAVING ......................................................... 28
WHAT ARE TAGS?
ADDING A FRACTION .................................................................................................................... 30
ADDING A HEADING...................................................................................................................... 30
Formatting a Heading ........................................................................................................... 31
ADDING A LINK TO A W EB PAGE ................................................................................................... 31
ADDING A LINK TO A MONOGRAPH OR CHART/SPECIAL TOPIC ........................................................ 32
ADDING A BULLETED OR NUMBERED LIST ..................................................................................... 33
Adding a List within a List ..................................................................................................... 33
Formatting a List ................................................................................................................... 33
ADDING A PARAGRAPH................................................................................................................. 34
Splitting a Paragraph ............................................................................................................ 34
Deleting a Paragraph ............................................................................................................ 35
Formatting a Paragraph ........................................................................................................ 36
ADDING A SUPERSCRIPT / SUBSCRIPT .......................................................................................... 37
Apply Superscript or Subscript to Existing Text .................................................................... 37
Adding a New Superscript or Subscript ................................................................................ 37
RELEASING A FIELD
WORK IN PROGRESS (WIP) ....................................................................................................... 39
TO VIEW ALL W ORK IN PROGRESS DOCUMENTS ........................................................................... 39
ADDING/EDITING A THERAPEUTIC CLASS LIST SET ............................................................ 40
Editing an Item in a List Set .................................................................................................. 40
Adding an Item to a List Set .................................................................................................. 40
Deleting an Item from a List Set ........................................................................................... 40
CHARTS / SPECIAL TOPICS....................................................................................................... 41
OPENING A CHART / SPECIAL TOPIC ............................................................................................. 41
SEARCHING CHARTS / SPECIAL TOPICS ........................................................................................ 41
ADDING A CHART / SPECIAL TOPIC ............................................................................................... 41
Blank Document .................................................................................................................... 42
Sharing Only and/or Share & Populate ................................................................................. 42
DELETING A CHART / SPECIAL TOPIC ............................................................................................ 43
TABLES
ENABLING TABLE EDITOR ............................................................................................................. 44
CREATING A NEW TABLE .............................................................................................................. 44
EDITING TABLE ATTRIBUTES......................................................................................................... 45
ADDING A ROW ............................................................................................................................ 46
DELETING A ROW ........................................................................................................................ 46
ADDING A COLUMN ...................................................................................................................... 46
DELETING A COLUMN ................................................................................................................... 46
CHANGING ALIGNMENT OF A COLUMN ........................................................................................... 47
CHANGING THE W IDTH OF A COLUMN ........................................................................................... 47
CHANGING ALIGNMENT OF A CELL ................................................................................................ 47
MERGING CELLS.......................................................................................................................... 48
SPLITTING (EXPLODING) CELLS .................................................................................................... 48
5
ADDING A HEADER....................................................................................................................... 48
ADDING A FOOTER ....................................................................................................................... 49
ADVANCED USER FUNCTIONS ................................................................................................. 50
ADDING A CHAPTER ..................................................................................................................... 50
DELETING A CHAPTER.................................................................................................................. 50
RENAMING A CHAPTER................................................................................................................. 50
GLOSSARY OF TERMS ............................................................................................................... 51
INDEX OF TAGS
CREATE A NEW USER .................................................................................................................. 54
GLOBAL FIELD COPY ................................................................................................................... 54
DELETE LOCAL CONTENT ............................................................................................................. 55
IMPORT CONTENT USING COPY/MOVE.......................................................................................... 56
IMPORT CONTENT FROM OTHER BOOK ......................................................................................... 57
DOCUMENT CONTROL .................................................................................................................. 57
CREATE A NEW LIST SET ............................................................................................................. 58
6
Welcome to the Lexicomp Information Management
System
Lexicomp’s Information Management System (LIMS) is an intelligent, cutting-edge database
management package designed to keep your hospital-specific clinical reference information
current. Using LIMS’s full word-processing capabilities, you can easily:
add new monographs, edit/review existing monographs, delete monographs, edit or
create tables, and create new text pieces
accept automated sharing of data from Lexicomp’s clinical information. Our content
undergoes daily updating and review from authors, editors, and reviewers positioned in
the healthcare field, and from our in-house staff of pharmacists.
immediately release this updated content to your online book
Since LIMS understands the appropriate structure of the data, it provides guidance while editing
within fields, lists, tables, etc, and at the same time displays the data fully formatted.
7
Installation
System Requirements
Recommended requirements for optimal functioning of Lexicomp’s Information Management
System (LIMS) are as follows:
1.0 GHz CPU
1 GB RAM
98MB of free disk space
Java 6 SE or higher
Internet connectivity (broadband preferable)
Installation Process
LIMS requires Java 6 SE or higher. If you do not currently have this installed, please contact your
IT Department. The following URL provides you with step by step instructions for downloading
Java: http://www.java.com
1. Open a browser and go to http://lexiedit.lexi.com.
2. Click the link to access Lexicomp’s Web Editor.
3. Follow the on-screen prompts to install the Web Editor client on your computer.
For help, please contact Lexicomp’s Technical Support department at 866-397-3433, option 3.
8
Opening a Database
1. Click on the database(s) you wish to edit from the Available Projects window.
To select multiple databases, hold down the CTRL key and then click on each
database you want to open.
2. Click the arrow up button to move the selected databases(s) to the Selected Projects
window.
To remove a database from the Selected Projects window, click on the database,
then click the arrow down button.
To remove all databases from the Selected Projects window, click on the double
arrow down button.
3. Click Open to open the selected database(s).
9
Exploring the Screen
1
5
2
4
6
3
1. Main Menu – Contains most of the commands available to LIMS.
2. Search Window – Allows searching within any/all selected books.
3. Book List – Displays the books selected to edit and their respective components.
4. Field List – Displays the list of fields that are included in the monograph shown in the
Editing Window. This is controlled by your View.
5. Editing Toolbar – Contains buttons that allow you to edit more easily (see Preferences in
Edit menu to add/remove buttons).
6. Editing Window – The area in which you will edit and update your clinical information.
10
Exploring the Toolbar
In addition to the explanation of buttons below, if you place your pointer over a button and hover,
a description of the button will appear. To remove buttons from the toolbar, select Edit and then
Preferences from the menu.
Save
Italicize text
Close
Underline text
Print
Increase first line left
indent
Cut selected text
Decease first line left
indent
Copy selected text
Increase left indent
(except first line)
Paste selected text
Preview – display
preview for current
field
Toggle between
showing all tags and
hiding all tags
Decrease left indent
(except first line)
Increase right indent
(except first line)
Decrease right indent
(except first line)
Change view
Increase drop (the
space above the text
piece)
Undo
Decrease drop
Redo
String-by-label
Find
Spell check
Insert symbol
Bold text
Bold and italicize text
11
Sharing
With “Sharing”, a link is established between your book and a Lexicomp source book allowing the
system to automatically import shared data. If you are not set up with a source book, and you
wish to be, please contact your Lexicomp representative. You can view the name of your source
book by doing the following: Open a monograph, right mouse click on a non-shared field in the
Field List window and select Show Copy Source. The pop up window lists the source book name
at the top.
There are two levels of sharing, editable and locked.
Editable Sharing
Privilege requirements: Editor
When the Share is editable, a share symbol
all contents from the source database.
appears next to the field label. The field inherits
Editing a Shared Field (break share)
Important Note: When a shared field is edited, the sharing is broken. Future updates to our
source data will not be reflected in that field with a broken share.
Right mouse click on the field in the Field List window.
Select Break Share. Notice the symbol changes to a broken share symbol.
Begin editing.
To Re-Establish a Share
1. Right mouse click on the field in the Field List window.
2. Select Attach Share.
3. Review the contents of the field to import. Select Attach Share from the pop up window.
Notice the symbol changes back to a share symbol.
Locked Sharing
When the Share is locked, a lock symbol
appears next to the field label. The user does not
have access to edit the data. The data will be updated automatically when Lexicomp’s source
data is updated.
Copying Text from a Lexicomp Source
Privilege requirements: Editor
12
To copy an entire monograph from a Lexicomp source, please refer to “Adding a Monograph”.
With LIMS, you can also copy an entire field of information from a Lexicomp source.
1. Right mouse click on the field in the Field List window [if it is a grayed out (new) field, you
must click twice].
2. Select Show Copy Source. A dialog box will appear showing the source name and
content of the field from the source database.
3. Click Import to copy the entire contents of that field into your database.
4. Edits can then be made to the field to delete, add to, or modify the existing text.
13
User Settings
User settings are maintained by Lexicomp. If you require a change to a user’s settings or you
wish to add or remove a user, please contact your Lexicomp representative.
User Privileges Overview
List Edit – privilege to edit your custom list sets (ie, therapeutic class/category) in the Settings
Window
View Edit – privilege to edit and add views; master view is only editable with administrator
privileges
Editor – privilege to full editing in the Editing window only (ie, can edit nonlocked fields in any
monograph or freetext of the project):
Add a monograph
Edit a monograph
Break sharing on a field
Add freetext
Edit freetext
Publisher – privilege to release edits. The edits go out to all applicable platforms (ie, Online,
iPhone, etc)
Read Only – privilege to view documents (no edit privilege)
Delete – privilege to delete a monograph, freetext piece, view, etc.
14
Views
A “view” is the list that determines how the fields are displayed in LIMS, online, in print, and/or on
handheld. To edit/manage the View, click on Settings in the Book List window, then click Views
in the Settings Window.
Common views you will see in your database include:
Master view - The “master” view contains the entire list of fields available for your project.
This view will be maintained by a Lexicomp representative. To add fields, relabel fields,
delete fields, or change sharing settings, please contact your Lexicomp representative.
Freetext view – The “freetext” view contains a list of fields used in the freetext. This view
is maintained by a Lexicomp representative.
Creating a New View
Privilege requirements: View
You might want to create a view that contains only a limited number of fields of information. This
view does not change your Master view. It will allow you to look at selected fields while reviewing
your data.
1.
2.
3.
4.
5.
6.
7.
8.
9.
Click Settings in the Books List window.
Click the Views button.
Click New, at the bottom of the View settings window.
Fill in the Name and Description at the top.
Click on a field, from the list on the right, you wish to add to the view. To select multiple
fields, hold down the CTRL key and then click on each field you want to add.
Click the Add button.
You can reorder the fields by using the Move Up and Move Down buttons.
When you are satisfied with the list of fields, select File and Save.
To activate this view in the Editing window, select the view and click the Activate button
at the bottom of the View settings window.
Reordering Fields in a View
Privilege requirements:
For non-default and non-master views: Editor
For Default and master views: Administrator + Editor
1. Click Settings in the Books List window.
2. Click the Views button.
3. Double click on the View in which you wish to reorder the fields or Select the view and
then click the Edit button at the bottom of the Settings Window.
4. Click on the field you wish to move.
5. Drag and drop the field to the desired position OR click the up or down button (repeatedly
if necessary) until the field is in the desired position.
6. Click Save.
15
Activating a View for Editing All Monographs in LIMS
Privilege requirements: Any; however, Editor privilege is required in order to open a document
using the activated view
1.
2.
3.
4.
Click Settings in the Books List window.
Click the Views button.
Click on the View you wish to activate in the editing window.
Click the Activate button at the bottom of the View settings window.
Changing a View for a Single Monograph
Privilege requirements: Editor
1. While the monograph is open, click the Change View button on the toolbar.
2. The dialog box lists the current view. Click the down arrow under Available Views to find
a drop down list of the available views.
3. Click the View you would like the monograph to use.
4. Click Change. The change affects only the open monograph.
Deleting a View
Privilege requirements: View + Delete
1. Click Settings in the Books List window.
2. Click the Views button.
3. Open the view by double clicking on the View you wish to delete or Select the view and
then click the Edit button at the bottom of the Settings Window.
4. Click on the Delete button.
Assigning a View Type
Privilege requirements:
For non-default and non-master views: Editor
For Default and master views: Administrator + Editor
1. Click Settings in the Books List window.
2. Click the Views button.
3. Open the view by double clicking on the View or select the view and then click the Edit
button at the bottom of the Settings Window.
4. Check mark the view type for which this view should be available.
16
Setting Defaults for Views
Note: You must set a default view for each platform.
Privilege requirements: Administrator
1.
2.
3.
4.
5.
6.
Click Settings in the Books List window.
Click the Views button.
Click on the Defaults button at the bottom of the Settings Window.
Locate the platform in which you would like to set the defaults.
Next to Default View for Book, select the view that should be used as a default for the
platform.
To override the default view for a specific chapter, select the view next to the chapter
name.
17
Short Cut Keys
control-A: select all text
control-B: insert bold emphasis tag
control-C: copy
control-D: insert bold italic tag
control-E: display special characters palette
control-F: find
control-I: insert italic tag
control-O: enter special character by number
control-P: show preview of field being edited, show print preview if no field is being edited
control-Q: quit the program
control-S: save current tab
control-T: collapse tags
control-shift-T: expand tags
control-U: insert underscore tag
control-V: paste
control-W: close current tab
control-X: cut
control-Y: redo
control-Z: undo
F7: spell check
Cutting, Copying, and Pasting Text
Privilege requirements: Editor
Cut, copy, and paste functions work like most word-processing applications. To cut, copy, or
paste text you can use the buttons on the tool bar or use short cut keys.
Important Notes:
When using LIMS, specific rules are in place to maintain data integrity and consistency.
For this reason, there will be circumstances where removing or pasting a desired
selection is not allowed. If your attempt to cut or paste text does not fall within the rules of
LIMS, you will get no results. For example, if you select and copy an entire paragraph,
including the paragraph tags, and attempt to paste it inside another paragraph, the
operation will not work because paragraphs cannot exist inside other paragraphs.
When cutting and pasting from a different application (such as Microsoft® Word), please
be sure to review the document online carefully. Be especially aware of any special
characters that were introduced while pasting into the document. If a special character
does not appear online as it should, replace that character in LIMS with an entity from our
Entity Pallette. If the selection cannot be pasted, try to copy smaller portions at a time to
avoid copying invalid XML from other programs.
18
Emphasizing Text
Privilege requirements: Editor
To quickly apply bold, italics, bold-italic, or underling for emphasis, select the text you want to
change and click the appropriate button from the toolbar, or use shortcuts as follows:
control-B: insert bold emphasis tag
control-D: insert bold italic tag
control-I: insert italic tag
control-U: insert underscore tag
To apply a second emphasis on the selected text, you must edit the attributes of the emphasis
tag:
1. Position your cursor on the tag and right mouse click.
2. Select Edit Attributes.
3. Select Yes for the style you wish to apply to the text.
4. Click Save.
To apply multiple emphasis on text not yet entered:
1. Place you cursor where you wish to enter the emphasized text.
2. Click the bold, bold-italic, italic, or underlining button.
3. Click an additional button to add another emphasis.
4. Enter the text in the emphasis tags.
Find / Replace
Privilege requirements: Editor
To find and/or replace a word or phrase within a document, click the Find button
Toolbar, select Tools then Find from the menu bar, or use the CTRL F shortcut.
on the
1. Enter the word (or phrase) you wish to find in the Find window. If replacing the word (or
phrase) with different text, enter the new text in the Replace With window.
2. Select the Direction
Forward – find will look in the forward direction from where your cursor is positioned
in the document.
Backward – find will look in the backward direction from where your cursor is
positioned in the document.
19
3. Select the Scope
All – find will search the entire document.
Field Only – find will search only the field in which your cursor is positioned.
4. Select the Options
Case Sensitive – the find will be case sensitive and match only those words with the
exact same case you entered in the Find window.
Wrap Search – the find will search from the point where your cursor is positioned
and once it hits the end (or beginning) of the document, the search will continue from
the beginning (or end) of the document.
Whole Word – the find will match only the entire word and not portions of it (ie, if
whole word is selected when finding “abnormal”, the word “abnormalities” will not be
found).
5. Click Find, Replace/Find, Replace, or Replace All.
Inserting Symbols
Privilege requirements: Editor
You can use the Symbol dialog box to insert symbols or special characters that are not on your
keyboard. You can display the Symbol dialog box by either clicking Symbol
on the toolbar,
typing CTRL E, or by selecting Tools and then Special Characters on the menu bar. Common
symbols (such as ®, ™, ≤, and ≥) are located on the Common tab, while other symbols can be
accessed using the drop down in the Symbols dialog box.
1. With the cursor positioned in the location where the symbol should be inserted, click on
the symbol/special character you wish to add.
2. To close the dialog box, click the X.
Preview / Edit Mode
Privilege requirements: Editor
While editing, tags are displayed. To hide the tags and display the information formatted as it
would appear online, click the Preview button
.
Printing
Privilege requirements: Editor or Read Only (for Read Only privilege, the user will access
Printing from the File menu only)
To quickly print a document, click the Print
button from the toolbar while the document is
open. You can also select File and Print Preview from the menu. An HTML Preview window will
appear. Click File and Print from this window.
20
Saving / Quitting
Privilege requirements: Editor
To quickly save a document, click Save
on the toolbar. You can also save a document with
the shortcut CTRL S on the keyboard or by selecting File and Save from the menu. All edits will
be saved. An empty tag will cause an error when trying to save the file. Empty tags (which appear
in red to assist in finding it) will need to be deleted.
To close a document, choose File and Close from the menu or click
be prompted if any unsaved edits exist.
on the Toolbar. You will
To quit the program, choose File and Quit from the menu or press the X in the upper right corner.
You will be prompted if any unsaved edits exist.
Spell Checking
Privilege requirements: Editor
To check the spelling of an open document, click Spellcheck
on the toolbar. The spell
checker begins checking at the cursor position and continues forward through the document until
the end of the document is reached. At that point, you are prompted to continue spell checking
from the beginning of the document. Choose yes if you wish to continue spell checking.
If a word is found that has no entry in any of the dictionaries used, a dialog box appears. The
word is displayed at the bottom of the dialog box and is also highlighted in the Editing Window.
Suggestions – presents a number of possible substitutions. This list includes words whose
spelling or pronunciation is close to the unrecognized word. The words are listed in decreasing
order or probability that they are the correct substitution.
Replace
1. If one of the words in the Suggestion list is the correct replacement for the misspelled
word, you can click on that word. The word you chose is then placed in the Replace With
text box.
2. You can also type replacement text of your choice in the text box. To spell check the
replacement text, click the check mark
button on the dialog box.
21
3. When the Replace With text box contains the desired substitution, click on the Replace
button to make the correction to the document.
Replace All – click this button to make the substitution to every occurrence of the misspelling
within the open document.
Ignore – click this button once to ignore if the unrecognized word is a word that you consider to
be spelled correctly (perhaps it is a jargon word, proprietary name, etc).
Ignore All – click this button to ignore every occurrence of the unrecognized word that you
consider to be spelled correctly.
22
Monographs
Opening a Monograph
Privilege requirements: Editor or Read Only
Click on the + sign next to the chapter heading in which the monograph is located (eg, for drug
monographs, go to “Alphabetical Listing of Drugs” and for laboratory test, go to the appropriate
laboratory name.) The + sign will expand into the letters of the alphabet. Click on the first letter of
the monograph you wish to open. Locate the monograph and simply click on it to open.
Searching Monographs
Privilege requirements: Any
NOTE: Exact Match or Begins With search produces the quickest results.
1. LIMS offers a number of ways to find a monograph. Select one of the following:
Exact match – will search for words matching exactly the string of characters
entered and nothing more (example: search for “surgical” would not show results
for “postsurgical”; also searching for “heart failure” will not give you results where
“heart failure” is followed by any punctuation such as “heart failure,”)
Contains – will search for string of characters found anywhere inside of a word
(example: A search for “aceta” will find “acetaminophen”, “acetate”, as well as
“phenylacetate”, etc.)
Begins with – will search for the string of characters only at the beginning of the
word (example: A search for “theo” will find “theophylline”). ***Note: This is the
best choice when searching.
Ends with – will search for the string of characters only at the end of the word
(example: A search for “icillin” will find “amoxicillin”, “ampicillin”, “dicloxicillin”, etc.)
2. Enter the string of characters for which you would like to search.
3. Select a field or fields you would like to search. The fields listed reflect the fields available
in the active view of all open databases, plus 3 specialty searches defined below. To
select multiple fields, simply control key click.
Name search – searches these fields: name, synonyms, brand names, replaces,
applies to, and alternative to
All text search – searches on all fields in the active view
Freetext search – searches all charts/special topics documents (i.e., Introduction,
Appendix, etc.)
4. Click search.
Advanced Searching
Privilege requirements: Any
Use the Advance Searching button to search multiple fields, using a different set of search criteria
for each field. For example, you can search the Contraindications field and the Warnings field for
“heart failure” simultaneously, giving you results where “heart failure” appears in both fields.
23
1. Click on Advance Search.
2. Select the search type from the drop down (i.e., Exact Match, Begins With, Contains,
Ends With; see explanations above).
3. In the empty box, enter the word(s) you want to locate.
4. Select the field you wish to search from the Within list.
5. To add another field on which to search, click the + button. At this point, you can resize
the screen by pulling down on the window when you place your cursor at the bottom of
the box and it turns to an ↕ arrow. You can now see there are 2 areas to enter a search.
Enter the search criteria for the additional field(s).
6. Select the Search Type.
a. Any Search Items – the results of the search will contain documents where
there was a match to any of the items you entered.
b. All Search Items – the results of the search will contain documents where all of
the search criteria exist in the document.
Adding a Monograph
Privilege requirements: Editor
To add a monograph, first decide on the type of new document you wish to add. Note: Sharing
options will only be available if there is source book set up. If you are not set up with a source
book, and you wish to be, please contact your Lexicomp representative.
Blank document – this can be compared to a blank sheet of paper in which you wish
to add all the information yourself.
Sharing Only – the document produced will contain Lexicomp source data in only the
fields that are set up for sharing.
Share & Populate – the document produced will contain the Lexicomp source data in
all fields (provided they are populated in the Lexicomp source).
24
Blank Document
1. Click on New Document in the Book List window.
2. Select Blank Document.
3. Select Monograph.
4. In the “Create a New Document” dialog box, enter the name of the document (i.e.,
monograph name or freetext name) in the “Name of New Document” box.
5. Select the chapter in which you want the new document to appear.
6. Click Create.
Sharing Only
1. Click on New Document in the Book List window.
2. Select Sharing Only.
3. Select the chapter in which you want the new document to appear.
4. Locate the document to share from and highlight it. The name will appear in the “Name of
new Document” box. If you wish to change the name, you can do so after the document
is created.
5. Click Create.
6. A new document appears with the name filled in. Save the document. The document
should now appear with the shared fields filled in.
Share & Populate
1. Click on New Document in the Book List window.
2. Select Share & Populate.
3. Select the chapter in which you want the new document to appear.
4. Locate the document to share from and highlight it. The name will appear in the “Name of
new Document” box. If you wish to change the name, you can do so after the document
is created.
5. Click Create.
6. A new document appears with the name filled in. All fields that are NOT set up as a share
should now contain data from the Lexicomp source as an aid in writing the new
document. Change the name if you wish at this time. Save the document. The document
should now appear with the shared fields filled in.
25
Deleting a Monograph
Privilege requirements: Editor + Delete
Open the document you wish to delete. Right mouse click on the name of the document in the
Field List window and select Delete Document.
Note: If your database is Online and/or on handheld, this deletion will be reflected immediately on
those platforms.
If another document contains a reference to the document being deleted, a Deletion Failed dialog
box will appear. In this box, a list of referencing documents will be displayed. To remove those
references, open the document listed. Click on the Related Information field and remove the
occurrence of the document you intended to delete.
Adding a Field to a Monograph
Privilege requirements: Editor
To add a field, the Field List window must be open. Notice the fields listed are either dark text
(those that are currently in the monograph) or grayed out (those that are not included in the
current monograph). The grayed out fields are available for addition to the open monograph.
Note: The field list that you see is determined by your currently active view.
To enter text in an empty field simply locate the field in the Field List window and click on
it. This will add the field label to your monograph. You can then edit this field.
To copy text from a Lexicomp source:
1. Right mouse click on the field in the Field List window.
2. Select Show Copy Source. A dialog box will appear showing the source name and
content of the field from the source database.
3. Click Import to copy the entire contents of that field into your database.
4. Edits can then be made to the field to delete, add to, or modify the existing text.
Editing a Field
Privilege requirements: Editor
General Information
To activate a field for editing, click on the field in the Editing window or click on the field in the
Field List window. Notice the field contains a beginning and ending tag identifying that field, such
as NAM for Name and SPI for Special Instructions, UBNLIST for U.S. Brand Names.
26
If the field was newly added, you will see not only the tag identifying the field, but you may also
see an empty beginning and ending format tag (i.e., paragraph tag). To enter new information,
position your cursor within the field tag, right mouse click, and point to Add Tag. Select the tag
you wish to add. Options will include paragraph, graphic, heading, list, table, reference, and
footnote for regular text fields and list-item for fields containing an itemized list such as synonym
or brand name.
Note: When editing in a field, “WIP” (work in progress) will appear next to the field name in the
editing window and field list window, and next to the drug name in the book list window. Also
note, the box next to “Release” is unchecked. To release the changes, check the box and save
the document. WIP will be removed once the data is released.
27
Editing a Specialty Field
Privilege requirements: Editor
Editing a Related Information Field
Related Information is the field used to refer the user to another monograph or chart/special topic
within the database. The items in the Related Information field will appear as a hotlink when
released to an online book (example 1) and they will appear with page number cross references
for print (example 2).
Example 1 - Online display example:
Acetaminophen
Related Information
Acetaminophen Toxicity Nomogram
Commonly Used Antidotes for Acute Overdoses
Example 2 - Print display example:
Acetaminophen
Related Information
Acetaminophen Toxicity Nomogram on page 1012
Commonly Used Antidotes for Acute Overdoses on page 1031
Notice the field contains a dialog box. This is to aid in choosing only legal items for this field,
which include monograph names and charts/special topic titles.
1. Click the Add button. The “Add Reference” dialog box appears. The left-hand window
of the dialog box contains the major sections of the book (ie, Alphabetical Listing of
Drugs, Appendix, etc). Each of these major sections will show the letters of the
alphabet that contain documents. Note: These lists are automatically updated when
monographs or charts/special topics are added or deleted.
1.5 To quickly locate a document, enter a word or words in search box and click
Search.
2. Click on the first letter of the name of the document you wish to reference.
3. Click on the document you wish to add and then click Add.
To select multiple documents, hold down the CTRL key and then click on each
document you wish to add to the Related Information field.
To select multiple documents that follow each other, click on the first document,
hold down the shift key, and click on the last document.
4. Click the Done button to close the dialog box.
Editing a List Field (Ex: Synonym/Index Term or Brand Name)
Privilege requirements: Editor
Notice the field contains a beginning and ending identifying tag (eg, SYNLIST for Synonyms).
Each entry in these fields is tagged as a “list-item”. (For more information on tags, please see the
section on Tags.)
28
To add a new brand name or synonym, place your cursor anywhere between the field
tags. Note: Make sure to place the cursor outside of any existing list-items. Right mouse
click, select Add Tag and then select List-Item. Enter the brand name or synonym you
wish to add in the list-item tag.
Upon saving the field, the added and/or edited items will sort alphabetically.
To delete an item from the list, simply highlight the entire entry, including the beginning
and ending tags, then hit the delete button on your keyboard.
Editing a Therapeutic Class / Category Field
Privilege requirements: Editor
Notice the field contains a dialog box. This is to aid in choosing only legal items for this field
based on the chosen Therapeutic Class System.
1. Click the Add button. The “Add Item” dialog box appears containing a list of available
therapeutic classes.
2. Click on the therapeutic class you wish to add to the Therapeutic Class field (if you
want to add a class that is not in the list, see Adding/Editing a Therapeutic Class List
Set).
To select multiple therapeutic classes, hold down the CTRL key and then click on
each class you wish to add.
To select multiple classes that follow each other, click on the first class, hold
down the shift key, and click on the last class.
3. Click the OK button.
Deleting a Field from a Monograph
Privilege requirements: Editor
LIMS offers two ways to delete a field from a monograph. Once marked as deleted, the field
remains RED until the monograph is saved. Once saved, the deleted field will not appear when
the monograph is reopened.
1. In the Field List window, locate the field you wish to delete. Right click on the field and
select Delete or
2. Locate the field in the Editing window. Click to activate the field. Click the Delete
button.
Undeleting a Field from a Monograph Before Saving
Privilege requirements: Editor
LIMS offers two ways to undelete a field from a monograph before you have saved the field.
Note: After saving a field marked as Delete, the field cannot be undeleted. Fields marked as
29
deleted appear in RED prior to saving, thus, only when a field label appears in red, can it be
undeleted.
1. In the Field List window, locate the field you wish to undelete. Right click on the field and
select Undelete or
2. Locate the field in the Editing window. Click to activate the field. Click the Undelete
button.
Warning: Deletes take place immediately! Any delete will update sources, such as online and
handheld, upon saving deletion.
30
What Are Tags?
The content of a document exists within Tags. These are displayed as arrow-shaped icons
defining the tag. Start tags point to the right and end tags point to the left. When a new tag is
inserted, it will appear in red because it is empty. Once information is added between the tags, it
will become gray. Some tags represent a specific field of information. In the following example,
the monograph name is surrounded by the tag NAM which represents the field of information
being viewed:
Other tags are used to format the specific content within a field, such as paragraph, list, and
emphasis.
Note: Multiple sets of tags (eg, tags for paragraphs, lists, emphasis, tables, etc) can appear in a
field.
Note: Empty tags will need to be deleted or an error will appear when you attempt to save the
file. Empty tags will appear red.
Some tags have a set of defined attributes. To display the list of attributes available for a format
tag, right mouse click with your cursor positioned on the tag. This will provide a list of options.
Select Edit Attributes.
To review a list of tags and definitions, refer to the Index of Tags.
Adding a Fraction
Privilege requirements: Editor
1. To add a fraction, position your cursor within the paragraph tag where you wish to insert
a fraction.
2. Right mouse click and select Add Tag.
3. Click on Fraction.
4. Enter the numerator.
5. Enter the denominator.
Adding a Heading
Privilege requirements: Editor
Position the cursor where you wish to add a heading. Keep in mind that a heading can only be
added where a paragraph can be. Right mouse click and point to Add Tag. A list of available tags
will appear. Select Heading.
If Heading is not listed, you have placed your cursor in a location where a new heading is not
allowed.
31
Formatting a Heading
Position the cursor on the Heading you wish to format. Right mouse click and point to Edit
Attributes.
Fill in the attributes as follows:
Name
Value
ID
Create an identification name (if applicable) which can be used for
linking back to this topic from other text in the book.
Justification
Select alignment for the heading (left, center, right, or both).
Size
Select size of heading. 1 = largest, 5 = smallest
Click save to apply the selected settings to the heading.
Adding a Link to a Web Page
Privilege requirements: Editor
To add a link to a web page, you must add the “web-link” tag. It is available to add inside a
paragraph.
1. To add a web-link, position your cursor within the paragraph tag where you wish to insert
the web-link.
2. Right mouse click and select Add Tag.
3. Click on Web-Link (you may have to scroll down to bring the tag into view).
4. Position your cursor within the Web-Link tag and enter the text which will allow the user
to launch the web page. For example,
“please contact <web-link>Lexicomp</web-link> for further information”.
5. While you are still within the Web-Link tag, right mouse click and select Edit Attributes.
32
6. Enter the URL including http:// if applicable.
7. Select New or Same.
New if you want the link to open a new window
Same if you do not want the link to open a new window
8. Click Save.
Adding a Link to a Monograph or Chart/Special Topic
Privilege requirements: Editor
You can add links to other monographs or charts/special topics within the same database. In this
example, we are linking from the Aspirin and Pravastatin monograph (Usual Dosage field) to the
Pravastatin monograph (see second paragraph).
Aspirin and Pravastatin
Usual Dosage Oral: Adults:
Initial: Pravastatin 40 mg with aspirin (either 81 mg or 325 mg); both medications taken once
daily. If pravastatin 40 mg does not achieve the desired cholesterol result, dosage may
be increased to 80 mg once daily with aspirin (either 81 mg or 325 mg) once daily. Some
patients may achieve/maintain goal cholesterol levels at a pravastatin dosage of 20 mg.
See Pravastatin for dosing in renal or hepatic impairment, as well as, dosing with concurrent
immunosuppressant therapy.
To add a link to a monograph, introductory piece, or appendix piece within your project/database,
you must add the “user-xref” tag. It is available to add inside a paragraph.
1. Open the monograph or freetext piece to which you wish to refer. Place your mouse
pointer over the name of the monograph or freetext piece (hover). A small box should
appear containing the “dbid” (database ID). Record the dbid number or commit to
memory to refer to later.
2. In the monograph or freetext piece where you want the link to appear, position your
cursor in the location you wish the link to appear.
3. Right mouse click and select Add Tag.
4. Click on User-xref (you may have to scroll down to bring the tag into view).
5. Position your cursor on the User-xref tag and select Edit Attributes. Insert the dbid of the
monograph or freetext that you recorded earlier.
6. Click Save.
7. With your cursor remaining inside the user-xref tag, insert the text that will become the
hot-link. For example, in the case of linking to a monograph, insert the monograph name.
33
Adding a Bulleted or Numbered List
Privilege requirements: Editor
Position the cursor where you wish to add a list. Keep in mind that a list can only be added where
a paragraph can be. Right mouse click and point to Add Tag. A list of available tags will appear.
Select List. If List is not given as a choice, you have placed your cursor in a location where a
new list is not allowed.
Each item in the list is surrounded by a para tag which is surrounded by an item tag. Editing must
be done within the para tag, not the item tag.
Adding a List within a List
Place the cursor before the end item tag of the list where you wish to insert a new list. Insert a
new list tag. Be sure to fill in the attributes for the style and indentation of your new list.
Formatting a List
Right mouse click on the list tag and select Edit Attributes.
Fill in the attributes as follows:
Name
Value
Number-space
Extra space allowing larger number to be used. 1 = least space, 5 =
most space
Item-drop
Used internally by Lexicomp
34
Name
Value
List-drop
Used internally by Lexicomp
Id
Used internally by Lexicomp
type
Select the type of list you wish to create. Options are Arabic,
lowroman, uproman, lowalpha, upalpha, built, and dash.
First-indent
Select a number to reflect the level of left indent you wish to apply
for the first line of each item. 0 = no indent, 9 = most indent
Drop
Select a number to reflect the amount of blank space you want to
apply above each item. 0 = no space, 9 = most space
Left-indent
Select a number to reflect the level of left indent you wish to apply to
the subsequent lines of each item. 0 = no indent, 9 = most indent
Right-indent
Select a number to reflect the level of right indent you wish to apply
to each item. 0 = no indent, 9 = most indent
Justification
Select alignment for the entire list (left, right, center, both)
Click Save to apply the selected settings to the list.
Adding a Paragraph
Privilege requirements: Editor
There are two ways to add a paragraph:
1. Position the cursor where you wish to add a paragraph. Keep in mind that a paragraph
cannot be added if you cursor is positioned within another paragraph. Right mouse click
and point to Add Tag. A list of available tags will appear. Select Paragraph.
Note: If Paragraph is not listed, you have placed your cursor in a location where a new
paragraph is not allowed.
2. To add a new paragraph immediately following an existing paragraph, position your
cursor to the immediate left of the ending tag in the paragraph. Hit the return key. A new
paragraph tag will appear following the existing paragraph. The new paragraph will retain
the same attributes as the original paragraph.
Splitting a Paragraph
Privilege requirements: Editor
Position the cursor inside the paragraph at the point where you wish to split the existing text. Hit
the return key. The new paragraph will retain the same attributes as the original paragraph.
35
Deleting a Paragraph
Privilege requirements: Editor
There are several ways in which to delete a paragraph:
1. Position the cursor inside the paragraph you wish to delete. Right mouse click and select
Delete to delete the entire paragraph and its contents or
2. Select the entire paragraph, including the begin and end paragraph tags. Press the
delete button on your keyboard.
3. Backspace over the beginning or ending paragraph tag.
36
Formatting a Paragraph
Formatting a Paragraph with Use of Buttons on Toolbar
Note: The paragraph must already contain text for the buttons to be activated. Notice the buttons
for First Line indent look very similar to those for indenting the other lines of the paragraph.
Please select the button for indenting carefully.
Create a first-line only indent:
1. Position the cursor inside the paragraph you wish to format.
2. On the Toolbar, click First Line Increase Indent
or First Line Decrease Indent
.
3. Clicking more than once will further increase or decrease the indent.
Create a left indent:
1. Position the cursor inside the paragraph you wish to format.
2. On the Toolbar, click Increase Indent
or Decrease Indent
.
3. Clicking more than once will further increase or decrease the indent.
Create a right indent:
1. Position the cursor inside the paragraph you wish to format.
2. On the Toolbar, click Increase Indent
or Decrease Indent
.
3. Clicking more than once will further increase or decrease the indent.
Add or remove space above a paragraph:
1. Position the cursor inside the paragraph you wish to format.
2. On the Toolbar, click Increase Drop
or Decrease Drop
.
Place text next to the field label:
1. Position the cursor inside the paragraph you wish to format.
2. On the Toolbar, click String By Label
the first paragraph in a field.
To Change Formatting by Editing Attributes
Right mouse click and point to Edit Attributes.
. Please Note: This should ONLY be used on
37
Fill in the attributes as follows:
Name
Value
ID
Used internally by Lexicomp
String by label
In monograph editing only, select yes if you want the paragraph to
begin next to the field label instead of dropping to a new line. Note:
This will formatting will not be reflected in the LIMS preview, but will
be reflected in places such as Online and Print.
First-indent
Select a number to reflect the level of left indent you wish to apply to
the first line of the paragraph. 0 = no indent, 9 = most indent
Drop
Select a number to reflect the amount of blank space you want to
apply above the paragraph. 0 = no space, 9 = most space
Left-indent
Select a number to reflect the level of left indent you wish to apply to
the subsequent lines of the paragraph. 0 = no indent, 9 = most
indent
Right-indent
Select a number to reflect the level of right indent you wish to apply
to the paragraph. 0 = no indent, 9 = most indent
Justification
Select alignment for the entire paragraph (left, right, center, both)
Click SAVE to apply the selected settings to the paragraph.
Adding a Superscript / Subscript
Privilege requirements: Editor
Apply Superscript or Subscript to Existing Text
1. Select the text you wish to superscript or subscript by highlighting it with your mouse.
2. Right mouse click and select Add Tag.
3. Click on Superscript or Subscript.
Adding a New Superscript or Subscript
1. To add a superscript or subscript, position your cursor within the paragraph tag where
you wish to insert a superscript or subscript.
2. Right mouse click and select Add Tag.
3. Click on Superscript or Subscript.
4. Enter the text between the beginning and ending tags that you wish to superscript or
subscript.
38
Releasing a Field
Privilege requirements: Editor + Publish
When a field is edited, it is considered “Work In Progress” or WIP. Once the WIP has been
reviewed, it can be “released”. Released means that the edits you have made are finalized and
ready to be published either electronically or printed.
To release edits, simply check the “Release” box next to the field label in the Editing Window and
save the document. Once saved, the WIP will be removed and the monograph or freetext will be
removed from the Work In Progress index.
39
Work In Progress (WIP)
Work in Progress is defined as “editing that has not yet been released.” Unreleased data will not
show up in places such as Online or Palm. When you edit a monograph or a special topic/chart,
the document name will be added to the Work in Progress heading in the booklist window and a
“WIP” icon will appear in the following places:
next to the field label in the editing window
next to the field label in the field list window
next to the drug name in the book list window
When all fields of the document have been release, the “work in progress” status is removed.
To View all Work In Progress Documents
Click on the + sign next to the Work In Progress heading in the Book List window. All documents
that have been edited and not yet released can be viewed here. Note that the documents will also
appear under the alphabetical index and will be denoted by the WIP icon.
40
Adding/Editing a Therapeutic Class List Set
When editing a Therapeutic Class field, a drop down list of items is displayed. To edit this list, you
must edit the List Set (the terms used to create the list). To access the List Set, click on Settings
in the Book List window, then click List Sets in the Settings Window.
Note: Editing a list set requires List Set privilege for the user. Lexicomp master list sets can only
be changed by Lexicomp. If you require a change to Lexicomp’s master list of Therapeutic
Classes or Categories, please contact your Lexicomp representative.
Editing an Item in a List Set
1.
2.
3.
4.
5.
6.
Select the List Set in which you wish to edit an item.
Select the item
Click the Edit button
Change the description.
Click Save.
Click the Save button in the upper right corner to save changes made to the List Set.
Adding an Item to a List Set
1.
2.
3.
4.
5.
Select the List Set in which you wish to add an item.
Click the Add button.
In the Add List Set Item dialog box, enter the Description for the item.
Click Save.
Click the Save button in the upper right corner to save changes made to the List Set.
Deleting an Item from a List Set
1. Select the List Set from which you wish to remove an item.
2. Select the item you wish to remove.
3. Click the Remove button. Note: If the item you are deleting is referred to within other
documents, a dialog box will appear listing the documents containing the reference. All
references to the item you wish to delete must be removed before you can execute the
deletion.
4. Click the Save button in the upper right corner to save changes made to the List Set.
41
Charts / Special Topics
Opening a Chart / Special Topic
Click on the + sign next to the heading, Charts/Special Topics. The + sign will expand into the
names of items included in the book. Simply click on the desired chart/topic to open. These
documents will appear in Magenta text.
Searching Charts / Special Topics
NOTE: Currently the search string is limited to letters and numbers; you cannot type spaces or
punctuation. Exact Match or Begins With search produces the quickest results.
1. Select one of the following:
Exact match – will search for words matching exactly the string of characters
entered and nothing more (example: a search for “surgical” will not find
“postsurgical”.)
Contains – will search for string of characters found anywhere inside of a word
(example: search for “aceta” will find “acetaminophen”, “acetate”, as well as
“phenylacetate”, etc.)
Begins with – will search for the string of characters only at the beginning of the
word (example: search for “theo” will find “theophylline”)
Ends with – will search for the string of characters only at the end of the word
(example: search for “icillin” will find “amoxicillin”, “ampicillin”, “dicloxicillin”, etc.)
2. Enter the string of characters for which you would like to search.
3. Select Freetext search
4. Click search.
Adding a Chart / Special Topic
To add a chart/special topic, first decide on the type of new document you wish to add. Note:
Sharing options will only be available if there is source book set up. If you are not set up with a
source book, and you wish to be, please contact your Lexicomp representative.
Blank document – this can be compared to a blank sheet of paper in which you wish
to add all the information yourself.
Sharing Only and/or Share & Populate - the document produced will contain
Lexicomp source data.
42
Blank Document
1. Click on New Document in the Book List window.
2. Select Blank Document.
3. Select Free Text.
4. In the “Create a New Document” dialog box, enter the name of the document (i.e.,
monograph name or freetext name) in the “Name of New Document” box.
5. Select the chapter in which you want the new document to appear.
6. Click Create.
Sharing Only and/or Share & Populate
1. Click on New Document in the Book List window.
2. Select Sharing Only or Share & Populate (they produce the same result).
3. Select the chapter in which you want the new document to appear.
4. Locate the document to share from and highlight it. The name will appear in the “Name of
new Document” box. If you wish to change the name, you can do so after the document
is created.
5. Click Create.
43
6. A new document appears with the name filled in. Change the name if you wish at this
time. Save the document. The document should now appear with the shared data filled
in.
Deleting a Chart / Special Topic
Open the document you wish to delete. Right mouse click on the name of the document in the
Field List window and select Delete Document.
Note:
If your database is Online and/or on handheld, this deletion will automatically be
reflected on those platforms.
If another document contains a reference to the document being deleted, a Deletion
Failed dialog box will appear. In this box, a list of referencing documents will be
displayed. To remove those references, open the document listed. Click on the
Related Information field and remove the occurrence of the document you intended
to delete.
44
Tables
Enabling Table Editor
The table editor allows you to edit tables in a graphical presentation. To turn on the table editor:
1.
2.
3.
4.
5.
Click on Edit on the menu bar
Select Preferences
On the Preferences dialog box, click on the Misc tab.
Check mark “Use Table Editor”
Select Save
Creating a New Table
Important Note: The system will not allow you to save a table with empty tags (tags containing no
data). If you are planning to work on a very large table and may not have time to complete it
before saving, you should change your preferences so that blank paragraphs are not
automatically input into empty cells upon creation. To do this, go to Edit and Preferences on the
Menu bar. Select the New Content tab. Select “Do not insert anything into new fields” and save.
1. Place your cursor where you wish to add the table. Make sure to position your cursor
outside of existing tags.
2. Right mouse click and from the Add Tag list, scroll to down and select “table”.
3. In the Create Table box:
a.
b.
c.
d.
e.
f.
Enter a title
Enter the number of columns for the table
Enter the number of rows for the table
Check mark header if you want the table to contain a bold heading row
Check mark footer if you want the table to contain footnotes
Click ok.
4. Begin adding text inside the paragraphs. Important Note: If you have changed your
Preferences in regard to insertion of New Content, paragraph tags may not appear in the
cells. In this case, to begin adding text to the cells, place your cursor inside the cell, right
mouse click and select “paragraph” from the Add Tag menu. Now you can begin typing
inside the paragraph tag.
5. Edit table attributes. See next topic.
45
Editing Table Attributes
Certain table attributes should be set in order to achieve the best appearance in electronic display
of the table, as well as a printed version. To edit table attributes, click on the grid
Click the Layout tab.
Attribute
Frame
(edit table).
Value
Top – grid line appears only under the heading row(s)
Bottom – grid line appears only at the bottom of the table
Topbot – grid line appears under the heading row(s) and also at the
bottom of the table.
All – grid lines appear between all rows and columns
None – no grid lines are present
Orient
Portrait or landscape
Horizontal alignment
Center is standard
Header vertical
alignment
Middle is standard
Body vertical
alignment
Middle is standard
46
Attribute
Value
Footer vertical
alignment
Leave as unset
Column separator
No – no vertical grid lines will appear between the columns
Yes – vertical grid lines will appear between the columns
No – no horizontal grid lines will appear between the columns
Row separator
Yes – horizontal grid lines will appear between the columns
Adding a Row
1. Click on the table to activate the table editor if it is not already activated.
2. Click
to insert a row above the current row or click
current row.
to insert a row below the
Deleting a Row
1. Click on the table to activate the table editor if it is not already activated.
2. Click
to edit the row attributes.
3. Click the delete button. The entire row will be removed.
Adding a Column
1. Click on the table to activate the table editor if it is not already activated.
2. Click
to insert a column to the left of the current column or click
column to the right of the current column.
to insert a
Deleting a Column
1. Click on the table to activate the table editor if it is not already activated.
2. Click
at the top of the column you wish to delete. The buttons allows you to edit the
column attributes.
3. Click the delete button. The entire column will be removed.
47
Changing Alignment of a Column
Note: Alignment of an entire column is set in the column attributes. It can be overwritten on the
individual entry/cell.
1. Click on the table to activate the table editor if it is not already activated.
2. Click
above the column in which you wish to change the alignment.
3. In the Edit Column box, select the justification by clicking the arrow to the right of
“alignment”.
4. Click Save
Changing the Width of a Column
Note For a portrait table, the entire column width available is 500pts (or units). For a landscape
table, the width can total a maximum of 1000.
1. Click on the table to activate the table editor if it is not already activated.
2. Click
above the column in which you wish to change the width.
3. In the Edit Column box, enter a number that is proportionate to the other columns,
followed by an asterisk. Please do not enter any spaces in this box. (example 4 column
table could be 125* for each column, totaling 500; in this case each column would be
equivalent in width)
4. Click Save
Changing Alignment of a Cell
Note: Alignment of an entire column is set in the column attributes. It can be overwritten on the
individual entry/cell.
1. Click on the table to activate the table editor if it is not already activated.
2. Click
in the cell in which you wish to change the alignment.
48
3. On the Edit Entry box, select the justification by clicking the down arrow to the right of
“alignment”.
Merging Cells
Important Note: When merging cells, the data in the top left uppermost cell will remain after the
merge. Data in all other cells selected to merge will be removed. It’s best to merge cells before
the data is input.
1. Click on the table to activate the table editor if it is not already activated.
2. Select each entry to merge together by clicking
bar at the top of the cell turns blue.
3. Click the merge button
inside each cell. Once selected, the
in either cell to merge the cells.
Splitting (Exploding) Cells
Important Note: Data entered prior to the merge will not be restored. Only data in the left
uppermost cell, or data entered after the merge, will remain.
1. Click on the table to activate the table editor if it is not already activated.
2. Click on
to split (explode) the cells..
Adding a Header
1. Click on the table to activate the table editor if it is not already activated.
2. Click
(edit table) in the top left corner of the table to edit the table properties.
3. On the Edit Table box, click the Components tab and check mark Header. A heading row
(indicated in blue) will be inserted upon Save. This row defaults to bold.
49
Adding a Footer
1. Click on the table to activate the table editor if it is not already activated.
2. Click
(edit table) in the top left corner of the table to edit the table properties.
3. On the Edit Table box, click the Components tab and check mark Footer. A footer row
(indicated in green) will be inserted upon Save. This row defaults to bold.
50
Advanced User Functions
Adding a Chapter
1. Place your cursor over the database name in the left hand window.
2. Right mouse click and select Add Chapter.
3. Enter the Chapter name and click create.
Deleting a Chapter
1. Make sure the chapter is empty (no document should exist in the chapter you wish to
delete).
2. Place your cursor over the chapter name. Right mouse click.
3. Select Delete.
Renaming a Chapter
1. Place your cursor over the chapter name. Right mouse click.
2. Select Rename
3. Enter new name. Click Rename.
51
Glossary of Terms
Administrator – User who has been given all access, including access to edit master view and
users.
Attribute – A value (description) which defines the format, appearance, or type of text.
Charts / Special Topics (also referred to as freetext) – Text that is not contained in monograph
format. This includes text, tables, and charts that have a free-flowing appearance.
Database – A collection of data arranged for ease and speed of search and retrieval
Edit Mode – Describes a screen where format tags are activated and editing of data is allowable
Field – Information in a monograph is displayed within appropriate labels, referred to as field
labels. These include “Brand Names”, “Use”, “Usual Dosage”, “Special Instructions”, “Dosage”,
“Forms”, “Adverse Reactions”, among others.
List Set – A defined list of terms from which to choose. Certain fields are linked to List Sets (i.e.,
Therapeutic Category)
Monograph – Document containing information housed in “fields”. Examples include generic
drug monographs, laboratory tests, and guidelines.
Preview Mode – Describes a screen where the monograph or freetext piece open will display as
it would look in a web browser
Publisher – A user with privileges to release changes to the database to an online book
Settings – Certain database options are maintained here, including:
User preferences
List Sets (therapeutic class/category lists)
Views
Sharing – Data that is inherited from Lexicomp’s master database. Multiple fields of data can be
shared.
Tags – All content of a document exists within tags. Tags are displayed as arrow-shaped icons
identifying the tag. The tag defines the type of data is contains (i.e., paragraph).
View – A view defines what field labels are used and the order in which the fields appear in the
editor, online, palm, and in a printed book.
Master View – View that contains sharing information and the entire list of available fields.
Work in Progress (WIP) – editing that has not yet been finalized
Toolbar – Bar in LIMS that contains buttons for ease of editing, such as bold, italics, etc.
52
Index of Tags
Calculation – used internally by Lexicomp to link to a Calculation module
Emphasis – add bold, italic, bolditalic, or underline to text
Footnote – text of a footnote
Footnote-number – superscript number identifying a footnote; placed immediately
following text to be referenced
Fraction – contains a numerator and denominator for a fraction
Global-xref - used internally by Lexicomp
Graphic – contains graphic name; placed where graphic should appear
Heading – bold text with 5 choices of size; see Adding a Heading
Index-term – used internally by Lexicomp for printing purposes
Internal-anchor – link to another area within the document
Internal-link – link to another area within the document
List – add a list of terms/phrases in outline format
Math – used internally by Lexicomp
Paragraph – see Adding a Paragraph for more information
Ref-callout-list - used internally by Lexicomp
Subscript – a symbol/number written immediately below another character
Supscript - a symbol/number written immediately above another character
Table – arrangement of data in rows and columns; see Adding a Table for more
information
User-xref – add a link to another document within the same project/database (see Adding a
Link to a Monograph or Chart/Special Topic)
Web-link – add a hyperlink to another web page
53
Index
Adding a Field, 25
Adding a Monograph, 23
Blank Document, 24
Bold text, 18
Book List, 9
Brand Name, 27
Bulleted list, 33
Check spelling, 20
Copy source, 11
Deleting a Field, 28
Deleting a Monograph, 25
Editing a Field, 25
Editor, 13
Field List, 9
Find / Replace, 18
Fraction, 30
Glossary, 51
Hardware Requirements, 7
Heading, 30
Installation Process, 7
Italicize text, 18
Java 1.4.2, 7
Link, 31, 32
Master view, 14
Monographs, 22
Adding a Monograph, 23
New Document, 23
Share & Populate, 24
Sharing Only, 22, 24
Numbered list, 33
online update, 38
Opening a Database, 8
Outline, 33
Paragraph, 34
Adding a Paragraph, 34
Deleting a Paragraph, 35
Edit Attributes, 36
First-line indent, 36
Formatting a Paragraph, 36
Left indent, 36
Right indent, 36
Splitting a Paragraph, 34
Preview, 19
Privileges, 13
List Edit, 13
View Edit, 13
Publisher, 13
Quitting, 20
Read Only, 13
Related Information, 27
Releasing, 38
Saving, 20
Screen, 9
Share & Populate, 24
Sharing, 11
Break share, 11
Editable Sharing, 11
Locked Sharing, 11
Sharing Only, 22, 24
Short Cut Keys, 17
Spell Checking, 20
Subscript, 37
Superscript, 37
Symbols, 19
Synonym, 27
Tags, 30
Therapeutic Class, 28
Toolbar, 10
Undeleting a Field, 28
Underline text, 18
update online, 38
User Settings, 13
Views, 14
WIP, 39
Work In Progress, 39