1
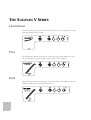
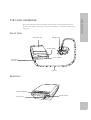
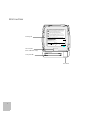
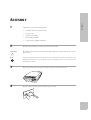
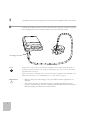
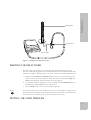
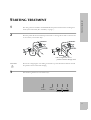
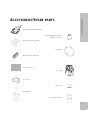
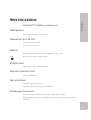
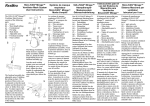
SULLIVAN® V LIGHTWEIGHT
SULLIVAN® V PLUS
SULLIVAN® V ELITE
CLINICIAN’S MANUAL
Reorder No: 21805/5 99 06
RESMED
SULLIVAN® V LIGHTWEIGHT
SULLIVAN® V PLUS
SULLIVAN® V ELITE
CLINICIAN’S MANUAL
Reorder No: 21805/5 99 06
• ResMed Corp 10121 Carroll
Canyon Road San Diego CA
92131-1109 USA Tel: +1 (858)
689 2400 or 1 (800) 424 0737
Fax: +1 (619) 689 2412
• ResMed Ltd 97 Waterloo Road
North Ryde NSW 2113 Australia
Tel: +61 (2) 9886 5000 or 1 800
658 189 Fax: +61 (2) 9887 4872
• ResMed (UK) Limited 67B
Milton Park Abingdon Oxon
OX14 4RX UK Tel: +44 (1235)
862 997 Fax: +44 (1235) 831
336
• ResMed Priess GmbH & Co
KG Karstrasse 17A 41068
Moenchengladbach
Germany
Tel: +49 (2161) 837037 Fax:
+49 (2161) 837072
• ResMed SA Parc de la
Bandonnière 2, rue Maurice
Audibert 69800 Saint Priest
France Tel: +33 (0) 437 251 251
Fax: +33 (0) 437 251 260
• ResMed Singapore Pte Ltd
150 Kampong Ampat #06-06 KA
Centre Singapore 368324 Tel:
+65 284 7177 Fax: +65 284
7787
Internet: http://www.resmed.com Email: [email protected]
Protected by: EP(DE,FR,GB) 0088761, JP 1697822, US 4944310, US 5199424, US 5522382.
SULLIVAN® is a trademark of ResMed Ltd.
© 1999 ResMed. All rights reserved.
WARNINGS AND CAUTIONS . . . . . . . . . . . . . . . . . . . . . . . . . . . . . . . .
1
THE SULLIVAN V SERIES . . . . . . . . . . . . . . . . . . . . . . . . . . . . . . . . . .
4
ASSEMBLY . . . . . . . . . . . . . . . . . . . . . . . . . . . . . . . . . . . . . . . . . . . .
7
PREPARING FOR USE . . . . . . . . . . . . . . . . . . . . . . . . . . . . . . . . . . . . .
11
RESETTING THE HOUR METER
SETTING THE TREATMENT PRESSURE
LIMITING THE DELAY TIMER
SETTING THE START PRESSURE
ELITE MODEL . . . . . . . . . . . . . . . . . . . . . . . . . . . . . . . . . . . . . . . . . .
SETTING THE REAL-TIME CLOCK
SMARTSTART
AUTOMATIC LEAK ADJUSTMENT
DOWNLOADING COMPLIANCE DATA
STARTING TREATMENT . . . . . . . . . . . . . . . . . . . . . . . . . . . . . . . . . . . .
STOPPING
GETTING UP
11
12
13
14
15
15
15
16
16
17
18
18
CALIBRATION . . . . . . . . . . . . . . . . . . . . . . . . . . . . . . . . . . . . . . . . . .
19
CLEANING AND MAINTENANCE . . . . . . . . . . . . . . . . . . . . . . . . . . . . . .
21
SERVICING . . . . . . . . . . . . . . . . . . . . . . . . . . . . . . . . . . . . . . . . . . . .
23
SELF TESTING (PLUS AND ELITE MODELS)
CONTENTS
CONTENTS
23
TROUBLESHOOTING . . . . . . . . . . . . . . . . . . . . . . . . . . . . . . . . . . . . .
24
WARNINGS RELATED TO TREATMENT . . . . . . . . . . . . . . . . . . . . . . . . . .
27
ACCESSORIES/SPARE PARTS. . . . . . . . . . . . . . . . . . . . . . . . . . . . . . . . .
29
SPECIFICATIONS . . . . . . . . . . . . . . . . . . . . . . . . . . . . . . . . . . . . . . . .
31
i
ii
DEFINITIONS
This manual contains special terms and icons that appear in the margins to draw the reader’s
attention to specific and important information.
WARNING
WARNINGS AND CAUTIONS
WARNINGS AND CAUTIONS
Alerts the user to possible injury.
!
CAUTION
Alerts the user to possible equipment problems.
!
NOTE
i
An informative or helpful note.
Please read this manual carefully before use.
INDICATIONS
The SULLIVAN V nasal CPAP systems are for the treatment of Obstructive Sleep Apnea
(OSA) in adults.
CONTRAINDICATIONS
Nasal CPAP therapy should be used with caution in subjects with the following conditions:
•
Existing respiratory failure or insufficiency (such as, risk of increased work of
breathing, due either to incomplete reversal of upper airway obstruction; or to
breathing at high lung volume, leading to worsening respiratory failure; risk of
rebreathing leading to worsening respiratory failure)
•
Pneumothorax or pneumomediastinum
•
Emphysematous bullae, or past history of pneumothorax (risk of pneumothorax)
•
Decompensated cardiac failure or hypotension, particularly if associated with
intravascular volume depletion (risk of further hypotension or reduction in cardiac
output)
•
Massive epistaxis or previous history of massive epistaxis (risk of recurrence)
1
•
Pneumoencephalus, recent trauma or surgery (for example, pituitary or nasal) that may
have produced cranio-nasopharyngeal fistula (risk of entry of air or other material into
the cranial cavity)
•
Acute sinusitis, otitis media or perforated ear drum.
The clinician should assess on a case by case basis the relative risks and benefits of nasal CPAP
therapy in such a subject. When assessing the relative risks and benefits, the clinician should
understand that the SULLIVAN V series can deliver pressures up to 20 cm H2O. Also in the
unlikely event of certain fault conditions, a maximum static pressure of 35 cm H2O is
possible. If such a pressure could present risk to particular patients, then this device must not
be used.
For patients with limited respiratory capacity during sleep (for example, emphysema, reduced
central drive, neuromuscular, chest wall or lung parenchymal disease, and similar conditions),
the use of SmartStart feature may not be advisable; if the unit is stopped inadvertently by this
feature (due to a leak, for example) the patient may not have strong enough breathing to
restart the unit.
WARNINGS
!
•
THIS IS NOT A LIFE SUPPORT DEVICE. It may stop operating with a power
interruption or if a fault occurs in the product.
•
Explosion Hazard - Do not use in the vicinity of flammable anesthetics.
•
The SULLIVAN V nasal CPAP systems must only be used with a suitable mask system
as supplied by ResMed. ResMed mask systems have a number of special features which
are not common to other CPAP mask systems.
•
A nasal mask should not be worn unless the machine is turned on and operating
properly. The vent holes associated with the mask should never be blocked.
•
At low pressures, the flow through the exhalation ports may be inadequate to clear all
exhaled gas from the tubing. Some rebreathing may occur.
•
The air flow temperature for breathing produced by this device can be as much as 6°C
(11°F) higher than the temperature of the room. Caution should be exercised if the
room temperature is warmer than 32°C (90°F).
•
Do not open the flow generator case or attempt to adjust the unit.
OXYGEN USE
WARNINGS
•
!
Explanation: When the device is not in operation, and the oxygen flow is left on, oxygen
delivered into the air delivery tubing may accumulate within the device enclosure and
create a risk of fire.
•
2
If oxygen is used with this device, the oxygen flow must be turned off when the device is
not operating.
Oxygen supports combustion. Oxygen should not be used while smoking or in the
presence of an open flame.
i
At a fixed flow rate of supplemental oxygen flow, the inhaled oxygen concentration will vary,
depending on the pressure settings, patient breathing pattern, mask selection, and the leak rate.
WARNINGS AND CAUTIONS
NOTE
3
THE SULLIVAN V SERIES
LIGHTWEIGHT
The SULLIVAN V Lightweight is the standard model of the series. It is equipped with a delay
timer and international power supply.
PLUS
The SULLIVAN V Plus has all the features of the Lightweight, and in addition has a carry
bag, pressure display on the front panel and an hour meter on the underside.
ELITE
R210-352/2 K8
The SULLIVAN V Elite has all the features of the other models, and in addition has pressure
feedback, compliance data recording and SmartStart.
4
Please take some time to become familiar with the features of the SULLIVAN V flow
generator. For details on the range of accessories available, see “Accessories/Spare parts”
on page 29.
FRONT VIEW
Flow generator
THE SULLIVAN V SERIES
THE FLOW GENERATOR
Mirage mask
Control panel
Carry handle
Air outlet
(with air tubing connector)
Air tube
REAR VIEW
Air inlet and filter
Power plug
On/Off switch
5
BOTTOM VIEW
Do not disassemble - risk of electrical shock. Refer servicing to qualified personnel.
DANGER - Do not operate near anesthetics. Read Operating Manual before using.
Gefahr eines elektrischen Schocks - Gerät nicht auseinandernehmen. Wartung nur
durch qualifiziertes Personal. GEFAHR - Nicht in der Nähe von Betäubungsmitteln
benutzen. Benutzung nur auf Verschreibung eines Arztes.
Ne pas démonter - risque d'électrocution. S'adresser à un personnel technique
qualifié pour le service. DANGER - Ne pas faire fonctionner en
présenced'anesthésique. Lire le manuel d'utilisation avant emploi.
No desmontar - Riesgo de descargas eléctricas. Solicitar el mantenimiento al
personal técnico cualificado. PELIGRO - No manipular en presencia de anestésicos.
Leer el manual de instrucciones antes de utilizar el equipo.
Foam pad
Non smontare - rischio di scossa elettrica. Indirizzarsi a personale tecnico qualificato
per la manutenzione. PERICOLO - Non usare in presenza di anestetico. Leggere il
manuale d'istruzioni attentamente prima dell'uso.
Tag inte isär - risk för elstöt. Reparation endast av kvalificerad person. FARA Använd inte nära bedövningsmedel. Läs bruksanvisningen före användandet.
110-240V ~ 50-60 Hz, 120 VA
Made by ResMed Ltd, Sydney, Australia
ResMed Corp, San Diego, USA
ResMed (UK) Ltd, Abingdon, UK
ResMed Asia Pacific Ltd, Sydney, Australia
ResMed-Priess GmbH & Co KG, Moenchengladbach, Germany
ResMed SA, Lyon, France
ResMed Malaysia SDN BHD, Kuala Lumpur, Malaysia
LR76410
ACN 003 765 142
NRTL/C
Protected by: EP(DE,FR,GB) 0088761, JP 1697822, US 4944310,
US 5199424, US5522382.
C ResMed.
SULLIVAN® is a trademark of ResMed Ltd.
Serial No.
R210-305/4 C9
Hour meter
(Plus and Elite only)
Carry handle
Air outlet
6
1
2
CAUTION
!
NOTE
i
Check that you have the following items:
•
a SULLIVAN V flow generator unit
•
a power cord
•
a length of air tubing
•
an air tubing connector
•
a mask system (supplied separately).
ASSEMBLY
ASSEMBLY
Place the flow generator on a table near the head of the bed.
Be careful to place it where it cannot be bumped, and where someone will not trip over the
power cord.
The flow generator may be placed on the floor beside or underneath the patient’s bed. However, you
should ensure that the area is free from dust and clear of bedding, clothes or any other objects that
could block the air inlet.
3
Plug the power cord into the power socket at the rear of the flow generator.
4
Plug the other end of the power cord into a power outlet.
7
5
6
Assemble the mask system according to the user instructions supplied with the mask system.
Connect the air tubing connector to the air outlet of the flow generator. Connect one end of
the air tubing firmly onto the connector and the other end to the mask system.
Air tubing connector
NOTE
i
If the patient is using an axial swivel connector (supplied with the modular Mask Frame Kit, or
available separately), connect this too. For further information, please refer to the user instructions
supplied with the axial swivel.
If you are connecting a humidifier, please refer to the instructions supplied with the humidifier. The
Elite model will need to be set to Humidifier ON. See “Elite model” on page 15.
IMPORTANT
!
8
•
Make sure the power cord and plug are in good condition and the equipment is not
damaged.
•
Only use the same type of mask and air tubing as originally supplied with the flow
generator. A different type of mask or tubing may alter the pressure the patient receives,
therefore reducing the effectiveness of the treatment.
Turn on the power at the outlet and turn the flow generator switch to ON.
ASSEMBLY
7
The flow generator is now assembled. To start treatment, see “Preparing for use” on page
11.
9
10
Before the flow generator may be used by the patient, there are a number of settings that
need to be made by the clinician.
NOTE:
i
•
Reset the hour meter
•
Set the treatment pressure
•
Limit the delay times available
•
Set the start pressure
•
On the Elite model, you must also set the real-time clock and enable or disable
SmartStart. See “Elite model” on page 15.
PREPARING FOR USE
PREPARING FOR USE
The UCU2 can be used to adjust the following settings: IPAP pressure, delay times available,
start pressure. For further details, please refer to the UCU2 Clinical Manual.
RESETTING THE HOUR METER
The Plus and Elite (and some Lightweight) models are equipped with an hour meter. The
hour meter displays the total number of hours that the motor has been running, and may
therefore be taken as an indication of compliance. The hour meter may be found on the
underneath of the flow generator. See “Bottom View” on page 6.
The hour meter should be reset to zero when the flow generator is given to a patient.
NOTE
i
NOTE
i
You should reset the hour meter before setting the treatment pressure or start pressure.
To reset the hour meter:
1.
Hold down the Start, 5 minute and 10 minute buttons while you turn on the main
power switch at the rear of the flow generator. Keep the buttons pressed until the
Start, 5 minute and 10 minute buttons illuminate.
2.
Press the Stop and 20 minute buttons together and release them. The motor will start
running.
Do not press the Start, 5 minute or 10 minute buttons as this may interfere with the pressure
calibration of the flow generator. If one of these buttons has been pressed by mistake, the pressure
will need to be recalibrated. See “Calibration” on page 19.
3.
Press the 20 minute button to reset the hour meter.
4.
Press the Stop button to revert to normal operating mode, or turn the flow generator
off.
11
SETTING THE TREATMENT PRESSURE
To set the treatment pressure, you will need a reference manometer with a range of 0-22 cm
H2O in intervals of 0.1 cm, fitted with a sensor tube (3 or 2.5 mm internal diameter) and a
standard Luer taper fitting.
NOTE:
i
1.
Assemble the flow generator as the patient would normally use it complete with mask
and air tubing, and connect all accessories (e.g. humidifier, filters, O2 etc.) that are
normally used.
2.
Turn on the flow generator to allow the pressure transducer to warm up. The motor
does not need to be running; if it does start running, press the Stop button to stop the
flow. Let the flow generator warm up for 15 minutes
3.
Remove the plug from one of the access ports on the mask, and insert the Luer taper
end of the sensor tube. The other end of the sensor tube should be fitted to the
manometer. If you have a blind bubble, attach it to the mask. If you do not, or are using
the Mirage Mask, you will need to block the opening of the mask with the palm of your
hand (however, be careful not to block the mask vent).
4.
Turn the flow generator off. Hold down the Start and 20 minute buttons while you
turn on the main power switch at the rear of the flow generator. Keep the buttons
pressed until the Start and 20 minute buttons illuminate. The motor will start running
and will build up to the current pressure setting.
5.
Read the pressure on the manometer. Adjust the pressure using the 5 minute (decrease
pressure) and 10 minute (increase pressure) buttons until the manometer shows the
desired pressure. If you wish to set the pressure to 10 cm H2O, press the Start button.
The hour meter on the underside of the flow generator will display the set pressure while in pressure
setting mode. However, a manometer should be used when accurate pressure setting is required.
6.
12
Press the Stop button to revert to normal operating mode.
Remember to replace the plug in the access port of the mask.
0
Manometer
100
200
PREPARING FOR USE
.
300
Access port
Sensor tube
Figure 1 : Setting the Treatment Pressure
LIMITING THE DELAY TIMER
The delay timer starts treatment very gently while the patient falls asleep, and slowly
increases to full operating pressure over a selected time period. You can limit the delay times
available to the patient. The delay times are 0 (none), 5 minutes, 10 minutes and 20 minutes.
NOTE:
i
1.
Hold down the 5 minute and 10 minute buttons while you turn on the main power
switch at the rear of the flow generator. Keep the buttons pressed until the Stop and
Start buttons illuminate. Some other buttons may also light up.
2.
The lit buttons indicate which delay times are available. Press the 20 minute button to
add delay times and the Start button to remove them.
3.
Press the Stop button to revert to normal operating mode.
Pressing a delay button which has been disabled will activate the next enabled delay. For example, if the 20
minute delay has been disabled, pressing the 20 minute delay button will activate the 10 minute delay. If all
the time delays have been disabled, pressing any of the delay buttons will select Start.
SETTING THE START PRESSURE
13
The “Start pressure” is the pressure at which the flow generator starts when the delay timer is
used. To set the Start pressure, you will need a reference manometer with a range of 0-22 cm
H2O in intervals of 0.1 cm, fitted with a sensor tube (3 or 2.5 mm internal diameter) and a
standard Luer taper fitting.
14
1.
Assemble the flow generator as the patient would normally use it complete with mask
and air tubing, and connect all accessories (e.g. humidifier, filters, O2 etc.) that are
normally used.
2.
Turn on the flow generator to allow the pressure transducer to warm up. The motor
does not need to be running; if it does start running, press the Stop button to stop the
flow. Let the flow generator warm up for 15 minutes.
3.
Remove the plug from one of the access ports on the mask, and insert the Luer taper
end of the sensor tube. The other end of the sensor tube should be fitted to the
manometer. If you have a blind bubble, attach it to the mask. If you do not, or are using
the Mirage Mask, you will need to block the opening of the mask with the palm of your
hand (however, be careful not to block the mask vent.)
4.
Turn the flow generator off. Hold down the 5 minute and 20 minute buttons while you
turn on the main power switch at the rear of the flow generator. Keep the buttons
pressed until the 5 minute and 20 minute buttons illuminate. The motor will start
running and will build up to the current Start pressure setting.
5.
Read the pressure on the manometer. Adjust the Start pressure using the 5 minute
(decrease pressure) and 10 minute (increase pressure) buttons until the manometer
shows the desired Start pressure. If you wish to set the Start pressure to 4.0 cm H2O,
press the Start button.
6.
Press the Stop button to revert to normal operating mode.
SETTING THE REAL-TIME CLOCK
The real-time clock is used to determine compliance, and must be set before the flow
generator is given to the patient. To set the clock:
1.
Hold down the Start and 5 minute buttons while you turn on the main power switch
at the rear of the flow generator. Keep the buttons pressed until the Start and 5
minute buttons illuminate.
2.
The hour meter on the underside of the flow generator will display the currently set
time. Press the 5 minute button to change the hours and press the Start button to
change the minutes.
3.
Press the Stop button to revert to normal operating mode, or turn the power off.
4.
The clock battery has a 5 year life span. If you are using the flow generator to monitor
patient compliance, be sure to contact your supplier to have the battery replaced before
the end of the battery life span.
ELITE MODEL
ELITE MODEL
SMARTSTART
When SmartStart is enabled the flow generator will automatically start when the patient
breathes into the mask, and automatically stop when they remove the mask. To enable
SmartStart:
1.
Hold down the Start, 5 minute and 20 minute buttons while you turn on the main
power switch at the rear of the flow generator. Keep the buttons pressed until the
pressure display lights come on.
2.
Press the Start button to enable/disable SmartStart. If the Start button is lit, then
SmartStart is enabled. If the Start button is not lit, then SmartStart is disabled.
3.
If the patient is using a humidifier, then the humidifier setting must be set to ON. Press
the 20 minute button to set the humidifier setting. If the 20 minute button is lit, then
the humidifer setting is ON. If the 20 minute button is not lit, then the humidifer
setting is OFF.
4.
Press the Stop button to revert to normal operating mode, or turn the power off.
AUTOMATIC LEAK ADJUSTMENT
15
The Elite model uses a pressure sensor to accurately determine the treatment pressure at the
patient’s mask. If a leak should occur, the flow generator will increase the air flow slightly to
maintain the treatment pressure at the set level.
DOWNLOADING COMPLIANCE DATA
The Elite model records up to 200 nights of patient compliance data that can be downloaded
for review and print-out. Data may also be downloaded via modem. Please refer to your
compliance software manual for details.
16
1
2
The flow generator should be assembled beside the patient’s bed with the air tubing and
mask system connected. (See “Assembly” on page 7.)
STARTING TREATMENT
STARTING TREATMENT
Have the patient lie down in bed and put the mask on. Arrange the air tube so that it is free
to move if they turn in their sleep.
* this configuration is not
possible with the Mirage mask
CAUTION
!
3
Do not leave long lengths of air tubing around the top of the bed that could twist around
the patient’s head or neck while sleeping.
Start the flow generator in one of three ways:
Stop
button
Start
button
5
10
20
Delay timer buttons
17
START BUTTON
Press the Start button to start the air flow. The air will begin flowing slowly and build up to
full operating pressure in about 10 - 15 seconds.
DELAY TIMER
If the patient has difficulty falling asleep with full pressure, they can use the Delay timer. The
airflow will start very gently while they fall asleep, and slowly increase to full operating
pressure over a selected time period. They can select a delay time of 5, 10 or 20 minutes (unless
you have disabled some of the delay times).
Choose a delay time and press the corresponding button. The air will start to flow
automatically. There is no need to push the Start button. If you the patient has not yet fallen
asleep after the delay period, they may press one of the delay buttons again.
SMARTSTART (ELITE ONLY)
When SmartStart is enabled the flow generator will automatically start when the patient
breathes into the mask, and stop when they remove it. If the patient wants to use the Delay
timer, they will need to press a delay button to start treatment. However, the flow generator
will still stop automatically. SmartStart can only be enabled by the clinician. See “Elite model”
on page 15.
STOPPING
The patient may stop treatment at any time by pressing the Stop button. If they have the Elite
model and SmartStart is enabled, they can simply remove their mask, and treatment will stop
automatically.
GETTING UP
If the patient needs to get up during the night, they must remove their mask and turn the
flow generator off. The patient should be reminded to replace their mask when they return to
bed and turn the flow generator on again.
18
The flow generator is factory calibrated before delivery and will not require periodic
calibration for home use. However, for clinical use such as titrations, the calibration should
be checked every month.
NOTE:
i
CALIBRATION
CALIBRATION
Some countries require all medical equipment to have a periodic service and calibration. Please
check the regulations in your country.
QUICK CHECK
To check the calibration of the flow generator:
1.
Set the treatment pressure to 16 cm H2O using the hour meter display on the bottom
of the flow generator. (To do this, see “Setting the treatment pressure” on page 12.)
2.
Measure the pressure at the mask using an accurate manometer. If the delivered
pressure differs more than 0.5 cm H2O from 16 cm H2O, then the calibration will
need adjusting.
ADJUSTING THE CALIBRATION
To calibrate the flow generator you will need a reference manometer with a range of 0-22
cm H2O in intervals of 0.1 cm, fitted with a sensor tube (3 or 2.5 mm internal diameter) and
a standard Luer taper fitting.
1.
Assemble the flow generator as the patient would normally use it, and connect all
accessories (e.g. humidifier, filters, O2 etc.) that are normally used.
2.
Turn on the flow generator to allow the pressure transducer to warm up. The motor
does not need to be running; if it does start running, press the Stop button to stop the
flow. Let the flow generator warm up for 15 minutes.
3.
Remove the plug from one of the access ports on the mask, and insert the Luer taper
end of the sensor tube. The other end of the sensor tube should be fitted to the
manometer.
4.
Turn the flow generator off. Hold down the Start, 5 minute and 10 minute buttons
while you turn on the main power switch at the rear of the flow generator. Keep the
buttons pressed until the Start, 5 minute and 10 minute buttons illuminate.
5.
If you have a blind bubble, attach it to the mask. If you do not, or are using the Mirage
mask, block the opening of the mask with the palm of your hand (however, be careful
not to block the mask vent).
6.
Press the Stop and 20 minutes buttons together and release them. The motor will
start running and will build up to pressure.
19
7.
Read the pressure on the manometer. Adjust the pressure using the 5 minute (decrease
pressure) and 10 minute (increase pressure) buttons until the pressure on the
manometer reads 16 ± 0.2 cm H2O.
8.
Press the Stop button to revert to normal operating mode, or turn the flow generator
off.
0
Manometer
100
200
300
Access port
Sensor tube
Figure 2 : Calibrating the Flow Generator
NOTE:
i
20
The Lightweight and Plus models will need recalibrating if the patient lives above an altitude of
900m (3000’). Contact your supplier for further details. The Elite model has a pressure sensor that
automatically adjusts for altitude variations.
DAILY
Disconnect the air tubing and hang it up in the shade - not in the sun, as the tubing may
harden and crack over time.
Clean the mask according to the User Instructions supplied with it.
CLEANING AND MAINTENANCE
CLEANING AND MAINTENANCE
If you are using a humidifier, clean it in accordance with the instructions in the manual
supplied with it.
WEEKLY
Wash the air tube with mild detergent and drip dry. Wash the mask and headgear according
to the User Instructions supplied with them.
PERIODICALLY
The exterior of the flow generator should be cleaned with a damp cloth and mild detergent.
WARNINGS:
!
Beware of electrocution. Do not immerse the flow generator or power cord in water. Always
unplug the flow generator before cleaning and be sure that it is dry before plugging it back in.
The mask and air tube are subject to normal wear and tear. Inspect them regularly for
damage.
REPLACING THE AIR FILTER STRIPS
The air filter strips should be replaced
approximately every 6 months (or more often if
they become noticeably dirty).
To remove the air filters, slide out the air filter
cover.
Instructions on replacing the air filter strip are
supplied with the new filters.
WARNING
Do NOT wash the air filter strips. The air filter strips are not washable.
!
21
22
All SULLIVAN V Series flow generators are designed to give years of trouble free operation.
They will not require regular servicing provided that they are cleaned and maintained
according to the instructions in this manual. If you feel that your unit is not performing
properly, see “Self testing (Plus and Elite models)” below and “Troubleshooting” on
page 24.
SERVICING
SERVICING
If it is still not working properly, consult your equipment supplier or take it to an authorized
service agent.
CAUTION
!
Inspection and repair should only be performed by an authorized service agent.
Under no circumstances should you attempt to service or repair the unit yourself.
SELF TESTING (PLUS AND ELITE MODELS)
You may conduct a self test to check whether the flow generator’s software and hardware
are running correctly.
1.
Hold down the Stop, Start and 5 minute buttons while you turn on the main power
switch at the rear of the flow generator. Keep the buttons pressed until the Stop or
Start buttons illuminate. The flow generator is now in self testing mode. The hour
meter on the underside of the flow generator will show tESt.
2.
One at a time, press the Stop, Start, 5 minute, 10 minute and 20 minute buttons.
Each time, the corresponding button should illuminate.
3.
Press the 20 minute button again. This will initiate three further tests. The motor
should start, the lights on the pressure display should cycle upwards and the hour
meter should show a repeating cycle 1111, 2222, 3333, 4444 etc.
4.
Turn the flow generator off at the main power switch. When next switched on, the
flow generator will revert to normal operating mode.
23
TROUBLESHOOTING
Problem
Possible cause
Solution
Flow generator does not start when you
press the Start or Delay timer
button (and the buttons are not
illuminated)
•Power cord is not connected
properly
•Check both ends of the power
cord
•Flow generator is not switched
on
•Switch on main switch at rear of
unit
•Power outlet may be faulty
•Try another power outlet
•Power is not on
•Check both ends of the power
cord are plugged in properly
SmartStart is enabled (Elite only) but
flow does not start when you begin
breathing in the mask
•Check main switch at rear of unit
is on
•Power outlet may be faulty. Try
another power outlet
•Breath is not deep enough to
trigger SmartStart
•Excessive leak
•Take a deep breath in and out
through the mask
•Adjust position of mask and
headgear
•Plugs may be missing from ports
on mask. Replace them
•Air tube not connected properly.
Connect air tube firmly at both
ends
•Air tube kinked or punctured.
Straighten or replace air tube
SmartStart is enabled, but the flow
generator does not stop automatically
when you remove your mask
•SmartStart not enabled
•Check with your clinician
•Flow generator incorrectly
calibrated
•Return to supplier for calibration
•SmartStart not enabled
•Use only equipment as
recommended and supplied by
ResMed, or have SmartStart
disabled
•Incompatible humidifier or mask
system being used
24
•Contact your clinician
Possible cause
Solution
Insufficient air flow delivered from the
flow generator
•Delay timer is in use
•Wait for air pressure to build up
gradually, or press the Start
button to start immediately
•Replace air filter strips
•Air filter strips are dirty
•Air tubing is kinked or punctured
•Air tubing is not connected
properly
•Straighten or replace air tubing
TROUBLESHOOTING
Problem
•Check and tighten both ends of
the air tubing
•Replace plugs
•Plugs missing from the mask
ports
Air leaking around nose and eyes
•Nasal cushion not fitted properly
onto mask frame
•Fit cushion properly
•Mask and headgear straps not
positioned correctly
•Adjust position of mask and
headgear (Note: tighter is not
always better)
•Plugs missing from mask ports
•Replace plugs
•Nasal cushion is torn or distorted
•Replace cushion
Stop button flashing constantly when
flow generator turned on
•Flow generator fault
•Return to supplier for service
25
26
A number of possible problems may arise during the course of CPAP treatment. The
following Warning is printed in the User’s Manual:
WARNING
!
If you experience any of the following symptoms during your CPAP treatment, consult your
clinician immediately:
•
Headache
•
Middle ear or sinus discomfort
•
Chest pain
•
Dryness of the nose, mouth or throat
WARNINGS RELATED TO TREATMENT
WARNINGS RELATED TO TREATMENT
(The use of a humidifier may help. Your clinician or equipment supplier can advise you
on the range of humidifiers available.)
•
Feeling slightly bloated
(This is usually the result of swallowing air while you are awake. Using the delay timer
may help, but consult your clinician if the symptoms persist.)
•
Air continually leaking out of the mouth while sleeping
•
Recurrence of any sleep apnea symptoms while on CPAP.
Do not stop your CPAP treatment without the approval of your clinician. Always consult
your clinician if you expect to be in a situation where you cannot use your CPAP for more
than a few days.
If you are admitted to hospital or prescribed any other form of medical treatment, always
inform the medical staff that you are being treated with nasal CPAP. It is also important to
contact the clinician who is treating you for sleep apnea.
If you experience an infection of the upper respiratory tract, middle ear or sinus, contact
your clinician before continuing your CPAP treatment. You may be advised to stop
treatment until the infection has cleared. If you continue with treatment during an infection,
it is advisable to wash your mask and tubing more often.
Skin irritation may occur from sensitivity to the materials in the mask or from too much
tension in the headgear straps. A correctly fitted mask and optimum tension in the straps
will often prevent skin irritation. If problems persist, contact your clinician for advice.
27
28
ACCESSORIES/SPARE PARTS
ACCESSORIES/SPARE PARTS
HumidAire™ heated humidifier
HCH Humidification Insert
(Modular mask only)
ResMed Passover humidifier
Chin strap
Replacement air filter strips
Air tube (2m/6’ 6”)
Carry bag
Power cord
Axial swivel
Mirage Mask
Air tubing connector
29
30
SULLIVAN® V CPAP FLOW GENERATORS
PERFORMANCE
SPECIFICATIONS
SPECIFICATIONS
Operating pressure range: 4 - 20 cm H2O.
DIMENSIONS (H X W X D)
105 mm x 240 mm x 280 mm
(4.1 in x 9.4 in x 11.0 in)
WEIGHT
Elite: 2.0 kg (4.4 lb), Plus: 2.0 kg (4.4 lb), Lightweight 1.7 kg (3.7 lb)
NOTE:
i
Weight may vary slightly depending on model.
POWER SUPPLY
Input range: 110-240 V, 50-60 Hz, 120 VA
HOUSING CONSTRUCTION
Injection molded plastic
AIR FILTER STRIPS
Outer filter strip: polyester fibre
Inner filter strip: open cell polyester-urethane foam
ENVIRONMENTAL RATINGS
Temperature limits: Operating +5°C to +40°C, Storage -20°C to +60°C
Humidity limits: Operating 15 to 95% RH (non-condensing), Storage up to 95% RH (noncondensing)
31
AIR TUBING
Flexible Hytrel plastic, 2 m (6’ 6”) length
IEC 601-1 CLASSIFICATIONS
Class II
Type CF
NOTE
i
The manufacturer reserves the right to change these specifications without notice.
GLOSSARY
Class II (double insulated)/Classe II (double isolation)
Type CF Applied Part/ Partie appliquée du type CF
FLOW/PRESSURE CURVE
Mirage Mask
Pressure (cm H20)
25
20
15
10
5
0
0
10
20
30
40
Diffuser Flow (L/m in)
32
50
60