1
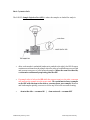
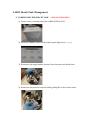
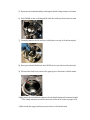
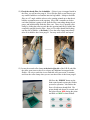
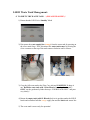
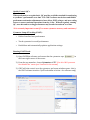
LSR II Start-Up Protocol: (Monday - Friday) 1. Turn on the power to the computer (attached to right side of the workstation) - at the Windows login prompt, select ‘administrator’ and enter ‘BDIS’ as the password to log in and gain access to the computer. 2. Push the GREEN POWER SWITCH on the lower right corner to turn on the LSR II. 3. ALLOW LASERS TO WARM UP FOR 30MIN BEFORE RUNNING SAMPLES! (IF YOU ARE THE 1ST USER OF THE DAY AND LSR IS NOT ALREADY ON) 4. Double click the ‘BD FACSDiva Software’ desktop icon to launch program. 5. When prompted, SELECT YOUR P.I. as the user and leave password field blank. 6. Once the FACSDiva software has connected to the cytometer (usually 1-2min), it will ask you to Choose CST Settings – Select ‘Keep Current Settings’ *If you see the message ‘Cytometer Disconnected’ after launching the FACSDiva software, click on ‘Cytometer’ from the top menu and select ‘Connect’ to re-connect the software. If this is unsuccessful, try power cycling the cytometer (turn off and on by pressing the green power switch) and then click ‘Connect’ again. If this still did not work, try power cycling both the workstation computer and the cytometer. LSR II Daily Start-Up.docx Created by Dave Stanley 7. Verify the sheath and waste tank fluid levels – If the sheath tank level is low, you will need to replenish the sheath supply - if the waste level is high, you will need to empty the waste tank. *(PLEASE WEAR PPE!)* *(SEE ‘SHEATH TANK MANAGEMENT’ PROTOCOL TO REFILL SHEATH)* *(SEE ‘WASTE TANK MANAGEMENT’ PROTOCOL TO EMPTY WASTE)* 8. When you are ready to acquire your first sample PRESS THE ‘RUN’ BUTTON on the front control panel à the light will turn from ORANGE (standby) to GREEN (running). Pre-Experiment Cleaning: 9. Load and Acquire a tube of 10% Bleach for 5 minutes - (Clean). 10. Load and Acquire a tube of ddH20 for 5 minutes - (Rinse). 11. Proceed with your experiment. Sample Flow Rates: LO = 12µl/min MED = 35µl/min HI = 60µl/min *These values are approximate, and may be (+/-) by adjusting the ‘SAMPLE FINE ADJ’ knob. The knob turns 10x times, adjusting the flow rate for each setting (H/M/L) from 0.5x to 2x the sample flow rate. The 5th turn marks the 1x point for each setting, which reflects the sample flow rate values listed above. LSR II Daily Start-Up.docx Created by Dave Stanley Basic Cytometer Info: The LSR II’s Sample Injection Port (SIP) is where the samples are loaded for analysis: • • • After each sample is unloaded (and arm is pushed to the side), the LSR II runs a continuous vacuum thru the sample injection tube to backflush any excess fluid and prevent carryover of cells between samples. When the arm is to the side, a vacuum is continuously aspirating thru the SIP. If a sample tube is left on the SIP while the support arm is to the side, a vacuum will aspirate the sample into the waste tank. Be careful not to leave a sample on the SIP with the arm to the side or you may loose your sample! Remove and load samples quickly, so as not to loose any cells in the vacuum cleaning. Arm to the side = vacuum ON / Arm centered = vacuum OFF LSR II Daily Start-Up.docx Created by Dave Stanley LSR II Sheath Tank Management: à TO REPLENISH THE SHEATH TANK: *(PLEASE WEAR PPE!)* 1) Locate a new (or already open) box of BD FACSFlow (20L) 2) Press the ‘Standby’ button on the control panel (light turns orange) 3) Disconnect the supply and air pressure lines from the steel sheath tank 4) Release the air pressure from the tank by pulling UP on the ‘release valve’ 5) Open the steel sheath tank by twisting the black clamp counter-‐clockwise 6) Push DOWN on the oval-‐shaped lid until the lid drops down into the tank 7) Carefully remove the lid and set it aside (place on top of clean kim wipes) 8) Next, pour sheath fluid from the FACSFlow box into the steel sheath tank 9) Fill until the fluid level reaches the upper groove line that is visible inside 10)Re-‐insert the tank lid and tighten with the black clamp until extremely tight. * The clamp arm must cross the short axis of the lid to create a proper seal. 11)Re-‐attach the supply and air pressure lines to the sheath tank 12) Check the sheath filter for air bubbles – if there is any air trapped inside in the filter, you will need to purge it. First, flick the filter several times to get any smaller bubbles to accumulate into one big bubble. It helps to hold the filter at a 45° angle with the release valve opening pointed up so that the air bubbles accumulate next to the opening. Next, find a container or dish to catch the fluid that is going to leak from the filter vent tubing during the air purge, and hold this dish under the filter vent. Then, slowly open the roller clamp by sliding the roller towards the tube opening until the air bubble has completely purged from the filter – there will be some sheath fluid leaking out after the air bubble, so Be Ready! Close the roller clamp immediately after all air bubbles have been purged. You may need to flick and repeat.. ======> 13) Locate the second roller clamp at the back right side of the LSR II and slide the roller open (same as above) to release any additional air trapped in the fluidics. Be sure to catch the excess fluid that will come out in a container, and close the roller clamp when you are sure that all the air has been purged. 14) Press the ‘PRIME’ button on the front control panel to prime the fluidics system for operation – this flushes the flow cell with new sheath fluid. The prime should take about 30 seconds, and the light will turn RED during the prime and back to GREEN when finished. LSR II Waste Tank Management: à TO EMPTY THE WASTE TANK: *(PLEASE WEAR PPE!)* 1) Ensure that the LSR II is in ‘Standby’ Mode 2) Disconnect the waste supply line (orange) from the waste tank by pressing on the silver metal clasp. Next, disconnect the waste tank sensor by twisting the silver connector at the top of the tank counter-clockwise until it releases (Bleach Under Sink) 3) Carry the full waste tank to the Flow Core sink and CAREFULLY dump it out. Refill the waste tank with 1 Liter Bleach (located under the sink) – ONLY use the graduated cylinder that says ‘FOR BLEACH ONLY’ and pour very slowly! 4) Return the empty tank (with 1L Bleach) back to its position under the LSR II bench and reconnect both the orange supply line and the black tank sensor line 5) The waste tank is now ready for operation! Quality Control (QC): When performed on a regular basis, QC provides a reliable standard for monitoring a cytometer’s performance over time. The CS&T software tracks laser and fluidics performance and makes adjustments to laser delays, PMT voltages, and area scaling factors to ensure consistent operations from day to day. Without regularly running QC, user data and/or sorting performance may become inconsistent over time. *It is extremely important to run QC to ensure cytometer accuracy and consistency! Cytometer Setup & Tracking (CS&T): • Defines baseline laser performance Tracks cytometer’s overall performance • Establishes and automatically updates application settings • Running CS&T Beads: 1) Open FACSDiva software and ensure that the cytometer says in the lower right corner of the screen 2) From the top menu bar, choose Cytometer > CST *(for Aria I & II you must first disable the ‘sweet spot’ function for the stream) 3) CS&T will take control over the cytometer, and a new window opens -‐ this is the CS&T software interface *(will look similar to below -‐ for reference only) 1) First, you will need to select the configuration that you plan to use for your experiment. A ‘configuration’ is a saved software profile for a particular set of filters and/or a nozzle size. If you are on the Aria I or II, there are different configurations that pair with each nozzle size -‐ be sure that you have selected the configuration that matches the nozzle size you are using. (Please refer to ‘Changing the Nozzle Size & Configuration’ in the User Manual). If you are on the LSRII and do not require any filter changes for your experiment, leave the configuration ‘as is’ and proceed with CS&T. 2) 3) 4) 5) Grab the QC Beads from the FACS Core fridge (look in the white ‘BD’ box). There should already be a 5ml tube inside the QC box containing beads diluted in H20, but if there isn’t, first vortex a QC bead vial and then add 2 drops per 1ml H20 in a 5ml tube to achieve an optimal concentration. =====> Ensure that the bead lot ID # listed in the CS&T software window matches the bead lot ID # that is actually listed on the QC bead vial (look on the box and the individual vials containing the QC beads). They should be the same lot ID # as the flow core regularly checks to ensure QC beads are up to date. If not, please inform the flow core manager and ask for assistance. (it is not mandatory to run QC before every experiment – if you are unable to locate the beads etc. proceed with your experiment and simply skip QC). Load the 5ml QC bead tube onto the cytometer and click on the green ‘RUN’ button. Ensure that the drop-‐down box above it says ‘Check Performance.’ The CS&T software will now perform Quality Control, which takes ~5-‐7min. 6) If there are any errors upon completion, please notify the core manager. The results are saved in the software, so you may click OK and proceed with your experiment if the manager is not in the lab. Post Experiment Cleaning (LSR II): After you finish your experiment, please perform the following cleaning procedure: 1) Load a tube of 10% Bleach and leave the SIP arm to the side for ~2min. * This cleans the SIP arm of any cells/debris so they don’t enter the system 2) ‘Acquire’ the tube of 10% Bleach for 5 minutes – (Clean). 3) Load and Acquire a tube of ddH20 for 5 minutes – (Rinse). 4) From ‘File’ tab select ‘Log Out’ to exit your account. Shut-‐Down (LSR II): If you are the last user of the day, please shut down the cytometer and computer: 1) Ensure that the cleaning procedure has been performed!!! 2) Exit Diva software and turn off the computer (standard windows shutdown) 3) Turn OFF the LSR II by pressing the GREEN power button on the front right LSR II Post Experiment Cleaning.docx Created by Dave Stanley