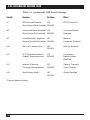
1
SEPTEMBER 1999
MD1600C
MD1601C
V.34 Rackmount Modem Card
for 2-/4-Wire
V.34 Rackmount Modem Card
for 2-Wire Only
CUSTOMER
SUPPORT
INFORMATION
Order toll-free in the U.S. 24 hours, 7 A.M. Monday to midnight Friday: 877-877-BBOX
FREE technical support, 24 hours a day, 7 days a week: Call 724-746-5500 or fax 724-746-0746
Mail order: Black Box Corporation, 1000 Park Drive, Lawrence, PA 15055-1018
Web site: www.blackbox.com • E-mail: [email protected]
V.34 RACKMOUNT MODEM CARD
FEDERAL COMMUNICATIONS COMMISSION
AND
INDUSTRY CANADA
RADIO FREQUENCY INTERFERENCE STATEMENTS
This equipment generates, uses, and can radiate radio frequency energy and if not
installed and used properly, that is, in strict accordance with the manufacturer’s
instructions, may cause interference to radio communication. It has been tested
and found to comply with the limits for a Class A computing device in accordance
with the specifications in Subpart J of Part 15 of FCC rules, which are designed
to provide reasonable protection against such interference when the equipment
is operated in a commercial environment. Operation of this equipment in a
residential area is likely to cause interference, in which case the user at his own
expense will be required to take whatever measures may be necessary to correct
the interference.
Changes or modifications not expressly approved by the party responsible
for compliance could void the user’s authority to operate the equipment.
This digital apparatus does not exceed the Class A limits for radio noise emission from
digital apparatus set out in the Radio Interference Regulation of Industry Canada.
Le présent appareil numérique n’émet pas de bruits radioélectriques dépassant les limites
applicables aux appareils numériques de la classe A prescrites dans le Règlement sur le
brouillage radioélectrique publié par Industrie Canada.
1
V.34 RACKMOUNT MODEM CARD
NORMAS OFICIALES MEXICANAS (NOM)
ELECTRICAL SAFETY STATEMENT
INSTRUCCIONES DE SEGURIDAD
1. Todas las instrucciones de seguridad y operación deberán ser leídas antes
de que el aparato eléctrico sea operado.
2. Las instrucciones de seguridad y operación deberán ser guardadas para
referencia futura.
3. Todas las advertencias en el aparato eléctrico y en sus instrucciones de
operación deben ser respetadas.
4. Todas las instrucciones de operación y uso deben ser seguidas.
5. El aparato eléctrico no deberá ser usado cerca del agua—por ejemplo, cerca
de la tina de baño, lavabo, sótano mojado o cerca de una alberca, etc..
6. El aparato eléctrico debe ser usado únicamente con carritos o pedestales
que sean recomendados por el fabricante.
7. El parato eléctrico debe ser montado a la pared o al techo sólo como sea
recomendado por el fabricante.
8. Servicio—El usuario no debe intentar dar servicio al equipo eléctrico más allá
a lo descrito en las instrucciones de operación. Todo otro servicio deberá ser
referido a personal de servicio calificado.
9. El aparato eléctrico debe ser situado de tal manera que su posición no
interfiera su uso. La colocación del aparato eléctrico sobre una cama, sofá,
alfombra o superficie similar puede bloquea la ventilación, no se debe colocar
en libreros o gabinetes que impidan el flujo de aire por los orificios de
ventilación.
10. El equipo eléctrico deber ser situado fuera del alcance de fuentes de calor
como radiadores, registros de calor, estufas u otros aparatos (incluyendo
amplificadores) que producen calor.
2
V.34 RACKMOUNT MODEM CARD
11. El aparato eléctrico deberá ser connectado a una fuente de poder sólo del
tipo descrito en el instructivo de operación, o como se indique en el aparato.
12. Precaución debe ser tomada de tal manera que la tierra fisica y la polarización
del equipo no sea eliminada.
13. Los cables de la fuente de poder deben ser guiados de tal manera que no
sean pisados ni pellizcados por objetos colocados sobre o contra ellos,
poniendo particular atención a los contactos y receptáculos donde salen
del aparato.
14. El equipo eléctrico debe ser limpiado únicamente de acuerdo a las
recomendaciones del fabricante.
15. En caso de existir, una antena externa deberá ser localizada lejos
de las lineas de energia.
16. El cable de corriente deberá ser desconectado del cuando el equipo
no sea usado por un largo periodo de tiempo.
17. Cuidado debe ser tomado de tal manera que objectos liquidos no sean
derramados sobre la cubierta u orificios de ventilación.
18. Servicio por personal calificado deberá ser provisto cuando:
A: El cable de poder o el contacto ha sido dañado; u
B: Objectos han caído o líquido ha sido derramado dentro del aparato; o
C: El aparato ha sido expuesto a la lluvia; o
D: El aparato parece no operar normalmente o muestra un cambio
en su desempeño; o
E: El aparato ha sido tirado o su cubierta ha sido dañada.
3
V.34 RACKMOUNT MODEM CARD
FCC REQUIREMENTS FOR
TELEPHONE-LINE EQUIPMENT
1. The Federal Communications Commission (FCC) has established rules
which permit this device to be directly connected to the telephone network
with standardized jacks. This equipment should not be used on party lines
or coin lines.
2. If this device is malfunctioning, it may also be causing harm to the
telephone network; this device should be disconnected until the source of
the problem can be determined and until the repair has been made. If this
is not done, the telephone company may temporarily disconnect service.
3. If you have problems with your telephone equipment after installing this
device, disconnect this device from the line to see if it is causing the
problem If it is, contact your supplier or an authorized agent.
4. The telephone company may make changes in its technical operations
and procedures. If any such changes affect the compatibility or use of
this device, the telephone company is required to give adequate notice
of the changes.
5. If the telephone company requests information on what equipment is
connected to their lines, inform them of:
a. The telephone number that this unit is connected to.
b. The ringer equivalence number.
c. The USOC jack required: RJ-11C.
d. The FCC registration number.
Items (b) and (d) can be found on the unit’s FCC label. The ringer
equivalence number (REN) is used to determine how many devices can be
connected to your telephone line. In most areas, the sum of the RENs of all
devices on any one line should not exceed five (5.0). If too many devices
are attached, they may not ring properly.
6. In the event of an equipment malfunction, all repairs should be performed
by your supplier or an authorized agent. It is the responsibility of users
requiring service to report the need for service to the supplier or to an
authorized agent.
TRADEMARKS
Any trademarks mentioned in this manual are the sole property of their owners.
4
V.34 RACKMOUNT MODEM CARD
CONTENTS
1. Specifications . . . . . . . . . . . . . . . . . . . . . . . . . . . . . . . . . . . . . . . . . . . . . 7
2. Introduction and Description . . . . . . . . . . . . . . . . . . . . . . . . . . . . . . . . 10
2.1 Introduction . . . . . . . . . . . . . . . . . . . . . . . . . . . . . . . . . . . . . . . . . . . 10
2.2 Features . . . . . . . . . . . . . . . . . . . . . . . . . . . . . . . . . . . . . . . . . . . . . . . 10
2.3 How to Use This Manual . . . . . . . . . . . . . . . . . . . . . . . . . . . . . . . . . 11
3. Installing Your Modem. . . . . . . . . . . . . . . . . . . . . . . . . . . . . . . . . . . . . . 12
3.1 Before You Begin . . . . . . . . . . . . . . . . . . . . . . . . . . . . . . . . . . . . . . . 12
3.1.1Card Cage . . . . . . . . . . . . . . . . . . . . . . . . . . . . . . . . . . . . . . . . . . 12
3.1.2 Serial Cable. . . . . . . . . . . . . . . . . . . . . . . . . . . . . . . . . . . . . . . . . 12
3.1.3 Telephone Line . . . . . . . . . . . . . . . . . . . . . . . . . . . . . . . . . . . . . 12
3.2 Installation . . . . . . . . . . . . . . . . . . . . . . . . . . . . . . . . . . . . . . . . . . . . 12
3.3 PC Board Controls . . . . . . . . . . . . . . . . . . . . . . . . . . . . . . . . . . . . . . 13
3.3.1 DIP-Switch Settings . . . . . . . . . . . . . . . . . . . . . . . . . . . . . . . . . . 14
3.4 OOS (Busy Out) Toggle Switch. . . . . . . . . . . . . . . . . . . . . . . . . . . . 18
3.4.1 Out of Service/Test Jumper . . . . . . . . . . . . . . . . . . . . . . . . . . . 18
3.5 Dial-Up and Leased Lines . . . . . . . . . . . . . . . . . . . . . . . . . . . . . . . . 19
3.6 Modem LED Indicators. . . . . . . . . . . . . . . . . . . . . . . . . . . . . . . . . . 20
4. Software Configuration . . . . . . . . . . . . . . . . . . . . . . . . . . . . . . . . . . . . . 23
4.1 Introduction . . . . . . . . . . . . . . . . . . . . . . . . . . . . . . . . . . . . . . . . . . . 23
4.2 Serial Port Limitations . . . . . . . . . . . . . . . . . . . . . . . . . . . . . . . . . . . 23
4.2.1 How Can You Identify Your UART Type? . . . . . . . . . . . . . . . . 24
4.2.2 The 16550 UART and Windows 3.1 . . . . . . . . . . . . . . . . . . . . . 26
4.3 Configuring Your Software. . . . . . . . . . . . . . . . . . . . . . . . . . . . . . . . 27
4.3.1 Configuring Software for Your Modem . . . . . . . . . . . . . . . . . . 27
4.4 PC Initialization Strings . . . . . . . . . . . . . . . . . . . . . . . . . . . . . . . . . . 27
4.4.1 Changing Default Parameters . . . . . . . . . . . . . . . . . . . . . . . . . . 29
4.5 Macintosh Initialization . . . . . . . . . . . . . . . . . . . . . . . . . . . . . . . . . . 29
4.6 Configuring Software for Your Computer . . . . . . . . . . . . . . . . . . . 29
4.6.1 Configuring Software for the Remote System . . . . . . . . . . . . . 30
4.6.2 Terminal Emulation . . . . . . . . . . . . . . . . . . . . . . . . . . . . . . . . . 31
4.6.3 File Transfer Protocols. . . . . . . . . . . . . . . . . . . . . . . . . . . . . . . . 31
4.7 When to Disable Data Compression . . . . . . . . . . . . . . . . . . . . . . . . 32
4.7.1 Disabling Error Correction . . . . . . . . . . . . . . . . . . . . . . . . . . . . 33
5
V.34 RACKMOUNT MODEM CARD
5. Modem Commands, S-Registers, and Result Codes. . . . . . . . . . . . . . . 34
5.1 Modem AT Commands . . . . . . . . . . . . . . . . . . . . . . . . . . . . . . . . . . 34
5.1.1 Callback Security Commands . . . . . . . . . . . . . . . . . . . . . . . . . . 47
5.1.2 V.25bis Commands . . . . . . . . . . . . . . . . . . . . . . . . . . . . . . . . . . 48
5.1.3 Remote Configuration. . . . . . . . . . . . . . . . . . . . . . . . . . . . . . . . 49
5.1.4 Remote Configuration Procedures. . . . . . . . . . . . . . . . . . . . . . 50
5.2 S-Registers . . . . . . . . . . . . . . . . . . . . . . . . . . . . . . . . . . . . . . . . . . . . . 51
5.3 Result Codes . . . . . . . . . . . . . . . . . . . . . . . . . . . . . . . . . . . . . . . . . . . 57
5.3.1 AT Commands and S-Register Summary . . . . . . . . . . . . . . . . . 59
6. Testing Your Modem . . . . . . . . . . . . . . . . . . . . . . . . . . . . . . . . . . . . . . . 61
6.1 Local Analog Loopback Test/V.54 Loop 3. . . . . . . . . . . . . . . . . . . 61
6.2 Digital Loopback Test/V.54 Loop 2 (Local/Manual). . . . . . . . . . 62
6.3 Digital Loopback Test/V.54 Loop 2 (Remote/Automatic) . . . . . 63
6.4 Local Analog Loopback Test (Synchronous Mode) . . . . . . . . . . . 65
6.5 Digital Loopback Test (Local/Manual) (Synchronous Mode) . . 65
6.6 Digital Loopback Test (Remote/Automatic,
Synchronous Mode) . . . . . . . . . . . . . . . . . . . . . . . . . . . . . . . . . . . . . . 66
7. Service and Tech Support . . . . . . . . . . . . . . . . . . . . . . . . . . . . . . . . . . . 67
Appendix: Regulatory Information. . . . . . . . . . . . . . . . . . . . . . . . . . . . . . 68
Index . . . . . . . . . . . . . . . . . . . . . . . . . . . . . . . . . . . . . . . . . . . . . . . . . . . . . . 72
6
V.34 RACKMOUNT MODEM CARD
1. Specifications
Data Rates (Modem) — 33,600, 31,200, 28,800, 26,400, 24,000, 21,600, 19,200,
16,800, 14,400, 12,000, 9600, 7200, 4800, 2400, 1200, 0-300 bps
Data Rates (Fax) — 14,400, 12,000, 9600, 7200, 4800, 2400, 1200, 300 bps
Data Format — Serial, binary, asynchronous at 0-300, 1200, 2400, 4800, 7200,
9600, 14,400, 16,800, or 19,200, 21,600, 24,000, 26,400, 28,800, 31,200, 33,600
bps; synchronous at 1200, 2400, 4800, 9600, 14,400, 16,800, or 19,200, 21,600,
24,000, 26,400, 28,800, 31,200, 33,600 bps
Compatibility — CCITT V.42bis, V.42, ITU V.34+, ITU V.34, AT&T V.32 terbo,
CCITT V.32bis, V.32, V.21*, V.22bis, V.22, V.23*, V.25bis, Bell 212A and
103/113, CCITT V.17, Group 3 T.4, T.30, and EIA TR-29 Class 2 (*V.21/V.23
international models only)
Error Correction — V.42 (LAP-M or MNP 3 and 4) error correction
Data Compression — V.42bis, (4:1 throughput) or MNP 5 (2:1 throughput)
data compression
Speed Conversion — Serial-port data rates adjustable to 300, 1200, 2400, 4800,
9600, 19,200, 38,400, 57,600, and 115,200 bps
Flow-Control Options — X-ON/X-OFF, Hardware RTS/CTS, ENQ/ACK, Unixto-Unix Copy Protocol (UUCP) Spoofing
Mode of Operation — MD1600C: Full duplex over both dialup lines and 2- or
4-wire leased lines, automatic or manual dialing, automatic or manual answer;
MD1601C: Full duplex over both dialup lines and 2-wire leased lines,
automatic or manual dialing, automatic or manual answer
Leased-Line Restoral — When in dial-backup mode, modem attempts leased-line
restoral periodically (controlled by S-Register S18 setting)
Intelligent Features — Fully AT Command compatible, microprocessorcontrolled remote configuration, EIA extended Automode, adaptive line
probing, automatic symbol rate and carrier frequency during start-up, retrain
and rate renegotiation, autodial, redial, tones, dial pauses, call-status display,
automatic parity and data rate selection, keyboard-controlled modem options,
non-volatile memory and on-screen displays for modem option parameters
and up to ten telephone numbers, command lines of up to 60 digits each,
help menus
7
V.34 RACKMOUNT MODEM CARD
Command Buffer — 60 characters
Modulation — Trellis Coded Modulation (TCI) at 33,600, 31,200, 28,800, 26,400,
24,000, 21,600, 19,200, 16,800, 14,400, 12,000, and 9600 bps; QAM at 9600
(non-trellis), 4800, and 2400 bps; PSK at 1200 bps; FSK at 300 bps
Fax Modulations — V.21CH2 FSK at 300 bps; V.27ter DPSK at 4800
and 2400 bps; V.29 QAM at 9600 and 7200 bps; V.17 TCM at 14400,
12000, 9600, and 7200 bps
Fax Carrier Frequencies — V.21CH2 (Half Duplex); 1650 Hz Mark, 1850 Hz
Space for Transmit Originate; 1650 Hz Mark, 1850 Hz Space for Transmit
Answer; V.27 ter 1800 Hz Originate/Answer; V.29 QAM 1700 Hz
Originate/Answer; V.17 TCM 1800 Hz Originate/Answer
Carrier Frequencies (Data) — 1800 Hz, V.32/V.32bis/V.34/Enhanced V.34—
33.6 K/31.2 K/28.8 K/26.4 K/24 K/21.6 K/19.2 K/16.8 K/14.4 K/12 K/
9.6 K/7.2 K/4.8 K
Carrier Frequencies 2400 and 1200 bps (V.22bis/V.22 or Bell 212A Standard) —
Transmit Originate: 1200 Hz; Transmit Answer: 2400 Hz; Receive Originate:
2400 Hz; Receive Answer: 1200 Hz
Carrier Frequencies, 300 bps (Bell Standard) — 1270 Hz Mark, 1070 Hz Space
for Transmit Originate; 2225 Hz Mark, 2025 Hz Space for Transmit Answer;
1270 Hz Mark, 1070 Hz Space for Receive Answer
Carrier Frequencies — V.21: 980 Hz Mark, 1180 Hz Space for Transmit
Originate; 1650 Hz Mark, 1850 Hz Space for Transmit Answer; 1650 Hz Mark,
1850 Hz Space for Receive Originate; 980 Hz Mark, 1180 Hz Space for Receive
Answer. V.23: 390 Hz Mark, 450 Hz Space for Transmit Originate; 1300 Hz
Mark, 2100 Hz Space for Transmit Answer; 1300 Hz Mark, 450 Hz Space for
Receive Answer.
Transmit Level — MD1600C: -10 dBm (dialup), -9 dBm (leased-line); MD1601C:
-11 dBm dialup, -15 dB (leased-line); dBm level selectable with DIP Switch #3
in leased-line setting
Frequency Stability — ±0.01%
Receiver Sensitivity — -43 dBm under worst-case conditions
AGC Dynamic Range — 43 dB
Interface — EIA RS-232C/ITU V.24
8
V.34 RACKMOUNT MODEM CARD
Connectors (on Modem Rack, RM1600) — (1) DB25 RS-232C, (1) RJ-11
for phone line (per Modem on Modem Rack, RM1600)
Diagnostics — Power-on Self Test, Local Analog Loop, Local Digital Loop,
Remote Digital Loop, Back-to-Back Test
Indicators — LEDs for Transmit Data, Receive Data, Carrier Detect, Speed
Indicators, Off Hook, Terminal Ready, Ring Indicator, and Out of Service
(Busy)
Controls — Toggle switches for Out of Service (OOS), Power On/Off;
On-board DIP switches and jumpers for various modem options
Operating Temperature — 32 to 120 °F (0 to 50 °C)
Power Requirements — 115 VAC, 60 Hz, 0.3 Amp, 240 VAC/50 Hz optional
Power Consumption — Approximately 6 watts
Size — 10.5"L x 5.5"W (26.7 x 13.9 cm)
Weight — 1.5 lb. (0.68 kg)
9
V.34 RACKMOUNT MODEM CARD
2. Introduction and Description
2.1 Introduction
The V.34 Rackmount Modem Card provides data communication at 33,600-14,400
bps (V.34+/V.32terbo/V.32bis), as well as other prevalent datacomm standards.
The V.34 Rackmount Modem Card also includes dial back-up with automatic
leased line restoral, adaptive protocol enhancing used in typical UNIX® batch file
transfers and support for the IBM AS/400™ and System/3X™ environment. This
User’s Manual will help you install, configure, test and use your V.34 Rackmount
Modem Card data/fax modem.
The V.34 Rackmount Modem Card automatically adjusts to line conditions
and the capabilities of the modem it connects to, resulting in the highest possible
speed, the most accurate error correction, and the most efficient data compression
possible for each connection. The V.34 Rackmount Modem Card is designed for
data rates as high as 33,600 bps in full-duplex mode over public telephone lines.
Two models are available:
• MD1600C: V.34 Rackmount Modem Card for 2-/4-Wire
• MD1601C: V.34 Rackmount Modem Card for 2-Wire Only
2.2 Features
V.34 Rackmount Modem Card features include:
• Support of data rates of 33,600, 31,200, 28,800, 26,400, 24,000, 21,600,
19,200, 16,800, 14,400, 12,000, 9600, 7200, 4800, 2400, 1200, 0-300 bps.
• Automatic fallback to slower speeds in noisy line conditions,
and fall-forward to faster speeds as conditions improve.
• Dial Back-Up with Automatic Leased Line Restoral.
• ITU-T V.42 LAP-M and MNP Classes 3 and 4 error correction.
• Data transfer rates up to 115,200 bps with V.42bis 4-to-1 data compression.
• Automatic disabling of compression when transferring already-compressed
files.
• Serial port data rates adjustable to 115.2K bps.
10
V.34 RACKMOUNT MODEM CARD
• Autodial, redial, pulse (rotary) and touch-tone dial.
• Dial tone and busy signal detection for reliable call-progress detection.
• Compatibility with the standard AT command set used by most
communication programs.
• On-screen help menus.
• Nonvolatile memory for storage of customized modem parameters
and ten telephone numbers.
• Sends and receives faxes from your computer at 14,400, 9600, 7200
or 4800 bps.
• Responds to EIA TR.29 Class 2 fax commands.
• Supports Unix-to-Unix® UUCP Spoofing.
• Supports the IBM AS/400™ and System/3X environment.
2.3 How to Use this Manual
• Chapter 1 lists the specifications for the V.34 Rackmount Modem Card.
• Chapter 2 (this chapter) begins with a short introduction, a profile on modem
features, followed by a guide (which you are now reading) to the use of this
manual.
• Chapter 3 describes hardware installation and configuration.
• Chapter 4 covers communication software configuration recommended
specifically for the V.34 Rackmount Modem Card. Other issues covered
include setting up initialization strings, changing default parameters,
configuring software for the remote system and file transfer protocols.
• Chapter 5 covers modem AT commands, Remote Configuration commands,
S-Registers and Result Codes.
• Chapter 6 illustrates the V.34 Rackmount Modem Card’s diagnostic
capabilities, providing Analog and Digital Loopback testing procedures.
• Chapter 7 explains how to obtain service and technical support assistance.
11
V.34 RACKMOUNT MODEM CARD
3. Installing Your Modem
3.1 Before You Begin
3.1.1 MODEM RACK WITH POWER SUPPLY (RM1600)
The V.34 Rackmount Modem Card (MD1600C or MD1601C) is designed to mount
in the Modem Rack with Power Supply (RM1600). This rack is an EIA-standard
19-inch-wide by 7-inch-high rack, and mounts in any standard computer cabinet.
The rack has a sixteen modem slot capacity, one power supply source (you can also
order a Redundant Power Supply, part number PS1600), sixteen DB25 (female)
connectors for RS-232C/V.24 interface, and sixteen RJ-11 backplane connectors
(for phone line interface).
3.1.2 SERIAL CABLE
You must provide a serial cable to connect each corresponding V.34 Rackmount
Modem Card(s) to your computer. The cable must have a DB25 male interface
to connect to the modem rack. We recommend cable part number EDM25C.
3.1.3 TELEPHONE LINE
The V.34 Rackmount Modem Card uses one RJ-11 jack per corresponding modem
slot to connect to the telephone lines. To connect the modem to the phone lines,
plug one end of the RJ-11 cable that is provided with the modem into the rack’s
RJ-11 connector (located on the backplane of the modem rack) and the other
end into the phone-company-provided RJ-11 or RJ-11W modular phone jack.
3.2 Installation
Follow the steps listed below to install Modem Cards into the Modem Rack.
1. Make sure that the power cord is unplugged before installing Modem Cards.
The Power Supply (included with the Modem Rack) is already installed in the
far right slot in the Rack when shipped from the factory.
2. Slide a Modem Card into one of the sixteen available modem slots. Start by
inserting a Modem into the leftmost channel (slot #1) of the Rack. The toggle
switch should be at the bottom of the Card, with the component side of the
Card facing the right. The Modem’s gold edge connector is offset so that the
Modem cannot be inserted incorrectly. Continue installing Modem Cards in
the Rack as needed.
12
V.34 RACKMOUNT MODEM CARD
3. Plug the RS-232C Cable into the appropriate modem slot (DB25/25-pin
connector female) at the rear of rack.
NOTE
Any cables connected to the computer must be shielded to reduce
interference.
4. If you are connecting your phone line directly to the Modem Card, plug
one end of the RJ-11 cable provided with the modem into the Rack’s RJ-11
connector (located on the back plane of the modem rack) and the other
end into the phone-company-provided RJ-11 or RJ-11W modular phone jack.
5. Plug in the Modem Rack power cord.
6. Verify the remote modem’s current configuration settings with your V.34
Rackmount Modem Card in terms of data compression, error correction,
transmission rate, etc. (ATL5/ATL7 Command—see Chapter 5 on AT
commands).
7. Attach the V.34 Rackmount Modem Card to dial-up phone lines and/
or leased lines and verify DIP Switch #10 and #5 settings (Section 3.5).
8. Make sure the modem and computer/terminal serial port baud rates are
adjusted (Section 3.5).
9. Set both local and remote modems to either Normal (&E0&W0) mode
or to Reliable (&E2&W0) mode.
10. Verify leased line transmit level (DIP Switch #3) setting (Section 3.3.1).
11. Proceed to Chapter 4 of this manual, or to the manual for your datacommunications software.
3.3 PC Board Controls
The V.34 Rackmount Modem Card is designed on a single printed circuit board.
This board contains sixteen DIP switches, a two-position “Out of Service” (OOS)
toggle switch that extends from the front of the modem circuit card, and a
TEST/OOS Berg jumper.
13
V.34 RACKMOUNT MODEM CARD
Figure 3-1. V.34 Rackmount Modem Card.
The sixteen DIP Switches and the Berg jumper control various modem options
or set default values for the V.34 Rackmount Modem Card’s Command mode.
There is a difference in how several of the switches operate depending on whether
you are in synchronous or asynchronous mode (DIP Switch #12).
Most communications software packages have installation procedures of their
own, which call for certain modem DIP Switch settings. Refer to the manual for
the software package you’ll be using to see if it requires any such settings.
3.3.1 DIP SWITCH SETTINGS
The vast majority of installations are similar, with the V.34 Rackmount Modem
Card being used to dial up a remote installation where the call is automatically
answered. The factory-default DIP-Switch settings are based on this assumption.
Table 3-1 contains a brief description and summary of the V.34 Rackmount
Modem Card’s DIP-Switch options.
14
V.34 RACKMOUNT MODEM CARD
Table 3-1. DIP Switch Settings.
Switch
Function
Position
Effect
#1
DTR Forced/
DTR from Interface*
UP*
DOWN
DTR forced from
computer/terminal
#2
Flow Control &E4*
(Async/ Dial-Up/Leased
Line)
UP*
DOWN
Hardware flow
control enabled
#2
SDLC*/BSC (Sync)
UP*
DOWN
SDLC enabled
#3
Result Codes Enabled*
(Async Dial-up)
UP
DOWN*
Modem responses
are echoed
#3
DbM Transmit
UP
MD1600C: -9dB*/-15dB
DOWN*
MD1601C: -15dB/-11dB*
(Async/Sync/Lease-Line)
Lease Line
MD1600C transmits
at -9dB; MD1601C
transmits at -15 dB
#4
UUCP Disabled* (Async
Dial-Up/Leased Line)
UUCP “spoofing”
Disabled
#4
AS/400 Mode Disabled* UP*
(SyncDial-Up/Leased line) DOWN
AS/400 Mode
Disabled
#5
Auto-Answer Enabled*
(Async Sync/Dial-Up)
Auto-Answer
in dial-up mode
#5
Answer/Originate*
UP*
(Async/Sync/Leased Line) DOWN
Originate call in
Lease Line mode
#6
Max-Throughput Enabled* UP*
(Async/Dial-Up/Leased)
DOWN
Modem set up to
operate at highest
efficiency level
#6
Slave Clock Disabled*
(Sync/Dial-Up/Leased)
Clock controlled
by remote device
*Factory-Default Setting
UP*
DOWN
UP*
DOWN
UP*
DOWN
15
V.34 RACKMOUNT MODEM CARD
Table 3-1 (continued). DIP Switch Settings.
Switch
Function
#7
RTS/Normal/Forced*
UP
(Sync/Async/Dial/Leased) DOWN*
RTS Forced On
#8
Command Mode Enabled* UP
(Sync/AsyncDial/Leased) DOWN*
Command Mode
Enabled
#9
Local/Remote Loopback* UP
(Async/Sync/Dial/Leased) DOWN*
Remote
Loopback Enabled
#10
Dial-Up*/Leased-Line
UP*
DOWN
Dial-Up Enabled
#11
“AT”/Proprietary Result
Codes* (Asynchronous)
UP
DOWN*
Proprietary
Result Codes
Enabled
#11
Internal*/External
Clocking (Synchronous)
UP
DOWN*
Selects Transmit
Clock Source
#12
Sync/Async Mode*
UP
DOWN*
Async Enabled
*Factory-default setting.
16
Position
Effect
V.34 RACKMOUNT MODEM CARD
Table 3-2. DIP Switches #13-16.
Switch
Condition
Effect
#13/#14
UP/UP*
28.8-Kbps Operation (Default)
#13/#14
DOWN/UP
19.2-Kbps Operation
#13/#14
UP/DOWN
14.4-Kbps Operation
#13/#14
DOWN/DOWN
9600-bps Operation
NOTE
A modem baud-rate command (for example, $MB33600) overrides the
setting of these speed-selection switches (DIP switches #13 and #14).
Switch
Condition
Effect
#15
#15
UP*
DOWN
CD/DSR from Interface
CD/DSR Forced On
#16
#16
} MD1600C
UP
DOWN*
2-Wire Operation
4-Wire Operation
#16
#16
} MD1601C
UP*
DOWN
Used in combination with
DIP-Switch #9/Loopback Tests
*Factory-Default Setting
17
V.34 RACKMOUNT MODEM CARD
3.4 OOS (Busy Out) Toggle Switch
The V.34 Rackmount Modem Card contains a two-position OOS switch on the
front panel. This switch can be used to create a “busy out” (OOS) condition for
the modem (take the modem off-hook).
To place a modem in the Busy condition, move the OOS toggle switch to the
(BUSY) position. The modem then goes off-hook, its OOS and OH LEDs light,
and incoming calls to this modem get a busy signal. If you suspect a problem with
a particular modem, you can use the BUSY switch to have an optional device (such
as a “hunt group”) that looks for a non-busy line to perform a “roll over” to the
next available modem while you check the status of the Busy modem.
3.4.1 OUT OF SERVICE/TEST JUMPER
When the V.34 Rackmount Modem Card is Out Of Service (OOS), it is busy to
incoming calls. In the Test (default) setting, the modem drives pin 25 high when
the modem is in Test mode. In the OOS (optional) setting, the computer or
terminal forces pin 25 high and puts the modem in a busy condition.
Test Setting
(Default Setting)
OOS Setting
(Optional Setting)
Figure 3-2. Test and OOS Jumper Settings.
18
V.34 RACKMOUNT MODEM CARD
3.5 Dial-Up and Leased Lines
Connection to the phone system is made via RJ-11 type jacks such as an RJ-11C
or RJ-11W. The modem can also be connected to an RJ-41 or an RJ-45S jack, but
would not use these jack’s dB-level programming features. The V.34 Rackmount
Modem Card is designed to transmit at a permissive level of -10dB for the
MD1600C and -11 dB for the MD1601C.
To connect the modem to the phone lines, plug one end of the RJ-11 cable that
is provided with the modem into the corresponding RJ-11 connector located on
the back plane of the modem rack and the other end into the phone-companyprovided RJ-11 or RJ-11W modular phone jack. Make sure that DIP-Switch #10 is
in the UP position (default) when in dial-up mode.
Although the majority of installations involves dial-up lines, the modem also
connects to leased lines (sometimes referred to as dedicated, private, or 3002
lines). The MD1600C connects to either 2- or 4-wire leased lines; the MD1601C
connects to 2-wire leased lines only.
To connect the modem to leased lines, first determine the type of line
termination provided by the phone company. Most phone companies provide a
terminal block with a pair of screws. Some provide a conventional RJ-11 type of
connector. If the RJ-11 connector is used, you can use the same cable that you use
for dial-up connection. If the screw-terminal connector is used, you may need a
special cable—call for technical support.
Make two DIP switch setting changes on the modem’s PC board. First, place DIP
Switch #10 in the DOWN position (changes the modem from dial-up to leased-line
operation). Second, set one of the two modems on the leased line circuit to
“originate,” and the other to “answer.” To do this, change the setting of DIP Switch
#5. When you changed the DIP Switch #10 setting, you also changed the function
of DIP Switch #5. Now the UP position selects answer mode frequencies while the
DOWN position selects originate mode frequencies. Place DIP Switch #5 in the
UP position on one of the two modems, and on the other modem, place Switch #5
DOWN. It doesn’t matter which is which, just so you have local and remote
modems in opposite modes.
NOTE
The MD1600C defaults to 4-wire operation. If you wish to operate over a
2-wire leased line, change the setting of DIP Switch #16 to the UP
position.)
For leased lines, the MD1601C operates only in 2-wire mode.
19
V.34 RACKMOUNT MODEM CARD
3.6 Modem LED Indicators
The V.34 Rackmount Modem Card has ten LED diagnostic indicators, as shown
in Figure 3-3.
RCV XMT
CD
28.8 14.4
24
OH
DTR
RI
OOS/
ERR
Figure 3-3. LED Diagnostic Indicators.
1. Receive Data (RCV). This LED blinks when data is being received, on for a
space, off for a mark. The state of this RCV LED matches that of the RCV
circuit on Pin 3 of the RS-232C/V.24 interface.
2. Transmit Data (XMT). This LED blinks when data is being transmitted, on
for a space, off for a mark. The state of this LED matches that of the XMT
circuit on Pin 2 of the RS-232C/V.24 interface.
3. Carrier Detect (CD). This LED lights when a valid carrier tone has been
detected.
4. 28,800 bps (28.8). This LED is lit when the modem is connected at
28,800 bps.
5. 14,400 bps (14.4). This LED is lit when the modem is connected at
14,400 bps.
NOTE
When both 28.8 and 14.4 LEDs light, modem is in 21,600-26,400 bps
mode of operation.
20
V.34 RACKMOUNT MODEM CARD
6. 2400 bps (24). This LED is lit when the modem is connected at 2400 bps.
7. Off Hook (OH). This LED is lit when the phone line is “off hook.” This
occurs when the modem is dialing, on line, or answering a call. The LED
also flashes when the modem is pulse dialing in the Command Mode.
8. Data Terminal Ready (DTR). When the DTR LED is lit, the modem is
permitted to answer an incoming call. When DTR goes off, a connected
modem disconnects if dependent on DTR. The state of this DTR LED
matches that of the DTR circuit on Pin 20 of the RS-232C/V.24 interface.
9. Ring Indicator (RI). This LED is lit during the ringing interval as an incoming
call is received.
10. Out-of-Service/Error (OOS/ERR). When the OOS/ERR LED is flashing, the
leased line is down and the modem is in self-test mode has failed. When
OOS/ERR LED is on, this indicates the modem is in an out of service (OOS)
state. When the modem is out of service, it is busy to incoming calls.
21
V.34 RACKMOUNT MODEM CARD
NOTE
To verify if you are engaged in V.34+ mode, first type +++AT<CR> (online escape command while maintaining command mode), then type
ATL8. The L8 command displays the current on-line CONNECT status of
the V.34 Rackmount Modem Card. What then appears on your monitor is
your modem’s current on-line condition (i.e., DSP and Firmware version,
Link Type, Line Speed, Serial Speed, Type of Error Correction/Data
Compression, Number of past Retrains, etc.). An example of L8 listing is
shown in Figure 3-4.
Figure 3-4. An example of how the online diagnostics might appear.
22
V.34 RACKMOUNT MODEM CARD
4. Software Configuration
4.1 Introduction
Since the configuration of your communications software is affected by the
capabilities of your computer, this chapter begins with a discussion of the
limitations of some serial ports and how to identify them. It then discusses
communications configuration in general and recommends settings specifically
for the V.34 Rackmount Modem Card.
4.2 Serial Port Limitations
When you configure your software, you need to consider how the hardware
on both ends of the connection will affect the connection. Some serial ports,
particularly those in older PC-compatible computers, may limit the performance
of the V.34 Rackmount Modem Card. You should know if yours is one of them.
The limiting factor is an integrated circuit called a Universal Asynchronous
Receiver/Transmitter, or UART. An early UART used in PC/XT and compatible
computers was the 8250, followed by the 8250A UART. The UARTs typically used
in today’s PC-compatible computers include types 16450, 16550, 16554, 16650,
16654, and 16750. For example, the Pentium 200 uses a 16550 UART.
When a modem communicates with V.42bis 4-to-1 compression enabled, it
sends up to four times as much uncompressed data to the serial port as it receives
compressed over the telephone line. Therefore, a modem communicating with at
14,400 bps may require a serial port that can reliably transfer data at four times
14,400 bps, or 57,600 bps; at 19,200, it may require one that works reliably up to
four times 19,200, or 76,800 bps; and at 28,800 bps, it may require one that works
reliably up to four times 28,800 bps, or 115,200 bps. If your serial port cannot
handle these speeds, we recommend that you replace your present serial card
with one that has at least a 16550FN UART or equivalent.
Macintosh computers do not use UARTs. Older Macintosh computers—
the Macintosh SE through IIfx—use a Zilog Z8530 chip called a Serial
Communications Controller, or SCC, that has a maximum speed of 57,600 bps.
This speed can be compromised by other serial communications, including printer
transmissions and AppleTalk, the networking software that allows Macintosh
computers to share files. When AppleTalk is active, it controls all serial
communications on the Macintosh. Because AppleTalk gives priority to network
communications, an older Macintosh may lose modem data at higher transmission
speeds. Therefore, when AppleTalk is active, you risk losing data on serial-port
23
V.34 RACKMOUNT MODEM CARD
communications over 2400 bps, though most users can work at up to 9600 bps
without problems. Other activities that could cause the serial driver to drop bits
at high speeds include the floppy disk driver formatting a disk, the CPU paging
in or out in virtual memory mode, and the Mac IIci or IIsi running the on-board
video in 8-bit mode. So, for maximum communications speed on older Macintosh
computers, we recommend as few concurrent activities as possible. To use V.42bis
compression at 19,200 bps or faster, we recommend that you install a high-speed
serial-port card. Recent Macintosh computers, such as PowerMac, Quadra, and
Centris models, support speeds up to 115,200 bps.
4.2.1 HOW CAN YOU IDENTIFY YOUR UART TYPE?
If you have MS-DOS 6.0 or later, you can find your UART at the DOS prompt.
After the opening screen, select COM Ports. The last line of the report tells you
what type UART you have for each COM port. MSD does not distinguish between
the 8250 and the 8250A. However, if you have an IBM AT, Pentium, or newer
computer, you likely have an 8250A, 16450, 16550, 16554, 16650, 16654, or 16750
UART installed, all of which are reliable at least up to 19,200 bps. If you would like
more information about your UART than MSD can provide, you can download
shareware UART identification programs from the IBM Communications Forum
on CompuServe, or from a local BBS.
24
V.34 RACKMOUNT MODEM CARD
Figure 4-1. MSD UART Identification.
25
V.34 RACKMOUNT MODEM CARD
Table 4-1. Buffer Sizes of Common UARTs.
UART
FIFO Buffer
8250
8250A
16450
16550
16554
16650
16654
16750
1-byte
1-byte
1-byte
16-bytes
16-bytes
32-bytes
64-bytes
64-bytes
4.2.2 ADVANCED UARTS AND WINDOWS 3.1
Windows 3.1 may cause a loss of data when communicating at high speed, even
with a 16550, 16554, 16650, or 16654, or 16750 UART installed. (Windows 95
and 98 do not have this problem.) Because Windows is multitasking—it switches
between several programs running at the same time—it can make the serial port
wait briefly while Windows performs other tasks. Meanwhile, incoming data can
be lost. The older 8250A and 16450 UARTs can store data in a one-byte first-in
first-out (FIFO) buffer (a memory area in the UART in which the first bit in is the
first bit out), but once the buffer is full, the data is lost. The 16550 has a 16-byte
FIFO buffer, which accounts for much of its high speed. However, in Windows 3.1,
the 16550’s FIFO buffer is disabled by default. To enable the buffer, use Notepad
to open the SYSTEM.INI file in your Windows directory, and add the following line
to the [386Enh] section:
COMnFIFO=1
where n is the number of the COM port the 16550 is installed on. For example,
if the 16550 is installed on COM2, the line should be:
COM2FIFO=1
After you save SYSTEM.INI you must restart Windows for the change to take
effect.
However, there is another problem when the FIFO buffer is enabled: Windows
cannot recognize the COM port because of a bug in the Windows 3.1 serial port
driver, COMM.DRV (Windows 95 and 98 do not have this problem). The only way
around the problem is to replace the COMM.DRV file in the WINDOWS/SYSTEM
26
V.34 RACKMOUNT MODEM CARD
directory with another driver. Several drivers that will solve this problem are
available commercially or on BBSs. A freeware driver called CyberCom is available
as CYBERC.ZIP on CompuServe in the IBM Communications Forum, Library 0.
CyberCom will enable Windows communications at speeds up to 115,200 bps if
you have a 16550 UART installed.
4.3 Configuring Your Software
Communications software must be configured to work with your modem, your
computer, and the remote system it is calling. Fortunately, most communications
programs make the process easy by providing a default initialization string for your
modem as well as defaults for most of the other required parameters.
4.3.1 CONFIGURING SOFTWARE FOR YOUR MODEM
Because remote computers may have different connection requirements such
as speed, number of bits, parity sessions, each session. Most communications
programs, however, have a separate modem configuration menu because modem
configurations rarely change from session to session.
The most important configuration is the modem initialization string. This
is a sequence of commands the software uses to configure the modem when the
communications software is loaded or when a session begins. Always begin the
initialization string with the ATtention AT, then follow it with the modem reset&F.
Issuing a reset command before other commands ensures that you are starting
with a known state.
The rest of the commands in the initialization string depend on the capabilities
of the modem and what you want it to do. Some older communications programs
require you to create the initialization string by yourself. Most modem communications programs, however, provide you with a ready-made initialization string
that is automatically selected when you choose your modem model from a list. It is
a poor idea to use an initialization string intended for another modem, especially
one from another manufacturer, because modem capabilities and command
implementations vary from modem to modem.
4.4 PC Initialization Strings
We recommend the following initialization string for a V.34 Rackmount Modem
Card connected to a PC-compatible computer:
AT &F X4 S0=0 ^M
27
V.34 RACKMOUNT MODEM CARD
This string resets the V.34 Rackmount Modem Card to the factory default
settings, selects extended result codes NO DIAL TONE and BUSY, and turns off
auto-answer. ^M must end every string sent to the modem from software. It is the
ASCII code for the RETURN key on most keyboards, and the default code for the
carriage-return character in the Modem and most communications programs. The
carriage-return character is defined in the Modem in S-register S3; if you change it,
you must also change the carriage-return character code used in your communications software. If you send a command directly to the modem in terminal mode
rather than indirectly through communications software, you must end the
command string by pressing the RETURN key (<CR>) instead of adding ^M
to the string.
Figure 4-2. An example of modem-initialization setup.
NOTE
The above and following setup screens are examples from a particular
data-communications package; other third-party software will have
different screens.
28
V.34 RACKMOUNT MODEM CARD
4.4.1 CHANGING DEFAULT PARAMETERS
ATDT for touch-tone service and ATDP for rotary service), the dialing suffix (^M),
the hang-up string (+++ATH0^M), and response messages (RING, NO CARRIER,
BUSY, etc.). Communications software with a host mode might also include an
auto-answer AT S0=1^M).
4.5 Macintosh Initialization
Macintosh computers cannot use RTS/CTS hardware flow control without a serial
cable wired for hardware control. (The old Macintosh 128 and 512 models cannot
use RTS/CTS flow control at all. For those Macintosh computers turn off the
default RTS/CTS hardware flow control, turn on XON/XOFF flow control and
pacing, and ignore DTR.)
AT &F X4 &E5 &E13 &D0 ^M
For hardware flow control, use the following initialization string:
AT &F X4 &E13 &D0 ^M
Add S0=0 to both strings to disable auto-answer if the Modem is on a voice line.
You can store the initialization string in nonvolatile memory. With your
communications software open and connected to the modem’s COM port, type
the initialization string in the terminal window, substituting a carriage return for
^M. To store the string, enter
AT &F9 &W0 <CR>.
Now you can initialize your modem with the following simple string:
AT Z ^M
4.6 Configuring Software for Your Computer
You must configure your communications software to match your computer’s
configuration. If the Modem is connected to the COM2 serial port, you must tell
the software you are using COM2. Another important parameter is the serial-port
baud rate. This is the speed at which your modem communicates with your
computer, not the speed at which your modem communicates with another
modem. When V.42bis data compression is enabled, a serial-port baud rate four
times the transmission speed of the modem will optimize data compression. So if
29
V.34 RACKMOUNT MODEM CARD
your UART is fast enough, you should set the serial port to as close as you can to
four times the top speed of your modem.
Communication Parameters
Device:
Baud:
COM1
COM2
COM3
38400
57600
115000
Flow-Control:
Break length:
NONE
CTS/RTS
XON/XOFF
50
100
200
Stop Bits
1
Data Bits
1.5
2
5
6
7
8
Parity
None
Odd
Mark
Space
Current modem type:
V.34 Rackmount Modem Card
Even
OK
Modem List:
Intel 9600/EX
Manual Modem
Microcom QX/AX
MT2834BA
V.34 Rackmount Modem Card
Cancel
More...
Figure 4-3. A sample configuration-parameters screen.
If you have an 8250 UART, your most reliable serial-port speed will be 9600 bps;
if you have an 8250A or 16450 UART, try 19,200 bps; if you have a 16550 or more
advanced UART, a serial-port setting of 115,200 bps can be set reliably.
4.6.1 CONFIGURING SOFTWARE FOR THE REMOTE SYSTEM
You must meet the requirements of the remote system for successful
communications. Though the V.34 Rackmount Modem Card can automatically
synchronize with the speed of the other modem, you must specify parameters such
as type of flow control, break length, number of data bits, number of stop bits, and
parity. If you set these parameters incorrectly with the remote system, gibberish will
appear on your screen.
30
V.34 RACKMOUNT MODEM CARD
4.6.2 TERMINAL EMULATION
If you are accessing the remote computer as if from an on-site terminal, the
keyboard codes used by your computer may not match the ones used by the
remote computer. To be compatible with the remote computer, your software
must be able to substitute the appropriate codes in what is known as terminal
emulation. Most communications programs can emulate the most common
mainframe terminals, including the DEC VT100, VT102, and VT52 terminals,
and the basic TTY mode. If in doubt about which to choose for a BBS, try ANSI
or VT100 first. Here’s a sample terminal-emulation screen:
Figure 4-4. A sample terminal-emulation setup screen.
4.6.3 FILE-TRANSFER PROTOCOLS
When you unload or download files with your modem, the host computer will ask
which file-transfer protocol you want to use. Most communications programs allow
you to choose a default protocol. Your software’s documentation should list the
ones it can use (not all communications programs support all protocols). We
31
V.34 RACKMOUNT MODEM CARD
recommend Zmodem for most transfers. Here’s a sample file-transfer protocols
screen:
Figure 4-5. A sample file-transfer protocols screen.
4.7 When to Disable Data Compression
If your serial port cannot keep up because it has an older UART, you may lose data
when using data compression. Also, the speed advantage hardware compression
gives you is entirely dependent on how much the data being transmitted can be
compressed. If the data is already in a compressed form—a .ZIP or .SIT file, for
example—trying to compress it more will actually slow the transmission slightly
compared to transmitting the same file with compression disabled. This effect will
be most noticeable if your modem negotiates MNP 5 compression with the other
modem. V.42bis will not try to further compress a compressed file, but MNP 5 will.
The command to disable compression is AT &E14 <CR>&E14. If you have an
older UART or if you use your modem mostly for downloading long, compressed
files from BBSs, you may want to include the &E14 command in your initialization
32
V.34 RACKMOUNT MODEM CARD
string as follows:
AT &F S0=0 X4 &E14 ^M
As a general rule, you should try to transmit files in already-compressed form
rather than relying on V.42bis hardware compression. Because software
compression is more efficient than hardware compression, you will have a higher
throughput with software compression. Of course, this efficiency does not include
the time spent compressing and decompressing .ZIP or .SIT files, but it will save on
phone bills. And hardware compression will still be there for those occasions when
it is inconvenient to compress a file with software. Note also that when you
download files with compression disabled, you can use a slower serial-port speed if
you have an older UART.
4.7.1 DISABLING ERROR CORRECTION
By default, the V.34 Rackmount Modem Card is set to auto-reliable mode. In this
mode, the Modem determines during the handshake whether the other modem is
using V.42 error correction. If it is, the Modem then switches itself to reliable mode
and enables error correction. If it is not, the Modem remains in non-errorcorrection mode.
Normally, we recommend that you leave the V.34 Rackmount Modem Card set
to auto-reliable mode (&E1). However, you may encounter some circumstances in
which the V.34 Rackmount Modem Card will work better with error correction
turned off. For example, on CompuServe, error correction will slow file transfers at
modem speeds of 9600 bps and under. If this is a problem for you, you can turn off
error correction with the command AT &E0, or you can include the command in
your initialization string as follows:
AT &F S0=0 X4 &E0 ^M
33
V.34 RACKMOUNT MODEM CARD
5. Modem Commands, S-Registers,
and Result Codes
5.1 Modem AT Commands
AT commands are the means by which you, and your communications software,
are able to communicate with and configure your modem. They enable you to
establish, read, and modify parameters in addition to dialing. The following
provides a summary and brief explanation of the AT commands recognized by the
V.34 Rackmount Modem Card.
COMMAND:
VALUES:
DEFAULT:
DESCRIPTION:
AT
n/a
n/a
Attention Code that precedes most command strings
except A/, A:, and Escape Codes.
COMMAND:
VALUES:
DEFAULT:
DESCRIPTION:
Return
n/a
n/a
Pressing RETURN key executes most commands.
COMMAND:
VALUES:
DEFAULT:
DESCRIPTION:
A
n/a
n/a
Answer call, even if no ring present.
COMMAND:
VALUES:
DEFAULT:
DESCRIPTION:
$
n/a
n/a
This symbol placed in dialing string enables the modem
to detect AT&T’s “call card” tones to access user’s
calling card to originate an online connection.
COMMAND:
VALUES:
DEFAULT:
DESCRIPTION :
A/
n/a
n/a
Repeat last command. (Do not precede this command
with AT. Do not hit RETURN to execute.)
34
V.34 RACKMOUNT MODEM CARD
COMMAND:
VALUES:
DEFAULT:
DESCRIPTION:
A:
n/a
n/a
Continuous redial (10 redials in DOC units) of last
number until answered. (Not used in international
models.)
COMMAND:
VALUES:
DEFAULT:
DESCRIPTION:
$An
n = 0 or 1
$A0
$A0 discards data during auto-reliable time period.
$A1 buffers data during auto-reliable time period.
COMMAND:
VALUES:
DEFAULT:
DESCRIPTION:
#An
n = 0 thru 3
#A0
#A0 selects initial handshake at 33,600 to 31,200 to
28,800 to 24000 to 21,600 to 19,200 to 16,800 to 14,400
to 12,000 to 9600 to 4800 to 2400 to 1200 to 300 bps.
#A1 selects initial handshake at 33,600 bps only.
#A2 selects initial handshake at 33,600 to 31,200 to
28,800 to 24000 to 21600 to 19,200 to 16,800 19,200 to
14,400 to 9600 to 4800 bps.
#A3 selects initial handshake at 2400 to 1200 to 300 bps.
COMMAND:
VALUES:
DEFAULT:
DESCRIPTION:
Bn
n = 0 or 1
B0
B0 selects V.21 for 300 bps operation.
B1 selects 300 bps operation. (Not used in international
models.)
COMMAND:
VALUES:
DEFAULT:
DESCRIPTION:
&Bn
n = 0 or 1
&B0
&B0 selects normal transmit buffer size.
&B1 selects reduced transmit buffer size.
35
V.34 RACKMOUNT MODEM CARD
COMMAND:
VALUES:
DEFAULT:
DESCRIPTION:
&BSn
n = 0 or 1
&BS1
&BS0 selects maximum transmit block size of 64
characters.
&BS1 selects maximum transmit block size of 256
characters (MNP mode)/128 characters (LAP-M mode).
COMMAND:
VALUES:
DEFAULT:
DESCRIPTION:
$BAn
n = 0 or 1
$BA0
$BA0 selects speed conversion on.
$BA1 selects speed conversion off.
COMMAND:
VALUES:
DEFAULT:
DESCRIPTION:
&Cn
n = 0, 1, 2 or 4
&C1
&C0 forces Carrier Detect on.
&C1 lets Carrier Detect act normally.
&C2 lets Carrier Detect drop S24 time on disconnect.
&C4 resets modem when Carrier Detect drops.
COMMAND:
VALUES:
DEFAULT:
DESCRIPTION:
&CDn
n = 0 or 1
&CD0
&CD0: Execute cleardown on disconnect.
&CD1: Do not execute cleardown on disconnect.
COMMAND:
VALUES:
DEFAULT:
DESCRIPTION:
Ds
s = phone #
n/a
Dial a telephone number “s”, where s may include up to
60 digits or T, P, R, comma, and semicolon; characters.
COMMAND:
VALUES:
DEFAULT:
DESCRIPTION:
DsNd
s = phone # and d = 0 through 9
n/a
Store telephone number. To store, phone number “s” is
entered and followed by N and then Directory Number
“d.”
36
V.34 RACKMOUNT MODEM CARD
COMMAND:
VALUES:
DEFAULT:
DESCRIPTION:
&Dn
n = 0 through 3
&D2
&D0 means DTR is ignored.
&D1 means modem returns to command mode.
&D2 lets modem react to DTR normally.
&D3 causes modem to reset to modem default
parameters.
COMMAND:
VALUES:
DEFAULT:
DESCRIPTION:
$Dn
n = 0 or 1
$D0
$D0 disables DTR Dialing.
$D1 enables DTR Dialing.
COMMAND:
VALUES:
DEFAULT:
DESCRIPTION:
%DF
n = 0 or 1
%DF0
%DF0 selects V.34 Line Probe Data in Graph Format.
%DF1 selects V.34 Line Probe Data in Table Format.
COMMAND:
VALUES:
DEFAULT:
DESCRIPTION:
%DP
n = 0 or 1
%DP0
%DP0: Do not read Line Probe information from DSP
during handshaking.
%DP1: Read Line Probe Information from DSP during
handshaking.
COMMAND:
VALUES:
DEFAULT:
DESCRIPTION:
En
n = 0 or 1
E1
E0 selects do not echo Command mode characters.
E1 selects do echo Command mode characters.
COMMAND:
VALUES:
DEFAULT:
DESCRIPTION:
$EBn
n = 0 or 1
$EB0
$EB0 enables 10-bit mode.
$EB1 enables 11-bit mode.
37
V.34 RACKMOUNT MODEM CARD
COMMAND:
VALUES:
DEFAULT:
DESCRIPTION:
&En
n = 0 through 15
&E1, &E4, &E6, &E10, &E13, &E15
&E0 selects no error correction.
&E1 selects V.42 Auto-reliable Mode.
&E2 selects V.42 Reliable Mode.
&E3 selects no modem-initiated flow control.
&E4 selects CTS modem-initiated flow control.
&E5 selects XON/XOFF modem-initiated flow control.
&E6 selects XON/XOFF not passed through.
&E7 selects XON/XOFF passed through.
&E8 selects Enq/Ack pacing off.
&E9 selects Enq/Ack pacing on.
&E10 selects Normal Mode flow control off.
&E11 selects Normal Mode flow control on.
&E12 selects Pacing off.
&E13 selects Pacing on.
&E14 selects data compression disabled.
&E15 selects data compression enabled.
COMMAND:
VALUES:
DEFAULT:
DESCRIPTION:
%En
n=0 through 5
%E1
%E0 = Modem won’t escape.
%E1 = +++ Method (default setting).
%E2 = Break Method.
%E3 = Either +++ or Break Method.
%E4 = No “OK” Response to +++
%E5 = “OK” Response to +++
COMMAND:
VALUES:
DEFAULT:
DESCRIPTION:
#Fn
n = 0 through 2
#F2
#F0 means no fall back when on-line.
#F1 means fall back from 33600 to 4800 bps when online (increments of 2400 bps).
#F2 means fall back to 4800 bps from 33.6 Kbps/fall
forward if line improves (increments of 2400 bps).
COMMAND:
VALUES:
DEFAULT:
&Fn
n = 0, 8 or 9
&F8
38
V.34 RACKMOUNT MODEM CARD
DESCRIPTION:
&F loads factory-default values from ROM.
&F8 reads factory-default values when &F is issued.
&F9 reads parameters stored in nonvolatile memory
when &F is issued.
COMMAND:
VALUES:
DEFAULT:
DESCRIPTION:
$Fn
n = 0 or 1
$F1
$F0 means do not fall back to normal connect if CR
received.
$F1 means fall back to normal connect if CR received.
COMMAND:
VALUES:
DEFAULT:
DESCRIPTION:
&Gn
n = 0, 1 or 2
&G0
&G0 turns off CCITT guard tone.
&G1 turns on CCITT 550 Hz guard tone.
&G2 turns on CCITT 1800 Hz guard tone.
(Not used in International models.)
COMMAND:
VALUES:
DEFAULT:
DESCRIPTION:
Hn
n = 0 or 1
n/a
H0 selects Hang Up (go on hook).
H1 selects Go
COMMAND:
VALUES:
DEFAULT:
DESCRIPTION:
$Hn
n = 1 through 3
Read-Only Command
$H1 brings up Help Screen #1.
$H2 brings up Help Screen #2.
$H3 brings up Help Screen #3.
COMMAND:
VALUES:
DEFAULT:
DESCRIPTION:
In
n = 0, 1, or 2
Read Only Command
I0 requests modem ID #.
I1 requests firmware revision #.
I2 for internal use.
COMMAND:
VALUES:
I9
N/A
39
V.34 RACKMOUNT MODEM CARD
DEFAULT:
DESCRIPTION:
Read-Only Command
The I9 command is a query to display this modem’s
characteristics when operating within Windows 95.
Entering ATI9<cr> invokes BLR 28800 FAX CT on your
video monitor.
(The response to the query reveals that your modem
is a BLR, 28.8K, FAX, and Class Two capable device.)
COMMAND:
VALUES:
DEFAULT:
DESCRIPTION:
L
5, 6, 7, 8, 9, 10 and 11
Read-Only Command
Lists all stored telephone numbers in memory.
L5 lists all current operating parameters.
L6 lists all current S-Register values.
L7 lists additional parameters.
L8 lists current on-line diagnostics.
L9 displays Signal Strength Information.
L10 displays Signal to Noise Ratio Information.
L11 displays Noise Information.
COMMAND:
VALUES:
DEFAULT:
DESCRIPTION:
#Ln
n = 0 through 3
#L0
#L0 selects modems negotiate V.42 Mode.
#L1 selects MNP on and LAP-M off.
#L2 selects LAP-M on and MNP off.
#L3 selects no detection phase; go directly to LAP-M
mode.
COMMAND:
VALUES:
DEFAULT:
DESCRIPTION:
$LLn
n = 0 or 1
$LL0
$LL0 leased-line handshake.
$LL1 V.34 leased-line handshake.
COMMAND:
VALUES:
DEFAULT:
DESCRIPTION:
$MBn
n = speed
$MB33600 bps
$MB75 selects CCITT V.23 mode
$MB300 selects 300 bps on-line
$MB1200 selects 1200 bps on-line
$MB2400 selects 2400 bps on-line
40
V.34 RACKMOUNT MODEM CARD
$MB4800 selects 4800 bps on-line
$MB9600 selects 9600 bps on-line
$MB14400 selects 14400 bps on-line
$MB19200 selects 19200 bps on-line
$MB28800 selects 28800 bps on-line
$MB33600 selects 33600 bps on-line
COMMAND:
VALUES:
DEFAULT:
DESCRIPTION:
Nd
d = 0 through 9
n/a
Dial stored telephone number “d” (Do not include the
letter D in this command.)
COMMAND:
VALUES:
DEFAULT:
DESCRIPTION:
NdNe
d = 0 through 9; e = any other number 0 through 9
n/a
Number Linking. If first number dialed is busy, another
stored number may be automatically dialed. In example,
stored number d is dialed, and if busy, stored number e
is dialed.
COMMAND:
VALUES:
DEFAULT:
DESCRIPTION:
O
n/a
n/a
Exit Command Mode and go into Online Mode.
COMMAND:
VALUES:
DEFAULT:
DESCRIPTION:
P
n/a
Tone Dial
Modem will pulse-dial numbers following the P.
COMMAND:
VALUES:
DEFAULT:
DESCRIPTION:
&Pn
n = 0 or 1
&P0
&P0 selects 60-40 pulse ratio.
&P1 selects 67-33 pulse ratio.
COMMAND:
VALUES:
DEFAULT:
DESCRIPTION:
Qn
n = 0, 1 or 2
Q0
Q0 selects Result Codes displayed.
Q1 selects Result Codes suppressed (quiet).
Q2 selects Dumb Answer Mode.
41
V.34 RACKMOUNT MODEM CARD
COMMAND:
VALUES:
DEFAULT:
DESCRIPTION:
&Qn
n = 0 or 1
&Q0
&Q0 selects proprietary command set.
&Q1 selects AT command set.
COMMAND:
VALUES:
DEFAULT:
DESCRIPTION:
Rn
n = 0 or 1
R0
R0 means modem will not reverse modes.
R1 means modem will reverse modes.
COMMAND:
VALUES:
DEFAULT:
DESCRIPTION:
&Rn
n = 0, 1 or 2
&R1
&R0 lets Clear to Send act normally.
&R1 forces Clear to Send on.
&R2 drops for 1 second on disconnect.
COMMAND:
VALUES:
DEFAULT:
DESCRIPTION:
$Rn
n = 0 or 1
$R0
$R0 selects disconnect after 12 retransmits.
$R1 selects do not disconnect after 12 retransmits.
COMMAND:
VALUES:
DEFAULT:
DESCRIPTION:
&RFn
n = 0 or 1
&RF1
&RF0 selects CTS follows RTS.
&RF1 selects CTS to act independently.
COMMAND:
VALUES:
DEFAULT:
DESCRIPTION:
Sr=n
r = 0-11, 13, 15-17, 24-26, 29, 30, 32, 34, 36, 37, 48
n/a
Sets value of S-Register “r” to value of “n”, where “n”
is entered in decimal format.
COMMAND:
VALUES:
DEFAULT:
DESCRIPTION:
Sr?
r = 0-11, 13, 15-17, 24-26, 29, 30, 32, 34, 36, 37, 48
n/a
Reads value of S-Register “r” and displays value in
3-digit decimal format.
42
V.34 RACKMOUNT MODEM CARD
COMMAND:
VALUES:
DEFAULT:
DESCRIPTION:
$SBn
n = speed
$SB115200 bps
$SB300 selects 300 bps at serial port
$SB1200 selects 1200 bps at serial port
$SB2400 selects 2400 bps at serial port
$SB4800 selects 4800 bps at serial port
$SB9600 selects 9600 bps at serial port
$SB19200 selects 19,200 bps at serial port
$SB38400 selects 38,400 bps at serial port
$SB57600 selects 57600 bps at serial port
$SB115200 selects 115200 bps at serial port
COMMAND:
VALUES:
DEFAULT:
DESCRIPTION:
$SPn
n = 0 or 1
$SP0
$SP0 disables UUCP spoofing.
$SP1 enables UUCP spoofing.
COMMAND:
VALUES:
DEFAULT:
DESCRIPTION:
&SFn
n = 0 or 1
&SF0
&SF0 selects DSR follows CD.
&SF1 selects DSR independent.
COMMAND:
VALUES:
DEFAULT:
DESCRIPTION:
&Sn
n = 0, 1 or 2
&S1
&S0 forces Data Set Ready on.
&S1 lets Data Set Ready act normally.
&S2 Data Set Ready drop is regulated by S24 on
disconnect.
COMMAND:
VALUES:
DEFAULT:
DESCRIPTION:
T
n/a
Tone Dial
Modem will tone-dial numbers following the T.
COMMAND:
VALUES:
DEFAULT:
&Tn
n = 4 or 5
&T5
43
V.34 RACKMOUNT MODEM CARD
DESCRIPTION:
&T4 selects Enable Response to Request for Remote
Digital Loopback.
&T5 selects Disable Response to Request for Remote
Digital Loopback.
COMMAND:
VALUES:
DEFAULT:
DESCRIPTION:
#Tn
n = 0 or 1
#T1
#T0 turns off Trellis Coded Modulation.
#T1 turns on Trellis Coded Modulation.
COMMAND:
VALUES:
DEFAULT:
DESCRIPTION:
Un
n = 0, 1, 2, or 3
n/a
U0 places modem in Analog Loop Originate Mode.
U1 places modem in Analog Loop Answer Mode.
U2 places modem in Remote Digital Loopback test
mode.
U3 places modem in Local Digital Loopback Test Mode.
COMMAND:
VALUES:
DEFAULT:
DESCRIPTION:
Vn
n = 0 or 1
V1
V0 means Result Codes sent as digits (terse response).
V1 means Result Codes sent as words (verbose
response).
COMMAND:
VALUES:
DEFAULT:
DESCRIPTION:
#Vn
n = 0 or 1
#V1
Bypass V.32terbo handshaking process.
#V0 means V.32terbo enabled in originate/answer
mode.
#V1 means V.32terbo disabled in originate/answer
mode.
COMMAND:
VALUES:
DEFAULT:
DESCRIPTION:
W
n/a
n/a
Wait for new dial-tone.
44
V.34 RACKMOUNT MODEM CARD
COMMAND:
VALUES:
DEFAULT:
DESCRIPTION:
&Wn
n = 0 or 1
&W1
&W0 causes modem to store its current parameters in
non-volatile RAM, and modem will load these for future
sessions instead of reading factory ROM defaults, unless
&F command is used.
&W1 causes modem not to store parameters.
COMMAND:
VALUES:
DEFAULT:
DESCRIPTION:
Xn
n = 0, 1, 2, 3 or 4
X0
X0 selects Basic Result Codes (w/o CONNECT 1200,
CONNECT 2400).
X1 selects Extended Result Codes (w/CONNECT 1200,
CONNECT 2400).
X2 selects Standard AT Command set with NO DIAL
TONE.
X3 selects Standard AT Command set with BUSY.
X4 selects Standard AT Command set with NO DIAL
TONE and BUSY.
COMMAND:
VALUES:
DEFAULT:
DESCRIPTION:
#Xn
n = 0 or 1
#X0
#X0 selects single XOFF character sent until XON level
returns.
#X1 selects multiple XOFF characters after buffer level
is full.
COMMAND:
VALUES:
DEFAULT:
DESCRIPTION:
Yn
n = 0 or 1
Y0
Y0 disables sending or responding to long-space “break.”
Y1 enables sending or responding to long-space
“breaks.”
COMMAND:
VALUES:
DEFAULT:
DESCRIPTION:
Z
n/a
n/a
All configuration parameters are reset to default values.
45
V.34 RACKMOUNT MODEM CARD
COMMAND:
VALUES:
DEFAULT:
DESCRIPTION:
, (comma)
n/a
n/a
Causes pause during dialing.
COMMAND:
VALUES:
DEFAULT:
DESCRIPTION:
; (semicolon)
n/a
n/a
Causes return to Command Mode after dialing.
COMMAND:
VALUES:
DEFAULT:
DESCRIPTION:
! (exclamation point)
n/a
n/a
Causes modem to flash On-Hook.
COMMAND:
VALUES:
DEFAULT:
DESCRIPTION:
@
n/a
n/a
Causes modem to wait for ringback, then 5 seconds
of silence, before processing next part of command.
COMMAND:
VALUES:
DEFAULT:
DESCRIPTION:
+++AT<CR>
n/a
n/a
In-band Escape Sequence. Places modem in
Command mode while still remaining online. Enter +++
followed by the letters A and T, up to ten command
characters, and a RETURN.
COMMAND:
VALUES:
DEFAULT:
DESCRIPTION:
BREAK AT<CR>
n/a
n/a
Out-of-band Escape Sequence. Places modem in
Command mode while still remaining online. Not
preceded by AT. Enter a BREAK signal, followed by the
letters A and T, up to sixty command characters, and hit
RETURN.
46
V.34 RACKMOUNT MODEM CARD
5.1.1 CALLBACK SECURITY COMMANDS
COMMAND:
VALUES:
DEFAULT:
DESCRIPTION:
#DBn
n= 0, 1, or 2
DB0
#DB0 disables Callback Security. Answering Yes to the
prompt turns off Callback Security and erases stored
phone numbers and passwords. Answering No to the
prompt aborts the command.
#DB1 activates remote and local password security.
#DB2 activates remote password security.
COMMAND:
VALUES:
DEFAULT:
DESCRIPTION:
#CBNyyxxxxxx
n/a
n/a
Callback password, with xxxxxx being callback password
and yy being the memory location. Callback password
xxxxxx must start with a non-numeric character and is
case-sensitive. Callback password xxxxxx must be a
minimum of 6 and maximum of 10 characters. yy
memory locations are from 0 to 29. Must have T (tone)
dialing in string.
COMMAND:
VALUES:
DEFAULT:
DESCRIPTION:
+ - Dxxxxxx???Nxx
n/a
n/a
Callback Phone Numbers xxxxxx with the + preceding
the phone number indicating the callback modem
phone number for the corresponding password at the
same memory location. The (-) preceding the phone
number enables direct entry when the caller uses the
correct password without the callback modem having to
return the call. The ??? entry at the end of the phone
number represents an extension added to the main
phone number. Nxx is the memory location of the
callback phone number and password.
COMMAND:
VALUES:
DEFAULT:
DESCRIPTION:
#Pn
n= 0, 1, or 2
#P0
Parity of the prompt messages sent by the callback
modem.
47
V.34 RACKMOUNT MODEM CARD
#P0 is no parity
#P1 is odd parity
#P2 is even parity
COMMAND:
VALUES:
DEFAULT:
DESCRIPTION:
#RCBNxx
n/a
n/a
Erases the callback password stored at memory location
xx. Memory locations are 0 to 29.
COMMAND:
VALUES:
DEFAULT:
DESCRIPTION:
#RDNxx
n/a
n/a
Erases the callback phone number stored at memory
location xx. Memory locations are 0 to 29.
5.1.2 V.25BIS COMMANDS
COMMAND:
VALUES:
DEFAULT:
DESCRIPTION:
$Vn
n= 0, 1, 2, 5, or 6
$V0
$V0 returns modem to AT command mode when in
V.25bis mode.
$V1 enables V.25bis mode of operation.
$V2 allows modem to receive one V.25bis command
while in AT command mode without leaving AT
command mode.
$V5 DSR follows DTR in V.25bis mode.
$V6 DSR does not follow DTR in V.25bis mode.
COMMAND:
VALUES:
DEFAULT:
DESCRIPTION:
CRNdd
n/a
n/a
Dials phone number dd, where dd can be up to 20
characters (0 through 9, *, #, P, T, and :). The phone
number is checked against the Delayed and Forbidden
Number lists before it is dialed.
COMMAND:
VALUES:
DEFAULT:
CSPs
n/a
n/a
48
V.34 RACKMOUNT MODEM CARD
DESCRIPTION:
The CSP command will change the serial baud rate of
your modem:
CSP0300 - 300 bps
CSP1200 - 1200 bps
CSP2400 - 2400 bps
CSP4800 - 4800 bps
CSP9600 - 9600 bps
CSP19200 - 19200 bps
CSP38400 - 38400 bps
CSP57600 - 57600 bps
CSP115200 - 115200 bps
COMMAND:
VALUES:
DEFAULT:
DESCRIPTION:
CRIdd;nn
n/a
n/a
Dials dd same as CRN Command and ignores nn
identification string.
COMMAND:
VALUES:
DEFAULT:
DESCRIPTION:
DIC or CIC
n/a
n/a
The disregard or connect to incoming calls command is
used for auto-answer operations. DIC stops the modem
from answering incoming calls. CIC causes the modem
to answer incoming calls.
5.1.3 REMOTE CONFIGURATION
The Remote Configuration feature is a network-management tool that allows you
to configure modems remotely. This means you could configure modems
anywhere in your network from one location without having to visit the sites or rely
on remote users to follow your instructions. With Remote Configuration, which is
protected by two-level security, you can download new parameters, program new
V.42 capabilities, and implement new features. Remote Configuration also makes
troubleshooting a remote location a lot easier.
The way Remote Configuration works is that S-Register S13 has been set up to
contain the special Remote Configuration escape code. When calling a modem
equipped with Remote Configuration, you enter the proper Remote Escape code
to enable entering your Set-up Password. After entering it, you can then execute
AT commands as if you were connected locally. If you set S-Register S13 to zero,
Remote Configuration is disabled.
49
V.34 RACKMOUNT MODEM CARD
5.1.4 REMOTE CONFIGURATION PROCEDURES
The procedures for using the Remote Configuration features are the same whether
or not a call originates from the remote modem. Once the modem is on-line,
perform the procedures in Table 5-1.
Table 5-1. Remote Configuration.
Step
Procedure
1.
Remote Escape Configuration requires %%%<CR> to be
sent if the default value in S-Register S13 has not been
changed.
The modem responds with:
1. - DATA Mode
2. - COMMAND Mode
2.
You then select 1 or 2. With 1, the modem goes back into
data mode, and with 2, the modem responds with the
following: “Password>”
3.
Enter your Set-up Password, and if the code is correct the
modem responds with: “OK”
You can now use any AT commands of the modem being
remotely configured as if they were being entered locally.
You cannot change the setup of the LOGIN Password
until you enter the proper LOGIN Password.
4.
When you are done entering AT commands and you want
to exit, type AT0 and hit return. The modem responds
with:
1. DATA Mode
2. COMMAND Mode
5.
Enter a 1 to go back on-line with your computer, or enter
2 and the correct password to talk to your modem.
50
V.34 RACKMOUNT MODEM CARD
Password Commands
COMMAND:
VALUES:
DEFAULT:
DESCRIPTION:
#Ixxxxxxxxxx
n/a
#Iblackbox
Login Password is any keyboard characters (x)
(case-sensitive), minimum 6 and maximum 10
characters. The default Login Password is “blackbox”
(all one word, all lowercase letters).
COMMAND:
VALUES:
DEFAULT:
DESCRIPTION:
#Syyyyyyyyyy
n/a
#SMODEMSETUP
Setup password is any keyboard characters (y)
(case-sensitive), minimum 6 and maximum
10 characters. The default setup password
is MODEMSETUP.
5.2 S-Registers
Certain Command Mode configurations are stored in memory registers called,
S-Registers. The S command is used to assign a value to, and to read the current
value of an S-Register. To assign a value to an S-Register, enter the letter S,
followed by the S-Register number and an equals sign (=), and then a decimal
response to the message “ENTER THE NEW VALUE IN DECIMAL FORMAT”.
To read an S-Register value, enter the letter S followed by the S-Register number
and a question mark (?), then hit RETURN. To verify that the S-Register value was
entered correctly, enter for example, ATS8? and hit RETURN. You should receive
a response of the assigned value given to that S-Register.
S0
Number of Rings Until Modem Answers
Unit:
1 ring
Range:
0-255
Default:
1
Description:
Sets the number of rings before the modem answers.
S1
Rings Which Have Occurred
Unit:
1 ring
Range:
0-255
Default:
0
51
V.34 RACKMOUNT MODEM CARD
Description:
Counts the number of rings that have occurred.
S2
Escape Code Character
Unit:
Range:
Default:
Description:
ASCII Character
0-127
43 (+ sign)
Defines the escape-code character.
S3
Return Character
Unit:
Range:
Default:
Description:
ASCII Character
0-127
13
Defines the character recognized as Carriage Return
(RETURN) or “Enter.”
S4
Line Feed Character
Unit:
Range:
Default:
Description:
ASCII Character
0-127
10
Defines the character recognized as LINE FEED.
S5
Backspace Character
Unit:
Range:
Default:
Description:
ASCII Character
0-127
8
Defines the character recognized as BACKSPACE.
S6
Wait Time for Dial Tone
Unit:
Range:
Default:
Description:
1 second
2-255, 4-255**
2, 4**
Sets the time the modem waits after the RETURN key is
pressed before executing a dial command.
**Value for international units only.
52
V.34 RACKMOUNT MODEM CARD
S7
Time for Carrier (Abort Timer)
Unit:
1 second
Range:
1-255, 1-45*
Default:
45
Description:
Defines the Abort Timer (lack of carrier) delay time.
S8
Pause Time for Comma
Unit:
Range:
Default:
Description:
1 second
0-255, 4-255**
2, 4**
Sets the length of the pause caused by a comma inserted
in a dialing command.
S9
Carrier Detect Response Time
Unit:
100 milliseconds
Range:
1-255
Default:
6
Description:
Sets the time delay for when the modem first detects
a valid incoming carrier signal and when the modem
turns on its Carrier Detect circuit.
S10
Carrier Loss Disconnect Delay Time
Unit:
100 milliseconds
Range:
0-255
Default:
7
Description:
Sets the time a carrier signal must be lost before the
modem disconnects.
S11
Tone Dialing: Tone Spacing and Duration
Unit:
1 milliseconds
Range:
1-255, 80-255*
Default:
70, 80*
Description:
Sets the time duration of spacing between tones
in tone-dialing.
* Value for International and DOC units
** Value for International Units only
53
V.34 RACKMOUNT MODEM CARD
S13
Remote Configuration Escape Character
Unit:
ASCII Character
Range:
0-127
Default:
37 (% sign)
Description:
Defines the remote-configuration escape character.
S15
Callback Time Delay
Unit:
Range:
Default:
Description:
S16
Callback Attempts
Unit:
Range:
Default:
Description:
S17
Changing Break Time
Unit:
Range:
Default:
Description:
Seconds
10-255
20
S15 defines the time delay for Callback attempts after
initial passwords have been exchanged between
modems.
1 Attempt
1-255
4
S16 defines the number of attempts allowed after initial
passwords have been exchanged between modems.
10 milliseconds
0-2.5 sec
250
S17 defines the break time (space) to local PC.
S18
Automatic Leased Line Restoral
Unit:
30 minutes
Range:
10-255
Default:
30 minutes
Description:
S18 periodically checks the leased line to see if it’s
operational and restores the lease line if possible, while
in dial back-up mode. S18 defines how often attempts
occur. The default of S18 is 30 minutes and can be set
in one-minute increments from 10 to 255 minutes.
54
V.34 RACKMOUNT MODEM CARD
S19
Dial-Back Timer
Unit:
Range:
Default:
Description:
1 minute
0-255
1
S19 specifies the duration of time the modem attempts
to reestablish the leased-line connection.
S24
PBX/CBX Disconnect Drop Time for DSR/CTS/CD
Unit:
50 milliseconds
Range:
0-255
Default:
20
Description:
Defines DSR/CTS/CD dropout time. The default
of 20 equals one second.
S25
DTR Dropout Time
Unit:
Range:
Default:
Description:
S26
Failed Password Attempts
Unit:
Range:
Default:
Description:
S29
Local Inactivity Timer
Unit:
Range:
Default:
Description:
100 milliseconds
0, 1 through 255
0
Defines DTR dropout time. The default of 0 equals
50ms.
1 failed attempt
0-255
0
Counts the number of times there has been a failed
password attempt.
minutes
1-255
20
Defines the amount of idle time that can elapse between
AT commands after the SETUP password has been
entered.
55
V.34 RACKMOUNT MODEM CARD
S30
Inactivity Timer
Unit:
Range:
Default:
Description:
1 minute
0-255
0
Inactivity timer used to disconnect the modem.
S32
Time Elapse for Escape Sequence
Unit:
1 second
Range:
0-255
Default:
20
Description:
Sets the duration in which modem waits for a <CR>
to be entered during escape sequence execution.
S34
Buffer Length of Command Mode After Online Escape Sequence
Unit:
ASCII Character
Range:
0-60
Default:
10
Description:
Sets buffer length of command mode after on-line
escape sequence.
S36
Time Between DTR Inactive and Modem Off-Hook
Unit:
1 second
Range:
0-255 seconds
Default:
0
Description:
Sets the time between DTR inactive (low) and the
modem going off-hook. The DTR Busy-out feature
is disabled with S36=0.
S37
Time Between DTR Active and Modem On-Hook
Unit:
1 second
Range:
0-255 seconds
Default:
5
Description:
Sets the time between DTR being active and the
modem going on-hook (not busy).
56
V.34 RACKMOUNT MODEM CARD
S48
Program V34 Connect Speeds
Unit:
N/A
Range:
33, 31, 28, 26, 24, 21, 19, 16, 14, 12, 96, and 48
Default:
0
Description:
Defines which speed modem connects within Enhanced
V.34 mode scope (e.g., S48 = 21 means maximum
connect speed is 21.6K). This register is useful when line
conditions will not support higher Enhanced V.34
speeds (e.g., 33.6K, 31.2K, 28K, 26.4K, 24K...). The
modem default is a value of 0, which indicates a
connection attempt of 33.6K.
5.3 Result Codes
The V.34 Rackmount Modem Card Command mode provides you with several
responses, or “Result Codes,” that can aid you in Command mode operation.
These Result Codes are displayed on your video monitor.
AT&Q0 selects CONNECT 2400 is 9.
AT&Q1 selects CONNECT 2400 is 10.
The following tables list result codes generated by the &Q command.
57
V.34 RACKMOUNT MODEM CARD
Table 5-2. &Q0 Result Codes.
Terse
Verbose
0
1
2
3
4
5*
6
7
8
9*
11*
12*
13*
19*
21*
24*
26*
28*
31*
33*
OK
CONNECT
RING
NO CARRIER
ERROR
CONNECT 1200
NO DIALTONE
BUSY
NO ANSWER
CONNECT 2400
CONNECT 4800
CONNECT 9600
CONNECT 14400
CONNECT 19200
CONNECT 21600
CONNECT 24000
CONNECT 26400
CONNECT 28800
CONNECT 31200
CONNECT 33600
* With MNP error correction on, RELIABLE (or R) is added to these result codes.
With LAP-M error correction on, LAP-M (or L) is added to these result codes. With
data compression on, COMPRESSED (or C) is added. (Note these “Extended”
Result Codes are displayed when your modem is set up to do so with an X1, X2, X3,
or X4 command.)
58
V.34 RACKMOUNT MODEM CARD
Table 5-3. &Q1 “Standard AT” Result Codes.
Terse
Verbose
TERSE
0
1
2
3
4
5
6
7
8
10
11
12
13
19
21
24
26
28
31
33
VERBOSE
OK
CONNECT
RING
NO CARRIER
ERROR
CONNECT 1200
NO DIAL TONE
BUSY
NO ANSWER
CONNECT 2400
CONNECT 4800
CONNECT 9600
CONNECT 14400
CONNECT 19200
CONNECT 21600
CONNECT 24000
CONNECT 26400
CONNECT 28800
CONNECT 31200
CONNECT 33600
*Error Correction/Data Compressed modifiers are not displayed with Standard AT
Result Codes.
5.3.1 AT COMMANDS AND S-REGISTER SUMMARY
The vast majority of installations are similar, with the V.34 Rackmount Modem
Card being used to dial up a remote installation where the call is automatically
answered. Your V.34 Rackmount Modem Card has a default configuration to dial
another 33,600 bps modem that supports error correction, data compression, and
flow control. If the answering modem is not compatible, the V.34 Rackmount
Modem Card can match protocols, provided the protocols are industry-standard
(i.e., ITU-T, AT&T, or Bell) and not proprietary.
59
V.34 RACKMOUNT MODEM CARD
The &W command, used in conjunction with specific other AT commands and
S-Registers, can reconfigure the V.34 Rackmount Modem Card to conform to a
specific application. The V.34 Rackmount Modem Card can store its configuration
parameters and S-Register values in its nonvolatile memory.
The command AT&W0 (or AT&W) causes the modem to store its current
parameters in its nonvolatile RAM. The command also sets the modem upon
power up, or when it is reset with an ATZ command, the modem reads all its
configuration and S-Register parameters from RAM, and not from the factory
settings in ROM (note you may recall factory installed defaults by entering
AT&F8&W0). The &W command changes the configuration parameters stored
in RAM that you specifically intend to alter. All other default parameters remain
unchanged.
The AT&W1 command sets the modem so that it does not store its parameters
in RAM, and on power up or when an ATZ command is issued, parameters are
read from the factory-default settings in ROM.
Before using the &W command, you may want to view the modem’s current
operating parameters. Use the ATL5, ATL6, and ATL7 commands to display the
current modem configuration.
60
V.34 RACKMOUNT MODEM CARD
6. Testing Your Modem
6.1 Local Analog Loopback Test/V.54 Loop 3
In this test, data from your computer or terminal is sent to your modem’s
transmitter, converted into analog form, looped back to the receiver, converted
into digital form and then received back at your monitor for verification. No
connection to the phone line is required. See Figure 6-1.
V.34 Rackmount Modem Card
Figure 6-1. Local Analog Loopback Test.
The test procedure is as follows:
1. Connect the modem to your computer. With your communication software,
set the desired baud rate.
2. Type ATU0 (or ATU) and hit ENTER. This places your modem in Analog
Loopback mode, in the Originate mode. The modem is now out of the
Command mode and in a pseudo On-Line mode.
3. Once you receive a connect message (if responses are enabled), enter data
from your keyboard. For this test, typing multiple upper-case “U” characters
is a good way to send an alternating test pattern of ones and zeros.
4. For a more complete test, you should also test the modem in Answer mode.
To do this, you must “escape” from Originate mode by entering an Escape
Sequence (+++AT<CR> or <BREAK>AT<CR>). Then type ATU1 and hit
ENTER to place the modem in Analog Loopback mode, in the Answer mode.
Then repeat step 3.
61
V.34 RACKMOUNT MODEM CARD
5. When testing is completed, you may exit Answer mode by entering an Escape
Sequence (+++AT<CR> or <BREAK>AT<CR>), which returns the modem to
Command mode.
6. Your modem passes this test if the data entered from your keyboard are the
same as the data received on your monitor. If different data is appearing on
your monitor, your modem is probably causing the problem, although it could
also be your computer. If your modem passes this test, but you are receiving
errors while on-line, the remote modem or the phone line could be at fault.
6.2 Digital Loopback Test/V.54 Loop 2 (Local/Manual)
The Digital Loopback Test is an on-line test that loops data sent from one modem
across the phone line to another modem, then back to the first modem. See
Figure 6-2.
There are two ways to put a modem into Digital Loopback mode.
1. Locally or Manually, described here in Section 6.2.
2. Remotely or Automatically, see Section 6.3.
NOTE
All loopback tests will operate at all speeds except 300 bps. Disable
error correction (&E0&W0<cr>) before engaging in loopback tests.
In this test the local modem is placed in Digital Loopback mode. Data is
entered and transmitted from the remote modem (which is not in digital loopback
mode), sent across the phone line to the local modem and looped back to the
remote modem.
The test procedure is as follows:
1. Go into Terminal mode. Type AT and hit ENTER; you should get an OK
message.
2. Dial the remote modem by entering the Dial command and the phone
number, to establish On-Line mode.
3. Type the Escape Sequence (+++AT<CR> or <BREAK>AT<CR>) which brings
your modem into Command mode, while still maintaining the pseudo
On-Line mode with the remote modem.
62
V.34 RACKMOUNT MODEM CARD
4. Type ATU3 from the local PC and hit ENTER. Once you receive an OK
message from your modem (if responses are enabled), the local modem is
placed in Digital Loopback mode.
5. Data is typed from the remote keyboard. For this test, typing multiple uppercase “U” characters is a good way to send an alternating test pattern of ones
and zeros. The data received by the local modem will enter its analog receiver,
be converted to digital data, be reconverted into analog, and then looped
through its transmitter back to the remote modem. Your modem passes this
test if the data entered from the remote keyboard is the same as the data
received on the remote monitor.
Local V.34
Rackmount
Modem Card
Remote V.34
Rackmount
Modem Card
Figure 6-2. Digital Loopback Test (local/manual).
6. When testing is complete, you may end the test by typing an Escape Sequence
(+++AT<CR> or <BREAK>AT<CR>) to bring your modem into Command
mode. The modem should respond with an OK message. If you wish to stay
on-line with the remote modem for normal data transmission, type AT0 and
hit ENTER. If you wish to terminate the call, type ATH and hit ENTER to hang
up.
6.3 Digital Loopback Test/V.54 Loop 2 (Remote/Automatic)
In this test, your modem must be on-line with another modem set up to respond
to a request for Digital Loopback.
The test procedure is as follows:
1. Go into Terminal mode. Type AT and hit ENTER; you should get an OK
message.
63
V.34 RACKMOUNT MODEM CARD
2. Dial the remote modem by entering the Dial command and the phone
number, to establish On-Line mode.
NOTE
The &T4 command must be set on the remote modem to run this test.
3. Type the Escape Sequence (+++AT<CR> or <BREAK>AT<CR>) which brings
your modem into Command mode, while still maintaining the connection
with the remote modem.
4. Type ATU2 and hit ENTER. The local modem responds to this command by
transmitting an unscrambled marking signal, which causes the remote modem
to place itself in Digital Loopback mode. Then the local modem exits
Command mode and enters pseudo-On-Line mode.
Local V.34
Rackmount
Modem Card
Remote V.34
Rackmount
Modem Card
Figure 6-3. Digital Loopback Test (remote/automatic).
5. Type data from your keyboard. For this test, typing multiple upper-case “U”
characters is a good way to send an alternating test pattern of ones and zeros.
The data received by the remote modem will enter its analog receiver, be
converted to digital data, be reconverted into analog, and then looped
through its transmitter back to the local modem. Your modem passes this test
if the data entered from the local keyboard is the same as the data received on
your monitor.
64
V.34 RACKMOUNT MODEM CARD
6.4 Local Analog Loopback Test (Synchronous Mode)
To initiate the Local Analog Loopback Test, with the modem in Synchronous
mode:
1. Enter AT&M1U. This first switches your modem from asynchronous to
synchronous mode, and places it into the Analog Loopback/Originate mode.
The modem is now out of the Command mode and in the pseudo-On-Line
mode.
2. Once you receive a connect message (if responses are enabled), enter data
from your keyboard. For this test, typing multiple upper case “U” characters
is a good way to send an alternating test pattern of ones and zeros.
3. For a more complete test, you should also test the modem in Answer mode.
To do this, pull out and then reinsert modem card in rack cage. Then type
AT&M1U1 and hit ENTER to place the modem in Analog Loopback mode,
in the Answer mode. Then repeat step 2.
Local V.34 Rackmount
Modem Card
Figure 6-4. Local Analog Loopback Test (Synchronous Mode).
6.5 Digital Loopback Test (Local/Manual) (Synchronous Mode)
This test must be run when you have a data connection with another modem. To
initiate the Digital Loopback Test (local/manual), DIP-Switch #9 must be in the
UP position, then place DIP-Switch #16 in the position opposite to the one it is
currently in (the modem requires a state of change in Switch #16 to activate
Loopback tests). Once you receive an OK message from your modem (if responses
are enabled), the local modem is placed in Digital Loopback mode.
65
V.34 RACKMOUNT MODEM CARD
To exit the Digital Loopback Test (local/manual), pull out and then reinsert
the Modem Card into the Modem Rack.
Local V.34
Rackmount
Modem Card
Remote V.34
Rackmount
Modem Card
Figure 6-5. Digital Loopback Test (local/manual, Synchronous).
6.6 Digital Loopback Test (Remote/Automatic) (Synchronous Mode)
This test must be run when you have a data connection with another modem. To
initiate the Digital Loopback Test (remote/automatic), DIP-Switch #9 must be in
the DOWN position, then place DIP Switch #16 in the position opposite to the one
it is currently in (the modem requires a state of change in Switch #16 to activate
Loopback tests). Once you receive an OK message from your modem (if responses
are enabled), the local modem is placed in Digital Loopback mode.
To exit the Digital Loopback Test (remote/automatic), pull out and then
reinsert the Modem Card into the Modem Rack.
Local V.34
Rackmount
Modem Card
Remote V.34
Rackmount
Modem Card
Figure 6-6. Digital Loopback Test (remote/automatic, Synchronous).
66
V.34 RACKMOUNT MODEM CARD
7. Service and Technical Support
Our technical support personnel can help you get the most out of your V.34
Rackmount Modem Card. If you have any questions about the operation of this
unit, call 724-746-5500. Please fill out the modem information (below), and have it
available when you call. If your modem requires service, the tech support specialist
will guide you on how to send in your modem.
Please fill in the following information on your Modem. This will help tech
support in answering your questions.
Modem Model No.:______________________________________________
Modem Serial No.: ______________________________________________
Modem Firmware Version: _______________________________________
COM Port#: ____________________________________________________
Fax Software Type and Version: ___________________________________
Datacomm Software Type and Version: _____________________________
The modem model and serial numbers are silkscreened on the bottom of your
modem. The software versions are printed on the diskette labels. Type ATI1 to
display the modem firmware version.
Please note the status of your modem before calling tech support. This status
can include LED indicators, screen messages, diagnostic test results, problems with
a specific application, etc. Use the space below to note modem status:
If your tech support specialist decides that service is required, modems may be
sent to our factory. Include the following with your modem:
• a description of the problem.
• return address.
• contact name and phone number.
• if possible, note the name of the technical support specialist with whom you
spoke.
67
V.34 RACKMOUNT MODEM CARD
Appendix: Regulatory Information
FCC Class A Compliance
See page 1 of this manual.
Compliance with BABT Requirements
Approved for connection to telecommunications system specified in the
instructions for use subject to the conditions set out in them.
WARNING
Interconnection directly, or by way of other apparatus, of ports marked
“SAFETY WARNING see instructions for use” with port marked or not
so marked may produce hazardous conditions on the network. Advice
should be obtained from a competent engineer before such a
connection is made.
The apparatus has been approved for use of the following facilities:
• Auto-calling
• Loop disconnect and MF dialing
• Phone number storage and retrieval by a predetermined code
• Operation in the absence of proceed indication
• Automatic storage of last number dialed
• Tone detection-busy
• Auto clear from the originating end
• DTR dialing
• Modem
• PBX timed break register recall
European Low Voltage Directive
When correctly installed and maintained, the modem will present no hazard to the
user. When correctly installed, the modem will be connected to the PSTN or a PW
and to a Data Terminal Equipment (DTE), whose modem connections comply
68
V.34 RACKMOUNT MODEM CARD
with CCITT recommendation V.28. The DTE connections are therefore taken
to be safe voltages (less than ±30 volts).
The main power source shall be installed near to the equipment and shall be
easily accessible. The plug that connects the apparatus to the main power supply
must be fitted with a 5A fuse that complies with BSI1362.
Ports that are capable of connecting to other apparatus are defined as SELV.
To ensure conformity with EN41003, make sure that these ports are only
connected to ports of the same type on other apparatus.
Compliance with BS6305 Clause 6.2, BS6320 Clause 7.2, and
BABT/SITS/82/005S/D
a. The modem is suitable for connection to the Public Switched Telephone
Network (PSTN) provided by British Telecommunications plc or Kingston
Communications (Hull) plc. Circuit supply by British Communications,
Mercury Communication, or Hull City Council. Only direct exchange lines
may be used, not shared service.
b. The modem is suitable for household, office, and similar general indoor use.
It is not suitable for use as an extension to a pay phone.
c. BT lines supplied must support either loop disconnect or multifrequency tone
signalling.
d. REN (Ringer Equivalence Number).
The REN value of a unit is calculated from 3/n where n is the total number
of units that can be connected in parallel that will still cause the standard bell
(as defined in BS6305 Appendix D) to ring.
REN values of less than 0.3 cannot be assigned.
REN=1
If a telephone or other device is connected in parallel with the modem, the
combined REN must not exceed 4. A BT supplied telephone may be assumed to
have REN of 1.0 unless otherwise noted.
69
V.34 RACKMOUNT MODEM CARD
The approval of this modem for connection to the British Telecom public
switched telephone network is INVALIDATED if the apparatus is subject to any
modification in any material way not authorized by BABT or if it is used with or
connected to:
i. internal software that has not been formally accepted by BABT.
ii. external control software or external control apparatus which cause the
operation of the modem associated call setup equipment to contravene the
requirements of the standard set out in BABT/SITS/82/005S/D,
All other apparatus connected to this modem and thereby connected directly
or indirectly to the British Telecom public switched telephone network must be
approved apparatus as defined in Section 22 of the British Telecommunications
Act 1984.
The REN number for this apparatus = 1.
Compliance with BS6789: Section 3.1 and Part 2
a. The modem is not capable of allowing Auto Call using “999” or other PABX
emergency numbers.
b. Modes other than modes 1, 2, or 3 should not be used on the BT PSTN. The
modem is a mode 1 device.
c. Users are advised to check the numbers entered during the Auto Call setup
phase prior to dialing.
d. The user should not issue any sequence of commands to the modem that
would cause the modem to exceed the maximum allowable pause of 8 seconds
from the time the modem goes off hook until dialing begins.
e. For correct operation of the call progress monitor, the power has to be
properly connected and switched on.
Compliance with BS6328 Part 1
a. The modem is not suitable for use on circuits with British
Telecommunications signalling at a normal frequency of 2280 Hz.
b. The modem does not require signalling or otherwise employ the frequency
range dc to 200 Hz.
70
V.34 RACKMOUNT MODEM CARD
c. The modem may be connected to a point-to-point two-wire or four-wire
Private Circuit.
d. The modem does not require dc from the Private Circuit for correct
operation. The modem may be damaged if connected, in a private circuit
mode, to a circuit supplying dc current (the maximum permissible direct
current is zero amps).
Canadian Limitations Notice
Notice: The ringer equivalence number (REN) assigned to each terminal device
provides an indication of the maximum number of terminals allowed to be
connected to a telephone interface. The termination of an interface may consist
of any combination of devices subject only to the requirements that the sum of
the ringer equivalence numbers of all the devices does not exceed 5.
Notice: The Industry Canada label identifies certified equipment. This certification
means that the equipment meets certain telecommunications network protective,
operational, and safety requirements. The Industry Canada does not guarantee the
equipment will operate to the user’s satisfaction.
Before installing this equipment, users should ensure that it is permissible
to be connected to the facilities of the local telecommunications company. The
equipment must also be installed using an acceptable method of connection.
The customer should be aware that compliance with the above conditions may
not prevent degradation of service in some situations.
Repairs to certified equipment should be made by an authorized Canadian
maintenance facility designated by the supplier. Any repairs or alterations made
by the user to this equipment, or equipment malfunctions, may give the
telecommunications company cause to request the user to disconnect the
equipment.
Users should ensure for their own protection that the electrical ground
connections of the power utility, telephone lines, and internal metallic water pipe
system, if present, are connected together. This precaution may be particularly
important in rural areas.
Caution: Users should not attempt to make such connections themselves, but
should contact the appropriate electric inspection authority, or electrician, as
appropriate.
71
V.34 RACKMOUNT MODEM CARD
Index
.SIT. . . . . . . . . . . . . . . . . . . . . . . . . . . . . . . . . . . . . . . . . 32-33
.ZIP. . . . . . . . . . . . . . . . . . . . . . . . . . . . . . . . . . . . . . . . . 32-33
14,400 bps (14.4) LED . . . . . . . . . . . . . . . . . . . . . . . . . 21
2400 bps (24) LED . . . . . . . . . . . . . . . . . . . . . . . . . . . . 21
28,800 bps (28.8) LED . . . . . . . . . . . . . . . . . . . . . . . . . 21
A
Analog and Digital Loopback testing . . . . . . . . . . . . . 11
Answer mode. . . . . . . . . . . . . . . . . . . . . . . . . . . . . . . . . 20
AT. . . . . . . . . . . . . . . . . . . . . . . . . . . . . . . . . . . . . . . . . . 27, 34
AT commands . . . . . . . . . . . . . . . . . . . . . . . . . . . . . . . . 13, 34
ATDP . . . . . . . . . . . . . . . . . . . . . . . . . . . . . . . . . . . . . . . 29
ATDT . . . . . . . . . . . . . . . . . . . . . . . . . . . . . . . . . . . . . . . 29
ATL5/ATL7 Command . . . . . . . . . . . . . . . . . . . . . . . . 13
Automatic fallback . . . . . . . . . . . . . . . . . . . . . . . . . . . . 10
B
Berg jumpers . . . . . . . . . . . . . . . . . . . . . . . . . . . . . . . . . 14
Busy signal . . . . . . . . . . . . . . . . . . . . . . . . . . . . . . . . . . . 10
C
Carrier Detect (CD) . . . . . . . . . . . . . . . . . . . . . . . . . . . 21
Command mode . . . . . . . . . . . . . . . . . . . . . . . . . . . . . . 14
Communications software . . . . . . . . . . . . . . . . . . . . . . 27
CyberCom . . . . . . . . . . . . . . . . . . . . . . . . . . . . . . . . . . . 27
D
Data Terminal Ready (DTR) . . . . . . . . . . . . . . . . . . . . 21
Dial tone . . . . . . . . . . . . . . . . . . . . . . . . . . . . . . . . . . . . 10
Dial-up phone lines. . . . . . . . . . . . . . . . . . . . . . . . . . . . 13
Digital Loopback Test. . . . . . . . . . . . . . . . . . . . . . . . . . 62-64, 66
DIP Switch . . . . . . . . . . . . . . . . . . . . . . . . . . . . . . . . . . . 14-17, 20
E
EIA TR.29 Class 2 fax commands . . . . . . . . . . . . . . . . 11
Enhanced V.34/V.32terbo/V.32bis. . . . . . . . . . . . . . . 10
Escape Sequence. . . . . . . . . . . . . . . . . . . . . . . . . . . . . . 64
F
Full-duplex. . . . . . . . . . . . . . . . . . . . . . . . . . . . . . . . . . . 10
72
V.34 RACKMOUNT MODEM CARD
I
IBM AS/400™ . . . . . . . . . . . . . . . . . . . . . . . . . . . . . . . . . 10-11
ITU-T V.42 LAP-M . . . . . . . . . . . . . . . . . . . . . . . . . . . . 10
L
Leased lines . . . . . . . . . . . . . . . . . . . . . . . . . . . . . . . . . . 13, 20
Local Analog Loopback Test . . . . . . . . . . . . . . . . . . . . 61, 65
M
MNP Classes 3 and 4 . . . . . . . . . . . . . . . . . . . . . . . . . . . 10
MNP5 . . . . . . . . . . . . . . . . . . . . . . . . . . . . . . . . . . . . . . . 32
Mode Indicate/Mode Indicate Common Interface. . 19
Modem baud rate command . . . . . . . . . . . . . . . . . . . . 17
Modem Rack with Power Supply . . . . . . . . . . . . . . . . . 12
N
Normal (&E0&W0) mode . . . . . . . . . . . . . . . . . . . . . . 13
O
Off Hook(OH) . . . . . . . . . . . . . . . . . . . . . . . . . . . . . . . 21
On-screen help menus . . . . . . . . . . . . . . . . . . . . . . . . . 11
OOS(Busy Out). . . . . . . . . . . . . . . . . . . . . . . . . . . . . . . 18
Originate mode. . . . . . . . . . . . . . . . . . . . . . . . . . . . . . . 20
Out-of-Service/Error (OOS/ERR) . . . . . . . . . . . . . . . 18, 21
R
Receive Data (RCV) . . . . . . . . . . . . . . . . . . . . . . . . . . . 21
Redundant Power Supply. . . . . . . . . . . . . . . . . . . . . . . 12
Reliable (&E2&W0) mode . . . . . . . . . . . . . . . . . . . . . . 13
Remote Escape Configuration . . . . . . . . . . . . . . . . . . . 50
Result Codes . . . . . . . . . . . . . . . . . . . . . . . . . . . . . . . . . 11, 57-59
Ring Indicator (RI). . . . . . . . . . . . . . . . . . . . . . . . . . . . 21
RS-232C Cable. . . . . . . . . . . . . . . . . . . . . . . . . . . . . . . . 13
RS-232C/V.24 interface . . . . . . . . . . . . . . . . . . . . . . . . 12
RTS/CTS . . . . . . . . . . . . . . . . . . . . . . . . . . . . . . . . . . . . 29
S
S-Register . . . . . . . . . . . . . . . . . . . . . . . . . . . . . . . . . . . . 11, 51, 60
Serial cable . . . . . . . . . . . . . . . . . . . . . . . . . . . . . . . . . . 12
Serial Communications Controller . . . . . . . . . . . . . . . 23
System/3X . . . . . . . . . . . . . . . . . . . . . . . . . . . . . . . . . . . 10, 11
73
V.34 RACKMOUNT MODEM CARD
T
Terminal Emulation . . . . . . . . . . . . . . . . . . . . . . . . . . . 31
Test (default) setting . . . . . . . . . . . . . . . . . . . . . . . . . . 18
TEST/OOS Berg jumper . . . . . . . . . . . . . . . . . . . . . . . 13
Transmit Data (XMT) . . . . . . . . . . . . . . . . . . . . . . . . . 21
U
UART . . . . . . . . . . . . . . . . . . . . . . . . . . . . . . . . . . . . . . . 23-24, 26, 30, 32-33
UNIX® batch file . . . . . . . . . . . . . . . . . . . . . . . . . . . . . . 10
UUCP Spoofing. . . . . . . . . . . . . . . . . . . . . . . . . . . . . . . 11
V
V.42 error correction . . . . . . . . . . . . . . . . . . . . . . . . . . 33
V.42bis 4-to-1 data compression. . . . . . . . . . . . . . . . . . 10
W
Windows 3.1. . . . . . . . . . . . . . . . . . . . . . . . . . . . . . . . . . 26
Windows 95 and 98 . . . . . . . . . . . . . . . . . . . . . . . . . . . . 26
WINDOWS/SYSTEM directory . . . . . . . . . . . . . . . . . . 27
X
XON/XOFF . . . . . . . . . . . . . . . . . . . . . . . . . . . . . . . . . 29
Z
Zilog Z8530 chip . . . . . . . . . . . . . . . . . . . . . . . . . . . . . . 23
74
NOTES