1
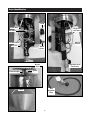
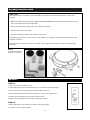
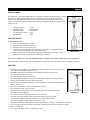
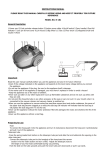
Propane Gas Patio Heater - 45,000 BTU
USER'S MANUAL
WARNING
Important safety precautions are described in
these instructions! Carefully read and follow
all safety information before assembling and
operating the heater.
THIS APPLIANCE IS APPROVED FOR
OUTDOOR USE ONLY.
BH-BBRZH45
800-779-3267
[email protected] • www.schaeferfan.com
©2008 Schaefer Ventilation Equipment
Parts Identification
Knob
Igniter Wire
Plugs into
Gas Valve
Gas Valve
Thermocoupler
Anti-Tilt
Switch
Gas Line
Spark
Igniter
Regulator Hose
Connection
Burner
Head
Thermocoupler
Igniter
Gas
Regulator
Hose
Emitter
2
Assembly Instructions
STEP 1
Attach three vertical supports to
the base using three M8x15 bolts.
STEP 4
Slide the regulator hose through the
post and connect to the burner head.
* IMPORTANT NOTE *
A thin layer of teflon tape should be
applied to the threads on the gas valve
before attaching the hose to ensure a
safe, tight connection.
STEP 2
Fasten the post to the vertical supports
using six M6x35 bolts and six M6 nuts.
STEP 6
Insert a bolt from the inside
through each of the three tabs on
top of the emitter. Place a steel
washer on each bolt. Lay the
reflector over the washers and add
another washer on top before
tightening a wing nut on each bolt.
STEP 3
Slide the cylinder cover over the
post.
STEP 7
Place a 20 lb propane cylinder on
the base. Connect the gas regulator
hose to the cylinder valve by
turning the knob clockwise.
DO NOT USE A TOOL; TIGHTEN
BY HAND ONLY.
Replace cylinder cover.
* IMPORTANT NOTE *
A leak test should be performed
before lighting the heater to ensure
safe operation (see next page).
STEP 5
Fasten the burner head on the post with
four Phillips head M6x10 screws.
3
Assembly Instructions cont'd
LEAK TEST
Now that the heater is assembled, a leak test should be performed on all connections and hoses to ensure safe
operation.
1. MIX IN A SPRAY BOTTLE EQUAL PARTS WATER AND DISH SOAP. Solution can also be mixed in a bowl,
and a small brush can be used for application.
2. Ensure the control knob is fully closed - turn completely clockwise.
3. Open the valve on the gas cylinder.
4. Apply the solution generously to all connections and hoses.
If any bubbles appear, there is a leak. Close the gas cylinder valve completely. Tighten the leaking connection and
repeat the test process.
If the leak cannot be repaired, close the gas cylinder valve completely and contact your dealer or a qualified gas
technician.
STEP 8
Assemble the wheel kit
as shown, if necessary.
Operation
TURN ON
1. Be sure valve on gas cylinder is open
2. Push control knob in, turn counter-clockwise 90° (to the flame symbol) and hold it.
3. At the same time, press the igniter button until the flame comes on.
4. Release the knob and check for flame on the burner. If it goes out, repeat step 2.
5. Release the knob and turn it fully counter-clockwise to HI.
6. Flame can be adjusted anywhere between LO and HI as needed.
TURN OFF
1. Push control knob in, turn clockwise to OFF to shut off gas supply.
2. Close the valve on the gas cylinder.
4
Safety
SPECIFICATIONS
This applicance is an infrared portable heater. The burner is controlled and adjusted by the control
knob. The gas supply is controlled by the valve on the gas cylinder. The burner is made of
stainless steel. Heat diffusion is assisted by the reflector above. Objects placed under a heater
while it is operating are subject to radiant heat and may be damaged. This heater is approved for
outdoor use only.
•
•
•
•
•
Operating pressure
Maximum output
Minimum output
Gas consumption at HI
Burner orifice
11" WC
45,000 BTUH
25,000 BTUH
1 kg/h
1.9mm
FOR YOUR SAFETY
IF YOU SMELL GAS:
1. Close the valve on the gas cylinder.
2. Extinguish all open flame in the area.
3. Perform a leak test (see previous page)
4. If bubbles are detected, tighten the connection(s). If no leaks are detected, open the
valve on the gas cylinder and verify you still smell gas.
5. If you still smell gas, turn the heater control knob to OFF and close the valve on the
gas cylinder. Contact your dealer or a qualified gas technician.
Dimensions
Never store or handle gas, or any other flammable vapors or liquids in the vicinity of the heater or any gas appliance.
Faulty installation, modifications, repairs or maintenance to the heater may be the cause of injury or damage to property.
CAUTIONS
•
•
•
•
•
•
•
•
•
•
•
•
•
•
•
•
•
DO NOT operate the heater in an explosive environment. Keep away from areas where gas,
other vapors or flammable liquids are stored.
BEFORE EACH USE verify that no parts are damaged and inpect the gas hose.
Never modify this heater in any way.
Never use the heater without the reflector.
Observe minimum clearances as shown (24" from edge of reflector; 18" above reflector).
Always place the heater on a level, stable, hard surface.
Provide fresh air ventilation at all times. Do not obstruct the ventilation opening (hand hole)
on the cylinder cover.
Never clean with abrasive, corrosive or flammable cleaners.
Do not paint the heater or any of its parts.
Perform a leak test when heater is first assembled, and each time the hose has been
disconnected, before lighting.
Clearances
Never leak test with an open flame nearby or while smoking.
The valve on the gas cylinder must be fully closed when not using the heater.
Anyone in the vicinity of the heater should be made aware of hot surfaces.
Do not hang clothing or other objects on the heater to dry.
Installation, maintenance and repair of the heater should always be done by a qualified gas technician.
In case of high winds, turn the heater control knob to OFF and close the valve on the gas cylinder.
Remove the reflector.
Do not move the heater while it is operating or still hot.
5
Maintenance
PREVENTIVE CARE AND MAINTENANCE
The heater should be inspected annually for debris, insects or spider webs that could obstruct the burner.
When the heater will not be in use for a prolonged period of time, remove the gas cylinder and be sure the gas valve is
closed completely. Store the gas cylinder outdoors, in a well-ventilated area.
Have the heater inspected if:
• You smell gas combined with yellow-tipped flames on burner.
• Heater does not provide expected amount of heat.
• Burner makes small popping sounds while operating (this sound is normal when turning off the heater).
Repairs should only be performed by a qualified gas technician.
Contact your dealer for replacement parts.
Warranty
Schaefer Ventilation Equipment, LLC. warrants to the original purchaser that our products which prove to be
defective in material or workmanship within one year (unless otherwise specified) from date of purchase will be
repaired or replaced at the option of Schaefer Ventilation Equipment, LLC. F.O.B. Sauk Rapids, Minnesota.
What is Not Covered By The Warranty
The warranty does not cover:
(1)
(2)
(3)
(4)
(5)
Installations not made in accordance with installation instructions;
Where the operation of the product varies substantially from our operating instructions;
Malfunctions resulting from misuse, negligence, alteration, accident or lack of performance of required
maintenance;
Loss of time, inconvenience, loss of use of the product, or other consequential damages;
Removal of any manufacturer nameplate.
The above constitutes our sole warranty.
THERE IS NO WARRANTY OF MERCHANTABILITY AND THERE ARE NO WARRANTIES WHICH EXTEND
BEYOND THE DESCRIPTION OF THE FACE HEREOF.
All information, illustrations and specifications provided here are based on the latest product information
available at the time of printing. Product specifications subject to change.
800-779-3267
www.schaeferfan.com
©2008 Schaefer Ventilation Equipment 11-26-08