1
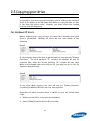
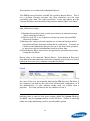
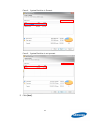
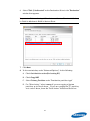
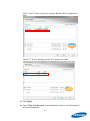
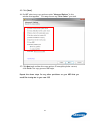
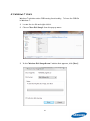
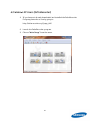
Norton Ghost 15.0 How to copy partitions from an HDD to a Samsung SSD This Quick User Guide was created under Symantec’s authorization by Samsung Electronics Co., Ltd. in order to offer a simple & easy data migration process for Samsung SSD Users. This user guide only covers drive (partition) copying. For the complete user manual, including information on the other features of Norton Ghost 15.0, please see the full user guide provided by Symantec. Table of Contents CHAPTER 1 ...................................................................................................................................................................................3 GETTING STARTED......................................................................................................................................................................4 1.1 Before you install… .............................................................................................................................................4 1.2 Installing Norton Ghost ..................................................................................................................................4 To Install Norton Ghost.......................................................................................................................................5 To Complete the Installation ...........................................................................................................................5 CHAPTER 2 ...................................................................................................................................................................................6 MIGRATING YOUR DATA.............................................................................................................................................................7 2.1 Preparing your drive.........................................................................................................................................7 2.2 To Start Norton Ghost .....................................................................................................................................8 2.3 Copying your drive ......................................................................................................................................... 10 For Windows XP Users ...................................................................................................................................... 10 For Windows 7 Users ......................................................................................................................................... 14 APPENDIX 1 ............................................................................................................................................................................. 23 To burn the Symantec Recovery Disc… .................................................................................................... 24 A.1 Windows 7 Users .......................................................................................................................................... 25 A.2 Windows XP Users (InfraRecorder)............................................................................................... 26 APPENDIX 2 ............................................................................................................................................................................. 28 Symantec Technical Support............................................................................................................................ 29 2 Chapter 1 Getting Started 3 Getting Started 1.1 Before you install… Please make sure your computer meets the minimum system requirements: Component Operating System PC Memory (RAM) Minimum Requirements Windows XP or later 512 MB Available hard disk space You will need between 430 MB and 1 GB of free space to install Norton Ghost and its related software components. The drive can be any speed, but it must be capable of being used as a startup drive from the BIOS. Windows XP users will need to install the Microsoft .NET Framework 2.0 or later to run Norton Ghost. CD-ROM or DVDROM drive Software If the .NET Framework is not already installed, you are prompted to install it after Norton Ghost is installed and your computer is restarted. NOTE: If you are using a notebook computer, you must purchase a separate USB to SATA adapter cable for the data migration step. 1.2 Installing Norton Ghost NOTE: The CD included with your SSD is in English only. Norton Ghost is available in 10 languages, however. If you would like to download a copy in your native language, please visit www.samsung.com/ssd or follow the direct download link in the “Site Link” section of the Samsung SSD Magician software. You will find two files available to download for each language: (1) a full ISO file containing both Norton Ghost and Symantec Recovery Disk (SRD) software, and (2) a simple setup file containing only the Norton Ghost software. The SRD feature allows you to boot from CD if Windows cannot start. If you want to take advantage of the full functionality of Norton Ghost, you should download and burn the ISO file to a CD. Instructions for how to burn the ISO file can be found in Appendix 1. 4 To Install Norton Ghost 1. Log on to your computer using either the Administrator account or an account that has administrator privileges. 2. Insert the Norton Ghost product CD into the media drive of the computer. The setup file should automatically run. If you downloaded your copy of Norton Ghost from Samsung’s website (www.samsung.com/ssd), double-click on the install file instead. 3. In the window that appears, click [Install Norton Ghost]. 4. In the License Agreement panel, read the license agreement and then click [I accept the terms in the license agreement]. 5. Click [Install Now] in the License Agreement panel to begin the installation process. 6. Click [Finish] to complete the installation. Important: If you are using the CD, remove it from the media drive and then click [Yes] to exit the installation wizard and restart the computer. You must restart your computer before you can use Norton Ghost. To Complete the Installation After you install the product, you are prompted to enter a license key and activate it. You can then run LiveUpdate to check for product updates and configure your first backup. 1. In the Welcome panel, click [Next]. 2. Click [I’ve already purchased the product and have a license key]. You can find the license key on the back of your product CD jacket. Do not lose the license key. You must use it every time you install Norton Ghost. You may use the included English license key for any version of Norton Ghost. 3. Click [Next]. 4. Click [Run LiveUpdate] to check for any product updates released since the product shipped. This will ensure that you have the most upto-date software possible. 5. Click [Finish] 5 Chapter 2 Migrating Your Data 6 Migrating your Data Important: In order to use the “Copy My Hard Drive” feature described below, your new SSD must be larger than the cumulative size of all data stored on your current HDD. If your new SSD is not large enough to accommodate all of the data on your HDD, please delete or backup any unimportant files on your HDD. 2.1 Preparing your drive 1. If you are using a Desktop PC, connect the SSD to any available SATA cable connection. You may use the cables included in the box. If you are a notebook user, you must purchase a separate USB to SATA adapter cable. 2. Windows will automatically install the “Device Driver,” but Windows Explorer will not recognize the SSD. 3. Launch the “Computer Management” program by doing one of the following: A. Search for “Computer Management” in the Windows Start Menu B. Go to Control Panel > Administrative Tools > Computer Management 4. Select Disk Management from the menu on the left-hand side of the screen. It is located under the Storage category in the sidebar. 5. An “Initialize Disk” window should automatically pop up. If it doesn’t, Select Disk 1, and choose “Initialize Disk” from the pop-up menu. You 7 can tell if your disk has already been initialized by checking the status in the left-hand column. If the disk is labeled as both “Unknown” and “Not Initialized,” as in the screenshot below, the system has not yet performed the initialization process. 6. In the “Initialize Disk” dialog window that appears, choose MBR for the partition style and click [OK]. NOTE: If “Disk 1, Basic, ###GB (where ### refers to the size of your SSD drive), Online” is displayed, your SSD is ready to use. DO NOT format the drive. Leave it “Unallocated.” If the drive is already formatted and/or has partitions allocated, you must remove all existing partitions. 2.2 To Start Norton Ghost Norton Ghost is installed in the Windows Program Files Folder by default. During installation, a program icon is installed in the Windows system tray from which you can open Norton Ghost. You can also open Norton Ghost from the Windows Start menu. 8 Depending on the Windows version you are running, use one of the following methods: On the classic Windows taskbar, click Start > Programs > Norton Ghost > Norton Ghost On the Windows taskbar, click Start > All Programs > Norton Ghost > Norton Ghost In the Windows system tray, double-click the Symantec Norton Ghost tray icon In the Windows system tray, right-click the Norton Ghost tray icon and click Open Norton Ghost 9 2.3 Copying your drive Important: If the hard drive that you want to copy contains more than one partition, you must copy each partition, one at a time, to the new hard drive. If the power or the hardware fails while you copy the data, no data is lost from the source drive. However, you must restart the copying process from the beginning. For Windows XP Users Before beginning the copy process, you must first determine how your drive is partitioned. Windows XP users will see cases similar to the following: Case 1 In the scenario above, the drive is partitioned into two separate “Primary Partitions.” The first partition, “C:” contains the Windows OS and its essential files, while the second partition “D:” contains all user data. While in this example there are only two (2), you may have up to four (4) separate data partitions. Case 2 In the other likely scenario, the user will see one “Primary Partition” containing all Windows OS files and user data together. Regardless of which scenario above is similar to your own, follow these steps: 1. Make sure the SSD is connected and initialized. 2. Select [Tools] from the Norton Ghost toolbar. 10 3. Select [Copy My Hard Drive] from the list of options. option in the list. It will be the 4th 4. In the “Source Drive” window, choose the partition you would like to copy. In most cases, this is the “C:” drive. 5. Click [Next]. 6. Select “Disk 2, Unallocated” as the Destination Drive in the “Destination” window that appears. Important: Disk numbering differs between Norton Ghost and Windows; i.e. Disk1 in Windows is Disk2 in Norton Ghost. 7. Click Next. 8. In the next window, under “Advanced Options,” do the following: A. Check Set the drive active (for booting OS) B. Check Copy MBR C. Select Primary Partition under “Destination partition type” D. For “Drive Letter,” use whatever drive letter Norton Ghost suggests. Once the entire migration process is complete and you disconnect the old HDD, Windows will assign the SSD the drive letter “<C>” 11 Note: If your PC already is already using drive letters <C> and <D> for other HDDs and <E> for the Optical Disk Drive, Norton Ghost will assign drive letter <F> for target drive. If your PC just has only a <C> drive, then Norton Ghost will assign drive letter <D> to SSD. 9. Click Finish. If your scenario is similar to Case 2 above, with only a single “Primary Partition” on your drive, you may stop here. The following steps are required for those with a scenario resembling Case 1 above, in which the Windows OS and user data are stored on separate “Primary Partitions.” Now that your main partition (C drive) has been successfully copied, you may now copy any secondary partitions (the D drive, for example). If there are any other partitions on the HDD that you would like to migrate to your new SSD, follow the steps below: 1. Select [Tools] from the Norton Ghost toolbar. 2. Select [Copy My Hard Drive] from the list of options. option in the list. 12 It will be the 4th 3. In the “Source Drive” window, choose the partition you would like to copy. 4. Click [Next]. 5. Select “Disk 2, Unallocated” as the Destination Drive in the “Destination” window that appears. 6. Click Next. 7. Do NOT select any copy options under “Advanced Options” in the window that appears. You may select any drive letter you wish or let Norton Ghost assign it automatically. 13 8. Click Finish. Repeat the above steps for any other partitions on your HDD that you would like to migrate to your new SSD. For Windows 7 Users Before beginning the copy process, you must first determine how your drive is partitioned. Windows 7 users will see cases similar to the following: Case 1 In the scenario above, there are four partitions. The first is an OEM Recovery Partition, which is explained below. The next is a System partition, created and reserved by Windows 7, that contains crucial system booting files. The third partition contains the Windows OS and its application data. The final partition contains general user data. The OEM Recovery Partition is created by the manufacturer of your computer to use in the event of a system failure. It contains Windows system files as well as all preloaded software that came on your computer. 14 This partition is not detected in Windows Explorer. This OEM Recovery Partition can NOT be copied by Norton Ghost. This is not a problem, however, because the other partitions are the ones containing your data. The “other partitions,” in the case above, are the “System” partition and two additional partitions labeled “Win7” and “Data.” Tip: If you want to preserve a clean install of Windows to use at a later time, follow these steps: 1.) Backup the partitions that contain your data to an external storage device using Norton Ghost. 2.) Restore your PC to its original out-of-the-box state using the OEM Recovery software. 3.) Backup your newly restored computer to an external storage device using Norton Ghost. Keep this backup file in a safe place. It serves as a clean install of Windows that you can use in the event that you want to start over with a fresh Windows install at a later date. 4.) Install Norton Ghost and restore the partitions you backed up in step 1 using Norton Ghost. Please refer to the separate “Norton Ghost – Data Backup & Recovery” User Manual at www.samsung.com/ssd for complete instructions on how to backup and recover your computer using Norton Ghost. Case 2 In the second likely scenario, there is no OEM Recovery Partition. This is the case if the user has manually deleted the OEM Recovery Partition, if the computer was built by the user from off-the-shelf components, or if the manufacturer of your machine simply does not include such a partition. The other partitions are the same as in Case 1. Attention Windows 7 Users: Windows 7 automatically creates a separate partition that is used to boot your system, called the System Partition. You MUST copy the System partition to the SSD first. Failure to carefully follow the steps below may result in an unbootable system. 15 Case 3 When installing Windows 7, there is an option to exclude the system partition. In this case, there will be only 2 partitions, as in the above screenshot. The “C:” Drive would include the operating system, all booting files, and all applications. The “D:” Drive would include general user data. NOTE: You MUST copy the “C:” partition first in this scenario, as it contains all necessary booting files. Case 4 In the case above, the user has elected to create only one single partition on the drive. This is not recommended. To increase system stability and improve data management, please make a separate data partition, as shown in Case 3. 16 Regardless of which scenario above is similar to your own, follow these steps: 1. Make sure the SSD is connected and initialized. 2. Select [Tools] from the Norton Ghost toolbar 3. Select [Copy My Hard Drive] from the list of options. option in the list. It will be the 4th 4. In the “Source Drive” window, check the Show Hidden Drives option and then choose the System Partition. If there is no System Partition, please select the “C:” Drive instead. 17 Case 1: System Partition is Present Case 2: System Partition is not present 5. Click [Next]. 18 6. Select “Disk 2, Unallocated” as the Destination Drive in the “Destination” window that appears. Important: Disk numbering differs between Norton Ghost and Windows; i.e. Disk1 in Windows is Disk2 in Norton Ghost. 7. Click Next. 8. In the next window, under “Advanced Options,” do the following: A. Check Set the drive active (for booting OS) B. Check Copy MBR C. Select Primary Partition under “Destination partition type” D. For “Drive Letter,” select <none> if you are copying a System partition, as in Case 1 above. If you are copying the “C:” partition, as in case 2 above, leave the “Drive Letter” as Norton Ghost has 19 determined. A B C D 9. Click Next and confirm the copy options. If everything looks correct, click Finish. The copy process will begin. Now that the system partition has been copied, it is safe to copy the rest of the data from your HDD to your new SSD. 10. Select [Tools] from the Norton Ghost toolbar. 11. Select [Copy My Hard Drive] from the list of options. 4th option in the list. It will be the 12. In the “Source Drive” window, choose the partition you would like to copy. In most cases, the primary partition containing your data is the “C” drive. If you’ve already copied the “C” drive, the second partition is usually labeled as the “D” drive. 20 Case 1: The “C” drive, in general, contains Windows OS and application data. Case 2: “C” drive is already copied. “D” contains user data 13. Click [Next]. 14. Select “Disk 2, Unallocated” as the Destination Drive in the “Destination” window that appears. 21 15. Click [Next]. 16. Do NOT select any copy options under “Advanced Options” in the window that appears. You may choose any “Drive Letter” you wish. 17. Click Next and confirm the copy options. If everything looks correct, click Finish. The copy process will begin. Repeat the above steps for any other partitions on your HDD that you would like to migrate to your new SSD. 22 Appendix 1 23 Appendix 1 To burn the Symantec Recovery Disc… An .ISO file is a digital copy of a full CD, allowing you to burn the equivalent of the original factory CD right from your own computer. You will need the following: One blank CD-R disc. Do not use a CD-RW disc. The SRD .ISO file, downloaded from www.samsung.com/ssd A CD creation program capable of burning .ISO files to a CD such as GEAR PRO Professional Edition, Nero Burning ROM, or Easy CD Creator. Windows 7 Users can use the ISO burning tool built into Windows. If you do not have a CD burning program installed on your computer, you can download and install InfraRecorder, a free ISO CD burning utility: http://infrarecorder.org/?page_id=5 Instructions for burning an .iso using InfraRecorder are available below. Alternatively, another free .iso burning software is available (English only) from GEAR Software: http://www.gearsoftware.com/GEAR-ISO-Burn.cfm For more detailed instructions than those provided below, please refer to the user manual for the particular software product you are using to burn the .ISO. After the .ISO file is burned to CD, the CD then serves as a bootable copy of the Symantec Recovery Disk software. 24 A.1 Windows 7 Users Windows 7 includes native .ISO burning functionality. To burn the .ISO file in Windows 7: 1. Locate the .iso file and right-click it. 2. Choose “Burn Disk Image” from the pop-up menu. 3. In the “Windows Disk Image Burner” window that appears, click [Burn]. 25 A.2 Windows XP Users (InfraRecorder) 1. If you have not already downloaded and installed the InfraRecorder Program, please do so now by going to: http://infrarecorder.org/?page_id=5 2. Launch the InfraRecorder program. 3. Choose “Write Image” from the menu. 26 4. In the window that pops up, locate the .ISO file, highlight it, and click [Open]. 5. Choose the appropriate disk drive, if you have multiple, and click [OK]. 27 Appendix 2 28 Appendix 2 Symantec Technical Support For the fastest support and the most up-to-date information for Norton Ghost, please visit www.symantec.com/support/. Country Int. Code Number Opening hours Argentina 54 5288 5300 9 A.M. - 5 P.M. (Mon - Fri) Australia Austria 61 1800 680 026 43 (0)1 501 375 020 9 A.M. - 5 P.M. (Mon - Fri) 9 A.M. - 8 P.M. (Mon - Fri) Belgium Brasil Cambodia Canada Canada (French) Chile China Colombia Denmark Finland France Germany Greece Hong Kong India Israel Italy Japan Korea Laos New Zealand Norway Luxemburg Malaysia 32 55 855 1 1 56 86 57 45 358 33 49 30 852 91 972 39 81 82 856 64 47 352 60 (0)2 713 1700 0 11 5189 6300 65 6822 8034 800 745 6061 1 800 561 0820 (2) 352 6800 800 830 1153 593 0909 35 445 700 (0)9 22 930410 (0)1 73 01 84 85 (0)69 6641 0300 0 0800 4414 4299 2598 1234 0008001007601 1 80 945 0644 024 827 0000 03 5642-2682 02 1566 0144 65 6822 8035 0800 174 089 23 05 33 00 (0)29 8479 5020 1800 880 455 29 9 A.M. - 8 P.M. (Mon - Fri) 9 A.M. - 5 P.M. (Mon - Fri) 9 A.M. - 5 P.M. (Mon - Fri) 9 A.M. - 5 P.M. (Mon - Fri) 9 A.M. - 5 P.M. (Mon - Fri) 9 A.M. - 5 P.M. (Mon - Fri) 9 A.M. - 5 P.M. (Mon - Fri) 9 A.M. - 5 P.M. (Mon - Fri) 8 A.M. - 5 P.M. (Mon - Fri) 9 A.M. - 6 P.M. (Mon - Fri) 9 A.M. - 8 P.M. (Mon - Fri) 9 A.M. - 8 P.M. (Mon - Fri) 9 A.M. - 5 P.M. (Mon - Fri) 9 A.M. - 5 P.M. (Mon - Fri) 9 A.M. - 5 P.M. (Mon - Fri) 9 A.M. - 5 P.M. (Mon - Fri) 9 A.M. - 8 P.M. (Mon - Fri) 9 A.M. - 5 P.M. (Mon - Fri) 9 A.M. - 5 P.M. (Mon - Fri) 9 A.M. - 5 P.M. (Mon - Fri) 9 A.M. - 5 P.M. (Mon - Fri) 8 A.M. - 5 P.M. (Mon - Fri) 9 A.M. - 8 P.M. (Mon - Fri) 9 A.M. - 5 P.M. (Mon - Fri) Country México Philippines Poland Portugal Russia Int. Code 52 63 48 55 7 Saudi Arabia 966 Singapore Spain Sweden Switzerland Taiwan Thailand The Netherlands Turkey 65 34 46 41 886 66 31 90 United Arab Emirates 971 United Kingdom United States Vietnam Number Opening hours 5002 3400 1800 1601 2026 (0)222030329 11 5189 6300 499 2722059 9 A.M. - 5 P.M. (Mon - Fri) 9 A.M. - 5 P.M. (Mon - Fri) 9 A.M. - 5 P.M. (Mon - Fri) 9 A.M. - 5 P.M. (Mon - Fri) 10 A.M. - 6 P.M. (Mon - Fri) 800 8440742 (English) 800 8440742 (Arabic) 1800 720 7898 91 529 9400 (0)8 7039615 (0)44 212 6262 0080 185 5873 1800 441 7077 (0)20 504 0565 00 800 3192 2433 9 A.M. - 5 P.M. (Mon - Fri) 9 A.M. - 5 P.M. (Mon - Fri) 9 A.M. - 5 P.M. (Mon - Fri) 12 P.M. - 8 P.M. (Mon - Fri) 8 A.M. - 5 P.M. (Mon - Fri) 9 A.M. - 8 P.M. (Mon - Fri) 9 A.M. - 5 P.M. (Mon - Fri) 9 A.M. - 5 P.M. (Mon - Fri) 9 A.M. - 8 P.M. (Mon - Fri) 9 A.M. - 5 P.M. (Mon - Fri) 800 04414047 (English) 800 04414047 (Arabic) 44 (0)20 7616 5600 1 800 745 6061 84 65 6822 8037 30 10 A.M. - 6 P.M. (Mon - Fri) 10 A.M. - 6 P.M. (Mon - Fri) 9 A.M. - 5 P.M. (Mon - Fri) 9 A.M. - 5 P.M. (Mon - Fri) 9 A.M. - 5 P.M. (Mon - Fri) www.samsung.com/ssd 31 All brand and product names are trademarks of their respective companies. Design and contents of this manual are subject to change without notice. ©2011 Samsung Electronics, Co., Ltd. All rights reserved.